

Page 1

DOS and Windows
Driver Guide
Version 2.0
®
Page 2

DOS and Windows
Driver Guide
Version 2.0
Manual Version 2.0b
Copyright © 1987-1994, 1994-1995
by
Elo TouchSystems, Inc.
105 Randolph Road
Oak Ridge, Tennessee 37830
(615) 482-4100
A Raychem Company
All rights reserved.
P/N 008100-A DOC # SW000054
Page 3

Trademark Acknowledgements
IntelliTouch, AccuTouch, and MonitorMouse are registered trademarks, and ELODEV, TouchUp, TouchBack, and
SmartSet are trademarks of Elo TouchSystems, Inc. All other trademarks are the property of their respective hold ers.
Copyright
Copyright © 1987-1992, 1994-95 by Elo TouchSystems, Inc. All rights reserved. Reproduction, adaptation, or translation
without prior written permission is prohibited, except as allowed under copyright laws. Printed in USA. H54798.
Software License Agreement
BY OPENING THE ACCOMPANYING DISKETTE ENVELOPE, YOU ARE AGREEING TO BECOME BOUND BY
THE TERMS OF THIS AGREEMENT, INCLUDING THIS SOFTWARE LICENSE AND LIMITED WARRANTY.
Software License
This software is protected by both the United States copyright law and international treaty provisions. Therefore, except as
noted below, you should treat the software just like any other copyrighted material. Elo TouchSystems, Inc. (Elo)
authorizes you to make archival copies of the sof tware for the purp oses of b acking-up your software and protecting your
investment from loss, and to make additional copies for use within a single company or facility.
THIS SOFTWARE IS LICENSED FOR USE ONLY WITH ELO TOUCHSCREENS.
The enclosed software program object code (drivers, utilities, diagnostics, and/or demon stration programs) may be freely
duplicated or distributed without charge, but may not be resold. You may not decompile, reverse assemble, reverse
engineer, or patch any software program object codes.
Any supplied software program source code is proprietary and may not be disclosed to third parties. Such source code may
be modified and/or partially or completely incorporated into your own applications, together with any supplied object
code, and the resulting programs may be used, given away or sold without additional licenses or fees.
You may not reproduce, distribute, or revise the program documentation without expressed written consent from Elo.
This software and accompanying written materials may contain reference to, or information about, Elo products
(equipment or programs), that are not now available. Such references or information must not be construed to mean that
Elo intends to provide such products, programming, or services.
Limited Warranty
THIS SOFTWARE AND ACCOMPANYING WRITTEN MATERIALS ARE PROVIDED "AS IS" WITHOUT
WARRANTY OF ANY KIND. FURTHER, ELO DOES NOT GUARANTEE, OR MAKE ANY REPRESEN-TATIONS
REGARDING THE USE, OR THE RESULTS OF THE USE, OF THE SOFTWARE OR ACCOMPANYING WRITTEN
MATERIALS IN TERMS OF CORRECTNESS, ACCURACY, RELIABILITY OR CURRENTNESS. IF THE
INCLUDED SOFTWARE OR ACCOMPANYING WRITTEN MATERIALS ARE DEFECTIVE, YOU, AND NOT ELO
OR ITS DEALERS, DISTRIBUTORS, AGENTS, OR EMPLOYEES, ASSUME THE COST OF ALL NECESSARY
SERVICING, REPAIR, OR CORRECTION. THE ENTIRE RISK AS TO THE RESULTS AND PERFORMANCE OF
THE SOFTWARE AND ANY FURTHER PROGRAMS OR WRITTEN MATERIALS DEVELOPED UTILIZING
THESE MATERIALS IS ASSUMED BY YOU.
Elo warrants only that the diskette is free from defects in material and workmanship under normal use and service for a
period of sixty (60) days after receipt.
Elo's entire liability and your exclusive remedy as to the diskette shall be, at Elo's option, either return of the purchase
price or replacement of the diskette.
EXCEPT AS PROVIDED ABOVE, ELO DISCLAIMS ALL WARRANTIES, EITHER EXPRESSED OR IMPLIED,
INCLUDING BUT NOT LIMITED TO IMPLIED WARRANTIES OF MERCHANTABILITY AND FITNESS FOR A
PARTICULAR PURPOSE, WITH RESPECT TO THE SOFTWARE, WRITTEN MATERIALS OR DISKETTE. IN NO
EVENT SHALL ELO BE LIABLE FOR ANY INCIDENTAL OR CONSEQUENTIAL DAMAGES OF ANY KIND.
This Agreement shall be governed by and construed in accordance with the laws of the State of Tennessee.
Governing Law
Page 4

Contents
Introduction...............................................................................................1
About this Manual................................................................................................. 1
About Elo Software............................................................................................... 2
Included Software...................................................................................... 2
Other Software Available from Elo............................................................. 3
Writing Your Own Driver............................................................................ 4
Touchscreens and Controllers Supported................................................. 4
System Requirements............................................................................... 6
Differences from Previous Versions .......................................................... 6
Distribution Rights...................................................................................... 7
Product Registration............................................................................................. 7
Contacting Elo......................................................................................................7
Installation.................................................................................................9
Step 1 - Configuring the Touchscreen Controller................................................. 9
Step 2 - Installing the Controller......................................................................... 10
Step 3 - Running the INSTALL Program............................................................ 10
Command Line Flags .............................................................................. 11
Updating Existing Drivers ........................................................................ 11
Step 4 - Calibrating the Touchscreen................................................................. 12
Why Calibration is Necessary.................................................................. 12
When Recalibration is Necessary............................................................ 13
Where to Go from Here......................................................................................13
Changing Your Hardware Configuration With SETUP ....................................... 14
Uninstalling the Software.................................................................................... 14
Demonstration Program .......................................................................... 14
Previous Versions of MonitorMouse for DOS.......................................... 14
MonitorMouse for Windows..................................................................... 14
All Elo Software....................................................................................... 15
DOS Demonstration Program ................................................................17
Introduction ........................................................................................................ 17
Installation.......................................................................................................... 18
Included Files .......................................................................................... 18
Running ELODEMO...........................................................................................18
Command Line Flags .............................................................................. 18
Demo Descriptions.................................................................................. 20
Main Menu.................................................................................... 20
Process Control ............................................................................ 20
Busy Box....................................................................................... 20
Map Quiz....................................................................................... 20
Stereo Unit.................................................................................... 21
Finger Painting.............................................................................. 21
Touch Keyboard ........................................................................... 21
Teller Machine .............................................................................. 21
Touch Piano.................................................................................. 22
Touch Maze.................................................................................. 22
Page 5

Black Jack..................................................................................... 22
Touch X,Y..................................................................................... 22
Jigsaw Puzzle............................................................................... 23
Touch Windows............................................................................ 23
Home Control................................................................................ 23
How ELODEMO Was Created ........................................................................... 24
DOS Touchscreen Driver and Calibration Utility..................................25
Introduction ........................................................................................................ 25
Who Should Use ELODEV and ELOCALIB ............................................ 25
Compatibility....................................................................................................... 26
Installation.......................................................................................................... 26
ELODEV............................................................................................................. 27
Placement in AUTOEXEC.BAT............................................................... 27
ELODEV Command Line......................................................................... 27
ELODEV Command Syntax..................................................................... 27
Serial Controllers .......................................................................... 28
PC-Bus Controllers....................................................................... 28
Micro Channel Controllers ............................................................ 29
Command Line Flags.................................................................... 29
Calibration Points Flag (-c) ................................................. 30
X,Y Axes Swapping Flag (-s).............................................. 31
Software Interrupt Flag (-i) ................................................. 31
Untouch Wait Time Flag (-w) ............................................. 32
Program the Controller Flag (-p) ........................................ 32
Extract Flag (-x).................................................................. 33
Help Flag (-h)..................................................................... 33
Updating Flags................................................................... 34
Using Multiple Co-Resident Copies of ELODEV ..................................... 34
ELOCALIB.......................................................................................................... 35
Calibrating in Multiple Video Modes (ELOGRAPH.CAL)......................... 36
Command Line Flags .............................................................................. 36
Video Mode(s) Flag (-m)...............................................................36
Save Points in File Flag (-s).......................................................... 36
Update AUTOEXEC Flag (-u)....................................................... 37
Quick Calibration Flag (-q)............................................................ 37
Set Calibration From File Flag (-c)................................................ 37
Language Flag (-L) ....................................................................... 37
Help Flag (-h)................................................................................38
Examples...................................................................................... 38
Calibration Point Ordering ....................................................................... 38
Point Extrapolation .................................................................................. 39
Third Point............................................................................................... 39
MonitorMouse for DOS...........................................................................41
Introduction ........................................................................................................ 41
Who Should Use MonitorMouse for DOS................................................42
Compatibility....................................................................................................... 42
Coordinates vs. Mickeys.......................................................................... 42
Page 6

Light Pen Emulation ................................................................................ 43
Installation.......................................................................................................... 44
Included Files .......................................................................................... 44
Placement in AUTOEXEC.BAT............................................................... 44
Using MonitorMouse Without a Mouse.................................................... 45
Using NOMOUSE.COM................................................................ 45
Command Line Flags.........................................................46
Using PATCHMSE.EXE................................................................ 46
Command Line Flags......................................................................................... 47
Mouse Button Emulation Mode Flag (-m)................................................ 47
Cursor Flag (-c)........................................................................................ 48
Beep Flag (-b).......................................................................................... 49
Calibration File Directory Flag (-d)........................................................... 49
Mickey/Pixel Ratio Flag (-r)...................................................................... 50
Jump Flag (-j) .......................................................................................... 50
Spawn Flag (-s)....................................................................................... 51
Terminate Flag (-t)................................................................................... 51
Interrupt Flag (-i)...................................................................................... 51
Extract Flag (-x)....................................................................................... 51
Help Flag (-h)........................................................................................... 52
Flag Defaults ........................................................................................... 52
Updating Flags ........................................................................................ 52
Running the Tutorial Program............................................................................ 53
Command Line Flags .............................................................................. 53
MonitorMouse for Windows...................................................................55
Introduction ........................................................................................................ 55
Compatibility....................................................................................................... 56
Installation.......................................................................................................... 56
Included Files .......................................................................................... 56
DOS Mouse Driver................................................................................... 57
Hardware Mouse Cursor............................................................... 57
MonitorMouse for DOS............................................................................57
Windows Setup (SYSTEM.INI)................................................................ 58
Serial Mouse.................................................................................58
Bus Controller on COM Port Interrupt........................................... 58
Using the Touchscreen Control Panel................................................................ 59
Calibrating MonitorMouse for Windows...................................................59
Mouse Button Emulation Mode ............................................................... 60
Click Sound on Touches.......................................................................... 61
No Cursor................................................................................................ 61
Tips on Using the Touchscreen in Windows...................................................... 62
Double-Clicking........................................................................................ 62
Border Width ........................................................................................... 62
Menus...................................................................................................... 62
Scrolling................................................................................................... 63
Maximizing Windows............................................................................... 63
Using the Overscan Area......................................................................... 63
Option Buttons and Check Boxes............................................................ 63
Page 7

Choosing the Control-Menu, Minimize, Maximize, and Restore Buttons. 63
Elo Wallpaper.......................................................................................... 64
Running DOS Programs from Windows............................................................. 64
Running DOS Mouse-Driven Programs................................................... 64
Running DOS ELODEV-Based Programs...............................................64
Running DOS Polled Touchscreen Programs......................................... 65
Other Driver Configurations................................................................................ 65
TouchBack...............................................................................................67
Introduction ........................................................................................................ 67
Compatibility....................................................................................................... 67
Installation.......................................................................................................... 68
Included Files .......................................................................................... 68
Placement in AUTOEXEC.BAT............................................................... 68
Options............................................................................................................... 69
Environment Variables ............................................................................ 69
Command Line Flags .............................................................................. 70
Command Lead-in Character Flag (-c)......................................... 70
Number and Size of Buffers Flag (-b)........................................... 70
Interrupt Flag (-i)........................................................................... 71
Extract Flag (-x) ............................................................................ 71
Help Flag (-h)................................................................................71
Updating Flags.............................................................................. 71
Configuring Your Controller...................................................................73
General Information ........................................................................................... 73
Emulation Modes..................................................................................... 73
Increasing the Untouch Wait Time .......................................................... 74
Non-standard Serial Ports....................................................................... 74
Choosing an Interrupt (IRQ) for PC-Bus Controllers................................74
Controller Data Sheets.......................................................................................75
IntelliTouch Serial Controller (E281-2300)............................................... 77
IntelliTouch Serial Controller (E281{A}-4002).......................................... 78
AccuTouch Serial Controller (E271-2210)............................................... 79
AccuTouch and DuraTouch Serial Controller (E271-2200)..................... 80
AccuTouch Serial Controller (E271-140)................................................. 81
DuraTouch Serial Controller (E261-280)................................................. 82
IntelliTouch PC-Bus Controller (E281-4035) ........................................... 83
IntelliTouch PC-Bus Controller (E281{A}-4025)....................................... 85
AccuTouch and DuraTouch PC-Bus Controller (E271-2201).................. 87
AccuTouch PC-Bus Controller (E271-141) and DuraTouch PC-Bus
Controller (E271-142).............................................................................. 88
Touchscreen Type Jumpers (for AccuTouch E271-141 Only)...... 89
AccuTouch and DuraTouch Micro Channel Controller (E271-2202)....... 90
Controller Installation.................................................................... 90
Troubleshooting...................................................................................... 93
General Information ........................................................................................... 93
Display Problems..................................................................................... 93
Page 8

Peeling Back the Layers.......................................................................... 94
Calibration Problems............................................................................... 94
Where to Go From Here.......................................................................... 95
MonitorMouse for Windows..................................................................... 96
Touchscreen Control Panel .......................................................... 98
MonitorMouse for DOS............................................................................99
TouchBack............................................................................................. 101
ELODEV................................................................................................ 102
ELODEMO............................................................................................. 103
ELOCALIB............................................................................................. 103
Diagnostic Utilities............................................................................................ 103
BUSSTAT.............................................................................................. 104
COMDUMP............................................................................................ 106
INFO...................................................................................................... 108
Interrupt Flag (-i)......................................................................... 108
Help Flag (-h)..............................................................................109
SAWDUMP............................................................................................ 110
TOUCHES............................................................................................. 111
Error Messages.....................................................................................113
ELODEMO Error Messages............................................................................. 113
ELODEV Error Messages ................................................................................ 114
MonitorMouse for DOS Error Messages .......................................................... 118
TouchBack Error Conditions ............................................................................ 121
Error Messages ..................................................................................... 121
Beep Codes........................................................................................... 123
MonitorMouse for DOS Programming Information ............................125
Introduction ...................................................................................................... 125
Subfunction 0 - Get Mode and Options............................................................126
Subfunction 1 - Set Mode and Options ............................................................ 126
Subfunction 2 - Wa it for Untouch..................................................................... 127
MonitorMouse for Window s Programming Information ....................129
Z-Axis Capability .............................................................................................. 129
Launching the Touchscreen Control Panel...................................................... 130
Calibrating from Within Your Program.............................................................. 130
Touch Icons...................................................................................................... 131
Index ................................................................................................................ 133
Page 9

BOUT THIS MANUAL
A
This manual provides all of the information you need to install and use the
software on the Elo TouchSystems DOS and Windows Driver Disk.
This manual is organized as follows:
About this Manual
•
About Elo Software
•
Product Registration
•
Contacting Elo
•
Introduction
1
2
7
7
Chapter 1 Describes the included software and hardware requirements.
Chapter 2 Gives instructions on how to install the software.
Chapter 3 Describes the touchscreen demonstration program.
Chapter 4 Describes the installation and use of ELODEV™ and ELOCALIB,
Chapter 5 Details the use of MonitorMouse® for DOS, a mouse emulation
the touchscreen driver and calibration program for DOS.
driver.
1
Page 10

2 Chapter 1 - Introduction
Chapter 6 Details the use of MonitorMouse for Windows.
Chapter 7 Describes the installation of TouchBack™, a keystroke emulation
driver for DOS.
Appendix A Provides detailed information on configuring your touchscreen
controller.
Appendix B Gives tips on troubleshooting an installation.
Appendix C Lists error messages with explanations.
Appendix D Contains information for programmers on MonitorMouse for DOS.
Appendix E Contains information for programmers on MonitorMouse for
Windows.
See the !READ.ME! file on the accompanying DOS and Windows Driver Disk for
any additions or changes made after this manual was printed.
For details on available product configurations, touchscreen theory of operation,
and general troubleshooting, see the IntelliTouch® Product Manual or the
AccuTouch® Product Manual as appropriate.
BOUT ELO SOFTWARE
A
Included Software
The accompanying DOS and Windows Driver Disk contains the following Elo
driver software:
ELODEV Touchscreen driver program for DOS.
MonitorMouse for DOS Mouse emulation driver for DOS. Combines
Makes all Elo touchscreen controllers,
including serial RS-232, PC-Bus, and Micro
Channel versions, look the same to other
driver and application programs.
touch input from ELODEV and mouse input
from your mouse driver into a single
MOUSE.COM compatible application
interface.
MonitorMouse for Windows Mouse emulation driver for Microsoft
Windows. Allows all Windows programs to
be used with a touchscreen. Your mouse
Page 11

About Elo Software 3
may be used in conjunction with the
touchscreen. DOS mouse-driven programs
run from Windows may also use the
touchscreen.
TouchBack Keystroke emulation driver for DOS.
Applications must be specially written for
use with TouchBack. Your application
documentation should specify if TouchBack
is required.
The DOS and Windows Driver Disk also contains the following software:
ELODEMO A VGA-graphics program for DOS which
demonstrates the capabilities of the
touchscreen hardware and many techniques
for touchscreen software.
Utility and Diagnostic Programs An assortment of programs are included to
calibrate the touchscreen and verify the
operation of serial ports, touchscreen
controllers, and driver programs.
Other Software Available from Elo
MonitorMouse for DOS and MonitorMouse for Windows are only two in a family
of MonitorMouse products for various operating systems available separately
from Elo. Each has a similar "look and feel" for a consistent user interface across
platforms:
MonitorMouse for OS/2 Mouse emulation driver for OS/2 2.x and
MonitorMouse for Windows NT Mouse emulation driver for Windows NT.
MonitorMouse for Macintosh Mouse emulation driver for the Apple
1.3. DOS and Windows programs run under
OS/2 may also use the touchscreen.
DOS and Windows 3.1 programs run under
Windows NT may also use the touchscreen.
Macintosh family of computers.
Page 12

4 Chapter 1 - Introduction
The following manuals and software are included in the DOS Programmer's
Toolkit, also available separately from Elo:
ELODEV
Programmer's Reference Defines the application programming
TouchBack
Programmer's Reference Defines the application programming
TouchUp™
User's Guide Includes the touch zone definition utility for
interface for the ELODEV touchscreen
driver. Includes sample source code in C,
Pascal, and assembly. (70 pages).
interface for the TouchBack keystroke
emulation driver. Includes sample source
code in BASIC, dBase, Clipper, etc. (50
pages).
ELODEV and TouchBack, screen capture
program, and example programs in C and
Pascal. (85 pages).
Writing Your Own Driver
If you are using an operating system not supported by the Elo drivers described
above, contact Elo Technical Support for information on the availability of other
drivers. Technical manuals are also available on the touchscreen controllers with
machine-independent example code for writing your own drivers.
Touchscreens and Controllers Supported
Elo produces two touchscreen technologies: resistive and surface wave (SW). The
AccuTouch® resistive touchscreen consists of a glass panel molded to the precise
shape of a display's face. The glass is coated with a transparent, conductive layer
and then covered by a clear, hard-coated sheet of plastic. This cover sheet is
suspended over the glass by less than one-thousandth of an inch with tiny
separator dots. With a light touch, the conductive inner surface of the plastic sheet
makes contact with the underlying glass. The resulting voltage is digitized for
each axis and a coordinate determined.
The IntelliTouch® surface wave touchscreen consists of a clear glass overlay with
piezoelectric transducers and a set of reflector stripes. Surface waves are
transmitted by the transducers, reflected across the face of the overlay, and
reconverted into an electronic signal. A finger or gloved hand touching the
Page 13

About Elo Software 5
touchscreen absorbs a portion of the wave at the touch location. The touchscreen
controller's microprocessor analyzes the resulting change in the received signal
and determines the touch coordinates. The IntelliTouch touchscreen can sense
both touch location and touch pressure.
A touchscreen controller is required for both technologies to provide touchscreen
drive signals, convert received analog signals into digital coordinates, and
transmit coordinates to the PC. There are several types of controllers.
Serial controllers use a standard RS-232 port and are baud rate selectable. They
can be mounted anywhere; for example, externally (in separate enclosures) or
inside display enclosures.
Bus controllers plug directly into a card slot within an IBM PC, PS/2, or
compatible computer, so external packaging and power is not required. Bus
controllers are address and interrupt (IRQ) selectable and are available for PC-Bus
(ISA/EISA) and Micro Channel architectures.
The software on the Elo DOS and Windows Driver Disk supports the Elo
touchscreen controllers listed below. E281{A}-4002 refers to both the E281-4002
and E281A-4002 controllers. Likewise, E281{A}-4025 refers to both the E2814025 and E281A-4025 controllers.
Controller Enclosure Touchscreen
Model Model Interface Type
E281-2300 N/A RS-232 IntelliTouch
E281{A}-4002 E281{A}-2852 RS-232 IntelliTouch
E271-2210 E271-RS232BX RS-232 AccuTouch
E271-2200 N/A RS-232
E271-140 E271-3{R} RS-232 AccuTouch
E261-280 N/A RS-232 DuraTouch
E281-4035 N/A PC-Bus IntelliTouch
E281{A}-4025 N/A PC-Bus IntelliTouch
E271-2201 N/A PC-Bus AccuTouch & DuraTouch
E271-141 N/A PC-Bus AccuTouch
E271-142 N/A PC-Bus DuraTouch
E271-2202 N/A Micro Channel AccuTouch & DuraTouch
AccuTouch & DuraTouch
1
®
The following obsolete part numbers can be cross-referenced to the controller
model numbers referred to above.
1
DuraTouch touchscreens are no longer manufactured by Elo.
Page 14

6 Chapter 1 - Introduction
Part Number Controller Model
00285X-XXX Enclosure Con tains E281-4002 IntelliTouch Serial
E271-3 Enclosure Contains E271-140 AccuTouch Serial
002710-XXX Controller E271-140 AccuTouch Serial Controller.
002714-XXX Controller E271-141 AccuTouch PC-Bus Controller.
002750-XXX Controller E261-280 DuraTouch Serial Controller.
002751-XXX Controller E271-142 DuraTouch PC-Bus Controller.
00285X-2-XXX Controller E281-4002 IntelliTouch Serial Controller.
Controller, configured for Stream Mode,
Binary Mode, Z-Axis Enabled, 9600 Baud.
Controller, configured for 2400 Baud, 8-Bit
Data, Binary Mode, Filtered Mode, Stream
Mode.
00285X-25-XXX Controller E281-4025 IntelliTouch PC-Bus Controller.
E271-280 Controller E261-280 DuraTouch Serial Controller.
E271-141 Controller with
Daughter Board
System Requirements
The DOS drivers will run on any system with DOS version 2.0 or later. The
Windows drivers will run on any system with Windows 3.1 or later. The DOS
demonstration program requires a VGA color display. The touchscreen calibration
program for DOS supports standard and VESA-compatible display modes.
Otherwise, all software is video independent. An Elo touchscreen must be
installed on the display and connected to a serial or bus controller.
Differences from Previous Versions
The ELODEV and MonitorMouse for DOS/Windows disks and manuals have
•
been combined into this single manual and disk. A new installation program is
included. The installation program and Touchscreen Control Panel for
Windows are included in English, German, French, and Spanish.
E271-142 DuraTouch PC-Bus Controller.
Page 15

The performance of MonitorMouse for DOS and MonitorMouse for Windows
•
have been enhanced when using an IntelliTouch controller with firmware
revision 2.2 or later, or a SmartSet™ controller (E271-22xx or E281-23xx).
The DOS demonstration program has been converted to VGA and enhanced
•
considerably.
Many other minor improvements have been made to the various drivers and
•
utility programs. For information on differences between all prior versions,
see the DIFFER.* files, an option selectable when installing the DOS and
Windows Driver Disk. All drivers are backwards compatible with previous
versions.
Distribution Rights
ELODEV, MonitorMouse for DOS, MonitorMouse for Windows, TouchBack,
and their support software may be distributed freely in executable form with any
software you develop using them. See the license agreement at the beginning of
this manual for details.
Product Registration 7
RODUCT REGISTRATION
P
To stay informed on the latest product announcements and software releases, be
sure to fill out and return the product registration card packaged with this manual.
ONTACTING ELO
C
Elo TouchSystems, Inc.
105 Randolph Road
Oak Ridge, TN 37830
VOICE: (615) 482-4100 (Eastern Time)
FAX: (615) 482-4943
Technical Support Line
VOICE: (615) 220-4299 (Voice mail after hours)
FAX: (615) 482-6617
INTERNET: ELOTECH@raychem.com
BBS: (615) 482-9840
(Downloads only, up to 14.4K baud, multiple protocols)
CompuServe: GO ELOTOUCH
Select Elo TouchSystems from the Messages and Library menus.
Page 16

8 Chapter 1 - Introduction
Product announcements, press releases, application notes, software drivers and
utilities are available on CompuServe and the Elo BBS.
Your comments and suggestions are welcome.
Page 17

Installation
•
Step 1 - Configuring the Touchscreen Controller 9
•
Step 2 - Installing the Controller 10
•
Step 3 - Running the INSTALL Program 10
•
Step 4 - Calibrating the Touchscreen 12
•
Where to Go from Here 13
•
Changing Your Hardware Configuration with SETUP 14
•
Uninstalling the Software 14
This chapter describes the installation procedure for the software on the DOS and
Windows Driver Disk. Four steps are required:
Step 1 Configuring the touchscreen controller.
Step 2 Installing the controller.
Step 3 Running the INSTALL program.
Step 4 Calibrating the touchscreen.
TEP
S
1 - C
ONFIGURING THE TOUCHSCREEN CONTROLLER
Elo ships most touchscreen controllers preconfigured for use with Elo software.
9
Page 18

10 Chapter 2 - Installation
Serial controllers are usually ready to use.
•
PC-Bus controllers require a hardware interrupt (IRQ) and a block of I/O ports
•
that will not contend with another device. If IRQ5 and/or I/O ports 280-299
are not available, you may have to re-jumper your controller.
Micro Channel controllers are configured with the Reference Disk included
•
with your PS/2 or compatible computer.
Switch and jumper settings, as well as other configuration information, are given
in Appendix A.
S
S
TEP
TEP
2 - I
3 - R
NSTALLING THE CONTROLLER
If you need help installing the controller or making the connections, see the
AccuTouch Product Manual or the IntelliTouch Product Manual as appropriate
for step-by-step instructions.
UNNING THE
The DOS and Windows Driver Disk contains an installation program which
automatically transfers all necessary files to your hard disk.
If you will be installing the Windows drivers, be sure Windows is installed and
operating properly before proceeding. You must have a DOS mouse driver
(MOUSE.COM) installed for your mouse if you wish to continue using your
mouse along with the touchscreen in DOS or Windows.
If you only wish to change the configuration of your touchscreen controller, see
Changing Your Hardware Configuration with SETUP, page 14, for information
on the SETUP utility.
INSTALL P
ROGRAM
To install the software, insert the DOS and Windows Driver Disk and type:
A:INSTALL [Enter]
or
B:INSTALL [Enter]
Respond to the on-screen prompts and instructions. You will be asked to specify
the model and configuration of your controller, then select
Installation
Installation
displayed for each installation option. You may specify the drive and directory for
the files you choose to install, or use the default (C:\TOUCH).
between
Windows Express Installation
,
. The software to be installed and disk space requirements will be
DOS Express
, or
Selective
Page 19

Your AUTOEXEC.BAT file, (and SYSTEM.INI file for Windows install-ations),
will be modified by the INSTALL program. Copies of the original files will be
saved as AUTOEXEC.OLD and SYSTEM.OLD.
Command Line Flags
Several flags may be specified on the INSTALL command line.
To override the default system language used by INSTALL, specify the -L flag as
follows:
INSTALL -L<x>
Use -Lg or -Ld for German, -Ls for Spanish, -Lf for French, or -Le for English.
To override the path to C:\AUTOEXEC.BAT, use the -a flag as follows:
INSTALL -a<filename with path>
Step 3 - Running the INSTALL Program 11
To skip the VGA graphics sign-on screen, enter:
INSTALL :
More than one flag may be specified, separated by spaces. Flags may be in upper
or lower case.
Updating Existing Drivers
If you are updating a previous version of the drivers, be sure to install and read the
DIFFER.* files. These files explain the differences from all previous versions.
The file extension corresponds to the version for which changes are listed. For
example, ELODIFF.16 lists the changes made from ELODEV version 1.5b to
version 1.6.
It is best to erase or overwrite any files from previous releases. All files are
generally compatible, but mixing files from different versions may cause
problems. If you are updating to a hard disk, specify the paths containing the
earlier version and the INSTALL program will overwrite the obsolete files.
All files are now installed into a single directory (default is \TOUCH). You will
probably want to delete the old version of MonitorMouse for DOS which was
previously installed in a separate directory (typically \MONMOUSE). INSTALL
does not delete this directory.
NOTE
Page 20

12 Chapter 2 - Installation
S
TEP
4 - C
ALIBRATING THE TOUCHSCREEN
The final installation step is calibrating the touchscreen. Type "GO" when
instructed to begin the calibration sequence.
You will be prompted to touch three calibration points on the screen. Before you
do so, position yourself in front of the screen in normal sitting (or standing)
position, with normal height and reach.
Using your finger as accurately as possible, touch each of the three points as they
appear in the corners of the screen. The program responds with a beep as you lift
your finger from each point.
Calibration is performed in four common video modes: 80x25 text mode, CGA
320x200 graphics, VGA 320x200 graphics, and VGA 640x480. If your DOS
application runs in another video mode, see Chapter 4 for additional information
on ELOCALIB. If you are running Windows in another video mode such as super
VGA, see Chapter 6 for information on calibrating the touchscreen in Windows
with the Touchscreen Control Panel.
The numerical values for the calibration points for the last video mode are
displayed. X or Y axis inversion is normal.
If the calibration program does not respond to a touch, check the cabling, the
switch and/or jumper settings on the controller, and the configuration you selected
when installing the software. Run SETUP to change the configuration (see page
14). See Appendix B, page 93 for additional troubleshooting information.
Why Calibration is Necessary
The need for calibration is unique to the touchscreen. Unlike mouse or keyboard
applications where the cursor is part of the image, a touchscreen is a physical
overlay with an independent coordinate system. Only by knowing the position of
the image can the PC software convert touchscreen coordinates into image
coordinates.
Besides the differences among touchscreens and controllers, calibration also
compensates for the variation in video image among displays. The image is
affected by horizontal and vertical adjustments on the monitor and by the physical
mounting of the touchscreen.
Additional calibration complications include image blooming, where bright
colored images expand, and the "pin cushion" effect, which causes the corners of
the display to be stretched. Poor display linearity can cause similarly sized boxes
to be larger at the edges of the screen than they are in the m iddle, or vice versa.
Page 21

The displayed image can also be tilted. Even changing video modes can affect the
screen size.
Perfect calibration cannot be achieved in all circumstances. For example, the user
can encounter parallax problems with a change in position, or because the present
user is not the same stature as the person who calibrated the screen.
Even the most sophisticated calibration techniques can only partially overcome
such variations. Therefore, most touchscreen software uses only a two or threepoint calibration sequence and relies instead on well placed touch zones and
appropriate user feedback.
The three-point calibration sequence used by Elo automatically corrects inverted
touchscreen installations and backwards cable connections. X or Y-axis inversion
is normal for most touchscreens.
When Recalibration is Necessary
Where to Go from Here 13
Once calibrated, the touchscreen will be ready to run automatically each time the
system is restarted. Recalibration should only be necessary after moving or
resizing the video image, or after changing either the touchscreen, controller, or
monitor.
Type "DEMOCAL" or click on Calibrate in the Windows Touchscreen Control
Panel to re-run the calibration sequence.
HERE TO GO FROM HERE
W
If you chose:
DOS Express Installation
Windows Express Installation
Proceed to Chapter 3 for information on
running the demonstration program.
Then see Chapter 5 if you will be using
the MonitorMouse for DOS mouse
emulator or Chapter 7 for the
TouchBack driver.
Skip to Chapter 6 for information on
MonitorMouse for Windows, the
Windows mouse emulator.
Selective Installation
If you will doing software development under DOS, see the DOS Programmer's
Toolkit, available separately from Elo.
See Chapters 3-7 as appropriate.
Page 22

14 Chapter 2 - Installation
For details on available product configurations, theory of operation, touchscreen
installation, and general troubleshooting, see the IntelliTouch Product Manual or
the AccuTouch Product Manual as appropriate.
Technical Reference manuals are also available for Elo touchscreen controllers.
The remainder of this chapter discusses changing your hardware configuration and
uninstalling the software.
HANGING YOUR HARDWARE CONFIGURATION WITH
C
If you reconfigure your hardware settings, run the SETUP program from your hard
disk to reconfigure the drivers. SETUP is typically found in the \TOUCH
directory. Be careful not to confuse this program with the Windows Setup
program. To run SETUP, type:
SETUP [Enter]
SETUP
The procedure is very similar to the INSTALL program, except no software is
installed and the DOS and Windows Driver Disk is not required.
Flags may be specified for SETUP as with INSTALL. See page 11.
NINSTALLING THE SOFTWARE
U
Demonstration Program
You may wish to delete the demonstration program from your hard disk after you
have run it. This will free approximately 1.7 Mbytes of disk space. Delete
ELODEMO.EXE, *.PIC, *.IMG, and *.BGI, typically found in the \TOUCH
directory.
Previous Versions of MonitorMouse for DOS
If you have a previous version of MonitorMouse for DOS already installed
(version 1.4x or earlier), you should delete it as it was previously installed in a
separate directory (typically \MONMOUSE).
MonitorMouse for Windows
Delete CURSOFF.EXE and ELO.BMP from the \WINDOWS directory. Delete
MONMOUSE.DRV, VMMD.386, ELOCALW.*, and OEMELO.INF from
Page 23

\WINDOWS\SYSTEM. Delete the lines indicated by comments as added by Elo
from your SYSTEM.INI file. Delete the [EloCalW] section from WIN.INI. Run
Windows Setup and re-select your mouse.
All Elo Software
Delete the Elo directory (typically \TOUCH) and then follow the instructions
above for deleting MonitorMouse for Windows if necessary. Remove any lines for
ELODEV, MONMOUSE, NOMOUSE, and TCHBACK from AUTOEXEC.BAT
as necessary.
Uninstalling the Software 15
Page 24

DOS Demonstration Program
NTRODUCTION
I
Included on the accompanying DOS and Wi ndows Driver Disk is ELODEMO, a
touchscreen demonstration program for DOS. ELODEMO has several sample
applications, but its main purpose is to demonstrate the capabilities of the
hardware.
Introduction
•
Installation
•
Running ELODEMO
•
How ELODEMO Was Created
•
67
18
18
24
Programmers: ELODEMO also demonstrates various user interface
programming techniques. If you will be doing software development under DOS,
see the DOS Programmer's Toolkit, available separately from Elo for technical
details.
17
Page 25

18 Chapter 3 - DOS Demonstration Program
NSTALLATION
I
ELODEMO is installed with the INSTALL program on the DOS and Windows
Driver Disk by choosing
Installation
choose
ELODEMO with
ELODEMO requires a 286 computer or better with VGA graphics, approximately
400K of available RAM, and 1.7 Mbytes of hard disk space.
Windows Express Installation
. To conserve disk space, ELODEMO is not installed if you
Selective Installation
DOS Express Installation
Included Files
The following files are typically installed in the \TOUCH directory:
ELODEMO.EXE Demo program.
*.PIC,*.IMG Screen images used by ELODEMO.EXE.
*.BGI Video driver used by ELODEMO.EXE.
Selective
or
. You may choose later to install
.
To delete the demonstration program from your hard disk after you have run it,
see Uninstalling the Software, page 14.
UNNING
R
ELODEMO
To run ELODEMO, type:
ELODEMO [Enter]
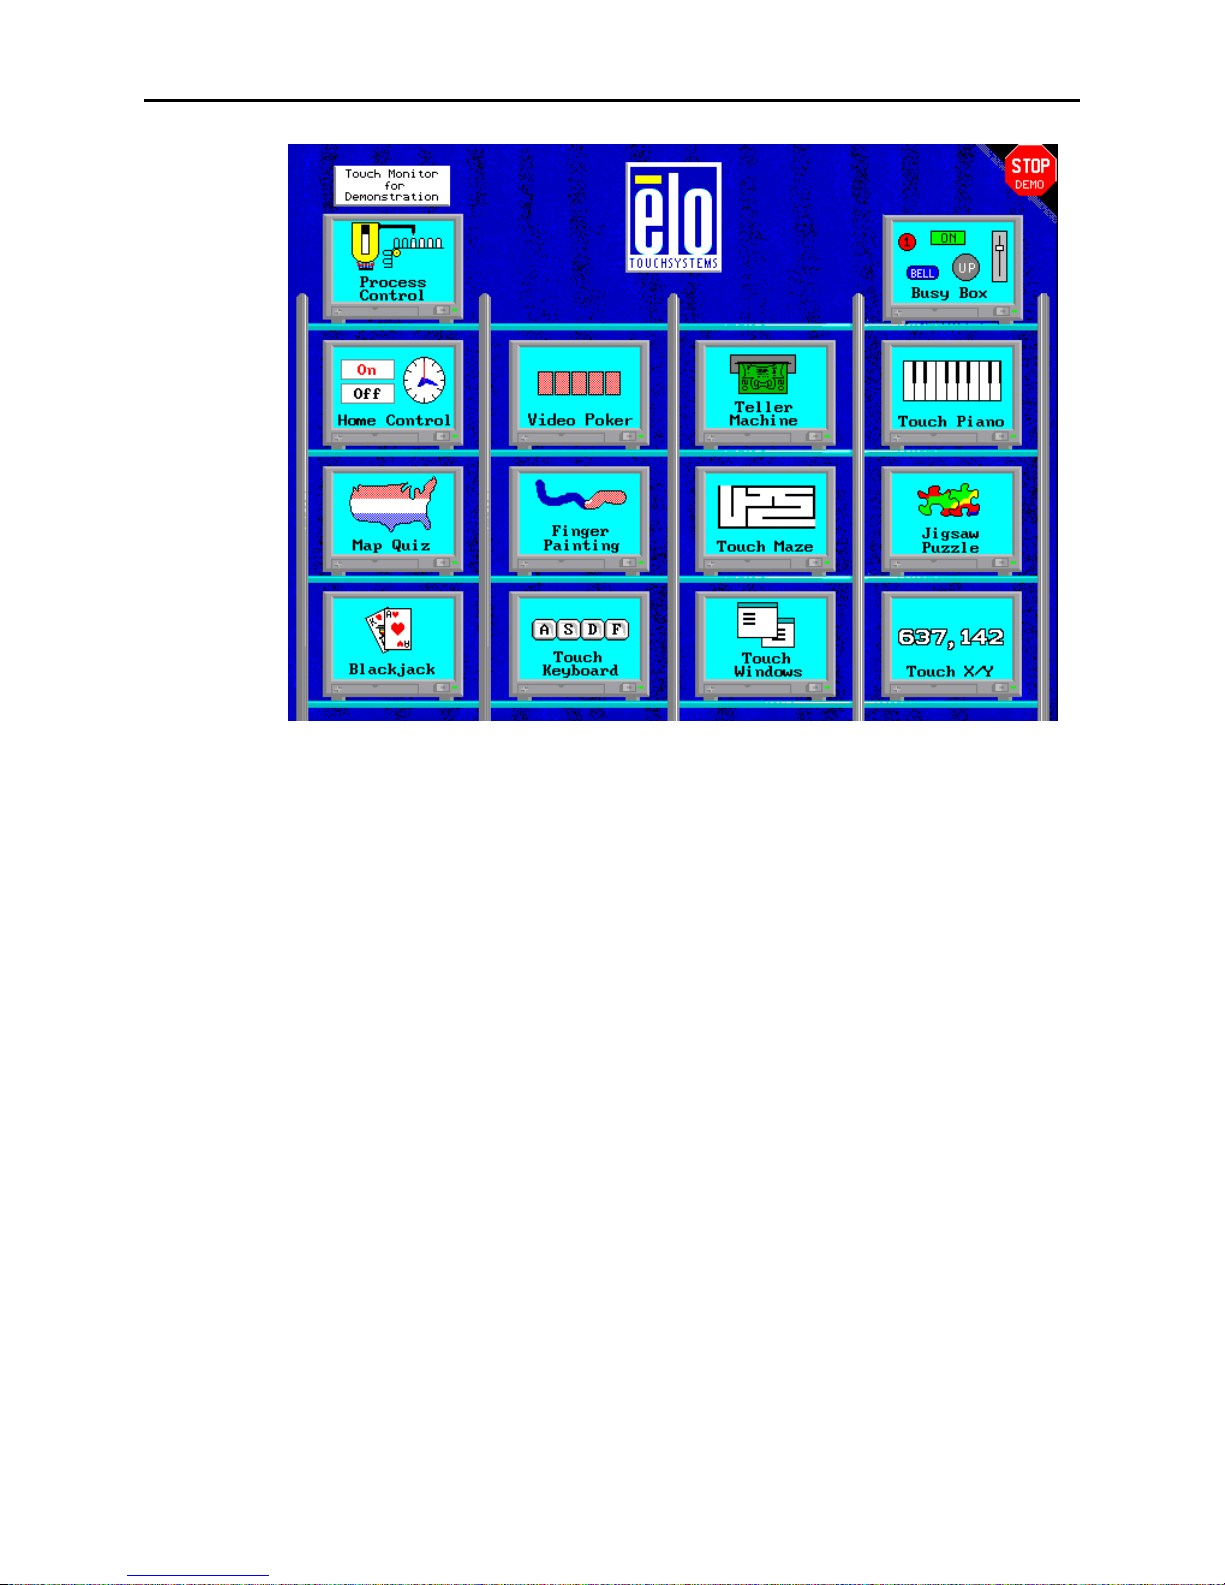
typically from the \TOUCH directory. The main menu is shown in Figure 3-1.
Command Line Flags
Several flags are available when running ELODEMO.
To prevent the main menu from timing out to the DOS prompt after one minute of
no activity, type:
ELODEMO -x
This flag is especially useful at trade shows. To exit, you must either press the
[Esc] key or touch the secret button (extreme lo wer-left corner of the screen), t hen
touch the normal "Stop Demo" button.
Page 26
Running ELODEMO 19
Figure 3-1. ELODEMO Main Menu
To prevent the various demos from timing out to the main menu, type:
ELODEMO -t
To customize your demo with a trade show or company name, use the -c flag. The
text between the quotes can be up to 15 characters:
ELODEMO -c"<Name>"
Two other flags are available. The -i flag specifies which copy of ELODEV to use
if multiple copies are loaded. For example:
ELODEMO -i62
See Using Multiple Co-Resident Copies of ELODEV, page 34, for more
information.
The -h flag lists the available flags.
Flags may be upper or lower case. Multiple flags may be specified, separated by
spaces. For example, to run ELODEMO at a trade show without any screen timing
out, type:
ELODEMO -x -t
Page 27

20 Chapter 3 - DOS Demonstration Program
Demo Descriptions
The following is information on ELODEMO that may not be obvious.
Main Menu
This screen demonstrates a "secret zone". If the "-x" flag is used when running
ELODEMO to prevent users from exiting to DOS, you must touch the extreme
lower left corner of the screen, then touch the normal "Stop Demo" zone to exit.
Secret zones may be used by applications to select diagnostic or set-up modes.
Process Control
This screen simulates a process or industrial control system. The screen appears to
operate in real time, meaning it senses and reacts to data from on-line machinery.
The object is to stabilize the system by making adjustments until the flashing
warning messages are eliminated.
Adjusting the flame affects the temperature and pressure. The pressure release
valve can be used to adjust the pressure in the tank. The bottles must be filled, but
filling them too much will cause them to overflow. The tank must also be filled
periodically. With IntelliTouch touchscreens, pressing the "Fill" button harder fills
the tank faster.
The speed of the line can be adjusted, as well as hal ted with the "Stop" button.
"Stop" and "Start" must be held continuously for five seconds before they will
activate.
Busy Box
This screen demonstrates various types of buttons, slide switches, dials, pull-down
menus, keypads, etc. If you have an IntelliTouch touchscreen, the Z-axis
(pressure) is also demonstrated.
Map Quiz
Tests how well you can identify the states of the U.S. or the countries of Europe in
this educational demo.
Touch each state or country as prompted. After 10 questions, your score will be
displayed.
Studies have shown that scores are generally higher when computerized
interactive training programs use a touchscreen. Other input devices detract from
the lesson, while the touchscreen permits focused attention.
Page 28

Running ELODEMO 21
Stereo Unit
Touch the "Power" button to activate and quit the equalizer/spectrum analyzer.
It is easy to set all the levels at once. Simply slide your finger horizontally across
all of the slide controls.
Finger Painting
This screen demonstrates the speed, resolution, and accuracy of Elo touchscreens.
You can choose a color and thin or wide lines. With wide lines selected, the width
of the line is based on the Z-axis if using an IntelliTouch touchscreen, or the speed
of motion if using an AccuTouch touchscreen. The Erase button works like an
erasure. The Clear button clears the whole screen.
Touch Keyboard
This screen demonstrates the feasibility of data entry using a touchscreen. While it
is not always practical to replace standard keyboards with touchscreen keyboards,
there are instances where a keyboard such as this may suffice for limited text
entry.
Keys are only entered on untouch, (when you lift your finger), allowing for
correction of missed touches. Using this software technique with a trained
operator, keyboard screens can be made even smaller.
Do not touch "Shift" at the same time as a key. Touch "Shift", release, then touch
the key to be shifted. Touchscreens cannot distinguish between two simultaneous
touches.
This screen also demonstrates an implementation of touch timing. Hold your
finger on a key and it begins to repeat. Continue holding and it repeats even faster.
Teller Machine
This screen simulates an Automated Teller Machine (ATM). It allows deposits,
withdrawals, transfers, balance and check clearing inquiries.
The ATM demonstrates a public-oriented user interface. All such applications
should use Point Mode, where the software acts immediately on touch-down and
ignores all other touch data until untouch and retouch. Try touching a zone and
holding it. The software highlights and beeps, waits half a second, then removes
the highlighting. You must untouch before it will recognize another touch.
Contrast this screen with the Keyboard demo which maintains the highlighting
and acts only on untouch.
Page 29

22 Chapter 3 - DOS Demonstration Program
While the use of untouch in the keyboard demo allows a higher density of touch
zones, it does require training, although only a few seconds worth. With the
public, you do not have any opportunity for training. Because Point Mode is
natural to use, public-oriented applications should be written using it.
Touch Piano
Play the piano right on the screen.
You cannot touch more than one note at a time.
Touch Maze
Find your way through this maze.
Touch "Start" and slide your finger down the paths. If you hit the hedges, slide
back to the center of the path and continue. As you move through the maze, you
leave behind footprints.
Black Jack
This demonstration simulates casino-style black jack.
Touch the stacks of chips to place your bet, up to $200. As you touch the chips,
they form new stacks. You may touch these stacks to reduce your bet. Touch
"DEAL".
After the cards are dealt, touch "Hit," "Stand," or "Double". Splits and insurance
are not implemented.
Touch "Wager" to play again.
Touch X,Y
This screen outputs the coordinates of your touch and demonstrates some of the
modes the Elo drivers make available to programmers.
As you slide your finger around, coordinates are displayed. Initially you are in
Untranslated Mode, meaning the coordinates are displayed as they are received
from the touchscreen controller. Note they are unscaled and uncalibrated and the
origin is in the upper left or lower right corner. Touch "Untranslated" to switch the
driver into Translated Mode. Now the coordinates are adjusted by the driver to
match the screen resolution. A cursor appears which can be moved to 10,10.
Stream Mode outputs coordinates continuously as long as the screen is touched.
Point Mode only outputs a point when the screen is first touched. Point Mode with
Page 30

Running ELODEMO 23
Untouch Mode outputs two points for each touch—once when first touched, and
once on untouch.
For more information on programming, see the DOS Programmer's Toolkit,
available separately from Elo.
Jigsaw Puzzle
Solve a jigsaw puzzle.
Slide each piece into place. An audio signal indicates it is locked into its correct
position. You may slide pieces on top of each other if you wish. Pieces cannot be
rotated.
Touch Windows
This demo shows how windowing software can be implemented using a
touchscreen.
Touch any of the overlay activation zones, labeled "Ovly1 - Ovly10". Each causes
an overlay to appear. Multiple overlays are stacked. When an overlay is "opened",
its "icon" disappears. Overlays are removed and returned to icon form by pressing
"HIDE".
Overlays can be moved by touching their "MOVE" zone and sliding. You can also
move them by touching their left, right, or bottom edges and sliding.
Overlays underneath can be brought to the top of the stack by moving them until
part of the "TOP" zone is visible, and then touching that zone.
Within the overlay, there are three zones which make different tones. Slide your
finger up and down over these zones. The selection is made on untouch.
Although this screen is in text mode, a graphical version would work identically.
Home Control
Shows how a home can be controlled using a touchscreen.
The main menu displays the status of the Security, Lighting, Heating, and
Sprinkler systems, along with the current day and time. The current state of the
device is displayed in the "ON/OFF" field in real time. Touching this area
manually overrides the device.
Touching the name of a device displays a screen with two analog clocks - one for
the start time and one for the end time. Move the hands on the clock simply by
Page 31

24 Chapter 3 - DOS Demonstration Program
sliding them, as you would set the time on a grandfather clock. As you move the
minute hand, the hour hand and AM/PM will change appropriately. You may also
move the hour hand and touch "AM" or "PM" directly. Note the On Time selected
is displayed. Next, toggle each day of the week you want the device to be
activated. Finally, touch "Accept" or "Cancel".
Touch the clock on the main screen to set the time. (The system day and time are
not affected). The clock is enlarged to facilitate the use of the techniques
described above.
You may spin the hands of the clock quickly by circling close to the center point.
To move the minute hand with the greatest precision, drag it at the outer edge of
the clock, or even slide beyond the clock's perimeter.
If the minute hand is aligned with the hour hand, touching the hour hand selects it.
Touching beyond its length selects the minute hand.
H
OW
ELODEMO W
ELODEMO was written in Borland Pascal. The graphics screens were developed
with various painting programs. The Elo TouchUp touch zone definition utility
was also used, which is included in the DOS Programmer's Toolkit, available
separately from Elo.
AS CREATED
Page 32

NTRODUCTION
I
DOS Touchscreen Driver
and Calibration Utility
Introduction
•
Compatibility
•
Installation
•
ELODEV
•
ELOCALIB
•
25
26
26
27
35
Included on the accompanying DOS and Windows Driver Disk are ELODEV™
and ELOCALIB, a touchscreen driver and calibration utility for DOS.
Who Should Use ELODEV and ELOCALIB
ELODEV makes all Elo touchscreens and controllers look the same to application
programs or other drivers. ELODEV is required by the MonitorMouse for DOS,
MonitorMouse for Windows, and TouchBack drivers. See Chapters 5, 6, and 7
respectively. In addition, some applications are specially written for direct
interaction with ELODEV rather than using a mouse interface. Your applicatio n
documentation should specify if only ELODEV is required.
25
Page 33

26 Chapter 4 - DOS Touchscreen Driver and Calibration Utility
The ELOCALIB utility is run automatically during the calibration step of the
installation process. You may run it again as required. ELOCALIB is used only
with DOS programs as MonitorMouse for Windows has its own calibration
program.
Programmers: When developing new touchscreen applications, ELODEV is the
most efficient driver to use when mouse emulation is not a requirement. The DOS
Programmer's Toolkit, available separately from Elo, includes the ELODEV
Programmer's Reference and TouchUp User's Guide. These manuals define the
application programming interface (API) for the ELODEV driver and the touch
zone definition utility. Sample source code is included in C, Pascal, BASIC, and
assembly language.
OMPATIBILITY
C
The ELODEV touchscreen driver is compatible with all Elo touchscreens and
controllers. See Touchscreens and Controllers Supported, page 4, for a complete
list.
ELOCALIB supports calibration in text mode, CGA, EGA, VGA, and VESAcompatible SVGA graphics modes.
NSTALLATION
I
ELODEV.EXE and ELOCALIB.EXE are installed by the INSTALL program
described in Chapter 2 if you choose
Express Installation
copied to the \TOUCH directory.
The rest of this section describes the details of loading ELODEV and using
ELOCALIB, including the command line structure and optional flags. Typically,
you will not need to read this chapter. If you have problems with an ELODEV
installation, see Appendix B—Troubleshooting.
DOS Express Installation, Windows
Selective Installation
, or
. They are typically
Page 34

ELODEV
Placement in AUTOEXEC.BAT
The ELODEV command line is placed in AUTOEXEC.BAT by the INSTALL
program. ELODEV.EXE is a terminate-and-stay-resident (TSR) program and
must be installed before any other Elo driver, including MonitorMouse for DOS
(MONMOUSE.COM) and TouchBack (TCHBACK.EXE). ELODEV occupies
about 6K of system RAM when loaded.
ELODEV Command Line
The ELODEV command line includes controller parameters and flags. These
include the type of touchscreen controller, where/how it is connected, and the
calibration values. A sample ELODEV command line is shown below:
C:\TOUCH\ELODEV 2201,280,5 -C722,3587,3319,841,1,15
ELODEV 27
By keeping these hardware-dependent parameters outside the application
program, the application can be hardware-independent and therefore will work
with any Elo touchscreen and controller configuration.
The INFO program (see page 108) can be used to easily display the current
ELODEV parameters.
The controller parameters may be changed by running the SETUP program (see
page 14), or use your system editor to manually make the changes.
The calibration values (-c flag) are initially placed on the ELODEV command line
by ELOCALIB during the installation process. Recalibrating with ELOCALIB
will update these values. Because the ELODEV command line includes
calibration values, the touchscreen will not need to be calibrated each time the
system is started.
ELODEV Command Syntax
ELODEV ignores spaces and tabs when scanning the command line. Flags consist
of a hyphen and a letter, in upper or lower case. Multiple flags may be specified,
separated by spaces. You may find it useful to include a comment at the end of the
command line, preceded by a semicolon:
C:\TOUCH\ELODEV 2201,280,5 -C722,3587,3319,841,1,15 -I64 ;touchscreen driver
One of the following three command formats is used, depending on the type of
controller.
Page 35

28 Chapter 4 - DOS Touchscreen Driver and Calibration Utility
Serial Controllers
Command format:
ELODEV <controller>,<COM port>,<baud rate>
where <controller> is:
2300 for the IntelliTouch E281-2300 controller.
4002 for the IntelliTouch E281{A}-4002 controller.
2210 for the AccuTouch E271-2210 controller.
2200 for the AccuTouch and DuraTouch E271-2200 controller.
140 for the AccuTouch E271-140 controller.
280 for the DuraTouch E261-280 controller.
<COM port> is 1 or 2, matching the COM port where the serial output of the
touchscreen controller is connected.
<baud rate> matches the switch or jumper settings on the controller.
For example,
ELODEV 4002,1,9600
It is not necessary to use the DOS MODE command to configure the
communications parameters of the COM port used by ELODEV.
NOTE
If you want to use ELODEV with a serial touchscreen controller installed on a
serial port other than COM1 or COM2, you must supply custom code to do so.
See the SetUserCom function in the ELODEV Programmer's Reference for more
information. You may also consider using a PC-Bus controller.
PC-Bus Controllers
Command format:
ELODEV <controller>,<Base I/O Port (hex)>,<IRQ>
Where <controller> is:
4035 for the IntelliTouch E281-4035 controller.
4025 for the IntelliTouch E281{A}-4025 controller.
2201 for the AccuTouch and DuraTouch E271-2201 controller.
141 for the AccuTouch E271-141 or DuraTouch E271-142
<Base I/O Port> matches the jumper settings on the controller.
controller.
Page 36

ELODEV 29
<IRQ> matches the interrupt jumper on the controller. (The IRQ for the E2712201 controller is software selected by the ELODEV command line rather than
with a jumper.)
For example,
ELODEV 2201,280,5
Micro Channel Controllers
Command format:
ELODEV <controller>
Where <controller> is:
2202 for the AccuTouch and DuraTouch E271-2202 controller.
The Base I/O Port and IRQ are software selected using the Reference Disk. See
Controller Installation, page 90.
Command Line Flags
A number of flags can be specified on the ELODEV command line:
-c<xl,xh,yl,yh,zl,zh> Calibration points.
-s<+/-> X,Y axes swapping.
-i<interrupt> Software interrupt.
-w<ms> Untouch wait time.
-p<+/-> Program the controller.
-h Display quick reference information.
An additional flag allows you to remove ELODEV from memory if it is no longer
needed:
-x Extract ELODEV.
Other flags may be required as described by the application program
documentation.
Page 37

30 Chapter 4 - DOS Touchscreen Driver and Calibration Utility
Calibration Points Flag (-c)
This flag specifies the Calibration Points:
-c<XLow,XHigh,YLow,YHigh,ZLow,ZHigh>
The coordinates are specified in decimal.
Purpose
Calibration tells ELODEV the position and size of the video image in relation to
the touchscreen. This relationship varies not only between monitors, but also with
monitor adjustment. Only by knowing the position of the image can ELODEV and
the application software locate the user's touch. The need for calibration is
discussed at length in Chapter 2.
How the Calibration Points Are Determined
The ELOCALIB program is typically used to acquire the calibration points and
place them on the ELODEV command line in AUTOEXEC.BAT. (Sometimes an
application will include its own calibration program or procedure. See your
application documentation for details.) ELODEV then uses these calibration
points to map touch coordinates from the controller to screen coordinates.
ELODEV or the application program further maps the screen coordinates into
valid touch zones or on-screen buttons.
Hardware Axis Inversion
The calibration process used by ELOCALIB also forces the default origin to be
the upper-left corner. Because the touchscreen typically has its origin in the lowerleft corner, it is normal for ELOCALIB to indicate the Y (vertical) axis is being
inverted. If the touchscreen is installed on the CRT face rotated 180°, ELOCALIB
will indicate the X (horizontal) axis is being inverted.
Z-Axis Calibration
To insure compatibility, Z-Axis Calibration Points are required even for
controllers that only operate in two dimensions. In this case, any values may be
used for ZLow and ZHigh, such as 0,0 or 1,15.
When using an IntelliTouch controller, the Calibration Range for Z is actually a
sensitivity range. Values of 1,15 or 1,255 are normally used for ZLow,ZHigh,
since these ranges match the values returned by the controller.
This range can be decreased if the application requires fewer levels of Z. Before Z
scaling occurs, the value of Z returned by the controller is pushed within the
Calibration Points. For example, if ZHigh is reduced to 10, all touches harder than
Page 38

ELODEV 31
10 will be reported as having a value of 10. Likewise, when ZLow is increased to
5, all lighter touches will be reported as having a value of 5.
X,Y Axes Swapping Flag (-s)
This flag can be used to swap the X and Y axes to correct touchscreens rotated
90° or with reversed cables:
-s<+/ >
where -s+ swaps X and Y, and -s- does not. Omitting the -s flag is the same as
specifying -s-.
ELOCALIB automatically adds or removes the -s flag on the ELODEV command
line in AUTOEXEC.BAT. The -s- flag should only be required with some
DuraTouch controller installations.
Software Interrupt Flag (-i)
This flag specifies the software interrupt MonitorMouse for DOS, TouchBack, or
your application program uses to access ELODEV functions:
-i<n>
where <n> is specified in hex. The default interrupt is 65. Any interrupt from 30
to FF inclusive may be specified. ELODEV does not check to insure that the
vector is not in use.
All Elo software, including ELOCALIB, ELODEMO, INFO, MonitorMouse for
DOS, and TouchBack, supports the -i flag. If no -i flag is specified, these
programs check only interrupts 60 66 looking for ELODEV. These interrupts are
recommended for most applications because DOS reserves them for user
programs (see an IBM Technical Reference Manual).
If you suspect a conflict with another TSR program, you can try using the -i flag
to specify another software interrupt for ELODEV, usually 60-66. Once ELODEV
is installed, the software interrupt can be changed only by extracting ELODEV
(see -x flag, page 33) and reinstalling it with a new interrupt specified.
Programmers: Avoid using -i60 with Turbo/Borland C, Pascal, and Debugger.
Page 39

32 Chapter 4 - DOS Touchscreen Driver and Calibration Utility
Untouch Wait Time Flag (-w)
This flag specifies the Untouch Wait Time (also called Wait Time):
-w<n>
where <n> is the time (in milliseconds) required before the program recognizes an
untouch (lifting of the finger). The default Wait Time will vary depending on the
controller.
When Requ ir ed
The Wait Time flag is not normally required, since the default should be enough
time for most applications. However, if the touchscreen is transmitting data at a
slower than normal rate, the Wait Time may need to be increased to eliminate
false untouches. You can test for this condition with the TOUCHES utility, see
page 111.
Conditions which may require this flag include:
Using 16 inch or larger IntelliTouch touchscreens if the controller firmware
•
revision level is prior to 2.2. (The IntelliTouch firmware revision level is
displayed when ELODEV is loaded, unless it is prior to 2.2). Try -w90.
Using a serial controller at a baud rate slower than the one recommended on
•
the controller data sheet in Appendix A.
When the controller must perform extra samples due to an environment of
•
extreme electrical noise.
In the latter three cases, display the default Wait Time with the INFO utility (see
page 108), then increase it until TOUCHES no longer indicates false untouches.
Program the Controller Flag (-p)
This flag selects whether to query and/or program the controller with software
setup information when ELODEV is loaded. This flag is ignored with controllers
that do not use two-way communication. -p+ is the default.
-p<+/ >
If -p- is specified, ELODEV will not communicate with the controller during
installation. The -p- flag is useful if there can only be one-way communication
with the controller, as when all serial port output must be rerouted to another
device, such as a display. It may also be required if the RS-232 handshaking lines
are not connected.
Page 40

ELODEV 33
Specifying -p+ is useful only after ELODEV is installed. It uses the original
ELODEV parameters to determine if and how the controller should be
reprogrammed. Use the -i flag if ELODEV is not at the default software interrupt
(65 hex). For example,
ELODEV -p+ -i62
The -p+ flag will also re-display the controller firmware revision level and other
information.
The -p+ flag with an E261-280 controller also functions like the DURASET
program from ELODEV versions before 1.4.
Extract Flag (-x)
Use the -x flag to extract ELODEV from memory if it is no longer needed:
ELODEV -x
Note that no controller information is specified.
If an error message indicates it cannot be extracted, a TSR loaded after
ELODEV.EXE may be interfering with its extraction. Generally you should
extract TSR's in the reverse order from which they were loaded.
If ELODEV is installed at a software interrupt other than the default (65 hex),
include the -i flag:
ELODEV -x -i61
The -i flag is the only one that has any effect when used with the -x flag.
ELODEV can be extracted and reinstalled to change the -i flag.
Help Flag (-h)
At any time you may type:
ELODEV -h
or just:
ELODEV [Enter]
to display the ELODEV version number, command line syntax, and lists of
supported controllers and flags.
Page 41

34 Chapter 4 - DOS Touchscreen Driver and Calibration Utility
Updating Flags
ELODEV may be re-run to modify the settings of a previously installed copy. For
example:
ELODEV -w90
Note that no controller information is specified.
Only the -c, -s, -w, and -p flags can be changed using this method. To change the
-i flag, extract and reinstall ELODEV as explained above.
If ELODEV is installed at a software interrupt other than the default, include the -i
flag:
ELODEV -w90 -i61
You can use the INFO.EXE utility (typically in \TOUCH) to confirm the updated
settings. See page 108.
Using Multiple Co-Resident Copies of ELODEV
Multiple copies of ELODEV are useful if the application program controls
multiple touchscreens, or if the application is being tested with different
controllers and/or configurations.
Install each copy of ELODEV using a different software interrupt flag (-i<n>, see
page 31). Each copy of ELODEV must have its own calibration values. Use
ELOCALIB -i<n> to calibrate a specific copy of ELODEV. ELOCALIB will
correctly update calibration data in your AUTOEXEC.BAT file even if multiple
copies of ELODEV are loaded there.
INFO, ELODEMO, MonitorMouse for DOS, and TouchBack all support the -i
flag to specify the copy of ELODEV they should use. If you do not specify the -i
flag, the first ELODEV found while scanning interrupts 60 66 (in that order) will
be used.
Page 42

ELOCALIB
ELOCALIB.EXE measures the touch coordinates of known points near the
outside edges of the video image, and stores these calibration points for later use.
If you elect to store these points in AUTOEXEC.BAT when so prompted,
ELODEV uses them to automatically calibrate each time you reset the system.
To run ELOCALIB, type the following (typically from the \TOUCH directory):
You will see a menu listing the video modes supported by your video card, such
as shown in Figure 4-1. SVGA modes will only be listed if you have a VESAcompatible video card or video driver. Use the arrow keys to select the video
mode used by your application. For example, if your application runs in 80x25
text mode, calibrate in 80x25 mode even if your system is capable of VGA
graphics. Press [Enter].
The video will switch into the selected mode (unless it is not supported). Follow
the on-screen instructions to calibrate the screen. When you return to the menu,
the calibration points will be displayed. X or Y axis inversion is normal for most
touchscreens. Press [S] to save the calibration points.
ELOCALIB 35
ELOCALIB [Enter]
ELOCALIB 1.6 - Copyright 1987-1994 Elo TouchSystems, Inc.
Mode Description Resolution Colors XLow XHi YLow YHi ZLow Zhi
01 CGA Text 40 x 25 16 Colors
03 CGA Text 80 x 25 16 Colors
04 CGA Graphics 320 x 200 4 Colors
06 EGA Graphics 640 x 200 2 Grays
0D EGA Graphics 320 x 200 16 Colors
0E EGA Graphics 640 x 200 16 Colors
10 EGA Graphics 640 x 350 16 Colors
11 VGA Graphics 640 x 480 2 Colors
12 VGA Graphics 640 x 480 16 Colors
13 VGA Graphics 320 x 200 256 Colors
0100 VESA Graphics 640 x 400 256 Colors
0101 VESA Graphics 640 x 480 256 Colors
0102 VESA Graphics 800 x 600 16 Colors
0103 VESA Graphics 800 x 600 256 Colors
0104 VESA Graphics 1024 x 768 16 Colors
0108 VESA Text 80 x 60 16 Colors
0109 VESA Text 132 x 25 16 Colors
010A VESA Text 132 x 43 16 Colors
Touchscreen orientation:
Use [-][¯] keys to select mode and [Enter] to calibrate.
[S] to Save points in file or AUTOEXEC and quit ELOCALIB. [Esc] to abort.
Figure 4-1. ELOCALIB Video Mode Menu
Page 43

36 Chapter 4 - DOS Touchscreen Driver and Calibration Utility
Calibrating in Multiple Video Modes (ELOGRAPH.CAL)
Most applications use only one video mode, and that is the mode you should
calibrate in. If your application uses multiple video modes, the extremes of the
display area may change with the mode switches. Some monitors allow the
images to be aligned with separate adjustments for each mode. However, other
monitors will require different calibration points for each mode.
Do the best you can with the available monitor controls. Try to make the video
image as large as possible, and be sure to check the size and position of each
mode again before calibrating in the modes you use. The most commonly used
video mode should be calibrated last. The points for this mode will also be stored
on the ELODEV command line with the -c flag.
ELOCALIB can store calibration points for multiple video modes in a file
(typically ELOGRAPH.CAL). MonitorMouse for DOS will use
ELOGRAPH.CAL to automatically stay in calibration with mode changes (see -d
flag, page 49). Other applications must be specifically programmed to read
ELOGRAPH.CAL, such as ELODEMO.
Command Line Flags
ELOCALIB supports several command line flags. Flags consist of a hyphen and a
letter, in upper or lower case. Multiple flags may be specified, separated by
spaces.
Video Mode(s) Flag (-m)
Use:
ELOCALIB -m<n1>[,<n2>...]
where <n1>,<n2> are video mode(s) to calibrate (in hex). If no -m flag is given,
ELOCALIB provides a menu of modes to choose from.
Save Points in File Flag (-s)
Use:
ELOCALIB -s<+/->[,<FileName>]
to save (-s+) or not save (-s-) the calibration points in a file without prompting. If
a <FileName> is not specified, the default is ELOGRAPH.CAL in the current
directory.
Page 44

ELOCALIB 37
Update AUTOEXEC Flag (-u)
Use:
ELOCALIB -u<+/->[,<FileName>]
to update (-u+) or not update (-u-) the ELODEV command line in
AUTOEXEC.BAT with the calibration points (-c flag, page 30). Another batch
file containing the ELODEV command line may be specified with <FileName>.
Quick Calibration Flag (-q)
Use:
ELOCALIB -q
in combination with the -s and -u flags to allow the whole calibration/ save/update
process to be performed without any keystrokes.
Software Interrupt Flag (-i)
Use:
ELOCALIB -i<n>
where <n> specifies the software interrupt of ELODEV (in hex). This flag is
particularly useful when multiple copies of ELODEV are loaded. See Using
Multiple Co-Resident Copies of ELODEV, page 34. When ELOCALIB updates
the AUTOEXEC file, it will update only the appropriate ELODEV command line.
If using a monochrome and color monitor on the same system, use the DOS
MODE command (MODE MONO or MODE CO80) to switch to the appropriate
monitor before calibrating.
Set Calibration From File Flag (-c)
Use:
ELOCALIB -c<n>[,<FileName>]
to calibrate a loaded ELODEV using calibration points from an existing
calibration file. If <FileName> is not specified, ELOGRAPH.CAL in the current
directory is assumed. <n> is the video mode in hex.
Language Flag (-L)
Same as INSTALL program, see page 11.
Page 45

38 Chapter 4 - DOS Touchscreen Driver and Calibration Utility
Help Flag (-h)
Type:
ELOCALIB -h
to display quick reference information on all flags and the current version of
ELOCALIB.
Examples
ELOCALIB Provides a menu of video modes to calibrate in (see
Figure 4-1, page 35). You are prompted to save the
points in a calibration file and/or update your
AUTOEXEC.BAT file.
ELOCALIB -m13 -s- -u- -q Calibrates ELODEV for video mode 13 hex only
and does not save the points in a calibration file,
does not update AUTOEXEC.BAT, and does not
wait for a keypress before calibration begins.
ELOCALIB -m3,13 -s+ Calibrates in modes 3 and 13 hex and saves the
ELOCALIB -c10 Calibrates a loaded ELODEV for video mode 10
Calibration Point Ordering
After the touchscreen has been calibrated, ELOCALIB displays the calibration
points in the order XLow, XHigh, YLow, YHigh, ZLow, ZHigh. The Z values are
constants defined in the ELOCALIB source code but may be manually changed to
set a sensitivity range (see Z-Axis Calibration, page 30).
These six points are the same points required by the ELODEV -c flag. If the
proper video mode is calibrated, these points will be consistent with
MonitorMouse for Windows, MonitorMouse for OS/2, and MonitorMouse for
Windows NT.
points in ELOGRAPH.CAL in the current directory.
ELODEV is calibrated in the last mode listed with
the -m flag. You will be prompted to update
AUTOEXEC.BAT.
hex with the points found in ELOGRAPH.CAL in
the current directory.
Page 46

Point Extrapolation
You may have noticed ELOCALIB does not acquire its calibration points in the
corners of the video image. The points are taken a little in from the edges, then
extrapolated to achieve an estimated value at the edges. This is because the image
on many monitors is not very linear, and usually least linear in the corners, due to
the pin cushion effect. By acquiring calibration points near the edges instead of at
the edges, more of the video will be closely calibrated with the touchscreen.
Third Point
The third calibration point is used strictly for detecting swapped axes. Your touch
does not have to be as precise for this point.
ELOCALIB 39
Page 47

NTRODUCTION
I
MonitorMouse for DOS
Introduction
•
Compatibility
•
Installation
•
Command Line Flags
•
Running the Tutorial Program
•
41
42
44
46
53
Included on the accompanying DOS and Windows Driver Disk is MonitorMouse
for DOS, a touchscreen driver which emulates the Microsoft mouse driver under
DOS. You will be able to run most existing DOS mouse-driven applications and
off-the-shelf software without modification using an Elo touchscreen.
With MonitorMouse for DOS, the touchscreen may be used alone, or in
conjunction with any mouse. Various mouse button emulation modes are
supported providing options on how button clicks are simulated. You can choose
the best mode for your application, and change between modes at any time.
MonitorMouse for DOS works with MonitorMouse for Windows to allow this
same flexibility in Windows as well as DOS programs run from Windows. See
Chapter 6 for information on MonitorMouse for Windows.
®
41
Page 48

42 Chapter 5 - MonitorMouse for DOS
Who Should Use MonitorMouse for DOS
MonitorMouse for DOS is recommended when converting existing DOS mousedriven applications to touch, and for applications that will support both a mouse
and a touchscreen.
Programmers: MonitorMouse for DOS is not necessarily recommended for new
DOS applications, unless they must also support a mouse. By emulating the
mouse buttons, you may be adding extra complexity to your user interface, and
sacrificing the naturalness and effectiveness possible with a pure touch interface.
When writing new DOS applications, you may choose to call ELODEV directly
for maximum efficiency, or use Elo's TouchBack keystroke emulation driver. See
the DOS Programmer's Toolkit, available separately for more information.
OMPATIBILITY
C
Applications using only the left button will be the easiest to use with the
touchscreen.
Because MonitorMouse for DOS uses ELODEV, the Elo touchscreen driver
program, your application will be compatible with all Elo touchscreens and
controllers. Because MonitorMouse for DOS can also use the mouse driver
supplied with your mouse (MOUSE.COM or MOUSE.SYS), you will be able to
use any brand of mouse in conjunction with the touchscreen.
Coordinates vs. Mickeys
All mouse-driven applications that ask the mouse driver for coordinates (absolute
position) rather than mickeys (relative motion) will work with MonitorMouse for
DOS. Most applications, including all Microsoft Windows applications, use
coordinates and therefore will work immediately with the touchscreen.
The best way to know if your application will work with MonitorMouse for DOS
is to try it. The cursor should jump to your fingertip with each touch as it does
with the DOS 6.x EDIT program.
MonitorMouse for DOS does its best to emulate relative motion, but good results
are not guaranteed. If your application moves the cursor or high-lighting without
informing the mouse driver, MonitorMouse for DOS will not be able to determine
the distance from a touch to the cursor. Knowing this distance is critical for
simulating that motion with mickeys.
If your DOS application is relative motion-based, you will have to slide the cursor
to the desired location (as you would with a mouse) rather than just touching the
Page 49

Compatibility 43
desired area. Try choosing a mouse button emulation mode (-m flag) where the
cursor can be slid before clicking (see page 47). Use in combination with the -jflag (see page 50). The cursor may not track with your finger because of the
application's mickey-to-pixel ratio and/or acceleration or ballistic algorithms. The
-r flag (see page 50) can be used to set a non-standard mickey-to-pixel ratio, but
motion algorithms used by the application or driver are unknown and cannot be
simulated. If the application does not move the cursor and it does not use any
motion algorithm, it may then be possible to have the cursor jump to your
fingertip with the -j+ flag.
Alternatively, find out from the developer if the application or library can also
operate in an absolute mode. Sometimes a set-up parameter or flag can be used, or
a different input device specified during installation which also emulates the
mouse. Also, see the following section Light Pen Emulation.
Programmers: If you are the developer of the relative motion-based application,
you may be able to modify it to use coordinates rather easily. Typically, mickeys
are used only because properly scaled coordinates are not available in video
modes unsupported by MOUSE.COM. However, if you use mouse functions 7
and 8, (see Microsoft Mouse Programmer's Reference), you can force both the
mouse driver and MonitorMouse for DOS to scale to any resolution, such as
800x600. If you make this change to use absolute coordinates, you can discard the
mickey-to-pixel conversion code in your application and let the mouse driver do
it.
Light Pen Emulation
MonitorMouse for DOS can emulate BIOS light pen functions in text mode.
Applications written for a light pen can be used with the touchscreen.
This feature may be useful even if you have never used a light pen. If your DOS
application does not work well with MonitorMouse for DOS because the cursor
does not stay under your finger, (the application uses the mouse in relative mode),
and the application supports light pens as an input device, select "light pen" as the
input device and try it again with MonitorMouse for DOS.
Page 50

44 Chapter 5 - MonitorMouse for DOS
NSTALLATION
I
MonitorMouse for DOS is installed by the INSTALL program described in
Chapter 2. Choose
Installation
, or
DOS Express Installation, Windows Express
Selective Installation
The rest of this section describes the details of the installation. Typically you can
skip to Mouse Button Emulation Mode Flag (-m), page 47. If you have problems
with a MonitorMouse for DOS installation, also see Appendix B—
Troubleshooting.
Included Files
The following files are typically installed in the \TOUCH directory:
MONMOUSE.COM MonitorMouse for DOS driver.
NOMOUSE.COM Elo's MOUSE.COM-compatible driver for operation
without a mouse.
PATCHMSE.EXE Patches MOUSE.COM for operation without a
mouse. Alternative to using NOMOUSE.COM.
TUTORIAL.EXE Tutorial program for practicing with mouse button
emulation modes.
.
Placement in AUTOEXEC.BAT
The MonitorMouse for DOS command line is placed in AUTOEXEC. BAT by the
INSTALL program. MONMOUSE.COM is a terminate-and-stay-resident (TSR)
program. A portion of a sample AUTOEXEC file is shown below:
MOUSE ; mouse driver
C:\TOUCH\ELODEV 2201,280,5 -C722,3587,3319,841,1,15 ; touchscreen driver
C:\TOUCH\MONMOUSE -M6 ; MonitorMouse for DOS
Your mouse driver and the ELODEV touchscreen driver must be loaded before
MonitorMouse for DOS. MONMOUSE occupies about 4K of system RAM when
loaded and ELODEV about 6K. MONMOUSE requires a loaded mouse driver.
If you do not have a mouse connected, NOMOUSE will be used in place of your
mouse driver as in the following example. See the next section, Using
MonitorMouse Without a Mouse, for more information.
C:\TOUCH\NOMOUSE ; NOMOUSE driver
C:\TOUCH\ELODEV 2201,280,5 -C722,3587,3319,841,1,15 ; touchscreen driver
C:\TOUCH\MONMOUSE -M6 ; MonitorMouse for DOS
Later, if you reconnect a mouse, replace NOMOUSE.COM with your original
mouse driver.
Page 51

Installation 45
If you will be connecting and disconnecting your mouse you can place MOUSE
and NOMOUSE in your AUTOEXEC file. NOMOUSE will not load if it sees a
mouse driver. A trick to prevent the warning message output by NOMOUSE is
shown in the following example:
MOUSE ; mouse driver
IF ERRORLEVEL 0 GOTO :OK ; if loaded OK, skip NOMOUSE
C:\TOUCH\NOMOUSE ; load NOMOUSE if no MOUSE
:OK
C:\TOUCH\ELODEV 2201,280,5 -C722,3587,3319,841,1,15 ; touchscreen driver
C:\TOUCH\MONMOUSE -M6 ; MonitorMouse for DOS
NOTE
MonitorMouse for DOS will only be active while mouse-driven applications are
running. Therefore, MonitorMouse for DOS will not conflict with touchscreen
applications that do not use it. Because MonitorMouse for DOS takes over
ELODEV when it becomes active, a single program should not make both mouse
and ELODEV or TouchBack calls.
If you have both MonitorMouse for DOS and TouchBack loaded, TouchBack
applications should call the ENABLE command at start-up, and DISABLE before
exiting. MonitorMouse for DOS or TouchBack may also be extracted from
memory when not in use.
Using MonitorMouse Without a Mouse
MonitorMouse for DOS requires a mouse driver to supplement some of its
functions. Therefore, MONMOUSE.COM will not load unless it detects a loaded
mouse driver. However, most mouse drivers will not load unless they detect a
mouse.
There are two ways to load a mouse driver without a mouse connected.
Using NOMOUSE.COM
If a DOS mouse driver was not detected by the INSTALL program,
NOMOUSE.COM was placed in your AUTOEXEC.BAT file. NOMOUSE.COM
is a TSR program. It occupies only about 600 bytes of system RAM when loaded,
as opposed to over 16K for most current mouse drivers, and does not affect the
use of any serial ports or hardware interrupts.
NOMOUSE.COM does not contain code to display a mouse cursor. However, a
cursor will still be displayed in Windows and when running DOS programs that
draw their own cursor. With most dedicated touchscreen applications, a cursor is
not required anyway. In fact , a cursor may distract the user because thei r eyes will
be drawn to the cursor instead of focusing on the entire image.
Page 52

46 Chapter 5 - MonitorMouse for DOS
If you require a cursor and one is not being displayed, see Using
PATCHMSE.EXE below.
Command Line Flags
NOMOUSE.COM supports two command line flags. Flags consist of a hyphen
and a letter, in upper or lower case:
NOMOUSE {-x | -h}
where:
-h displays these flags
-x extracts NOMOUSE.COM from memory
If an error message is displayed when using the -x flag indicating
NOMOUSE.COM cannot be extracted, a TSR loaded after it may be interfering
with its extraction. Generally you should extract TSR's in the reverse order from
which they were loaded.
Using PATCHMSE.EXE
You may also create your own version of NOMOUSE.COM by patching your
MOUSE.COM so it will install without detecting a mouse. A patched mouse
driver will display a mouse cursor in DOS programs.
To patch your mouse driver, use the PATCHMSE.EXE utility installed by the
DOS and Windows Driver Disk INSTALL program. First, change into the
directory where your MOUS E.COM is located, then run PATCHMSE specifying
its path. For example,
\TOUCH\PATCHMSE
The program will list the versions of MOUSE.COM it knows how to patch. Select
the version you have, or abort the program if your mouse driver is not listed.
PATCHMSE will make a patched copy of the driver called NOMOUSE.COM. If
the version of MOUSE.COM does not match the version you specified, the driver
will not be patched.
Next, change your AUTOEXEC.BAT file to load the NOMOUSE.COM you just
created instead of MOUSE.COM (or the NOMOUSE.COM used by the Elo
INSTALL program).
Page 53

To find out the version of your mouse driver, install it and read its sign-on
message. The company (e.g. Microsoft, Logitech) and version number are usually
displayed.
If PATCHMSE does not list your version, try to locate a copy of one supported.
MOUSE.COM may be found in the \MOUSE, \DOS, or \WINDOWS directory. It
may also be found on the Microsoft Windows release disks, although it may be in
a compressed form. See the README.MMW file for uncompressing instructions.
OMMAND LINE FLAGS
C
MonitorMouse for DOS supports several command line flags. Flags consist of a
hyphen and a letter, in upper or lower case. Multiple flags may be specified,
separated by spaces.
MONMOUSE [Flag(s)]
Command Line Flags 47
NOTE
where [Flag(s)] are:
-m<mode> Mouse button emulation mode 0-6.
-c<+/-> Mouse cursor on/off.
-b<+/-> Beeps on/off.
-d<directory> Path where ELOGRAPH.CAL is found.
-r<x>,<y> Default mickey/pixel ratio.
-j<+/-> Jump/don't jump to touch with mickeys.
-s<+/-> Emulation active/inactive in spawned
programs.
-t<+/-> Emulation active/inactive after program terminations.
-i<interrupt> Software interrupt of ELODEV (hex).
-x Extract MonitorMouse for DOS from memory.
-h Display quick reference information.
For example:
MONMOUSE -m6 -c-
No flags are required for use with MonitorMouse for Windows, as its options are
set with the Touchscreen Control Panel. However, DOS programs run from
Windows will use the defaults set by these flags.
Mouse Button Emulation Mode Flag (-m)
Four mouse button emulation modes are supported. (Three additional modes are
available for backwards compatibility but are no longer documented). The modes
Page 54

48 Chapter 5 - MonitorMouse for DOS
vary in the button actions they support (clicking, dragging, double-clicking). The
modes are the same as in MonitorMouse for Windows and all other versions of
MonitorMouse. You should choose the simplest mode that will work for your
application. A Tutorial program is included for practicing with each mode (see
page 53).
Mode 0 Left button clicking only. No dragging or right button is supported.
Works with large targets. Recommended for public kiosk
applications.
Moves the cursor to your point of touch and "clicks" the left
button. A beep will confirm the click. The cursor will not move,
nor will any other clicks be simulated until your finger is lifted and
the screen retouched.
Mode 1 Left button clicking only. No dragging or right button is supported.
Works with large and small targets.
The cursor follows your sliding finger and the left button is clicked
at the point of untouch (lift-off).
Mode 5 Left button clicking and dragging. No right button is supported.
Mode 6 Same as Mode 5, but supports double-clicking by tapping twice.
Mode 0 is the default if no flag is specified. The INSTALL program adds the -m6
flag if MonitorMouse for Windows was also installed.
Cursor Flag (-c)
The mouse cursor can be turned on and off with the cursor flag (-c+ and -crespectively). With most dedicated touchscreen applications, a cursor is not
required. In fact, it may distract the user because their eyes will be drawn to the
cursor instead of focusing on the entire image.
The left button is held down when you touch the screen, and it
stays down until you untouch, dragging as you move.
Recommended for general use.
If the second touch occurs immediately after the first and is nearby,
a double-click will be simulated at the exact point of the first
touch. If you do not hear two beeps, you have tapped too fast.
This flag will have no effect if the application draws it own cursor, uses a cursor
bar or highlighting rather than a cursor, or in some windowed application
environments, including Microsoft Windows. In Windows, use the Touchscreen
Page 55

Control Panel to turn off the cursor (see page 61). The default for the cursor flag is
on (-c+).
Beep Flag (-b)
Normally MonitorMouse for DOS gives a "click" sound for each touch. The beep
flag may be used to disable the beeps (-b-).
Because the touchscreen does not have the tactile feedback of a mouse button,
audible feedback helps to confirm your action. The default for the beep flag is on
(-b+).
Calibration File Directory Flag (-d)
This flag specifies a path where the file ELOGRAPH.CAL is found. For example,
MONMOUSE -m6 -dC:\MYCAL
Command Line Flags 49
ELOGRAPH.CAL is produced by ELOCALIB.EXE, and contains a list of
calibration points for each video mode used. MonitorMouse for DOS will
automatically recalibrate itself using the values from ELOGRAPH.CAL as you
switch video modes. When MonitorMouse for DOS is not active, the original
calibration points are restored.
When MonitorMouse for DOS is installed, it looks for ELOGRAPH.CAL in the
directory where MONMOUSE.COM is (typically \TOUCH), then the current
directory, unless specified otherwise with the -d flag. If this flag is not specified,
and ELOGRAPH.CAL is not found in the default directories, MonitorMouse for
DOS uses ELODEV's calibration for all video modes. If ELOGRAPH.CAL is
loaded, and your application uses a video mode not listed in the file,
MonitorMouse for DOS will use the calibration values of the closest video mode,
or the default calibration.
If you are using MonitorMouse for Windows, the Touchscreen Control Panel will
allow calibration in the video mode used by Windows, even if the mode is not
supported by ELOCALIB.
Page 56

50 Chapter 5 - MonitorMouse for DOS
Mickey/Pixel Ratio Flag (-r)
This flag specifies the default "mickey-to-pix el ratio" for horizontal and vertical
motion. A "mickey" is a unit of distance, typically 1/200 of an inch. Consequently,
the mickey/pixel ratios specify how far the mouse must move for the cursor to
move a given number of pixels. Because MonitorMouse for DOS uses absolute
positioning rather than relative motion, your finger may appear out of calibration
when using certain programs which use mickeys rather than coordinates. This flag
can help you correct the pixel-to-mickey calibration.
The -r flag is required with some mickey-based (relative motion) programs.
Specifically, it is needed only if all the conditions below are true:
The program uses motion from the mouse driver rather than coordinates.
•
The program draws its own cursor or cursor bar.
•
The program performs its own mickey-to-pixel conversion, and changes the
•
ratios without informing the mouse driver through mouse function 15.
If your application fits these criteria, adjusting the ratios through trial-and-error
may keep the cursor in better calibration with your touch. Increase the value if the
cursor falls behind your finger when sliding, or decrease it if the cursor speeds
ahead of your finger.
The defaults for this flag are the same as they are for the mouse driver:
namely 8 for X and 16 for Y.
Jump Flag (-j)
The -j flag is only of concern in programs which use mickeys (relative motion)
rather than coordinates. With -j+, a new touch will emulate mickey motion to the
new touch location from the point of last release, thus causing the cursor to jump
to your fingertip. With -j-, a new touch will not simulate any motion to that point.
The default is -j-.
-r 8,16
Page 57

Spawn Flag (-s)
Instructs MonitorMouse for DOS to remain active when an application spawns
another program. This flag is required for some off-the-shelf software to run
properly. Therefore, the default for the spawn flag is on (-s+).
Technically speaking, if the application sets up a mouse interrupt routine, then
spawns another program which expects to receive mouse interrupts,
MonitorMouse for DOS must remain active after the spawn.
If the -s- flag is specified, MonitorMouse for DOS will disable itself when the
program spawns. If you spawn non-mouse-driven programs within a DOS shell,
you may want to use the -s- flag to disable MonitorMouse for DOS while in the
spawned programs. However, if a spawned program makes a mouse call,
MonitorMouse for DOS will automatically re-enable itself.
Terminate Flag (-t)
Command Line Flags 51
Instructs MonitorMouse for DOS to remain active after a program terminates.
This flag is required for some off-the-shelf software to run properly.
Normally, you will want MonitorMouse for DOS to disable itself when a program
terminates. Therefore, the default for the terminate flag is off (-t-). This prevents
beeps when you touch the screen at the DOS command level and in programs
which do not use the mouse. MonitorMouse for DOS will always automatically
re-enable itself if a program makes a mouse call.
The -t+ flag may be also required with some mouse-driven applications that do
not respond at all to the touchscreen. See Appendix B—Troubleshooting.
Interrupt Flag (-i)
The -i<n> flag allows you to specify the software interrupt of ELODEV in hex.
This flag is necessary if more than one copy of ELODEV is loaded, as when
controlling two touchscreens. You will also need it if ELODEV is installed at a
software interrupt other than 60 through 66 (hex). If the -i flag is not specified, the
first ELODEV found when checking interrupts 60-66 will be used.
Extract Flag (-x)
Use the -x flag to extract MonitorMouse for DOS from memory if it is no longer
needed. If an error message indicates it cannot be extracted, a TSR loaded after
Page 58

52 Chapter 5 - MonitorMouse for DOS
MONMOUSE.COM may be interfering with its extraction. Generally you should
extract TSR's in the reverse order from which they were loaded.
Help Flag (-h)
At anytime, type:
MONMOUSE -h
to display quick reference information on all flags and the current version of
MonitorMouse for DOS.
Flag Defaults
The following summarizes the default values for each flag:
-m0 Mouse button emulation mode 0 - click
-c+ Cursor on.
-b+ Beep on.
-d<current directory> ELOGRAPH.CAL in current directory.
-r8,16 Mickey/pixel ratios of 8 for horizontal
-j- Do not simulate mickey movement to
-s+ Active in spawned programs.
-t- Not active after program terminations.
-i Use the first copy of ELODEV found
on touch.
motion and 16 for vertical motion.
new touches.
when scanning software interrupts 60
through 66 (hex) in that order.
Updating Flags
You may re-run MonitorMouse for DOS to update the flags of an installed copy.
If a flag is not specified, it is left unchanged. You may also reconfigure
MonitorMouse for DOS with a software command (see Appendix D).
If you recalibrate, you will need to re-run MonitorMouse for DOS so it will
recognize the new values.
Only the -i flag cannot be updated. Extract MonitorMouse for DOS and reload it
with the new value.
NOTES
Page 59

UNNING THE TUTORIAL PROGRAM
R
The DOS and Windows Driver Disk installation includes a tutorial program for
practicing with the various mouse button emulation modes (see -m flag, page 47).
It is also useful to verify the operation of the touchscreen and mouse hardware
with MonitorMouse for DOS before trying your application. (The mouse will not
work if NOMOUSE is loaded instead of a mouse driver.)
To run Tutorial type:
TUTORIAL
typically from the \TOUCH directory.
Command Line Flags
Two command line flags are recognized by Tutorial:
Running the Tutorial Program 53
TUTORIAL M
The "M" flag causes the program to run in monochrome mode even if it detects a
color adapter. This flag may be needed if you have a monochrome display, such as
an LCD, and it is connected to a color card.
TUTORIAL L
The "L" flag tells Tutorial you are left-handed. This will place the ex ercise on the
left side of the screen for easier reach.
Both flags may be specified, separated by a space. Flags may be in upper or lower
case.
Page 60

MonitorMouse for Windows
Introduction
•
Compatibility
•
Installation
•
Using the Touchscreen Control Panel
•
Tips on Using the Touchscreen in Windows
•
Running DOS Programs from Windows
•
Other Driver Configurations
•
55
56
56
59
62
64
65
NTRODUCTION
I
Included on the accompanying DOS and Windows Driver Disk is MonitorMouse
for Windows, a touchscreen driver which emulates the Microsoft mouse in
Windows 3.1. You will be able to run all Windows programs immediately with an
Elo touchscreen, in Standard or 386/Enhanced Mode. The touchscreen may also
be used with DOS programs run from Windows.
As with MonitorMouse for DOS, the touchscreen may be used alone, or in
conjunction with any mouse. Various mouse button emulation modes are
supported providing options on how button clicks are simulated. You can choose
the best mode for your application, and change between modes at any time.
®
55
Page 61

56 Chapter 6 - MonitorMouse for Windows
OMPATIBILITY
C
MonitorMouse for Windows is compatible with all Windows 3.1 applications.
Applications using only the left button will be the easiest to use with the
touchscreen.
Because MonitorMouse for Windows works with ELODEV, it is compatible with
all Elo touchscreens and controllers. Because the mouse driver from your mouse
manufacturer can also be used, you will be able to use any brand of mouse along
with the touchscreen in Windows.
NSTALLATION
I
MonitorMouse for Windows is installed by the INSTALL program described in
Chapter 2. Choose
Installation
.
Windows Express Installation
or
Selective
The rest of this section describes the details of the installation. Typically you can
skip to Using the Touchscreen Control Panel, page 59. If you have problems with
a MonitorMouse for Windows installation, also see Appendix B—
Troubleshooting.
Included Files
MonitorMouse for Windows consists of the following files:
File Typical Installed Path Description
MONMOUSE.DRV \WINDOWS\SYSTEM MonitorMouse for Windows
VMMD.386 \WINDOWS\SYSTEM Virtual MonitorMouse driver
ELOCALW.CPL \WINDOWS\SYSTEM Touchscreen Control Panel
ELOCALW. HLP \WINDOWS\SYSTEM Help file f or
CURSOFF.EXE \WINDOWS Used by ELOCALW . CPL.
ZAXIS.EXE \TOUCH Demo of IntelliTouch Z-axis
METER.DLL \TOUCH Used by ZAXIS.EXE.
ELO.BMP \WINDOWS Elo "wallpaper" for your
OEMELO.INF \WINDOWS\SYSTEM Used by the Microsoft
driver.
for Enhanced Mode.
for Windows 3.1.
ELOCALW.CPL
capabilities in Windows.
Windows desktop.
Windows Setup program.
Page 62

These files are copied to your hard disk by the INSTALL program described in
Chapter 2. ELOCALW.CPL and ELOCALW.HLP are included in English,
French, Spanish, and German.
DOS Mouse Driver
A DOS mouse driver (MOUSE.COM, MOUSE.SYS or compatible) is required if
you wish to use your mouse along with the touchscreen in Windows. While
Windows does not typically require a DOS mouse driver for mouse operation, the
MonitorMouse for Windows touchscreen driver requires it to allow any brand of
mouse to be used along with the touchscreen. Later, if you change brands of
mouse, you will not have to change your Windows setup, only load a different
MOUSE.COM.
The DOS mouse driver must be compatible with the Microsoft mouse driver
version 8.2 or later. A suitable MOUSE.COM from Microsoft may be found in
your DOS directory. It may also be found on your Windows 3.1 disks, although in
a compressed form. See the README.MMW file on the DOS and Windows
Driver Disk for information on de-archiving this Microsoft driver.
Installation 57
Hardware Mouse Cursor
If you have a video board that has hardware mouse cursor capability, and are
using a Microsoft Mouse driver version 7.03 or later, you must disable the
hardware cursor since it is not supported by Windows. When loading
MOUSE.COM, typically in AUTOEXEC.BAT, specify the /y option.
MonitorMouse for DOS
MonitorMouse for Windows requires that MonitorMouse for DOS is operating
properly (see Chapter 5). The Tutorial program can be used to verify the operation
of MonitorMouse for DOS (see page 53).
Page 63

58 Chapter 6 - MonitorMouse for Windows
Windows Setup (SYSTEM.INI)
The Elo INSTALL program modifies the Windows driver settings in
SYSTEM.INI, so running the Microsoft Windows Setup utility is not required.
Changes made by INSTALL to SYSTEM.INI are indicated by inserted comments.
Typical changes are shown below:
[boot]
;Start of line(s) placed by Elo TouchSystems
mouse.drv=monmouse.drv
;End of line(s) placed by Elo TouchSystems
;Next line commented out by Elo TouchSystems
;mouse.drv=mouse.drv
: :
[boot.description]
;Start of line(s) placed by Elo TouchSystems
mouse.drv=Elo MonitorMouse(R) 1.5 for Windows 3.1
;End of line(s) placed by Elo TouchSystems
;Next line commented out by Elo TouchSystems
;mouse.drv=Microsoft, or IBM PS/2
: :
[386Enh]
;Start of line(s) placed by Elo TouchSystems
mouse=vmmd.386
;End of line(s) placed by Elo TouchSystems
;Next line commented out by Elo TouchSystems
;mouse=*vmd
Serial Mouse
If you have a serial mouse, moving it while Windows Enhanced Mode is loading
can prevent the mouse from working. To fix this problem, the Elo INSTALL
program may add the following command to the [386Enh] section of your
Windows SYSTEM.INI file.
COMxBUFFER=0
where x is 1 or 2, specifying the COM port of your mouse.
Bus Controller on COM Port In terrupt
If you are using a bus touchscreen controller on a COM port interrupt (IRQ3 or
IRQ4), and running Windows in Enhanced Mode, the INSTALL program may
add two lines to your Windows SYSTEM.INI file. Do not add these lines if you
are using a serial touchscreen controller.
You can tell which interrupt your bus controller is using by running the INFO
utility found in the \TOUCH directory. You can also look at the third parameter in
your ELODEV command.
Page 64

Using the Touchscreen Control Panel 59
If your touchscreen controller is configured for IRQ3, the following lines are
added to the [386Enh] section of SYSTEM.INI:
COM2Base=0
COM2Irq= 1
If your touchscreen controller is configured for IRQ4, the following lines are
added:
COM1Base=0
COM1Irq= 1
SING THE TOUCHSCREEN CONTROL PANEL
U
Run the Touchscreen Control Panel by double-clicking its icon with the mouse
(the touchscreen may not be calibrated yet), or use the keyboard if you are using
NOMOUSE.COM. The Touchscreen icon will be found in the Windows Control
Panel, usually found in the Main program group.
Figure 5-1. Windows 3.1 Control Panel with Touchscreen Icon
Calibrating MonitorMouse for Windows
The Touchscreen Control Panel is shown in Figure 5-2. Select Calibrate to initiate
the calibration sequence. Follow the on-screen instructions. You will be given the
opportunity to confirm the calibration points before they are stored in your
WIN.INI file. Recalibration should only be necessary after moving or resizing the
video image, or after changing either the touchscreen, controller, or monitor.
If the Calibrate button is dimmed, ELODEV.EXE is not loaded (see
Appendix B—Troubleshooting).
Page 65

60 Chapter 6 - MonitorMouse for Windows
If the calibration is off when running DOS mouse-driven programs from
Windows, you may need to use an ELOGRAPH.CAL file with MONMOUSE.COM. ELOGRAPH.CAL is created by ELOCALIB and should contain
calibration points for each video mode you use in your DOS programs. See
Calibrating in Multiple Video Modes (ELOGRAPH.CAL), page 36, and the
Calibration File Directory Flag (-d), page 49.
NOTE
Figure 5-2. Touchscreen Control Panel
Mouse Button Emulation Mode
Four mouse button emulation modes are supported. (Three additional modes are
available for backwards compatibility but are no longer documented). The modes
vary in the button actions they support (clicking, dragging, double-clicking). The
modes are the same as in MonitorMouse for DOS and all other versions of
MonitorMouse. You should choose the simplest mode that will work for your
application. The current mode is indicated in the Touchscreen Control Panel.
Mode 0 Left button clicking only. No dragging or right button is supported.
Works with large targets. Recommended for public kiosk
applications.
Moves the cursor to your point of touch and "clicks" the left
button. A beep will confirm the click. The cursor will not move,
nor will any other clicks be simulated until your finger is lifted and
the screen retouched.
Mode 1 Left button clicking only. No dragging or right button is supported.
Works with large and small targets.
Page 66

Using the Touchscreen Control Panel 61
The cursor follows your sliding finger and the left button is clicked
at the point of untouch (lift-off).
Mode 5 Left button clicking and dragging. No right button is supported.
The left button is held down when you touch the screen, and it
stays down until you untouch, dragging as you move.
Mode 6 Same as Mode 5, but supports double-clicking by tapping twice.
Recommended for general use.
If the second touch occurs immediately after the first and is nearby,
a double-click will be simulated at the exact point of the first
touch. If you do not hear two beeps, you have tapped too fast.
If the mouse button emulation mode is dimmed, MONMOUSE.COM is not
loaded. See Installation, page 44.
Click Sound on Touches
Checking this box enables a "click" sound for each touch. Because the
touchscreen does not have the tactile feedback of a mouse button, audible
feedback helps to confirm your action.
No Cursor
Checking this box disables the Windows mouse pointer (arrow cursor). With most
dedicated touchscreen applications, a mouse pointer is not required. In fact, it may
distract the user because their eyes will be drawn to the pointer instead of focusing
on the entire image.
This option does not affect other cursors, such as the hourglass.
Page 67

62 Chapter 6 - MonitorMouse for Windows
IPS ON USING THE TOUCHSCREEN IN WINDOWS
T
The following are suggestions for using the touchscreen in Windows. Mouse
button emulation mode 6 is assumed.
Double-Clicking
Double-clicking is common in the Windows environment, so MonitorMouse
mouse button emulation mode 6 is recommended. If you are running a dedicated
Windows application which does not use double-clicking, you may use Mode 5
instead.
If you are using an IntelliTouch touchscreen controller with revision 2.2 or later
firmware (see INFO, page 108), or a SmartSet controller (E271-22xx or E28123xx), you should be able to double-tap the touchscreen with the same speed as
you would double-click the mouse.
If you do not hear two beeps when double-tapping with other touchscreen
controllers, you are probably double-tapping too fast. Use the Windows Control
Panel program to adjust the mouse double-click speed to a slower setting. Then
use a relaxed pace when double-tapping.
Border Width
To make resizing windows with the touchscreen easier, increase the Border Width
with the Windows Control Panel program. Select Desktop, then Border Width and
enter the new value (17 is recommended for 640x480 video resolution, 26 for
1024x768). For other resolutions, pick a border width that visually matches the
title bar width. Wide borders may look strange at first, but after awhile they will
seem normal. See Figure 5-1, page 59, for an example of wide borders.
Menus
Menus are best navigated by sliding along the menu bar, then down a drop-down
menu. Highlighting will follow your finger, indicating the position of touch.
When you release, the highlighted item will be selected. This technique is easier
than tapping an item on the menu bar, and then tapping an item within the dropdown menu.
Windows 3.1 has an option that can benefit right-handed users. Add the line:
MenuDropAlignment=1
Page 68

to the [windows] section of the WIN.INI file. Drop-down menus will be shifted
left so they will not appear under your hand.
Scrolling
Scrolling lists can be performed by touching the scroll bars, as you would with the
mouse. Some lists can be scrolled more easily by touching the data area, sliding
your finger to an edge, then continuing to slide outside the area. This technique
works in drop-down lists too.
Maximizing Windows
To maximize a window, try double-tapping on the window's title bar, rather than
tapping the Maximize button. Likewise, to restore a maximized window to its
previous size, double-tap on its title bar instead of tapping the Restore button. You
can also use the Control menu to maximize, minimize, and restore windows.
Tips on Using the Touchscreen in Windows 63
Using the Overscan Area
MonitorMouse for Windows pushes all touches in the display's overscan area
within the screen image. This effectivel y enlarges the active touch area of zones
on the edges of the image. You may touch the edges and corners of the CRT face
to easily click on items displayed at the extremes of the image. For example, when
a window is maximized, you may touch the upper-right corner to restore the
window, touch the top to click on the window title, and double-tap the upper-left
corner to close the window.
Option Buttons and Check Boxes
It is easier to select an option by touching the option name rather than the option
button. The same is true with check boxes.
Choosing the Control-Menu, Minimize, Maximize, and Restore Buttons
Application windows can be maximized and restored easily by double-tapping the
title bar as described above. The Minimize, Maximize, and Restore buttons, and
the Control-menu box can be difficult to touch as they are quite small on high
resolution screens. Since they all act on button release, you can slide among them
before selecting as with the drop-down menus. You can also use the Control menu
to easily maximize, minimize, restore, and close windows.
Page 69

64 Chapter 6 - MonitorMouse for Windows
Elo Wallpaper
ELO.BMP can be used to display Elo "wallpaper" when giving demos of
MonitorMouse for Windows. To load, click on Control Panel, select Desktop,
Wallpaper, and enter ELO.BMP. Select Tile.
UNNING
R
DOS P
DOS programs run from Windows may also use the touchscreen. However, the
procedures are slightly different in Standard and Enhanced Modes.
If you are running Windows in Enhanced Mode, you may get warning messages
when you run multiple DOS programs that use ELODEV or MonitorMouse for
DOS, saying there is a contention over a LPT or COM port. To prevent these
messages, run Control Panel, select 386 Enhanced, Device Contention, and select
Never Warn for the contending device.
ROGRAMS FROM WINDOWS
Running DOS Mouse-Driven Programs
MonitorMouse for DOS will automatically be enabled so you can use the
touchscreen with DOS programs run from Windows that use MOUSE.COM. (See
Coordinates vs. Mickeys, page 42, for restrictions.) An ELOGRAPH.CAL file can
be used to keep the touchscreen calibrated in all video modes used by the DOS
programs. See Calibrating in Multiple Video Modes (ELOGRAPH.CAL), page 36,
and the Calibration File Directory Flag (-d), page 49.
In Enhanced Mode, each DOS session may use a different mouse button
emulation mode (specified with the -m flag). In Standard Mode, changing the
mouse button emulation mode affects all DOS mouse-driven programs.
Running DOS ELODEV-Based Programs
DOS programs that use ELODEV, such as ELODEMO, may be run from
Windows. Even programs that use TouchBack may be run from Windows.
In Enhanced Mode, ELODEV-based programs may be run directly. In Standard
Mode, another copy of ELODEV must first be loaded and calibrated within the
DOS session. Otherwise you will get a message saying ELODEV was not found.
MonitorMouse for Windows hides ELODEV in Standard Mode because
ELODEV is not multi-tasking. By loading another copy in each DOS session that
requires it, ELODEV-based programs and Windows programs can all share the
touchscreen.
Page 70

If you load a second copy of ELODEV in the DOS session, ignore the Windows
message about TSR's when EXITing the session in Standard Mode. Extracting
ELODEV before EXITing will not eliminate this message, because Windows
cannot detect TSR extractions.
Calibrating ELODEV in one DOS session will not affect calibration in other
sessions or Windows. In fact, any ELODEV parameter may be changed without
affecting other sessions in both modes of Windows.
Running DOS Polled Touchscreen Programs
DOS programs that bypass ELODEV and directly poll Elo touchscreen
controllers, such as the BUSSTAT utility, may be run from Windows in Standard
and Enhanced Modes. However, these programs must not reconfigure the
controller with software setup.
THER DRIVER CONFIGURATIONS
O
Other Driver Configurations 65
MonitorMouse for Windows requires three DOS drivers: MOUSE.COM,
ELODEV.EXE, and MONMOUSE.COM. If one or more of these drivers are not
loaded before entering Windows, operation can continue, although with the
following limitations:
MONMOUSE.COM not loaded - The mouse can still be used in Windows
•
and with DOS programs run from Windows. The touchscreen will not operate
as a mouse within Windows. Windows programs that directly call ELODEV
can use the touchscreen. DOS ELODEV-based programs can be run from
Windows. MONMOUSE.COM can be manually loaded in DOS sessions to
use the touchscreen with DOS mouse-driven programs. The Touchscreen
Control Panel can still be used to calibrate the touchscreen, but the mouse
button emulation mode cannot be selected.
ELODEV.EXE and MONMOUSE.COM not loaded - The mouse can still
•
be used in Windows and with DOS programs run from Windows. The
touchscreen will not operate as a mouse within Windows. ELODEV and
MONMOUSE.COM can be manually loaded in DOS sessions to use the
touchscreen with ELODEV-based and DOS mouse-driven programs. The
Touchscreen Control Panel cannot calibrate the touchscreen nor select the
mouse button emulation mode.
MOUSE.COM, ELODEV.EXE, and MONMOUSE.COM not loaded -The
•
mouse can still be used in Windows, although it must be hardware compatible
with a Microsoft or IBM mouse. The touchscreen will not operate as a mouse
within Windows. MOUSE.COM, ELODEV, and MONMOUSE.COM can be
Page 71

66 Chapter 6 - MonitorMouse for Windows
manually loaded in DOS sessions to use the touchscreen with ELODEV-based
and DOS mouse-driven programs. The Touchscreen Control Panel cannot
calibrate the touchscreen nor select the mouse button emulation mode.
Page 72

NTRODUCTION
I
Included on the accompanying DOS and Windows Driver Disk is TouchBack™, a
touchscreen driver which emulates keystrokes for DOS keyboard-driven
applications.
Introduction
•
Compatibility
•
Installation
•
Options
•
TouchBack
67
67
68
69
OMPATIBILITY
C
Applications must be specially written for use with TouchBack. Your application
documentation should specify if TouchBack is required.
Because TouchBack works with the ELODEV touchscreen driver, it is com pati ble
with all Elo touchscreens and controllers.
Programmers: The DOS Programmer's Toolkit, available separately from Elo,
includes the TouchBack Programmer's Reference and the TouchUp User's Guide.
The TouchBack manual defines the application programming interface (API) for
67
Page 73

68 Chapter 7 - TouchBack
the TouchBack driver. The TouchUp manual describes the touch zone definition
utility used when developing TouchBack-based programs. Sample source code is
included in BASIC, dBase, Clipper, and many other languages.
NSTALLATION
I
TouchBack is installed by the INSTALL program described in Chapter 2. Choose
DOS Express Installation
The rest of this chapter describes the details of the installation. If you have
problems with a TouchBack installation, also see Appendix B—Troubleshooting.
Included Files
TouchBack consists of a single file, TCHBACK.EXE, typically located in the
\TOUCH directory.
Selective Installation
or
.
Placement in AUTOEXEC.BAT
The TouchBack command line is placed in AUTOEXEC.BAT by the INSTALL
program. TCHBACK.EXE is a terminate-and-stay-resident (TSR) program. A
portion of a sample AUTOEXEC file is shown below:
C:\TOUCH\ELODEV 2201,280,5 -C722,3587,3319,841,1,15 ; touchscreen driver
C:\TOUCH\TCHBACK ; TouchBack driver
The ELODEV touchscreen driver must be loaded before TouchBack. TouchBack
occupies about 16K of system RAM when loaded and ELODEV about 6K.
There may be several flags on the TCHBACK command line. Flags are described
in the next section.
TSR programs for keyboard enhancement (such as SuperKey or BUF128) must be
installed before TouchBack. If you use SideKick, you must load it after
TouchBack.
Page 74

PTIONS
O
TouchBack supports several environment variables and command line flags.
Environment Variables
TouchBack normally looks for application screen files (.PIC extension) and touch
zone table files (.BIN extension) in the directory where the application is running.
You can specify different directories with the following environment commands:
SET PICPATH=<pathname> Use the SET PICPATH command to
SET BINPATH=<pathname> Use the SET BINPATH command to
Options 69
specify the directory in which application
screen files are located.
specify the directory in which touch zone
table files are located.
For example:
SET PICPATH=E:\SCREENS
These commands must be placed in the DOS environment with the DOS SET
command before TouchBack is loaded. If you change an environment option after
TouchBack is loaded, you must extract TouchBack (see -x flag, page 71) and
reload it. Otherwise, TouchBack will not recognize the changed environment
option.
If you are not familiar with environments or the SET command, consult a DOS
manual.
An application program may override the default paths specified by these
environment commands.
NOTE
If you have both MonitorMouse for DOS and TouchBack loaded, TouchBack
applications should call the ENABLE command at start-up, and DISABLE before
exiting. MonitorMouse for DOS or TouchBack may also be extracted from
memory when not in use.
Page 75

70 Chapter 7 - TouchBack
Command Line Flags
TouchBack command line flags enable you to change the command lead-in
character, specify the number and size of buffers, remove TouchBack from
memory, and display a list of available flags.
Flags consist of a hyphen and a letter, in upper or lower case. For example:
TCHBACK -c127
Multiple flags may be specified, separated by spaces.
Command Lead-in Character Flag (-c)
TouchBack uses rubout (ASCII 255) as its default command lead-in character.
Your application documentation should specify if this flag is required. You can
change the character to any code, printing or non printing with this command:
TCHBACK -c<code>
The code is a decimal ASCII code between 1 and 255 for the character you want
to use. You can find ASCII codes in most books on DOS.
Number and Size of Buffers Flag (-b)
Buffers are areas in memory set aside for storing the .BIN file that holds the touch
zone data. The format for this flag is:
TCHBACK -b<number of buffers>,<size of each in bytes>
If this flag is not specified, TouchBack defaults to one buffer that can hold a 2082
byte .BIN file, enough for 51 touch zones on a single screen. You may use the -b
flag to specify a smaller or larger buffer size, but it must be at least as large as
your largest .BIN file. (Use the DOS DIR command to display file sizes). The
number of buffers required should be specified in your application documentation.
The product of the number of buffers times the size must not exceed 52K.
NOTE
To change the number or size of the buffers, you must extract TouchBack from
memory then reinstall it using the -b flag with the desired parameters. See -x flag,
page 71.
Page 76

Options 71
Interrupt Flag (-i)
The -i flag allows you to specify the software interrupt of ELODEV:
TCHBACK -i<n>
where <n> is specified in hex. This flag is necessary if more than one copy of
ELODEV is loaded, as when controlling two touchscreens. You will also need it
if ELODEV is installed at a software interrupt other than 60 through 66 (hex). If
the -i flag is not specified, the first ELODEV found when checking interrupts 6066 will be used.
Extract Flag (-x)
Use the -x flag to extract TouchBack from memory if it is no longer needed:
TCHBACK -x
If an error message indicates it cannot be extracted, a TSR loaded after
TCHBACK.EXE may be interfering with its extraction. Generally you should
extract TSR's in the reverse order from which they were loaded.
Help Flag (-h)
At any time, type:
TCHBACK -h
to display quick reference information on all flags and the current version of
TouchBack.
Updating Flags
You may re-run TouchBack to update the -c flag of an installed copy.
Page 77

Configuring Your Controller
ENERAL INFORMATION
G
This appendix explains how to configure your touchscreen controller's switch
and/or jumper settings for use with the drivers on the DOS and Windows Driver
Disk.
Your controller's switch and jumper settings can be found on one of the next few
pages. Our recommendations should give you the best performance.
For information on physically setting the switches and jumpers to the listed
settings, and controller installation instructions, see the IntelliTouch Product
Manual or the AccuTouch Product Manual as appropriate.
General Information
•
Controller Data Sheets
•
$SSHQGL[$
73
75
Emulation Modes
ELODEV will work with a touchscreen controller in an emulation mode if the
emulated controller is specified. However, performance may be less than optimal
and the power-on diagnostics and firmware revision level will not be displayed.
See the IntelliTouch Product Manual or the AccuTouch Product Manual for
jumper settings.
73
Page 78

74 Appendix Error! Main Document Only.Error! Main Document Only.7 - Configuring
Your Controller
Increasing the Untouch Wait Time
If you use a baud rate lower than the one recommended for certain serial
controllers, you may have to increase the Untouch Wait Time (-w flag) when
loading ELODEV.
If you are using a 16 inch or larger IntelliTouch touchscreen with controller
firmware prior to revision 2.2, you must specify the -w90 flag to increase the
Untouch Wait Time. The firmware revision level is displayed when ELODEV is
loaded, unless it is prior to 2.2.
Non-standard Serial Ports
ELODEV supports serial touchscreen controllers installed on serial ports other
than COM1 and COM2 if you write your own support code. The command syntax
for installing ELODEV is slightly different under this circumstance. See the
SetUserCom function in the ELODEV Programmer's Reference for more
information.
Choosing an Interrupt (IRQ) for PC-Bus Controllers
ELODEV requires all PC-Bus controllers to be in Interrupt Mode. Choose the
hardware interrupt (IRQ) carefully so it will not conflict with another device that
is in use while the application program is running. The following table lists the
devices normally assigned to each IRQ:
IRQ XT 286/386/486 or later
2 IBM EGA, IBM network Mapped to IRQ9
3 COM2 COM2
4 COM1 COM1
5 Hard disk controller LPT2
6 Floppy disk controller Floppy disk controller
7 LPT1 LPT1
Elo's recommendations on choosing an interrupt, in order of preference, are as
follows. Skip the IRQ if a conflict may exist.
XT: 7,3,4,2,6,5 286/386/486 or later: 5,7,2,3,4,6
Page 79

Controller Data Sheets 75
NOTE
When XT disk controllers are installed in AT type systems, IRQ5 is not available.
For 286/386/486's or later, IRQ5 (LPT2) is highly recommended. Since the BIOS
does not use interrupts when outputting to a printer and most software uses the
BIOS for printer output, you can jumper your PC-Bus touchscreen controller for
IRQ5 without contending with LPT2. On XT-type systems, IRQ7, LPT1, is highly
recommended for the same reasons.
If necessary, choose a COM port IRQ. ELODEV eliminates the interrupt conflict
by disabling the interrupt line drivers of the COM ports while the touchscreen is
in operation. A COM port can be used simultaneously only if the COM port is
polled by the application or accessed strictly through the BIOS.
Programmers: If the selected IRQ contends with LPT1 or LPT2, ELODEV saves
the state of the Interrupt Enable bit on the parallel port controller when
OpenTouch is called. ELODEV then disables the parallel port interrupt and takes
over the interrupt for the touchscreen controller. The original state of the bit and
interrupt vector are restored when CloseTouch is called. The same technique
works with a COM port. Applications may use a contending COM or LPT port
simultaneously, but only in polled mode.
ONTROLLER DATA SHEETS
C
Data for each controller begins on a new page. The controllers are listed in the
following order:
Controller Page
IntelliTouch Serial Controller (E281-2300) 77
IntelliTouch Serial Controller (E281{A}-4002) 78
AccuTouch Serial Controller (E271-2210) 79
AccuTouch and DuraTouch Serial Controller (E271-2200) 80
AccuTouch Serial Controller (E271-140) 81
DuraTouch Serial Controller (E261-280) 82
IntelliTouch PC-Bus Controller (E281-4035) 83
IntelliTouch PC-Bus Controller (E281{A}-4025) 85
AccuTouch and DuraTouch PC-Bus Controller (E271-2201) 87
AccuTouch PC-Bus Controller (E271-141) and DuraTouch PC-Bus
Controller (E271-142) 88
AccuTouch and DuraTouch Micro Channel Controller (E271-2202) 90
If you cannot identify your controller from the list above, see the cross-reference
chart for obsolete part numbers on page 6.
Page 80

76 Appendix Error! Main Document Only.Error! Main Document Only.7 - Configuring
Your Controller
NOTE
Switches may be labeled either OFF/ON or OPEN/CLOSE, depending on your
controller. The data sheets tables always list switch positions as OFF (open) or
ON (close).
Page 81

IntelliTouch Serial Controller (E281-2300)
Verify the controller's jumper settings are as follows:
Baud Rate (From Left)
9600 (recommended) J0-N
J1-N
4800 J0-Y
J1-Y
2400 J0-Y
J1-N
1200 J0-N
J1-Y
19200 Cross-connect (connect jumper
horizontally so the top pins of J0 and J1
are jumpered)
Binary Mode J2-N
Hardware handshaking enabled J3-N
Stream Mode J4-N
Reserved J5-N
Reserved J6-N
Power-on settings from jumpers J7-Y
Reserved J8-N
Reserved J9-N
Emulation mode
None J10-N
J11-N
Controller Data Sheets 77
Jumpers cross-connected horizontally on the bottom pins of the jumper block have
no effect and are available as extra jumpers.
9600 baud is recommended because it has the throughput necessary for many
applications.
Page 82

78 Appendix Error! Main Document Only.Error! Main Document Only.7 - Configuring
Your Controller
IntelliTouch Serial Controller (E281{A}-4002)
Verify the controller's switch settings are as follows:
For: Set:
Stream Mode SW0-OFF
Binary Mode SW1-OFF
Z-axis enable SW2-ON
9600 Baud (recommended) SW3-ON, SW4-ON, SW5-ON
4800 Baud SW3-ON, SW4-ON, SW5-OFF
2400 Baud SW3-ON, SW4-OFF, SW5-ON
1200 Baud SW3-ON, SW4-OFF, SW5-OFF
600 Baud SW3-OFF, SW4-ON, SW5-ON
300 Baud SW3-OFF, SW4-ON, SW5-OFF
150 Baud SW3-OFF, SW4-OFF, SW5-ON
Reserved SW6-ON
Reserved SW7-ON
9600 baud is recommended because it has the throughput necessary for many
applications.
Page 83

AccuTouch Serial Controller (E271-2210)
The E271-2210 controller is a compact version of the E271-2200 controller.
Verify the controller's jumper settings are as follows:
Baud Rate (From Left)
9600 (recommended) J0-N
J1-N
2400 J0-Y
J1-N
1200 J0-N
J1-Y
300 J0-Y
J1-Y
19200 Cross-connect (connect jumper
horizontally so the top pins of J0 and J1
are jumpered)
Binary Mode J2-N
Hardware handshaking enabled J3-N
Stream Mode J4-N
Reserved J5-N
Reserved J6-N
Power-on settings from jumpers J7-Y
Reserved J8-N
Reserved J9-N
Emulation mode
None J10-N
J11-N
Controller Data Sheets 79
Jumpers cross-connected horizontally on the bottom pins of the jumper block have
no effect and are available as extra jumpers.
9600 baud is recommended because it has the throughput necessary for many
applications.
Page 84

80 Appendix Error! Main Document Only.Error! Main Document Only.7 - Configuring
Your Controller
AccuTouch and DuraTouch Serial Controller (E271-2200)
Verify the controller's jumper settings are as follows:
(From Top)
Default from jumpers J7-Y
Reserved J6-N
Touchscreen Type
AccuTouch J5-Y
DuraTouch J5-N
Stream Mode J4-N
Hardware handshaking enabled J3-N
Binary Mode J2-N
Baud Rate
9600 (recommended) J1-N
J0-N
2400 J1-N
J0-Y
1200 J1-Y
J0-N
300 J1-Y
J0-Y
J8 through J11 elsewhere on the controller should not be jumpered.
Jumpers cross-connected vertically on the right side of the jumper block have no
effect and are available as extra jumpers.
9600 baud is recommended because it has the throughput necessary for many
applications.
Page 85

AccuTouch Serial Controller (E271-140)
Verify the controller's switch settings are as follows:
For: Set:
9600 Baud SW1-OFF SW2-OFF
4800 Baud SW1-ON SW2-OFF
2400 Baud (recommended) SW1-OFF SW2-ON
300 Baud SW1-ON SW2-ON
8-bit Data SW3-OFF
Binary Mode SW4-ON
Filtered SW5-ON
Stream Mode SW6-OFF
2400 baud is recommended to limit the excessive amounts of data at higher baud
rates.
Controller Data Sheets 81
Next, verify the Touchscreen Type jumpers. The controller is shipped with a
jumper installed on the pins marked W1. This is the correct setting for E274 5wire touchscreens. If you are using an older E270 3-wire touchscreen, install the
jumper on W2 instead.
Page 86

82 Appendix Error! Main Document Only.Error! Main Document Only.7 - Configuring
Your Controller
DuraTouch Serial Controller (E261-280)
Verify the controller's jumper settings are as follows:
For: Jumper:
Binary Mode E2 (requires 4.0 EPROM)
9600 Baud (recommended) E5
300 Baud E6
1200 Baud Neither
If Elo has installed the controller inside your monitor, then E2 and E5 have
already been jumpered. 9600 is recommended because it has the throughput
necessary for many applications.
The E2 jumper is only supported by version 4.0 or later EPROMs. The controller
is normally shipped with this jumper installed if it has a 4.0 EPROM. The E2
jumper causes the controller to power up compatible with ELODEV, so software
setup is not necessary. This jumper is necessary if you can turn the E261 280
controller off independently from the computer; for example, when the controller
is installed internally in a monitor. Contact Elo for an updated EPROM if
necessary.
If your controller does not have EPROM version 4.0 or later and E2 is not
jumpered, the controller must be configured by software setup to work with
ELODEV. This setup is automatically performed by ELODEV upon installation.
See the -p flag for more information, page 32.
Page 87

IntelliTouch PC-Bus Controller (E281-4035)
The E281-4035 controller is a half-card version of the E281{A}-4025 controller.
Verify the controller's switch settings are as follows:
12-bit Mode SW1-ON
Reserved SW2-ON
Stream Mode SW3-OFF
Reserved SW4-ON
Z-axis enable SW5-ON
Reserved SW6-ON
Next, set the controller's Base I/O Port address with the W2 and W3 jumpers. W3
selects the high order address, and W2 the low order address. The values of the
settings are shown in the following table.
W3 W2
HI (100X) LOW (10X)
Position Value Position Value
(from top) (in hex) (from top) (in hex)
0 000 0 00
1 100 2 20
2 (recommended) 200 4 40
3 300 6 60
8 (recommended) 80
AA0
CC0
EE0
Controller Data Sheets 83
To calculate the Base I/O Port address, add the values of the jumpered positions of
W3 and W2. For example, the E281-4035 is shipped jumpered for a Base I/O Port
address of 280 hexadecimal. W3 is jumpered in the third position (200), and W2
is jumpered in the fifth position (80). The address is the sum of 200 + 80, which is
280.
Next, install a jumper vertically at W1 to select the Interrupt (IRQ). The E281-
4035 is shipped jumpered for IRQ5. See Choosing an Interrupt (IRQ) for PC-Bus
Controllers, page 74. The jumper block positions are as follows:
Page 88

84 Appendix Error! Main Document Only.Error! Main Document Only.7 - Configuring
Your Controller
Interrupt (IRQ)
W1
(from left)
2
3
4
5 (factory set)
6
7
Remember the Base I/O Port address and IRQ values. You will need them when
running the INSTALL program.
Page 89

IntelliTouch PC-Bus Controller (E281{A}-4025)
Verify the controller's switch settings are as follows:
12-bit Mode SW1-ON
Reserved SW2-ON
Stream Mode SW3-OFF
Reserved SW4-ON
Z-axis enable SW5-ON
Reserved SW6-ON
Reserved SW7-ON
Reserved SW8-ON
Next, set the controller's Base I/O Port address with the W2 and W3 jumpers. W3
selects the high order address, and W2 the low order address. The values of the
settings are shown in the following table.
W3 W2
Position Value Position Value
(from top) (in hex) (from top) (in hex)
4 300 8 E0
3 (recommended) 200 7 C0
2 100 6 A0
1 000 5 (recommended) 80
460
340
220
100
Controller Data Sheets 85
To calculate the Base I/O Port address, add the values of the jumpered positions of
W3 and W2. For example, the E281{A}-4025 is usually shipped jumpered for a
Base I/O Port address of 280 hexadecimal. W3 is jumpered in the third position
(200), and W2 is jumpered in the fifth position (80). The address is the sum of
200 + 80, which is 280.
Next, install a jumper vertically at W1 to select the Interrupt (IRQ). A jumper is
supplied, but may be found in a horizontal, inactive position. See Choosing an
Interrupt (IRQ) for PC-Bus Controllers, page 74. The jumper block positions are
as follows:
Page 90

86 Appendix Error! Main Document Only.Error! Main Document Only.7 - Configuring
Your Controller
W1 Position Interrupt (IRQ)
(from left)
62
53
44
3 5 (factory set)
26
17
Remember the Base I/O Port address and IRQ values. You will need them when
running the INSTALL program.
Page 91

Controller Data Sheets 87
AccuTouch and DuraTouch PC-Bus Controller (E271-2201)
Verify the controller's jumper settings are as follows:
(From Top)
Default from jumpers J7-Y
Reserved J6-N
Touchscreen Type
AccuTouch J5-Y
DuraTouch J5-N
Stream Mode J4-N
No Interrupt (software selected) J3-N
J2-N
Base I/O Port (in hex)
280 (recommended) J1-N
J0-N
240 J1-N
J0-Y
180 J1-Y
J0-N
100 J1-Y
J0-Y
2A0 Cross connect (connect jumper
vertically so the left pins of J0 and J1
are jumpered)
J10 and J11 elsewhere on the controller should not be jumpered.
Jumpers cross-connected vertically on the right side of the jumper block have no
effect and are available as extra jumpers.
Page 92

88 Appendix Error! Main Document Only.Error! Main Document Only.7 - Configuring
Your Controller
AccuTouch PC-Bus Controller (E271-141) and DuraTouch PC-Bus
Controller (E271-142)
Verify the controller's switch settings are as follows:
For: Set:
12-bit Mode (recommended) SW1-ON
8-bit Mode SW1-OFF
No calibration data on reset SW2-ON
Stream Mode SW3-OFF
Filtered SW4-ON
The 12-bit Mode is recommended, although if the resolution provided by a
nominal 255x255 screen is adequate, then 8-bit Mode may be preferred because of
its lower interrupt overhead. (The controllers deduct overscan and inaccessible
areas, typically returning a range of 28 to 227, for example.)
Next, set the controller's Base I/O Port address with the W2 and W3 jumpers. W3
selects the high order address, and W2 the low order address. The values of the
setting are shown in the following table:
W3 W2
Position Value Position Value
(from top) (in hex) (from left) (in hex)
1 000 1 E0
2 100 2 C0
3 (recommended) 200 3 A0
4 300 4 (recommended) 80
560
640
720
800
To calculate the Base I/O Port address, add the values of jumpered positions W3
and W2. For example, the E271-141 is usually shipped jumpered for a Base I/O
Port address of 280 hexadecimal. W3 is jumpered in the 3rd position (200), and
W2 is jumpered in the 5th position (80). The address is the sum of 200 + 80,
which is 280.
Next, install a jumper vertically at W1 to select the Interrupt (IRQ). A jumper is
supplied, but may be found in a horizontal, inactive position. See Choosing an
Interrupt (IRQ) for PC-Bus Controllers, page 74. The jumper block positions are
as follows:
Page 93

Controller Data Sheets 89
Position Interrupt (IRQ)
(from left)
12
23
34
4 5 (factory set)
56
67
Remember the Base I/O Port address and IRQ values. You will need them when
running the INSTALL program.
Touchscreen Type Jumpers (for AccuTouch E271-141 Only)
Verify the Touchscreen Type jumpers on the AccuTouch E271-141 Controller
only. The controller is shipped with a jumper installed on the pins marked W4.
This is the correct setting for E274 5-wire touchscreens. If you are using an older
E270 3-wire touchscreen, install the jumper on W5 instead.
Page 94

90 Appendix Error! Main Document Only.Error! Main Document Only.7 - Configuring
Your Controller
AccuTouch and DuraTouch Micro Channel Controller (E271-2202)
Verify the controller's jumper settings are as follows:
(From Top)
Default from jumpers J7-Y
Reserved J6-N
Touchscreen Type
AccuTouch J5-Y
DuraTouch J5-N
Stream Mode J4-N
Reserved J3-N
Reserved J2-N
Reserved J1-N
Reserved J0-N
Jumpers cross-connected vertically on the right side of the jumper block have no
effect and are available as extra jumpers.
Controller Installation
Several additional steps are required when installing controllers in a Micro
Channel computer. Proceed in order as follows.
Copy the file @6253.ADF from the DOS and Windows Driver Disk to your
Backup Copy of your "IBM PS/2 Reference Disk." If you do not have a backup of
your Reference Disk, boot with the Reference Disk in drive A and follow the on
screen instructions to create one.
Follow the "Installing an Adapter" instructions in your IBM Personal System/2
Quick Reference. The controller (adapter) may be installed in any available slot.
Power up with your backup copy of the Reference Disk in drive A. Error 165 -Adapter Configuration Error -- will appear because you just installed a new
adapter. Press [Enter] on the logo screen, then follow t he on screen inst ructions to
"Automatically configure the system".
Next, follow the on screen instructions to "View Configuration" and verify that
the E271-2202 controller was detected. You should see installed in a slot the "Elo
E271-2202 Touchscreen Controller". The Base I/O Port and selected Interrupt
(IRQ) will also be shown. Later, if you have problems, you can "Change
Configuration" of the controller's Base I/O Port and Interrupt.
Quit the program, remove the Reference Disk, and restart the computer. The
system should now boot without any error messages. Continue the software
installation as you would with other controllers.
Page 95

Controller Data Sheets 91
Note that the Base I/O Port and Interrupt (IRQ) are not specified because they
were determined by the configuration programs on the Reference Disk, the ADF
file, and other adapters present in your system.
After the software is installed, you can run the INFO utility to display and verify
the chosen Base I/O Port and Interrupt for the E271-2202 controller. See page
108.
Page 96

ENERAL INFORMATION
G
Should you experience operational difficulties with the touchscreen system either
during or after installation, this appendix should help you determine the source of
the problem.
The first step in troubleshooting a touchscreen system is to determine whether the
problem is due to the hardware, driver software, or application software.
Display Problems
Troubleshooting
General Information
•
Diagnostic Utilities
•
$SSHQGL[%
93
103
If you are experiencing a display problem, (such as no video, horizontal and
vertical synchronization, raster non-linearities, etc.), realize that the video function
of the display and the Elo touchscreen installed on the display are entirely separate
systems. Therefore, problems with the display should be treated as display
problems, not touchscreen problems. Diagnostic procedures and possible
corrections for display problems should be performed using the troubleshooting
procedures outlined in your display manual.
The touchscreen is powered from its controller. Usually the display and
touchscreen controller have separate power supplies and operate independently.
Thus it is possible for the touchscreen to interact with the computer even if the
93
Page 97

94 Appendix Error! Main Document Only.Error! Main Document Only.7 -
Troubleshooting
display is powered off. Internal serial controllers are usually powered by a supply
that is separate from the display's power supply, but controlled through the
display's power switch. In this case, even if display problems exist, the
touchscreen system will probably function if the display power switch is on.
Peeling Back the Layers
The secret to troubleshooting is to first identify at what level the problem exists.
For example, if your application uses MonitorMouse for DOS, there are several
layers of software and drivers involved. The problem could be with your
application, MonitorMouse for DOS, ELODEV, your mouse driver, the
touchscreen hardware, or a conflict with other software. The problem could even
be at a lower level such as a conflict with other hardware, or even the computer.
The best approach to troubleshooting is to remove the layers one by one until the
problem disappears. If the problem exists after all software has been removed,
then hardware troubleshooting is in order.
Calibration Problems
Calibration problems can appear at any level. If the touchscreen hardware is
responding and is linear, (see COMDUMP, BUSSTAT, and TOUCHES later in
this appendix), but a touch does not activate the appropriate zone, check the
calibration. Other symptoms of improper calibration are when a cursor does not
move at the same pace as a sliding finger, or when it moves in the opposite
direction. A cursor should always move in the same axis as your finger.
Calibration problems are usually due to calibrating in the wrong video mode.
Even though you may have a VGA monitor, for example, your application may be
running in text mode, so calibrate in text mode rather than graphics mode.
If using MonitorMouse for DOS with a DOS application, apparent calibration
problems may actually be due to a relative mode application. See Coordinates vs.
Mickeys, page 42, and MonitorMouse for DOS later in this appendix for help on
identifying this situation.
If you have a calibration problem, try erasing ELOGRAPH.CAL and re-running
DEMOCAL or ELOCALIB. Only ELODEMO and MonitorMouse for DOS use
ELOGRAPH.CAL. TouchBack does not.
Besides the remainder of this appendix, see the following sections for more
information on calibration:
Page 98

General Information 95
Section Page
Step 4 - Calibrating the Touchscreen 12
Calibration Points Flag (-c) 30
ELOCALIB 35
Calibrating in Multiple Video Modes (ELOGRAPH.CAL) 36
Calibration File Directory Flag (-d) 49
Calibrating MonitorMouse for Windows 59
Running DOS Mouse-Driven Programs (from Windows) 64
Where to Go From Here
The remainder of this appendix discusses troubleshooting the MonitorMouse for
Windows, MonitorMouse for DOS, TouchBack, and ELODEV drivers, as well as
the ELODEMO and ELOCALIB programs. For each, the layers are diagrammed
with specific tests given to try at each level. The appendix ends with descriptions
of the diagnostic utilities installed from the DOS and Windows Driver Disk
(typically in \TOUCH).
There are still other sources for troubleshooting information. See the IntelliTouch
Product Manual or the AccuTouch Product Manual for hardware troubleshooting
tips. See the DOS Programmer's Toolkit when troubleshooting application
problems. Remember to check the README files from the DOS and Windows
Driver Disk for other suggestions and known incompatibilities that may have been
identified after the printing of this manual. Of course, Elo Technical Support is
also available to assist you.
Page 99

96 Appendix Error! Main Document Only.Error! Main Document Only.7 -
Troubleshooting
MonitorMouse for Windows
The layers for MonitorMouse for Windows are as follows:
Windows Enhanced Mode Driver (VMMD.386)
Windows Standard Mode Driver (MONMOUSE.DRV)
Windows
MonitorMouse for DOS (MONMOUS E.COM)
ELODEV.EXE
Your mouse driver (MOUSE.COM/.SYS, etc.)
Try these procedures:
Run Windows Setup and verify that MonitorMouse for Windows is selected
•
as your mouse driver. If it is not, click on Options/Change System Settings,
and select MonitorMouse for Windows. If it is not listed, exit Windows and
run INSTALL from the DOS and Windows Driver Disk.
Make sure the touchscreen and mouse work with the MonitorMouse for DOS
•
Tutorial program (see page 99).
Check your SYSTEM.INI file to be sure the changes INSTALL made are still
•
there (see page 58).
See if the problem is only with Windows Enhanced Mode. Try Standard Mode
•
by invoking Windows with the /S flag. Double-check the [386Enh] section of
SYSTEM.INI (see page 58).
Check the dates of the MONMOUSE.DRV and VMMD.386 files in your
•
WINDOWS\SYSTEM directory. They should match those on the DOS and
Windows Driver Disk. If not, reinstall the DOS and Windows Driver Disk.
Check the version of your mouse driver. Some old or clone mouse drivers do
•
not work very well with Windows, or when returning to Windows from DOS
sessions. Try temporarily loading NOMOUSE.COM and see if the problem is
resolved. (Your mouse won't work at this point.) Many mice are Microsoft or
Logitech hardware compatible. Try the latest Microsoft or Logitech mouse
driver with your mouse.
Run the Windows Setup program from the \WINDOWS directory and reinstall
•
your mouse driver. Check that Windows works with your mouse (the
touchscreen will not work). If the mouse does not work, check for conflict
with other drivers and/or re-install Windows. Once Windows works with your
mouse, re-run Windows Setup, reinstalling MonitorMouse for Windows.
Check that your mouse and touchscreen are not using the same hardware
•
interrupt (IRQ). See the procedure under MonitorMouse for DOS, page 99.
Page 100

General Information 97
The mouse IRQ is important in Windows Enhanced Mode even if you are
using NOMOUSE.COM. See if NOMOUSE.COM is the same as the version
on the DOS and Windows Driver Disk. If not, try that version.
If NOMOUSE.COM was created with PATCHMSE from Microsoft
MOUSE.COM version 7.04, the IRQ will be 2. Earlier versions may be 5. The
patches for Microsoft 8.x or later drivers do not use an interrupt, so using one
of these patched drivers is recommended.
Try removing all unnecessary TSR's and device drivers from
•
AUTOEXEC.BAT and CONFIG.SYS. Conflicts may show up only in
Windows. Check for interrupt contention with other devices. Remove other
devices and drivers to see if they may be contending with the touchscreen
controller or drivers.
If you are using a bus touchscreen controller on a COM port interrupt (IRQ4
•
or IRQ3), see Bus Controller on COM Port Interrupt, page 58.
If you have a serial mouse, and it does not work after it was moved while
•
Windows Enhanced Mode was loaded, see Serial Mouse, page 58.
If you get a warning message saying there is a contention over a LPT or COM
•
port when you run multiple DOS programs that use ELODEV or
MonitorMouse for DOS, see Running DOS Programs from Windows, page 64,
to prevent these messages.
If your calibration is off only while in Windows, try recalibrating with the
•
Touchscreen Control Panel.
If your calibration is off when running DOS mouse or touchscreen-driven
•
programs from Windows, make sure MonitorMouse for DOS is loading an
ELOGRAPH.CAL file. See Calibration File Directory Flag (-d), page 49.
Also make sure ELOGRAPH.CAL contains correct calibration points by
recalibrating with ELOCALIB in each video mode you use. You must reboot
before MONMOUSE.COM will recognize the new calibration points.
If double-clicking is difficult, check that you are using Mode 6. Also see
•
Double-Clicking, page 62.
If you get a message when Windows is started saying MOUSE.DRV is not
•
version 8.20 or later, delete POINTER.EXE from the LOAD= line in
WIN.INI.
 Loading...