


USER MANUAL
Elo Touch Solutions
ET3201L 32” Interactive Digital Signage Touchmonitor
ET4201L 42” Interactive Digital Signage Touchmonitor
ET5501L 55” Interactive Digital Signage Touchmonitor
ET7001L 70” Interactive Digital Signage Touchmonitor
SW601990 Rev E
Copyright © 2014 Elo Touch Solutions, Inc. All Rights Reserved.
No part of this publication may be reproduced, transmitted, transcribed, stored in a retrieval system, or translated into any language or computer language, in any form or by any means, including, but not limited to, electronic, magnetic, optical, chemical, manual, or otherwise without prior written permission of Elo Touch Solutions, Inc.
Disclaimer
The information in this document is subject to change without notice. Elo Touch Solutions, Inc. and its Afffiliates (collectively "Elo") makes no representations or warranties with respect to the contents herein, and specifically disclaims any implied warranties of merchantability or fitness for a particular purpose. Elo reserves the right to revise this publication and to make changes from time to time in the content hereof without obligation of Elo to notify any person of such revisions or changes.
Trademark Acknowledgments
AccuTouch, CarrollTouch, Elo, Elo (logo), Elo Touch, Elo Touch Solutions, Elo TouchSystems, IntelliTouch, iTouch, SecureTouch, TouchTools and VuPoint are trademarks of Elo and its Affiliates. Windows is a trademark of Microsoft Corporation.
User Manual: Interactive Digital Signage
SW601990 Rev E, Page 2 of 36
Table of Contents |
|
|
Chapter 1 – Introduction........................................................................... |
4 |
|
Chapter 2 – Unpacking.............................................................................. |
5 |
|
Chapter 3 – Touchmonitor Installation ................................................ |
7 |
|
Chapter 4 – Mounting ................................................................................ |
9 |
|
Chapter 5 – Operation ............................................................................... |
13 |
|
Chapter 6 |
– Technical Support............................................................... |
28 |
Chapter 7 |
– Safety & Maintenance........................................................ |
29 |
Chapter 8 |
– Regulatory Information ................................................... |
31 |
Chapter 9 |
– Warranty Information......................................................... |
35 |
User Manual: Interactive Digital Signage
SW601990 Rev E, Page 3 of 36

Chapter 1: Introduction
Product Description
Your new Interactive Digital Signage (IDS) touchmonitor combines Elo Touch Solutions reliable performance with the latest developments in touchscreen technology and display design. This combination of features creates a natural flow of information between a user and the touchmonitor.
This touchmonitor incorporates a 24-bit color, active matrix thin-film-transistor, and digital signage LCD panel to provide superior display performance. Its Full HD resolution of 1920x1080 is suitable for displaying graphics and images. Other features that enhance this
LCD monitor’s performance are Plug & Play compatibility, built-in speakers and headphone output capability, a remote for on screen display (OSD) controls, and a family of IDS computer modules.
The computer modules are designed to slide into a bay on the rear of the monitor. The monitors form factor will not be affected and extra cabling is not required. Your IDS touchmonitor will turn into an IDS All-in-One touchcomputer.
Precautions
Follow all warnings, precautions and maintenance as recommended in this user manual to maximize the life of your unit and prevent risks to user safety. See Chapter 8 for more information on touchmonitor safety.
For your health and safety, it is strongly recommended that at least two people (four for the
ET7001L) handle, lift, and/or move these touchmonitors.
This manual contains information that is important for the proper setup and maintenance of the IDS and optional computer module. Before setting up and powering on your new touchmonitor and computer module, read through this manual, especially the Installation, Mounting, and Operation chapters.
User Manual: Interactive Digital Signage
SW601990 Rev E, Page 4 of 36
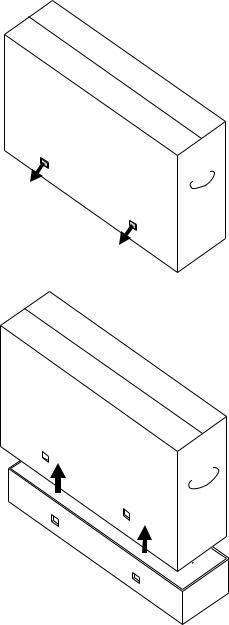
Chapter 2: Unpacking
Unpacking the Interactive Digital Signage Touchmonitor
To unpack the IDS, follow these steps:
1.The carton should be oriented in the manner according to its labeling. The hinged plastic locks should be at the ‘bottom’.
2.Open and remove all 4 hinged plastic locks. There are 6 hinged plastic locks for the 7001L unit.
3. Once the locks are removed, lift the cartons top lid off the bottom frame.
4. With the top lid removed, you now have access to the IDS touchmonitor and the included accessories.
User Manual: Interactive Digital Signage
SW601990 Rev E, Page 5 of 36

Chapter 3: IDS Touchmonitor Installation
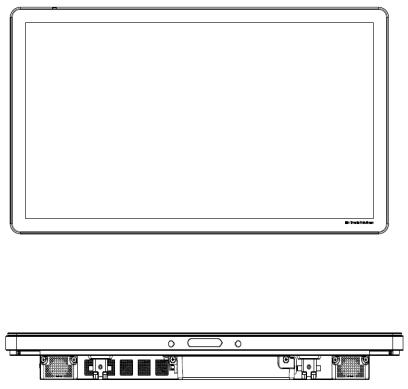
Connector Panel & Interfaces
Note: For your health and safety, it is strongly recommended that at least two people (four for the ET7001L) handle, lift, or move these Touchmonitors. Elo recommends safe lifting techniques as described in OSHA/NIOSH Guidelines.
Check that the following items are present and in good condition:
IDS touchmonitor
User Manual CD
Quick Install Guide
OSD Remote connected to the monitor
Cables
oHDMI, USB, North America power, Europe/Korea power, U.K. power, Argentina power,
Taiwan power, China power, Korea power, Japan power, & Japan 3pin-2pin adapter
Remove the cable cover on the bottom rear (when viewed in landscape orientation) to access the touchmonitors connector panel.
Pictures of the connector panel and interfaces. The OSD connection is in red.
3201L/4201L/5501L/7001L
Images of monitor back I/O ports with OSD remote
User Manual: Interactive Digital Signage
SW601990 Rev E, Page 6 of 36

IDS Touchmonitor Connections to an External Computer
1.Connect the HDMI cable between the monitor and the video source.
2.Connect the USB touch cable between the monitor and the PC.
3.Select the correct power cable for your region. Connect it between the AC power source and the touchmonitors POWER IN connector.
4.The touchmonitor ships in an ON state. Use the remote OSD to access the On Screen Display Menu.
User Manual: Interactive Digital Signage
SW601990 Rev E, Page 7 of 36

Installing the IDS Touchscreen Technology Software Drivers
IntelliTouch Plus units are HID compatible, but will require the Elo driver if touch calibration is required.
Optical units are HID compatible and do not require an Elo touch driver. If an Elo touch driver has previously been installed on the host computer, remove this driver by opening Control Panel and selecting to remove the driver completely.
Visit the Elo Touch Solutions website www.elotouch.com for:
Updates to the Elo touch driver
Additional touch driver information
Detailed touch driver installation guides
Touch drivers for other operating systems
The Elo touch driver and the Elo Computer Module driver packs are available with the CD that ships with the touchmonitor.
User Manual: Interactive Digital Signage
SW601990 Rev E, Page 8 of 36

Chapter 4: Mounting
Note: For your health and safety, it is strongly recommended that at least two people (four are recommended for the ET7001L) handle, lift, or move these touchmonitors.
Note: When laying the display face-down (for attaching mounting brackets or stands), protect the glass on the face from scratching and damage. Lay the display on a non-abrasive surface, or first protect the display face with film or foam.
General Mounting Information
The following three mounting orientations are supported: Landscape, portrait and table-top mode. For optimal touch performance, ensure that the monitor is supported fully and is as flat as possible.
Portrait
User Manual: Interactive Digital Signage
SW601990 Rev E, Page 9 of 36
Landscape
Table Top –Refer to the Temperature Control section for table top mode requirements.
User Manual: Interactive Digital Signage
SW601990 Rev E, Page 10 of 36
Rear VESA Mount
For the 32” and 42” models:
A four-hole, 400x400mm mounting pattern is provided on the rear of the monitor.
The VESA FDMI-compliant mounting is coded: VESA MOUNT PER MIS-F, 400,400,6MM
For the 55” models:
A four-hole, 600x600mm mounting pattern is provided on the rear of the monitor.
The VESA FDMI-compliant mounting is coded: VESA MOUNT PER MIS-F, 600,600,6MM
For the 70” models:
A four-hole, 400x400mm mounting pattern is provided on the rear of the monitor.
The VESA FDMI-compliant mounting is coded: VESA MOUNT PER MIS-F, 400,400,8MM
Refer to www.elotouch.com for dimensional drawings.
User Manual: Interactive Digital Signage
SW601990 Rev E, Page 11 of 36
 Loading...