

Page 1
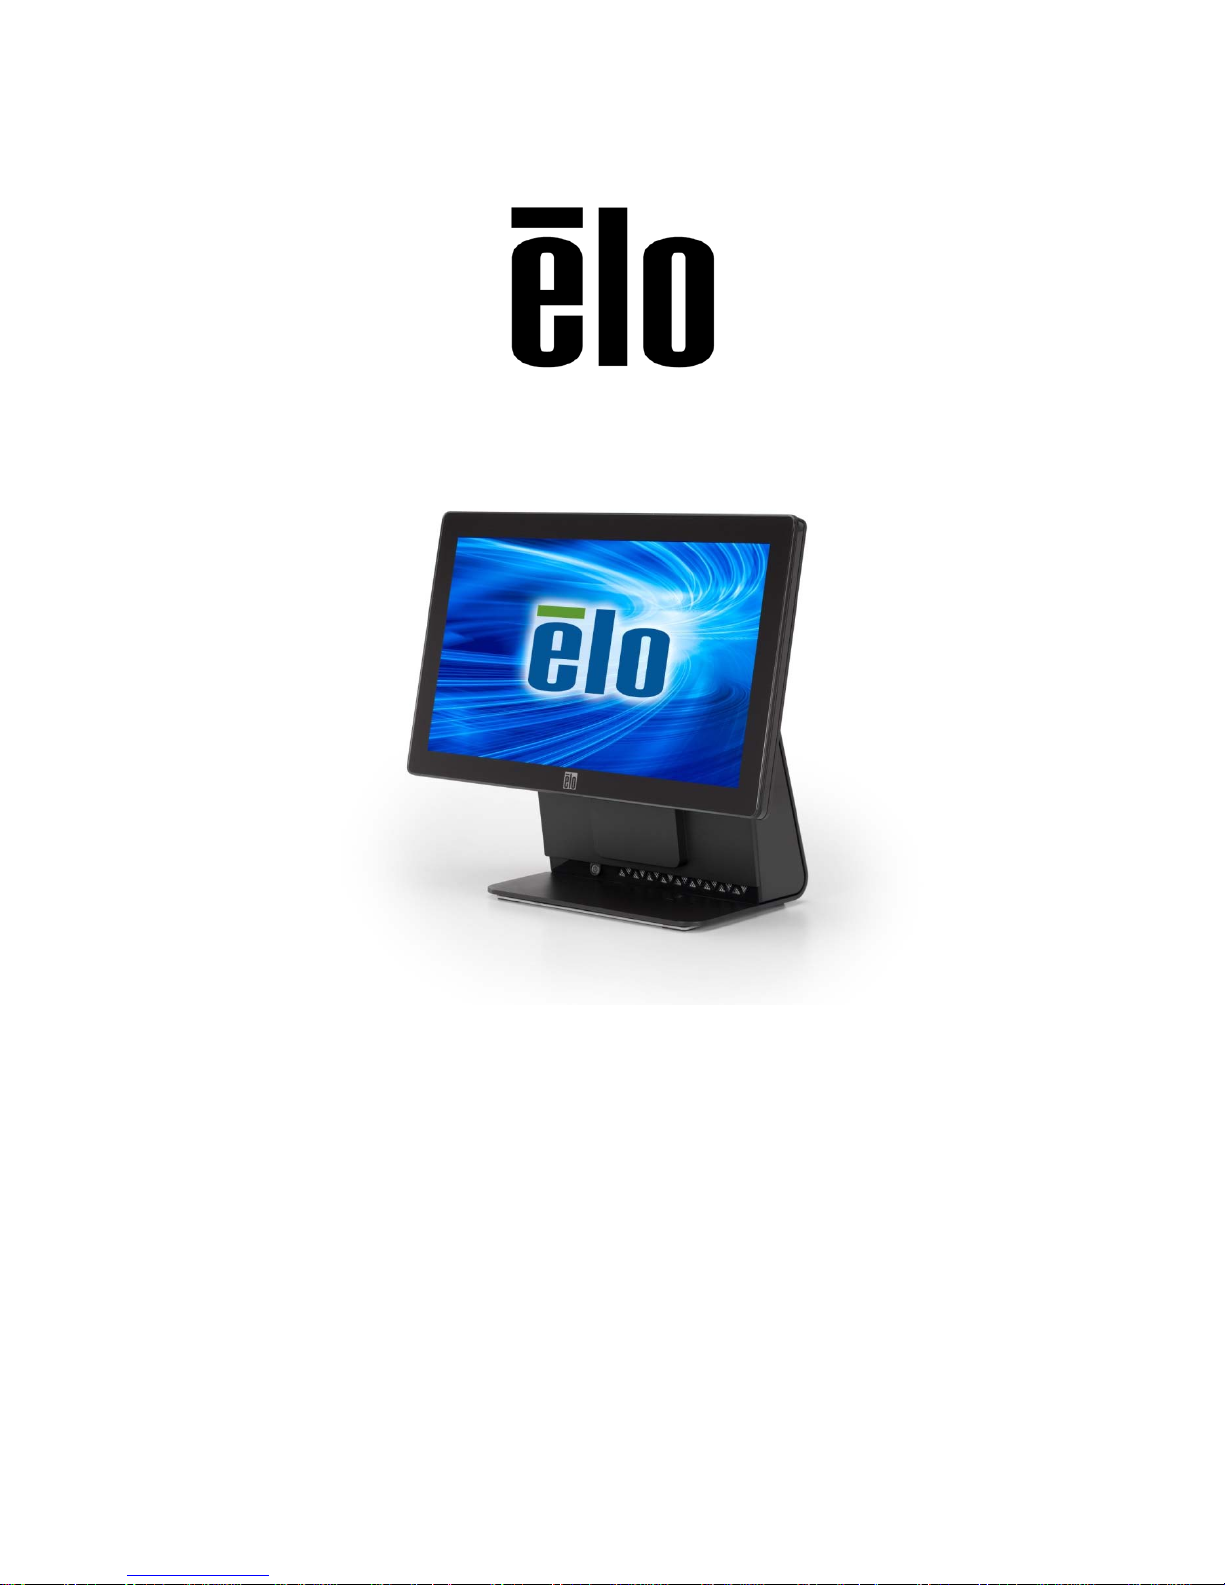
Elo Touch Solutions
15.6” Widescreen E-Series RevC All-in-One Touchcomputer
USER MANUAL
SW602266 Rev A
Page 2

Copyright © 2014 Elo Touch Solutions, Inc. All Rights Reserved.
No part of this publication may be reproduced, transmitted, transcribed, stored in a retrieval system, or
translated into any language or computer language, in any form or by any means, including, but not
limited to, electronic, magnetic, optical, chemical, manual, or otherwise without prior written permission of
Elo Touch Solutions, Inc.
Disclaimer
The information in this document is subject to change without notice. Elo Touch Solutions, Inc. and its
Affiliates (collectively "Elo") makes no representations or warranties with respect to the contents herein,
and specifically disclaims any implied warranties of merchantability or fitness for a particular purpose. Elo
reserves the right to revise this publication and to make changes from time to time in the content hereof
without obligation of Elo to notify any person of such revisions or changes.
Trademark Acknowledgments
AccuTouch, CarrollTouch, Elo, Elo (logo), Elo Touch, Elo Touch Solutions, Elo TouchSystems,
IntelliTouch, iTouch, SecureTouch, TouchTools and VuPoint are trademarks of Elo and its Affiliates.
Windows is a trademark of Microsoft Corporation.
Page 3

Table of Contents
Chapter 1: Setup ...................................................................................... 4
Unpacking Your Touchcomputer ................................................................................................4
Adjusting the Display ....................................................................................................................5
Calibrating the Touchscreen .......................................................................................................6
Additional Extended Cable Cover for Your System .................................................................7
Additional Mounting Option for Your System ............................................................................8
Chapter 2: Operation ............................................................................... 9
Elo Touch Solutions – E-Series Hardware Monitoring Utility .................................................9
LED Functionality ........................................................................................................................10
Accessing the Input/Output Panel ............................................................................................11
Setting Up the Operating System .............................................................................................12
Creating the Recovery Flash Drive ..........................................................................................16
Recovering the Operating System ...........................................................................................19
Chapter 3: Safety and Maintenance ..................................................... 23
Safety ............................................................................................................................................23
Care and Handling ......................................................................................................................24
Chapter 4: Technical Support............................................................... 26
Technical Assistance ..................................................................................................................26
Chapter 5: REGULATORY INFORMATION .......................................... 27
I. Electrical Safety Information ..............................................................................................27
II. Emissions and Immunity Information ................................................................................27
III. Agency Certifications ...................................................................................................29
IV. China RoHS ...................................................................................................................30
Chapter 6: WARRANTY INFORMATION ............................................... 31
Page 4
This chapter discusses how to set up and test your touchcomputer.
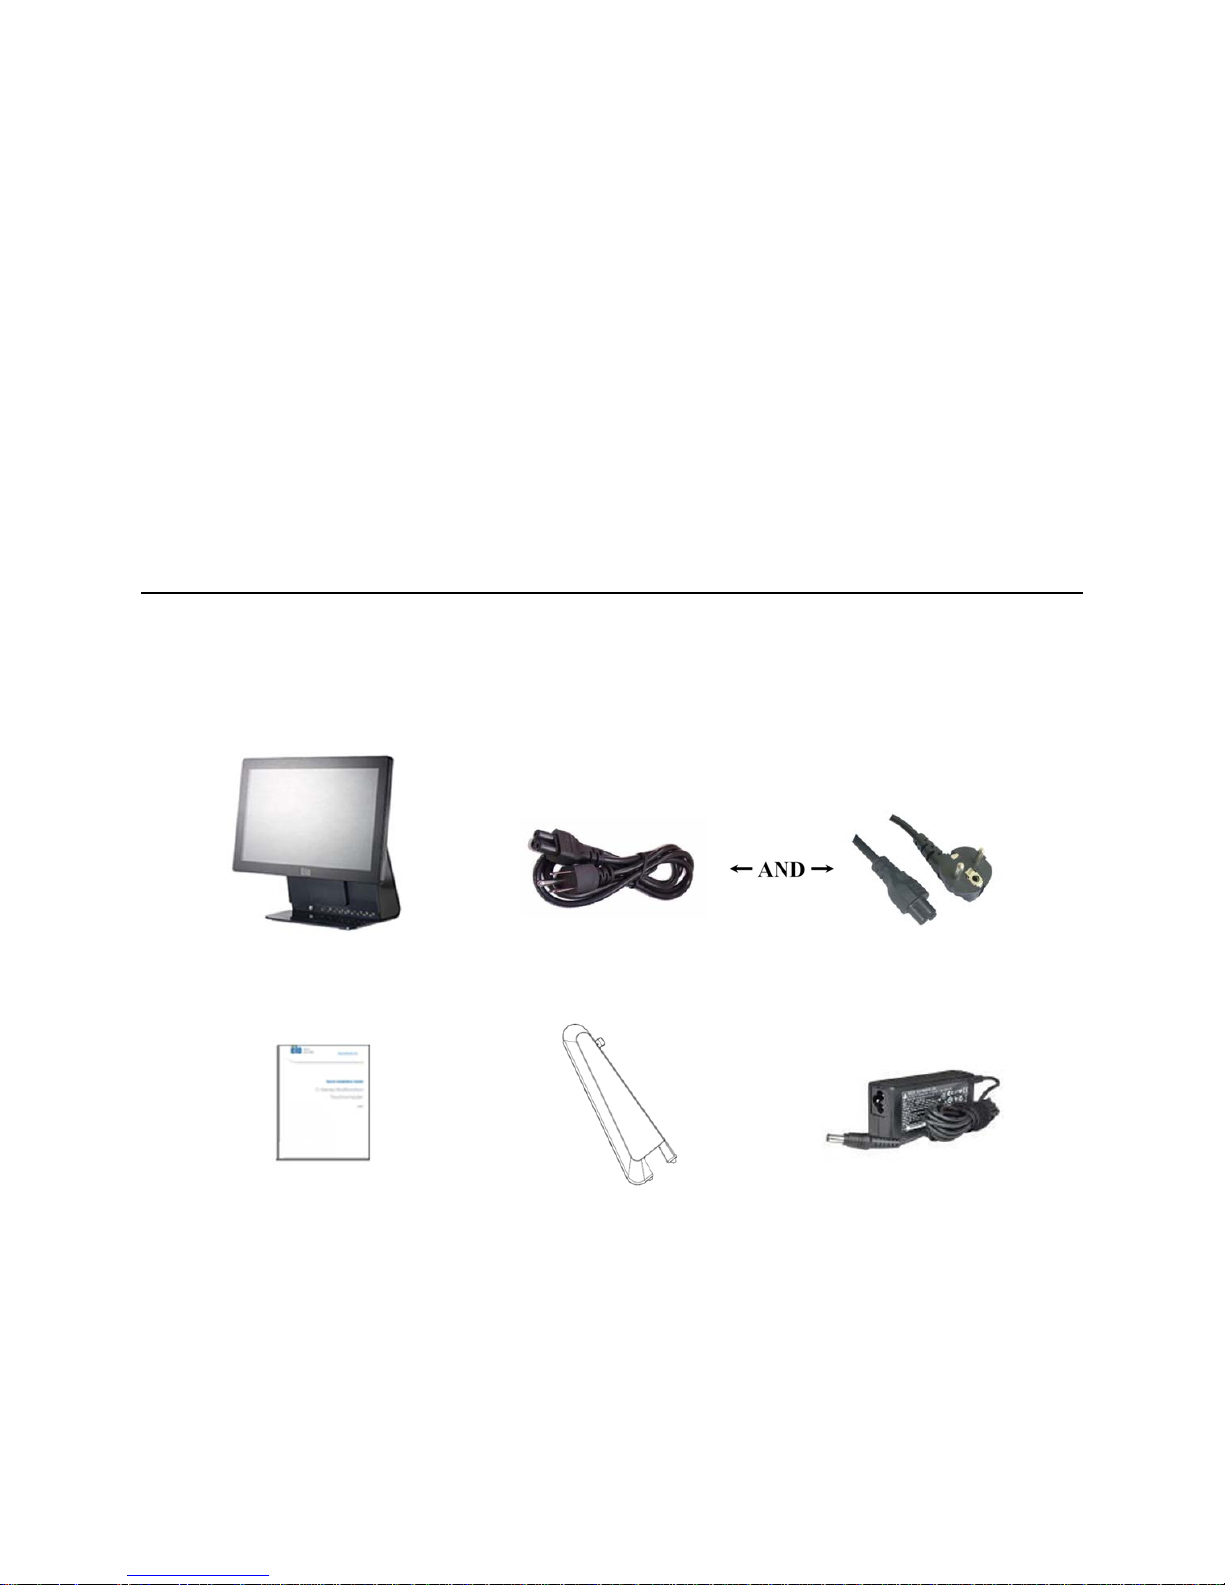
Unpacking Your Touchcomputer
Check that the following items are present and in good condition:
C H A P T E R
1
SETUP
Touchcomputer
Quick Install Guide Power Adapter
Power cable US/Canada Power cable Europe
Extended Cable Cover
User Guide – E-Series AiO Touchcomputer
SW602266 Rev A, Page 4 of 32
Page 5

Adjusting the Display
The display screen can be adjusted from -17 to +75 degrees, as shown below.
17°
75°
-17°
CAUTION: To prevent tipping or dropping, be sure to hold the base when
adjusting the display.
+75°
User Guide – E-Series AiO Touchcomputer
SW602266 Rev A, Page 5 of 32
Page 6

Calibrating the Touchscreen
The touchscreen is pre-calibrated for accurate touch response.
If for any reason the touchscreen needs to be recalibrated, please double-click
the EloConfig shortcut on the system desktop (for Windows 7 & 8.1) and then
click “Calibrate Touch Screens”.
This launches the calibration program. The window shown below opens. Follow
the instructions to calibrate the touchscreen.
User Guide – E-Series AiO Touchcomputer
SW602266 Rev A, Page 6 of 32
Page 7
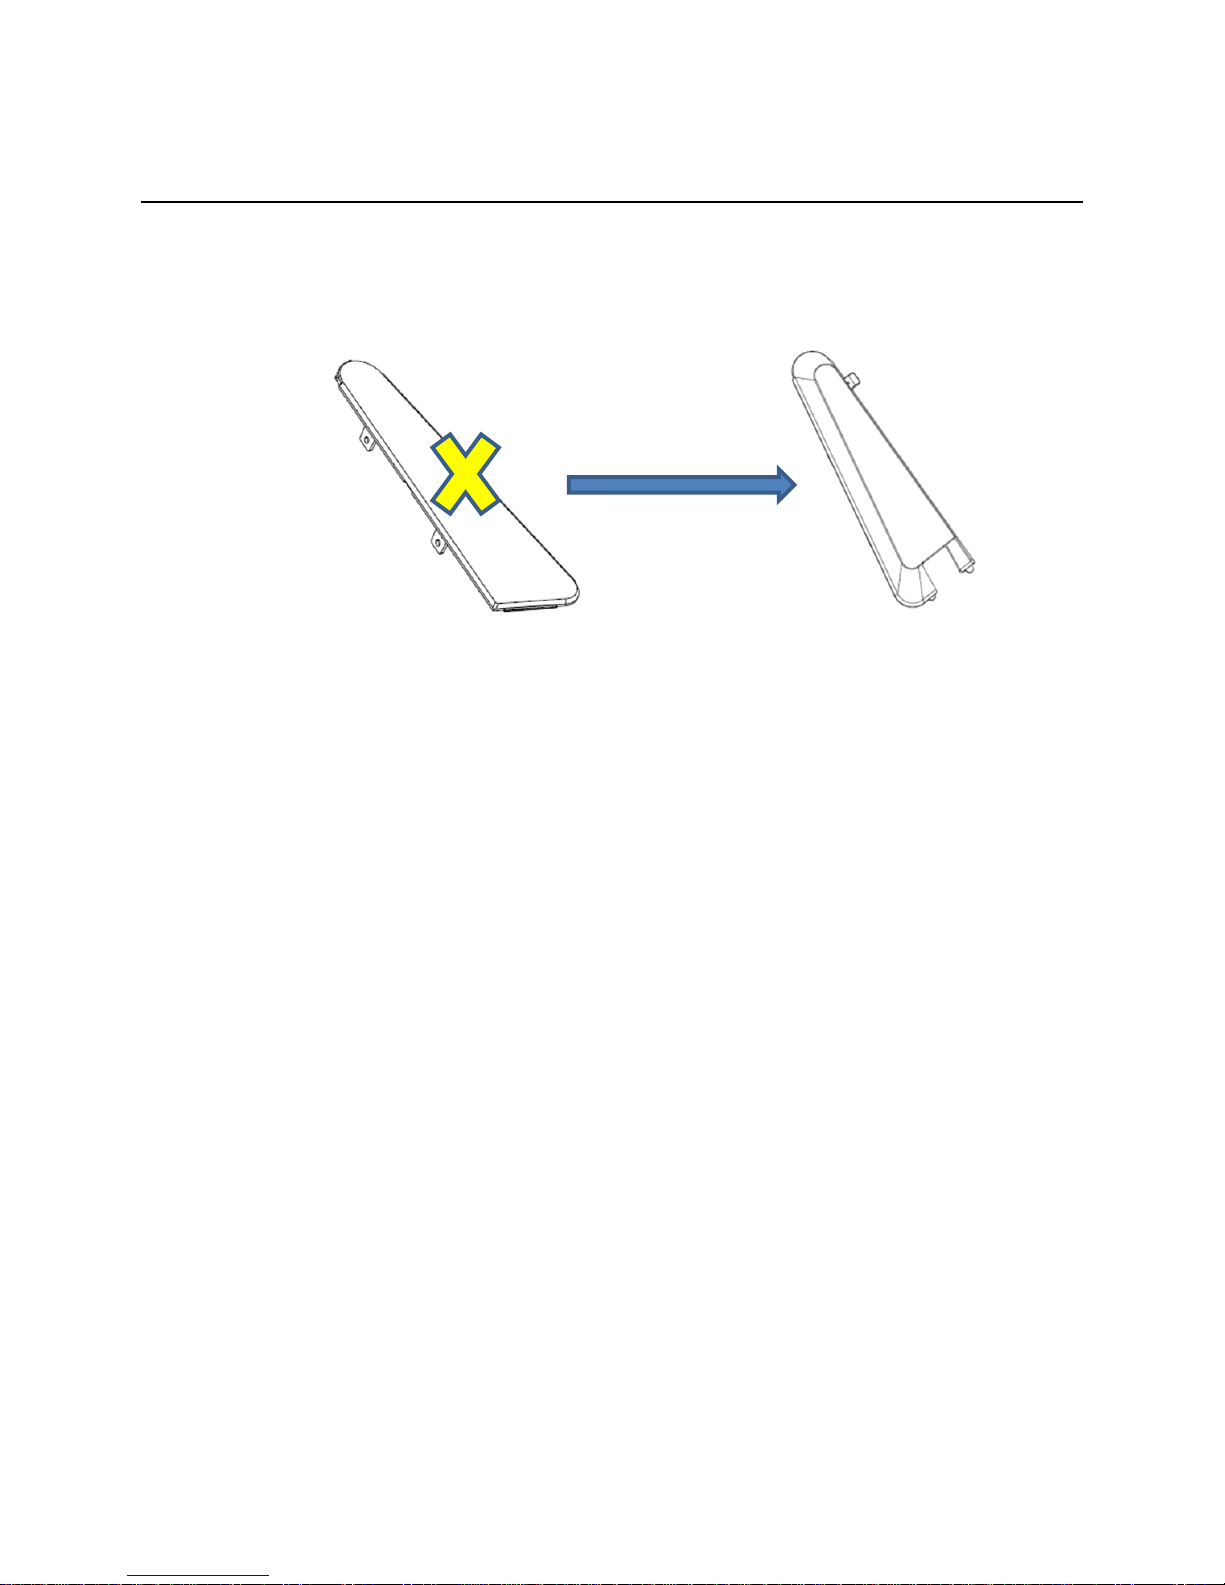
Additional Extended Cable Cover for Your System
E-Series RevC provides an additional extended cable cover in the accessory box.
You may need to replace the original cable cover to the extended cable cover if
most of I/O ports have been connected.
User Guide – E-Series AiO Touchcomputer
SW602266 Rev A, Page 7 of 32
Page 8
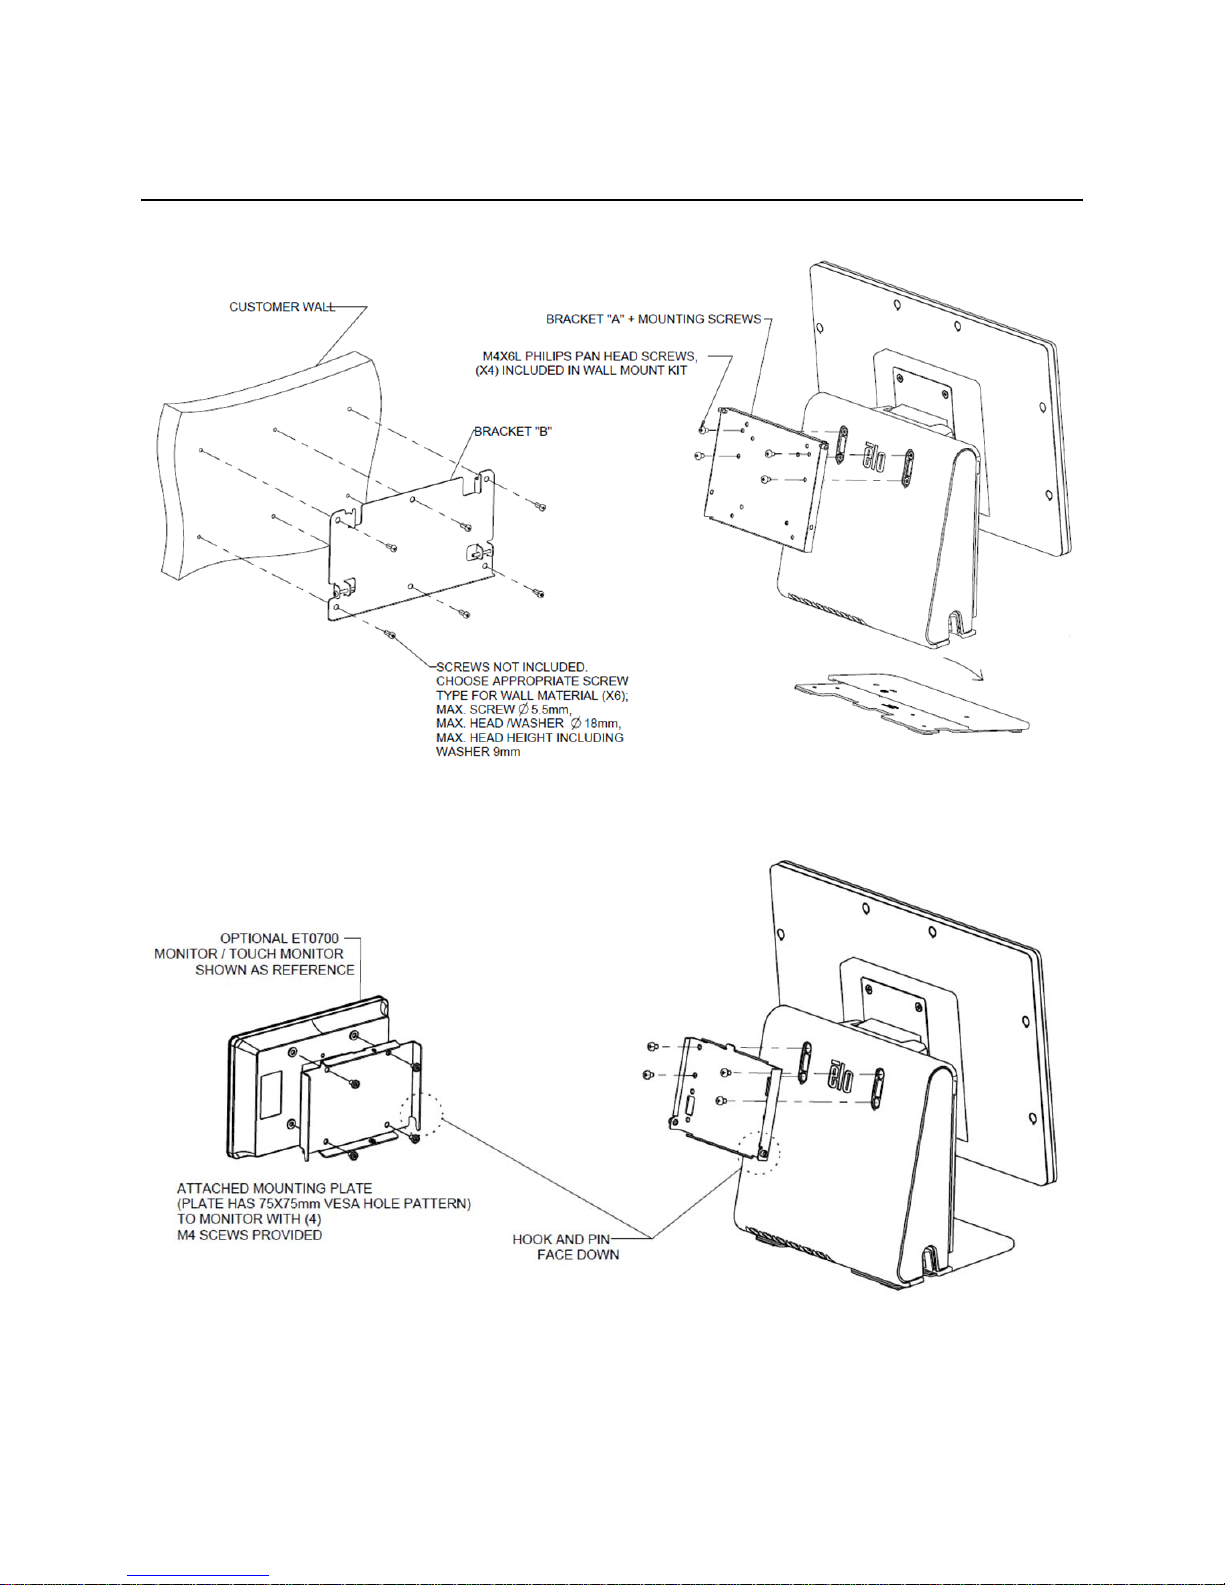
Additional Mounting Option for Your System
1) Mounting on the wall
REMOVE SCREWS TO
REMOVE FOOT PLATE
2) Second monitor mount onto your system (any monitor under 2.5 Kg with 75mm
VESA mount)
User Guide – E-Series AiO Touchcomputer
SW602266 Rev A, Page 8 of 32
Page 9
C H A P T E R
2
OPERATION
This chapter describes how to interact with the Elo Touch Solutions diagnostic
tool, power LED, and input/output panel.
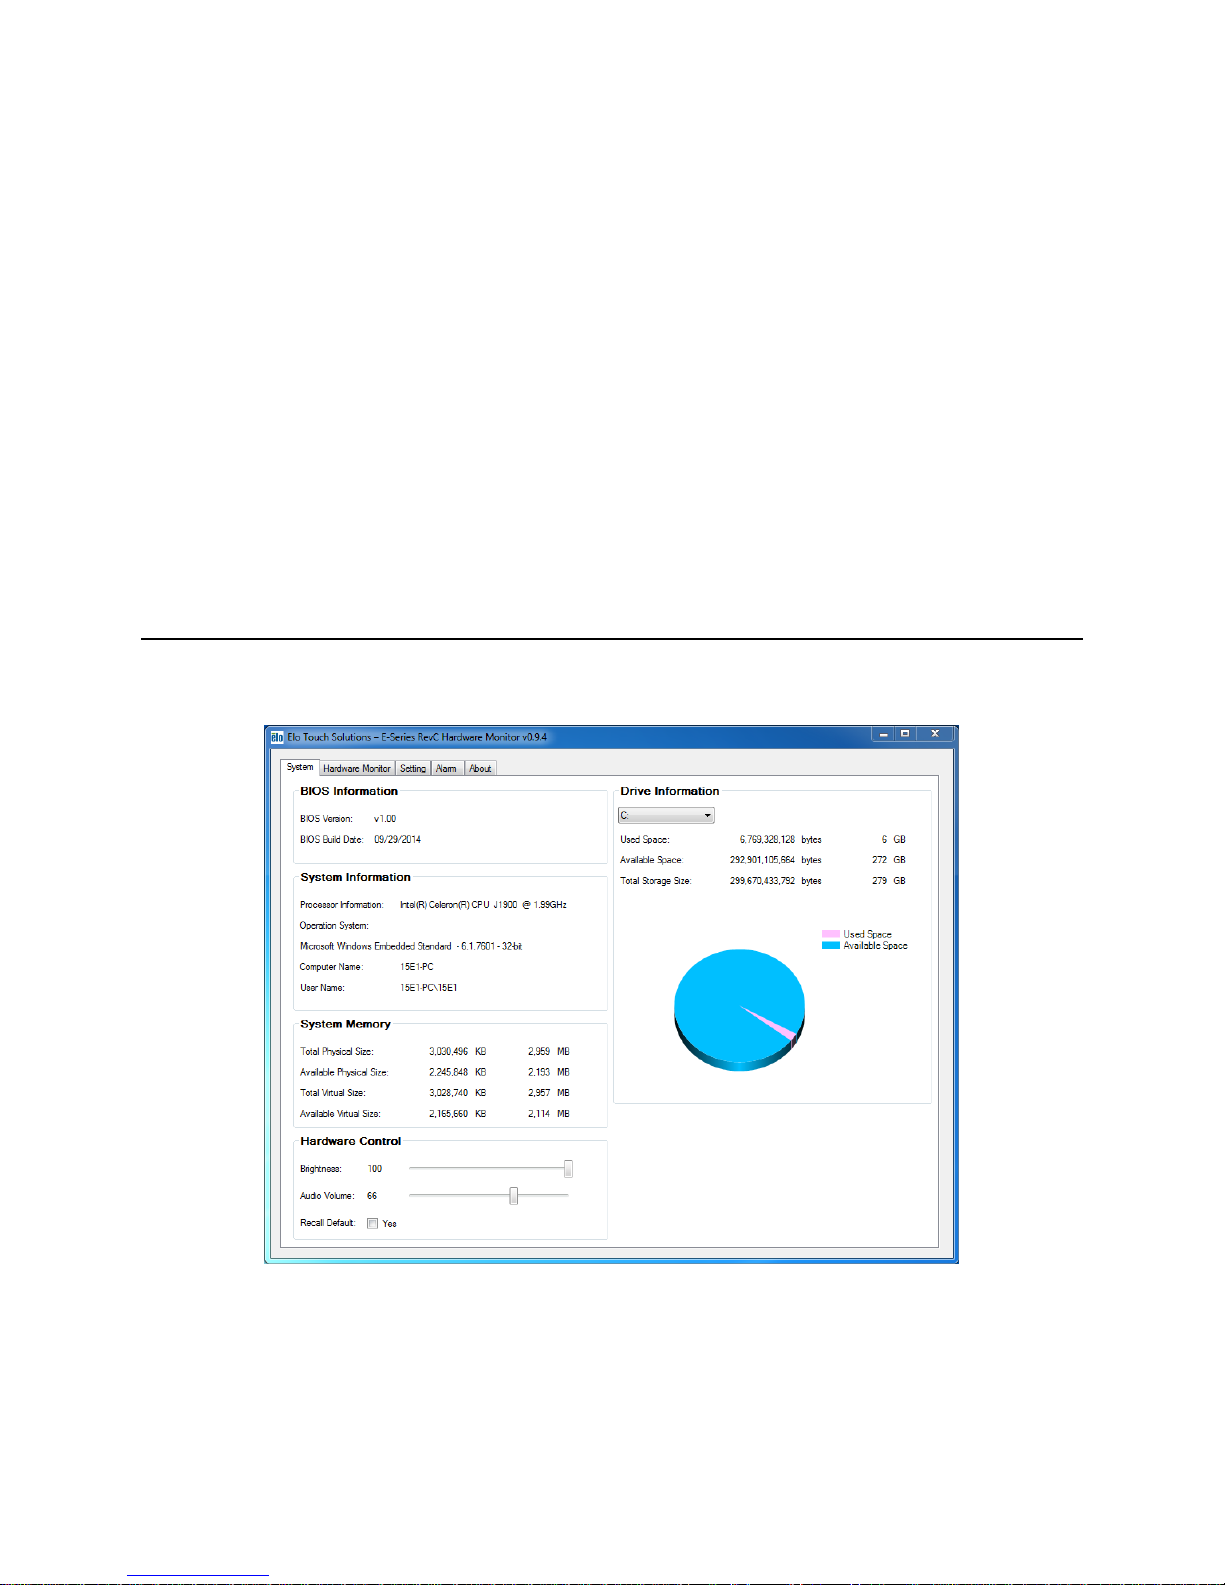
Elo Touch Solutions – E-Series Hardware Monitoring Utility
E-Series Hardware Monitor Menu
User Guide – E-Series AiO Touchcomputer
SW602266 Rev A, Page 9 of 32
Page 10
The Hardware Monitor tool provides the following features.
Feature Description
System Display the BIOS version, operating system version, Hardware
Control (Volume & Brightness), memory information, and drive
information.
Hardware
Monitor
Setting Set alarms when the CPU temperature, system temperature, and
Alarm
About General information for the E-Series diagnostic tool.
LED Functionality
The E-Series base has a LED indicating the state of the touchcomputer. The
table below shows LED state and corresponding color.
LED Color to Observer State
Off No input power — Off mode
Red Input power present – Off or Hibernation mode
Monitor the CPU temperature, system temperature, and system
output voltages.
output voltages that meet the setting criterion.
Display the record of all alarms.
Orange Input power present — Standby mode S3
Green Input power present — Power on
User Guide – E-Series AiO Touchcomputer
SW602266 Rev A, Page 10 of 32
Page 11

Accessing the Input/Output Panel
To access the input/output (I/O) ports, remove the I/O cover at the left of the unit.
A security screw is included and may be used to secure the front cover to the
touchcomputer. Below are the I/O descriptions:
Note: As a safety precaution, always leave the I/O cover attached when the system is
powered on.
User Guide – E-Series AiO Touchcomputer
SW602266 Rev A, Page 11 of 32
Page 12

Setting Up the Operating System
If configured with an operating system, the initial setup of the operating system
takes approximately 5-10 minutes. Additional time may be needed depending on
touchcomputer hardware configurations and connected devices.
To set up the Microsoft® Windows® Operating System for the touchcomputer,
turn on the touchcomputer by pressing the power button, and then follow the onscreen instructions.
Injecting a new language (For Windows POSReady 7 Only)
Windows POSReady 7 only allows the use of only one language at one time. But
you can use the Elo Touch Solutions language injection feature to modify your
language preference. English is set as the default language, but you can change
this language to suit your preferences.
1. Power off your system completely.
2. Power on your system.
3. After the Elo splash screen (shown below), press “↑” or “↓” repeatedly to
pause on Windows Boot Manager.
User Guide – E-Series AiO Touchcomputer
SW602266 Rev A, Page 12 of 32
Page 13

4. Select either Restore OS 32bit or Restore OS 64bit depending on your OS
environment.
5. The following User Interface (UI) will be presented:
6. Select Inject Language, and the following UI will be presented.
User Guide – E-Series AiO Touchcomputer
SW602266 Rev A, Page 13 of 32
Page 14

6. Click the drop-down list and select the preference language.
7. Click Inject Selected Language
8. While the injecting process is performing, DO NOT use your keyboard or
mouse during this time. It may cause an error in the language injection
process.
9. After the language package is installed correctly, press any key to exit the
window.
User Guide – E-Series AiO Touchcomputer
SW602266 Rev A, Page 14 of 32
Page 15

10. You should see the new injected language in both “Selected Language” and
“Injected Language”.
11. Click Cancel Exit. The system will reboot and new language UI should be
presented when the system enters the Desktop.
User Guide – E-Series AiO Touchcomputer
SW602266 Rev A, Page 15 of 32
Page 16

Creating the Recovery Flash Drive
All POSReady 7 and Windows 8.1 touchcomputers come with the built-in Elo
Restore Utility on the Windows Desktop. The utility is able to create a recovery
flash drive based on the operating system you purchased. Please create your
recovery flash drive immediately. In the event the HDD/SSD recovery partition
is accidentally deleted or becomes inaccessible, you will need to use the
recovery flash drive to recover your system.
The following procedures demonstrate how to use the utility to create a recovery
flash drive.
1. Right-click the EloRestoreUtility icon on the Desktop and select “Run as
administrator”.
2. Click “Start” button to begin the process.
3. Once completed, you shall see a pop-up window to ask to insert a blank flash
drive to any of available USB ports on your system.
4. After the flash drive is inserted, you shall see a window as shown below.
Click “Format Drive” to continue the process. PLEASE NOTE THAT ALL
User Guide – E-Series AiO Touchcomputer
SW602266 Rev A, Page 16 of 32
Page 17

DATA WILL BE LOST DURING THIS PROCESS.
5. Click “Create Restore Media” to proceed. This step will take 10-20 minutes
depending on your system configurations and flash drive performance.
6. Once the message says “Creation Restore Media success…”, please remove
the flash drive and click “Exit” to exit the program.
User Guide – E-Series AiO Touchcomputer
SW602266 Rev A, Page 17 of 32
Page 18

7. In case the system is crashed and you have to use the recovery flash drive,
reboot the system and press F11 several times to enter Device Boot Menu.
Then, choose boot from flash drive.
8. When the following UI is presented, click “Install Recovery Solution” button.
9. Follow the on-screen instructions to complete the installation process and
then exit the program.
Note: All data is deleted during the recovery process. The user must back up files
when necessary. Elo Touch Solutions does not accept liability for lost data or
software.
Note: The end user must adhere to Microsoft's Licensing Agreement
User Guide – E-Series AiO Touchcomputer
SW602266 Rev A, Page 18 of 32
Page 19

Recovering the Operating System
If for any reason the touchcomputer’s operating system needs to be recovered
TO FACTORY SETTINGS, you can recover your system by following procedures
below. PLEASE NOTE THAT ALL CUSTOMER SETTINGS AND DATA WILL
BE LOST DURING THIS PROCESS. Please be sure to completely backup all of
your data, settings, and customer-installed software before proceeding.
1. Power off your system completely.
2. Power on your system.
3. After the Elo splash screen (shown below), press “↑” or “↓” repeatedly to
pause on Windows Boot Manager.
User Guide – E-Series AiO Touchcomputer
SW602266 Rev A, Page 19 of 32
Page 20

4. Select Select either Restore OS 32bit or Restore OS 64bit depending
on your OS environment.
5. The following User Interface (UI) will be presented:
6. Select Restore OS. System will test your hardware automatically. Once
the process completes, click Start button to perform the system recovery
User Guide – E-Series AiO Touchcomputer
SW602266 Rev A, Page 20 of 32
Page 21

function.
7. The following process will reformat the primary hard drive. Please back
up your data before performing the recovery process.
8. Once completed, click the Close button. The system will return to the
main menu of the Elo Recovery Solution. Then click the Exit button to
restart your system.
User Guide – E-Series AiO Touchcomputer
SW602266 Rev A, Page 21 of 32
Page 22

NOTE: All data is deleted during the recovery process. The user must back up
files when necessary. Elo Touch Solutions does not accept liability for
lost data or software.
NOTE: The end user must adhere to Microsoft's Licensing Agreement.
User Guide – E-Series AiO Touchcomputer
SW602266 Rev A, Page 22 of 32
Page 23

C H A P T E R
3
SAFETY AND MAINTENANCE
Safety
Important information regarding the proper setup and maintenance of your touchcomputer:
To reduce the risk of electric shock, follow all safety notices and do not disassemble
the touchcomputer.
Turn off touchcomputer before cleaning (refer to “Care and Handling” for proper
cleaning methods).
Your touch computer is equipped with a 3-wire, grounding power cord. The power
cord plug only fits into a grounded outlet. Do not attempt to fit the plug into an outlet
that has not been configured for this purpose. Do not use a damaged power cord.
Only use the power cord that comes with your Elo Touch Solutions touchcomputer.
Use of an unauthorized power cord might invalidate your warranty.
The slots located on the sides and top of the touchcomputer case are designed to
allow for ventilation. Do not block or insert anything inside these ventilation slots.
It is important that your touchcomputer remains dry. Do not pour liquid into or onto
your touchcomputer. If your touchcomputer becomes wet, do not attempt to repair it
yourself. Contact Elo Customer Service for assistance.
User Guide – E-Series AiO Touchcomputer
SW602266 Rev A, Page 23 of 32
Page 24

Care and Handling
The following tips will help maintain optimal performance of your touchcomputer.
To avoid risk of electric shock, do not disassemble the power adapter or display. The
unit is not user serviceable. Remember to unplug the touch computer from the power
outlet prior to cleaning.
To clean the touch monitor (except touchscreen), use a cloth lightly dampened with a
mild detergent.
Do not wipe the screen with a cloth or sponge that could scratch the surface.
To clean the touchscreen, use window or glass cleaner. Put the cleaner on the rag
and wipe the touchscreen. Never apply the cleaner directly on the touchscreen.
Do not use alcohol (methyl, ethyl, or isopropyl) or any strong solvent to clean your
touchcomputer. Do not use thinner or benzene, abrasive cleaners, or compressed air.
Avoid getting liquids inside your touchcomputer. If liquid does get inside, have a
qualified service technician inspect the unit before you power it on again.
WEEE Directive
This product should not be disposed of with household waste. It should be
deposited at a facility that enables recovery and recycling. Ensure that product is
disposed at the end of its useful life according to local laws and regulations.
Elo has put in place recycling arrangements in certain parts of the world. For
information on how you can access these arrangements, please visit
http://www.elotouch.com/AboutElo/ewaste-program/.
User Guide – E-Series AiO Touchcomputer
SW602266 Rev A, Page 24 of 32
Page 25

Battery Notice
E-Series touch computer comes with a lithium coin cell battery, which is located in the
motherboard. Take caution to not replace this battery with an unsuitable replacement as that
may result in explosion hazard. Discard battery at the end of its useful life according to local
laws and regulations.
User Guide – E-Series AiO Touchcomputer
SW602266 Rev A, Page 25 of 32
Page 26

Technical Assistance
There are two methods to obtain contact information for technical assistance on
the touchcomputer:
The web
The phone
Using the Web
C H A P T E R
4
TECHNICAL SUPPORT
For online self-help, go to www.elotouch.com/go/websupport.
For technical support, go to www.elotouch.com/go/contactsupport.
For current Elo news, product updates, and announcements, or to register to
receive our Touchcomputer newsletter, go to www.elotouch.com/go/news.
Using the Phone
For technical support, see the table at the end of the user guide for contact
information.
User Guide – E-Series AiO Touchcomputer
SW602266 Rev A, Page 26 of 32
Page 27

C H A P T E R
5
REGULATORY INFORMATION
I. Electrical Safety Information
A) Compliance is required with respect to the voltage, frequency, and current
requirements indicated on the manufacturer’s label. Connection to a different power
source than those specified herein may result in improper operation, damage to the
equipment, invalidation of warranty, or a fire hazard if the requirements are not followed.
B) There are no operator-serviceable parts inside this equipment. There are hazardous
voltages generated by this equipment which constitute a safety hazard. Service should
be provided only by a qualified service technician.
C) This equipment is provided with a detachable power cord which has an integral safety
ground wire intended for connection to a grounded safety outlet.
1) Do not substitute the cord with other than the provided approved type. Under no
circumstances use an adapter plug to connect to a 2-wire outlet as this defeats the
continuity of the grounding wire.
2) The equipment requires the use of the ground wire as a part of the safety
certification. Modification or misuse can provide a shock hazard that can result in
serious injury or death.
3) Contact a qualified electrician or the manufacturer if there are questions about the
installation prior to connecting the equipment to main power.
II. Emissions and Immunity Information
A) Notice to Users in the United States: This equipment has been tested and found to
comply with the limits for a Class A digital device, pursuant to Part 15 of FCC Rules.
These limits are designed to provide reasonable protection against harmful interference
in a residential or commercial installation. This equipment generates, uses, and can
User Guide – E-Series AiO Touchcomputer
SW602266 Rev A, Page 27 of 32
Page 28

radiate radio frequency energy, and if not installed and used in accordance with the
instructions, may cause harmful interference to radio communications.
B) Notice to Users in Canada: This equipment complies with the Class A limits for radio
noise emissions from digital apparatus as established by the Radio Interference
Regulations of Industry Canada.
C) Notice to Users in the European Union: Use only the provided power cords and
interconnecting cabling provided with the equipment. Substitution of provided cords and
cabling may compromise electrical safety or CE Mark Certification for emissions or
immunity as required by the following standards: This Information Technology
Equipment (ITE) is required to have a CE Mark on the manufacturer’s label which means
that the equipment has been tested to the following Directives and Standards:
This equipment has been tested to the requirements for the CE Mark as required by
EMC Directive 2004/108/EC indicated in European Standard EN 55022 Class A and the
Low Voltage Directive 2006/95/EC as indicated in European Standard EN 60950-1.
D) General Information to all Users: This equipment generates, uses, and can radiate
radio frequency energy. If not installed and used according to this manual, the
equipment may cause interference with radio and television communications. There is,
however, no guarantee that interference will not occur in any particular installation due to
site-specific factors.
1) In order to meet emission and immunity requirements, the user must observe the
following:
a) Use only the provided cables to connect the Elo touchcomputer.
b) To ensure compliance, use only the provided manufacturer’s approved power
cord.
c) The user is cautioned that changes or modifications to the equipment not
expressly approved by the party responsible for compliance could void the user’s
authority to operate the equipment.
2) If this equipment appears to cause interference with radio or television reception,
or any other device:
a) Verify as an emission source by turning the equipment off and on.
b) If you determine that this equipment is causing the interference, try to correct
the interference by using one or more of the following measures:
i) Move the digital device away from the affected receiver.
ii) Reposition (turn) the digital device with respect to the affected receiver.
iii) Reorient the affected receiver’s antenna.
iv) Plug the digital device into a different AC outlet so the digital device and
the receiver are on different branch circuits.
User Guide – E-Series AiO Touchcomputer
SW602266 Rev A, Page 28 of 32
Page 29

v) Disconnect and remove any I/O cables that the digital device does not use.
(Unterminated I/O cables are a potential source of high RF emission levels.)
vi) Plug the digital device into only a grounded outlet receptacle. Do not use
AC adapter plugs. (Removing or cutting the line cord ground may increase
RF emission levels and may also present a lethal shock hazard to the user.)
vii) If you need additional help, consult your dealer, manufacturer, or an
experienced radio or television technician.
Warning
This is a class A product. In a domestic environment this product may cause
radio interference in which case the user may be required to take adequate
measures
III. Agency Certifications
The following certifications have been issued for the touchcomputer:
UL/CUL FCC TUV
CB CE Mexico COC
S-Mark Australia (RCM) Japan (VCCI)
China (CCC) Korea (KC)
Ukraine
(UKSERTCOMPUTER)
Taiwan (BSMI)
User Guide – E-Series AiO Touchcomputer
SW602266 Rev A, Page 29 of 32
Page 30

IV. China RoHS
In accordance to Chinese law (Administration on the Control of Pollution Caused
by Electronic Information Products), the section below lists out the name and
amount of the toxic and/or hazardous materials that this product may contain.
Component
Name
Plastic
Parts
Metal Parts X O O O O O
Wire and
Cable
Assembly
LCD Panel X O O O O O
Touch
Screen
Panel
PCBA X O O O O O
CD O O O O O O
O: Indicates that this toxic or hazardous substance contained in all of the homogeneous materials
for this component is below the limit requirement in SJ/T11363-2006.
X: Indicates that this toxic or hazardous substance contained in at least one of the homogeneo us
materials used for this component is above the limit requirement in SJ/T11363-2006. For items
marked with X, exemptions were taken according to EU RoHS.
Lead
(Pb)
O O O O O O
X O O O O O
X O O O O O
Toxic or Hazardous Substances and Elements
Mercury
(Hg)
Cadmium
(Cd)
Hexavalent
Chromium
(Cr6+)
Polybrominated
Biphenyls
(PBB)
Polybrominated
Diphenyl Ethers
(PBDE)
Explanation of Markings
(1). In accordance with the SJ/T11364-2006 requirement, the electronic
information products are marked with the following pollution control logo.
The Environment-Friendly Use Period for this product is 10 years. The product
will not leak or mutate under normal operating conditions listed below, so that the
use of this electronic information product will not result in any severe
environmental pollution, any bodily injury, or damage to any assets.
Operating Temperature: 0-35°C / Humidity: 20%-80% (non-condensing).
Storage Temperature: -30~60 °C / Humidity: 5%~95% (non-condensing).
(2). It is encouraged and recommended that this product be recycled and reused
according to local laws. The product should not be thrown away casually.
User Guide – E-Series AiO Touchcomputer
SW602266 Rev A, Page 30 of 32
Page 31

C H A P T E R
WARRANTY INFORMATION
For warranty information, go to http://www.elotouch.com/Support/warranty.asp
6
User Guide – E-Series AiO Touchcomputer
SW602266 Rev A, Page 31 of 32
Page 32

Check out our website
www.elotouch.com
Get the latest...
Product information
Specifications
News on upcoming events
Press release
Software drivers
Getting in Touch with Us
To find out more about the extensive range of Elo touch solutions, visit our website at
www.elotouch.com, or simply call the office nearest you:
Tel 800-ELO-TOUCH
North America
Elo Touch Solutions
1033 McCarthy Blvd
Milpitas, CA 95035
Copyright 2014 Elo Touch Solutions, Inc. All rights reserved.
Tel + 1 408 597 8000
Fax +1 408 597 8050
customerservice@elotou
ch.com
Europe
Tel +32 (0) 16 70 45 00
Fax +32 (0)16 70 45 49
elosales@elotouch.com
Asia-Pacific
Tel +86 (21) 3329 1385
Fax +86 (21) 3329 1400
www.elotouch.com.cn
Latin America
Tel 786-923-0251
Fax 305-931-0124
www.elotouch.com
User Guide – E-Series AiO Touchcomputer
SW602266 Rev A, Page 32 of 32
 Loading...