

Page 1
USER MANUAL
Elo Touch Solutions
Elo Backpack
ELO-KIT-EloView-Engine
Page 2

UM600183 Rev A, page 2 of 38
User Manual – Elo Backpack
Copyright © 2018 Elo Touch Solutions, Inc. All Rights Reserved.
No part of this publication may be reproduced, transmitted, transcribed, stored in a retrieval system, or translated into any language or computer
language, in any form or by any means, including, but not limited to, electronic, magnetic, optical, chemical, manual, or otherwise without prior written
permission of Elo Touch Solutions, Inc.
Disclaimer
The information in this document is subject to change without notice. Elo Touch Solutions, Inc. and its Affiliates (collectively “Elo”) makes no representations or
warranties with respect to the contents herein, and specifically disclaims any implied warranties of merchantability or fitness for a particular purpose. Elo
reserves the right to revise this publication and to make changes from time to time in the content hereof without obligation of Elo to notify any person of such
revisions or changes.
Trademark Acknowledgments
Elo, Elo (logo), Elo Touch, Elo Touch Solutions, EloView, are trademarks of Elo and its Affiliates.
Page 3

UM600183 Rev A, page 3 of 38
User Manual – Elo Backpack
Table of Contents
Section 1: Introduction ............................................................................................................................................................................................................................... 4
Section 2: Unpacking and Operation ......................................................................................................................................................................................................... 5
Section 4: Technical Support and Maintenance ...................................................................................................................................................................................... 26
Section 5: Regulatory Information ............................................................................................................................................................................................................ 29
Section 6: Warranty Information............................................................................................................................................................................................................... 37
Page 4

UM600183 Rev A, page 4 of 38
User Manual – Elo Backpack
Section 1: Introduction
Product Description
Your new Elo Backpack system provides the reliable performance from Elo that can be paired with an external monitor. This creates a natural
flow of information between a user and the Elo Backpack.
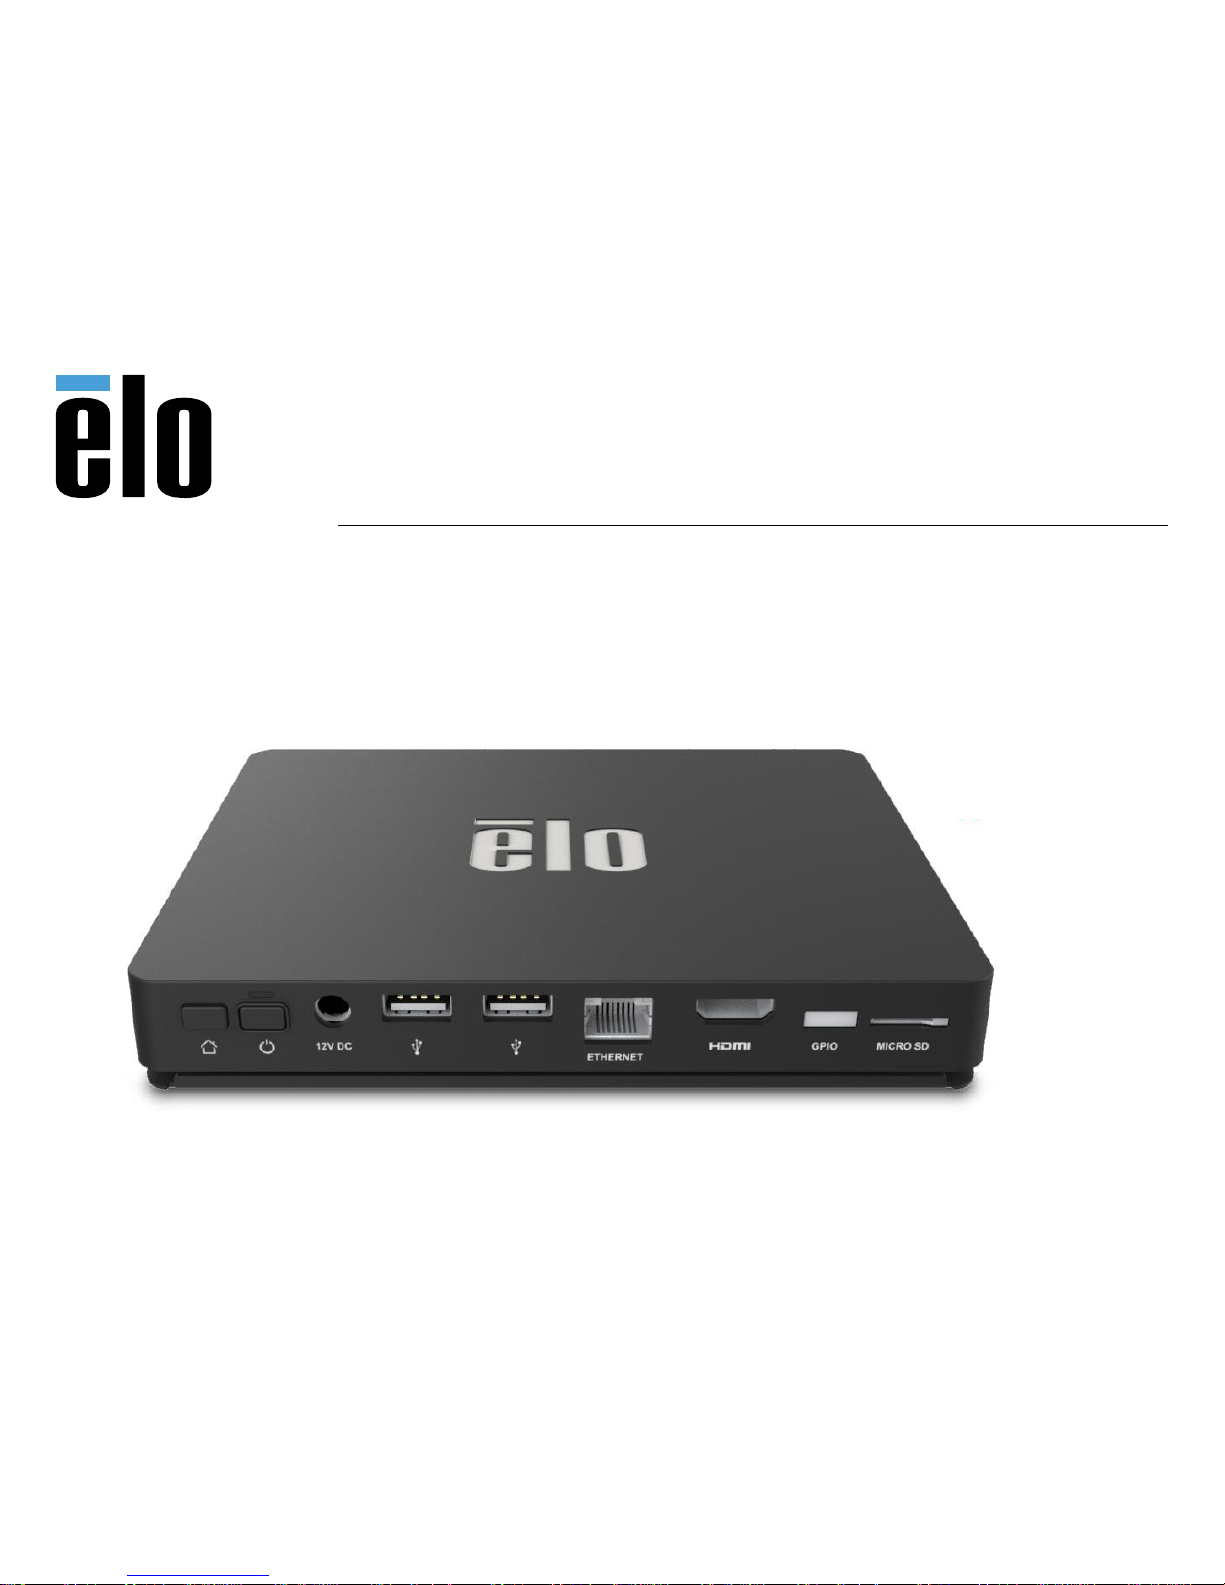
This Elo Backpack has the following features that enhance system performance such as:
• Plug & Play compatibility
• HDMI Out
• LAN/Wi-Fi/Bluetooth
• A general-purpose input/output header via an optional GPIO cable
• Two USB type A ports
• SD card slot
This manual contains detailed guidelines for operating (Sections 2 and 3) and maintaining (Section 4) your new Elo Backpack system.
Page 5
UM600183 Rev A, page 5 of 38
User Manual – Elo Backpack
Section 2: Unpacking and Operation
Box Contents
Verify that the box contains:
•
Elo Backpack
•
Quick Install Guide
•
Power adaptor
•
North American power adaptor head
•
Europe power adaptor head
•
China power adaptor head
Elo Backpack
1. Connect the included 12V DC Power cable to Elo Backpack and the wall power outlet.
2. Connect USB cable from Elo touchmonitor to one of the USB Type A connections
3. Connect HDMI cable between Elo touchmonitor and HDMI Out connection
4. Press the power button to power on the Elo Backpack
Page 6
UM600183 Rev A, page 6 of 38
User Manual – Elo Backpack
Page 7

UM600183 Rev. A, page 7 of 38
User Manual – I-series 2.0
Power
The first time the DC power is connected to the system, the system will automatically turn on.
Press and hold power button when the system is on to bring up the Power Off option popup.
In the event that the system freezes and does not respond, press and hold the power button until the system turns off. If the system does not turn
off via the power button, the system will need to be powered down by unplugging the power cord from the wall.
The Elo Backpack power button is equipped with an LED that indicates the power status of the system, as follows:
Power status
Led status
OFF (disconnected from wall)
Off
OFF (connected to wall)
Orange (Solid)
SLEEP
White (Blinking)
ON
White (Solid)
For detailed power consumption specifications, refer to technical specifications available on the Elo website www.elotouch.com.
To bring the system out of sleep/standby mode, press the power button once. If the system is in sleep mode, touching the external screen (if using
an Elo Touch monitor) will wake up the system,
If long periods of non-use are planned, turn off and unplug your Elo Backpack to save power.
The operating voltage, frequency and current for the system is provided in the power ratings table below:
Product
Operating Voltage Range
Operating Frequency Range
Operating Current
Elo Backpack
100 - 240Vac
50 – 60 Hz
1.2A
Page 8

UM600183 Rev. A, page 8 of 38
User Manual – I-series 2.0
Operating System
System comes with Android 7.1.2 pre-loaded.
Wi-Fi + Bluetooth
The following protocols are supported for Wi-Fi and Bluetooth:
• Bluetooth 4.1+ BLE, A2DP/ HID (Keyboard/Mouse)/Barcode scanner support
• IEEE 802.11b/g/n/ac; WEP/WPA/WPA2 capable; 2.4Ghz/5Ghz
HDMI Output
Elo Backpack is equipped with an HDMI port that can be connected to an external monitor and support resolutions up to 1920 x 1080 @ 60Hz
input. When using an Elo touchmonitor as an external display, touch can be enabled by connecting a USB cable to the type A USB port on the
Elo Backpack to the type B USB port on the monitor side.
Page 9

UM600183 Rev. A, page 9 of 38
User Manual – I-series 2.0
General-purpose Input / Output (GPIO) Support
The Elo Backpack supports GPIO, limited to the following conditions:
• Max Voltage: 5V
• Max Current: 200mA
There are two input connections and one output connection.
Pin 1 5 Volt output connection
Pin 2 Input connection 1
Pin 3 Input connection 2
Pin 4 and Pin 5 are tied to ground
Elo has an optional GPIO cable (PN: E086398) which extends this GPIO connection and allows easy connection of peripherals to the Elo
Backpack. More information on this cable is available from Elo website.
Page 10
UM600183 Rev. A, page 10 of 38
User Manual – I-series 2.0
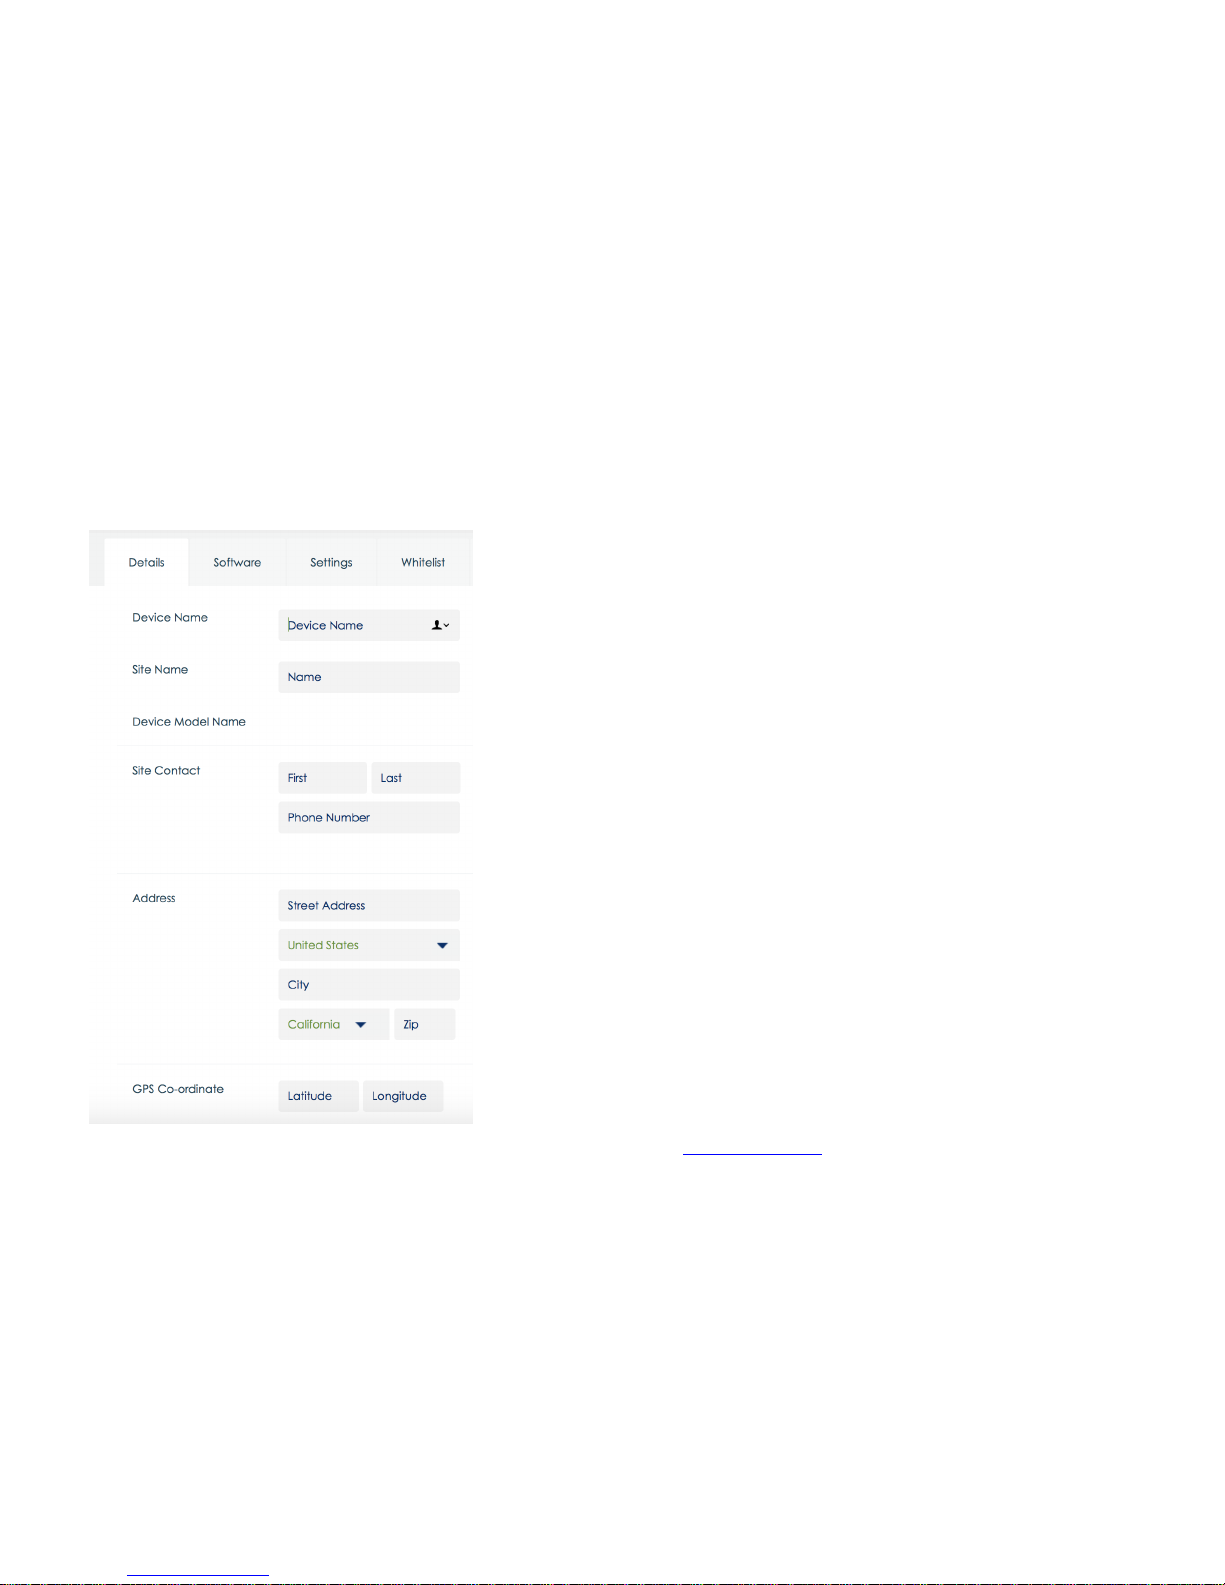
Global Positioning Satellite (GPS)
The Elo Backpack supports GPS functionality through software. User can input the longitude and latitude coordinates that define the device
location. This allows GPS functionality indoors. In your EloView cloud account, enter the Edit mode under Details and the GPS co-ordinate option
will be accessible.
For more details on how to use this feature, please reference the apps notes at www.eloview.com.
Page 11
UM600183 Rev. A, page 11 of 38
User Manual – I-series 2.0
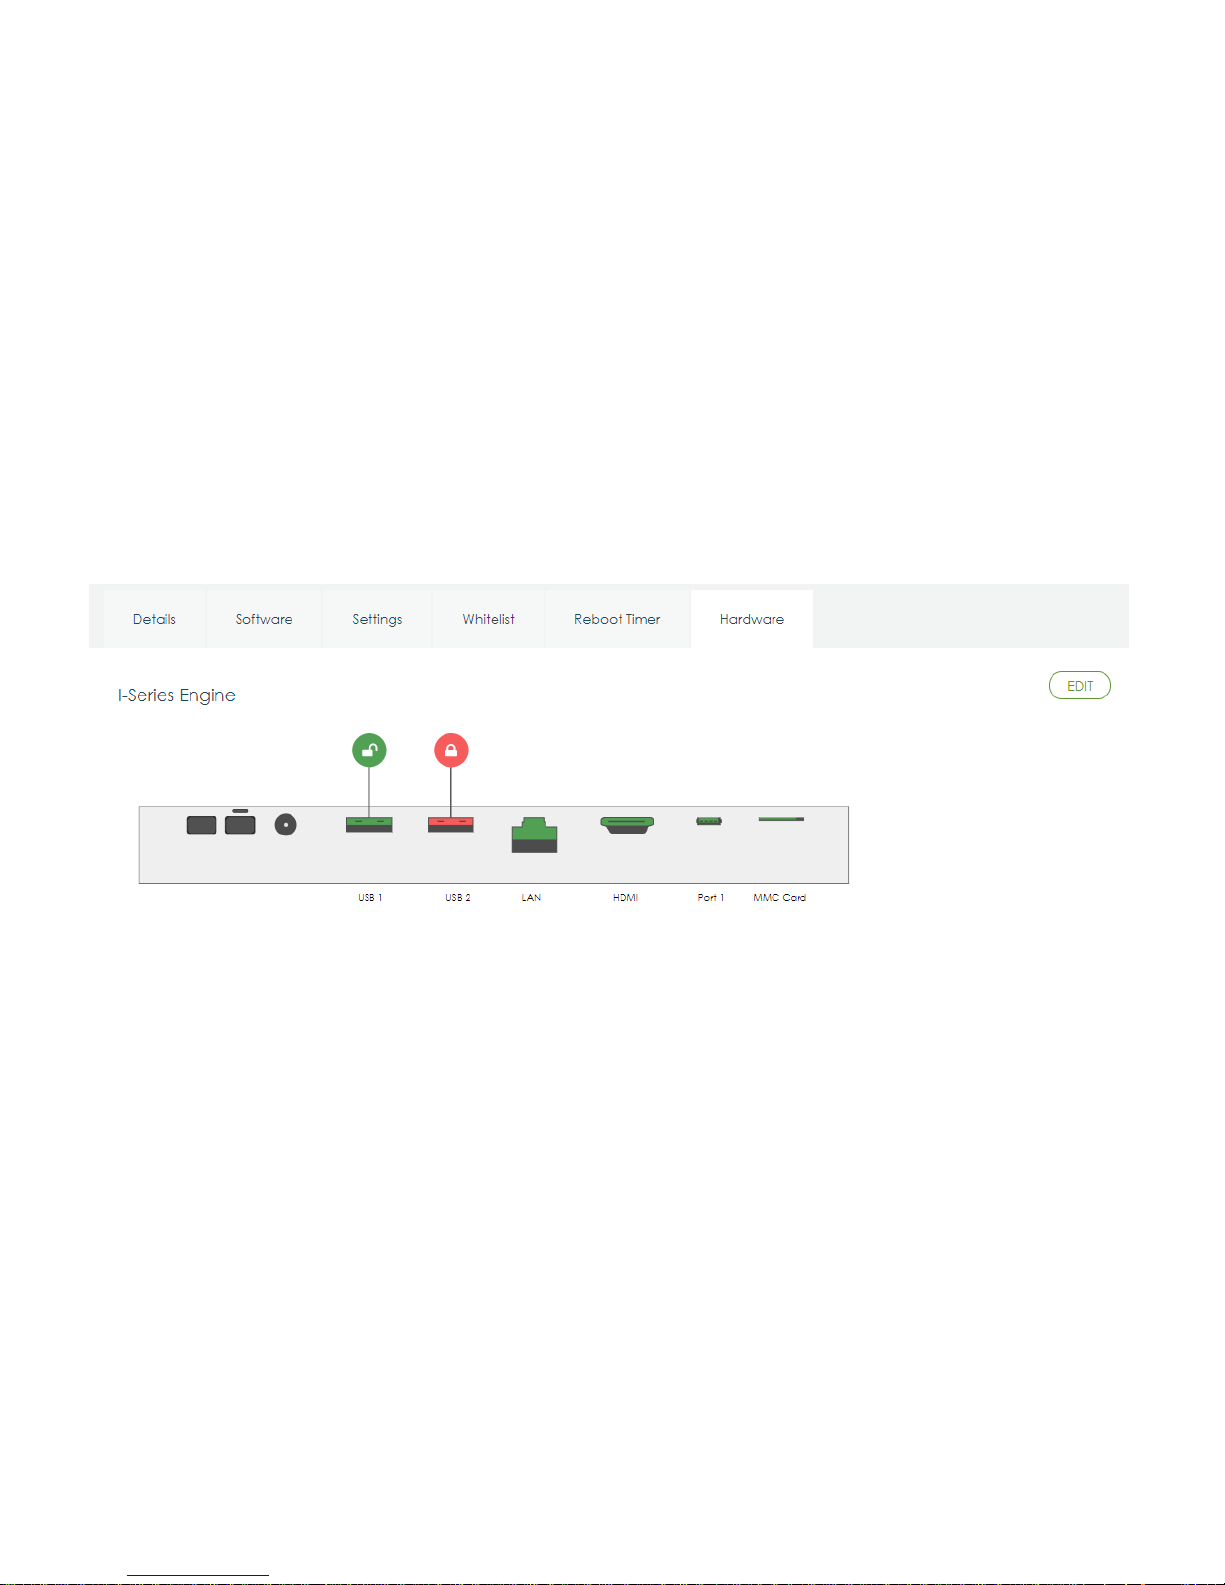
USB Control
The Elo Backpack allows users to enable or disable specific USB ports.
From EloView:
Select the port that you want to enable or disable. If the lock is green, then the USB port is enabled. If the lock is red, then the port is disabled.
Page 12
UM600183 Rev. A, page 12 of 38
User Manual – I-series 2.0
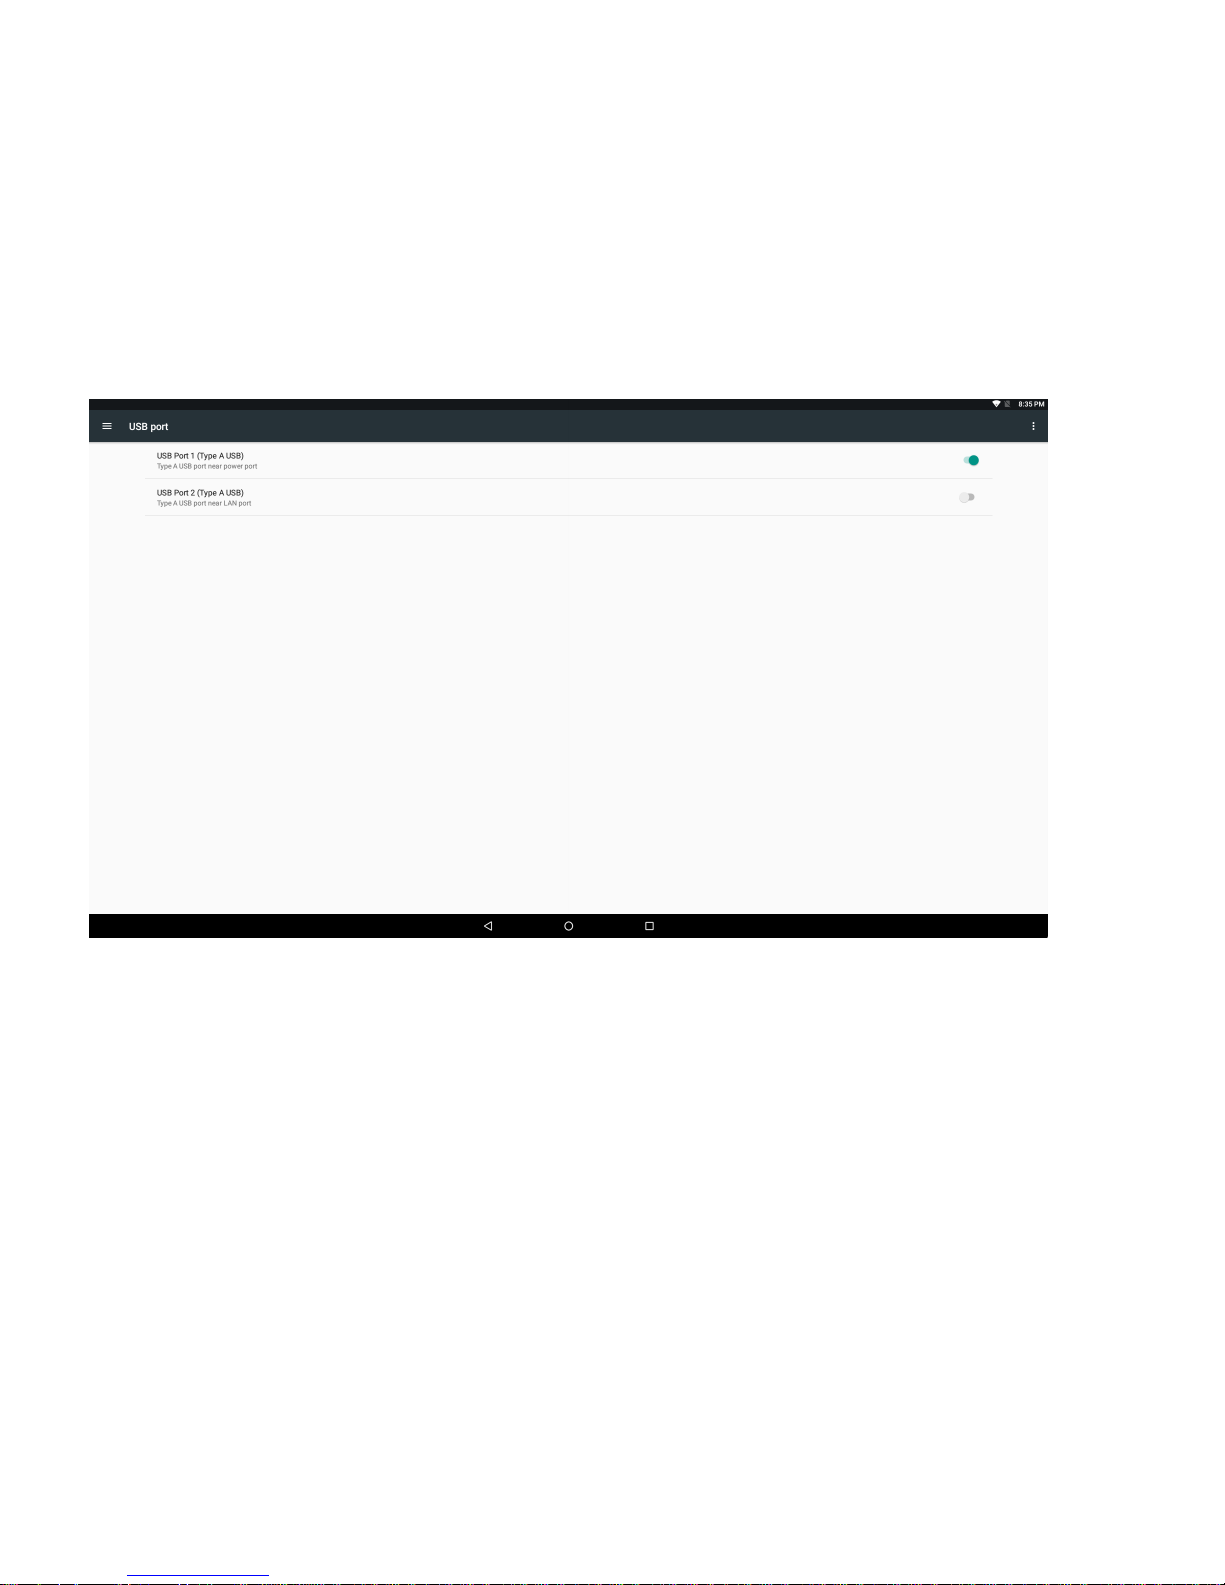
From Android Settings USB port:
Page 13

UM600183 Rev. A, page 13 of 38
User Manual – I-series 2.0
Android Debug Bridge (ADB) control
The Elo Backpack supports debugging via Wi-Fi, Ethernet or using the Type A USB port.
Enter the Android Settings Android Tablet tap 7 times on the Build Number to enter developer mode. Go back to the Settings and you will
see “Developer Options.” From here, enable the option called “USB debugging.”
To connect via Wi-Fi, ensure that your Elo Backpack is online and not behind a firewall. Find the IP address (by going to Settings About Phone
Status IP Address. On your host computer, use the command adb connect <IP address> to be able to perform ADB actions.
To connect via Ethernet, enter the Developer Mode and enable the “Ethernet debugging with static IP” option. Connect the Ethernet cable and
run the command adb connect 192.168.1.5 to connect to the device.
To connect via the Type A USB port, perform the following steps:
1. Ensure the USB cable (type A) is not connected to the Elo Backpack.
2. From the settings, enter Developers Options
3. Turn on the “Enable USB Debugging” option
4. Turn on “Switch USB to device mode” option.
Note, enabling this option will cease communication between the USB peripheral ports.
5. Plug USB cable into the Type A USB1 port.
6. In the host PC, input “adb devices” to check if the Elo Backpack serial number shows up. If it is there, then you have
connected successfully.
Note: When connecting to ADB over the USB port, all external USB ports will be disabled.
Page 14

UM600183 Rev. A, page 14 of 38
User Manual – I-series 2.0
Intelligent Brightness Control
To extend the life of the panel, Elo incorporates intelligent brightness control, which automatically turns off the panels backlight during hours
when the system is not being used.
This function is fully controllable through your EloView account. Navigate to the Settings tab and use the dropdown menus that relate to the
Display Timer.
This function is ON by default and will turn off the backlight during the hours of midnight and 6AM daily.
Page 15

UM600183 Rev. A, page 15 of 38
User Manual – I-series 2.0
Secure Digital Card (SD Card)
The Elo Backpack supports SD cards (up to 128 GB).
Page 16

UM600183 Rev. A, page 16 of 38
User Manual – I-series 2.0
3G/4G LTE Module Information
The following devices from ConnectedIO are supported:
North America: EM1000T-NA
Europe: EM1000T-EU
Refer to the links above for more details about the modems.
Page 17

UM600183 Rev. A, page 17 of 38
User Manual – I-series 2.0
Software Section
(To download SDK, go to www.elotouch.com)
Glossary
1. Abbreviation
SoC: System on a chip
2. Terms
• IDLE_MODE: ELO specification for device interaction with POWER_KEY action
• MSR: Magnetic Stripe Reader
• BCR: Barcode Reader
• NFC: Near Field Communication
• ELOPeripheralService: The fundamental class to provide different functions for ELO application developmentEx
System Overview
Fig 3-1 shows the software stack for an Android system. This implementation is based on standard Android design and extends the
framework functionality at Java services layer to fulfill customer requirement. The extended functionality at Java service is named as
“ELOPeripheralService” which provides the interfaces for application development.
Page 18

UM600183 Rev. A, page 18 of 38
User Manual – I-series 2.0
Fig 2-1. Android System Structure
Android Framework Java Service
Based on developed programming language, Android services can be divided into native (C base) and Java service. Android services are a
kind of server-client structure where the server side can receive a request from the client and output the result to client. Also, the server-client
structure can deal with synchronization issues from multi-client requests. Therefore, this framework ability, which forms the fundamental class
“ELOPeripheralService,” is based on this kind of server-client design feature from Android.
Page 19

UM600183 Rev. A, page 19 of 38
User Manual – I-series 2.0
ELOPeripheralService
ELOPeripheralService is the major module to accept a client request from application layer. For service, complete the Android framework
system design then the below classes are added into system:
ELOPeripheralNative
Execution of some native-C function flows for ELOPeripheralService
ELOPeripheralManager
Provides the interface to the application layer, which is the client component relative to ELOPeripheralService
EloPeripheralEventListener
Application extends abstract class to receive the driven event from EloPeripheralManager
Uses event driven notification method to notify the application program about the status change
IELOPeripheralService.aidl
Android programming language for java layer IPC communication
Used for Client-Server (ELOPeripheralManager-ELOPeripheralService) IPC communication where sending the
application’s request to server side
IELOPeripheralServiceListener.aidl
Android programming language for java layer IPC communication
Used for server to notify the event driven status change to ELOPeripheralManager, then ELOPeripheralManager will notify
to application layer
Page 20

UM600183 Rev. A, page 20 of 38
User Manual – I-series 2.0
Figure 2-2. ELOPeripheralService
Page 21

UM600183 Rev. A, page 21 of 38
User Manual – I-series 2.0
ELOPeripheralManager and ELOPeripheralEventListener
As we mentioned in the last section, ELOPeripheralManager and ELOPeripheralEventListener are the components that provide interface
for application development. Inner member data of ELOPeripheralManager and ELOPeripheralEventListener are listed below:
1. ELOPeripheralManager
This manager contains some inner class member (as shown below) and for each inner class, provides specific functionality to
peripheral equipment or defined action flow.
ELOPeripheralManager
mBCR_APIs
mMSR_APIs
mNFC_APIs
mGPIO_APIs
mIDLE_APIs
public void registerListener(ELOPeripheralEventListener listener)
public void unregisterListener(ELOPeripheralEventListener listener)
• public void registerListener(ELOPeripheralEventListener listener)
Provide interface for application to register the feedback structure instance
Needs to register before request (Activity life cycle: onResume)
• public void unregisterListener(ELOPeripheralEventListener listener)
Provide interface for application to unregister the feedback structure instance
Needs to unregister before leave the application (Activity life cycle: onPause)
Page 22

UM600183 Rev. A, page 22 of 38
User Manual – I-series 2.0
1.1.1. BCR
activeBCR
Activates the BCR device to read barcode data
BCR is active and successfully reading the barcode sequence data. Now, the application will be notified by
“ELOPeripheralEventListener” about receiving data
disactiveBCR
Deactivate the BCR device
isBCRDeviceConnected
Checks whether the BCR device is connected to the Android device
Page 23
UM600183 Rev. A, page 23 of 38
User Manual – I-series 2.0
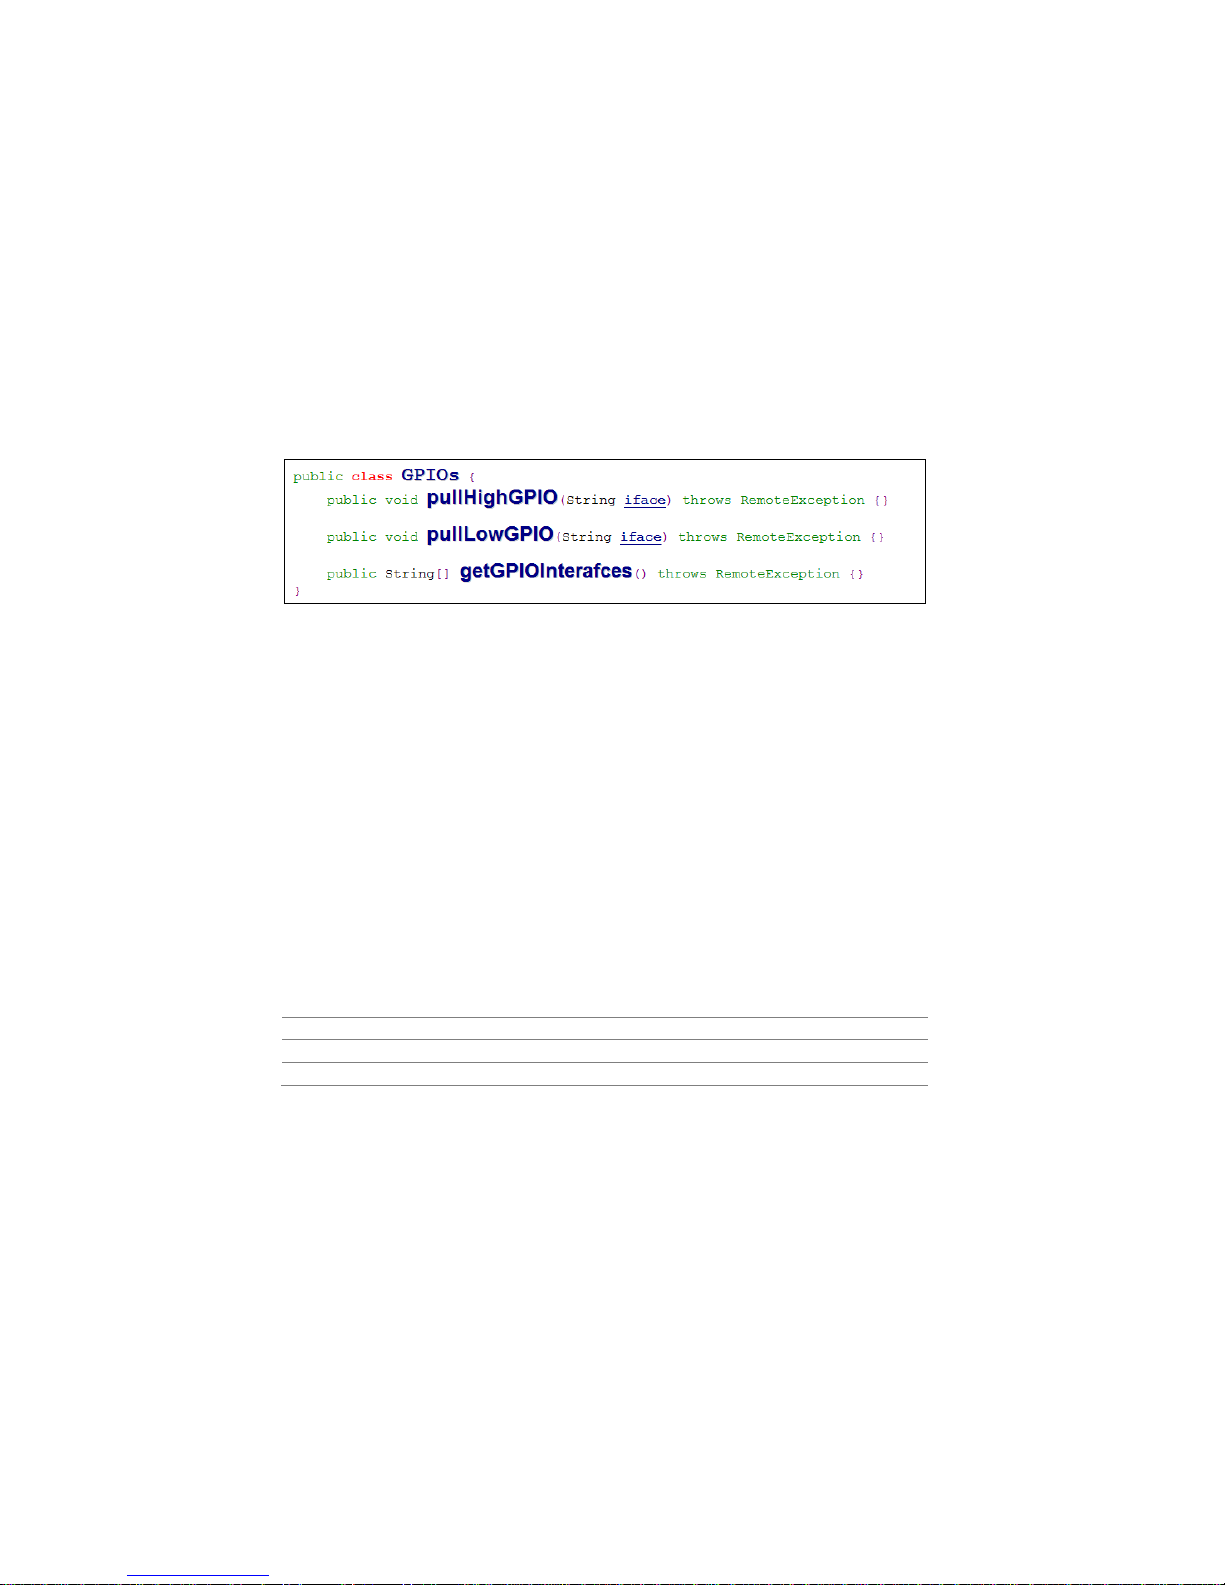
1.1.2. GPIOs
pullHighGPIO
Pull high the state of GPIO-iface
PullLowGPIO
Pull low the state of GPIO-iface disactiveBCR
getGPIOInterfaces
Get the list string data of interest GPIOs at designed system.
Refer to Table 3-1 GPIOs list
Note:
The pull action is only workable with output pin defined GPIO
The GPIO input pin can notify the application about the status change read by “ELOPeripheralEventListener”
GPIO
PIN definition
gpio80
Output
gpio81
Input
gpio82
Input
Table 3-1 GPIOs List
Page 24

UM600183 Rev. A, page 24 of 38
User Manual – I-series 2.0
1.1.3. IDLE
activeIdleMode
Forces system to enter IDLE_MODE (IDLE_MODE on)
disactiveIdleMode
Forces system to leave IDLE_MODE (IDLE_MODE off)
1.2. ELOPeripheralEventListener
onBCR_StateChange
Refer to Table 3-2
Notifies the application about the BCR status change data
onGPIO_StateChange
Refer to Table 3-2
Notifies the application about the GPIOs status change data
Page 25

UM600183 Rev. A, page 25 of 38
User Manual – I-series 2.0
BCR state
value
ELOPeripheralManager.BCR_STATE_DEVICE_CONNECTION
1 << 0
ELOPeripheralManager.BCR_STATE_DEVICE_DISCONNECTION
1 << 1
ELOPeripheralManager.BCR_STATE_DATA_RECEIVIED
1 << 2
ELOPeripheralManager.BCR_STATE_PIN_AUTO_DISABLE
1 << 3
GPIO state
value
ELOPeripheralManager.GPIO_STATE_HIGH
1 << 4
ELOPeripheralManager.GPIO_STATE_LOW
1 << 5
GPIO data
gpio81
gpio82
Table 3-2
Page 26

UM600183 Rev. A, page 26 of 38
User Manual – I-series 2.0
Section 4: Technical Support and Maintenance
Solutions to Common Problems
Problem
Suggested Troubleshooting
The Elo Backpack does not turn on when power is
applied to the system.
Check that the power cable is properly connected to the wall and the Elo
Backpack. If the power LED is solid white, then the system is ON. If the power LED is
orange, then the system is OFF.
If the system stays in the OFF state, try unplugging the power cable and then replugging it after five seconds
In the case that the power button LED displays solid white light, there may be an issue
with the display. Please contact Elo Support.
Monitor connected to the Elo Backpack has a blank
screen
If the power button LED is blinking, the system may be in SLEEP mode. Press the power
button to bring the unit out of SLEEP mode.
Page 27

UM600183 Rev. A, page 27 of 38
User Manual – I-series 2.0
Technical Assistance
Refer to last page for worldwide technical support phone numbers.
Technical Specifications
visit www.elotouch.com/products
for technical specifications for this device
Support
visit www.elotouch.com/support for technical support
Page 28

UM600183 Rev. A, page 28 of 38
User Manual – I-series 2.0
Elo Backpack Care and Handling
The following tips will help maintain optimal performance of your Elo Backpack:
• Disconnect the power cable before cleaning.
• To clean the unit, use a soft cotton or microfiber cloth lightly dampened with a mild detergent.
• It is important that your unit remains dry. Do not get liquids on or inside the unit. In the event that liquid does get inside, have a qualified
service technician inspect the unit before you power it on again.
Page 29

UM600183 Rev. A, page 29 of 38
User Manual – I-series 2.0
Section 5: Regulatory Information
Electrical Safety Information
Compliance is required with respect to the voltage, frequency, and current requirements indicated on the manufacturer’s label. Connection
to a different power source than those specified herein will likely result in improper operation, damage to the equipment or pose a fire hazard if
the limitations are not followed.
There are no operator serviceable parts inside this equipment. There are hazardous voltages generated by this equipment which constitute a
safety hazard. Service should be provided only by a qualified service technician.
Contact a qualified electrician or the manufacturer if there are questions about the installation prior to connecting the equipment to mains
power.
Emissions and Immunity Information
Notice to Users in the United States: This equipment has been tested and found to comply with the limits for a Class A digital device, pursuant to
Part 15 of FCC Rules. These limits are designed to provide reasonable protection against harmful interference in a residential installation. This
equipment generates, uses, and can radiate radio frequency energy, and if not installed and used in accordance with the instructions, may
cause harmful interference to radio communications.
Notice to Users in Canada: This equipment complies with the Class A limits for radio noise emissions from digital apparatus as established by the
Radio Interference Regulations of Industrial Canada.
Notice to Users in the European Union: Use only the provided power cords and interconnecting cabling provided with the equipment.
Substitution of provided cords and cabling may compromise electrical safety or CE Mark Certification for emissions or immunity as required by
the following standards:
This Information Technology Equipment (ITE) is required to have a CE Mark on the Manufacturer’s label which means that the equipment has
been tested to the following Directives and Standards: This equipment has been tested to the requirements for the CE Mark as required by EMC
Page 30

UM600183 Rev. A, page 30 of 38
User Manual – I-series 2.0
Directive 2014/30/ EU as indicated in European Standard EN 55032 Class A and the Low Voltage Directive 2014/35/EU as indicated in European
Standard EN 60950-1.
General Information to all Users: This equipment generates, uses and can radiate radio frequency energy. If not installed and used according
to this manual the equipment may cause interference with radio and television communications. There is, however, no guarantee that
interference will not occur in any particular installation due to site-specific factors.
1.
In order to meet emission and immunity requirements, the user must observe the following:
a.
Use only the provided I/O cables to connect this digital device with any computer.
b.
To ensure compliance, use only the provided manufacturer’s approved line cord.
c.
The user is cautioned that changes or modifications to the equipment not expressly approved by the party responsible for
compliance could void the user’s authority to operate the equipment.
2.
If this equipment appears to cause interference with radio or television reception, or any other device:
a.
Verify as an emission source by turning the equipment off and on. If you determine that this equipment is causing
the interference, try to correct the interference by using one or more of the following measures:
i.
Move the digital device away from the affected receiver.
ii.
Reposition (turn) the digital device with respect to the affected receiver.
iii.
Reorient the affected receiver’s antenna.
iv.
Plug the digital device into a different AC outlet so the digital device and the receiver are on different branch circuits.
v.
Disconnect and remove any I/O cables that the digital device
does not use. (Unterminated I/O cables are a potential source
of high RF emission levels.)
vi.
Plug the digital device into only a grounded outlet receptacle. Do not use AC adapter plugs. (Removing or cutting the line cord
ground may increase RF emission levels and may also present a lethal shock hazard to the user.)
If you need additional help, consult your dealer, manufacturer, or an experienced radio or television technician.
Page 31

UM600183 Rev. A, page 31 of 38
User Manual – I-series 2.0
Radio Equipment Directive
Elo hereby declares that the radio equipment type, I-Series 2.0, is in compliance with Directive 2014/53/EU. The full text of the EU Declaration of
Conformity is available at the following internet address: www.elotouch.com
This device is designed and intended for indoor use only.
Operation frequency and radio-frequency power are listed as below:
o WLAN 802.11b/g/n/ac
▪ 2400 - 2483.5MHz < 17 dBm EIRP
▪ 5150 - 5250MHz < 18 dBm EIRP
o BT 2400-2483.5MHz < 11 dBm EIRP
Page 32

UM600183 Rev. A, page 32 of 38
User Manual – I-series 2.0
ECC/DEC/(04)08:
The use of the frequency band 5 150-5 350 MHz is restricted to indoor operation because of the protection requirements of satellite services
FCC:
This device complies with part 15 of the FCC Rules. Operation is subject to the following two conditions: (1) This device may not cause harmful
interference, and (2) this device must accept any interference received, including interference that may cause undesired operation.
Changes or modifications not expressly approved by the party responsible for compliance could void the user‘s authority to operate the
equipment.
This equipment has been tested and found to comply with the limits for a Class A digital device, pursuant to part 15 of the FCC Rules. These
limits are designed to provide reasonable protection against harmful interference when the equipment is operated in a commercial
environment. This equipment generates, uses, and can radiate radio frequency energy and, if not installed and used in accordance with the
instruction manual, may cause harmful interference to radio communications. Operation of this equipment in a residential area is likely to
cause harmful interference in which case the user will be required to correct the interference at his own expense.
This equipment should be installed and operated to ensure a minimum of 20 cm spacing to any person at all times.
IC:
This device complies with Industry Canada’s licence-exempt RSSs. Operation is subject to the following two conditions:
(1) This device may not cause interference; and
(2) This device must accept any interference, including interference that may cause undesired operation of the device.
Le présent appareil est conforme aux CNR d'Industrie Canada applicables aux appareils radio exempts de licence. L'exploitation est autorisée
aux deux conditions suivantes:
(1) l'appareil ne doit pas produire de brouillage, et
(2) l'utilisateur de l'appareil doit accepter tout brouillage radioélectrique subi, même si le brouillage e st susceptible d'en compromettre le
fonctionnement."
Page 33

UM600183 Rev. A, page 33 of 38
User Manual – I-series 2.0
This equipment should be installed and operated to ensure a minimum of 20 cm spacing to any person at all times.
Page 34

UM600183 Rev. A, page 34 of 38
User Manual – I-series 2.0
Agency Certifications
The following certifications and marks have been issued or declared for this peripheral:
•
FCC/IC
•
CE
•
UL/cUL/CB
•
Japan MIC
•
VCCI
•
China CCC
•
China SRRC
Waste Electrical & Electronic Equipment Directive (WEEE)
This product should not be disposed of with household waste. It should be deposited at a facility that enables recovery and recycling.
Elo has put in place recycling arrangements in certain parts of the world. For information on how you can access these a rrangements, please
visit www.elotouch.com/e-waste-recycling-program/.
Caution:
Risk of explosion if battery is replaced by an incorrect type.
Dispose of used battery according to the local laws and regulations.
Page 35

UM600183 Rev. A, page 35 of 38
User Manual – I-series 2.0
中国RoHS (China RoHS)
根据中国法律《电器电子产品有害物质限制使用管理办法》,以下部分列出了产品
中可能包含的有害物质的名称和含量。
中国电子电气产品环境信息
触控一体机
有害物质
铅
(Pb) 汞 (Hg) 镉 (Cd)
六价铬
(Cr(VI))
多溴联
苯
(PBB)
多溴二苯
醚
(PBDE)
电缆组件
X O O O O
O
金属框架
X O O O O O 塑胶盖
O O O O O O 印制线路板
X O O O O
O
本表格依据 SJ/T 11364 的规定编制.
O:
表示该有害物质在该部件所有均质材料中的含量均在 GB/T 26572 规定
的限量要求以下.
X:
表示该有害物质至少在该部件的某一均质材料中的含量超出 GB/T
26572 规定的限量要求.
标志说明
根据 SJ/T11364 的要求, 电子信息产品标有以下污染控制标识。 此产品在10年内不会
对环境产生影响。
Page 36

UM600183 Rev. A, page 36 of 38
User Manual – I-series 2.0
Power Specifications
Electrical Ratings
Input
110/240VAC
Operating Conditions
Temperature
0°C - 40°C
Humidity
20% to 80% (non-condensing)
Storage Conditions
Temperature
-20°C - 50°C
Humidity
10% to 95% (non-condensing)
Page 37

UM600106 Rev A, page 37 of 38
User Manual – i-series 2.0
Section 6: Warranty Information
For warranty information, go to http://support.elotouch.com/warranty/
Page 38

© 2018 Elo Touch Solutions, Inc. All rights
User Manual – i-series 2.0
www.elotouch.com
Visit our website for the latest
• Product Information
• Specifications
• Upcoming Events
• Press Releases
• Software Drivers
To find out more about our extensive range of Elo touch solutions, go to www.elotouch.com, or call the office nearest you.
North America
Tel +1 408 597 8000
Fax +1 408 597 8001
elosales.na@elotouch.com
Europe
Tel +32 (0)16 70 45 00
Fax +32 (0)16 70 45 49
elosales@elotouch.com
Asia-Pacific
Tel +86 (21) 3329 1385
Fax +86 (21) 3329 1400
www.elotouch.com.cn
Latin America
Tel +52 55 2281-6958
elosales.latam@elotouch.com
 Loading...