

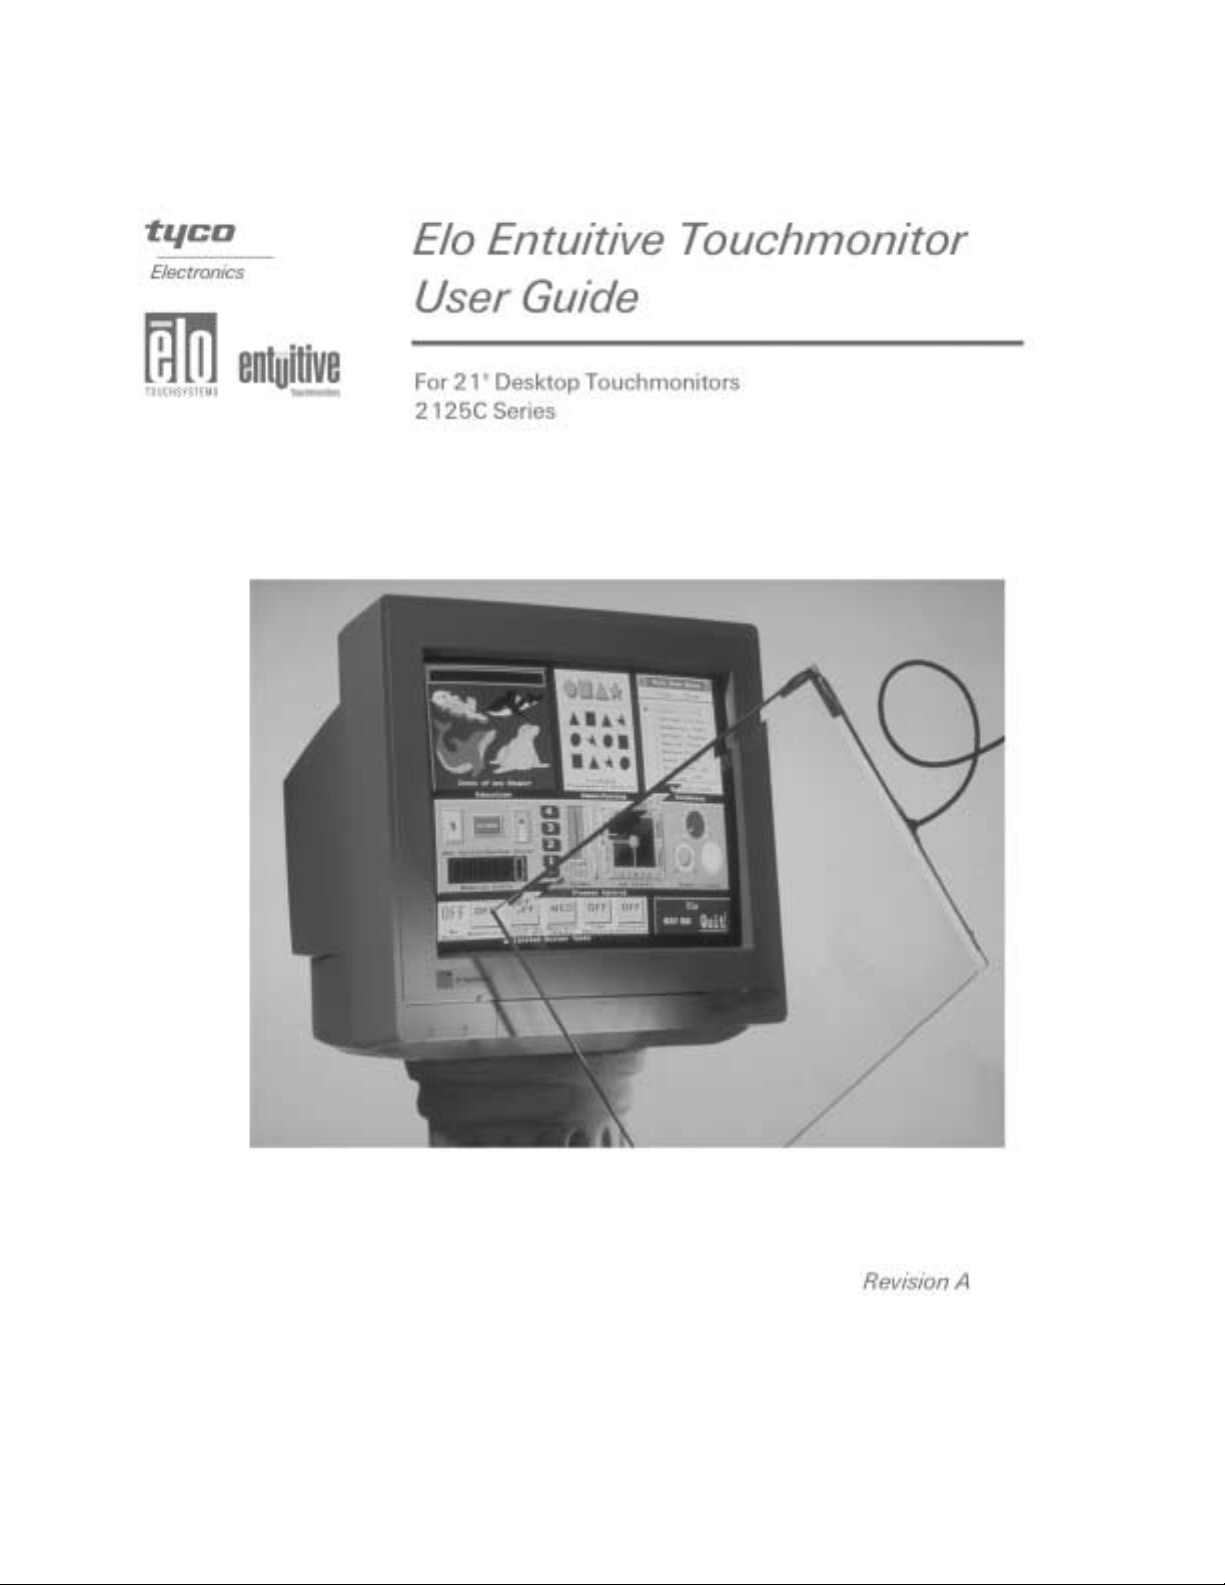
Page 1
Page 2

User Guide
Elo Entuitive 2125C Desktop Touchmonitor
Revision A
P/N 0085 44
ET2125C Series Models
Elo TouchSystems, Inc.
1-800-ELO-TOUCH
www.elotouch.com
Page 3

Copyright © 2001 Elo TouchSystems Inc. All Rights Reserved.
No part of this p ublic ation ma y be repr oduce d, tra nsmitte d, transc ribe d, stor ed in a ret rieval system,
or translated into any language or computer language, in a ny form or by any means, including, but not
limited to, electronic, magnetic, optical, chemical, manual, or otherwise without prior written permission of Elo TouchSystems.
Disclaimer
The informat ion in this docum ent is subje ct to change with out notice . Elo TouchSystems make s no
representations or warranties with respect to the contents hereof, and specifically disclaims any
implied warranti es of mer chanta bilit y or fitness for a parti cular purp ose. El o TouchSystems rese rves
the right to rev ise th is pu blic a tio n and to mak e ch ang e s fr om t im e to t im e in the c o nten t h er eof w i thout obli gation of Elo TouchSystems to not ify any person of such r evisions or changes.
Trademark Acknowledgments
IntelliTouch, SecureTouch, AccuTouch, Entuitive, and MonitorMouse are trademarks of Elo TouchSystems, Inc.
Other product names mentioned herein may be trademarks or registered trademarks of their respective companies. Elo TouchSystems claims no interest in trademarks other than its own.
iii
Page 4

iv
Page 5

Table of Contents
Chapter 1
Introduction 1
Precautions . . . . . . . . . . . . . . . . . . . . 1
About the Product . . . . . . . . . . . . . . . . . 1
Chapter 2
Installation and Setup 3
Unpacking Your Touchmonitor. . . . . . . . . . . 3
Getting Started . . . . . . . . . . . . . . . . . . 4
Installing the Base . . . . . . . . . . . . . . . 4
Selecting a Suitable Location . . . . . . . . . 4
Connecting Your Touchmonitor . . . . . . . . . . 5
Installing the Driver Software . . . . . . . . . . . 8
Installing the Serial Touch Driver for Windows
2000, Me, 95/98 and NT 4.0 . . . . . . . . . 9
Installing the USB Touch Driver for Windows
2000, Windows Me and Windows 98. . . . .9
Chapter 3
Operati o n 11
About Touchmonitor Adjustments . . . . . . . . 11
Touchmonitor Controls . . . . . . . . . . . . . 12
Using the On Screen Display (OSD) . . . . . 12
Brightness. . . . . . . . . . . . . . . . . 13
Contrast . . . . . . . . . . . . . . . . . . 13
Locking/Unlocking the OSD Functions. . . . 13
OSD Adjustments . . . . . . . . . . . . . . 14
Appendix C
Technical Specification s 27
Touchmonitor Specifications . . . . . . . . . . 27
21" CRT Touchmonitor Dimensions . . . . . 31
Signal PINOUT for 21" Monitor . . . . . . . 33
Power Consumption. . . . . . . . . . . . . . . 34
Preset Timing Table. . . . . . . . . . . . . . . 35
Setting the Refresh Rate . . . . . . . . . . 35
Warranty 37
Inde x 39
Chapter 4
Troubleshooting 17
Monitor Warning Messages . . . . . . . . . 18
Appendix A
Touch Te chnology 19
Touchscreens: An Overview. . . . . . . . . . . 19
IntelliTouch Touchscreens. . . . . . . . . . . . 20
AccuTouch Touchscreens . . . . . . . . . . . . 21
Appendix B
Touchmonitor Safety 23
Care and Handling of Your Touchmonitor . . . . 24
Regulatory Information 25
v
Page 6

Copyright © 1996, Borland International. All rights reserved. BORLAND CONFIDENTIAL
September 21, 2001 9:10 am (D:\V era new\8544-21 inch Hyundai CRT UG\21inch Hyundai
CRTTOC.fm)
vi
Page 7

Congratulati ons on your purchase of an Elo TouchSystems Entuitive
touchmonitor. Your new high-resolution touchmonitor combines the reliable
performance of Elo’ s touch technology with the latest advances in CRT display
design. This combination of features creates a natural flow of information
between a user and the touchmonit or.
Precautions
C HAPTER
1
C
HAPTER
1
I
NTRODUCTION
Follow all warnings, precautions and maintenance as recommended in this
user’s manual to maximize the life of your unit. See Appendix B for more
information on touchmon itor safety.
Abou t the Pr oduct
Your CRT touchmonitor is a color display with the following features:
• 20-inch viewable image 0.25mm dot pitch CDT
• Supports a widerange of screen refresh rates with flicker-free picture quality.
• Plug and Play functionality automatically adjusts the monitor to its optimum
performance.
• VESA DPMS (Display Power Management Signaling).
• VESA DDC1/2B compatibility.
• Patented touch technology from Elo TouchSystems.
• RS-232 or Uni versal Serial Bus (US B) tou c h in te rfac e.
1-1
Page 8

1-2 Elo Entuitive Touchmonitor User Guide
Page 9
C
HAPTER
2
I
NSTALLATION AND
This chapter discusse s how to install your CRT touchmonitor and how to install
Elo TouchSystems driver software.
Unpac king Your Touc hmon itor
Check that the following 9 items are pres ent and in good condition:
C HAPTER
2
S
Quick Installation Guide
ETUP
CR T Touchmonitor
Monito r p ower cable (US/Canada)
Serial touchscreen cable
Video cable
CD
Software
User's
Guide
User’s Guide, Quick Install Guide,
and TouchTools CD-ROM
European power cable
Base
2-3
Page 10
Getting Started
Installing the Base
• Carefully turn the touc hmonitor upside-down.
• Place the base against the bottom of the monitor so that the base fasteners are
aligned with appropriate slots.
• Push the base towards the front of the moni tor until the latch locks into
position.
• Carefully turn the touchmonitor right-side up.
Selecting a Suita ble Locatio n
• Place the monitor at least 12 inches from other electrical or heat-emitting
equipment and allow at least 4 inches on each side fo r ventilation.
• Place the monitor in a position where no light shines or is reflected directly
on the screen.
• To reduce eye strain, avoid installing the display unit against a bright
background such as a window.
• Position the monitor so the top of the screen is no higher than eye level.
• Position the monitor directly in front of you at a comfortable reading
distance.
2-4 Elo Entuitive Touchmonitor User Guide
Page 11
Conn ecting Your Touchmon itor
Your touchmonitor comes with a Seria l (RS-232) touchscreen connector cable.
I
MPORTANT
:
Before connecting the cables to your touch monitor and PC, be sure that the com puter
and touchmonitor are turned off.
Video cable
1 Connect one end of the video cable to the video connector on your PC and
the other end of the cable to the video connector on your monitor. Secure the
cable by turning the screws on the connector.
2-5
Page 12
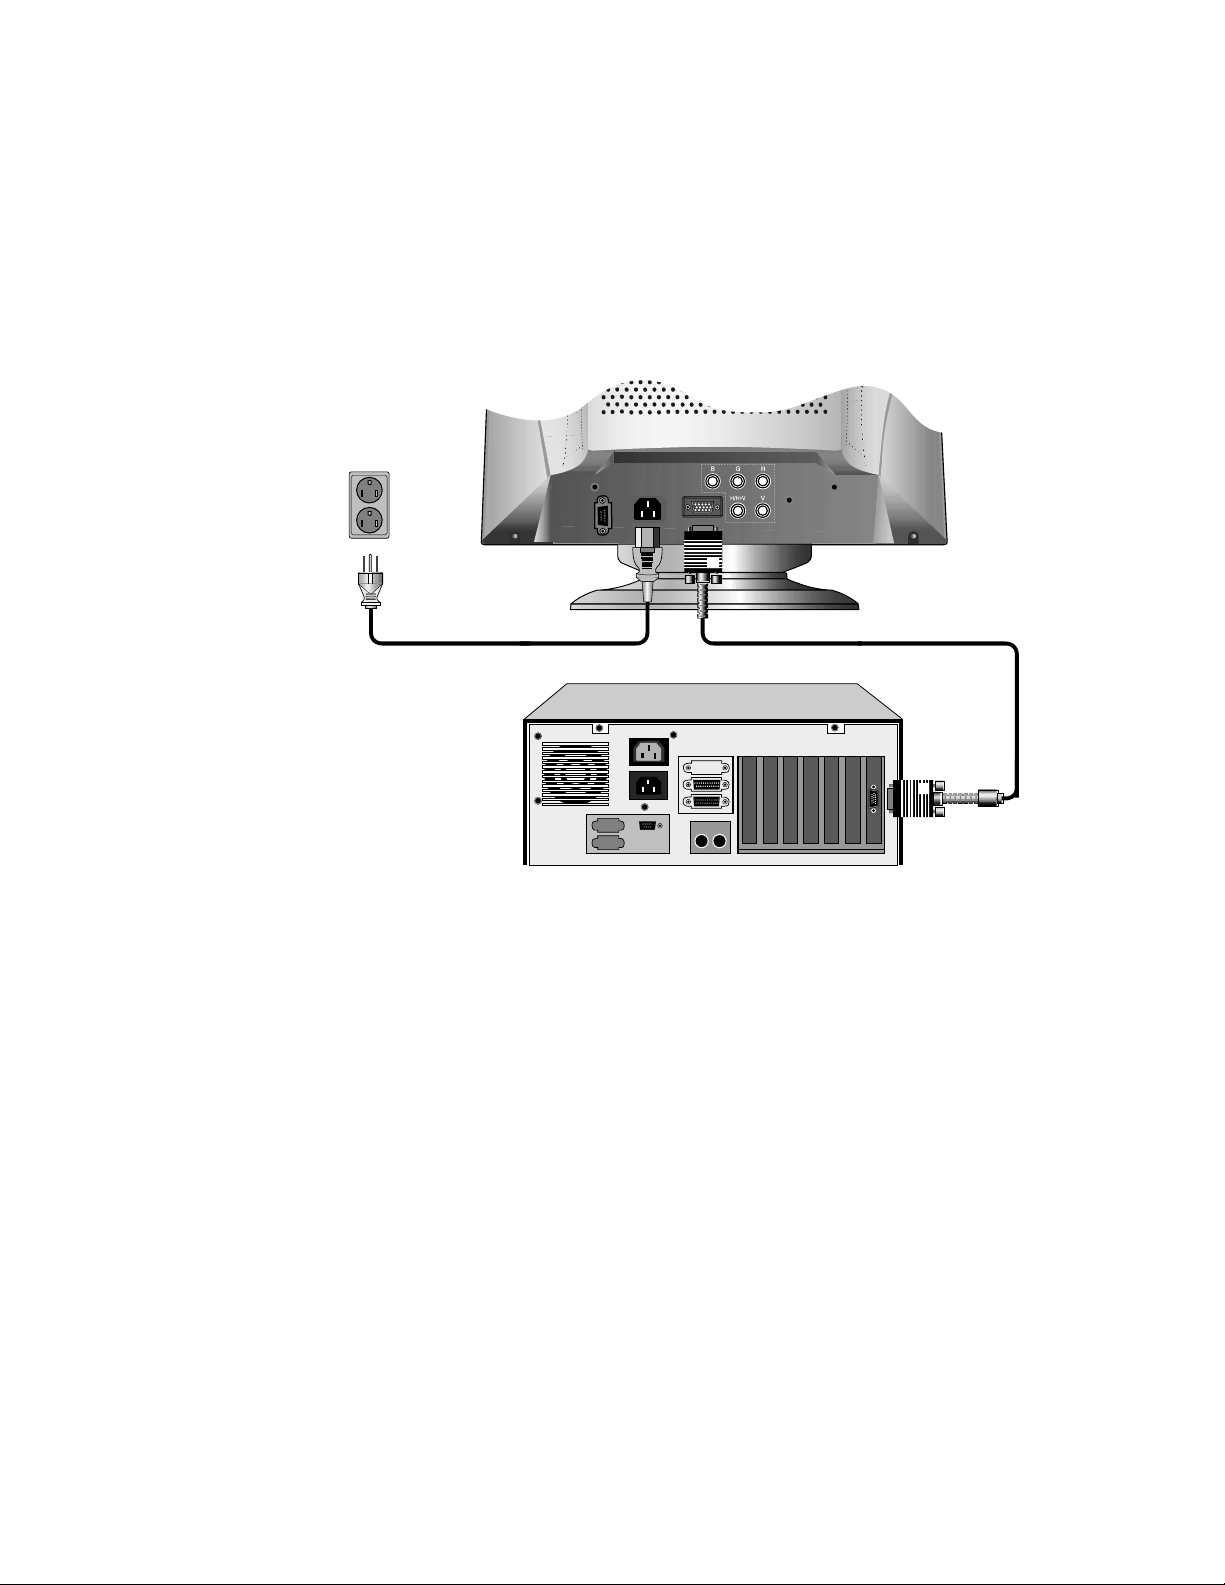
Power cable
2 Connect the power cable to the AC connector on your touchmonitor. To
Video cable
protect your equipment a gainst risk of damage from electrical surges in the
power line, plug the touchmonitor’s power cord into a surge protector, and
then connect the sur ge protector to a grounded (three-pronged) AC electrical
outlet.
2-6 Elo Entuitive Touchmonitor User Guide
Page 13

Power cable
Video cable
Touchscreen cable
3 Connect the touchscre en cable. Connect one end to the appropriate port on
the back of your PC. Connect the other end of the cable to the touchscreen
connector on your t ouchmonit or. Th e touchsc reen ca ble c onnector s shou ld fit
snugly into the connect ors on your touchmonitor and PC.
2-7
Page 14
4 Power on your monitor using the Soft power swit ch and check tha t the power
LED is on, then power on your PC. I f not, repeat steps 2, 3, and 4, or refer to
Chapter 4, Troubleshooting.
5 After a brief pause the picture should appear. If necessary, adjust the front
panel controls accor ding to your personal preference (see Chapter 3).
6 Insert the Elo TouchTools CD-ROM in your computer’s CD-ROM drive to
install the approp riate touchscreen driver software. Follow the dire ctions
starting on the next page to inst all the driver software.
Installing the D river Soft ware
Elo TouchSystems provides driver software that allows your touchmonitor to
work with your computer. Drivers are locate d on the enclosed CD-ROM for the
following operat ing systems:
• Windows 2000
• Windows Me
• Windows 98
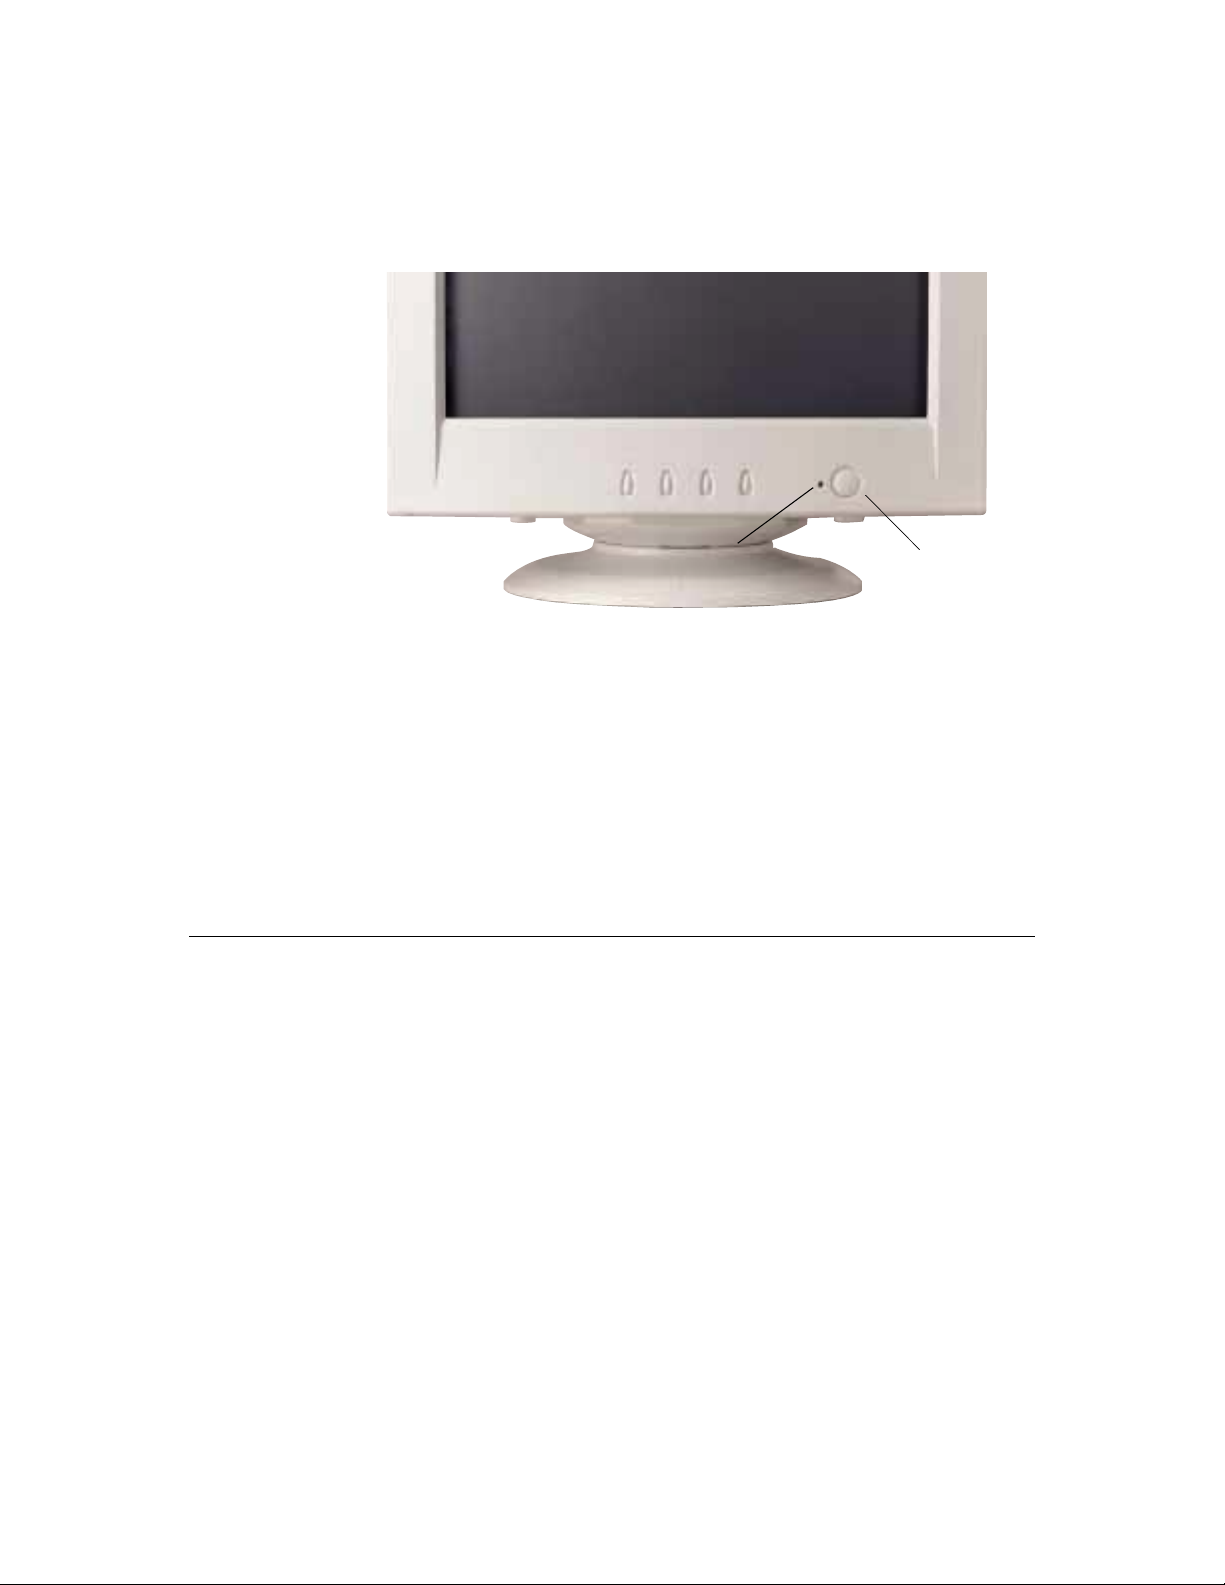
Power LED Soft Power Switch
• Windows 95
• Windows NT 4.0
Additional driver s and driver information fo r other operating systems (i ncluding
MS DOS, Windows 3.x, OS/2, Macintosh and Linux) are available on the Elo
TouchSystems web site at www.elotouch.com.
2-8 Elo Entuitive Touchmonitor User Guide
Page 15

N
Your Elo touchmonitor is plug-a nd-play compliant. Information on the video
capabilitie s of your touchmonitor is sent to your video display adapter when
Windows starts. If Windows detects your touchmonitor, follow the instructions
on the screen to install a generic plug-and-play monitor.
Refer to the appropriat e following section for driver installation instructions.
Installing the Serial Touch Driver for Windows 2000, Me,
95/98 and NT 4.0
OTE
:
For Windows 2000 and NT 4.0 you must have administrator access rights to install the
driver.
1 Insert the Elo CD-ROM in your computer’s CD-ROM drive.
If the AutoStart feature for your CD-ROM drive is active, the system
automatically de tects the CD and starts the setup program.
2 Follow the directions on the screen to complete the driver setup for your
version of Windows.
If the AutoStart featu re is no t acti ve:
1 Click Start > Run.
2 Click the Browse button to locate the EloCd.exe program on the CD-ROM.
3 Click Open, then OK to run EloCd.exe.
4 Follow the directions on the screen to complete the driver setup for your
version of Windows.
Installing the USB Touch Driver for Windows 2000,
Windows Me and Windows 98
1 Insert the Elo CD-ROM in your computer’s CD-ROM drive.
If Windows 98, Windows Me or Windows 2000 starts the Add New
Hardware Wizard:
2 Choose Next. Select “Search for the best driver for your device
(Recommended)” and choose Next.
3 When a list of search locations is displayed, place a checkmark on “Specify a
location” and use Browse to select the \EloUSB direct ory on the Elo
CD-ROM.
2-9
Page 16

N
4 Choose Next. Once the El o TouchSystems USB touchscreen driver has been
detected, choose Next again.
5 You will see several files being copied. Insert your Windows 98 CD if
prompted. Choose Finish.
If Windows 98, Windows Me or Windows 2000 does not start the Add New
Hardware Wizard:
OTE
For Win dows 2000 you must hav e adm ini strator access rights to install the driver.
1 Insert the Elo CD-ROM in your computer’s CD-ROM drive.
2 If the AutoStart feature for your CD-ROM drive is active, the system
automatically de tects the CD and starts the setup program.
3 Follow the directions on the screen to complete the driver setup for your
version of Windows.
If the AutoStart featu re is no t acti ve:
1 Click Start > Run.
2 Click the Browse button to locate the EloCd.exe program on the CD-ROM.
3 Click Open, then OK to run EloCd.exe.
4 Follow the directions on the screen to complete the driver setup for your
version of Windows.
2-10 Elo Entuitive Touchmonitor User Guide
Page 17

About T ouchmonitor Adjustments
By design, your El o Entui tive touchm onitor sh ould not requi re any adjust ments.
The factory setti ngs will give you optimum video r esults with most standar d PC
video display adapters.
However, after connecting your touchmonitor you can further optimize the
settings to meet your requir ements by following the directions in this chapter.
C HAPTER
3
C
HAPTER
3
O
PERATION
I
MPORTANT
All adjustments you make to the controls are automatically memorized, so you
do not need to reset your choices every time you unplug your touchmonitor or
power it off and on. If there is a power failure your touchmonitor settings will
not default to the factor y specif ications.
:
Do not remove the CRT touchmonitor cover. The touchmonitor uses high voltages, and
the metal edges i nside t he touch monit or cover are sh arp. Re moving the t ouchm onito r
cover voids the warranty.
3-11
Page 18

Touchmo nitor C ontr ols
You can adjust the screen display by using the buttons located below the scre en.
Using the On Screen Display (OSD)
1 Push the MENU button to access the OSD. The resolution and f requency are
displayed at the top of the menu for your information.
2 Push the or button to choose the item you want to adjust. The selected
item is highlighted.
3 Push the SELECT button to adjust the highlighted item.
4 Push th e or button to ad j u st th e s el e ct i o n .
5 Push the SELECT button to return to the previous menu if you are in a
submenu.
The display unit automatic ally saves the new settings in 3 to 4 seconds after
your last adjustments and the menu disappears. You can also push the
MENU button to make the menu disappear.
3-12 Elo Entuitive Touchmonitor User Guide
Page 19

Brightness
Use the button to select the brightness adjustment.
Adjust with or button.
Contrast
Use the button to select the brightness adjustment.
Adjust with or button.
Locking/Unlocking the OSD Functions
You are able to lock the OSD functions if you do not want them to be changed.
To lock the OSD functions:
1 Press the power button to turn the monitor off.
2 Press the power but ton on and press the Menu key for 2 or 3 seconds or until
you see the gr een LED on the power button. The factory OS D menu window
will appear.
3 Use the or button to select the OL option.
4 Press the Select button to highlight the Locked option on the menu.
5 Press the power button to turn the monitor off then turn it back on.
To unlock the OSD functions:
1 Press the power button to turn the monitor off.
2 Press the power but ton on and press the Menu key for 2 or 3 seconds or until
you see the gr een LED on the power button. The factory OS D menu window
will appear.
3 Use the or button to select the OL option.
4 Press the Select button to highlight the Unlocked option on the menu.
5 Press the power button to turn the monitor off then turn it back on.
3-13
Page 20

OSD Adju stments
H. Size Adjusts the horizontal size of the entire screen image.
H. Position
V. Size
Adjusts the horizontal position of the entire screen image.
Adjusts the vertical size of the entire screen image.
V. Position Adjusts th e vertical position of the entire screen image.
Pincushi on
Trapezoid
Parallel
Pin Balance
V. Moire
H. Moire
If the verti ca l side s of the pi ct ure cur ve i n or bul ge ou t, you can
correct the di stortion by using th e pincushion adjust me nt.
If the picture is wider at the top or at the bottom, you can
correct the distortion by using the trapezoid adju stment.
If the sid es of th e sc re en image ar e tilted, you can correc t the
distortion by using the parallel adjustment.
If the sides of the picture are bowed to the right or the le ft, you
can correc t the pin cushion balance by using this adjustment.
Clears vertical moire if a series of concen tric circles or arcs
appear on your screen.
Clears horizontal moire if a series of concentric circles or arcs
appear on your screen.
Top Corner
Bottom
Corner
H. Linearity
V. Linearity
BNC/D-Sub
(Option)
3-14 Elo Entuitive Touchmonitor User Guide
If the top corner sides of the picture curve in or bulge out, you
can correct the top corner distortion by using this adjustment.
If the bottom corner sides of the picture curve in or bul ge out,
you can correct the top corner distortion by using this
adjustment.
If either the left or right side of the picture is out of proportion
from the othe r, you can correct thi s by using the horizont al
line ar ity adjus tm e n t.
If either the top or bottom side of the picture is out of
proportion w ith the center, you can correct this by using the
vertical li nearity adjustment.
Press the Se lect button to selec t the signal source
(BNC or D-Sub).
Page 21

Purity
PR
If the prim ary colors like white, blue or r ed display some a reas
or dots showing different color s, you can correct this by using
the purity adjustment.
H.
Convergence
V.
Convergence
Language
Rotation
OSD H.
Position
OSD V.
Position
HC
VC
If shadows appear around text or g raphic images, you can
remove them by using the horizontal convergence adjustment.
If shadows appear around text or g raphic images, you can
remove them by using the vertical convergence adjustment.
You can select the language in which adjustment menus are
displayed. The following langua ges are available; English,
German, French, Italian, Spanish, Swedish, Finnish, Danish,
and Portugu ese.
If the entire screen image is tilted, you can corre ct the
distortion by using the rotation adjustment.
Adjusts th e O SD menu’s horizontal position on the scree n.
Adjusts th e O S D me nu’s vertical position on the screen.
Color temperature affects the tint of the image. With lower
color temperature the image t urns reddish and wit h higher
temperat ures bluish.
Color
Control
Recall
Information
There are three color setting av ailable: 9300K, 6500K, or
USER. With the USER setting you can set individual values
for red, green, and blue.
If you opera te your display unit i n a factory preset mode, this
function deletes adjustments you made for size, position and
shape, and restores the properties which have been set in the
factory. If you operate your display unit in user mode, this
function h as no effect except that the contras t will be reset to
the maximum value and the brightness to the cut-off level.
Informat ion shows horizonta l and vertical sync polarity of
current timing set.
3-15
Page 22

N
External ma gnetic fields may cause distortion or discoloration
in the picture. Demagnetizing t akes place automatically when
the display unit is switched on, and the unit normally maintains
faultless color purity during operation.
Degauss
If you have tilted, swiveled or mo ved the display unit , you can
perform demagnetization. Du ring the process the picture is
distorted for a few seconds. After demagnetization, the color
impuriti es have disappeared if caused by stray magnetic fields.
Do not use the de gauss feature more than once every half ho ur
or the degaus s function will not work.
Brightness Adjusts the brightness o f the screen.
Contrast Adjusts the contrast of the screen.
OTE
:
Moire is an interface patter n that ma kes the screen seem t o have faint lines. A picture
that is rastered or consists of small repeating figures is sensitive to moire interference.
Strong color s are also liable to intensif y moire. The moire pattern on the screen does not
affect the printout of the image.
3-16 Elo Entuitive Touchmonitor User Guide
Page 23

C HAPTER
4
C
HAPTER
4
T
ROUBLESHOOTING
Problem Suggestion (s)
No picture. Your touchmonitor may not be getting power.
Touchmonitor does not enter pow er
management mode.
Screen fl ickers The screen may seem to flicker w hen the refresh
Color defects If your colo r is not uniform, degauss the
Picture appears to be ghosting. Make certa in there is a good connect ion between
Picture is not centered. Read about adjusting your touchmonitor picture
Picture appears “washed out”. Readjust your brightness and contrast settings.
Make certa in that your power strip is plugged i nto
the wall so cket and that the PC and touchmonitor
are plugged in and powered on.
Test the pow er supp ly by tryi ng di ffer en t ca bles or
a different wall outlet, or by plugging another
applian ce into the outlet.
The touchmo nitor mig ht b e in st and by mod e. Push
one of the key boar d ke ys. Che ck th at t he ke yboar d
is proper ly connected to the computer.
Ensure that your computer and video card are
properly configured (consult the video card
documentation).
The video signal from the computer does not
comply with VESA DPMS standard. Either the
computer or the graphics adap ter is not using the
VESA DPMS power ma nagement functio n.
rate is less than 75Hz. See the list of recommended
modes in Appendix C, page 27.
touchmoni tor as described in Chapter 3, page 15,
and make sure that the touchmonitor is at least 12
inches fr om any other electrical equipmen t.
the touch m onitor and the computer.
and make the appropriate adjustments.
4-17
Page 24

Problem Suggestion (s)
Picture not present or severely
distorted.
Duplicated images A problem with your graphics adapter or
Touch doesn’t work. Check to make sure the touchscreen cable is
Verify that your video displa y adapter settings are
formatted for the correct resolution and vertical
refres h rates.
touchmoni tor. Contact your service representative.
securel y attached at both ends.
Monitor Warning Messages
Message Suggestion
Error message: OUT OF RANGE The graphics adapter is set for a refresh rate or a
Self diagnost ics message: NO SIGNAL This messag e indic ates th at the signa l is miss ing or
line frequency that is too high. Select another
display mode with lower frequencies as directed
by your vide o card vendor.
faulty. Check that the signal cable connector is
properly connected and that the connection pins
are not bent or damaged. If the connector is loose,
tighten the connector scr ews. Check that the PC is
powered on.
4-18 Elo Entuitive Touchmonitor User Guide
Page 25

Touchscreens: An Ov erview
Typically, users communicate with com puters by using a mouse, a keyboard, or
a combination of the two. Users who are not keyboard- literate or mouse-savvy
can become frustrated with how long human-to-computer interactions take.
Computer literac y is learned. This is complicated by the fact that using a
keyboard or a mouse is neither intuitive nor natural for most people.
Touchscreens cut out the le arning curve by eliminating keyboard/mouse
intermediaries and allowing a natural flow of information to develop between a
user and a comput er.
C
HAPTER
4
T
OUCH
A PPENDIX
A
T
ECHNOLOGY
When a user wants to access information or perform a function on a computer
with a touchscreen installed, a touch quickly and accurately does the job that
once required complica ted keyboard interactions or precise mouse movements.
A frustrating expe rien ce w ith a co mp ut er d uri ng a tran s acti o n can cre ate
dissatisfaction for your customer. Touchscreens help eliminate unpleasant
transactions by creating a natural flow of information that enhances your
product or service. Touchscreens speed up user/computer interactions. People
get what they wan t faster and are more satisfied w ith the p ro cess .
A-19
Page 26

IntelliTouch Touch screens
IntelliTouch uses Elo’s patented surface wave technology to provide superior
image clarity, stable drift-free operation, and a durable surface that is unaffected
by scratches. With IntelliTouch you get fast, accurate response to soft stylus
stimulation (fi nger, glove d hand, pencil eraser ) that is also sensi tive to pressure .
For example, a customer in a department store could scroll through a product
catalog by inc reasing or decreasing pressure on an icon. IntelliTouch’s pressure
sensitivity inc reases the intuitive nature of a user/touchscreen interaction by
allowing for increase d selectivity.
An Intelli Touch touchscreen is a great choice for point-of-information or public
access applic ati ons such as the following :
• Point-of-in formation kiosks
• Vending
• Electronic cat alogs
• In-store locat ors
• Gaming and lottery
• Banking/finan cial transactions
• Ticket sales
• Interactive education
• Multimedia demonstrations
A-20 Elo Entuitive Touchmonitor User Guide
Page 27

AccuTouch Touch screens
Elo’s patented five -wire resistive technology makes AccuTouch products
unmatched for durability and accuracy. Touch an AccuTouch screen with a
finger, gloved ha nd, stylus, finge rnai l, or eve n a credit car d, and you’l l recei ve a
fast, accurate response—every time. The surface of an AccuTouch touchscreen
is scratch-r esistant a nd can withsta nd spil ls and other t ypes of wear and te ar that
often occur in heavy-us age environments.
An AccuTouch touchscreen is best use d for cl erk- or employee-activated
applications suc h as:
• Industrial pro cess control
• Medical equi pment
• Point-of-sale terminals
• Transportation
A-21
Page 28

A-22 Elo Entuitive Touchmonitor User Guide
Page 29

A PPENDIX
B
C
HAPTER
4
T
OUC HMON ITOR
This manual contains inf ormation that is important for the proper setup and
maintenance of your touc hmonitor. Befor e setti ng u p and poweri ng on your new
touchmonitor, read through this manual, especially Chapter 2, Installation and
Setup, and Chapter 3, Operation.
1 To reduce the risk of electric shock, follow all safety notices and never open
the touchmonitor case.
2 Your new touchmonitor is equipped with a three-wire, grounding power
cord. The power cord plug will only fit into a three-pronged safety ground
outlet. Do not attempt to fit the plug into an outlet that has not been
configured for this purpose. Do not use a damaged power cord. Use only the
power cord that comes with your Elo TouchS ystems t ouchmonitor . Use of an
unauthorized power cord may invalidate your warranty.
S
AFET Y
3 The slots located on the sides and top of the touchmo nitor case are for
ventilatio n. Do not bloc k or insert anything to the ventilation slots.
4 It is important that your touchmonitor remains dry. Do not pour liquid int o or
onto your touchmonitor . If your touchmo nitor becomes wet do not attempt to
repair it yourself.
B-23
Page 30

Care an d Handling of Your Touchmo nitor
The following tips will help keep your Elo Entuitive touchmonitor functioning
at the optimal level.
• To avoid risk of electric shock, do not disassemble the display unit cabinet.
The unit is not user serviceable. Remember to unplug the display unit from
the power outlet before cleaning.
• Do not use alcohol (methyl, ethyl or isopropyl) or any strong dissolvent. Do
not use thinner or benzene, abra sive cleaners or compressed air.
• To clean display unit cabinet, use a cloth lightly dampened with a mild
detergent.
• Avoid getting liquids inside your touchmonitor. If liquid does get inside,
have a qualified servi ce te chnician check it before you power it on again.
• Do not wipe the screen with a cloth or sponge that could scratch the surface.
• During transport ation of the monitor, the swivel base must be removed.
B-24 Elo Entuitive Touchmonitor User Guide
Page 31

C
HAPTER
4
R
EGULATORY INFORMATION
Electrical Safety Infor mation
A) Compliance is required with respect to the voltage, frequency, and current
requirements indicated on the manufacturer’s label. Connection to a different
power source than thos e specified herein will likel y result in improper operation or
damage to the equipment, or may pose a fire hazard if the limit ations are exceeded.
B) There are no operator serviceable parts inside this equipment. This equipment
genera tes hazardou s voltages that constitute a safety hazard . Service s hould be
provided only by a qualified service technician.
C) This equipment is provided with a detachable power cord that has an integral
safety ground wire and three-prong connector intended for connection to a
grounded s afety outlet.
1) D o no t subs t i tute th e cord w ith any cord ot her tha n the provided approved
type. Under no circumstances use an adapter plug to connect to a two-wire
outlet, as t his will defeat the continuity of the groun ding wire.
2) This equipment requires the use of the ground wire as a part of its safety
certification. Modification or misuse can provide a shock hazard that can
result in serious injury or death.
3) If there are any questions about the installation prior to connecting the
equipment to mains pow er, contact a qualified e lectrician or t he manufacturer.
Emissions and Immunity Information
A) Notice to Users in the United States: This equipment has been tested and found
to com p ly with Par t 15 C la ss B of FCC Ru les for d ig i ta l devices. T he se limits are
designed to provide reasonable protection against harmful interference in a residential installation. This equipment generates, uses, and can radiate radio frequency energy, and if not installed and used in accordance with the instructions,
may cause harmful interfere nce to radio communications.
B) Notice to Users in Canada: This equipment has been tested and found to comply with Class B radio noise emission limits as established by the Radio Interference Regulations of Industrie Canada for digital devices.
C) Notice to Users in the European Union: This equipment has been tested and
found t o comply w ith the Class B require ments of CE marking fo r Informati on
Technology Equipment as required by: Low Voltage Directive 73/23/ECC and
standard EN 60950; EMC Directive 89/336/ECC, and per standard EN 55022.
D) General Information to All Users: This equipment generates, uses, and can
radia te radi o fre qu enc y ene rgy. If not in stal le d and used acc or din g to t his man ual ,
the equipment may cause interference with radio and television communications.
There is, however, no guarantee that interference will not occur in any particular
instal lation due to sit e-specific factors.
25
Page 32

1) In order to meet emission and immunity requirements, the user must
observe the following:
a) Use only the provided I/O cables to connect this digital device with
any computer.
b) To ensure compliance, use only the provided manufacturer-approved
line cord.
c) The user is cautioned that changes or modifications to the equipment
not expressly approved by the party responsible for compliance could
void the user’s authority to operate the equipment.
2) If this e quipment ap pears to cau se interfe rence with r adio or tel evision
reception, or any other device:
a) Verify as an emission source by turning the equipment off and on.
b) If you de te r m in e th a t th is equ i pm e n t is cau s in g the int er fe rence, try to
correct the interference by using one or more of the following measures:
i) Move the digital device away from the affected receiver.
ii) Reposition (turn) the digital device with respect to the affected
receiver.
iii) Reorient the affected receiver’s antenna.
iv) Plug the digital device into a different AC outlet so the digital
device and the receiver are on different branch circuits.
v) Disconnect and remove any I/O cables that the digital device
does not use. (Unterminated I/O cables are a potential source of
high RF emission levels.)
vi) Plug the digital device into only a grounded outlet receptacle.
Do not use AC adapter plugs. (Removing or cutting the line cord
ground may increase RF emission levels and may also present a
lethal shock hazard to the user.)
If you need additional help, consult your dealer, manufacturer, or an experienced radio or television te chnician
26 Elo Entuitive Touchmonitor User Guide
DHHS
Page 33

C
HAPTER
4
T
ECHNICAL
N
OTE
:
All specifications are subject to change.
Touchmon itor Spe cifications
21" Touch mon itor S pecific at ions
Picture Tube
Maximum Resolution
Deflection Frequency
Maximum Video Inpu t Bandwidth
Display Area*
Input Signal
Input Voltage
Display Colors*
Power C onsumption
Power M anagement
Plug and Play Compatibility
CRT Life
A PPENDIX
C
S
PECIFICATIONS
21” (20” di agonal viewable im age), 0.25mm dot pitch,
anti-static, anti-glare, and TCO treatment coated.
1600 x 1200@85H z
Horizontal: 30-107kHz
Vertic al: 50-150Hz
261 MHz
Factory Setting: approx. 380mm x 285mm
R.G.B. Analog , 15 pin D-sub, BNC optional
100-240 VAC, 3.0A
Analog in put; unlimited colors
120 watts (typical)
Compliant with VESA DPMS signaling method.
Compliant with VESA DDC 1/2B standards.
Average operational CRT life is 12,000 hours to half
brightness.
*Dependent on video controller/card used.
C-27
Page 34

21" Touch mon itor S pecific at ions
On-Screen Adjustments
Safety Regulations
EMI
Ergonomics
Monitor Dime n sions
Net Weight (without touchscreen)
Ambient Temperature
Humidity
H/V POSITION, H/V SIZE, PINCUSHION,
TRAPEZIOD, PARALLEL, PIN BALANCE, H/V
MOIRE, TOP CORNER, BOTTOM CORNER, H/V
LINEARITY, BNC/D-SUB (OPTION), PURITY, H/V
CONVERGENCE, LANGUAGES, ROTATION, OSD
H/V POSITION, COLOR CONTROL, RECALL,
INFORMATION, DEGAUSS, BRIGHTNESS,
CONTRAST
UL, cUL, DHHS, TÜVGS
TCO95, FCC Class B, (FCC Class A for models
without touch controllers), CE
ZH1/618:10.80; DIN EN 2941-3:1993
ISO/DIS 9241-7,-8:1986; Anti-glare screens: Part 7
class 1 .
Clear screens: Part 7 clas s 3.
500mm (W) x 495mm (H) x 484mm (D)
13.7kg un packed, 16.7kg packed
Operating: 0°C - 40°C
Storage: -20°C - 65°C
Operating: 20%-95%
Storag e: 10%-95%
C-28 Elo Entuitive Touchmonitor User Guide
Page 35

Table C.1
IntelliTouch Touchmonitor SpecificationS
Mechanical
Positional Accuracy Standard deviation of error is less than 0.080 in. (2.03 mm). Equates to less
Touchpoint Density More than 100, 000 touchpoints/in
Touch Activ ation Force Typically less than 3 ounces (85 grams).
Surface Dur ability Surface durability is that of glass, Mohs’ hardness rating of 7.
Expected Life
Performance
Sealing Unit is sealed to protect against splashed liquids , dirt, and dust. See IntelliTouch
than ±1% .
No known wear-out mechanism, as there are no layers, coatings, or moving parts .
IntelliTouch technology has been operationally tested to more than 50 m illion
touches in o ne location without failure, using a stylus similar to a finger.
Product Manual for details.
2
(15,500 touchpoints/cm2).
Optical
Light Transmission (per
ASTM D1003)
Visual Resolution All me asurements made using USA F 1951 Resolution Chart, under 30X
Gloss (per ASTM D2457
using a 60-degree gloss
meter)
90%
magnifica tion, with test unit located approxim ately 1.5 in (38 mm) from surface of
resolution chart.
Clear surface: Excellent , w ith no noticeabl e degradation.
Antiglare surface: 6:1 minimum .
Clear surface: N/A
Antiglare surface: Curved: 60 ± 20 gloss units or 75 ± 15 gloss units.
Environmental
Chemica l Resistance The active area of the touchscreen is resistant to all chemicals that do not affect
Electrostati c P ro te ction
(per EN 61 000-4-2, 1995)
glass, su ch as:
Acetone
Toluene
Methyl ethy l ketone
Isopropyl alcohol
Methyl alco hol
Ethyl acetate
Ammonia-based glass cleaners
Gasoline
Kerosene
Vinegar
Meets Level 4 (15 kV air/8 kV contact discharges).
Mechanical
Construction Top: Polyes ter with outside hard-surface coati ng w ith clear or antig lare finish.
Insi de : T ranspar en t con d uctive co a tin g .
Bottom: Glass substrate with uniform resistive coating. Top and bottom layers
separated by Elo-patented separator dots.
C-29
Page 36

Table C.2
AccuTouch Touchmonitor Specifications
Mechanical
Positional Accuracy Standard deviation of error is less than 0.080 in. (2.03 mm). This equates to less
Touchpoi nt Density More than 100,000 tou chpoints/in² (15,500 touchpoints/cm ²).
Touch Acti vation Force Typically less than 4 ounces (113 gram s).
Surfac e D urability Meets Taber Abrasion Test (ASTM D10 44), CS-10F wheel, 500 g. Meets pencil
Expected Life Performance AccuTouch technology has been operationally tested to greater than 35 mil lion
than ±1% .
hardnes s 3H .
touches in one location without failure, using a stylus similar to a finger.
Optical
Light Transmission
(per ASTM D1003)
Visual Resolution All measur em ents made using USAF 1951 Resolution Chart, under 30 X
Haze (per ASTM D1003) Clear surface: Less than 1. 5% .
Gloss (pe r A STM D2457) Clear surface: N/A
Environmental
Chemical Resistance The activ e area of the touchscreen is resistant to the following chemicals when
Typically 75% at 550-nm wavelength (visible light spectrum).
magnif ication, with test unit l o cated approx im ately 1.5 in. (38 mm) from surface
of resolution chart.
Clear sur face: N/A
Antiglare sur f a ce : 6:1 mini m um.
Antiglare sur face: Les s th an 15%.
Antigla re surface: 90 ± 20 glos s units tested on a hard-coated front surface.
exposed for a period of one hour at a tem perature of 21°C:
Acetone
Methylene chloride
Methyl ethyl ketone
Isoprop yl alcohol
Hexane
Turpentine
Minera l spirits
Unleaded gasoline
Diesel fuel
Motor oil
Transmis sion fluid
Antifreeze
C-30 Elo Entuitive Touchmonitor User Guide
Page 37

21
" CRT Touchmonitor Dimensions
500 mm (19.7)
406.4 m m (16)
484.5 mm (19)
304.8 mm (17)
433 mm (17)
495.3 mm (19.5)
275 mm (10.8)
C-31
Page 38

484.5 mm (19)
70 mm (2.75)
C-32 Elo Entuitive Touchmonitor User Guide
Page 39

Signal PI NOUT for 21" Monito r
PIN Number Signal
1 Red video
2 Gree n video
3Blue video
4Ground
5 *VGA card detection (GND)
6 Red return
7 Green return
8Blue return
9+5 V
10 Sync return
11 Ground
12 SDA (S e ria l D a ta )
13 Horizontal Sync
14 Vertical Sync
15 SCL (Serial Cloc k)
12345
7 6810 9
1113 1215 14
*Pin 5, sel f-test pin shall be gro unded when signal connector is plugged in.
C-33
Page 40

P o we r Cons umpt ion
The touchmonitor comes with a power-saving feature that controls its power
consumption. This feature complies with both the EPA’s Energy Star
requirements and Europ ean NUTEK/TCO’s power management guidelines. It
also conforms to the Display Power Management System (DPMS) power-down
signaling method approved by the Video Electronics Standard Association
(VESA).
Mode LED
Normal Green <=120
Standby G reen/Orange blinking (1 sec.) <=1 0
Suspend Green /O range blinking (0.5 sec.) <=10
Off Orange <=5
Soft Power Switch Off Not illum inated <=1
N
OTE
:
The power button does not disconnect the display unit from the mains. The only way to
isolate the display unit completel y from the mains supply is to unplug the mains cable.
21" Monitor
Power
consum p t ion (W)
C-34 Elo Entuitive Touchmonitor User Guide
Page 41

Preset Timing Table
Your Elo Entuitiv e touch monitor has 11 pre set ti ming modes. The fol lowing are
modes preset as factory defaults:
No. Resolution
1 720x400 31.5 kHz 70 Hz
2 640x480 31.5 kHz 60 Hz
3 640x480 63.7 kHz 120 Hz
4 800x600 53.7 kHz 85 Hz
5 1152x864 67.5 kHz 75 Hz
6 1024x768 68.7 kHz 85 Hz
7 1024x768 81.8 kHz 100 Hz
8 1280x1024 79.9 kHz 75 Hz
9 1280x1024* 91.9 kHz 85 Hz
10 1600x1200 93.8 kHz 75 Hz
11 1600x1200 106.3 kHz 85 Hz
*Recommended primary mode
Horizontal
Frequency Refresh Rate
Setting th e Re fre sh R at e
To set the refresh rate for Windows 98:
1 Access the Control Panel in Windows (Start > Settings > Control Panel).
2 Double click on Display.
3 Click the Settings tab.
4 Click the Advanced button.
5 Click on Adapter and select 85 Hz from the list.
6 Click on Apply to set the selected value.
C-35
Page 42

C-36 Elo Entuitive Touchmonitor User Guide
Page 43

C
HAPTER
4
W
ARRANTY
Except as otherwise stated herein or in an order acknowledgment delivered to
Buyer, Seller warrants to Buyer that the Product shall be free of defects in
materials and workmanship. See relevant specification sheet for touchmonitors.
Seller makes no warranty regarding the model life of monitors. Seller’s
suppliers may at any time and from time to time make changes in the monitors
delivered as Products or components.
Buyer shall notify Seller in writing promptly (and in no case later than thirty
[30] days after discov ery) of the failure of any Product to conform to the
warranty set forth above; shall describe in commercially reasonable detail in
such notice the symptoms assoc iated with such failure; and shall provide to
Seller the opportun ity to inspect such Products as installed, if possible. The
notice must be received by Seller during the Warranty Period for such product,
unless otherwise directed in writing by the Seller. Within thirty (30) days after
submitting such noti ce, Bu yer shall package the allegedly defective Product in
its original ship ping carton(s) or a functional equivalent and shall ship to Seller
at Buyer’s expense and risk.
Within a reasonable time after receipt of the allegedly defective Product and
verification by Seller that the Product fails to meet t he warranty set forth above,
Seller shall corr ect such failure by, at Seller’s options, either (i) modif ying or
repairing t he Product or (ii) replacing the Product. Such modification, repair, or
replacement and the return shipment of the Product with minimum insurance to
Buyer shall be at Se ller’s expense. Buye r shall be ar the r isk of loss or damage in
transit, and may insure the Product. Buyer shall reimburse Seller for
transportat ion cost incurred for Product returned but not found by Seller to be
defective. Modification or repair of Products may, at Seller’s option, take place
either at Seller ’s facilities or at Buyer’s premises. If Seller is unable to modify,
repair, or replace a Product to conform to the warranty set forth above, then
Seller shall, at Seller’s option, either refund to Buyer or credit to Buyer’s
account the purchase price of the Product less depreciation calculated on a
straight-line basis over Seller’s stated Warranty Period.
THESE REMEDIES SHALL BE THE BUYER’S EXCLUSIVE REMEDIES
FOR BRE ACH OF WARRANTY. EXCEPT FOR THE EXPRESS
WARRANTY SET FORTH ABOVE, SELLER GRANTS NO OTHER
WARRANTIES, EXPRESS OR IMPLIED BY STATUTE OR OTHERWISE,
REGARDING THE PRODUCTS, THEIR FITNESS FOR ANY PURPOSE,
THEIR QUALITY, THEIR MERCHANTABILITY, THEIR
NONINFRINGEMENT, OR OTHERWISE. NO EMPLOYEE OF SELLER
OR ANY OTHER PARTY IS AUTHORIZED TO MAKE ANY WARRANTY
FOR THE GOODS
37
Page 44

OTHER THAN THE WARRANTY SET FORTH HEREIN. SELLER’S
LIABILITY UNDER THE WARRANTY SHALL BE LIMITED TO A
REFUND OF THE PURCHASE PRICE OF THE PRODUCT. IN NO EVENT
SHALL SELLER BE LIABLE FOR THE COST OF PROCUREMENT OR
INSTALLATION OF SUBSTITUTE GOODS BY BUYER OR FOR ANY
SPECIAL, CONSEQUENTIAL, INDIRECT, OR INCIDENTAL DAMAGES.
Buyer assumes the risk and agrees to indemnify Seller against and hold Seller
harmless from all liability relating to (i) assessing the suitabil ity for Buyer’s
intended use of the Product s and of any system design or drawing and (ii)
determining the complia nce of Buyer’s use of the Products with applicable
laws, regulations, codes, and standards. Buyer retains and accepts full
responsibil ity for all warranty and other claims relating to or arising from
Buyer’s products, which include or incorporate Products or components
manufactured or supplied by Seller. Buyer is solely responsible for any and all
representations and warranties regarding the Products made or authorized by
Buyer. Buyer will indemnify Seller and hold Seller harmless from any liability,
claims, los s, cos t, or expe nses (inc lu ding rea sonable a tto rney’s fees) a ttribu table
to Buyer’s products or representations or warranties concerning same.
Elo TouchSystems (800) 356-8682 or (650) 361-2507 · Fax (650) 361-5579 ·
www.elotouch.com
Users should independently evaluate the suitability of the product for their
application.
38 Elo Entuitive Touchmonitor User Guide
Page 45

Index
A
About the Product, 1
About Touchmonitor Adjustments, 11
AccuTouch Touchscreens, 21
Ambient Temperatu re, 28
B
BNC/D-Sub, 14
Brightness, 16
C
Care and Handling of Your Touchmonitor, 24
Chemical Resistance, 29, 30
Color Control, 15
Connecting Your T ouchmonitor, 5
Construction,30
Contrast, 16
Corner ad ju st m e nt , bott om , 14
Corner ad ju st m e nt , top, 14
CRT Life, 27
D
Deflection Frequency, 27
Dimensions for 21" CRT Touchmonitor, 31
Display Area, 27
Display Colors, 27
E
Electrical Safety Information, 25
Electrostatic Protection, 29
EMI, 28
Emissions and Immunity Information, 25
Ergonomics, 28
Expecte d Li fe P erformanc e, 29 , 30
G
Getting Started, 4
Gloss,29, 30
H
Haze, 30
Horizo nt al converge nc e, 15
Horizo nt al li nearity, 14
Horizo nt al Moire, 14
Horizo nt al P os i t io n, 14
Horizo nt al S iz e , 14
Humidity, 28
I
Information, 15
Input Signal, 27
Input Voltage, 27
Installing the Base, 4
Installing the Driver Software, 8
Instal ling th e Seria l Touch D river f or Window s 2000 , Me,
95/98 and NT 4.0, 9
Installing the USB Touch Driver for Windows 2000,
Windows Me and Windows 98, 9
Intelli Touch Touc hm o nit or Spe c if i ca tio ns , 29
Intelli Touch Touc hs c reens, 20
L
Language, 15
Light Transmission, 29, 30
Locking/Unlocking the OSD Functions,13
M
Maximum Resolution, 27
Maximum Video Input Bandwidth, 27
Monitor Dimensions, 28
Monitor Warning Messages, 18
N
Net Weight, 28
O
On-Screen Adjustments, 28
Operation, 11
OSD Adjustments, 14
OSD Horizontal Position, 15
OSD Vertical Position, 15
P
Parallel, 14
Picture Tube, 27
Pin Balance, 14
Pincushion, 14
Plug and Play Compatibility, 27
Positional Accuracy, 29, 30
Power Consumption, 27, 34
Power Management,27
Precautions, 1
Index-39
Page 46

Preset Modes, 34
Preset Timing Table,35
Purity, 15
R
Recall, 15
Regulatory Information, 25
Rotation, 15
S
Safety Regulations, 28
Sealing, 29
Selecting a Suitab le Location,4
Setting the Refresh Rate, 35
Signal PINOUT for 21" Monitor, 33
Solutions to Common Problems, 17
Surfac e Dur a bi lity, 29, 30
T
Technical Specifications, 27
Touch Activation Force, 29, 30
Touchmonitor Controls, 12
Touchmonitor Safety, 23
Touchmonitor Specifications, 27
Touchpoint Density, 29, 30
Touchscreens
An Overview, 19
Trapezoid, 14
Troubleshooting, 17
U
Unpacking Your Touchmonitor, 3
Using the On Screen Display (OSD), 12
V
Vertical convergence, 15
Vertical lineari ty, 14
Vertical Moire, 14
Vertical Position, 14
Vertical Size, 14
Visual Resolution, 29, 30
W
Warranty, 37
Index-40
Page 47

 Loading...