

Page 1
USER MANUAL
Elo Touch Solutions
PayPoint® Plus for Windows
Page 2

UM600523 Rev.A, page 2 of 41
User Manual – PayPoint Plus for Windows
Copyright © 2018 Elo Touch Solutions, Inc. All Rights Reserved.
No part of this publication may be reproduced, transmitted, transcribed, stored in a retrieval system, or translated into any language or computer
language, in any form or by any means, including, but not limited to, electronic, magnetic, optical, chemical, manual, or otherwise without prior written
permission of Elo Touch Solutions, Inc.
Disclaimer
The information in this document is subject to change without notice. Elo Touch Solutions, Inc. and its Affiliates (collectively “Elo”) makes no representations or
warranties with respect to the contents herein, and specifically disclaims any implied warranties of merchantability or fitness for a particular purpose. Elo
reserves the right to
Revise this publication and to make changes from time to time in the content hereof without obligation of Elo to notify any person of such revisions or
changes.
Trademark Acknowledgments
Elo, Elo (logo), Elo Touch, Elo Touch Solutions and PayPoint, are trademarks of Elo and its Affiliates.
Page 3

UM600523 Rev.A, page 3 of 41
User Manual – PayPoint Plus for Windows
Table of Contents
Section 1: Introduction ............................................................................................................................................................................................................................... 4
Section 2: Unpacking and Operation ......................................................................................................................................................................................................... 5
Section 3: Receipt Printer ........................................................................................................................................................................................................................ 17
Section 4: Barcode Scanner .................................................................................................................................................................................................................... 22
Section 5: Technical Support and Maintenance ...................................................................................................................................................................................... 29
Section 6: Regulatory Information ........................................................................................................................................................................................................... 32
Section 7: Warranty Information .............................................................................................................................................................................................................. 40
Page 4

UM600523 Rev.A, page 4 of 41
User Manual – PayPoint Plus for Windows
Section 1: Introduction
Product Description
The Elo PayPoint Plus register is an all-in-one Wintel based cash register that comes equipped with built-in
receipt printer, magnetic stripe reader, barcode reader, and cash drawer. In addition to its built-in
peripherals, the system has USB, Serial, and HDMI ports that allow for connectivity of external devices.
Precautions
Follow all warnings, precautions and maintenance as recommended in this user manual to maximize the
life of your unit and prevent risks to user safety. See Section 6 for more information on safety.
This manual contains information that is important to ensure proper setup of the PayPoint Plus. Before
setting up and powering on your PayPoint Plus, read through this manual, especially Unpacking and
Operation, and Technical Support and Maintenance sections.
Page 5

UM600523 Rev.A, page 5 of 41
User Manual – PayPoint Plus for Windows
Section 2: Unpacking and Operation
Box Contents
Verify that the box contains:
• PayPoint Plus for Windows
• Quick Install Guide
• Power Cable
• 1x receipt paper roll
• 2x cash drawer keys
• 1x RJ45 to DB9 Serial Cable
Page 6
UM600523 Rev.A, page 6 of 41
User Manual – PayPoint Plus for Windows
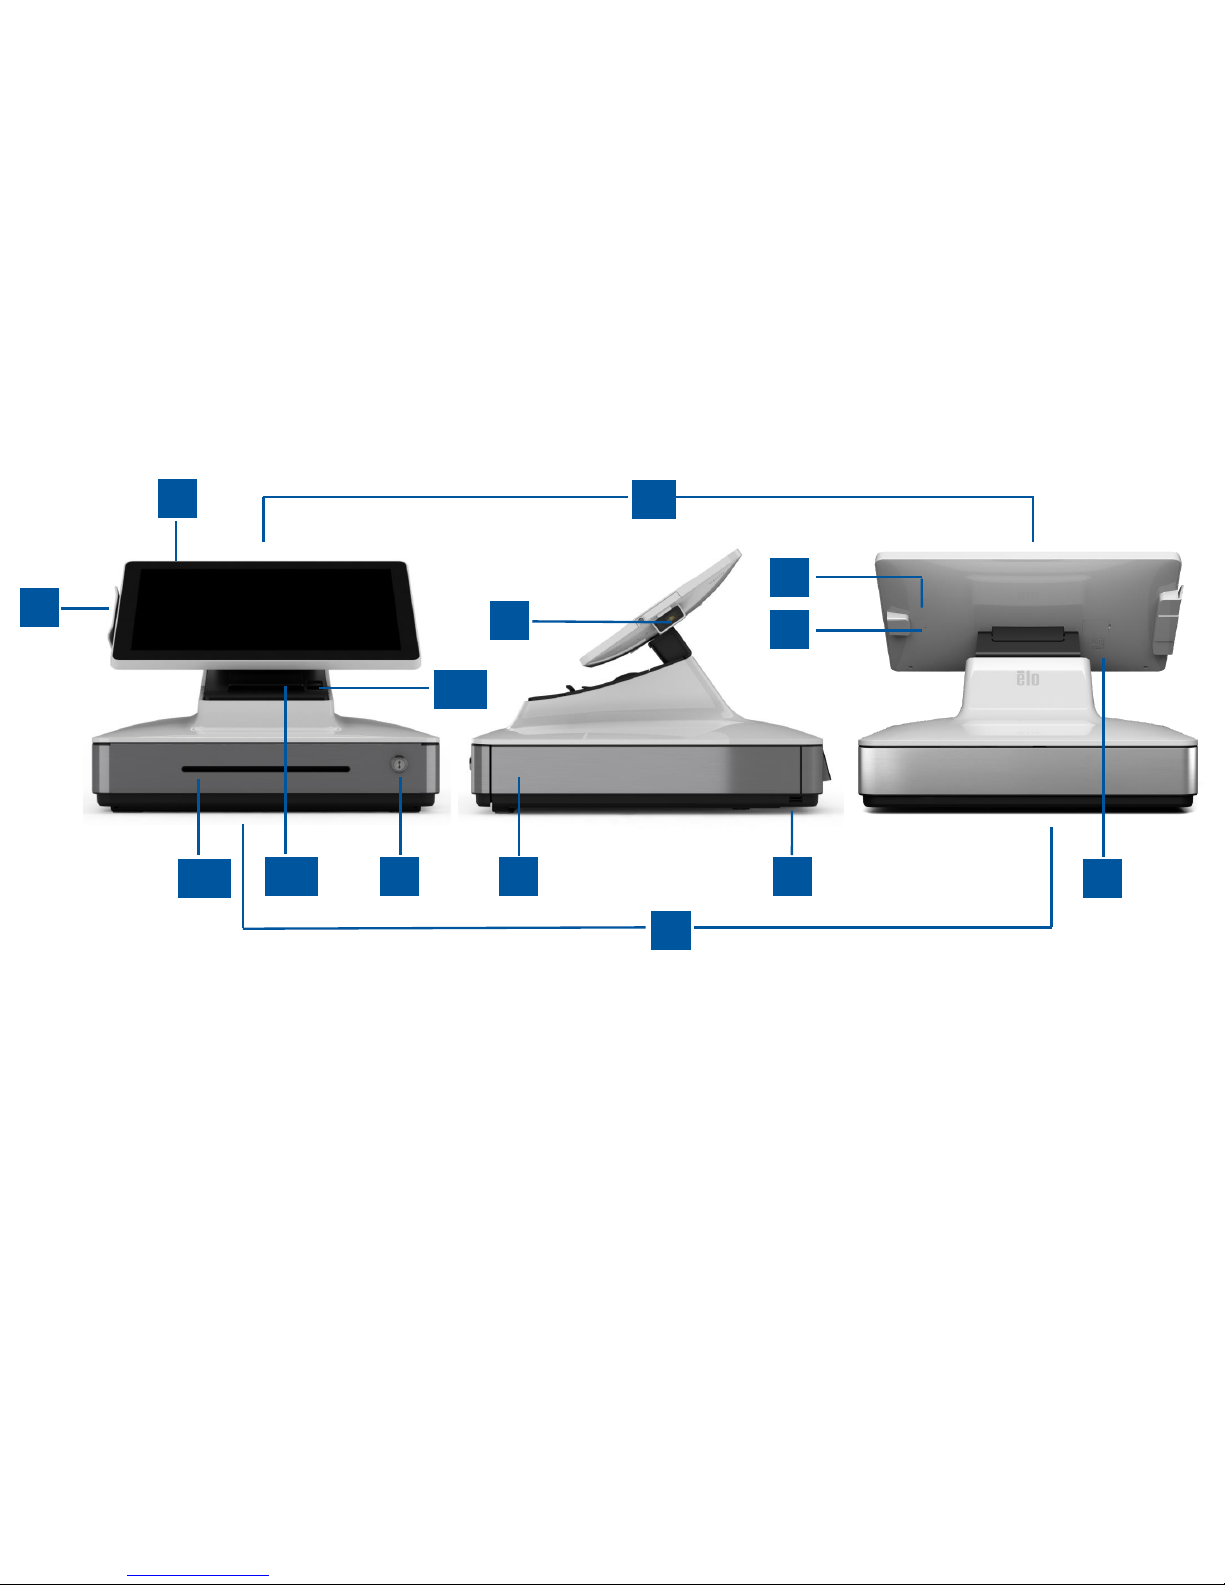
Elo PayPoint Plus Layout
Page 7
UM600523 Rev.A, page 7 of 41
User Manual – PayPoint Plus for Windows
A. PayPoint Plus Display Head
1
Magnetic Stripe Reader (MSR)
2
Touch display
3
Barcode scanner
4
Barcode scanner manual trigger
5
Memory/SSD Door
6
Speaker
Page 8

UM600523 Rev.A, page 8 of 41
User Manual – PayPoint Plus for Windows
1. Magnetic Stripe Reader (MSR)
The register has a built in encryptable magnetic stripe reader. Application provider is responsible for correctly encrypting the reader.
When the register is in cashier-facing view, the MSR will be on the left of the register display head. When register is in customer-facing view, the
MSR will be on the right of the register display head.
2. Touch display
The register is equipped with a 15.6” FHD with Multitouch TouchPro Pro-G (glass) PCAP touch display.
3. Barcode scanner
The register has a built-in barcode scanner that scans 1-D and 2-D barcodes. When the register is in cashier-facing view, the barcode scanner
will be on the right of the register display head.
4. Barcode scanner manual trigger
The back of the display head has a manual trigger for the barcode scanner. It can be accessed with a pin or paper clip.
5. Memory/SSD Door
Remove memory/SSD door to access the memory and SSD storage device for expandable.
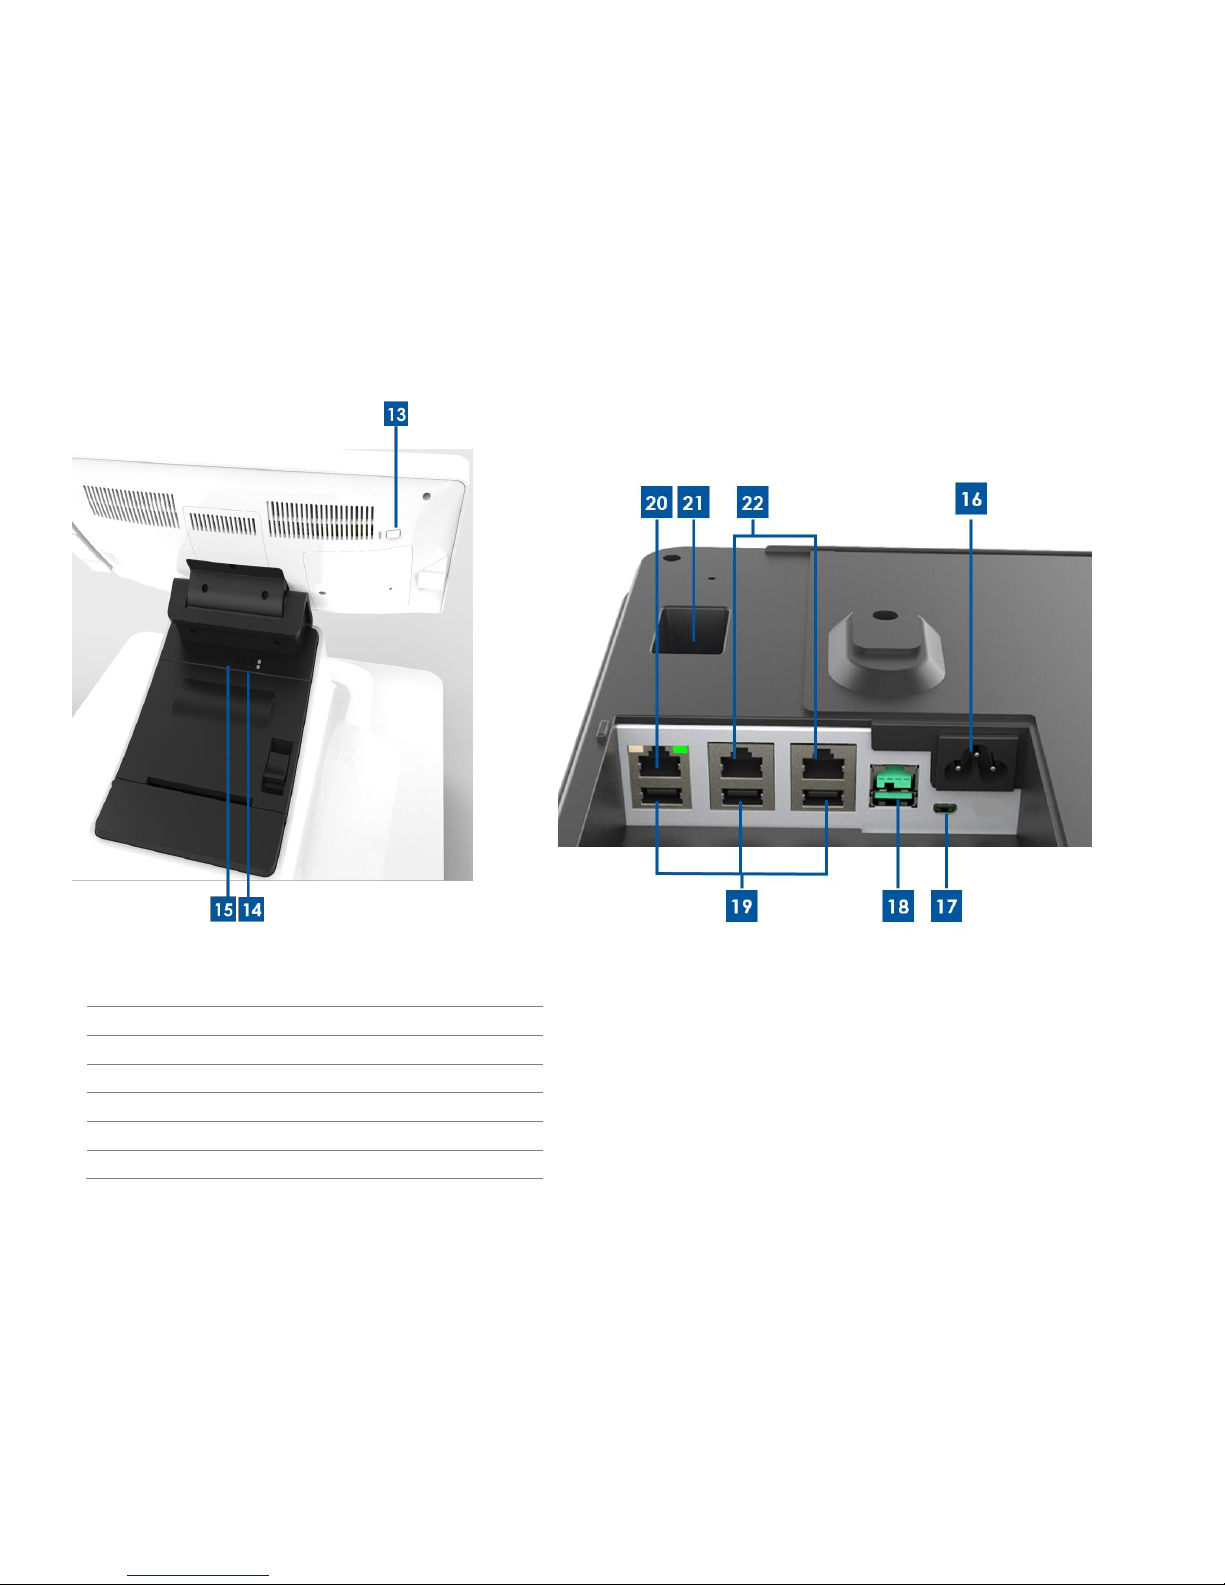
B. PayPoint Plus Base
7
USB Port
16
AC power Input
8
Cash Drawer
17
Micro HDMI Port
9
Cash Drawer Lock
18
12V USB Port
10
Receipt Printer
19
USB Ports
11
Cash Drawer Media Slot
20
Ethernet Port
12
Printer Head Release Lever
21
RJ12 Cash Drawer Port
13
Power Button
22
2x RJ45 Serial Ports
14
Printer Feed Button
15
Printer Power Button
Page 9

UM600523 Rev.A, page 9 of 41
User Manual – PayPoint Plus for Windows
6. Speaker
The register has a built in speaker on the back of the display head.
7. USB Port (USB 2.0)
This USB port can be used to connect other point of sale peripheral devices.
8. Cash Drawer
The register is equipped with a cash drawer for storing cash, coins, and checks.
9. Cash Drawer Lock
Use the key that comes with the Elo PayPoint Plus register to lock / unlock the cash register. When cash drawer is locked, cash drawer will not
open even when it is commanded to.
Note: Your register comes with one of three unique key and lock combinations. A key and lock pair are marked with matching numbers (001,
002, or 003).
10. Receipt Printer (built-in)
The register is equipped with a built-in receipt printer that is located on the register base.
11. Cash Drawer Media Slot
The cash drawer is designed with a slot for slipping checks into the cash drawer.
12. Printer Head Release Lever
Pull this release lever to release the printer head cover. For more information on how to change printer paper on the register, refer to the
Receipt Printer section of this manual.
13. Power Button
The register has a power button on the back of the display head. A short press will turn off the LCD backlight. A long press will automatically
power down the PayPoint Plus.
14. Printer Feed Button
Press the printer feed button to feed paper through the PayPoint Plus printer.
Page 10

UM600523 Rev.A, page 10 of 41
User Manual – PayPoint Plus for Windows
15. Printer Power Button
Press the printer power button to power off (and to turn back on) the PayPoint Plus printer. Printer will print printer diagn ostics information when
printer power button is pressed and held during printer bootup / power on.
16. AC Power In
The PayPoint Plus has a built-in power supply. Plug in the AC power cable provided. The unit can be powered by 110V-240V output
17. Micro HDMI Port
The PayPoint Plus has a built-in micro HDMI port to support Elo Monitors for customer displays.
18. 12V Powered USB Port
The PayPoint Plus has a 12V powered USB port that can provide power (and touch interface) to an external Elo monitor.
19. USB Ports
The USB ports can be used for external peripherals or payment devices.
20. Ethernet Port
Connect a LAN cable to the Ethernet port to enable internet.
21. RJ12 Cash Drawer Port
The register is equipped with a secondary cash drawer port. The cash drawer port follows Star Micronics pin out. Please consult your cash
drawer user manual to determine which cash drawer cable you will require.
22. 2x RJ45 Serial Ports
The register has two RJ45 serial ports for connecting external peripherals or payment devices.
Page 11

UM600523 Rev.A, page 11 of 41
User Manual – PayPoint Plus for Windows
Register Display Head
The Elo PayPoint Plus register display head can be flipped to allow customers to complete purchase
transactions by self-swiping payment cards, and to authorize transactions by signing directly onto the
touchscreen.
Figure 3. Elo PayPoint Plus display head can be flipped and supports two configurations:
Elo PayPoint Plus register cashier-facing view (top) and customer-facing view (bottom)
Power
Press the register power button to turn the Elo PayPoint Plus register on.
Page 12

UM600523 Rev.A, page 12 of 41
User Manual – PayPoint Plus for Windows
In the event that the register freezes and does not respond, press and hold the power button until the
register turns off. If the register does not turn off via the power button, the register will need to be
powered down by unplugging the power cord from the wall.
The Elo PayPoint Plus register power button is equipped with an LED that indicates the power status of the
register, as follows:
Register Power Status
LED Status
OFF (disconnected from wall)
Off
OFF (connected to wall)
Red (Solid)
SLEEP
White (Blinking)
ON
White (Solid)
The system consumes low power when in SLEEP and OFF modes. For detailed power consumption
specifications, refer to technical specifications available on the Elo website www.elotouch.com.
To bring register out of sleep/standby mode, press the power button once.
If long periods of non-use are planned, turn off the Elo PayPoint Plus register to save power.
The maximum voltage, frequency and current for the register, are provided in the power ratings table
below:
Operating Voltage Range
Operating Frequency Range
Operating Current
100 - 240Vac
50 – 60 Hz
2.5A Max
Page 13

UM600523 Rev.A, page 13 of 41
User Manual – PayPoint Plus for Windows
Recovering the Operating System
If for any reason the touch computer’s operating system needs to be recovered to FACTORY SETTINGS, you can recover your system by following the
procedures below. PLEASE NOTE THAT ALL CUSTOMER SETTINGS AND DATA WILL BE LOST DURING THIS PROCESS. Please be sure to completely backup
all of your data, settings, and customer-installed software before proceeding.
1. Power off your system completely.
2. Power on your system.
3. After the Elo splash screen (shown below), press “↑” or “↓” repeatedly to pause
on the Windows Boot Manager.
Page 14

UM600523 Rev.A, page 14 of 41
User Manual – PayPoint Plus for Windows
4. Select either Restore OS 32bit or Restore OS 64bit depending on your OS environment.
5. The following User Interface (UI) will be presented:
Page 15

UM600523 Rev.A, page 15 of 41
User Manual – PayPoint Plus for Windows
6. Select Restore OS. System will test your hardware automatically. Once the process completes, click Start button to perform the system recovery
function.
7. The following process will reformat the primary hard drive. Please back up your data before performing the recovery process.
8. Once completed, click the Close button. The system will return to the main menu of the Elo Recovery Solution. Then click the Exit button to
restart your system.
NOTE: All data is deleted during the recovery process. The user must back up files when necessary. Elo Touch Solutions does not accept liability
for lost data or software.
NOTE: The end user must adhere to Microsoft's Licensing Agreement.
Page 16

UM600523 Rev.A, page 16 of 41
User Manual – PayPoint Plus for Windows
Duty Usage Cycle
12 hours on per 24 hours
This will promote power savings, extend life of the display and trouble-free operation throughout the life of the register.
Page 17

UM600523 Rev.A, page 17 of 41
User Manual – PayPoint Plus for Windows
Section 3: Receipt Printer
Printer Paper
The register receipt printer operates using heat, and not with ink. Printer paper compatible with the Elo
PayPoint Plus receipt printer are as follows:
Type: Thermal Paper
Paper width: 80 mm (58 mm with paper roll guide installed)
Printing width: 72mm (50.8mm with paper roll guide installed)
Roll Diameter (maximum): 80 mm
Thickness: 0.053 – 0.085 mm
To change the paper for the Elo PayPoint Plus register receipt printer:
1. Ensure that the register display head is flipped away from the receipt printer (in custom er-
facing view).
2. Pull the receipt printer head release lever to release the printer head cover.
3. Lift printer head cover.
4. Take out the roll of used printer paper and replace with new roll of printer paper. Make sure
that the paper is placed and positions in the correct orientation, as shown below.
Page 18

UM600523 Rev.A, page 18 of 41
User Manual – PayPoint Plus for Windows
Installing Paper Roll Guide
To operate printer with a 58 mm width receipt paper roll, install paper roll guide as follows:
1. Insert the paper roll guide along the groove of the body
Note: Securely insert into the groove marked with “∆ 58”
2. Secure the paper roll guide by pressing on it until it clicks in place.
Page 19

UM600523 Rev.A, page 19 of 41
User Manual – PayPoint Plus for Windows
Cleaning and Care of Printer
The following tips will help maintain optimal performance of your Elo PayPoint Plus register receipt printer:
• Do not pull any paper that is ejected from the printer.
• Do not touch the printer roller or thermal head surface with bare hands. In the case of
contact between printer roller or thermal head and hands, clean the roller and/or thermal
head surface with alcohol, as specified in the latter parts of this section herein.
Note: Contaminating heating elements with any oil or grease (e.g. oil from hands) may shorten the life of
the thermal head.
• Turn off printer before performing maintenance on it.
Prior to cleaning the PayPoint Plus register receipt printer, ensure that the register display head is flipped
away from the receipt printer (in customer-facing view). Pull the receipt printer head release lever to
release printer head cover and access the different printer components listed in Figure 4 above.
Guidance on how to clean the printer photo-sensor, thermal head, and roller are as follows:
Roller (Platen)
It is recommendable to clean the printer roller once every 6 months. To do so:
Use a dry, soft cloth, to wipe off any stains from the printer roller.
Clean the entire rubber roller by rotating it.
Page 20

UM600523 Rev.A, page 20 of 41
User Manual – PayPoint Plus for Windows
Paper holder and its surrounding area:
It is recommendable to clean the paper holder and its surrounding area once every 6 months. To do so:
Use a Nylon brush (or equivalent) to brush off any paper dust or other residues that may have accumulated.
Thermal head
It is recommendable to clean the printer thermal head once every 6 months. To do so:
Moist cotton swab (or soft cloth) with alcohol (ethanol, methanol, or isopropyl alcohol).
Wipe the thermal head with the cotton swab to remove any stain from the thermal head.
Use a dry soft cloth to wipe the thermal head.
Wait to allow the thermal head to dry off, and then shut the printer head cover.
Note: Do not clean thermal head immediately after printing, as thermal head may be hot.
Be careful of static electricity while cleaning the thermal head. Static electricity can
damage the head.
Page 21

UM600523 Rev.A, page 21 of 41
User Manual – PayPoint Plus for Windows
Clearing Paper Jam
In case of paper jam, open the paper jam printer door (highlighted in light gray outline below) to clear
paper jam. Open paper jam printer door by exerting upward pressure on side rib (highlighted by blue
arrow below). If unable to unlatch door using finger force, use an apparatus (e.g. coin) to gently exert an
upward lever force to the side latch.
After removing the paper jam door, rotate the knob to clear the paper jam. Once the paper jam is
cleared, replace the paper jam door.
Figure 5. In case of paper jam, exert upward pressure on side
rib (blue arrow) to open paper jam printer door (light gray)
Figure 6. In case of paper jam, rotate the knob to clear the jam.
Page 22

UM600523 Rev.A, page 22 of 41
User Manual – PayPoint Plus for Windows
Section 4: Barcode Scanner
Out-of-Box Settings
Out of the box the default settings of the barcode reader are as follows:
• USB VCP (Virtual COM Port)
• Presentation Mode
o Illumination always on
• Most common barcodes enabled
• Beep on successful scan
This section covers procedures to set barcode settings and configurations.
Note: Not all available configurations are covered herein. For complete list, refer to N3680 User Guide
from www.honeywellaidc.com.
Page 23

UM600523 Rev.A, page 23 of 41
User Manual – PayPoint Plus for Windows
Reader Interface
VCP Mode (Virtual COM Port):
This is the default setting for the scanner out of the box.
USB Keyboard Mode:
USB HID Mode:
Page 24

UM600523 Rev.A, page 24 of 41
User Manual – PayPoint Plus for Windows
Illumination Settings
The above setting is the default for the scanner. The white illumination light will be on at all times.
Scanning the above barcode will disable the white illumination light when the scanner is not in use.
Trigger Mode Settings
Out of the box the default of the scanner will be presentation mode (always on). The reader will be
scanning for barcodes at all times.
Manual Trigger mode:
Scanning the above barcode will enable manual trigger mode. When in this mode, the scanner will need
to be activated manually (by software or hardware button) between each scan.
Presentation Mode (default setting):
Page 25

UM600523 Rev.A, page 25 of 41
User Manual – PayPoint Plus for Windows
Audio Settings
Out of the box the scanner will be configured to beep on each successful scan of a barcode. This beep
can be enabled or disabled based on your preference.
Beep Disable:
Scanning the above barcode will disable the beeper when a barcode is successfully scanned.
Beep Enable:
Scanning the above barcode will enable the beeper when a barcode is successfully scanned.
Page 26

UM600523 Rev.A, page 26 of 41
User Manual – PayPoint Plus for Windows
Keyboard Country Settings
Out of the box the scanner will be configured as US English keyboard
US Keyboard (by default):
Belgium Keyboard:
Canada (French):
Czech Republic:
France (French):
Page 27

UM600523 Rev.A, page 27 of 41
User Manual – PayPoint Plus for Windows
Italy:
Japan:
United Kingdom:
Page 28

UM600523 Rev.A, page 28 of 41
User Manual – PayPoint Plus for Windows
Additional Configurations
Mobile Phone Optimization
Out of the box the scanner will be optimized to read printed barcodes. If the primary application for your
scanner will be reading barcodes from mobile devices, the reader can be configured for this purpose.
Reread Delay
If your application requires sometimes rereading of the same barcode, your scanner can be adjusted to
allow this. The reader is configured to have a delay between each read of the same barcode to prevent
multiple scans of the same item. Use a shorter delay when repetitive barcode scanning is required.
500ms (short delay):
750ms (medium delay):
1 second (long delay):
2 seconds (extra-long delay):
Page 29

UM600523 Rev.A, page 29 of 41
User Manual – PayPoint Plus for Windows
Section 5: Technical Support and Maintenance
Solutions to Common Problems
Problem
Suggested Troubleshooting
The Elo PayPoint Plus register does not respond when
turning on the system.
Check that the power cable is properly connected to both the register and the wall.
Power button LED will be red when register is properly connected to the wall.
OR - Unplug the power cable, re-plug after five seconds, and press the power button
to turn on the system.
OR - In the case that the power button LED displays solid white light, which suggests
that the system is on, there may be an issue with the display or LCD backlight. Please
contact Elo Customer Service.
Blank screen
If the power button LED is blinking, the register may be in SLEEP mode. Press the
power button to bring the unit out of SLEEP mode.
Receipt printer does not print text on the receipt
paper
Ensure that the thermal receipt paper is installed in the printer in the proper
orientation.
Note: Only one side of the thermal paper is coated with the dye that changes color
when heated. This is the side that will need to contact the printer thermal head.
Refer to Receipt Paper Section of this manual for more information on how to
properly install the thermal receipt paper in the receipt printer.
OR - Try and restart the register.
Poor receipt printing quality
Poor receipt printing quality may be due to the use of poor quality thermal paper.
Refer to Receipt Printer section of this manual for more information on recommended
thermal paper for the Elo PayPoint Plus register receipt printer.
Receipt printer does not run when it’s supposed to
Ensure that receipt paper is loaded onto the printer.
In case of paper jam, refer to Receipt Printer section of this manual.
MSR does not read card properly
The MSR may not function properly when dirty. Use MSR cleaning cards (purchasable
in some office supply stores).
Cash drawer doesn’t open
Check to ensure that cash drawer lock is not in lock position.
Ensure that the thermal receipt paper is installed in the printer in the proper
orientation.
Page 30

UM600523 Rev.A, page 30 of 41
User Manual – PayPoint Plus for Windows
Technical Assistance
Refer to last page for worldwide technical support phone numbers.
Technical Specifications
visit www.elotouch.com/products for technical
specifications for this device
Support
visit www.elotouch.com/support for technical support
Page 31

UM600523 Rev.A, page 31 of 41
User Manual – PayPoint Plus for Windows
Elo PayPoint Plus Register Care and Handling
The following tips will help maintain optimal performance of your Elo PayPoint Plus register:
• Disconnect the power cable before cleaning.
• To clean the unit (except for touch screen), use a soft cotton or microfiber cloth lightly
dampened with a mild detergent.
• It is important that your unit remains dry. Do not get liquids on or inside the unit. In the event
that liquid does get inside, have a qualified service technician inspect the unit before you
power it on again.
• Do not wipe the screen with a cloth or sponge that could scratch the surface.
• When cleaning the touchscreen, use window or glass cleaner applied to a clean cloth.
Never apply the cleaner directly on the touchscreen. Do not use alcohol (methyl, ethyl or
isopropyl), thinner, benzene, or other abrasive cleaners.
Page 32

UM600523 Rev.A, page 32 of 41
User Manual – PayPoint Plus for Windows
Section 6: Regulatory Information
Electrical Safety Information
Compliance is required with respect to the voltage, frequency, and current requirements indicated on
the manufacturer’s label. Connection to a different power source than those specified herein will likely
result in improper operation, damage to the equipment or pose a fire hazard if the limitations are not
followed.
There are no operator serviceable parts inside this equipment. There are hazardous voltages generated
by this equipment which constitute a safety hazard. Service should be provided only by a qualified
service technician.
Contact a qualified electrician or the manufacturer if there are questions about the installation prior to
connecting the equipment to mains power.
Emissions and Immunity Information
Notice to Users in the United States for FCC compliance:
This device complies with part 15C of the FCC Rules. Operation is subject to the following two conditions:
(1) This device may not cause harmful interference, and (2) this device must accept any interference
received, including interference that may cause undesired operation of the device.
Changes or modifications not expressly approved by the party responsible for compliance could void the
user‘s authority to operate the equipment.
NOTE: This equipment has been tested and found to comply with the limits for a Class A digital device,
pursuant to Part 15 of the FCC Rules. These limits are designed to provide reasonable protection against
harmful interference when the equipment is operated in a commercial environment. This equipment
generates, uses, and can radiate radio frequency energy and, if not installed and used in accordance
with the instruction manual, may cause harmful interference to radio communications. Operation of this
equipment in a residential area is likely to cause harmful interference in which case the user will be
required to correct the interference at his own expense.
This equipment should be installed and operated to ensure a minimum of 20 cm spacing to any person.
Page 33

UM600523 Rev.A, page 33 of 41
User Manual – PayPoint Plus for Windows
Notice to Users in Canada for IC compliance:
This equipment complies with the Class A limits for radio noise emissions from digital apparatus as
established by the Radio Interference Regulations of Industrial Canada.
CAN ICES3(A)/NMB3(A)
This device complies with Industry Canada’s license-exempt RSSs. Operation is subject to the following
two conditions:
(1) This device may not cause interference; and
(2) This device must accept any interference, including interference that may cause undesired
operation of the device.
Le présent appareil est conforme aux CNR d’Industrie Canada applicables aux appareils radio exempts
de licence. L’exploitation est autorisée aux deux conditions suivantes:
(1) l’appareil ne doit pas produire de brouillage, et
(2) l’utilisateur de l’appareil doit accepter tout brouillage radioélectrique subi, même si le brouillage est
susceptible d’en compromettre le fonctionnement.
Notice to Users in the European Union:
Use only the provided power cords and interconnecting cabling provided with the equipment.
Substitution of provided cords and cabling may compromise electrical safety or CE Mark Certification for
emissions or immunity as required by the following standards:
This Information Technology Equipment (ITE) is required to have a CE Mark on the Manufacturer’s label
which means that the equipment has been tested to the following Directives and Standards: This
equipment has been tested to the requirements for the CE Mark as required by EMC Directive 2014/30/
EU as indicated in European Standard EN 55032 Class A and the Low Voltage Directive 2014/35/EU as
indicated in European Standard EN 60950-1.
General Information to all Users:
This equipment generates, uses and can radiate radio frequency energy. If not installed and used
according to this manual the equipment may cause interference with radio and television
communications. There is, however, no guarantee that interference will not occur in any particular
installation due to site-specific factors.
1.
In order to meet emission and immunity requirements, the user must observe the following:
a.
Use only the provided I/O cables to connect this digital device with any computer.
b.
To ensure compliance, use only the provided manufacturer’s approved line cord.
c.
The user is cautioned that changes or modifications to the equipment not expressly approved by
the party responsible for compliance could void the user’s authority to operate the equipment.
Page 34

UM600523 Rev.A, page 34 of 41
User Manual – PayPoint Plus for Windows
2.
If this equipment appears to cause interference with radio or television reception, or any other device:
a.
Verify as an emission source by turning the equipment off and on. If you determine that this
equipment is causing the interference, try to correct the interference by using one or more of the
following measures:
i.
Move the digital device away from the affected receiver.
ii.
Reposition (turn) the digital device with respect to the affected receiver.
iii.
Reorient the affected receiver’s antenna.
iv.
Plug the digital device into a different AC outlet so the digital device and the receiver are on
different branch circuits.
v.
Disconnect and remove any I/O cables that the digital device does not use. (Unterminated I/O
cables are a potential source of high RF emission levels.)
vi.
Plug the digital device into only a grounded outlet receptacle. Do not use AC adapter plugs.
(Removing or cutting the line cord ground may increase RF emission levels and may also
present a lethal shock hazard to the user.)
If you need additional help, consult your dealer, manufacturer, or an experienced radio or television
technician.
Page 35

UM600523 Rev.A, page 35 of 41
User Manual – PayPoint Plus for Windows
Radio Equipment Directive
Elo hereby declares that the radio equipment type, Elo PayPoint Plus, is in compliance with Directive
2014/53/EU. The full text of the EU Declaration of Conformity is available at the following internet address:
www.elotouch.com
This device is designed and intended for indoor use only.
Operation frequency and radio-frequency power are listed as below:
o WLAN 802.11a/b/g/n/ac
▪ 2400GHz ≤ 30 dBm EIRP
▪ 5150 – 5725GHz ≤ 24 dBm EIRP
▪ 5725 – 5850GHz ≤ 30 dBm EIRP
o Bluetooth Tx power
▪ BR: 9.5 dBm
▪ EDR2/EDR3: 5.5 dBm
▪ BLE (LR-125k): 5.0 dBm
▪ BLE 1M/2M: 5.5 dBm
ECC/DEC/ (04)08:
The use of the frequency band 5 150-5 350 MHz is restricted to indoor operation because of the protection
requirements of satellite services
Page 36

UM600523 Rev.A, page 36 of 41
User Manual – PayPoint Plus for Windows
Agency Certifications
The following certifications and marks have been issued or declared for this peripheral:
• US FCC
• Canada IC
• EU CE
• US and Canada UL/cUL
• International CB
• Japan VCCI
• China CCC
• China SRRC
• Australia RCM
Page 37

UM600523 Rev.A, page 37 of 41
User Manual – PayPoint Plus for Windows
中国 RoHS (China RoHS)
根据中国法律《电器电子产品有害物质限制使用管理办法》,以下部分列出了产品
中可能包含的有害物质的名称和含量。
中国电子电气产品环境信息
触控一体机
有害物质
铅
(Pb) 汞 (Hg) 镉 (Cd)
六价铬
(Cr(VI))
多溴联
苯
(PBB)
多溴二苯
醚
(PBDE)
电缆组件
X O O O O O 玻璃外罩
X O O O O O 液晶面板
X O O O O O 金属框架
X O O O O
O
塑胶盖
O O O O O
O
印制线路板
X O O O O
O
本表格依据 SJ/T 11364 的规定编制.
O:
表示该有害物质在该部件所有均质材料中的含量均在 GB/T 26572 规定
的限量要求以下.
X:
表示该有害物质至少在该部件的某一均质材料中的含量超出 GB/T
26572 规定的限量要求.
标志说明
根据 SJ/T11364 的要求, 电子信息产品标有以下污染控制标识。 此产品在 10 年内不
会对环境产生影响。
Page 38

UM600523 Rev.A, page 38 of 41
User Manual – PayPoint Plus for Windows
Power Specifications
Waste Electrical & Electronic Equipment Directive (WEEE)
This product should not be disposed of with household waste. It should be deposited at a facility that enables recovery and recycling.
Elo has put in place recycling arrangements in certain parts of the world. For information on how you can access these a rrangements, please
visit www.elotouch.com/e-waste-recycling-program/.
Caution:
Risk of explosion if battery is replaced by an incorrect type.
Dispose of used battery according to the local laws and regulations.
Electrical Ratings
Input Voltage
100 - 240VAC
Input Current
2.5A
Operating Conditions
Temperature
0°C - 35°C
Humidity
20% to 80% (non-condensing)
Altitude
0 to +10000 ft (3048m)
Storage Conditions
Temperature
-30°C - 60°C
Humidity
5% to 95% (38.7°C max wet bulb
temperature)
Altitude
0 to +35000 ft (10668m)
Page 39

UM600523 Rev.A, page 39 of 41
User Manual – PayPoint Plus for Windows
Page 40

UM600523 Rev.A, page 40 of 41
User Manual – PayPoint Plus for Windows
Section 7: Warranty Information
For warranty information, go to http://support.elotouch.com/warranty/
Page 41

© 2018 Elo Touch Solutions, Inc. All rights reserved.
User Manual – PayPoint Plus for Windows
www.elotouch.com
Visit our website for the latest
• Product Information
• Specifications
• Upcoming Events
• Press Releases
• Software Drivers
To find out more about our extensive range of Elo touch solutions, go to www.elotouch.com, or call the office nearest you.
North America
Tel +1 408 597 8000
Fax +1 408 597 8001
elosales.na@elotouch.com
Europe
Tel +32 (0)16 70 45 00
Fax +32 (0)16 70 45 49
elosales@elotouch.com
Asia-Pacific
Tel +86 (21) 3329 1385
Fax +86 (21) 3329 1400
www.elotouch.com.cn
Latin America
Tel +52 55 2281-69581
elosales.latam@elotouch.com
 Loading...