

EloStar 7215, 7217, 7216, 7215-3XX Series, 7216-3XX Series Operating Instructions Manual
...Page 1
Operating Instructions No. 9999-043-0
Seite 1
B7215e01_2.pmd
Rel. 1 vom 10.09.2003
Contents:
1. Important notes
1.1 Explanation of terms
2. Opening the electronic lock
3. Closing the electronic lock
4. Time-out following erroneous entries
5. Correction with the ”C“ button
6. Charge monitoring, replacing the battery
6.1 Opening and closing after replacing the battery
7. Mechanical emergency release, EloStar 7216 / 7217
and 7216-3XX-X / 7217-3XX-X only
7.1 Closing after emergency release, 7216 / 7217
7.2 Closing after emergency release, and 7216-3XX-X
and 7217-3XX-X
8. Querying the lock status
9. Detecting keypad replacement and tampering
10. Programming the electronic lock
10.1 Programming the master combination
10.2 Programming a user combination
10.2.1 Deleting a user combination
10.3 Activating a combination interlock (duality principle)
10.3.1 Opening the safe with the combination interlock
feature activated
10.3.2 Deactivating the combination interlock function
10.4 Programming a timed delay period
10.4.1 Opening the lock with the timed delay function
activated
10.4.2 Deleting a timed delay period
10.5 Programming a relaese period
10.6 Programming I/O functions (input/output functions)
10.7 Programming for automatic locking
10.7.1 Deleting automatic locking
10.8 Programming an override combination
10.8.1 Deleting an override combination
10.9 Programming a time-lock period
11. Triggering a silent alarm
12. Activity logging
13. Transmitting data from the electronic lock to a PC
14. Reset function
15. Troubleshooting
electronic lock
Typ: 7215 / 7216 / 7217/ 7215-3XX-X / 7216-3XX-X / 7217-3XX-X
1.1 Explanation of terms
The following terms and symbols are used:
User number = User number (abbreviated UNo.)
UNo. = 0 for master
UNr. = 1 to 9 for users
Combination = A combination (series) of digits,
e.g. 4 7 6 2 3 9
Opening
combination = A series of digits required to open
the lock.
It comprises the:
User number and combination.
e.g. master combination
0 _ 6 5 4 7 2 1
e.g. user combination
3 _ 8 7 9 5 8 3
Factory
combination = The initial combination, programmed
at the factory. For this electronic
lock the combination has been preset to 0 _ 1 2 3 4 5 6.
Master
combination = Combination used by the master to
open the lock.
User
combination = Combinations for additional users.
All user combinations are
subordinate to the master
combination.
Override
combination = Combination which will open the
lock immediately even if a delay
period has been programmed.
P No. = Program number
LED = Light-emitting diode at the keypad.
Note = Caution =
1. Important notes
• Beforehand any operation use C-Button
• In the interest of security, change the factory
combination
0 _ 1 2 3 4 5 6 immediately.
• Do not use any personal data for your new master
or user combination.
• The maximum permissible interval between any two
keypad entries is 60 seconds. If this limit is exceeded,
then the entire procedure will have to be repeated
from the beginning.
• A signal tone sounds each time a button is pressed.
• Store the keys used for mechanical emergency
release (only for the EloStar 7216 / 7217 / 7216-3XXX / 7217-3XX-X) in a secure place and never inside
the safe itself!
• A 10-second time-out period will be started after in
valid combinations have been entered in three
consecutive attempts.
• Do not damage the inspection seal on the lock as
otherwise the guarantee will be invalidated.
Models available
7215 Electronic lock with rigid bolt.
7215-300-0 to 7215-399-0
Electronic lock with spring-loaded bolt.
7216 Electronic lock with rigid bolt and mechanical
emergency release, VdS Class1.
7216-300-0 bis 7216-399-0
Electronic lock with spring-loaded bolt and
mechanical emergency release, VdS Class1.
7217 Electronic lock with rigid bolt and mechanical
emergency release, VdS Class2.
7217-300-0 bis 7217-399-0
Electronic lock with spring-loaded bolt and
mechanical emergency release, VdS Class2.
Page 2
Operating Instructions No. 9999-043-0
Seite 2
B7215e01_2.pmd
Rel. 1 vom 10.09.2003
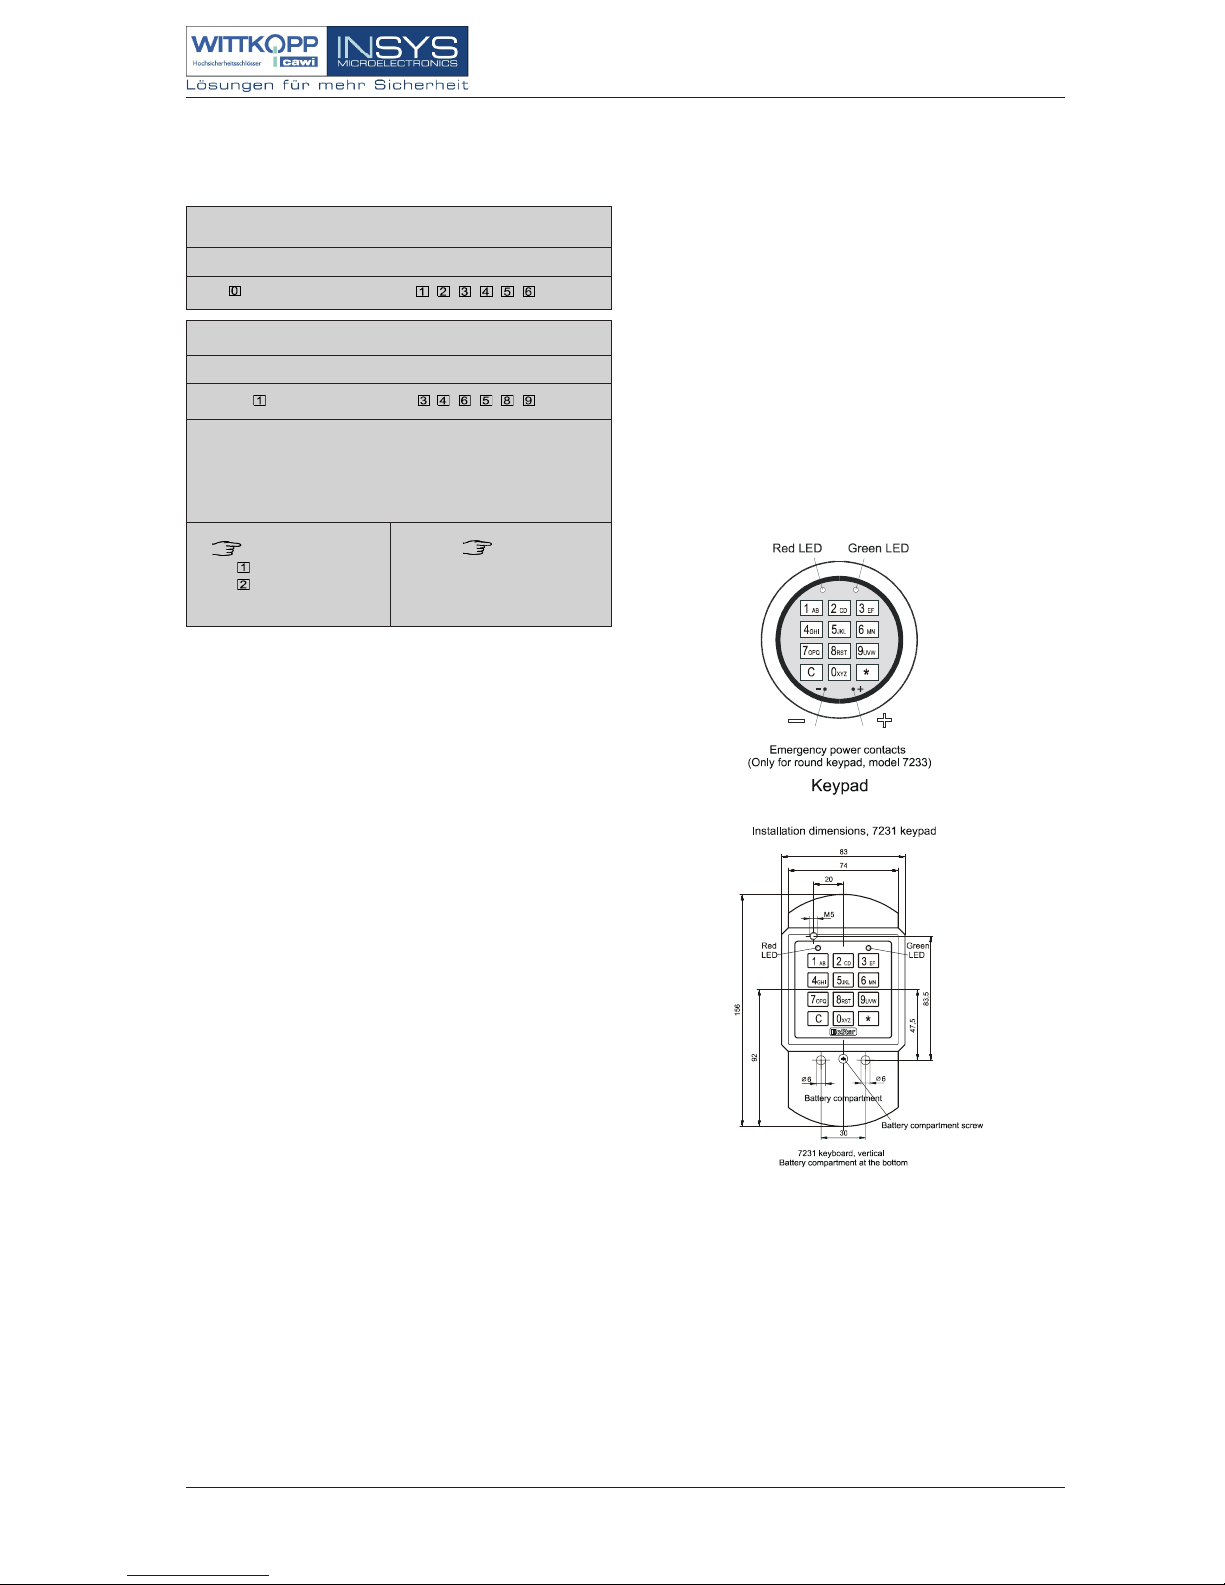
2. Opening the electronic lock
The electronic lock is opened by entering the appropriate
combination (pressing seven buttons); please refer to the
examples:
Please note: You may press the ”C“ key to correct the entry.
In this case you will have to repeat the entire entry sequence.
After a correct entry has been made the green LED blinks
once; the motor moves the bolt into its ”open“ position. The
green LED will blink once and a low-high signal sounds to
confirm that the electronic lock is in its open position. The
handle can now be used to open the door. If the system
fails to function when opening the door for the safe, then
press the handle firmly in the ”close“ direction (the locking
bolt might be jammed) and enter the combination once again.
3. Closing the electronic lock
Close the door, turn the handle back to the stop and press
any digit button.
Please note: The motor now moves the locking bolt into its
”closed“ position. The green LED blinks once and a lowhigh signal sounds to confirm that the lock is closed. The
container is now closed and locked. In the interest of security,
however, attempt to turn the handle to ensure that the
container is properly closed.
If the electronic lock was not locked correctly, then the red
LED will light and a signal tone will sound 12 times in
sequence. The LED blinking in green and a signal tone every
seven seconds indicates that the lock is ”open.“ Now repeat
the procedure as described in Section 3. Once the safe has
been locked, and in the interest of security, have the lock’s
status shown optically as described in Section 8.
4. Time-out following erroneous entries
Twelve high-pitched signal tones will sound and the red LED
will light if an invalid combination is entered. You now have
two more chances to enter a valid combination. After the
third consecutive invalid entry, however, the time-out period
commences; the keypad will accept no entries during this
12-second period. This time-out period will be extended by
12 additional seconds following each subsequent invalid
entry. The time-out period cannot be interrupted with the
”C“ button. The red LED blinks every five seconds during
the time-out period. The end of the time-out period is
indicated by the green LED blinking and a single low-high
signal.
It is now necessary to enter a valid combination twice
in order to open the electronic lock.
This is done by connecting the new battery (9-volt alkaline)
to the emergency contacts located at the keypad. Important!
Observe correct polarity when making the connection
to the emergency contacts! See Figure 1. Enter your
combination to open the safe while emergency power is
being applied.
The battery is replaced in the normal fashion with the safe
door open.
The battery is easily replaced by unscrewing the battery
compartment retaining screw and sliding out the battery
compartment (only for the 7231 keyboard; the 7233 model
has an external battery compartment) . Markings inside the
Enter UNo. Enter factory combination or master combination
Opening the lock using the factory combination or
master combination
e.g.
Enter UNo. Enter user combination
Correct combination: Green LED blinks once and a
high low tone sounds.
Invalid combination: 12 high-pitched signal tones
and the red LED lights
Opening the lock with a user combination
°
Button for user combination 1
Button for user combination 2
etc. through user combination 9
°
e.g.
The electronic lock is delivered
without any user combinations preprogrammed.
5. Correction with the ”C“ button
If you press the ”C“ button during the course of an entry
sequence, then all digits previously entered will be canceled.
Any programming mode which might have been commenced
will also be terminated. You must initiate programming once
again, from the beginning, by pressing the * button.
Exception: Neither the time-out period following erroneous
entries nor the timed delay period can be interrupted with
the ”C“ button.
6. Charge monitoring, replacing the battery
If the battery charge is insufficient, then a high-pitched
warning tone will sound 10 times after the combination is
entered while the red and green LEDs blink alternately 10
times. This is to remind you to install a new 9-volt alkaline
battery within the next few days.
Warning: If you ignore the low-battery warning for too long
you run the risk of having to use the emergency power supply
feature to open the lock, and thus the safe (only for the model
7233 keypad).
Figure 1
Page 3
Operating Instructions No. 9999-043-0
Seite 3
B7215e01_2.pmd
Rel. 1 vom 10.09.2003
compartment show how the battery is to be installed
(polarity).
Use only a 9-volt alkaline battery (not a rechargeable
battery). The programmed combinations and times are
retained in memory while the battery is being changed.
Please dispose of used batteries properly; do not throw
them in household trash.
6.1 Opening and closing after replacing the
battery
If the battery is changed, then the combination will have to be
entered twice in order to open the lock.
Press the ”C“ button to retrieve information on the current status
of the lock. See Section 8. Querying the lock status.
If the battery is changed with the lock in its unlocked status, then
it will be necessary to enter the combination twice to close it;
then press any digit.
Refer to Section 9, Detecting keypad replacement and tampe-
ring, for optical and acoustic confirmation.
7. Mechanical emergency release, EloStar 7216 /
7217 and 7216-3XX-X / 7217-3XX-X only
An optional feature is the ability to open the safe mechanically
in an emergency (using a double-bitted, high-security key),
this being supplementary to the electronic lock. This makes
it possible to open the safe if the battery was not changed
out in time, if the electronics should fail, if the combination
has been lost or if an overly long timed delay period was
inadvertently programmed. Remember that if emergency
opening capability is not provided, the safe will have to be
forced open and damaged beyond use if the electronics
should ever fail. The mechanical emergency release and
the electronic lock both provide the same high security
standards.
Store the emergency release key in a secure
location and never inside the safe itself
Mechanical emergency release for the EloStar 7216 / 7217:
Insert the supplied double-bitted key in the lock and open
the lock. Turn the handle to release the door.
If the model 7216 or 7217 electronic lock has been opened
under motor power, then it cannot be closed with the
emergency release key.
A model 7216 / 7217 electronic lock which has been opened
with the emergency release key can only be closed with
the electric motor.
If the master combination is lost, then it will be necessary
to replace the electronic lock.
Mechanical emergency release for the EloStar 7216
3XX X / 7217 3XX X:
Insert the supplied double-bitted key in the lock and open
the lock. Turn the handle to release the door.
If the model 7216-3XX-X or 7217-3XX-X electronic lock
has been opened under motor power, then it cannot be
closed with the emergency release key!
7.1 Closing after emergency release, 7216 /
7217
Rectify the problem.
Close the emergency release feature, enter the master or user
combination and then press any digit key.
7.2 Closing after emergency release, 7216-3XX-X /
7217-3XX-X
Close the emergency release feature. The electronic lock
will be closed together with this locking procedure.
8. Querying the lock status
Pressing the ”C“-button when the electronic lock is in its
stand-by status (i.e. not while entering a combination or
programming) will cause the status of the electronic lock –
”open“ or ”closed“ – to be shown.
9. Detecting keypad replacement and tampering
If, after a combination is entered, the following signal is given:
One high-pitched tone and the green LED blinks
once, then one low-pitched tone and the red LED
blinks once
this indicates that either the keypad has been replaced out
or an invalid combination was entered more than three times.
The lock will not open following this signal; the combination
will have to be entered again.
10. Programming the electronic lock
The electronic lock is shipped from the factory
programmed with the factory combination 0 _ 1 - 2 - 3 4 - 5 - 6; no user combinations are programmed.
Before using your safe for the first time it is essential that, in
the interest of security, you enter your own personal master
combination; the factory combination may not be left
unchanged. Programming should be undertaken only with
the door open. Select your new 6-digit master combination
before starting the programming sequence. Do not use as
the combination any personal information such as a birthday
or other data which could be derived from knowledge about
your person. Store your master combination or user
combination and the emergency release keys in a secure
place so that only you have access to them. Never leave
the emergency release keys inside the safe.
Programming options
P No. 0: Change the master combination
P No. 1: Programming, modifying or deleting the 9
user combinations
User combination 9 is the override
combination.
P No. 2: Programming or deleting a combination inter
lock (duality principle)
P No. 3: Programming and deleting a timed delay
period. Programming a release period.
P No. 4: Programming and deleting automatic locking
P No. 5: Programming a reset function
P No. 6: Programming a time-lock period
P No. 7: Deactivating or activating of power safe mode
P No. 9: Programming I/O functions
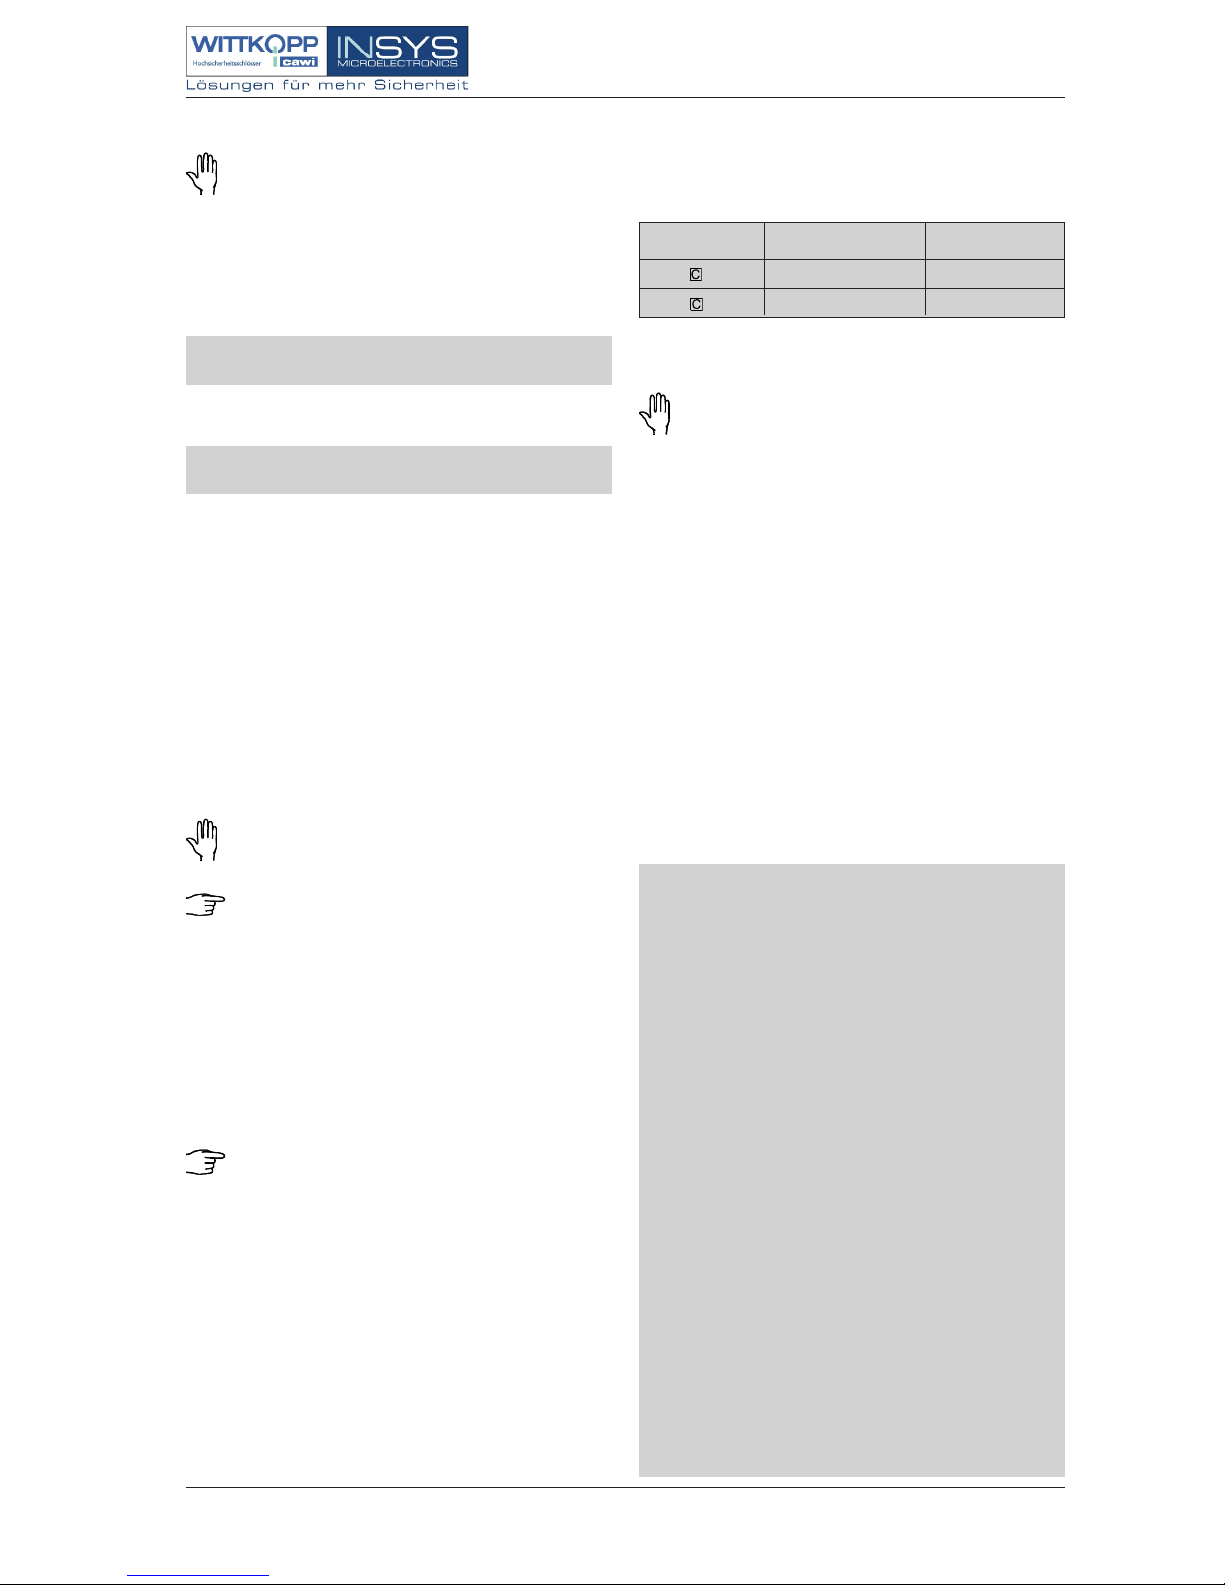
Button Response Lock status
Red LED blinks once OPEN
Green LED blinks once
CLOSED
Page 4
Operating Instructions No. 9999-043-0
Seite 4
B7215e01_2.pmd
Rel. 1 vom 10.09.2003
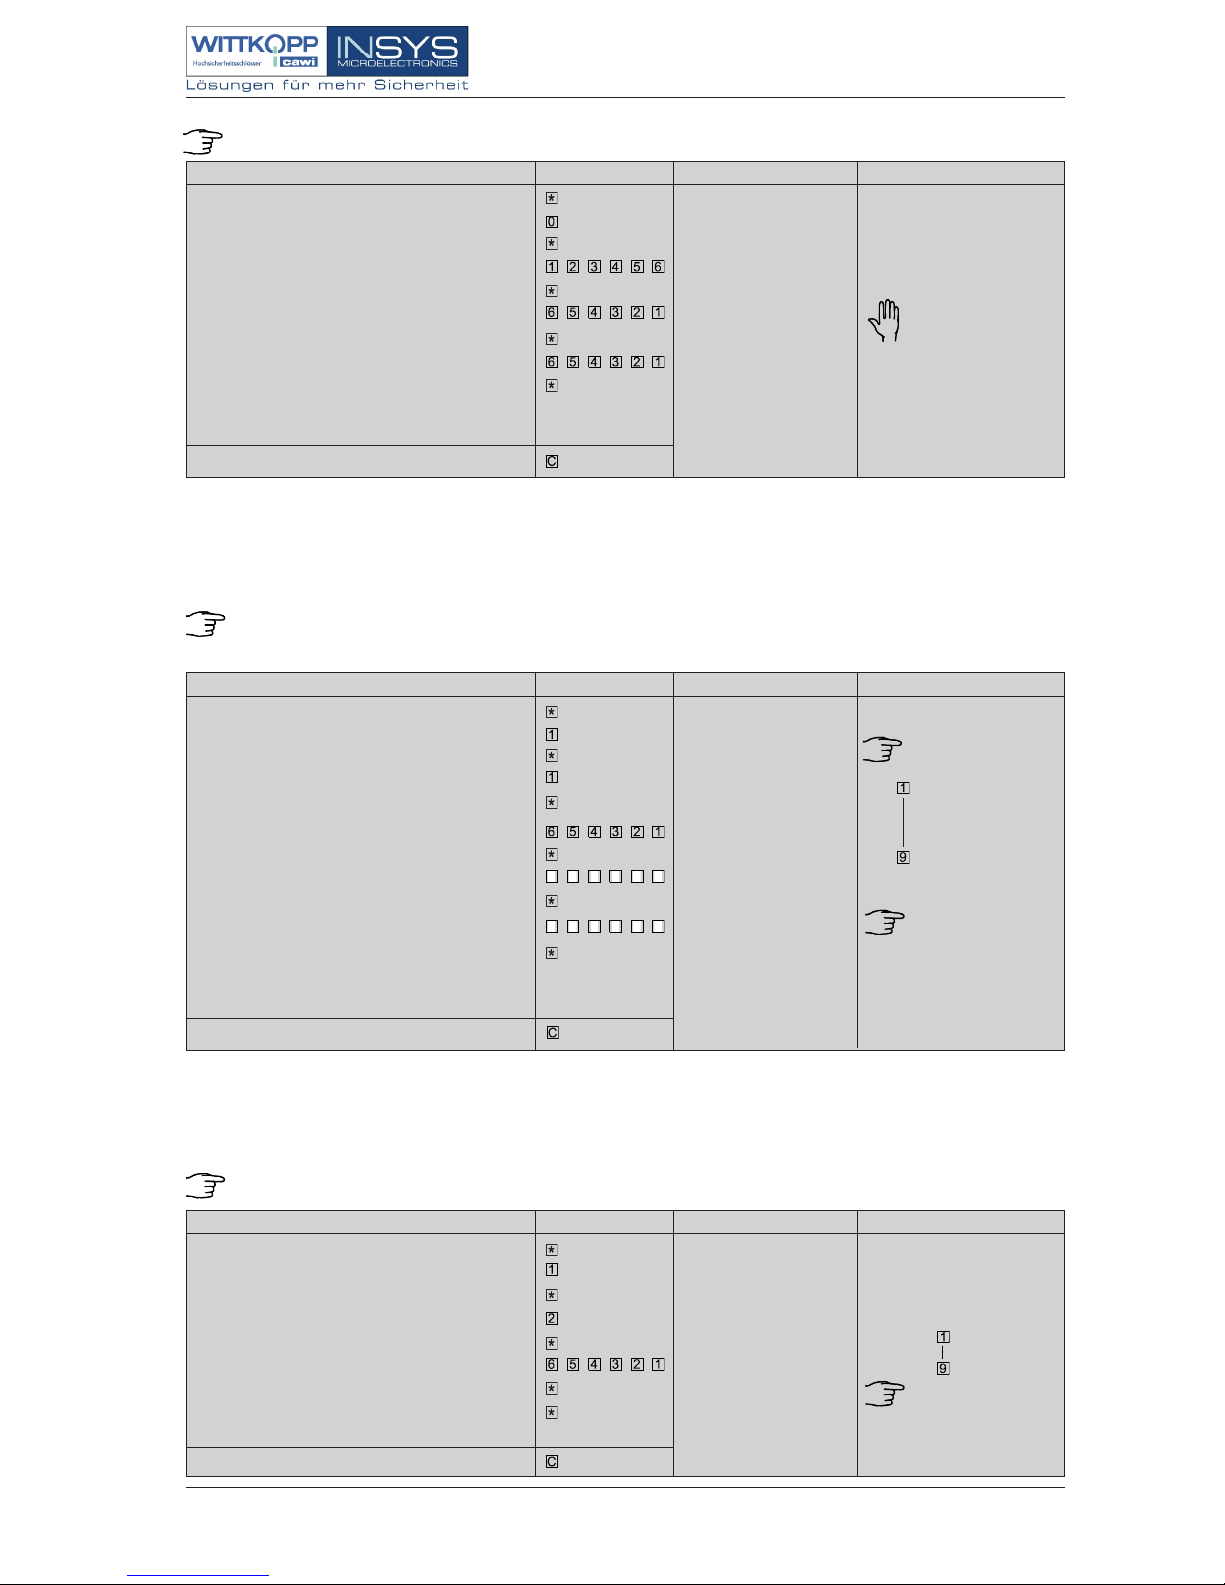
10.1 Programming the master combination
Possible only with the electronic lock open and only by using the master combination.
Function
Operation, button(s)
Response
Initiate programming
Select P No. 0
Confirm the entry
Enter previous 6-digit combination, e.g. °
Confirm the entry
Enter new 6-digit combination, e.g.
Confirm the entry
Enter new combination again to confirm
Confirm the entry
OK = green LED lights and
low-high tone sounds.
Cancel
Error = 12 high-pitched
tones and red LED lights.
Please check to ensure
that the lock functions
correctly with the new
master combination
before closing the safe
door.
° Set at the factory for
1 - 2 - 3 - 4 - 5 - 6
Comments
Green LED blinks once
Close the lock:
Press any digit button
10.2 Programming a user combination
A user combination can be set up for the first time only by the master combination owner. Changes to a
user combination may be made with either the master combination or the particular user combination.
Programming is possible only with the electronic lock open.
Initiate programming
Select P No. 1
Confirm the entry
Select user number, e.g. °
Confirm the entry
Enter the 6-digit master or user combination, e.g.
Confirm the entry
Enter the new 6-digit user combination, e.g.
Confirm the entry
Enter the new user combination again to confirm
Confirm the entry
Cancel
A maximum of 9 user
combinations can be
programmed
987654
The previous user
combination will be
retained if there is an
error in programming.
° = UNo. 1
= UNo. 9
User 9 =Override combination
Green LED blinks once
OK = green LED lights and
low-high tone sounds.
Error = 12 high-pitched
tones and red LED lights.
987654
Close the lock:
Press any digit button
Function Operation, button(s)
Response
Comments
Initiate programming
Confirm the entry
Select the user combination to be deleted, e.g.2 °
Confirm the entry
Enter the 6-digit master combination e.g.
Confirm the entry
Re-confirm the entry
Cancel
The previous user
combination will be
retained if there is an error
in programming.
If fewer than 3 user combinations
are programmed, then any
combination interlock which may
have been programmed
previously will have to be deleted.
See Section 10.3.2
10.2.1 Deleting a user combination
Only the master combination owner can delete a user combination and only with the electronic lock open.
Green LED blinks once
Close the lock:
Press any digit button
OK = green LED lights and
low-high tone sounds.
Error = 12 high-pitched
tones and red LED lights.
Function Operation, button(s)
Response
Comments
° = UNo. 1
= UNo. 9
Page 5
Operating Instructions No. 9999-043-0
Seite 5
B7215e01_2.pmd
Rel. 1 vom 10.09.2003
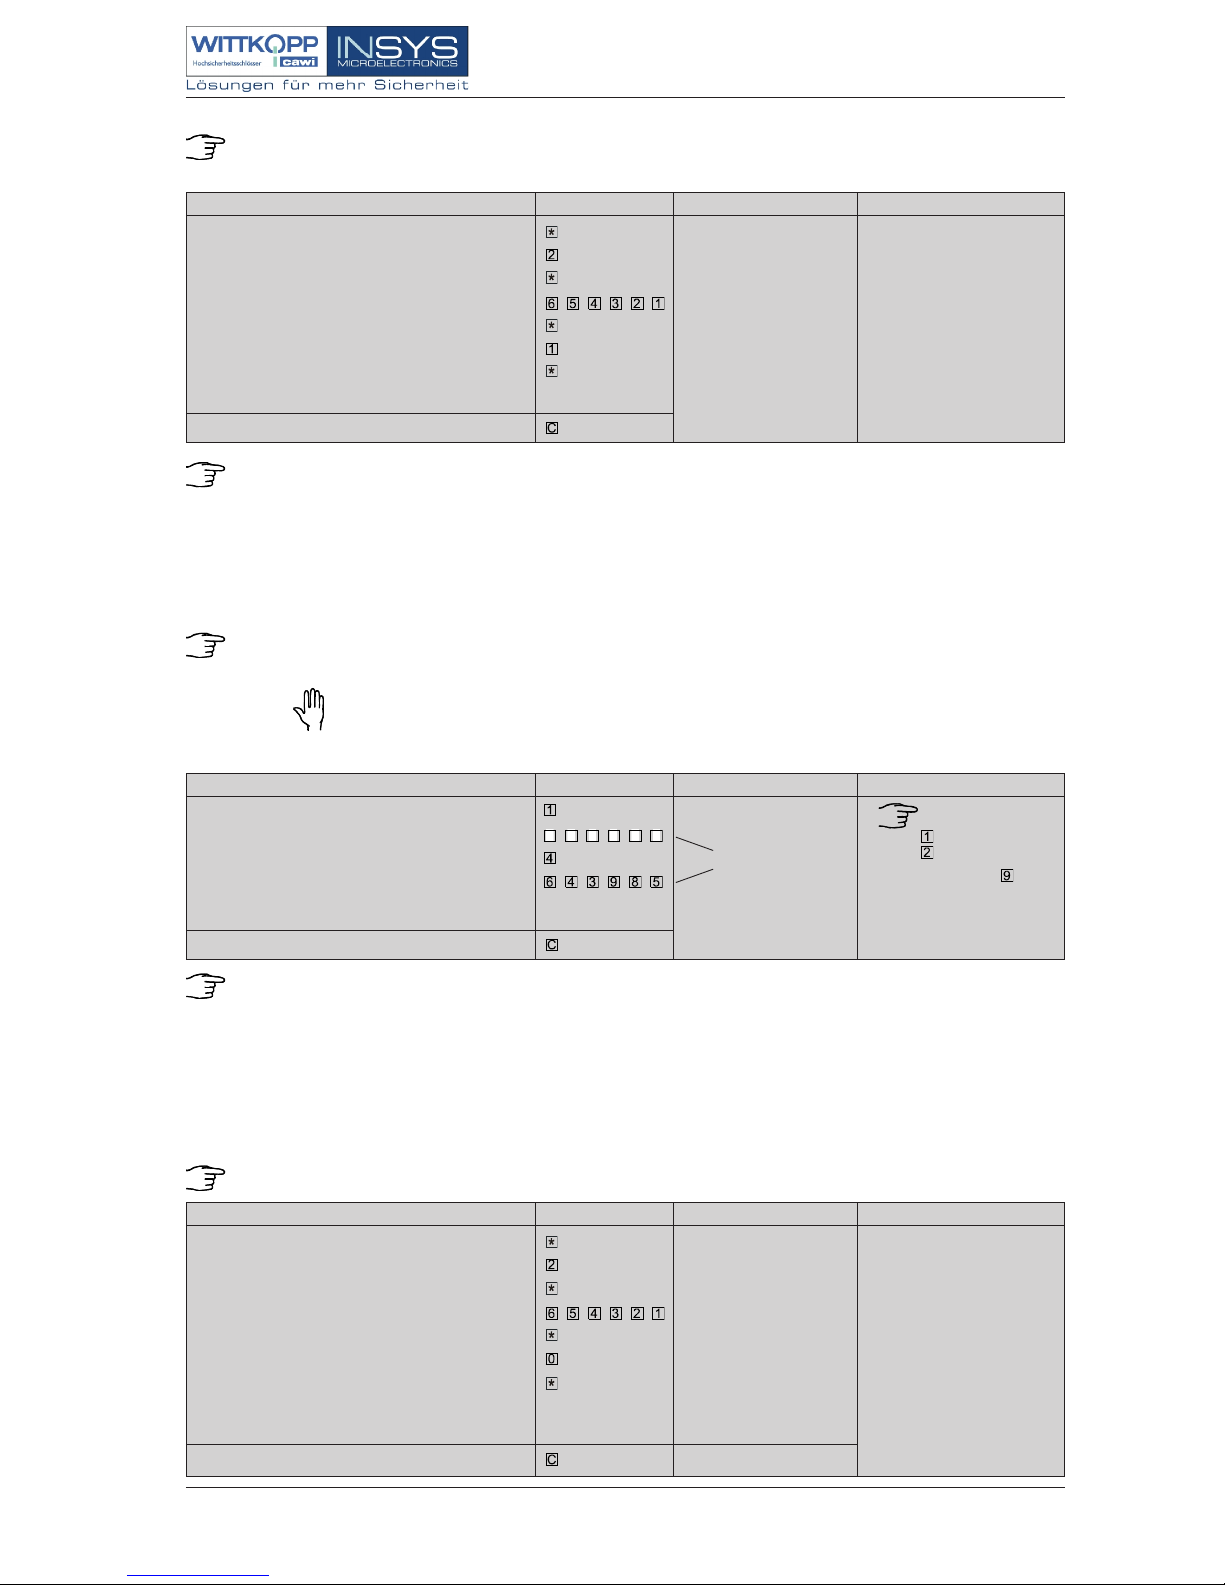
10.3 Activating a combination interlock (duality principle)
Possible only with the electronic lock open and only with the master combination.
At least two user combinations will have to have been programmed beforehand as otherwise an error
signal will sound.
Initiate programming
Select P No. 2
Confirm the entry
Enter 6-digit master combination, e.g.
Confirm the entry
Codeverknüpfung aktivieren
Confirm the entry
Cancel
Green LED blinks once
OK = green LED lights and
low-high tone sounds.
Error = 12 high-pitched
tones and red LED lights.
Close the lock:
Press any digit button.
When this feature is active either the master combination owner alone or two user combination holders acting together can
open the safe.
Function Operation, button(s)
Response
Comments
10.3.1 Opening the safe with the combination interlock feature activated (duality principle)
When user combinations are employed to open the lock it is necessary to enter any two different user
combinations, including the associated user number (see example below).
Once the first user combination has been entered a beep will sound every five seconds for a period of
60 seconds. If the second user combination is not entered within this 60-second period, then the entry
will be discarded and both user combinations will have to be entered again.
Example:
°
Button for UNo. 1
Button for UNo. 2
etc. through to button
for UNo. 9
°
°
Function Operation, button(s)
Response
Enter first user number, e.g. 1
Enter first user combination, e.g.
Enter second user number, e.g. 4
Enter second user combination, e.g.
Cancel
Comments
OK = green LED lights
and low-high tone
sounds.
Error = 3 high-pitched
tones and red LED
lights
987654
The master combination holder continues to be authorized to open the lock alone.
User 9 = Override combination
Function Operation, button(s) Response
Initiate programming
Select P No. 2
Confirm the entry
Enter 6-digit master combination e.g.
Confirm the entry
Entry
Confirm the entry
Cancel
Comments
10.3.2 Deactivating a combination interlock function (duality principle
Possible ith the electronic lock either open or closed and only with the master combination.
Green LED blinks once
OK = green LED lights and
low-high tone sounds.
Error = 12 high-pitched
tones and red LED lights.
Close the lock:
Press any digit button.
Page 6
Operating Instructions No. 9999-043-0
Seite 6
B7215e01_2.pmd
Rel. 1 vom 10.09.2003
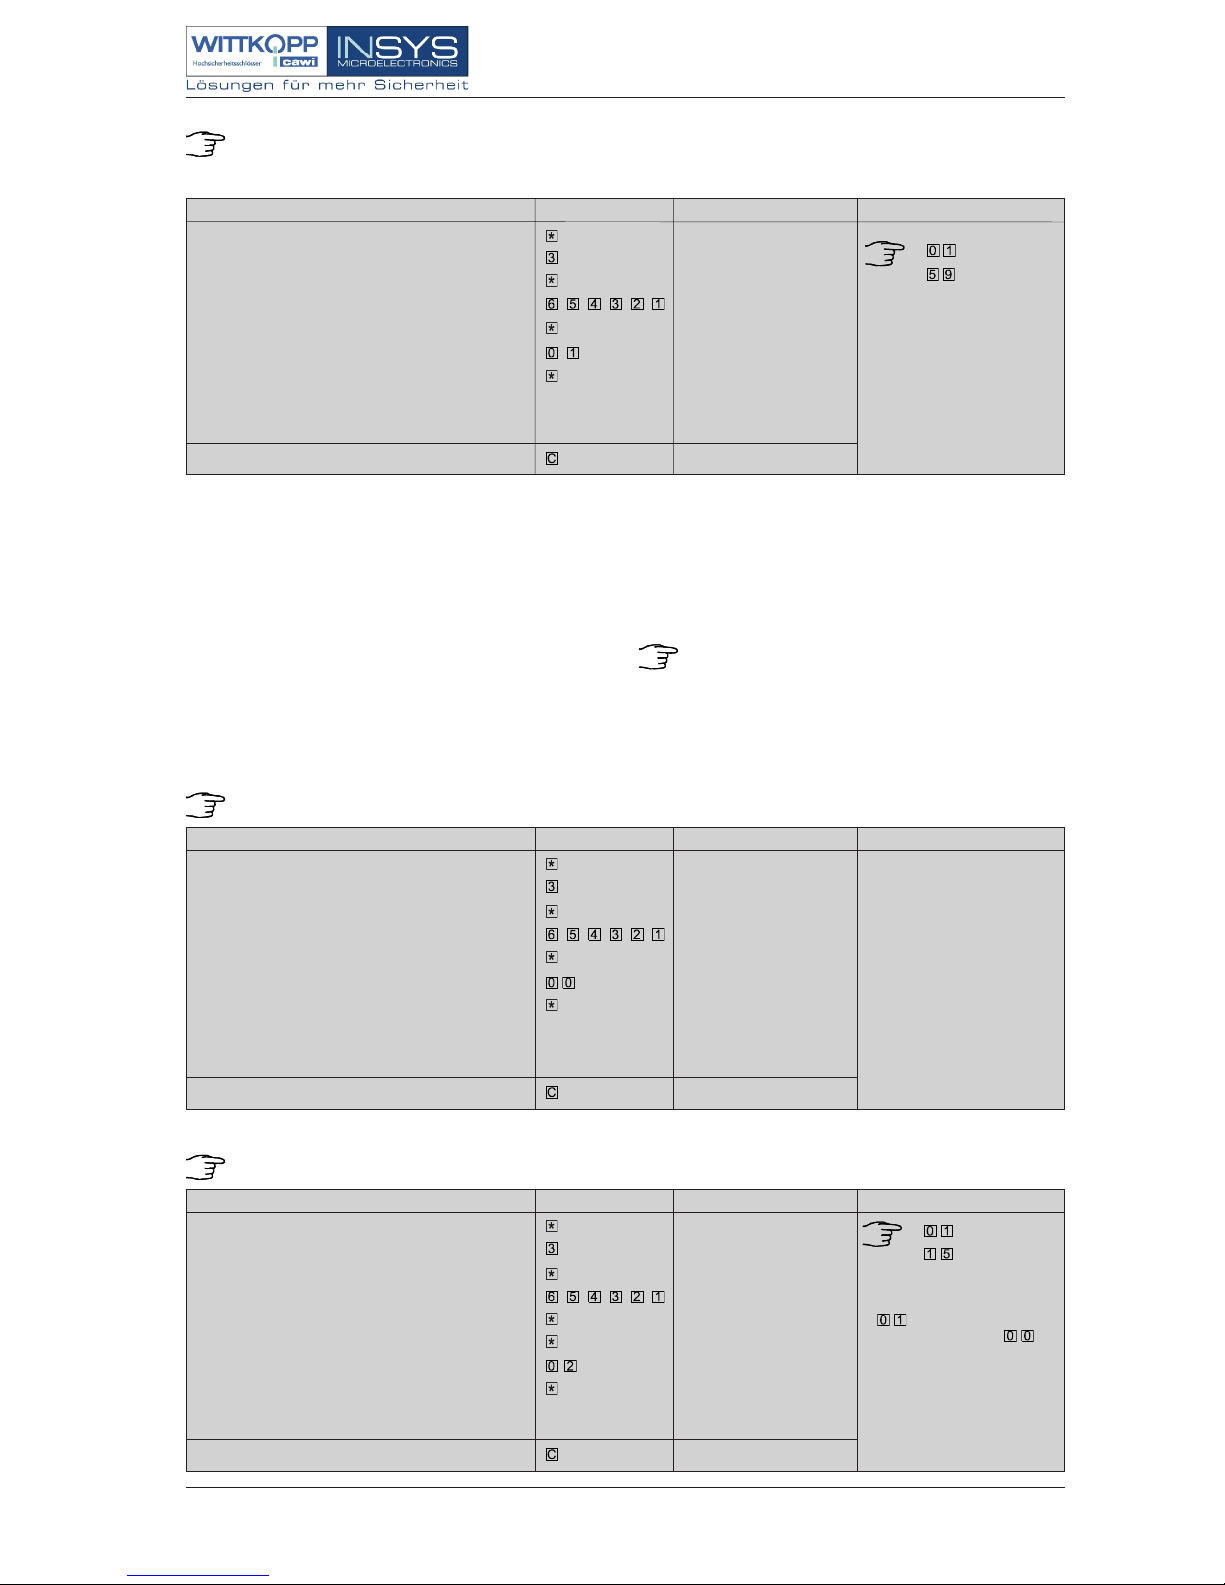
10.4.1 Opening the lock with the timed delay function activated
If a timed delay period has been programmed, it is applicable
to all combinations. Once a valid combination has been
entered, the green LED will blink at 5-second intervals during
the timed delay period. During this period the electronics
will not respond to any keypad entries. The end of this timed
delay period is signaled by 15 signal tones; the green LED
lights. The release period begins running and you can now
open the electronic lock by entering your combination
again.
If a combination interlock was programmed (see
Sections 10.3 and 10.3.1) only one combination need
be entered during the release period.
If an invalid combination is entered or the ”C“ button
is pressed during the release period, then the entire
opening procedure will have to be repeated. This means
that once a valid combination has been entered, the timed
delay period will begin running anew.
10.4.2 Deactivating a timed delay period
Possible only with the electronic lock open and only with the master combination.
Function
Operation, button(s)
Response
Initiate programming
Select P No. 3
Confirm the entry
Enter 6-digit master combination, e.g.
Confirm the entry
Entry
Confirm the entry
Cancel
Comments
Green LED blinks once
OK = green LED lights and
low-high tone sounds.
Error = 12 high-pitched
tones and red LED lights.
Close the lock:
Press any digit button.
10.4 Programming a timed delay period
Possible only with the electronic lock open and only with the master combination.
It is possible to program a release period in combination to the time delay periode. The release periode is set to
1 Minute on factory suply. For reprogramming see 10.5
Explanation: Timed delay period = Period from entering a combination the first time to clearance for entering a combination the
second time to actually open the safe. Release period = Period of time available, once the timed delay period has expired, to open
the safe by entering a combination
Function
Operation, button(s) Response
Initiate programming
Select P No. 3
Confirm the entry
Enter 6-digit master combination, e.g.
Confirm the entry
Enter timed delay period °, e.g. 1 minute
Confirm the entry
Cancel
° = 1 minute to
= 59 minutes
Comments
Green LED blinks once
OK = green LED lights and
low-high tone sounds.
Error = 12 high-pitched
tones and red LED lights.
Close the lock:
Press any digit button.
10.5 Programming a release period
Possible only with the electronic lock open and only with the master combination.
Function
Operation, button(s)
Response
Initiate programming
Select P No. 3
Confirm the entry
Enter 6-digit master combination, e.g.
Confirm the entry
Confirm the entry
Enter release period °, e.g. 2 minute
Confirm the entry
Cancel
Comments
Green LED blinks once
OK = green LED lights and
low-high tone sounds.
Error = 12 high-pitched
tones and red LED lights.
Close the lock:
Press any digit button.
° = 1 minute to
= 15 minutes
Release period set by factory
to
= 1 Minute.
If release time is set to
the
electronic lock will open
automaticly once the time delay
period has expired.
Page 7
Operating Instructions No. 9999-043-0
Seite 7
B7215e01_2.pmd
Rel. 1 vom 10.09.2003
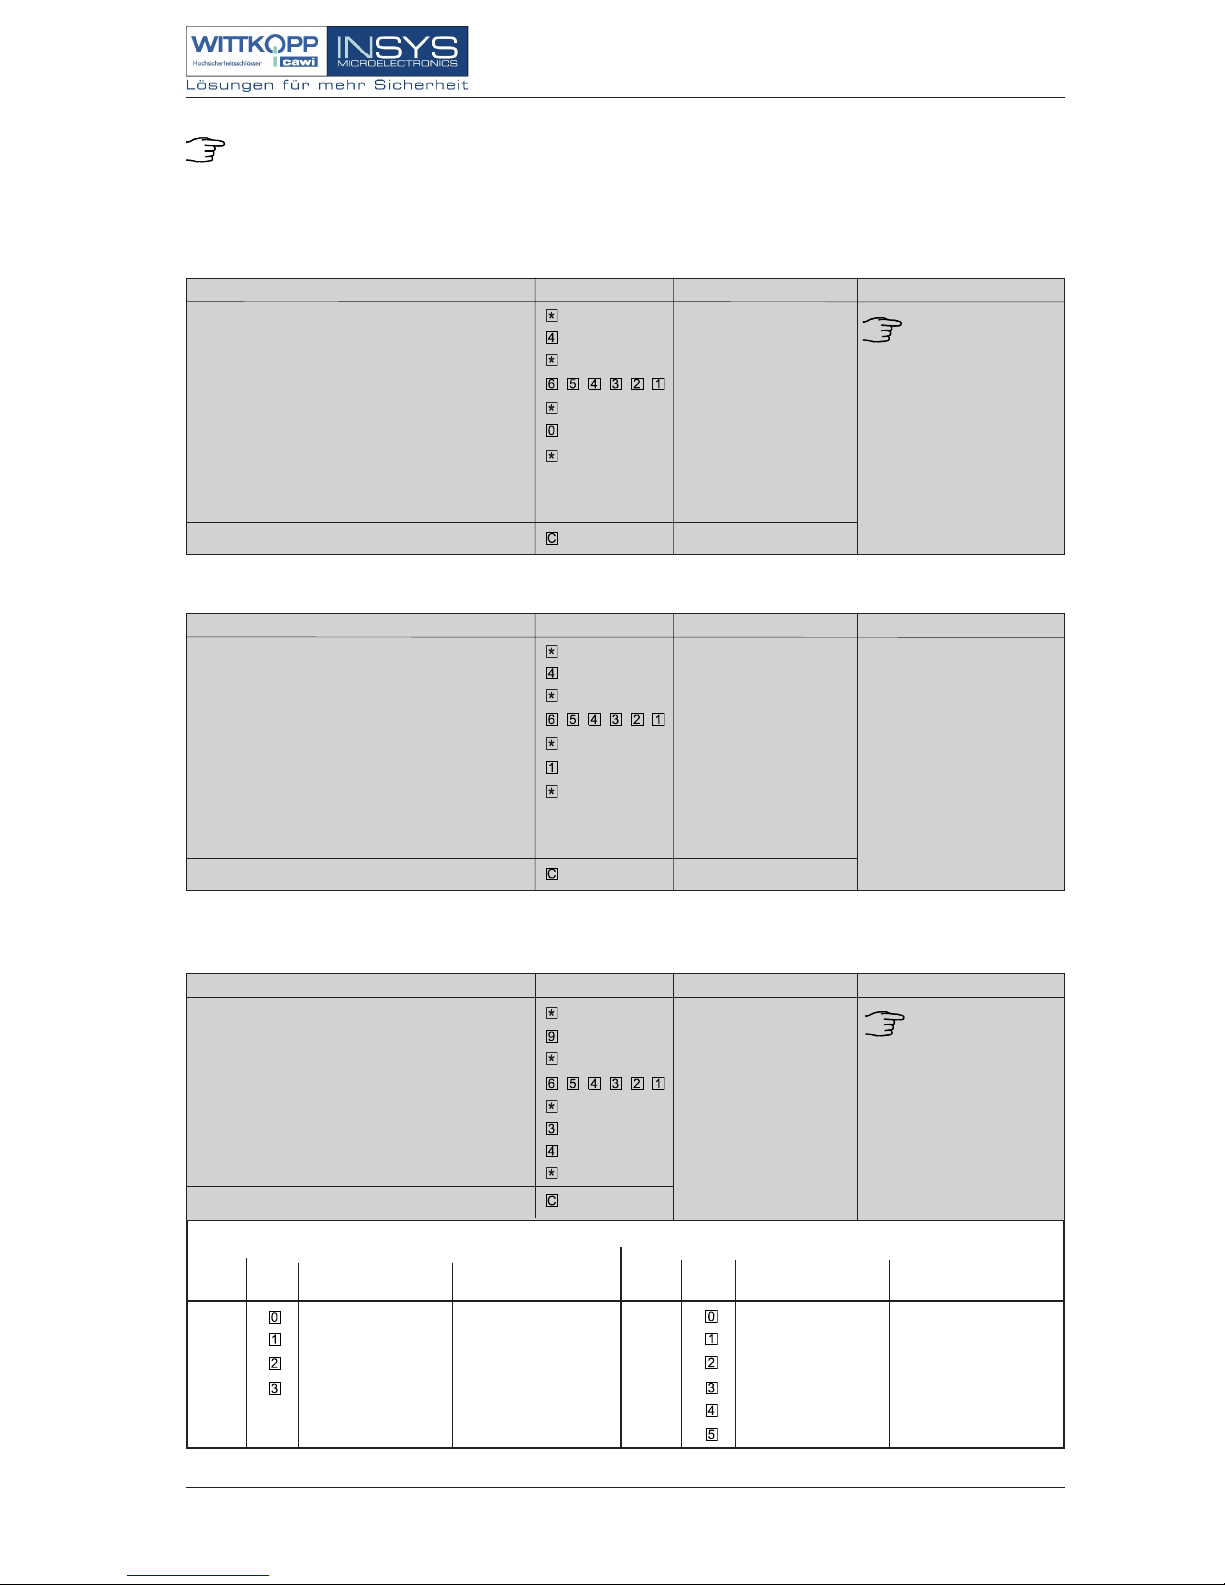
10.6 Programming I/O functions (input/output functions)
Programming requires the external connection box „EloXT“. Functions may by programmed only if the external contacts
are actually used as otherwise it might not be possible to open the clock!
Any undesired I/O programming will then have to be reversed to function number 0.
Programming is possible with the electronic lock closed or open and only with the master combination.
Before programming any I/O function the power safe must be deactivated.
Deactivating of power safe mode (The electronic lock will be delivered with power safe mode aktivated.
Function
Operation, button(s)
Response
Initiate programming
Select P No. 7
Confirm the entry
Enter 6-digit master combination, e.g.
Confirm the entry
Deactivating of power safe mode°
Confirm the entry
Cancel
Comments
Green LED blinks once
OK = green LED lights and
low-high tone sounds.
Error = 12 high-pitched
tones and red LED lights.
Close the lock:
Press any digit button.
° If no I/O function is
prommed the power safe
mode must be
deactivated.
Activating of power safe mode
Function
Operation, button(s)
Response
Initiate programming
Select P No. 7
Confirm the entry
Enter 6-digit master combination, e.g.
Confirm the entry
Activating of power safe mode
Confirm the entry
Cancel
Comments
Green LED blinks once
OK = green LED lights and
low-high tone sounds.
Error = 12 high-pitched
tones and red LED lights.
Close the lock:
Press any digit button.
Programming I/O functions
Programming is possible with the electronic lock closed or open and only with the master combination.
I N F U C T I O N E N
0 No function No function
1 Door switch No function
2 Door switch External relaese
3 External relaese No function
Function
No.
Button
In funtion In function
IN_1 IN_2
O U T F U N C T I O N E N
Function
No.
Button
Out function Out function
OUT_1 OUT_2
0 No function No function
1 bolt position No function
2 Silent alarm No function
3 Silent alarm bolt position
4 Silent alarm End of time delay
5 bolt position End of time delay
T A B L E O F F U N C T I O N N U M B E R S
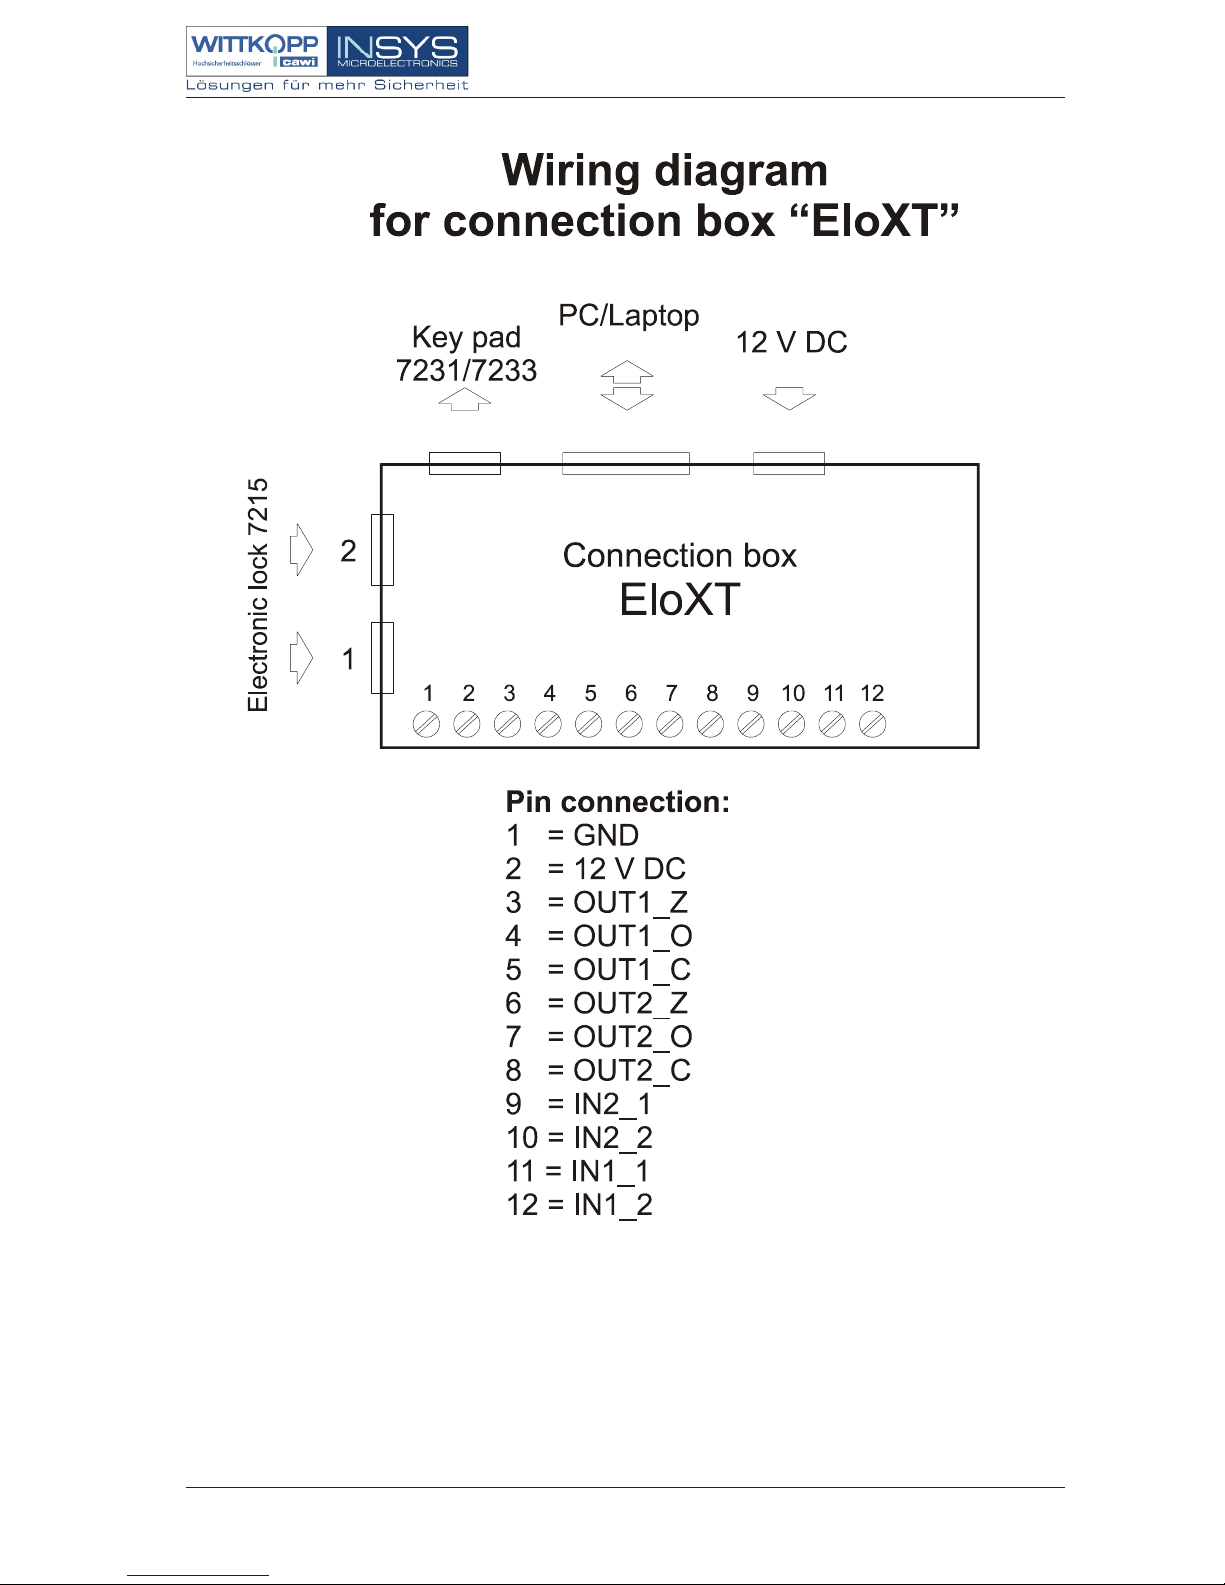
Wireing diagram „EloXT“ ref. to page 12.
Fuction Operation, button(s)
Response
Initate programming
Select P No 9
Confirm the entry
Enter 6-digit master combination, e.g.
Confirm the entry
° Input function-No. (ref. to tabel of function) e.g.
° Output function-No. (ref. to label of function) e.g.
Confirm the entry
Cancel
Comments
Green LED blinks once
° The lock is delivered
programmed for Infunction number 0 and
Out-function number 0
OK = green LED lights and
low-high tone sounds.
Error = 3 high-pitched tones
and red LED lights.
Page 8
Operating Instructions No. 9999-043-0
Seite 8
B7215e01_2.pmd
Rel. 1 vom 10.09.2003
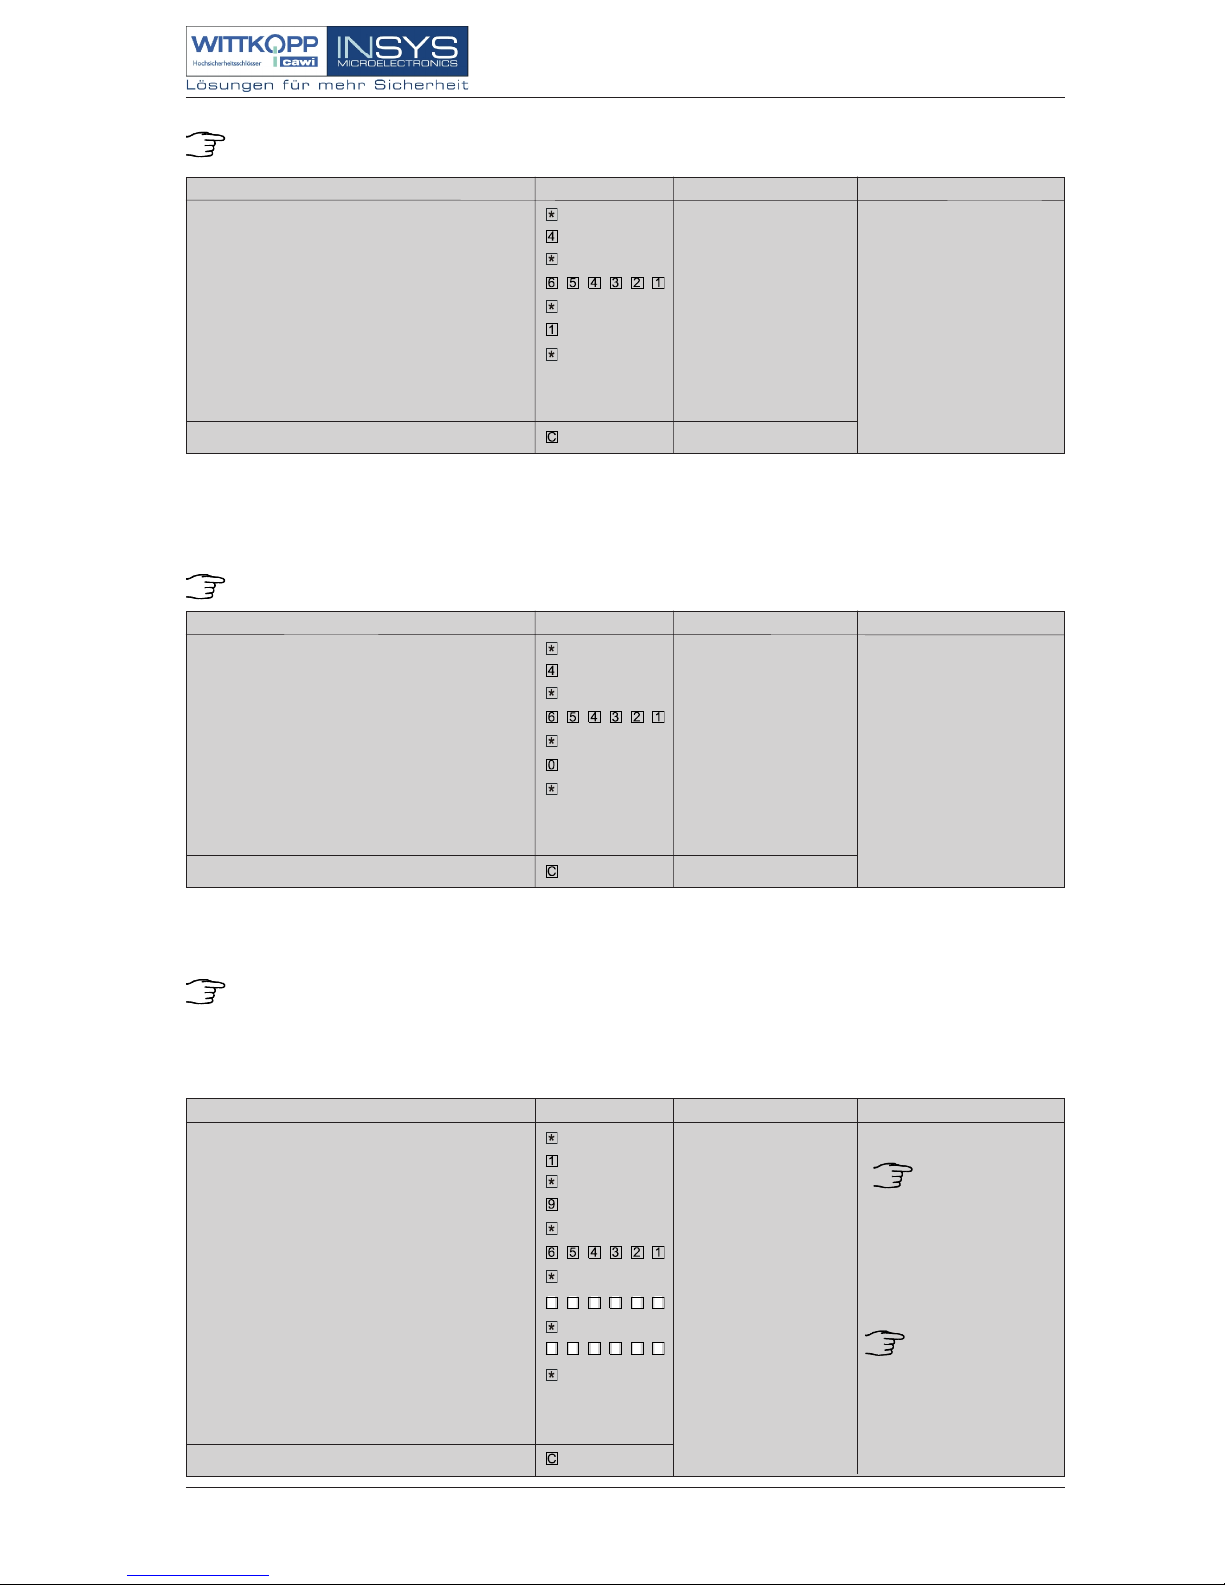
If the electronic lock is opened while programmed automatic closure is active, then the green LED will blink every 2 seconds during
the 10-second open phase.
10.7 Programming automatic locking
Can be programmed only with the electronic lock open and only with the master combination.
This programmed function automatically locks the electronic lock after 10 seconds.
Function
Operation, button(s)
Response
Initiate programming
Select P No. 4
Confirm the entry
Enter 6-digit master combination, e.g.
Confirm the entry
Enter
Confirm the entry
Cancel
Comments
Green LED blinks once
OK = green LED lights and
low-high tone sounds.
Error = 12 high-pitched
tones and red LED lights.
IMPORTANT!
The lock will close automatically
after 10 seconds.
10.7.1 Deleting automatic locking
Function
Operation, button(s)
Response
Initiate programming
Select P No. 4
Confirm the entry
Enter 6-digit master combination, e.g.
Confirm the entry
Enter
Confirm the entry
Abbruch
Comments
Green LED blinks once
OK = green LED lights and
low-high tone sounds.
Error = 12 high-pitched
tones and red LED lights.
IMPORTANT!
After the function is deleted
the lock will automatically
close one more time after 10
seconds have elapsed.
Can be programmed only with the electronic lock open and only with the master combination.
10.8 Programming an override combination
An override combination (permitting immediate opening even if a time-lock period has been specified) can be set
up for the first time only by the master combination owner.
Changes may be made with either the master combination or a user combination.
Programming is possible only with the electronic lock open.
User 9 is defined as the override combination. If override is not desired, then user 9 may not be
programmed!
Funktion Operation, button(s)
Response
Initiate programming
Select P No. 1
Confirm the entry
Select user number 9 °
Confirm the entry
Enter the 6-digit master or user combination, e.g.
Confirm the entry
Enter the 6-digit override combination
Confirm the entry
Enter the override combination again to confirm
Confirm the entry
Cancel
° Only one override
combination can be
programmed.
987654
If there is an error in
programming, then the
previous override
combination will remain
valid.
Comments
Green LED blinks once
OK = green LED lights and
low-high tone sounds.
Error = 12 high-pitched
tones and red LED lights.
987654
Close the lock:
Press any digit button.
Page 9
Operating Instructions No. 9999-043-0
Seite 9
B7215e01_2.pmd
Rel. 1 vom 10.09.2003
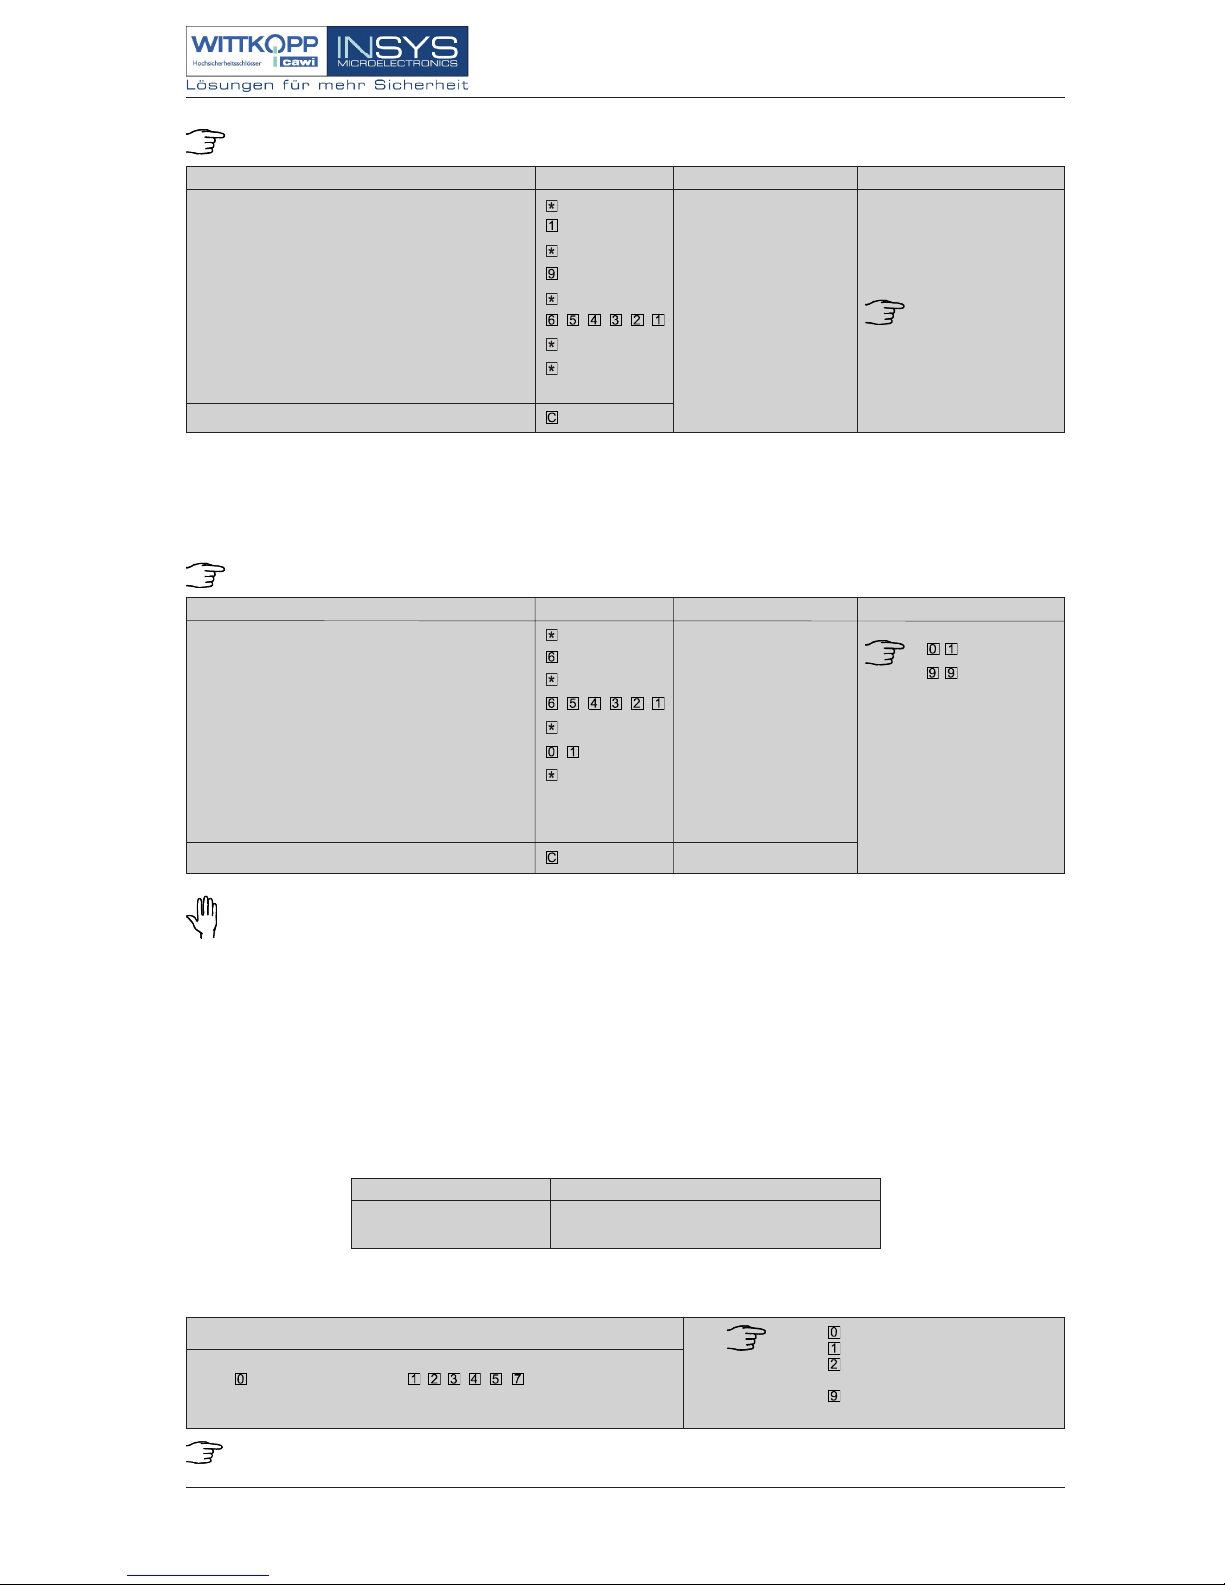
Operation, button(s)
Response
Initiate programming
Select P No. 1
Confirm the entry
Select user number 9
Confirm the entry
Enter the 6-digit master combination, e.g.
Confirm the entry
Confirm the entry
Cancel
If there is an error in
programming, then the
previous override
combination will continue
to be valid.
Comments
10.8.1 Deleting an override combination
This may be done only with the electronic lock open and only with the master combination.
Function
Green LED blinks once
Close the lock:
Press any digit button.
OK = green LED lights and
low-high tone sounds.
Error = 12 high-pitched
tones and red LED lights.
10.9 Programming a time-lock period
This may be done only with the electronic lock open and only with the master combination.
Function
Operation, button(s)
Response
Initiate programming
Select P No. 6
Confirm the entry
Enter the 6-digit master combination, e.g.
Confirm the entry
Enter the time-lock period °. e.g. 1 hour
Confirm the entry
Cancel
° = 1 hour to
= 99 hours.
Comments
Green LED blinks once
OK = green LED lights and
low-high tone sounds.
Error = 12 high-pitched
tones and red LED lights.
Following the final entry confirmation the electronic lock will respond to no keyboard commands whatsoever during the
specified time-lock period. After the programmed time-lock period has elapsed the electronic lock may be opened with the
master combination or a user combination.
A programmed time-lock period will automatically be deleted once the period has run to an end.
11. Triggering a silent alarm
To trigger a silent alarm, increase by 1 the final digit of your master combination or user combination.
Master or user combination Master or user combination for silent alarm
1 2 3 4 5 6 1 2 3 4 5 7
1 2 3 4 5 9 1 2 3 4 5 0
Example:
Once a silent alarm has been activated, the lock will open in the same way as if the master combination or a user combination
had been entered. This also applies to any programmed delay period or a combination interlock.
Enter UNo. and the master or user combination for silent alarm
°
° Button for UNo. 0 (master combination)
Button for UNo. 1 (user combination)
Button for UNo. 2 (user combination)
etc. through
Butto for UNo. 9 (user combination)
Entering the combination:
Page 10
Operating Instructions No. 9999-043-0
Seite 10
B7215e01_2.pmd
Rel. 1 vom 10.09.2003
12. Activity logging
The 128 most recent activities are logged and can be read
out by connecting the electronic lock to a PC (RS232
interface).
The following activities will be logged:
1. Opening
2. Locking
3. Programming master and user combinations
4. Programming a combination interlock (duality principle)
5. Programming the timed delay period
6. Programming I/O functions
7. Keyboard manipulation and battery replacement
8. Alarm (silent alarm)
You will find explanations for the commands and the
log in the program description for the ”EloComm“ PC
software.
13. Transmitting data from the electronic lock to a PC
The associated terminal program can be obtained from:
CARL WITTKOPP GmbH & KG, Sternbergstr. 5, D-42551 Velbert, Germany; Phone: +49 / 2051 / 95660, Fax: +49 / 2051 /
956666 or INSYS, Waffnergasse 8, D 93047 Regensburg, Germany; Phone: +49 / 941 / 560061, Fax: +49 / 941 / 563471.
Descriptions of the functions and operating instructions are included with the PC software.
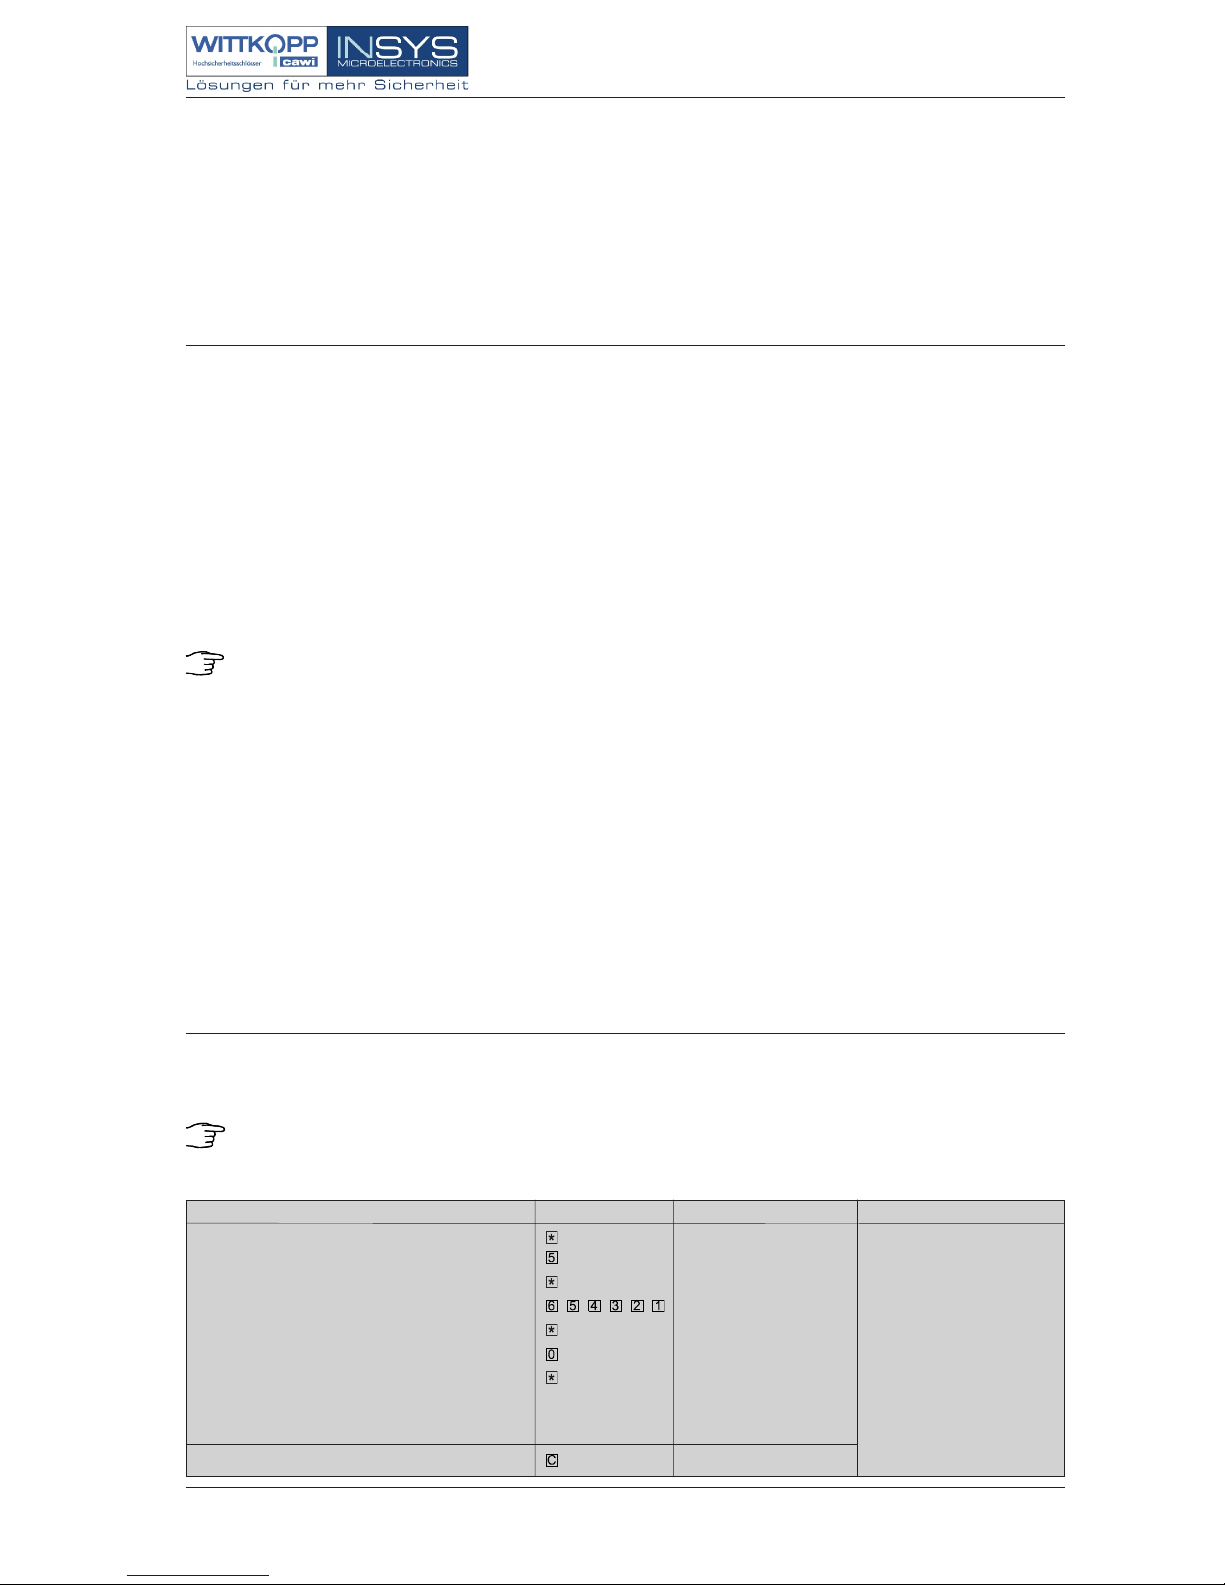
14. Reset function
This programming option returns all the programmed functions to the factory default settings for the
electronic lock.
Only the master combination and any programmed timed delay period will be retained.
This can be done only with the electronic lock closed and only with the master combination.
Function
Operation, button(s)
Response
Initiate programming
Select P No. 5
Confirm the entry
Enter the 6-digit master combination, e.g.
Confirm the entry
Enter
Confirm the entry
Cancel
Comments
Green LED blinks once
OK = green LED lights and
low-high tone sounds.
Error = 12 high-pitched
tones and red LED lights.
Page 11
Operating Instructions No. 9999-043-0
Seite 11
B7215e01_2.pmd
Rel. 1 vom 10.09.2003
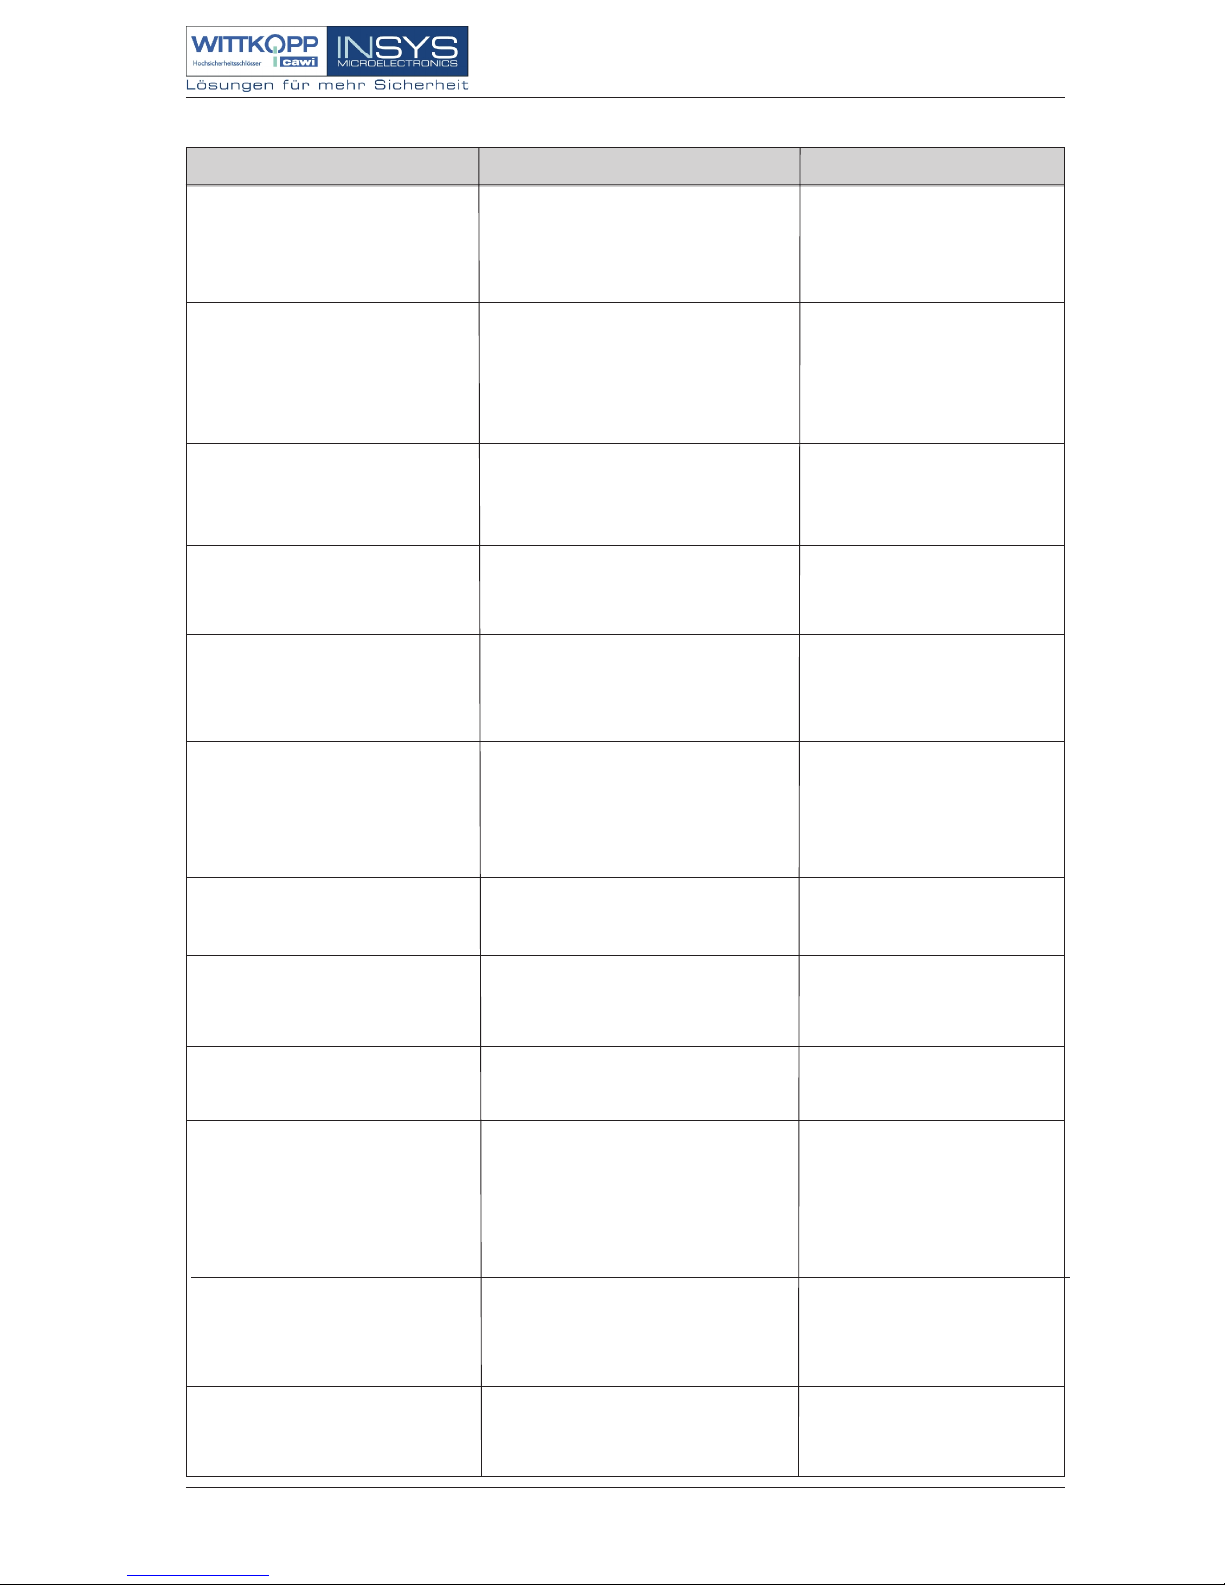
15. Troubleshooting
Problem Potential cause Remedy
Red LED lights and a tone sounds 12
times in sequence. Then the green
LED blinks and a signal tone sounds
every 7 seconds.
Door for the safe is not properly closed. Close the door properly and press
any digit button. See Section 3:
Closing the electronic lock.
Twelve high-pitched tones and the
RED lights.
Incorrect entry of a master or user
combination or error in a programming
sequence.
Check the combination. Enter a
valid combination. See Section 4:
Time-out following erroneous
entries.
Or carry out programming
correctly. See Section 10:
Programming the electronic lock.
Lock does not respond to any entries
at all.
Invalid master or user combinations have
been entered three times in sequence.
The time-out period following errors has
been activated.
Enter a valid master or user
combination once the lock-out
period has elapsed. See Section
4: Time-out period following
erroneous entries.
Ten high-pitched warning tones, the
red and green LEDs blink 10 times
alternately.
Battery is weak. The low battery warning
has been activated.
Install a new battery. See
Section 6: Charge monitoring;
replacing the battery.
Green LED blinks every five
seconds; the electronics do not
respond to any keypad entries.
A timed delay period has been
programmed.
See Section 10.4.1: Opening the
lock with the timed delay function
activated
One high-pitched tone and the green
LED blinks once, followed by one lowpitched tone and the red LED blinking
once.
Manipulation indicator: The keypad has
been changed out or invalid
combinations were entered three times
or the battery has been replaced.
Enter the combination once again.
See Section 9: Detecting keypad
replacement and tampering.
Keypad does not respond. A timed delay period is running.
Wait until the timed delay period
has elapsed. See Section 10.4:
Programming a timed delay
period.
Keypad does not respond. The battery is dead.
Connect an emergency power
battery. Applicable only for
keyboard model 7233. See
Section 6: Charge monitoring;
replacing the battery.
The lock cannot be opened once the
timed delay period has elapsed.
Release period has also elapsed. Observe the release time
window, which will be from 30
seconds to 2 minutes, depending
on the timed delay period which
was programmed. See Section
10.4: Programming a timed delay
period (Explanation)
Beep signal at five-second intervals
for a period of 60 seconds
A combination interlock has been
programmed. The second
combination will have to be entered.
Enter the second combination
within the 60-second period.
See Section 10.3.1: Opening the
lock with the combination
interlock feature activated.
Keypad does not respond. A time-lock period has been
programmed.
Wait until the programmed timelock period has elapsed. The
lock can then be opened with the
master combination or a user
combination. See Section 10.9:
Programming a time-lock period.
Programming of I/O-function
not possible.
Power safe mode still activated.
Deactivate power safe mode.
See Section 10.6: Programming of
I/O function.
Page 12
Operating Instructions No. 9999-043-0
Seite 12
B7215e01_2.pmd
Rel. 1 vom 10.09.2003
We can assume guarantee liability neither for malfunctions
caused by incorrect changes or application of undue force
or improper treatment nor in the event of losses to property
or assets due, for example, to a failure to close the safe
properly. We recommend obtaining appropriate insurance
coverage to protect the contents of your safe. Your property
insurance sales agent can provide details.
If the safe cannot be opened even though you have followed
the instructions given above, then kindly contact the safe
manufacturer.
 Loading...