

Page 1
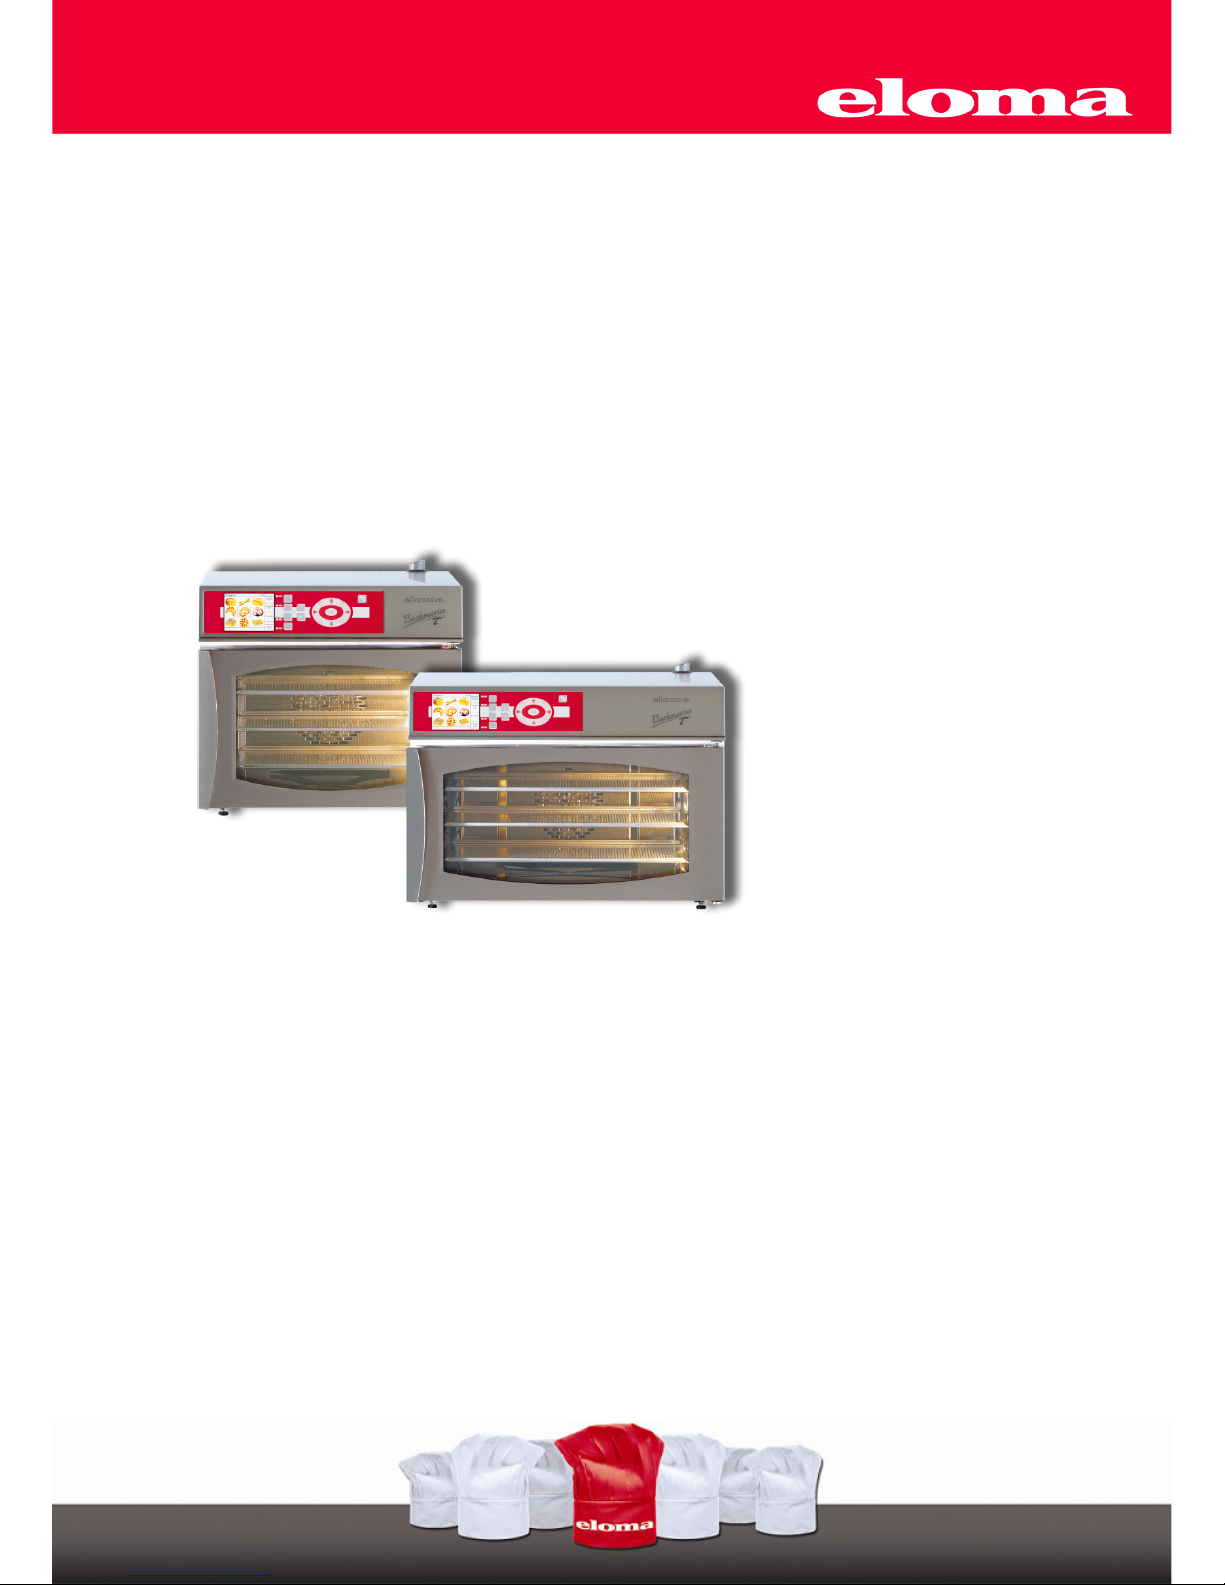
Operation Manual
Backmaster T
EB 30, EB 30 XL
Page 2

Page 3

1
Dear Customer,
You have chosen an Eloma baking oven.
Thank you for your confidence
These operation manual apply to Eloma’s Backmaster T EB 30, Backmaster T EB 30 XL electrical appliances.
Please read the installation and operating instructions in full before starting up the appliance and make sure to
pay particular attention to the safety information.
Attention!
The named standards are valid for Germany in all other countries follow the local standards and valid instructions.
Damages based on installation not complying with the directives given hereunder are not covered by warranty terms.
Check for any transport damage.
Should there any signs of transport damage, inform your dealer / freight forwarder immediately.
For information and tips please contact:
Eloma GmbH Innovative cooking and baking technology
82216 Maisach / Germany Otto-Hahn-Str. 10. Tel.: +49 (0) 8141 395-0 Fax: +49 (0) 8141 395-130
For our baking forum and user tips, visit our website at www.eloma.com.
User hotline:
Service
You can reach us practically around the clock, 7 days a week, 365 days a year:
Your service hotline:
For information on liability for material defects and warranty conditions, please consult our
general terms and conditions of business (T&C).
Eloma GmbH D-82216 Maisach
Appliance model:.............................
Appliance Nr.:..................................
Dealer: Installer:
Date:………………… Installed on:……………….
Page 4

2
Operating Instructions
Backmaster T
EB 30, EB 30 XL
Table of contents:
1. Safety information ................................................. 4
2. Operating panel and description of functions ........ 7
2.1 Backmaster T EB 30 and EB 30 XL panel ............ 7
2.2 Operating the Backmaster T using Scout .............. 8
2.3 Screen layout for manual operation ...................... 8
3. Starting the Backmaster T up ................................ 9
3.1 Manual input ......................................................... 10
3.2 Manual operation with one step ............................ 11
3.3 Entering several baking steps ............................... 12
3.4 Operating states for several baking steps ............. 13
3.5 Display of actual values ........................................ 14
3.6 Selecting additional functions ................................ 15
3.7 Delayed start for manual input .............................. 15
4. Saving programs ................................................... 16
4.1 Saving programs ................................................... 16
4.2 Deleting a program ................................................ 19
4.3 Copying a program ................................................ 19
4.4 Selecting and starting a program from the
program list ........................................................... 20
4.5 Selecting and starting a program from the
pictogram level ...................................................... 21
4.6 Assigning pictograms to saved baking programs .. 21
4.7 ASC mode ............................................................. 22
4.8 Assigning saved baking programs to the
ASC level .............................................................. 22
4.9 Program sequence in ASC mode .......................... 23
4.10 Selecting and starting a program from the
pictogram level ...................................................... 23
5. Combi baking ........................................................ 24
6. Pre-heating ........................................................... 25
7. Special programs .................................................. 26
7.1 Cleaning ................................................................ 26
7.1.1Manual cleaning .................................................... 26
7.2 HACCP ................................................................. 27
7.2.1Interface for connecting cable ............................... 27
7.2.2Selecting and printing baking logs ......................... 28
7.3 Weekly
program .................................................... 29
7.4 Setup .................................................................... 29
7.4.1 Date/Time ............................................................. 29
7.4.2 Start screen .......................................................... 30
7.4.3 Language ............................................................. 30
7.4.4 Unit parameters .................................................... 30
8. Errors .................................................................... 31
8.1 Displaying errors ................................................... 31
8.2 Error messages ..................................................... 32
8.3 Troubleshooting .................................................... 33
9. End of operation .................................................... 33
10. Cleaning and maintenance ................................... 34
11. ProConnect Backmaster communication ......... 35
11.1 Starting up ProConnect Backmaster
communication ...................................................... 35
11.2 Function for networking a baking control
system (option) ..................................................... 35
12. EC Declaration of Conformity ................................ 37
Version 1.
Item no. (/504459 /201
Page 5

3
Pictograms/symbols used
Danger! Warning! Caution
Indicates a situation presenting an
immediate danger, which, if
Indicates a potentially dangerous
situation, which, if
Indicates a potentially dangerous
situation, which, if
if not avoided, will result in
serious injury or death.
not avoided, could result in
serious injury.
not avoided, could result in minor or
moderate injury.
Caustic substances
Caution: Risk of burns
Caution: Hot steam
Caution: Hot liquid
Warning: Dangerous electrical voltage
Do not dispose the Backmaster domestic waste
Page 6
4
1. Safety information
- Installing the appliance incorrectly, making incorrect settings on it or modifying
it can lead to damage, injury or even death.
- Read the installation and operating instructions for the baking oven through carefully
before starting it up.
Use for intended purpose
- The appliance shall only be used for its intended purpose, namely the professional preparation of food.
- The Eloma baking ovens are designed for use in commercial environments.
Method of operation
- The Backmaster T enables you to prepare baked goods using the best possible baking environment.
This means the ability to adjust temperature and humidity levels exactly as required for each type of
baked good.
- At the same time, the required baking method can be selected using the scout feature
on the operating panel.
- The Climatic® cursor moves during this process. This moveable Climatic® cursor indicates the exact
temperature in degrees and the exact humidity level between 10 and 1000 ml or in seconds.
- The baking chamber temperature can be set to between 30°C and 250°C, and the humidity level to
between 10 and 1000 ml, or in seconds depending on the setting made in the Service menu.
Operation
- Keep this manual in a place where it can be accessed by all users of the appliance at any time.
- Insert the water tank only with the lid.
The baking oven must only be operated
- By trained staff
- For its intended purpose as outlined in the operating instructions, and whilst in perfect working order.
- To prevent the risk of accidents or damage to the appliance, it is essential that operating staff are given
training and health and safety briefings on a regular basis.
- If the machine is set up outside, it must be ensured that it is adequately protected from rain, thunder
storms and lightening. It must be set up on a solid foundation to ensure stability.
It must also be ensured that the machine is only accessible for qualified personnel.
The appliance must not be operated
- By children or persons with impaired physical, sensory or mental abilities, or by persons who do not
have the requisite experience and/or knowledge, unless they are being supervised by a person who is
responsible for their safety or are receiving instructions in how to use the appliance from this person.
- At an ambient temperature of < +4°C
- In toxic atmospheres or atmospheres where there is a risk of explosion
- With food containing highly flammable ingredients (e.g. alcohol)
Door lock, emergency release lever
- The Backmaster T is fitted with an automatic door lock.
- If the Backmaster is being used, the door is closed by giving it a gentle push.
- When the program ends the door opens automatically, depending on the setting
made in the Service menu.
- The door can be opened by means of the "Open door" sensor button either during or after operation.
- When the door opens automatically at the end of the baking time, there is a risk of personnel
sustaining burns.
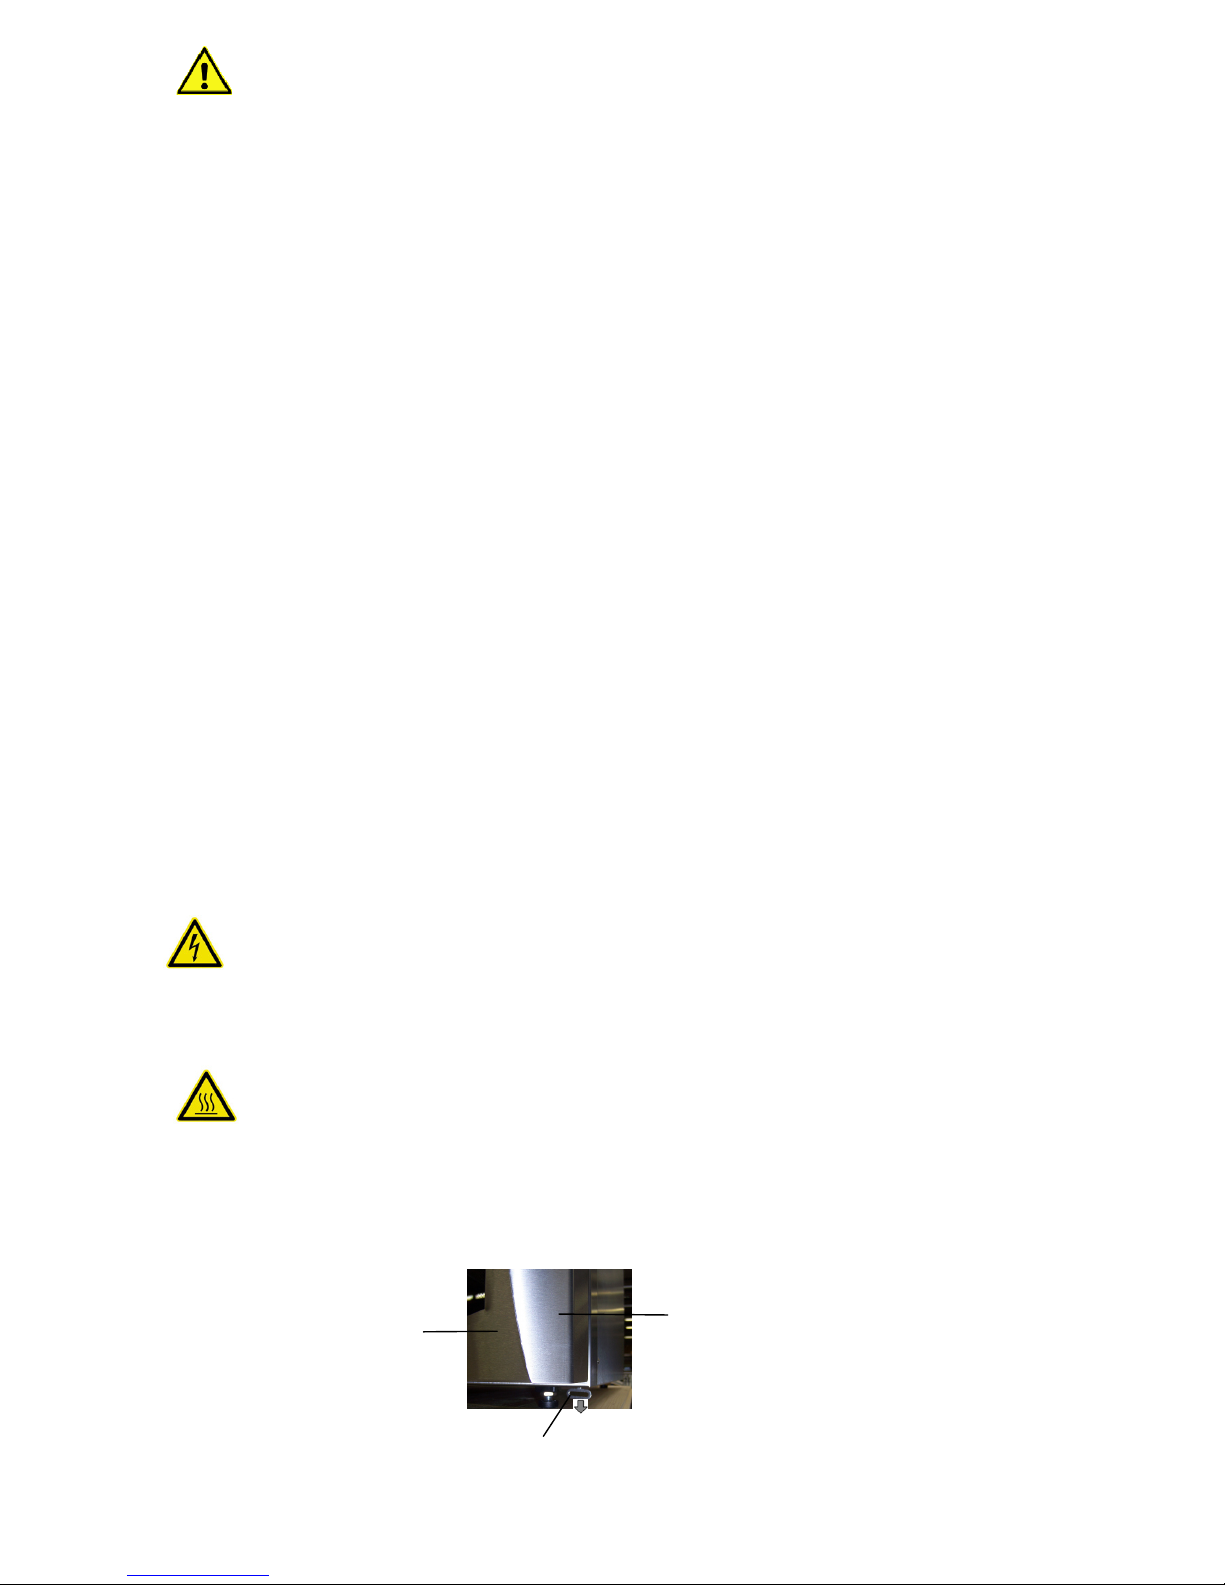
- Should a malfunction or power failure occur, or should the appliance be disconnected from
the mains, the door can easily be opened by mechanical means.
- The emergency release lever can be found underneath the door, near to the handle.
- Push the emergency release lever down and the door will open.
See close-up photo:
Emergency release lever
Door
Handle
Page 7
5
- Only authorised customer service personnel may open the side wall and carry out
repairs and maintenance work.
Risk of injury
Installation
- Please refer to the installation instructions for precise information on how to install the appliance.
- Only authorised customer service personnel may install appliances, put them into operation and
perform maintenance work on them.
Risk of burns!
- Care must be taken when opening the baking chamber door, as hot air and steam could escape.
Risk of burns!
- The functional surfaces of the appliance become hot during operation.
- When the door opens automatically at the end of the baking time, there is a risk of personnel
sustaining burns.
Appliance defects
- If the glass part of the door is damaged, the appliance must not be started up.
Contact customer service.
- If malfunctions occur, disconnect the appliance from the mains and close the water shut-off valve.
Contact customer service.
Before turning on
- Lock the air baffle in place. Never reach behind the air baffle during operation and never attempt
to stop fans manually.
- Lock the rack in place correctly.
- Take care not to bend the tracks when doing this, as this will stop grids, trays and containers from
being held securely in place.
Condensation hood (option)
- An optional condensation hood is available for Eloma baking ovens.
- The condensation hood is controlled fully automatically via the baking oven.
- During the baking process, steam is condensed as it passes over air-cooled plate condensers.
Cleaning
- Do not spray water into the hot baking chamber.
- Under no circumstances must water jets, steam cleaners or high-pressure cleaners be used on
the exterior of the appliance.
- Only use Eloma Multi-Clean special cleaning agents.
- Eloma GmbH accepts no liability for damage caused by using non-Eloma cleaning agents or rinse
agents; use of such agents will also invalidate any warranty claims.
- Please observe the instructions for use provided with the cleaning agent and rinse agent.
- Wear appropriate protective gear when carrying out manual cleaning work (gloves, protective goggles).
- Do not breathe in spray mist.
- Make sure that the air baffle and racks are used and locked in place in accordance with regulations.
Notes on maintenance
- Insert the water tank only with the lid.
- Empty and clean the tank every day. If the appliance is going to be out of operation for a
prolonged period, allow the tank to dry out.
- To keep the appliance in perfect working order, an authorised service partner should carry out
maintenance work on it at least once a year.
- We recommend that you agree a maintenance contract for this purpose.
- If the appliance is not going to be used for a prolonged period, turn it off, disconnect it from the
mains and close the water tap.
Page 8
6
Before turning on
- Before closing the oven door make sure that the pans and grids inside are securely in place to avoid
damages to the door glass.
- When opening and closing the door take care to leave enough space for yourself and other
people to avoid possible injuries.
- Lock the air baffle in place. Never reach behind the air baffle during operation and never attempt
to stop fans manually.
- Lock the rack or mobile tray rack in place correctly.
Loading/unloading
Risk of burns
- Depending on the selected baking temperature, the food containers, grids, rack trolley and inside of the
door in particular may reach high temperatures. It is recommended that you wear protective gloves.
- The temperature of the glass part of the door and the casing may reach more than 60°C at some
points during operation.
- Maximum permissible loading weight:
EB 30 10 kg (max. 10 kg per tray)
EB 30 XL 15 kg (max. 15 kg per tray)
Fixing the rack in place (tabletop appliances)
- Hanging in place: Push the rack up and hang it in place.
- Take care not to bend the tracks when doing this, as this will stop grids, trays and containers from
being held securely in place.
Appliance with water tank option
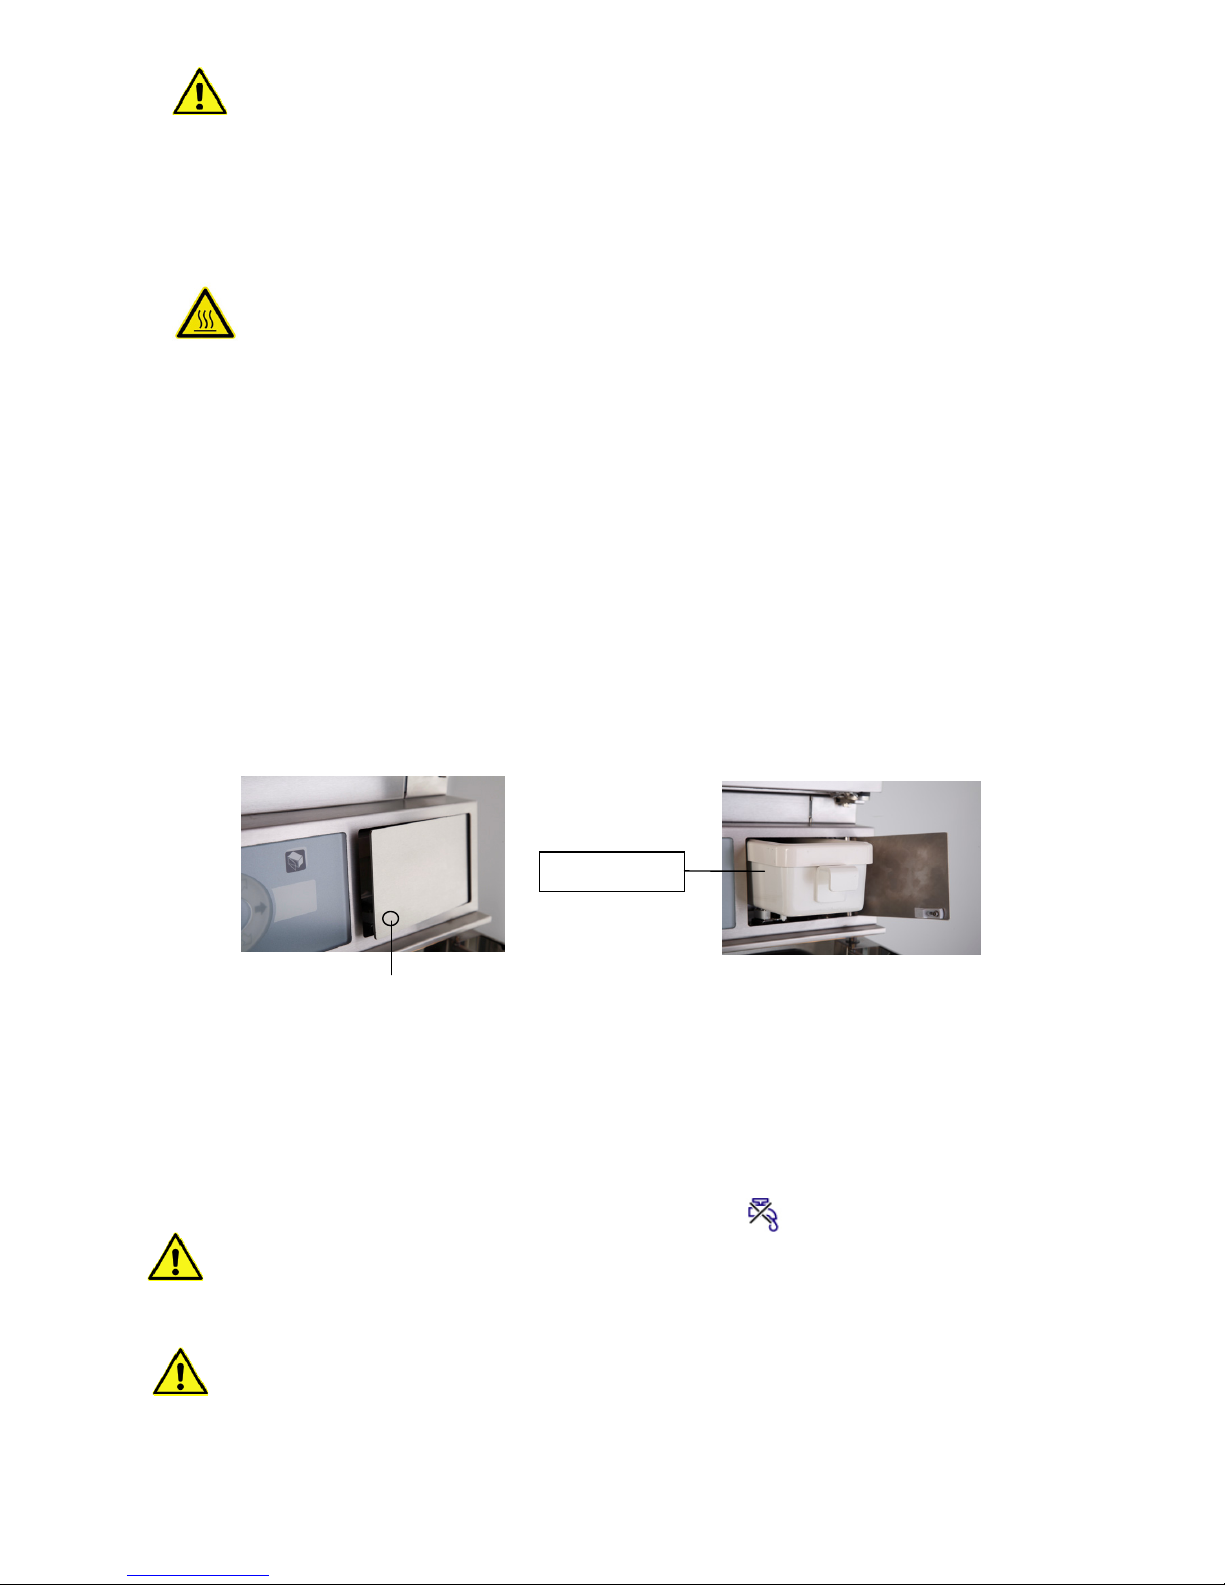
If your appliance is not connected to a water supply, it can be filled with water manually.
- The Backmaster is equipped with a water tank that has a capacity of around 2 litres.
- This water tank is located on the right-hand side of the top section, next to the oven's control panel.
- In order to fill the water tank, it must be removed from the oven.
- Press the cover on the operating panel firmly to open it up.
- Take hold of the water tank by the handle, lift it up slightly and then pull it towards you.
- Place the tank on a level surface.
- Open the lid and fill the tank with water up to the appropriate mark.
- Now close the water tank by pushing the lid down until it clicks into place and re-insert the tank
next to the control panel, pushing it in as far as it will go.
- Close the cover on the operating panel.
- The Backmaster is now ready to use again.
- If the water level in the tank has fallen below 250 ml, the
icon lights up in the info line to warn
of this lack of water.
Only use softened water
- The water poured into the tank must have a chloride and sulphate content of below 50 mg/l.
- If possible, only fill the tank with as much water as will be needed for one day (maximum 2.1 litres).
- Ensure that no dirt has penetrated the water tank.
Insert the water tank only with closed cover.
Water tank
Press here
Page 9
7
2. Operating panel and description of functions
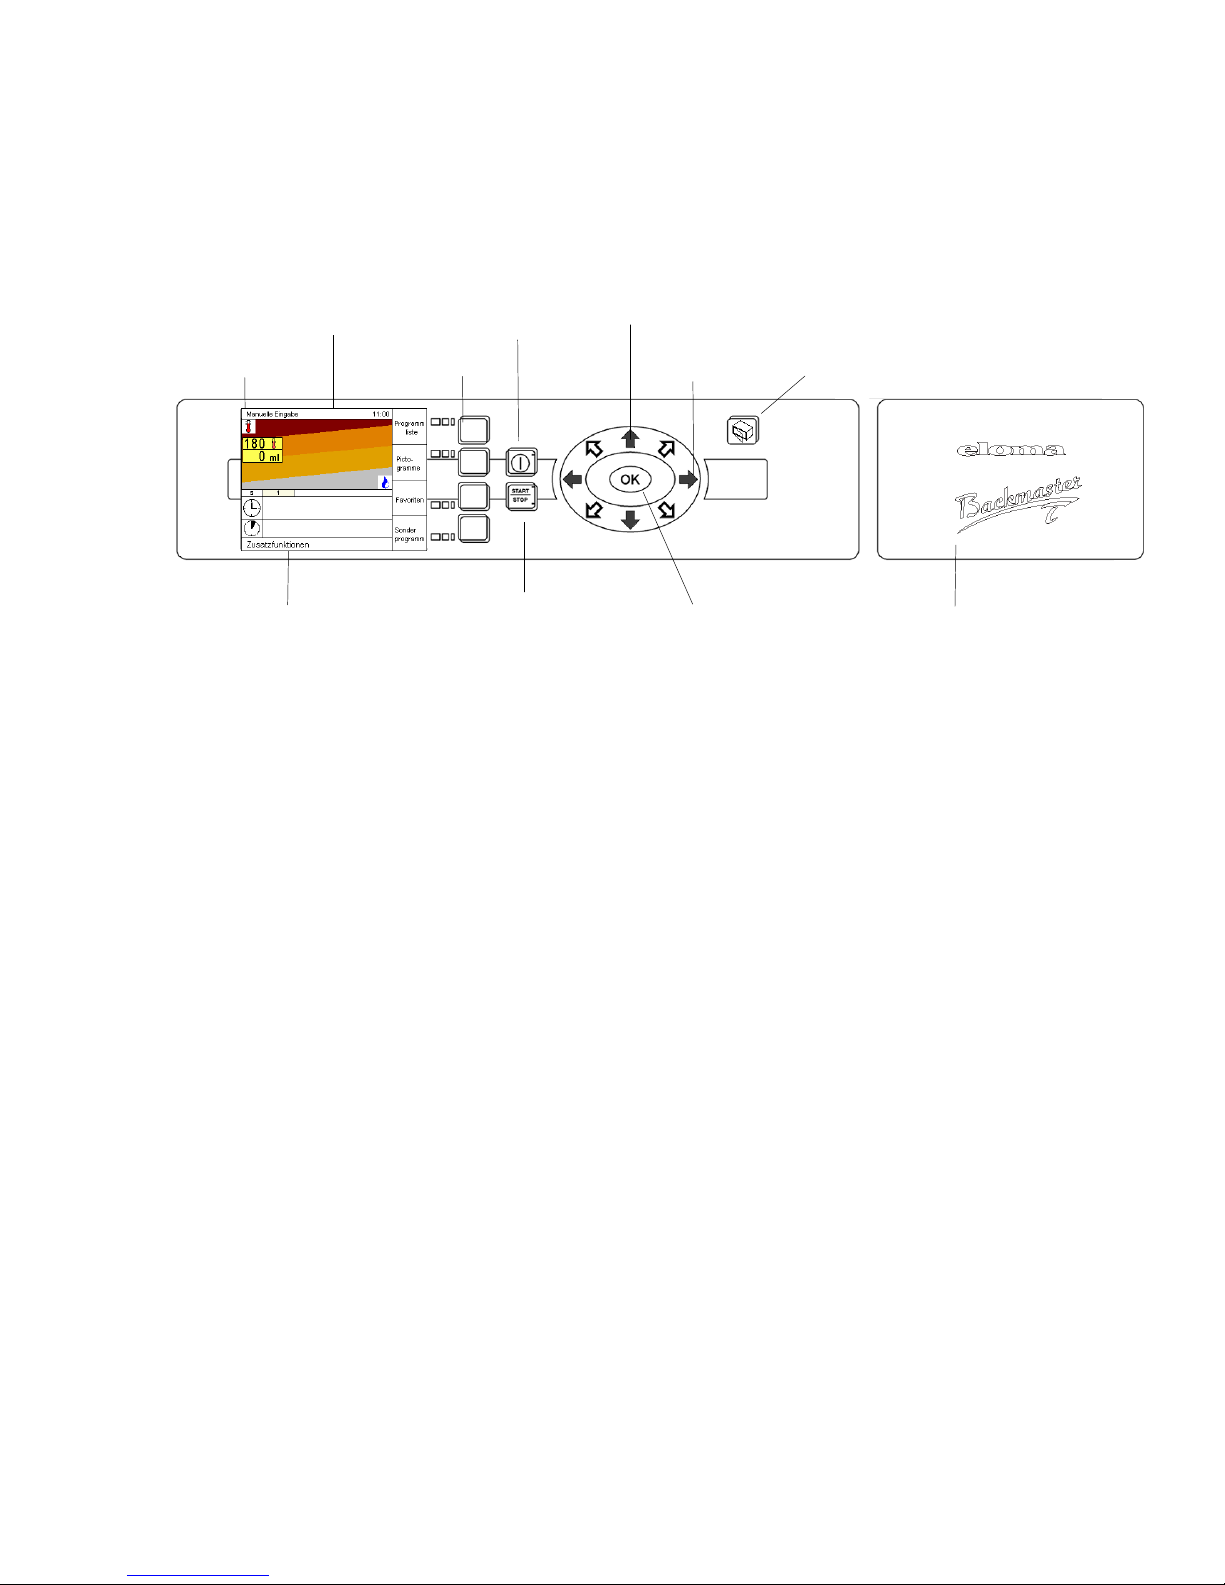
2.1 Backmaster T EB 30 and EB 30 XL panel
To achieve a high degree of evenness in baking, the direction in which the fan rotates changes during
operation. The length the rotation direction is dynamically adapted to the baking time, which means, that
during short baking times, the rotation direction is changed at shorter intervals than with longer ones.
The oven space light is controlled by the program and depends on the door’s position.
If the door is opened, to put in or take something out of the oven, the light switches off.
See also device settings in the service menu.
Climatic monitor for baking ON/OFF key Backmaster Scout
Operation system Sensor key Direction arrows Open door button
Info Zeile Taste Start/Stop Bestätigungstaste OK
Info line Start/Stop key OK to confirm Water tank option
Page 10
8
2.2 Operating the Backmaster T using Scout
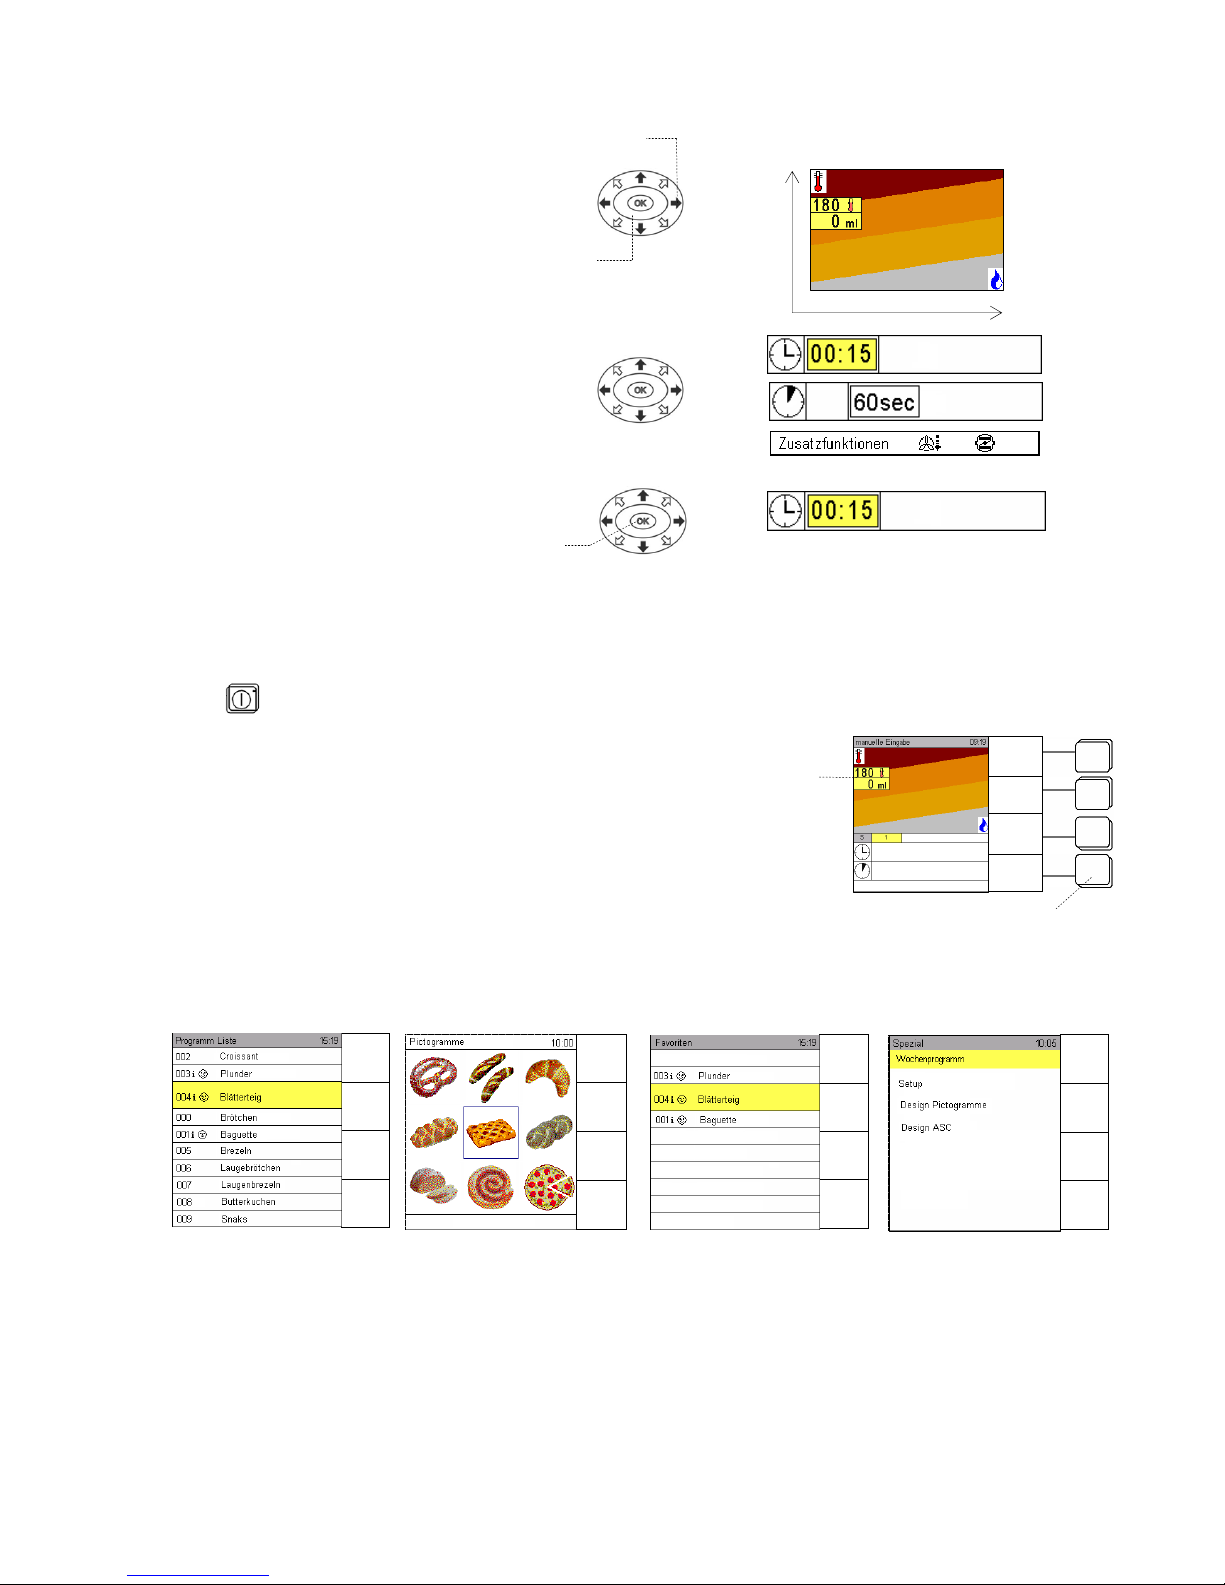
Press the Scout direction arrows to
move the Climatic cursor around the
Climatic screen.
The selected field appears on a yellow
background.
Press the Scout direction arrows briefly to
make changes step by step, or hold them
down to make changes rapidly.
Confirm your settings by
pressing OK.
The setting, in this case the time, is
adopted.
2.3 Screen layout for manual operation
Press to switch the appliance on; the start screen appears.
The moveable Climatic cursor indicates the exact
temperature in degrees and the humidity level.
Using sensor buttons to select menus
Press the sensor buttons to call up the different menus.
OK
Climatic screen
Scout
Climatic cursor
Sensor buttons
Direction arrows
Humidification
Temperature
Program
list
Pictograms
Favourites
Special
program
Manual
input
Picto
grams
Favourites
Pre-eating
ON
Manual
input
Picto
grams
Favourites
Pre-heating
ON
Manual
input
Autoclean
HACCP
Manual
input
Program
list
Favourites
Pre-heating
ON
Special programs
Page 11
9
3. Starting the Backmaster T up
Prior to start: open water tap
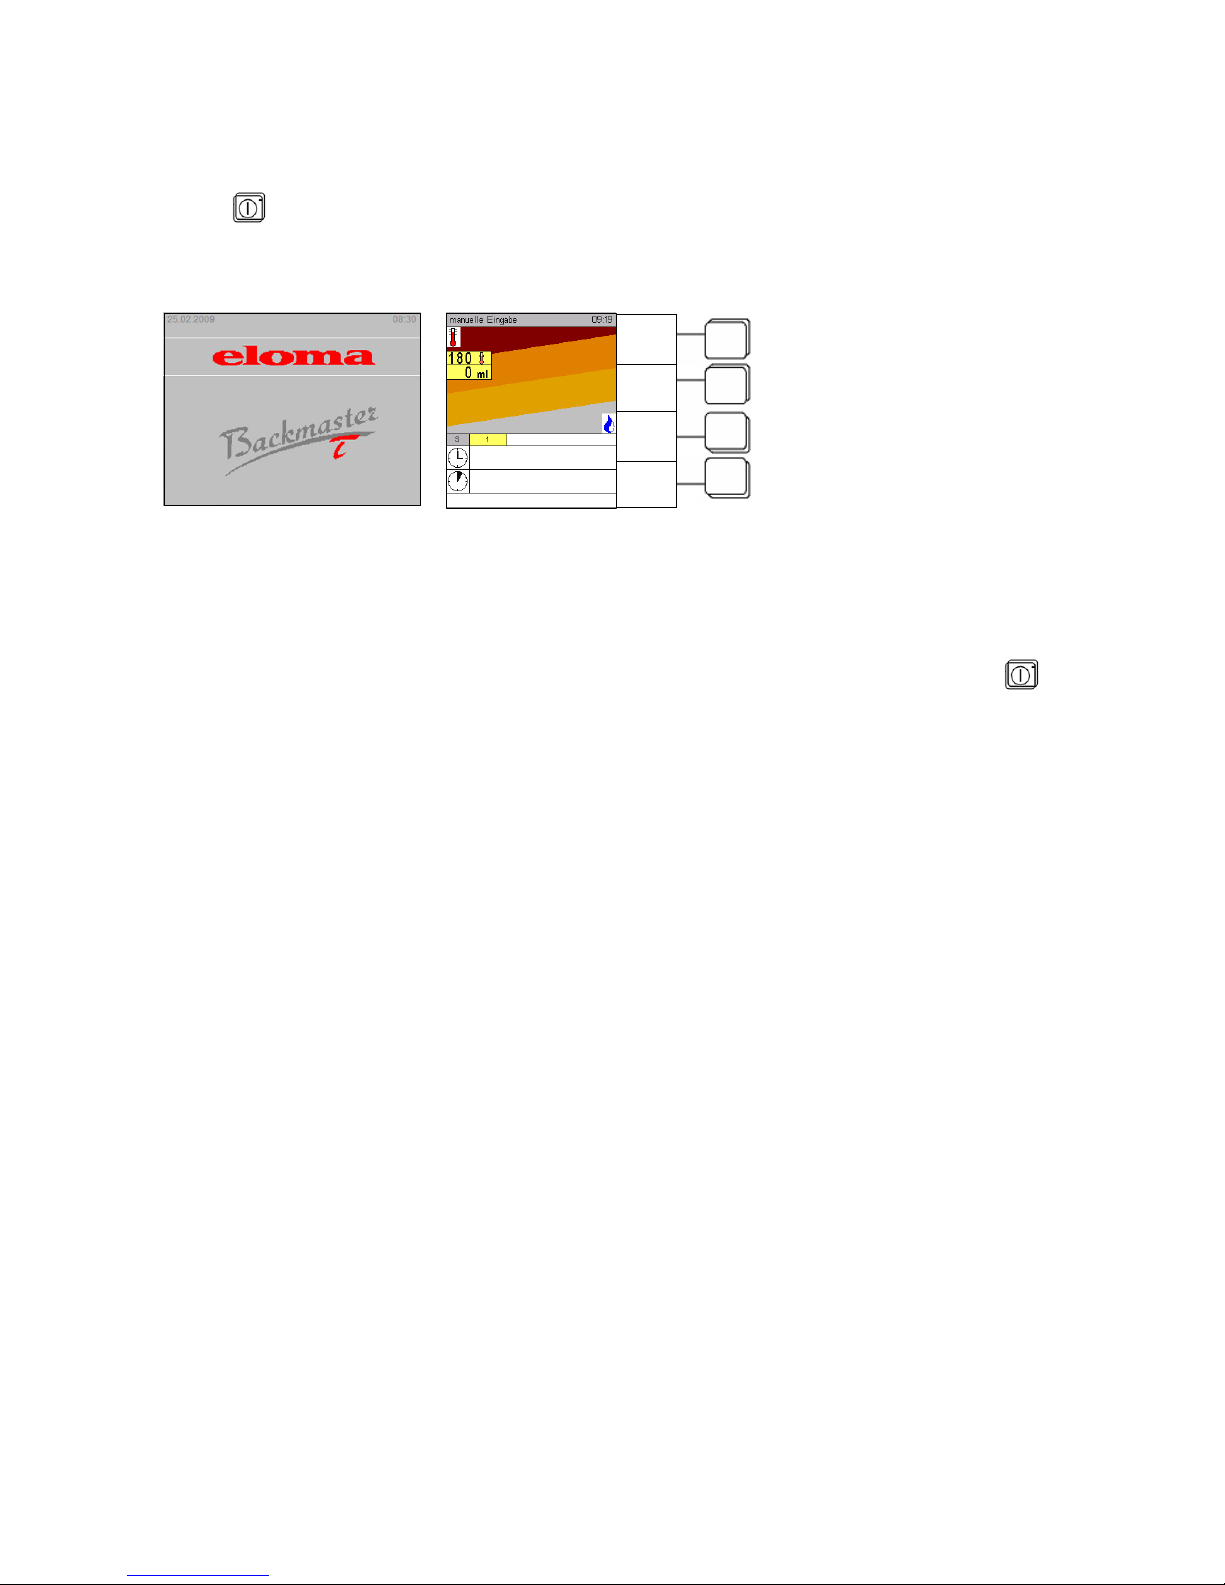
If the appliance is connected to the mains, the Eloma standby screen appears.
Press the ON/OFF button; the start screen appears and the appliance is ready to
use.
The LED lights up.
"Manual input" appears in the operating mode display.
Press the Special program sensor button and select Setup to open the Service input menu.
Select the start screen and press OK to confirm.
Four display menus can be selected as the start screen (Manual input/Favourites/Program
list/Pictograms).
The default Climatic cursor settings that appear after the appliance has been switched on using
are
temperature = 180°C and humidity = 0 ml.
Initially, only icons are displayed in the "Time" and "Rest period" lines.
Program
list
Picto-
grams
Favourites
Special
program
Eloma Standby screen
Start screen
Page 12

10
3.1 Manual input
The temperature and humidity level are set via the Climatic cursor.
Input range: temp. 30°C – 250°C and humidity level 10 1000 ml or in seconds, depending on the setting
made in the Service menu.
Default baking settings are temp. 180°C and humidity level 0 ml.
Enter the baking program manually.
Use Scout to enter the desired temperature and humidity level, 10 1000 ml, in 10 ml increments.
If a humidity level of "0" is entered in the first baking step and confirmed with OK, 00:00 appears in the
time display and the baking time of between 00:00 and 23:59 hours is entered using the direction arrows.
If a humidity level of ">0" is entered in the first baking step and confirmed with OK, 00:00 appears in the
time display and the rest period of between 0 180 seconds can be entered using the direction arrows.
You can also enter 0 sec. as the rest period.
For the baking step, the time must always be entered, otherwise it will not be possible to input any other
settings.
The time can be set to between 00:00 and 23:59 or switched to continuous operation.
Time at a setting of 00:00 press or at 23:59 press = continuous operation
The appliance always has to be pre-heated. This is selected via the Pre-heating sensor button.
For a description of the pre-heating function, refer also to Section 7.
For information on entering several baking steps, see Section 3.3. Up to 20 baking steps are possible per
baking program.
Save the baking programs as described in Section 4.
Start the appliance by pressing
; the appliance will switch to Pre-heating mode, assuming that this
mode has been activated.
When pre-heating is complete, a signal sounds. The temperature is maintained.
Press the "Open door" sensor button to open the door.
Now insert food into the appliance quickly so that the drop in temperature resulting from holding the door
open can be kept to a minimum.
Close the door the baking process will now start.
The door can be opened at any time during the baking process by pressing the "Open door" sensor
button, allowing more food to be placed in the baking chamber, if required. The baking program is
interrupted. Once the food has been inserted, leave the door slightly ajar and the program will continue to
run from the point at which it was interrupted.
Additional baking
You can subject food to additional baking both before and after the end of the specified baking process.
The additional baking function is only ever available in the last baking step of a baking program; the baking
chamber temperature remains unchanged.
If the baking time is to be extended by 1, 2, 3 or 4 minutes, depending on the setting parameters, before
the end of the baking program, press the Additional baking sensor button as many times as required.
If the baking time is to be extended by 1, 2, 3 or 4 minutes after the end of the baking program, you must
perform the following steps:
Switch the audible signal/buzzer off by pressing the arrow keys.
Press the Additional baking button as many times as required and leave the door slightly ajar.
Then press the
button.
The appliance continues to bake for the period of time you have set.
Pressing the Additional baking sensor button a fifth time deactivates the function.
When the baking program has finished, a signal sounds and the door opens automatically, depending on
the settings made in the Service menu.
Settings can be made in the Service menu to determine whether or not a signal should sound at the end of the
baking program and what time delay will apply before the door is opened. Default setting = 5 sec.
Page 13
11
3.2 Manual operation with one step
Use Scout to enter the desired temperature and humidity level via the Climatic cursor and confirm your
settings with OK.
Enter the baking time and confirm with OK.
Enter the rest period and confirm with OK.
Use the additional functions to select whether the exhaust air flap should be open or closed.
The "Pre-heating ON" sensor button is activated.
Start the Backmaster T by pressing
; the appliance begins to pre-heat and the LED lights up.
Once the nominal temperature is reached, a signal sounds and "Pre-heating end" appears in the info line.
The signal continues to sound at regular intervals until the door is opened.
The nominal temperature is maintained for a maximum of 1 hour.
Insert food into the appliance and ajar the door. The baking program starts at the first baking step.
When the program ends a signal sounds.
The door opens automatically (depending on the setting made in the Service menu).
The baking program can be started again by pressing .
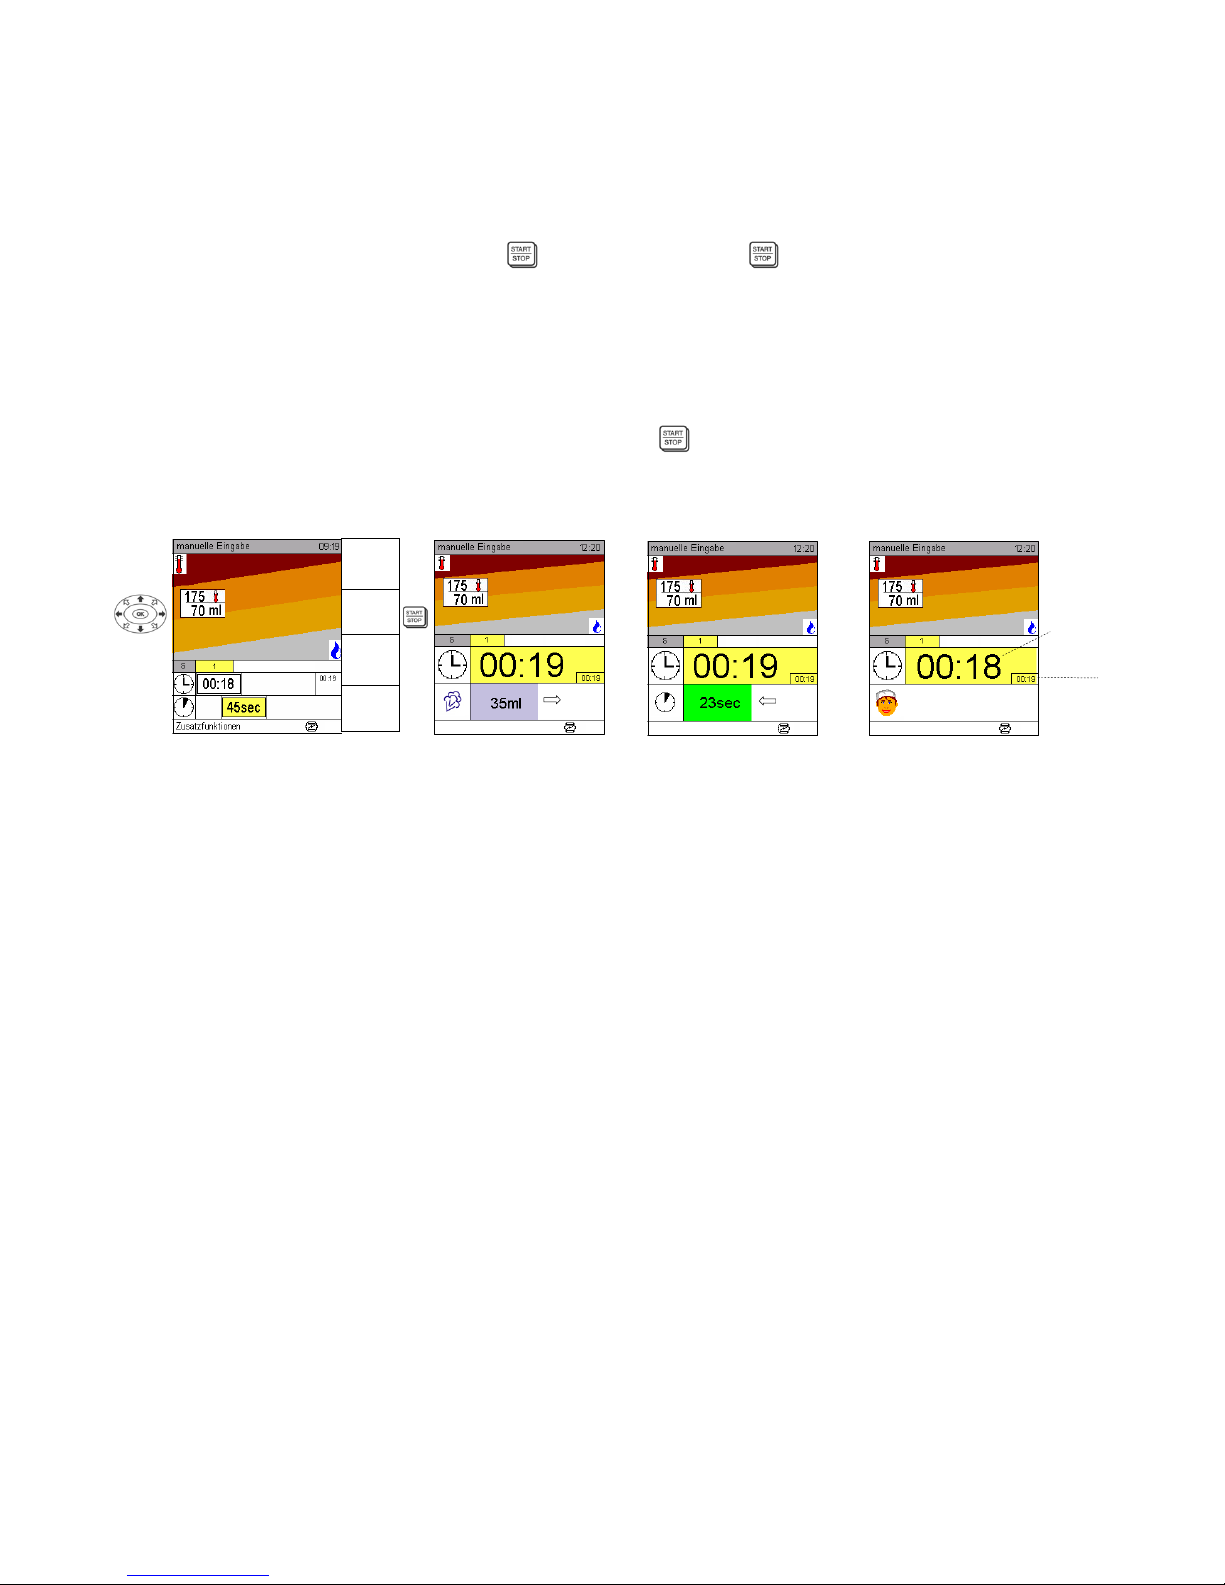
A display indicating how the program is progressing appears on the screen.
Bars indicating the progress of the program appear in the display fields.
During humidification, the bar extends to the right and when the rest period is running down, the bar
decreases in length from right to left.
Additional manual humidification can always be executed by pressing the "Shot of steam" sensor button.
When the program is complete, a signal sounds.
Time
remaining
Nominal
time
Manual input
Humidification
Rest period
Baking
Menu
back
Save
Next
Step
Pre-heating
ON
Page 14
12
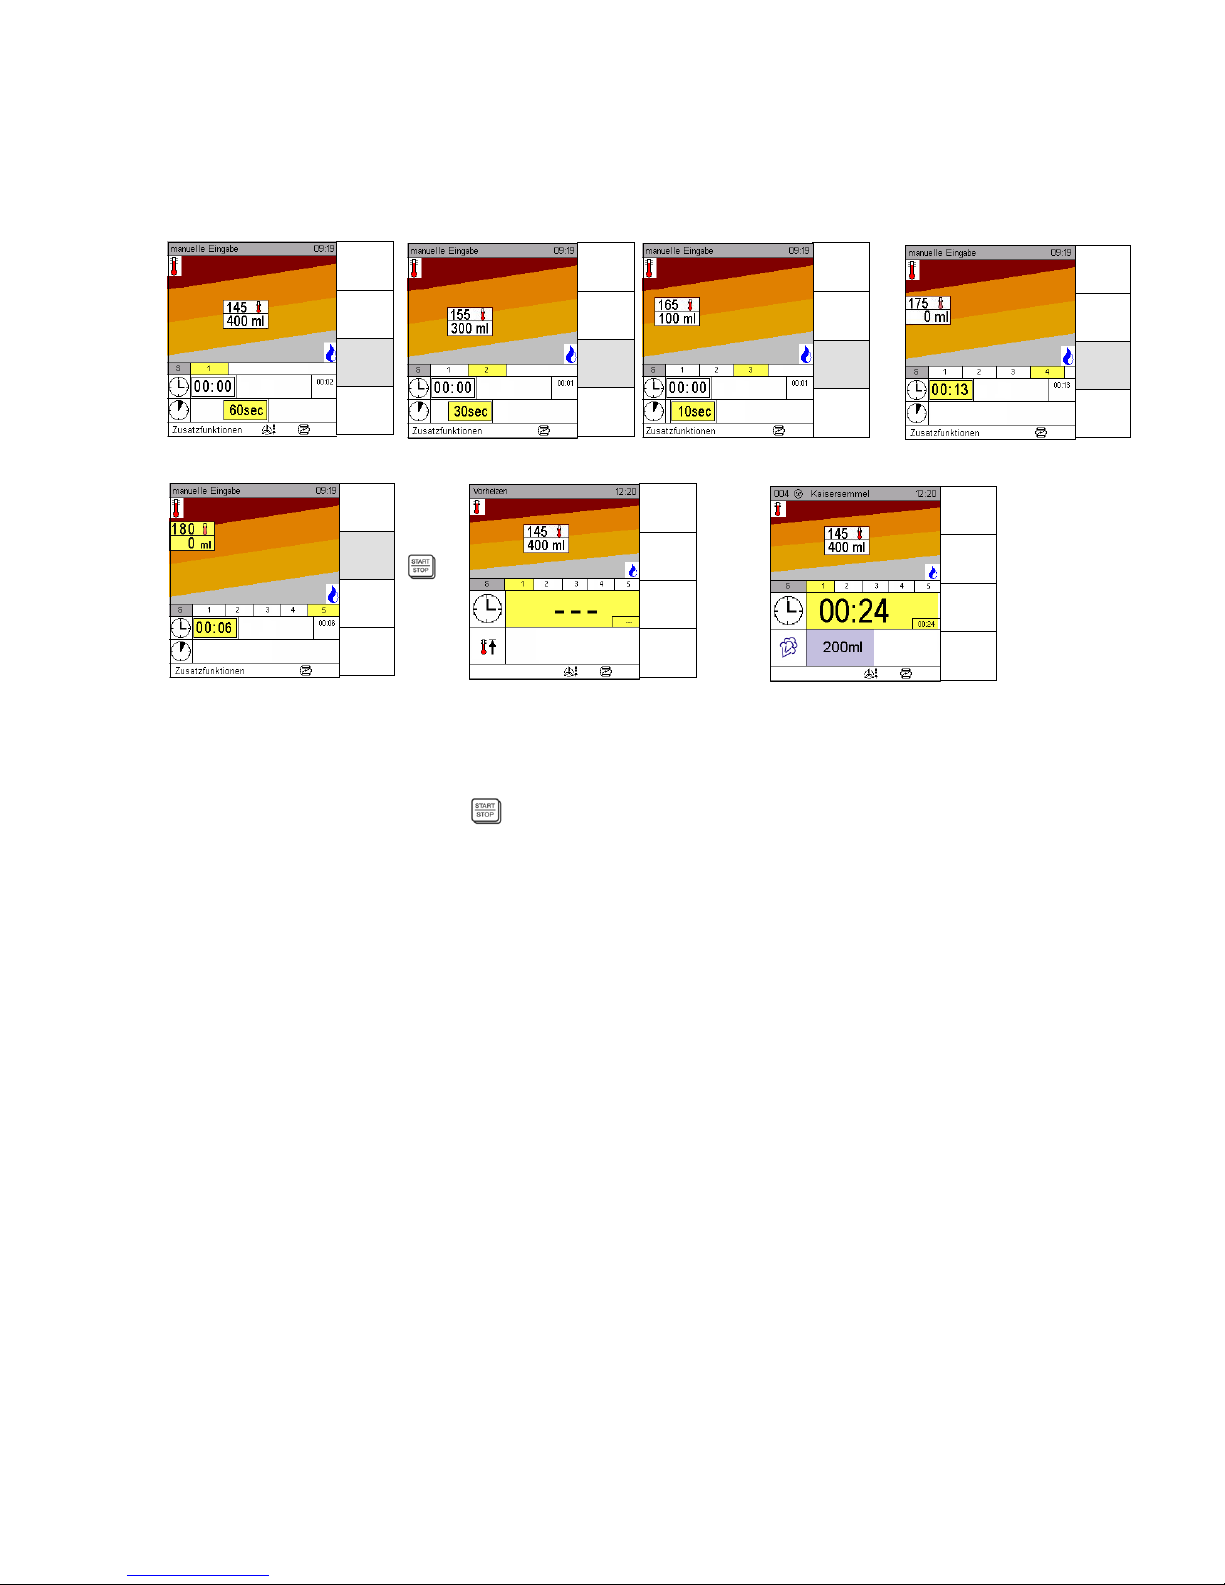
3.3 Entering several baking steps
Enter the first step as described in Section 3.1.
If several baking steps are to be entered, select the Next step sensor button.
Enter the first step as described in Section 4.
The maximum number of baking steps is 20.
Step 1 Step 2 Step 3 Step 4
Step 5 etc. Pre-heating Start first step
You can check which baking step was performed immediately prior to this point by pressing the "Back to
menu" sensor button briefly.
Pressing the "Back to menu" sensor button for longer will take the user back to the start screen.
Caution! This will cause all previously entered data to be cleared automatically.
Start the appliance by pressing
; the appliance will switch to Pre-heating mode, assuming that this
mode has been activated.
When pre-heating is complete, a signal sounds and Pre-heating end appears in the info line.
The temperature is maintained.
Press the "Open door" sensor button to open the door.
Insert food into the appliance and ajar the door. The program starts at the first baking step automatically.
The door can be opened at any time during the baking process by pressing the "Open door" sensor
button, allowing more food to be placed in the baking chamber, if required. The baking program is
interrupted. Once the food has been inserted, ajar the door and the program will continue to run from the
point at which it was interrupted.
When the baking program has finished, a signal sounds and the door opens automatically, depending on
the settings made in the Service menu.
Settings can be made in the Service menu to determine whether or not a signal should sound at the end of the
baking program and what time delay will apply before the door is opened. Default setting = 3 sec.
Additional baking
Refer to the "Additional baking" description contained in Section 3.1.
Menu
back
Save
Next
Step
Pre-heating
ON
Menu
back
Save
Next
Step
Pre-heating
ON
Menu
back
Save
Next
Step
Pre-heating
ON
Menu
back
Save
Next
Step
Pre-heating
ON
Dampfstoss
Change
Step
Next
Step
Add on
baking
Menu
back
Save
Next
Step
Pre-heating
ON
Page 15
13
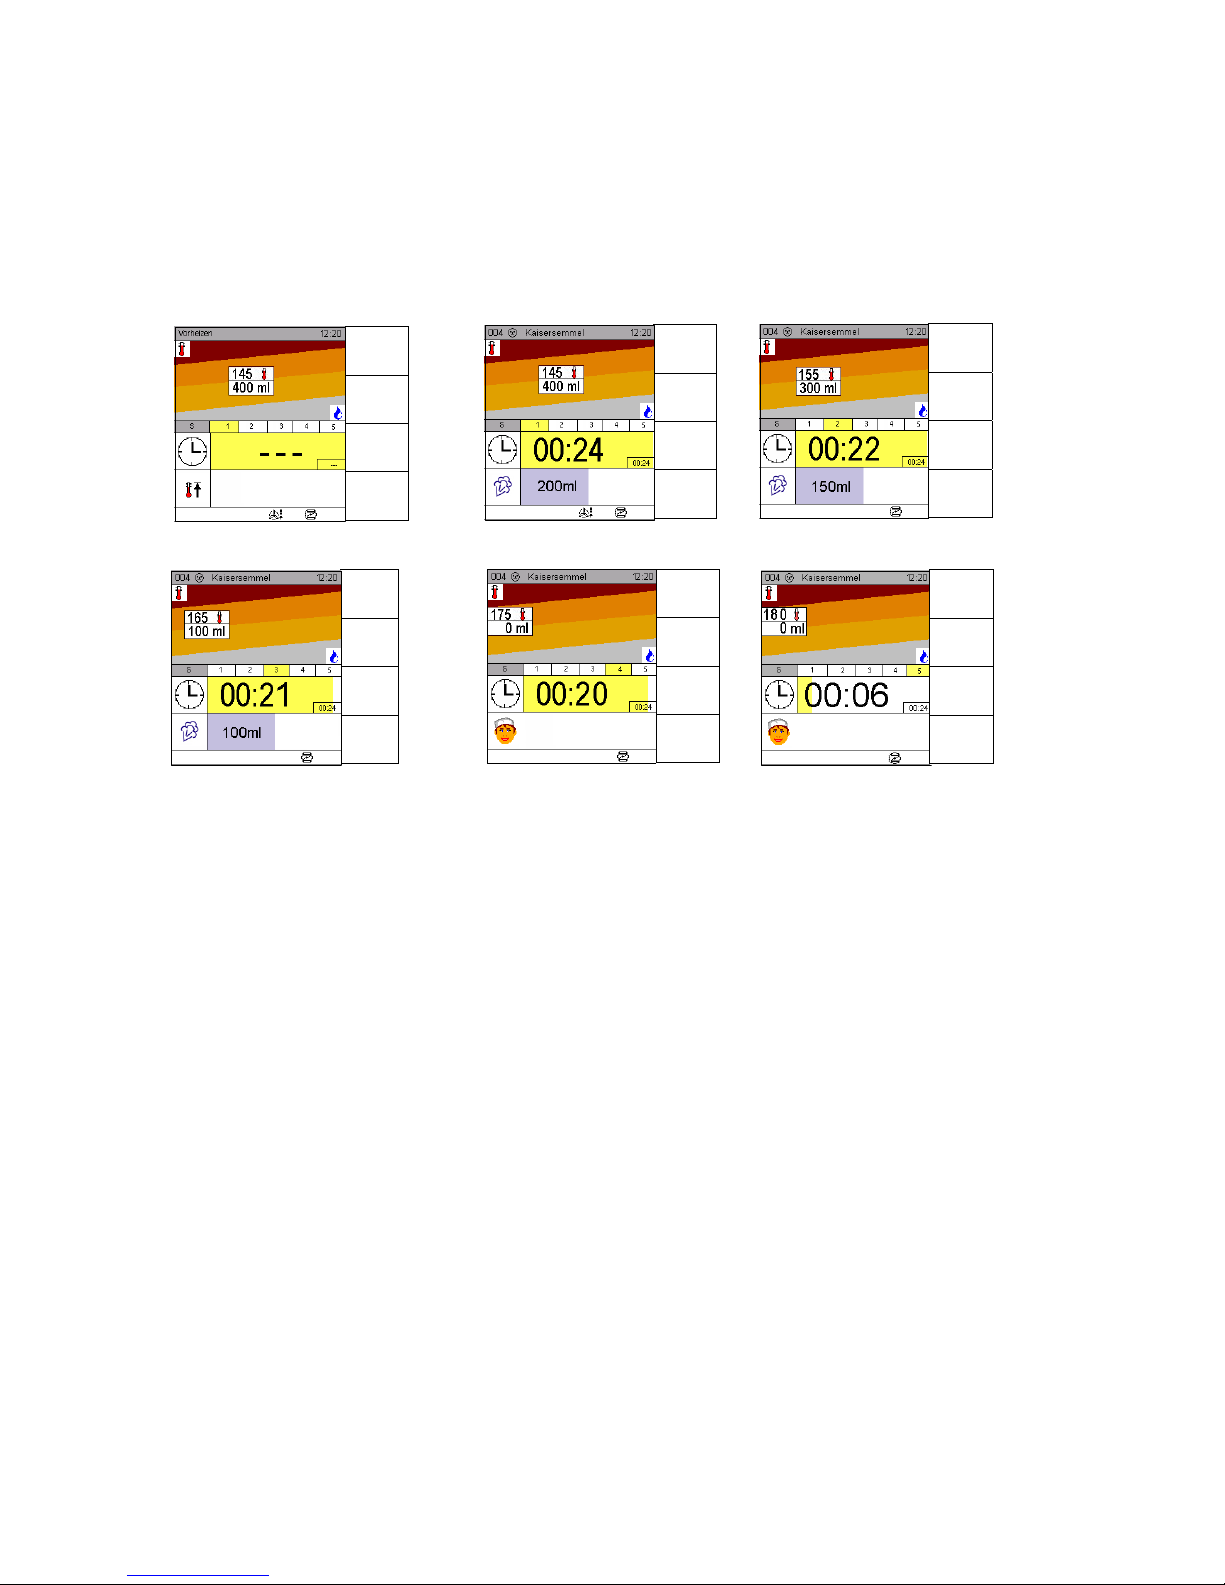
3.4 Operating states for several baking steps
Example: Bread rolls
1st step input: temperature 145°C, 400 ml humidity, pause of 60 sec, flap closed
2nd step input: temperature 155°C, 300 ml humidity, pause of 30 sec, flap closed
3rd step input: temperature 165°C, 100 ml humidity, pause of 10 sec, flap closed
4th step input: temperature 175°C, baking time of 13 min, flap closed
5th step input: temperature 180°C, baking time of 6 min, flap closed
Pre-heating operating state Step 1 operating state Step 2 operating state
Step 3 operating state Step 4 operating state Step 5 operating state
If the Shot of steam sensor button is pressed, water will be evaporated in the baking chamber.
Manual
Steam
Change
Step
Next
Step
Manual
Steam
Change
Step
Next
Step
Add on
baking
Manual
Steam
Change
Step
Next
Step
Add on
baking
Manual
Steam
Change
Step
Next
Step
Add on
baking
Manual
Steam
Change
Step
Next
Step
Add on
baking
Page 16
14
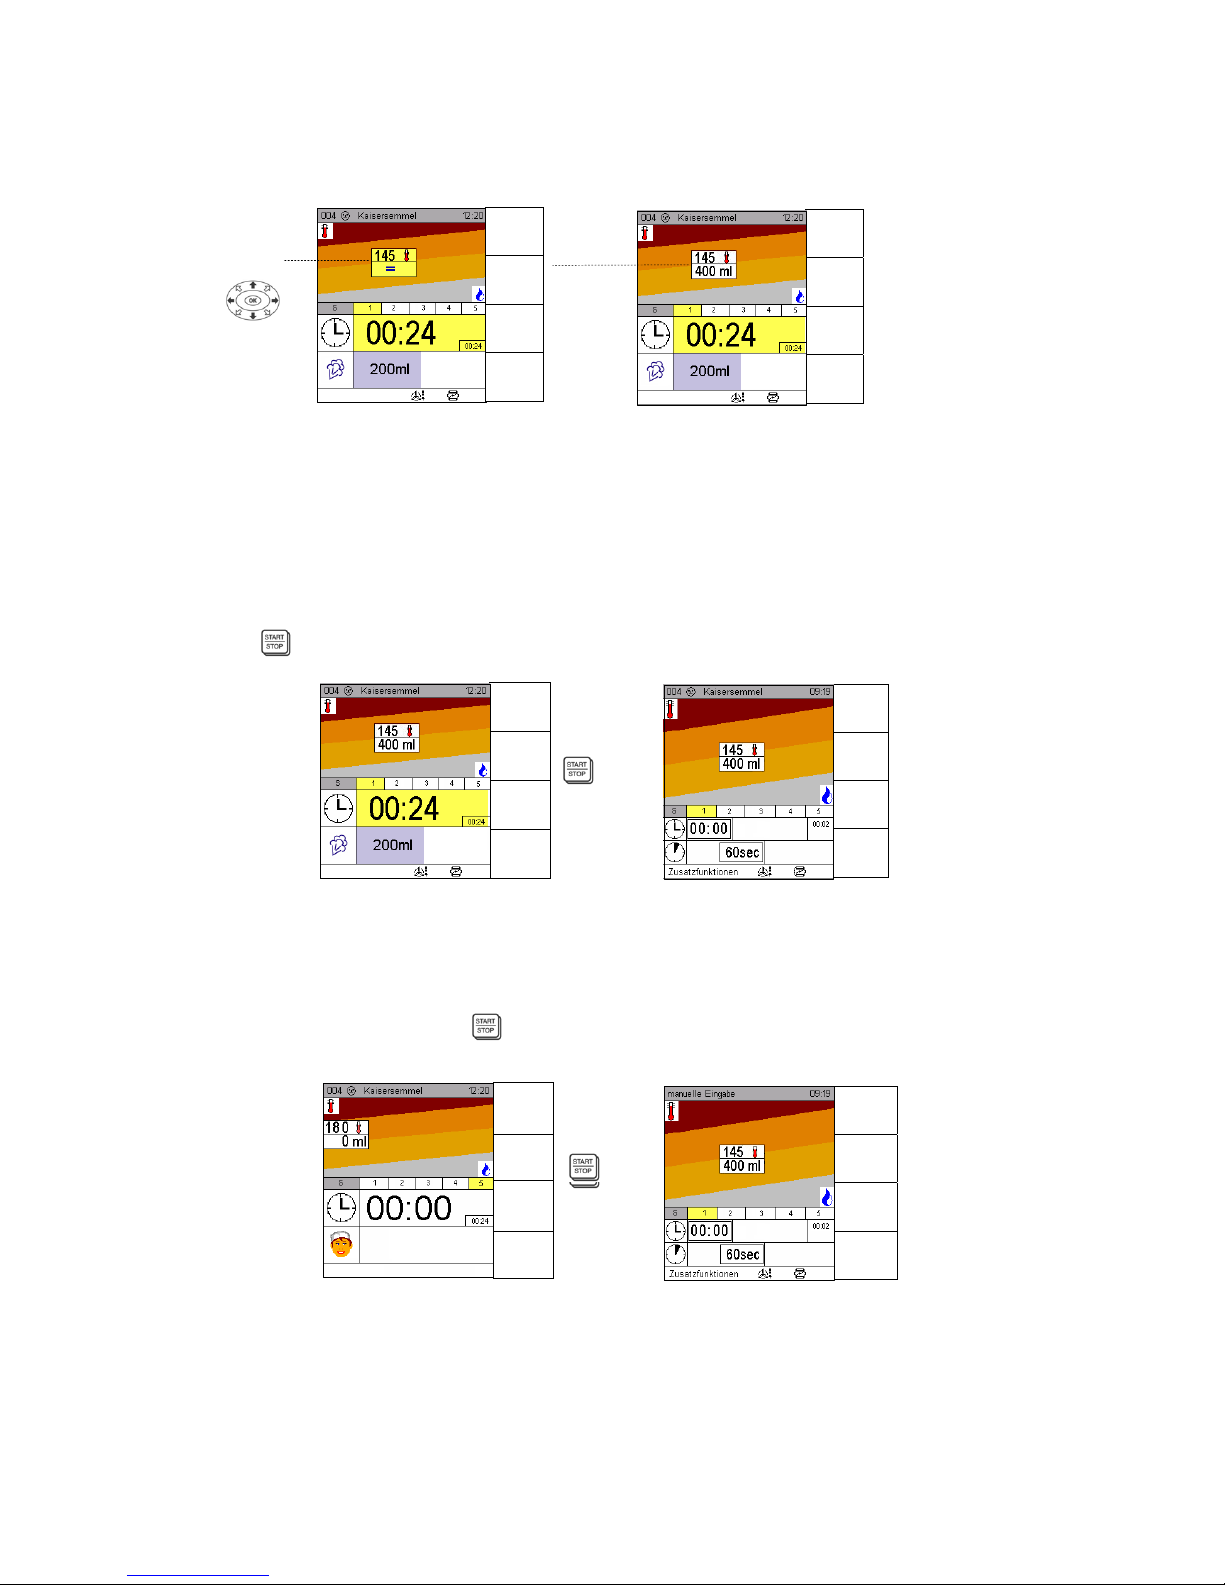
3.5 Display of actual values
During operation, the actual temperature values for the active baking step can be displayed for 5 seconds by
pressing one of the direction arrows.
After 5 seconds, the nominal values will be displayed again automatically.
Next step
Press the "Next step" function button whilst a baking program is running to view the settings for the next
baking step.
Change step
Press the "Change step" function button whilst a baking program is running to view and modify the settings
for a baking step.
Press the "Save changes" function button to activate the changes for the program being executed.
Terminating a program
Press
to terminate the active program; entered data is retained in the memory.
Program end
The appliance switches off. The STOP LED lights up and a signal sounds. The signal can be stopped
immediately by pressing an arrow key or opening the door.
If required, press the "Additional baking" sensor button. Leave the door slightly ajar and the additional baking
procedure will start automatically.
When the program ends, press to switch the display to the "Manual input" screen.
Display during signal time Display following start/stop
Display during signal time Display following start/stop
Memory
When a program is terminated or completed, the entered data is retained in the memory so that the same
baking process or program can be started again straightaway.
Manual
Steam
Change
Step
Next
Step
Add on
baking
A
ctual
values
Nominal
display
Manual
Steam
Change
Step
Next
Step
Add on
baking
Manual
Steam
Change
Step
Next
Step
Add on
baking
Menu
back
Save
Pre-heating
ON
Menu
back
Save
Preheat
ON
Add on
baking
Page 17
15
3.6 Selecting additional functions
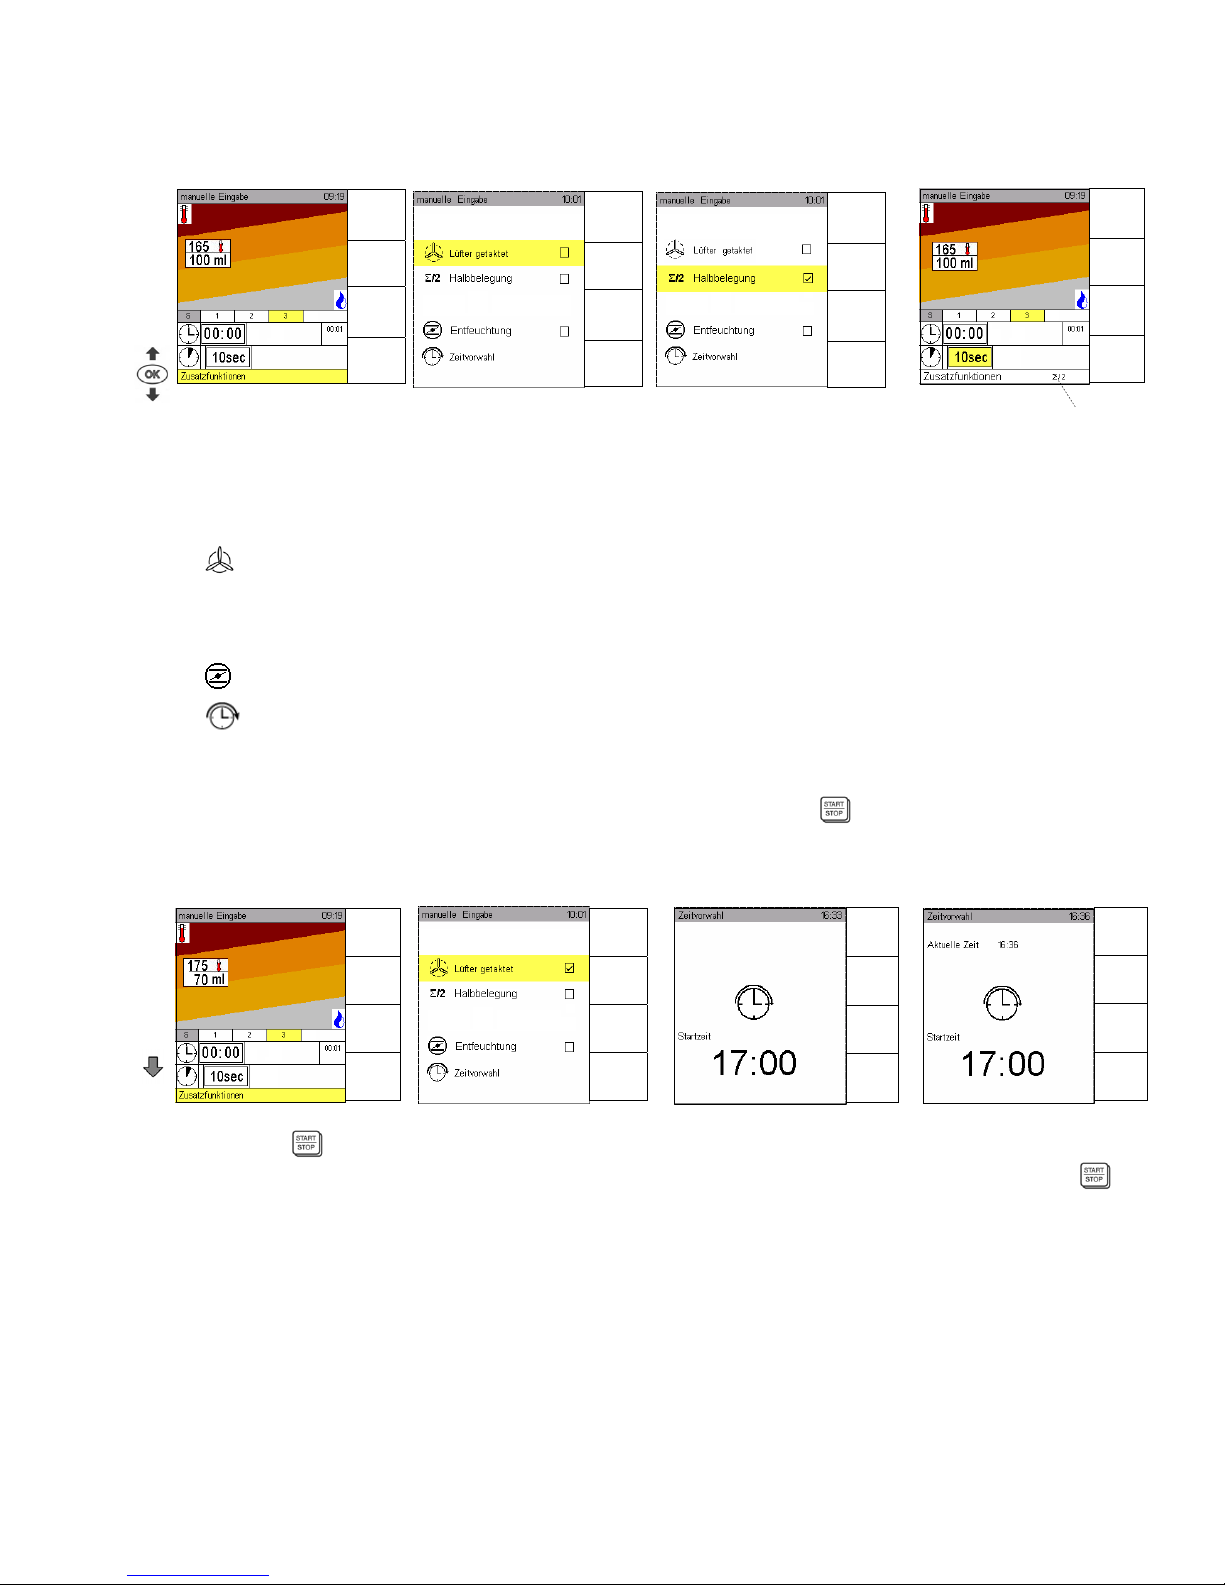
You can select other functions using the Additional functions line.
Manual input Additional functions Additional function activated Manual input
Press OK to select or deselect a function. ““ appears when a function is selected.
Press the "Back to menu" sensor button briefly to return to the "Manual input" screen.
The additional functions are shown in the info line.
Fan pulsing
½ Half load can be selected if you are not using all the trays.
If the program is saved with ½, this is indicated by the " ½" icon, which appears in the program list.
In addition, a continuous query “half load" at program start can be set in the service menu.
The default setting for the exhaust air flap is closed.
Program start can be pre-programmed.
3.7 Delayed start for manual input
Once the start time has been entered using Backmaster Scout, press the button and the appliance will go
into standby.
Press the button to cancel the delayed start.
The "Manual input" screen is automatically displayed again and the preset program can be started using
.
Menu
back
Save
Next
Step
Pre-heating
ON
Menu
back
Save
Next
Step
Pre-
heating
ON
Info line
Menu
back
Save
Next
Step
Pre-heating
ON
Menu
back
Help
Help
Menu
back
Save
Next
Step
Pre-heating
ON
Manual input
Delayed start
Time input Display of standby
t t
Menu
back
Save
Next
Step
Pre-heating
ON
Menu
back
Save
Next
Step
Pre-heating
ON
Page 18
16
4. Saving programs
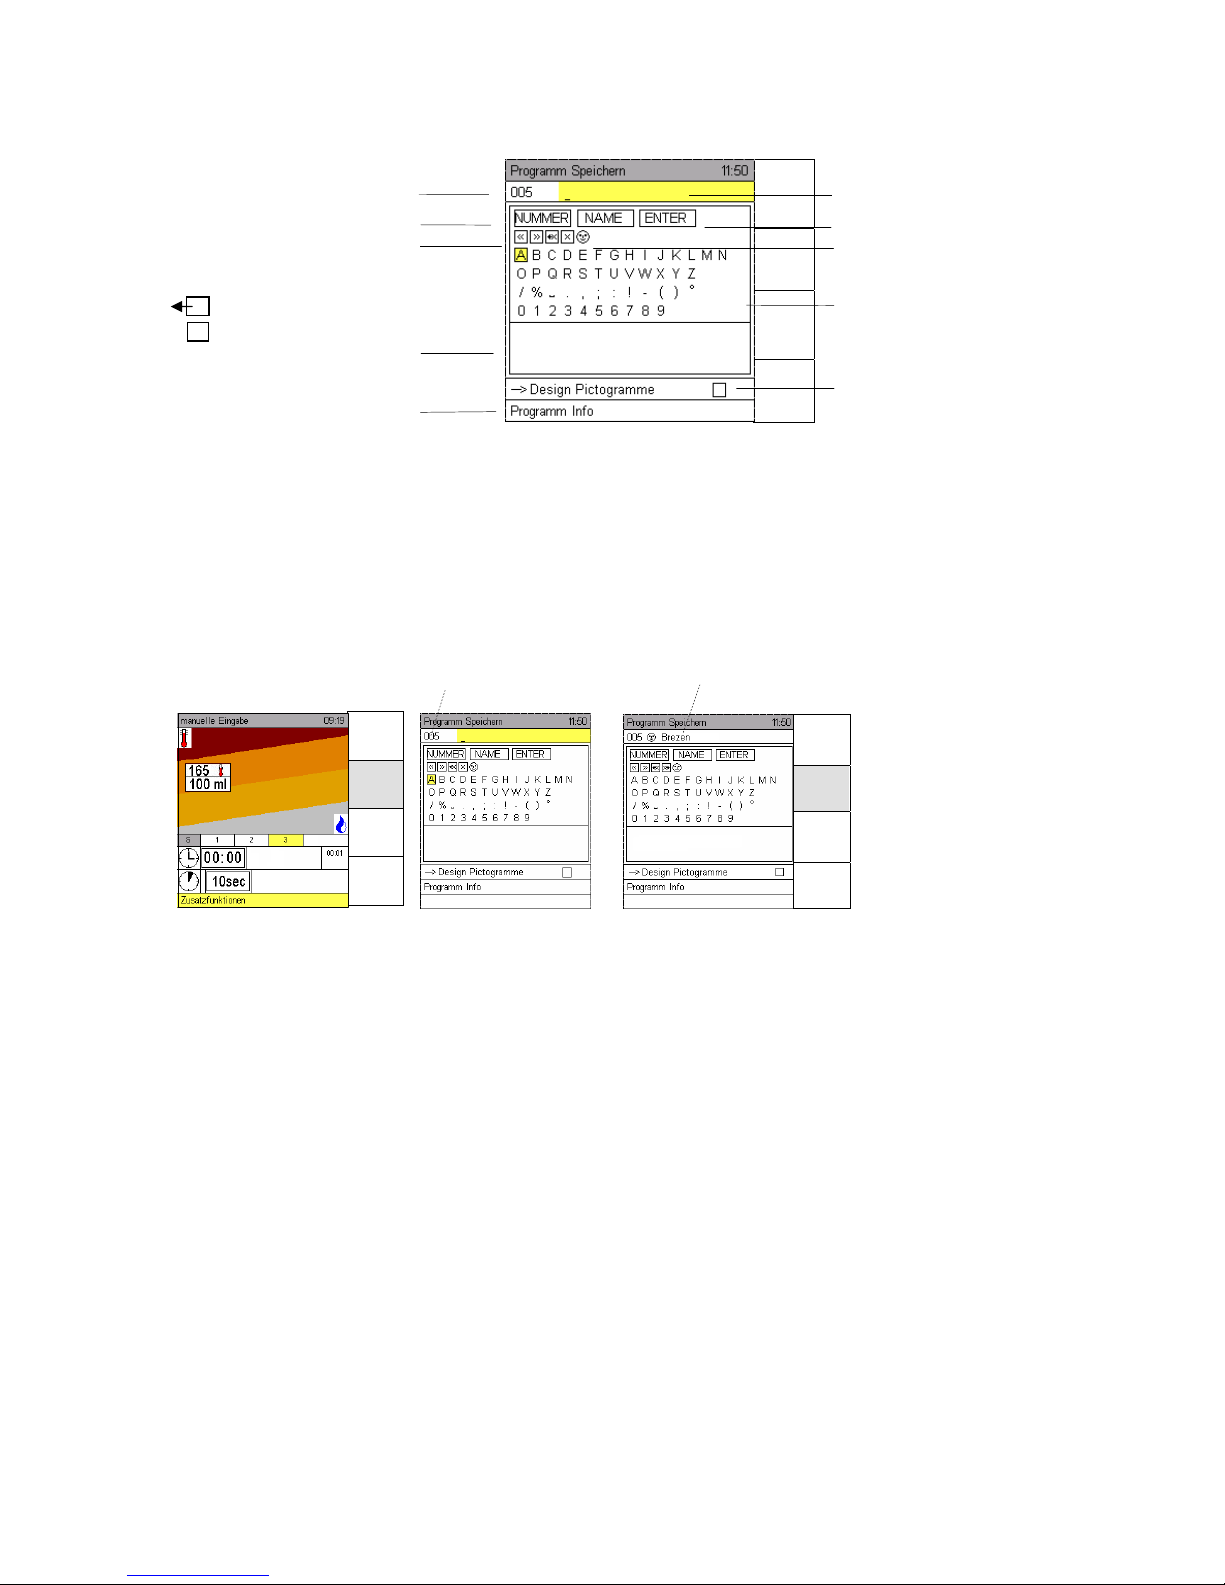
Program number
Input field number
Input field name
<< Left cursor
>> Right cursor
x Delete characters to the left
x Delete characters
Suggested name field
Info line
Program name
Confirmation of program name/no.
Favourite icon
Letters/numbers field
Pictogram design
4.1 Saving programs
Make the settings you require for a baking program and press the Save sensor button.
The program number is preset, but it can be changed.
For new baking programs, the next available program number is suggested.
To enter the program name, use the direction arrows to select the required letters/numbers and confirm
with OK.
The program name must not exceed 22 characters.
The program can be marked as a favourite by moving the cursor to the icon and pressing OK.
If the program name is confirmed with ENTER, Scout jumps to "Pictogram design". Select "" or deselect
the function using OK.
If the program name is confirmed with ENTER, additional information relating to the baking program can
be stored in "Program info".
Press the Save sensor button to save the program.
Press the START button to start the program.
Press the "Back to menu" sensor button to return to the "Program list" input screen.
Press the "Manual input" sensor button to return to the "Manual input" input screen.
Menu
back
Save
A -> a
a -> A
Help
Program number
Program name
Menu
back
Save
Next step
Pre-heating
ON
Menu
back
Save
A -> a
a -> A
Help
Page 19
17
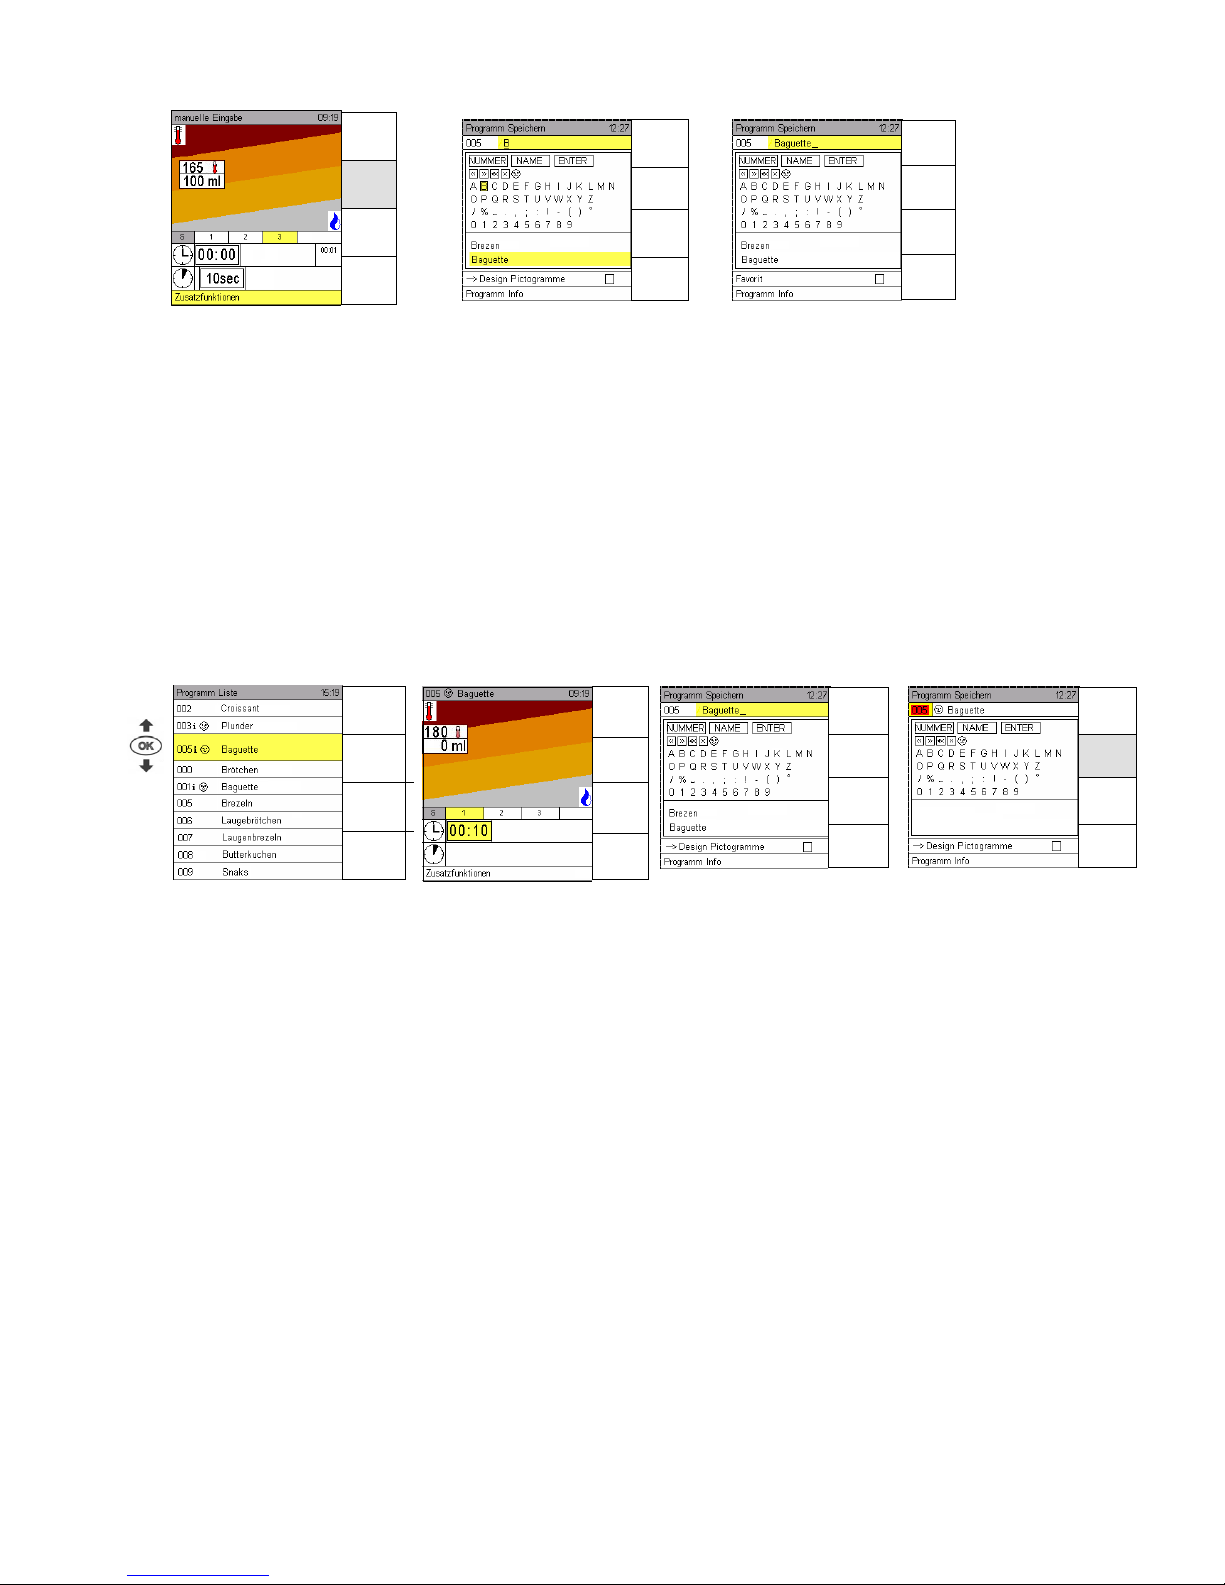
Selecting and editing program names from the suggested name field
Use Scout to enter the first letter of the program.
Confirm with OK.
Use Backmaster Scout to select the suggested name field.
Two suggestions are provided in the form of existing program names starting with the same letter as that
displayed at the cursor position.
Press Backmaster Scout to scroll through other program names in the highlighted name line, if any are
available.
If the suggested name is confirmed with OK, the program name can be edited or adopted as it is by
pressing Enter.
Save the program as described in Section 5.1.
Changing program numbers
Select the required program and confirm with OK.
Press the Save sensor button.
Move the Scout cursor to the "Number" input field and confirm with OK.
The "Number" input field is highlighted in yellow and the program number can now be changed.
If the program number in the input field turns red, it means that this number has already been assigned
but can be overwritten. This will delete the old program.
Press the Save sensor button to return to the input screen.
Menu
back
Save
A -> a
a -> A
Help
Menu
back
Save
A -> a
a -> A
Help
Menu
back
Save
Next
Step
Pre-heating
ON
Menu
back
Save
A -> a
a -> A
Help
Menu
back
Save
A -> a
a -> A
Help
Menu
back
Save
Next
Step
Pre heating
ON
Manual
input
Picto
grams
FavouritesPh
Pre heating
ON
Page 20
18
Selecting a program as a favourite
Mark the programs you use frequently as favourites.
They can then be filtered out of the program list to make them easier to find.
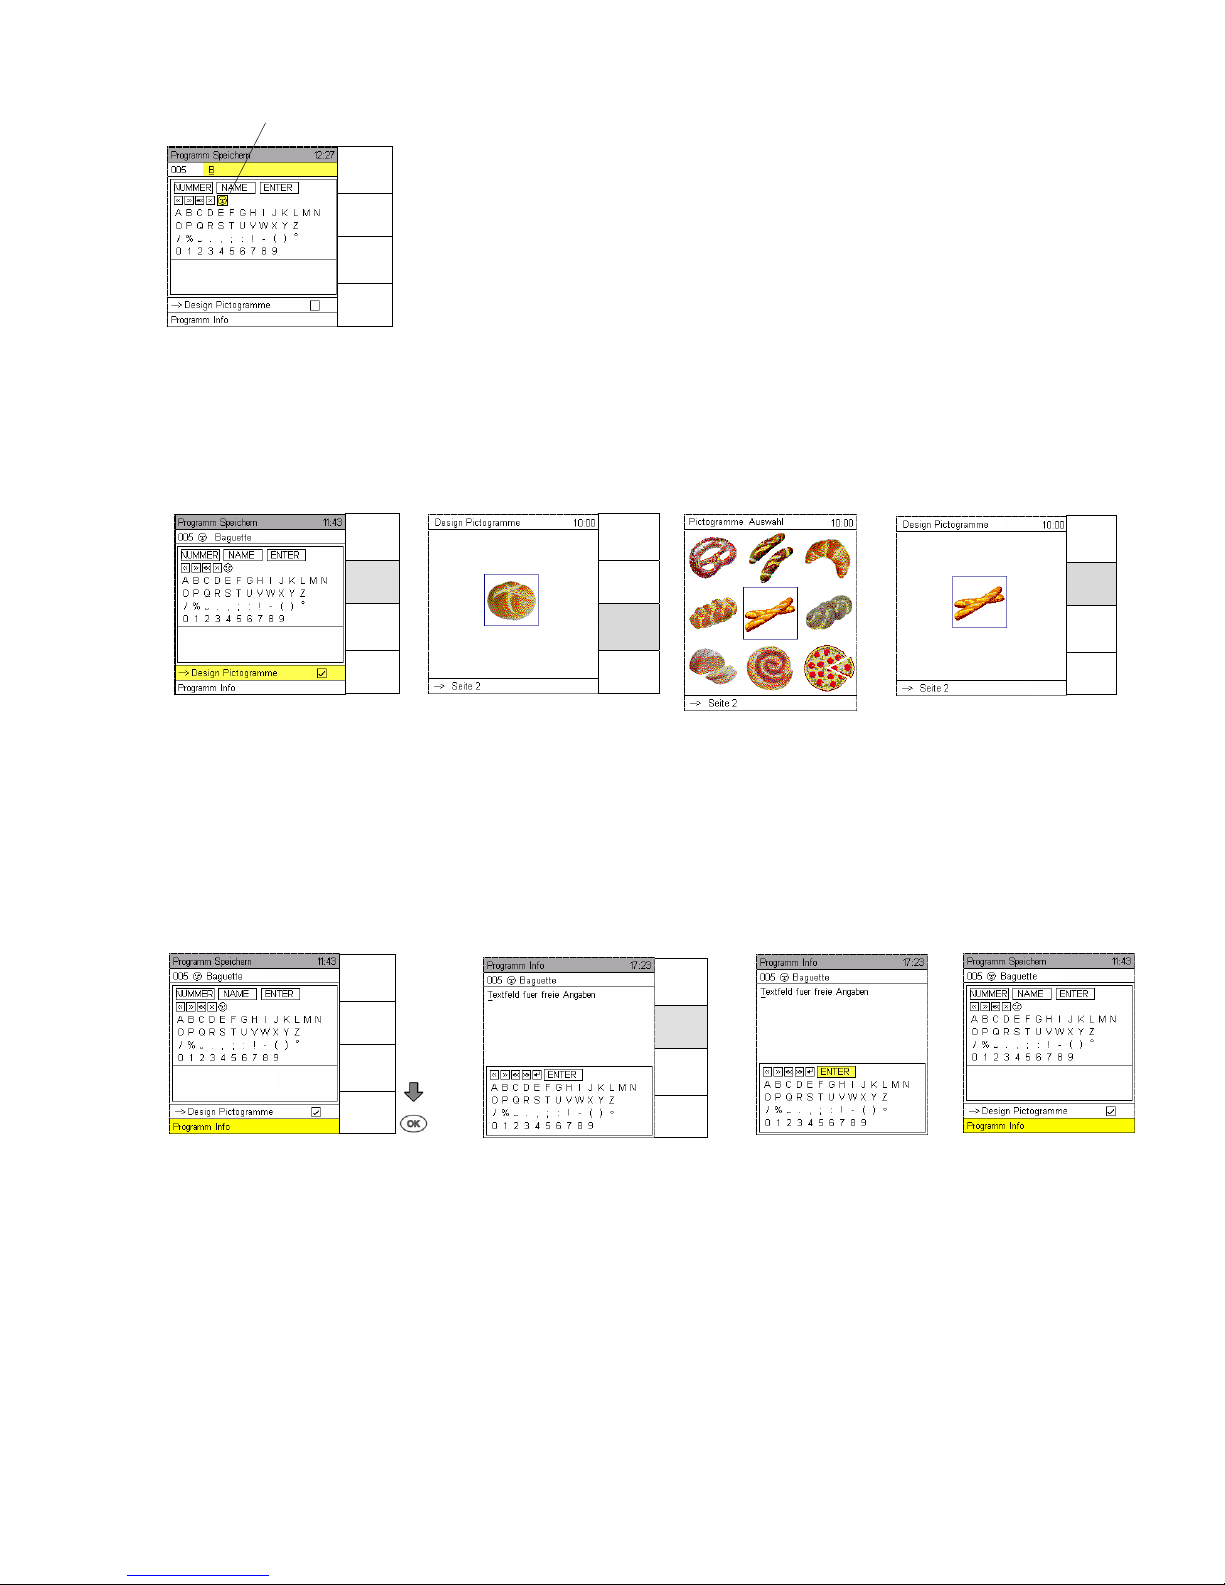
The program can be marked as a favourite by moving Scout to the icon and pressing OK.
Pictogram design
If the program name is confirmed with ENTER, Scout jumps to "Pictogram design". Select "" or deselect the
function using OK.
Press the Save sensor button to open the "Pictogram design" input screen.
Press the "Picto selection" sensor button to open the available saved pictograms.
Use Scout to select a pictogram for the baking program that has been entered and confirm with OK.
Press the Save sensor button to save the entered baking program under that particular pictogram.
Press the Back to menu and Manual input sensor buttons to access the "Manual input" screen.
Program info
If the program name is confirmed with Enter, Scout
can be used to select the "Program info" line.
If the "Program info" line is opened with OK, you can enter your own specific data for the program.
If the program is saved with this information, this is indicated by the "i" icon, which appears in the program list.
If "ENTER" is selected with OK at the "Program info" level, you will return to the "Save program" input screen.
Favourite icon
Menu
back
Save
A -> a
a -> A
Help
Menu
back
Save
A -> a
a -> A
Help
Menu
back
Save
Picto
selection
Delete
program
Menu
back
Save
Picto
selection
Delete
program
Menu
back
Save
A -> a
a -> A
Help
Menu
back
Save
A -> a
a -> A
Help
Page 21
19
4.2 Deleting a program
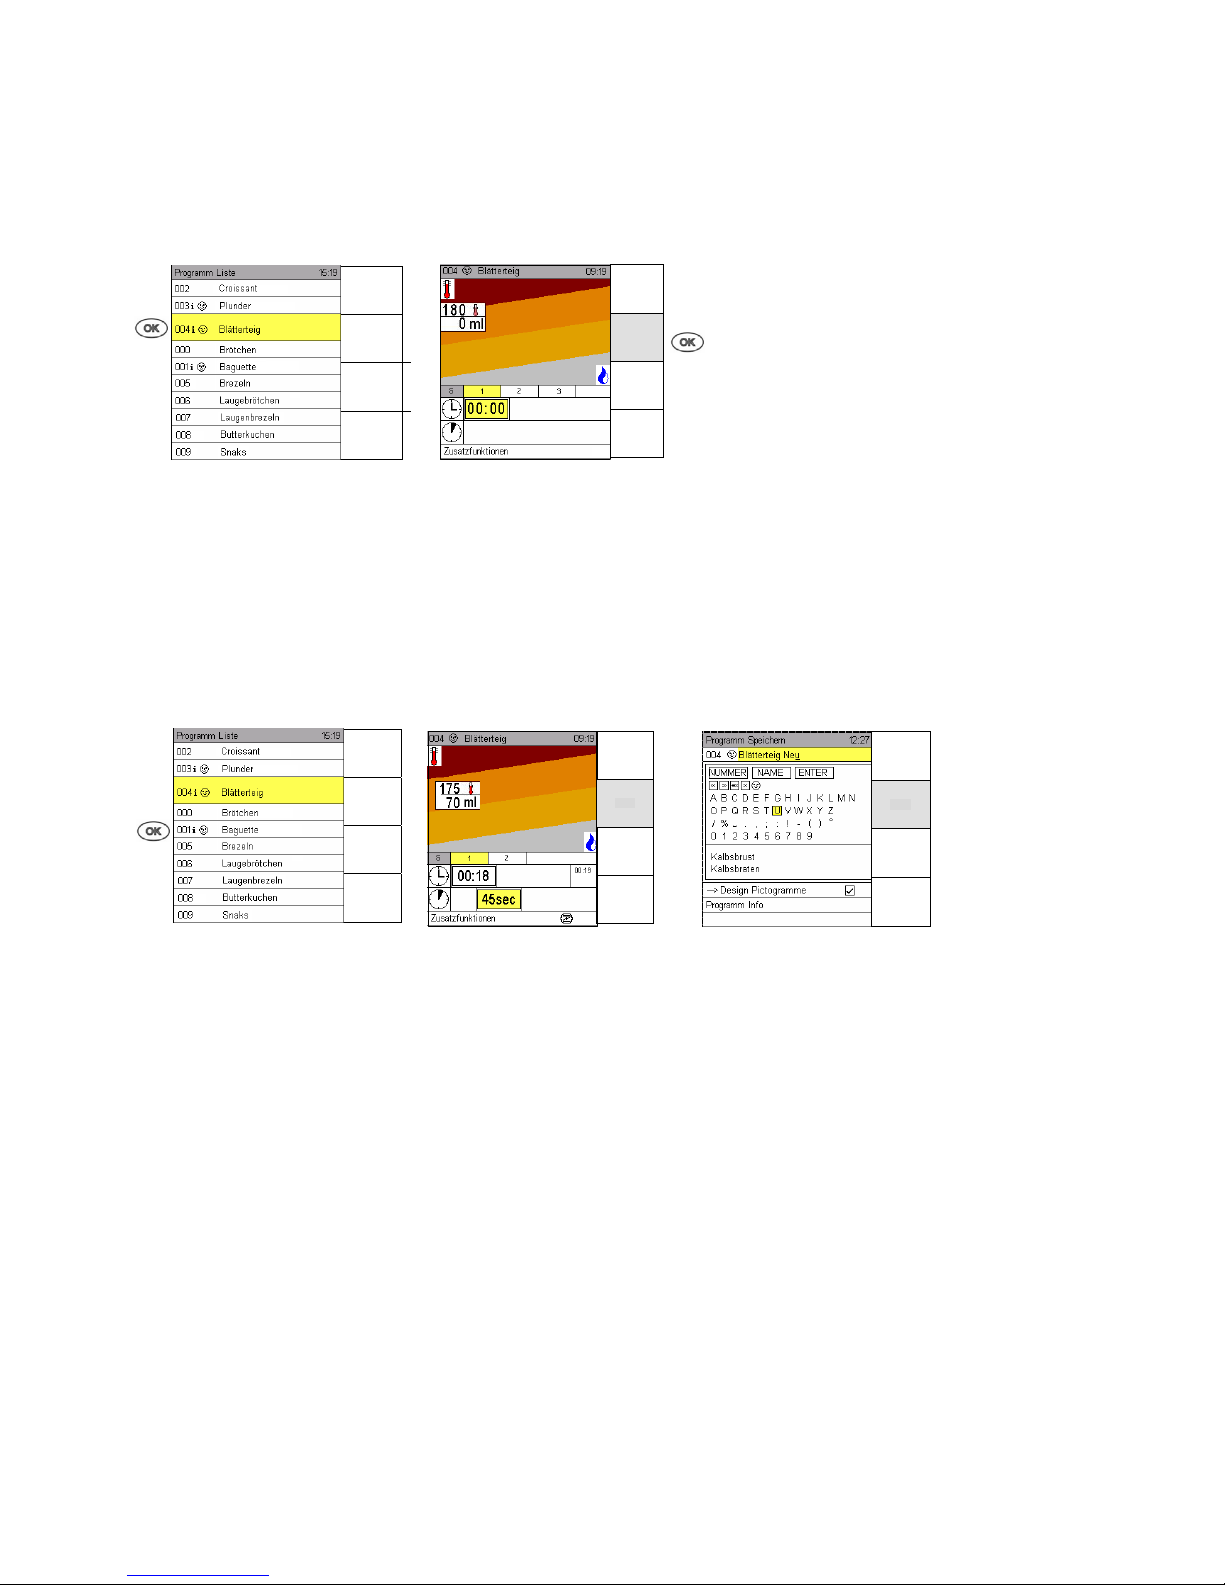
Call the program from the program list and confirm with OK.
Call the program from the program list and confirm with OK.
Press sensor key „Next Step“ and set the time to „0“.
Press sensor key „Delete program”.
The complete program is deleted.
Or:
Enter "0" in the input field humidity level, „0“ in the input field time and „0“in the input field rest time.
Press sensor key „Delete program.
The complete program is deleted.
4.3 Copying a program
Saved programs can be overwritten and copied.
Call the program from the program list and confirm with OK.
Press the Save sensor button.
For details on entering the new program name and/or number, refer to Section 5.1.
Confirm your settings by moving Scout to Enter.
Press the Save sensor button; the program is copied or overwritten.
The same program can be saved several times under different numbers.
Manual
input
Picto-
grams
Favourites
P
h
Pre-heating
ON
Menu
back
Delete
program
Manual
input
Pictograms
Favourites
Pre-heating
ON
Menu
back
Save
A -> a
a -> A
Help
Menu
back
Save
Next
Step
Pre-heating
ON
Page 22
20
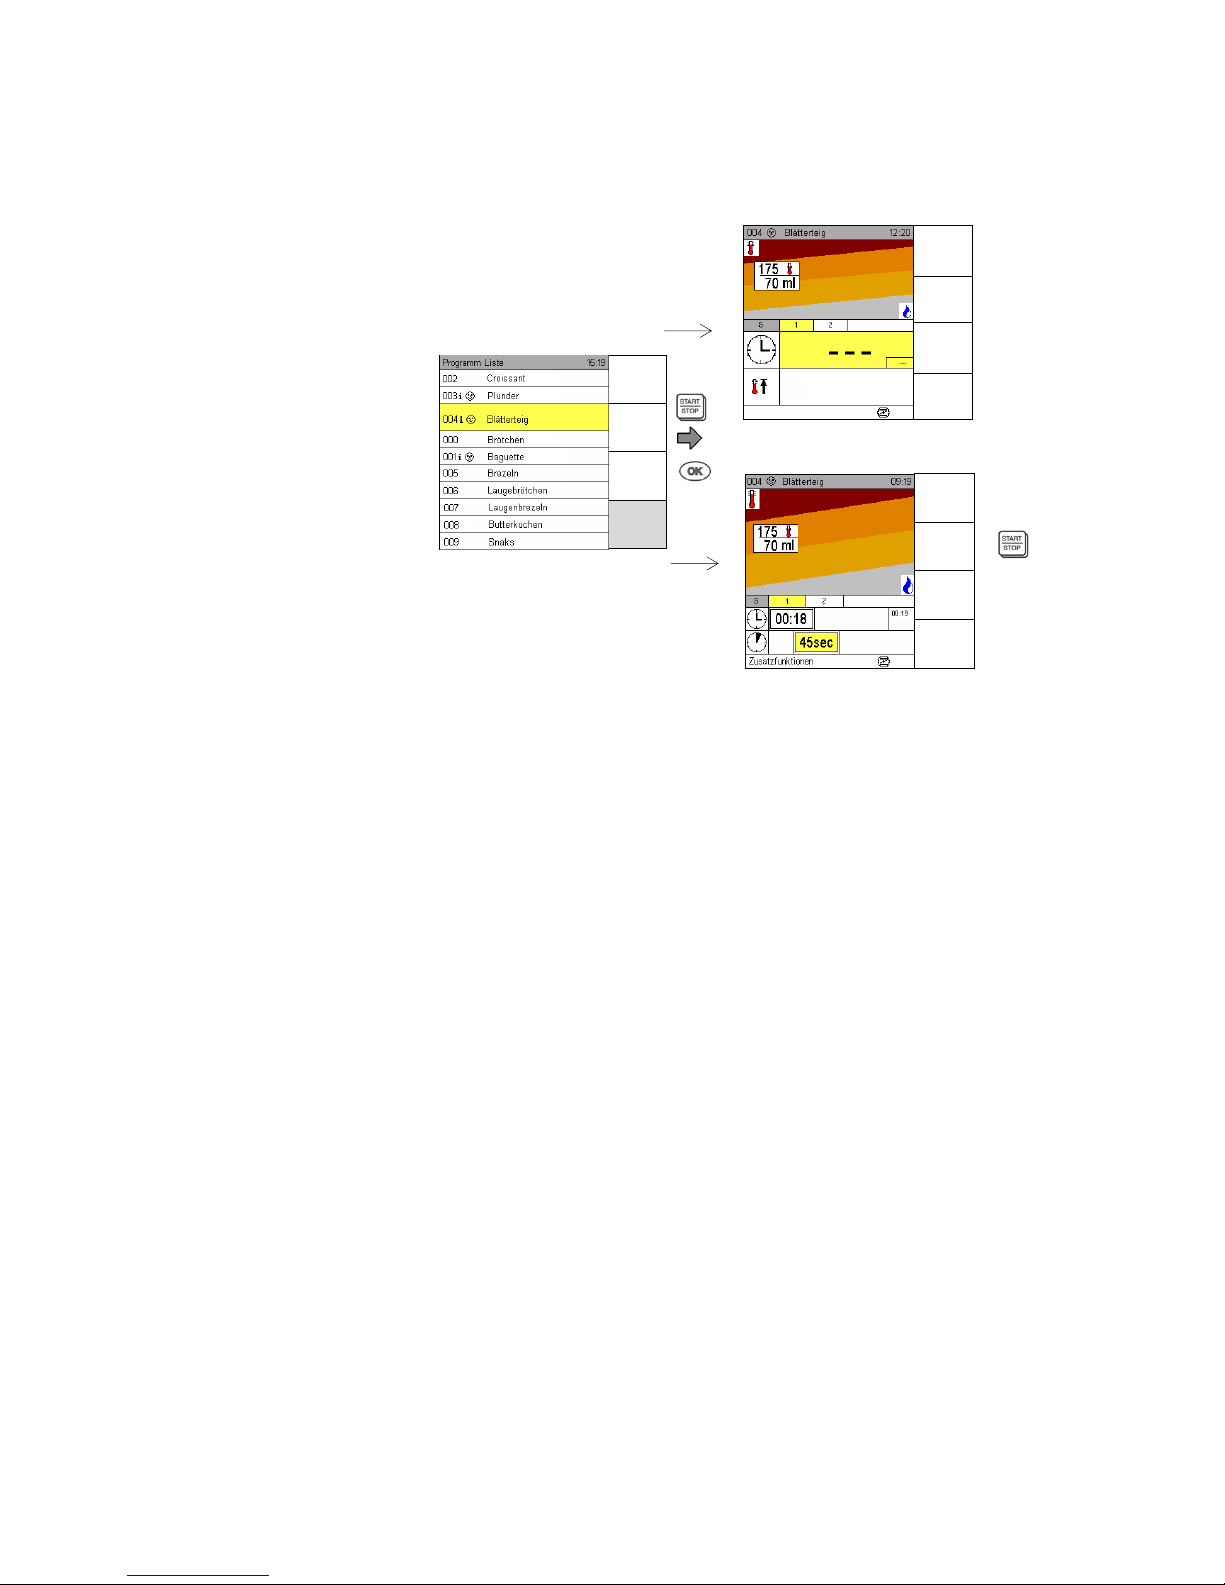
4.4 Selecting and starting a program from the program list
All saved programs can be called up via the Program list sensor button.
Selecting a program from the program list
Use Scout and to select a program.
Press Scout to access "Program info".
Press the "Pre-heating ON" sensor button if required.
Press Start/Stop to start the program immediately or OK to display it.
Program displa
y
Starting with Pre-heating
Manual
input
Picto-
grams
Favourites
Pre-heating
ON
Menu
back
Save
Next
Step
Pre-heating
ON
Page 23
21
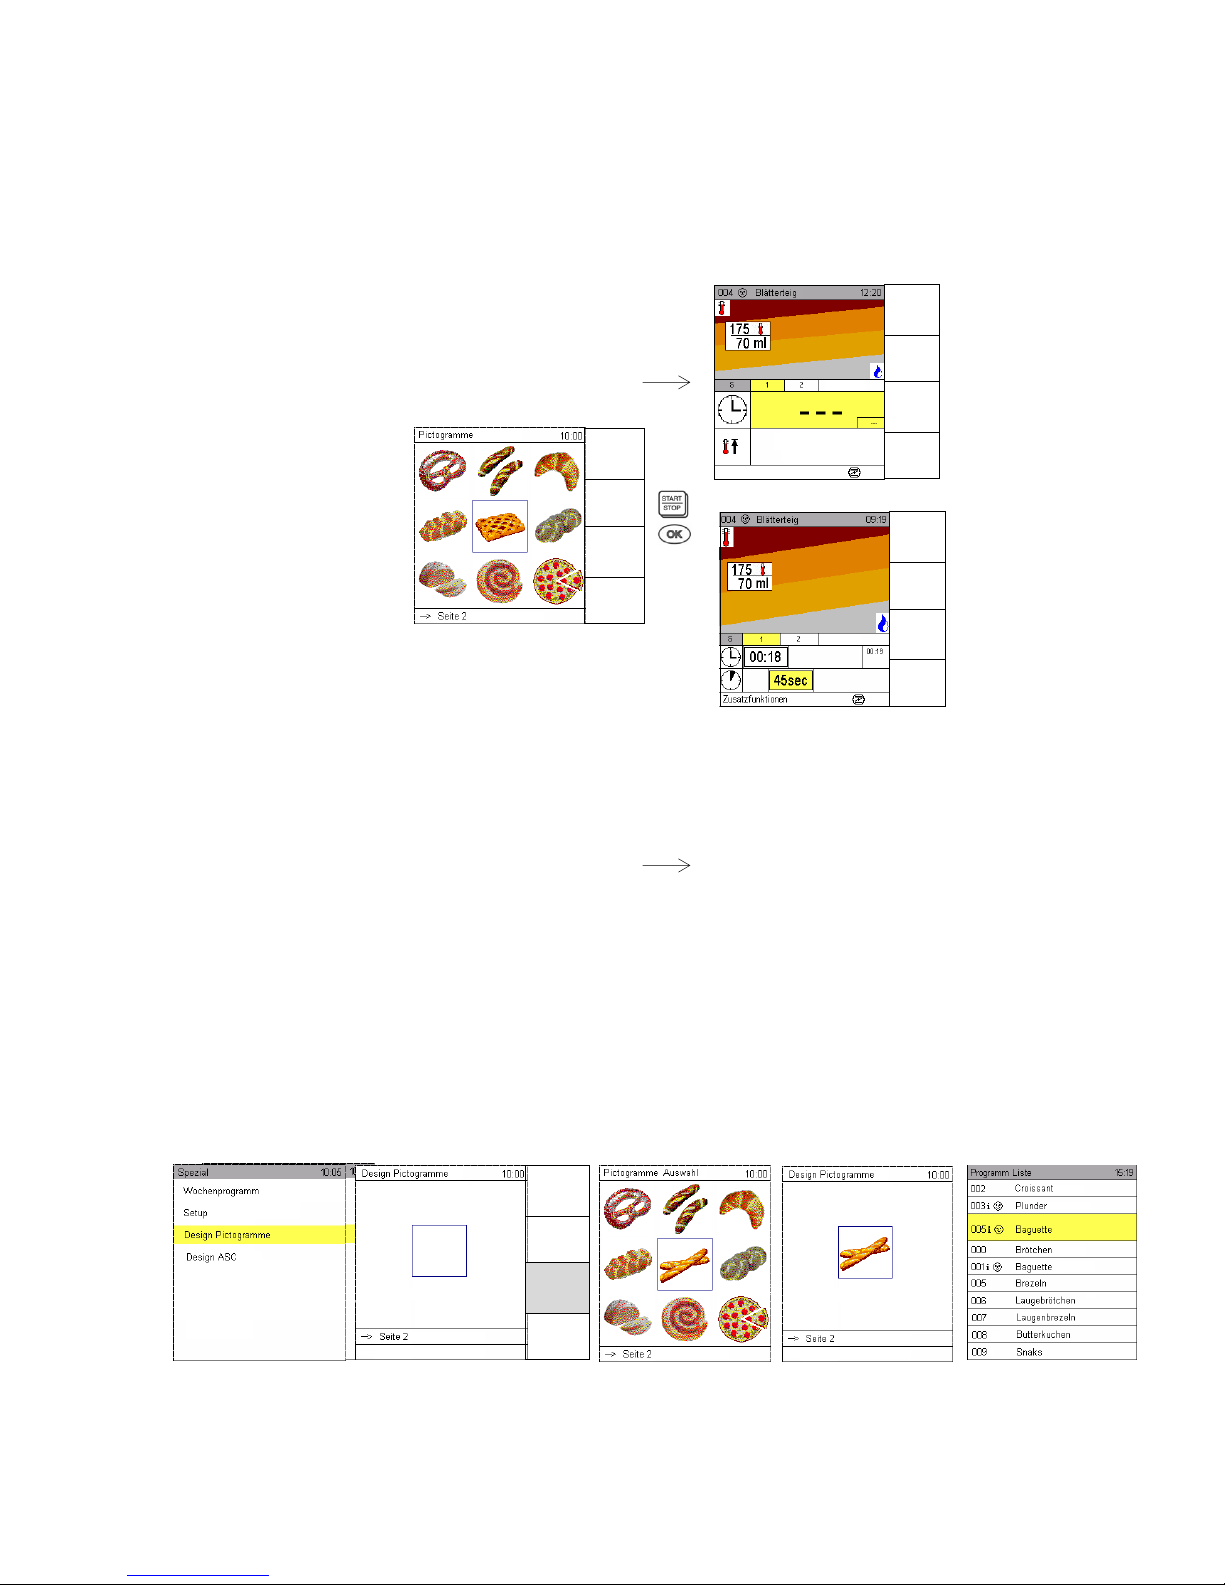
4.5 Selecting and starting a program from the pictogram level
Press the "Pictograms" sensor button to open the "Pictograms" screen.
Use Scout to select the saved baking program you require via the chosen pictogram and confirm with OK.
You can use Scout to select the baking programs saved in each pictogram.
The baking program number and name are shown in the info line.
Press "Start/Stop" to start the program immediately or OK to display it, followed by "Start/Stop" to start it.
4.6 Assigning pictograms to saved baking programs
18 pictograms (9 per screen page) can be freely assigned via the pictogram screen.
In the Service menu, numbers from 1 to 18 can be set instead of the pictogram images.
Press the Special program sensor button, select the "Pictogram design" input field and confirm with OK.
Use Scout to select a free pictogram location.
Press the "Picto selection" sensor button to open the available saved pictograms.
Move Scout to the info line and confirm with OK to access the second pictogram page.
Use Scout to select a pictogram and confirm with OK.
The pictogram appears in the location you selected previously.
Press the "Program list" sensor button to select the baking program for the pictogram you chose previously
and confirm with OK.
The baking program is saved under the selected pictogram image.
Saved baking programs cannot be started from the "Pictogram design" level.
Press the "Back to menu" and "Manual input" sensor buttons to access the "Manual input" screen.
Pictograms
Pictograms
Starting with Pre-heating
Manual
input
Program
list
Favourites
Pre-heating
ON
Menu
back
Save
Next
step
Pre-heating
ON
Menu
back
Program
list
Pictograms
Delete
program
Page 24
22
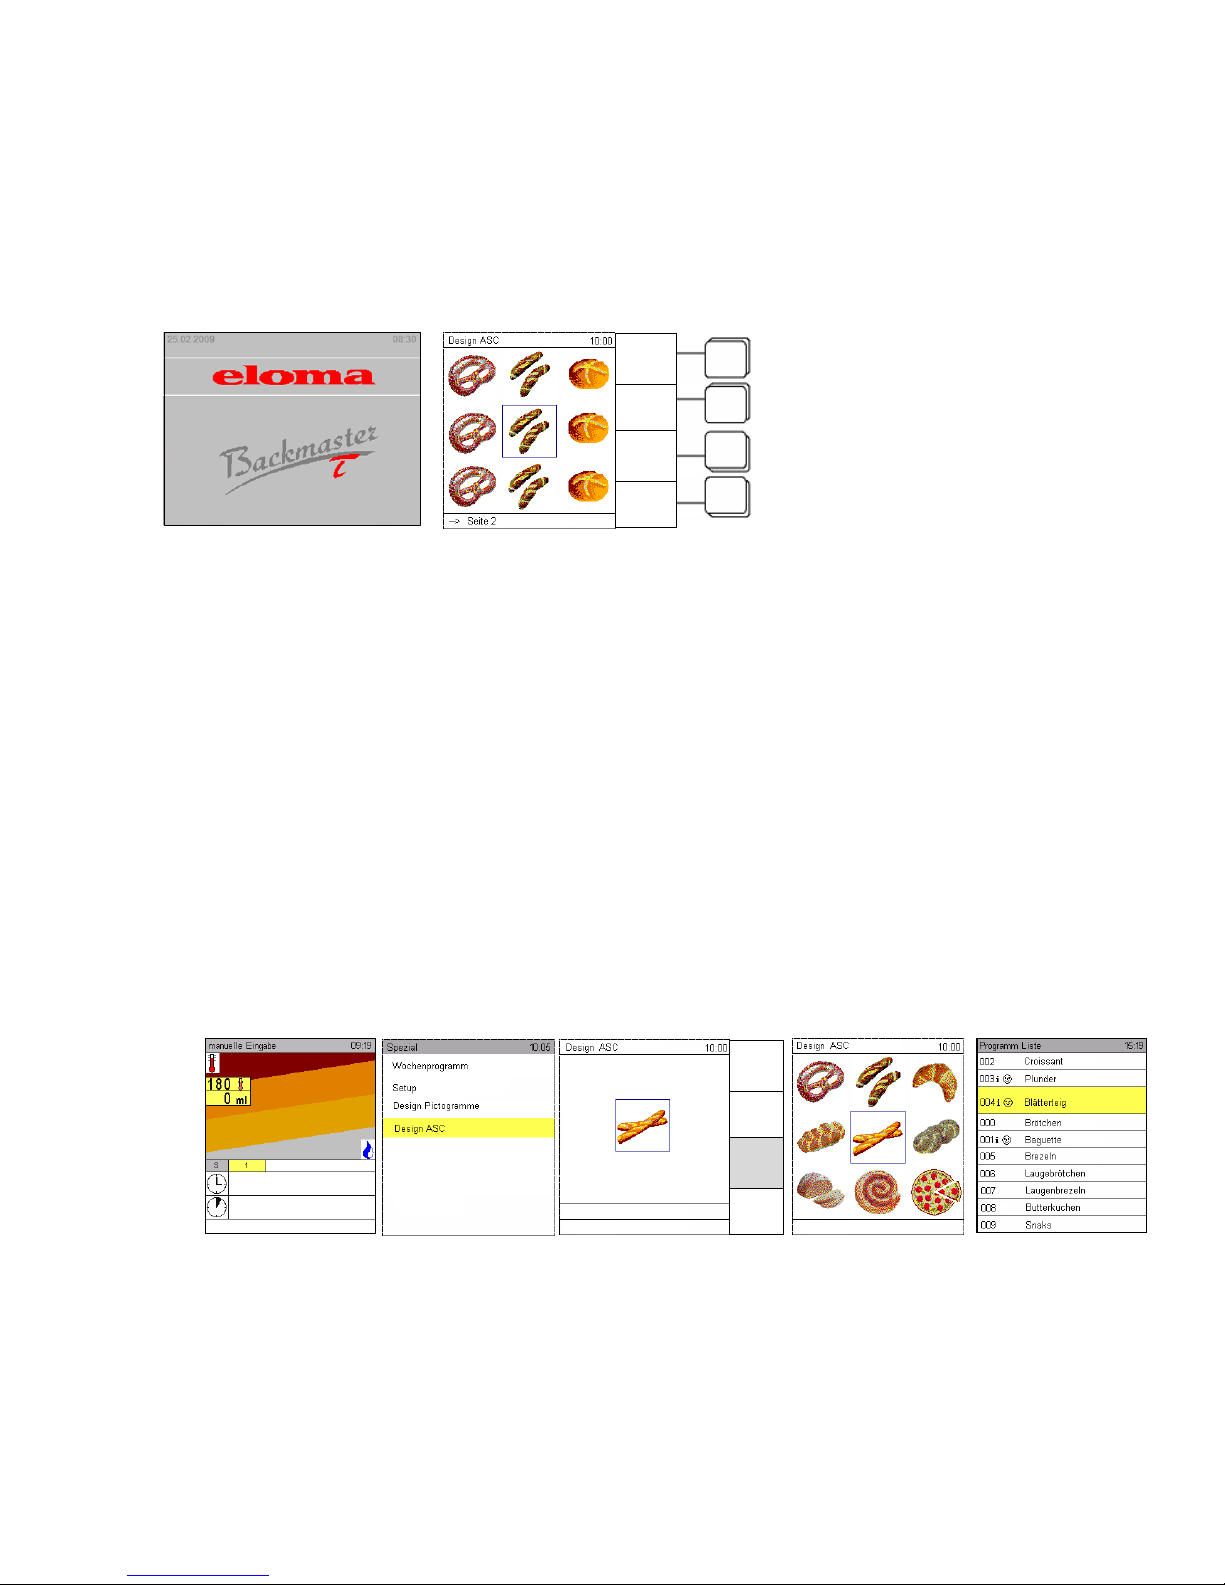
4.7 ASC mode
If ASC mode is activated, the ASC screen will appear when the appliance is switched on.
Service personnel or customer service staff trained by Eloma can then access additional operating features.
This secure ASC mode protects the user in terms of incorrect operations, which can be particularly useful
for chain store customers, for example. ASC mode is activated by the branch manager, for instance,
who defines the programs and images for the ASC screen before the appliance is actually put to use.
The branch manager than activates ASC mode.
ASC screen design
Three levels are available in the ASC control system.
Three different programs can be assigned to the different tray levels.
Pictograms are assigned and the ASC screen is designed as described in Section 4.8.
The branch manager is responsible for designing the ASC screen.
To do this, ASC mode must be deactivated. You can obtain detailed information on this topic from our
hotline: Eloma Maisach factory, telephone number +49 (0)35023 63888.
4.8 Assigning saved baking programs to the ASC level
18 pictograms are available for selection.
In the Service menu, numbers from 1 to 18 can be set instead of the pictogram images.
Press the Special program sensor button, select the "Pictogram design" input field and confirm with OK.
Press the "Picto selection" sensor button to open the available saved pictograms.
Move Scout to the info line and confirm with OK to access the second pictogram page.
Use Scout to select a pictogram for the saved program and confirm with OK.
Press the "Program list" sensor button to select a baking program for the pictogram you have chosen and
confirm with OK.
The program is saved under the selected pictogram image.
Saved baking programs cannot be started from the "ASC design" level.
Press the "Back to menu" and "Manual input" sensor buttons to access the "Manual input" screen.
An example of the program sequence used in ASC mode can be found in Section 4.9.
Service
Autoclean
Eloma standby screen
Start screen
Menu
back
Program
list
Pictograms
Delete
program
Page 25
23
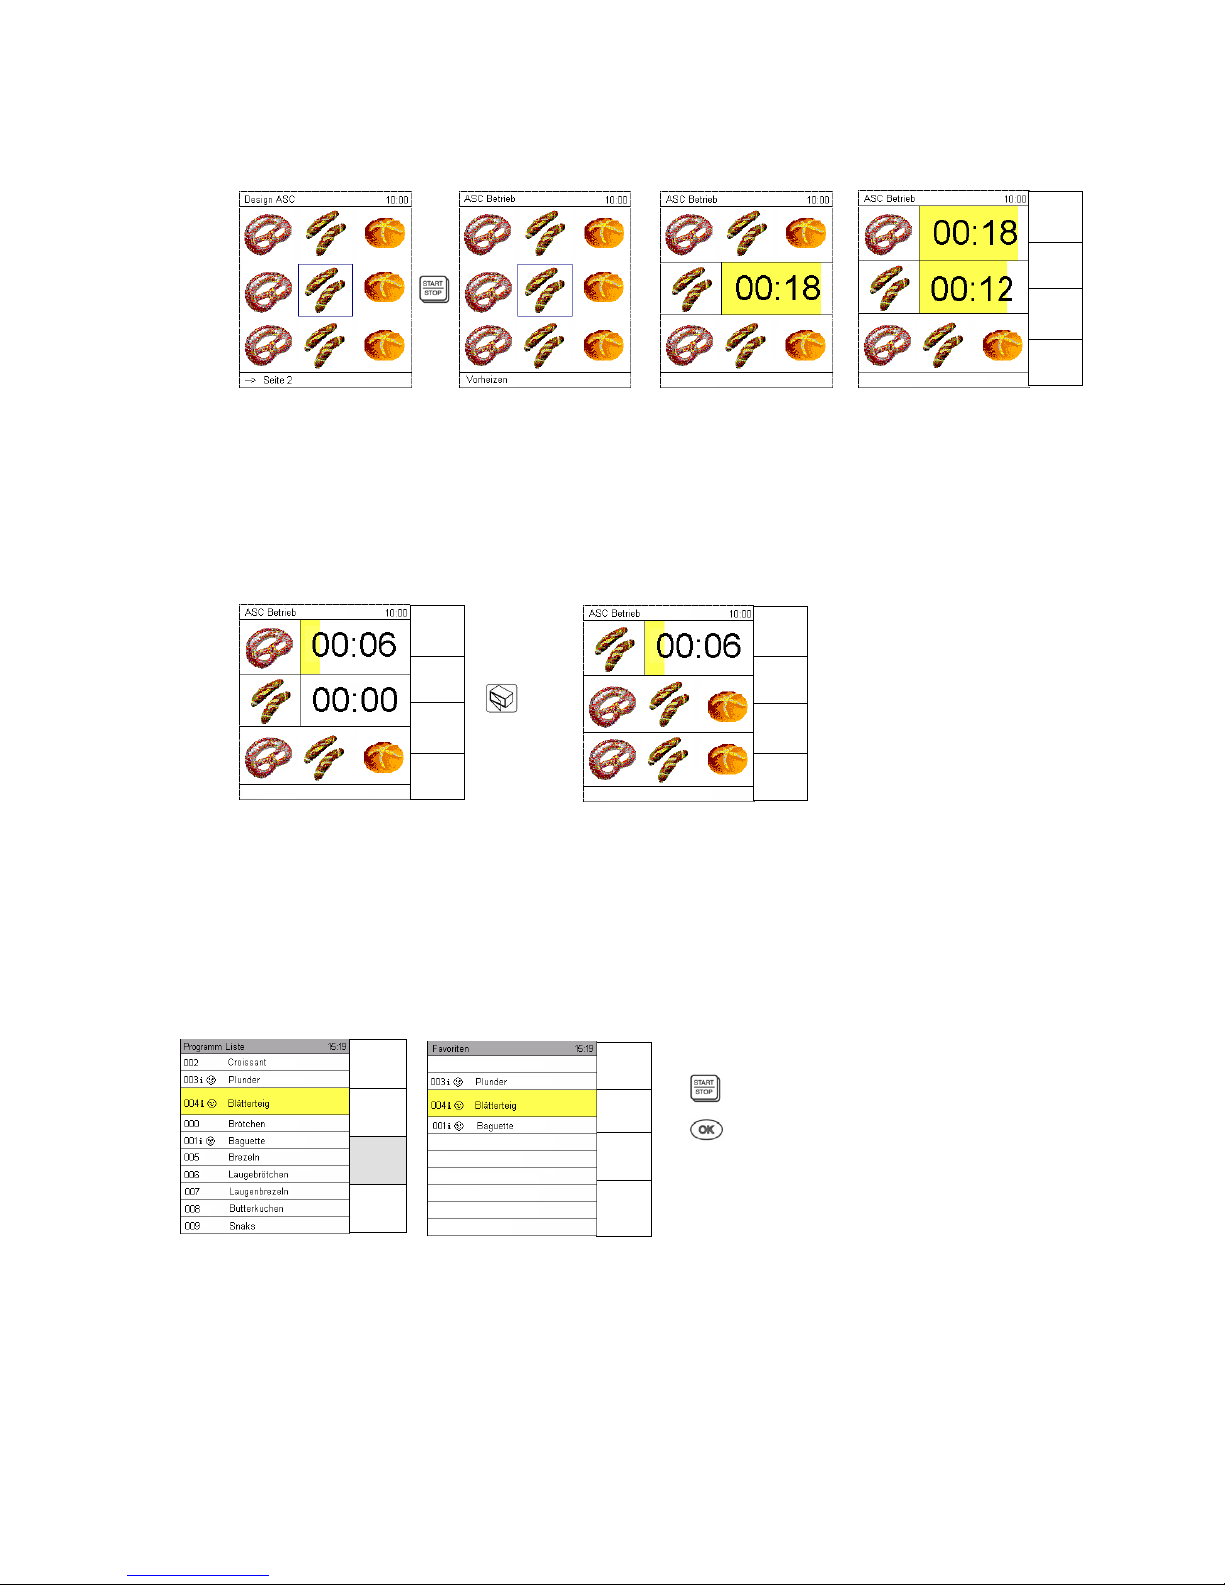
4.9 Program sequence in ASC mode
Only products that require a similar climate within the baking chamber should be baked together.
The branch manager is responsible for coming up with reasonable combinations of products.
Use Scout to select a baking product at the required level and press the Start/Stop button.
The appliance goes into the pre-heating stage automatically. "Pre-heating" appears in the info line.
When pre-heating is complete, "Pre-heating end" is displayed and you must open the door by pressing the
"Open door" sensor button. Insert food at the required level and leave the door slightly ajar; the program
will start automatically.
If food is to be inserted at another level too, use Scout to select the level and the product and confirm with
OK. Then press the "Open door" sensor button, insert the food and leave the door slightly ajar or close it.
Proceed in the same way as for the last level.
When the baking time for one level has elapsed, a signal sounds and the food can be removed from the
baking chamber.
When the door opens, the display for the corresponding level resets to its initial state and new products
can then be inserted at that level.
Pre-heating can only be performed again once the times for all levels have elapsed.
4.10 Selecting and starting a program from the pictogram level
Favourites are identified by the icon.
Press the Favourites sensor button to bring up the list.
Use Scout or to select a favourite.
Press "Start/Stop" to start the program immediately or OK to display it, followed by "Start/Stop" to start it
(see above).
Manual
Steam
Add on
baking
Manual
Steam
Add on
baking
Manual
Steam
Add on
baking
Manual
input
Picto-
grams
Favourites
Pre-heatin
g
ON
Manual
input
Pictograms
Favourites
Pre-heating
ON
Page 26
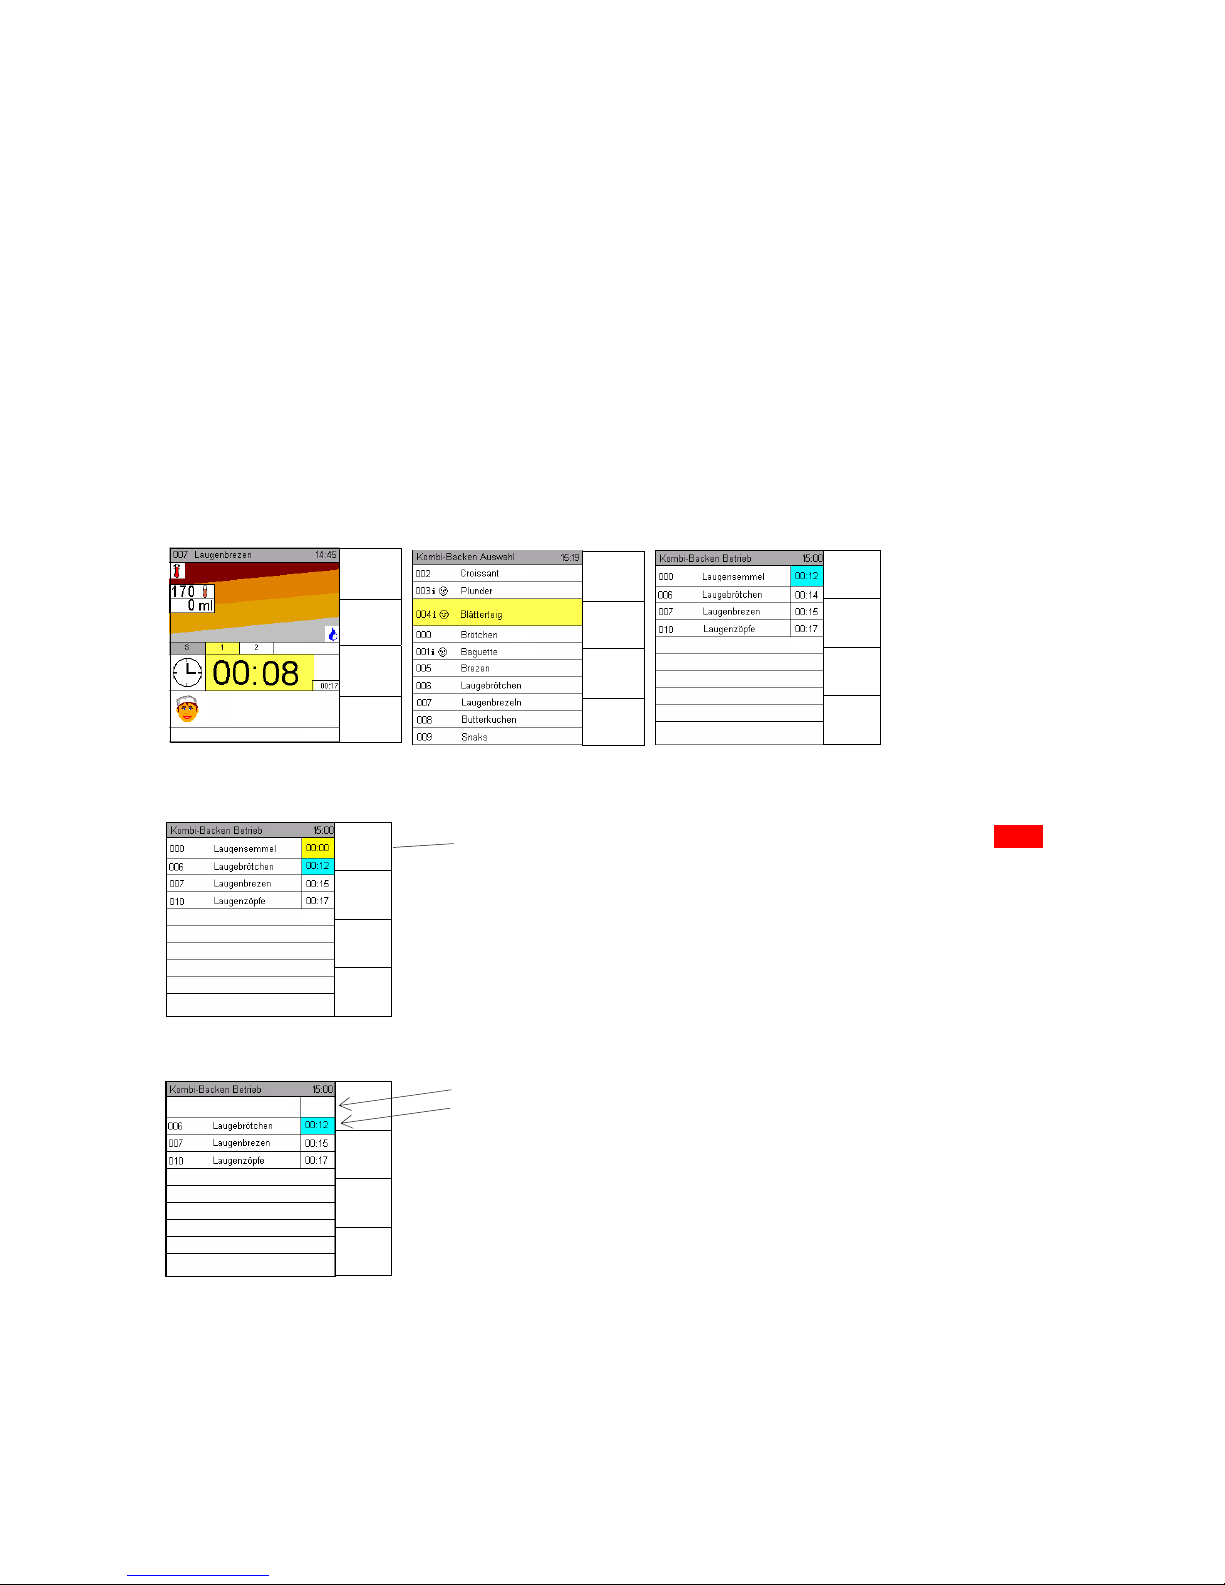
24
5. Combi baking
Combi baking is a function that can be selected for baking products that require a similar climate within
the baking chamber and that do not need a humidification setting, just a baking temperature.
Manual humidification is possible.
Combi baking can be selected in manual and program modes.
The Combi baking sensor button is available:
1. During baking
2. After the "Pre-heating" process
3. In the last baking step of a program containing several steps
Make manual entries as described in Section 3.1 or select a baking program from the program list.
Press START/STOP to start the program.
Press the "Combi baking" sensor button to select other baking programs from the program list and
start them with OK.
The time remaining for the started programs is displayed.
Additional baking can also be applied to the individual levels.
Display 1 Display 2 Display 3
Display 5
If an hourglass is empty, i.e. the time has elapsed (display 00:00), a
signal sounds and the line is highlighted in colour.
Open the door and take the baked items out.
Display 6
The display for the expired program is cleared.
The hourglass jumps to the baking program with the next shortest
time.
You can cancel the combi baking function by pressing Start/Stop; this
causes the display to return to "Manual input", see Section 3.1.
When combi baking has finished, the appliance returns to "Manual input",
see Section 3.1.
If several trays are inserted simultaneously, the program must be copied
and assigned to the individual levels.
Copying a program
Press Scout; the first line is highlighted.
Use Scout to select the line to be copied.
Press the "Copy program" sensor button.
The next available line is highlighted; alternatively, you can use Scout
to select a different line and confirm with OK. The baking program is
copied to the line.
Manual
Steam
Combi
baking
Add on
baking
Menu
back
Manual
Steam
Combi
baking
Add on
baking
Manual
Steam
Change Step
Combi
baking
Add on
baking
Manual
Steam
Combi
baking
Add on
baking
Page 27

25
6. Pre-heating
The appliance always has to be pre-heated prior to baking.
The default setting is always "Pre-heating ON".
The pre-heating function brings the temperature of the Backmaster baking chamber to a set nominal
temperature.
There are 2 options:
1. Manual pre-heating
Manual pre-heating uses a nominal temperature that is set to a higher value than the nominal
temperature of the baking program. The % increase in the nominal temperature is defined using the
adjustable parameters in the Service menu sec. 7.4.4 unit parameters.
Enter all baking steps.
Start the baking program with
.
The appliance is brought to the set nominal temperature.
Once the nominal temperature is reached, a signal sounds and "Pre-heating end" appears in the info line.
The signal continues to sound at regular intervals until the door is opened.
The nominal temperature is maintained for a maximum of 1 hour.
Insert food into the appliance and close the door. The baking program starts automatically at the first
baking step.
If the user cancels pre-heating by pressing the "Open door" sensor button and then leaves the door
slightly ajar, this will cause the appliance to move straight on to the first baking step.
The "manual pre-heating" function cannot be saved in a baking program.
You can select other functions as normal using the Additional functions line.
2. Setting the pre-heating function in the Service menu
The "Pre-heating button" setting can be activated/deactivated in the Service menu see
sec. 7.4.4 unit parameters.
Page 28
26
7. Special programs
7.1 Cleaning
7.1.1 Manual cleaning
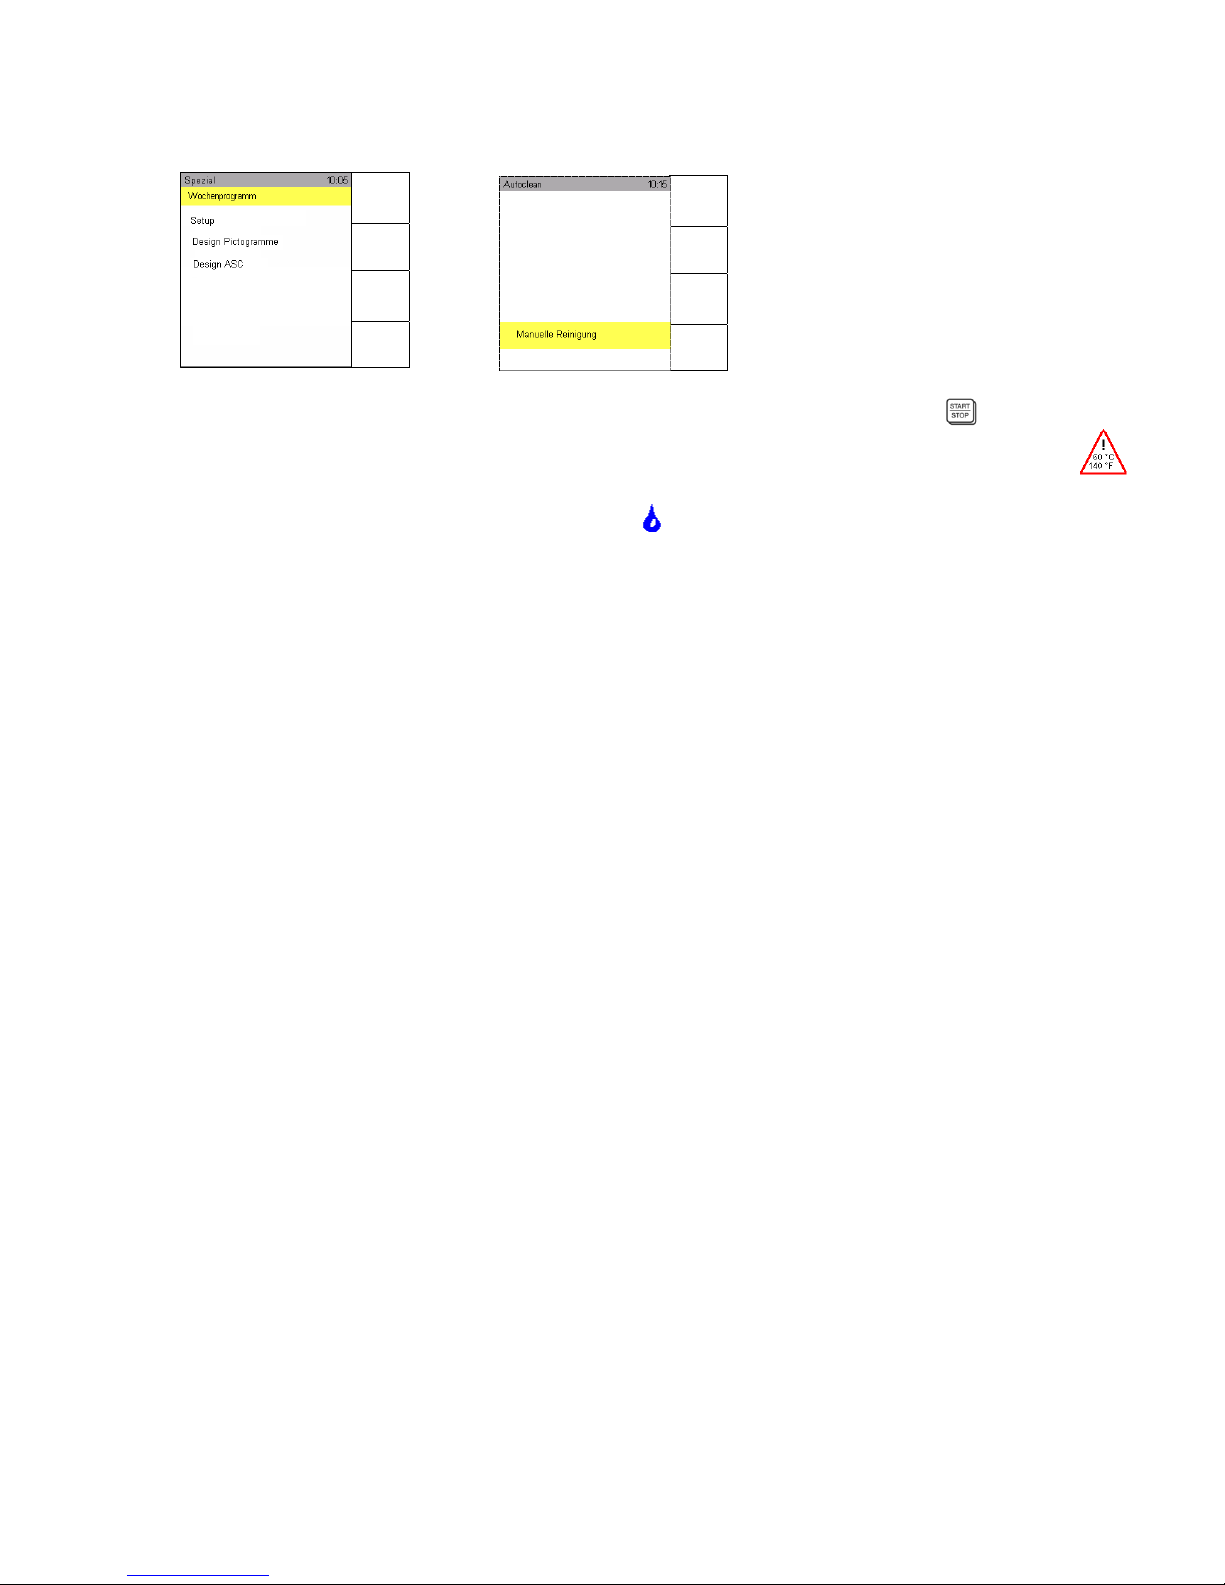
Select manual cleaning via the "Autoclean" sensor button using Scout and start it with .
Caution!: manual cleaning begins only at a maximum temperature of max. 60°C/140°F display indicates
Any burnt on grease and food is softened.
When
soaking is finished, a signal sounds and the display flashes.
Open the appliance door and thoroughly clean the baking chamber.
-Close the door door. The baking chamber is dried and you should leave its door open afterwards to
ensure good ventilation.
Cleaning preparations
Before you start the appliance up: open the water tap or, for appliances that are not connected to a water
supply, fill the water tank by hand; see Section 1.6
Make sure that the baking chamber is empty.
Trays and racks should be cleaned in the dishwasher.
Manual
input
Autoclean
HACCP
Menu
back
Start
Time
Program
Info
Help
Page 29
27
7.2 HACCP
All baking data relevant to HACCP is recorded continuously and automatically during operation of the
Backmaster T. The 200 most recent baking logs are always contained in the memory and can be output via
the serial interface.
Baking programs are saved in the form of a log if they are stopped via the Start/Stop button or if the appliance
switches off automatically. A log is created for the Autoclean cleaning program as well.
7.2.1 Interface for connecting cable
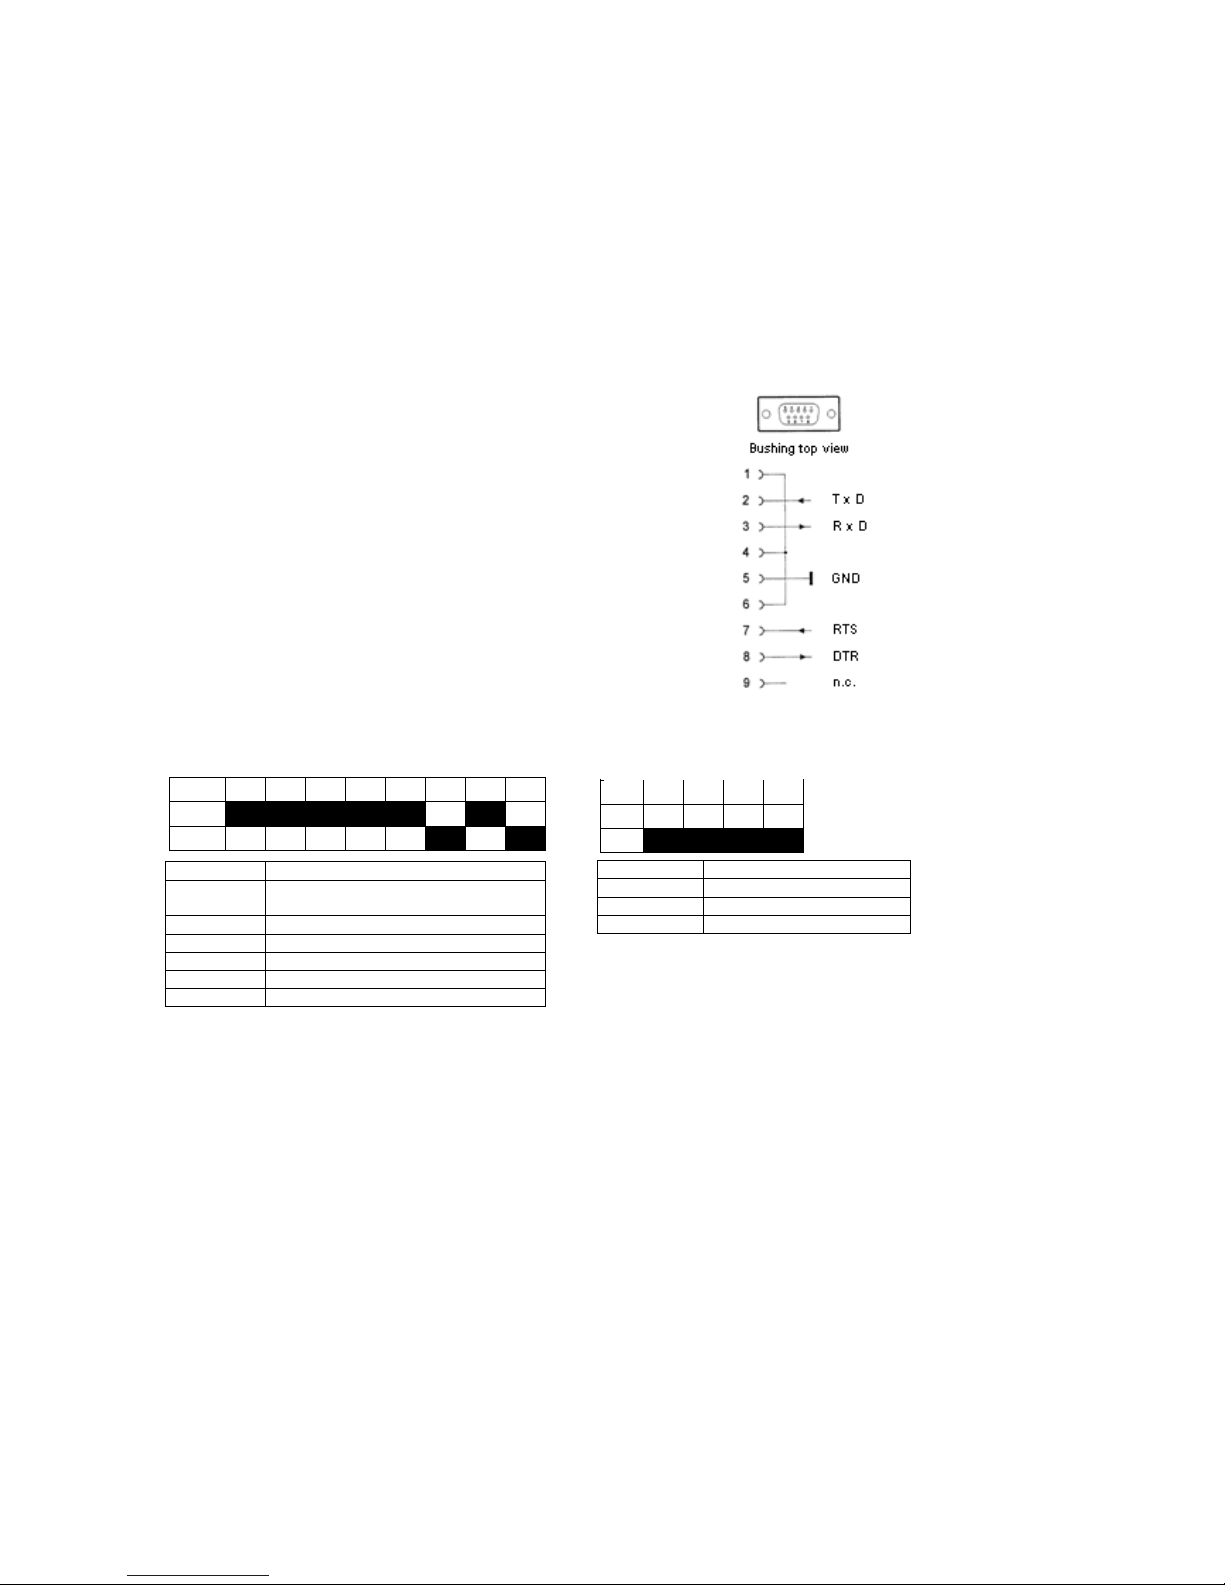
If a printer capable of outputting at least 40 characters per line is connected to the appliance, this data can be
printed out. Printer setting data: 9600,N,8,1.
The port for the cable connection is on the right side of the control panel.
Connector no.
EXTERNAL 9-pin min-D socket
Function:
RS-232C
Serial interface (9600, N, 8, 1)
9600 BAUD, 8 data bits, EVEN
PARITY,
1 STOP BIT
The connection socket is located on the
side of the operating panel.
Connect
printer
DIP switch assignment, thermal printer NP 104
1. Parallel interface (DIP switch 1)
1 2 3 4 5 6 7 8
ON
OFF
Switch NOMINAL
1 CR/LF:
CR/LF: Carriage return + line feed
2 40 columns
3 Normal character
4 Normal zero
5...7 German
8 Not defined
2. Serial Interface (DIP Switch 2)
1 2 3 4
ON
OFF
Switch SOLL
1 Parity Check
2 Even Parity
3, 4 9600 bps
2. 2. Serial interface (DIP switch 2)
1 2 3 4
ON
OFF
Switch NOMINAL
1 Parity check
2 Even parity
3, 4 9600 bps
Page 30
28
7.2.2 Selecting and printing baking logs
The printer and the appliance must be switched off before the connecting cable is plugged in or
unplugged, otherwise the control unit and/or the printer may suffer damage.
The appliance must be switched on and no baking program must be running.
When creating HACCP logs, it is important for the correct time and date to be set on the appliance
(see Section 7.4).
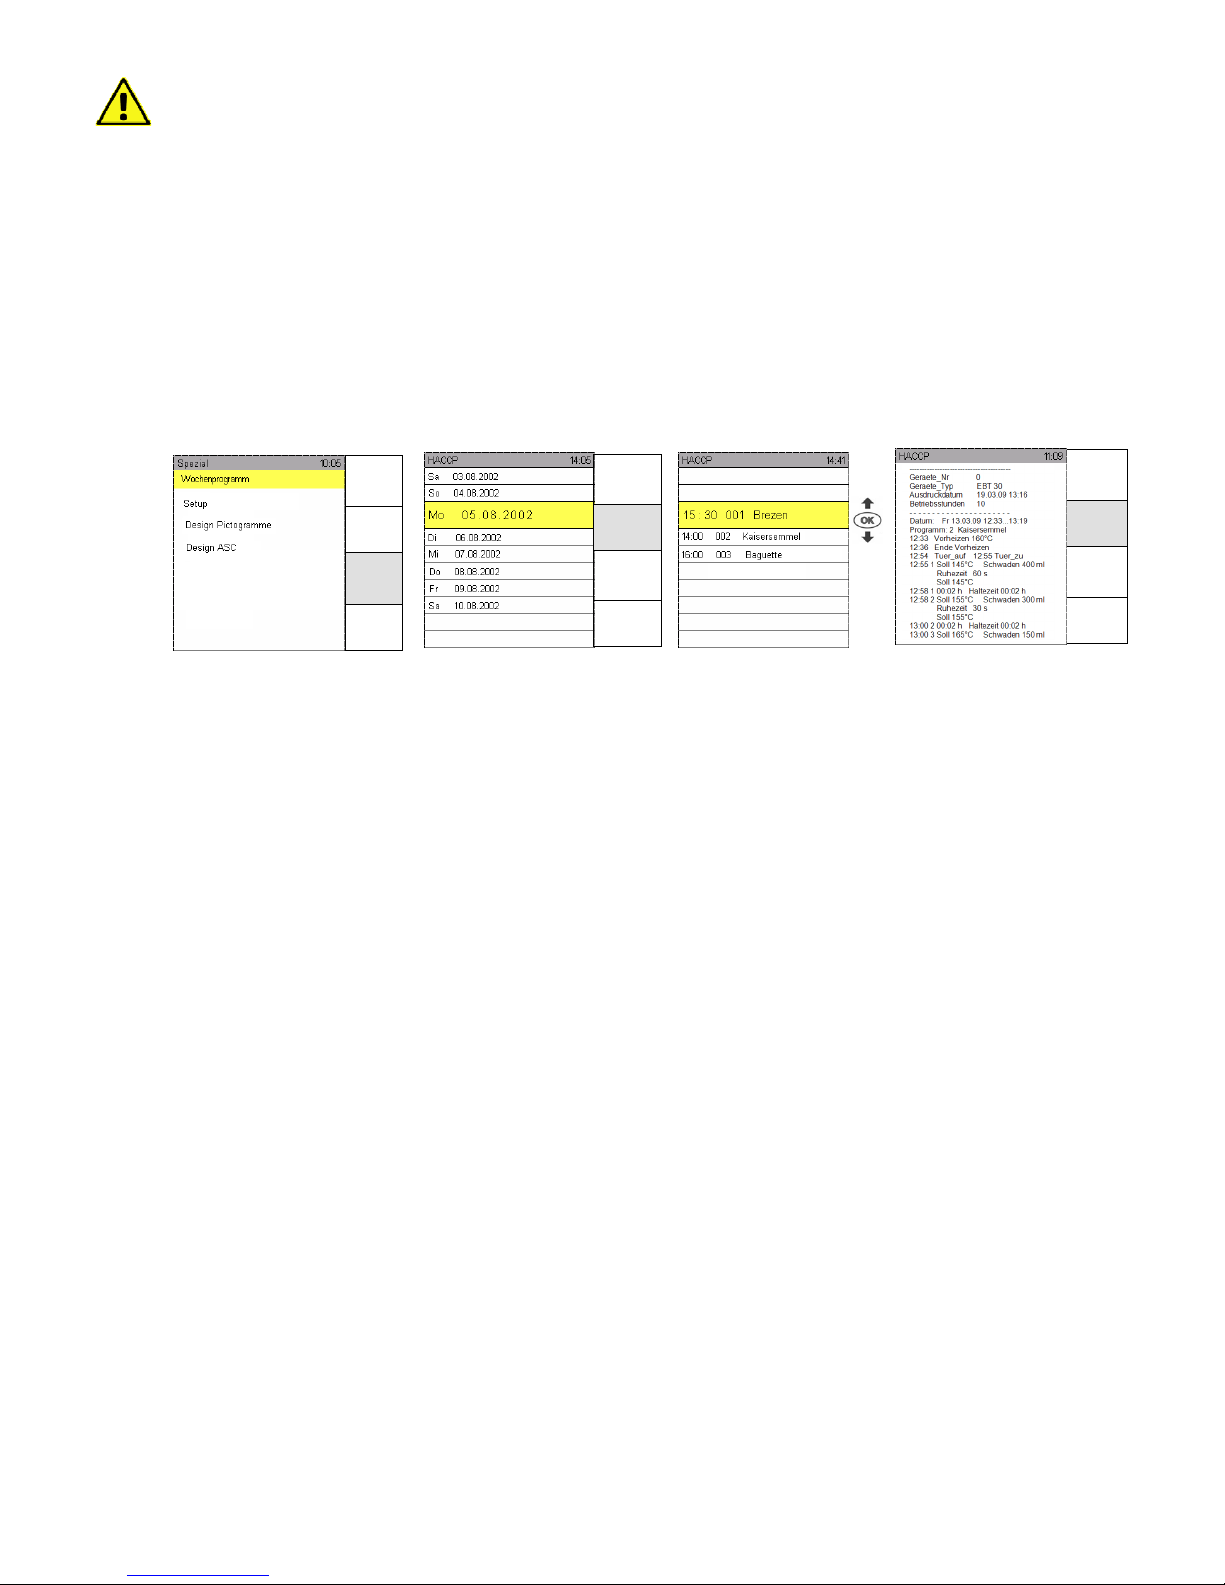
Press the Special program sensor button to select HACCP and confirm with OK.
A selection list appears, containing dates and days of the week.
Press the Scout direction arrow to scroll through the HACCP list in chronological order.
Press the "Print" sensor button to print out the HACCP data for the highlighted day.
Select the day of the week and confirm with OK to choose and print out the baking data for the individual
programs run on that day.
Press the "Print 7" sensor button to print out the baking program or Autoclean logs for the last 7 days.
Menu
back
Drucken
Drucken 7
Menu
back
Print
Next
page
Manual
input
Autoclean
HACCP
Page 31
29
7.3 Weekly program
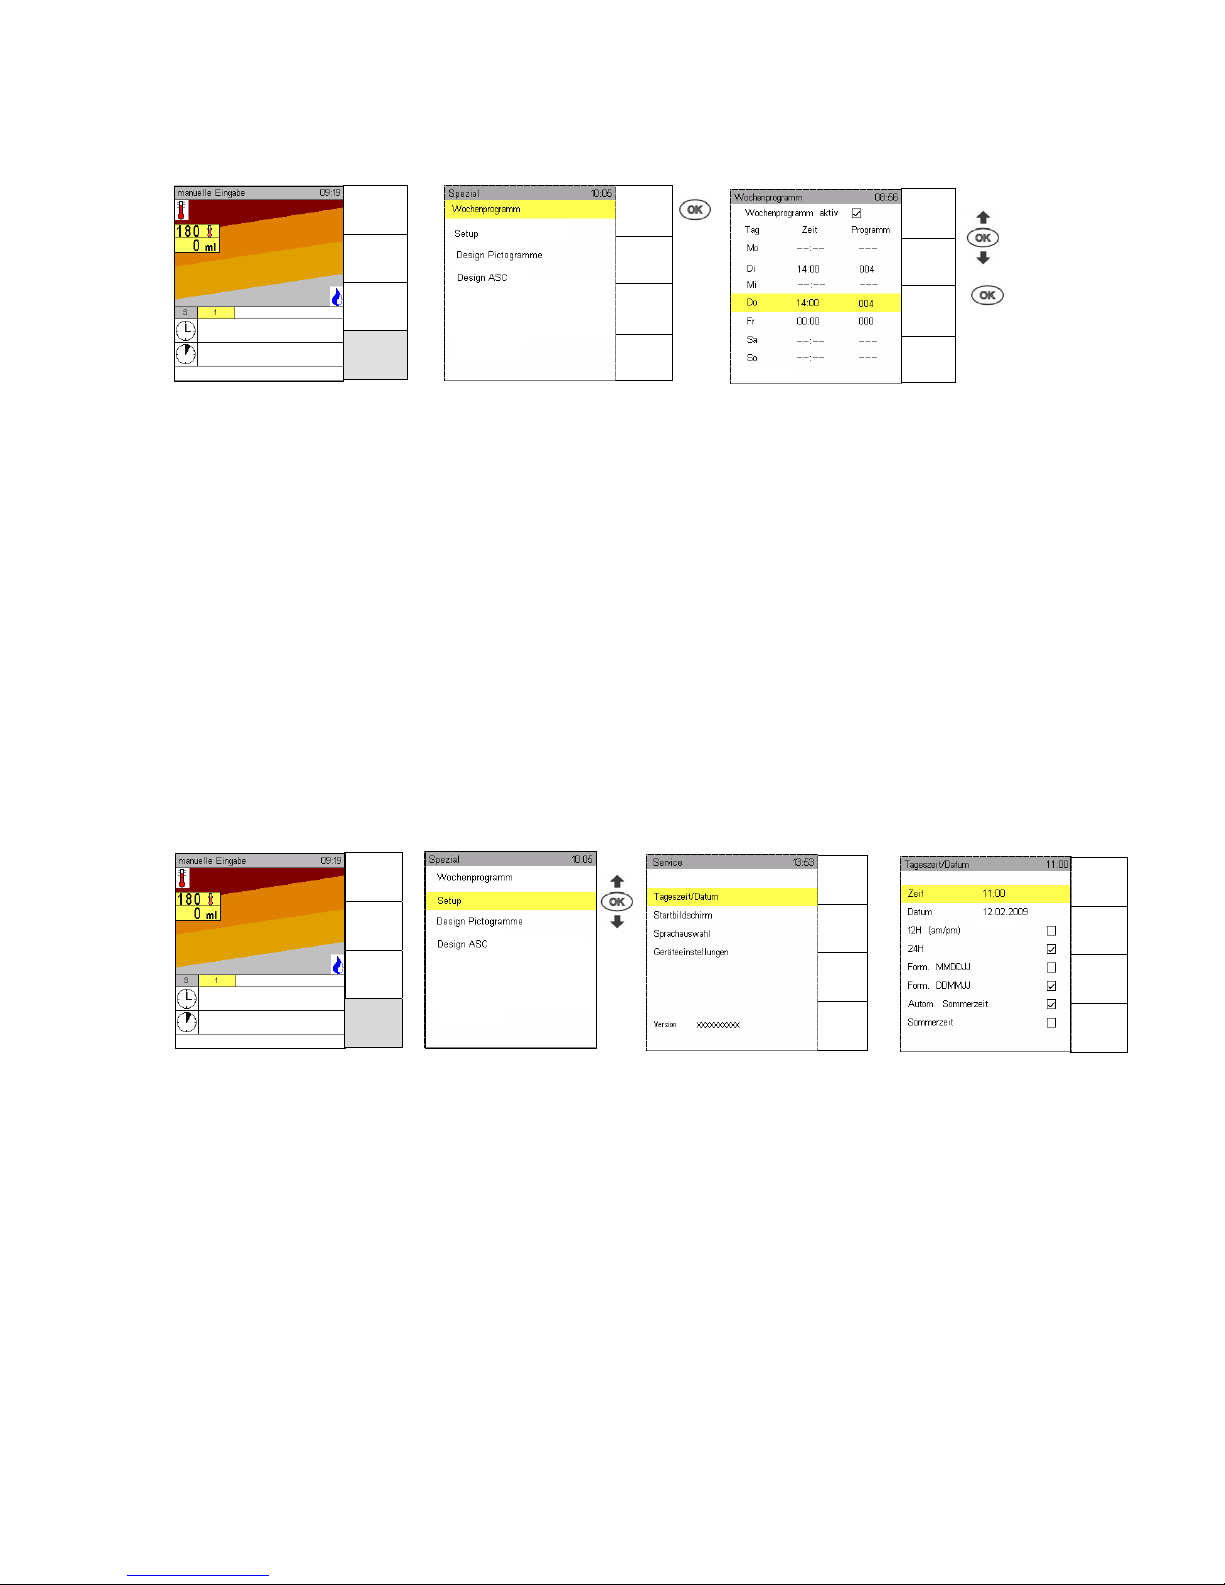
The weekly program can only be used for saved programs and enables a delayed start to be set for
certain programs on different days of the week.
Press the "Special program" sensor button, select the "Weekly program" input field and confirm with OK.
Press OK to select or deselect the function. ““ appears when the function is selected; this means that the
weekly program is active.
Use the Scout direction arrows and to select the day, the time and the required baking program.
Press OK to complete your entries. The appliance will start on the set day of the week, at the specified time.
Press the Back to menu sensor button briefly to return to the "Manual input" screen.
7.4 Setup
7.4.1 Date/Time
On delivery of the appliance, the current time is already set.
However, if it does become necessary to reset the date and time, press the Special program sensor button,
use Scout to select the "Set-up" input field and confirm with OK.
Use the Backmaster Scout direction arrows and to enter the new time and confirm with OK.
The Time/Date screen can be used to input data in different formats or to switch between summer and
winter time; such settings must then be confirmed with the OK button.
Menu
back
Help
Manual
input
Autoclean
HACCP
Program
list
Pictograms
Favourites
Special
program
Menu
back
Help
Menu
back
Help
Program
list
Picto
grams
Favourites
Special
program
Page 32
30
7.4.2 Start screen
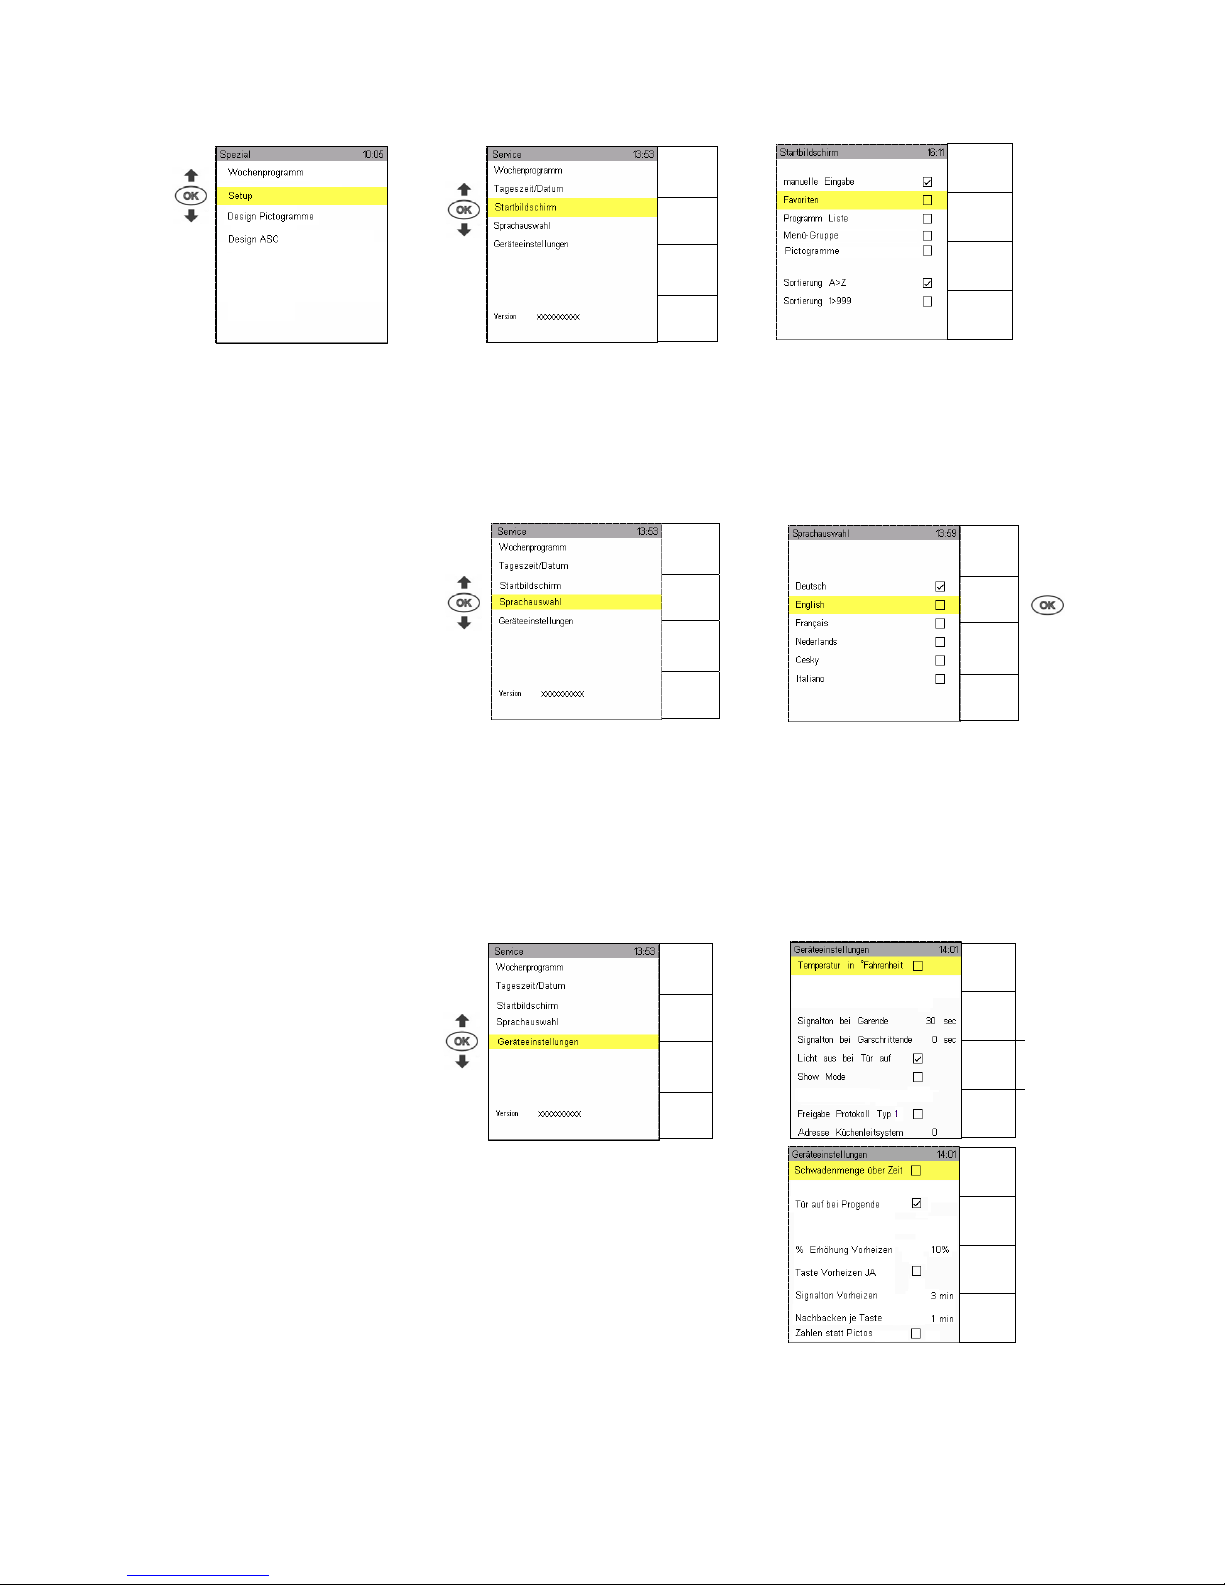
You can choose from 4 different start screens.
Select "" or deselect the function using OK.
The "Manual input" screen is not shown here (see Section 3).
7.4.3 Language
All functions, menus and information can be displayed in different languages.
Use Scout to select the "Language" input field and confirm with OK.
Select "" or deselect the function using OK.
7.4.4 Unit parameters
Use Scout to select the "Unit parameters" input field.
Other functions can be activated or changed here.
Select "" or deselect the function using OK.
Menu
back
Help
Menu
back
Help
Back to
menu
Help
Menu
back
Help
Menu
back
Help
Menu
back
Next
page
Menu
back
Previous
page
Page 33
31
8. Errors
8.1 Displaying errors
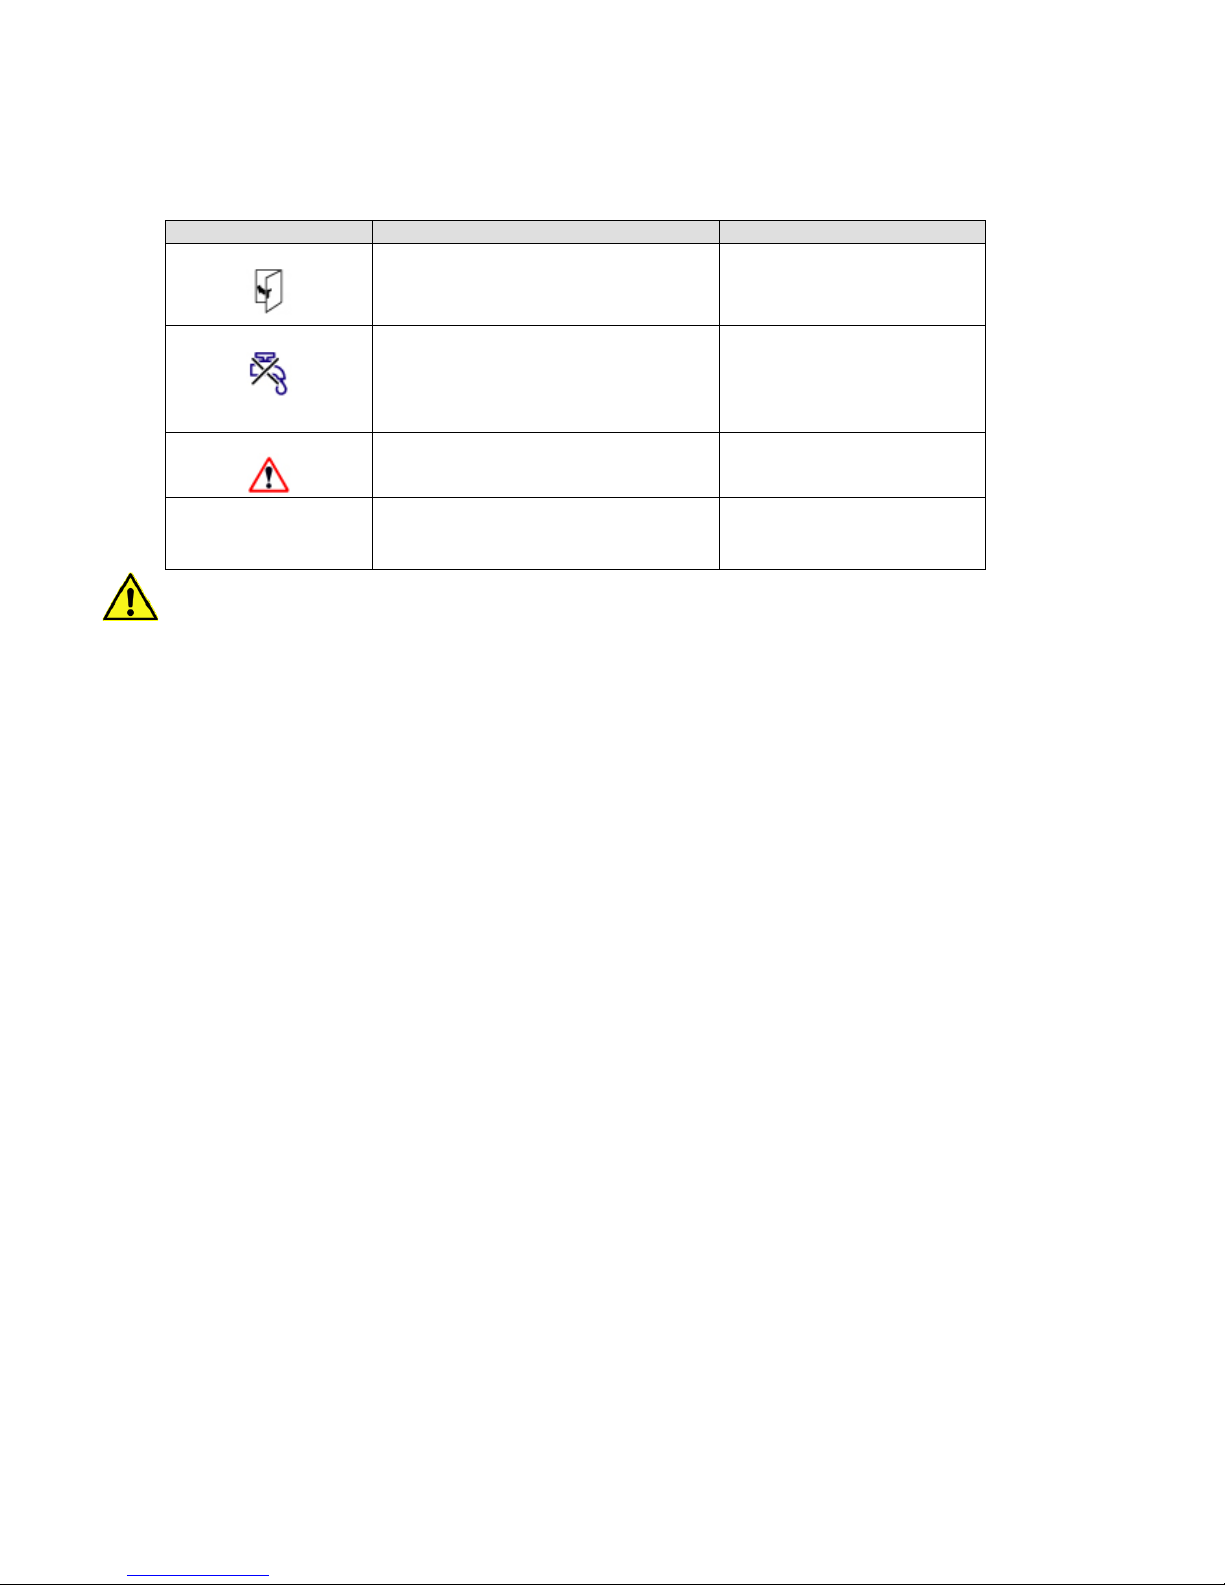
You can use the "Help" sensor button to call up useful information relating to the errors displayed on the
screen.
ERROR icons OPERATING STATE REMEDY
Door open Close the door.
Water supply interrupted Open water tap
General fault Customer service call!
If the appliance is not working correctly, you should try to remedy minor faults yourself, by referring to
the tables above and below.
If you cannot remedy the cause of the fault:
Switch the appliance off, disconnect it from the mains and close the water tap.
Contact customer service.
Press the "Back to menu" sensor button to switch from the "Help" screen page to the corresponding
start screen.
After a short time the display returns to the previous page automatically.
Page 34

32
8.2 Error messages
The "Error info" sensor button can be used to display errors.
Error info Description Remedy
111
Baking chamber sensor Operation stop!
117
Steam discharge
sensor
Operation stop!
Call customer service!
211
Excess temperature in
the baking chamber or
M1 STB triggered
Operation stop!
Call customer service!
314
Water level is low Fill the water tank
315
Solenoid valve damage Operation stop!
Close the water tap
Call customer service!
511
Control module Warning
Module temperature above 65°C
Operation still possible, call customer service!
512
Control module Operation stop!
Module temperature above 70°C
Call customer service!
Page 35

33
8.3 Troubleshooting
If the appliance is not working correctly, you should try to remedy minor faults yourself, by referring to
the table below.
If you cannot remedy the cause of the fault:
Switch the appliance off, disconnect it from the mains and close the water tap.
Contact customer service, stating the data, type and number of your appliance.
Fault Possible cause Remedy
Appliance cannot be
switched on
Main switch not turned on Turn the main switch on.
Mains-side fuse deactivated Switch the mains-side fuse on.
No humidification Water tap not open Turn the water tap on.
Water on the bottom of
the baking chamber
Appliance faulty or humidity that
was previously correct is now
set too high
Reduce the humidity or contact
customer service.
Light does not come on Faulty halogen lights Replace the halogen lights.
Caution: only use 10 V, 10 W
halogen lights. Cover your hand
with a cloth before touching the
light, otherwise its service life will
be seriously adversely affected.
Rust in the baking
chamber
Water quality Filter your water, observe the
relevant installation instructions.
Incorrect cleaning agent Use Eloma cleaning agents.
Cleaning agent not thoroughly
flushed out
Always flush the baking chamber
out thoroughly.
Particles of iron in the water
supply
Customer to remove all
components of the water supply
that are made of untreated steel.
Door does not close, no
error message
Appliance leaning forwards or
door incorrectly aligned
Adjust the appliance so it is level.
Allow trained customer service
staff to align the door properly.
During the warranty period, maintenance work must only be performed on the appliance by service
staff trained by Eloma. You can request the names and addresses of our service partners by
contacting the Eloma Maisach factory on telephone number +49 (0)35203 63888.
9. End of operation
Press the button to switch the appliance off. The LED on the button goes out.
Close the water tap.
If the appliance is not going to be used for a prolonged period, disconnect it from the mains.
Page 36
34
10. Cleaning and maintenance
Regular cleaning of the baking oven is of utmost importance.
Only Eloma recommended cleaner agents may be used.
If food residue is left in the baking chamber and then heated up again, this will impair the smell and taste
of the food being baked and will also cause smoke to form.
If a lot of salt is used in the food being baked, the appliance must be cleaned at regular intervals
to prevent the baking chamber becoming corroded.
If cleaning agent residue is left in the baking chamber, this could lead to corrosion.
The baking appliance must not be started up if no air baffle is in place.
Maintaining the door seals
The service life of seals is heavily influenced by the way in which they are maintained.
Grease and caustic cleaning agents attack the seal material and accelerate the rate of wear.
Therefore, please observe the following maintenance instructions:
Clean the seals by hand every day with a mild grease solvent.
Use fresh water to remove any cleaning agent residue.
Leave the door open overnight so that the door seals are not put under unnecessary strain.
The door should also be left open when the appliance is not in use.
Inspect the seals regularly for damage. If a seal is damaged, replace it to prevent steam and/or air
from escaping.
The seals on appliances featuring the Autoclean cleaning system still need to be cleaned by hand.
Cleaning the glass parts of the door:
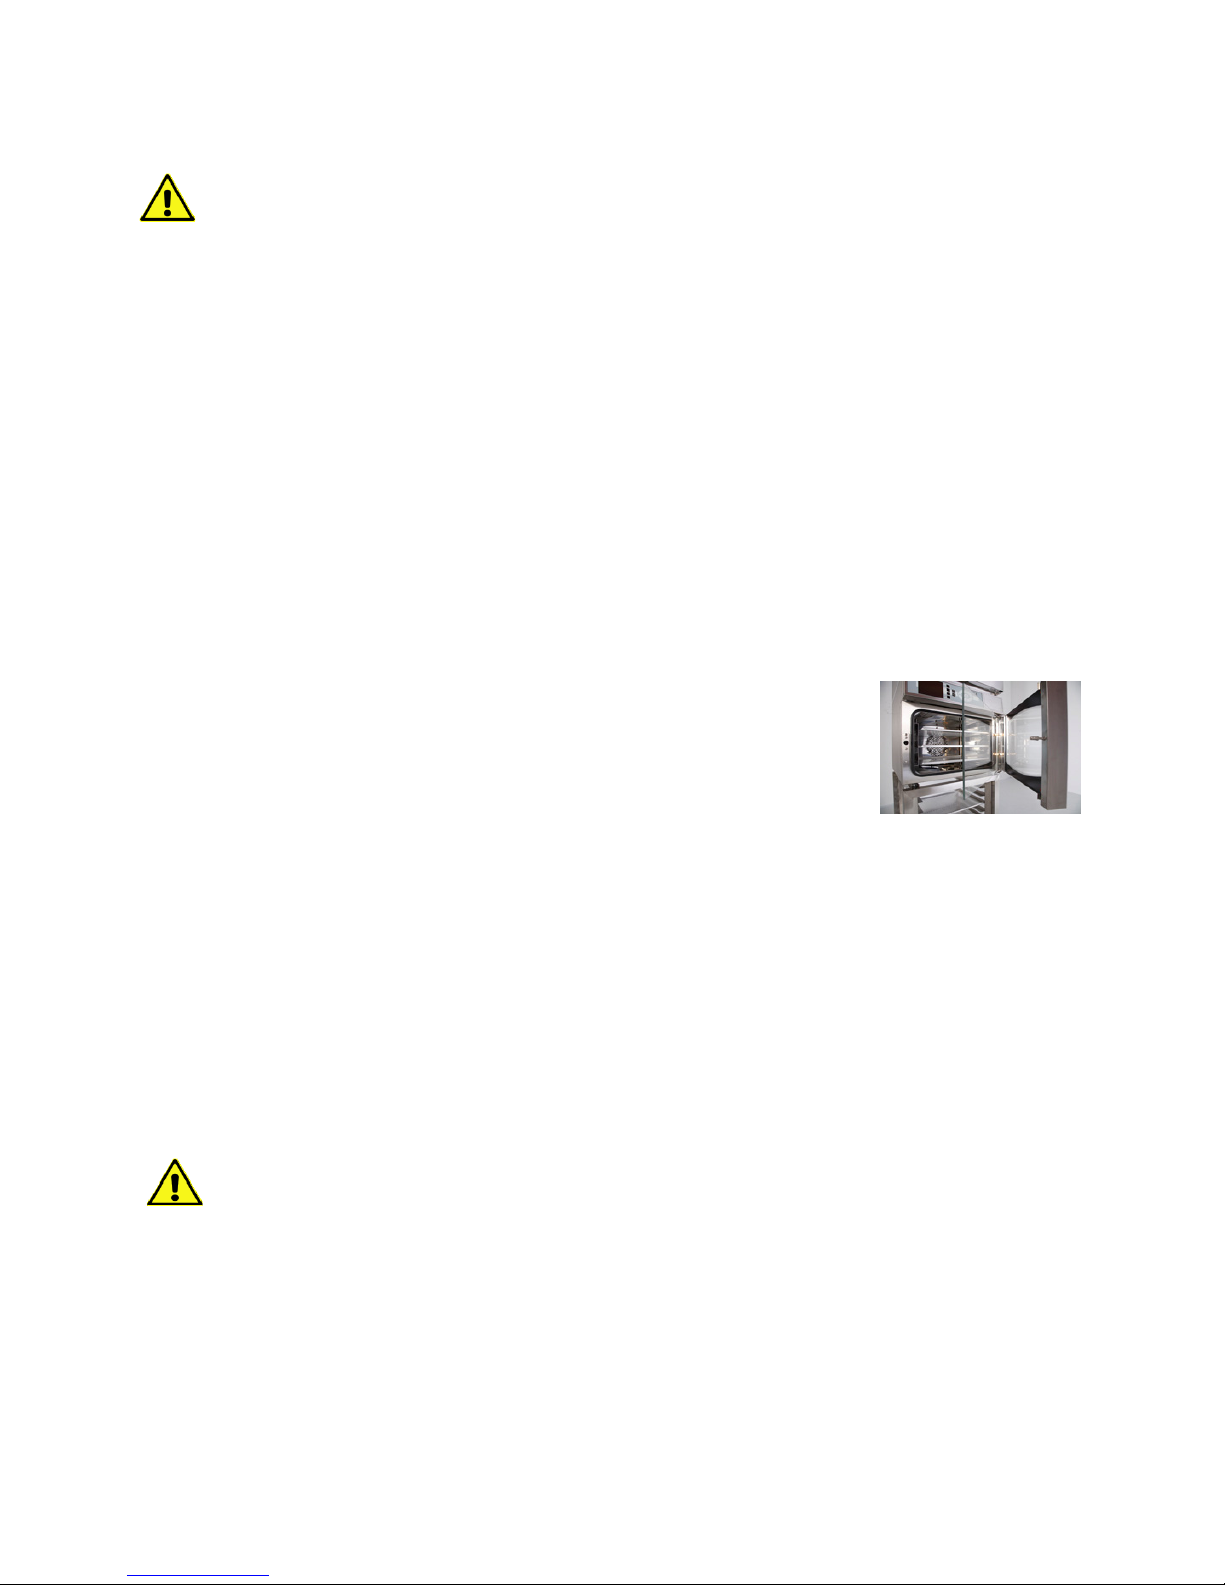
The door is made of two parts and the inner pane can be swivelled out
in order to clean it.
Only clean these panes of glass with a soft cloth. Do not use
scouring agents.
Cleaning the glass panel:
Only clean the glass panel with a soft cloth. Do not use scouring agents.
Cleaning the external surfaces:
Use a grease solvent or a special stainless steel cleaner.
Do not use flammable liquids for cleaning the appliance.
Cleaning the water tank
If tap water is used, the tank must be emptied each day and rinsed well in running water.
Do not use any cleaning agents to clean the tank.
If the appliance is going to be out of operation for a prolonged period, remove any residual water with
an absorbent sponge.
Ensure that all water is removed from the line:
Switch the appliance on, press the Humidification button several times or start a program with 200 ml
humidity. Wipe the appliance out.
If distilled water is used, no special cleaning has to be performed.
Under no circumstances must water jets, steam cleaners or high-pressure
cleaners be used on the exterior of the appliance.
See the "Kitchen safety rules" ("Sicherheitsregeln für Küchen") published by
the relevant German professional associations.
Do not spray jets of water into a hot baking chamber.
Page 37
35
11. ProConnect Backmaster communication
11.1 Starting up ProConnect Backmaster communication
Backmaster T
Backmaster is in standby mode or switched off.
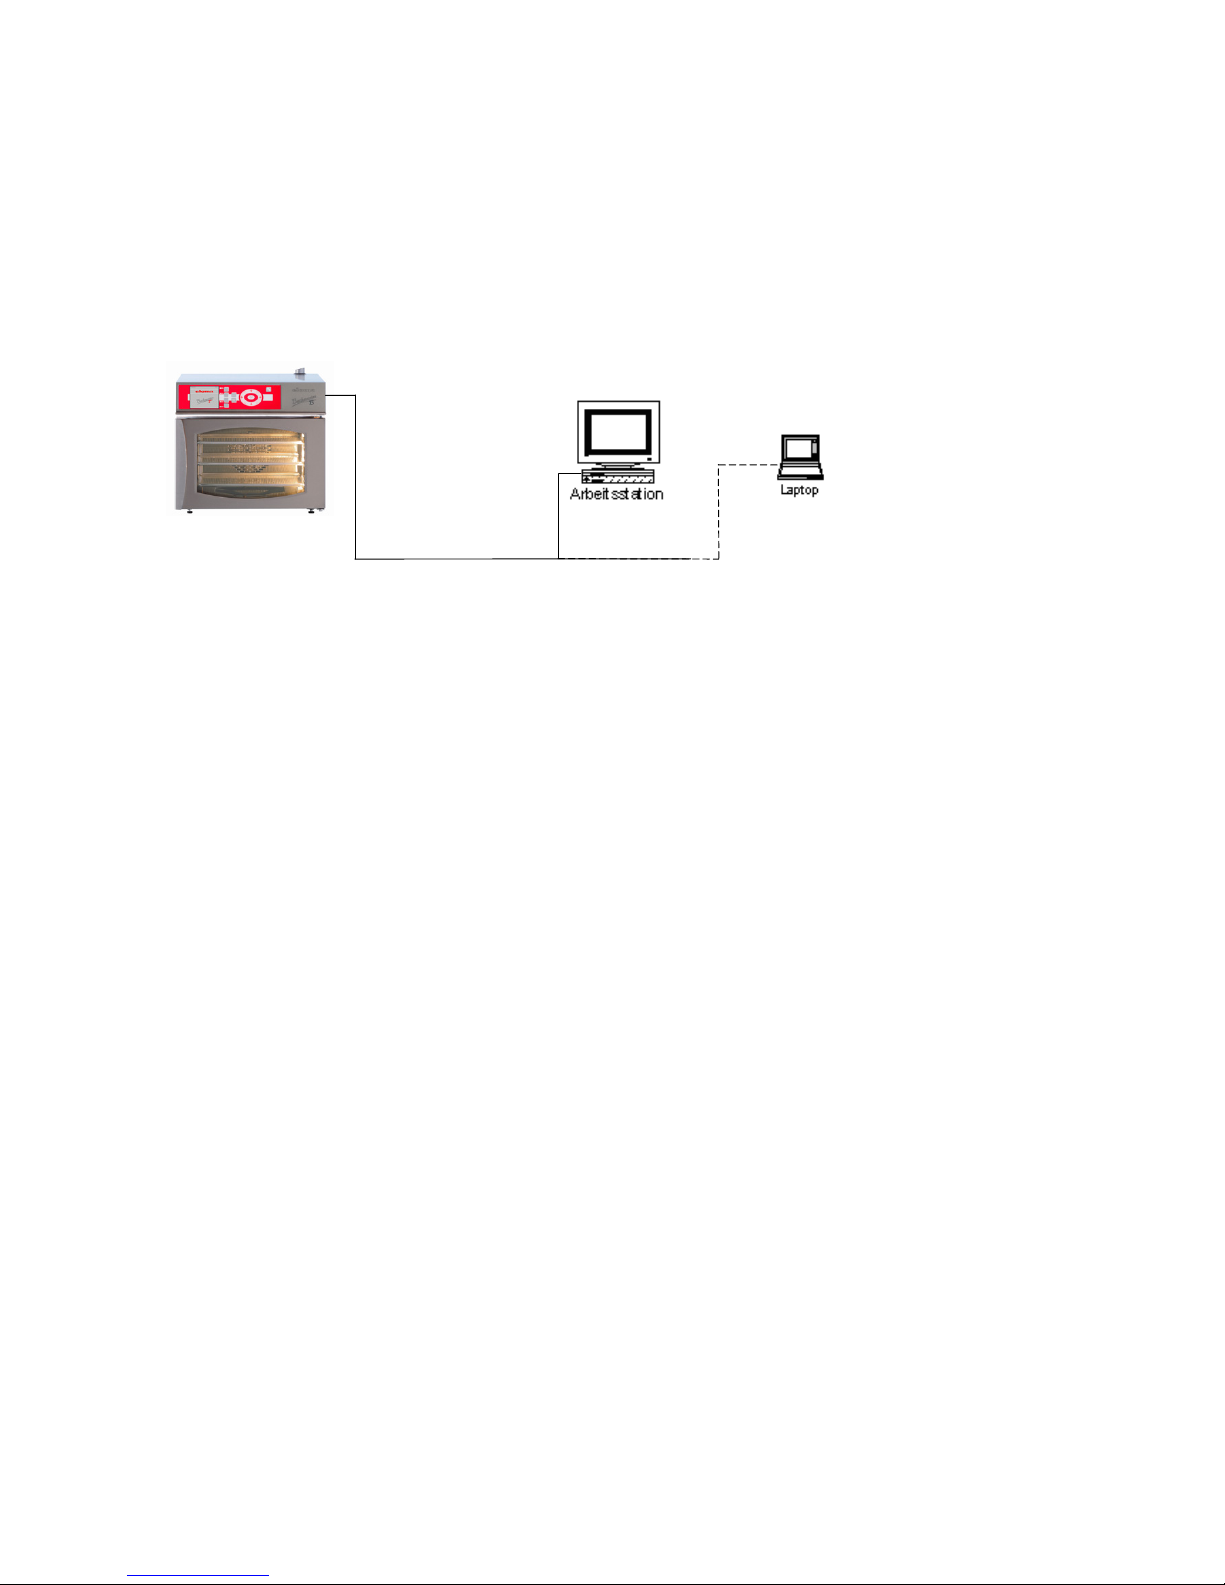
Establish a communication link between the PC and the Backmaster in the form of a point-to-point
RS-232 connection, using the connecting cable provided.
Plug the connecting cable into the external 9-pin D-Sub socket located on the side of the operating panel
and the other end into the PC.
Switch the PC on and start ProConnect up.
Set the appliance address in the PCPrg to the Backmaster appliance address:
Menu/Options/Device address
Set the Com port in the PCPrg to that used as the interface of the
PCPrg Backmaster connection.
If the connection is established via one of the PC's USB ports using a USB/RS-232 adapter, this
interface will also appear as the Com port on the PC.
Communication can be tested in the set-up dialogues for the appliance address and the
interface.
Other customised connection and networking options are also available, of course.
Contact our service hotline or our sales department for further information.
11.2 Function for networking a baking control system (option)
Certain hardware/software configurations facilitate networking via a kitchen control system.
RS-232 connection
Page 38

36
Baking examples
All baking times and temperatures are depending on product quality and preparation.
Backmaster EB 30
Bakery products
3 trays
440 x 350 mm
approx.
pieces/charge
Baking time
minutes
Temperature
° C / ° F
Flap exhaust
air
C
losed /Open
Humidi-
fication
Bread rolls/buns
(pre-baked)
36 20
180° C
356° F
closed yes
Pretzels 18-27 18
170 ° C
338° F
open no
Mini Baguettes 80 g 45 10-15
190° C
374 ° F
closed yes
Puff pastry/Petits fours
according to size
18-27 18
165° C
329° F
closed yes
Snacks according to size 18-27 18
170° C
338° F
closed yes
Croissants 27-36 18-20
170° C
338 ° F
closed yes
Backmaster EB 30 XL
Backwaren 3 trays
400 x 600
mm approx.
pieces/charge
Baking time
minutes n
Temperature
° C / ° F
Flap exhaust
air
C
losed /Open
Humidi-
fication
Bread rolls/buns
(pre-baked)
60 20 180 closed yes
Pretzels 36 18 170 open no
Mini Baguettes 80 g 60 10-15 190 closed yes
Puff pastry/Petits fours
according to size
45 18 165 closed yes
Snacks according to size 45 18 170 closed yes
Croissants 60 18-20 170 closed yes
Page 39
Page 40

38
Notes:
Page 41

39
Notes:
Page 42

Notes:
Page 43

Page 44

41
Englisch
Art. Nr.: bed_(/504459_ebt_30_30xl_1v_en
 Loading...