

Page 1
Page 2

Introduction
IMPORTANT SAFEGUARDS
Read Instructions - All the safety and operating instructions
should be read before the appliance is operated.
Retain Instructions - The safety and operating instructions
should be retained for future reference.
Heed Warnings - All warnings on the product and in the
operating instructions should be adhered to.
Follow Instructions - All operating and use instructions
should be followed.
Cleaning - Unplug this product from the wall outlet before
cleaning. Do not use liquid cleaners or aerosol cleaners.
Use a damp cloth for cleaning.
Attachments - Do not use attachments not recommended
by the product manufacturer.
Power Sources - This product should be operated only from
the type of power source indicated on the marking label. If
you are not sure of the type of power supply to your home
consult your appliance dealer or local power company. For
products intended to operate from battery power, or other
sources, refer to the operating instructions.
Damage Requiring Service - Unplug this product from the
wall outlet and refer servicing to qualified service personnel
under the following conditions:
* When the power-supply cord or plug is damaged.
* If liquid has been spilled, or objects have fallen into the
product.
* If the product has been exposed to rain or water.
* If the product does not operate normally by following the
operating instructions. Adjust only those controls that
are covered by the operating instructions as an
improper adjustment of other controls may result in
damage and will often require extensive work by a
qualified technician to restore the product to its normal
operation.
* If the product has been dropped or damaged in any
way.
* When the product exhibits a distinct change in
performance - this indicates a need for service.
Replacement Parts - When replacement parts are required,
be sure the service technician has used replacement parts
specified by the manufacturer or have the same
characteristics as the original part. Unauthorized
substitutions may result in fire, electric shock or other
hazards.
Heat - The product should be situated away from heat
sources such as radiators, heat registers, stoves, or other
products (including amplifiers) that produce heat.
WARNING: Handling the cord on this product or
cords associated with accessories sold with this
product, will expose you to lead, a chemical known to
the State of California to cause birth defects or other
reproductive harm.
Wash hands after handling.
82
Page 3
Introduction (Continued)
WARNING:
TO REDUCE THE RISK OF FIRE OR ELECTRIC SHOCK, DO NOT EXPOSE
THIS PRODUCT TO RAIN OR MOISTURE.
The connection of a non- shielded equipment interface cable to this
equipment will invalidate the FCC Certification or Declaration of this device
and may cause interference levels which exceed the limits established by the
FCC for this equipment. It is the responsibility of the user to obtain and use a
shielded equipment interface cable with this device. If this equipment has
more than one interface connector, do not leave cables connected to unused
interfaces. Changes or modifications not expressly approved by the
manufacturer could void the user’s authority to operate the equipment.
FOR UNITED STATES USERS:
INFORMATION
This equipment has been tested and found to comply with the limits for a Class B
digital device, pursuant to Part 15 of the FCC Rules. These limits are designed to
provide reasonable protection against harmful interference in a residential
installation. This equipment generates, uses and can radiate radio frequency energy
and, if not installed and used in accordance with the instructions, may cause harmful
interference to radio communications. However, there is no guarantee that
interference will not occur in a particular installation. If this equipment does cause
harmful interference or television reception, which can be determined by turning the
equipment off and on, the user is encouraged to try to correct the interference by
one or more of the following measures:
-Reorient or relocate the receiving antenna.
-Increase the separation between the equipment and receiver.
-Connect the equipment into an outlet on a circuit different from that to which the
receiver is connected.
-Consult the dealer or an experienced radio/TV technician for help.
USER-INSTALLER CAUTION:
Your authority to operate this FCC verified equipment could be voided if you make
changes or modifications not expressly approved by the party responsible for
compliance to Part 15 of the FCC rules.
83
Page 4

Introduction (Continued)
Lithium-ion Battery Handling Precautions
Danger
Do not disassemble or modify the battery pack. The battery pack is equipped with built-in safety protection features. Should these
features be disabled, the battery pack can leak acid, overheat, emit smoke, burst and/or ignite.
Do not connect the positive (+) and (-) terminals with a metal object such as wire. Do not transport or store the battery pack together
with metal objects such as necklaces, hair pins etc. Otherwise, short-circuiting will occur, over current will flow, causing the battery
pack to leak acid, overheat, emit smoke, burst and/or ignite, or the metal object such as wire, necklace or hair pin can generate heat.
Do not discard the battery pack into fire or heat it. Otherwise, its insulation can melt down, its gas release vent or safety features will
be damaged and/or its electrolyte can ignite, possibly leading to acid leakage, overheating, smoke emission, bursting and/or ignition.
Do not use or leave the battery pack near a heat source such as a fire or a heater (80°C or higher). If the resin separator should be
damaged owing to overheating, internal short-circuiting may occur to the battery pack, possibly leading to acid leakage, overheating,
smoke emission, bursting and/or ignition of the battery pack.
Do not immerse the battery pack in water or seawater, and do not allow it to get wet. Otherwise, the protective features in it can be
damaged, it can be charged with extremely high current and voltage, abnormal chemical reactions may occur in it, possibly leading
to acid leakage, overheating, smoke emission, bursting and/or ignition.
Do not recharge the battery pack in extremely hot weather. Otherwise, hot temperatures can trigger its built-in protective features,
inhibiting recharging, or can damage the built-in protective features, causing it to be charged with extremely high current and voltage,
and, as a result, abnormal chemical reactions can occur in it, possibly leading to acid leakage, overheating, smoke emission,
bursting and/or ignition.
Do not pierce the battery pack with a nail or other sharp objects, strike it with a hammer, or step on it. Otherwise, its battery pack will
became damaged and deformed, internal short-circuiting can occur, possibly leading to acid leakage, overheating, smoke emission,
bursting and/or ignition.
Do not strike or throw the battery pack. The might cause leakage, overheating, smoke emission, bursting and/or ignition. Also, if the
protective feature in it becomes damaged, it could become charged with an extremely high current and voltage, abnormal chemical
reactions can occur, which can lead acid leakage, overheating, smoke emission, bursting and/or ignition.
84
Page 5

Introduction (Continued)
Do not use an apparently damaged or deformed battery pack by drop of the battery pack or any other damage. Otherwise, acid
leakage, overheating, smoke emission, bursting and/or ignition of the battery pack may occur.
Do not directly solder the battery pack. Otherwise, heat can melt down its insulation, damage its gas release vent or safety features
possibly leading to acid leakage, overheating, smoke emission, bursting and/or ignition.
Do not reverse the positive (+) and negative (-) terminals. Otherwise, during recharging, the battery pack will be reverse – charged,
abnormal chemical reactions then may occur, or excessively high current can flow during discharging possibly leading to acid
leakage, overheating, smoke emission, bursting and/or ignition.
Do not connect the battery pack to an electrical outlet, vehicle cigarette lighter, etc. When subjected to large voltage, over current can
flow on the battery pack, possibly leading to acid leakage, overheating, smoke emission, bursting and/or ignition.
Do not use the battery pack for a purpose other than those specified. Otherwise, its guaranteed performance will be lost and/or its
service life will be shortened. Depending on the equipment in which the battery pack is used, excessively high current can flow
through battery pack, possibly damaging it and leading to acid leakage, overheating, smoke emission, bursting and/or ignition.
Battery electrolytes can cause skin and eye injury. If you come into contact with any material leaking from the battery, it could be
electrolyte. Do not touch your face or eyes. Wash your hands or the area of contact with clean running water immediately. Seek
medical attention immediately if contact with the eyes has occurred.
Warning
If recharging operation fails to complete even when a specified recharging time has elapsed, immediately stop further recharging.
Otherwise, acid leakage, overheating, smoke emission, bursting and/or ignition can occur.
Do not put the battery pack into a microwave oven or pressurized container. Rapid heating or disrupted sealing can lead to acid
leakage, overheating, smoke emission, bursting and/or ignition.
If the battery pack leaks or gives off a bad odor, remove it from any exposed flame. Otherwise, the leaking electrolyte may catch fire,
and the battery pack may emit smoke, burst or ignite.
If the battery pack gives off an odor, generates heat, becomes discolored or deformed, or in any way appears abnormal during use,
recharging or storage, immediately remove it from the equipment or battery pack charger and stop using it. Otherwise, the
problematic battery pack can develop acid leakage, overheating, smoke, emission, bursting and/or ignition.
85
Page 6

Introduction (Continued)
Caution
Do not use or subject the battery pack to intense sunlight or hot temperatures such as in a car in hot weather. Otherwise, acid
leakage, overheating and/or smoke emission can occur. Also, its guaranteed performance will be lose and/or its service life will be
shortened.
The battery pack incorporates built-in safety devices. Do not use it in a location where high levels of static electricity may be present.
Otherwise, the safety devices can be damaged, possibly leading to acid leakage, overheating, smoke emission, bursting and/or
ignition.
The guaranteed recharging temperature range is 0 to 45°C. A recharging operation outside this temperature range can lead to acid
leakage and/or overheating of the battery pack, and may cause damage to it.
If electrolyte leaking from the battery pack contacts your skin or clothing, immediately wash it away with running water. Otherwise,
eye injury or skin inflammation can occur.
Store the battery pack in a location where children cannot reach it. Also, make sure that sure that a child does not take out the battery
pack from the battery pack charger or equipment.
If you find rust, a bad odor, overheating and/or other irregularities when using the battery pack for the first time, return it your supplier
or vendor.
86
Page 7

Introduction (Continued)
BEFORE YOU USE
Temperature of the main body
When this recorder is used for a long time in the power-on state, the temperature of the main body may become high. However, this
is not a fault.
The power plug cord applicable to the local power specifications is attached. Be sure to use power cord applicable to your local
power specification.
Use only the attached AC adapter. Do not use any other AC adapter on any account.
Use this recorder under the following environmental conditions:
Temperature: 0°C to 40°C (32°F to 104°F) Camera Head: -10°C to 50°C (14°F to 122°F)
Humidity: -10 to 80% (No condensation)
Do not place this recorder at any of the following places:
* A place exposed to direct sunlight, a humid or dusty place, a place exposed to sea wind
* A place with an extreme temperature or humidity variation, such as near an air conditioner
* A place near magnet or magnetic field
Camera head
If the camera head has been used in water, such as sea and river, wash the camera head completely with fresh water, wipe the water
off the camera head with a dry, soft cloth, and dry the camera head completely in an airy, shaded place.
Note: The recorder and the AC adapter are not waterproof.
Camera cable
* Note: Pulling or dragging the camera cable when using the camera could cause failure to the recorder or the camera.
* Note: If there is a break or hole in the camera cable coating this could cause water penetration through such break or hole and
resultant failure in the recorder or the camera.
Do not clean the recorder with volatile solvent, such as thinner and benzene; this could cause the recorder to fail. Clean this
recorder only with a dry, soft cloth.
Do not rub or hit the front or the LCD panel roughly, the front or the LCD panel could be damaged or broken.
Do not point the camera lens directly at the sun, or the camera may malfunction.
87
Page 8

Introduction (Continued)
Do not handle the recorder or the camera head roughly.
When removing the battery, turn OFF the power supply to the recorder beforehand.
When carrying the recorder or the camera head, be sure hold the recorder and the camera securely.
When using the camera head or the recorder on your body, take care that the camera cable or the strap does not catch on anything.
Never operate or watch the display while driving a car or a bike, you could have an accident. When using the camera in your car or
on your body, pay attention to the traffic and road surface conditions around you to prevent any accident
This recorder is composed of precision electronic parts and components. If this recorder is handled as follows, the internal data could
be destroyed:
* The battery is removed, the SD memory card is extracted or the USB cable is connected when the recorder is in operation.
* The USB cable or the AC adapter comes out during communication.
* Any other abnormal way of handling
If this recorder is disassembled or altered intentionally by the user, the recorder will no longer be qualified for free repair even if it is
within the warranty period.
Luminescent spot and black spot
This recorder uses a CCD area image sensor composed of numerous pixels, and some of the pixels may not operate normally.
Therefore, luminescent spots or black spots could be witnessed on the output screen. This is not a defect but a phenomenon
peculiar to the CCD area image sensor.
.
88
Page 9

Introduction (Continued)
Battery
* The battery used for this recorder is a rechargeable lithium-ion battery. This battery is susceptible to temperature and humidity,
and the higher or lower the humidity is, the more the battery is susceptible.
* Whenever the use of this recorder ends, be sure to remove the battery.
* Note: The shooting enabled time duration is shorter in cold climate, such as at a ski area.
* If the battery is dropped by accident, check the terminal area for deformation. If the battery is set in this recorder with the terminal
area deformed, the recorder may be damaged.
* Batteries must be disposed of as chemical waste. DO NOT INCINERATE AS BATTERY MAY EXPLODE
* Be careful not to drop the battery pack when you release it from the Cam.
* For a long-time storage, select a dry place with the temperature range of 15 – 25℃.
* Be careful not to get the battery wet.
Clock
* This recorder contains no clock battery. If the clock is kept supplied with power from the camera battery, the date and time
settings will be reset. If this is the case, set the date and time again. (ÎP
LCD panel
* The LCD panel used for the LCD monitor has been made with ultra-high precision, has the effective pixel count of 99.99% or
more. However, note that some LCD panels may have the pixel missing and a continuous glow of 0.01% or less.
AC adapter
* This camera will not operate unless the battery pack is installed.
* When the AC adapter is used near a radio receiver (particularly when receiving medium wave), the radio receiver could have
noise. When using, keep the AC adapter at least 1m (3.3ft.) away from a radio receiver.
* The AC adapter in use could emit oscillating sound from the inside. This is not an abnormal phenomenon.
* After use, be sure to unplug the AC adapter from the AC power outlet or power will be continue to be consumed at up to 0.3W.
* Be careful not to contaminate the terminal area of the AC adapter.
107)
89
Page 10

Introduction (Continued)
SD memory card
Do not leave the SD memory card in any place that is exposed to high temperature or direct sunlight or any source of
electromagnetic wares or static electricity. Also, do not bend, drop or strongly shock the SD memory card.
Otherwise, the SD memory card could be broken or the contents of the SD memory card could be destroyed or lost.
* After use or for storage or carriage, put the SD memory card into a case or pouch.
* Be careful not to allow the terminal area at the back of the SD memory card to be contaminated with dirt, water or foreign matter.
Do not the terminal area.
Image data
The recorded data could be destroyed or lost if you fail to handle the unit or the SD card according to the precautions noted above.
Under those circumstances, ELMO USA Corp will not liable in any way for any damages due to corruption of or loss of the recorded
data.
Do not use the product where video or audio recording is prohibited by law.
You may to be ordered to leave, have the product confiscated, be arrested and be subject to fines and prosecution.
90
Page 11

Introduction (Continued)
Condensation
“Condensation” is the formation of small drops of water on the inside or outside of this recorder when steam in the air changes to
liquid when it is brought from a cold place suddenly into a warm place. If the recorder is used with condensation, the camera could
not take clear images or the recorder could be broken down.
Condensation tends to occur when
* This recorder is brought from a ski slope into a heated place.
* This recorder is brought from a cooled room or car compartment into a hot open air.
Measures to counter condensation
When this recorder has to be brought from a cold place suddenly into a warm place, place the recorder in a plastic bag and airtightly
seal the bag beforehand. Then, leave the recorder as it is in the warm place for about an hour, and then take it out when the recorder
is warmed up to the ambient temperature.
If condensation occurs
Turn OFF the power supply, and leave this recorder for about an hour until the condensation disappears. After confirming no
condensation, start using the recorder.
Note with care that if the recorder is used particularly with the condensation left on the inside of the camera lens, the recorder could
not record clear images.
Carrying
Do not sit down on a chair or the like with this recorder in the rear pocket of your trousers or skirt, or the recorder could be broken
down or damaged.
Life of the O-rings
The waterproof function of this recorder and camera head is maintained by 4 O-rings within the camera head. The life of these
O-rings depends on how the recorder is used. However, in order to reliably maintain the waterproof function, it is advisable to
replace the O-rings at a cycle of once a year.
The replacement can be handled for a charge by ELMO USA Service Department only.
91
Page 12

Introduction (Continued)
DISCLAIMERS
● The contents of this instruction manual are subject to change without notice.
● It is prohibited to copy any part or the whole of this instruction manual without our prior written consent. Unless used for personal
use, it is also prohibited under copyright law to use this instruction manual without our prior consent.
● For any claim for loss or lost earnings due to the use of this recorder or any claim raised by a third person or party, be forewarned
that we are not liable.
* ELMO does not warrant this product for suitability for any specific purpose.
● ELMO USA Corp will not liable for: a) any claim for loss earnings due to the use of this recorder or any claim raised by a third person
or party, b) for any damage, lost earnings or the like caused by the loss of the memory contents due to failure, repair or other reason,
be forewarned that we are not liable at all.
Precautions for shooting
When shooting an important scene, be sure to try shooting beforehand and confirm normal video and audio recording operation.
Compensation related to the memory contents
ELMO USA Corp. will not be liable for compensation to the user if the visual record or audio record fails due to some problem with
this recorder or SD memory card.
Image of the SD memory card
The data recorded on this recorder may not be playable on some other recorders. Always confirm this compatibility beforehand.
The following images may not be playable on this recorder:
- Images recorded or created on other recorders
- Images edited on a PC
Memory card applicable to this recorder
- For this recorder, the SD memory card formatted in the FAT16 from that complies with the SD Standard can be used..
- As the SD memory applicable to this camera, SD Memory Card M-Series made by Hagiwara Sys-Com is recommended.
The SD memory card formatted may not always be applicable based on the maker and the kind of the SD memory card for
this recorder.
- For this recorder, the SD memory cards up to 2GB in capacity can be used.
The free space of the SD memory card is smaller than the indicated capacity.
92
Page 13

Introduction (Continued)
Life of the battery
The battery has its own span of life. Along with the frequency of use and the time passed, the battery capacity decreases gradually.
When the usable time becomes substantially short, the battery life seems to have come near the end. Then, procure a new battery.
LCD monitor
* Do not press the LCD monitor strongly, or the display of the LCD monitor could be uneven or the LCD monitor could be broken
down.
* When used in a cold place, images look like trailing. However, this is not a fault.
Images in this manual
The photos in this manual as display image examples are only imaginary. They are not images actually taken by using this recorder.
Copyright
Unless used for personal use, it is prohibited strictly under copyright law or international convention to use any still-image or
moving-image format file without the prior consent of the copyright holder. It is also prohibited strictly under copyright law or
international convention to transfer such a file, whether it is paid for or charge-free, onto the Internet or distribute the same to third
persons. If this recorder should be used for any illegal act against copyright law, be forewarned that we are not liable at all for any
compensation. Even if using for personal use, be careful that there could be a situation where video or audio recording is restricted or
illegal.
- The SD logo is a registered trademark.
- Windows, Windows MediaTM, Internet Explorer and DirectX are trademarks of Microsoft Corporation of the United States and
other countries.
- Other names, company names and product names referred to in this instruction manual are trademarks or registered trademarks
of the respective companies.
This recorder may be use in household environment. However, if this recorder is used in close proximity to a radio receiver or
television receiver, poor reception could be caused. Handle the recorder in the proper manner in accordance with the instruction
manual.
93
Page 14

Introduction (Continued)
Contents
Introduction ...................................................................................... 82
IMPORTANT SAFEGUARDS ....................................................... 82
Lithium-ion Battery Handling Precautions ....................................84
BEFORE YOU USE ...................................................................... 87
DISCLAIMERS.............................................................................. 92
Contents........................................................................................ 94
Confirming the Accessories upon Unpacking ............................... 95
Preparations .....................................................................................96
The Name of Each Part ................................................................96
The Name of Each Screen ...........................................................97
How to Charge the Recorder ........................................................ 98
Remaining Battery Power .............................................................99
How to Use and Remove the Belt Clip .......................................100
How to attach/detach the camera head ...................................... 102
Waterproof function of this recorder ...........................................103
How to Load and Unload the SD Memory Card ......................... 104
Turn ON and Turn OFF the Power Supply .................................105
Turning ON the power suppl y ..................................................... 105
Turning OFF the power supply ...................................................105
Setting to the hold state ...............................................................106
Set the Date and Time ...................................................................107
Recording .......................................................................................108
How to record.............................................................................. 108
Changing the record settings...................................................... 110
Standard duration of recording ................................................... 11 2
Playing back the file......................................................................114
How to play the file ..................................................................... 114
Search / Bookmark ..................................................................... 115
Changing the play settings ......................................................... 11 7
Delete File .......................................................................................11 9
Using in Connection with External Devices .............................. 120
Attaching an external microphone to the recorder .....................120
Outputting video to the external monitor ....................................121
Connection to the earphone .......................................................122
Connection to a speaker............................................................. 122
Changing Various Settings on the Setting Item Screen..........123
How to change ............................................................................ 123
Setting Item List .......................................................................... 124
SD card information ....................................................................126
Format SD card .......................................................................... 127
Firmware upgrade....................................................................... 128
Setting the Date and Time ..........................................................130
Replacing the Lens .......................................................................132
Adjusting the Focus...................................................................... 133
Connection to the PC.................................................................... 134
Connection to the PC ................................................................. 134
Browsing the files........................................................................ 135
Troubleshooting ............................................................................136
Specification .................................................................................. 141
Optional Accessories ................................................................... 142
Note .................................................................................................143
94
Page 15
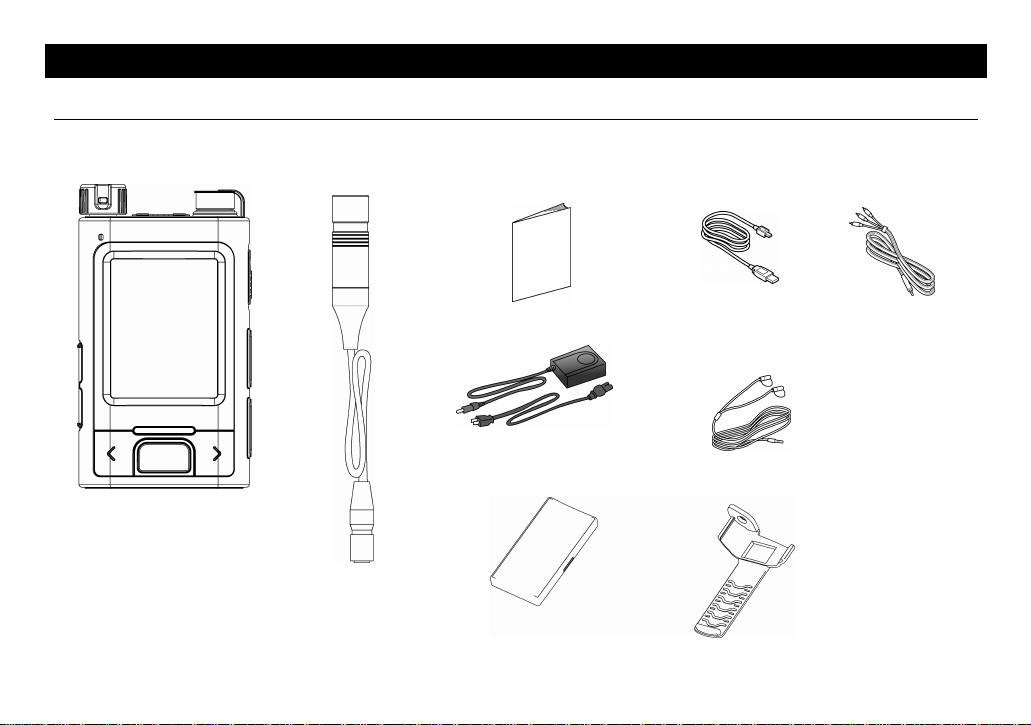
Confirming the Accessories upon Unpacking
Recorder
Camera head
Instruction manual
AC adapter/ Power cord
Battery pack
Introduction (Continued)
USB cable
Earphone
Belt clip
AV cable
95
Page 16
Preparations
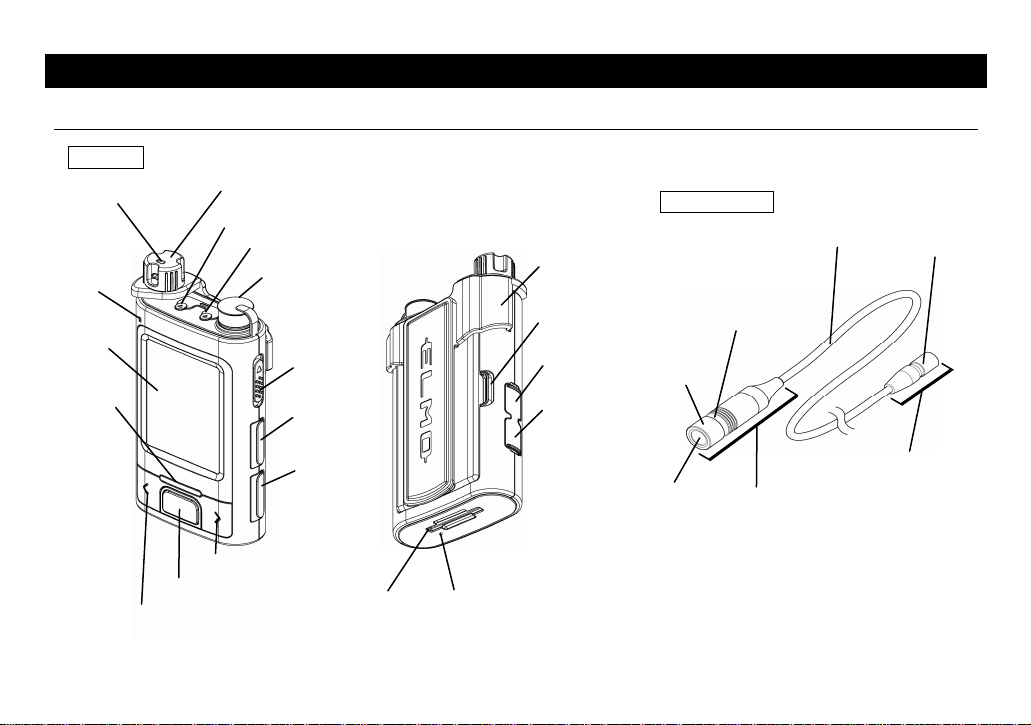
The Name of Each Part
Recorder
Strap hole
Microphone
LCD
LED
∨(Down)
Belt clip locking screw
Earphone / AV output
∧(Up)
REC
External microphone
Camera head
attaching connector
POWER&
HOLD
MENU
ENTER
SD card slot
RESET
96
Belt clip
Battery lock
USB terminal
DC-IN terminal
Camera Head
Lens cover
Front glass
Camera cable
Direction indicator ring
※The side marked with
the ELMO logo
indicates the upper
side.
Camera unit
Screw lock
Head connector
Page 17
y
∧ ∨
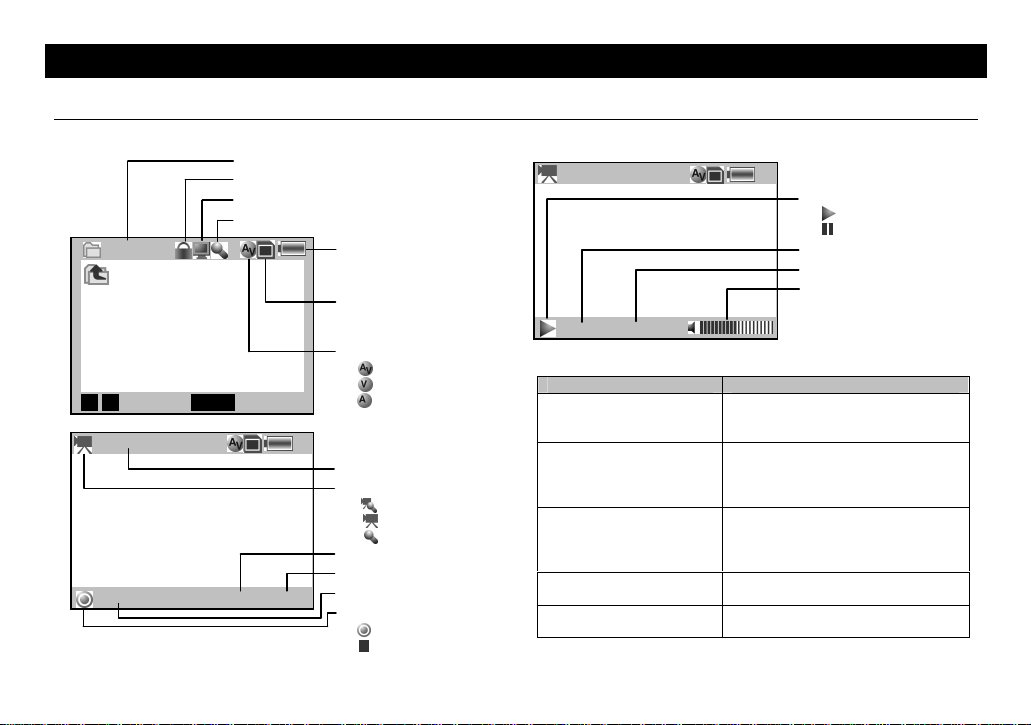
The Name of Each Screen
Preparations (Continued)
Playlist
Return
SELECT
ENTER
MOV00001.asf
00:00:00 010:25:00(999MB)
Folder name
HOLD
AV cable connection
External microphone
Battery remaining power
Blue: Normal
Red: Charged
SD memory card
Blue: SD memory card i n
Gray: No SD memory card
Record state
OK
Record file name
Record mode
: Video + audio
: Video (No audio)
: Audio only
Recordable time
SD memory card remaining capacity
Recorded time
Record state
:Record state
:Record standby state
: Video + audio
: Video (No audio)
: Audio only
MOV00001.asf
Play state
: Play state
: Pause state
Played time
Total recorded time
Volume
00:00:50/00:07:00
zWarning message displa
Message Meaning
Load the SD memory
card.
The SD memory card is
locked. Check and load
the SD memory card
again.
The SD memory card is
unformatted. Do you want
to format the SD memory
card now?
This file cannot be played. The file is corrupted and cannot be
The SD memory card has
little remaining capacity.
The SD memory card has not been
loaded or may not have been loaded
properly. (ÎP104)
The write switch of the SD memory
card is in “LOCK.”
The SD memory card has been
formatted in a wrong format. Format
the SD memory card in the FAT16
file system (ÎP127)
played. Delete the data.
The remaining capacity of the SD
memory card is very low.
97
Page 18
Preparations (Continued)
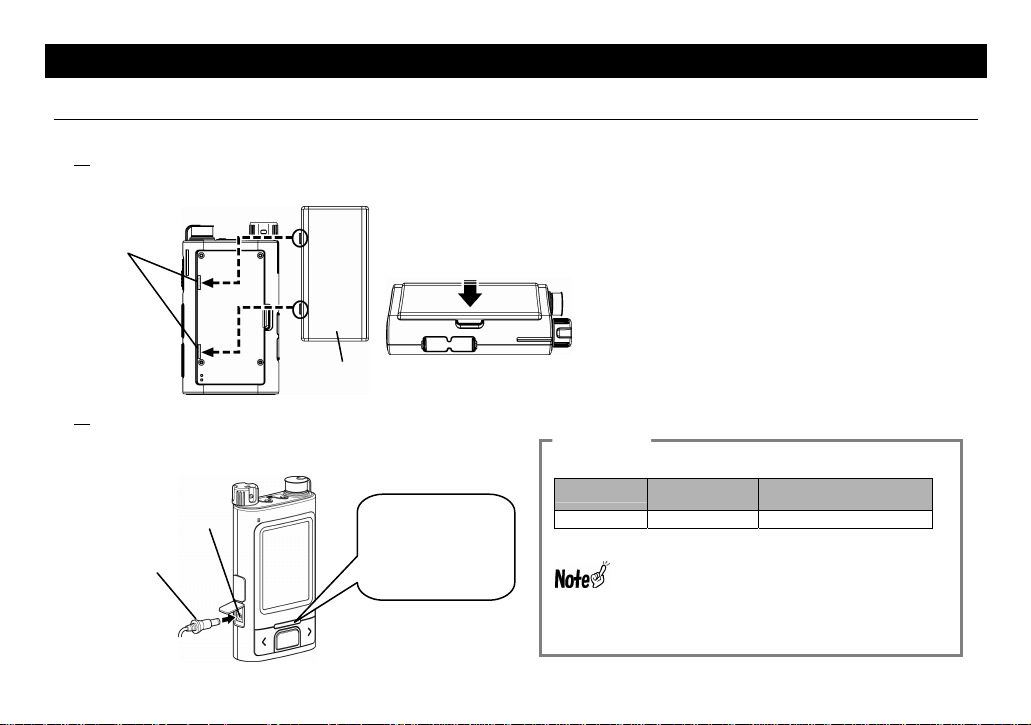
How to Charge the Recorder
1 Set in the battery.
Fit the catches of the battery in their mating slits in the recorder,
and push the battery in completely.
Fit catches in
Battery
2 Start recharging.
Plug the DC plug of the AC adapter in the DC-IN terminal on
the side of the recorder, and plug the power plug in the AC
power outlet.
To AC power receptacle
DC-IN terminal
DC plug
While ch arging, the
LED lights up orange.
Upon completing the
charge, the LED turns
green.
Push
Check
Battery charging time and continuous operating time
Charging time
Approx. 3 hours Approx. 5 hours Approx. 2.5 hours
※ Charging in a high-temperature or low-temperature
environment may require longer time
Continuous play
time
When plugging or unplugging the AC adapter,
turn OFF the power supply to the recorder
beforehand.
Continuous recording time
(Saving mode: ON)
98
Page 19
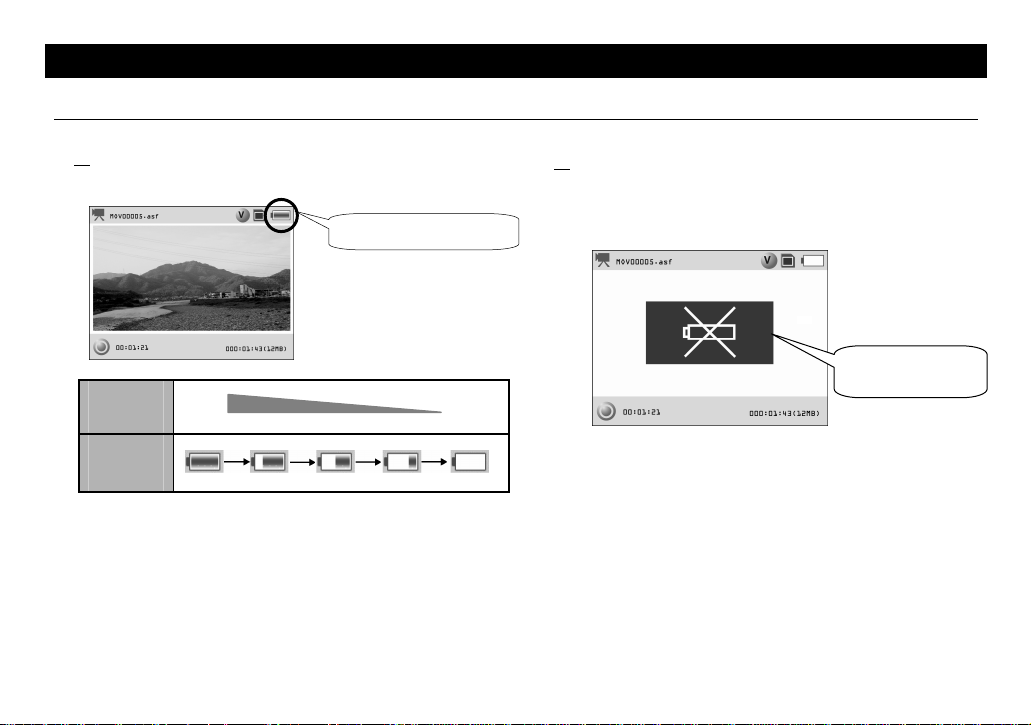
Remaining Battery Power
Preparations (Continued)
1 According to the remaining batter y power, the battery icon on
the upper right corner of the LCD monitor varies as illustrated
below:
Remaining
battery
power:
Change in
the icon
display
Full
Battery remaining power
Empty
2 When the remaining battery power is running low, the “No
Battery Power” indicator appears on the LCD monitor and the
power is turned OFF in 5 minutes.
In this case, recharge the battery immediately with the supplied
AC adapter. (ÎP
99
98)
“No Battery Power”
Warning
Page 20
Preparations (Continued)
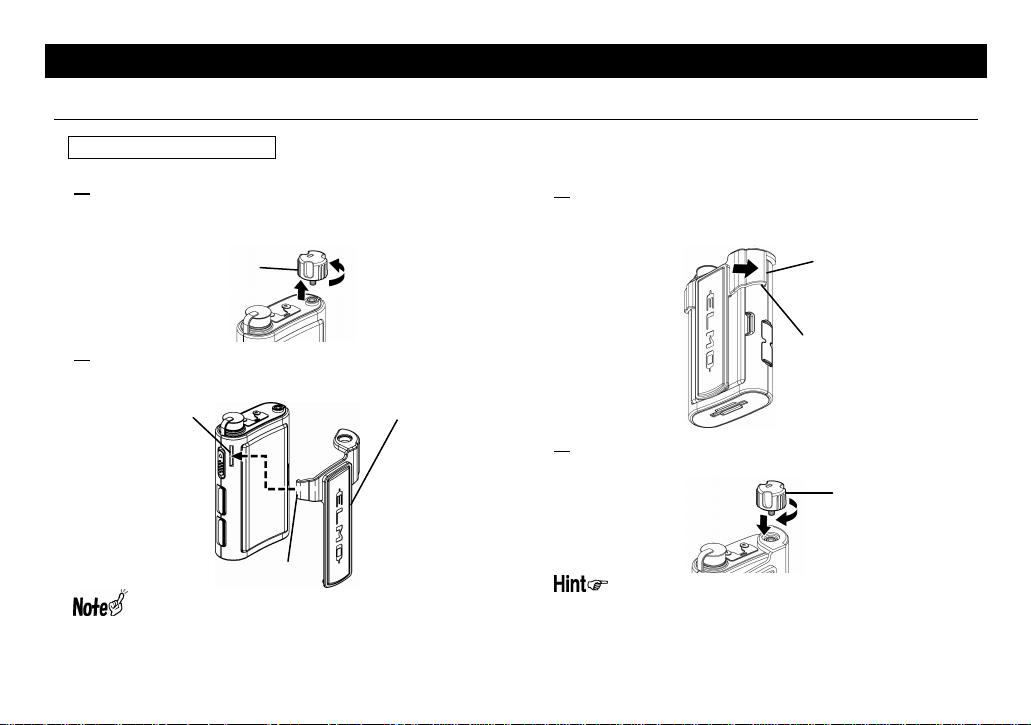
How to Use and Remove the Belt Clip
How to attach the belt clip
1 Remove the belt clip locking screw
Remove the belt clip locking screw by turning it
counterclockwise.
Belt clip locking
screw
2 Attach the belt clip.
Match the slit (1) in the reorder side with the A part of the belt
clip.
Slit (1)
A part of the belt clip
Do not apply excessive force to the belt clip, or the belt
clip could be broken.
Belt clip
3 Fit the belt clip
Fit the convex (B) part of the belt clip in the slit (2) by pressing it
in the arrowed direction.
4 Attach the belt clip locking screw.
Attach the belt clip locking screw by turning it clockwise.
The threaded hole for belt clip locking is of the same
shape and size as that of the threaded hole (1/4-20UNC)
of tripods, so that this recorder can be used by fixing it to
flexible camera mounts available in the market.
100
Convex (B) part of the belt
Slit (2)
Belt clip locking screw
Page 21

How to remove the belt clip
Preparations (Continued)
1 Remove the belt clip locking screw
Turn the Belt clip locking screw counterclockwise for removal.
Belt clip locking
screw
2 Remove the belt clip.
Press the C part of the belt clip in the arrowed direction while
pressing the other side of the belt clip
.
C part of the belt clip
3 Attach the belt clip locking screw.
Attach the belt clip locking screw by turning it clockwise.
Belt clip locking
101
screw
Page 22

r
Preparations (Continued)
How to attach/detach the camera head
When attaching the camera head to the recorder, turn OFF the power supply to the recorder beforehand.
Attaching the Camera Head to the Recorder
1 Remove the rubber cover.
Remove the rubber cover from the camera head attaching
connector of the recorder.
Rubber cover.
2 Attach the camera head.
Attach the head connector of the camera head to the camera
head attaching connector.
Camera head.
Camera head attaching
connecto
When attaching the
head connector,
confirm the right
connector position in
relation to the camera
connector so that the
pins mate with the
holes. If the head
connector is thrust
forcibly, the camera
connector pins could
be bent or other
damage could be
caused.
3 Fasten the screw lock.
Fix the camera head by turning the screw lock of the head
connector clockwise.
102
Screw lock.
Head
connector
(Concave)
Camera connector
(Convex)
Page 23

Preparations (Continued)
Removing the Camera Head
1 Remove the camera head.
Turn the screw lock of the head connector counterclockwise to remove the camera head, and attach the rubber cover.
Waterproof function of this recorder
The camera head section of this recorder is waterproof. Note with care that the recorder is NOT waterproof.
zWaterproof performance: Corresponding to JIS Protection Class 8 (IP×8) with waterproof structure working up to 40m in water depth.
Camera head part:
Waterproof
Recorder part:
Non-waterproof
The recorder part is not waterproof structure. Do not soak
in water.
After using the camera head in the water (sea, river),
wash the camera head completely with fresh water. Then,
wipe water droplets off the camera head with a dry, soft
cloth, and dry the camera head completely in an airy,
shaded area.
When the lens is replaced or the focus is adjusted, check
the thread part and the O-ring for dirt, and the O-ring for
breaks, scrapes or cracks. These defects could cause a
water leak or failure.
103
Page 24

Preparations (Continued)
How to Load and Unload the SD Memory Card
When loading or unloading the SD memory card, turn OFF the power supply to the recorder beforehand, or the stored data
could be lost. The file saved in the SD memory card could be corrupted or deleted or “write” function of the SD memory card
could be disabled.
Do not insert any object other than the SD memory card into the SD memory card socket, or the recorder could be damaged.
How to load the SD memory card
How to unload the SD memory card
1 Load the SD memory card.
Load the SD memory card in the SD memory card slot in the
side of the recorder. At this time, ensure that the back side of
the SD memory card is the topside (LCD side).
SD me mory car d sl ot
SD memory card
(Back side)
SD memory card (Front side)
LCD
SD memory card (Back side)
1 Unload the SD memory card.
Push the SD memory card in the arrow direction, and the SD
memory card will eject a little. Pull out the SD memory card
from the SD memory card socket.
Push the SD memory
card.
104
Page 25

Turning ON the power supply
Turn ON and Turn OFF the Power Supply
Before turning ON the power supply, be sure to load the SD memory card. (ÎP104)
1 Turn ON the power supply.
Press [POWER&HOLD] slide switch to the POW ER side for approx. 2 seconds.
Then, the Startup screen appears on the LCD monitor.
※When the power supply is being turned ON, do not operate any buttons.
Turning OFF the power supply
1 Turning OFF the power supply
Press [POWER&HOLD] slide switch to the P OWER side for approx. 2 seconds.
Then, the power supply is turned OFF.
Do not turn OFF the power supply to the recorder during recording,
or the file under recording could be broken and unable to be played.
105
Playlist screen
Power OFF
After turning ON the power
supply, do not operate any
buttons until the Playlist
screen appears, or the SD
memory card may not be
recognized normally.
※ When turning ON the power
supply to the recorder for the first
time after the purchase, the
screen for setting the date and
time appears (ÎP107)
Auto Power OFF Function
If no operation is made for approx.
5 minutes except the time when the
camera is recording or playing, the
power supply to the camera will be
turned OFF automatically to save
the battery life.
Page 26
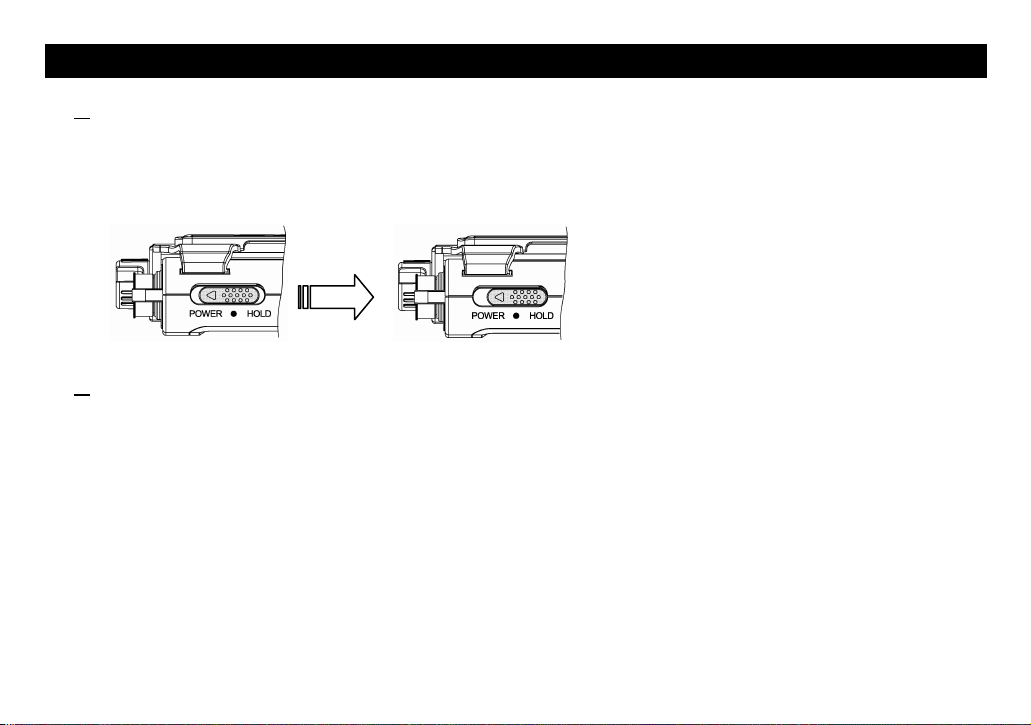
Setting to the hold state
1 Set to the hold state.
Press the [POWER&HOLD] slide switch to “HOLD” side until the switch is clicked.
※ When the recorder is set to the hold state, no other functions of the recorder
are available. This helps prevent wrong operations during the recording or
when playing back the data.
“Click”
2 Release the hold state.
Return the [POWER&HOLD] slide switch to the center.
106
Page 27

Set the Date and Time
When the power supply to the recorder is turned ON for the first time after purchase, the Date and Time Setting screen appears.
Then, set the date and time according to the procedures below.
1 Move the cursor.
To move forward the cursor, press [ENTER]. To move backward the cursor,
press [MENU].
※ cursor moves forward in the following order:
Yea r Æ Month Æ Day Æ Hour Æ Minute Æ Second
2 Change the values.
Change the values by using [∧] or [∨]
Cursor
3 Accept the values.
Press [REC] to fix the values.
●Now, the initial setting is completed, and the Playlist screen appears.
In an y of the following events, the date and time setting is reset, so you must set the date and time again:
●The battery has been removed from the recorder.
●The recorder with the battery in has not been used for a long time.
●The battery has been discharged completely.
107
Page 28

q
)
Recording
How to record
1 Turn ON the power supply. (ÎP105)
2 Start video recording.
The recorded data is saved automatically on the SD memory card.
Method (1):
Playlist screen
Record Standby
screen
Displays the camera
image. (For audio only,
the microphone is
displayed.)
[REC] lighting
[REC]
[REC]
Press [REC] to stand by for the
recording. Press [REC] again to
start recording.
In the record standby state, it is
possible to adjust the camera
direction while watching the LCD
monitor or set the record by using
the OSD. (ÎP110)
(For audio only, such adjustment is
not re
uired.
Record screen
Starts recording.
[REC] blinking
Method (2):
Playlist screen
[REC]
When shooting an important scene, be sure to try
shooting beforehand and check the resolution,
the video quality and the frame rate to see
whether their settings are appropriate or not.
Do not turn OFF the power supply to the recorder
during recording, or the being recorded could be
corrupted and become unplayable.
Hold down [REC] to start recording.
This is convenient for quick start when the
camera direction adjustment or record
setting is not required.
Hold down
108
Page 29
How to record (Continued)
3 End video recording.
How to end (1)
Record screen
[ENTER]
Playlist screen
Only when the frame rate set value is 25 frames/sec or 15 frames/sec, will the Record Preview screen be displayed at 12.5
frames/sec. However, the file is recorded at the record frame rate set value.
Hold down [ENTER], and the
recording will end.
Hold down
Upon the end of recording, the
recorded file can reviewed
shortly.
Recording (Continued)
How to end (2)
Record screen
[REC]
Record Standby
screen
Hold down [REC], and the
recording will end.
Hold down
Stand by for the recording,
and prepares for the next
recording.
109
Page 30

Recording (Continued)
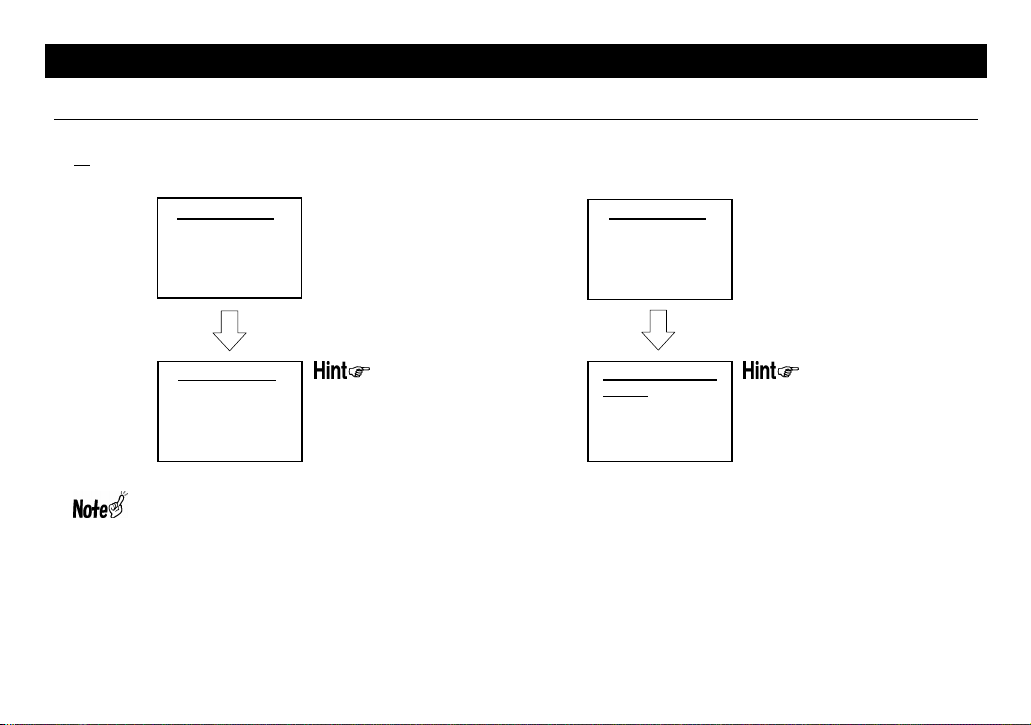
Changing the record settings
1 Turn ON the power supply. (ÎP105)
2 Display the Record Mode setting screen.
Press [REC] once to enter the Record mode, and then, press
[MENU] to appear the Record Mode setting screen.
3 Select the record setting item.
Move the cursor to the items to be set using [∧] or [∨], and
press [ENTER] to make the selection.
When [ENTER] is pressed in the 2nd menu level, the setting
is accepted and the OSD menu disappears. When [MENU]
is pressed in the 1st or 2nd menu level, the setting is
cancelled and the OSD menu disappears.
Record settings
OSD
-1st hierarchy,
-2nd hierarchy,
110
Page 31

Recording (Continued)
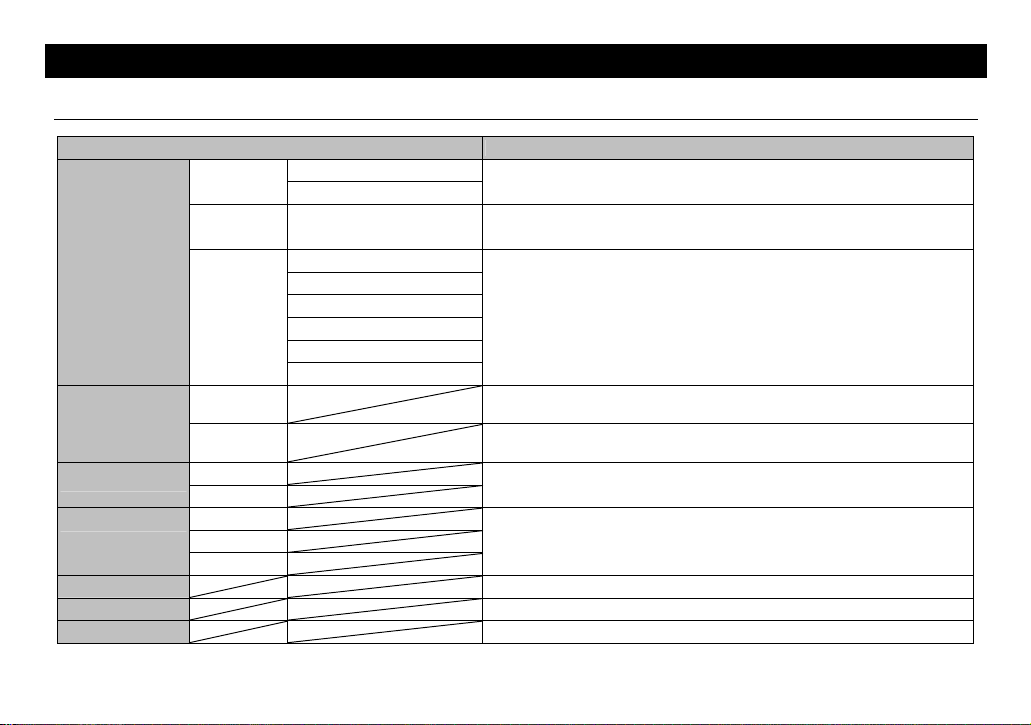
[OSD item list of record settings]
1st menu level 2nd menu level
Resolution
Video Quality
Frame Rate
Record Mode
[Video/Audio]
Time Display
Display Brightness
Camera Length
Exposure
Name
704×480
640×480
320×240
160×128
High
Standard
Low
25 frames/sec
15 frames/sec
5 frames/sec
3 frames/sec
1 frame/sec
Video + Audio
Video (No Audio)
Audio Only
Counter
Clock
Dark ÅÆ Bright
11 steps
80cm
150cm
Dark ÅÆBright
13 steps
Function
To set the resolution
To set the video quality
To set the frame rate
To set the data to be recorded
To switch the time display mode in the status display bar to the counter mode or clock
mode
To set the brightness of the LCD monitor
To set the length of the cable of the camera head to be connected
To adjust the intensity of light that comes into the camera
111
Page 32

Recording (Continued)
Standard duration of recording
[SD memory card capacity: 1GB] Record Mode: Video (No Audio) ※Comparison table of approximate recording time.
Resolution Video quality
704 x 480
640 x 480
320 x 240
160 x 128
High
Standard
Low
High
Standard
Low
High
Standard
Low
High
Standard
Low
25 frames/sec 15 frames/sec 5 frames/sec 3 frames/sec 1 frames/sec
34min 56min 2hr50min 4hr44min 14hr12min
38min 1hr 4min 3hr14min 5hr24min 16hr14min
45min 1hr15min 3hr47min 6hr19min 18hr57min
45min 1hr15min 3hr47min 6hr19min 18hr57min
54min 1hr30min 4hr32min 7hr34min 22hr44min
1hr 8min 1hr53min 5hr41min 9hr28min 28hr25min
1hr 8min 1hr53min 5hr41min 9hr28min 28hr25min
1hr30min 2hr31min 7hr34min 12hr38min 37hr54min
2hr16min 3hr47min 11hr22min 18hr57min 56hr51min
4hr32min 7hr34min 22hr44min 37hr54min 113hr42min
6hr 3min 10hr 6min 30hr19min 50hr32min 151hr36min
9hr 5min 15hr 9min 45hr29min 75hr48min 227hr25min
[SD memory card capacity: 1G] Record Mode: Video + Audio ※Comparison table of approximate recording time.
Resolution Video quality
704 x 480
640 x 480
320 x 240
160 x 128
[SD memory card capacity: 1GB] Record Mode: Audio ※Comparison table of approximate recording time.
71hr4min
High
Standard
Low
High
Standard
Low
High
Standard
Low
High
Standard
Low
25 frames/sec 15 frames/sec 5 frames/sec 3 frames/sec 1 frame/sec
33min 56min 2hr44min 4hr26min 11hr50min
38min 1hr 4min 3hr 6min 5hr 1min 13hr13min
45min 1hr14min 3hr35min 5hr48min 14hr57min
45min 1hr14min 3hr35min 5hr48min 14hr57min
53min 1hr29min 4hr16min 6hr51min 17hr13min
1hr7min 1hr50min 5hr15min 8hr21min 20hr18min
1hr 7min 1hr50min 5hr15min 8hr21min 20hr18min
1hr29min 2hr26min 6hr51min 10hr43min 24hr43min
2hr12min 3hr35min 9hr48min 14hr57min 31hr35min
4hr16min 6hr51min 17hr13min 24hr43min 43hr44min
5hr35min 8hr50min 21hr15min 29hr32min 48hr23min
8hr 3min 12hr29min 27hr44min 36hr40min 54hr 8min
Frame rate
Frame rate
112
Page 33

Recording (Continued)
The actual memory capacity and recording time of the SD mem ory card may depend on its manufacture or type.
When the SD memory card of different capacity from 1GB is used, the recording time is roughly proportional to the capacity.
The recording time of the SD memory card of the same capacity varies according to the shooting conditions.
SD memory card applicable to this camera
・As the SD memory card applicable to this camera, SD Memory Card M-Series made by Hagiwara Sys-Com
is recommended.
113
Page 34

Playing back the file
How to play the file
1 Turn ON the power supply (ÎP105)
2 Select the file
Select the file to be played by using [∧] or [∨].
3 Play the file
Press [ENTER] to play the file.
※ When the playback ends, return to the Playlist screen.
z Button operation during playback
Button operation Function
[∧]
[∨]
[ENTER]
[MENU]
Frame-by-frame rewind/Frame-by-frame playback
It is normal operation to take approx. two more seconds for
frame-by-frame rewind than frame-by-frame playback due to the
file structure.
When frame-by-frame rewind is in work (The duration to
displaying the previous frame), do not conduct any
operation. Unexpected operation may occur.
To adjust the volume
To stop temporarily
☞When this button is held down, the
Playlist screen is displayed again.
To switch the play mode (ÎP115)
/When the recorder is at a pause, the
OSD remains in display.
☞When this button is held down, the
Setting Item screen is displayed.
Playlist screen
[ENTER]
114
Page 35

Search / Bookmark
1 Turn ON the power supply. (ÎP105)
2 Play the file. (ÎP11 4)
3 Switch the play mode.
During the data playing, each time [MENU] is pressed, the play mode is switched as follows:
Play Search Bookmark
Search mode
In the search mode, when [∧] (UP) or [∨] (DOW N) is held down, the data in
playback can be fast-rewound or fast-forwarded.
z
Button operation in the search mode
Button operation Function
[∧]
[∨]
[ENTER]
[MENU]
shorter by jumping through the frames. Some scenes maynot be
displayed during Fast-rewind/Fast-forward. Audio function does not
output sound during Fast-rewind/Fast-forward.
To go to the next file or to return to the previous file
☞When this button is held down, the play mode is
switched to the fast-forward/fast-rewind mode.
To stop temporarily
☞When this button is hel d down, the Playlist screen is
displayed again.
To switch the play mode
☞When this button is held down, the Setting Item screen
is displayed.
Fast-rewind/Fast-forward make the total time of pla yback
Playing back the file (Continued)
File exchange (Next file / Previous file)
When the record mode for the playing file
is set to [Video + Audio] or [Video], the
mode can not be selected to [Audio only].
When the record mode for the playing file
is set to [Audio only], the mode can not be
selected to [Video + Audio] or [Video].
115
Page 36

Playing back the file (Continued)
Bookmark mode
In the bookmark mode, when a favorite scene is checked with
[
] and [ENTER] is pressed, the checked favorite scene can
be displayed instantaneously by using [∧] (UP) or [∨] (DOW N)
z Button operation in the bookmark mode
Button operation Function
[∧]
[∨]
[ENTER]
[MENU]
Depending on the length of video file, the scene may start
slightly earlier than bookmarked position.The bookmark
function is used as a rough indication for playing video.
The bookmark is not retained after the end of the data
play.
To jump to the checked bookmark
To check a bookmark
☞When this button is held down, the
bookmark is deleted.
To switch the play mode
☞When this button is held down, the
Setting Item screen is displayed.
116
Page 37

Changing the play settings
1 Turn ON the power supply. (ÎP105)
2 Play the file. (ÎP11 4)
3 Display the play settings.
Press [ENTER] in playback to pause the recorder.
Then, press [MENU]. Then, the Play Setting OSD appears.
4 Select the play settings.
Move to the item to be set by using [∧] (UP) or [∨] (DOW N), and fix
the selection by pressing [ENTER].
When [ENTER] is pressed in the 2nd menu level, the setting is fixed
and the OSD menu. When [ENTER] is pressed in the 1st or 2nd menu
level, the setting is cancelled and the OSD menu disappears.
When the playing an audio file, the Play Setting OSD is not
displayed.
Playing back the file (Continued)
Play settings
OSD
-1st hierarchy,
-2nd hierarchy,
117
Page 38

Playing back the file (Continued)
[OSD item list of play settings]
1st menu level 2nd menu level
Display
Playback Speed
Display Time
Brightness
Name
ON
OFF
x 1/2
Standard
x 2
x 4
x 8
Counter
Clock
Dark ÅÆBright
11 steps
Function
To display the status display bar on the screen in recording
To set the file playback speed
To switch the time display mode of the status display bar during recording or playback
to counter mode or clock mode
To fix the brightness of the LCD monitor
118
Page 39

1 Turn ON the power supply (ÎP105)
2 Select the file.
Select the file to be operated on the Playlist screen by using [∧]
or [∨].
3 Display the OSD
When [MENU] is pressed, the OSD appears.
When [MENU] is pressed again, the OSD disappears
●File Operation screen
Play
Delete File
File information
SD Information
Format SD Card
4 Select “Delete File.”
Select “Delete File” by using [∧] (UP) or [∨] (DOWN), and press
[ENTER]
5 Delete the file.
When the confirmation message is displayed, press [ENTER].
Then, the file is deleted.
When [MENU] is pressed, the file deletion is cancelled.
Delete File
119
Page 40

Using in Connection with External Devices
Attaching an external microphone to the recorder
When attaching an external microphone to the recorder, turn OFF the power supply to the recorder beforehand.
1 Remove the rubber cover.
Remove the cover from the external microphone terminal on the
top of the recorder.
2 Attach the microphone.
Connect the connection plug (only of φ 3.5mm
mini-plug-shaped) of the microphone with the external
microphone input terminal of the recorder.
※ Confirm on the recorder’s display LCD monitor that the
external microphone is connected.
3 Start recording.(ÎP108)
※ When an external microphone is connected, the built-in
microphone cannot be used.
External microphone(not included)
120
Page 41

Using in Connection with External Devices (Continued)
Outputting video to the external monitor
When connecting the recorder with any external equipment, turn OFF the power supply to the recorder beforehand.
1 Connect the AV cable.
Remove the rubber cover from the Earphone /AV output terminal, and connect the supplied AV cable equipped with RCA pin plugs. T hen,
connect the AV cable on the monitor side.
※When the AV cable is plugged in the recorder, the video output is switched automatically from the recorder LCD monitor to an external
monitor.
Yellow plug:To the video output terminal
White plug:To audio input terminal (left)
Red plug:To audio input ter minal (ri ght)
AV cable (supplied)
When the camera head is attached to the recorder, recording can be made by using an external monitor.
When using the external monitor, set the video output system to that of your country/region.(ÎP
Monitor
123,125)
121
Page 42

Using in Connection with External Devices (Continued)
Connection to the earphone
1 Connect the earphone.
Remove the rubber cover from the Earphone /AV output terminal,
and connect the earphone.
※The audio output of the recorder is monaural.
The φ 3.5mm mini-plug can be used for earphone
connection, but all operations of the earphone cannot be
guaranteed.
The earphone jack is common to the AV cable jack. If the
LCD monitor display disappears due to wrong
recognition when the earphone is in connection, redo
the connection of the earphone.
Connection to a speaker
1 Connect the AV cable.
Remove the rubber cover from the Earphone /AV output terminal,
and connect the supplied AV cable with a speaker (not included).
The φ 3.5mm mini-plug can be used for speaker
connection, but all operations of the speaker cannot be
guaranteed.
When connecting/disconnecting the AV cable, check the
connector shape carefully to confirm the right mating
position and plug the AV cable carefully.
AV cable
Earphone (supplied)
122
Page 43

How to change
Changing Various Settings on the Setting Item Screen
1 Turn ON the power supply.(ÎP105)
2 Display the setting items.
Hold down [MENU] to display the setting items.
3 Select the setting item.
Select the setting item by using [∧] (UP) or [∨] (DOWN), and
press [ENTER].
When the setting item has 2 menu levels, the Setting Contents
screen of the 2nd level is displayed.
4 Select the setting contents.
Select the setting contents, and press [ENTER] to fix the selection.
For the setting contents, refer to the “setting item list.”(ÎP
When [MENU] is pressed, the Playlist screen is resumed.
Setting item
Setting contents
124)
123
Page 44

Changing Various Settings on the Setting Item Screen (Continued)
Setting Item List
Name Function
704 × 480
640 × 480
320 × 240
160 × 128
High
Standard
Low
25 frames/sec
15 frames/sec
5 frames/sec
3 frames/sec
1 frame/sec
Video + Audio
Video (No Audio)
Audio Only
ON Display Status
OFF
x 1/2
Standard
x 2
x 4
x 8
To set the resolution
To set the video quality
To set the frame rate
To set the recording mode
ON: To display the status display bar on the screen in recording
To set the file playback speed
Record Option
Display
Resolution
Video Quality
Frame Rate
Record Mode
[Video/Audio]
Playback Speed
124
Page 45
Changing Various Settings on the Setting Item Screen (Continued)
Setting Item List (Continued)
Name Function
Counter Display Time
Clock
Dark ÅÆBright Brightness
11 steps
Display
SD Card
TV system
Language
F/W Upgrade To upgrade the firmware(ÎP128)
S/W Information To display the version information of the firmware
Set Time To set the time(ÎP130)
Power Saving
mode
SD card
information
Format SD
card
NTSC
PAL
English
Japanese
Korean
OFF
10 seconds
30 seconds
1 minute
3 minutes
5 minutes
To display the SD memory card information
To format the SD memory card
To switch the time display mode of the status display bar during recording or
playback to counter mode or clock mode
To set the brightness of the LCD monitor
To automatically turn OFF the power supply to the LCD monitor at the set time
※When resetting the turned-off status, the LCD monitor returns to the ON
state by button operation.
To switch the TV system to the NTSC system (e.g., Japan, North America) or
the PAL system (e.g., Europe, Australia)
To set the on-screen l anguage to English, Japanese or Korean
125
Page 46

Changing Various Settings on the Setting Item Screen (Continued)
SD card information
1 Turn ON the power supply.(ÎP105)
2 Display the setting items.
Hold down [MENU] to display the setting items.
3 Select “SD Card.”
Select the “SD card” by using [∧] or [∨], and press [ENTER].
Then, the SD memor y card items are displayed.
4 Select “SD Card information”
Select the “SD Information” by using [∧] or [∨ ], and press
[ENTER]. Display the SD information
Setting item screen
126
Page 47

Format SD card
Changing Various Settings on the Setting Item Screen (Continued)
1 Turn ON the power supply.(ÎP105)
2 Display the setting items.
Hold down [MENU] to display the setting items.
3 Select “SD Card.”
Select the “SD card” by using [∧] or [∨], and press [ENTER].
Then, the SD memor y card items are displayed.
4 Select “SD Information.”
Select the “Format SD card” by using [∧] or [∨], and press
[ENTER].
5 Format SD card
When “Are you Sure to format this SD Card” appears, press
[ENTER] to execute the formatting.
When [MENU] is pressed, the format is cancelled.
Setting item screen
127
Page 48

Changing Various Settings on the Setting Item Screen (Continued)
Firmware upgrade
For the purpose of enhancing the recording function, the recorder can upgrade the firmware (recor der operation program).
Since this upgrading is to change the central function of the recorder, improper upgrading could cause failure to the recorder,
such as no startup.
For upgrading the firmware, only use upgrades distributed from our website
If any firmware other than the above or the above firmware with the addition of processing is used, it could cause failure.
Therefore, when upgrading the recorder, observe the following pr ocedures with care:
When connecting the recorder with the PC or upgrading, be sure to use both the AC adapter and the battery. Note that if the
power supply is shut off during the upgrading process, the system will fail and will no longer be functional.
http://www.elmo.co.jp/suv-cam/en/index.html
1 Connect the recorder with the PC. (ÎP134)
2 Turn ON the power supply. (ÎP105)
3 Move the file.
The latest firmware preserved in an arbitrary folder on the personal
computer is moved in the SD card.
※The SD card is recognized as "Removal disk".
4 Reboot the recorder.
Turn OFF the power supply to the recorder, and unplug the USB cable.
Then, turn ON the power supply again to the recorder.
5 Display the setting item.
Hold down [MENU].
The firmware is moved here.
128
Page 49

Changing Various Settings on the Setting Item Screen (Continued)
6 Select “F/W Upgrade.”
Select “F/W Upgrade” by using [∧] (UP) or [∨] (DOWN), and press
[ENTER].
7 Confirm the upgrade file.
When the upgrade file is not contained in the SD memory card, a
message shown in the right figure appears.
When the upgrade file is contained, go to the next step.
8 Execute the upgrade.
A message confirming the execution of the upgrade appears. W hen
[ENTER] is pressed, the upgrade starts.
When [MENU] is pressed, the upgrade is cancelled and the display
returns to the setting item menu.
9 The upgrade is completed.
The power supply is turned OFF automatically.
※After the upgrade is completed, the upgrade file in the SD memory
card is deleted automatically.
Since the set value of each setting item may be changed after the
upgrade, check all setting values after the upgrade completion
129
Page 50

Changing Various Settings on the Setting Item Screen (Continued)
Setting the Date and Time
The date and time is saved in the recorded data.
1 Turn ON the power supply.(ÎP105)
2 Display the setting items.
Hold down [MENU].
3 Select “Set Time.”(ÎP107)
4 Set the date and time.(ÎP107)
In an y of the following events, the date and time setting is reset, so the date and time should be set again:
• The battery has been removed from the recorder.
• The recorder with the battery in has not been used for a long time.
• The battery has been discharged completely.
130
Page 51

131
Page 52

Replacing the Lens
The camera lens can be replaced by the optional lens.
1 Remove the lens cover.
Remove the lens cover from the camera unit mounting bracket by
turning the lens cover counterclockwise.
2 Remove the lens.
Remove the lens from the camera unit mounting bracket by turning
the lens counterclockwise.
The spring attached to the lens is used for fixing the lens.
Be careful not to lose this spring.
3 Attach the optional lens for replacement to the camera unit
mounting bracket by turning the optional lens clockwise.
When the lens has been replaced, the lens should be
adjusted again. (ÎP
as shown in the right illustrations while directing attention
to the attachment direction.
133) Also, attach the spring to the lens
4 Attach the lens cover.
Attach the lens cover to the camera unit mounting bracket by
turning the lens cover
Check the threaded part and the O-ring for dirt, and the
O-ring for breaks, scrapes or cracks. These defects could
cause a water leak or failure.
clockwise.
Counterclockwise
Lens cover
Counterclockwise
Lens
Clockwise
Optional lens
Clockwise
Lens cover
Camera unit mounting bracket
Lens
Camera unit mounting bracket
Spri ng
132
Page 53

Do not scrub the lens or give a shock to the lens, or the lens could be damaged or failed.
Note that separation at any point other than the point where separation is permitted could cause failure.
Apply grease to the O-ring of the camera unit mounting bracket. If the O-ring is not coated with grease, a water leak could be
caused.
When the lens is replaced or the focus should be adjusted, adjust the focus.
1 Remove the lens cover.
2 Remove the lens cover from the camera unit mounting bracket by turning the
lens cover counterclockwise. Adjust the focus.
Adjust the focus while watching the video on the LCD monitor.
To shoot a near by object, turn the lens clockwise.
To shoot a remote object, turn the lens counterclockwise
.
3 Attach the lens cover.
After adjusting the focus, attach the lens cover to the camera unit mounting
bracket by turning the lens cover clockwise.
Check the thr eaded part and the O-ring for dirt, and the O-ring for breaks, scrapes or cracks. These defects could cause water
leak or failure.
For this recorder, use the dedicated O-ring.
Adjusting the Focus
Counterclockwise: To shoot a
remote object
Clockwise: To shoot a nearby
object
Lens
Lens cover
133
Page 54

Connection to the PC
Connection to the PC
The PC applicable to this import should have been installed with Microsoft Windows2000 (SP4 or newer) or XP (SP2 or newer).
When connecting the recorder with the PC or upgrading, be sure to use both the AC adapter and the battery.
1 Connect the USB cable.
Connect the supplied USB cable with the USB terminal.
Then, the PC connection illustration is displayed on the LCD
monitor of this recorder.
※ If this recorder is not recognized normally, redo the
connection.
USB cable (attached)
To the power
supply outlet
2 Turn ON the power supply. (ÎP105)
When this recorder is connected with the PC for the first time, the
necessary driver is installed automatically by the plug-and-play
function of Windows. For the second and subsequent connections,
the driver installation is not displayed.
My Computer
Removable Disk
Playlist
MOV00001.asf
MOV00002.asf
:
:
VOC00001.asf
VOC00002.asf
:
:
134
Page 55

Connection to the PC (Continued)
Do not unplug the USB cable until the file operation ends completely.
The file can be renamed only on the PC.
Select the file to be renamed, click [Name Change] on the File menu. After inputting a new name, press [ENTER].
Browsing the files
The files in the SD memory card can be browsed on the viewer software of a PC.
zThe ASF files are supported by the viewer software, such as Windows Media Player
The ASF files are not always supported by all viewer software. Check your viewer software whether it supports the ASF files.
Audio Codec
The adopted audio Codec of this recorder is G.726. If your PC has not been installed with the audio Codec G.726, the files
recorded in the record mode of “Video + audio” or “Audio only” cannot be played on the PC. In this case, install the audio
Codec G.726 in your PC. For details, visit our website
http://www.elmo.co.jp/suv-cam/en/index.html
135
Page 56

Troubleshooting
■Battery and power source
Symptom Cause Remedy
The SUV-Cam cannot be
turned ON.
The battery runs out
quickly after charging.
The power supply is ON
but the LCD display is
OFF.
Does the battery have a charge? Use the attached AC adapter or charge the battery. (ÎP
If the recorder is used in cold climates, the battery power may be
The SUV-Cam is being used in a cold Climate
Does the battery have a charge? Use the supplied AC adapter or charge the battery. (ÎP98)
Is the power saving mode ON? Press any button to release the power saving mode.
Is the AV cable plugged in?
lowered temporarily. Warm up the recorder with your body
temperature or the like.
If the AV cable is plugged in, the video output is switched
automatically to the external monitor.
To confirm on the LCD monitor, unplug the AV cable.
98)
136
Page 57

Troubleshooting (Continued)
■Shooting, video recording and audio recording
Symptom Cause Remedy
Is the SD memory card loaded? Load the SD memory card.(ÎP104)
The video cannot be
recorded.
The recording stops
suddenly
The video is not normal.
The video is too bright or
too dark.
The video in play is
accompanied by noise.
The screen shimmers.
Is the free space of the SD memory card
adequate?
Is the SD memory card locked? Release the lock of the SD memory card.
Is the camera head attached? Attach the camera head.(ÎP
The SD memory card has no free space.
Is the camera cable length setting proper?
Is the camera head attached properly?
Is the video output system correct?
Is the exposure set properly?
Is the recorder used near TV receiver or cellular
phone?
Is a dark place being shot?
Is shooting made under the fluorescent
illumination with power supply frequency of
60Hz?
Delete some data from the SD memory card before
recording.(ÎP
Depending on the card type or record mode (resolution, video
quality, frame rate), the recording may stop on the way due to the
lack of the SD memory card’s free.
Refer to P
recording.
Adjust the camera setting to the cable length for the camera head
in use.(ÎP
Attach the camera head properly to the recorder.
102)
(ÎP
When connecting the external monitor, set the video output
system to that of your country/region.(ÎP
Change the exposure set value in adjustment to the desired
brightness. (ÎP
Keep this recorder as far away as possible from TV receiver or
cellular phone.
This is not a failure.
To reduce the noise, sufficiently brighten the object.
This is not a failure.
Avoid light from fluorescent lamps when shooting.
119)
102)
112 “Standard duration of recording” for before the
110, 111)
123, 125)
110, 111)
137
Page 58

Troubleshooting (Continued)
■LCD monitor
Symptom Cause Remedy
The power supply is ON
but the LCD display is
OFF.
The LCD monitor is too
bright or too dark.
Red, blue or green
luminescent spots or black
spots may be seen.
Is the power saving mode ON? Press any button to release the power saving mode.
Is the AV cable plugged in?
Is the screen brightness appropriate? Adjust the screen brightness setting. (ÎP
This is a liquid crystal property phenomenon. This is not a failure.
If the AV cable is plugged in, the video output is switched
automatically to the external monitor. To confirm on the LCD
monitor, unplug the AV cable.
123, 125)
138
Page 59

Troubleshooting (Continued)
■Played video
Symptom Cause Remedy
The video cannot be
played.
The video in play is rough.
The video in play is
accompanied by noise.
Vertical stripe pattern is
seen.
The video is too bright or
too dark.
No audio is heard.
Is the SD memory card loaded? Load the SD memory card saved with the recorded data.
Is there any playable data on the SD memory
card?
The resolution and the video quality are set too
low.
When video is short in a dark place, noise may
be generated to maintain the brightness.
When intensive light like spot light is irradiated to
a part of the screen, vertical stripe pattern or the
like may be seen.
Is the exposure “Camera Brightness” setting
proper?
Is the record mode set properly? When video only is recorded, audio is not recorded.
Is “Record setting” set to “Video only (No
audio)”?
The Audio side of the earphone or AV cable is
not connected with the Audio Input side of the
TV or the like.
The audio volume of the recorder is low. Increase the audio volume. (ÎP114)
When the recorder is connected to the TV or the
like, the volume of the TV or the like is smaller
than that should be.
Video record /audio record the data in the recorder, and then play
the data. (ÎP
Raise the resolution and video qualit y settings higher, and then
record the data. (ÎP
Record the data in a bright place.
This is not a failure.
Change the exposure set value in adjustment to the desired
brightness. (ÎP
Set “Record setting” to “Video recording + Audio recording.”
(ÎP
Make proper connection. (ÎP122)
Adjust the volume of the TV or the like.
108)
123, 124)
110, 111)
123, 124)
139
Page 60

Troubleshooting (Continued)
■Others
Symptom Cause Remedy
“Load the SD memory
card” appears.
“The SD memory card is
locked” appears.
“The SD memory card has
not been formatted. Do you
want to format it now?”
appears.
Each button does not
operate when pressed.
“Hold on” appears. Is the switch set to “HOLD”?
“This file cannot be played”
appears.
Upgrade is disabled. Is the upgrade file saving destination right?
The SD memory card is not loaded. Load the SD memory card.
Is the SD memory card locked? Release the lock of the SD memory card.
The format system of the SD memory card is
wrong.
Is the switch set to “HOLD”?
The file is corrupt. The file is corrupt and cannot be played. Delete the file.(ÎP
Format the SD memory card in the FAT16 file system.(ÎP
This is not a failure. To operate the button, release the setting to
“HOLD.” (ÎP
If the switch is not set to “HOLD” but the button operation do not
work, press “RESET” to restart the unit forcibly.(ÎP
※“RESET” has no function of returning the recorder to the
factory setting.
This is not a failure. To operate the button, release the setting to
“HOLD.” (ÎP
Save the upgrade file in the right destination.
(ÎP
106)
106)
128)
127)
96)
119)
140
Page 61

App
g
App
g
y
g
p
(
)
(
)
(
)
y
p
(
)
p
y
(
)
App
g
y
j
j
A
V
SUV-Cam
Power supply DC 3.7V(when the battery is used)
Power consumption 2.8W(when the battery is used)
Operating temperature
Allowable relative humidity
Camera head
main unit
Water proofing IPX8
Total length 80cm or 150cm
Mass
Dimension diameter
Lens
Focal length 3.8mm
F number 2.0
Horizontal field angle 53.4°
Vertical field angle 40.0°
Focus adjustment Manual
Shooting range 0.5m to ∞(factor
Camera
Image pickup element 1/4″ CCD
Total picture element 470,000 pixels
Effective number of
min. object brightness
White balance Auto
Electronic shutter 1/50 to 1/100,000 sec
Resolution Horizontal:480TV Vertica:420TV
S/N ratio 48dB or more
/
DC 5.0V
/
4.5W
when the AC adapter is used
0°C to 40°C
10% to 80%
=
80cm
:
20mm length :84.8mm
ixe 440,000 pixels
2 lx
when the AC adapter is used
Camera Head -10°C to 50°C
rox. 115
settin
150cm
)
=
rox. 150
Recorder
main unit
LCD monitor
Built-in microphone Monaural micro
Recording medium
File forma t .asf
Moving image
compressed format
Audio compression
format
Vide output NTSC/PAL(switches b
Audio input Input impedance 2.2kΩor less
Audio output 38mW+38mW
USB USB 2.0
Mass
Dimension 56mm (Horizontal) x 102mm (Vertical) x 30mm (width)
Terminal
Earphone/AV OUTφ3.5 mini
External microphone
DC IN Dedicated jack
Battery pack
Lithium-ion batter
Nominal voltage 3.7V
Rating capacity 1660mAh
Mass Approx. 43g
Dimension
AC adapter
Power supply
Power consumption
Mass Approx.115g(Exclude the power code )
Dimension 53mm (Horizontal) x 76mm (Vertical) x 26mm (width)
2.2″TFT QVGA
SD card(not included
※
The capacity of the SD card can be used up to 2GB.
Compliant with MPEG4
Compliant with G.726
Load impedance 16Ω
(Exclude the projection part)
φ
3.5 mini
(
desor
tion type
39mm
C 100-250
DC 5.0V 2.0A
hone (Built-in
)
the setting item.
Audio: Monaural
(
rox. 130
when batter
)
ack(stereo
ack(monaural
)
Horizontal) x 78mm (Vertical) x 9mm (width
50-
)
60Hz
Specification
)
)
)
is installed
141
Page 62

Optional Accessories
Optional accessories
Camera head 80cm # 2614
Camera head 150cm # 2614-1
Battery pack # 2615
Lens f=6.0mm F2.5 # 2616
Lens f=8.0mm F2.0 # 1616-1
For the information of the optional accessories, ask the sales outlet from whom you have purchased this recorder or visit our website at
http://www.elmo.co.jp/suv-cam/en/index.html
142
Page 63

Note
143
Page 64

Note
144
Page 65

Page 66

 Loading...