

Page 1

8mm
SOUND PROJECTOR
Instruction
Manual
'
..
Page 2
IMPORTANT
SAFEGUARDS
When using your photographic equipment,
basic
safety
precautions
should always be followed, including the
following:
1.
Read
and understand all instruction
s.
2.
Close supervision
is
necessary when any appliance
is
used
by or near
ch
ildren.
Do
not leave appliance
unattended while
in
use.
3.
Care
must
be taken
as
burns can occur from touch-
I
ng
hot parts.
4.
Do
not operate
appliance wi
th
a damaged cord
or
,if the
appliance
has been dropped
or
damaged until
it
has been examined by a qualified serviceman.
5.
Do
not let cord hang over edge
of
table
or
counter
or
touch hot surfaces.
6.
If an extension cord IS necessary, a cord with a
suitable current rating should be
used
, Cords rated
for
l
ess
amperage than the
app
liance may overheat.
Care
should be taken to arrange the cord
so
that
it
will not be tripped over
or
pulled.
Page 3

7.
Always
unplug appliance from electrical outlet when
not
in
use.
Never yank cord to
pu
II
pi
ug
from outl
et.
Grasp plug and
pu
ll
to disconnect.
S.
Let
appliance cool completely before putting away.
Loop cord
loosely around
app
lian
ce
when storing.
9.
To protect against electrical shock hazards,
do
not
immerse this
app
lian
ce
in
water or other liquid
s.
'
1
O. To avoid electric shock hazard,
do
not disassemble
this
appliance but take
it
to a qualified serviceman
when
some
service
or
repair work is required. Incorrect reassembly can cause electric shock hazard
when the
appliance
is
used
subsequentl
y.
SAVE
THESE
INSTRUCTIONS
Page 4

Specifications·· ......................................................
1
Nomenclature····
········
············································ 2
Preparation
for
projection
..
···································
4
Sound
projection
" ........................
...
.....................
6
Image
adjustment
·························· ·················· ........ 8
Single
frame
projection
··
.. · ..
···································· 9
Reverse
projection
...........
....
.................................
..
9
Rewinding
the
film···
·········································· ····
·10
Removing
the
film
in
the
midway
projection
··········
11
Various sound
projection·
···········
··························1 2
[
Now
To Use Extension Speakers
How
To Reproduce Sound
Through
Stereo Set
How
To Use
Earphone
or
Headphone
How
To Use Public Address System (P.A.)
Recording···
......................................................
···
·14
[
Recording
Procedure···············································14
Recording
Technic
······· ··········· ·······························
·18
.
Normal
Recording
18
.
Mixing
----------------
19
. Double Recording (Double
Rec)
20
. Overlap Recording
22
. Record
control
and its Release
_______
24
(For
re-recording
o~
dubbing)
When
using
1200ft
(360m)
reel
(Optional accessory)··
···25
Cleaning·················
·· ··
······················
················
·····
26
Replacing
projection
lamp
····································27
Replacing
exciter
lamp
·······························
···········28
Replacing
amplifier
and
exciter
lamp
fuse ......
······28
Replacing
power
fuse ··························
··················29
Voltage
selection·
······· ················ ..........................
·30
Frequency
selection··································
·············30
Trouble
shooting
hints·
···························
···
···········3
1
How
to
change
projection
lens
··
························:··31
Jack
for
synchronizer
R-1
.........................
.......
····32
Optional
accessories .........
...............
....................
·33
Projection
distance
and
image
size·· ···················
··38
Projection
time
and
film
length
··········
··················39
Page 5

<Projector >
Power source:
Project
ion
speed:
Motor:
Usable
film:
F i I m loa d i
ng
:
Reel
ca
paci ty :
Specifications
Singl e phase
AC, 50/60
Hz
18
&
24 fps.
(Lever
changing)
Induction m
oto
r
S
up
er
8/S
ingle 8 sound
a
nd
sile
nt film
Automati c
Max.
1200ft
(360m)
St
ill
pict'ure proj
ection:
Possib
le
Reverse projection:
Film
rewindin
g:
<Light source>
Project
ion lamp:
Pro
jec
tion
lens :
<Sound recording &
Sound
system:
Ampl
ifi
er
:
Tone co
ntrol
:
Leve
l co
ntrol:
Doubl e r
ecor
ding:
Input terminal:
Output terminal:
R
ecor
ding head:
Erasing hea
d:
Possib
le
High
spee
d
rew
inding
15V-150W hal ogen l amp
with cold
hi-l
ow bri
ghtness
is
possible.
F 1.3 f =
15
- 25mm zoom lens
reprodu~tion
>
mirr
or
Choic e of
Mod
el
M-O;
Magneti
c/o
ptical r
epro
duction and ,
magnetic
record
ing
Model M
Magne
ti
c r epro
ducti
on and
recording
IC
circuit
is
built
in .
Music
power
output>; 15W
Continuous
power o
utput; (5% ) 12W
High ton e
contro
l type
Automatic/Manua
l le
vel
contro
l
Possible anywhere
in
the
film
during
projecti
on
Mixing is p
oss
ible
on
both AUX and MIC t e
rminal
s.
EXT.
SP. (Imp
edance 8
Q)
AUX
OUT
(Imp
edanc e 600
Q)
Moni
(L
ow impedan ce type)
Specia
l alloy magne
tic hea
d
(AI ternate
bias
system)
Al te
rnate eras
ing
system
Photo electric
element :
Solar
battery
Exciter
lamp :
Speaker
:
Mi
crop
hon
e:
Leve
l meter:
Indication lamp:
Attachments:
4 V -0. 75A
Direct-curr
ent I
ighting
system
(Model M-O)
Bui
lt-in
5"
(12.5cm) dynamic speaker
Electret
condenser
typ e
(Imp
edan
ce
600
Q)
Bui
It-in
Re
cor
ding lamp,
Pilot
lamp
800ft (240m) Auto reel,
Power
cord,
Carrying
case
,
Microphone Mo
nit
or
receive
r,
Aperture clea
ning
brush
es
and
Projection
lamp
)I{
Specifications
are
subject
to
change
without
pri
or
notice.
Page 6

2
~J.
....
"._
..
",~~'11
Nomenclature
._J.u;:~
..
¥.~~~&..,~
~
0
@I
~
~
~
O
Front
housing
cover
f}
Focusing
knob
@}
Auto-threadi
ng lever
O
Reel
spindle
0 Feed reel
arm
0 Film
threading
slot
O Reel
arm
lock
(i)
Rewind ing lever
0 Single
frame
feed
knob
C@
Zoom
lens
G)
Synchronizer
R-1
jack
f)
Film
trimmer
o 0
'-----
--
0
41.1
Elevation
control
knob
CIl
Exciter
lamp
window
0
0
0
~
4D
~
~
(Model
M-O
only)
.,
M-O
changing
lever
(Model
M-O
only)
4D
Loop
restorer
4D
Framing
knob
4D
Film
counter
Gl
Tone
control
knob
~
Volume
control
knob
<Slf
with
amp. switch
fD
Motor
switch
~
Lamp
switch
~
Pilot
lamp
t}) Recording
indicator
lamp
Page 7

~
Level
meter
tD
Auto
threading
release lever
o Rear
film
guide
~
Take-up
reel arm
~
Reel
lock
~
P.A.
-ALe
selection
switch
;;n
Normal
Rec-Double
Re c
IW
selection
switch
~
Auxiliary
volume
control
knob
Q)
Mon
itor
jack
~
Microphone
indicator
lamp
4)
AUX
IN
jack
~
Microphone
jack
o Double
recording
control
knob
@)
Double
recording
indicator
lamp
~
Record
control
button
~
Recording
button
(D
Speaker
$
Power
fuse
holder
Q)
Power
cord
socket
GI
Projection
speed chang i
ng
lever
$
Vol
tage
indication
window
$ Extension speaker con
nector
$
AUX
OUT
jack
I
3
Page 8

4
Preparation
for
projection
50/60HI
UVt!OW
300w
Uw(ln)
FUSE
..
~
~
... l
..
..
J . 3A
•
---
Arm
lo
ck
button
Reel spindl
es
Reel
10
k
o Plug
In
the
pow
er
cor
d and the pil ot
lamp w
ill
light.
Arm
lo
ck
button
f)
Pull
up
the f
eed
reel ar
m and
take-up
reel
arm. After
projection,
fold the
r
eel arms
with the
reel arm
locks
depressed.
8
Put
the feed
reel
( full
ree
l) and
the
take-up ree
l on the
ir
ree
l spindles,
and
fasten
the reels
with the
reel
locks.
Turn
down the
ree
l lock to
the
right
dir
ect
ion
in
accor
dan
ce
with
the
thic
k·
n
ess
of reel.
Page 9

For
magnetic
sound film
lM11
I
1tQ}1
For optical sound film
Volume
control
knob
Projection
speed
M-O
changing
lever
Exciter l
amp
window
o
Se
t the M- O changing lever in accord
-
an
ce
with the film to be projected.
(App
l icable for model
M-
O onl y)
o Make s ur e that the
projec
tion speed
changing lever is
se
t at correc
t p
os
i-
tio
n.
Fo
r 24 fps, set the lever to upper
s ide, and
for
18, to l owe
r.
Important
Be sure to tu
rn
off the motor when
changing the
projec
t ion speed.
5
Page 10
6
Sound projection
Film
trimmer
Motor
switch
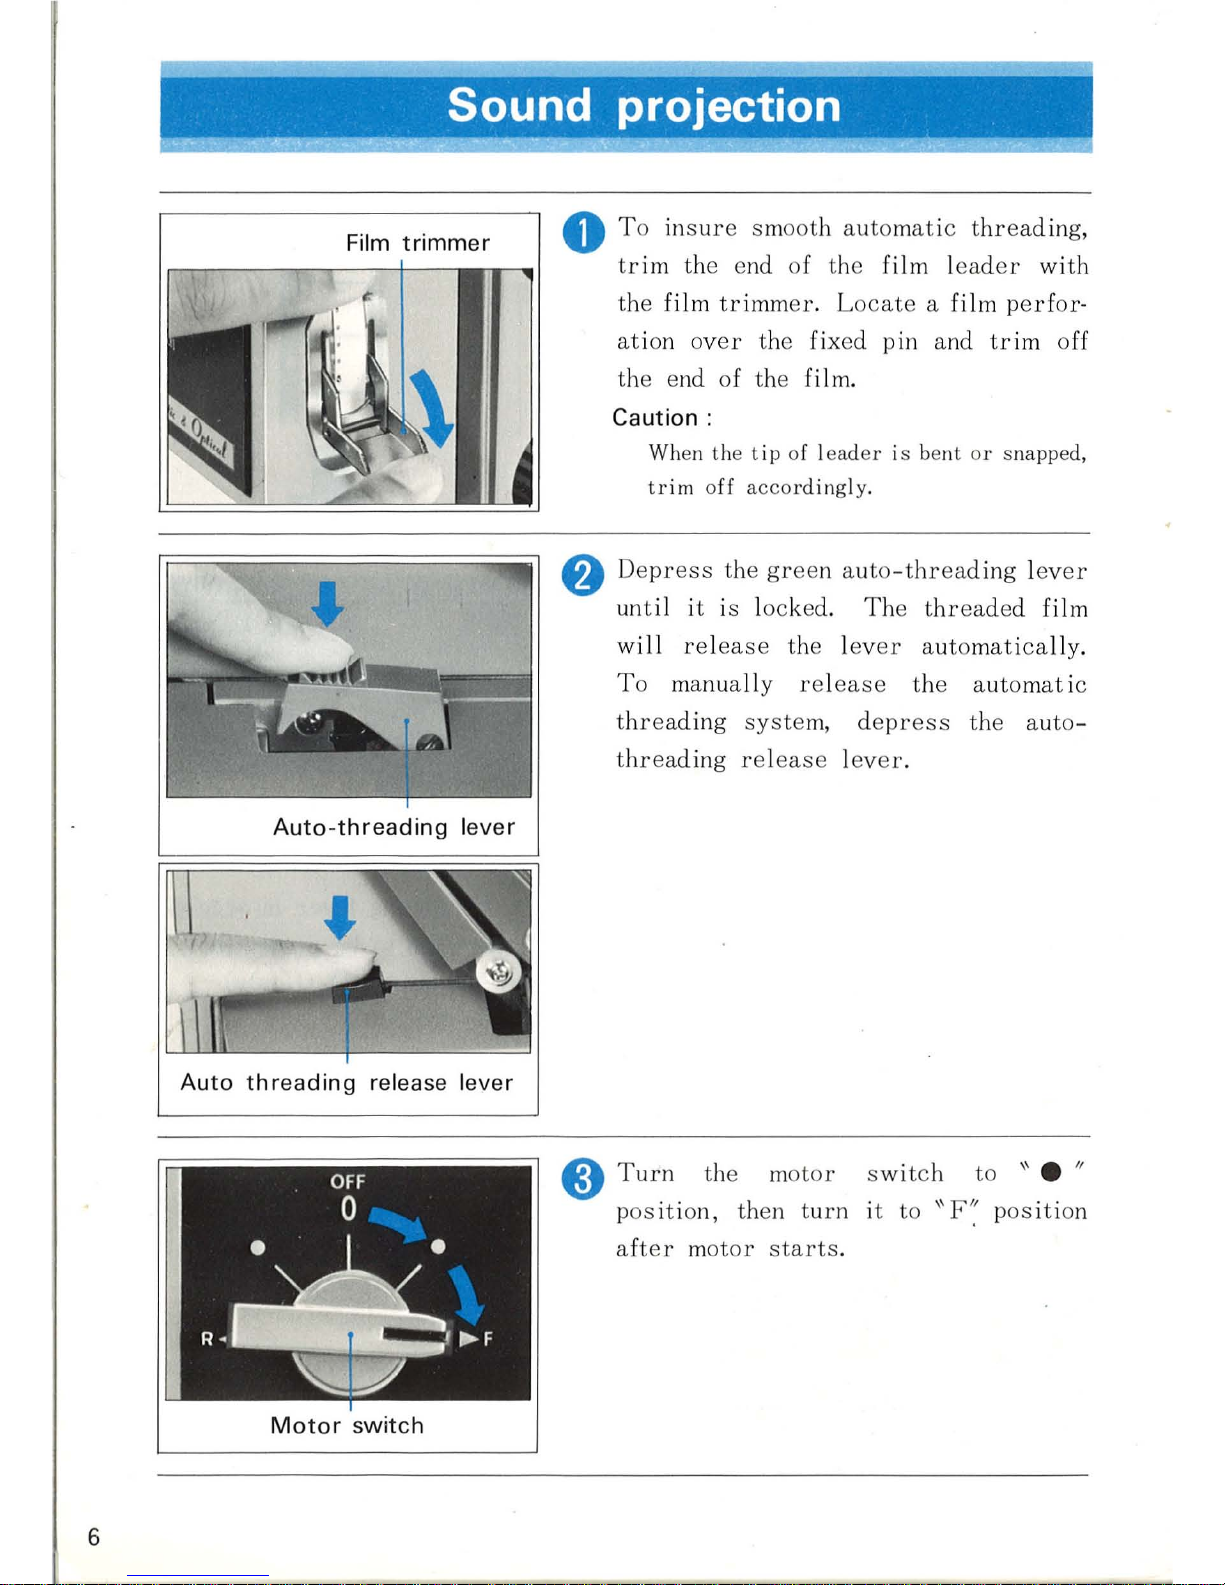
o To
insur
e smooth automatic
threading,
trim
the end of the film leader
with
th
e film
trimm
er. L
oca
te a film perfor·
ati
on over the fixed pin and
trim
off
the end of the film.
Caution :
When the tip of leader is be
nt
or snapped,
trim off
acco
rdin
gly.
8 De
press th e gree
n auto
-threading lever
until
it is locked.
The threaded film
will
relea
se
the lev
er
automatically.
To manually r el
ease
the automatic
threading
system,
depress
the
aut
o-
threading rel
ease
lever.
8
Turn
the mot
or swit
ch to \
\.
"
positi
on, then turn it to \\ F " positi
on
aft
er motor starts.
Page 11

Lamp switch
LAMP
(]
(]~
(]~
L-L--e
Volume
contorol
knob
Tone
contorol knob
Insert the film lead
er into the trea
din
g
slot
as
indicated by the red arrow on
the slot. The au
tomat
ic th
read
ing
syste
m path
up
to the take-up reel
will
be compl eted in a few
seco
nds,
at which
tim
e the auto-threa
ding lever
will
be rel
ease
d automatically.
Set th
e la
mp swit
ch
to
"
Ck
" P
?s
it io
n.
If
mor e
brill
ian
ce
is
re
quir
ed, s
hif
t
th
e la
mp
switch
further
to
"Clf
" posi-
tion for 30% ext
ra brilliance. Th
e la
mp
sa
vin
g "
Cl~
"
pos
iti
on
will
give th
ree
tim
es norm
al la
mp
lif
e.
A
dju
st volume and tone by t
urning th
e
volum e co
ntr
ol knob and tone contro
l
knob.
7
Page 12

8
Image adjustment
ring
knob
Framing
knob
Loop
restorer
levation
control
knob
fil
ls
the
picture
size
on screen desired one?
A
dju
st the size of pictu
re
to
fit the
scree
n s i
ze
by
turning
zooming
ring.
4D
Is
the
focus sharp?
Adjust the focus
by
turning
focus ing knob.
(i)
Doesn't
appear a
frame
line on the screen?
When the frame line
appears
, t
urn
th e
framing knob
to elimin
ate the
lin e.
(i)
When the film loo
p,
set
by
the automatic
threading
syste
m,
is l
ost
during
projec
tion due to an im
proper spli
ce
or
any oth
er
reaso
n,
it can
be in
sta
ntly
restored
by pusing the loop r
esto
rer
diag
onally downwa·rd.
@
Is
the
height
of
picture
right?
Adju
st the heig
ht
of pi c
ture by
turnin
g elevation co
ntr
ol knob.
Page 13
Single frame projection
Single frame feed k
nob
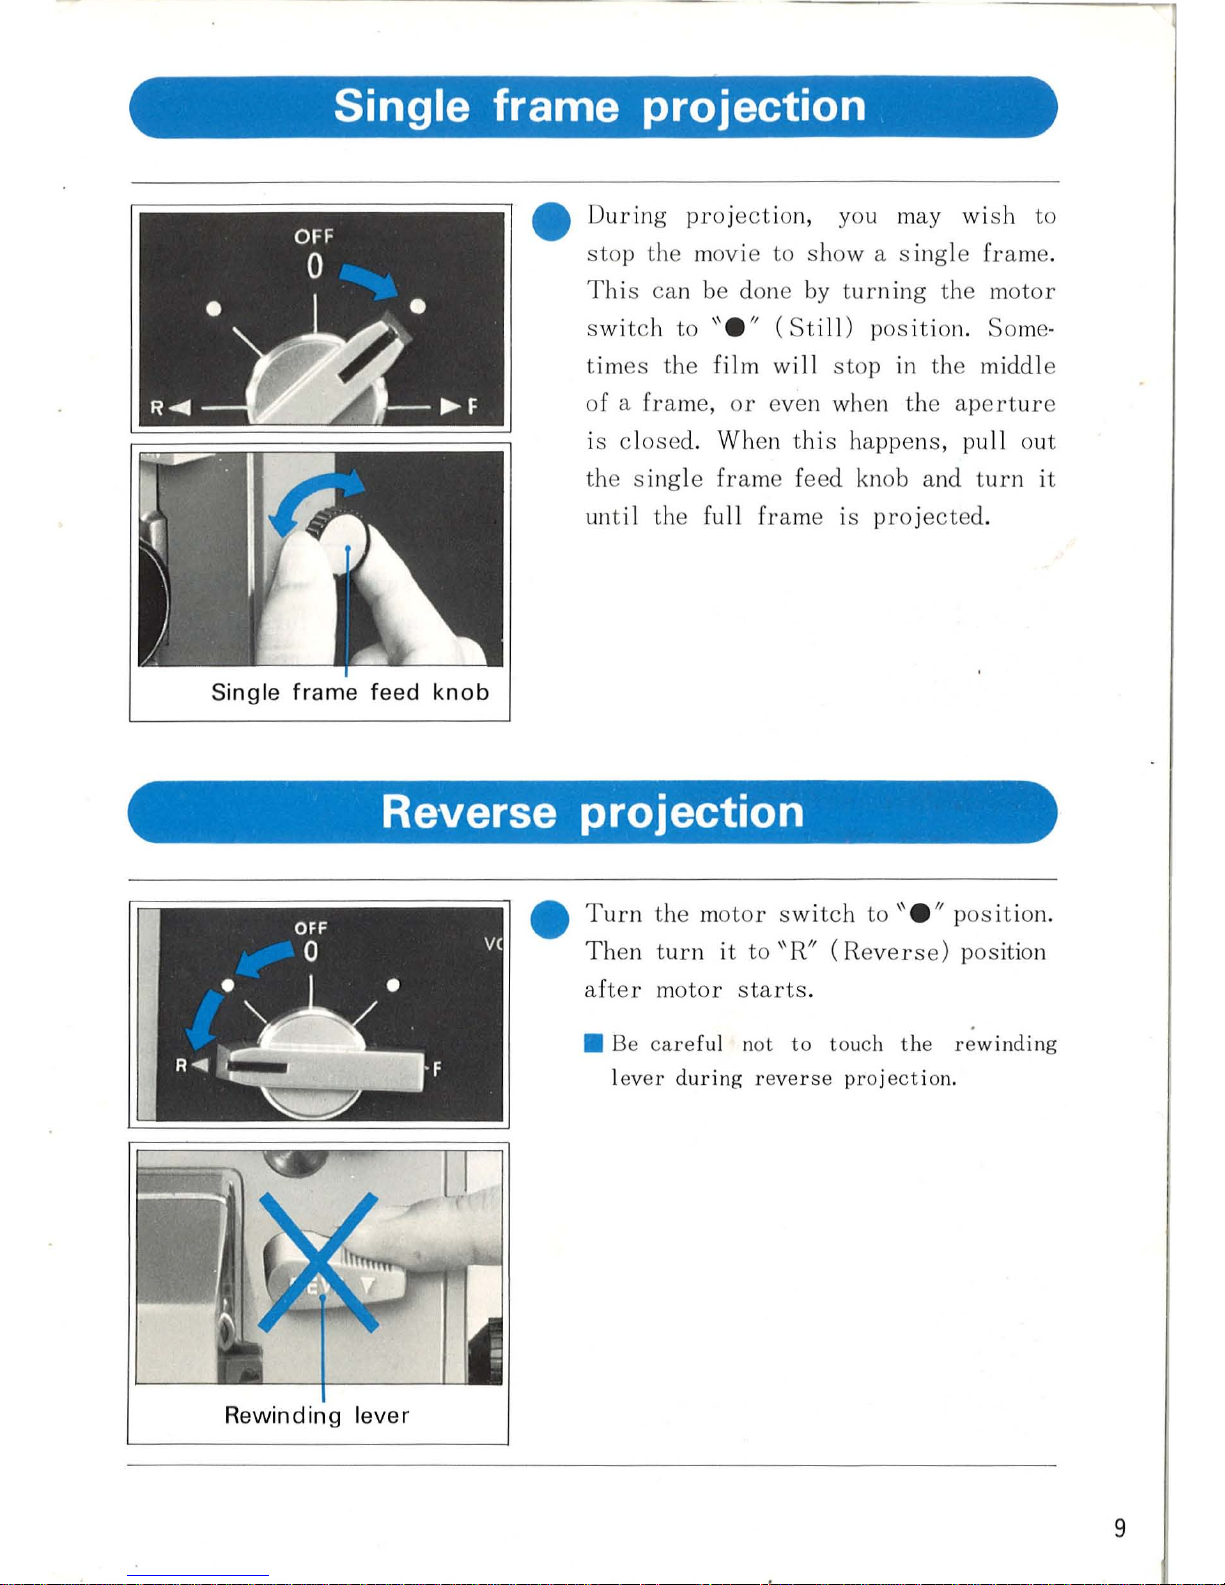
•
During projec
tio
n,
you may
wi
sh to
stop the movie to show a s
in
gle frame.
This ca
n be done by
turnin
g the motor
s
wit
ch
to
"e"
(Still) pos
ition.
So
me·
tim
es
the film will
sto
p in the middle
of a fr ame, or even
wh
en the ape
rtur
e
is cl
ose
d. When
thi
s happens, pull out
the s
in
gle frame feed knob and
turn
it
until the full
fram
e is projected.
Reverse projection
•
Rewin d
in
g leve r
Turn the motor s
wit
ch to \'e" p
os
ition.
Th
en
turn
it
to "R" (Rever
se) pos
ition
aft
er mo
tor starts
.
• Be careful not t o t ouch the re
winding
lever
during
rever
se proje
cti
on.
9
Page 14

10
Rewinding the film
o
Aft
er
the film h
as bee
n wound co mpl e-
tely
on
the take-up
ree
l, turn
off the
la
mp
and moto
r.
•
Insert the end of the
film
int
o the slot
of the f
eed ree
l hub.
Turn
the m
otor
switch co
unt
erc
lockwi
se
to "e " p
os
itio
n,
then
turn
it
to
"R"
pos ition
after motor start
s.
Lock the
rew
inding l
eve
r by pushing
down to the
dir
ect
ion of
the
arrow as
illu
strated
in
the pictur
e .
•
The
rewi
nding l
ever
is r el
eased automa
-
t i call
y when the proj ect
or
ope
rate
s for
f
orward projection.
So
you may 1
eave
th e
rewinding lever
locked
until
the n
ext
projection.
Caution :
Wh en
rew
indin g film
aft
er removing·
the film
during
midway
projection,
t
urn
take-up
reel cl
oc kwi
se
ove r one
round by hand and then
turn
the
opera-
tion swi
tch
to
"
R~".
Page 15

Removing
the
film
in
the
midway
projection
o
Ret
urn
the m
otor
sw
itc h to
"OFF"
.
Open
the front housing
cover
by pullin
g
towards you.
The first
sp
rock
et
shoe
The
second
sprocket
shoe
•
Push
the
fir
st
sprocket
shoe sideways
.
• Open the lens hol
der
to
the
dil'ection
of
arrow.
• Depress
down the film guide.
•
Take
out the film.
II
Page 16

12
Various sound projection
How
To
Use Extension Speakers
o
Adapter
cord
(SC-002)
In
case
you u
se
Elmo extra
speak
er
(Option),
connect th
e speaker's plug
to
EXT.
SP
. connector
of
the
projector.
In
case
you u
se
your own
ex
tension
sp
ea
ker s, u
se
an
opt
ional co
rd adapt
er
SC-002 for connection
with
the phone
plug 6
¢.
How
,
To
Reproduce Sound Through
Stereo
Set
AUX. OUT
Jack
EI!:!.2
I.
. . 1
,
I
.
--
------
-
Level
meter
o
Connect
AUX.
OUT jac
k of the projec-
t
or
to
AUX. IN or
LINE
IN
receptacl
e
of
the ster eo
set
wit
h an
accesso
ry
cor
d.
In
this case,
sound is not re.prod-
u
ced
by
built-in
or
exte
nsion s peaker s .
• When us ing
extra amp I ifi
er .
adjust
the
vo lum e co
ntr
ol
to
make
the nee
dl e of level
m
eter
stay
in t he
red
area.
Thi
s is
stand-
ar
d l evel. (600£2 about
-lOdb)·
Page 17

How
To
Use Earphone Or Headphone
Monitor
jack
•
Connect the
earp
hone
or hea
dph one plug
to
MONI jack of the
projector.
In this
case
, no so und is
reproduce
d by built·
in
of
ex
tens ion speaker
s.
How
To
Use Public Address System
(P.
A.)
P. A. -ALC Selection switch
Microphone
indicator
lamp
•
Se
t the P.A.
-AL
C
select
ion s
witch
to
"P.A.".
P l
ug the
attached
mi
crop·
hone int o
micr
ophone j
ack. Then s
wit
ch
on
the
amplifi
er
and the
microph
one
lamp
will light. Now
projec
tor is
ready
for publ ic
address.
Caution:
It
is r
ecommended t o u
se
publ ic
address
system
in combinat
ion
with extensi
on
sp
ea
ker. Don
't appr
oac h the micr ophone
to
speaker,
or in
crease the
input
level
too
mu
ch I est the uncomfo
rtabl
e v i
brat
ed
so
und (ho
wling)
should co me out.
13
Page 18

14
Recording ·
Use
film with a magnetically
coated so
und
tra
ck
because
this sound
record-
ing devi
ce
employs the magne
tic recor
ding
sys
tem. Not only no
rmal reco
rd-
ing but
also
various ways
of
recording can be enjoyed such as double r.ecord-
ing, fade
-in/
fade- out,
over
lap, r
eco
rd
contro
l and its
relea
s ing.
Recording
procedur~
M-O
changing
lever
----I
----I
~I
o
Set
the M-O chang ing lev
er
to
"M".
(Applica
ble
for
model M-O only)
8
Load
the proj
ector
with magne
tic
ally
coated
film.
8
Sw
itch on the ampl ifi
er
by t
urnin
g
volume co
ntr
ol knob clockwise.
o Co
nn
ect
ion of th e
recording source.
Page 19

To connect the recording source to
AUX
. IN
jack
.
AUX.IN
Jack
1 Connect LINE OUT
or
AUX. OUT
connector of tape
recorder
or
record
player
etc. to
AUX
. I jack of the
projector
.
Note
: 1.
If
the output of sound
sources
is
rela·
ti
vely
high (e.g.
record
player,
tape
recor
·
der,
radio
tuner,
tape
deck etc.,
which
incorporate
an amp
lifi
er),
connect them
to
the AUX.
IN
jack.
Note
: 2.
AUX.
IN
ja
ck
is
separate
ly
circuited
wi
th
the
vol ume
control
so
as
to
mix
sounds .
Therefore
the
input level from
AUX.
IN
jack is not
automatica
lly
recorded.
<>
Stereo-to-monaural
adapter
cord
(Refer
to
"MC
-00
3"
on
page
37)
avai
lable
for
sound
reproduction
in combina
tion
with
2 -channel
stereophon
ic
unit.
<>
When
recording
from a
unit
hav i
ng
neither
LINE
OUT
nor
AUX.
OUT
jack
connect
AUX.IN
jack of
the
projector
to
either
eaL"phone
or
EXT. SP.
connector
of
the
unit
with
an
accessory
input
cord. (Input
cords
with
resistor
MC-009
is
avai I abl e. )
I MC-009
3 .
5</;
~
-
----
------
-
=c:=J
=m 3.
5</;
AUX. Volume
control
2 Adjust the auxili
ary
volume
contro
l
knob until the level
meter
indicates
the opt
imum
leve
l.
Note
:
The adj
ustment
of
level
meter
shou
ld
be
done,
after
turning
motor
swi
tch
to
"e"
towards
F,
by
depressing
red
recording
button
sl
ightly.
15
Page 20

16
£/1'10
I
.•
• ,zwr
-~----
Level
meter
Note
: 2
Maximum
recording
level
can
be
achieved
when
the
indicator
swings
in
the
LH-side
red
zone.
Connection
to
microphone
jack.
Microphone
jack
I <-
~
~
'OT;:)
•
AUX.1N
0 I
MIC/
.......JIi
1
~
OFF
rzw-.r
,,,,
..
BH
'-'-
ON
1 Connect the microphone plug to MIC
jack.
Note
:
If
the
output of sound
sources
is
rela
·
tively
low (e.g.
record
player
which does
not
incorporate
an
amp I i
fier),
connect
them
to
the larger (3.5mm) microphone
ja
ck
instead
of AUX. IN
jack
.
2
Set
the
P.A.-ALC
selection
switch
to
either
ON
(Automatic
recording)
or
OFF
(Manual recording)
on
your
recording
. When the
switch
is
in
the position of
ALC
-O
,
set
the
black point of volume
contro
l knob
to the top
position
. When it is
ALC
-OF
F,
adjust
the volume
contro
l
knob until the
level
meter
indicates
the optimum level.
Note
:
For
the
protection
of
picking
up
noise,
approach
the
microphone
to
sound
source
as
near
as
possible
and
record
the
sound
at
low
level.
Page 21

MONI
Jack
Reset button
/'
.
_ 0 6 6 0
Recording button
Monitor
receiver
or
headphone is co
n-
n
ected
to MONL jack. (Impedan
ce
is
16Q.)
Set
the numb
er
of film
counter
by
pus hing
reset butto
n. (The fi
lm co unt
er
ca
n be u
sed
as
the
reference
of
record-
in
g,
as
it advan
ces
by
one numb
er
per
every
18
frames.)
Whil
e d
epressi
ng
red button
sli ghtly,
tur
n the m
otor swit
ch to "e"
towards
"F';
Note
: 1.
Ascerta
in
that
red
recording
indi-
cator
lamp is I ighted. Now the
recording
butt
on is locked a
nd the
projecto
r is ready for r
ecor
din
g.
2.
Wh
en the m
otor
swi
tch
is
retur
-
ned to
"OFF", the lock of record-
ing button is
automatically rel
e-
ased.
3 .
Wh
en the M-O changin g l
ever
is
se
t to
"0", the recording
lamp
wi
II
n
ot
I ig ht.
17
Page 22

18
Recording Technic
Normal Recording
+R
ecording to the non-r
ecor
ded fi lm
or
re-r
eco
rding
aft
er
eras
in g.
NORMAL , ....
r"
I DOUBLE
REC.
,
REC.
I
~
Normal Rec -Double
Rec selection switch
Recording
t
o
Set
the double
recording
contro
l knob
to .
\\
Normal Rec".
f)
After
ascertaining
th
at
the
projector
is
ready
for recor
ding, t
urn
the m
otor
s
witc
h to
"F"
. At the same time,
start
recording
by
operat
ing mi
crop
hone,
tape
record
er
or
record player
etc.,
while w
atc
hin g the
screen.
Note
:
1.
Moni
tor
the r
eco
rding leve
l through
mon i
tor jac
k.
2.
If
th
e r
ecor
din g is done
without
moni
tor
in g,
turn the m
otor switch
to
"OFF" after
turn
ing aux il ia ry
vol
um
e co
nt
rol knob a nd vol ume
control kn
ob count
erc
l6ckw ise.
Otherwi
se the amp
lifi
ed sound of
so
und sour
ce
such
as tape recorder
wi
II come o
ut from
spea
ke r .
Page 23

Mixing
LEVEL"""""
(
4 • 6
. f .
2 8
. .
o
10
AUX.volume
control knob
control
knob
o
Set
Normal Rec-Double Rec selection
sw
itch to "Normal Rec".
f)
Connec t microp
hone to microp
hone jack
and so und sou
rce
such
as
tape recorder
to
AUX.IN jac
k.
8
Adjust
respectiv
e input level by
turn·
ing volume
cont
rol knob and aux
ili
ary
control kn
ob.
o
Turn motor switch to ·
"F"
, while push·
ing
recording
button.
19
Page 24

20
Double Recording (Double Rec)
+R
eco
rding
to the recorded film without
erasing th e original so
und.
Recording
1 /
AUX
. volume control knob
Recording
2
o
Set
Normal Rec-D
ouble R
ec sel
ection
s
wit
ch to "Double Rec".
Then
red
double
recor
ding indi
cator
la
mp
will
light.
8 When
start
ing double r
ecor
ding with-
out microp
hone,
set
up the input level
by adjustin
g volume co
ntr
ol knob.
Note
:
Bot
h automalic a
nd
manual
record
ing
is poss
ible.
(For
furth
er
de
ta il s
re
fe r to P 16.)
Wh en using AUX. IN j
ack
for double
recording
set up
the
input level
by
ad justing
Auxiliary
volume co
ntrol.
Page 25

OFF
~
Bm
ON
4
.
6
OUBLE
2
8
REe.
I
.
I
..--....
0
10
Double
recording
control
knob
8
The rat
io
of
doub
le
recording
is
con
-
troll
ed by
do
uble recording
co
ntr
ol
kn
ob
.
Not
e: Variation contr
oll ed
by doub
le reco rd-
ing control kn
ob
can not
be
checked
t
hr
ough leve l m
eter
or monitor rece iv-
er. Adjust
the level of doub le recor
d-
in
g with the graduati
on
around the
kn
ob.
A Do
ubl
e r
ecording
(In
case prev
ious
and
new
sounds
are recorded
In
eve
n
ratio,
or
1 : 1)
+
Start
recording,
after. sett
ing
the
double
recording contr
ol kn ob
to
"5"
in
the
graduations.
,~4
i
6,
2 8
, ,
1.-..
____
>
'0
4
i
6,
2 8
, ,
o 10
o 10
B
Double recordi
ng
with
fadin
g eff
ect
.
+ Do
uble reco
rding with fade
-in
/fade-out
recording
operat
ion.
Recording
I
Note
:
1.
Doubl
e recording can not be per -
formed at
"0"
in
the graduations.
Pr
ev
ious recording remains
un-
changed.
2.
Pr
evious recording h
ard
ly remains
at
"10"
in
the graduations.
21
Page 26

22
\
Overlap Recording
A Overlap recording
with
fade -
in
effect
+Origina
l sound is
gradua
lly
overco
me by new sound.
Normal
Rec-Double
. -
i
_.
.
NORMAL I
... : ....
DOUBLE
REC.
.
REC.
~
)
()
"
',.
..
LEVEL""""'"
'
~.:
:', , : ".
4 • 6 '
''7--\
Recording
1
o
Set
the Normal
Rec-Doub
le Rec
se-
l
ect
ion
switch
to Double Rec and double
recording indi
cat
ion lamp will light in
red
.
Turn
the Doubl e
recording contr
ol knob
slowly cl
ockwise
from
"0" pos
iti
on in
the
graduat
ions fully to "10" position.
When the double r
eco
rding control knob
comes to
"10" position, set the Normal
Rec-Doub
le R
ec
selec
ti on s
witch
to
Normal Rec
imm
edi
ate
ly.
$~
4 • 6
~
NORMAL
wm
IOOUBLE
2'0'8
L-..,I"
AEC. Will REC. •
~
~
1O
'
Page 27

B Overlap recording
with
fade-out
effect
• New sound is gradually over co me by original sound.
Normal Rec-Double
Rec
selection
switch
o
Se
t the
Normal Rec- Doub le Rec
lection swi tch to Do
ub
le Rec.
se
-
f)
After setti
ng No
rma
l Rec-Double R
ec
selec
tion s
wit
ch to Doubl e Rec,
turn
the Double r
eco
rding contr
ol knob slow-
ly counte
rclockwi
se from "10" posi-
ti on full y to "0" positon.
Recording
t
23
Page 28

24
Record cont rol and its Release (For
re-r~COrding
)
or dubbing
Recording
t
Recording
t
o Record control
Recor
ding dur
ing
project
ion with out
s
to
pping proj
ector.
Push the
reco
rding
butt
on with the
r
ecord co ntrol be ing
depressed,
and
then re l
eas
e the reco
rd
con
trol butt
on.
8
Re
leasing record control
(Releas
ing r
eco
rd
co ntrol without s topp'
ing project
ion
.)
, Depress
the reco
rd
control
butt
on unti I
the
reco
rding bu
tton r e
turn
s.
Page 29

When
using
1200
ft
(360m)
reel
(Optional
accessory)
Film guide
Auto th reading
release l
ever
o Push
the silv
er
mark
on th e r
ear
film
guide
as far
as
it
will
go and, while
pu
shing,
turn
the film guide clockwi
se
as
illustrated.
Pl
ace
the 1200ft( 360m)
ree
l on th e
take·up
ree
l spindle and
lock the
ree
l.
f)
Load
the film. When about
12"
(30cm)
of
the
film leader com
es out
of the
rear
film guide,
return
the motor s
witch
to
"OFF".
8
After
inserting
the end of th e film
l
ea
der into
the
reel
hub, r el
ease
the
auto·threading
lev
er
by d
epress
ing the
aut o·t
hreading rel
ease lever
.
o Wh en u
se
of the 1200ft
ree
l is co
m·
pleted,
return
the r
ear
film guide to
i
ts original
pos
ition,
turn
ing
counter·
clockwi
se
as
illu
strated.
25
Page 30

26
Front
housing c
over
Cleaning
o
Grasp
the top of the
front
housing
cover
and pull
it
toward
you to open.
f)
Open
the
hin ged l
ens
hol
der
to th e
direct
ion of the
arrow
as ill
ustrated
.
8 Ge ntl y c l
ean
the
aperture and
pressure
pl
ates
with
the brush
es
provided
or
a
so
ft cloth .
• To remove the lens,
turn
the focus ing
kn
ob full y clockwi
se
and pull the lens
stra
ight out .
•
Be
carefu
l ne it h
er
to touch the
film sending claw nor
to scrat
ch the
film
path
dur
ing
clean ing.
Th
e f
ilm
gate and
path,
which a re in continu
ous cont
act
with th
e f
ilm,
are precise
ly
ma c
hin
ed
to
prevent
dam
age
to the fi lm.
Page 31

Replacing projection lamp
.Th
e type of
project
ion lamp is
15V-150W
halogen lamp with co ld mirror
.
(ANSI
code
EFR
or
eq uivalent)
.Di
sconnect
the
power
cord
and ens
ure
that
the lamp h
as
cool
ed
suffi
cie
nt-
ly to handle.
o Swing open the la
mp
hous ing from i
ts
top
with
the
spring
lock
depressed
as
sho
wn.
Not
e:
Il
eal
proo f gl
ass
is not
br
oke
n but orig inally
sp
l il
int
o two pi
eces
to
al low expans ion and con·
trac
t io
n.
f)
Detach
the lamp
soc
ket from the lamp
by p
ullin
g to the l
eft
.
8 P ull the la
mp
to the left by holding the
b
ase
of th e la
mp
and then pull out the
lamp
toward
you.
o T o in
sta
ll a
replace
ment la
mp,
push th e
b
ase
of
the lamp. into the hollow of
the
spr
ing hold
er
with
the
protrusion
on th e
reflector
edge facing t
oward
you.
Th
en
, push
the
reflector
into the metal rim
.
Line up the
pins
on the la
mp
with
the
hol
es
in the
socket
and push the
socket
int
o pos ition.
27
Page 32

28
Replacing exciter lamp
(This instruct
ion is applicable f
or
model M- O only.)
.Th
e type of exc
it
er
lamp is BRS in,
ANS
I code
or equiv
alent.
Notch
o
Di
s,connect the po
wer
cor
d.
f)
To remove the exci
ter lamp,
pu
sh up
the ej
ector
at
the b
ase
of the lamp
and, while hol
din
g it u
p,
turn
the lamp
coun
te
rclockwise.
8 To
in
sta
ll a replacement
exciter la
mp,
align th e
thr
ee
guide pins
with
the hol
es
of the la
mp base
flange,
with
the notch
of the lamp
base flange facing to the
left.
Th
en depress
the la
mp
and
turn
it
clockwi
se
as
far
as
it will
go.
Replacing
amplifier
and
exciter
lamp
fuse
When the amp
lifi
er or
exciter lamp fuse brea
ks, the amplifi
er does
not
w
or
k,
'eve
n if volume con
trol kn
ob is t
urn
ed on and the exciter la
mp does
n
ot
light up, even if M
-O
changing lever is set to
"0"
.
• When the above troubl
es
hap pen.
o Pul l out the
po
wer
cord
.
f)
Ta
ke off the
rear
cover
by takin g out
scre
ws of the
cover.
Page 33

Amplifie r fu
se
8
Th
ere
sta
nd two fuse
below the
trans-
form
er.
Th
e left one is for amplifie r
and
right
one
for
exciter lamp.
The
va
lue of bo
th fuses
is 3A (3.15A) .
Exciter la mp fuse
. Replacing
power
fuse
Wh en
pilot
lamp
does not
1 ight
and
mot
or
does not
star
t al though
power sour
ce cord
h
as
no abnormal
co
ndition,
check
power
source
fuse
.
Wh en
replacing
power fuse, power sour
ce
co
rd
sho
uld
be pull
ed
out
without
fai
l.
100-240V
Type
230-260V
Type
F
or
U.S.
A.
and Canad a
Power Sour
ce
Ca
pac
ity
of Fuse
lOO
-260V
AC
3A (3.15A)
Never
use
any
fuse
other
than
the spe
cified value.
For
Scandinavia
countries
Wh en replacing
power fuse
for
this mode
l,
1. Di
sconnect th e pow
er
cord.
2.
Take
off
rear
cover
by
loosing
screws
of
the
cove r a
nd
rep
lace
power fuse
whi ch is l
ocate
d on the
right
sid e of
transformer
.
29
Page 34

30
Voltage selection
.Th
ere is a single vo
ltag
e mode I
in comp
l i
ance
with el
ectr
ic
regulat
ions
or
co nditions of
eac
h cou
ntry.
o Wh en
select
ing
voltage,
power
cord
should
be pulled out
without
fail.
o
Tak
e off the
rear
cover
by
taking
out
two
set
scre
ws on
the
upp
er
sid e.
8 Pull the vol
tage sel
ect
ion
socket, adjust
the
voltage
to the
power sour
ce
to be
see
n th e
volt
age value
for
set
ting
from
th
e notch and put
it
aga
in.
Frequency selection
.
Frequency
is already
set eith
er
50Hz
01'
60 Hz
to
correspo
nd
with
the co
untry to
be de-
li
ve [·ed.
Wh
en
frequ
ency sel
ect
ion is requi
red,
it
is
recommendable to consult
with
the
near
est Elmo dealer.
When
it
is done
by yourself, however,
do
it
as
fo ll
ows
.
60Hz
....
---->
. 50Hz
o P
ul
l o
ut
the
power sou
rce
cor
d.
o Take off the r
ear
cover
by
turning
two
set
screws coun
tercloc
kwise.
8 As shown
in
the
picture,
change the
belt
in
accordance
with
the
required
frequency.
No
te:
Ther
e is a s i
'ng
le frequ
ency
model in
accordance
with the
e l
ectric condi-
tio
ns of
each co
untr
y.
Page 35

-Trouble shooting hints
When
the
motor
will
not
e
If
the
power
cord
is
correc
tly
plugged
In.
start:
e
If
the
power fuse
breaks
.
When
the
projection
lamp
e
If
the
lamp is
correct
ly insert
ed
int
o la
mp
does
not
light
: soc ket.
When
the
film
does
not
thread
to
the
take up
reel :
When
the
image
on
the
screen is
out
of
focus :
e
If
th
e film l
eade
r is
correct
ly
trimm
ed with
the film
trimmer.
e
If
the
perforat
ion
at
the beginning of th e
film is n
ot
damaged.
e
If
the
fi
1m leader
is correc
tly spl i
ced
.
e
If
the projection lens l S
fitt
ed
int
o th e
b
ar
rel.
How
to
change projection lens
Focusing
knob
After
turning
the
focusing
knob fully cloc
k-
wise, pull o
ut
the lens.
While pulling
the
focus ing knob t
owards
you put the n
ew lens
into barr
el.
31
Page 36

32
Jack for synchronizer R-1
S)'n_
chroniz
er
R-1
jack
~
----
Sound
recorder
SR
- 1
• Thi s jack is
used
when the
transfer
of
so
und
recorded
by
cassette
tape recor-
der
is made onto the magnetic sound
track
of film . Normall y
this
is a
device
to
transfer
the sound on the
cassette
tape
recorded
by E lmo sound
recorder
SR
-1
together
wit
h Elmo synch
ro sound
movie cam
era
Sup
er
110R
(Pulse
sys-
tem) onto the sound
trac
k of
fi
I m f
or
Elmo
ST -1200 D
projector.
• Synchronizer
R-1
(Opti on)
Elmo
sy
nchroni
zer
R-1
is requir
ed
when the sound on
cassette
tape
is
transfered
ont o the magnetic sound
track
for ST -1200 D
projector.
The synchro-
- ni
zer R-1
regulates
the r unning
speeds
of both
the
ST-
1200 D and
SR-1 at
a
con
sta
nt r
ate,
receiving the synchro
pul
se
signals from the
ST -1200 D and
SR-
l.
Synchronizer
ST-1200D
• So und
transfer
The conn
ectio
n of
eac
h eq uipment for
so
und
transfer
is s hown
as
above.
(For
further deta
ils refer to the ins
tru
ction
manual
for
synchron izer
R-l.)
Page 37

Optional
<accessories
• Elmo viewer type
100
Attachme
nt
of
the
Elm o vie
wer
type 100
on the
ST
-1200 D
projector
will
allow
you to enjoy a
project
ion
in
a
brig
ht
room
or
in
place
of l
arge
size
scree
n
in a
dark
room
set
up.
As the
adapter
is n
ecessa
ry to
attach
thi s
viewer
to
the proj
ector, prepare
the
adaptor
for
ST -1200 D
projector.
• Long-focus Zoom Lens
Sh
arp
F1.4,
25
- 50mm long·focus zoom
lens f
or projection
in
a l
arge audit
o-
rlUm.
•
Hi-Fi Zoom lens
Ou
tsta
ndingly br ig
ht
wide-ang le F1.
1,
12.5-25mm sh
ort-focus zoom lens.
33
Page 38

34
. 4-channel Mixer
For
making int eresting
recordings
such
as
fad e-in, fade-out,
over
lap, etc.
• Twin 2-way Hi-Fi Speaker
High
performance
ex
tension
speaker
with a 10"
(25cm) woof
er
and a
horn
typ e
tweeter.
Especially
useful
for
projec
tion
in a l
arge
auditor
ium.
Stores
in one p
orta
ble
case.
• Headphone Model EH-72
High
qU1;llity hea
dph one
for
mo
nitoring
in
recording
or reproduction.
• Headphone Model EH-75
This
model can select th e impedance
of either
1
6Q
or
600Q by s
wit
ch.
Page 39

-
po-
b
'"
,,-
•
1200ft
(360m)
Reel
The 1 argest ree 1 capac
i ty I n the 8
mm
world.
Enabl
es
co ntinu ous
project
ion
exte
nded
over
one hour.
• Editor
912
Easy-to-
handle quality e
ditor
wit
h a
brig
ht and l
arge
scree
n which
accep
ts
both S
up
er
8 and Regul
ar
8 films.
• Daylight projection
mirror
This accessory
mirr
or
provides aclear
projection image
in a
bri
ght pl
ace when
u
sed with a spec
ial translucent
scree
n.
• Translucent screens
60c m
X8
0cm
(23.6"
X
31.5")
39cm X 52cm (15.4" X 20.
5")
Spec
ial qual ity
scree
ns f
or
dayli
ght
rear
projection.
35
Page 40

36
• Stereo movie unit ESM - 1
Le
ts you c
aptur
e and view
three-dimen-
sional film s
wh
en used in co mbination
with
Elmo movie cameras and
projec
t-
or s .
• Synchronizer
R-1
Used as a device for tra
nsferring the
so
unds · recorded on the
cassett
e tape
o
nt
o magnetic sound film.
You
can tran
sfer the sound to the sound
track of the film
lat
er on by e
dittin
g
the film and tape befor ehand.
Page 41

• Cord and plug
For ST-
1200
D projector a
nd
mixer
MX
-4
MC-OOI 3.
5¢
~
.....
..........
=::CJ=» 3.
5¢
1.
5m
MC-002
6¢
· ..
~
6
¢
1.5111
MC-003 5
1'
D[N (Ma l
e)
ge:::::::J)c:J:
..........
==>=-0
3.
5¢
1.
5m
(F"om
ste
reo
to
mOll
o)
MC
-004 Cl ip
g
>_
..
-
....
==>=-0
3.
5¢
1.
5m
MC
-005 5
1'
J)[ N (Femal
e)gc:Jl/}I::J: ....
....
==>=-0
3.
5¢
For DIN Connecto r
MC-006 P
in
plug =C>=
.....
=::I:J=>.
3.
5¢
1.5111
MC-007 3.
5¢
~
...
=CC~
.
3.
5¢
Spi n
il
co
rd
M
C-008
3.5¢
«=ILl>
..
~
c::cD=»
3.5 ¢
10
m
MC-009 3.5¢
oq
..:...3
. .
..
..
_-_
.......
C
}
.,
3.5¢
:
I
:
lO
Q
For
SR-1
PC-OOI DIN 6
1'
( Mal
e)
~
e::::::JI)c:J:
...
~
~
D[N 61' ( Ma l
e)
Pulse·synchro.-.SH-I. PG- I. SA-I.
)l'ojeclO
l'
Pul
se cord u
ni
t etc.
PC
-002
~
.........
=t::::mJJ
Supe ,'
ll
OH
<- ,
SR
- l
PC
-003 DIN 61'
(Mal
e)~s::::::H)I::J:
....
:t:::I{Il-:::E~
DIN GP ( Ma l
e)
Pul
se recording co
rd
(Pnlse·synchro projector
'-'
SR-!)
PC
-005 DIN 61'
(Male)~ECa)r::t::
..........
=::::::::J=
Pin pl ug
Ph il ips
t.ap
e "
eeo
rde r
22
09AV
<- ,
1'-
10
PC
-006
DIN 6
1'
~EDJ)D::
..
.....
:c(£]:I~
DI
N GP
Pulse·sync
hro pr
ojcctor .- . 1'-10
PC
-007 DIN 5
1'
g
EOIDr=
:o(£J3g
DIN 5
1'
Ste r
eo t.ape r
ceo
rde ,' <
-->
1'-10
PC
-008
3.
5¢
~
...
.....
~J
G
.rip-R
+--
, S R- l
PC-009
3.
5¢
u=tLI=
... =e:Jl=» 2. 5 ¢
G
r ip- H
<---+
Tape
r
ecorder
PC-OlO
3.
5¢
-=
....
.......
=
3.
5¢
( Fe mal
e)
rape reco
rd
er
~
M iC
l'oph
one
For extension speaker
Plug
adapter
I
MP-OOI
I G¢
3.
5¢
G¢
I
37
Page 42

Projection distance and image size
Foca
l length
12.5
mm
(Opt
iona l
accessories)
Wide 15
mm
Di
stance
Im
age
size
(c
m)
Im
age size
(c
m)
1 m 3 1
X
4 8
2 6
X
3 5
1 . 5 m 4 7
· X 6 3 3 9
X
5 2
2 m 6 3
X
8 5 5 2
X
7 0
2 5 m
7 9
X
1
06
6 6
X
8 8
3 m 9 5
X
1
28
7 9
X
106
5 m 1 6 0
X
2 1 3 1
3 3
X
17
8
1 0 m
32
0
X
4
28
266
X
3 5 6
Foca
l length
Te
le 25
mm
50
mm
(Opt
ional
accessories)
Di
stance
Im
age s ize
(c
m)
Image size
(c
m)
1
m 1 5
X
2 0 7
X
1
0
1 5 m 2 3
X
3 1
1 1
X
1 5
2 m 3 1
X
4 2 1
5
X
2 0
2 5 m
3 9
X
5 2
1 9
X
2 6
3
m
4 7
X
6 3 2 3
X
3 1
5
m 7 9
X
1
06
3 9
X
5 3
1 0 m
1
60
X
2 1 3
7 9
X
1
06
1 5 m
240
X
320
1 1 9
X
1
60
2 0
m
3 2 0
X
428
160
X
2 1 3
. 3 0
m
------
2 4 0
X
320
4 0 m
------
320
X
428
38
Page 43

Projection time and film length
Tim
e
24
fp
s
18
fp
s
Tim
e
24 fps
18
fp
s
(
min
.")
ft
ft
(
min.
)
ft
ft
m m
m m
1
6.1
20
4.6
15
21 128.0 . 420
96
.0 315
2
12.2
40
9.1
30
22
134.1
440 100.6
330
3
18.3 60
13.7
45
23
140.2 460 105.2 345
4 24.4
80
18
.3
60
24
146.3 480 109.7 360
5 '
30.5 100
22
.9
75
25
152.4 500
ll4
.3 3
75
6 36.6 120 27.4
90
26
158.5 520
ll8
.9 390
7 42.7 140
32.0
105
27 164.6 540 123.4 405
8
48.8
160 36.6 120 28 170.7 560
128.0 420
9 54.9 180 41.1
135
29 176.8 580
132.6
435
10
61.0 200 45.7 150 30
182.9 600 137.2 450
II
67.1 220 50.3
165
31 189.0 620 141.7 465
12
73.2 240
54
.9
180
32 195.1 640
146.3
480
13 79.2 260 59.4
195
33
201.2 660
150.9
495
14 85.4 280
64.0
210
34 207.3 680 155.4
510
15
91.4 300
68
.6 225 35 213.4 700
160.0 525
16
97.5
320
73.2 240 40 243.9 800
182.9 600
17
103.6 340 77.7 255 50
304.8 1000 228.6 750
18 109.7 360
82.3
279
60
365.8 1200
274.4 900
19
ll5
.8 380 86.9
285
70
426.8
1400
320.0 1050
20
121.9 400 91.4
300 80 487.8 1600
365.8 1200
39
Page 44

,
Ef/'1Jl
ELMO CO.,
LTD.
Nagoya, Japan
OVERSEAS
SUBSIDIARY
COMPANIES
West
Germany Elmo (Europe) G. m. b.
H.
Canada
U.S.A.
U.S.A.
0-4,
Dusse ldorf, Elmo-l-Iaus,
Steinstr.
23,
W
est
Germany
Tel.
326867, 326870
,326
895
Arrow
Photographic
Equipment
Ltd.
44
West
Drive
Bramalea, Oritario
L6T
3
T6
Te
l.
416 453 7880
Elmo
Mfg
Corp
.
32
-10
57th
Street
Woods ide, NY 11377
Te
l.
212-626-0150
Elmo
Mfg
Corp.
21220
Erwin
Street,
Woodland
Hill,
CA
91364
Te
l.
213-346-4500
Printed
in
Japan
 Loading...