

Page 1
START-UP GUIDE
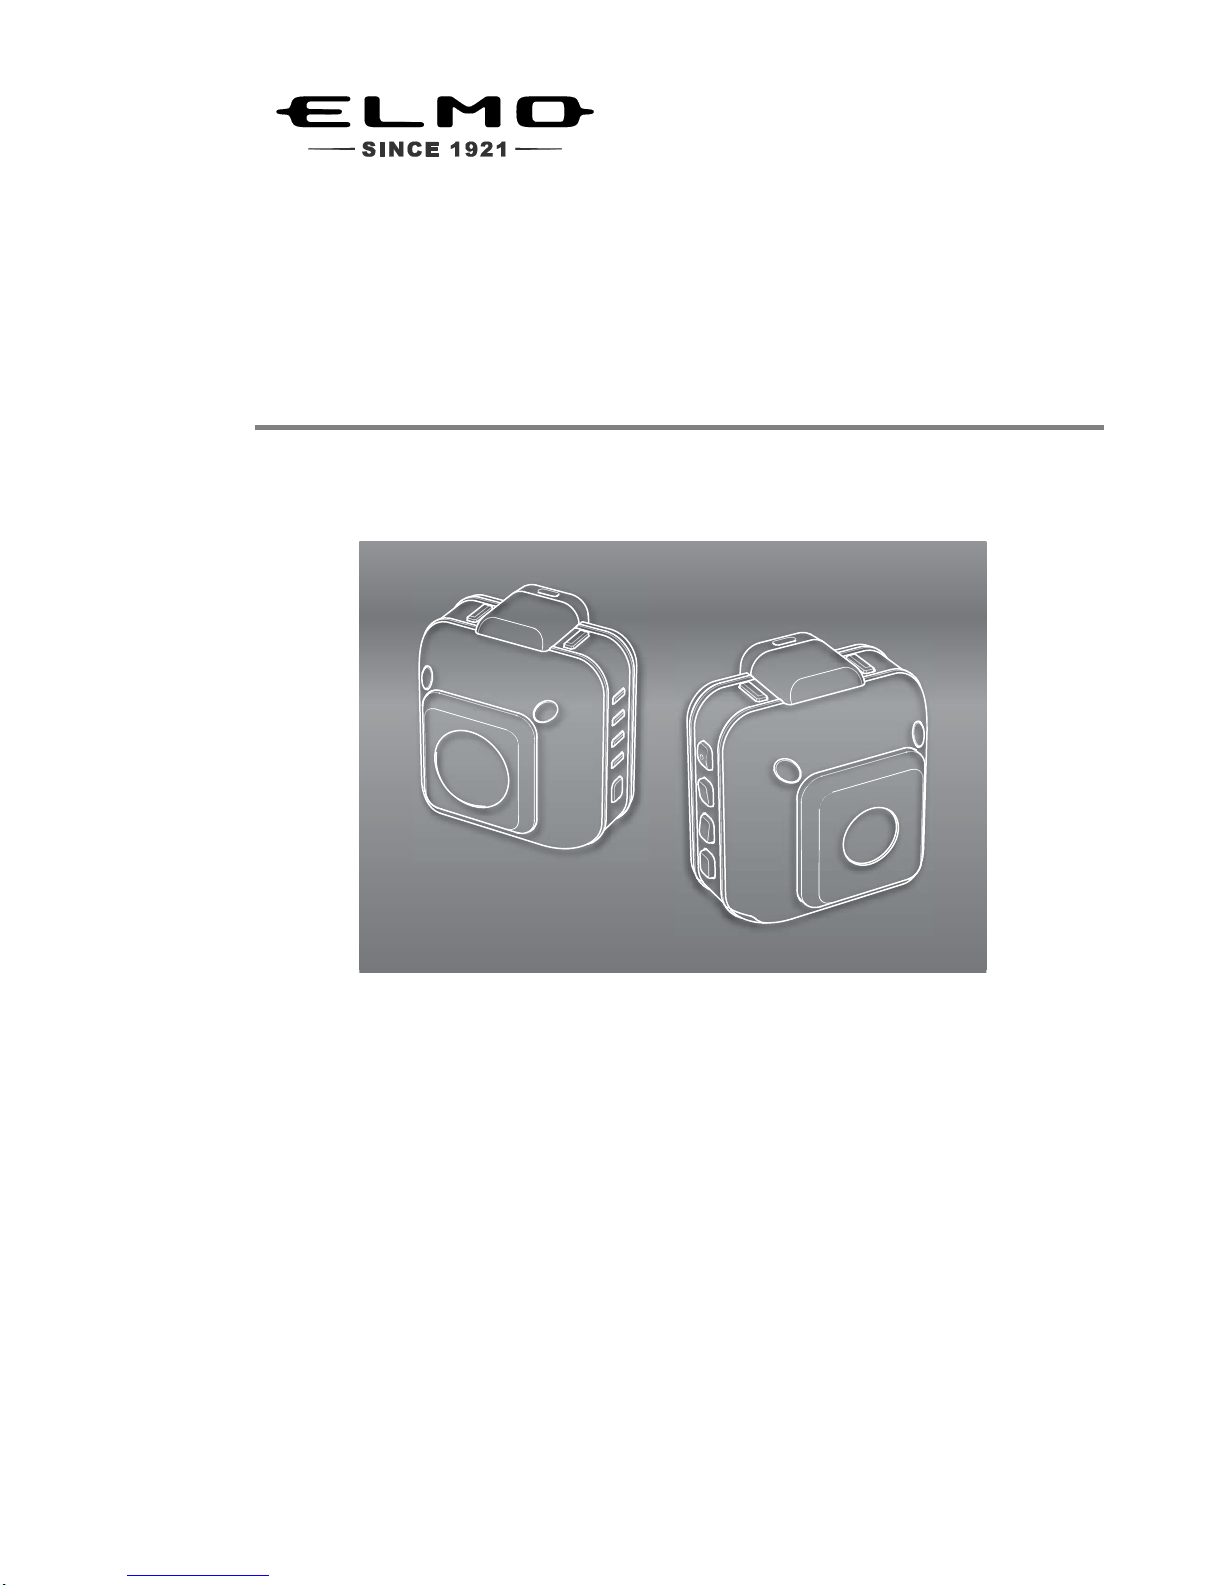
QBiC S X1 / D1
©2013 Copyright ELMO Co., Ltd. All rights reserved.
Any names, company names and product names referred to in this guide are
trademarks or registered trademarks of the respective companies.
Page 2

2
TABLE OF CONTENTS
BEFORE YOU USE .................................................................................................... 3
QBiC S PACKAGE CONTENTS ................................................................................. 4
THE NAME OF EACH PART ...................................................................................... 5
PREPARATIONS ........................................................................................................ 6
Installation of battery pack / Charging ..................................................................... 6
INSERTING microSD CARD AND WiFi CARD ....................................................... 7
PRECAUTIONS WHEN USING QBiC S IN THE OPEN AIR .................................. 8
STARTING THE ALER T MODE ............................................................................... 10
POWERING ON .................................................................................................... 10
Lighting of LED while battery-powered mode is enabled ...................................... 10
Alarm sound in battery mode ................................................................................ 11
POWERING OFF .................................................................................................. 11
CHECKING THE MAINTENANCE MODE ............................................................ 11
START ALERT MODE (SHIFTING TO ALERT MODE) ........................................ 12
STOP ALERTING (SHIFTING TO MAINTENANCE MODE) ................................ 13
MAINTENANCE TOOL ............................................................................................. 14
ABOUT QBiC S MAINTENANCE TOOL ............................................................... 14
CHECK PC ENVIRONMENT ................................................................................ 14
GET AND INSTALL THE QBiC S MAINTENANCE TOOL .................................... 15
UNINSTALL QBiC S MAINTENANCE TOOL ........................................................ 15
CONNECT THIS PRODUCT TO PC VIAUSB CABLE ......................................... 16
CONNECTING TO WiFi ........................................................................................... 17
REGISTER FOR ACCESS POINT ....................................................................... 17
MASS STORAGE MODE ......................................................................................... 18
TURNING ON THE MASS STORAGE MODE ..................................................... 18
UPDA TE ................................................................................................................... 19
IMPORTANT SAFEGUARDS ................................................................................... 21
BEFORE YOU USE .................................................................................................. 27
DISCLAIMERS ......................................................................................................... 31
Page 3

3
BEFORE YOU USE
Thank you for purchasing QBiC S X1/D1.
This guide is intended to describe the usage and settings of the product for the
purpose of appropriate usage and the user’s safety.
Please read this guide and the “Important Safeguards” carefully before using
the product.
Please refer to the QBiC instruction manual for any other setting and
information.
Please keep this guide for future reference.
《QBiC S INSTRUCTION MANUAL》
Please download the QBiC Instruction manual from the
following QBiC Website.
QBiC Product Website: http://www.elmoqbic.com/
Page 4

Page 5

5
THE NAME OF EACH PART
QBiC S FRONT
QBiC S BACK
The specification in the above applies to both X1 & D1
NOTICE
Microphone
WiFi LED
Schedule LED
Key lock LED
REC LED
Alert/Alert cancel REC switch
Accessary installation port
micro USB port
Lock
Reset switch
Back cover
(WiFi card slot inside)
Battery slot
Lens
WiFi switch
Schedule switch
LED lights switch
Power/Battery PWR LED
Power switch
Maintenance MNT LED
LED lights
Page 6
6
PREPARATIONS
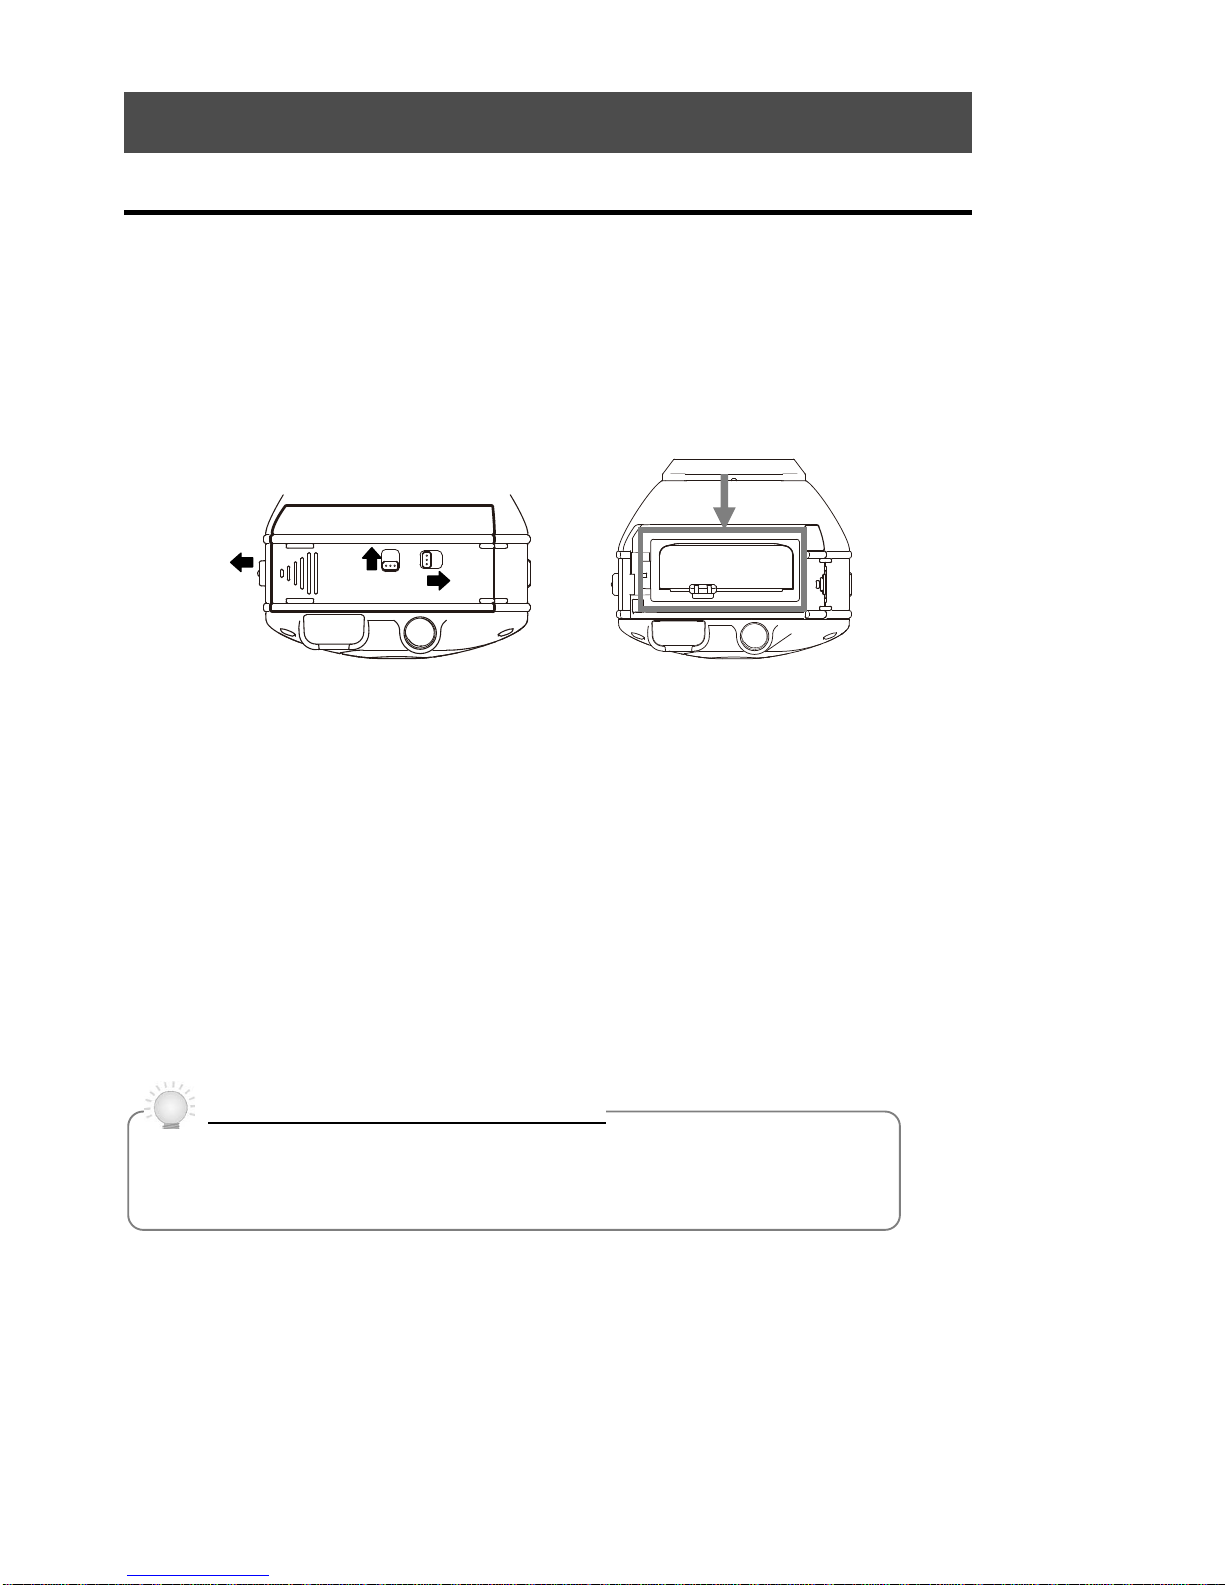
INSTALLATION OF BATTERY PACK/CHARGING
*Battery pack is not inserted in the product. Battery is not fully charged at the time of
purchase. Charge the battery fully before starting to use the product.
1. The rating label which mentions product name; etc. is attached at the bottom of
the product (①). Slide 2 knobs to the opposite directions of the arrows on the
label and unlock. Slide and open the slot(②). Insert the battery pack. Slide and
close the slot. Lock the knobs.
① ②
2. Turn off the product. Charging is not possible while the power is on.
3. Open the micro USB port cover. Connect the micro USB plug (smaller one) of the
supplied USB cable to the micro USB port of the product.
4. Connect the USB plug of the USB cable to a USB port on the supplied AC
adapter your PC.
5. [Power LED] on the product blinks in red while charging.
6. Battery is fully charged when [Power/LED LED] turns off.
Charging from the USB port on your PC is possible.
However, be sure to turn off the product and note that it takes longer time
to charge than when using the AC adapter.
Charging from the USB port on your PC
Page 7

7
INSERTING microSD CARD AND WiFi CARD
1. Insert the supplied micro SD card in the WiFi card.
*When the WiFi card is write-protected, recording is not possible. Verify that the slide
switch is set to the unlock position. If the slide switch is set to [LOCK], slide it to
other end to release the lock.
CAUTION
Pay attention to the direction of the card when inserting the micro SD
card. Insert the microSD card until it clicks. Improper insertion of the card
may cause error.
2. T o remove back cover, unlock the lock in the back cover with a flat object such as
a coin. Insert the object in ① and turn it to the direction ② indicated with an
arrow.
The back cover is removed.
3. Insert the WiFi card in the WiFi card slot.
CAUTION
Pay attention to the direction of the card when inserting the WiFi card.
Insert the WiFi card until it clicks.
Improper insertion of the card may cause error or damage the product.
Card slot
①
②
Slide switch
Page 8

8
4. Close the back cover and lock it. Insert a flat object such as a coin in ① and
turn it to the direction ② indicated with an arrow.
CAUTION
Make sure to close the cover correctly and lock it tight. Insufficient
locking may deteriorate the waterproof performance and damage the
product.
PRECAUTIONS WHEN USING QBiC S IN THE OPEN AIR
Please use a commercially available outdoor housing when using this product in the
open air.
This product is guaranteed to be waterproof when the USB cover is properly installed
(USB cable is not used), but NOT guaranteed if USB cover is NOT properly installed
(USB cable is used).
And also waterproof is not guaranteed if this product is used in the open air for an
extended period of time, regardless of using the USB cover properly.
Follow the following instructions when you use the camera under water.
1. Make sure that all covers, slots and knobs are firmly closed.
USB cover
Lock
Back cover
Knobs
micro USB port
Batter
y
slot
①
②
Page 9

9
2. When this product is used with AC adapter, (①) remove USB cover (②) install
USB packing seal to the micro USB port (③) plug the USB cable (with USB
packing seal) connect USB cable and AC adapter, and start to use.
Use a commercially available outdoor housing if this product is used in the open
air.
CAUTION
The supplied AC adapter is not waterproof.
Also the USB packing seal does not guarantee waterproof property.
3. The inside of outdoor housing may get hot or cold depending on the location of the
camera. Be sure to consult with the system installer in advance and use an extra
device such as cooling fan or heating equipment together with the outdoor
housing if necessary.
CAUTION
The camera is not guaranteed to be waterproof or to be free of trouble or
damages under every condition.
Please refer to the QBiC S instruction manual for the details about use of QBiC S in
the open air.
Please download QBiC S instruction manual from the following website.
QBiC Product Website: http://www.elmoqbic.com/
①
②
③
④
Page 10

10
STARTING THE ALERT MODE
This product supports “Alert mode” which continuously records video and save it to
microSD card and “Maintenance mode” which configures the variety of settings and
also plays the recorded movie which is stored in the micro SD card.
In this section the following topics are covered:
[Operation of each mode] / [Indication of LEDs]
POWERING ON/OFF
POWERING ON
Press and hold (over 1second) [Power Switch] to power on the product.
[Power LED] turns blue or green.
The factory setting is “Maintenance mode”.
LIGHTING OF LED WHILE BATTERY-POWERDMODE IS ENABLED
This product supports 24-hour continuous monitoring function by the power
feeding from AC adapter.
In case the power supply is cut off, electricity is fed from the built-in battery
pack; therefore, the alert recording will be continuously operated for up to 2
hours.
At this time “Power/Battery PWR LED” turns red and it indicates that the
product is using the electricity in the built-in battery.
When “Power/Battery PWR LED” turns red, the power is not fed by AC adapter.
The product may unexpectedly turn off; so check the power conditions as soon
as you possible.
NOTICE
Turns
blue
Page 11
11
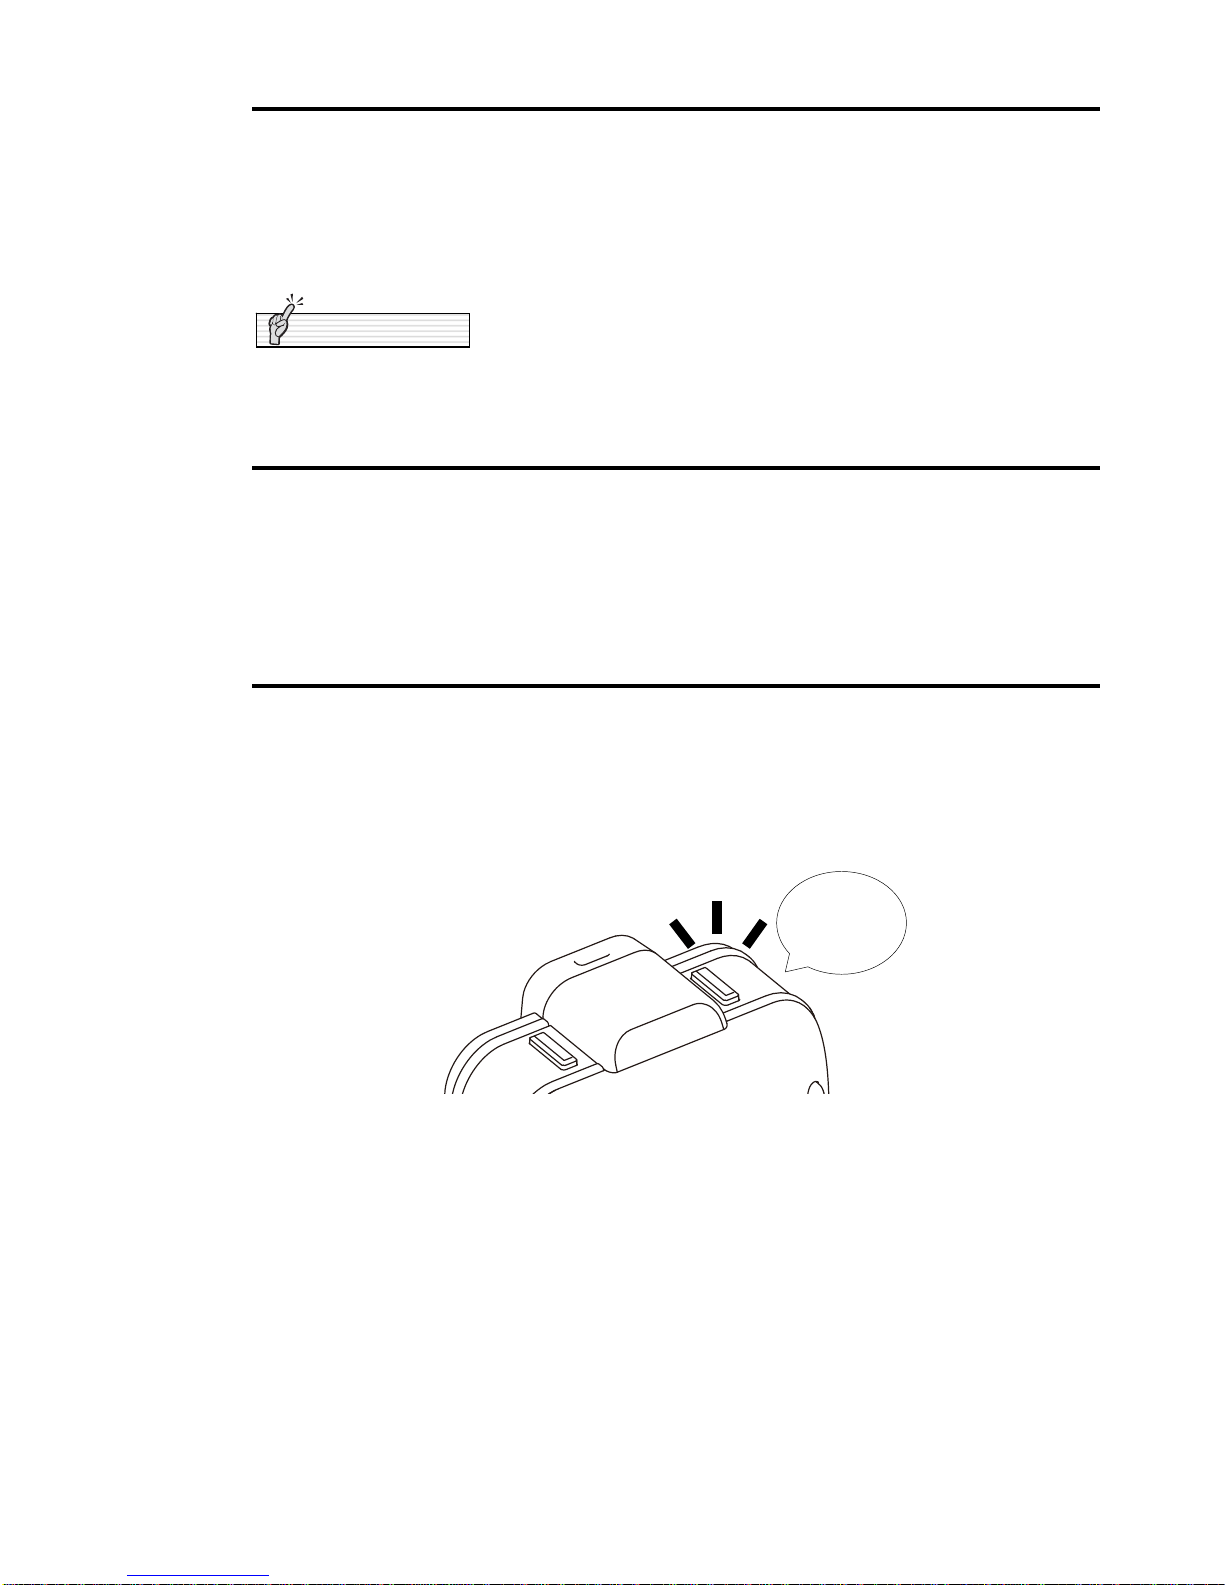
ALARM SOUND IN BATTERY MODE
This product will sound to inform the remaining battery level.
A long beep sound occurs when the product is working in “Alert mode” and the
remaining operation time is less than 5 minutes.
Immediately charge if the product starts to makes alarm sound.
Battery alarm can be disabled by using the QBiC S Maintenance Tool.
POWERING OFF
Press and hold (over 2 seconds) [Power Switch] to power off the product.
[Power/Battery PWR LED] turns off.
If the power turns off by the power switch in alert mode, the product automatically
changes the mode into “Maintenance mode” before powering off.
CHECKING THE MAINTENANCE MODE
The Product boots in “Maintenance mode” when powering on for the first time.
When the product is in “Maintenance mode”, “Maintenance MNT LED” turns red and
indicates user that the product is in the “Maintenance mode.
“WiFi LED” lights accordingly to WiFi settings.
Turns
red
NOTICE
Page 12

12
START ALERT MODE (SHIFTING TO ALERT MODE)
Press “Alert/Cancel alert REC switch” in “Maintenance mode” and shift the mode to
the “Alert mode”. When the product is in the “Alert mode”, “Maintenance MNT LED”
and “WiFi LED” turn off, and instead “REC LED” turns green.
“REC LED” turns on when the product is recording a movie. “REC LED” does not turn
on if the product is not recording; e.g. the camera is in the “Scheduling setting” mode.
When the camera is in the “Alert mode”, the “WiFi LED” turns off regardless of WiFi
setting conditions.
When the camera shifts the mode to “Alert mode”, the movie is automatically
recorded and saved into microSD card which installed in the camera.
Date and time to record can be configured in the recording settings.
The factory default setting is VGA/5fps/385Kbps. The movie can be continuously
recorded for approx.7 days when using a 32GB microSD card.
NOTICE
REC LED
Turns
green
Alert/Cancel alert/ REC switch
Page 13

13
STOP ALERTING (SHIFTING TO MAINTENANCE MODE)
Press and hold “Alert/Cancel Alert REC switch” (over 2 seconds) and cancel the
“Alert mode”. The camera shifts the mode to the “Maintenance mode”.
Use “QBiC S Maintenance tool” in the “Maintenance mode” to configure a variety of
settings and play recorded movies.
CAUTION
No movie is recorded if the camera is in the maintenance mode. When
the alert monitoring is set, check that the “Maintenance LED” is turned off
and the camera shifts the mode to the “Alert mode”.
Page 14
14
MAINTENANCE TOOL
ABOUT QBiC S MAINTENANCE TOOL
QBiC S Maintenance Tool is a tool to configure detailed settings of the camera. Inst all
the tool to PC and connect PC and the camera with the supplied USB tool prior to
use.
By using the tool, you can:
● See live viewing video
● Record scheduled movies (day and time)
● Change image quality and frame rate of recording movies
● Set up switch lock for tamper-resistance
● Edit WiFi settings for remote monitoring
CHECK PC ENVIRONMENT
The following OS is supported.
Windows
Microsoft Windows XP* SP3/Windows Vista SP2/Windows 7 SP1
CAUTION
*64 bit version is not supported
Page 15

15
GET AND INSTALL THE QBiC S MAINTENANCE TOOL
Go to QBiC Product Website to download the QBiC S Maintenance Tool.
1. Log on as an administrator and execute Setup.exe.
2. Follow the messages and install.
Warning messages about hardware compatibility and digital signature may
appear, depending on PC environment.
Tick “Always trust software from ELMO COMPANY, LIMITED.” And click “Install”
button.
3. The “QBiC S Maintenance Tool” icon will be installed on your PC desktop if the
installation is successful.
CAUTION
Rebooting may be asked.
When your PC shows the message to ask your PC to reboot, click “Yes” button and
reboot your PC.
UNINSTALL QBiC S MAINTENANCE TOOL
To uninstall the QBiC S Maintenance tool, use the uninstall function in OS
Page 16

16
CONNECT THIS PRODUCT TO PC VIAUSB CABLE
1. Boot the QBiC S Maintenance Tool.
From start menu in your PC, click “Start” ”All Programs” ”ELMO””QBiC S
Maintenance Tool”.”QBiC S Maintenance Tool”.
Or click the icon of the QBiC S Maintenance tool located on your PC desktop.
2. Connect PC to the camera via the supplied USB cable.
3. Power on the camera.
QBiC Maintenance tool recognizes the camera and ready to use.
For the details about QBiC Maintenance tool refer to the QBiC S instruction manual.
NOTICE
Supplied USB cable
micro USB connector
USB connector
Page 17

17
CONNECTING TO WiFi
By using WiFi the camera can be connected to a network and movies can be
displayed to other devices. The configuration differs from wireless LAN router or
wireless LAN access point which you use.
CAUTION
● PC in the network is required to use.
● When configuring the settings, be sure that your PC is within the
area of working wireless LAN access point.
REGISTER FOR ACCESS POINT
Use the “QBiC S Maintenance Tool” to register an access point.
Check if the “QBiC S Maintenance Tool” is already installed to your PC. If not, install
before starting to register.
1. Select [Network Settings] [Infrastructure] tag in the QBiC S Maintenance Tool.
2. The access point around QBiC S is listed. And choose the access point to use.
If you cannot find any access point to register, select “AP Manual settings” and input
the desired SSID and Network KEY.
* The design images may change without notice.
NOTICE
Page 18

18
MASS STORAGE MODE
This product can be used as a storage device. Using this mode, you can retrieve the
data stored in the micro SD card.
TURNING ON THE MASS STORAGE MODE
1. Open the micro USB Port Cover of the product.
2. Power off the product. Connect the micro USB plug (smaller one) of the
supplied USB cable to the micro USB port of the product. USB plug of the USB
cable to a USB port on your PC.
3. Press and hold [Power Switch] (over 5 seconds).
4. The micro SD card inside the product will be recognized as a removal disk.
Three beep sounds occur and the menu appears on the screen of your PC.
5. Select the menu and operate.
6. Power off the product. Remove the USB cable from the product and attach the
micro USB Port Cover.
CAUTION
Make sure you attach the cover properly and completely. Insufficient
attachment may deteriorate the waterproof performance and damage
the product.
Connect first and
then power on.
Page 19

19
UPDATE
This product and the QBiC application software will be updated from time to time to
improve their performance and functionality. For the details about updating, refer to
the QBiC S Instruction manual.
Please get the latest manual from the following QBiC Product website:
http://www.elmoqbic.com/
Page 20

20
QBiC S X1/D1
IMPORTANT
SAFEGUARDS
Please read this IMPORTANT SAFEGUARDS carefully before
using the product and keep it for future reference.
Also please download QBiC Instruction Manual from the following
website and read carefully to ensure safe and proper use.
QBiC Product Website: http://www.elmoqbic.com/
Page 21

21
IMPORTANT SAFEGUARDS
Please read all precautions and warnings before starting to use.
The information is provided to ensure proper operation of this product and will
prevent you or others from personal injury or loss of assets.
Review the following symbols so that you understand them before reading the rest of
the manual.
Please read carefully and keep the manual in a safe place for future reference.
Carefully read the following symbols and definitions before reading the next chapter.
DANGER
Ignoring the warning and operating the system incorrectly subjects the
user to an extremely high risk of injury or death.
WARNING
Ignoring the warning and operating the system incorrectly subjects the
user to possible risk of injury or death.
CAUTION
Ignoring the warning and operating the system incorrectly subjects the
user to risk of injury or loss of assets.
Definition
Name: Danger/Warning/Caution
Meaning: Dangerous action or anything which is needs to be warned or
cautioned.
Name: Prohibited
Meaning: Do not do
Name: Forced
Meaning: Forced to do or follow
Name: Do not touch
Meaning: Touching is prohibited
It could cause electric shock or injure
Meaning: Do not disassemble
Meaning: Disassembling is prohibited.
It could cause electric shock or injure. to human body
Page 22

22
DANGER
The battery used for this product is a rechargeable lithium-ion battery. This
battery is susceptible to temperature and humidity.
This battery is designed to be used solely with this product. Do not use it
with other product.
● Do not use an apparently damaged or deformed battery. It could cause
smoke, fire, electric shock or burn.
● When charging the battery, make sure to follow the specified method,
using the appropriate charger.
● When disposing of used batteries, follow the instructions of your local
government.
Do not use a leaked battery. If liquid leaked from a battery permeates the
eye, rinse the eye immediately and consult a doctor for the necessary
treatment.
Do not use the battery in the wrong way as described below.
It could cause the battery to leak, overheat, ignite or burst, leading to injury,
death or fire.
● Carry or store the battery with metal objects.
● Disassemble, modify or heat the battery or throw it into fire or water.
● Leave the battery in extremely hot places.
● Drop or strike the battery.
● Reverse the positive (+) and negative (-) terminals.
Do not place this product near equipment with heat, such as heating
equipment. Do not throw this product into fire or heat it.
● The built-in battery may ignite or burst and it may subject the user to an
extremely high risk of injury, death or fire.
Do not use this product near flammable, ignitable or explosive gas.
● It could cause fire or explosion.
Do not do compose or remodel the supplied ac adapter.
It could cause fire or the electric leakage if you touch inside the device
directly.
Do not use it as a direct current.
Do not run water over the supplied AC adapter.
Do not use it in the bathroom or shower room.
● It could cause fire or electric shock.
Insert the USB cable properly to the AC adapter until it clicks.
● Improper insertion could cause the inserting point to detach or ignite
leading to fire or electric shock.
Page 23

23
WARNING
Do not unscrew or unclench the case.
● There are some points which have extremely high voltage inside the
product. They could cause smoke, fire, electric shock, burn, or failure.
● Contact your dealer or ELMO Customer Service for check-up or repair.
Keep this product and accessories out of reach from babies and children.
The cable may be wound around their neck and may cause choking.
WiFi card and microSD card could choke or seriously injure babies and
children if swallowed. Contact Emergency Services immediately if this
happens.
● Babies and children may get injured by dropping, stepping on or
crushing this product.
If the product begins to smoke or develops a strange odor or abnormal noise,
unplug the AC adapter from the consent immediately and power off the
product. Or, carefully remove the battery, disconnect all the cables, remove
all nearby inflammable objects. Wait from a distance until no more smoke or
odor or noise comes from the product.
● If you continue to use in this condition, fire or electric shock may occur.
● Make sure that no more smoke appears. Then contact your dealer or
ELMO Customer Service for repair.
Never attempt to repair it by yourself.
Do not give excessive shock by dropping or bumping this product or the
supplied AC adapter.
Do not place any heavy objects on this product.
Very high risk of smoke, fire, electric shock, burns or malfunction.
● We do not guarantee the waterproof performance of the product if the
body is damaged or deformed due to an external impact.
Do not spill water or insert foreign objects inside the product or the supplied
AC adapter. Do not solder wires or pins or insert foreign objects into the USB
connector port or card slot.
Do not insert irregular plug or connector into the each terminal.
Firmly insert the connector into the terminal. Do not touch with wet hand.
● Very high risk of smoke, fire, electric shock, burns or malfunction.
Page 24

24
WARNING
This product is waterproof. However, we do not guarantee its waterproof
ability in all conditions. The supplied AC adapter is not waterproof. Pay
close attention when using the product when raining, snowing, in and near
water.
If any abnormality is found during use of the product or the supplied AC
adapter, power off the product or carefully remove the battery. Contact
your dealer or ELMO Customer Service.
● Continuous use could lead to fire or electric shock.
If any liquid or any foreign object gets into the product or the supplied AC
adapter, remove the AC adapter from the consent and turn off the product
immediately or carefully remove the battery. Or carefully remove the
battery and disconnect all the cables if connected. Contact your dealer or
ELMO Customer Service.
● Continuous use could lead to smoke, fire, electric shock, or
malfunction.
Do not touch this product, the supplied AC adapter or cable-connected
devices during thunderstorm.
● Very high risk of electric shock under these conditions.
Do not swing this product by the hanging strap.
● It may hit a person or object and it could lead to injury, failure,
malfunction or breakdown.
Supplied WiFi card is exclusive to this product. Do not use it with anything
else.
● Do not fold, drop, or apply strong vibration to the card.
The USB cable is exclusive to the product. Do not use it with anything
else.
● Do not place any heavy objects on the USB cable, or do not damage,
work on, add bend by force, twist, pull or heat the USB cable
connector port to avoid smoke, fire, electric shock or burns.
The supplied AC adapter is exclusive to the product. Do not use it with
anything else. Or, do not use anything else as a charging device for the
product.
Continuous use could lead to fire or electric shock.
Use a commercially available outdoor housing when you use the product
in the open air.
Carefully choose the equipment in order to maintain the appropriate
environment for the product.
● It could cause fire or electric shock.
Page 25
25
CAUTION
Prior to using this product on a commercial airplane or in a hospital, check
with authorized personnel.
● This product will emit electromagnetic energy which can interfere with
aircraft instruments or patient monitoring equipment.
Remove the attachments and leave this product uncharged if this product
is unused for an extended period or when you do maintenance on the
product.
(Charge at least every 6 months even if this product is unused for an
extended period. Leaving this product uncharged may cause charging
trouble).
● Leaving and storing this product to a “power ON” state may cause
degradation of insulation, electric leakage and so on. It may cause
smoke, ignition or fire.
Do not use or store this product in a hot place such as a car, in a dusty,
humid, or steamy place for an extended period.
● It could cause fire or electric shock
● It could deform the body, leading to a malfunction.
Do not leave this product in areas with smoke, steam or water vapor.
● It could cause fire or electric shock
● It may degrade the waterproof performance.
Do not pull the wire when unplugging a cable from an outlet. Hold the plug
to disconnect.
Unplug the cable before carrying this product.
● Damaged cable could cause smoke, fire, electric shock, burns or
malfunction.
Hold onto this product when disconnecting a cable, strap, or other
accessories such as tripod.
● This product may pop-up and it may cause injury or malfunction if it
falls.
Do not look at the white LED light directly at close range. Do not shine
white LED light into a human eye.
Do not look at the white LED light directly at close range. Do not shine
white LED light into a human eye.
● It may be a cause of impaired eyesight and so on.
Allow 1 meter or longer distance when shooting movies and photos of
babies and children.
● Do not shine white LED on vehicle passenger. It may provoke
accident.
Do not directly point the lens at the sun.
● It could cause smoke, fire, burns or breakdown.
Page 26

26
Do not put this product in contact with your skin for an extended period.
Pay close attention if your skin is sensitive.
In case skin irritation occurs after touching this product go to see doctor
immediately.
● This product may get hot. Holding this product with hand for an
extended period may cause low temperature burns.
● The material of plastic parts and metallic parts of this product may
rarely be a cause of the skin irritation.
Page 27

27
BEFORE YOU USE
■ ELMO shall not be liable for malfunction and/or breakdown followed by using this
product and the AC adapter under excessive conditions and/or misuse by the
user.
In that case the product or the supplied AC adopter will no longer be qualified for
free repair regardless of warranty period.
■ Install the supplied USB packing seal to the connector part when the product is
continuously fed from the USB terminal. Be reminded that waterproof is not
guaranteed even if the USB packing seal contacts the product. The product is not
waterproof if rain or snow directly showers down on the product.
■ Use a commercially available outdoor housing in case of installing the product in
the open air. Consult with the system installer in advance and use an extra
device such as cooling fun or heating equipment together with the outdoor
housing if necessary.
■ When shooting an important scene, be sure of try shooting beforehand and
confirm normal video and audio recording operation.
ELMO shall not be liable for compensation to the user if the visual record or
audio record fails due to a problem not related to this product.
■ Use this product under the following environmental conditions:
Temperature: 0° to 40°Celsius (32° to 104°Fahrenheit)
Humidity: 10% to 80% (No condensation)
■ GPS
● GPS system detects radio waves from satellites and determine location.
Radio waves from satellites may be blocked or reflected which may prevent
proper location detection if this product is used in the following places. Try to
use this product in the open space and off the ground to ensure proper
operation.
- Indoor, underground, in a forest, a grove, or tunnels
- Near high building(s), high-voltage wire(s), magnetic, metal, or electric
device
● Use GPS in accordance with regulations of countries and regions where you
use it.
■ Wireless LAN (WiFi) radio wave
● This product uses 2.4GHz radio waves. This product and the wireless device
in this product have been certified under the Radio Law. Using this product in
countries other than the country where you purchased it may infringe the radio
wave laws of the country where it is used.
● In case of communication problem change location. Depending on the using
environment (e.g., there are many obstacles) the wireless communication may
be adversely affected. Especially the wireless communication is not available
under the following conditions.
- The product is placed in water
- There are metal and/or concrete between the product and monitor
● Do not use this product under the following conditions:
Page 28

28
- Near industrial, scientific, and medical devices, such as a pacemaker
- Near in-plant radio station for mobile equipment identifier (license
required and being used in factory line; etc.)
- Near low power wireless base station (license not required)
● Electromagnetic interference caused by using Bluetooth devices and this
product at the same area
Bluetooth devices and this product use the same band of frequency (2.4GHz).
So using these devices in the same area may cause electromagnetic
interference and it may cause lower communication speed or connection
failure.
Turn off the device which is not currently using if the communication problem
occurs.
■ Waterproof
● This product is guaranteed to be waterproof under the criteria set forth by us.
However, we do not guaranty its waterproof performance in all conditions.
● The product warranty does not cover malfunction due to misuse by the user.
● We do not guarantee its waterproof ability if the product is given excessive
shock by dropping or bumping it. Contact your dealer or ELMO Customer
Service for repair (fee applies).
● Inside of this product, card and battery, and the supplied AC adapter are not
waterproof. Do not touch them with wet hands.
■ The transparent dome in front of this product is for lens protection. Pay attention
to the handling as this dome is prone to scratches. Clear images may not be able
to be obtained if it has been damaged (depending on size and location).
Contact your dealer or ELMO for service to replace transparent dome (fee
applies).
■ Do not leave this product in any of the following places:
● Outdoor, humid or dusty place
● In a place exposed to direct sunlight (inside a car or by the window) or high
temperature
● In a place where the temperature is below 0°Celsius (or 32°Fahrenheit,
freezing place without heating equipment)
● In a place exposed to extreme temperature or humidity variation (such as near
air-conditioner or heater)
● In a place exposed to frequent vibration (such as inside vehicle or machines)
● Near magnet or magnetic field
● Where organic solvents are used
■ Using this product in cold place
● Touching metallic parts at the low temperature environment may infect skin.
Use gloves when using this product in the low temperature environment.
■ Condensation
● “Condensation” is the formation of small drops of water on the inside or
outside of this product, especially on the inside surface of the lens, when
moisture in the air changes to liquid when it is brought from a cold place
suddenly into a warm place.
● Using this product with condensation may result in malfunction.
If condensation occurs, turn power OFF, swipe the surface with a dry soft cloth,
and then leave this product in the place where humidity and dust are less and
Page 29

29
temperature is stable (10°-30° Celsius or 50°-86° Fahrenheit is ideal). Start to
use again after condensation is completely gone.
If this product is used with the condensation left on the inside of the camera
lens, the product may not record clear images.
■ Built-in microphone
● Operational sounds from this product itself may be recorded when the built-in
microphone is used; however, that is not a malfunction of this product.
■ Precautions for shooting
● Recording time depends on resolution, quality for recording, and so on.
● Do not use this product where photo or video recording is prohibited by law.
Obey all relevant laws. You may be ordered to leave, subjected to fine, be
arrested, and/or forfeit the product.
● Do not use this product for purposes prohibited by law. Obey all relevant laws.
You may be subjected to fine, be arrested, and/or forfeit the product.
■ Treatment
● Do not clean this product with strong solvents, such as thinner and benzene;
they could cause this product to malfunction.
● Wipe with a dry soft cloth.
● When severe contamination is found, first check if the USB connector port and
card slot are properly covered, rinse with fresh water, and wipe with a dry soft
cloth.
■ Luminescent spot and black spot
● This product uses a CMOS area image sensor composed of numerous pixels,
and some of the pixels may not operate normally. Therefore, luminescent
spots or black spots could be witnessed on the output screen. This is not a
defect but a phenomenon peculiar to the CMOS area image sensor.
■ Image data
● This product is composed of precision electronic parts and components. If this
product is handled as follows, the internal data of microSD card could be
destroyed:
- WiFi card and micro SD card are dislodged, or power is turned OFF
while this product is in operation.
- The USB cable (included in the package) comes out during
communication.
● Under those circumstances, ELMO shall not be liable for any damages due to
corruption of or loss of the recorded data.
■ WiFi card and microSD CARD
● When using microSD card other than supplied, format it with this product
before starting to use. Do not use any other device to format. Some microSD
card may not be capable of use even after formatting with this product. The
result varies with manufacturer and type.
● Do not remove WiFi card while the device is accessing micro SD card
(recording). It may cause malfunction or breakdown.
● After use or for storage or transportation, put WiFi card and microSD card into
a case or pouch.
Page 30

30
■ Performance and lifetime of built-in battery
● A rechargeable lithium ion battery is used in this product.
● The battery has its own life span. Along with the frequency of use, time of use
and the time passed, battery capacity decreases gradually.
● If operation time becomes substantially short at normal temperature
(10°-30°Celsius or 50°-86°Fahrenheit is ideal), the battery life seems to have
come near its end. Replace it with a new battery.
Contact your dealer or ELMO Customer Service for battery replacement (fee
applies).
● Charging may not be possible in the cold and hot environment. In that case
leave this product in the moderate temperature (10°-30°Celsius or
50°-86°Fahrenheit) for a while and retry.
Pay attention to condensation when moving this product from cold to hot
place.
■ Disposal of this product
● Battery recycling
The rechargeable lithium ion battery can be removed from this product. When
disposing of this product, please recycle the battery by following your
applicable regulations.
Contact your local battery recycling organization for further information on the
recycling details.
■ Advice for disposing/giving someone microSD card
● Data in microSD card cannot be completely deleted even if using “format” or
“delete” feature in this product or PC.
We recommend “physically” destroying or using exclusive data deletions
software available in the market to completely delete all the data. Any data in
microSD card shall be managed under the user’s responsibility.
■ About AVC Visual Patent Portfolio License
● The product is licensed by AVC Visual Patent Portfolio License (AVC Video)
and this license is provided for your private, non- commercial use only.
- When playing any videos which are recorded as private and non-commercial use
- When playing AVC Videos which are provided by MPEG-LA, LLC license holders
- When using for promotional, commercial use, contact MPEG-LA, LLC.
Page 31

31
DISCLAIMERS
■ The contents of this document are subject to change without notice.
The latest version can be obtained from the following website:
http://www.elmoqbic.com/
■ It is prohibited under copyright law to use or copy any part or the whole of this
document without our prior written consent.
■ ELMO shall not be liable for any claim for damage or loss of earnings or any
claim raised by a third person due to the use, malfunction or repair of this
product.
■ Some items are described in this document as follows:
● ”microSD memory card” and “microSDHC memory card” “microSD card”
● ”battery pack””battery”
■ Copyright
Unless used for personal use, it is prohibited strictly under copyright law or
international convention to use any still-image or moving-image format file
without the prior consent of the copyright holder. It is also prohibited strictly under
copyright law or international convention to transfer such a file, whether it is paid
for or charge-free, onto the Internet or distribute the same to a third person. If this
product should be used for any illegal act against copyright law, be forewarned
that ELMO shall not be liable at all for any compensation. Even if using for
personal use, be careful that there could be a situation where video or audio
recording is restricted or illegal.
All the names, company names and product names referred to in the document are
trademarks or registered trademarks of the respective companies.
Page 32

32
ATTENTION
● This product is designed to be used in domestic environment. However,
if this product is used in close proximity to a radio or television, it may
cause interference to radio or television reception.
● Any image, which is obtained through a camera system, and which can
be identified, is considered to be private information. Be forewarned
that the person who makes sure of such images shall be liable for
disclosing of such images.
● Unless used for personal use, it is prohibited by copyright law to record
books and pictures without the prior consent of copyright holder.
● Repair parts
Repair parts are the items which are needed to maintain product
functionality.
The holding period of such items is equal to the repair period which we
will accept.
6X1MWGF02 R0-Xxx
2013/01
 Loading...