

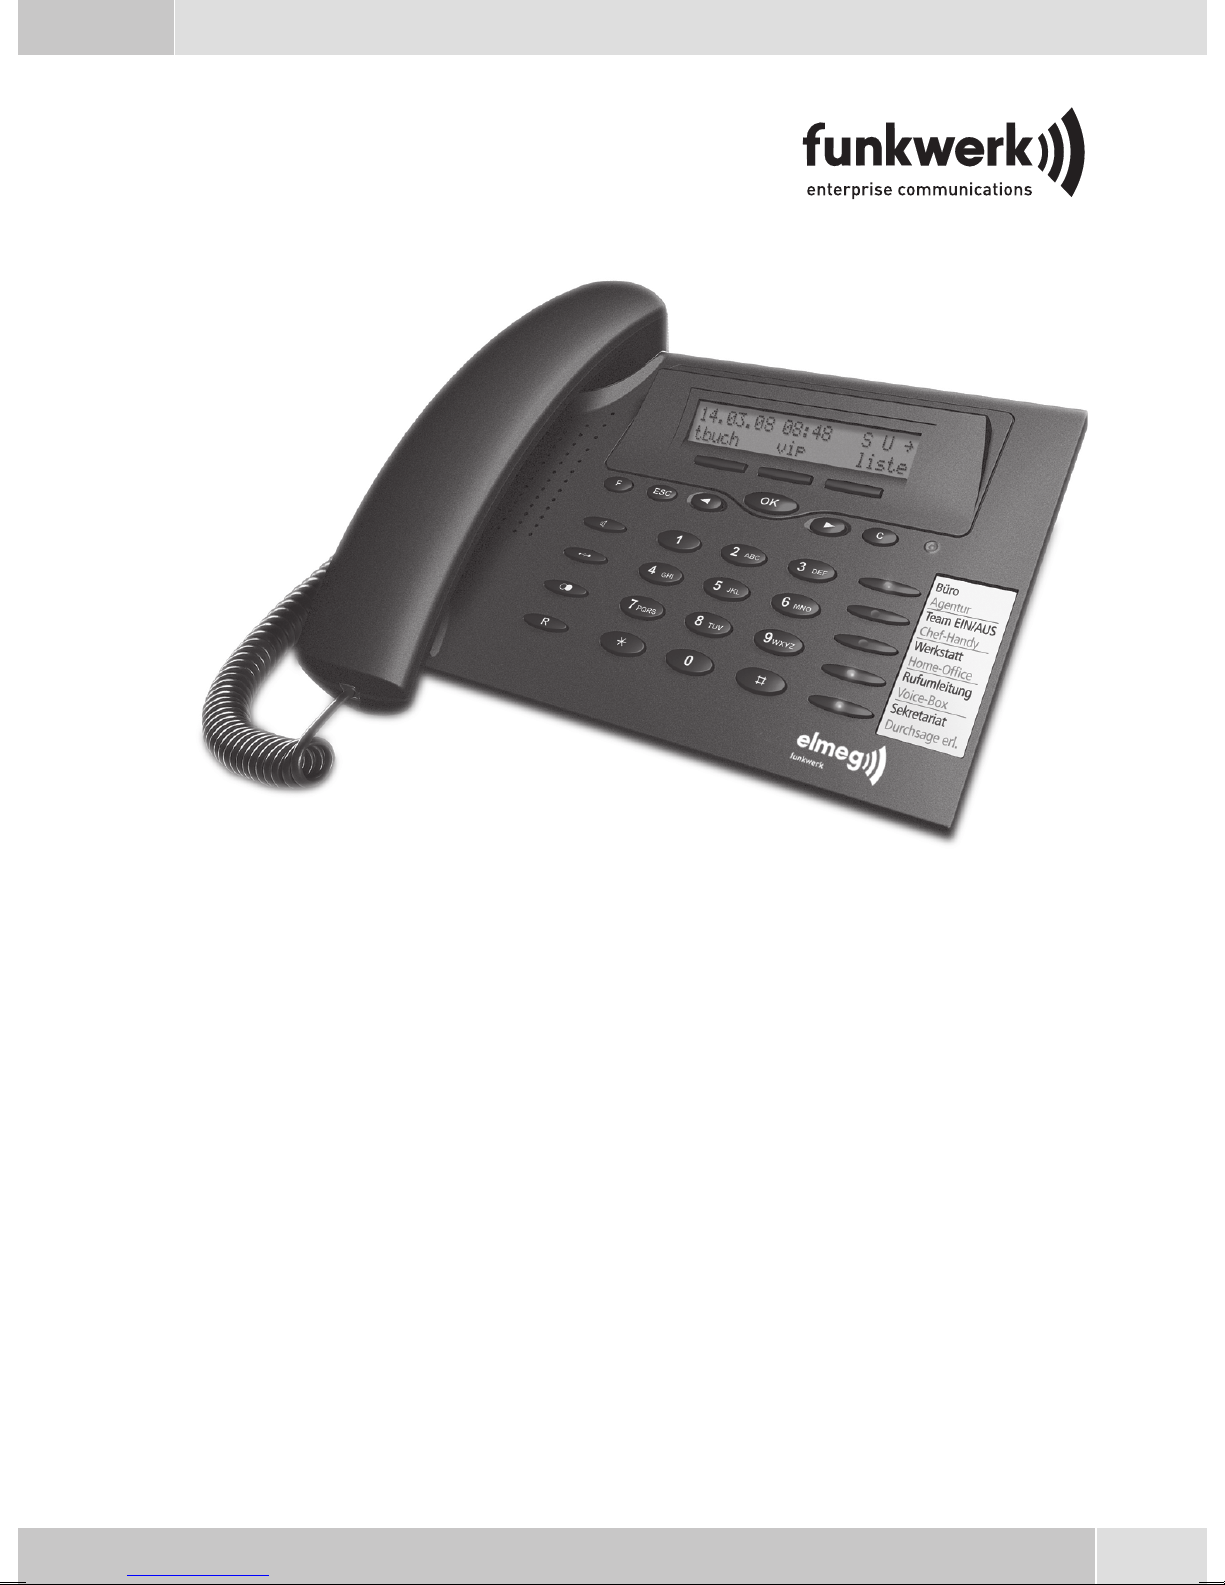
Page 1
Operating instructions
Bedienungsanleitung
Notice d'utilisation
Istruzioni per l'uso
Instrucciones de servicio
Bruksanvisning
Brukerveiledning
егчейсЯдйп чсЮузт
Betjeningsvejledning
Instrukcji obslugi
Handleiding
Manual de instruções
English - Deutsch - Français - Italiano - Español - Svenska
Norsk - ЕллзнйкЬ - Dansk - Polski - Nederlands - Portuguкs
elmeg CS290 / CS290-U / IP-S290
Page 2

Page 3

English . . . . . . . . . . . . . . . . . . . . . . . . . . . . . . . . . . . . . . 1
User interface of the telephone. . . . . . . . . . . . . . . . . . . . . . . . . . . . . . . . . . . . . . . . . . 2
Description and installation . . . . . . . . . . . . . . . . . . . . . . . . . . . . . . . . . . . . . . . . . . . 3
Safety notes. . . . . . . . . . . . . . . . . . . . . . . . . . . . . . . . . . . . . . . . . . . . . . . . . . . . . 3
Telephone installation . . . . . . . . . . . . . . . . . . . . . . . . . . . . . . . . . . . . . . . . . . . . . . 4
Advanced system telephone configuration . . . . . . . . . . . . . . . . . . . . . . . . . . . . . . . . . . 8
Operation . . . . . . . . . . . . . . . . . . . . . . . . . . . . . . . . . . . . . . . . . . . . . . . . . . . . . 12
Declaration of conformity and CE mark . . . . . . . . . . . . . . . . . . . . . . . . . . . . . . . . . . . 19
Deutsch . . . . . . . . . . . . . . . . . . . . . . . . . . . . . . . . . . . . . . 1
Bedienoberfläche des Telefons. . . . . . . . . . . . . . . . . . . . . . . . . . . . . . . . . . . . . . . . . . 2
Beschreibung und Installation . . . . . . . . . . . . . . . . . . . . . . . . . . . . . . . . . . . . . . . . . . 3
Sicherheitshinweise . . . . . . . . . . . . . . . . . . . . . . . . . . . . . . . . . . . . . . . . . . . . . . . . 3
Installation des Telefons . . . . . . . . . . . . . . . . . . . . . . . . . . . . . . . . . . . . . . . . . . . . . 4
Erweiterte Konfigurierung des Systemtelefons . . . . . . . . . . . . . . . . . . . . . . . . . . . . . . . . 8
Bedienung. . . . . . . . . . . . . . . . . . . . . . . . . . . . . . . . . . . . . . . . . . . . . . . . . . . . . 12
Konformitätserklärung und CE-Zeichen . . . . . . . . . . . . . . . . . . . . . . . . . . . . . . . . . . . 19
Français . . . . . . . . . . . . . . . . . . . . . . . . . . . . . . . . . . . . . . 1
Présentation du téléphone . . . . . . . . . . . . . . . . . . . . . . . . . . . . . . . . . . . . . . . . . . . . 2
Description et installation . . . . . . . . . . . . . . . . . . . . . . . . . . . . . . . . . . . . . . . . . . . . 3
Remarques de sécurité . . . . . . . . . . . . . . . . . . . . . . . . . . . . . . . . . . . . . . . . . . . . . . 3
Installation du téléhone. . . . . . . . . . . . . . . . . . . . . . . . . . . . . . . . . . . . . . . . . . . . . . 5
Configuration étendue du téléphone de système . . . . . . . . . . . . . . . . . . . . . . . . . . . . . . . 9
Utilisation. . . . . . . . . . . . . . . . . . . . . . . . . . . . . . . . . . . . . . . . . . . . . . . . . . . . . 13
Déclaration de conformité et marque CE . . . . . . . . . . . . . . . . . . . . . . . . . . . . . . . . . . . 20
Italiano . . . . . . . . . . . . . . . . . . . . . . . . . . . . . . . . . . . . . . 1
Interfaccia utente del telefono . . . . . . . . . . . . . . . . . . . . . . . . . . . . . . . . . . . . . . . . . . 2
Descrizione e installazione . . . . . . . . . . . . . . . . . . . . . . . . . . . . . . . . . . . . . . . . . . . . 3
Informazioni per la sicurezza . . . . . . . . . . . . . . . . . . . . . . . . . . . . . . . . . . . . . . . . . . 3
Installazione del telefono . . . . . . . . . . . . . . . . . . . . . . . . . . . . . . . . . . . . . . . . . . . . . 4
Configurazione estesa del telefono di sistema . . . . . . . . . . . . . . . . . . . . . . . . . . . . . . . . . 9
Uso. . . . . . . . . . . . . . . . . . . . . . . . . . . . . . . . . . . . . . . . . . . . . . . . . . . . . . . . . 12
Dichiarazione di conformità e marcatura CE. . . . . . . . . . . . . . . . . . . . . . . . . . . . . . . . . 19
Español . . . . . . . . . . . . . . . . . . . . . . . . . . . . . . . . . . . . . . 1
Teclas y pantalla del teléfono. . . . . . . . . . . . . . . . . . . . . . . . . . . . . . . . . . . . . . . . . . . 2
Descripción e instalación . . . . . . . . . . . . . . . . . . . . . . . . . . . . . . . . . . . . . . . . . . . . . 3
Indicaciones de seguridad . . . . . . . . . . . . . . . . . . . . . . . . . . . . . . . . . . . . . . . . . . . . 3
Instalación del teléfono . . . . . . . . . . . . . . . . . . . . . . . . . . . . . . . . . . . . . . . . . . . . . . 4
Configuración ampliada del teléfono de sistema . . . . . . . . . . . . . . . . . . . . . . . . . . . . . . . 9
Manejo . . . . . . . . . . . . . . . . . . . . . . . . . . . . . . . . . . . . . . . . . . . . . . . . . . . . . . 13
Declaración de conformidad y símbolo CE . . . . . . . . . . . . . . . . . . . . . . . . . . . . . . . . . . 20
Svenska . . . . . . . . . . . . . . . . . . . . . . . . . . . . . . . . . . . . . . 1
Telefonens manöveryta . . . . . . . . . . . . . . . . . . . . . . . . . . . . . . . . . . . . . . . . . . . . . . 2
Beskrivning och installation . . . . . . . . . . . . . . . . . . . . . . . . . . . . . . . . . . . . . . . . . . . 3
Säkerhetsanvisningar . . . . . . . . . . . . . . . . . . . . . . . . . . . . . . . . . . . . . . . . . . . . . . . 3
Installation av telefon . . . . . . . . . . . . . . . . . . . . . . . . . . . . . . . . . . . . . . . . . . . . . . . 4
Utvidgad konfigurering av systemtelefonen . . . . . . . . . . . . . . . . . . . . . . . . . . . . . . . . . . 9
Användning. . . . . . . . . . . . . . . . . . . . . . . . . . . . . . . . . . . . . . . . . . . . . . . . . . . . 12
Konformitetsförklaring och CE-märken . . . . . . . . . . . . . . . . . . . . . . . . . . . . . . . . . . . 19
Page 4

Norsk . . . . . . . . . . . . . . . . . . . . . . . . . . . . . . . . . . . . . . . 1
Betjeningsgrensesnitt for telefonen . . . . . . . . . . . . . . . . . . . . . . . . . . . . . . . . . . . . . . . 2
Beskrivelse og Installation . . . . . . . . . . . . . . . . . . . . . . . . . . . . . . . . . . . . . . . . . . . . 3
Sikkerhetshenvisninger. . . . . . . . . . . . . . . . . . . . . . . . . . . . . . . . . . . . . . . . . . . . . . 3
Installere telefonen . . . . . . . . . . . . . . . . . . . . . . . . . . . . . . . . . . . . . . . . . . . . . . . . 4
Utvidet konfigurering av systemtelefonen . . . . . . . . . . . . . . . . . . . . . . . . . . . . . . . . . . . 9
Håndtering . . . . . . . . . . . . . . . . . . . . . . . . . . . . . . . . . . . . . . . . . . . . . . . . . . . . 13
Konformitetserklæring og CE-merker. . . . . . . . . . . . . . . . . . . . . . . . . . . . . . . . . . . . . 20
ЕллзнйкЬ .....................................1
ЕрйцЬнейб чейсйумпэ фпх фзлецюнпх ......................................2
РесйгсбцЮ кбй егкбфЬуфбуз...........................................3
ЕгкбфЬуфбуз фпх фзлецюнпх ..........................................5
ЕкфефбмЭнз дйбмьсцщуз фзт ухукехЮт ухуфЮмбфпт .............................9
ПдзгЯет чсЮузт..................................................13
ДЮлщуз ухмцщнЯбт кбй уЮмб CE........................................21
Dansk . . . . . . . . . . . . . . . . . . . . . . . . . . . . . . . . . . . . . . . 1
Telefonens betjeningsflade . . . . . . . . . . . . . . . . . . . . . . . . . . . . . . . . . . . . . . . . . . . . 2
Beskrivelse og installation . . . . . . . . . . . . . . . . . . . . . . . . . . . . . . . . . . . . . . . . . . . . 3
Sikkerhedsanvisninger . . . . . . . . . . . . . . . . . . . . . . . . . . . . . . . . . . . . . . . . . . . . . . 3
Installation af telefonen. . . . . . . . . . . . . . . . . . . . . . . . . . . . . . . . . . . . . . . . . . . . . . 4
Udvidet konfiguration af systemtelefonen . . . . . . . . . . . . . . . . . . . . . . . . . . . . . . . . . . . 9
Betjening . . . . . . . . . . . . . . . . . . . . . . . . . . . . . . . . . . . . . . . . . . . . . . . . . . . . . 13
Konformitetserklæring og CE-mærke . . . . . . . . . . . . . . . . . . . . . . . . . . . . . . . . . . . . . 19
Polski .......................................1
Interfejs obs³ugi telefonu .............................................2
Opis i instalacja ..................................................3
Wskazówki bezpieczeñstwa ...........................................3
Instalacja telefonu .................................................5
Zaawansowana konfiguracja telefonu systemowego .............................9
Obs³uga ......................................................13
Deklaracja zgodnoœci i symbol CE .......................................20
Nederlands . . . . . . . . . . . . . . . . . . . . . . . . . . . . . . . . . . . . 1
Gebruikersinterface van de telefoon. . . . . . . . . . . . . . . . . . . . . . . . . . . . . . . . . . . . . . . 2
Beschrijving en installatie . . . . . . . . . . . . . . . . . . . . . . . . . . . . . . . . . . . . . . . . . . . . 3
Veiligheidsaanwijzingen . . . . . . . . . . . . . . . . . . . . . . . . . . . . . . . . . . . . . . . . . . . . . 3
Telefoon installeren . . . . . . . . . . . . . . . . . . . . . . . . . . . . . . . . . . . . . . . . . . . . . . . . 4
Uitgebreide configuratie van de systeemtelefoon . . . . . . . . . . . . . . . . . . . . . . . . . . . . . . . 9
Bediening . . . . . . . . . . . . . . . . . . . . . . . . . . . . . . . . . . . . . . . . . . . . . . . . . . . . . 13
Conformiteitsverklaring en CE-teken . . . . . . . . . . . . . . . . . . . . . . . . . . . . . . . . . . . . . 19
Português . . . . . . . . . . . . . . . . . . . . . . . . . . . . . . . . . . . . . 1
Interface do utilizador do telefone. . . . . . . . . . . . . . . . . . . . . . . . . . . . . . . . . . . . . . . . 2
Descrição e instalação. . . . . . . . . . . . . . . . . . . . . . . . . . . . . . . . . . . . . . . . . . . . . . . 3
Instruções de segurança . . . . . . . . . . . . . . . . . . . . . . . . . . . . . . . . . . . . . . . . . . . . . 3
Instalação do telefone . . . . . . . . . . . . . . . . . . . . . . . . . . . . . . . . . . . . . . . . . . . . . . . 5
Configuração alargada do telefone de sistema . . . . . . . . . . . . . . . . . . . . . . . . . . . . . . . . . 9
Manuseamento . . . . . . . . . . . . . . . . . . . . . . . . . . . . . . . . . . . . . . . . . . . . . . . . . . 13
Declaração de conformidade e o símbolo CE . . . . . . . . . . . . . . . . . . . . . . . . . . . . . . . . . 20
Page 5

Operating instructions
elmeg CS290 / CS290-U / IP-S290
English
1
Page 6
English
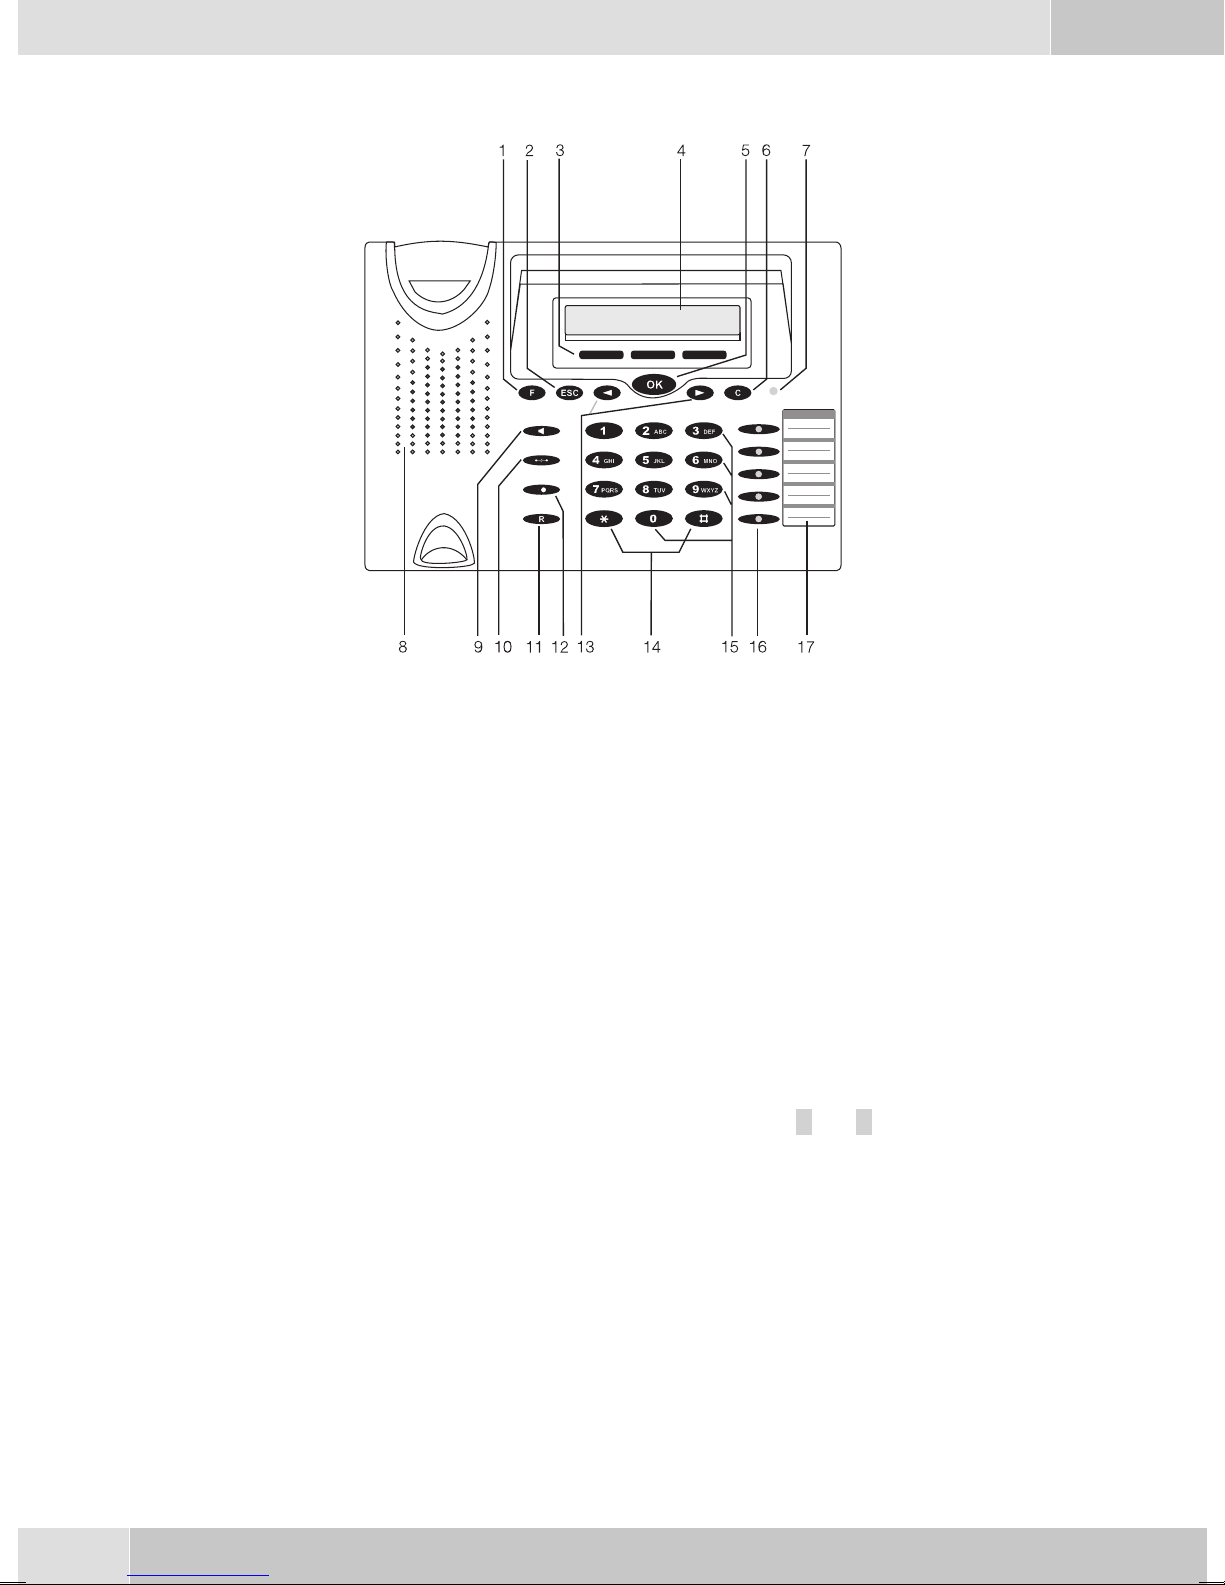
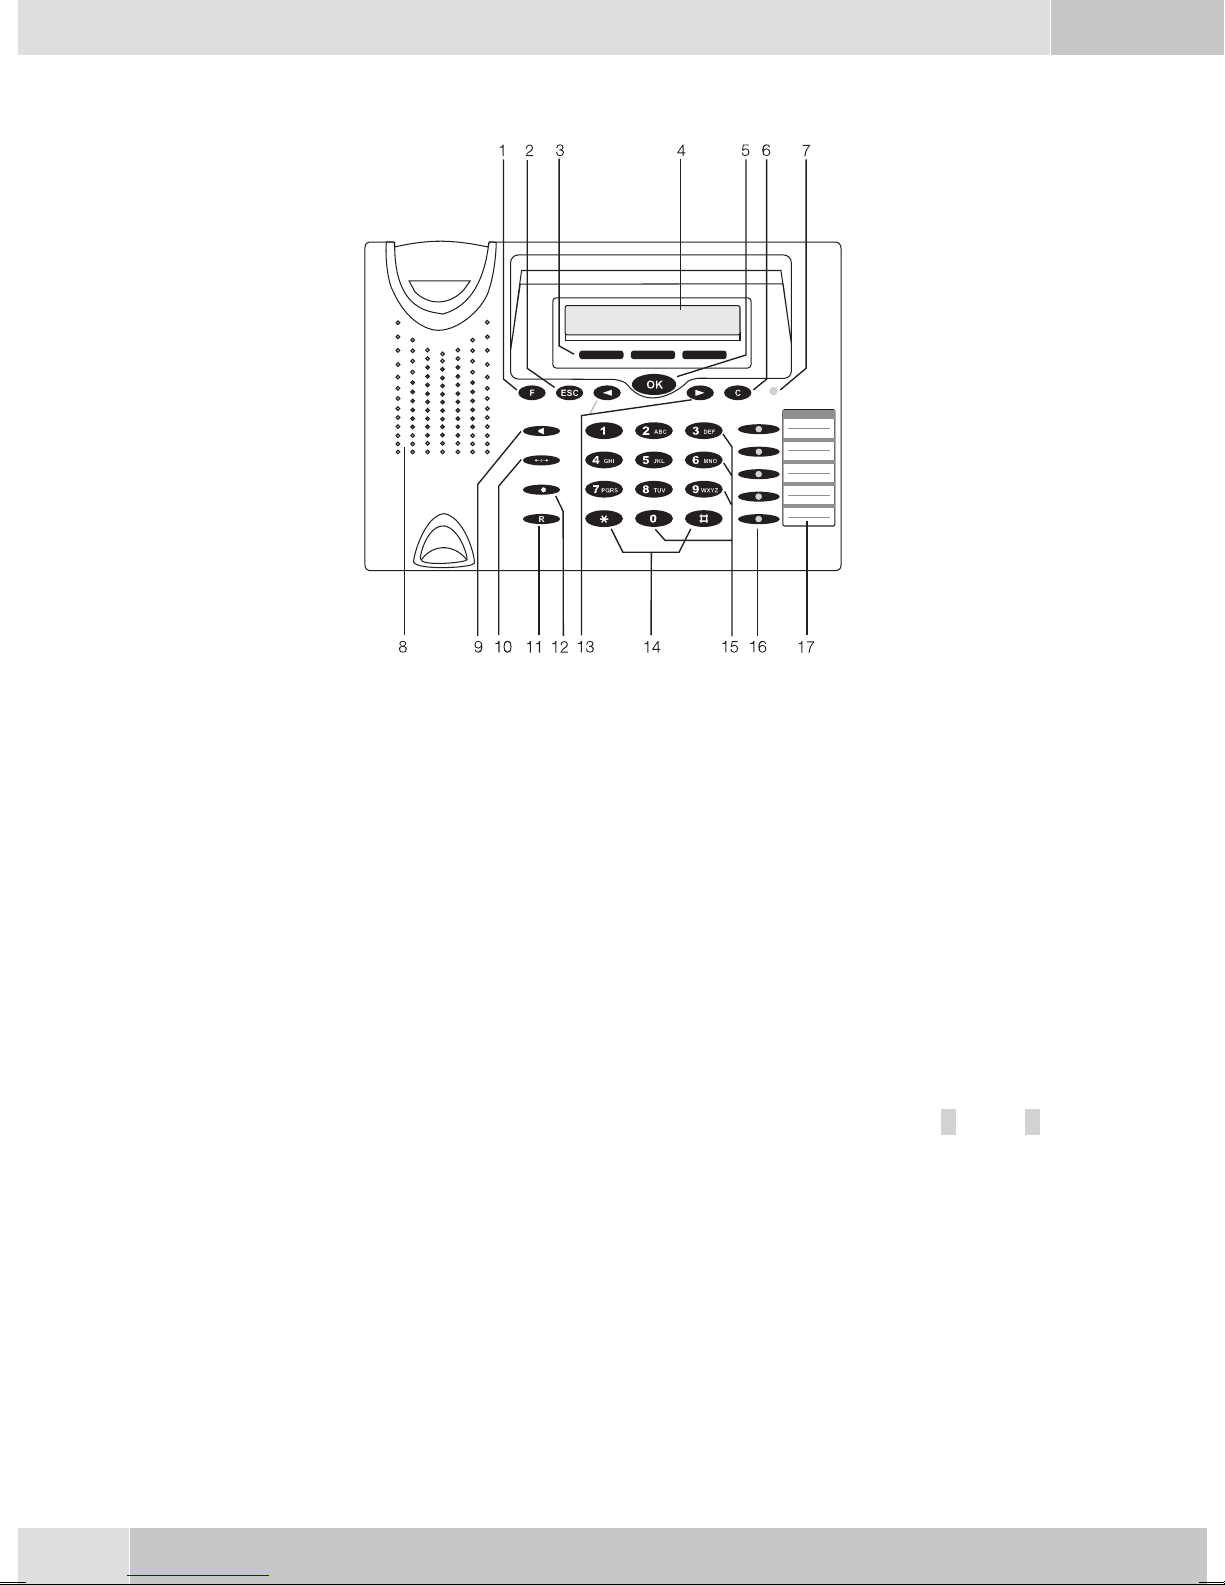
User interface of the telephone
1 Functionbutton: Thiskey opensthe programmingmenu. Ifyou arealready locatedin amenu
and thenpress thekey, eithermenu-specific functionsare shown, oryou aremoved back one
programmingstep.
2 Escape button: Pressingthe Esc buttonduring programmingreturns the telephoneto its idle
status.
3 3softkeys
The functionsof the softkeys aredisplayed incapital or small letters(depending onyour settings).
4 Display:Thedateandtimeappear onthetoplineofthedisplaywhenyouconnectthe unittothe
power supplysystem (IPS290), or tothe internalISDN orUP0 (CS 290,CS290-U) portof the
PABXsystem.Thedateandtimeareimportedautomaticallyfromthepabxsystem.Thetextdis
played for a function on line 2is always located above the corresponding softkey. When you
pressthesoftkey, thenextlevel isdisplayed.
Ifnot allinformationfitinto thescreen,thiswill beindicatedby»««or»««.
5 OKbutton: Pressingthisbuttonstoresasetting inthetelephone.Youthenhear theacknowled
gementsignal.
6 Ckey:Pressthisbuttontomovebackonemenustepinthemenu.Ifyouarecurrentlyintheinput
mode,thisbutton canbeused todeleteindividualcharacters.
-
-
7 Call-LED:Incomingcalls aresignaledby arapidlyflashingLED.
8 Speaker
9 Openlistening (hands-freebuttonIP-S290)
10 Endinga call
2
Page 7

11 Inquiriybutton
12 Lastnumberredial button
English
13
14 asteriskkey,rhombus key
15 Dialkeys /VIPkeys
16 5programmable functionkeyswithinset LED
17 Labelpanelfor programmablefunctionkeys
Arrowbuttons:Thearrows»{«and»}«intherightcorneronthetoplineofthedisplayindicate
thatyoucan callupfurtherfunctionson thelowerlinesusing thearrowbuttons.
Eachbuttonhas anLEDassignedto it.TheseLEDs canbeusedto indicatecertain functions.
TheLEDs ofthetwokeys atthebottomhave twodifferentcolors(onlyCS 290andCS290-U).
Description and installation
elmeg CS290
Thissystem telephoneisdesignedfor connectiontoaninternalS0-port (4wires) ofanelmeg pabxsystem.
elmeg CS290-U
This system telephone is designed for connectionto an internal Up0-port (2 wires) of an elmegpabx system.The systemtelephonecomeswithan ISDNport towhichfurther ISDNterminaldevicescanbeconnected.
elmeg IP-S290
Connectthis systemtelephonetothecorresponding LANport (ornetwork)of thePABXsystemusinga Cat.
5cable.The systemtelephoneisequippedwith aPCoutputthatcanbeused toconnect otherIPterminal devices.
Setting up/ Configuring the system-telephone
On the system telephone itself you can only carry out a limited configuration of the supported features.
Complete configuration of the system telephone is possible only via the appropriate ports of the elmeg
PABX system.
Safety notes
•
Mindthe storageand operationtemperaturesfor thedevice listedin thetechnicalspecifications.
Onlyconnect thedevice whenthe permissibleambient operatingtemperature hasbeenreached.
•
Please notethat condensation onor inthe unitmust be preventedwhen moving fromcold to warm
surroundings.Onlyremovetheunitfrom thepackage whenthe permissibleambientoperatingtem
perature hasbeen reached.
•
Youshould notmake callsorconnect ordisconnect anylines duringthunderstorms.
•
Onlyattach theconnecting cordsat theconnectionsprovided.
•
Make surephone cablesare installedina safemanner toprevent tripping.
•
Avoidthe following:
Directsunlight
Sources ofheat (forexample radiators)
-
3
Page 8

English
Electronicdevices (forexample stereocomponents, officeequipmentor microwavedevices
Ingressof moistureor liquids
Aggressivefluids orvapors
Dusty environment
Donot usethe unitin excessivelyhumidrooms orhazardous locations.
•
Onlyopen thosesections ofthe devicespecifiedin theassembly /operating instructions.
•
Donot touchplug connectorswith pointed,metal, ormoist objects.
•
Ifyoudonotpermanentlymountthe deviceor anyaccessories, besuretoplaceit/themonanon-slip
•
surface.
Whenrequired, cleanthe unitwith aslightlymoistenedcloth.
•
Onlyuse approvedaccessories.
•
Onlyterminalswith SELVand/or whichcomply withETS300047 maybeconnectedtotheunit.This
•
regulationis fulfilledwhen approvedterminal devicesareused asintended.
Plug-in power supply
Useonly approvedpower plug-inunits (DSA-0101F-05 UPor L15D52 ABDDLAWO).
•
Donot usepower plug-inunits withvisibledefects ordamage (fissures,cracks, etc.)
•
Scope of supply
System telephone, Handsetwith connection cord, Connectioncable, 2 feet,Operating instructions, Label
panel forprogrammable functionkeys. Adapter cord(CS290-U) for headsetsequipped with4-pin connecting cord (8-pin plug / 4-pin cord).
Care and maintenance
The ISDN system telephone has been manufactured for normal, everyday use. When required, clean the
ISDN system telephonewith a slightlymoistened cloth, orwith an anti-static cloth.Never use asolvent to
cleanthephone!Never usea drycloth; electrostaticcharges coulddamage theelectronicsinthesystem.Itis
essential that no liquids penetrate into the inside of the ISDN system telephone, as this could destroy the
phone.
Installing the telephone
Beforeinstalling thetelephone youmust mountthe rearfeet forthe telephoneat thepositions (6)shown in
figure 4. Dependingon the height ofthese two feet you canadjust the display angle of yourphone to your
personal angle of vision. Ensure that the two feet have the same height.
Toadjust theheight, pullthefeet offof thebottom ofthetelephone, rotatethem around60°and placethem
backintheenclosure.By turningthe feetbyaround60° (aroundthelongitudinalaxis)eachtimeyou canset
three different heights for the phone.
Please notethat theplastic feet ofyour telephonemay leavemarks onsensitive surfaces,such asfurniture.
Themanufacturer ofthe telephone isnot liablefor anysuch damage.Therefore,useappropriate non-skid
ding pads under the phone.
-
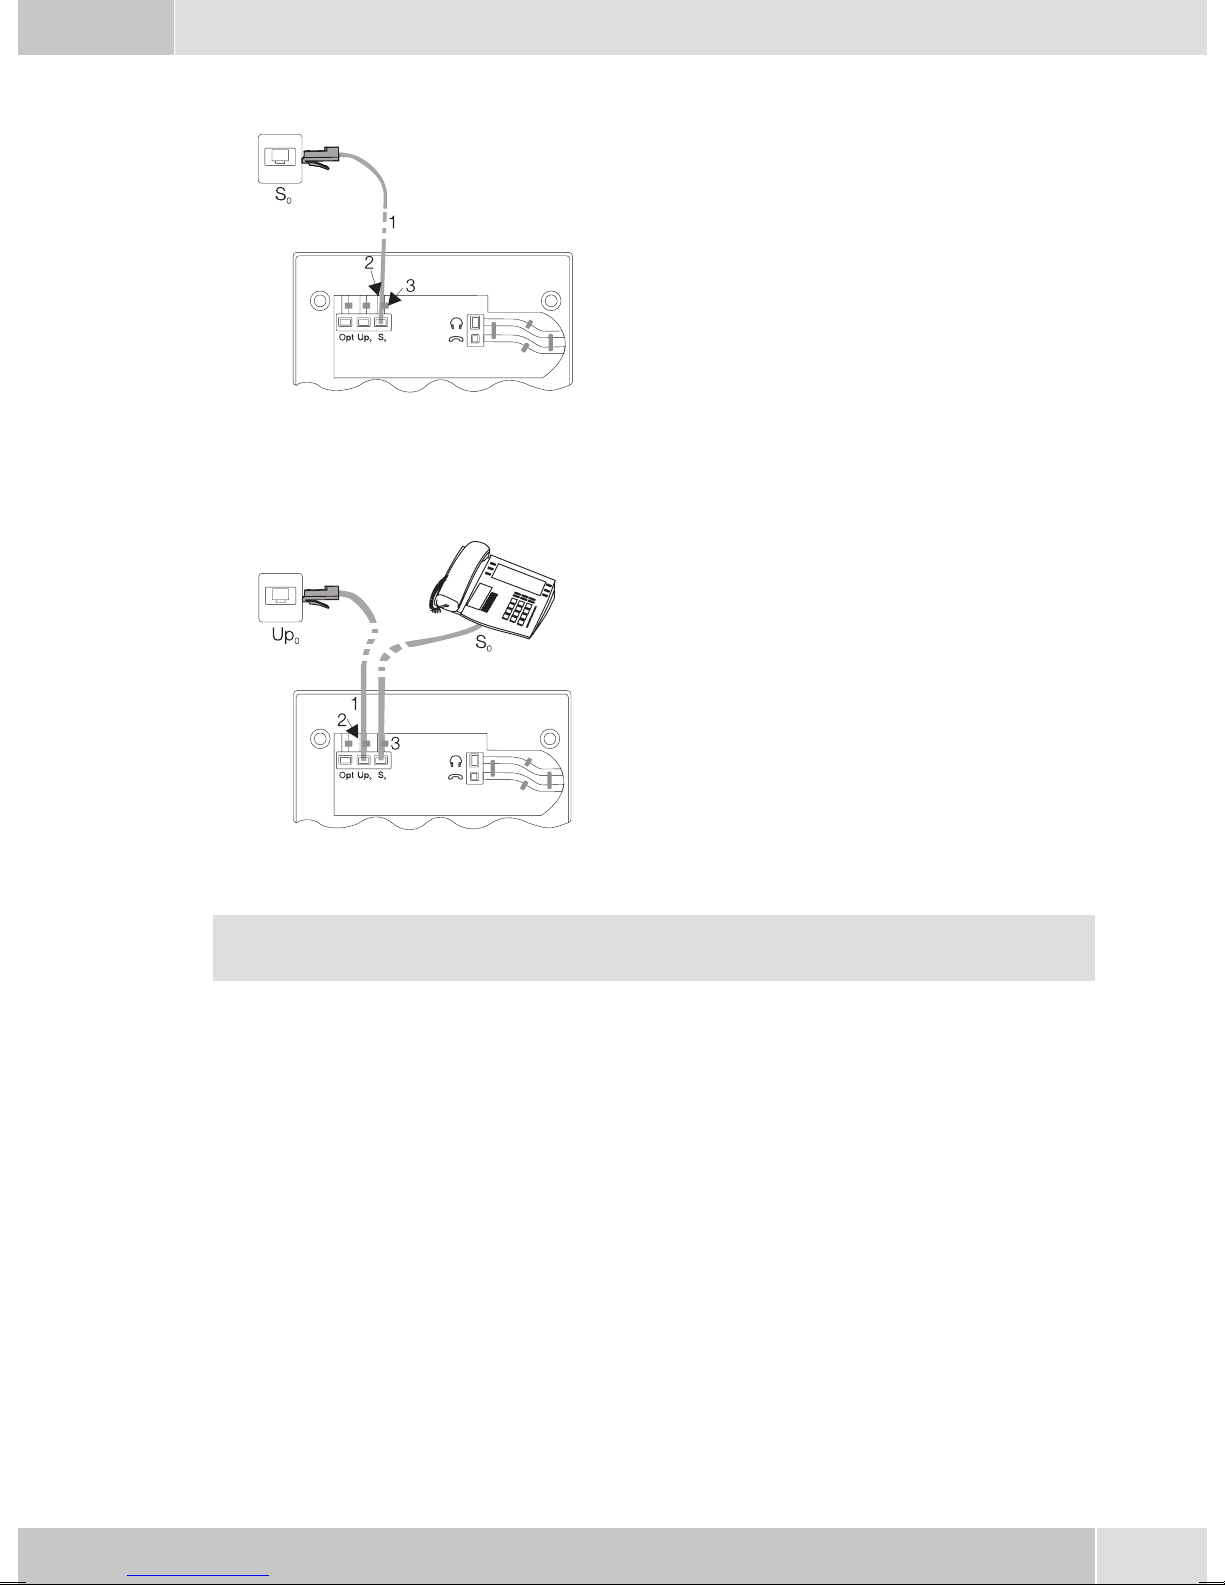
Telephone installation
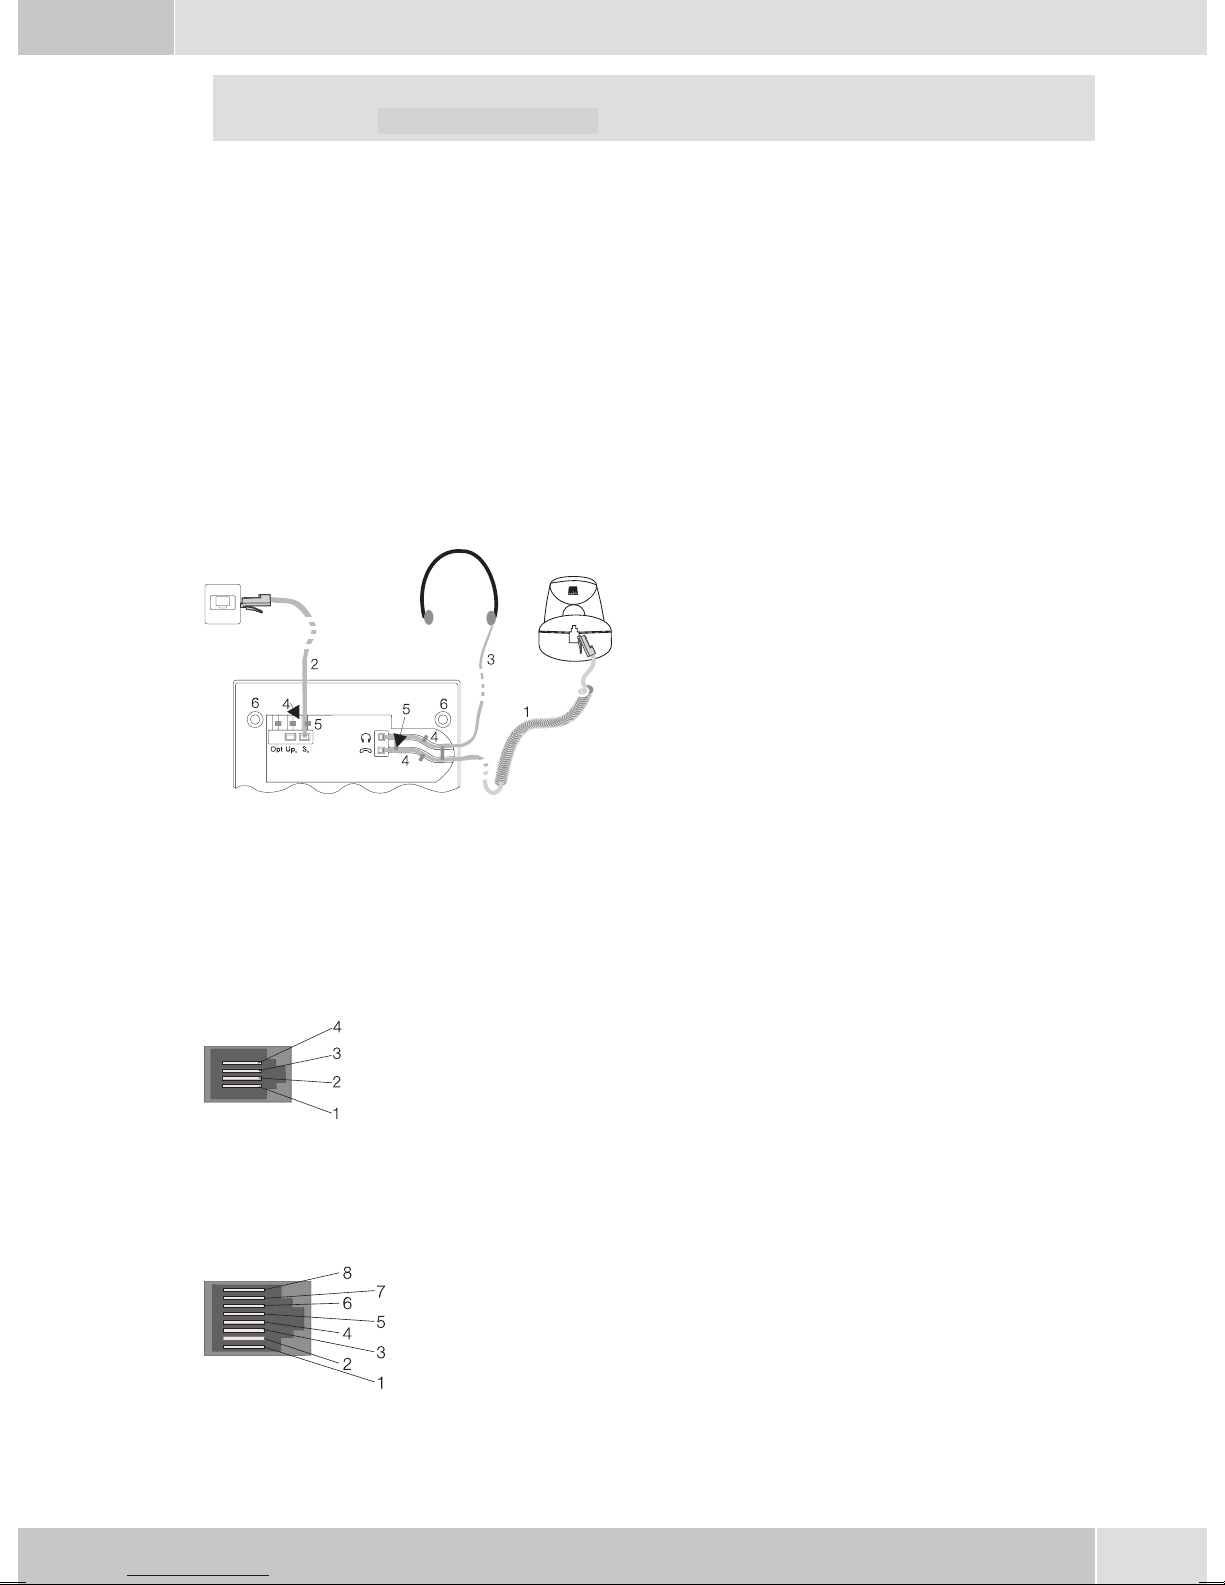
Connecting the handset cord
Connectthehandset cord(1) asshown infigure2.Lay thehandset cordin thecordgroove(2)andlockitbe
low the two cord retainers (3).
4
-
Page 9
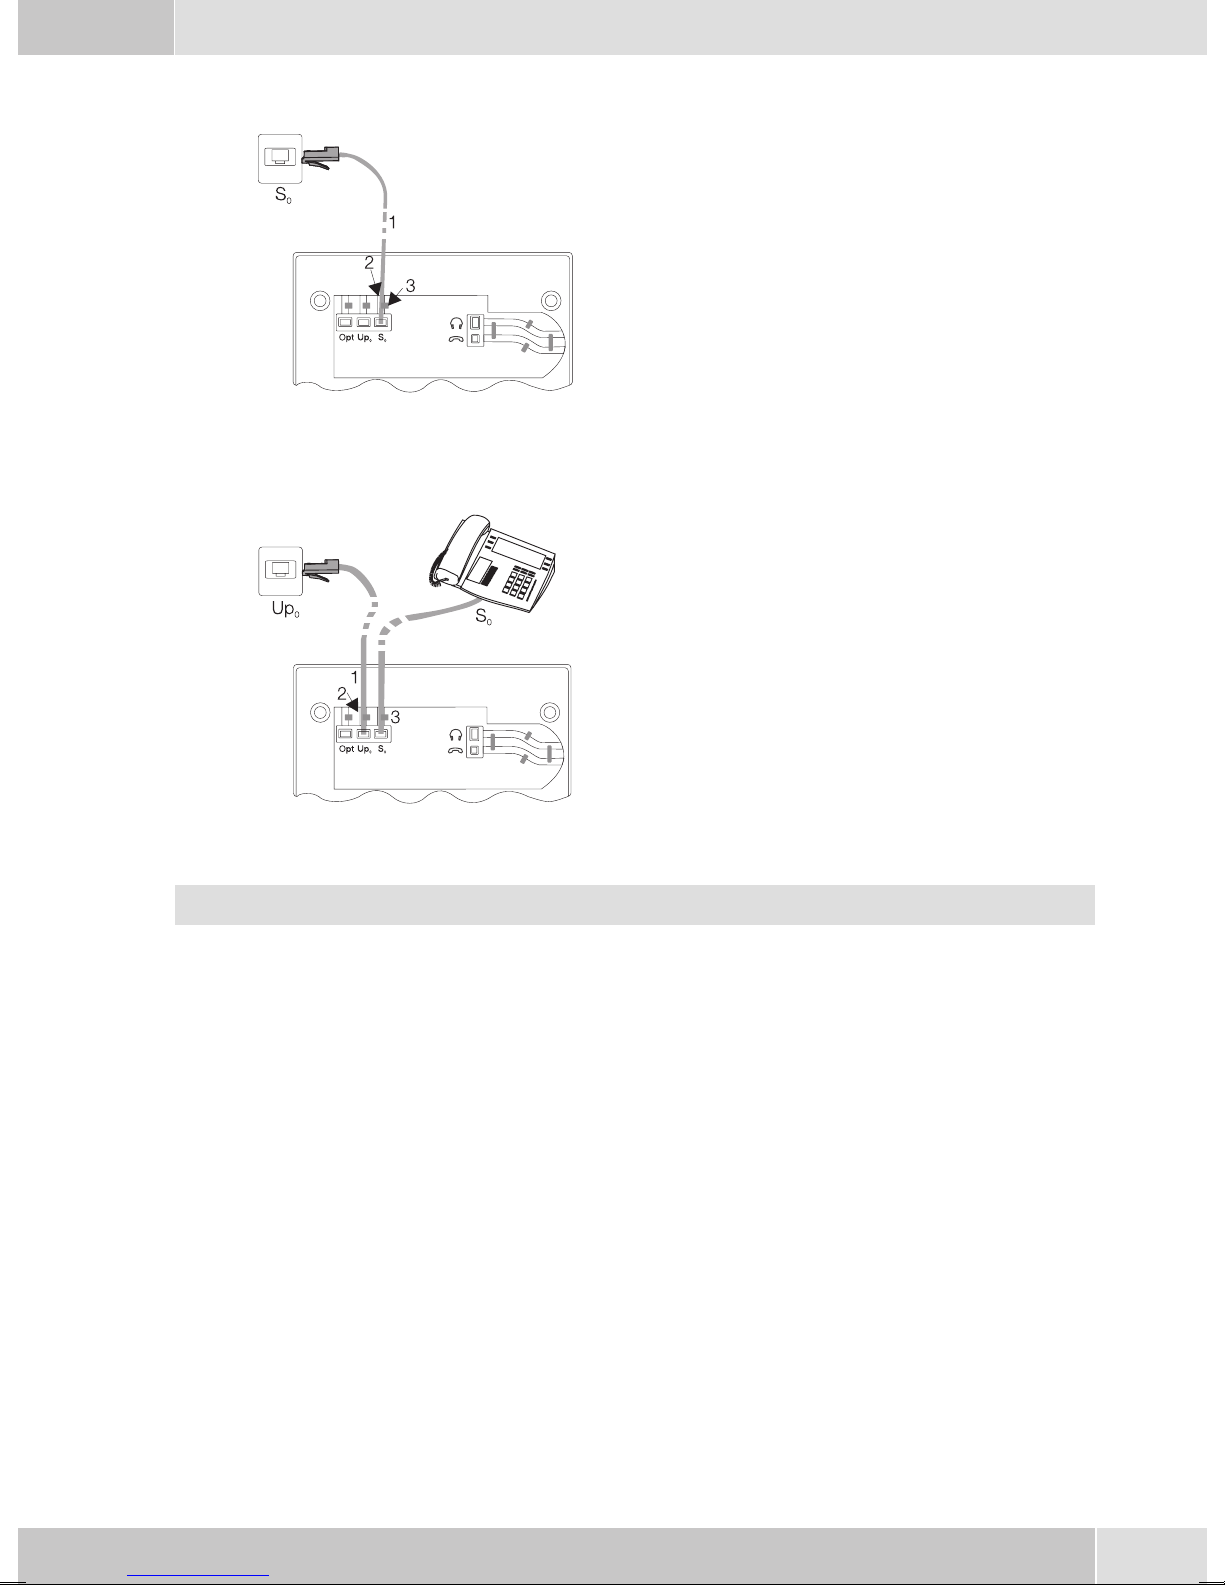
elmeg CS290 at the ISDN port
Figure 2
elmeg CS 290-U at the UP0-port
English
Connect the ISDN-cord (1) to the S0-jack as
shown in figure 2. Ensure that the longer ISDN
connector is plugged into the ISDN jack and the
shorter ISDN connector into the ISDN socket on
the telephone.Then laythe ISDNcord inthe cord
groove(2)and lockit belowthetwocordretainers
(3).
Connect the ISDN-cord (1) to the UP0jack as
shown in figure 1. Ensure that the longer ISDN
connector is plugged into the ISDN jack and the
shorter ISDN connector into the ISDN socket on
the telephone.Then laythe ISDNcord inthe cord
groove(2)and lockit belowthetwocordretainers
(3). Figure1 shows adownstream ISDN-telephoneconnected totheS0--portoftheelmeg 290-U.
Figure 1
CS290-U phones may not be connected through the S0 jack to the ISDN connection.
Important notes for the UP0-connection
•
You canconnect afurther eightISDN devices withan S0port atthe S0jack ofthe telephone.Howe
ver,ifthese terminaldevices arepowered bythe elmegCS 290-Usystem telephone,then twodevices
onlymay beconnected.
•
TheISDNconnection constellationfor down-circuitterminal deviceson thesystem telephonemust
bestar-shaped (pleaseuse theISDN distributor).
•
Themaximum linedistance betweenthe elmegCS 290-Uand anydownstream ISDNterminaldevi
cesmay notexceed 100meters.
•
Terminatingresistors maynot beconnected.
-
-
5
Page 10
English
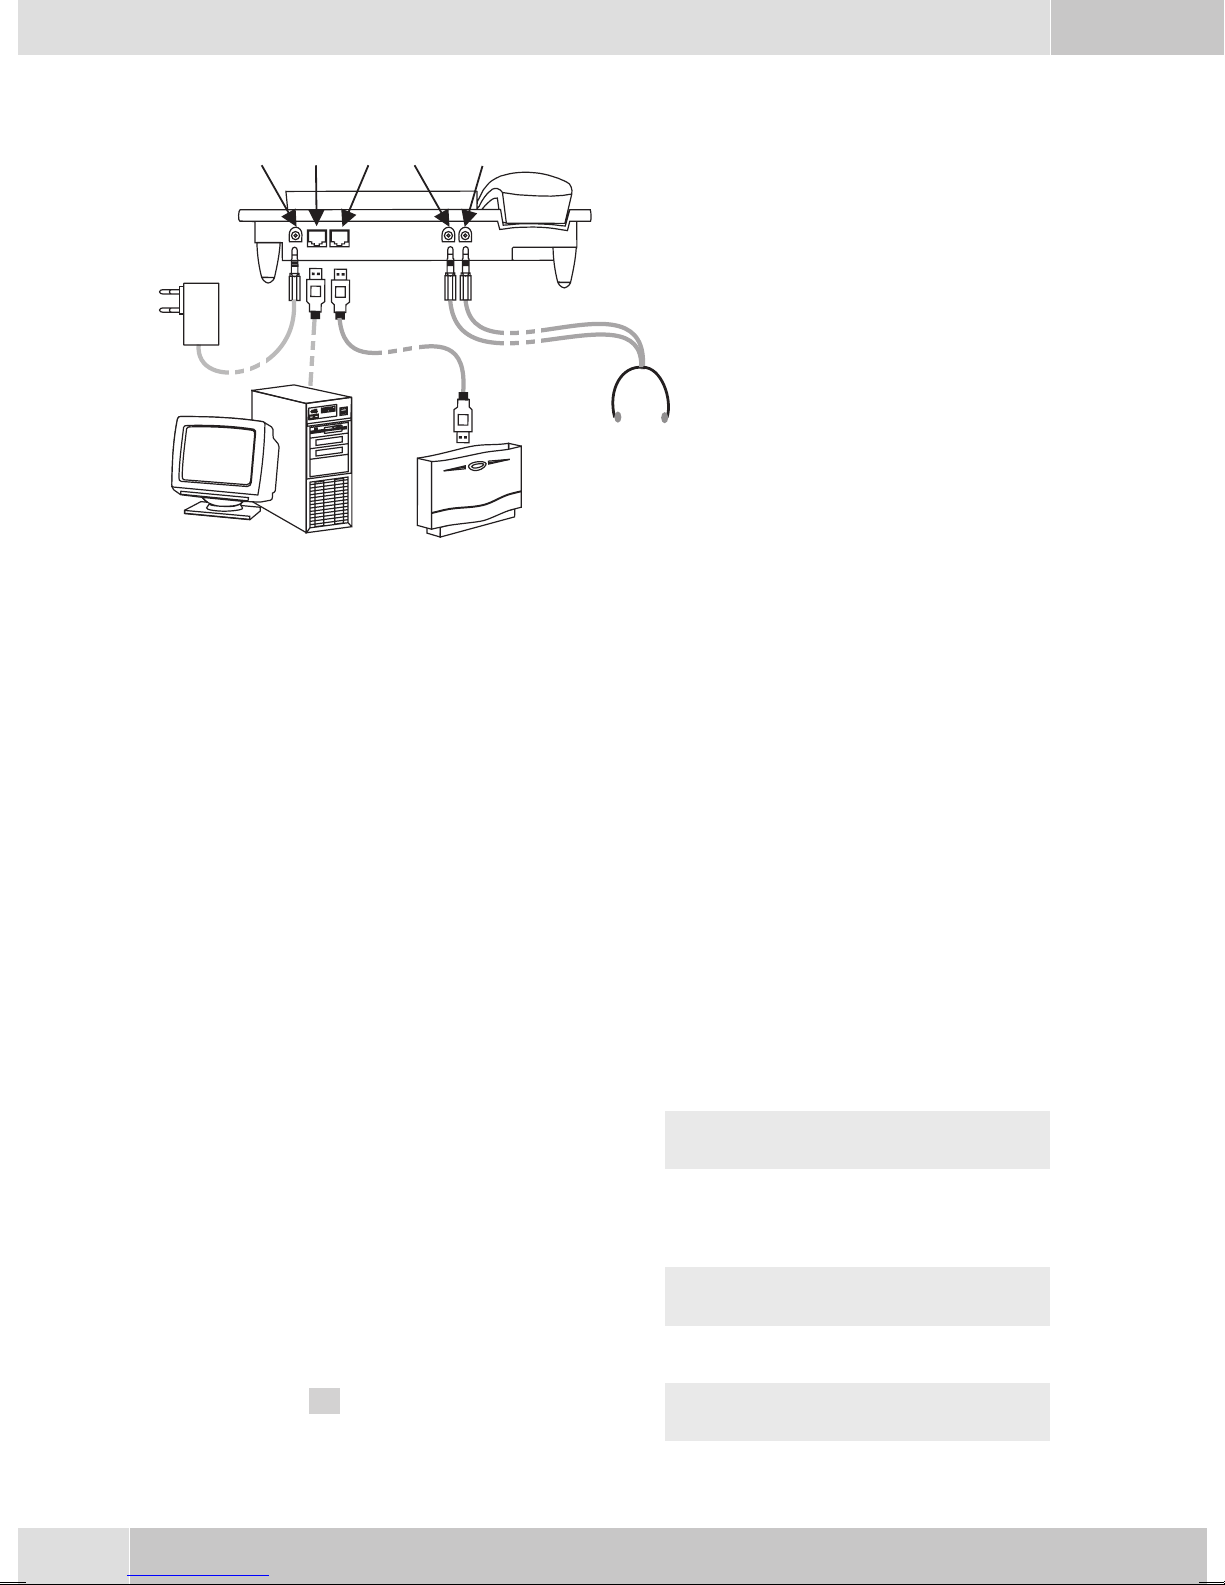
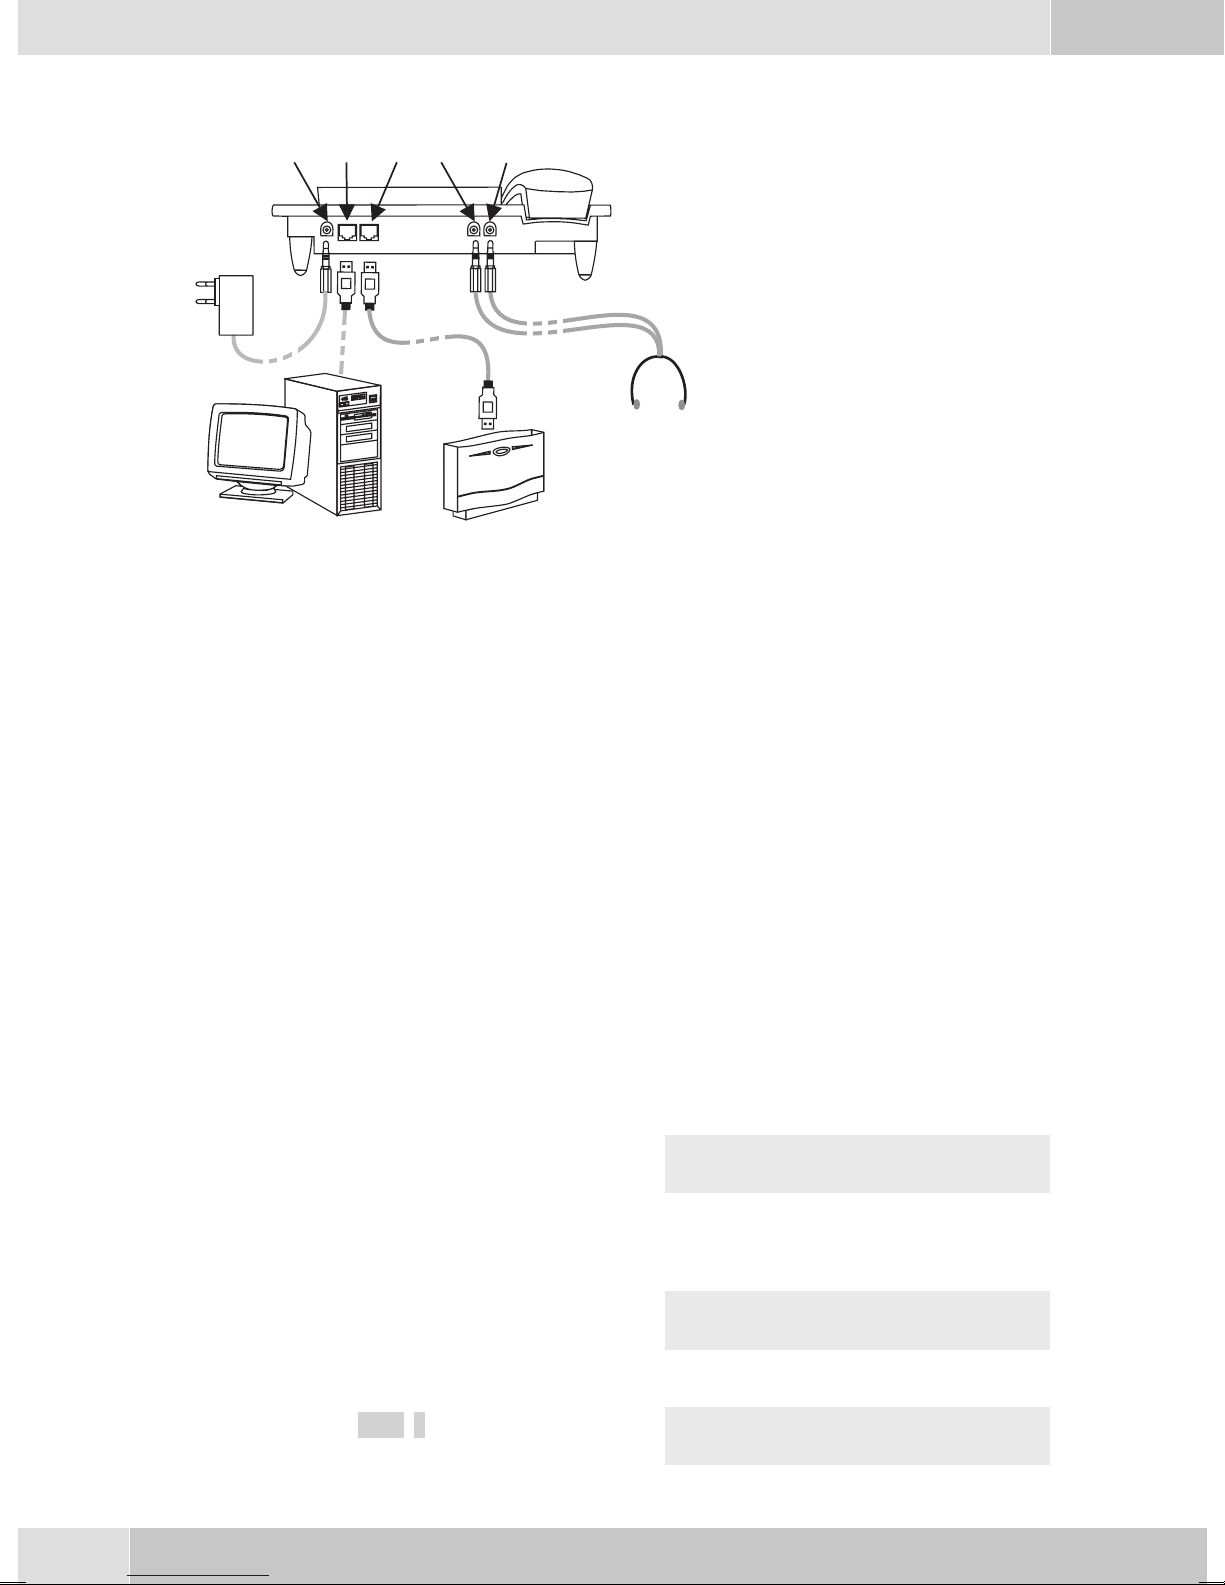
elmeg IP-S290 at the Ethernet-port
1
2
3
4
5
6
7
8
9
Figure 3
Audio in / Audio out
The telephone isequipped with aninput (7) and anoutput (8) for audiosignals. These ports areprovided
forheadsets. Thejacks arelinkedto thecorresponding portsfor theheadset jackson thebottom ofthetelephones.
Connection for plug-in power
-
supply unit
Plug-in power supply unit
-
Ethernet PC-Connection
-
PC or other IP-telephone
-
Ethernet-port of the pabx
-
elmeg pbx
-
Audio-In connection (micropho
-
ne)
Audio-Out connection (hand
-
set)
Headset with two 5mm-ste
-
reo-connectors.
-
-
-
Connecting to and operating the system telephone at the pabx system (basic function including
DHCP)
Consult theinstallation instructionsfor thePABX system todetermine whichport canbe used forconnecting the IP-S290. Connect this port with the Ethernet PABX port on the system telephone.
• Configureyour PABXsystem foruse withIPsystem telephones.
•
Definethe MSNsfor theIP systemtelephoneswithin thePABX system.
•
Switch onthe power (plug-inpower supply unit) tothe IPsystem telephoneand wait untilthe tele
phonehas beeninitialized.
Oncethe IPsystemtelephonehas beeninitializedyouwill berequestedtoselectthe languageinthedisplay.
•
Selectthe displaylanguage.
Press the arrow buttons to view the available
deutsch english polski
languages and confirm your selection by pres
O
.
. Program dial number
O
sing
•
Enterone ofthe MSNsthat hasbeen inputto thePABX system(in theexampleshown here,12) .
Confirm your entry by pressing
-
MSN-1>12
Welche Sprache
-
Swtich to Use DHCP.
Select »on«. use DHCP
•
Thetelephoneand PABXsystem aresynchronized.
6
off on
Page 11
Ifthere isnoconnectiontothePABXsystem (noLANlink,orthetelephonehas notbeenlogged
in),the symboll» -----/ /----‰ « willbeshownin thedisplayinsteadofthetime.
You can now use the IP system telephone at the ISDN or UP0 port.
Connecting a headsets (not included in the scope of supply)
Recommended: Headsets from Plantronics including a U10PS connection cable or GN Netcom.
English
Connecttheheadset asshown infigure4. Thenlay theheadset cord(3) inthe cordgroove (4)and lockit be
low the cord retainers (5).
You can use the handset or the headset for making calls.
Headset »Firefly F142 N« from Plantronics (not for IP-S290)
The LED in the mike arm of this headset is activated using the headset button on the telephone.
Figure 4
-
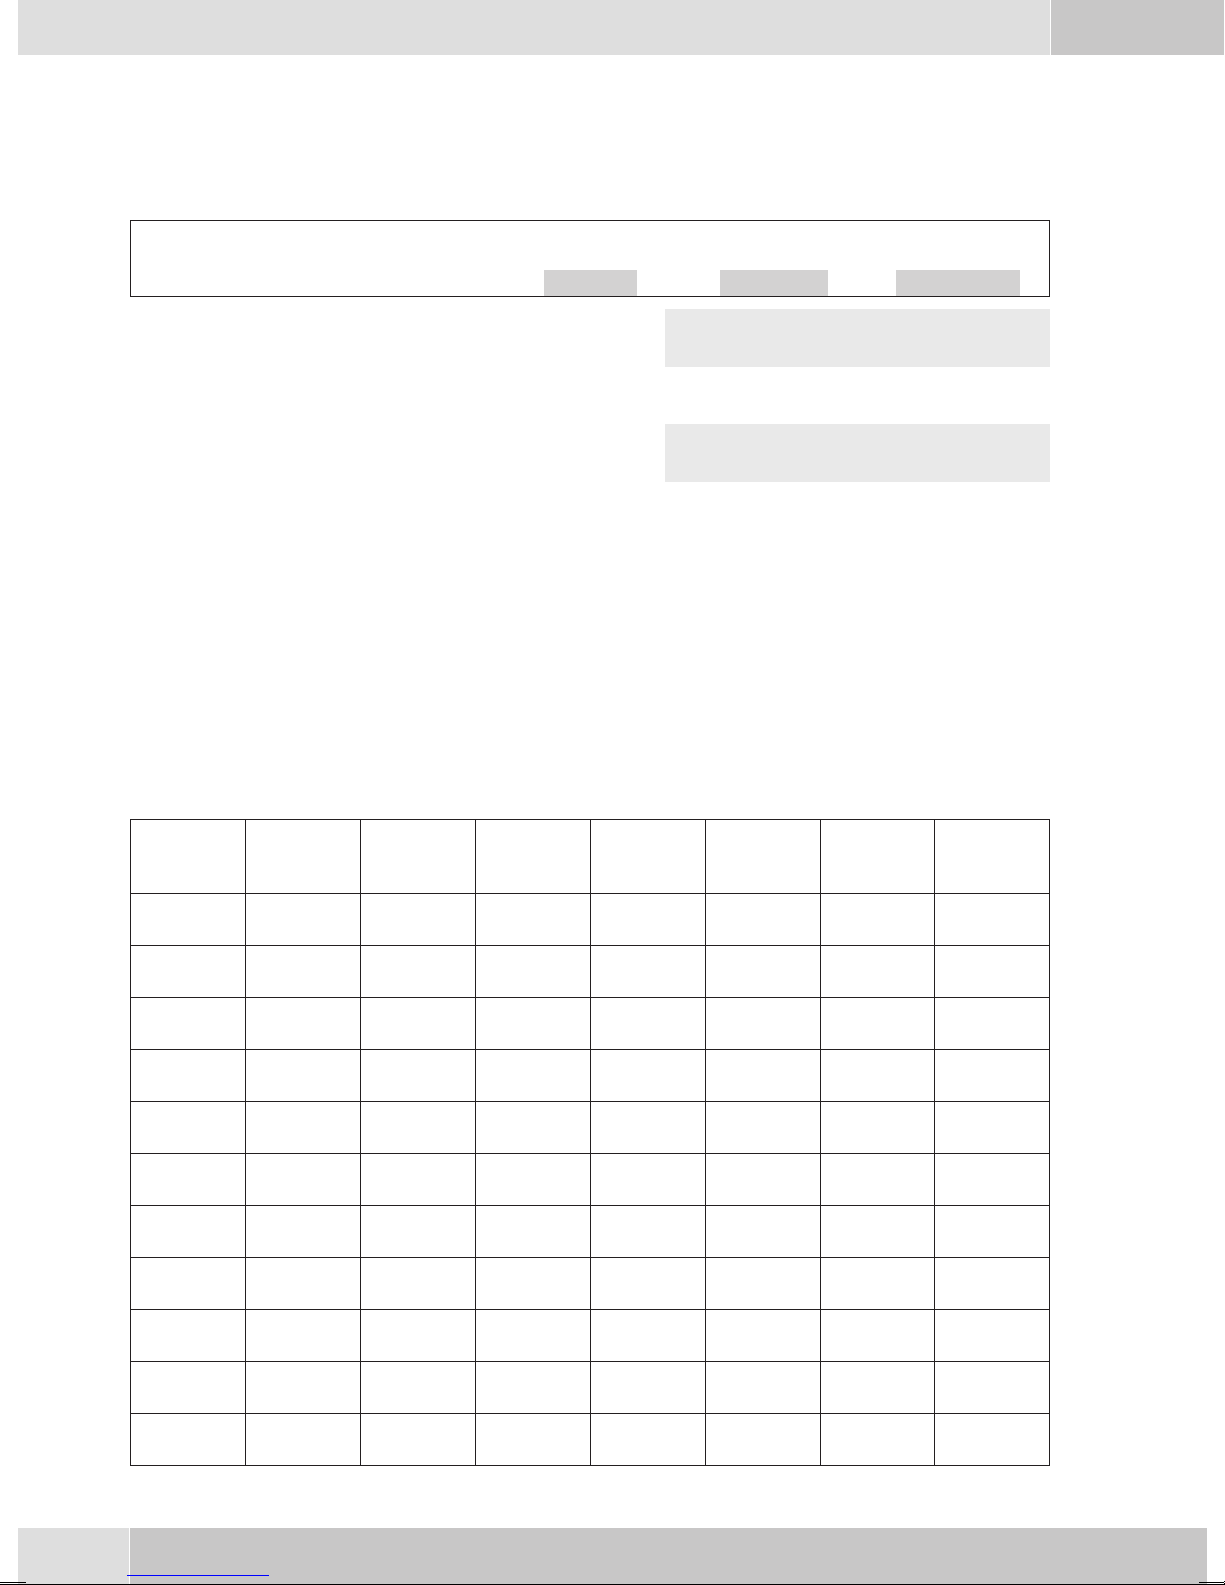
Pin assignments of the headsets
Headset-connection CS 290, IP-S290
1 - Microphone +
2 - Handset (ground)
3 - Handset
4 - Microphone (ground)
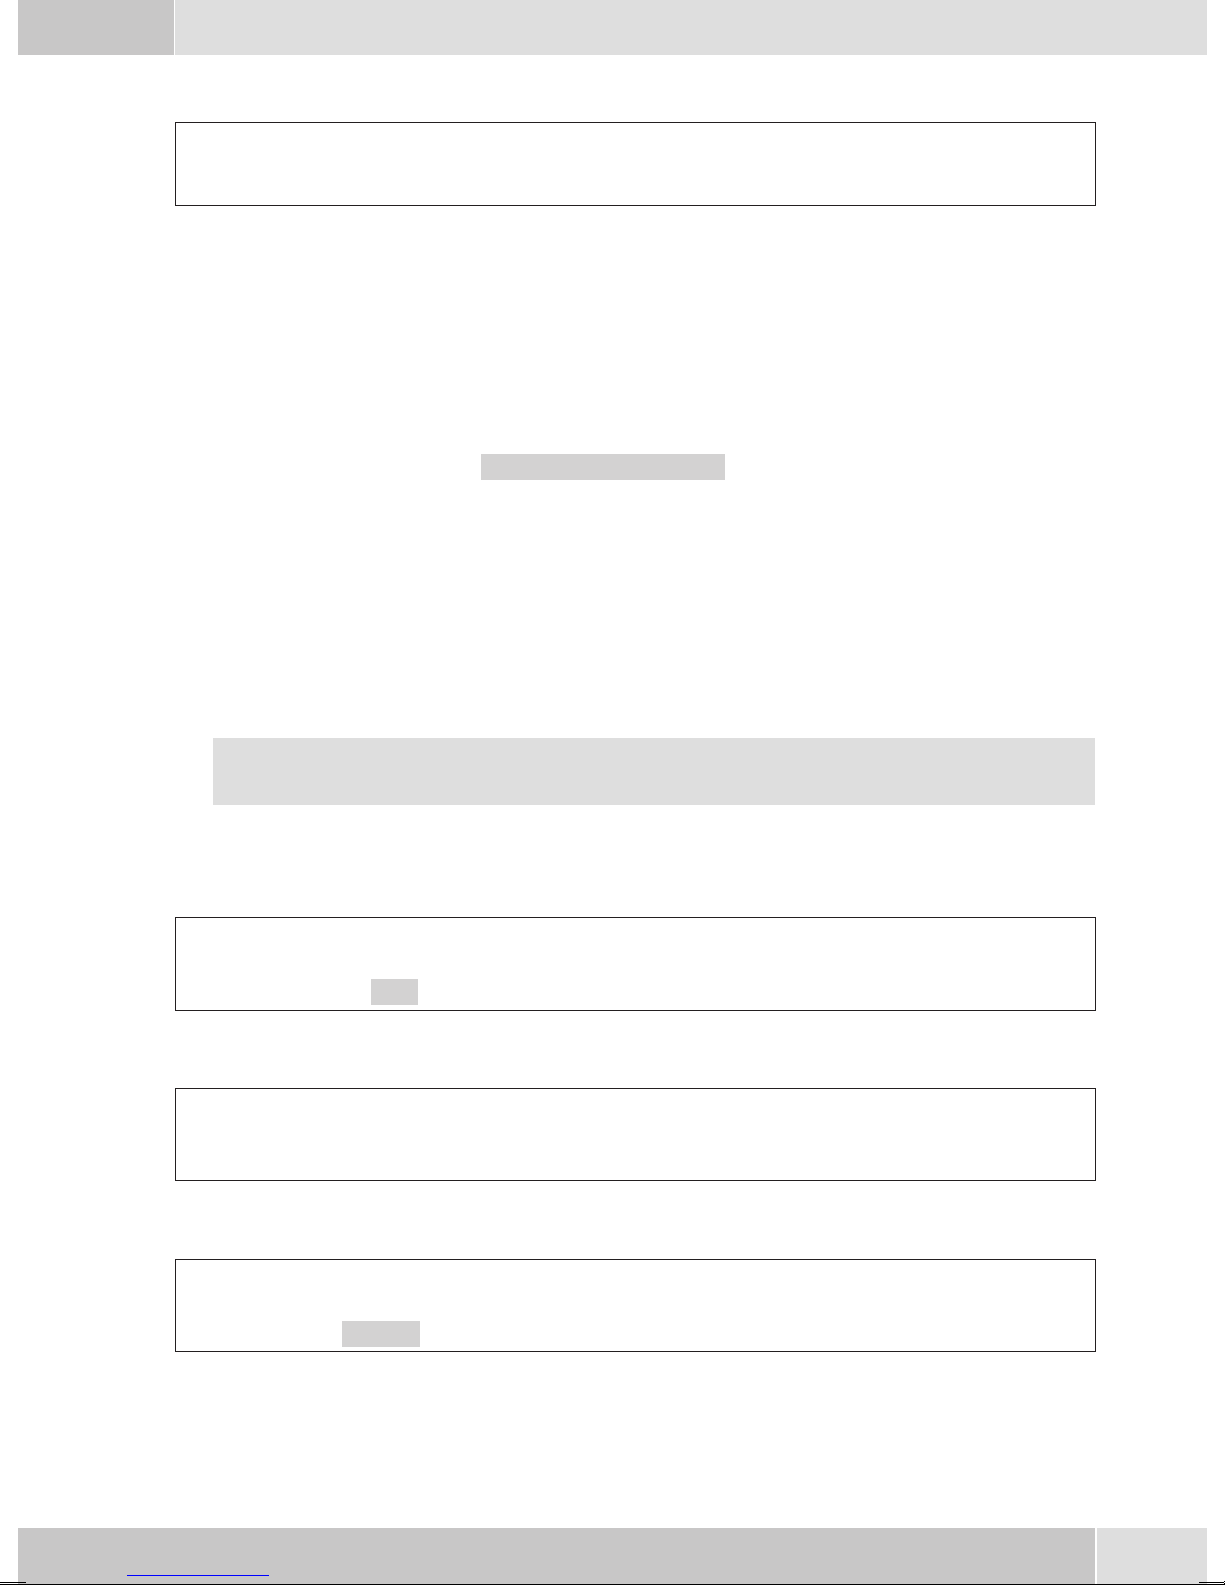
Headset-connection CS 290-U
1 - DSHG receiver
2 - Ground
3 - Microphone +
4 - Handset (ground)
5 - Handset (3.3 V switchable via resistor)
6 - Microphone (ground)
7 - V+ (3.3V)
8 - DSHG transmitter
7
Page 12

English
Changing the label
Thelabelsfor thefunction keysare providedon thelast pageofthisoperating manual.Cut outthe labelyou
wish to use.
To changethe label panel,press theflexible cover togetherbetween yourindex finger andthumb and liftit
out. The label panel can now be changed.
Youcan fillin thelabel panelvia yourPCyourself. TheCD ROMsupplied withthe systemcontains anAdo
be Acrobat file with templates.
Pictographs
-
Thepictographs(symbols)describedbelowhavebeenusedintheseoperatinginstructionstoil
lustratesome proceduresforsettingand usingthetelephone.
b Liftup thehandsetorstartprepared dialing.
a Replacehandset.
Thetelephone isidle.
l Acall issignaled.
Theringer melodysounds.
g Youare conductingacall.
d Athree-partyconference callisinitiated.
q Youhear thepositiveornegativeacknowledgement signal.
t Selectthecall number,code,characteror text.
0...9
Pressthe appropriatebuttononthepush-button set.
-
,#
*
Advanced system telephone configuration
Ingeneral, yourtelephone allowsfor alimited configurationonly ofthe supportedfeatures. Completecon
figuration is possible only using an elmeg PABX system.
Activating the extended configuration mode
Enter the code number »**46782551##« (Vanity-format »**INSTALL1##«).
Advanced Settings
Entering or modifying MSN extension numbers
Under
bers.
8
-»config«-»msn«-»msn-1...3« -»tnumb« -you canenter andedit thephonenum
F
-
-
Page 13

Connected to a pabx
English
Begin as follows:
Numberlength(softkey »number«)
•
The maximumlength forinternal numbersthat are assignedto different internalextensions within
yourPABX system;
Automaticexchange lineaccess (softkey»
•
Withdirect exchangelineaccess,youdonothavetodialtheline accessdigitforconductingoutgoing
calls.
Lineaccess digit(softkey »extern«)
•
Line access digitfor the pabx; theline access digitis placed automatically infront of the numberof
thecaller forthe externalcalls.
Setting the User Interface
Begin as follows:
Connecting / using a headsets (softkey »headset«)
Configuring a headset; For headset operation, use the function key »headset«. You may also want to
use the function key »auto-answer«.
Defaultsetting duringa connection
•
Selectwhether inthe initialsettings »DTMF«or»keypad«is possibleduring anongoing call;
Programming function keys
»config«-
F
-»adjust«--»use«
F
ln. access«)
Begin as follows:
• Directdial buttons(softkey »
Programinga telephonenumber fora specificfunction button.
• Functionbuttons (softkey»
•
Selectthefunctionkeythatyouwishtoassignanewfunctionto . Confirmyour selectionbypressing
(anextension keyin thisexample).
O
•
Enterthe desiredinternal extensionnumber »
Possible settings and allocation options are described in the detailed operating instructions
provided on the CD.
Deactivating the extended configuration mode
Enter the code number »**46782550##« (Vanity-format »**INSTALL0##«).
F
-»adjust«-
list«oder»new«)
function«)
prog new function {}
1_:-
1_ / Extension key
Number>
Number«andconfirm bypressing
O
.
If theISDN telephone isdisconnected from the ISDNnetwork, (for exampleby unplugging theISDN con
nectorofthe phoneorbyswitchingoff orresetting thepabx),the extendedconfigurationmodewillbeauto
matically switched off.
-
-
9
Page 14
English
Setting the display language
You can select the language of your display.
Begin as follows:
a
Deutsch Press the arrow buttons to view the available
languages.
Example:
English Press the arrow buttons to view the available
languages.
FSSS
config Display language
Welche Sprache? }
deutsch english polski
Which language?}
deutsch english polski
S Press the softkey below the desired language.
The display switches to the changed language
immediately.
Entering letters and numbers
You canadvance throughthecharacters (lettersornumbers) bypressing theappropriate buttonrepeatedly.
The following buttons are configured for the entry of figures and numbers:
Button 1st press
1
2
3
4
5
6
7
8
9
*
1
ABc 2 ÄÅÆ
DEF 3 €
GHI 4
JKL5
MNO6 ÖØ
PQRS7ß$
TUV8Ü
WX Y Z 9 ¥
*
2nd
press
3rd press 4th press 5th press 6th press 7th press
#
#
10
Page 15

Every letter that you enter is shown as capitals.
Example: »FUNKWERK«.
English
Several special characters are assigned to the button »
For ex.: »!«, »&«, »?«, »+«, »-«, »=«, »(«, »)«, »@«, »$«, …
Whenyoupressthe
ralspecialcharacters areshown inthe display.Press theappropriate keyto selectthe correspondingspecial
characters
Additional Information in the Display
Whenthetelephoneis inthe idlestate, additionalinformati
on about functions thathave been configuredare shown on
the top line of the display.
»S« Thedial filterfor the telephonehas beenconfigured viathe PCconfiguration program.Phone
»U« Callrerouting (AWS)configured.
>
S
1…9
numbersor partialnumbersare nowenabledor inhibitedforcalling.
If you wish to get more information about the
configuredfunctions pressthe rightarrow button and then »info«.
keythefirst timeaspace isinserted. Whenyou pressthis keya secondtime seve
0
. If you wish to view further special characters, press the
0
«.
key.
0
01.11.05 08:30 S U }
-
tbook vip
01.11.05 08:30 S U {
mail charges info
MSN extension numbers
-
You canenter upto 3 phonenumbers (MSNs)via PCconfiguration thatcan beusedby thetelephone atthe
internal ISDN connection for the pabx system. Please observe the instructions in the PABX manual.
When youenter anMSN orextension numberin your ISDN systemtelephone you areessentially defining
that yourISDN systemtelephone iscalled usingthis MSNor extensionnumber whena callis made.If you
entermore thanone MSNextension numberin yourtelephone, yourphonewillring eachtime oneof these
MSN extension numbers is called.
Entering or editing MSN extension numbers
Entering orediting a phonenumber canonly be performedvia thePC configuration programfor the tele
phone or via the » Advanced Configuration« of the telephone.
Viewing MSN extension numbers
Begin as follows:
»tnumb«.
Setting the melody and the volume
Youcan defineand seta specificmelodyand itsvolume foreach extensionnumberthat youenter. You can
set a different ringing melody or volume for internal calls.
In theinitial setting ofthe telephone, 10different melodies arestored for callsignaling. These
10 melodies can not be changed.
- »config«-»msn«-»msn-1« (or »msn-2«, »msn-3«)
F
-
11
Page 16

English
Setting the melody
In the menu »msn-1«, »Program msn-1« press »Sound« and then »internal«or»ex
ternal«.
O Use the arrow buttons to set the desired melo
dy.
Confirm your entry by pressing OK.
Setting the ringer melody volume
In themenu »MSN-1«,»Program MSN-1« press »volume«and then »internal«or»ex
ternal«.
O Use the arrow buttons to set the volume.
Confirm your entry by pressing OK.
Assigning a name to the MSN extension number
You can assign your own names (max. 5 characters) to the MSN extension numbers.
The assignments for the keypad for entering letters and digits are described on page 10.
In the menu »MSN-1«, »Program MSN-1«-
Select melody {}
-
- --------- 2
Select volume {}
MSN-1 - ------ +
-press »msn-name«.
>
-
-
t
O
Oncea namehas beenenteredforanumber,the softkeydesignations »msn-1«,»msn-2«or»msn-3«
arereplaced bythe correspondingnames inthe menu.In thisexamplehere»STORE«isdisplayed instead
of »msn-1«.
Enter the name desired name.
In this example: »STORE«.
Confirm your entry with OK.
Own MSN designation
MSN-1>STORE
Operation
Important notes
Notall ofthe featuresdescribed heremaybe implementedin thestandard ISDNconnection ofyourservice
provider. Contactyour serviceprovider todeterminewhichfeatures comestandard withyour ISDNaccess
and which ones you must apply for separately.
If the ISDNtelephone is disconnected fromthe ISDN network, (forexampleby unplugging theISDN con
nector of the phone or by switching off or resetting the pabx), several settings and lists will be lost.
For ex.:Temporarily storedtext messages(SMS, UUS1), arequested Completionof call tobusy subscriber
or data downloaded from the pabx.
Starting a call
-
Dial number - no correction possible
btg
Lift up handset Dial call number Conversation
12
Page 17
English
Dial call number - correction possible
atbg
Handset on hook Dial call number Lift up handset Conversation
Tochangethe numberor tocorrect awrong entry,selectthewrong figurewith thearrow buttonsand press
to delete it.
C
If youwish toconduct thecall usingthe handset,just liftit upafter dialingthe number. Any timeduring a
call you can switch back and forth between hands-free calling, speaker function and use of the handset.
After you have dialedthe number you canalso press the speakerbutton to have thenumber dialed and to
use hands-free calling.
Ifanumberthatistobedialedisinhibitedthroughthedialfilterforthesystemtelephoneandtheinhibitfil
ter is activated, the brief message »Inhibited number« will appear in the display.
Other options for dialing without lifting the handset
Theoption ofdialing withoutlifting thehandset andof correctingor addingto anumber alsoexists during
dialing:
-
• fromthe redialingmemory.
• fromthe callerlist.
• fromthe VIP-memory.
• fromthe directdialing memory.
If you are using one of these options, you can make further entries prior to initiatingthe call.
You can define which number (MSN), if any, is to be transmitted to the party being called.
Dialing from the VIP memory
a
Handset on hook
Dialing from the direct dialing memory
a
Handset on hook Press the direct dialing key Lift up handset Conversation
S
vip
Select VIP destination Select VIP destination Lift up handset
Z
or
tb
bg
Dialing from the pabx telephone directory
a
Handset on hook
Starting a call with a fixed MSN extension number
Youcan conductan internalor externalcall suchthat adefined number(MSN) istransferred fromyour te
lephone to the party you are calling. This number must have been entered previously in your telephone.
S
tbook
t
Enter first letter Select entry Lift up handset Conversation
OO
bg
13
-
Page 18
English
When you call, either number that is transmitted is shown in the second line of the display (»msn1...
msn3«) or the name that you have assigned to this number (MSN).
at
Handset on
hook
Restricting calling line identification for the next call
During anexternal or internalcall, you can preventthe numberfrom beingtransmitted (displayed) tothe
partyyouhave called.Youcanalsopermanentlyset thisspecificfunction(detailedinstructionson theCD).
Dial call
number
at
Handset on hook Dial call number
Accepting a call
OFS S
msn msn-1 ... msn-3
OF S
secret
Lift up handset Conversation
bg
Lift up
handset
Conversation
bg
albg
Handset on hook Lift up handset Conversation
Restricting calling line identification
Whena callissignaled,youcandecide beforeacceptingthecallwhetheryour numberistobetransmitted to
the caller. If yourphone is the finaldestination of call reroutingyou can use thisprocedure to prevent the
caller from seeing the final destination phone number (i. e. yours).
al
Handset on hook
Rejecting / forwarding a call
Rejecting a call
al
Handset on hook
Call Deflection
al
Handset on hook
>S
secret
S
reject
S
x-fer
Dial call number
bg
Lift up handset Conversation
t
O
14
Page 19

Redialing
Simple last number redial
English
a
Handset on hook Lift up handset Conversation
Extended redialing
Intheextendedredialing functionthe 10previous calls,connectionsand dialedtelephonenumbersaresto
red. Youcan viewthese bypressing the
dialed automatically.
a
Handset on hook Select entry Select entry Lift up handset Conversation
The lastdialed number isdisplayed. At theend ofthe secondline the statusof thisentry is indicatedby the
letters displayed there.
»v« Connection
»A« Call
»|« Callsconfigured forautomaticredialing.
no entry Youplaced acalltosomebodybut didnotreachhim/her,orhis/herlinewas busy.
WW
W
W
button orthe arrowbuttons andsubsequently havethemre
or
bg
O
bg
-
-
Deleting a call number from extended redialing
a
Handset on hook Select entry Select entry
Automatic redialing
If youplaced acall toa subscriber whosenumber isbusy orwho doesnot answer,you can thenactivate au
tomatic redialing which will call that same subscriber again after about 10 seconds.
WW
bt g
Lift up handset Dial call number Subscriber busy or does not ans
wer
Whenthe telephoneisidle,autodialing isindicatedinthedisplay bypressingthesoftkey"AUTODIAL".
Afteraround10seconds thehands-freecallingfunctionofyourphoneisactivated andthenumberisdialed
automatically.
This is repeated for up to around 2 minutes.
Up to 20 call attempts are made if the subscriber can still not be reached.
or
WS
-
autodial
FS
delete?
a
Replace handset.
-
You can cancel automatic redialing by pressing the redial button.
15
Page 20
English
Deactivate automatic redialing
You can deactivate automatic redialing at any time. There are no further call attempts.
To deactivate automatic redialing during automatic dialing press
If you like to deactivate automatic redialing in the idle state of the phone, proceed as follows:
E
.
a
Handset on hook
Dialing from the caller list
a
Handset on hook
Deleting an entry from the caller list
a
Handset on hook
Muting
Conversation
S
list
SFS
list
SS
autodial yes
Select entry Lift up handset Conversation
mute
SS
b
Select entry
or
Room inquiriy
L
g
delete?
speak
Open listening (Hands Free Calling IP-S290)
g
Conversation Begin open listening End open listening Conversation
When youhang up thehandset whileopen listeningis active, bothopen listeningand the callitself areter
minated.
Using a headset
Activating and deactivating the headset
The handset remains in its cradle when "headsets" are being used.
a
Handset on hook activate headset Dial call number Call via headset Deactivate headset
z
LL
tg
g
z
-
16
Page 21
Activating and deactivating open listening while using the headset
English
g
Call via headset Activate open lis
Call waiting, Inquiriy call, Broker`s call and three-party conference
Call waiting
If, duringan ongoingcall, asecond callcomes infor you,the secondcall is signaledwhen »Callwaitingon«
is set.
g
Conversation
Room inquiriy
You have the option of establishing another connection during an ongoing call using the inquiriy call
function.
L
tening
waiting call
Call via headset and
-
g
g
open listening
S
accept
R
L
Deactivate open
listening
g
Call via headset Deactivate head
S
set
g
Call with subscriber 2; Subscriber 1 in hold condition
tg
-
Call with subscriber 1 Subscriber 1 in hold condition Dial call number Call with subscriber 2
An active connection can beterminated by pressing
put on hold.
Broker`s call
Ifyouhavemorethan oneconnection activeat yoursystemtelephone(callwaitingor inquiriycall), youcan
talk to these subscribers alternately.
g
Call with subscriber 2
If youhave configuredconnectionkeys youcan also carryout Broker'scalls betweendifferent callersusing
these keys.
Toterminateanactiveconnection,press
hold.
Conference
Ifyou havean activeconnection anda connectiononhold atyour systemtelephone, youcan initiatea con
ference call with these two subscribers. All three subscribers can speak to one another.
>S
conn1
g
Call with sub
scriber 1
.Youarethenreturnedtothecallthatwaspreviouslyputon
T
. You can return to thecall that was previously
T
g
Call with sub
scriber 2
conn1
-
S
conn2
-
S
...
etc.
...
etc.
-
17
Page 22
English
g
Call with subscriber 1, Party 2 is put on hold
Toendthethree-party conference,press thesoftkey below»back«.You arereconnected withthesubscri
ber of the last previous active connection. The other subscriber is put on hold.
Call switching
When a call is transferred, the active subscriber and the subscriber for the connection previously put on
hold are always connected with one another.
Youcaninitiate aninquiriycallyourself(e.g. inordertoannouncethe call)andcanthentransfer thecall.
g
Call with subscriber 1 Subscriber 1 in hold condition Dial call number
Keypad
Usingthe Keypadfunction you canmanage serviceor featuresin thePABX systemor inthe networkof the
service provider by entering character strings and digit sequences via the keypad.
R
S
conf
Conference with subscriber 1 and 2
t
d
S
x-fer
-
g
Conversation
Tone dialing (dtmf dialing)
Using tonefrequency dialing,you cantransmit multifrequencysignals (DTMF signals)during an ongoing
call inorder, for example,to poll youransweringmachine. Ifcall waitingis active foran ongoingconnection, tone frequency suffix dialing can not be utilized.
g
Conversation
RESET - Restauring the default telephone settings
You canreset thetelephone toits initialstate usingthe proceduredescribed below.All ofthe datathat you
have entered previously will be deleted.
a
Handset on hook
S
keypad
Input of character strings and digit sequences
S
dtmf
Input of character strings and digit sequences
FS>SS
config service data
t
t
S Press the softkey below »ok« to reset the tele
phone to its initial state. If you do not wish to
have the data deleted press the softkey below
»no«.
Thetelephoneis resetto itsinitialstate. Alldata
are deleted.
18
-
Sure to delete all?
no user ok
01.11.05 08:30 }
tbuch vip
Page 23

Declaration of conformity and CE mark
This device meets the requirements of the following EC directive R&TTE 1999/5/EG:
»Directive 1999/5/EC of the European Parliament and of the Council of 9 March
1999onradioequipmentandtelecommunicationsterminalequipmentand themu
tual recognition of their conformity«.
You can also request this EC declaration of conformity at the following Internet
URL: http://www.funkwerk-ec.com.
The waste container symbolwith the "X"through it on thedevice indicates that the
devicemustbe disposedof separatelyfromnormaldomesticwasteatanappropriate
waste disposal facility at the end of its useful service life.
English
-
© 2005 Funkwerk Enterprise Communications gmbH - All rights reserved.
Reprintingofthis document,even excerpts,is permittedonly withthe expressconsent ofthe publisherand
with precise source information, regardless of the media used (mechanical or electronic).
Function descriptionsincluded inthis documentation whichrefer to softwareproducts ofother manufacturers are basedon the software usedand valid atthe date the documentationwas prepared or published.
The product and company names used in this documentation may be protected by trademarks.
19
Page 24

Repair Service
Tonfunk GmbH
Repair Service
Unternehmenspark 2 / Halle D
Woltorfer Str. 77
31224 Peine
Funkwerk Enterprise Communications GmbH
Südwestpark 94
D-90449 Nürnberg
http://www.funkwerk-ec.com
20
Subject to modifications
090506
Page 25

Bedienungsanleitung
elmeg CS290 / CS290-U / IP-S290
Deutsch
1
Page 26
Deutsch
Bedienoberfläche des Telefons
1 Funktions-Taste:Mit dieserTasteöffnenSiedasProgrammier-Menü.BefindenSiesichbereits
in einem Menüund betätigen dann dieTaste , stehen Ihnenmenüabhängige Funktionenzur
Verfügungoder Siegeheneinen Programmierschrittzurück.
2 Escape-Taste: Durch Betätigen der Escape-Taste wird während des Programmierens wieder
derRuhezustand desTelefonserreicht.
3 3Softkeys
In derPC-Konfigurierung desTelefons könnenSie einstellen,obdie Funktionender Softkeys
nurmit großenoderkleinen Buchstabenangezeigtwerden.
4 Display: Nach dem Verbinden mit der Stromversorgung (IPS 290) oder dem internen
ISDN-oderUP0-(CS290, CS290-U)AnschlussderTK-AnlagewerdenIhneninderoberenZei
ledes DisplaysDatum undUhrzeitangezeigt. DatumundUhrzeitwerden automatischausder
TK-Anlageübernommen.DerangezeigteTextfüreine FunktioninZeile 2befindetsichimmer
oberhalb des zugehörigen Softkeys. Betätigen Sie den Softkey, wird die nächste Ebene ange
zeigt. Könnenim Display nichtalle Zeichenangezeigt werden,wird dies durch»«« oder »»«
gekennzeichnet.
5 OK-Taste:NachBetätigen dieserTastewirdeine Einstellungim Telefonabgespeichert.Sie hö
renanschließend einenQuittungston.
6 C-Taste:Mit dieserTastekönnenSie imMenüjeweilseinen Menü-Schrittzurückgehen.Befin
denSie sichineinem Eingabe-Modus,könnenSie mitdieserTasteeinzelneZeichenlöschen.
-
-
-
-
7 Anruf-Leuchtdiode:Ein AnrufwirddurchschnellesBlinkensignalisiert.
8 Lautsprecher
9 Lauthör-Taste(FreisprechtasteIP-S290)
10 Trenn-Taste
2
Page 27

11 Rückfrage-Taste
12 Wahlwiederholungs-Taste
Deutsch
13
14 Stern-Taste/ Raute-Taste
15 Wähl-Tasten /VIP-Tasten
16 5programmierbare FunktionstastenmitLeuchtdiode:
17 BeschriftungsschildfürprogrammierbareFunktionstasten
Pfeil-Tasten: DiePfeile »{« und»}« inder rechtenEcke deroberenDisplayzeile zeigenIhnen
an,dass SiemitdenPfeil-TastenweitereFunktionen inderzweiten Zeileaufrufenkönnen.
JedeTasteverfügtübereineLeuchtdiode.DieseLeuchtdiodekannzurAnzeigevonbestimmten
Funktionengenutzt werden.
DieLeuchtdioden derbeidenunteren Tastensindzweifarbig (nurCS290 undCS290-U).
Beschreibung und Installation
elmeg CS290
Dieses Systemtelefon ist für den Anschluss an einem internenS0-Anschluss (4adrige Verkabelung) einer
elmeg TK-Anlage vorgesehen.
elmeg CS290-U
DiesesSystemtelefon istfür denAnschluss aneinem internenUp0-Anschluss (2adrigeVerkabelung)einer
elmeg TK-Anlage vorgesehen. Das Systemtelefon verfügt über einen ISDN-Ausgang, an den weitere
ISDN-Endgeräte angeschlossen werden können.
elmeg IP-S290
Dieses Systemtelefon wird andem entsprechenden LAN-Anschluss (oderNetzwerk) der TK-Anlage über
ein Cat.5 Kabel angeschlossen.DasSystemtelefon verfügtüber einenPC-Ausgang, anden weitereIP-Endgeräte angeschlossen werden können. Das Systemtelefon verfügt über die Funktion Freisprechen.
Einstellen / Konfigurieren des Systemtelefons
AmSystemtelefon selbstkönnen Sienur eineeingeschränkte Konfigurierungder unterstütztenLeistungs
merkmale vornehmen.Eine vollständigeKonfigurierungdes Systemtelefonsist nurüber dieentsprechen
den Anschlüsse der elmeg TK-Anlage möglich.
Sicherheitshinweise
•
Beachten Sie die Umgebungstemperatur für Lagerungund Betrieb des Gerätes in den technischen
Daten. Das Gerät darf erst nach Erreichen der zulässigen Betriebs-Umgebungstemperatur ange
schlossenwerden.
•
Beachten Siebitte, dassbeim Übergangvon kalten zuwarmenTemperaturen Betauungam oder im
Gerät entstehen kann. Entnehmen Sie das Gerät erst aus der Verpackung, wenn die zulässige Be
triebs-Umgebungstemperaturerreichtist.
•
Während eines Gewitterssollten Sie keineLeitungen anschließen oder trennenund nicht telefonieren.
•
SchließenSiedie Anschlussschnürenur anden dafürvorgesehenenAnschlüssen an.
•
VerlegenSiedie Anschlussschnüreunfallsicher.
•
VermeidenSie diefolgenden Einflüsse:
DirekteSonneneinstrahlung
Wärmequellen(z.B. Heizkörper)
-
-
-
-
3
Page 28

Deutsch
ElektronischeGeräte (z.B.HiFi-Geräte, BürogeräteoderMikrowellengeräte)
EindringendeFeuchtigkeit oderFlüssigkeiten
AggressiveFlüssigkeiten oderDämpfe
Starker Staub
BenutzenSie dasGerät nichtin Feuchträumenoderexplosionsgefährdeten Bereichen.
•
Öffnen Sie nur die Bereiche des Gerätes, die in der Montage- / Bedienungsanleitung vorgegeben
•
sind.
BerührenSie dieSteckkontakte nichtmit spitzen,metallischenoder feuchtenGegenständen.
•
Wird das Gerät nicht fest montiert, stellen Sie das Gerät oder das Zubehörs auf einer rutschfesten
•
Unterlageauf.
ReinigenSiedas Gerätnur miteinem leichtangefeuchtetenTuch.
•
VerwendenSie nurdas zugelasseneZubehör.
•
Andas Gerätdürfen nurEndgeräteangeschlossen werden,die SELV-Spannung(Sicherheits-Klein
•
spannungs-Stromkreis) liefern und/oder der ETS 300047 entsprechen. Die bestimmungsmäßige
Verwendungvon zugelassenenEndgeräten erfülltdiese Vorschrift.
Stecknetzgerät
Verwenden Sie nur das im Lieferumfang enthaltene oder als Zubehör erhältliche Steckernetzge
•
rät(DSA-0101F-05 UPoder L15D52 ABDDLAWO).
VerwendenSie keineSteckernetzgeräte, diesichtbareBeschädigungaufweisen(Brücheoder Sprün
•
geim Gehäuse).
-
-
-
Lieferumfang
Systemtelefon, Hörer mit Höreranschlussschnur, Anschlussschnur, 2 Gerätefüße, Bedienungsanleitung,
Beschriftungsschild für programmierbare Funktionstasten. Adapterschnur (CS290-U) für Headsets mit
4poliger Anschlussschnur (Stecker 8polig / Schnur 4polig).
Pflege und Wartung
Das Telefon wurdefür normaleGebrauchsbedingungen gefertigt.Reinigen Sie,wenn nötig, dasGerät mit
einem leicht feuchten Tuch oder verwenden Sie ein Antistatiktuch. Benutzen Sie niemals Lösungsmittel.
VerwendenSieniemalseintrockenes Tuch;die elektrostatischeAufladung könntezu Defektenin derElektronik führen.Achten Sie aufjeden Falldarauf, dass keineFeuchtigkeit eindringenkann und dadurchdas
Telefon Schaden nimmt.
Aufstellen des Telefons
Vor dem Aufstellen des Telefons müssen die hinteren Gerätefüße des Telefons an den in Bild 4 gekenn
zeichneten Stellen (6) montiert werden. Je nach Höhe dieser beiden Füßekönnen Sie die Displayneigung
desTelefonsauf IhrenBlickwinkel einstellen.Bitte achtenSie aufeine gleichmäßigeHöhederbeidenGerä
tefüße.
Zum Ändern derHöhe ziehenSie die Gerätefüßevon der Unterseitedes Telefonsab. Drehen Siediese um
ca.60°umdieLängsachseundstecken SiedieFüßewiederindas Gehäuse.Durchdas DrehenderGerätefü
ße um jeweils ca. 60° der Längsachse können Sie drei verschiedene Höhen einstellen.
-
-
-
BeachtenSie bitte,dass dieKunststofffüße IhresTelefons aufempfindlichen Oberflächenz.B. vonMöbeln,
Spurenhinterlassenkönnen.DerHerstellerdesTelefonskannfürsolcheSchädennichthaften. Verwenden
Sie daher eine rutschfeste Unterlage für Ihr Telefon.
Installation des Telefons
Anschließen der Hörerschnur
SchließenSiedie Hörerschnur(1) wiein Bild2 gezeigtan.Legen Siedie Hörerschnurin dieSchnurführung
(2) und klemmen Sie sie unter den Schnurhaltern(3) fest.
4
Page 29
elmeg CS290 am ISDN-Anschluss
Bild 2
elmeg CS 290-U am UP0-Anschluss
Deutsch
Schließen Sie die ISDN-Anschlussschnur (1) wie
im Bild 2 gezeigt an die So-Buchse an. Bitte be
achten Sie, dass der längere ISDN-Stecker in die
ISDN-Anschlussdose und der kürzere ISDN-Ste
cker in die ISDN-Buchse des Telefons gesteckt
wird. Anschließend legen Sie die ISDN-An
schlussschnur in die Schnurführung (2) und
klemmenSie sieunterdenSchnurhaltern (3)fest.
Schließen Sie die ISDN-Anschlussschnur (1) wie
im Bild 1 gezeigt an die BuchseUP0 an. Bitte be
achten Sie, dass der längere ISDN-Stecker in die
ISDN-Anschlussdose und der kürzere ISDN-Ste
cker in die ISDN-Buchse des Telefons gesteckt
wird. Anschließend legen Sie die ISDN-Anschlussschnur in die Schnurführung (2) und
klemmenSie sieunter denSchnurhaltern (3)fest.
Das Bild 1zeigt einnach geschaltetes ISDN-Telefon am S0-Anschluss des elmeg 290-U.
-
-
-
-
-
Bild 1
Die TelefoneCS290-U dürfen nicht überdie S0-Buchse aneinen ISDN-Anschlussangeschlossen werden.
Wichtige Hinweise für den UP0-Anschluss
•
An der S0-Buchse des Telefons lassen sich bis zu acht ISDN-Endgeräte mit S0-Schnittstelle an
schließen. Werden die Endgeräte aus dem Systemtelefon elmeg CS 290-U gespeist, dürfen Sie nur
zweidieser Endgeräteanschließen.
•
Der ISDN-Anschluss für nachgeschaltete Endgeräte am Systemtelefon muss sternförmig erfolgen
(bitteISDN-Verteiler benutzen).
•
Die Leitungslängezwischen elmegCS 290-Uund nachgeschalteten ISDN-Endgeräten beträgtmax.
100 Meter.
•
Abschlusswiderständedürfen nichtangeschaltet werden.
-
5
Page 30
Deutsch
elmeg IP-S290 am Ethernet-Anschluss
1
2
3
4
5
6
7
8
Bild 3
9
Audio in / Audio out
DasTelefonverfügt übereinenEingang(7) undeinenAusgang(8)für Audio-Signale.DieseAnschüssesind
für denAnschluss einesHeadsets vorgesehen. DieBuchsen sind mitden entsprechendenAnschlüssen der
Buchse für das Headset auf der Unterseite des Telefons verbunden.
Steckernetzgerät-An
-
schluss
Steckernetzgerät
-
Ethernet PC-Anschluss
-
PC oder weiteres IP-Tele
-
fon
Ethernet TK-Anlagen-An
-
schluss
elmeg TK-Anlage
-
Audio-in Anschluss (Mi
-
krofon)
Audio-out Anschluss (Hö
-
rer)
Headset mit zwei 5mm
-
Stereo-Klinkenstecker.
-
-
-
-
-
Anschließen und in Betrieb nehmen des Systemtelefons an der TK-Anlage (Grundfunktion mit
DHCP)
LesenSieinder Montagesanleitungder TK-Anlagenach,welcheAnschlüssefürdenAnschlussdesIP-S290
vorgesehensind. VerbindenSie Anschluss mitdemEthernet TK-Anlagen-AnschlussdesSystemtelefons.
•
KonfigurierenSiedie TK-Anlagefür denEinsatz vonIP-Systemtelefonen.
•
LegenSie dieMSN derIP-Systemtelefone inderTK-Anlage fest.
•
Schalten Sie die Versorgungsspannung (Steckernetzgerät) an dasIP-Systemtelefon an und warten
Siebis dasTelefon initialisiertist.
Ist das IP-Systemtelefon initialisiert, werden Sie im Display zur Auswahl der Sprache aufgefordert.
•
WählenSie dieSprache fürdas Displayaus.
BetätigenSie diePfeil-Tasten,umdie verfügba
ren Sprachen auszuwählen und bestätigen Sie
O
.
. Rufnr. programmieren
O
mit
•
GebenSie eineder inder TK-Anlageeingetragenen MSN ein(imBeispiel 12).
Bestätigen Sie den Eintrag mit
-
Welche Sprache? }
deutsch english polski
MSN-1>12
Schalten Sie DHCP nutzen ein.
Wählen Sie »ein« aus. DHCP nutzen
•
Telefonund TK-Anlagewerden synchronisiert.
6
aus ein
Page 31

Deutsch
Besteht keine Verbindung zur TK-Anlage (keine LAN-Verbindungoder das Telefon ist nicht
angemeldet)wird imDisplaydieUhrzeitdurch dasSymbol» -----/ /---‰« ersetzt.
Sie können jetzt das IP-Systemtelefon wie ein Systemtelefon am ISDN oder UP0 nutzen.
Anschließen eines Headsets (nicht im Lieferumfang)
Empfohlen: Headsets der Fa. Plantronics mit U10PS Anschlussschnur oder GN Netcom.
Schließen Sie das Headset wie in Bild 4 gezeigt an. Anschließend legen Sie die Headsetschnur (3) in die
Schnurführung (4) und klemmen Sie sie unter den Schnurhaltern (5) fest.
Sie können entweder den Hörer oder das Headset zum Telefonieren nutzen.
Headset »Firefly F142 N« von der Firma Plantronics (nicht für IP-S290)
Die Leuchtdiode im Mikrofonarm dieses Headsets wird durch die Headsettaste des Telefons geschaltet.
Bild 4
Belegung des Headsets
Headset-Anschluss CS 290, IP-S290
1 - Mikrofon +
2 - Hörer (Ground)
3 - Hörer
4 - Mikrofon (Ground
Headset-Anschluss CS 290-U
1 - DSHG-Empfänger
2 - Masse (Ground)
3 - Mikrofon +
4 - Hörer (Ground)
5 - Hörer (3,3 V schaltbar über Widerstand)
6 - Mikrofon (Ground)
7 - V+ (3,3V)
8 - DSHG-Sender
7
Page 32

Deutsch
Wechseln des Beschriftungsfeldes
Die Beschriftungsschilderfür die Funktionstasten finden Sie aufder letztenSeite dieserBedienungsanlei
tung. Trennen Sie das gewünschte Beschriftungsschild heraus.
Zum Wechseln desSchildes ziehen Siedie flexible Abdeckungzwischen Daumen undZeigefinger zusam
menund hebenSiedie Abdeckungnachobenab. DasBeschriftungsschildkanndanngewechseltwerden.
Sie können das Beschriftungsfeld über Ihren PC selber beschriften. Auf der CD-ROM der TK-Anlagen
befindet sich eine Adobe Acrobat-Datei mit Vorlagen.
Piktogramme
UmIhnenindieserBedienungsanleitungeinigeAbläufebeiderEinstellungundBedienungdes
Telefons zu zeigen, wurden unter anderem die nachfolgend beschriebenen Piktogramme
(Symbole)verwendet.
b HörerabhebenodervorbereitendeWahl starten.
a Hörerauflegen.
DasTelefonbefindet sichinRuhe.
l EinAnruf wirdsignalisiert.
DieTonrufmelodie erklingt.
g Sieführen einGespräch.
-
-
d EineKonferenzschaltungisteingeleitet.
q Siehören denpositivenoder dennegativenQuittungston.
t Rufnummer,Kennziffer,ZeichenoderTextwählen.
0...9
,#
*
Erweiterte Konfigurierung des Systemtelefons
Normalerweise können Sie am Telefon nur eine eingeschränkte Konfigurierung der unterstützten Lei
stungsmerkmale vornehmen. Eine vollständige Konfigurierung ist nur über eine elmeg TK-Anlage
möglich.
Einschalten der erweiterten Konfigurierung
Geben Sie die Kennziffer »**46782551##« (Vanity-Format »**INSTALL1##«) ein.
Erweiterte Konfigurierung
Einebestimmte TastederWähltastaturbetätigen.
-
Rufnummer (MSN) eingeben oder ändern
Unter
fons eintragen oder ändern.
-»konfig«-»msn«-»msn-1...3« - »telnr«können Sie die Rufnummerndes Tele
F
8
-
Page 33

Anschluss an einer TK-Anlage
Deutsch
Beginnen Sie wie folgt:
Rufnummernlänge(Softkey»numl nge«)
•
Maximale Länge der internenRufnummern, die anderen Teilnehmernder TK-Anlage zugewiesen
sind;
AutomatischeAmtsholung (Softkey»
•
Beiautomatischer Amtsholungentfällt beiexternen Gesprächendie WahlderAmtskennziffer.
Amtskennziffer(Softkey »akz«)
•
AmtskennzifferderTK-Anlage;DieAmtskennzifferwird beiexternen AnrufenderRufnummerdes
Anrufersautomatisch vorangestellt.
Einstellungen in der Bedienung
Beginnen Sie wie folgt:
Anschluss / Nutzung eines Headsets (Softkey »headset«)
Einrichtung eines Headsets;Zum Bedienen desHeadsets benötigen Sie dieFunktionstaste »headset«
und optional die Funktionstaste »auto-rufannahme«.
Grundeinstellungwährend einerVerbindung
•
Auswahl,ob inderGrundeinstellungwährendeiner Verbindung»mfv«oder »keypad«möglich
ist;
Programmierung von Funktionstasten
-»konfig«
F
- »einst«
F
»tkanl«
>
amt_holen«)
>
»bedien«
Beginnen Sie wie folgt:
• Zielwahltasten(Softkey »
ProgrammiereneinerRufnummer aufeine Funktionstaste.
• Funktionstasten (Softkey»
•
WählenSiedie Funktionstastendie Siemit einerneuen Funktionbelegen möchtenaus . Betstätigen
Siedie Auswahlmit
•
GebenSie diegewünschte Internrufnummer»
Die möglichen Einstellungen und Zuweisungen sind in der ausführlichen Bedienungsanlei
tung auf der CD-ROM beschrieben.
Ausschalten der erweiterten Konfigurierung
Geben Sie die Kennziffer »**46782550##« (Vanity-Format »**INSTALL0##«) ein.
Wird dasTelefon vom ISDN-Netzgetrennt (z.B. ISDN-Steckerdes Telefon ziehen,Ausschalten oder Reset
der TK-Anlage) wird der Modus zur erweiterten Konfigurierung automatisch ausgeschaltet.
F
O
- »einst«
liste«oder»neu«)
funktion«)
(imBeispieleine Linientaste).
>
»zielw«
Nummer«einund bestätigenSie mit
Funktion neu prog {}
1_:-
1_ / Linientaste
Nummer>
.
O
-
Sprache der Displayanzeige einstellen
Sie können auswählen, in welcher Sprache die Displayanzeige erfolgen soll.
9
Page 34

Deutsch
Beginnen Sie wie folgt:
a
Deutsch BetätigenSie diePfeil-Tasten,umdie verfügba
ren Sprachen anzusehen.
Beispiel:
English BetätigenSie diePfeil-Tasten,umdie verfügba
ren Sprachen anzusehen.
S Betätigen Sieden Softkey unter dergewünsch
tenSprache.DieDisplayanzeigewirdsofortauf
die gewählte Sprache umgestellt.
Eingabe von Buchstaben und Ziffern
DurchmehrmaligesBetätigeneiner Tastewerden Ihnenim Displaydie Zeichen (Buchstabenoder Ziffern)
der Reihe nach angezeigt.
Für die Eingabe von Buchstaben und Ziffern sind die Tasten wie folgt belegt:
FSSS
konfig anzeige sprache
-
-
-
Welche Sprache? }
deutsch english polski
Which language? }
deutsch english polski
Taste 1.Druck 2.Druck 3.Druck 4.Druck 5.Druck 6.Druck 7.Druck
1
2
3
4
5
6
7
8
9
*
#
1
ABC2 ÄÅÆ
DEF 3 €
GHI 4
JKL5
MNO6 ÖØ
PQRS7ß$
TUV8Ü
WX Y Z 9 ¥
*
#
Alle eingegebenen Buchstaben werden als Großbuchstaben angezeigt.
Beispiel: »FUNKWERK«.
Die Taste »
Z.B.: »!«, »&«, »?«, »+«, »-«, »=«, »(«, »)«, »@«, »$«, …
« ist mit verschiedenen Sonderzeichen belegt.
0
10
Page 35

Deutsch
NachdemerstenBetätigender Taste»
dieserTastewerdeneinigeSonderzeichen imDisplay angezeigt.UmeinSonderzeichen auszuwählen,betä
tigen Sie die zugeordnete Tasten
betätigen Sie die Taste
Zusätzliche Displayinformationen
ImRuhezustanddes Telefonswerden inderoberenZeiledes
Displays zusätzliche Informationen über eingerichtete
Funktionen angezeigt.
»S« ÜberdiePC-KonfigurierungwurdedieWahlkontrolledesTelefonseingerichtet.Rufnummern
oderTeilrufnummern sindfürdie Wahlfreigegebenoder gesperrt.
»U« Rufumleitung(AWS)eingerichtet.
>
S
Um weitere Informationenüber die eingerich
teten Funktionen anzusehen, betätigen Sie die
rechte Pfeiltasteund anschließendden Softkey
»info«.
0
1…9
.
«wirdeinLeerzeicheneingefügt.Nachdem zweitenBetätigen
0
. Möchten Sie sich weitere Sonderzeichen ansehen,
01.11.05 08:30 S U }
tbuch vip
01.11.05 08:30SU{
-
mail geb hr info
Display-Kontrast {}
- ------ +
-
Rufnummern (MSN)
Über diePC-Konfigurierung könnenSie biszu 3 Rufnummmern(MSN) eintragen, die dasTelefon aminternenISDN-Anschlussder TK-Anlagenutzenkann. Bittebeachten Siedie Hinweiseinder Bedienungsanleitung Ihrer TK-Anlage.
MitdemEintrageinerRufnummerinIhrTelefonlegenSiefest,dass IhrTelefonbeiAnwahlmitdieser Rufnummer(MSN) erreichbarist. TragenSiemehrals eineRufnummerinIhremTelefon ein,klingeltIhrTelefon bei Anwahl jeder der eingetragenen Rufnummern.
Rufnummer (MSN) eintragen oder ändern
Das Eintragen oder Ändern einer Rufnummer ist nur über die PC-Konfigurierung oder die »Erweiterte
Konfigurierung« des Telefons möglich.
Rufnummer (MSN) ansehen
Beginnen Sie wie folgt:
»telnr«.
Tonrufmelodie und Lautstärke einstellen
Siekönnen separatfür jedeRufnummereineeigene TonrufmelodieundderenLautstärke festlegen. Fürin
terne Anrufe können Sie einen anderen Tonruf und eine andere Lautstärke einstellen.
-»konfig«-»msn«-»msn-1« (oder »msn-2«, »msn-3«)
F
-
ImTelefonsind10verschiedeneMelodienfürdenTonrufgespeichert.Diese10Melodienkön
nen nicht verändert werden.
Tonrufmelodie einstellen
Betätigen Sie im Menü »msn-1«, »MSN-1 programmieren« den Softkey »klang« und an
schließend den Softkey »intern« oder »extern«.
-
-
11
Page 36

Deutsch
O Betätigen Sie die Pfeil-Tasten, um die ge
wünschte Melodie einzustellen.
Bestätigen Sie die Eingabe mit OK.
Lautstärke der Tonrufmelodie einstellen
Betätigen Sie im Menü »msn-1«, »MSN-1 programmieren« den Softkey »lauts« und an
schließend den Softkey »intern« oder »extern«.
O Betätigen Sie die Pfeil-Tasten, um die ge
wünschte Lautstärke einzustellen.
Bestätigen Sie die Eingabe mit OK.
Der Rufnummer (MSN) einen Namen zuordnen
Sie können jeder Rufnummer (MSN) einen Namen von max. 5 Zeichen zuordnen.
Für die Eingabe von Buchstaben und Ziffern ist die Tastatur wie auf Seite 10 beschrieben belegt.
Betätigen Sie im Menü »MSN-1«, »MSN-1 programmieren«»msn-name«.
Melodie w hlen {}
-
- ------- 2
Ruflautst rke w hlen {}
-
MSN-1 - ---- +
-den Softkey
>
-
t
O
Nachdemfür eineRufnummerein Nameeingetragen wurde,werden imMenü dieSoftkey-Bezeichnungen
»msn-1«, »msn-2« oder»msn-3« durch den entsprechenden Namenersetzt. Im Beispiel erscheint
dann statt »msn-1« der zugeordnete Name »LAGER«.
Geben Sie den gewünschten Namen ein.
Im Beispiel:»LAGER«.
Bestätigen Sie die Eingabe mit OK.
Eigene MSN Bezeichnung
MSN-1>LAGER
Bedienung
Wichtige Hinweise
Nicht alle beschriebenen Leistungsmerkmale sind im ISDN-Standardanschluss Ihres Netzbetreibers ent
halten. Erkundigen Sie sich bei Ihrem Netzbetreiber, welche Leistungsmerkmale Ihr Anschluss enthält
oder welche Leistungsmerkmale zusätzlich beauftragt werden müssen.
WirddasTelefonvomISDN-Netzgetrennt(z.B.ISDN-Stecker desTelefonsziehen,AusschaltenoderReset
der TK-Anlage), werden verschiedene Einstellungen und Listen gelöscht.
Z.B.:Temporär gespeicherteTextnachrichten(SMS,UUS1), einangeforderterRückruf beiBesetztoder In
formationen, die aus der TK-Anlage übernommen wurden.
Ein Gespräch einleiten
-
-
Rufnummer wählen - ohne Korrekturmöglichkeit
btg
Hörer abheben Rufnummer wählen Gespräch
12
Page 37

Deutsch
Rufnummer wählen - mit Korrekturmöglichkeit
atbg
Hörer aufgelegt Rufnummer wählen Hörer abheben Gespräch
Um die Rufnummer zu ändern oder eine falsche Eingabezu korrigieren, wählen Sie mit den Pfeil-Tasten
die falsche Ziffer und betätigen Sie die
-Taste, um diese zu löschen.
C
Möchten Siedas Gespräch überden Hörerführen, soheben Sienach derEingabeder Rufnummerden Hö
rer ab.Sie können jederzeitwährend des Gesprächeszwischen Freisprechen,Lauthören und Hörerbetrieb
hin- und herwechseln.
Nachdem Sie eine Rufnummer eingegeben haben, können Sie auch die Lautsprecher-Taste drücken, um
die Rufnummer wählen zu lassen und das Freisprechen zu nutzen.
Isteinezu wählendeRufnummerüberdie Wahlkontrolledes SystemtelefonsgesperrtunddieSperre einge
schaltet, erscheint im Display der Hinweis »Gesperrt: Rufnr.«.
Weitere Möglichkeiten für die Wahl bei aufliegendem Hörer
Die Möglichkeit,bei aufliegendemHörer zu wählenund Rufnumern vor demWählen zu korrigieren oder
zu ergänzen, besteht auch beim Wählen:
• aus demWahlwiederholungs-Speicher.
• aus derAnruferliste.
• aus dem VIP-Speicher.
• aus demZielwahlspeicher.
Wenn Sie eineder genannten Möglichkeiten nutzen, können Sie vor demEinleiten der Wahl
weitere Eingabenvornehmen. Sie könnenfestlegen, welcheRufnummer (MSN) oderob keine
Rufnummer (MSN) zum Angerufenen übermittelt werden soll.
-
-
Aus dem VIP-Speicher wählen
a
Hörer aufgelegt
Aus dem Zielwahlspeicher wählen
a
Hörer aufgelegt Zielwahl-Taste betätigen Hörer abheben Gespräch
Aus dem Telefonbuch der TK-Anlage wählen
a
Hörer aufgelegt
S<>
vip
VIP-Ziel auswählen VIP-Ziel auswählen Hörer abheben
Z
S
tbuch
t
Anfangsbuchsta
ben eingeben
O<>O
-
oder
tb
bg
Eintrag
auswählen
bg
heben
-
Gespräch
Hörer ab
13
Page 38

Deutsch
Ein Gespräch mit fester Rufnummer (MSN) einleiten
Sie können eine interne oder externe Wahl so durchführen, dass von Ihrem Telefon einebestimmte Ruf
nummer (MSN)zum Gesprächspartner übermitteltwird. Diese Rufnummermuss vorabin IhremTelefon
eingetragen sein. Während der Anwahl sehen Sie in der zweiten Zeile des Displays die übermittelte Ruf
nummer(»msn-1«...»msn-3«)oderden Namen,denSiedieserRufnummer (MSN)zugewiesenhaben.
at
Hörer aufgelegt Rufnummer
wählen
Rufnummer für den nächsten Anruf nicht übermitteln
Sie können eine interne oder externe Wahl so durchführen, dass von Ihrem Telefon keine Rufnummer
(MSN) zum Gesprächspartner übermittelt wird. Sie könnendiese Funktion auch gezielt permanent ein
stellen (siehe ausführliche Bedienungsanleitung auf der CD-ROM).
at
Hörer aufgelegt Rufnummer wählen
Anruf annehmen
OFSS
msn msn-1
...
msn-3
OF S
geheim
Hörer abheben Gespräch
bg
Hörer abhe
ben
-
Gespräch
bg
-
-
-
albg
Hörer aufgelegt Hörer abheben Gespräch
Rufnummer nicht übermitteln
Wird ein Anruf signalisiert, können Sie vor Annahme des Gespräches entscheiden, ob Ihre Rufnummer
zumAnrufer übermitteltwird. IstIhr TelefondasZiel einerRufumleitung, könnenSie mitdieser Prozedur
verhindern, dass der Anrufer die Rufnummer des Umleitungsziels (Ihre) sieht.
al
Hörer aufgelegt
Einen Anruf ablehnen / weiterleiten
Ablehnen
al
Hörer aufgelegt
>S
geheim
S
ablehnen
bg
Hörer abheben Gespräch
Weiterleiten (Call Deflection)
al
Hörer aufgelegt
14
S
berg
t
Rufnummer wählen
O
Page 39

Wahlwiederholung
Einfache Wahlwiederholung
Deutsch
a
Hörer aufgelegt Hörer abheben Gespräch
Erweiterte Wahlwiederholung
In der erweiterten Wahlwiederholung werden die letzten 10 Anrufe, Verbindungen (Gespräche) und ge
wählten Rufnummern gespeichert. Sie können diese Einträge durch Betätigen der
Pfeil-Tasten ansehen und anschließend automatisch wählen.
a
Hörer aufgelegt Eintrag wählen Eintrag wählen Hörer abheben Gespräch
Sie sehenzuerst denEintrag, derals letzter Eintraghinzugefügt wurde. ImDisplay zeigtein Buchstabeam
Ende der zweiten Zeile den Status des Eintrages an.
»v« Verbindung(Gespräch)
»A« Anruf
»|« Anrufe,für dieautomatischeWahlwiederholung eingerichtetwurde.
kein Eintrag Sie habeneinen Teilnehmerangerufen, ihnaber nicht erreichtoder sein Telefonwar
WW
besetzt.
W
oder
<> O
bg
-Taste oder der
W
bg
-
Rufnummer aus der erweiterten Wahlwiederholung löschen
a
Hörer aufgelegt Eintrag wählen Eintrag wählen
Automatische Wahlwiederholung
HabenSie einenTeilnehmer angewählt,der besetzt istoder denAnruf nichtannimmt, könnenSie eineau
tomatische Wahl einleiten, bei der der gewünschte Teilnehmer nach ca. 10 Sekunden erneut angewählt
wird.
WW
bt g
Hörer abheben Rufnummer
wählen
Im Ruhezustand des Telefons wird eine eingeleitete Autowahl durch den Softkey »autowahl« in der
zweiten Zeile des Displays angezeigt.
Nach ca.10 Sekundenwird dasLauthören des Telefonseingeschaltet und dieautomatische Wahlder Ruf
nummer erfolgt.
Für ca. 2 Minuten wird versucht, den Teilnehmer zu erreichen.
Wird der Teilnehmer nicht erreicht, werden bis zu 20 Anrufversuche durchgeführt.
Teilnehmer ist besetzt
oder meldet sich nicht
oder
<> F S
l sch?
WS
autowahl
Hörer auflegen
a
-
-
Durch Betätigen der Wahlwiederholungs-Taste können Sie die automatische Wahl abbrechen.
15
Page 40

Deutsch
Automatische Wahlwiederholung ausschalten
Siekönneneine eingeleiteteautomatische Wahlwiederholungjederzeit ausschalten.Es werdendann keine
weiteren Anrufversuche durchgeführt.
Umdieautomatische Wahlwiederholungwährendeinerautomatischen Wahlauszuschalten, betätigenSie
die
MöchtenSiedieautomatischeWahlwiederholungimRuhezustand desTelefons ausschalten,gehen Siewie
folgt vor:
E
-Taste.
a
Hörer aufgelegt
Wählen aus der Anruferliste
a
Hörer aufgelegt
Löschen eines Eintrages aus der Anruferliste
a
Hörer aufgelegt
Stummschalten und Lauthören
Stummschalten
S<>
liste
S<>FS
liste
SS
autowahl ja
Eintrag auswählen Hörer abheben Gespräch
Eintrag auswählen
stumm
b
Raumrückfrage
oder
L
g
l sch?
sprech
Gespräch
SS
Lauthören (Freisprechen IP-S290)
g
Gespräch Lauthören beginnen Lauthören beenden Gespräch
Wenn Sie während des Lauthörens den Hörer auflegen, sind Hörergespräch und Lauthören beendet.
Headset (Leichtes Sprechzeug) nutzen
Headset ein- oder ausschalten
Während der Nutzung des Headsets bleibt der Hörer aufgelegt.
a
Hörer aufgelegt Headset einschalten Rufnummer wählen Gespräch über Headset Headset ausschalten
z
LL
tg
g
z
16
Page 41

Lauthören während der Headset-Nutzung ein- oder ausschalten
Deutsch
g
Gespräch über
Headset
Anklopfen, Rückfrage, Makeln und Konferenz
Anklopfen
Wenn Sie für Ihr Telefon Anklopfen erlaubt haben, sind Sie während einer bestehenden Verbindung für
weitere Anrufer erreichbar.
g
Gespräch
Rückfrage
Sie haben dieMöglichkeit, während eines bestehendenGespräches durch Rückfrage eine weitereVerbindung aufzubauen.
L
Lauthören
einschalten
Gespräch über Headset
anklopfendes Gespräch
g
und Lauthören
L
Lauthören aus
schalten
S
nehme
Gespräch über
-
g
Headset
S
Headset aus
schalten
g
Gespräch mit Teilnehmer 2;
Teilnehmer 1 wird gehalten
-
g
Gespräch mit Teilnehmer 1 Teilnehmer 1 wird gehalten Rufnummer wählen Gespräch mit Teilnehmer 2
Durch Betätigender
bindung zurück.
Makeln
HabenSie anIhremTelefondurchRückfrageoderMakelnzweiVerbindungen aktiv,sokönnenSiemitdie
sen Teilnehmern abwechselnd sprechen (Makeln).
g
Gespräch mit Teilneh
mer 2
SofernSiefür dieseTeilnehmerLinien-Tasten eingerichtethaben,ist dasMakeln zwischendiesen Teilneh
mern auch über diese Tasten möglich.
Zum Beenden der aktiven Verbindung betätigen Sie die
Verbindung zurück.
Konferenz
-Taste wirddie aktiveVerbindung beendetund Sie kehrenzur gehaltenenVer-
T
>S
-
R
verb1
g
Gespräch mit
Teilnehmer 1
verb2
T
tg
S
-Taste. Sie kehren dann zu der gehaltenen
g
Gespräch mit
Teilnehmer 2
S
verb1
...
usw.
...
usw.
-
-
HabenSie anIhremTelefoneine gehalteneundeineaktive Verbindung,könnenSieeineKonferenz mitdie
sen beiden Teilnehmern einleiten. Alle 3 Teilnehmer können miteinander sprechen.
-
17
Page 42

Deutsch
g
Gespräch mit Teilnehmer 1,
Teilnehmer 2 wird gehalten
Um die Konferenzschaltungzu beenden, betätigenSie den Softkey unter »zur ck«.Sie sind dannwie
der mit dem Teilnehmer der letzten aktiven Verbindung verbunden. Der andere Teilnehmer wird jetzt
wieder gehalten.
Gesprächsübergabe (Vermitteln)
Bei der Vermittlung eines Gespräches werden der aktive Teilnehmer und der Teilnehmerder gehaltenen
Verbindung miteinander verbunden.
Siekönnen zunächstselbsteineRückfragedurchführen (z.B.umdasGesprächanzukündigen)oder dasGe
spräch ohne Ankündigung direkt übergeben.
g
Gespräch mit Teilnehmer 1 Teilnehmer 1 wird gehalten Rufnummer wählen
Keypad
Die Funktion Keypad ermöglicht Ihnen die Steuerung von Dienst- oder Leistungsmerkmalen in der
TK-Anlage oder im Netz des Netzbetreibers durch die Eingabe von Zeichen- und Ziffernfolgen über die
Tastatur.
R
S
konf
Konferenz mit Teilnehmer 1 und
t
d
Teilnehmer 2
S
berg
-
-
g
Gespräch
Tonwahl (MFV-Wahl)
Mit derMFV-Wahl können Siewährend einerbestehenden Verbindung(Gespräch) Mehrfrequenzsignale
(MFV)senden,umz.B.einenAnrufbeantworterabzufragen.WirdaufeineamTelefonbestehendeVerbin
dung angeklopft, können Sie die MFV-Nachwahl nicht nutzen.
g
Gespräch
RESET - Grundeinstellungen wiederherstellen
Über dienachfolgend beschriebeneProzedur können Siedie Grundeinstellungendes Telefons wiederher
stellen. Alle von Ihnen eingegebenen Daten werden dabei gelöscht.
S
keypad
S
mfv
Zeichen- und Ziffernfolgen eingeben
Zeichen- und Ziffernfolgen eingeben
t
t
-
-
a
Hörer aufgelegt
FS>SS
18
konfig service daten
Page 43

Deutsch
S Betätigen Sie den Softkey unter »ja«, um die
Grundeinstellungen wiederherzustellen.
MöchtenSie dieDaten nichtlöschen, Betätigen
Sie den Softkey unter »nein«.
DasTelefonist wiederin derGrundeinstellung.
Alle Daten sind gelöscht.
Wirklich ALLES l schen?
nein benutzer ja
01.11.05 08:30 }
tbuch vip
Konformitätserklärung und CE-Zeichen
Dieses Gerät erfüllt die Anforderungen der R&TTE-Richtlinie 1999/5/EG:
»Richtlinie 1999/5/EG des Europäischen Parlaments und des Rates vom 9. März
1999überFunkanlagenundTelekommunikationsendeinrichtungenund diegegen
seitige Anerkennung ihrer Konformität«.
-
DieKonformitätserklärungkann unterfolgenderInternet-Adresse eingesehenwerden: http://www.funkwerk-ec.com.
Das aufdem Gerätbefindliche Symbolmit demdurchgekreuzten Müllcontainerbedeutet, dass das Gerät am Ende der Nutzungsdauer bei den hierfür vorgesehenen
Entsorgungsstellen getrennt vom normalen Hausmüll zu entsorgen ist.
© 2005 Funkwerk Enterprise Communications GmbH - Alle Rechte vorbehalten.
Ein Nachdruckdieser Dokumentation -auch auszugsweise -ist nur zulässigmit Zustimmung desHeraus
gebers und genauer Nennung der Quellenangabe, unabhängig von der Art und Weise oder den Medien
(mechanisch oder elektronisch), mit denen dies erfolgt.
Funktionsbeschreibungendieser Dokumentation,die sichauf Softwareprodukteanderer Herstellerbezie
hen, basierenauf der zurZeit der Erstellungoder Drucklegung verwendetenSoftware. Die indieser Doku
mentation verwendeten Produkt- oder Firmennamen sind unter Umständen über die Eigentümer
geschützte Warenzeichen.
-
-
-
19
Page 44

Reparaturservice
Tonfunk GmbH
Reparaturservice
Unternehmenspark 2 / Halle D
Woltorfer Str. 77
31224 Peine
Funkwerk Enterprise Communications GmbH
Südwestpark 94
D-90449 Nürnberg
http://www.funkwerk-ec.com
20
Änderungen vorbehalten
090506
Page 45

Notice d'utilisation
elmeg CS290 / CS290-U / IP-S290
Français
1
Page 46

Français
Présentation du téléphone
1 Touche defonction: Cette touchevous permet d'accéderau menude programmation. Sivous
voustrouvezdéjàdanslemenude programmation,et sivousactionnezlatouche,vouspouvez
accéderaux fonctionsspécifiquesdece menuouvous revenezàl'étapeantérieure.
2 Touchesortie deprogrammation: L'appuisur cettetouchefaitrevenirletéléphoneenposition
derepos pendantlaprogrammation.
3 3touches programmables
Lors de la configuration du téléphone avec le PC, vous pouvez déterminer, que les noms des
fonctionsdes touchesprogrammablessont écritsenmajusculesou enminuscules.
4 Ecran: Aprèsle raccordementà l’alimentation encourant (IPS 290)ou àla ligneRNIS ou UP0
(CS290,CS290-U)internede l’autocommutateur,ladateetl’heure apparaissentsurlaligne du
haut del’afficheur.La dateet l'heure sontprélevées automatiquementde l'autocommutateur.
Le texteaffiché pour unefonction sur laligne 2 setrouve toujours au-dessusde la touchepro
grammable correspondante.Actionnez latouche programmablepour atteindrele second ni
veaudestouches.
Un»««ou»»«vousindique,que l'écrann'apaspu affichertouslescaractères.
5 Touchedevalidation:L'appuisurcettetouchepermetdemémoriserunréglagedansletélépho
ne.Vous entendezalorsune tonalitédevalidation.
6 ToucheC:Cettetouchevouspermetderevenird'uneétapeenarrièredanslemenu.Sivousvous
trouvezen modedesaisie,vous pouvezeffacercertainssignesavec cettetouche.
-
-
-
7 Diodelumineuse d'appel:Clignoterapidement, lorsqu'unappelarrive.
8 Haut-parleur
9 Touched’écoute amplifiée (IP-S290mains-libres)
10 Touchede coupuredela communication
2
Page 47

11 Touchede doublecommunication
12 Touchede répétitiondela numérotation
Français
13
14 Toucheastérisque /touchedièse
15 Touchesde numérotation/Touches denumérotationdirecte
16 5touches defonctionprogrammablesavec diodelumineuse:
17 Etiquettede repéragedestouchesprogrammables
Touches decurseur: Les flèches»{«et»}« dans le coindroit de laligne supérieurede l'écran
vous indiquentque vous pouvezappeler d'autres fonctionsdans la secondeligne avec lestou
chesde curseur.
Chaque toucheest dotéed'une diodelumineuse. Cettediode lumineusepermetd'afficher cer
tainesfonctions.
Les diodesélectroluminescentes desdeux touches dubas sont bicolores(seulement CS290 et
CS290-U).
Description et installation
elmeg CS290
Ce téléphonede systèmeest conçupour être raccordéà la connexionS0 (câbleà 4brins) d'un autocommutateur elmeg.
-
-
elmeg CS290-U
Ce téléphone desystème est conçu pour êtreraccordé à la connexionUp0 (câble à 2brins) d'un autocommutateur elmeg. Le téléphone est équipé d'une sortie RNIS, à laquelle il est possible de relier des postes
RNIS additionnels.
elmeg IP-S290
Ce téléphone système est raccordé à la connexion LAN correspondante (ou »Réseau«) de
l’autocommutateuravec uncâble cat.5. Letéléphone systèmedispose d’unesortie PCàlaquelleil estpossi
ble de raccorder d’autres terminaux IP.
Réglage / Configuration du téléphone de système
Le téléphone de système permet uniquement une configuration limitée des fonctionnalités offertes. Une
configuration complète du téléphone système est seulement possible par l’intermédiaire des raccorde
ments correspondants de l’autocommutateur elmeg.
Remarques de sécurité
•
Veuillez tenir comptedes températures deservice et de stockageà ne pas dépasser,indiquées dans
les spécifications techniques. Veuillez laisser l’appareil atteindre la température ambiante
d’exploitationavant dele connecter.
•
Veuillez noter les éventuels effets de condensation lorsque la température ambiante augmente.
N’enlevez l’appareil de son emballage, que lorsque la température ambiante d’exploitation est at
teinte.
-
-
-
3
Page 48

Français
Vousne devriezni raccorderou débrancheraucun câblependant unorage nitéléphoner.
•
Raccordez lescâbles auxbornes prévuesà ceteffet.
•
Veillezà ceque lescordons debranchementssoit posésde manièresûre.
•
Evitezles situationssuivantes:
•
Ensoleillementdirect
Sources dechaleur (p.ex.radiateurs)
Appareilsélectroniques (p.ex.appareils HiFi,appareilsde bureautiqueou micro-ondes)
Pénétrationde liquides,humidité
Fluidesou vapeursaggressive
Emplacementsavec beaucoupde poussière
N’utilisezpas l’appareildans despièceshumides oudans deslieux àrisques d’explosion.
•
Veuillez seulement ouvrir les parties de l’appareil qui sont indiquées dans le manuel de monta
•
ge/d’installation.
Veuillez ne pas toucher les contacts de branchement avec des objets pointus, métalliques ou
•
humides.
Sivousnevoulez pasfixer l’appareil,veuillez placerl’appareil ouses accessoiressur unsupport anti
•
dérapant.
Nettoyez votreappareil avec unchiffonlégèrementhumide.
•
Utilisezuniquementles accessoireshomologués.
•
SeulslesterminauxquifournissentunetensionSELV (circuitde faibletensionde sécurité)et/ouqui
•
satisfont à la norme“ETS 300047" peuvent être raccordés àl’appareil. Une utilisation conformede
terminauxhomologuéspermet deremplir cettecondition.
-
-
Boîte d’alimentation à fiche
• Veuillezseulementutiliser lebloc d’alimentationlivréavecletéléphoneoubienleblocdisponibleen
accessoire(DSA-0101F-05 UPou L15D52 ABDDLAWO).
• Veuillezne pasutiliser debloc d’alimentationvisiblementdéfectueux(par ex.boîtier cassé).
Etendu de la livraison
Téléphone système, combiné avec cordon de raccordement, cordon de raccordement, 2 pieds, notice
d’utilisation, étiquetted’inscription pour touchesprogrammables. Cordon adaptateur(CS290-U) pour kit
mains libres avec cordon de raccordement 4 pôles (fiche 8 pôles / cordon 4 pôles).
Entretien et maintenance
Letéléphonea étéfabriquépourdesconditionsnormalesd'utilisation.Lorsquecelaest nécessaire,nettoyez
votre téléphoneRNIS avec unchiffon légèrement humideou utilisez un chiffonantistatique. N’utilisez ja
mais solvant! N’employez jamais un chiffon sec; la charge électrostatique pourrait entraîner des défauts
dans l’électronique de l’appareil. Veillez dans tous les cas à ce qu’aucune humidité ne pénètre et donc
n’endommage votre téléphone.
Mise en place du téléphone
Avantd'installer letéléphone, veuillezmonter lespieds arrièredu téléphoneaux endroits(6)montrés dans
lafigure 4.Selon lahauteur demontagedespieds, ilvous estpossible d'inclinerl'écrandu téléphone.Prêtez
attention à ce que les pieds soient nivellés.
Afin d'ajusterla hauteur, retirerles pieds dufond du téléphone.Tourner lespieds autourde leuraxe longi
tudinalpar env.60° etles enficheràleurs placesdans lebâti. Ilestpossible derégler troishauteurs différen
tes par chaque fois une rotation par 60° de l'axe longitudinal.
-
-
-
Nous attirons votre attention sur le fait que les pieds en plastiques de votre téléphone peuvent laisser des
traces sur des surfaces sensiblescomme les meublespar exemple. Le fabricant dutéléphone décline toute
responsabilté pour de tels dommages. Nous vous invitons par conséquent à utiliser un support antidér
apant adéquat pour votre téléphone.
4
-
Page 49

Français
Installation du téléhone
Raccordement du cordon du combiné
Branchez lecordon du combiné(1) commel'indique lafigure 2. Placezle câbledans lecanal (2)prévu à cet
effet et fixez-le sous les deux ergots de maintien (3).
elmeg CS290 à la connexion RNIS
Branchez le cordonRNIS (1) àla prise S0 comme
l'indique la figure2. Veuillez tenircompte du fait
que le connecteur RNIS le plus long est inséré
dans la prise femelle RNIS et le connecteur RNIS
le plus court dans la prise femelle RNIS du télé
phone. Ensuite,placez lecordon RNISdans leca
nal (2)prévu àcet effet,puis fixez-lesous lesdeux
ergots de maintien (3).
Figure 2
elmeg CS 290-U raccordé à la connexion UP0
-
-
Branchez lecordon RNIS (1)à la prise UP0 comme l'indique la figure1. Veuillez tenir compte du
fait quele connecteurRNIS le pluslong est inséré
dans la prise femelle RNIS et le connecteur RNIS
le plus court dans la prise femelle RNIS du téléphone. Ensuite,placez lecordon RNISdans lecanal (2)prévu àcet effet,puis fixez-lesous lesdeux
ergots de maintien(3). La figure 1montre le téléphone RNSI branché en étoile sur la connexion
S0-de l'elmeg 290-U.
Figure 1
Les téléphones CS0-U ne peuvent pas être raccordés par la prise S0 à une borne connexion
RNIS.
Remarques importantes pour la connexion UP0
•
La borneS0 du téléphonevous permet deraccorder jusqu'à huitposte RNISavec interfaceS0. Lors
quelespostessontalimentésparletéléphonedesystèmeelmegCS290-U, vouspouvezenraccorder
deux.
•
La connexionRNIS pourlesterminaux commutésen avalsur letéléphone systèmedoit être réalisée
enétoile (Utiliserun répartiteurRNIS).
•
Lalongueurdes lignesentrel’elmegCS 290-Uet lesterminauxRNIS commutésenavaldoits’éleverà
max.100 mètres.
•
Lesrésistances determinaison nedoivent pasêtre commutées.
-
5
Page 50

Français
elmeg IP-S290 à la connexion Ethernet
1
2
3
4
5
6
7
8
Connexion du bloc
-
d'alimentation à fi
che
bloc d'alimentation
-
à fiche
Connexion Ether
-
net PC
PC ou autre télépho
-
ne IP
Connexion Ether
-
net de l'autocom
mutateur
Autocommutateur
-
elmeg
Connexion Au
-
dio-in (micropho
ne)
Connexion Au-
-
dio-out (combiné)
-
-
-
-
-
-
-
Figure 3
Letéléphonedispose d'uneentrée (7)et d'unesortie(8)pourlessignauxaudio.Ces branchementssontprévuspour raccorderun kitmainslibres. Lesfiches sontreliées auxbranchements correspondantsde lafiche
pour le kit mains libres sous le téléphone.
Raccordement et mise en service du téléphone de système à l'autocommutateur (fonction de base
avec DHCP)
Veuillezvérifier dansles instructionsdemontage del’autocommutateur lesbranchementsqui sontprévus
pour laconnexion del’IP-S290.Reliez laconnexion àla connexionEthernet del’autocommutateur du télé
phone système.
•
Configurezl’autocommutateur pourutiliser destéléphonessystème IP.
•
Définissezle TNMdes téléphonessystème IPdansl’autocommutateur.
•
Branchez l’alimentation en courant(bloc d'alimentation à fiche) surle téléphone système IPet pa
tienterjusqu'à ceque letéléphone soitinitialisé.
Une fois que le téléphone IP est initialisé, on vous demande de sélectionner votre langue sur l’écran.
9
Audio in / Audio out
Casque avec deux
-
connecteurs stéréo
de 5 mm.
-
-
•
Sélectionnezla languepour l’écran.
Actionnez les touches de curseur pour consul
ter leslangues disponibles etvalidez en appuy
ant sur la touche
O
6
-
-
.
Welche Sprache? }
deutsch english polski
Page 51

Entrezun TNMenregistré dansl'autocommutateur (danscet exemple:12) .
•
Français
Validez l'entrée en appuyant sur la touche
.
O
Commutez sur Utiliser DHCP.
Sélectionnez »mar.« . utiliser DHCP
Letéléphone etl'autocommutateur sontsynchronisés.
•
S’iln’ya pasde connexionà l’autocommutateur(pas deconnexion LAN oubien sile téléphone
n’est pas activé), l’heure affichée sur l’écran est remplacée par le symbole
» -----/ /---‰«.
VouspouvezmaintenantutiliserletéléphonesystèmeIPcommeuntéléphonesystèmesur laligneRNISou
UP0.
Raccordement d'un casque (non inclus dans l'étendu de la livraison)
Conseillé : Casque de la société Plantronics avec cordon U10PS ou GN Netcom.
Branchezle casquecommel’indiquelafigure 4.Ensuite,placezlecordon (3)du casquedanslecanal (4)prévu à cet effet, puis fixez-le sous les deux ergots de maintien (5).
Vous pouvez maintenant téléphoner avec le combiné ou avec le casque.
Programmer n d'appel
TMN-1>12
arrêt mar.
Casque »Firefly F142 N« de la société Plantronics (pas pour IP-S290)
La commutationde la diodelumineuse intégréedans le bras micros'effectue parl'intermédiaire de latouche de casque du téléphone.
Figure 4
Affectation des contacts du casque
Connexion casque CS 290, IP-S290
1 - Microphone +
2 - Ecouteur (terre)
3 - Ecouteur
4 - Microphone (terre)
7
Page 52

Français
Connexion casque CS 290-U
1 - Récepteur DSHG
2 - Terre (Ground)
3 - Microphone +
4 - Ecouteur (terre)
5 - Ecouteur (3,3 V commutable par résistance)
6 - Microphone (terre)
7 - V+ (3,3V)
8 - Emetteur DSHG
Remplacement de l'étiquette
Les étiquettes d’inscription pour les touches de fonction se trouvent à la dernière page de cette notice
d’utilisation. Enlevez l'étiquette dont vous avez besoin.
Pourchangerd'étiquette, comprimezlecachesoupleentrelepouce etl'index etsoulevez-le.L'étiquettepeut
alors être remplacée.
Vous pouvez faire vous-même vos entrées dans le champs d'entrée de données à l'aide de votre PC. Vous
trouverez sur le CD-ROM des autocommutateurs un fichier Adobe Acrobat avec des modèles.
Pictogrammes
Pourvous montrerdans cemoded'emploicertaines procéduresà respecterlorsduparamétrageet delamanipulation dutéléphone,les pictogrammes(symboles) décritsdansce quisuitont
entreautres étéutilisés.
b Décrocherle combiné,lancerla numérotationpréparatoire.
a Raccrochezlecombiné.
Letéléphone setrouveau repos
l Letéléphone sonne.
Vousentendez latonalitéréglée.
g Vousconversez.
d Uneconférence aétéinitiée.
q Vousentendez latonalitépositiveou négativedevalidation.
t Sélectionnernuméro d'appel,coded'accès,caractèreou texte.
0...9
,#
*
Actionnezunetoucheparticulière duclavierdenumérotation.
8
Page 53

Français
Configuration étendue du téléphone de système
En général, le téléphone permet uniquement une configuration limitée des fonctionnalités offertes. Une
configuration complète est seulement possible avec un autocommutateur elmeg.
Activation du mode de configuration étendue
Entrez le code numérique »**46782551##« (format vanité »**INSTALL1##«).
Configurierung étendue
Programmer ou modifier un numéro d'appel TNM.
Sous
méros d'appel du téléphone.
Raccordement à un autocommutateur
Procédez de la manière suivante:
•
• Accèsautomatique auréseau (toucheprogrammable
• Code d'accèsau réseau(touche programmable
Réglages dans le menu Utilisations
Procédez de la manière suivante:
Connexion / utilisation d'un casque (touche programmable »casque«)
Configuration d'un casque; Pour utiliser un kit mains libres, vous avez besoin d’une touche de fonction
»casque«
-»config«-»tnm«-»tnm-1...3«-»ntl«>«vous pouvezsaisier oumodifierles nu
F
- »config« -
F
Longueurdes numéros(touche programmable
Longueur maximale des numéros internes attribués à d’autres correspondants de
l’autocommutateur;
En casd’accès auréseau automatique, iln’est plusnécessaire decomposer le coded’accès auréseau
pourles appelsvers l’extérieur.
Code d'accès au réseaude l'autocommutateur; Le code d'accèsau réseau est prérégléautomatiquement pour lesappels externesdu numérodetéléphone del'appelant.
F
« et en option d’une touche de fonction »prise auto«.
>
- »r gl.« -
»long. num«)
»r seau«)
»l. ext«)
>
>
- »utilis.«
-
•
Réglagede basependant uneconnexion encours
Sélectionner si »dtmf«ou»clav.« est possible dans les paramètres de base pendant une
communication;
Programmation des touches de fonction
Procédez de la manière suivante:
•
Touchesde numérotationdirecte (toucheprogrammable »liste«ou»nouv.«)
Programmerun numérode téléphonesur unetouche defonction.
•
Touchesde fonction(touche programmable»
•
Sélectionner la touche de fonction à laquelle vous souhaitez attribuer une nouvelle fonction .
Validezvotre choixen appuyantsur latouche
F
-»r gl.«-
fonction«)
Nouv. progr.fonction{}
1_:-
(dansl'exemple unetouche deconnexion).
O
1_ / connexion
num ro>
>
»«
9
Page 54

Français
Entrezle numérointerne souhaité»
•
Les réglageset attributionspossibles sontdécrits avecprécision dansla noticed’utilisation sur
le CD-ROM.
Désactivation du mode de configuration étendue
Entrez le code numérique »**46782550##« (format vanité »**INSTALL0##«
Si le téléphoneest coupé du réseau RNIS(par ex. enenlevant la ficheRNIS du téléphone,en déconnectant
ouen réinitialisantl'autocommutateur)lemodede configurationétendueestautomatiquementdésactivé.
Réglage de la langue d'affichage
Vous pouvez choisir sur votre téléphone dans quelle langue doivent apparaître les affichages à l'écran.
Procédez de la manière suivante:
a
français Actionnez les touches de curseur pour consul-
ter les langues disponibles.
FSSS
Num ro«etvalidez enappuyant surla touche
config affich langue
Quelle langue? }
deutsch english polski
O
.
Exemple:
english Actionnez les touches de curseur pour consul-
ter les langues disponibles.
Which language? }
deutsch english polski
S Appuyez sur la touche programmable appro-
priée. La commutationde la langue d'affichage
s'effectue immédiatement.
Saisie de lettres et de chiffres
En actionnantplusieurs foisune touche,les caractères (deslettres oudes chiffres)seront affichésdans leur
ordre d'apparition sur l'écran.
L'affectation des touches pour la saisie de lettres et de chiffres est la suivante:
Taste
1
2
Action
née 1 fois
1
ABC2 ÄÅÆ
-
Action
née 2 fois
-
Action
née 3 fois
-
Action
née 4 fois
-
Action
née 5 fois
-
Action
née 6 fois
-
Action
née 7 fois
-
3
4
5
6
DEF 3 €
GHI 4
JKL5
Mn O6 ÖØ
10
Page 55

Français
7
8
9
*
#
Toutes les lettres entrées sont affichées en majuscules.
Exemple: »FUNKWERK«.
La touche »
Par exemple: »!«, »&«, »?«, »+«, »-«, »=«, »(«, »)«, »@«, »$«, …
Après avoirappuyé unepremière fois surla touche
condefois surcette touche,plusieurs caractèresspéciaux apparaissentsur l'écran.Pour sélectionnerun ca
ractère spécial,appuyez surles touchesattribuées
res spéciaux, appuyez sur la touche
PQRS7ß$
TUV8Ü
WX Y Z 9 ¥
*
#
« est programmée avec plusieurs caractères spéciaux.
0
un espaceest ajouté. Aprèsavoir appuyéune se
0
. Sivous souhaitezvoir d'autrescaractè
0
1…9
.
-
-
-
Informations supplémentaires sur l'écran
Lorsque le téléphoneest au repos, des informationssupplémentaires surdes fonctions /caractéristiques programmées
apparaissent sur la ligne supérieure de l'afficheur.
»S« Lecontrôle decompositiondutéléphonea étéactivélors delaconfigurationaveclePC.Desnu-
mérosde téléphoneoudes numérospartielssontautorisés ouverrouillés.
»U« Renvoid'appel (Transfertd'appel)installé.
>
S
Numéros d'appel (TNM)
Lorsdela configurationparle PC,vous pouvezsaisir 3numéros(mulitnuméros),queletéléphonepeut uti
liser sur la connexion RNIS interne de l'autocommutateur. Veuillez observer les instructions de la notice
d'utilisation de votre autocommutateur.
En entrant un des multinuméros dans votre téléphone, vous déterminez le numéro d'appel de votre télé
phone. Si vous entrez plusieurs multinuméros dans votre téléphone, ce dernier sonnera pour chacun
d'entre eux.
Afin d'obtenirdes informationssupplémentai
ressur lesfonctions programmées,actionnezla
touche flèche versla droite et ensuitela touche
programmable »info«.
01.11.05 08:30 S U }
r per n abr.
-
01.11.05 08:30 S U {
mail taxe info
-
-
Entrer ou modifier un numéro TNM
L'introduction ou lamodificiation d'un numérone sontpossibles que parune configuration dutéléphone
ou par la »Configuration étendue« du téléphone.
11
Page 56

Français
Afficher le numéro d'appel (TNM)
Procédez de la manière suivante:
»n tl«.
Réglage de la mélodie et du volume sonore
Vous pouvezattribuer à chaquemultinuméro ,une mélodieparticulière et unvolume sonore. Pour lesap
pels internes, vous pouvez régler une autre mélodie et un autre volume.
Dans leréglage debase du téléphone,dix mélodies différentes sontmémorisées. Ces mélodies
sont inchangeables.
Régler la mélodie
Dans le menu »tnm-1«, »TNM-1 programmer« appuyez sur la touche »tona«et ensuite sur la
touche »interne« ou »externe«.
O En actionnant les touches de curseur, vous
pouvez changer cette tonalité. Validez l'entrée
en appuyant sur la touche OK.
Réglage du volume de la mélodie
-»config«-»tnm«-»tnm-1« (ou »tnm-2«, »tnm-3«)
F
Choisir m lodie
- ---------- 2
-
Dans lemenu »TNM-1«,»TNM-1 programmer«appuyez surla touche»volume« etensuite sur
la touche »interne« ou »externe«.
O Actionnez lestouches de curseur pourrégler le
volume.Validezl'entréeenappuyantsurla touche OK.
Attribuer un nom à un numéro TNM
Vouspouvez attribuerun nomde 5caractères max.à chacundesmultinuméros.\line L'affectationdes tou
ches pour la saisie de lettres et de chiffres est comme décrite à la page 10.
Dans le menu »TNM-1«, »TNM-1 programmer«»nom_tnm«.
O
Une fois qu'il a été entré un nom pour un multinuméro, les désignations de touches programmables
»tnm-1«,»tnm-2«ou»tnm-3« sont remplacéesdans lemenu parle nomcorrespondant. Ainsi,à la
place de »TNM-1« apparaîtra par exemple »MAGASIN«.
Entrez le nom souhaité.\line Dans cet exem
ple:»MAGASIN«.Validez l'entrée en appuy
ant sur la touche OK.
S lect. volume appel
TNM-1 - ---+
-appuyez sur la touche programmable
>
-
D finition_TNM_du_poste
TNM->1MAGASIN
-
-
12
Page 57

Français
Utilisation
Remarques importantes
Toutes les servicesdécrits ne sontpas réalisés dans laconnexion RNIS standard.Veuillez vous renseigner
auprès devotre opérateur poursavoir quelles sontles caractéristiques deperformance qui doiventêtre de
mandée séparément pour votre connexion RNIS.
Siletéléphone estcoupé duréseauRNIS(parex.enlèvementdelaficheRNIS dutéléphone, déconnexionou
réinitialisation de l'autocommutateur), certains réglages et liste seront effacés.
Par exemple: Messages textuels (SMS, UUS1) mémorisés temporairement, un rappel sur occupation de
mandé ou des informations reprises dans l'autocommutateur.
Lancer une conversation
Composition du numéro d'appel - sans possibilité de correction
btg
Décrochez le combiné Composez le numéro d'appel Vous conversez
-
-
Composition du numéro d'appel - avec possibilité de correction
atbg
Écout. raccroché Composez le numéro d'appel Décrochez le combiné Vous conversez
Pour modifierles numérosd'appel ouune entréeerronée, sélectionnezavec les touchesde curseurles chiffres erronés et actionnez la touche
Sivous voulezpoursuivre votreentretien parl’écouteur,veuillez décrocherl’écouteur aprèsla saisiedunuméro de téléphone. Vous pouvez passer à tout momentpendant l’entretien entre le mode mains libres, le
mode écoute amplifiée et le mode écouteur.
Unefois quevous avezsaisi lenumérode téléphone,vous pouvezégalement presserla touchehaut-parleur
pour laisser composer le numéro et utiliser la fonction mains-libres.
Unefois quevous avezsaisi lenumérode téléphone,vous pouvezégalement presserla touchehaut-parleur
pour laisser composer le numéro. Lorsque la personne appelée prend l'appel, décrochez et conversez.
Lorsque lenuméro quevous avezcomposé, estverrouillé parle contrôlede compositionactif dutéléphone
de système, l'écran affiche »verroui: n d'appel«.
Autres possibilités pour la composition avec l'écouteur raccroché
Il existeégalement lapossibilitéde composerdes numérosquand l'écouteurest raccrochéetde corrigerou
de compléter des numéros de téléphone avant de composer le numéro:
pour les supprimer.
C
•
àpartir dela mémoirede répétitiond'appel.
•
àpartir dela listedesappelants.
•
àpartir dela mémoirede numérotationd'accès rapide.
•
àpartir dela mémoiredes numérosd'appel directs.
Lorsque vousavez recoursàune deces possibilités,vous pouvezréaliser d'autresentrées avant
decomposer lenuméro. Vouspouvez spécifier,quel multinuméro sera transmisà votrecorre
spondant ou verrouiller complètement la transmission d'un numéro.
-
13
Page 58

Français
Numéroter à partir de la mémoire de numérotation d'accès rapide
a
Écout. raccroché
Numérotation à partir de la mémoire des numéros d'appel directs.
a
Écout. raccroché Appuyez sur la touche d'appel direct Décrochez le combiné Vous conversez
Numéroter à partir de l'annuaire téléphonique de l'autocommutateur
a
Écout. rac
croché
Lancer une conversation avec un numéro TNM fixe
Vous pouvezcomposer unnuméro interneet extérieurde tellemanière quevotre téléphonetransmette un
certain multinuméroau correspondant.Ce numérod'appel (multinuméro)doit avoirété enregistréauparavant dans votre téléphone. Pendant la composition du numéro, vous voyez sur la ligne inférieure de
l'écranlemultinuméro transmis(»tnm-1«...»tnm-3«)oulenomquevous avezaffectéàcemultinuméro.
-
S<>
vip
Sélectionnez le numéro
d'accès rapide
Z
S
r per
t
Introduisez la pre
mière lettre
O<> O
l'entrée souhaitée
ou
Sélectionnez
tb
Sélectionnez le numéro
d'accès rapide
Décrochez le
combiné
bg
bg
Décrochez
le combiné
Vous con
versez
-
at
Écout. rac-
croché
Supprimer la présentation du numéro d'appel pour le prochain appel
Vous pouvezcomposer un numérointerne et extérieurde telle manièreque votre téléphonene transmette
pas demultinuméro aucorrespondant. Vous pouvezégalement configurercette fonctionpour qu’ellesoit
activée en permanence (voir notice d’utilisation détaillée sur le CD-ROM).
Composez le nu-
méro d'appel
at
Écout. raccroché Composez le numé
Prendre l'appel
OF S S
tnm tnm-1
OF S
-
ro d'appel
secret
...
tnm-3
Décrochez le
bg
Décrochez le
combiné
Vous conver-
sez
bg
Vous conversez
combiné
albg
Écout. raccroché Décrochez le combiné Vous conversez
14
Page 59

Français
Supprimer la présentation du numéro d'appel
Pendant un appel, vous pouvez empêcher quevotre numéro d'appel soit transmis à votre correspondant.
Par exemple,si votretéléphone estl'appareil surlequel aété pratiquéun renvoid'appel, vous pouvez,grâce
àcetteprocédure, empêcherquelapersonnequiappelle puissevoirlenumérode téléphonedel'appareilsur
lequel l'appel a été renvoyé.
al
Écout. raccroché
Refuster/transférer un appel
Refuser
al
Écout. raccroché
Renvoi d'appel (Call Deflection)
al
Écout. raccroché
Répétition de la numérotation
Répétition simple
a
>S
secret
S
transm
W
bg
Décrochez le combiné Vous conversez
S
refus
t
Composez le numéro d'appel
bg
O
Écout. raccroché Décrochez le combiné Vous conversez
Répétition d'appels élargie
Avec la répétition d'appel élargie, cesont les 10 derniers appels, numéros detéléphone composés et com
munications(conversations) quisontmémorisés.Vouspouvezconsulter cesentréesetlescomposerensui
te automatiquement par le biais de la touche
a
Écout. raccroché Sélectionnez l'en
Vous voyez apparaîtrele derniernuméro de téléphoneenregistré. Ala fin dela deuxièmeligne, des lettres
vous indiquent le status de l'entrée.
»v« communication(conversation)
»A« Appel
»|« Tousles appelsd'unpostepour lesquelslarépétionautomatique aétéprogrammée.
pas d'entrée Vous avezappelé uncorrespondant, maisvous ne l'avezpas atteintou son téléphone
WW
-
trée souhaitée
étaitoccupé.
W
ou
ou les touches de curseur.
<> O
Sélectionnez l'en
trée souhaitée
-
bg
Décrochez le
combiné
Vous con
versez
-
-
-
15
Page 60

Français
Effacer des numéros de téléphone issus du système élargi de répétition d'appel
a
Écout. raccroché Sélectionnez l'en
Rappel automatique
Vous avezcomposé le numérode téléphoned'un correspondant, maisla ligneest déjà occupéeou ilne ré
pond pas.Vous pouvezinitier unenumérotation automatique parle biais delaquelle votre correspondant
sera rappelé au bout d'env. 10 secondes.
WW
trée souhaitée
bt g
Décrochez le
combiné
A l'état de veille du téléphone, l'écran vous indique la touche programmable »num_auto«, lorsque le
service de numérotation automatique a été activé.
Au bout d'environ10 secondes le téléphonecommute sur l'écoute amplifiéeet la numérotation automati
que de ce numéro d'appel est lancée.
Pendant environ 2 minutes, le téléphone cherche à joindre l'interlocuteur.
S'il n'est pas joignable, jusqu'à 20 tentatives vont être effectuées.
Composez le nu
méro d'appel
Correspondant est oc
cupé ou ne répond pas
ou
<> F S
-
Sélectionnez l'entrée
souhaitée
WS
-
num_auto
effac.?
a
Raccrochez le
combiné
-
-
Vous pouvez interrompre le rappel automatique en appuyant sur la touche de rappel.
Déconnecter le rappel automatique
Vouspouvez àtout momentmettreun termeaurappelautomatiqueque vousavezinitié.Lerappelautomatique est interrompu immédiatement.
Si vous voulez déconnecterle rappel automatique pendant unerépétition en cours, appuyezsur la touche
.
E
Si vousvoulez déconnecterle rappelautomatique lorsque letéléphone estau repos,veuillez procéderde la
manière suivante:
a
Écout. raccroché
Composition du numéro à partir de la liste d'appels
a
Écout. raccroché
S<>
liste
SS
num_auto oui
ou
Sélectionnez l'en
trée souhaitée
-
b
Décrochez le
combiné
L
g
Vous con
versez
-
Supprimer une entrée dans la liste des appelants
a
Écout. raccroché
S<>F S
liste
16
Sélectionnez
l'entrée souhaitée
effac. ?
Page 61

Commutation sur secret et écoute amplifiée
Réglage en muet
Français
Vous conversez
silen
Interrogation dans la salle
parler
SS
Ecoute amplifiée (Mains-libres IP-S290)
g
Vous conversez Commuter sur écoute amplifiée Terminer l'écoute amplifiée Vous conversez
Le fait de raccrocher le combiné pendant l'écoute amplifiée met un terme à la conversation et à l'écoute
amplifiée.
LL
Utilisation d'un casque
Activation et désactivation du casque
Pendant l'utilisation du casque téléphonique, le combiné reste en place sur le téléphone.
a
Écout. raccroché Activation du
z
casque
tg
Composez le numé-
ro d'appel
Conversation avec
casque
g
z
Désactivation du
casque
Commutation sur écoute amplifiée pendant l'utilisation du casque
g
Conversation
avec casque
Signal d'appel, double communication, va-et-vient et conférence
Signal d'appel
Si pour votre téléphone vous avez permis la fonction Signal d'appel, vous restez joignable, pour les appe
lants, pendant une communication en cours.
g
Vous conversez
Double communication
Vousavez lapossibilité, pendantuneconversation, d'établirune autreliaisonpar lebiais deladouble com
munication.
L
Commuter sur
écoute amplifiée
conversation annoncée par un
Conversation avec cas
que et écoute amplifiée
signal d’appel
g
L
-
Terminer l'écou
te amplifiée
S
pren.
-
Conversation
avec casque
g
S
Désactivation du
casque
g
Conversation avec le correspondant 2;
Le correspondant 1 est maintenu
-
-
17
Page 62

Français
g
Conversation avec le corre
spondant 1
Par actionnement de la touche
communication maintenue.
Va-et-vient
Si, en raison d'unedouble communication oud'un va-et-vient plus d'une liaison est active sur votre télé
phone vous pouvez converser en alternance avec ces différents correspondants (va-et-vient).
g
Conversation avec le
correspondant 2
Si vous avezaménagé des touches delignes intérieures, unva-et-vient entre lesdifférents correspondants
est également possible par le biais de ces touches.
Pour mettre un terme à la communication active, actionnez la touche
dernière conversation maintenue.
Le correspondant 1 est main
-
>S
conn1
R
Composez le numéro
-
tenu
la communication active est terminée et vous retrouvez la dernière
T
g
Conversation
avec le corre
spondant 1
conn2
-
tg
Conversation avec le corre
S
d'appel
g
Conversation
avec le corre
spondant 2
T
. Vous revenez ainsi à la
conn1
-
spondant 2
S
...
etc.
...
etc.
-
-
Conférence
Sivousavezsurvotretéléphoneune communicationmaintenueetunecommunicationactive,vouspouvez
initier une conférence avec ces deux correspondants. Ces trois correspondants peuvent se parler
mutuellement.
g
Conversation avec le correspondant 1,
Le correspondant 2 est maintenu
Pour mettrefin à l'appelde conférence,appuyez sur latouche programmablesous »retour«. Puisvous
êtesdenouveauenliaison aveclecorrespondant aveclequel vousparliez avantle lancementde laconféren
ce à trois. L’autre correspondant est de nouveau maintenu.
S
conf
Conférence avec les correspondants
d
1 et 2
Transfert de l'appel
Lorsdelatransmissiond'uneconversation,cesonttoujourslecorrespondantactifetlecorrespondantdela
dernière communication effectuée qui sont reliés.
Vous pouvez tout d'abord initaliser une double communication (par ex. pour annoncer la conversation),
puis transmettre la conversation.
g
Conversation avec le corre
spondant 1
R
-
Le correspondant 1 est
maintenu
Composez le numéro d'ap
t
pel
S
-
transm
-
Clavier
LafonctionClaviervouspermetlacommandedeservicesoudeprestationsdansl'autocommutateurousur
le réseau de l'opérateur par l'entrée de suites de signes et de chiffres par le clavier.
18
Page 63

Français
g
Vous conversez
Numérotation par fréquences vocales (numérotation dtmf)
Avec lasélection enDTMF, vouspouvez, pendantune communicationenvoyer dessignaux multifréquen
ces, pourinterroger votre répondeurpar ex. Si unsignal d'appelvous parvient pendantune communicati
on, vous ne pouvez par utiliser le système de sélection à multi-fréquences.
g
Vous conversez
Reset - Rétablissement de l'état de base
La procéduredécrite ci-après vouspermet de remettrevotre téléphoneen étatde base.Toutes les données
que vous avez saisies sont effacées.
a
Écout. raccroché
FS>SS
S
clav.
S
dtmf
Entrez les caractères et chiffres
Entrez les caractères et chiffres
config. service data
t
t
-
-
S Appuyez sur la touche programmable sous
»oui«, pour initialiser le téléphone. Si vous
préférezne paseffacerlesdonnées,appuyezsur
la touche programmable sous »non«.
Le téléphoneest ramenéà son étatinitial .Toutes les données ont été effacées.
Vraiment TOUT effacer?
non utilisateur oui
01.11.05 08:30 }
tbuch vip
19
Page 64

Français
Déclaration de conformité et marque CE
Ce dispositif répond aux exigences de la directive R&TTE 1999/5/EG:
»Directive 1999/5/CE du Parlement Européen et du Conseil Européen du 9mars
1999 surles équipementshertziens etdes équipementsterminaux detélécommuni
cations et la reconnaissance mutuelle de sa conformité«.
La déclaration de conformité peut être demandée à l'adresse Internet suivante:
HTTP://www.funkwerk-ec.com.
-
Lesymbole setrouvant surl'appareil etquireprésente unconteneur àordures signi
fie que l'appareil, une foisque sa durée d'utilisation a expiré,doit être éliminé dans
des poubellesspéciales prévuesà cet effet,de manièreséparée desordures ménagè
res courantes.
© 2005 Funkwerk Enterprise Communications GmbH - Tous les droits réservés.
L'impression decette documentation, mêmesous forme d'extraits, n'est permisequ'avec l'autorisation du
constructeuretencitantexactementla source,indépendamment delamanièreoudesmédias(mécaniques
ou électroniques) de la diffusion.
Lesdescriptionsfonctionnellesdecettedocumentationconcernantlesproduitslogicielsd'autresconstructeurs sont basées surle logiciel utiliséau moment de lafabrication ou de lamise sous presse. Les nomsde
produits ou de sociétés utilisés dans cette documentation sont dans certaines circonstances des marques
commerciales protégées par les propriétaires.
-
-
20
Page 65

Français
21
Page 66

Service de réparation
Tonfunk GmbH
Service de réparation
Unternehmenspark 2 / Halle d
Woltorfer Str. 77
31224 Peine
Funkwerk Enterprise Communications GmbH
Südwestpark 94
D-90449 Nürnberg
HTTP://www.funkwerk-ec.com
22
Sous réserve de modifications
090506
Page 67

Istruzioni per l'uso
elmeg CS290 / CS290-U / IP-S290
Italiano
1
Page 68

Italiano
Interfaccia utente del telefono
1 Tasto funzione: con questo tasto viene aperto il menu di programmazione. Se ci si trova
all’internodi unmenuesipremequesto tastosiaccedeallerelative funzionioppuresi tornaindietronella programmazione.
2 tasto ESC: premendo il tasto ESC durante la programmazione, il telefono torna ad essere
inattivo.
3 3softkey
NellaconfigurazionedaPCdeltelefonopuòessereimpostatoselefunzionideisoftkeyverranno
visualizzatesolo conletteremaiuscoleo minuscole.
4 Display: Dopoil collegamentocon l'alimentazioneelettrica (IPS290) opputecon l'interfaccia
internaISDN oUP0 (CS290, CS290-U)delcentralino,in altonella primariga deldisplay sono
visualizzate ladata el'ora.La datael'ora vengonorilevate automaticamentedal centralino.La
denominazionediunafunzionenella secondarigasitrovasempresopra ilcorrispondentesoft
key.Premere ilsoftkeyinquestione pervisualizzareillivello successivo.
Dal momentocheil displaynon puòvisualizzare tutteleinformazioniin unavolta, suldisplay
vienevisualizzato »««oppure»»«.
5 Tasto OK:Premendo questotasto iltelefono memorizzaun’impostazione. Diseguito siriceve
untono diconferma.
6 Tasto C: Questo tasto permettedi retrocedere di un passo allavolta all'interno del menu. Nel
modooperativo diinserimentodatiquesto tastopermettedicancellaresingolicaratteri.
-
7 Diododi chiamata:Incasodichiamata entranteilLED lampeggiavelocemente.
8 Altoparlante
9 Tastoascolto amplificato/vivavoce(IP-S290)
10 Terminarela chiamata
2
Page 69

11 TastoR (attesa)
12 Tastodi ripetizionedellaselezione
Italiano
13
14 Tastoasterisco /Tastocancelletto
15 Tastidi selezione/TastiVIP
16 5tastifunzione programmabilicondiodo luminoso:
17 Legendaper tastifunzioneprogrammabili
Tastifreccia: Lefrecce»{«e»}«nell’angolodestro dellarigasuperiore deldisplay indicanoche
l’utente può richiamare ulteriori funzioni nella seconda riga del display premendo i tasti
freccia.
Ognitasto èdotatodiunLED. QuestoLEDsegnalal'impiegodi determinatefunzioni.
Idiodi luminosideidue tastiinferiorisonobicolore(solo CS290eCS 290-U).
Descrizione e installazione
elmeg CS290
Il presentetelefono disistema èpredisposto per ilcollegamento aduna portaS0 interna(cavo a4 fili)di un
centralino elmeg.
elmeg CS290-U
Ilpresente telefonodi sistemaè predispostoper ilcollegamento adun'interfaccia Up0interna (cavoa 2fili)
di uncentralino elmeg.Il telefono disistema è dotato diun'uscita ISDN chepermette dicollegare ulteriori
dispositivi ISDN.
elmeg IP-S290
Il presente telefono di sistema viene collegato per mezzo di un cavo Cat. 5 alla corrispondente interfaccia
LAN (odi rete) delcentralino. Il telefonodi sistema èdotato diun'uscita PC chepermette dicollegare ulte
riori dispositivi terminali IP.
Impostazione / configurazione del telefono di sistema
Al telefonodi sistema potràessere effettuatasoltanto una configurazionelimitata delle funzionisupporta
te. Una configurazione completa del telefono di sistema può essere effettuata soltanto attraverso le corri
spondenti interfacce del centralino elmeg.
Informazioni per la sicurezza
•
Rispettare latemperatura ambienteindicata neidati tecniciper lostoccaggio e perl’uso deldisposi
tivo. Il dispositivova collegatosoloin ambientiin cuila temperaturaammessaper l’esercizio.
•
Tenere presente che al passaggio da temperature fredde a temperature calde non dovrà formarsi
condensa sulo nel dispositivo.Rimuovere l’imballaggiosoltanto dopo cheè stata raggiuntala tem
peratura d’esercizio.
•
Duranteun temporaleevitare dicollegare oscollegarele lineee nontelefonare.
•
Collegarei cavisoltanto allerispettive presepreviste.
•
Posarei cordonidi collegamentosenza crearealcun rischiodi infortunio.
•
Evitare leseguenti situazioni:
irradiazione direttadei raggidel sole
-
-
-
-
-
3
Page 70

Italiano
fontidi calore(ad es.radiatori)
apparecchiature elettroniche(ad es.impianti stereo,apparecchiature d’ufficioo fornia microonde)
penetrazionedi umiditào diliquidi
liquidio vaporiaggressivi
polvereforte
Nonusare ildispositivo inambienti umidioin zonesoggette arischio dideflagrazione.
•
Aprire esclusivamente quelle parti del dispositivo indicate nelle istruzioni per il montaggio o per
•
l’uso.
Nontoccare lespine maschiecon oggettiappuntiti,umidi ometallici.
•
Sel’apparecchiononèmontato inmodofisso,appoggiare l’apparecchioo gliaccessorisu unasuper
•
ficieantiscivolo.
Perla puliziadel dispositivousare esclusivamenteun pannoleggermente inumidito.
•
Utilizzareesclusivamente gliaccessori omologati.
•
Al dispositivo vanno collegati esclusivamente dispositivi terminali dotati di tensione di tipo SELV
•
(circuitoabassissimatensionedisicurezza)e/ochesianoconformiallanormaETS300047.Nelcaso
dell’usoappropriato deidispositivi terminaliomologatiquesta normaviene rispettata.
Alimentatore di rete a spina
Usare solo l’alimentatore di rete a spina in dotazione oppure quello disponibile come accessorio
•
(DSA-0101F-05 UPoppure L15D52AB DDLAWO).
Non usare alimentatoridi rete a spinache sono visibilmentedifettosi (con spaccature o crepe nella
•
cassa).
-
Dotazione di serie
Telefonodi sistema,microtelefono concavodi collegamento,cavo dicollegamento,2 piedini,manuale per
l'utente,legendaper itasti funzioneprogrammabili.Cavo adattatore(CS290-U) percuffia concavodicollegamento a 4 poli (connettore a 8 poli / cavo a 4 poli).
Pulizia e manutenzione
Il telefono èstato sviluppato perun uso ditipo normale. Senecessario pulire iltelefono con unpanno leggermente umidoo con unpanno antistatico. Nonutilizzare solventi. Nonusare maipanni completamente
asciutti;la caricaelettrostatica potrebbecausare anomaliedifunzionamentoall’elettronica. Evitarein qualunque modo che penetri umidità nel telefono poiché potrebbe esserne danneggiato in modo definitivo.
Posizionamento del telefono
Prima diposizionare il telefonomontare i piedini posterioridel telefono nei punti(6) contrassegnati nella
figura4. Conl'altezza diquestiduepiedinisipotrà variarel'inclinazione deldisplaydeltelefonoperadattar
la alle proprie esigenze. Impostare i due piedini alla stessa altezza.
Per modificare l'altezza, estrarre i piedini dal lato inferiore del telefono. Girarli di ca. 60° intorno all'asse
longitudinale e reinserirli sullo chassis. Girando i piedini rispettivamente di ca. 60° intorno all'asse
longitudinale, si potranno impostare tre diverse altezze.
Tenerepresentechei piedinidi plasticadi cuiè dotatoil telefonopossonolasciare traccesusuperfici delica
te, come ades. su mobili.Il produttore declinaogni responsabilità perquesto tipo didanni. Si consigliadi
utilizzare un supporto antiscivolo per il telefono.
-
-
Installazione del telefono
Collegamento del cavo del microtelefono
Collegareil cavodel microtelefono(1) comeillustrato nellafigura 2.Inserire ilcavodel microtelefononella
guida (2) e fissarlo sotto le due linguette di fissaggio (3).
4
Page 71

elmeg CS290 all'interfaccia ISDN
Figura 2
elmeg CS 290-U all'interfaccia UP0
Italiano
Collegare il cavo di collegamento ISDN (1) alla
presa So come illustrato nella figura 2. Il connet
tore piùlungo vainserito nellapresa ISDNe quel
lo più cortonella presa ISDN deltelefono. Posare
il cavo ISDN nell'incavo (2) e fissarlo sottole due
linguette di fissaggio (3).
Collegare il cavo di collegamento ISDN (1) alla
presa UP0 come illustrato nella figura 1. Il con
nettore più lungo va inserito nella presa ISDN e
quellopiùcortonellapresaISDN deltelefono.Po
sare il cavoISDN nell'incavo (2)e fissarlo sottole
due linguette di fissaggio (3). La figura 1 illustra
un telefono ISDN collegato a valle all'interfaccia
S0 dell'elmeg 290-U.
-
-
-
-
Figura 1
I telfoni CS290-U non dovranno essere collegati attraverso la presa S0 ad un'interfaccia ISDN.
Informazioni importanti per l'interfaccia UP0
•
AllapresaS0deltelefonopossono esserecollegatiuntotalediotto dispositiviterminaliISDNconin
terfacciaS0. Sei dispositiviterminali sonoalimentati daltelefonodi sistemaelmeg CS290-U, nepo
trannoessere collegatisoltanto due.
•
Il collegamento ISDN per dispositivi terminali collegati a valle del telefono di sistema deve essere
eseguitoa stella(utilizzare distributoreISDN).
•
La lunghezzadella lineatra elmegCS 290-Uedispositivi terminaliISDN collegatia valledeve essere
dimax. 100metri.
•
Leresistenze diterminazione nondevono essereinserite.
-
-
5
Page 72

Italiano
elmeg IP-S290 all'interfaccia Ethernet
1
2
3
4
5
6
7
8
9
Presa per l'alimentatore a
-
spina
Alimentatore
-
Interfaccia ethernet per
-
PC
PC o ulteriore telefono IP
-
Interfaccia ethernet per
-
centralino
Centralino elmeg
-
Presa Audio-in (microfo
-
no)
Presa Audio-out (cuffia)
-
Cuffia con due connetto
-
ri jack stereo da 5mm.
-
-
Figura 3
Audio in / Audio out
Il telefono èdotato di un ingresso(7) e di un'uscita (8)per segnali audio. Questeprese sono previste peril
collegamento diuna cuffia. Leprese sono connessecon i rispettivicollegamenti della presaper la cuffiasul
lato inferiore del telefono.
Collegamento e messa in servizio del telefono di sistema al centralino (funzione base con DHCP)
Consultare leistruzioni peril montaggiodel centralinoper rilevarequali interfaccesono previsteper ilcol
legamento dell'IP-S290. Effettuare il collegamento con l'interfaccia centralino Ethernet del telefono di
sistema.
•
Configurareil centralinoper l'utilizzodi telefonidisistema IP.
•
Definirel'MSN deitelefoni disistema IPnelcentralino.
•
Collegare l'alimentazioneelettrica (alimentatorea spina)al telefono disistema IPed attenderel'ini
zializzazionedel telefono.
Dopo l'inizializzazione del telefono di sistema IP, il sistema chiede all'utente di selezionare la lingua.
•
Selezionarela linguaper ildisplay.
Azionare itasti freccia perselezionare lelingue
disponibili e confermare la scelta con
O
.
Welche Sprache? }
deutsch english polski
-
-
6
Page 73

Inserireuno deimultinumeri (MSN)inseriti nelcentralino (nell'esempio12).
•
Italiano
Confermare i dati inseriti con
Attivare l'utilizzo di DHCP.
Selezionare »ON«. Utilizza DHCP
Iltelefono edil centralinosono sincronizzati.
•
Senon èpresenteuncollegamentoverso ilcentralino (nessuncollegamentoLAN oppureiltele
fono non è connesso), sul display l'ora è sostituita dal simbolo » -----/ /----‰«.
Adesso il telefono di sistema IP può essere utilizzato come un telefono di sistema all'interfaccia ISDN
oppure UP0.
Collegamento di una cuffia (non compresa nella fornitura)
Consigliato: Cuffie della ditta Plantronics con cavo di collegamento U10PS oppure GN Netcom.
Collegare lacuffia comeillustrato nellafigura 4.Posare ilcavo dellacuffia (3)nella guida(4) efissarlo sotto
le due linguette di fissaggio (5).
Si potrà effettuare la conversazione per mezzo del microtelefono oppure tramite la cuffia.
. inserire il numero
O
MSN-1>12
no si
-
Cuffia »Firefly F142 N« della ditta Plantronics (non per IP-S290)
Ildiodo luminosoinseritonell'astinadelmicrofonoviene azionatopermezzodeltasto cuffiedeltelefono.
Figura 4
Connessioni della cuffia
Connessioni della cuffia CS 290, IP-S290
1 - microfono +
2 - microtelefono (ground)
3 - microtelefono
4 - microfono (ground)
7
Page 74

Italiano
Connessioni della cuffia CS 290-U
1 - ricevitore DSHG
2 - Massa (Ground)
3 - microfono +
4 - microtelefono (ground)
5 - microtelefono (3,3V commutabile attraverso resistenza)
6 - microfono (ground)
7 - V+ (3,3V)
8 - trasmettitore DSHG
Cambiare la legenda
Le legendeper itasti funzionesi trovano sull'ultimapagina delpresente manualeper l'utente.Ritagliare la
legenda desiderata.
Per sostituire lalegenda estrarre lacopertura flessibiletendendola tra ilpollice e l’indicee sollevarla verso
l’alto. La legenda può essere sostituita.
È inoltrepossibile creare lapropria legenda daPC. Sul CD-ROMdel centralino sitroverà un filedi formato
Adobe Acrobat con modelli.
Pittogrammi
Per illustrarealcune procedure di impostazioneo di comandodel telefonoall’interno delpresentemanuale sonostatiusatii simbolidiseguito descritti.
b Sollevareil microtelefonooppureinviare laselezionedigitata.
a Riagganciareil microtelefono.
Iltelefono èaccesomanon attivo.
l Vienesegnalataunachiamata.
Suonala melodia/cadenzadisegnalazione.
g Sieffettua unaconversazione.
d Èstataavviataunaconferenza.
q Sisente iltonodiconferma positivoonegativo.
t Comporreil numerotelefonico,un codice,premereuntasto odigitareuntesto.
0...9
,#
*
Premereun determinatotastodiselezione.
8
Page 75

Configurazione estesa del telefono di sistema
Italiano
Normalmenteil telefonopermette soltantola configurazionedi unnumero limitatodelle funzionisuppor
tate. Una configurazione completa può essere eseguita unicamente attraverso un centralino elmeg.
Attivare la configurazione estesa
Inserire il codice »**46782551##« (Formato Vanity »**INSTALL1##«).
Configurazione estesa
Inserire o modificare il numero telefonico (MSN)
Sotto
numeri telefonici del telefono.
Collegamento di un centralino
Procedere come segue:
•
• Impegnoautomatico dellalinea urbana(Softkey »
• Codice diimpegno linea(Softkey »
-»config«-»msn«-»msn-1...3« -»n.tel«possono essereinseriti omodificatii
F
- »config« -
F
Lunghezzadel numerotelefonico (Softkey»
Lunghezzamassima deinumeri interniassegnati aglialtri utentidelcentralino;
Conl'impegnoautomaticodellalinea urbananonènecessario digitareilcodice diimpegnolineaper
effettuarechiamate esterne.
n_est«)
Codicediimpegnolinea esternadelcentralino;Incasodichiamateesterneilcodice diimpegno linea
vienepreposto automaticamenteal numerodel chiamante.
>
- »pabx«
cifre«)
urban«)
-
Configurazione dell'interfaccia utente
Procedere come segue:
Collegamento / utilizzo di una cuffia (Softkey »cuffia«)
Impostazione diuna cuffia;Perl'uso diunheadset serveiltasto funzione»cuffia«)ed opzionalmenteil
tasto funzione »risposta autom.«).
•
Impostazionebase duranteun collegamento
Selezionare se con l'impostazione base dovrà essere possibile usare »dtmf« oppure »keypad«
nelcorso diun collegamento;
Programmazione di tasti funzione
Procedere come segue:
•
Tastidi selezionediretta (Softkey»
Programmazionedi unnumero telefonicosu untasto funzione.
•
Tastifunzione (Softkey»
•
Selezionare i tasti funzione che si desiderano programmare . Confermare la scelta con
(nell'esempiountasto diinterno).
- »impost« -
F
F
-»impost«-
lista«oppure»nuovo«)
Funzione«)
>
- »pref«
-»tasti«
>
prog.tasto funzione {}
1_:-
O
1_ / interno
Numero>
9
Page 76

Italiano
Inserireil numerodi internodesiderato »
•
Le impostazioni ed assegnazioni possibili sono descritte dettagliatamente nel manuale per
l'utente che si trova sul CD-ROM.
Disattivare la configurazione estesa
Inserire il codice »**46782550##« (formato Vanity »**INSTALL0##«).
Seiltelefono vienestaccato dallaporta ISDN(ades.scollegandoilconnettoreISDNdeltelefono, spegnendo
o ripristinando il centralino) viene disattivata automaticamente la modalità di configurazione estesa.
Impostazione della lingua del display
Si potrà scegliere la lingua in cui verranno visualizzate le informazioni sul display.
Procedere come segue:
a
Deutsch Utilizzare i tasti freccia per elencare le lingue
disponibili.
FSSS
Numero«econfermare con
config display lingua
Welche Sprache? }
deutsch english polski
O
.
Esempio:
Italia Utilizzare i tasti freccia per elencare le lingue
disponibili.
deutsch english polski
quale lingua? }
S Premere il softkey corrispondente alla lingua
desiderata. Ildisplay commuta subitosulla lingua selezionata.
Inserimento di caratteri alfanumerici
Premendo un tasto più volte sul display appaiono in successione i singoli caratteri (lettere o cifre).
Per l’inserimento di caratteri e cifre utilizzare i tasti come indicato:
Tasto 1 volta 2 volte 3 volte 4 volte 5 volte 6 volte 7 volte
1
2
3
1
ABc 2 ÄÅÆ
DEF 3 €
4
5
6
7
GHI 4
JKL5
MNO6 ÖØ
PQRS7ß$
10
Page 77

Italiano
8
9
*
#
Tutti i caratteri sono maiuscoli.
Esempio: »FUNKWERK«.
Il tasto »
Ad esempio: »!«, »&«, »?«, »+«, »-«, »=«, »(«, »)«, »@«, »$«, …
Quando si preme la prima volta il tasto »
stesso tastoil display visualizzaalcuni caratterispeciali. Sesi desiderano selezionareun carattere speciale,
premereiltastorispettivo
il tasto
Ulteriori informazioni sul display
Seiltelefono èinattivolarigasuperioredeldisplayvisualizza
informazioni sulle opzioni impostate.
0
TUV8Ü
WX Y Z 9 ¥
*
#
« viene utilizzato per differenti caratteri speciali.
0
« viene inserito uno spazio. Alla seconda pressione dello
0
1…9
.
.Sesidesideranovisualizzareulterioricaratteri speciali,premere
01.11.05 08:30 S U }
rubr vip
»S« ConlaconfigurazionedaPCèstatoimpostatoilcontrollodellaselezionedeltelefono.Èpermes-
sao vietatala selezionedi determinatinumeritelefonici odipartidi numeritelefonici.
»U« Deviazionedi chiamataattivata.
>
S
Numeri telefonici (MSN)
La configurazione da PC permette l'inserimento di complessivamente 3 numeri telefonici interni (MSN)
che il telefono potrà usare. Osservare le istruzioni ed avvertenze riportate nel manuale del centralino.
Con l'inserimento diun numero telefoniconel telefono si stabilisceche il telefonoè raggiungibile seviene
selezionato talenumero telefonico(MSN). Se siinseriscono piùdi unnumero telefonico,il telefono suona
ogni volta che viene selezionato uno di questi numeri inseriti.
Inserimento o modifica dei numeri telefonici (MSN)
L'inserimentoo lamodifica diunnumero telefonicopossono essereeseguiti soltantoattraverso laconfigu
razione da PC oppure la »Configurazione estesa« del telefono.
Visualizzazione dei numeri telefonici (MSN)
Per visualizzare ulteriori informazioni sulle
funzioni impostate,premere iltasto freccia destra e quindi il softkey »info«.
01.11.05 08:30SU{
mail costo info
-
Procedere come segue:
»n.tel«.
F
-»configura«-»msn«-»msn-1« (oppure »msn-2«, »msn-3«)
11
Page 78

Italiano
Impostazione delle suonerie e del volume
Per ognunodei numeri telefonicipotranno essereimpostati separatamenteuna melodiaed ilvolume. Per
chiamate interne possono essere impostati una suoneria ed un volume diversi.
Sono memorizzate 10 diversemelodie per la suoneria.Queste 10 melodie nonpossono essere
modificate.
Impostare la melodia/cadenza di segnalazione
Nel menu »msn-1«, »programmaz. msn-1« premere il Softkey »suon.« e quindi il Softkey
»interno« oppure »esterno«.
O Premere i tasti freccia per impostare la suone
ria desiderata.
Confermare con OK.
Impostare il volume per la melodia di segnalazione.
Nel menu»msn-1«,»programmaz. msn-1« premere il Softkey»volume« e quindiil Softkey
»interno« oppure »esterno«.
O Utilizzarei tastifrecciaper impostareil volume
desiderato.
Confermare con OK.
Assegnazione di un nome al numero telefonico (MSN)
Ad ogni numero telefonico (MSN) può essere assegnato un nome di max. 5 caratteri.
Per l'inserimento dei caratteri alfanumerici utilizzare la tastiera come descritto a pagina 10.
Nel menu »msn-1«, »programmaz. msn-1« -
t
O
Digitare il nome desiderato.
Nell’esempio: »DEPOSITO«.
Confermare con OK.
>
scelta melodia {}
-
- ------- 2
regolazione volume {}
MSN-1 - --- +
- premere il Softkey »nome_msn«.
denominazione MSN
MSN-1>DEPOSITO
Dopoaverassociato unnome alnumeroildisplay visualizzai seguentimenu»msn-1«,»msn-2«oppu
re »msn-3«con i nomiassociati ai vari MSN.Nell’esempio compareperciò invece di»msn-1« ilnome
ad esso corrispondente »DEPOSITO«.
Uso
Informazioni importanti
La proprialinea ISDNpotrebbenon supportaretutte iservizi offertidal telefono.Rivolgersial gestoredella
rete per sapere quali funzioni sono incluse e quali dovranno essere richieste separatamente.
Seiltelefono vienestaccato dallaporta ISDN(ades.scollegandoilconnettoreISDNdeltelefono, spegnendo
o ripristinando il centralino) diverse impostazioni e liste vengono cancellate.
12
-
Page 79

Italiano
Ad esempio: Messaggitestuali memorizzati temporaneamente(SMS, UUS1), unarichiamata su occupato
richiesta o informazioni prese dal centralino.
Effettuazione di una chiamata
Selezionare il numero - senza possibilità di correzione
btg
Sollevare il microtelefono Digitare il numero telefonico Chiamata
Selezionare il numero - con possibilità di correzione
at b g
mtelef agganciato Digitare il numero telefonico Sollevare il microtelefono Chiamata
Per modificare il numero telefonico o correggere un errore, scegliere la cifra sbagliataper mezzo dei tasti
freccia e premere il tasto
Se sidesiderano effettuare laconversazione per mezzodel microtelefono, sollevarlodopo aver compostoil
numero.Durante laconversazione sipotrà commutaresempre traascolto amplificatoe conversazionecon
microtelefono.
C
per cancellarla.
Dopo aver composto ilnumero telefonicosi potrà anche premereil tasto vivavoce peravviare la selezione
del numero ed attivare la funzione vivavoce.
Se un determinato numero telefonico è bloccato attraverso il controllo della selezione del telefono di
sistema e il blocco è attivato, sul display appare l'informazione »bloccato:n_tel«.
Altre possibilità per la selezione del numero con microtelefono agganciato
Anchenelle seguentisituazionisihalapossibilitàdieffettuare laselezione conilmicrotelefonoagganciatoe
di correggere o completare il numero telefonico prima della selezione:
•
dalla memoriadi ripetizionedella selezione.
•
dalla listadelle chiamatesenza risposta.
•
selezionedalla memoriaVIP.
•
selezionedalla memoriadi selezionediretta.
Se si usufruisce di una delle possibilità elencate inalto, prima di effettuare la selezione, si po
trannoimpostare altrefunzioni. Sipotrà stabilirequale numerotelefonico(MSN)dovrà essere
trasmesso o se non dev'essere trasmesso nessun numero (MSN) al chiamato.
Selezione dalla memoria VIP
-
oppure
tb
Selezionare la destina
zione VIP
a
mtelef aggancia
to
S<>
vip
-
Selezionare la destinazio
ne VIP
-
Sollevare il mi
-
crotelefono
-
13
Page 80

Italiano
Selezione dalla memoria dei numeri diretti
a
mtelef agganciato Premere il tasto di selezione diretta Sollevare il microtelefono Chiamata
Scegliere il numero telefonico dalla rubrica del centralino
a
mtelef agganciato
Effettuazione di una chiamata con un determinato MSN uscente
Si potrà effettuare unachiamata interna o esterna,trasmettendo dal proprio telefono undeterminato nu
mero telefonico(MSN) all'interlocutore chiamato.Questo numerodev'essere stato inseritoprima neltele
fono. Durante la selezione nella seconda riga del display appare il numero telefonico trasmesso
(»msn1...msn3«) oppure il nome che è stato assegnato a questo numero telefonico (MSN).
S
rubr
at
mtelef aggan-
ciato
Digitare il
numero tele-
fonico
Z
t
Inserire la lettera
iniziale
O<>O
OFS S
msn msn-1 ...
bg
bg
Scegliere
una voce
Sollevare
il microte
lefono
Chiamata
-
bg
msn-3
Sollevare il
microtelefo-
no
Chiamata
-
-
Sopprimere la trasmissione del numero telefonico per la successiva chiamata
Sipotrà effettuareuna chiamatainterna oesterna senzatrasmettere dalproprio telefonoun numerotelefonico (MSN)all'interlocutore chiamato. Questafunzione puòessere impostata anchein modopermanente
(cfr. le istruzioni dettagliate nel manuale per l'utente sul CD-ROM).
at
mtelef agganciato Digitare il numero
telefonico
Riprendere una chiamata entrante
OF S
reserv
bg
Sollevare il mi
crotelefono
-
Chiamata
albg
mtelef agganciato Sollevare il microtelefono Chiamata
Non trasmettere il numero telefonico
Quando vienesegnalata unachiamata, prima diaccettare la chiamata,l'utente hala possibilitàdi decidere
sedesidera trasmettereil proprionumero telefonicoal chiamante.Se lechiamate inarrivo vengonodeviate
sul proprio telefono,questa procedura permettedi evitare cheil chiamanteveda il numerodel telefono su
cui sono state deviate le chiamate (cioè del proprio telefono).
14
Page 81

Italiano
al
mtelef agganciato
Rifiutare / trasferire una chiamata
Rifiutare
al
mtelef agganciato
Trasferta (Call Deflection)
al
mtelef agganciato
Ripetizione della selezione
Ripetizione semplice della selezione
>S
reserv
Sollevare il mi
crotelefono
S
rifiuta
S
trasf
Digitare il numero telefonico
t
bg
-
Chiamata
O
a
mtelef agganciato Sollevare il microtelefono Chiamata
Ripetizione estesa della selezione
Nella ripetizione estesa della selezione vengono memorizzati gli ultimi 10 numeri chiamati, collegamenti
(conversazioni) e numeri composti. Premendo il tasto
quindi selezionare automaticamente questi numeri.
a
mtelef agganciato Scegliere una vo
Per primaviene visualizzatala voceinserita comeultima. Ildisplay visualizzacon unalettera allafine della
seconda riga lo stato della voce.
»e« chiamataentrante
»u« chiamata
»|« chiamateper cuièstatautilizzatala ripetizioneautomatica.
WW
ce
-
W
W
oppure
<> O
Scegliere una
voce
bg
oppure i tasti freccia si potrà visualizzare e
bg
Sollevare il mi
crotelefono
-
Chiamata
nessuna lettera L’utentehachiamatoun numerooccupatoo dalqualenonha ricevutorisposta.
Cancellare un numero telefonico dalla ripetizione estesa della selezione
a
mtelef agganciato Scegliere una voce Scegliere una voce
WW
oppure
<> F S
canc.?
15
Page 82

Italiano
Ripetizione automatica della selezione
Seè statoun utenteoccupato oassente, èpossibile impostarela ripetizioneautomatica dellaselezione, fun
zione che consente di richiamare quel determinato derivato circa ogni 10 secondi.
bt g
Sollevare il mi
crotelefono
Allo statoinattivo deltelefono lerichiamate avviatevengono visualizzatecon ilsoftkey »RP automa
tica« nella seconda riga del display.
Dopoca.10 secondivieneattivatalafunzionevivavoce edavvienelaripetizioneautomatica dellaselezione.
Per circa 2 minuti viene ripetuta la selezione.
Se non si riesce a raggiungere l'utente, la selezione viene ripetuta fino a 20 volte.
È possibile interrompere la selezione automatica premendo il tasto di ripetizione della selezione.
Disattivare la ripetizione automatica della selezione
Lafunzionediripetizioneautomatica dellaselezione attivatapuò esseredisattivata inun qualsiasimomen
to. In tal caso non vengono più effettuati altri tentativi per raggiungere l'utente chiamato.
Per disattivare la ripetizione automatica mentre è in corso una selezione automatica, premere il tasto
.
E
Se si desiderano disattivare la ripetizione automatica della selezione quando il telefono non effettua la
selezione, procedere come segue:
Digitare il nu
mero telefonico
L'utente chiamato è occupa
to oppure non risponde
WS
-
rp auto
matica
-
a
Riagganciare il
microtelefono
-
-
-
a
mtelef agganciato
Selezione dalla lista delle chiamate senza risposta
a
mtelef agganciato
Cancellazione di una voce dalla lista delle chiamate senza risposta
lista
a
mtelef agganciato
Esclusione microfono e ascolto amplificato
Esclusione microfono
rp automatica si
S<>
S<>F S
lista
SS
oppure
-
Scegliere una
voce
muto
b
Sollevare il micro
telefono
Scegliere una voce
consultazione
L
g
Chiamata
canc.?
parla
Chiamata
16
SS
Page 83

ascolto amplific (Viva voce IP-S290)
Italiano
g
Chiamata Attivare ascolto amplificato Disattivare ascolto amplificato Chiamata
Se si riaggancia il microtelefono nel corso dell’ascolto amplificato la conversazione viene interrotta.
utilizzo della cuffia (kit vivavoce auricolare)
Attivare/disattivare una cuffia
Durante l'uso della cuffia, il microtelefono rimane agganciato.
a
mtelef agganciato Attivare cuffia Digitare il numero telefonico Conversazione con cuffia Disattivare cuffia
Attivare/disattivare ascolto amplificato durante l'uso di una cuffia
g
Conversazione
con cuffia
z
L
Attivare ascolto
amplificato
LL
tg
g
Conversazione con cuffia
e con ascolto amplificato
L
Disattivare as-
colto amplificato
g
Conversazione
con cuffia
g
z
S
Disattivare cuf-
fia
Avviso di chiamata in attesa, chiamata intermedia, chiamata alternata e conferenza
Avviso di chiamata in attesa
Seiltelefonoè impostatoin mododa poterriceverel'avviso dichiamatainattesa,conunachiamataincorso
si è raggiungibili per altri chiamanti.
g
Chiamata
Chiamata intermedia
Duranteunaconversazione incorso sipotràstabilireunaltrocollegamentopermezzo dellachiamata inter
media intermedia, premendo il tasto R (C per riprenderla).
g
Conversarzione con interlo
cutore 1
chiamata in attesa
-
Interlocutore 1 viene messo
R
in attesa
S
risp.
Digitare il numero tele
g
Conversazione con interlocutore 2;
Interlocutore 1 viene messo in attesa
tg
-
conversazione con l'interlo
fonico
cutore 2
-
-
Premendo il tasto
attesa.
il collegamento attivo viene interrotto, ritornando all'ultimo collegamento in
T
17
Page 84

Italiano
Chiamata alternata
Seè attivopiù diun collegamento,stabilito permezzo dellachiamata intermediao alternata,sipotrà parla
re alternativamente con questi interlocutori (chiamata alternata).
g
conversazione con
l'interlocutore 2
Se sono stati impostati dei tasti di interno, la chiamata alternata tra i diversi interlocutori può essere ef
fettuata anche per mezzo di questi tasti.
Per terminare la conversazione attiva, premere il tasto
conversazione messa in attesa.
Conferenza
Avendo una conversazione attiva ed una seconda in attesa, si potrà effettuare una conferenza con questi
due interlocutori. Tutti e 3 gli interlocutori possono parlare contemporaneamente.
>S
tel1
g
Conversazione con interlocutore 1,
l'interlocutore 2 viene messo in attesa
g
Conversarzione
con interlocutore 1
S
conf
S
tel2
T
g
conversazione con
l'interlocutore 2
. In tal modo si ritorna all'ultima
S
tel1
d
conferenza con l'interlocutore 1 e
l'interlocutore 2
...
etc.
...
etc.
-
-
Per terminarela conferenza premereil softkeysotto »ritorna«.Si ripristina ilcollegamento conil primo interlocutore. Il secondo viene messo in attesa.
Trasferta di chiamata (inoltro)
Nelcasodellatrasfertadiunaconversazionevengonosempremessiincollegamentotra lorol’interlocutore
attivo e l’ultimo interlocutore messo in attesa.
È possibileeffettuare primala chiamataintermedia(ad es.per annunciarela chiamata)oppure inoltrarela
chiamata direttamente senza preannuncio.
g
Conversarzione con in
terlocutore 1
Keypad
Lafunzionekeypad permettel'uso diservizi ofunzionidel centralinoo dellarete delgestore, inserendodel
le sequenze di caratteri o di cifre.
g
Chiamata
-
Interlocutore 1 viene messo in attesa Digitare il numero
S
keypad
R
t
Inserire cifre e simboli
t
telefonico
S
trasf
-
Selezione a toni (selezione DTMF)
ConlaselezioneDTMF, duranteun collegamento(conversazione)esistentesihalapossibilitàditrasmette
resegnali multifrequenza(DTMF), ades. peraccedere aduna segreteriatelefonica. Senelcorso diun colle
gamento subentra l'avviso di chiamata in attesa, la postselezione a toni non potrà essere usata.
18
-
-
Page 85

Italiano
g
Chiamata
Reset - Ripristino delle impostazioni di base
Tramitela proceduraseguente èpossibile ripristinareleimpostazioni dibase deltelefono. Idati inseritinel
telefono verranno cancellati.
a
mtelef agganciato
FS>SS
S
dtmf
Inserire cifre e simboli
config service dati
S Premere il softkey sotto »sì« per ripristinare
le impostazionidi base.Se nonsi voglionoper
dere i dati inmemoria premere il softkey sotto
»no«.
Vengono ripristinate le impostazioni di base
del telefono. Tutti i dati vengono cancellati.
t
Cancellare TUTTO?
no utente sì
-
01.11.05 08:30 }
rubr vip
Dichiarazione di conformità e marcatura CE
La presente apparecchiatura è conforme ai requisiti di cui alla direttiva R&TTE 1999/5/CE:
»Direttiva 1999/5/CE del Parlamentoeuropeo e delConsiglio, del 9marzo 1999, riguardante le apparecchiature radio, le apparecchiature terminali di telecomunicazione ed il reciproco riconoscimento della loro conformità«.
La dichiarazionedi conformità puòessere consultata alseguente indirizzo Internet:
http://www.funkwerk-ec.com.
Il simbolo raffigurante il bidone della spazzatura barrato a croce, riportato
sull'apparecchiatura,indicacheallafinedelsuo utilizzol'apparecchiatura dovràess
eresmaltitaneirispettivipuntidi raccoltadifferenziata, separatadai rifiutidomesti
ci normali.
© 2005 Funkwerk Enterprise Communications GmbH - Tutti i diritti sono riservati.
-
-
La riproduzione totale o parziale di questa documentazione è permessa esclusivamente previa autorizza
zione scritta dell'editore e solo con esattacitazione della fonte, indipendentemente dal modo odal mezzo
(meccanico o elettronico) con cui avviene.
Le funzionalità descritte all'interno delpresente manuale e facenti riferimentoa prodotti software di altri
produttori fannoriferimento asoftware utilizzati almomento della realizzazionedel dispositivoe delpre
sente manuale.Le denominazioni diprodotti editte usateall'interno delpresente manuale possonoessere
marchi registrati.
-
-
19
Page 86

Servizio di riparazione
Tonfunk GmbH
Servizio di riparazione
Unternehmenspark 2 / Halle D
Woltorfer Str. 77
31224 Peine
Funkwerk Enterprise Communications GmbH
Südwestpark 94
D-90449 Nürnberg
http://www.funkwerk-ec.com
20
Soggetto a modifiche
090506
Page 87

Instrucciones de servicio
elmeg CS290 / CS290-U / IP-S290
Español
1
Page 88

Español
Teclas y pantalla del teléfono
1 Tecladefunción:Medianteestateclaustedabriráelmenúdeprogramación.Siustedyaseencu-
entraen unmenúya continuaciónpulsalatecla,tendráasudisposiciónfunciones dependientesdel menúoretrocederá unpasoenla programación.
2 Teclaescape:Alpulsar lateclaescapedurantelaprogramaciónvolverá aalcanzarseelestadode
reposodel teléfono.
3 3teclas
Enlaconfiguraciónde PCde suteléfono ustedpuedeespecificar silas funcionesdelasteclasse
representanenminúsculas ymayúsculas.
4 Pantalla:Despuésdeconectar elaparato alaalimentacióndecorriente(IPS290) oalaconexión
RDSI interna o UP0 (CS 290, CS290-U) de la centralita, en la línea superior de la pantalla
apareceránlafechay lahora.Lafechayla horaseincorporaránautomáticamentedesdelacen
tralitaolaredRDSI.Eltextorelativoaunafunciónenlalínea2siempreseencontrarásobrelate
clacorrespondiente. Siustedpulsalatecla, apareceráelnivelsiguiente.
Sila pantallanopuedemostrartodos loscaracteres,éstoseindicacon »««o»»«.
5 TeclaOK:Alactivarestatecla, laconfiguraciónseguardaráenelteléfono.Acontinuaciónusted
oiráun sonidodeconfirmación.
6 TeclaC:Medianteestateclaustedpodráretrocederunpasoenelmenú.Siustedseencuentraen
elmodo registro,puedeutilizarestatecla paraborraralgunoscaracteres.
-
-
7 LEDde llamada:Unanuevallamada seindicaatravés deunparpadeorápido.
8 Altavoz
9 Teclaescucha (teclamanos libresIP-S290)
10 Teclade corte
2
Page 89

11 Teclade consulta
12 Teclade repeticióndelamarcación
Español
13
14 Teclade asterisco/tecla#
15 Teclasde marcación/teclasVIP
16 5teclasprogramables consoportedeLED:
17 Etiquetaparateclasde funciónprogrammables
Teclasdeflecha:Las teclas»{«y»}«queseencuentranenlaesquinaderechadelalínea superi
ordelapantallaleindicaránquepuedeseguirllamandofuncionesenlasegundalíneamediante
lasteclasde flecha.
Todatecladispone deun diodoluminoso.EsteLED puedeutilizarsepara indicarfuncionesde
terminadas.
Losdiodos luminososdelasdos teclasinferioressonbicolores(sólo CS290yCS290-U).
Descripción e instalación
elmeg CS290
Este teléfonode sistema esdiseñado para ser conectado ala conexión S0 interna(cableado de4 conductores) de una centralita elmeg.
-
-
elmeg CS290-U
Esteteléfonodesistemaesdiseñado paraser conectadoa laconexiónUp0 interna(cableadode2 conductores) deuna centralitaelmeg. Elteléfono desistema dispone deuna salida RDSI ala que pueden conectarse
varios aparatos terminales RDSI.
elmeg IP-S290
Esteteléfono desistema seconecta alacorrespondiente conexiónLAN (ored) dela centralitapor mediode
un cableCat. 5. Elteléfono desistema disponede unasalida PCa la quepueden conectarsevarios aparatos
terminales IP.
Ajuste / configuración del teléfono de sistema
En elteléfono desistema sólo sepuede realizaruna configuraciónlimitada delas prestacionessoportadas.
La configuracióncompleta del teléfonode sistema sóloes posiblepor medio delas conexiones correspon
dientes de la centralita elmeg.
Indicaciones de seguridad
•
Observela temperaturadelentorno paraelalmacenamiento yel serviciodel aparatoindicada enlas
características técnicas. El aparato sólodebe serconectado cuandose hayaalcanzado latemperatu
raambiental defuncionamiento requerida.
•
Tengaen cuentaque alpasar de temperaturasbajas amayores puedesuceder queseforme unacapa
deagua condensadaalrededor oenel aparato.Desembale elaparato sólo despuésque sehaya alcan
zado la temperaturaambiental defuncionamientorequerida.
•
Duranteuna tormentano debeconectar odesconectar ningunalínea nitampoco telefonear.
•
Conecteel cordónde alimentaciónsólo enlas conexionesprevistas.
•
Coloquelos cordonesde alimentacióndetal maneraque noprovoque accidentes.
-
-
-
3
Page 90

Español
Evitelas siguientesinfluencias:
•
Radiaciónsolar directa
Fuentesde calor(por ejemplo:radiador calorífero)
Aparatos electrónicos(por ejemplo:aparatos HiFi,de oficinao demicro ondas)
Entrada dehumedad olíquidos
Líquidos ovapores agresivos
Grancantidad depolvo
Noutilice elaparato enlugares húmedoso zonascon riesgosde explosión.
•
Abrasólo laspartes delaparato indicadasen lasinstrucciones parael montajey elmanejo.
•
Notoque loscontactos eléctricosconobjetos puntiagudoso metálicosohúmedos.
•
Sielaparato noesmontado deforma fija,ponga elaparato olos accesoriossobre unasuperficieanti
•
deslizante.
Limpieel aparatosólo conunpaño ligeramentehúmedo.
•
Usesólo losaccesorios autorizados.
•
Sólosepuedeconectar alapparato aparatosterminales quesuministren labaja tensiónde seguridad
•
o correspondan a la ETS 300047. El uso previsto de aparatos terminales homologados cumple con
estadirectriz.
Bloque de alimentación
Usesólo elbloquedealimentaciónsuministrado oelobteniblecomo accesorio (DSA-0101F-05UPo
•
L15 D52AB DDLAWO).
Nouseningúnbloque dealimentación,quealavistapresentedaños(rajadurasoroturas ensucarca
•
sa).
-
-
Volumen de entrega
Teléfono desistema, auricular concordón, cable deconexión, 2 piesde equipo, instruccionesde funcionamiento, etiquetapara teclas defunción programables. Cordónadaptador (CS290-U) para cascos concordón de conexión de 4 polos (conector 8 polos / cable 4 polos).
Cuidado y mantenimiento
Elteléfonosehadiseñado paracondiciones normalesde uso.Limpie elaparato cuandosea necesariomedianteun pañoligeramente humedecidoo empleeun pañoantiestático. Noutilicenunca disolventes.No utilicenunca unpañoseco;lacargaelectrostáticapodríaoriginardefectosenel sistemaelectrónico.Comprue
be siempre de que no penetre la humedad para que el teléfono no sufra daños.
Instalación del teléfono
Antesde instalarel teléfonodebe habermontadolos piesde equipoposteriores enlos lugaresmarcados (6)
enla figura4. Debidoa laaltura deestosdos piesusted puedeajustar lainclinación dela pantalladel teléfo
no a su ángulo visual. Asegúrese de que las alturas de los dos pies son simétricas.
Para alterar la altura, retire los pies al lado inferior del teléfono.Gire los pies unos 60° alrededor de su eje
longitudinaly despuéslos fijeenlatapa.Atravésdelgirodeunos60°delospies,ustedpuedeajustar lospies
en tres alturas diferentes.
Tengaen cuentaque lasbases deplástico desuteléfono puedendejar marcasen superficiessensibles como
muebles. El fabricante del teléfono no asumirá ningún tipo de responsabilidad sobre dichas marcas. Por
tanto, utilice una base antideslizante para su teléfono.
-
-
4
Page 91

Español
Instalación del teléfono
Conectar el cordón del auricular
Conecte elcordón (1)del microteléfonocomo seindica enla figura2. Cóloque elcordón delauricular enla
ranura (2) y fíjelo debajo de los dos soportes (3) del cordón.
elmeg CS290 en la conexión RDSI
Figura 2
elmeg CS 290-U en la conexión UP0
Conecte el cordónde conexión RDSI(1) a la con
exión S0como se indicaen la figura2. Introduzca
el clavija RDSI más largo en la caja de contacto
RDSIy elmás cortoenelcasquillo RDSIdel teléfo
no. A continuación, cóloque el cordón de conex
iónRDSI enla ranura (2)y fíjelodebajo delos dos
soportes (3) del cordón.
Conecte el cordónde conexión RDSI(1) a la conexiónUP0comoseindicaenla figura1.Introduzca elclavija RDSI máslargo enla caja decontacto
RDSIy elmás cortoenelcasquillo RDSIdel teléfono. A continuación, cóloque el cordón de conexiónRDSI enla ranura (2)y fíjelodebajo delos dos
soportes (3) del cordón. La imagen 1 muestra un
teléfono RDSIpostconectado ala conexiónS0 del
elmeg 290-U.
-
-
-
Figura 1
Los teléfonos CS290-U no deben conectarse a través del enchufe S0 en una conexión RDSI.
Notas importantes para la conexión a una conexión UP0
•
En el conector S0del teléfono pueden conectarse hasta ocho aparatos RDSI con puertos S0-. Si los
aparatos terminales obtienen su alimentación del teléfono de sistema elmeg CS 290-U, solamente
puedeconectar dosde ellos.
•
LaconexiónRDSIpara aparatosterminales postconectadosal teléfonode sistemadebe realizarseen
formade estrella(utilice undistribuidor RDSI).
•
Lalongituddel cableentre elelmegCS 290-Uy losaparatos terminalesRDSIpostconectadosnopue
desuperar los100 metros.
•
Losterminadores nopueden conectarse.
-
5
Page 92

Español
elmeg IP-S290 en la conexión Ethernet
Figura 3
1
2
3
4
5
6
7
8
9
Audio in / Audio out
Conexión del bloque de
-
alimentación
Bloque de alimentación
-
Conexión Ethernet PC
-
PC u otro teléfono IP
-
Conexión Ethernet de la
-
centralita
Centralita elmeg
-
Conexión Audio-In (mi
-
crófono)
Conexión Audio-out
-
(microteléfono)
Cascos con dos clavijas
-
estéreo de 5mm.
-
Elteléfonodispone deuna entrada(7) yuna salida(8) deaudio.Estas conexionesson paraunos cascos.Los
conectores estánunidos conlas correspondientesconexiones delconector delos cascosen laparte inferior
del teléfono.
Conexión a la centralita y puesta en funcionamiento del teléfono de sistema (funciones básicas con
DHCP).
Consulte las instruccionesde montaje de lacentralita para saberqué conexiones sedestinan a la conexión
del IP-S290. Una la conexión con la conexión Ethernet a centralita del teléfono de sistema.
•
Configurela centralitapara lautilizaciónde teléfonosde sistema
•
Fijeel MSNde losteléfonosde sistemaen lacentralita.
•
Conecte elsuministro decorriente (bloquede alimentación)al teléfonode sistemaIP yespere hasta
quese inicialize.
Si el teléfono de sistema IP está inicializado, se le pedirá en la pantalla que seleccione el idioma deseado.
•
Escoja elidioma queprefiera parala pantalla.
Pulse las teclas de flecha para ver los idiomas
disponibles y confirme con
•
Indiqueuno delos MSNintroducidosen lacentralita (enel ejemplo,12).
O
.
Welche Sprache }
deutsch english polski
Confirme la entrada con
Active la función Utilizar DHCP.
Seleccione »activo«. utilizar DHCP
6
. Programar núm. de llam.
O
MSN-1>12
inactivo activo
Page 93

Español
Elteléfono yla centralitasesincronizan.
•
Si noexiste conexióncon la centralita(si no hay conexiónLAN o si elteléfono noestá dado de
alta), en la pantalla se mostrará el símbolo » -----/ /----‰ «en lugar de la hora.
Ahora puede utilizar el teléfono de sistema IP como un teléfono de sistema conectado a RDSI o UP0.
Conectar unos cascos (no incluidos)
Esrecomendableutilizar: CascosdelamarcaPlantronicscon cordóndeconexiónU10PS oGNNetcom.
Conecte loscascos tal ycomo seindica en lafigura 4.A continuación,cóloque el cordón(3) delcasco en la
ranura (4) y fíjelo debajo de los dos soportes (5) del cordón.
Para telefonear usted puede utilizar el auricular o el casco.
Casco »Firefly F142 N« de la empresa Plantronics (no para IP-S290)
El LED en el brazo del micrófono del casco se activa a través de la tecla del casco.
Figura 4
Ocupación de los cascos
Conexión casco CS 290, IP-S290
1 - Micrófono +
2 - Microtel (Ground)
3 - Microteléfono
4 - Micrófono - (Ground)
7
Page 94

Español
Conexión casco-CS 290-U
Modificación de la rotulación
1 - Receptor DSHG
2 - Toma a tierra (Ground)
3 - Micrófono +
4 - Microtel (Ground)
5 - microteléfono (3,3V conmutable por resistencia)
6 - Micrófono - (Ground)
7 - V+ (3,3V)
8 - Emisor DSHG
Encontrará lasetiquetas para lasteclas de función enla última páginade estasinstrucciones. Separe laeti
queta deseada.
Para cambiarla etiquetahay quecontraer el recubrimientoflexible entrepulgar y índicey levantarlo hacia
arriba. Ahora la etiqueta puede cambiarse.
Pormedio desu PCpuede seleccionardiferentes inscripcionespara laetiqueta. Enel CD-ROMsuministra
do encontrará un fichero Adobe Acrobat que contiene diferentes diseños.
Pictogramas
Paraqueen estasinstruccionesdefuncionamientoaparezcan algunosprocedimientosdeconfiguracióny manejo del teléfono, seemplearon, entreotros, lospictogramas (símbolos)que se
describena continuación.
b Descolgarel auricularocomenzarla marcaciónpreparativa.
a Colgarel auricular
Elteléfono seencuentraen reposo.
l Seindica unallamada.
Sonarálamelodía dellamada.
g Ustedestáenuna conversación.
-
-
d Seha iniciadounaconferencia.
q Ustedoiráeltono positivoonegativode recibo.
t Seleccionarnúmero deteléfono,código,caracteres otexto.
0...9
,#
*
8
Activarunatecladeterminadadel teclado.
Page 95

Español
Configuración ampliada del teléfono de sistema
Normalmente en el teléfono puede efectuarseúnicamente una configuración restringida de las funciones
que soporta. La configuración completa sólo es posible a través de una centralita elmeg.
Activar la configuración ampliada
Introduzca el código »**46782551##« (Vanity-Format »**INSTALL1##«).
Configuración ampliada
Introducción o modificación del número de teléfono (MSN)
Debajo de
los números de teléfono del aparato.
Conexión a una centralita
Empiece de la siguiente manera:
Longitudde losnúmeros deteléfono(softkey »
•
la longitud máxima de los números de teléfono asignados a los otros abonados internos de su
centralita;
• Accesoautomático ala líneasaliente(softkey »
Si existeacceso automático ala líneasaliente, al realizarllamadas externas semarca elindicativo de
central.
• Indicativo decentral (softkey»l.ext«)
Indicativo de central de la centralita; En caso de llamadas externas el indicativo de central se pone
automáticamentedelante dela extensiónMSN delllamador.
Ajustes del manual
Empiece de la siguiente manera:
Conexión / Utilización de unos cascos (softkey »casco«).
Configuración de unoscascos; Para utilizarunos cascos necesitaráhacer uso dela tecla defunción »he
adset« y optativamente de la tecla de función »auto-rufannahme«.
-»config«-»msn«-»MSN-1...3« -»telnr« puede introduciro modificar
F
-»ajust«-
F
-»config«-
F
long.núm.«)
lín.sal«)
>
- »utiliz«
>
-»
-
•
Configuraciónbáscia durantela conexión
Usted puededeterminar si enla configuración básica duranteuna comunicaciónes posible unase
cuencia»dtmf«ouna secuencia»Teclad«.
Programación de las teclas de función
Empiece de la siguiente manera:
•
Teclasde destino(softkey »lista«>«o »nuevo«)
Programarun númerode teléfonopara unatecla defunción.
•
Teclasde función(softkey »
•
Seleccionelas lasteclas defunción alas quedesee asignaruna nuevafunción . Confirmela selección
con
(enel ejemplo:una teclade líneainterna).
O
-»ajust«-
F
funci n«)
>
-
- »mem_dr«
Funci n nueva prog {}
1_:-
Tecla de línea intern
Número>
9
Page 96

Español
Introduzca elnúmero interno »número« yconfirme conla tecla
•
Lasposiblesconfiguraciones yasignacionesy sedescriben enelmanual deinstrucciones detal
lado del CD-ROM.
Desactivar la configuración ampliada
Introduzca el código »**46782550##« (Vanity-Format »**INSTALL0##«)
Si elteléfono estádesconectado dela redRDSI (porejemplo porhaber desconectadola clavija, desconecta
do o reiniciado la centralita), el modo de configuración ampliada de desactivará automáticamente.
Ajustar el idioma de la pantalla
Puede seleccionar el idioma de la indicación en la pantalla.
Empiece de la siguiente manera:
a
Alemán Pulse las teclas de flecha para ver los idiomas
disponibles.
FSSS
config inform. idioma
deutsch english polski
.
O
Qu idioma? }
-
-
Ejemplo:
English Pulse las teclas de flecha para ver los idiomas
disponibles.
S Pulse la tecla bajo el idioma deseado. Las indi-
caciones aparecen inmediatamente en el idioma seleccionado.
Which language? }
deutsch english polski
10
Page 97

Registro de letras y cifras
Al pulsar una tecla varias veces, la pantalla le mostrará las caracteres (letras o cofras) en orden.
Para la entrada de letras y de cifras, las teclas están ocupadas de la manera siguiente:
Español
Tecla
1
2
3
4
5
6
7
8
9
*
pulsada
una vez
1
ABC2 ÄÅÆ
DEF 3 €
GHI 4
JKL5
MNO6 ÖØ
PQRS7ß$
TUV8Ü
Wx Y Z 9 ¥
*
pulsada
dos veces
pulsada
3 veces
pulsada
4 veces
pulsada
5 veces
pulsada
6 veces
pulsada
7 veces
#
Todas las letras introducidas se indican como mayúsculas.
Ejemplo: »FUNKWERK«.
La tecla »
Por ejemplo: »!«, »&«, »?«, »+«, »-«, »=«, »(«, »)«, »@«, »$«, …
Despuésde pulsarpor primeravez latecla »
cla porsegunda vezse muestraalgunos caracteresen lapantalla. Pulselas teclas asignadas
para seleccionar un carácter especial. Pulse la tecla
Información adicional en la pantalla
Cuando el teléfono no esté activo, en la línea superior de la
pantalla se presentan datos adicionales sobre funciones
configuradas.
»S« Elcontrol demarcacióndelteléfono fueconfiguradoa travésdela configuracióndePC. Núme
»U« Desvíode llamadaconfigurado.
#
« está recubierta con caracteres especiales diferentes.
0
«,se insiertaun carácterespacio. Despuésde pulsarla te
0
1…9
, cuando desee ver más caracteres especiales.
0
01.11.05 08:30 S U }
directorio vip
rosde teléfonoonúmerosde teléfonoparcialesestán autorizadosobloqueadosparamarcar.
-
-
11
Page 98

Español
>
S
Para recibirmás in formaciónsobre las funcio
nesconfiguradas,pulselateclacon laflechaha
cia la derecha y luego la tecla »info«.
01.11.05 08:30 S U {
-
mail tasa info
-
Números de teléfono (MSN)
A través dela configuración conel PC ustedpuede entregar 3números de teléfono(MSN), que elteléfono
puedeutilizar enla conexiónRDSI internade lacentralita. Tengaen cuentalos consejosincluidos enlasin
strucciones de funcionamiento de su centralita.
Al registrar unnúmero en su teléfono,usted permitirá quesu teléfono pueda localizarse almarcar esenú
mero (MSN). Si registra más de un número en su teléfono, éste sonará al marcar cualquiera de ellos.
Introducción o modificación del número de teléfono (MSN)
La configuracióno elcambio deun númerode teléfono sóloes posiblea travésde laconfiguración dePC o
de la » Configuración ampliada« del teléfono.
Ver el número de teléfono (MSN)
Empiece de la siguiente manera:
»msn-3«) »n_tel«.
Ajustar la melodía y el volumen
F
- »config«-»msn«-»msn-1« (o »msn-2«,
-
-
Ustedpodrá definirpor separadopara cadanúmero deteléfono unamelodía ysu volumen. Para lasllamadas internas puede ajustar otro tono de llamada y otro volumen.
En el teléfono están guardadas 10 melodías diferentes. Estas 10 melodías no pueden
modificarse.
Configurar la melodía
En el menú »MSN-1«, »MSN-1 programar«, pulse la tecla »Sonido« y después la tecla »In
terno« o »Externo«.
O Pulse las teclas de flecha, para ajustar la melo
día deseada.
Confirme la entrada con OK.
Configurar volumen de la melodía
En elmenú »MSN-1«,»MSN-1 programar«, pulsela tecla »Volumen« ydespués latecla »In
terno« o »Externo«.
O Pulse las teclas de flecha, para ajustar el volu
men deseado.
Confirme la entrada con OK.
-
Seleccionar melodía{}
- --------- 2
-
Selecc.vol.de llamada{}
MSN-1 - --+
-
-
12
Page 99

Asignar de un nombre al número de teléfono (MSN)
Puede asignar un nombre de max. 5 caracteres a cada extensión (MSN).
Para introducir letras y cifras el teclado está configurada como escrito en página 10.
Español
Pulse la tecla »MSN Nombre« en el menú »MSN-1«, »MSN-1 progra
mar«-
t
O
Después de haber entrado un nombre para un número de teléfono las demoninaciones de teclas
»MSN1-1«, »MSN-2>« o »MSN-3>« están sustituídas por los nombres correspondientes. En el
ejemplo la pantalla ahora muestra el nombre »LAGER« en lugar de »msn1-1«.
-»msn_nombr«.
>
Introduzca el nombre deseado.
En el ejemplo:»LAGER«. Confirme la entrada
con OK.
Propia design.de MSN
MSN-1LAGER
-
Manejo
Notas importantes
No todas las prestaciones descritas están realizadas en la conexión RDSI estándar de su operador de red.
Pregunteasu operadorde red,cuales prestacionesson implementadaso cualesdebensolicitarseseparadamente para su conexión RDSI.
Si suteléfono sesepara dela redRDSI (por ejemplo:separación del conectorRDSI, desactivar oreajuste de
la centralita), se borran varias configuraciones y listas.
Por ejemplo: Mensajes cortos (SMS, SUU), una rellamada cuando comunique o informaciones
incorporadas desde la centralita.
Iniciar una llamada
Marcar número de teléfono – sin posibilidad de corrección
btg
Descolgar el auricular Marcar un número Llamada
Marcar número de teléfono – con posibilidad de corrección
atbg
Microteléfono colgado Marcar un número Descolgar el auricular Llamada
Para modificarel númerode teléfonoo corregirun registro, seleccionela cifraincorrecta utilizandolas te
clas de flecha y pulse
Siusted desearealizar lallamada utilizandoel microteléfono,descuélguelo trasintroducir elnúmero dete
léfono.Encualquier momentode lallamada,ustedpodrá cambiarentreescuchamediantealtavoz yfuncio
namiento con microteléfono.
Después deindicar el númerode teléfono, también podrápulsar la teclaaltavoz para marcarlo y utilizarel
modo manoslibres. Cuandolallamada hayaaceptado por elusuario alque hallamado, levanteel auricular
para efectuar la llamada.
Si elnúmero deteléfono está bloqueadomediante elcontrol demarcación activodel teléfonode sistema,la
pantalla del teléfono mostrará el mensaje »bloque: n_llm«.
C
para borrarla.
-
-
-
13
Page 100

Español
Otras posibilidades de marcar cuando no se haya descolgado el auricular
También existela posibilidad demarcar conel auricular colgadoy de corregiro completarlos númerosde
teléfono antes de marcar cuando se marca:
apartir dela memoriaderepetición dela marcación.
•
apartir dela listallamadores
•
apartir dela memoriaVIP.
•
apartir dela memoriademarcación directa
•
Si usted aprovecha alguna de las posibilidades mencionadas, podrá proceder a realizar otros
registrosantesde iniciarlamarcación.Ustedpodráconfigurarsia lapersona llamadaseledebe
transmitir o no un número de teléfono (MSN) y, en caso de que así sea, cuál.
Marcar a partir de la memoria VIP
a
Microteléfono colgado
Marcación a partir de la memoria de marcación directa
a
Microteléfono colgado Pulsar tecla de marcación directa Descolgar el auricular Llamada
Marcar a partir de la guía telefónica de la centralita
a
Microteléfono
colgado
Iniciar una llamada con número de teléfono (MSN) fijo
Ustedpodrá llevara caboun marcadointerno oexterno detal formaquea suinterlocutor sele proporcione
undeterminado númerode teléfono(MSN). Este númerodeberá haberseregistrado deantemano ensu te
léfono.Durante lamarcación ustedverá enla segundalíneadela pantallael númerodel teléfonotransmiti
do (»msn-1«...»msn-3«) o el nombre que usted haya asignado a este número de teléfono (MSN).
S<>
vip
Seleccionar destino VIP Seleccionar destino VIP Descolgar el auricular
Z
S
guía
t
Introducir letras
iniciales
O<>O
o
Seleccionar
registro
tb
bg
bg
Descolgar
el auricular
Llamada
-
-
at
Microteléfono
colgado
No transmitir el número de teléfono en la siguiente llamada
Ustedpodrállevaracabo unmarcado internooexternodetal formaque suteléfononoproporcioneningún
número(MSN)a suinterlocutor. Estafunción puedeconfigurarse tambiénpermanentemente (vermanual
de instrucciones detallado del CD-ROM).
Marcar un
número
OFS S
14
msn msn1 ...
msn-3
bg
Descolgar el
auricular
Llamada
 Loading...