

Page 1
elmeg IP630 / en / elmeg IP630 / Cover_front_IP630.fm / 8/24/16
bintec elmeg User Guide
Template bintec-elmeg, Version 1, 01.07.2014
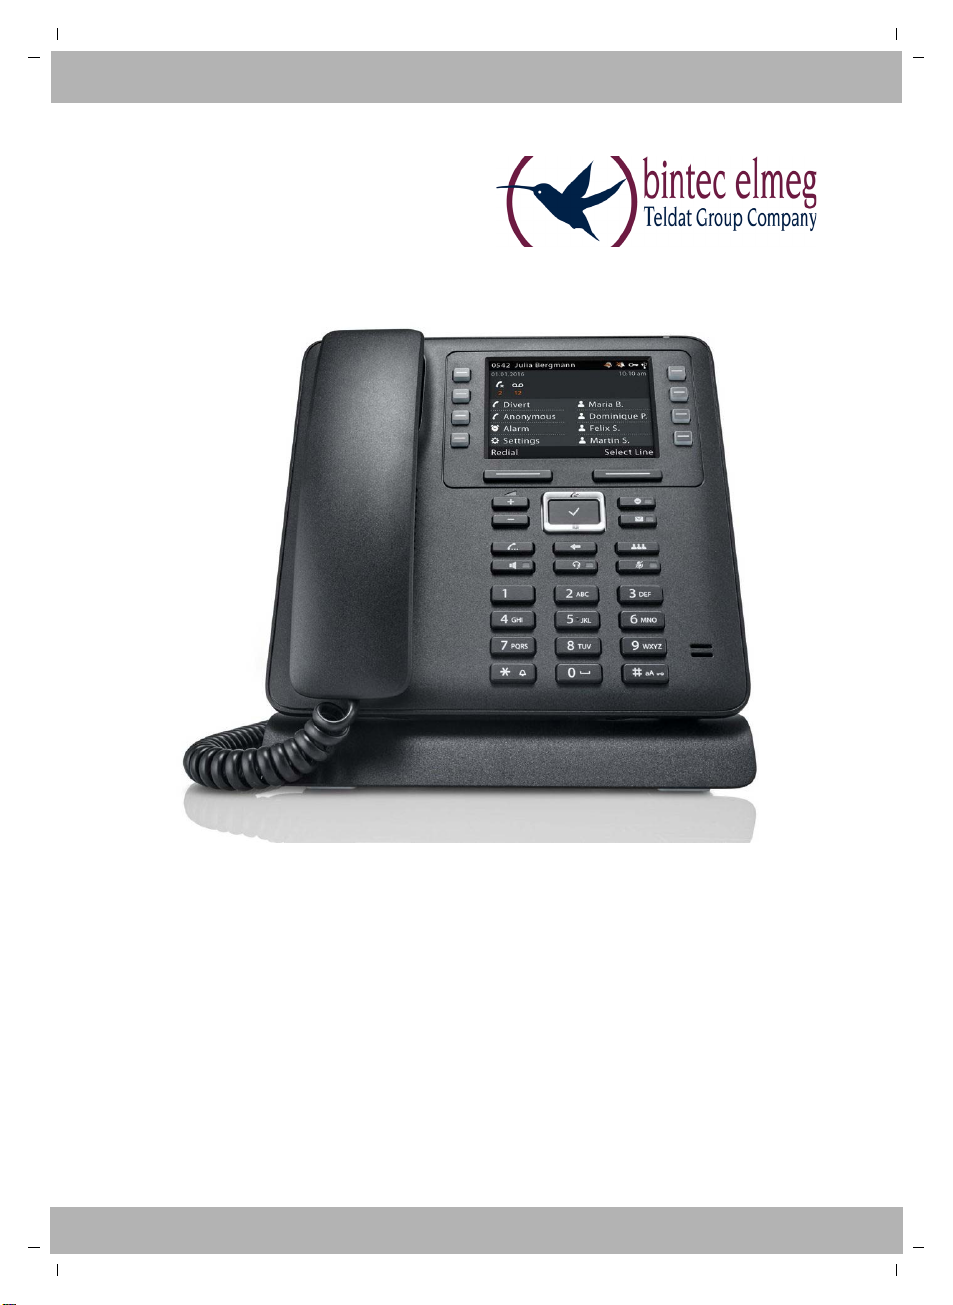
elmeg IP630
User Guide
elmeg IP630
Copyright© Version 1.0, 2016 bintec elmeg GmbH
1
Page 2

elmeg IP630 / en / elmeg IP630 / Cover_front_IP630.fm / 8/24/16
Legal Notice
Aim and purpose
This document is part of the user manual for the installation and configuration of bintec elgmeg
devices. For the latest information and notes on the current software release, please also read
our release notes, particularly if you are updating your software to a higher release version. You
will find the latest release notes under
Liability
This manual has been put together with the greatest possible care. However, the information
contained in this manual is not a guarantee of the properties of your product. bintec elmeg
GmbH is only liable within the terms of its conditions of sale and supply and accepts no liability
for technical inaccuracies and/or omissions.
The information in this manual can be changed without notice. You will find additional information and also release notes for bintec elmeg devices under www.bintec-elmeg.com.
bintec elmeg devices make WAN connections as a possible function of the system configuration. You must monitor the product in order to avoid unwanted charges. bintec elmeg GmbH
accepts no responsibility for data loss, unwanted connection costs and damage caused by unin
tended operation of the product.
Tra dem arks
bintec trademarks and the bintec logo, artem trademarks and the artem logo, elmeg trademarks and the elmeg logo are registered trademarks of bintec elmeg GmbH.
Company and product names mentioned are usually trademarks of the companies or manufacturers concerned.
www.bintec-elmeg.com.
bintec elmeg
-
Copyright
All rights reserved. No part of this manual may be reproduced or further processed in any way
without the written consent of bintec elmeg GmbH. The documentation may not be processed
and, in particular, translated without the consent of bintec elmeg GmbH.
You will find information on guidelines and standards in the declarations of conformity under
www.bintec-elmeg.com/confomity.
How to reach bintec elmeg GmbH
bintec elmeg GmbH
Südwestpark 94, D-90449 Nürnberg, Deutschland,
Telefon: +4991196730, Fax: +499116880725
Internet: www.bintec-elmeg.com
© bintec elmeg GmbH 2016, All rights reserved. Rights of modification reserved.
2
elmeg IP630
Template bintec-elmeg, Version 1, 01.07.2014
Page 3

elmeg IP630 / en / elmeg IP630 / LUGIVZ.fm / 8/24/16
bintec elmeg Contents
Contents
Overview . . . . . . . . . . . . . . . . . . . . . . . . . . . . . . . . . . . . . . . . . . . . . . . . . . . . . . . . . . . . . . . . . . . . 4
Keys . . . . . . . . . . . . . . . . . . . . . . . . . . . . . . . . . . . . . . . . . . . . . . . . . . . . . . . . . . . . . . . . . . . . . . . . . . . . . . . . . . . 4
Connections . . . . . . . . . . . . . . . . . . . . . . . . . . . . . . . . . . . . . . . . . . . . . . . . . . . . . . . . . . . . . . . . . . . . . . . . . . . 6
Illustration in the user guide . . . . . . . . . . . . . . . . . . . . . . . . . . . . . . . . . . . . . . . . . . . . . . . . . . . . . . . . . . . . 7
Safety precautions . . . . . . . . . . . . . . . . . . . . . . . . . . . . . . . . . . . . . . . . . . . . . . . . . . . . . . . . . . . . . . . . . . . . . 8
Using the telephone . . . . . . . . . . . . . . . . . . . . . . . . . . . . . . . . . . . . . . . . . . . . . . . . . . . . . . . . . 9
Getting to know your telephone . . . . . . . . . . . . . . . . . . . . . . . . . . . . . . . . . . . . . . . . . . . . . . . . . . . . . . . 9
Making calls . . . . . . . . . . . . . . . . . . . . . . . . . . . . . . . . . . . . . . . . . . . . . . . . . . . . . . . . . . . . . . . . . . . . . . . . . . 13
Call lists . . . . . . . . . . . . . . . . . . . . . . . . . . . . . . . . . . . . . . . . . . . . . . . . . . . . . . . . . . . . . . . . . . . . . . . . . . . . . . 20
Message Centre . . . . . . . . . . . . . . . . . . . . . . . . . . . . . . . . . . . . . . . . . . . . . . . . . . . . . . . . . . . . . . . . . . . . . . . 21
Voice mails . . . . . . . . . . . . . . . . . . . . . . . . . . . . . . . . . . . . . . . . . . . . . . . . . . . . . . . . . . . . . . . . . . . . . . . . . . . 22
Directories . . . . . . . . . . . . . . . . . . . . . . . . . . . . . . . . . . . . . . . . . . . . . . . . . . . . . . . . . . . . . . . . . . . . . . . . . . . . 23
Settings . . . . . . . . . . . . . . . . . . . . . . . . . . . . . . . . . . . . . . . . . . . . . . . . . . . . . . . . . . . . . . . . . . . . 26
Basic settings . . . . . . . . . . . . . . . . . . . . . . . . . . . . . . . . . . . . . . . . . . . . . . . . . . . . . . . . . . . . . . . . . . . . . . . . . 26
Configuring other settings with the Web configurator . . . . . . . . . . . . . . . . . . . . . . . . . . . . . . . . . . 31
Status of the telephone . . . . . . . . . . . . . . . . . . . . . . . . . . . . . . . . . . . . . . . . . . . . . . . . . . . . . . . . . . . . . . . 39
Appendix . . . . . . . . . . . . . . . . . . . . . . . . . . . . . . . . . . . . . . . . . . . . . . . . . . . . . . . . . . . . . . . . . . 40
Service (Customer Care) . . . . . . . . . . . . . . . . . . . . . . . . . . . . . . . . . . . . . . . . . . . . . . . . . . . . . . . . . . . . . . . 40
Manufacturer's advice . . . . . . . . . . . . . . . . . . . . . . . . . . . . . . . . . . . . . . . . . . . . . . . . . . . . . . . . . . . . . . . . . 40
Menu tree . . . . . . . . . . . . . . . . . . . . . . . . . . . . . . . . . . . . . . . . . . . . . . . . . . . . . . . . . . . . . . . . . . . . . . . . . . . . 42
Display icons . . . . . . . . . . . . . . . . . . . . . . . . . . . . . . . . . . . . . . . . . . . . . . . . . . . . . . . . . . . . . . . . . . . . . . . . . 43
Index . . . . . . . . . . . . . . . . . . . . . . . . . . . . . . . . . . . . . . . . . . . . . . . . . . . . . . . . . . . . . . . . . . . . . . 44
Template bintec-elmeg, Version 1, 01.07.2014
elmeg IP630
If the telephone is connected to a telephone system, the telephone system can have a
bearing on the telephone functions or block or add to them.
Further information: User guide for the telephone system
This guide is aimed at telephone users.
Information for administrators: www.bintec-elmeg.com
3
Page 4
elmeg IP630 / en / elmeg IP630 / overview_maxwell_3.fm / 8/24/16
11
14
1 2 3 4
10
13
12
7
8
9
6
15
5
16
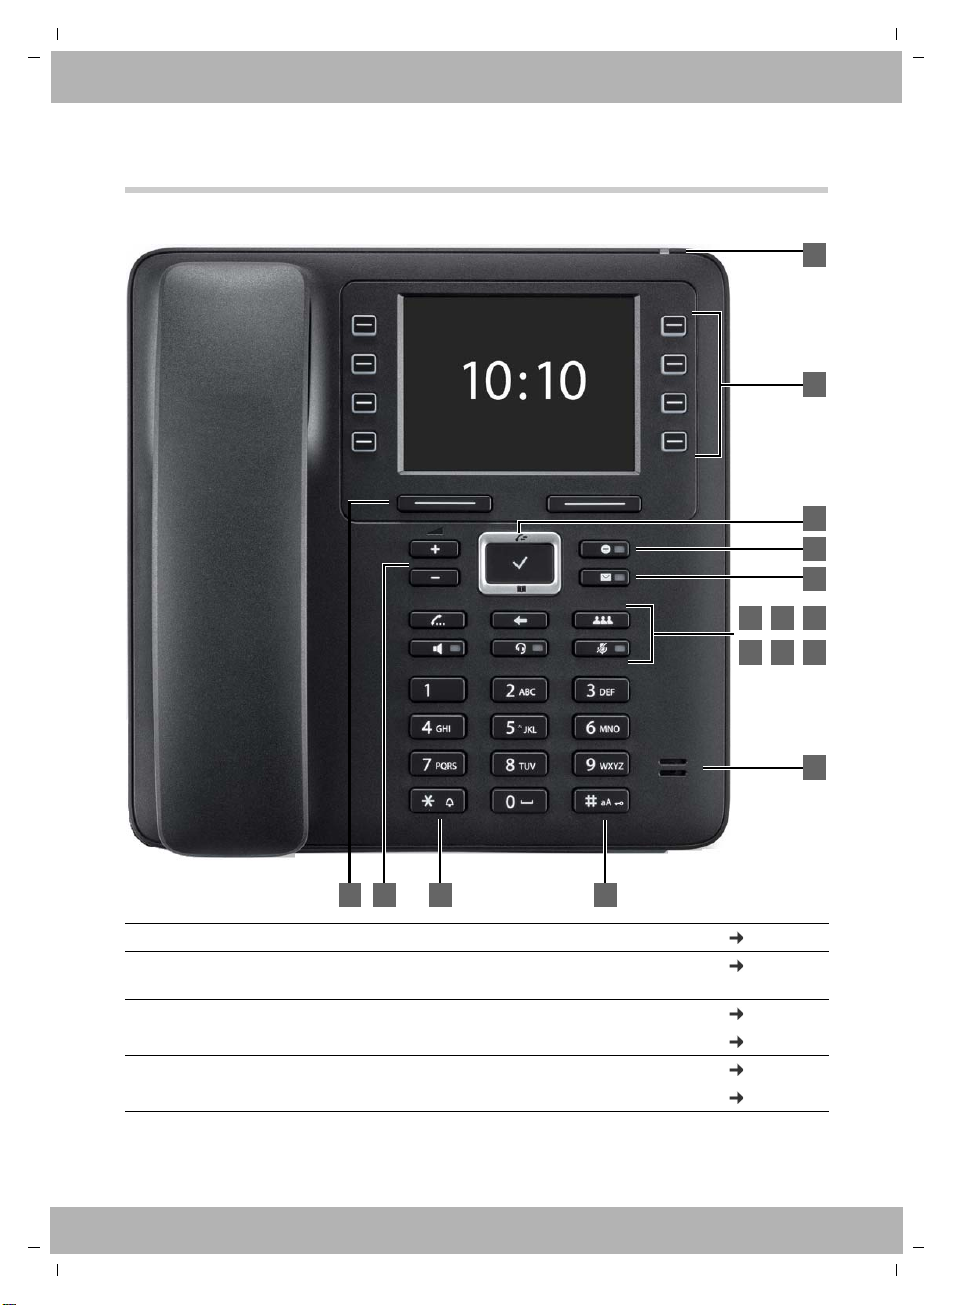
Overview
Keys
bintec elmegOverview
1 Display keys Activate the display key functions page 9
2 Volume keys Depending on the operating mode: Adjust the vol-
ume of the speaker, receiver, headset or ringtone
3 Star key Display special characters when inputting text page 12
Activate/deactivate the ringtone page 15
4 Hash key Switch text mode (upper/lower case letters, digits) page 12
Lock/unlock the keypad page 12
4
page 16
elmeg IP630
Template bintec-elmeg, Version 1, 01.07.2014
Page 5
elmeg IP630 / en / elmeg IP630 / overview_maxwell_3.fm / 8/24/16
bintec elmeg Keys
5 Status LED Status display for incoming calls
Flashes: Incoming call
Lights up: Call in progress
6 Function keys Programmable keys page 10
LED function depends on the key assignment page 36
7 Control key Scroll through lists and entries. In idle status: page 10
Open the call list page 20
Open the menu page 11
Open the directory page 23
8 Do Not Disturb key Activate/deactivate Do Not Disturb (DND) page 15
Lights up: "Do Not Disturb" function is activated
9 Message Centre Open call and message lists page 20
Flashes: New message in the Message Centre
10 Consultation call keyInitiate/end consultation call; put participant on
hold
11 End/back key Cancel function; page 11
go back one menu level (press briefly);
return to idle status (press and hold)
12 Conference call key Initiate conference call page 18
13 Handsfree key Activate/deactivate speakers page 16
Start dialling page 13
Lights up: Call is being made via the speaker
(handsfree mode)
14 Headset key Make call via headset page 15
Start dialling page 13
Lights up: Call is being made via the headset
15 Mute key Activate/deactivate microphone (mute) page 16
Lights up: The microphone is muted
16 Microphone Microphone of the handsfree unit
page 18
page 11
Template bintec-elmeg, Version 1, 01.07.2014
elmeg IP630
5
Page 6
elmeg IP630 / en / elmeg IP630 / overview_maxwell_3.fm / 8/24/16
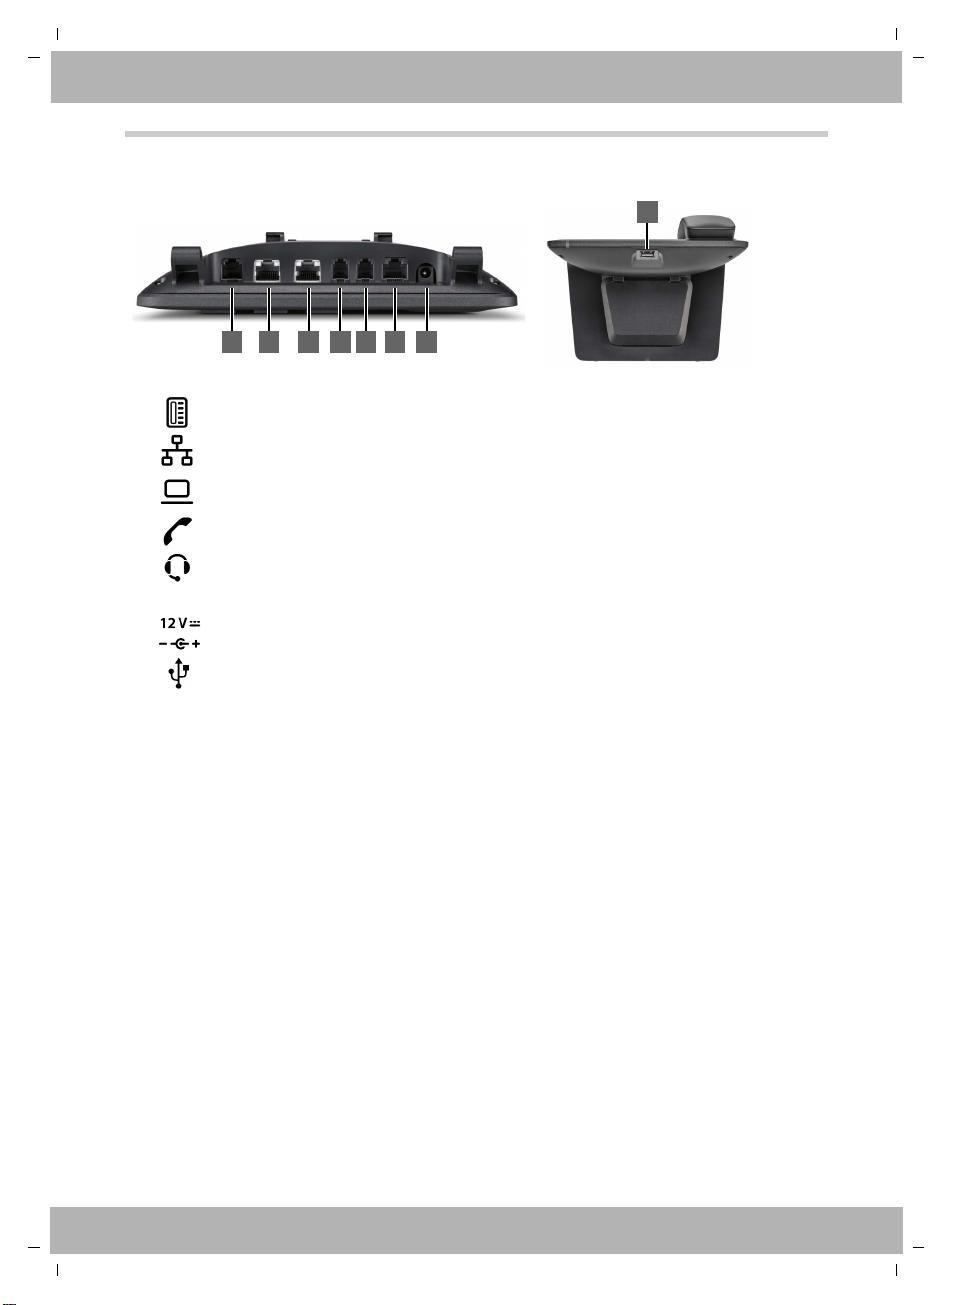
1 2 3 4 5 6 7
8
EHS
Connections
1 Expansion module with additional function keys
2LAN (PoE)
3
4 Receiver
5 Headset with RJ11 plug
6 EHS headset (Electronic Hook Switch)
7Power adapter
PC; a PC can also be connected to the telephone instead of to the local network, the
telephone establishes the network connection
bintec elmegConnections
8USB
6
elmeg IP630
Template bintec-elmeg, Version 1, 01.07.2014
Page 7
elmeg IP630 / en / elmeg IP630 / user_guide_operating_steps.fm / 8/24/16
bintec elmeg Illustration in the user guide
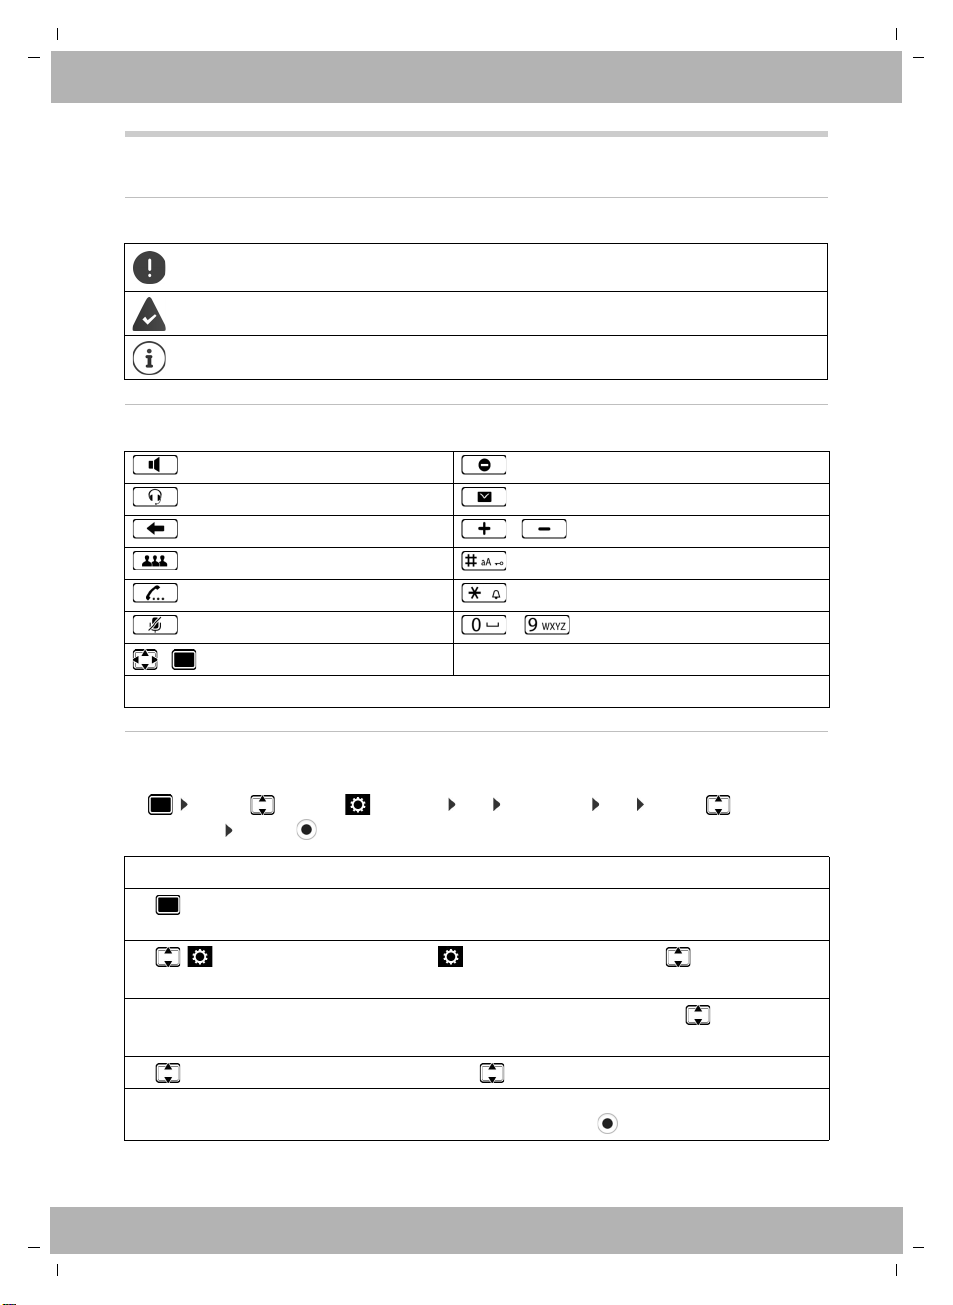
Illustration in the user guide
Icons
Important information regarding function and appropriate handling or functions that
could generate costs.
Prerequisite for carrying out the following action.
Additional helpful information.
Keys
Handsfree key Do not disturb key
Headset key Message key
End/Back key / Volume keys
Conference call key Hash key
Consultation call key Star key
Mute key – Digit/letter keys
/ Control key rim / centre
OK, Back, Select, Save, . . . Display keys
Template bintec-elmeg, Version 1, 01.07.2014
Procedures
Example: Setting the display language
¤ . . . use to select Settings OK Language OK . . . use to select the
language Select ( = selected)
Step Follow this procedure
¤ Press the centre of the Control key in idle status.
The main menu opens.
¤
¤ OK
¤ Language
¤ OK
Navigate to the icon using the Control key .
Press OK to confirm. The submenu Settings opens.
Select the Language entry using the Control key .
Press OK to confirm. The submenu Language opens.
¤ Press the Control key to select the language required.
¤ Select Press the Display key Select to highlight the entry.
The selected option is indicated with .
elmeg IP630
7
Page 8
elmeg IP630 / en / elmeg IP630 / security.fm / 8/24/16
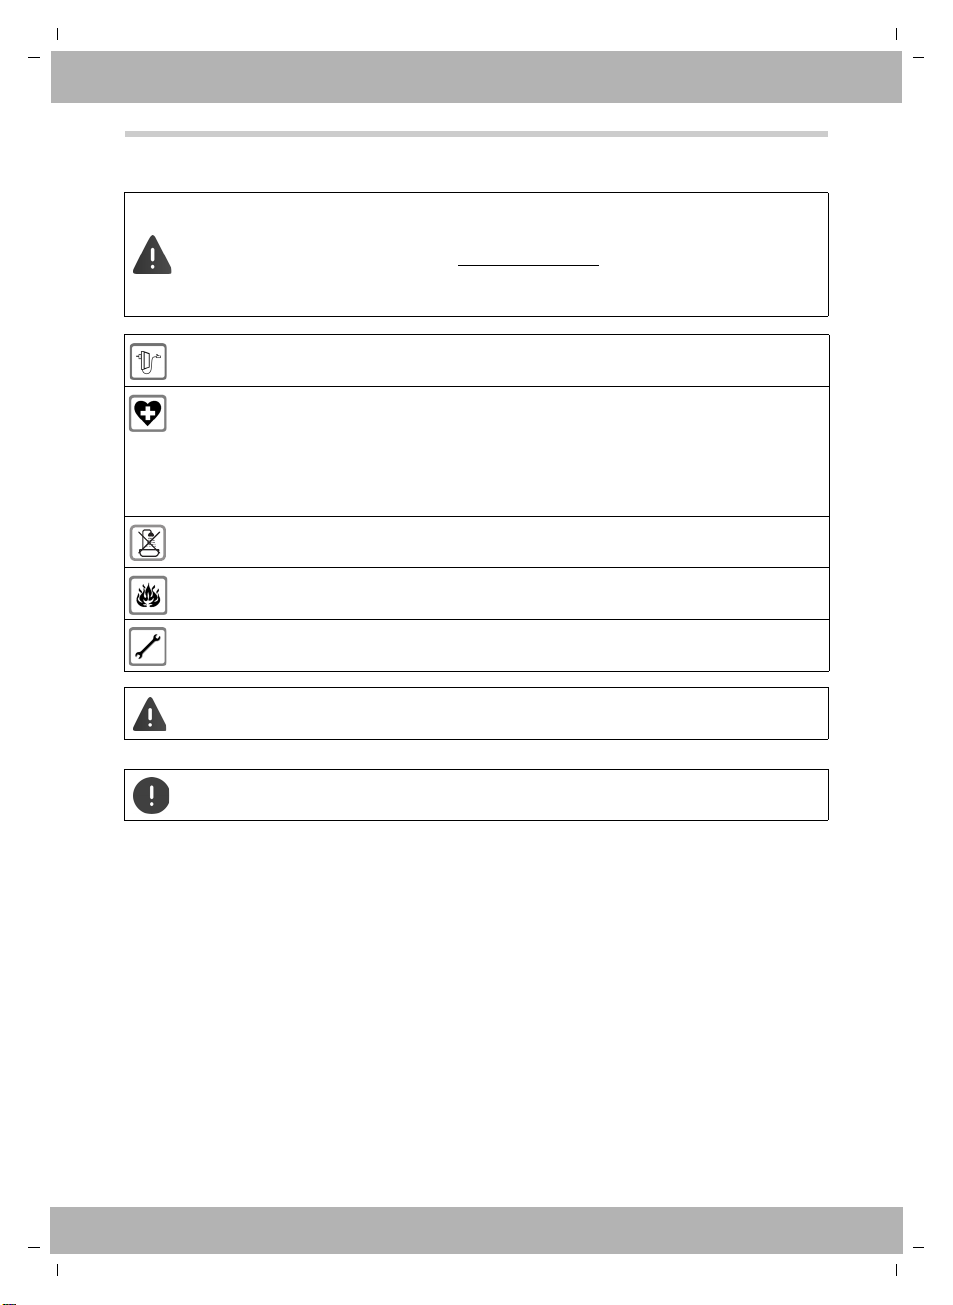
Safety precautions
Read the safety precautions and the user guide before use.
Comprehensive user guides for all telephones and telephone systems as well as for
accessories can be found online at bintec-elmeg.com
thereby help to save paper while providing fast access to the complete up-to-date
documentation at any time.
Use only the power adapter indicated on the device.
Using your telephone may affect nearby medical equipment. Be aware of the technical
conditions in your particular environment, e.g. doctor's surgery.
If you use a medical device (e.g. a pacemaker), please contact the device manufacturer.
They will be able to advise you regarding the susceptibility of the device to external
sources of high frequency energy (for the specifications of your bintec elmeg product
see "Specifications").
The devices are not splashproof. For this reason do not install them in a damp environment such as bathrooms or shower rooms.
Do not use the devices in environments with a potential explosion hazard
(e.g. paint shops).
Remove faulty devices from use or have them repaired by our Service team, as these
could interfere with other wireless services.
bintec elmegSafety precautions
in the Support category. We
Template bintec-elmeg, Version 1, 01.07.2014
The device cannot be used in the event of a power failure. It is also not possible to transmit emergency calls
To connect the phone to the local network and PC only use shielded cables.
8
elmeg IP630
Page 9
elmeg IP630 / en / elmeg IP630 / operating.fm / 8/24/16
Select LineRedial
4
5
415
6
12:1501/04/2016
Martin
Pat
BLF 1
Peter
IP1
IP2
Susan B. Group 1
10 Ben
1
2
3
Back OK
Current display key
functions
Display keys
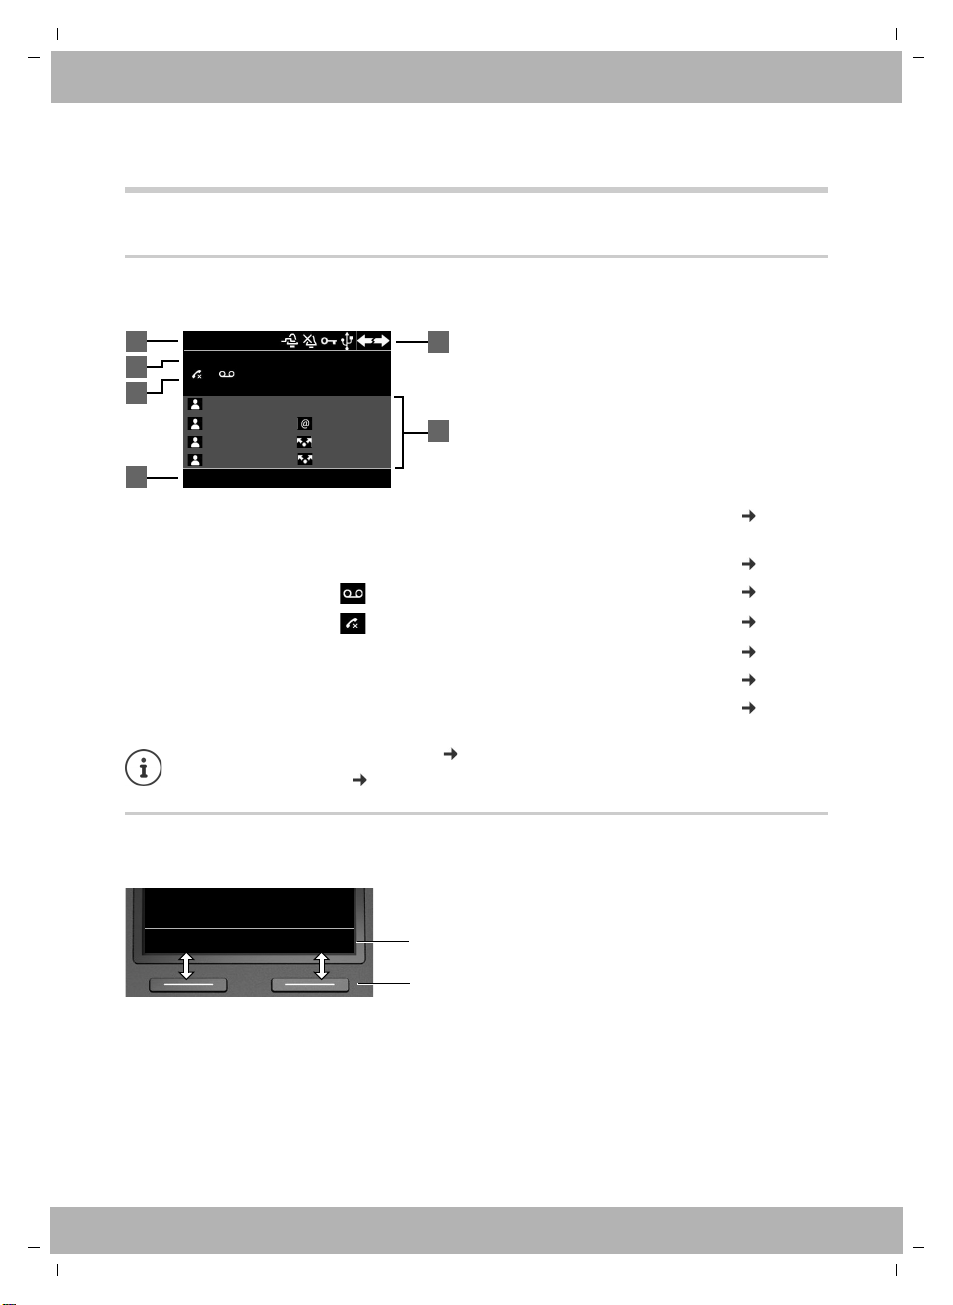
bintec elmeg Getting to know your telephone
Using the telephone
Getting to know your telephone
Display
Display in idle status (example):
1
Name of the standard connection, possibly abbreviated (is allocated by the
administrator e. g. extension and/or name of the telephone user)
2 Date and time page 26
3 Message display: New messages on the answer machine page 22
Missed calls page 20
4 Display key functions page 9
5 Status icons page 43
6 Assignment of the function keys page 10
page 13
Display keys
The display keys perform a range of functions depending on the operating situation.
elmeg IP630
Template bintec-elmeg, Version 1, 01.07.2014
Setting/modifying display colours: page 29
Setting date and time: page 26
9
Page 10
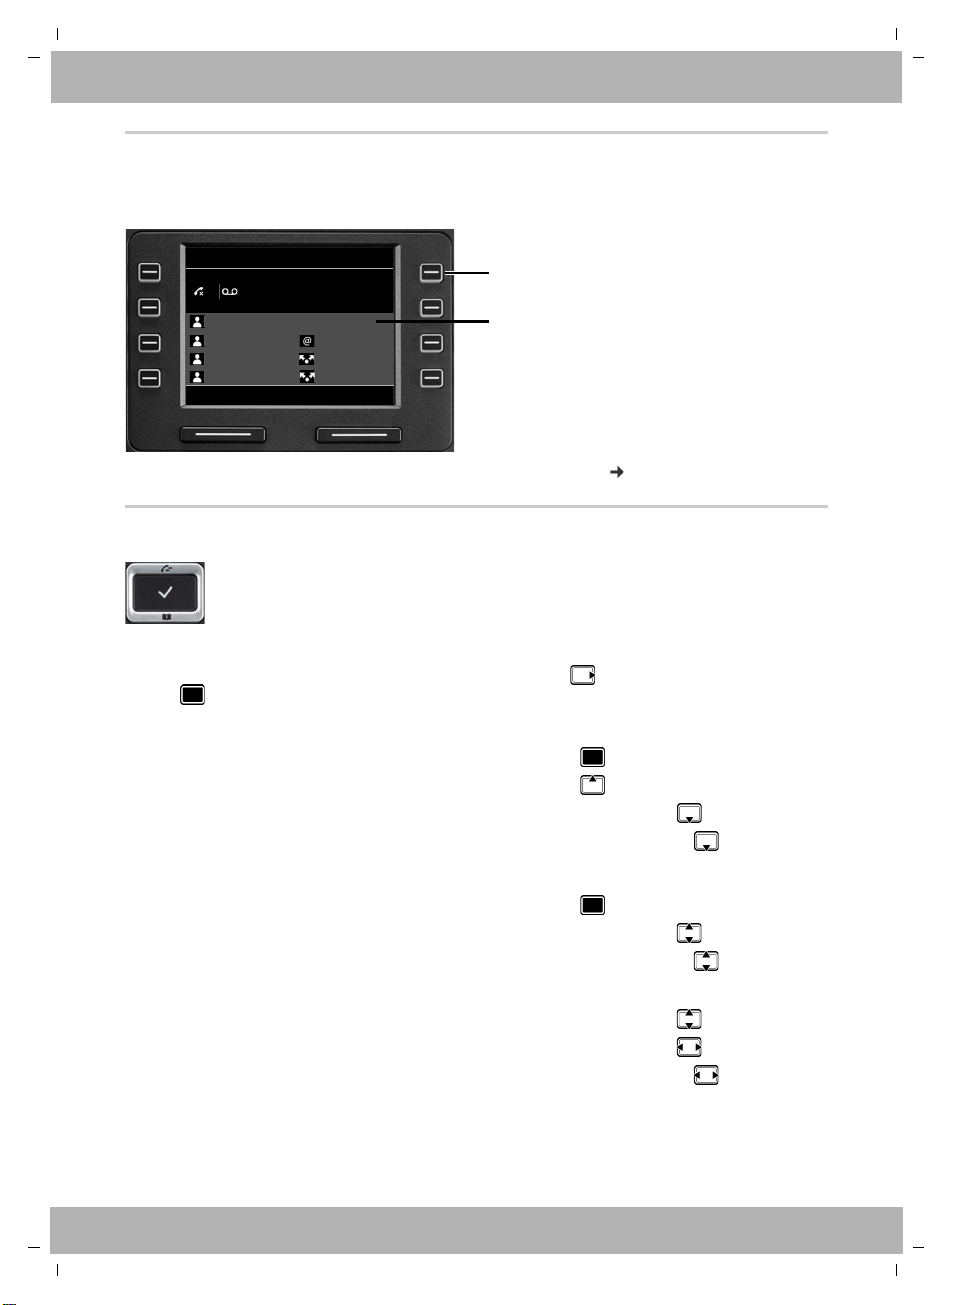
elmeg IP630 / en / elmeg IP630 / operating.fm / 8/24/16
Function key
Current value assigned
to the function key
Select LineRedial
415
12:1501/04/2016
Martin
Pat
BLF 1
Peter
IP1
IP2
Susan B. Group 1
01 Ben
Function keys
Programmable function keys offer rapid access to frequently used numbers and functions.
current assignment is displayed in idle status.
The
Assigning values to the function keys with the Web configurator: page 36
Control key
The Control key enables you to navigate the menus and input fields, and also to
call up certain functions depending on the situation.
bintec elmegGetting to know your telephone
Template bintec-elmeg, Version 1, 01.07.2014
In the description below, the side of the Control key (up, down, right, left) that you have to press
in the different operating situations is marked in black, e. g. for "press right on the Control
key" or for "press the centre of the Control key".
In idle status
Open the main menu
Open the call lists
Open the directory assigned to the key Briefly press
Open the list of available directories Press and hold
In submenus and lists and selection fields
Select/confirm function
Scroll one line upwards/downwards Briefly press
Scroll the list upwards/downwards Press and hold
In input fields
Moves the cursor up/down line by line Briefly press
Moves the cursor to the left/right one character at a time Briefly press
Moves the cursor rapidly to the left/right Press and hold
10
elmeg IP630
Page 11
elmeg IP630 / en / elmeg IP630 / operating.fm / 8/24/16
Menu
OKBack
Settings
Select Services
Contacts
Settings
OKBack
Date + Time
Audio Settings
Display
Language
Local Network
bintec elmeg Getting to know your telephone
During a conversation
Open the directory Briefly press
Open the list of available online directories Press and hold
Menu navigation
The functions of the telephone are displayed in a menu that consists of several levels.
Menu
overview page 42
Main menu
In idle status: Press the centre of the Control key .
The functions of the display menu are displayed each with
their icon.
The submenu selected is shown inverted.
¤ . . . Use the Control key to select a submenu
¤ Press the Display key OK
or
¤ Press the Control key
Submenus
Template bintec-elmeg, Version 1, 01.07.2014
elmeg IP630
The functions in the submenus are displayed as lists. The
selected function is highlighted.
¤ . . . Use the Control key to select a function
¤ Press the Display key OK
or
¤ Press the Control key
If not all the functions can be displayed, arrows are shown below.
Displaying more list entries: . . . scroll in the direction of the arrow with the Control key
Returning to the previous menu level
¤ Press the Display key Back
or
¤ press the End key briefly
Returning to idle status
¤ Press and hold the End key
If a key is not pressed, after 3 minutes the display will automatically change to idle
status.
Settings which have not been saved or confirmed are rejected.
11
Page 12
elmeg IP630 / en / elmeg IP630 / operating.fm / 8/24/16
Edit Entry
SetBack
Pa|
First Name:
Artmann
Surname:
abc2дбавгз abc
Entering text
Input position
¤ Use to select an entry field. A field is activated when the cursor is blinking inside it.
¤ Use to move the position of the cursor.
Correcting incorrect entries
Delete characters to the left of the cursor:
Entering letters/characters
Multiple letters and digits are assigned to each key between
and and the key. As soon as a key is
pressed, the possible characters are displayed at the bottom of the display.
The selected character is highlighted.
Select letters/digits:
¤ Press the key briefly several times in succession
Switch between lower case, upper case and digit entry mode:
¤ Press the Hash key . . . the mode set is displayed at the bottom on the right
When editing a directory entry, the first letter and each letter following a space is
automatically in upper case.
Entering special characters:
¤ Press the Star key . . . the available special characters are displayed . . . use to
navigate to the character you want OK
bintec elmegGetting to know your telephone
Locking/unlocking the keypad
The keypad lock prevents any accidental use of the telephone.
Locking the keypad: ¤ Press and hold . . . the following icon appears on the display
Unlocking the keypad: ¤ Press and hold . . . use to enter the keypad lock PIN
Changing the keypad lock PIN with the Web configurator: page 31
If a call is indicated on the handset, the keypad automatically unlocks and you can
accept the call. It then locks again when the call is finished.
It is not possible to call emergency numbers either when keypad lock is activated.
Template bintec-elmeg, Version 1, 01.07.2014
12
(default setting: 1234) OK
elmeg IP630
Page 13
elmeg IP630 / en / elmeg IP630 / telephony.fm / 8/24/16
bintec elmeg Making calls
Making calls
The phone is connected to the LAN.
At least one VoIP connection has been set up and assigned to the telephone.
VoIP connections are set up by the administrator with the Web configurator or
assigned using a PABX.
Up to four VoIP connections (call numbers) can be assigned to the telephone. The first
connection to be set up is the standard send connection. The name of the standard
send connection is displayed in idle status at the top left of the display header
( page 9).
No connection available: the following icon is shown in the display
Information about the telephone connections and the standard send connection:
Web configurator page 39
Making a call
¤ . . . use to enter a number lift the handset
or
¤ lift the handset . . . use to enter a number Dial
Calls are initiated via the standard send connection if you do not select another option. To use
another VoIP connection:
¤ Select Line . . . use to select required connection Dial . . . use to enter the
number Dial
Template bintec-elmeg, Version 1, 01.07.2014
Using the speaker to make calls:
Using the headset to make calls:
You can switch over at any time during the conversation.
In the following instructions, the icon also always stands for or .
When entering the call number:
Deleting incorrectly entered numbers to the left of the cursor:
Transferring a number to the local directory: ¤ ( page 23)
Cancel dialling:
Incoming call during number entry:
Accept the call:
Reject the call: ¤ Reject
¤ End
¤ Accept
¤ Press the Handsfree key
¤ Press the Headset key
¤
elmeg IP630
13
Page 14

elmeg IP630 / en / elmeg IP630 / telephony.fm / 8/24/16
Dialling from the directory
¤ . . . use to open the directory select entry lift the handset
or
¤ . . . use to select Contacts OK select entry lift the handset
More than one number in the directory entry: . . . use to select a number OK
Dialling from the redial list
The redial list contains the most recently dialled numbers.
¤ In idle status press Redial select entry lift the handset
or
¤ . . . use to open the call lists Outgoing select entry lift the handset
Dialling from a call list
The call lists contain the most recent accepted, outgoing and missed calls ( page 20). If the
number is saved in the directory, the name is displayed.
¤ . . . use to open the call lists select a list (All, Accepted, Missed, Outgoing)
select entry lift the handset
bintec elmegMaking calls
The list of new missed calls can also be opened by pressing the Message key .
Dialling a number using a function key
Dialling numbers with one press of a function key.
A number has been assigned to the function key.
Assigning numbers to function keys: Web configurator ( page 36).
¤ Press the function key . . . the number saved for the function key is dialled, the handsfree
function is activated
Ringback
Asking for a ring back when the line of a participant you have called is busy.
The PABX or the provider supports this function.
Initiating ringback
¤ Ringback . . . the ringback request is registered
When the other participant's line is free, the ringback is initiated. The telephone rings,
Ringback is displayed in the header.
There can be an active ringback on each line.
Template bintec-elmeg, Version 1, 01.07.2014
14
elmeg IP630
Page 15
elmeg IP630 / en / elmeg IP630 / telephony.fm / 8/24/16
Incoming Call
SilenceReject
12:15
via 1 IP1
Peter Smith
089123456789
089123456789
) (
)
(
bintec elmeg Making calls
Cancelling ringback
¤ . . . use to select Select Services OK Cancel Ringback OK
Anonymous calling
Withhold Calling Line Identification. The number is not shown to the person receiving the call.
The PABX or the provider supports this function.
¤ . . . use to select Select Services OK Withhold Number OK
if necessary, use to select a line Change ( = calls are anonymous)
Incoming calls
An incoming call is indicated by ringing, by a display on the screen and by the flashing Status
LED.
The display shows
• Incoming Call in the header
• the caller's name if it has been stored in the directory
• the caller's number if it has been transmitted
( page 15)
• the line on which the call is coming in on
• a picture of the caller, if one has been transmitted (CNIP)
Template bintec-elmeg, Version 1, 01.07.2014
Accepting the call: ¤ lift the handset
Switching the ringtone off: ¤ Silence
Rejecting the call: ¤ Reject
If the call is a ringback, Ringback is displayed in the header.
When a call comes in, the system looks for a matching entry in the local directory. If
the number is not found there, other directories are searched, if any have been
configured.
Protection from incoming calls
Activating/deactivating the ringtone
An incoming call is not signalled by ringing, but is displayed on the screen.
Switching the ringtone on/off: Press and hold the Star key
Ringtone is switched off: the following icon appears on the display
Ringtone silencing for anonymous calls: page 27.
elmeg IP630
15
Page 16

elmeg IP630 / en / elmeg IP630 / telephony.fm / 8/24/16
Switching the alert tone (beep) on/off
Switch on an alert tone (beep) instead of the ringtone:
¤ Press and hold the Star key press Beep within 3 seconds . . . the following icon
appears in the status line
Switching off the alert tone: Press and hold the Star key
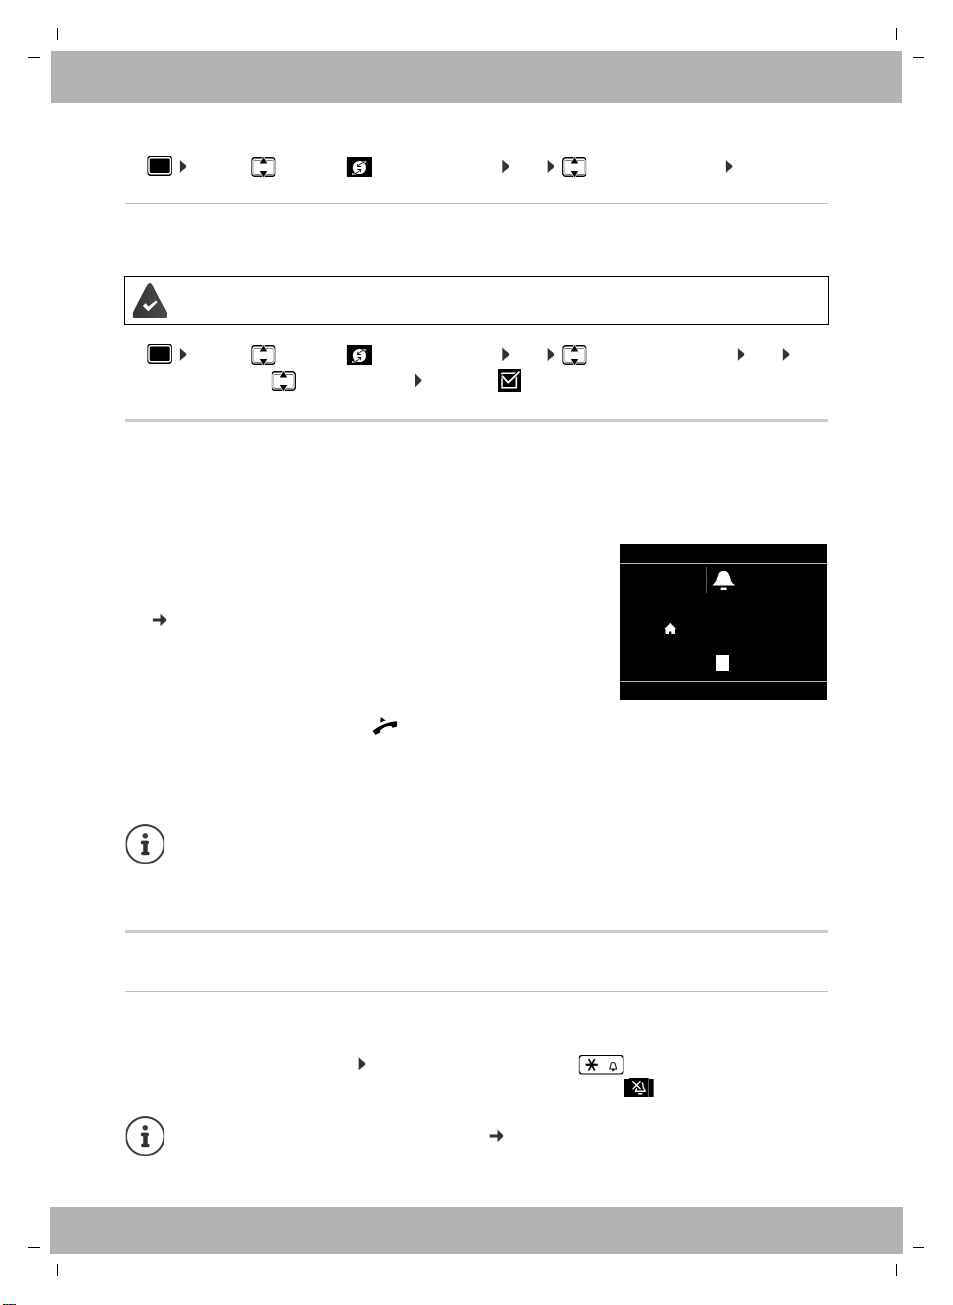
Switching the "Do not disturb" function on and off
Incoming calls are not signalled.
Switching "Do not disturb" on or off: Press the Do not disturn key
"Do not disturb" is switched on: the Do not disturb key is illuminated, the display shows
"Do not disturb" active
Set up call forwarding: page 19
The administrator can create a list of numbers which should never be signalled by the
telephone in the Web configurator.
During a conversation
bintec elmegMaking calls
Changing the volume
Changing the volume of the handset, the handsfree function or the headset during a call.
Louder: Save
Quieter: Save
If there is no input for two seconds, the most recent value is stored automatically.
Permanent volume settings: page 27.
The volume can be set at 10 levels.
The current setting is displayed.
Muting
Switching off the microphone in the handset, the handsfree facility and the headset. The other
party to the call no longer hears what is being said.
Activating/deactivating the microphone: Press the Mute key
Microphone is switched off: the Mute key is illuminated
Switching the handsfree function on/off
Making calls via the speaker and the microphone of the handsfree function.
Switching on the handsfree function during a call:
¤ Press the Handsfree key Replace handset
Handsfree function is switched on: the key is illuminated
Switching off the handsfree function during a call:
¤ Lift the handset continue the call through the handset
Template bintec-elmeg, Version 1, 01.07.2014
16
elmeg IP630
Page 17

elmeg IP630 / en / elmeg IP630 / telephony.fm / 8/24/16
Call Swap
SwapEnd
12:15
via 1 IP1
On hold: Susan Black
Peter Brown
089123456789
bintec elmeg Making calls
Displaying information
¤ Info
Function keys assigned: The assignment of the function keys is displayed ( page 36)
Function keys not
assigned:
Information about the device is displayed ( page 30)
Ending a call
¤ Replace the handset
Talking with several participants on the telephone
Accepting/rejecting Call Waiting
The PABX or the provider supports this function and the function is activated on the
telephone ( page 33).
Another call comes in during a conversation. The call is signalled in the display and by the Call
Waiting tone. Call Waiting is displayed in the header.
Accepting the call:
¤ Accept . . . the connection to the waiting participant is made. The first participant is put on
hold and hears some on-hold music.
Rejecting the call:
¤ Reject
Permit/prevent Call Waiting
Permit or prevent Call Waiting during a call for all or for certain lines.
¤ . . . use to select Select Services OK Call Waiting OK if necessary,
Consultation calls
Consulting a second participant during a conversation.
¤ Press the Consultation call key
or
¤ Consult
. . . the first conversation is put on hold
¤ Initiate a consultation call via the keypad or from the
. . . when the participant picks up, conduct consultation
call
elmeg IP630
Template bintec-elmeg, Version 1, 01.07.2014
press to select line Change ( = Call Waiting is permitted)
Define settings for Call Waiting with the Web configurator page 33
directory
17
Page 18

elmeg IP630 / en / elmeg IP630 / telephony.fm / 8/24/16
Conference
End
12:15
Susan
00499876543...
The display shows:
On hold: <Number> or <name in the directory>
Ending a consultation call:
¤ End . . . the connection to the participant on hold is reactivated
or
¤ Replace the handset . . . both calls are ended
The call on hold is transferred to the consultation participant.
If the consultation participant does not accept the call: a recall is initiated by the participant
on hold (your telephone rings). If you accept the call, you will be reconnected to the
participant previously on hold.
Initiating consultation call from the directory
During the conversation:
¤ Press the Control key select entry Options Dial OK . . . if necessary,
select the number with OK . . . the first conversation is put on hold, the number is
dialled
or
¤ Consult . . . the first conversation is put on hold Directory select entry Dial . . .
if necessary, use to select the number OK . . . the number is selected
bintec elmegMaking calls
Call swapping
Switch back and forth between two participants. The other call is placed on hold.
¤ Call a second participant during an external conversation (consultation call) or accept a
waiting call . . . use Swap to switch between the participants
Ending the connection to the active participant:
¤ End . . . the connection to the participant on hold is reactivated
Other ways of ending the call-swapping session:
• Replace the handset : The other two participants will be connected to one
another.
• The active participant ends the conversation: The connection to the participant on
hold is reactivated
• The participant on hold ends the conversation: The connection to the active
participant remains active.
Conference call
Speaking to two participants at the same time.
Initiating a conference call during a conversation:
¤ Press the Conference call key call second par-
ticipant . . . the conference is established as soon as the
call is accepted
Initiating a conference call from call swapping:
¤ Press the Conference call key . . . the active par-
ticipant and the participant on hold will be switched
into the conference
18
Template bintec-elmeg, Version 1, 01.07.2014
elmeg IP630
Page 19

elmeg IP630 / en / elmeg IP630 / telephony.fm / 8/24/16
bintec elmeg Making calls
Ending a conference call:
¤ End or replace the handset . . . the conference ends for all the participants
Transferring a call
Connecting both external participants to one another during call swapping or in an external
consultation call:
¤ Replace the handset . . . the call on hold will be transferred to the active participant.
If the active participant does not accept the call, a recall will be initiated by the participant on
hold.
Call divert
All incoming calls are diverted to another line or a network mailbox. A call divert function can
be configured for every line on the telephone.
The PABX or the provider supports this function.
If calls are diverted to an answer machine, it must be set up by the administrator with
the Web configurator.
Activating call divert:
¤ . . . use to select Select Services OK Call Divert OK . . .
if necessary, use to select a connection Change
¤ . . . use to select Phone Number enter number Save
or
¤ . . . use to select Voice Mail Save . . . calls are forwarded to the answer machine
assigned to the connection.
In idle status, the active call divert and the destination for the diverted call are shown on the
display.
Deactivating call divert:
¤ . . . use to select Selec t Services OK Call Divert OK . . . connections
with active call divert are marked with . . . use to select a connection Change
Template bintec-elmeg, Version 1, 01.07.2014
elmeg IP630
Specifying different call diverts for engaged numbers or calls which are not picked up
with the Web configurator page 34
19
Page 20

elmeg IP630 / en / elmeg IP630 / call_lists.fm / 8/24/16
OptionsView
Call Lists
All Accepted Missed Outgoing
08912345678
Tod ay, 0 9:30
Peter Brown
22.06, 11:30
Call lists
The telephone saves different types of calls in lists. The following call lists are available:
All Calls All outgoing, accepted and missed calls.
Accepted Calls Calls that were accepted.
Missed Calls Calls that were not accepted.
Missed calls that have not yet been viewed can also be accessed via the
Message key
Outgoing Calls Last selected numbers (redial list).
If the call list is full, a new entry overwrites the oldest.
Opening the call list
¤ . . . use to select a list (All, Accepted, Missed, Outgoing) . . . the calls in the selected
list type are displayed
Information about the calls
• Icon for the call type:
Missed Calls,
Accepted Calls,
Outgoing Calls
• Caller's number. If the number is saved in the directory,
the name is displayed instead.
• Date and time of the call
bintec elmegCall lists
( page 21).
Displaying more information about an entry: View . . . use to scroll through the entry
• Number type (if the caller is entered in the directory): Phone Home, Phone Office,
Phone Mobile
• Call duration
• Info: more information supplied by the provider (CNIP); otherwise the telephone number
Calling back a caller
¤ . . . use to select a list . . . use to select entry lift handset . . . the
number is dialled
20
Template bintec-elmeg, Version 1, 01.07.2014
elmeg IP630
Page 21

elmeg IP630 / en / elmeg IP630 / call_lists.fm / 8/24/16
Select LineRedial
415
12:1501/04/2016
Martin
Pat
BLF 1
Peter
IP1
IP2
Susan B. Group 1
10 Ben
bintec elmeg Message Centre
Copying a number to the directory
¤ . . . use to select a list . . . use to select an entry Options Save Number
. . . then
Creating a new entry: < New Entry > OK
or
Adding a number to an existing entry: . . . use to select an entry OK
¤ . . . use to select a number category OK . . . use to enter more data for the entry
Save entry: Save
More information about the local directory: page 23
Deleting entries
Deleting an entry:
¤ . . . use to select a list . . . use to select an entry Options Delete
Entry OK
Deleting all the entries in the list currently selected:
¤ . . . use to select a list Options Delete List OK confirm prompt with Ye s
elmeg IP630
Template bintec-elmeg, Version 1, 01.07.2014
Message Centre
The Message Centre gives you quick access with a single key press to missed calls and voice
mails on an answer machine.
The Message key flashes if there are new messages. A missed call is considered new if it
has been received since the Missed Calls list was last opened; a voice mail is considered new if
it has not been listened to.
The administrator can use the Web configurator to specify which types of messages are
accessible via the Message Centre.
Icons for message types and the number of new messages
are shown in idle status.
New messages:
on a network mailbox ( page 22)
in the Missed Calls list ( page 20)
The number displayed indicates the total for all the connections involved.
21
Page 22

elmeg IP630 / en / elmeg IP630 / call_lists.fm / 8/24/16
OKBack
Messages
Missed Calls
missed calls
Voice Mail
new messages
old messages
4
14
11
Opening the Message Centre:
¤ Press the Message key . . . use to select the
message type (Voice Mail or
Missed Calls) OK
The Voice Mail list is always displayed, when an answer machine is stored in the
telephone, the Missed Calls list only if it contains messages.
Voice mails
Managing messages stored in a network mailbox. Every network mailbox accepts incoming
calls on the corresponding VoIP phone number.
The administrator has entered the network mailbox(es) in the telephone with the Web
configurator or there is an answer machine available with the PABX.
Playing back voice mails
¤ Press the Message key OK . . . if necessary, use to select the answer machine
(connection) OK . . . all the voice mails for the connection are displayed use to select
an entry Play . . . the message is played back through the speaker on the telephone
Listening to messages through the handset:
¤ Lift the handset
Ending playback: ¤ Press the End Call key or replace the handset
bintec elmegVoice mails
22
Template bintec-elmeg, Version 1, 01.07.2014
An incoming call ends playback.
Editing voice mails
¤ Press the Message key OK . . . if necessary, use to select the answer machine
(connection) OK . . . all voice mails for the connection are displayed select entry . . .
then
Viewing call details:
Deleting the recording:
Deleting all entries:
Transferring the number to the directory:
¤ View
¤ Options Delete Entry OK
¤ Options Delete List OK Confirm prompt with Ye s
¤ Options Save Number OK create a new entry in the
directory or add the number to an existing entry ( page 23)
elmeg IP630
Page 23

elmeg IP630 / en / elmeg IP630 / directories.fm / 8/24/16
OptionsView
Directory
Brown, Susan
Fischer, Alexander
Meyer, Peter
Oscar
Smith, Elisabeth
OptionsEdit
View Entry
1: 08912345678
2: 004456565656
1: 01231234567
1: 089998877665
Susan
Brown
bintec elmeg Directories
Directories
The options are:
• Local directory
• Company directory ( page 25)
The local directory is pre-set as a standard directory. That means that it is the directory
that is opened with the Control key and into which entries are copied with the
"Copy to directory" function.
The administrator can make another directory, such as the company directory, the
standard directory.
Local directory
Opening the directory
In idle status:
¤ Press the Control key
or
¤ . . . use to select Contacts OK Directory OK
The entries are shown in alphabetical order and are sorted
by last name by default.
Change sort order:
¤ Options Sort by First Name or Sort by Surname
elmeg IP630
Template bintec-elmeg, Version 1, 01.07.2014
If an entry does not include a name, the first phone number entered is stored and
displayed as the last name.
Displaying a directory entry
¤ . . . use to select an entry View
or
¤ enter the first letter of the name . . . the first entry which starts with that letter is displayed
A directory entry can contain the following information:
• First name and last name: (max. 16 characters each)
• Up to six phone numbers (max. 32 digits each)
Two numbers can be assigned to the following categories:
work numbers (Phone Office 1/2)
private numbers (Phone Home 1/2)
mobile numbers (Phone Mobile 1/2)
¤ . . . use to scroll through the directory entry
23
Page 24

elmeg IP630 / en / elmeg IP630 / directories.fm / 8/24/16
Creating a new entry
¤ Options New Entry . . . use to enter data for the entry and use to move between
the entry fields Save
Creating a new entry with a dialled number:
¤ Enter the number -> Dir < New Entry > OK . . . use to select the number
category OK . . . use to enter more data for the entry Save
Creating a new entry with a number from the call list: page 21
Information on entering text: page 12
Changing an entry
¤ . . . use to select an entry View Edit . . . use to select an entry field
if necessary, delete old text, enter new text Save
Adding a number when dialling:
¤ Enter the number -> Dir . . . use to select an entry OK . . . use to select the
number category OK Save
Information on entering text: page 12
bintec elmegDirectories
Dialling from the directory
¤ . . . use to select an entry lift the handset
More than one number in the directory entry: . . . use to select a number OK
or
¤ . . . use to select an entry View . . . if necessary, use to select a number Options
Use Number OK
Initiate a consultation call from the directory: page 17
Deleting directory entries
Delete an entry selected from the list:
¤ Select an entry View Options Delete Entry OK . . . the entry is deleted
immediately
Deleting the whole list:
¤ Options Delete List OK . . . Confirm prompt with Ye s
24
elmeg IP630
Template bintec-elmeg, Version 1, 01.07.2014
Page 25

elmeg IP630 / en / elmeg IP630 / directories.fm / 8/24/16
ViewBack
Company directory
Abercrombie, Susan
Andrews, Alexander
Ant, Peter
Anton
a|
New SearchBack
Abercrombie, Susan
CEO
Company
1: 00491234567890
2: 00234 5989 1234 5678
1: 00491234567890
@
0000 123456789
bintec elmeg Directories
Company directory
If there is a directory available on your company's network you can use it on the telephone.
The administrator has set up and activated the directory in the Web configurator.
Opening the company directory
In idle status:
¤ Press and hold the Control key . . . use to select the company directory OK
or
¤ . . . use to select Contacts OK . . . use to select the company
directory OK
The company directory is shown with the name specified by the administrator in the
Web configurator.
Searching for an entry
¤ Enter the name (or the initial letters) . . . as soon as the
entry process stops, the search starts.
All the matching entries are displayed. If a matching
entry is not found, the search field is redisplayed. You
can launch a new search.
Displaying an entry
¤ . . . use to select an entry View
A directory entry can contain the following information
(depending on the information provided by the company
directory):
Personal information
First Name:, Surname:, Job:, Company:
Numbers: Office, Mobile, Home
Other contact data: Email:, Web Address:, Fax:
Address information: Street:, City:, ZIP Code:, Country:
Dialling a number from the company directory
¤ . . . use to select an entry lift the handset
elmeg IP630
Template bintec-elmeg, Version 1, 01.07.2014
More than one number in the directory entry: . . . use to select a number OK
25
Page 26

elmeg IP630 / en / elmeg IP630 / settings.fm / 8/24/16
The telephone is preconfigured. Individual settings can be modified via the display menu or on
a PC using the Web configurator. Web configurator
Basic settings
Date and time
The address of a time server on the Internet or on the local network is stored on your
phone. The date and time are taken from this time server provided that the phone is
connected to the network and synchronisation with the time server is activated.
Manual settings are overwritten in this case.
Settings for the time server in the Web configurator: page 38
¤ . . . use to select Settings OK Date + Time OK . . . then
Time: ¤ . . . use to enter hours and minutes in 4-digit format
e. g. for 07:15 Save
Time format: ¤ . . . use to select the time format
24h: e.g. 10:00, 18:00
12h: e.g. 10:00 am, 6:00 pm
12h selected: . . . use to select Time of Day: (am / pm)
Date:
Date format:
Save the settings: ¤ Save
¤ . . . use to enter day, month and year in 8-digit format
e. g.
for 14.01.2016 Save
¤ . . . use to select date order
Day Month Year: e. g. 17.04.2016
Month Day Year: e. g. 04.17.2016
bintec elmegBasic settings
Settings
page 31
for 17 April 2016
Template bintec-elmeg, Version 1, 01.07.2014
26
elmeg IP630
Page 27

elmeg IP630 / en / elmeg IP630 / settings.fm / 8/24/16
bintec elmeg Basic settings
Ringtones
Set the volume and melody for the ringtone and/or completely silence the ringtone for
anonymous calls.
Volume
The volume of the ringtone for incoming calls can be set at 10 levels.
¤ . . . use to select Settings OK Audio Settings OK Ringtones
OK Volum e OK . . .
the ringtone will be played with the melody set for external calls at the current
volume; the volume is shown graphically.
¤ . . . use to select the required volume Save
Changing the volume of the ringtone during an incoming call:
¤ Press the volume keys (for louder) or (for quieter)
Melody
Specify different ringtone melodies for different events (External Calls, Internal Calls,
Group Calls) and VoIP connections.
¤ . . . use to select Settings OK Audio Settings OK Ringtones
OK Melodies OK . . . use to select event to be signalled with the melody OK . . .
the melody currently set for connection 1 is played . . . use to select the melody
required if necessary, select melodies for the other connections Save
Template bintec-elmeg, Version 1, 01.07.2014
Loading more ringtones onto the phone: page 35
Ringtone silencing for anonymous calls
Prevent the telephone ringing when no number is transmitted with an external call.
¤ . . . use to select Settings OK Audio Settings OK Ringtones
OK Anonymous Call Silencing Edit ( = the telephone does not ring for anonymous
calls)
elmeg IP630
27
Page 28

elmeg IP630 / en / elmeg IP630 / settings.fm / 8/24/16
Advisory tones
The handset notifies acoustically about different activities and statuses.
Confirmations: At the end of an entry or after making a setting and when a new entry
Key Click: Each press of a key is accompanied by an acoustic signal.
These advisory tones can be switched on/off independently of each other.
arrives in the network mailbox or the call list, if an entry is incorrect.
¤ . . . use to select Settings OK Audio Settings OK Advisory
Tone s OK . . . then
Confirmation/error tone after making entries:
¤ . . . use to select On or Off
Tone when keys are pressed:
Save the settings:
¤ . . . use to select On or Off
¤ Save
Display
Screensaver
For display as a screensaver in idle status, there is a digital or an analogue clock which have been
loaded into the device memory.
¤ . . . use to select Settings OK Display OK Screensaver . . . then
Switch off: . . . use to select Off Save
Switch on: . . . use to select the time the display spends in idle status before the
Select screensaver:
Save the selection: ¤ Save
End screensaver
¤ Press any key briefly . . . the display changes to idle status
screensaver becomes active
10, 20, 30, 40, 50 or 60 minutes
¤ . . . use to select a screensaver (Digital Clock /
Analog Clock
bintec elmegBasic settings
Template bintec-elmeg, Version 1, 01.07.2014
Brightness
The brightness can be set at 10 levels.
¤ . . . use to select Settings OK Display OK Brightness OK . . .
the current setting is shown graphically . . . use to select the brightness required
Save
28
elmeg IP630
Page 29

elmeg IP630 / en / elmeg IP630 / settings.fm / 8/24/16
bintec elmeg Basic settings
Colour scheme
The display can appear in a range of colour combinations.
¤ . . . use to select Settings OK Display OK Colour Scheme OK
. . . use to select required colour scheme Select ( = selected)
Changing the display settings with the Web configurator: page 36
Language
Set the language for the display screen.
¤ . . . use to select Settings OK Language OK . . . use to select
language Select ( = selected)
Setting the display language with the Web configurator: page 36
Local network
Display network settings for the telephone.
¤ . . . use to select Settings OK Local Network OK
IP Address Type: static or dynamic
dynamic The telephone obtains its IP address automatically from a
DHCP service in the network (the router, for example). The
following fields show the current settings. These settings
cannot be changed.
static The telephone is provided with a permanent IP address. The
administrator makes the network settings using the other
fields.
IP Address: The phone's IP address in the local network.
Subnet Mask: The subnet mask for the local network. It specifies how many parts of the
IP address make up the network prefix and how many parts make up the
device address. The network prefix must be the same for all the devices in
the local network.
Standard Gateway: IP address of the system in the local network which assigns the address
and forwards information to other networks. This is frequently a router.
Changes to these settings should only be made by the administrator.
elmeg IP630
29
Template bintec-elmeg, Version 1, 01.07.2014
Page 30

elmeg IP630 / en / elmeg IP630 / settings.fm / 8/24/16
Resetting the device to the factory settings
A reset returns all the settings to the default settings. Network configuration, VoIP connections,
directories, call lists and all the individual settings are deleted or restored to the factory settings.
Safeguarding personnel settings from the reset: page 38
¤ . . . use to select Settings OK Reset OK confirm prompt with Ye s
Resetting using the device keys
¤ Disconnect the telephone from the mains power supply press the Control key hold-
ing the key down, reconnect the device with the power supply
Resetting the device with the Web configurator page 39
Displaying device information
The menu entry Info provides information about important settings on the telephone.
¤ . . . use to select Settings OK Info . . . the following information is
displayed:
Device: Telephone product name
SW Version: Version of the firmware currently loaded on the phone.
Country Version: Country-specific version of the product
MAC Address LAN: The phone's device address.
IP Address: The phone's current IP address within the local network. The IP address
is usually set automatically via a DHCP server in the network.
bintec elmegBasic settings
Template bintec-elmeg, Version 1, 01.07.2014
30
There is more information about the settings and the status of the telephone in the
status display of the Web configurator ( page 39).
elmeg IP630
Page 31

elmeg IP630 / en / elmeg IP630 / web_configurator.fm / 8/24/16
bintec elmeg Configuring other settings with the Web configurator
Configuring other settings with the Web configurator
Your phone is connected to the local network.
This chapter describes the user functions in the Web configurator.
Information for administrators: www.bintec-elmeg.com
Web configurator
Finding out the IP address of the phone
You need the IP address of the telephone to access the web configurator.
Displaying the IP address in the display menu of the telephone:
¤ Settings Local Network . . . the IP address is displayed
The IP address can sometimes change, depending on the settings of the DHCP server
in your network.
Starting the web configurator
¤ Open the Internet browser on the PC enter the IP address of the telephone (without any
leading zeros) in the address field of the browser . . . the login screen is displayed
¤ Select the language enter the password (preset: user) Login . . . the Web configurator is
launched, the Ringtones page is displayed
Template bintec-elmeg, Version 1, 01.07.2014
Changing the password
¤ Click on the icon in the top right select Change Password enter new password
re-enter new password Set
The password can also be changed by the administrator.
Changing the telephone PIN
The telephone PIN is used to lock the telephone keypad, for example ( page 12).
¤ Click on the icon in the top right select Change Phone PIN enter current PIN
(preset to 1234) enter new PIN re-enter new PIN Set
Changing the language
¤ Click on the icon in the top right select Change Language select required language
from the Language list Set
Ending the Web configurator
¤ Click on the icon in the top right select Logout . . . the login screen is displayed again
elmeg IP630
31
Page 32

elmeg IP630 / en / elmeg IP630 / web_configurator.fm / 8/24/16
Functions of the Web configurator
The following illustration shows the menu entries of the Web configurator for users.
Information on the administrator functions www.bintec-elmeg.com
Settings Tel ep ho ny Connections page 33
Call Settings page 33
Call Divert page 34
Do not Disturb page 34
Desk Phone Ringtones page 35
Display page 36
Keys and LEDs page 36
System Date and Time page 38
Save and Restore page 38
Reboot and Reset page 39
Status Device page 39
Connections page 39
Storage Allocation page 39
bintec elmegConfiguring other settings with the Web configurator
Template bintec-elmeg, Version 1, 01.07.2014
32
elmeg IP630
Page 33

elmeg IP630 / en / elmeg IP630 / web_configurator.fm / 8/24/16
bintec elmeg Configuring other settings with the Web configurator
Tel ep ho ny
Changing the standard send connection
If the telephone has more than one VoIP connection, outgoing calls are initiated via the standard send connection ( page 13).
Changing the standard send connection:
¤ Settings Te le p ho ny Connections
All the configured connections are shown. The check box under Default send connection
shows which connection is currently selected.
¤ Check the connection required Set
Only active connections can be selected.
Settings for Call Waiting
Specify the telephone's response when another call comes in during a call.
¤ Settings Te le p ho ny Call Settings
For each connection:
Prevent/permit Call Waiting:
¤ Select the option under Display waiting call ( = Call Waiting permitted) /
deselect ( = Call Waiting not permitted)
Permit Call Waiting:
¤ Select Acoustic signal from the list
Off: the incoming call is shown in the display only
or signalling with a Call Waiting tone (beep): once or every 4, 10, or 20 seconds
Save the settings: Set
Template bintec-elmeg, Version 1, 01.07.2014
elmeg IP630
33
Page 34

elmeg IP630 / en / elmeg IP630 / web_configurator.fm / 8/24/16
Setting up Call Divert
The provider/the PABX supports this function.
Forwarding incoming calls to another number or a network mailbox.
¤ Settings Te le p ho ny Call Divert
For each connection (Incoming line):
All Calls Forward all incoming calls.
When Busy Forward incoming calls when the line is busy.
No Answer Forward incoming calls after a defined period if they are not accepted.
Specifying the destination of diverted calls:
¤ Check the box under Voicemail
or
¤ check the box under Targ et num ber enter the number, to which calls are to be
diverted
For diverting calls when No Answer:
¤ From the Delay list, select the period after which Call Divert should be activated.
Activating/deactivating Call Divert:
¤ Select the option under Active ( = activated) / deselect ( = not activated) Set
bintec elmegConfiguring other settings with the Web configurator
Setting up Call Divert via the display menu: page 19
Do not Disturb
The provider/the PABX supports this function.
Block phone numbers and/or all anonymous calls. Calls from blocked numbers are not signalled.
¤ Settings Te le p ho ny Do not Disturb
The black list contains all the blocked numbers.
Activate the black list: ¤ Set the switch next to DND list to Yes
Block a number: ¤ Enter Name and Phone number of the call click on Add
Delete an entry: ¤ Click next to the entry
Delete all entries: ¤ Click Delete all
Block all anonymous calls: ¤ Activate the option Block anonymous callers ( = activated)
Save the settings: ¤ Set
34
elmeg IP630
Template bintec-elmeg, Version 1, 01.07.2014
Page 35

elmeg IP630 / en / elmeg IP630 / web_configurator.fm / 8/24/16
bintec elmeg Configuring other settings with the Web configurator
Desk Phone
Specifying and loading ringtones
Set a ringtone for each configured VoIP connection or use a standard ringtone for all of them.
¤ Settings Desk Phone Ringtones
Selecting ringtones
The standard ringtone is used for connections or events for which no individual ringtone has
been set up.
¤ Select a ringtone from the Default ringtone list click on Play . . . the melody selected is
played on the telephone Set
Use the standard ringtone for all calls:
¤ click on Use for all calls Set
or
set a different ringtone for each connection:
¤ Select ringtones for the various events from the lists click on Play . . . the melody selected
is played Set
Different ringtones can be used for the following events: External calls, Internal calls,
Group calls
Setting ringtones using the display menu: page 27
Loading ringtones from the PC
The ringtones available are displayed with a file name and size. A maximum of 20 more ringtones can be loaded into the telephone memory from the PC.
The data on the PC must be in the following format:
Format Max. number Tota l siz e
mp3, ogg, wav 20 max. 5 MB
¤ Next to the Ringtone file click on Browse in the file system of the PC navigate to the
location of the ringtone files in the memory and select the file required . . . the file name is
displayed
Load the ringtone file: ¤ Click on . . . the ringtone file is loaded into the telephone's inter-
Delete a ringtone file:
Save the settings:
Check available space in the memory: page 39
nal memory and presented for selection in the lists
¤ Click on . . . the ringtone file is deleted from the list
¤ Set
Template bintec-elmeg, Version 1, 01.07.2014
elmeg IP630
35
Page 36

elmeg IP630 / en / elmeg IP630 / web_configurator.fm / 8/24/16
Settings for the display
Tailor the telephone display to personal preferences and requirements.
¤ Settings Desk Phone Display
Language: ¤ Select the language to be used for the display from the Language
list
Screensaver:
Colour scheme:
Illumination:
Contrast:
Save the settings:
All the settings can also be made through the display menu: page 28
¤ Activate/deactivate the screensaver ( = activated; in idle status, a
screensaver is shown on the display)
Setting the screensaver with the display menu: page 28
¤ Select the colour scheme for the display from the Colour scheme list
(White on Black, White on Blue, White on Red or White on Green)
¤ Select the intensity of the display illumination from the Backlight
list (1 – 9; 1 = dark, 9 = light)
¤ Select the screen contrast from the Contrast list (1 – 9)
¤ Set
Settingthe screensaver
The default screensaver is an analogue clock.
¤ Select from the Screensaver list the screensaver you want (Analog clock, Digital clock)
Save the settings: Set
bintec elmegConfiguring other settings with the Web configurator
Setting the screen saver using the display menu: page 28
Assigning values to function keys
Assigning values to function keys ( page 10)
¤ Settings Desk Phone Keys and LEDs
The table contains an entry for each function key.
Key Name of the key, identifies the position of the key next to the display
Function Function assigned to the key
LED colour Colour with which the LED on the key signals an event, such as an incoming call.
Change the colour: select the colour required from the list
No auto provisioning
Function keys can automatically be assigned via a PABX. Preventing the key from
being overwritten by the PABX:
¤ Activate the option ( = activated)
Assigning a function:
¤ click on select function from the list Set
36
elmeg IP630
Template bintec-elmeg, Version 1, 01.07.2014
Page 37

elmeg IP630 / en / elmeg IP630 / web_configurator.fm / 8/24/16
bintec elmeg Configuring other settings with the Web configurator
Possible functions:
No function No function assigned
Line Assigns a specific connection (line) to the function key. The key is used to initiate
or accept a call on this connection. The key flashes if a call comes in and lights up
if the line is busy.
¤ Select the desired connection
Quick Dial Assigns a number to the function key.
¤ Select connection required enter Phone number enter name for the
function key
BLF The telephone is connected to a PABX which supports this function and the
number is assigned to a group.
A function key that is configured as BLF (Busy Lamp Field) indicates the status of
a shared line. It will be configured on all extensions of the group. The keys will
flash on all extensions if a call comes in and light up if the line on any extension
is busy.
¤ Select connection required enter Phone number enter name for the
function key
Accept incoming calls: Enter Call Pickup Code
SIP URI Assigns an SIP URI to the function key.
¤ Enter SIP URI (e. g. sip:Susan.Brown@211.122.10.15) enter name for the
function key
¤ Set
Template bintec-elmeg, Version 1, 01.07.2014
elmeg IP630
37
Page 38

elmeg IP630 / en / elmeg IP630 / web_configurator.fm / 8/24/16
System settings
Date and time
¤ Settings System Date and Time
Defining the time server
¤ Automatic adjustment of system time with time server: select Ye s in the Time server
field enter the IP address of the server required . . . the most recent synchronisation with the
time server is displayed Set
or
Entering the date and time manually
¤ Automatic adjustment of system time with time server: select No . . . then
Time and date:
Time zone:
Daylight Saving Time:
Time format:
Date format:
Save the settings:
¤ . . . set the Time with the arrows
¤ . . . open calendar select Date
¤ Select Time zone from the list
¤ Automatically adjust clock for daylight saving changes:
Select Yes /No
¤ Select Time format from the list:
12h (e. g. 6:00 am) or 24h (e. g. 18:00)
¤ Select Date order from the list:
Day Month Year (e. g. 17.04.2016) or
Month Day Year (e. g. 04.17.2016)
¤ Set
bintec elmegConfiguring other settings with the Web configurator
Template bintec-elmeg, Version 1, 01.07.2014
Setting the time and date with the display menu: page 26
Saving and restoring settings
Save data from the telephone to the PC and restore it back to the telephone if necessary.
¤ Settings System Save and Restore
Save Device Settings to PC
All settings: System settings and personal settings
Personalised settings: e. g. directory entries, ringtones, display settings, function key
assignments
¤ click Save all settings
or
¤ click Save personalized settings
¤ select a storage location on the PC save file
38
elmeg IP630
Page 39

elmeg IP630 / en / elmeg IP630 / web_configurator.fm / 8/24/16
bintec elmeg Status of the telephone
Restore Device Settings from PC
¤ Click Browse select the stored back-up file from the file system . . . the file is displayed
click . . . the file is loaded; a message indicates whether the loading process has been successful or not confirm the message with OK
Deleting unwanted back-up files: click
Rebooting or resetting the system
¤ Settings System Reboot and Reset
Restart the system:
Reset the system:
Once this has been completed, the login screen is displayed again, the telephone is in idle
status.
Resetting the device using the display menu: page 29
¤ Click Reboot system now confirm prompt with Yes . . . the
telephone is rebooted and temporarily not ready for operation.
¤ Reset to factory settings Confirm prompt with Ye s . . . all personal
settings, lists and directory entries are deleted, passwords are reset.
Status of the telephone
The Status menu contains information about the status of the telephone.
Device
The page shows general information about the telephone, such as the IP address, the current
status of the firmware and the time and date settings.
¤ Status Device
Connections
The page shows information about the VoIP connections configured for the telephone.
¤ Status Connections . . . name and status are shown for each connection
Status Registered VoIP connection available.
Not registered Currently there is no VoIP connection assigned. The telephone
cannot be used.
¤ Please contact the administrator
The Default send connection is marked with .
Changing the standard send connection: page 33
Storage Allocation
The page shows the memory space occupied by the internal memory and how much is still
available (in percent). Files are stored in the internal memory, for example.
¤ Status Storage Allocation
elmeg IP630
39
Template bintec-elmeg, Version 1, 01.07.2014
Page 40

elmeg IP630 / en / elmeg IP630 / appendix_legal.fm / 8/24/16
Appendix
Service (Customer Care)
Do you have any questions? For quick assistance, please refer to this user guide or visit
www.bintec-elmeg.com. Our bintec elmeg reseller will be happy to help with any further questions related to your bintec elmec phone.
Manufacturer's advice
Authorisation
Voice over IP telephony is possible via the LAN interface (IEEE 802.3).
Depending on your telecommunication network interface, an additional modem could be
necessary.
For further information please contact your Internet provider.
This device is intended for use worldwide. Use outside the European Economic Area (with the
exception of Switzerland) is subject to national approval.
Country-specific requirements have been taken into consideration.
We, bintec elmeg GmbH, declare that this device meets the essential requirements and other
relevant regulations laid down in Directives 2014/30/EU and 2014/35/EU.
The full text of the EU declaration of conformity is available at the following internet address:
www.bintec-elmeg.com/confomity
This declaration could also be available in the "International Declarations of Conformity" or
“European Declarations of Conformity” files.
Therefore please check all of these files.
bintec elmegService (Customer Care)
Template bintec-elmeg, Version 1, 01.07.2014
Environment
Disposal
Batteries should not be disposed of in general household waste. Observe the local waste disposal regulations, details of which can be obtained from your local authority.
All electrical and electronic products should be disposed of separately from the municipal
waste stream via designated collection facilities appointed by the government or the local
authorities.
This crossed-out wheeled bin symbol on the product means the product is covered by
the European Directive 2012/19/EU.
The correct disposal and separate collection of your old appliance will help prevent
potential negative consequences for the environment and human health. It is a precondition for
reuse and recycling of used electrical and electronic equipment.
For more detailed information about disposal of your old appliance, please contact your local
council refuse centre or the original supplier of the product.
40
elmeg IP630
Page 41

elmeg IP630 / en / elmeg IP630 / appendix_legal.fm / 8/24/16
bintec elmeg Manufacturer's advice
Care
Wipe the device with a damp cloth or an antistatic cloth. Do not use solvents or microfibre
cloths.
Never use a dry cloth; this can cause static.
In rare cases, contact with chemical substances can cause changes to the device’s exterior. Due
to the wide variety of chemical products available on the market, it was not possible to test all
substances.
Impairments in high-gloss finishes can be carefully removed using display polishes for mobile
phones.
Contact with liquid
If the device comes into contact with liquid:
1 Disconnect the power supply.
2 Allow the liquid to drain from the device.
3 Pat all parts dry.
4 Place the device in a dry, warm place for at least 72 hours (not in a microwave, oven etc.)
with the battery compartment open and the keypad facing down (if applicable).
5 Do not switch on the device again until it is completely dry.
When it has fully dried out, you will normally be able to use it again.
Template bintec-elmeg, Version 1, 01.07.2014
elmeg IP630
41
Page 42

elmeg IP630 / en / elmeg IP630 / menu_tree.fm / 8/24/16
Menu tree
The following illustration shows the full menu tree of the display menu.
Contacts Directory page 23
Enterprise directory page 25
Select Services Call Divert page 19
Withhold Number page 15
Call Waiting page 17
Active Ringbacks page 14
Settings Date + Time page 26
Audio Settings Ringtones Volu me page 27
Advisory Tones page 28
Display Screensaver page 28
Brightness page 28
Colour Scheme page 29
Language page 29
Local Network page 29
Reset page 30
bintec elmegMenu tree
Melodies External Calls page 27
Internal Calls page 27
Group Calls page 27
Anonymous Call
Silencing
page 27
Template bintec-elmeg, Version 1, 01.07.2014
42
Info page 30
elmeg IP630
Page 43

elmeg IP630 / en / elmeg IP630 / symbols.fm / 8/24/16
)
(
)
(
bintec elmeg Display icons
Display icons
The following icons are displayed depending on the settings and the operating status of your
telephone.
Icons in the status bar
Icon Meaning
No VoIP connection
Keypad lock activated
Ringtone deactivated
Beep function activated (ringtone deactivated)
Display icons to indicate . . .
Icon Meaning
Incoming call
Establishing a connection (outgoing call)
Connection established
No connection established/connection terminated
Conference established
Other display icons
Icon Meaning
Action complete (green)
Action failed (red)
Information
Warning
(Security) prompt
Template bintec-elmeg, Version 1, 01.07.2014
elmeg IP630
43
Page 44

elmeg IP630 / en / elmeg IP630 / LUGSIX.fm / 8/24/16
bintec elmeg Index
Index
A
Accepted calls . . . . . . . . . . . . . . . . . . . . . . . . . . .20
Advisory tone
confirmation . . . . . . . . . . . . . . . . . . . . . . . . . .28
key press . . . . . . . . . . . . . . . . . . . . . . . . . . . . .28
Alert tone (beep). . . . . . . . . . . . . . . . . . . . . . . . .16
Analogue clock as the screensaver . . . . . . . . . .28
Anonymous calling. . . . . . . . . . . . . . . . . . . . . . .15
Authorisation . . . . . . . . . . . . . . . . . . . . . . . . . . .40
B
Back key. . . . . . . . . . . . . . . . . . . . . . . . . . . . . . . . . 5
Beep (alert tone) . . . . . . . . . . . . . . . . . . . . . . . . .16
Black list. . . . . . . . . . . . . . . . . . . . . . . . . . . . . . . .34
BLF (Busy Lamp Field). . . . . . . . . . . . . . . . . . . . .37
C
Call
accept . . . . . . . . . . . . . . . . . . . . . . . . . . . . . . .15
anonymous . . . . . . . . . . . . . . . . . . . . . . . . . . .15
block . . . . . . . . . . . . . . . . . . . . . . . . . . . . . . . .34
during number entry . . . . . . . . . . . . . . . . . . .13
forwarding . . . . . . . . . . . . . . . . . . . . . . . . . . .19
in call list . . . . . . . . . . . . . . . . . . . . . . . . . . . . .20
incoming. . . . . . . . . . . . . . . . . . . . . . . . . . . . .15
information. . . . . . . . . . . . . . . . . . . . . . . . . . .20
initiate . . . . . . . . . . . . . . . . . . . . . . . . . . . . . . .13
outgoing . . . . . . . . . . . . . . . . . . . . . . . . . . . . .13
rejecting . . . . . . . . . . . . . . . . . . . . . . . . . . . . .15
Call divert
deactivate . . . . . . . . . . . . . . . . . . . . . . . . . . . .19
set up (display menu). . . . . . . . . . . . . . . . . . .19
set up (Web configurator) . . . . . . . . . . . . . . .34
Call list . . . . . . . . . . . . . . . . . . . . . . . . . . . . . . . . .20
accepted calls . . . . . . . . . . . . . . . . . . . . . . . . .20
all calls . . . . . . . . . . . . . . . . . . . . . . . . . . . . . . .20
copying a number to the directory . . . . . . . .21
delete . . . . . . . . . . . . . . . . . . . . . . . . . . . . . . .21
delete an entry . . . . . . . . . . . . . . . . . . . . . . . .21
dialling a number . . . . . . . . . . . . . . . . . . 14, 20
missed calls . . . . . . . . . . . . . . . . . . . . . . . . . . .20
open . . . . . . . . . . . . . . . . . . . . . . . . . . . . . . . .20
outgoing calls . . . . . . . . . . . . . . . . . . . . . . . . .20
Call swapping . . . . . . . . . . . . . . . . . . . . . . . . . . .18
Call waiting . . . . . . . . . . . . . . . . . . . . . . . . . . . . .18
accepting a call . . . . . . . . . . . . . . . . . . . . . . . .17
activating/deactivating . . . . . . . . . . . . . . . . .17
rejecting a call . . . . . . . . . . . . . . . . . . . . . . . . .17
settings (Web configurator) . . . . . . . . . . . . . .33
Caller
name on display . . . . . . . . . . . . . . . . . . . . . . .15
picture on display. . . . . . . . . . . . . . . . . . . . . .15
Caller display. . . . . . . . . . . . . . . . . . . . . . . . . . . .15
Caller picture. . . . . . . . . . . . . . . . . . . . . . . . . . . .15
Care . . . . . . . . . . . . . . . . . . . . . . . . . . . . . . . . . . .41
Care of the device . . . . . . . . . . . . . . . . . . . . . . . .41
Change telephone PIN. . . . . . . . . . . . . . . . . . . .31
Change the volume . . . . . . . . . . . . . . . . . . . . . .16
Colour scheme
set (display menu) . . . . . . . . . . . . . . . . . . . . .29
set (Web configurator) . . . . . . . . . . . . . . . . . .36
Company directory. . . . . . . . . . . . . . . . . . . . . . .25
displaying an entry. . . . . . . . . . . . . . . . . . . . .25
open . . . . . . . . . . . . . . . . . . . . . . . . . . . . . . . .25
Conference call . . . . . . . . . . . . . . . . . . . . . . . . . .18
Conference call key. . . . . . . . . . . . . . . . . . . . . . . . 5
Confirmation tone . . . . . . . . . . . . . . . . . . . . . . .28
Connection . . . . . . . . . . . . . . . . . . . . . . . . . . . . .33
expansion module . . . . . . . . . . . . . . . . . . . . . . 6
headset . . . . . . . . . . . . . . . . . . . . . . . . . . . . . . .6
LAN . . . . . . . . . . . . . . . . . . . . . . . . . . . . . . . . . . 6
PC . . . . . . . . . . . . . . . . . . . . . . . . . . . . . . . . . . . 6
power adapter . . . . . . . . . . . . . . . . . . . . . . . . . 6
receiver . . . . . . . . . . . . . . . . . . . . . . . . . . . . . . . 6
status. . . . . . . . . . . . . . . . . . . . . . . . . . . . . . . .39
USB . . . . . . . . . . . . . . . . . . . . . . . . . . . . . . . . . .6
Consultation call . . . . . . . . . . . . . . . . . . . . . . . . .17
Consultation call key . . . . . . . . . . . . . . . . . . .5, 17
Contact with liquid . . . . . . . . . . . . . . . . . . . . . . .41
Contrast
set (Web configurator) . . . . . . . . . . . . . . . . . .36
Control key . . . . . . . . . . . . . . . . . . . . . . . . . . .5, 10
Conversation
put on hold . . . . . . . . . . . . . . . . . . . . . . . . . . .17
Copying a number
from the call list to the directory . . . . . . . . . .21
Corporate directory
searching for entry . . . . . . . . . . . . . . . . . . . . .25
Correcting incorrect entries . . . . . . . . . . . . . . . .12
Correction of incorrect entries . . . . . . . . . . . . . .12
Country version . . . . . . . . . . . . . . . . . . . . . . . . .30
Customer Care . . . . . . . . . . . . . . . . . . . . . . . . . .40
D
Date format. . . . . . . . . . . . . . . . . . . . . . . . . 26, 38
Daylight Saving Time . . . . . . . . . . . . . . . . . . . . .38
Deactivating the microphone . . . . . . . . . . . . . .16
Default setting see Factory settings
Template bintec-elmeg, Version 1, 01.07.2014
elmeg IP630
44
Page 45

elmeg IP630 / en / elmeg IP630 / LUGSIX.fm / 8/24/16
bintec elmegIndex
Delete numbers . . . . . . . . . . . . . . . . . . . . . . . . .13
Device, status . . . . . . . . . . . . . . . . . . . . . . . . . . .39
Dialling a number
from the call list . . . . . . . . . . . . . . . . . . . 14, 20
from the company directory . . . . . . . . . . . . .25
from the directory . . . . . . . . . . . . . . . . . 14, 24
from the redial list. . . . . . . . . . . . . . . . . . . . . .14
via function key . . . . . . . . . . . . . . . . . . . . . . .14
via the keypad . . . . . . . . . . . . . . . . . . . . . . . .13
Dialling numbers
cancelling . . . . . . . . . . . . . . . . . . . . . . . . . . . .13
Digital clock as the screensaver . . . . . . . . . . . . .28
Directories. . . . . . . . . . . . . . . . . . . . . . . . . . . . . .23
Directory entry . . . . . . . . . . . . . . . . . . . . . . . . . .23
change . . . . . . . . . . . . . . . . . . . . . . . . . . . . . .24
delete . . . . . . . . . . . . . . . . . . . . . . . . . . . . . . .24
in the corporate directory . . . . . . . . . . . . . . .25
new . . . . . . . . . . . . . . . . . . . . . . . . . . . . . . . . .24
Directory, local
changing an entry . . . . . . . . . . . . . . . . . . . . .24
copying a number from the call list. . . . . . . .21
delete . . . . . . . . . . . . . . . . . . . . . . . . . . . . . . .24
delete entry. . . . . . . . . . . . . . . . . . . . . . . . . . .24
display entry . . . . . . . . . . . . . . . . . . . . . . . . . .23
new entry . . . . . . . . . . . . . . . . . . . . . . . . . . . .24
open . . . . . . . . . . . . . . . . . . . . . . . . . . . . . . . .23
Display. . . . . . . . . . . . . . . . . . . . . . . . . . . . . . . . . . 9
caller display . . . . . . . . . . . . . . . . . . . . . . . . . .15
contrast . . . . . . . . . . . . . . . . . . . . . . . . . . . . . .36
menu tree . . . . . . . . . . . . . . . . . . . . . . . . . . . .42
returning to idle status. . . . . . . . . . . . . . . . . .11
Display icons . . . . . . . . . . . . . . . . . . . . . . . . . . . .43
Display illumination
set brightness (display menu) . . . . . . . . . . . .28
set brightness (Web configurator). . . . . . . . .36
Display keys. . . . . . . . . . . . . . . . . . . . . . . . . . . .4, 9
Display MAC address . . . . . . . . . . . . . . . . . . . . .30
Display menu . . . . . . . . . . . . . . . . . . . . . . . . . . .42
Disposal. . . . . . . . . . . . . . . . . . . . . . . . . . . . . . . .40
DND (Do Not Disturb) see Silencing the telephone
Do not disturb. . . . . . . . . . . . . . . . . . . . . . . . . . .16
Do not disturb (DND) . . . . . . . . . . . . . . . . . . . . .34
Do Not Disturb key . . . . . . . . . . . . . . . . . . . . . . . .5
LED . . . . . . . . . . . . . . . . . . . . . . . . . . . . . . . . . . 5
Do not disturb key . . . . . . . . . . . . . . . . . . . . . . .16
Environment . . . . . . . . . . . . . . . . . . . . . . . . . . . .40
Error tone . . . . . . . . . . . . . . . . . . . . . . . . . . . . . .28
Expansion module, connection . . . . . . . . . . . . . . 6
F
Factory settings. . . . . . . . . . . . . . . . . . . . . . . . . .30
Firmware version . . . . . . . . . . . . . . . . . . . . 30, 39
Forwarding a call . . . . . . . . . . . . . . . . . . . . . . . .19
Function key . . . . . . . . . . . . . . . . . . . . . . . . . . . .14
BLF. . . . . . . . . . . . . . . . . . . . . . . . . . . . . . . . . .37
connection . . . . . . . . . . . . . . . . . . . . . . . . . . .37
quick dial. . . . . . . . . . . . . . . . . . . . . . . . . . . . .37
Function keys . . . . . . . . . . . . . . . . . . . . . . . . .5, 10
H
Handset
changing volume . . . . . . . . . . . . . . . . . . . . . .16
Handsfree
switching on/off . . . . . . . . . . . . . . . . . . . . . . .16
Handsfree key . . . . . . . . . . . . . . . . . . . . . . . . .5, 16
LED . . . . . . . . . . . . . . . . . . . . . . . . . . . . . . . . . . 5
Handsfree mode . . . . . . . . . . . . . . . . . . . . . . . . .13
changing volume . . . . . . . . . . . . . . . . . . . . . .16
Hash key . . . . . . . . . . . . . . . . . . . . . . . . . . . . . . . .4
Headset
changing volume . . . . . . . . . . . . . . . . . . . . . .16
using to make calls. . . . . . . . . . . . . . . . . . . . .13
Headset connection . . . . . . . . . . . . . . . . . . . . . . . 6
Headset key. . . . . . . . . . . . . . . . . . . . . . . . . . . . . . 5
LED . . . . . . . . . . . . . . . . . . . . . . . . . . . . . . . . . . 5
I
Icons
indications . . . . . . . . . . . . . . . . . . . . . . . . . . .43
status bar . . . . . . . . . . . . . . . . . . . . . . . . . . . .43
Idle status, returning to . . . . . . . . . . . . . . . . . . .11
Indications, icons . . . . . . . . . . . . . . . . . . . . . . . .43
Information on the telephone . . . . . . . . . . . . . .30
Initiate consultation call
from the directory . . . . . . . . . . . . . . . . . . . . .18
IP address . . . . . . . . . . . . . . . . . . . . . . . . . . . . . .30
finding via the display . . . . . . . . . . . . . . . . . .31
finding via the Web configurator. . . . . . . . . .39
obtaining automatically. . . . . . . . . . . . . . . . .29
static . . . . . . . . . . . . . . . . . . . . . . . . . . . . . . . .29
Template bintec-elmeg, Version 1, 01.07.2014
E
End key . . . . . . . . . . . . . . . . . . . . . . . . . . . . . . . . .5
Ending a call . . . . . . . . . . . . . . . . . . . . . . . . . . . .17
Entering letters . . . . . . . . . . . . . . . . . . . . . . . . . .12
Entering numbers. . . . . . . . . . . . . . . . . . . . . . . .12
Entering text . . . . . . . . . . . . . . . . . . . . . . . . . . . .12
45
K
Key
conference call . . . . . . . . . . . . . . . . . . . . . . . . .5
consultation call . . . . . . . . . . . . . . . . . . . . .5, 17
control key . . . . . . . . . . . . . . . . . . . . . . . . . . . . 5
display. . . . . . . . . . . . . . . . . . . . . . . . . . . . . . . .4
elmeg IP630
Page 46

elmeg IP630 / en / elmeg IP630 / LUGSIX.fm / 8/24/16
bintec elmeg Index
Key
do not disturb. . . . . . . . . . . . . . . . . . . . . . .5, 16
end/back . . . . . . . . . . . . . . . . . . . . . . . . . . . . . . 5
handsfree . . . . . . . . . . . . . . . . . . . . . . . . . . . .16
handsfree mode . . . . . . . . . . . . . . . . . . . . . . . . 5
hash. . . . . . . . . . . . . . . . . . . . . . . . . . . . . . . . . . 4
headset . . . . . . . . . . . . . . . . . . . . . . . . . . . . . . .5
message . . . . . . . . . . . . . . . . . . . . . . . . . . . . .21
message centre. . . . . . . . . . . . . . . . . . . . . . . . . 5
mute . . . . . . . . . . . . . . . . . . . . . . . . . . . . . . . . .5
programmable . . . . . . . . . . . . . . . . . . . . . . . . . 5
star. . . . . . . . . . . . . . . . . . . . . . . . . . . . . . . . . . .4
volume . . . . . . . . . . . . . . . . . . . . . . . . . . . .4, 16
Keypad
locking/unlocking . . . . . . . . . . . . . . . . . . . . .12
Keypad lock
changing the PIN . . . . . . . . . . . . . . . . . . . . . .31
PIN . . . . . . . . . . . . . . . . . . . . . . . . . . . . . . . . . .12
L
LAN connection . . . . . . . . . . . . . . . . . . . . . . . . . . 6
Language for the display screen
setting (display menu) . . . . . . . . . . . . . . . . . .29
setting (Web configurator). . . . . . . . . . . . . . .36
LED
do not disturb key . . . . . . . . . . . . . . . . . . . . . . 5
handsfree key . . . . . . . . . . . . . . . . . . . . . . . . . . 5
headset key. . . . . . . . . . . . . . . . . . . . . . . . . . . .5
message key . . . . . . . . . . . . . . . . . . . . . . . . . . .5
mute key . . . . . . . . . . . . . . . . . . . . . . . . . . . . . .5
Line
selecting for call . . . . . . . . . . . . . . . . . . . . . . .13
Liquid. . . . . . . . . . . . . . . . . . . . . . . . . . . . . . . . . .41
M
Main menu . . . . . . . . . . . . . . . . . . . . . . . . . . . . .11
Making calls . . . . . . . . . . . . . . . . . . . . . . . . . . . .13
Manufacturer’s advice . . . . . . . . . . . . . . . . . . . .40
Medical equipment . . . . . . . . . . . . . . . . . . . . . . . 8
Menu . . . . . . . . . . . . . . . . . . . . . . . . . . . . . . . . . .11
navigation. . . . . . . . . . . . . . . . . . . . . . . . 10, 11
open . . . . . . . . . . . . . . . . . . . . . . . . . . . . . . . .11
Menu tree
display . . . . . . . . . . . . . . . . . . . . . . . . . . . . . . .42
web configurator . . . . . . . . . . . . . . . . . . . . . .32
Message Centre . . . . . . . . . . . . . . . . . . . . . . . . .21
Message key . . . . . . . . . . . . . . . . . . . . . . . . . .5, 21
LED . . . . . . . . . . . . . . . . . . . . . . . . . . . . . . . . . . 5
Missed calls . . . . . . . . . . . . . . . . . . . . . . . . . . . . .20
Mute key . . . . . . . . . . . . . . . . . . . . . . . . . . . . . . . .5
LED . . . . . . . . . . . . . . . . . . . . . . . . . . . . . . . . . . 5
Muting. . . . . . . . . . . . . . . . . . . . . . . . . . . . . . . . .16
N
Number
copying from voice mail to the directory . . .22
showing on display . . . . . . . . . . . . . . . . . . . .15
transferring to the local directory . . . . . . . . . 13
O
Open listening . . . . . . . . . . . . . . . . . . . . . . . . . .16
P
PC connection. . . . . . . . . . . . . . . . . . . . . . . . . . . . 6
Phone
factory settings. . . . . . . . . . . . . . . . . . . . . . . .39
rebooting . . . . . . . . . . . . . . . . . . . . . . . . . . . .39
Power adapter. . . . . . . . . . . . . . . . . . . . . . . . . . . . 8
Power adapter, connection . . . . . . . . . . . . . . . . . 6
Put on hold . . . . . . . . . . . . . . . . . . . . . . . . . . . . .17
Q
Quick dial . . . . . . . . . . . . . . . . . . . . . . . . . . . . . .37
R
Receiver
connection . . . . . . . . . . . . . . . . . . . . . . . . . . . . 6
Redial list. . . . . . . . . . . . . . . . . . . . . . . . . . . . . . .20
dialling a number . . . . . . . . . . . . . . . . . . . . . .14
Reset . . . . . . . . . . . . . . . . . . . . . . . . . . . . . . . . . .39
Restart . . . . . . . . . . . . . . . . . . . . . . . . . . . . . . . . .39
Restore factory settings
using the device keys. . . . . . . . . . . . . . . . . . .30
using the display menu . . . . . . . . . . . . . . . . .30
using the Web configurator. . . . . . . . . . . . . .39
Ringback
cancelling . . . . . . . . . . . . . . . . . . . . . . . . . . . .15
initiate . . . . . . . . . . . . . . . . . . . . . . . . . . . . . . .14
Ringtone
activating/deactivating . . . . . . . . . . . . . . . . .15
delete . . . . . . . . . . . . . . . . . . . . . . . . . . . . . . .35
load . . . . . . . . . . . . . . . . . . . . . . . . . . . . . . . . .35
set using the display menu . . . . . . . . . . . . . .27
set using the Web configurator . . . . . . . . . . .35
setting the melody . . . . . . . . . . . . . . . . . . . . .27
standard . . . . . . . . . . . . . . . . . . . . . . . . . . . . .35
volume for incoming calls . . . . . . . . . . . . . . .27
S
Safety precautions . . . . . . . . . . . . . . . . . . . . . . . . 8
Screensaver
activate/deactivate (display menu) . . . . . . . .28
activate/deactivate (Web configurator) . . . .36
set up . . . . . . . . . . . . . . . . . . . . . . . . . . . . . . .28
Template bintec-elmeg, Version 1, 01.07.2014
elmeg IP630
46
Page 47

elmeg IP630 / en / elmeg IP630 / LUGSIX.fm / 8/24/16
bintec elmegIndex
Service. . . . . . . . . . . . . . . . . . . . . . . . . . . . . . . . .40
Setting language
for Web configurator . . . . . . . . . . . . . . . . . . .31
Setting the date
display menu . . . . . . . . . . . . . . . . . . . . . . . . .26
web configurator . . . . . . . . . . . . . . . . . . . . . .38
Setting the language for the Web configurator 31
Setting the time
display menu . . . . . . . . . . . . . . . . . . . . . . . . .26
web configurator . . . . . . . . . . . . . . . . . . . . . .38
Silencing the telephone . . . . . . . . . . . . . . . . . . .16
Specifying the time zone . . . . . . . . . . . . . . . . . .38
Split line
assigning function key . . . . . . . . . . . . . . . . . .37
Standard ringtone. . . . . . . . . . . . . . . . . . . . . . . .35
Standard send connection . . . . . . . . . . . . . . . . .13
change . . . . . . . . . . . . . . . . . . . . . . . . . . . . . .33
display . . . . . . . . . . . . . . . . . . . . . . . . . . . . . . .39
Star key . . . . . . . . . . . . . . . . . . . . . . . . . . . . . . . . .4
Status. . . . . . . . . . . . . . . . . . . . . . . . . . . . . . . . . .39
connections . . . . . . . . . . . . . . . . . . . . . . . . . .39
device . . . . . . . . . . . . . . . . . . . . . . . . . . . . . . .39
memory assignment . . . . . . . . . . . . . . . . . . .39
Status bar . . . . . . . . . . . . . . . . . . . . . . . . . . . . . . . 9
icons . . . . . . . . . . . . . . . . . . . . . . . . . . . . . . . .43
Storage allocation. . . . . . . . . . . . . . . . . . . . . . . .39
Submenu. . . . . . . . . . . . . . . . . . . . . . . . . . . . . . .11
SW version see Firmware version
System settings
date and time . . . . . . . . . . . . . . . . . . . . . . . . .38
saving/restoring . . . . . . . . . . . . . . . . . . . . . . .38
U
USB connection socket. . . . . . . . . . . . . . . . . . . . . 6
V
Voice mail . . . . . . . . . . . . . . . . . . . . . . . . . . . . . .22
delete . . . . . . . . . . . . . . . . . . . . . . . . . . . . . . .22
playing . . . . . . . . . . . . . . . . . . . . . . . . . . . . . .22
transferring number to directory . . . . . . . . .22
VoIP connection . . . . . . . . . . . . . . . . . . . . . 13, 33
Volume for ringtone . . . . . . . . . . . . . . . . . . . . . .27
Volume key . . . . . . . . . . . . . . . . . . . . . . . . . . .4, 16
W
Web configurator
accessing. . . . . . . . . . . . . . . . . . . . . . . . . . . . .31
changing password . . . . . . . . . . . . . . . . . . . .31
de-registration . . . . . . . . . . . . . . . . . . . . . . . .31
menu structure (users) . . . . . . . . . . . . . . . . . .32
selecting language. . . . . . . . . . . . . . . . . . . . .31
settings . . . . . . . . . . . . . . . . . . . . . . . . . . . . . .31
starting . . . . . . . . . . . . . . . . . . . . . . . . . . . . . .31
Template bintec-elmeg, Version 1, 01.07.2014
T
Tel ep ho ne
connections . . . . . . . . . . . . . . . . . . . . . . . . . . .6
Tel eph one set tin gs
in display menu . . . . . . . . . . . . . . . . . . . . . . .26
in the Web configurator. . . . . . . . . . . . . . . . .31
Time format . . . . . . . . . . . . . . . . . . . . . . . . . 26, 38
Time server . . . . . . . . . . . . . . . . . . . . . . . . . 26, 39
defining. . . . . . . . . . . . . . . . . . . . . . . . . . . . . .38
All rights reserved. Rights of modification reserved.
47
elmeg IP630
 Loading...