

Page 1
bintec elmeg User guide
elmeg IP120
User Guide
elmeg IP120
Copyright© Version 2.0, 2015 bintec elmeg GmbH
1
Page 2

bintec elmegUser guide
Legal Notice
Aim and purpose
This document is part of the user manual for the installation and configuration of bintec elgmeg
devices. For the latest information and notes on the current software release, please also read our
release notes, particularly if you are updating your software to a higher release version. You will find
the latest release notes under www.bintec-elmeg.com
Liability
This manual has been put together with the greatest possible care. However, the information contained in this manual is not a guarantee of the properties of your product. bintec elmeg GmbH is
only liable within the terms of its conditions of sale and supply and accepts no liability for technical
inaccuracies and/or omissions.
The information in this manual can be changed without notice. You will find additional information
and also release notes for bintec elmeg devices under www.bintec-elmeg.com
bintec elmeg devices make WAN connections as a possible function of the system configuration.
You must monitor the product in order to avoid unwanted charges. bintec elmeg GmbH accepts
no responsibility for data loss, unwanted connection costs and damage caused by unintended
operation of the product.
Trade mar ks
bintectrademarks and the bintec logo, artem trademarks and the artem logo, elmeg trademarks
and the elmeg logo are registered trademarks of bintec elmeg GmbH.
Company and product names mentioned are usually trademarks of the companies or manufacturers concerned.
.
.
Copyright
All rights reserved. No part of this manual may be reproduced or further processed in any way without the written consent of bintec elmeg GmbH. The documentation may not be processed and, in
particular, translated without the consent of bintec elmeg GmbH.
You will find information on guidelines and standards in the declarations of conformity under
www.bintec-elmeg.com
.
How to reach bintec elmeg GmbH
bintec elmeg GmbH
a Teldat Group Company
Südwestpark 94, D-90449 Nürnberg, Deutschland,
Telefon: +4991196730, Fax: +499116880725
Internet: www.bintec-elmeg.com
© bintec elmeg GmbH 2015, All rights reserved. Rights of modification reserved.
2
elmeg IP120
Page 3

bintec elmeg elmeg IP120 – More than just a telephone
elmeg IP120 – More than just a telephone
Your elmeg IP120 is an IP phone designed for professional use.
u Easy to set up
Use the automatic configuration via the hybird phone system. Both function keys and SIP
configuration can be configured and auto-provisioned via the hybird phone system.
u Web user interfaces for telephony and configuration
Operate and configure your telephone from your PC with ease.
u High Definition Sound Performance – HDSP
Make phone calls with brilliant sound quality.
u Phone functions for the professional user
Use the call divert, conference call, automatic ringback, call reject and Do Not Disturb (DND)
functions.
u Multiple directories
Manage your personal directory with up to 200 entries. Use an LDAP directory or online
directories on the Internet.
u Network connection
Connect your telephone to the local network via Ethernet. Connect a PC using your telephone as a 100 MBit Ethernet switch.
u Protect the environment
Reduce environmental pollution with the power-saving power adapter.
u Individual settings
Load your own ring tones.
Assign functions or frequently used numbers to the keys.
Further information about your phone can be found at www.bintec-elmeg.com.
3elmeg IP120
Page 4
Phone overview
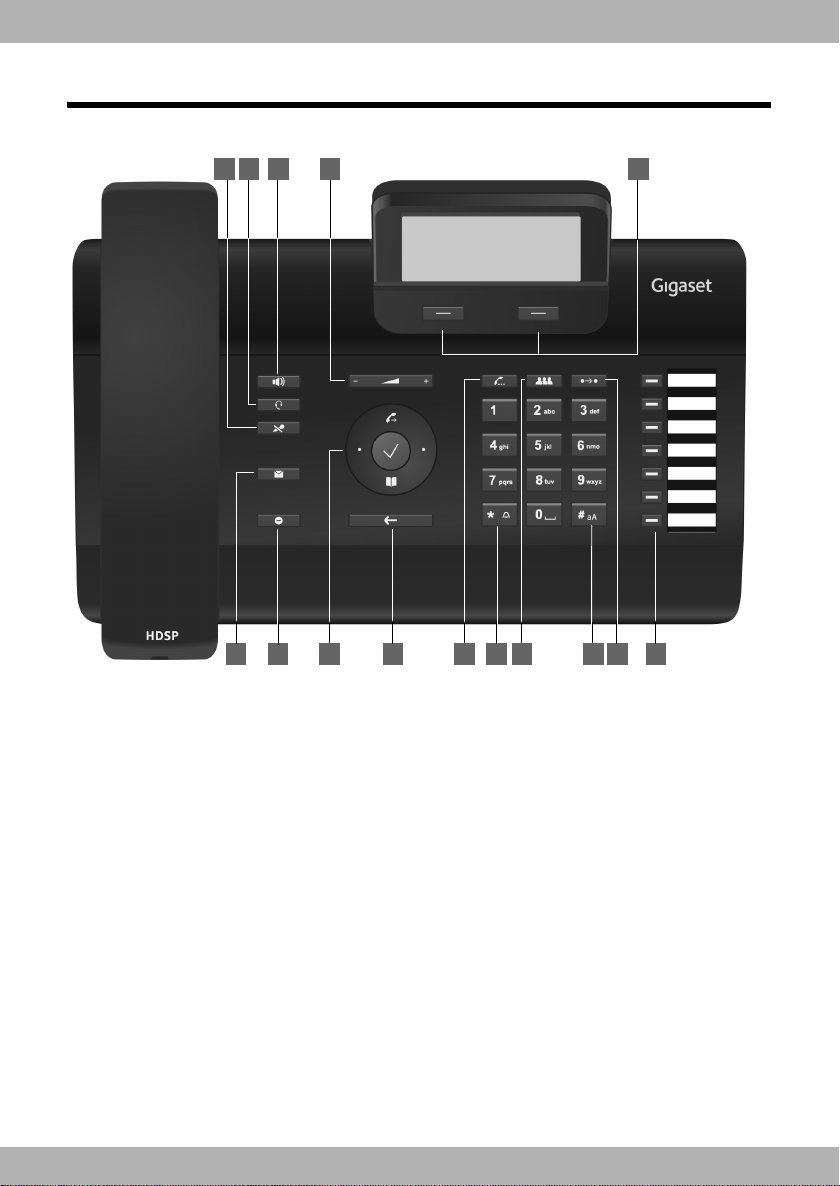
Keys
6 7
9 14 1510 128
21 3 4 5
11 13
bintec elmegPhone overview
4
1 Mute key Activate/deactivate microphone (mute)
2 Headset key Make call via headset
3 Speaker key Activate/deactivate speaker
4 Volume key Depending on the operating mode: Adjust the volume of the
5 Display keys Activate display functions
6 Message Centre Open call and message lists
7 Do Not Disturb key Do Not Disturb (DND) function
8 Navigation key Scroll through lists and entries. In idle status:
9 End call/back key End/reject call; cancel function;
10 Consultation key Initiate/end consultation call, put participant on hold
11 Star key Display special characters
speaker, receiver, headset or ringer
Open redial list. £ S. 44
È
Confirm or start action, select entry £ S. 26
‰
Open directory £ S. 47
Z
go back one menu level (press briefly);
return to idle status (press and hold)
During text entry
During dialling
Activate/deactivate ring tone
£ S. 36
£ S. 34
£ S. 36
£ S. 36
£ S. 24
£ S. 55
£ S. 37
£ S. 26
£ S. 27
£ S. 39
£ S. 25
£ S. 32
£ S. 37
elmeg IP120
Page 5

bintec elmeg Phone overview
Application area
Display functions (
£ S. 24)
T
T
Display symbols (£below)
Date
You set the time and date format using the Web configurator (
£ S. 106).
U
New Messages
(
£ S. 55)
U
U
Missed calls (£S. 44)
Calls Lines
18/02/2011
à 05
Ó^@ôó Ñ ]ÕÔ
™
11:45
18 MyName
Time
U
T
Own number / Name
U
12 Conference key Initiate conference call £ S. 39
13 Hash key Switch text mode (upper and lower case letters, numbers)
Activate/deactivate keylock
14 Tran sfer key Transfer call to another party
15 Function keys Programmable keys
£ S. 25
£ S. 40
£ S. 102
Understanding Light Emitting Diodes (LEDs)
Flashes Incoming call. £ S. 34
A
Lights up Call is being made via the speaker.
Lights up Call is being made via the headset. £ S. 34
B
Lights up The microphone is muted. £ S. 36
C
Flashes New message in the Message Centre. £ S. 55
E
Lights up "Do Not Disturb" function is activated. £S. 37
G
Flashes Incoming call on the number programmed to this key. £ S. 33
S
Lights up Call is being made on the number programmed to this key.
£ S. 36
Understanding the display
Understanding the display symbols
Ó
^
@
ô
ó
Ñ
]
Õ
Ô
Ã
™
Other icons may appear depending on the function. These are displayed alongside the corresponding
description.
New message in the Message Centre. £ S. 55
The microphone is muted. £ S. 36
Call is being made via the speaker. Flashing: Incoming call. £ S. 31
Headset connected £ S. 19
Ringer deactivated. £ S. 59
"Do Not Disturb" function is activated. £ S. 37
Telephone in conference call. £ S. 39
Secure connection. £ S. 35
HDSP quality connection. £ S. 35
New messages on the network mailbox. The number is displayed to the
Missed calls. £ S. 44
right.
£ S. 54
5elmeg IP120
Page 6

bintec elmegContents
Contents
elmeg IP120 – More than just a telephone . . . . . . . . . . . . . . . . . . . . . . . . . . . . . . . . . . . . . 3
Phone overview . . . . . . . . . . . . . . . . . . . . . . . . . . . . . . . . . . . . . . . . . . . . . . . . . . . . . . . . . . . . . 4
Keys . . . . . . . . . . . . . . . . . . . . . . . . . . . . . . . . . . . . . . . . . . . . . . . . . . . . . . . . . . . . . . . . . . . . . . . . . . . . . . . . . . . . . . 4
Understanding Light Emitting Diodes (LEDs) . . . . . . . . . . . . . . . . . . . . . . . . . . . . . . . . . . . . . . . . . . . . . . . 5
Understanding the display . . . . . . . . . . . . . . . . . . . . . . . . . . . . . . . . . . . . . . . . . . . . . . . . . . . . . . . . . . . . . . . . 5
Following safety precautions . . . . . . . . . . . . . . . . . . . . . . . . . . . . . . . . . . . . . . . . . . . . . . . . . 8
Using the phone in different scenarios . . . . . . . . . . . . . . . . . . . . . . . . . . . . . . . . . . . . . . . . 9
First steps . . . . . . . . . . . . . . . . . . . . . . . . . . . . . . . . . . . . . . . . . . . . . . . . . . . . . . . . . . . . . . . . . . 11
Check the package contents . . . . . . . . . . . . . . . . . . . . . . . . . . . . . . . . . . . . . . . . . . . . . . . . . . . . . . . . . . . . . 11
Setting up and connecting the device . . . . . . . . . . . . . . . . . . . . . . . . . . . . . . . . . . . . . . . . . . . . . . . . . . . . 12
Wall mounting . . . . . . . . . . . . . . . . . . . . . . . . . . . . . . . . . . . . . . . . . . . . . . . . . . . . . . . . . . . . . . . . . . . . . . . . . . . 18
Connecting a headset . . . . . . . . . . . . . . . . . . . . . . . . . . . . . . . . . . . . . . . . . . . . . . . . . . . . . . . . . . . . . . . . . . . . 19
Setting up the device (for the first time) . . . . . . . . . . . . . . . . . . . . . . . . . . . . . . . . . . . . . . . . . . . . . . . . . . 20
Proceeding . . . . . . . . . . . . . . . . . . . . . . . . . . . . . . . . . . . . . . . . . . . . . . . . . . . . . . . . . . . . . . . . . . . . . . . . . . . . . . 23
Using the phone . . . . . . . . . . . . . . . . . . . . . . . . . . . . . . . . . . . . . . . . . . . . . . . . . . . . . . . . . . . . 24
Operating via the keypad and display menu . . . . . . . . . . . . . . . . . . . . . . . . . . . . . . . . . . . . . . . . . . . . . . 24
Menu tree . . . . . . . . . . . . . . . . . . . . . . . . . . . . . . . . . . . . . . . . . . . . . . . . . . . . . . . . . . . . . . . . . . . . . . . . . . . . . . . 29
Operating via the PC . . . . . . . . . . . . . . . . . . . . . . . . . . . . . . . . . . . . . . . . . . . . . . . . . . . . . . . . . . . . . . . . . . . . . 30
Making calls . . . . . . . . . . . . . . . . . . . . . . . . . . . . . . . . . . . . . . . . . . . . . . . . . . . . . . . . . . . . . . . . 31
Calling . . . . . . . . . . . . . . . . . . . . . . . . . . . . . . . . . . . . . . . . . . . . . . . . . . . . . . . . . . . . . . . . . . . . . . . . . . . . . . . . . . . 31
Receiving incoming calls . . . . . . . . . . . . . . . . . . . . . . . . . . . . . . . . . . . . . . . . . . . . . . . . . . . . . . . . . . . . . . . . . 34
Ending a call . . . . . . . . . . . . . . . . . . . . . . . . . . . . . . . . . . . . . . . . . . . . . . . . . . . . . . . . . . . . . . . . . . . . . . . . . . . . . 35
Using functions when making a telephone call . . . . . . . . . . . . . . . . . . . . . . . . . . . . . . . . . . . . . . . . . . . 35
Making a call to multiple participants . . . . . . . . . . . . . . . . . . . . . . . . . . . . . . . . . . . . . . . . . . . . . . . . . . . . . 38
Setting up call divert (CD) . . . . . . . . . . . . . . . . . . . . . . . . . . . . . . . . . . . . . . . . . . . . . . . . . . . . . . . . . . . . . . . . 41
Using the call lists . . . . . . . . . . . . . . . . . . . . . . . . . . . . . . . . . . . . . . . . . . . . . . . . . . . . . . . . . . . 44
Viewing entries . . . . . . . . . . . . . . . . . . . . . . . . . . . . . . . . . . . . . . . . . . . . . . . . . . . . . . . . . . . . . . . . . . . . . . . . . . 44
Dialling a number from a list . . . . . . . . . . . . . . . . . . . . . . . . . . . . . . . . . . . . . . . . . . . . . . . . . . . . . . . . . . . . . 45
Copying an entry from the call list to the directory . . . . . . . . . . . . . . . . . . . . . . . . . . . . . . . . . . . . . . . . 46
Deleting an entry or list . . . . . . . . . . . . . . . . . . . . . . . . . . . . . . . . . . . . . . . . . . . . . . . . . . . . . . . . . . . . . . . . . . 46
Using directories . . . . . . . . . . . . . . . . . . . . . . . . . . . . . . . . . . . . . . . . . . . . . . . . . . . . . . . . . . . 47
Using the local directory . . . . . . . . . . . . . . . . . . . . . . . . . . . . . . . . . . . . . . . . . . . . . . . . . . . . . . . . . . . . . . . . . 47
Using an LDAP directory . . . . . . . . . . . . . . . . . . . . . . . . . . . . . . . . . . . . . . . . . . . . . . . . . . . . . . . . . . . . . . . . . 50
Using online directories . . . . . . . . . . . . . . . . . . . . . . . . . . . . . . . . . . . . . . . . . . . . . . . . . . . . . . . . . . . . . . . . . . 51
Managing messages . . . . . . . . . . . . . . . . . . . . . . . . . . . . . . . . . . . . . . . . . . . . . . . . . . . . . . . . 54
Managing voice mails on the network mailbox . . . . . . . . . . . . . . . . . . . . . . . . . . . . . . . . . . . . . . . . . . . . 54
Accessing messages via the Message Centre . . . . . . . . . . . . . . . . . . . . . . . . . . . . . . . . . . . . . . . . . . . . . . 56
Operating door interphones . . . . . . . . . . . . . . . . . . . . . . . . . . . . . . . . . . . . . . . . . . . . . . . . . 57
6
elmeg IP120
Page 7

bintec elmeg Contents
Configuring basic settings . . . . . . . . . . . . . . . . . . . . . . . . . . . . . . . . . . . . . . . . . . . . . . . . . . . 58
Setting the date and time . . . . . . . . . . . . . . . . . . . . . . . . . . . . . . . . . . . . . . . . . . . . . . . . . . . . . . . . . . . . . . . . 58
Setting the ringer . . . . . . . . . . . . . . . . . . . . . . . . . . . . . . . . . . . . . . . . . . . . . . . . . . . . . . . . . . . . . . . . . . . . . . . . 59
Activating/deactivating advisory tones . . . . . . . . . . . . . . . . . . . . . . . . . . . . . . . . . . . . . . . . . . . . . . . . . . . 61
Renaming or deleting ring tones . . . . . . . . . . . . . . . . . . . . . . . . . . . . . . . . . . . . . . . . . . . . . . . . . . . . . . . . . 61
Setting the display . . . . . . . . . . . . . . . . . . . . . . . . . . . . . . . . . . . . . . . . . . . . . . . . . . . . . . . . . . . . . . . . . . . . . . . 62
Setting the language . . . . . . . . . . . . . . . . . . . . . . . . . . . . . . . . . . . . . . . . . . . . . . . . . . . . . . . . . . . . . . . . . . . . . 63
Resetting the device to the default settings . . . . . . . . . . . . . . . . . . . . . . . . . . . . . . . . . . . . . . . . . . . . . . . 64
Showing information on the device . . . . . . . . . . . . . . . . . . . . . . . . . . . . . . . . . . . . . . . . . . . . . . . . . . . . . . 64
Configuring settings for the local network . . . . . . . . . . . . . . . . . . . . . . . . . . . . . . . . . . . 65
LAN settings . . . . . . . . . . . . . . . . . . . . . . . . . . . . . . . . . . . . . . . . . . . . . . . . . . . . . . . . . . . . . . . . . . . . . . . . . . . . . 66
Web configurator – configuring the phone on a PC . . . . . . . . . . . . . . . . . . . . . . . . . . . 71
Starting the Web configurator . . . . . . . . . . . . . . . . . . . . . . . . . . . . . . . . . . . . . . . . . . . . . . . . . . . . . . . . . . . . 71
Understanding the Web configurator menu tree . . . . . . . . . . . . . . . . . . . . . . . . . . . . . . . . . . . . . . . . . . 72
Configuring phone settings via the Web configurator . . . . . . . . . . . . . . . . . . . . . . . . . 74
Network and connectors . . . . . . . . . . . . . . . . . . . . . . . . . . . . . . . . . . . . . . . . . . . . . . . . . . . . . . . . . . . . . . . . . 74
Telephony . . . . . . . . . . . . . . . . . . . . . . . . . . . . . . . . . . . . . . . . . . . . . . . . . . . . . . . . . . . . . . . . . . . . . . . . . . . . . . . 85
Messaging . . . . . . . . . . . . . . . . . . . . . . . . . . . . . . . . . . . . . . . . . . . . . . . . . . . . . . . . . . . . . . . . . . . . . . . . . . . . . . . 97
Services . . . . . . . . . . . . . . . . . . . . . . . . . . . . . . . . . . . . . . . . . . . . . . . . . . . . . . . . . . . . . . . . . . . . . . . . . . . . . . . . . 98
Function keys . . . . . . . . . . . . . . . . . . . . . . . . . . . . . . . . . . . . . . . . . . . . . . . . . . . . . . . . . . . . . . . . . . . . . . . . . . . 103
System settings . . . . . . . . . . . . . . . . . . . . . . . . . . . . . . . . . . . . . . . . . . . . . . . . . . . . . . . . . . . . . . . . . . . . . . . . . 106
Checking the status of the phone . . . . . . . . . . . . . . . . . . . . . . . . . . . . . . . . . . . . . . . . . . 115
Accessories . . . . . . . . . . . . . . . . . . . . . . . . . . . . . . . . . . . . . . . . . . . . . . . . . . . . . . . . . . . . . . . 117
Service (Customer Care) . . . . . . . . . . . . . . . . . . . . . . . . . . . . . . . . . . . . . . . . . . . . . . . . . . . 117
Questions and answers . . . . . . . . . . . . . . . . . . . . . . . . . . . . . . . . . . . . . . . . . . . . . . . . . . . . . . . . . . . . . . . . . 117
Appendix . . . . . . . . . . . . . . . . . . . . . . . . . . . . . . . . . . . . . . . . . . . . . . . . . . . . . . . . . . . . . . . . 118
Caring for your telephone . . . . . . . . . . . . . . . . . . . . . . . . . . . . . . . . . . . . . . . . . . . . . . . . . . . . . . . . . . . . . . . 118
Contact with liquid . . . . . . . . . . . . . . . . . . . . . . . . . . . . . . . . . . . . . . . . . . . . . . . . . . . . . . . . . . . . . . . . . . . . . 118
Authorisation . . . . . . . . . . . . . . . . . . . . . . . . . . . . . . . . . . . . . . . . . . . . . . . . . . . . . . . . . . . . . . . . . . . . . . . . . . . 118
Using insert strips . . . . . . . . . . . . . . . . . . . . . . . . . . . . . . . . . . . . . . . . . . . . . . . . . . . . . . . . . . . . . . . . . . . . . . . 119
Using Gigaset QuickSync – additional functions for the PC interface . . . . . . . . . . . . . . . . . . . . . . 119
Specifications . . . . . . . . . . . . . . . . . . . . . . . . . . . . . . . . . . . . . . . . . . . . . . . . . . . . . . . . . . . . . . . . . . . . . . . . . . . 119
Open Source Software . . . . . . . . . . . . . . . . . . . . . . . . . . . . . . . . . . . . . . . . . . . . . . . . . . . . 120
General . . . . . . . . . . . . . . . . . . . . . . . . . . . . . . . . . . . . . . . . . . . . . . . . . . . . . . . . . . . . . . . . . . . . . . . . . . . . . . . . . 120
Information on license rights and copyright . . . . . . . . . . . . . . . . . . . . . . . . . . . . . . . . . . . . . . . . . . . . . 120
License text . . . . . . . . . . . . . . . . . . . . . . . . . . . . . . . . . . . . . . . . . . . . . . . . . . . . . . . . . . . . . . . . . . . . . . . . . . . . . 120
Glossary . . . . . . . . . . . . . . . . . . . . . . . . . . . . . . . . . . . . . . . . . . . . . . . . . . . . . . . . . . . . . . . . . . 126
Index . . . . . . . . . . . . . . . . . . . . . . . . . . . . . . . . . . . . . . . . . . . . . . . . . . . . . . . . . . . . . . . . . . . . 138
7elmeg IP120
Page 8
Following safety precautions
Warning
Be sure to read this user guide and the safety precautions before using your telephone.
Use only the power adapter indicated on the device.
Using your telephone may affect nearby medical equipment. Be aware of the
technical conditions in your particular environment, e.g., doctor's surgery.
If you use a medical device (e.g., a pacemaker), please contact the device manufacturer. They will be able to advise you regarding the susceptibility of the device
to external sources of high frequency energy (for the specifications of your bintec-elmeg product see "Technical Data").
The devices are not splashproof. For this reason do not install them in a damp
environment such as bathrooms or shower rooms.
Do not use the devices in environments with a potential explosion hazard
(e.g., paint shops).
bintec elmegFollowing safety precautions
If you give your phone to a third party, make sure you also give them the user
guide.
Remove faulty devices from use or have them repaired by our Service team, as
these could interfere with other wireless services.
Please note
The Ethernet cable supplied is intended for connecting a PC. To connect the telephone to the
local network use shielded cables exclusively.
8
elmeg IP120
Page 9
bintec elmeg Using the phone in different scenarios
DSL connection
1
2
3
4
5
6
7
ISDN, S2M
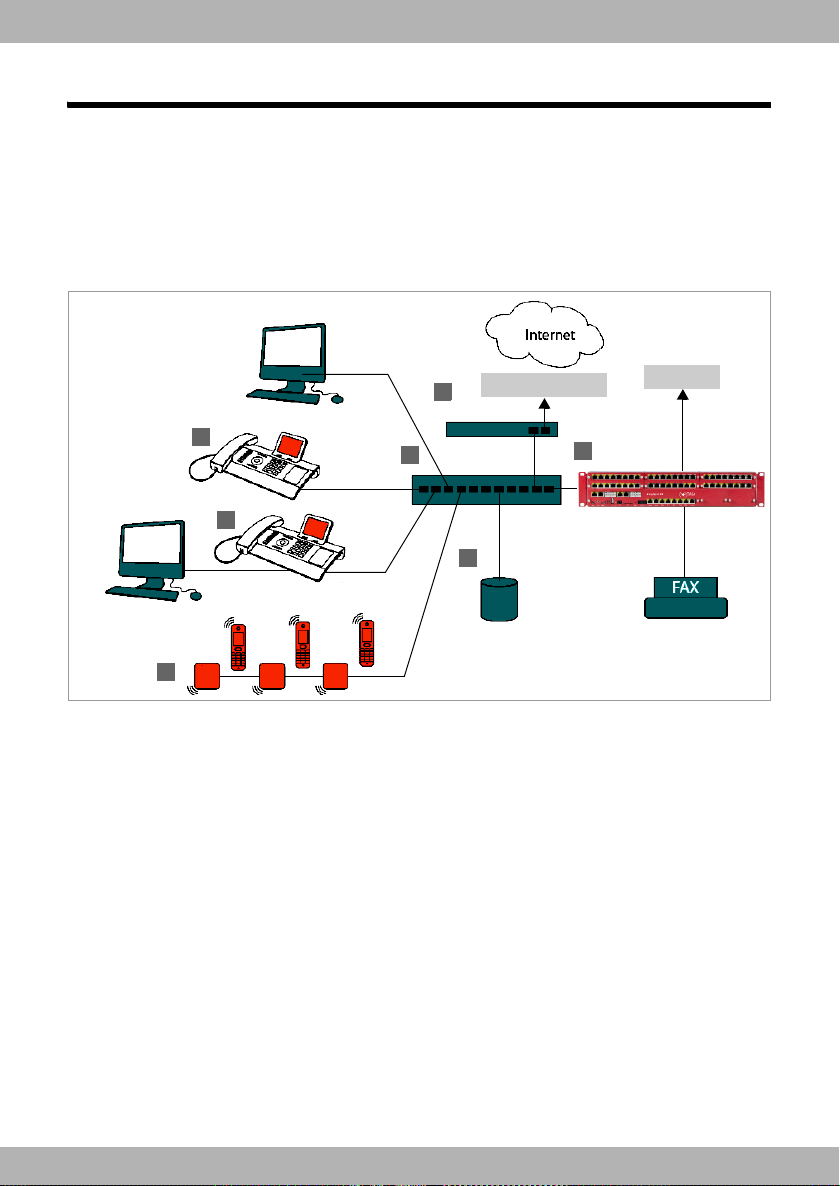
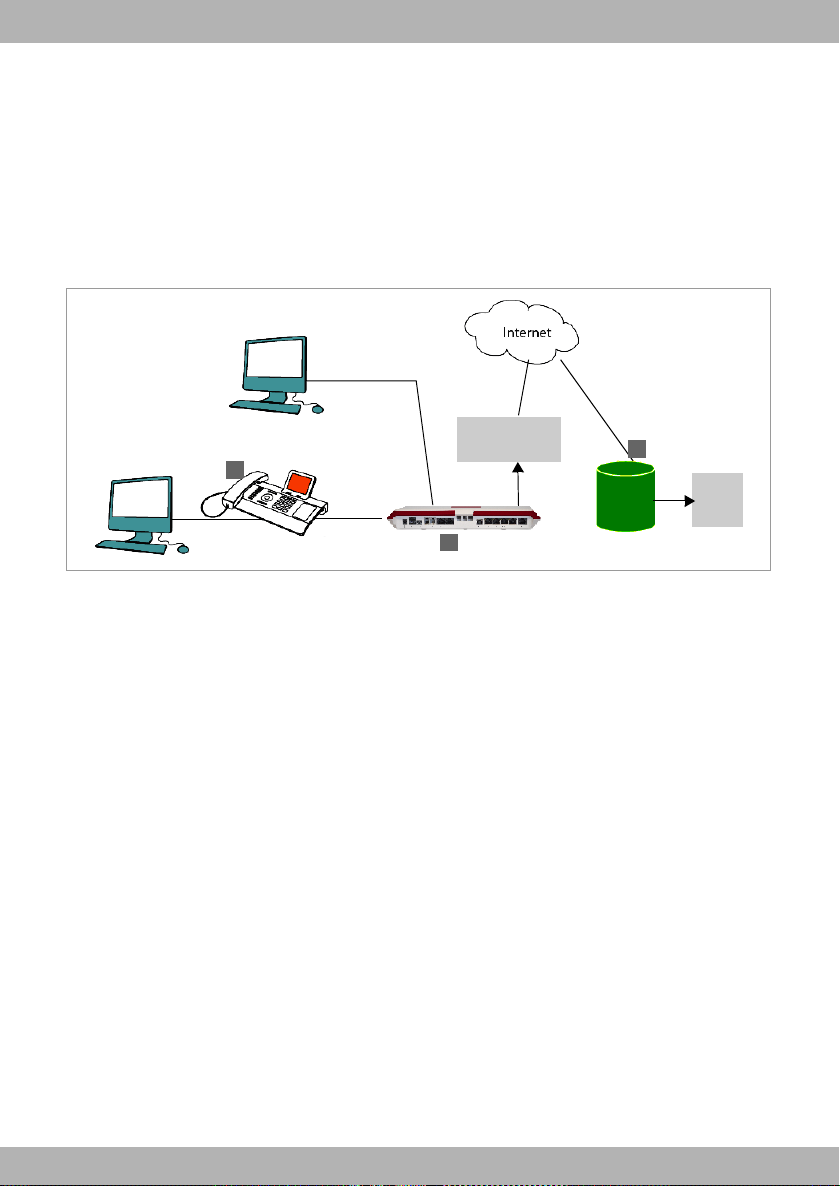
Using the phone in different scenarios
Using your phone in a professional environment with phone system and server
structure
If you use your elmeg IP120 in a corporate network with a telephone infrastructure, your phone
incorporates functions and data from the phone system and servers.
In a corporate environment, the VoIP accounts and most of the settings are configured centrally
by the phone system.
§§1§§ elmeg IP120 telephone
§§2§§ elmeg IP120 telephone with integrated switch.
Your PC is connected directly to the phone, providing you with an additional LAN connection
in your network.
§§3§§ DECT IP bases for connection to DECT handsets
§§4§§ Ethernet switch
Supports Quality of Service (QoS), 100 Mbit or Gigabit Ethernet and PoE (Power over Ethernet).
§§5§§ Phone system (e.g., hybird 600)
Forms Internet telephony, ISDN or S2M connections. Analogue devices can be connected. A
network connection is established using Ethernet.
§§6§§ Acts as a gateway to the Internet for the connected devices. Routes VoIP calls from the phone
system to the Internet.
9elmeg IP120
Page 10
bintec elmegUsing the phone in different scenarios
Internet
Connection
ISDN,
S2M
SIP provider
1
3
2
§§7§§ File, e-mail and workgroup servers, or NAS systems, can be seamlessly integrated into the
phone system architecture. As a result:
– Invitations to conference calls can be organised via the phone system
– The phone system can be backed up to a server or the system can be started via the net-
work
– Online directories (LDAP) can be managed centrally
Using your phone in a simplified environment without a phone system
You can also use your elmeg IP120 without a phone system.
§§1§§ elmeg IP120 telephone with integrated switch.
Your PC is connected directly to the phone, providing you with an additional LAN connection
in your network.
§§2§§ Acts as a gateway to the Internet for the connected devices. Routes VoIP calls from the phone
to the Internet.
§§3§§ The SIP provider transfers calls from the Internet and establishes a connection with the
standard telephone network.
In this scenario, you must manually configure the VoIP accounts for your phone. You can create
up to 6 VoIP accounts on your phone.
10
elmeg IP120
Page 11
bintec elmeg First steps
First steps
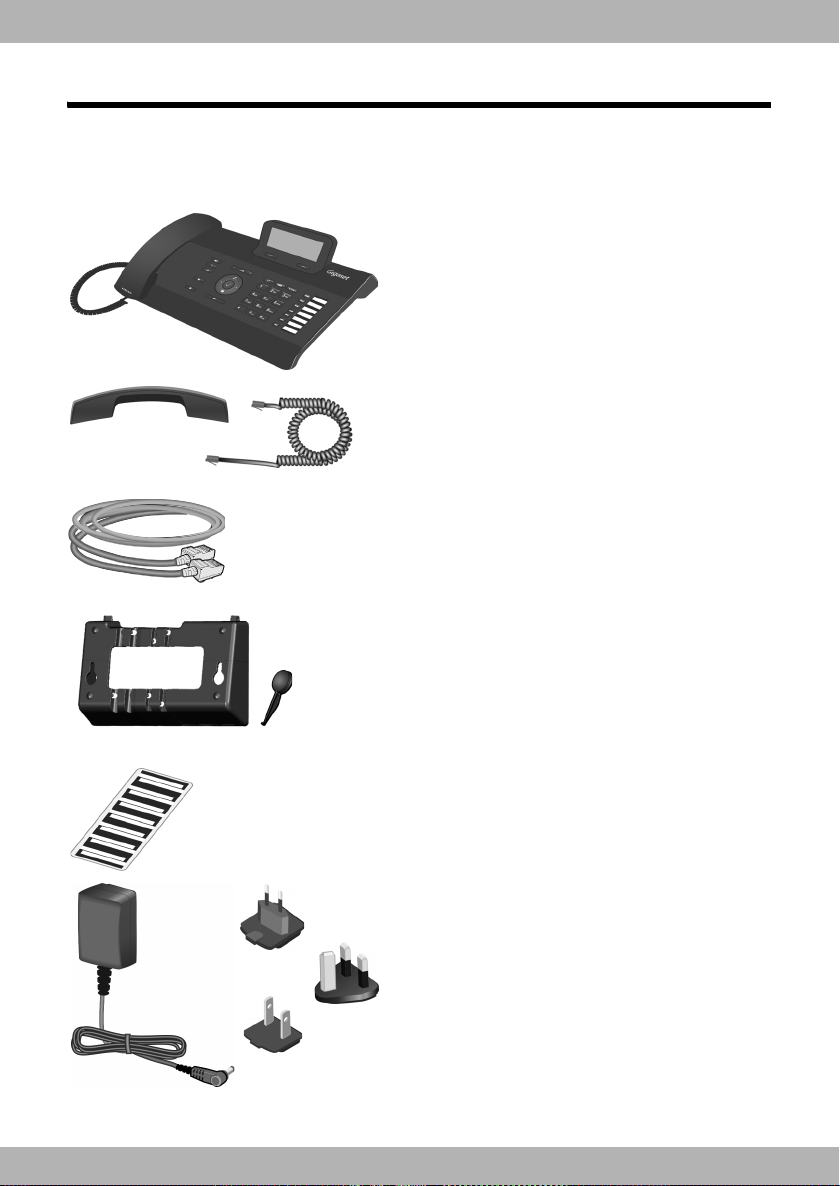
Check the package contents
Telephone: elmeg IP120
Receiver with cable for connection to the phone
Ethernet cable for connecting a PC
Wall bracket and
Tool for fixing the handset retainer when mounting the device on the wall.
Insert strips for labelling
the function keys (with protective film)
Optional:
Power adapter for connecting the phone to the
mains power supply (if required)
with three different plug-in modules
(Europe, Great Britain, USA)
The device is powered by PoE (Power over Ethernet) if it is connected to a switch with PoE-functionality (
£ S. 16).
11elmeg IP120
Page 12

bintec elmegFirst steps
Firmware update
Whenever there are new or improved functions for your elmeg IP120, firmware updates are
made available for you to download to your phone via hybird phone system (S. 113). If this
results in operational changes to your phone, a new version of this user guide or the necessary
amendments are published on the Internet at www.bintec-elmeg.com
Select the product to open the relevant product page for your telephone, where you will find
a link to the user guide.
To find out what version of firmware is currently loaded on your phone, see S. 115.
.
Setting up and connecting the device
The phone is designed for use in dry rooms in a temperature range of ±0°C to +45°C.
¤ Set up the phone at a central point where a connection to the local network is available.
Warning
u Never expose the elmeg IP120 to the following:
heat sources, direct sunlight or other electrical appliances.
u Protect your elmeg IP120 from moisture, dust, corrosive liquids and fumes.
Please note
You can also mount your elmeg IP120 on the wall (
£ S. 18).
12
elmeg IP120
Page 13
bintec elmeg First steps
1
2
3
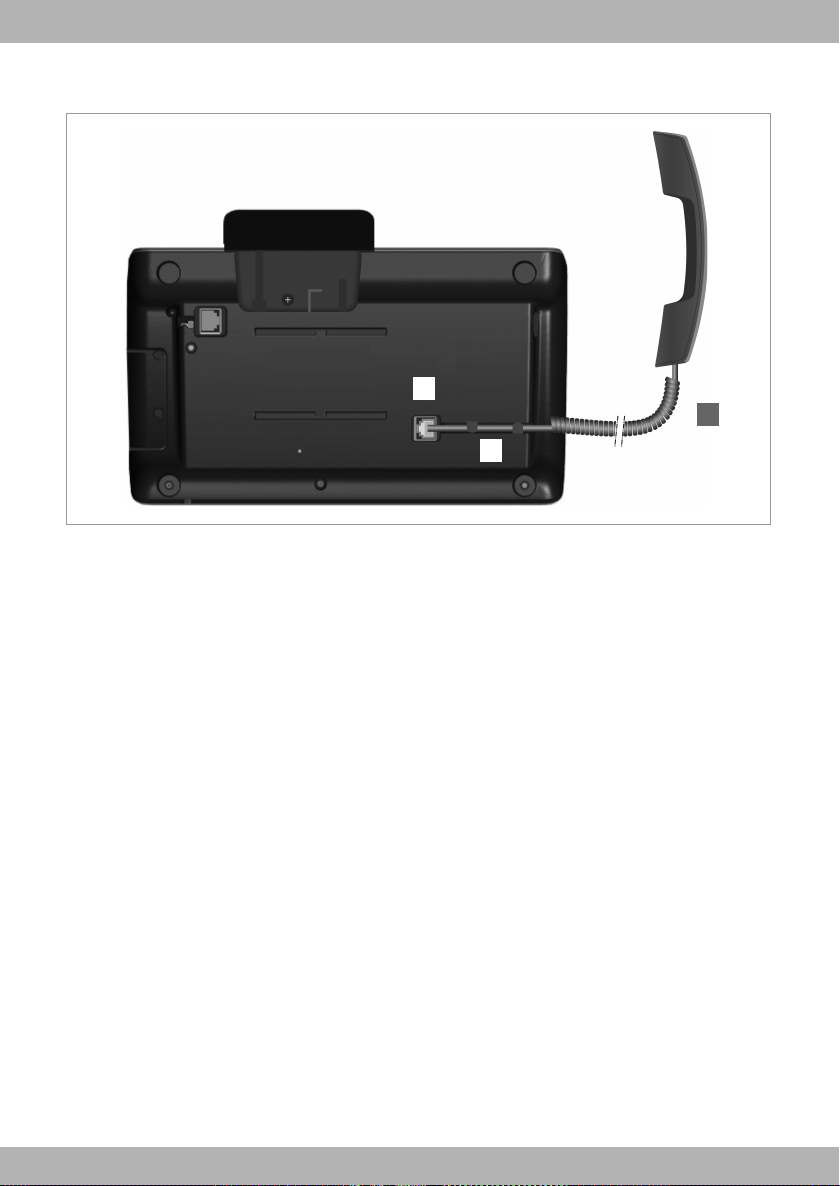
Connecting the receiver
§§1§§ Insert the connector, which can be found on the longer straight end of the connection cable,
into the connection port on the bottom of the phone.
§§2§§ Place the straight part of the cable in the cable recess provided.
§§3§§ Insert the other jack on the connection cable into the port on the receiver.
13elmeg IP120
Page 14

bintec elmegFirst steps
21
Connecting the network cable
To make calls via VoIP, your phone must have Internet access. This connection is established in
the local network via a gateway.
You connect your phone to the same local network as the gateway. See the Using the phone
in different scenarios section on S. 9 for an overview of the different options.
§§1§§ Attach one end of the Ethernet cable to the right-hand LAN port on the rear of the
phone.
§§2§§ Attach the other end of the Ethernet cable to a LAN port on your network Ethernet
switch or on the router itself.
Please exclusively use a shielded cable for the connection.
Warning
If you connect your elmeg IP120 to a PoE-capable Ethernet switch (PoE class IEEE802.3af), it will
be supplied with power via PoE (Power over Ethernet). The PoE network must not exceed the
premises boundaries.
14
elmeg IP120
Page 15
bintec elmeg First steps
2
1
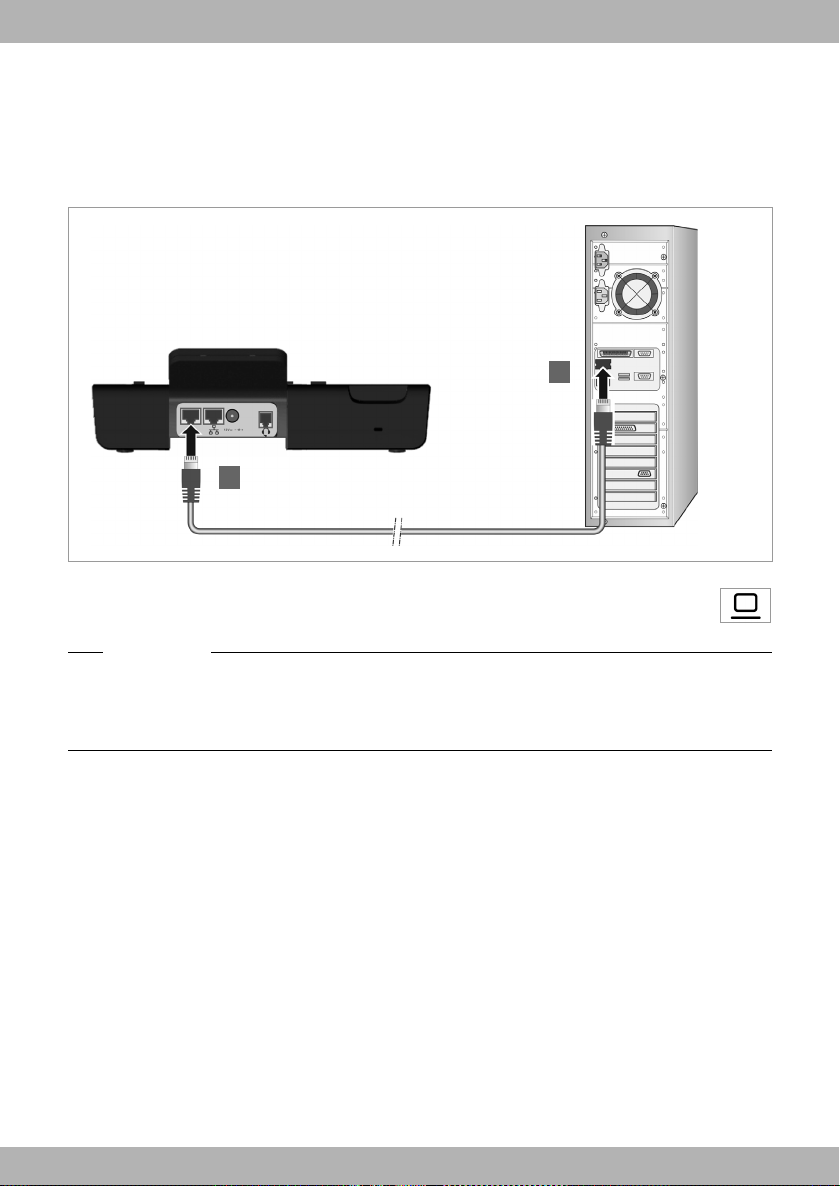
Connecting the PC
Your phone has an integrated two-port switch. This allows you to connect your PC to the local
network via the phone and avoid using additional connection ports on the switch or router.
The Ethernet cable supplied is intended for this connection. Do not use this cable to connect
the telephone to the local network (
§§1§§ Connect an Ethernet cable to the left-hand LAN port on the rear of the phone.
§§2§§ Connect the other end of the Ethernet cable to a LAN port on the PC.
Please note
You can operate and configure your elmeg IP120 using this or any other PC within the local network. For more information please see the chapter Web configurator – configuring the
phone on a PC,
hybird. For more information please see the hybird documentation.
£ S. 71. The elmeg IP120 can be auto-provisioned in cooperation with a
£ S. 14).
15elmeg IP120
Page 16

bintec elmegFirst steps
Europe
Great Britain
USA
1
2
2
1
3
Connecting a device to the mains power supply (if required)
Your elmeg IP120 is supplied with sufficient power by PoE (Power over Ethernet) and does not
need to be connected to the mains power supply. Prerequisite: The device is connected to an
Ethernet switch with PoE functionality (PoE class IEEE802.3af) (
To connect your device to the mains power supply, if required, a power adapter is supplied with
three different plug-in modules for Europe, Great Britain and the USA. First attach the appropriate plug-in module to the power supply unit.
§§1§§ Slide the required plug-in module into the recess on the underside of the power supply unit
until it clicks into place.
§§2§§ To remove the plug-in module again, press on the button marked Push and pull the plug-in
module out of the power supply unit.
£ S. 14).
§§1§§ Connect the power adapter to the port on the rear of the phone.
§§2§§ Then insert the plug into the mains socket.
Warning
Use only the power adapter supplied.
Please note
You can safeguard your device against theft by fitting a Kensington lock. The corresponding
hole can be found on the rear of the device (
§§3§§).
16
elmeg IP120
Page 17
bintec elmeg First steps
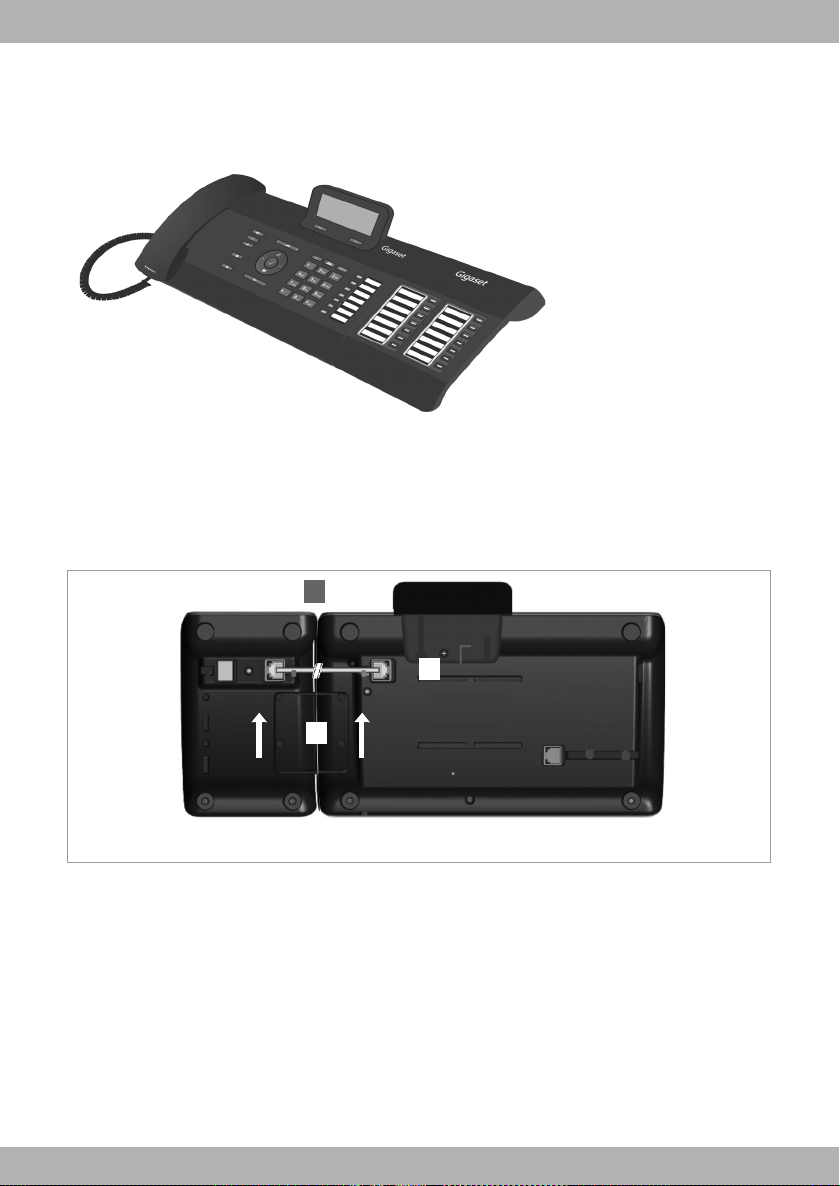
Extension module
1
3
Extension module elmeg IP120
2
Connecting extension modules (optional)
You can increase the number of programmable keys using extension modules (max. two; can
be ordered as accessories
The function keys can be programmed using the Web configurator (
The package contains:
u One extension module
u One connection frame with four fastening screws
u One connection cable
u Insert strips
£ S. 117). Each module includes 14 additional programmable keys.
£ S. 102).
§§1§§ Position the extension module to the right of the phone (on left when viewed from below),
so that the module and phone are the same height and meet in the centre.
§§2§§ Insert the clasps on the connection frame into the respective notches on the phone and
module and push the connection frame upwards until it clicks into place. Secure the connection frame with the screws provided.
§§3§§ Establish the connections using the cable supplied.
17elmeg IP120
Page 18
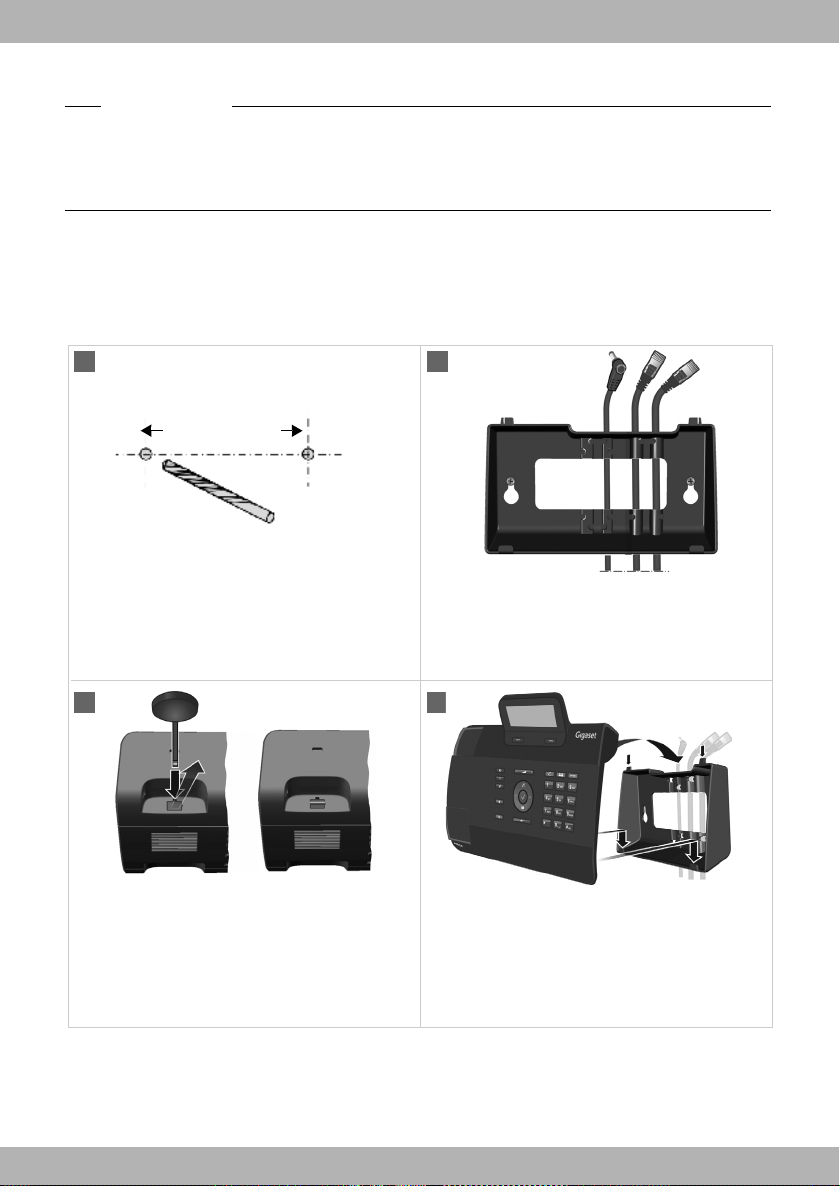
Please note
1 2
3 4
143 mm
5mm ø
¤ Drill two dowel holes and insert dowels.
You can use the wall bracket as a drilling
template.
¤ Thread the cables through the cable
guides on the back of the bracket and
screw it to the wall.
¤ Remove the handset retainer from the
cradle using the tool provided, and
replace it with the ridge pointing
upwards.
¤ Attach the phone to the wall bracket by
first hooking it onto the hooks at the bottom and then tilting the top back towards
the wall and pushing it downwards.
¤ Reconnect the cables.
If the extension module does not work after installation, restart your device (disconnect it from
the mains power supply and reconnect it).
If you attach more than one extension module, the device must be connected to the mains
power supply via a power adapter.
Wall mounting
It is also possible to mount the elmeg IP120 on the wall using the supplied wall bracket.
¤ Unplug the cables from the phone before you begin.
bintec elmegFirst steps
18
elmeg IP120
Page 19
bintec elmeg First steps
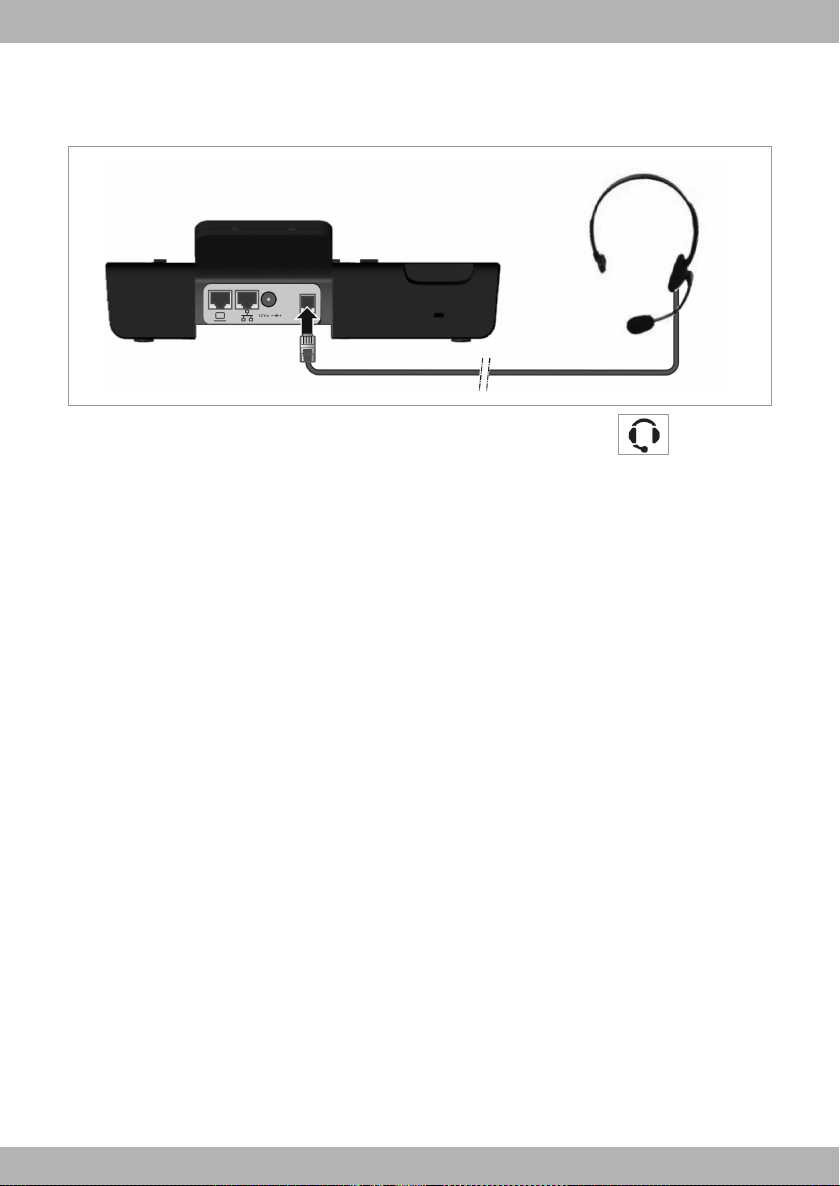
Connecting a headset
You can connect a headset via the RJ9 connector of your elmeg IP120.
¤ Connect the cable for the headset to the RJ9 connector on the phone.
19elmeg IP120
Page 20
bintec elmegFirst steps
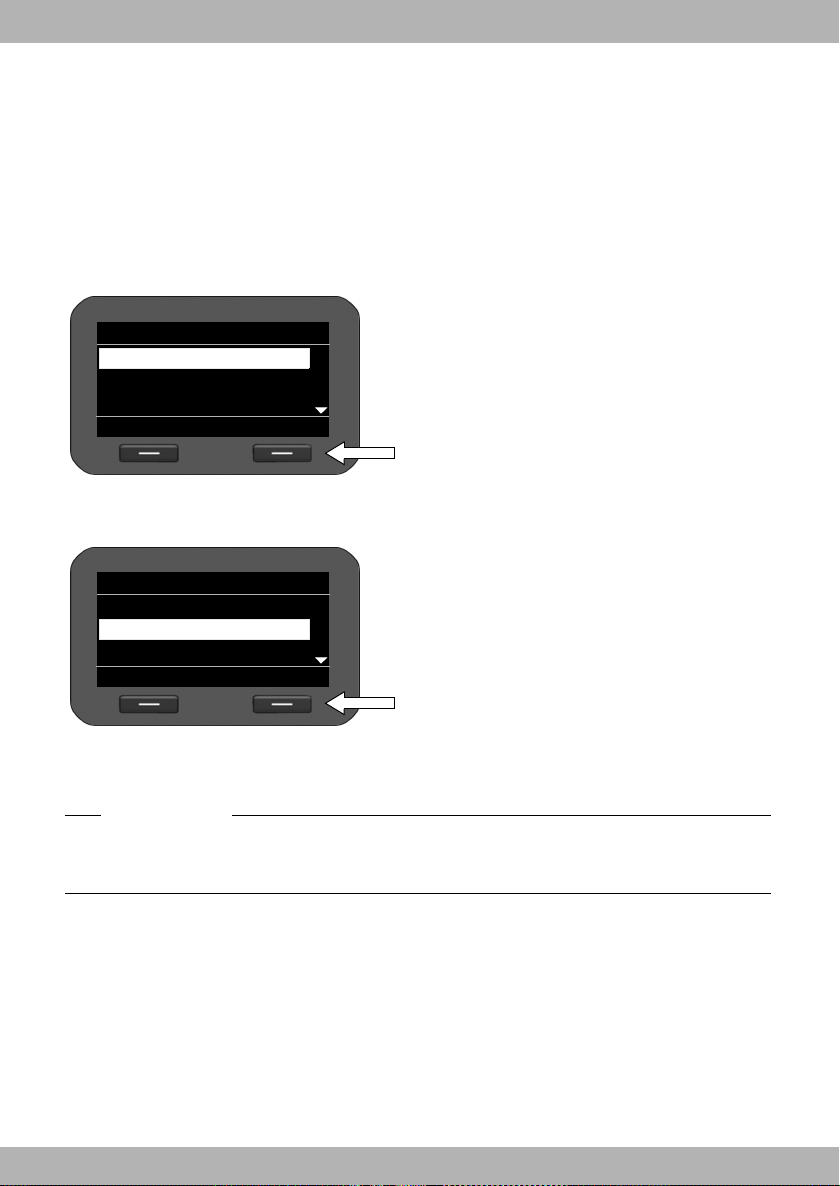
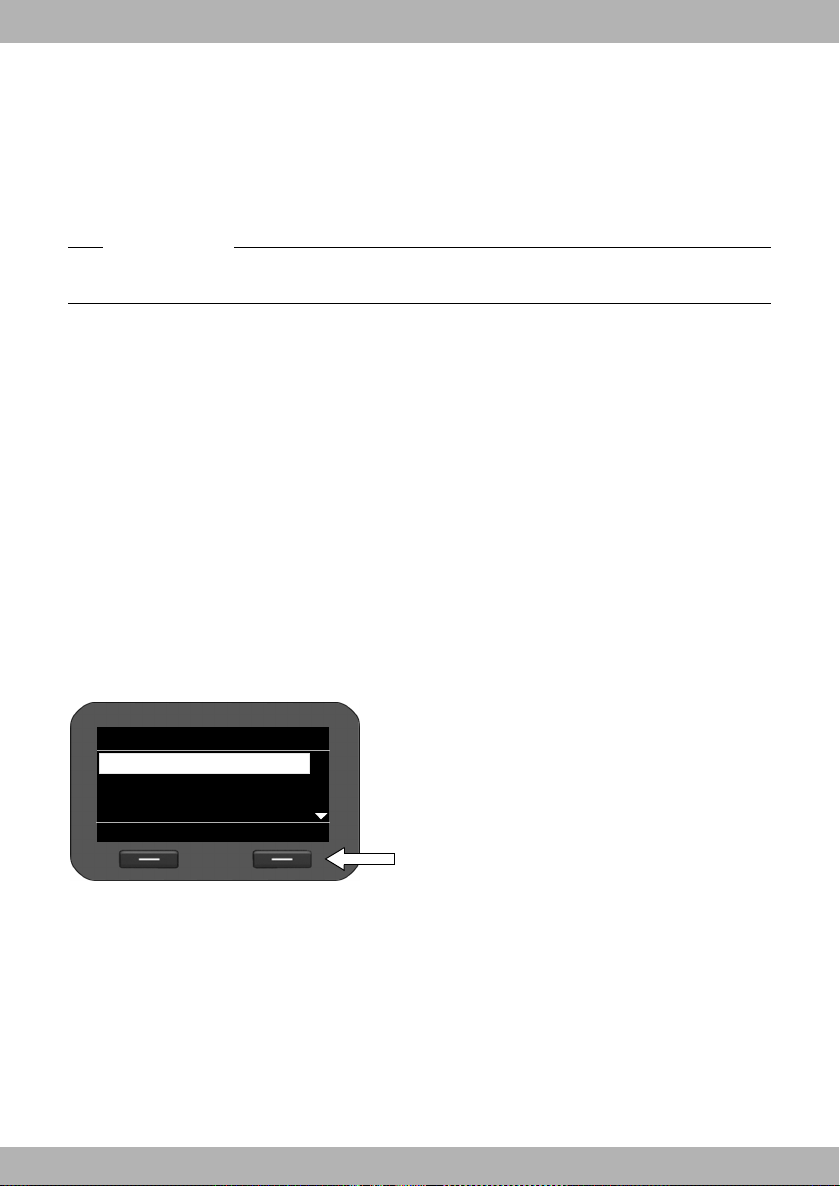
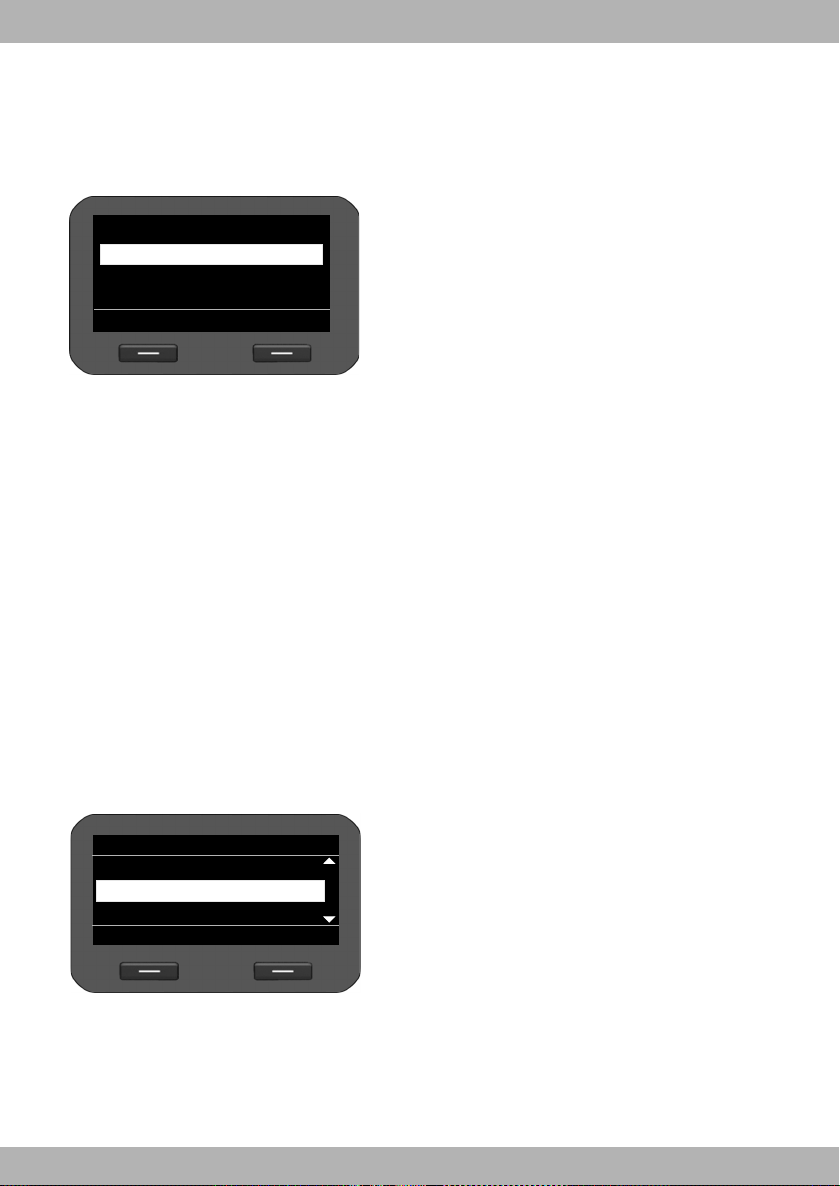
Select your Language
OK
Deutsch
English
Franc ais
Select Time Zone
OK
(GMT) GMT, Dublin, London
(GMT+01:00) Amster-
(GMT+02:00) Athens, Cairo, Is-
Setting up the device (for the first time)
Your device will start automatically as soon as it is connected to the mains power supply.
Please be aware that the device is powered by PoE (Power over Ethernet). This means that it is
supplied with power as soon as it is connected to an Ethernet switch with PoE-functionality.
The first time you use the device, an installation wizard will start automatically and guide you
through the necessary installation steps.
Configuring language and time zone settings
¤ Use the navigation key to select the required
language. To do this, press up or down on
the navigation key
Further information about the navigation
key can be found on £ S. 26.
q.
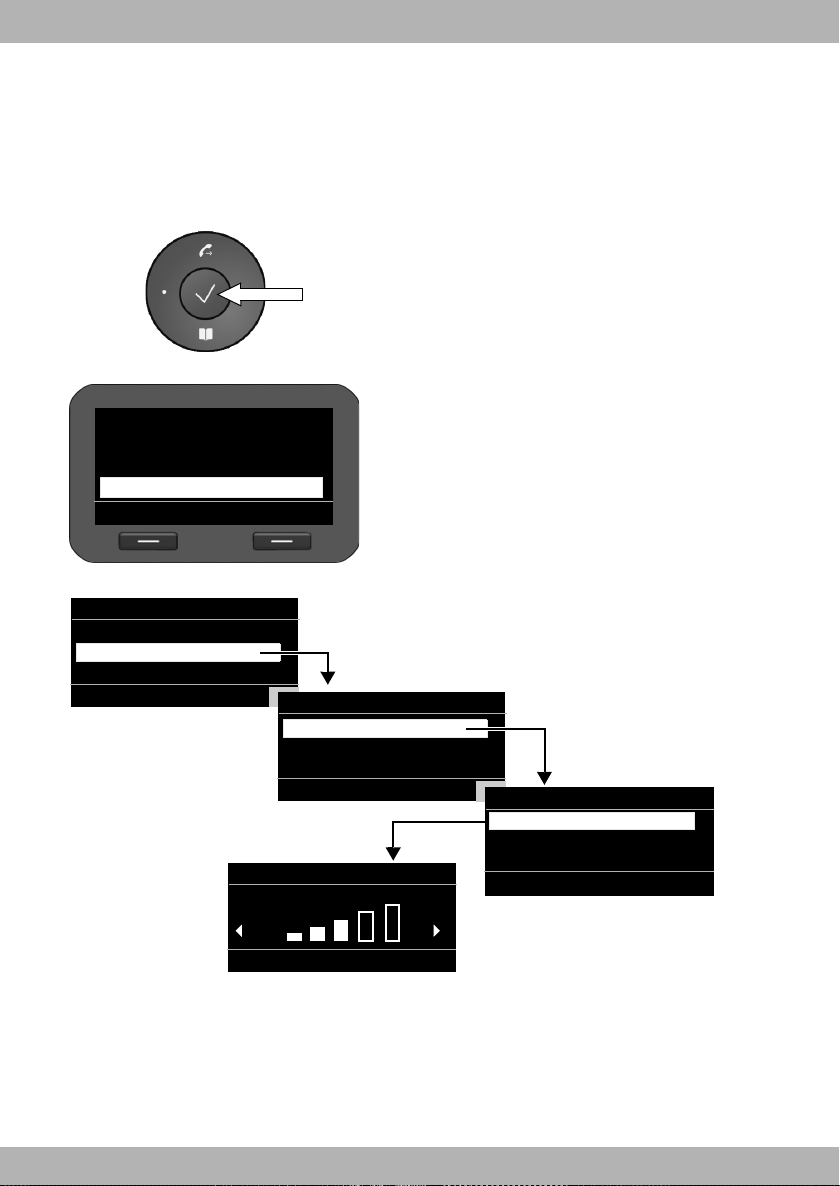
¤ Press the display key under §OK§ to confirm
your selection.
You can also use the OK function on the nav-
igation key (by pressing
the key).
‰ in the centre of
¤ Use the navigation key to select the required
time zone.
¤ Press the display key under §OK§ to confirm
your selection.
¤
When you have made your selection, press the end key I to return to the last entry screen.
You can correct your selection if necessary.
Please note
The date and time are automatically set by a time server. The time server is a provisionable
parameter which is set by default via DHCP by the hybird phone system. You can select a time
server using the Web configurator or deactivate this function (
£ S. 106).
20
elmeg IP120
Page 21
bintec elmeg First steps
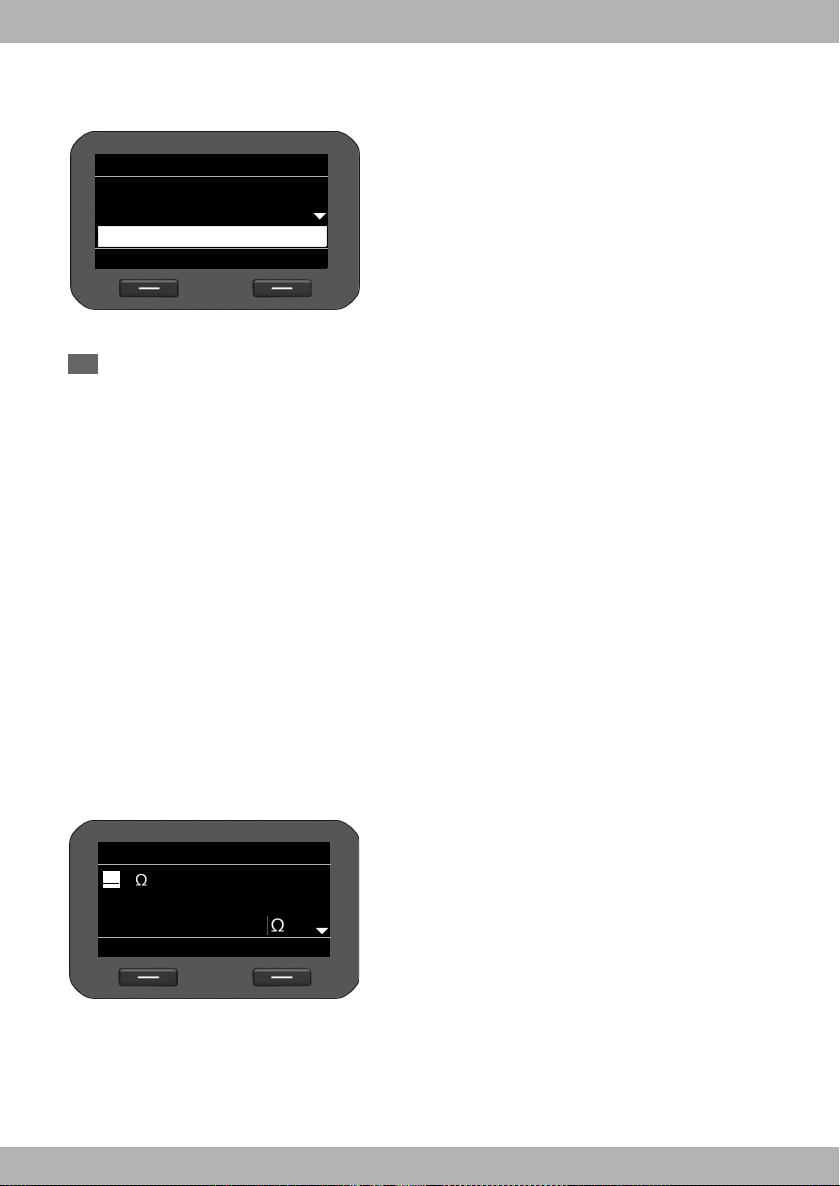
Local Network
OK
Network Type
IP Address Type
IP Address
Back
Establishing a connection to the local network
Your phone must be connected to the local network before it can connect to the Internet and
before you can operate it from a PC.
The device checks to see if a network connection already exists. The network connection is
automatically established if the phone has automatically been assigned an IP address from a
DHCP server in the network. If this is the case, the following screen will not appear and you can
£ S. 22.
skip to
Please note
The following network configuration is the default setting on your device: LAN with IP protocol
version 4 (IPv4) and DHCP.
If your phone has no network connection, you will need to configure the network manually.
Depending on the type of network, you will need the following information about the configuration:
u If the network uses IP protocol version 4 (IPv4) with a static IP address, you will need:
The device IP address, the network subnet mask, the IP addresses of the standard gateway
and DNS server.
u If the network uses IP protocol version 6 (IPv6):
IP addresses automatically: select IPv6 as Network Type. The connection is then established
automatically.
IP addresses statically: the device IP address, the address prefix length and the DNS server IP
address.
If there is still no network connection, you will then be asked whether you wish to configure the
connection manually.
¤ Select §§Yes§§ if you have the required information.
¤ Select §§No§§ if you want to use the display menu to configure the network at a later date
£ S. 65).
(
If you selected
work immediately.
Depending on your selection, additional
screens may be displayed so you can enter the
required information.
More detailed information on LAN configuration can be found on
§§Yes§§§, you can configure the net-
£ S. 65.
¤ Once you have configured all settings, press
the display key under
saved.
Your device is now connected to the local network and can be configured for Internet telephony.
§§OK§§. Your settings are
21elmeg IP120
Page 22

bintec elmegFirst steps
Configuring Internet telephony
Before you can use the Internet to phone anyone over the Internet, the fixed line network or the
mobile phone network, you need the services of a VoIP provider.
Prerequisite:
– You have a phone system in your network that provides VoIP accounts for your device, or
– You have registered with a VoIP provider (e.g., via your PC) and set up a VoIP account.
The device searches the network for a provisioning file and checks whether VoIP accounts
already exist. If the telephone has existing VoIP accounts, these accounts are configured automatically. You can now make calls with your phone via the Internet.
If the telephone has no existing VoIP accounts, you must configure them manually (
Please note
If the phone is provisioned within the hybird, the data is loaded automatically.
£ S. 83).
22
elmeg IP120
Page 23

bintec elmeg First steps
Proceeding
Now you have successfully set up your phone, you can adapt it to your personal requirements.
Use the following guide to quickly locate the most important topics.
If you are unfamiliar with menu-driven devices such as other bintec-elmeg telephones, you
should first read the section entitled Using the phone on S. 24.
Operating the phone via the keypad and display menu £ S. 24
Operating the phone via the PC £ S. 30
Making calls £ S. 31
Setting up and using directories £ S. 47
Setting ring tones £ S. 59
Setting up VoIP accounts £ S. 74
Loading your own sounds £ S. 111
If you have any questions about using your phone, please contact our Customer
Care team (
£ S. 117).
23elmeg IP120
Page 24
bintec elmegUsing the phone
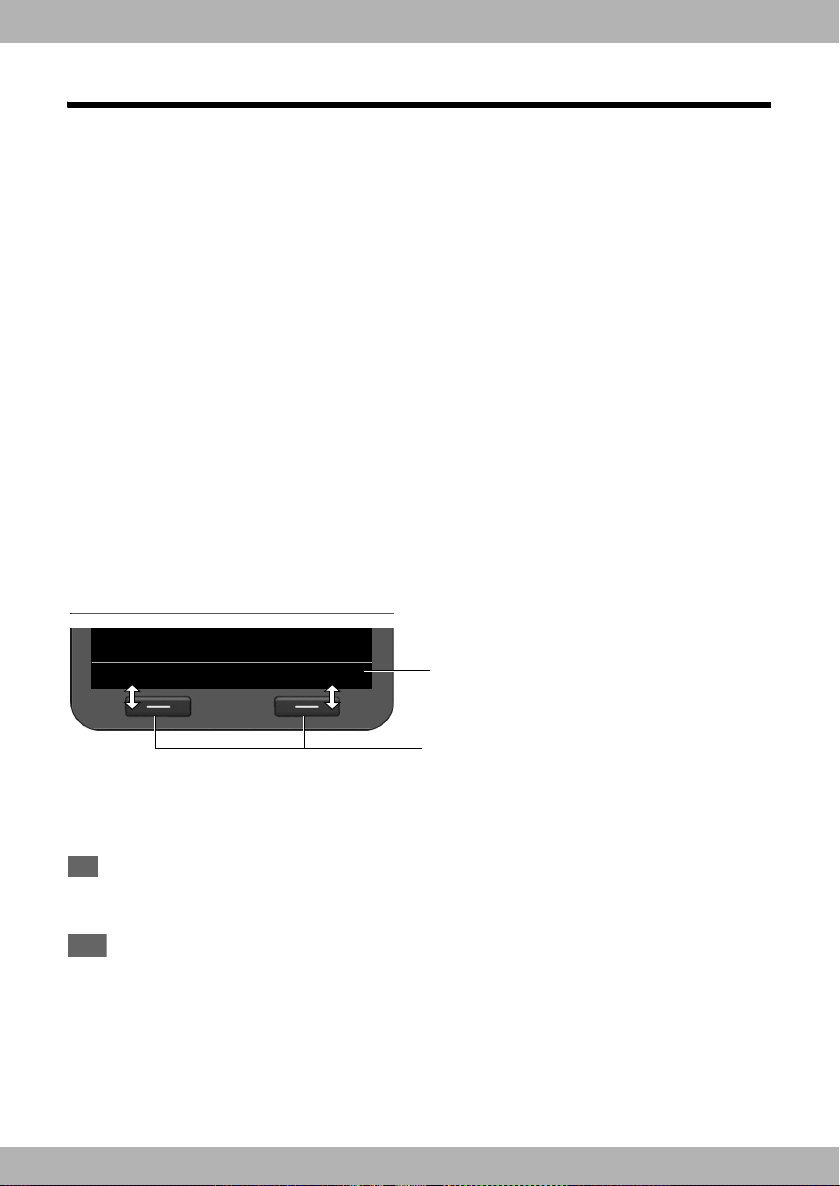
Back OK
Current display key functions
Display keys
Û
?
ß
Using the phone
You have a range of options for operating and configuring your elmeg IP120 in a way that is
convenient for you.
u The keypad and display allow quick and clear access to your phone’s features.
u The Web user interface provides access from a PC and helps you easily configure your phone
£ S. 30).
(
u If your phone is connected to a hybird phone system, you can also use the capabilities of the
phone system, such as Call Manager, conference and function key assignment.
The option you choose will depend on the situation.
Operating via the keypad and display menu
Display and display keys
The display gives you quick access to all the functions on your phone, particularly the menu
functions.
In idle status, icons on the display indicate the status of your phone (
time is displayed.
Use the display keys to activate the phone's functions and to navigate through the menu. Different functions are available depending on the operating situation. These functions are displayed at the bottom of the screen.
Example
£ S. 5). In addition, the
Some important display keys:
§§Options§§ Open a menu for further functions.
§§OK§§ Confirm selection.
Delete key: Delete one character at a time from right to left.
§§Back§§ Skip back one menu level or cancel the operation.
§§Save§§ Save entry.
Copy the displayed entry to the directory.
24
elmeg IP120
Page 25
bintec elmeg Using the phone
New Entry
Save
First Name:
Ke|
j k l
Û
abc
Û
?
Special Characters
Back
;:,.-+*#
§%&@? ! ¡
_’ " =/\
Insert
Writing and editing text
A text editor is provided for entering text via the keypad.
~ Enter the text.
Each key between Q and O is assigned several
letters and digits. Press the relevant key a certain
number of times to enter a particular character.
For example k = 2 x the 5 key.
The characters available are shown in the editor
field. The highlighted character is inserted to the
left of the cursor.
Deleting/correcting characters
Press the display key. The character to the left of the cursor is deleted. Press and
hold to delete the word to the left of the cursor.
Entry mode
A range of entry modes are available depending on the operating situation. The current mode
is displayed on the right-hand side of the editor field.
Abc Letters, first letter upper case, others lower case, e.g., for entering names.
abc Lower case only, e.g., for entering e-mail addresses.
123 Digits only for entering numbers.
Switching entry mode
# Press the hash key. The text entry mode will change.
Moving the cursor
r Press the navigation key briefly: moves the cursor one character at a time.
Press and hold the navigation key: moves the cursor word by word.
q Press the navigation key: moves the cursor line by line. The cursor stays in a hori-
zontal position.
Entering special characters
* Press the star key. The table of special characters is displayed.
p Select the required character.
§Insert§ Press the display key. The selected char-
acter is inserted at the cursor position.
25elmeg IP120
Page 26
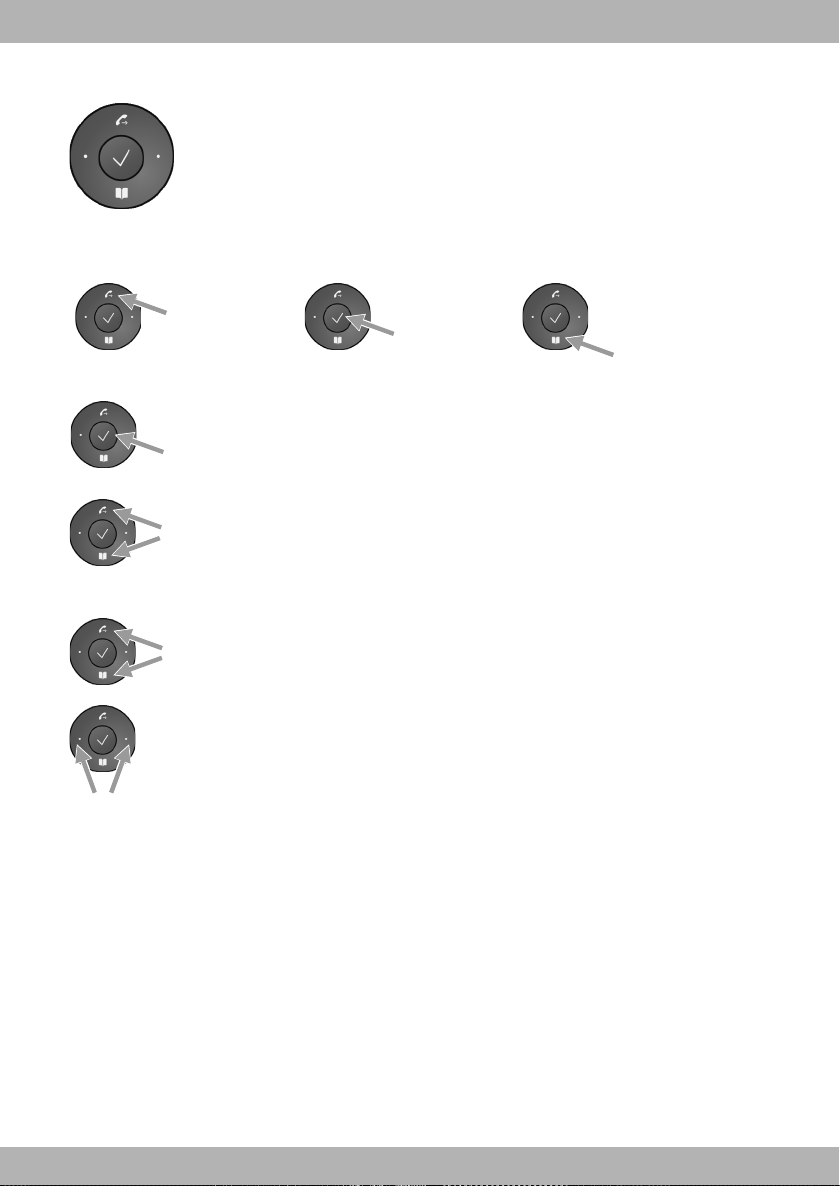
Navigation key
Open
redial list
Open
directory
Open
main menu
In idle status
In menus and lists
In input fields
bintec elmegUsing the phone
The navigation key enables you to access important telephone functions
quickly. You can use it to scroll through lists and directories with ease.
Depending on the operating situation:
§§OK§§, §§Yes§§, §§Save§§, §§Select§§ or §§Change§§.
Copy a number that has been entered or is shown in the display into the
directory.
Press briefly:
Navigate to the line above/below.
Press and hold:
Scroll up/down the list one line at a time.
Move the cursor up/down
line by line
Press briefly:
Move the cursor to the left/right one character at a time.
Press and hold:
Move the cursor to the left/right quickly.
Understanding the navigation key
The following illustrations demonstrate how to use the navigation key:
‰ Press the centre of the navigation key.
stuv Press down/up/left/right on the navigation key.
26
elmeg IP120
Page 27
bintec elmeg Using the phone
Back OK
Voice Mail
Contacts
Settings
Ã
Z
Ÿ
Select Services
Ú
Directory
Back
OK
Adam
Black, Susan
Brown, Tim
Using the menus
Your telephone's functions are accessed using a menu that has a number of levels.
Opening the main menu
¤ When the phone is in idle status, press the centre of the navigation key ‰.
The display menu functions are shown as a list with
the respective icons.
The selected function is highlighted via inverse display.
Accessing a function or opening the corresponding submenu
¤ Navigate to the required entry using the navigation key q and press the §OK§ display key or
‰ navigation key.
the
Back to the previous level
¤ Press the §Back§ display key or briefly press the end key I.
The current operation is cancelled and you will return to the previous menu level.
You can revert to idle status from the main menu.
Reverting to idle status
You can revert to idle status from anywhere in the display menu as follows:
¤ Press and hold the end key I.
Or:
¤ Do not press any key: After 3 minutes the display will automatically revert to idle status.
Settings that have not been saved by selecting the display keys §OK§, §Yes§, §Save§ or §Change§ or the
navigation key
Scrolling through lists
‰ are lost.
If it is not possible to view all of the functions/list
entries at the same time (list is too long), arrows
appear on the right-hand side. The arrows indicate
the direction in which you need to scroll to view the
rest of the entries in the list.
27elmeg IP120
Page 28
bintec elmegUsing the phone
Back OK
Voice Mail
Contacts
Settings
Ã
Z
Ÿ
Select Services
Ú
Settings
Back OK
Date / Time
Audio Settings
Display
Volume
Back Save
Call Volume
Audio Settings
Back OK
Ringer Settings
Advisory Tones
Ringer Settings
Back OK
Volume
Melodies
Anon. Call Silencing
¤ Continue to navigate through the menu using the
navigation and display key until you reach the Volume
submenu.
Audio Resource
Understanding the operating steps
The operating steps used to navigate through the display menu are shown in abbreviated form.
For example, setting the ringer volume
‰ ¢ Settings ¢ Audio Settings ¢ Ringer Settings ¢ Volum e
means:
¤ Press the centre of the navigation key to open
the main menu.
¤ Navigate up/down using the navigation key q
until the Settings submenu is selected.
¤ Press the display key §OK§ to confirm your selec-
tion.
28
elmeg IP120
Page 29
bintec elmeg Using the phone
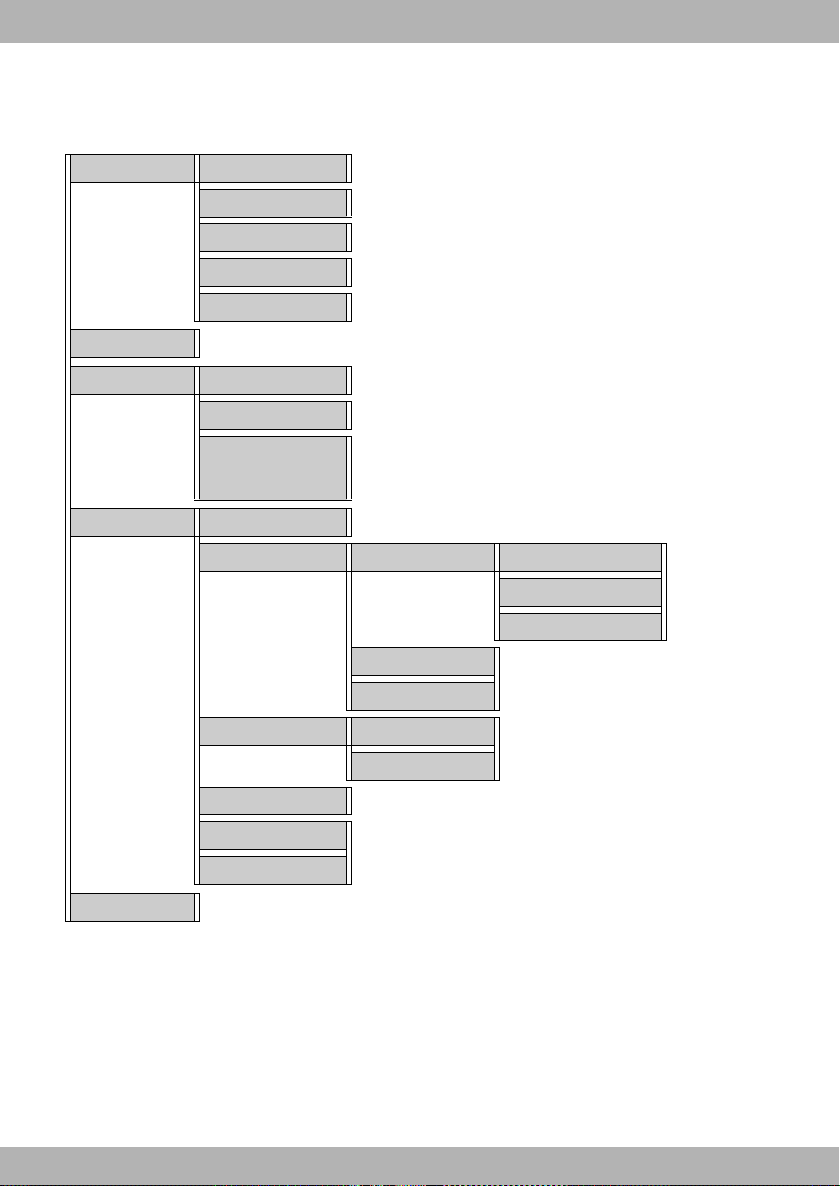
Menu tree
The following menu tree shows all the components of the display menu.
Select Services Next Call anonymous £S. 37
All Calls anonymous £ S. 37
Call Divert £ S. 41
Call Waiting £ S. 38
Active Ringbacks £ S. 34
Voice Mail £ S. 54
Contacts Directory £ S. 47
LDAP Directory £ S. 50
You can choose any name
Online directories £ S. 51 The name of these menu entries
Settings Date / Time £ S. 58
Audio Settings Ringer Settings Volume £ S. 59
Advisory Tones £ S. 61
Audio Resource £ S. 61
Display Backlight £ S. 62
Contrast £S. 63
Language £ S. 63
Local Network £ S. 66
Reset £ S. 64
Info £ S. 64
depends on Web configurator settings
£ S. 99.
Melodies £ S. 60
Anon. Call Silencing £ S. 60
29elmeg IP120
Page 30

bintec elmegUsing the phone
Operating via the PC
You can operate the main functions of your phone from your PC by using the Web configurator.
Starting the Web configurator
To start the Web configurator, you need the IP address of your phone. You will find this via the
display menu of the telephone in the LAN settings for the device:
‰ ¢ Settings ¢ Local Network (£ S. 66).
Please note
The IP address for your device can sometimes change, depending on the settings of the
DHCP server in your network.
Accessing the Web configurator:
¤ Open the Internet browser on your PC.
¤ Enter the IP address in the address field:
Example:
The login screen appears.
¤ Select the appropriate language.
¤ Select User as the user type and enter the corresponding password.
The default setting for the password is user, but this can be changed.
¤ Click on OK.
In User mode the following functions are available:
u Manage your contacts in the local directory and dial numbers directly (£ S. 109)
u View your call lists (£ S. 111)
u Forward incoming calls to another phone number (£ S. 93)
u Block individual phone numbers and/or all anonymous calls (£ S. 96)
u Decide on the assignment of the directory key and programme the function keys (£ S. 102)
u Download ring tones from the PC to your phone (£S. 111)
u Select different ring tones for your VoIP connections (£ S. 92)
u Change the password for the user login (£ S. 108)
u Configure settings for your phone display (£ S. 108)
All Web configurator functions – user and administrator mode – are described in the chapter
Web configurator – configuring the phone on a PC on S. 71.
30
elmeg IP120
Page 31

bintec elmeg Making calls
18/02/2012
Calls Lines
11:45
18 MyName
Making calls
Calling
You make your calls using the default account if you do not make another selection. The first
account that is created is used as the default account. You can change this using the Web configurator (
Selecting the VoIP account
Entering a number using the keypad
You make a call using the phone's receiver, speaker kit or a connected headset (£ S. 68).
~ Enter the phone number.
c Lift the receiver.
Or
c Lift the receiver.
~ Enter the phone number.
§§Dial§§ Press the display key.
The number is dialled.
The duration of the call is shown while the call is in progress.
Instead of putting the receiver to your ear:
A Press the speaker key to make a call via the speaker.
B Press the headset key to make a call via the headset.
You can also switch at any time during the call. Throughout the whole of this section, the c
icon can always represent either
£ S. 86).
If there are several VoIP accounts available on your
device, you can select the account you wish to use
for the call.
§§Lines§§ Press the display key.
q Select the required account.
§§OK§§ Press the display key to confirm the
selection.
A or B.
Please note
If your elmeg IP120 is connected to a telephone system, you can make settings for telephoning via headset or receiver (
£ S. 81).
31elmeg IP120
Page 32

bintec elmegMaking calls
Directory
View
Options
Adam
Black, Susan
Brown, Tim
When entering the phone number:
Û Press the display key to delete incorrectly entered figures to the left of the cursor.
* Press the display key to open a list with special characters.
Press one time: *, press two times:#; other special characters: . : ( )
ß Press the display key to copy entered phone numbers to the local directory
£ S. 47).
(
I Press the end key to cancel dialling.
Incoming call while entering a phone number:
The call is displayed as with a "call waiting" during a call (£ S. 38).
§Accept§ Press the display key to accept the call.
§Reject§ Press the display key to reject the call.
Please note
If you reject the call, the numbers already entered will still be displayed and you can continue entering the phone number.
Dialling a number from the directory
You can save up to 200 entries in the local directory. You can create directory entries and manage them quickly and easily using the Web configurator (
£ S. 47).
(
To dial a number proceed as follows:
£ S. 109) or the phone's display menu
Z Open the directory using the navigation key s.
Or use the display menu
‰ ¢ Contacts ¢ Directory
32
q Scroll through the list to the required name.
c Lift the receiver.
The default number is dialled (
Please note
You can also dial a phone number from the directory via the Web configurator (£ S. 109).
£ S. 49).
elmeg IP120
Page 33

bintec elmeg Making calls
18/02/2011
Calls Lines
11:45
™
18 MyName
Dialling a number using a function key
You can assign phone numbers to up to 7 function keys; you then only need to press a key once
to dial the number. You can increase the number of function keys by connecting extension
modules. Use the Web configurator to assign numbers to the function keys (
£ S. 102).
S Press the function key.
The number assigned to the function key is dialled.
In the Web configurator you can set whether you want the calls you initiate with a function key
to be made via the headset (
£ S. 81).
Dialling a number from the call lists
The following calls are saved:
u Outgoing calls (redial list)
u Accepted calls
u Missed calls
The last 60 numbers are stored in each of the call lists. The name will appear on the display if you
have saved the number in the directory.
You can browse through the entries and dial directly from within the record.
If there are new entries in the missed calls list, the Message Centre key
icon is displayed.
To save numbers from a list in the directory, see (
£ S. 44).
E flashes and the Ó
Viewing call lists and dialling numbers
Open the required call list:
È Open the redial list using the navigation key t.
E Open the list of missed calls in the Message Centre.
Or use the §§Calls§§ display key
§§Call§§ Press display key to show the call lists.
q Select list:
All Calls
Outg. Calls
Accept. Calls
Missed Calls
§§OK§§ Press the display key to open the selected
call list.
33elmeg IP120
Page 34

bintec elmegMaking calls
All Calls
View
Options
04567892312
Black, Susan
Brown, Tim
2/30
™
š
¬
Reject
Silence
via
§§1§§ Account 1
Black, Susan
ä ..23456787656
11:42
×
The last (most recent) call or dialled phone number is shown on the display.
q Select another entry if necessary.
c Lift the receiver.
The number is dialled.
Please note
You can also access the call lists using the Web configurator (£ S. 111).
Initiating ringback
You can initiate a ringback if the number you have called is busy. Prerequisite: This function is
supported by your phone system or your provider.
§§Ringback§§ Press the display key to initiate a ringback.
Ringback is initiated as soon as the line is free again.
Deactivating ringback
You can deactivate the ringback for all of the VoIP accounts configured on your phone or just
for certain VoIP accounts.
‰ ¢ Select Services ¢ Active Ringbacks
Accounts for which ringback is permitted are marked.
q Select the required entry.
§§Change§§ Press the display key to deactivate the ringback.
Receiving incoming calls
You hear the ringer and the speaker key A flashes.
If the call is received on one of the phone numbers programmed on a function key, this function
S flashes.
key
The display shows the caller's number (where calling line identification is permitted
their name, if they are saved in the directory.
The account that the call is received on is also
shown.
c Lift the receiver. You can speak to the
caller.
34
£ S. 37) and
elmeg IP120
Page 35

bintec elmeg Making calls
Info
via
§§1§§ Account 1
Black, Susan
ä ..23456787656
9:13
W
ÕÔ
Connection
Please note
When you receive a call, the phone first of all searches for a corresponding entry in the local
directory. If the number doesn't appear there, the other directories are searched (if config-
£ S. 99).
ured) (
Deactivating the ringer
§§Silence§§ Press the display key to deactivate the ringer. You can then decide whether to
accept or reject the call.
Rejecting a call
§§Reject§§ Press the display key or the end key I to reject the call.
Incoming calls via telephone system
In the Web configurator you can set whether you want to accept calls automatically via the
headset or with the receiver (
£ S. 81).
Note
If you accept calls via the headset, incoming calls will automatically be accepted without the
press of a key. This may lead to eavesdropping of the room, if no one is operating the phone.
Ending a call
& Put down the receiver or press the end key I.
Using functions when making a telephone call
Display when establishing a connection or during a call
The display shows
u The VoIP account you are using to make the call.
u The caller's number (where calling line identifi-
cation is permitted
they are saved in the directory.
W Connection icon. This indicates the status of the connection.
z
W
Ô indicates a connection with the highest voice quality.
Õ indicates that it is an encrypted connection.
09:13 shows the duration of the call.
§§Info§§ Press the display key to view technical information about the phone. This function
is helpful when calling the Service Hotline, for example.
Establishing a connection
Connection established
X
œ
£ S. 37) and their name, if
Connection interrupted
Conference call
35elmeg IP120
Page 36

bintec elmegMaking calls
Adjusting the volume
You can adjust the volume of the receiver, speaker kit or headset during a call. You can adjust
the volume of the ringer while the phone is ringing.
H To decrease the volume press the left side of the key and to increase the volume
press the right side of the key. Each time you press the key, the volume will increase
or decrease by one level.
There are five volume settings available. The current setting is shown.
The last setting is saved when you change the ringer volume.
Use the display menu to permanently configure the ringer melody and volume (
£ S. 59).
Muting
You can deactivate the microphone for the receiver, the speaker kit and the headset. The other
party can then no longer hear you.
C Press the mute key during the phone call.
Press the key again to reactivate the microphone.
The C key is lit up while the function is activated and the ^ icon is displayed.
Activating/deactivating speaker mode
Activating via the receiver during a call:
A & Press the speaker key and put down the receiver.
The A key is lit up while the function is activated and the @ icon is displayed.
In speaker mode, you hear the caller via the speaker.
Deactivating speaker mode during a call:
c Lift the receiver. Continue the call via the receiver.
Please note
You should tell your caller if you have activated the speaker.
36
elmeg IP120
Page 37

bintec elmeg Making calls
Do not disturb
You can activate the Do Not Disturb (DND) function if you do not want to receive any calls and
you do not want the phone to ring.
You can still make calls when this function is activated.
G Press the Do Not Disturb key.
Press the same key again to deactivate the function.
G key is lit up while the function is activated and the Ñ icon is displayed
The
While the function is activated, the G key is lit up and the text "Do Not Disturb" active
appears in the display..
Please note
u You can also activate/deactivate the ring tone via the * key.
u You can permanently deactivate the ringer for anonymous calls (£ S. 60).
u You can use the Web configurator to create a blacklist of unwanted names and numbers
£ S. 96). Once you activate the blacklist function, calls from these numbers will not be
(
put through.
u If your phone is connected to a hybird phone system you can also control this function
using the phone system‘s function keys.
Anonymous calling – withholding caller ID
You can make anonymous calls (CLIR = Calling Line Identification Restriction). Your phone number will not be displayed when making outgoing calls. You are calling anonymously.
Prerequisite: Anonymous calls are only possible via VoIP connections through providers that
support the "anonymous calling" function. You may have to ask your VoIP provider to activate
this function.
Making an anonymous call
Select:
‰ ¢ Select Services ¢ Next Call anonymous
Then proceed as normal:
~ Enter the phone number.
c Lift the receiver.
The number is dialled. Your number is not transferred.
Activating/deactivating "anonymous calling" for all calls
You can permanently activate/deactivate the anonymous call function for all of the VoIP
accounts configured on your phone or just for certain accounts.
‰ ¢ Select Services ¢ All Calls anonymous
Accounts for which anonymous calling is permitted are marked with a tick.
q Select the required entry.
§§Change§§ Press the display key to tick the box.
Press the display key again to remove the tick.
37elmeg IP120
Page 38

bintec elmegMaking calls
Accept
via
§§1§§ Account 1
Tim Brown
ä ..23456787656
×
Reject
Call Waiting
Remove
via
§§1§§ Account 1
..345123456789099
..451234567890123
11:42
W
Add Part.
Call Swap
à
Making a call to multiple participants
Initiating a consultation call
During a call, you want to consult a second participant.
J Press the consultation call key during the call.
The call is placed on hold. You can make another call to a second participant. Once the call has
ended, press the consultation key again. You are reconnected to the first participant.
Accepting/rejecting call waiting
You hear the call waiting tone during a phone call.
The display shows the caller's number (where calling line identification is permitted
their name, if they are saved in the directory.
The display also shows the subscriber number used
to receive the call and indicates whether this is a
ringback.
Accepting a call:
§§Accept§§ Press the display key to accept the call.
You are connected to the waiting participant.
The first participant hears music on hold. The number is displayed and the
waiting participant.
q Select the connection.
§§Remove§§ Press the display key to end the
à icon identifies it as the
selected connection.
£ S. 37) and
Rejecting a call:
§§Reject§§ Press the display key to reject the waiting call.
Activating/deactivating call waiting
You can deactivate call waiting during a call for all of the accounts configured on your phone or
just for certain accounts.
‰ ¢ Select Services ¢ Call Waiting
Accounts for which call waiting is permitted are marked with a tick. Callers via other accounts
hear the busy tone.
q Select the required entry.
§§Change§§ Press the display key to tick the box.
Press the display key again to remove the tick.
38
elmeg IP120
Page 39

bintec elmeg Making calls
Remove
..345123456789099
..451234567890123
11:42
ž
Add Part.
Conference
via
§§1§§ Account 1
ž
]
Call swapping
You are speaking to one participant and a second is on hold; this may be because you have
accepted a waiting call or have placed one caller on hold.
J Press the consultation key to swap from one caller to the other.
Initiating a consultation call with a third participant:
§§Add Part.§§
Press the display key. Both participants are placed on hold.
~ Enter the phone number for the third participant.
§§Dial§§ Press the display key. The number is dialled.
To speak to one of the participants on hold again after you have finished the ringback:
q Select the relevant participant.
J Press the consultation key.
Initiating a conference
You are speaking to one participant while another is on hold.
q Select the participant who is on hold.
K Press the conference key to add the waiting participant to a conference.
Or
You are speaking to one or more participants and you wish to add an additional participant.
K Press the conference key.
~ Enter the phone number for the additional participant.
§§Dial§§ Press the display key. The number is dialled.
As soon as the participant answers, they are automatically connected to the conference call.
The participants in the conference are listed on the
display.
Removing a participant from the conference call:
q Select the participant.
§§Remove§§ Press the display key to end the confer-
ence for the highlighted participant.
§§Add Part.§§ Press the display key to begin a consul-
tation call with another participant. In
contrast to conference key
conference participants are put on
hold.
Please note
Only participants who share the same VoIP account can participate in a conference call.
K. The
39elmeg IP120
Page 40

bintec elmegMaking calls
Transferring a call to another number
You are speaking to one participant and you want to transfer the call to a third participant.
Transfer without consultation:
L Press the transfer key. The call is placed on hold.
~ Enter the phone number for the participant to whom you want to transfer the call.
L Press the transfer key again. The call is transferred to the number you have dialled.
Your connection to the participant is ended.
Transfer with consultation:
Use this function to ensure that the connection is actually established.
L Press the transfer key. The call is placed on hold.
~ Enter the phone number for the participant to whom you want to transfer the call.
§§Dial§§ Press the display key. The number is dialled.
When you call the third participant you can wait for them to answer and speak to them, for
instance to tell them you are forwarding a call. Then press the transfer key
Transfer to participants on hold:
You are speaking to one participant and there are others on hold. You can transfer the current
call to one of the participants on hold.
L.
q Select one of the participants on hold.
L Press the transfer key. The chosen participant is connected to the person you are
currently speaking to.
40
elmeg IP120
Page 41

bintec elmeg Making calls
Back
OK
All Calls
No Answer
When Busy
§§3§§ Call Divert
Û
Save
To Phone Number:
089123456
§§3§§ Call Divert
Setting up call divert (CD)
When you divert a call, the call is forwarded to another connection. Your call divert settings can
be specific to a particular connection (i.e., settings for each configured VoIP account).
Prerequisite: You VoIP provider supports call divert or the service is provided by a phone system.
Call divert using the provider's network services
‰ ¢ Select Services ¢ Call Divert
The list contains the accounts configured on your telephone.
q Select the required account.
§§OK§§ Press the display key to confirm the selection.
q Select when the call divert is to apply.
§§OK§§ Press the display key to confirm the selection.
All Calls All calls are diverted.
No Answer Calls are diverted if no one accepts the call within several rings.
When Busy Calls are diverted if your line is busy.
Off No calls are diverted.
~ Enter the phone number to which the call
§§Save§§ Press the display key to save the settings for
Please note
Please refer also to:
u Setting up call divert using the web configurator (£ S. 93).
u Assigning a call divert to a function key (£ S. 104)
should be diverted.
this account.
41elmeg IP120
Page 42

bintec elmegMaking calls
Back
OK
All Calls
When Busy
No Answer
§§3§§ ..9876543212344543
‰
‰
Back
Save
When Busy
§§3§§ ..9876543212344543
On
Back
Save
To:
§§3§§ ..9876543212344543
Voice Mail
Call divert using the phone system
If your elmeg IP120 is connected to a hybird phone system, call divert is saved to the phone system and not the phone. In this case you can setup the call divert easily via the hybird phone system. You can set up call divert for each number assigned to your phone. The idle display indicates if a call divert is activated.
‰ ¢ Select Services ¢ Call Divert
The list contains the accounts configured on your telephone.
q Select the desired account.
§§OK§§ Press the display key to confirm the selection.
If there are multiple numbers assigned to the account on the phone system, these are displayed.
q Select the number for which you wish to set up a divert.
§§OK§§ Press the display key to confirm the selection.
The account and number selected are shown in the
top right of the display. Active call diverts are
marked with a ‰.
q Select the call divert you wish to edit.
All Calls All calls are diverted.
When Busy Calls are diverted if your line is busy.
No Answer Calls are diverted if no one accepts the call within several rings. This also
applies to calls waiting that are not accepted.
§§OK§§
Press the display key to edit the call divert.
r Activate/disactivate call divert.
s Selct To.
You can divert calls to a voice mailbox or to a number.
r Select Voice Mail or Target Number.
~ Enter the number of the voice mailbox or the
number to which the call should be diverted.
42
elmeg IP120
Page 43

bintec elmeg Making calls
Back
Save
After x seconds:
§§3§§ ..9876543212344543
15
For a call divert of the type No Answer, select a
length of time after which the call should be
diverted.
r Select the desired length of time.
You can choose from values ranging from 5 to
120 seconds.
§§Save§§ Press the display key to save the settings for this account.
43elmeg IP120
Page 44

bintec elmegUsing the call lists
Call Lists
Back
OK
All Calls
Outg. Calls
Accept. Calls
All Calls
View
Options
04567892312
Black, Susan
Brown, Tim
2/30
™
š
¬
Using the call lists
The following call lists are available:
All Calls All outgoing, accepted and missed calls.
Outg. Calls Last dialled numbers (redial list).
Accept. Calls Calls that were accepted.
Missed Calls Calls that were not answered.
If the list contains entries that you have not yet viewed, the display shows
the
™ icon and the number of new entries. You can also access the list via
the Message Centre (
A maximum of 60 entries is saved in the lists. The next entry overwrites the oldest one. You can
access all of the lists via the display menu.
Please note
You can also manage the call lists via the Web configurator (£ S. 111).
Viewing entries
You can open a list when the telephone is in idle status.
§§Calls§§ Press the display key to show the call lists.
£ S. 55).
q Select list.
§§OK§§ Press the display key to open the selected list.
44
The calls are displayed in chronological order, from
the most recent through to the oldest.
The number of the selected entry and the total
number of entries in the list (e.g., 1/30) is displayed
in the top right corner.
An icon is shown in front of each entry to indicate
whether it is an outgoing (
missed (
™) call.
š), accepted (›) or
elmeg IP120
Page 45

bintec elmeg Using the call lists
Black, Susan
Back
Dial
via
§§1§§ Account 1
01.04.11, 09:30
Duration: 00:03:23
All Calls
View
Options
04567892312
Black, Susan
Brown, Tim
5/30
™
š
¬
Information on the entry:
u Phone number of the caller/called party. If the number is saved in the directory, the name is
displayed instead.
u VoIP account on which the call was made/received.
u Date and time of the call. Outgoing calls also include the duration of the connection.
The information displayed is determined by the information transferred by the caller and
whether or not the caller appears in the directory.
If the caller has activated CLIP (Calling Line Identification Presentation), the caller's phone number is identified. The caller can then be identified by this number if he or she is already saved in
the directory. Prerequisite: The feature is activated for the VoIP account.
Displaying detailed information
§§View§§ Press the display key. The information available is displayed, with the phone num-
ber as a minimum.
If the number is saved in the directory, the directory
entry is displayed (
£ S. 47).
Please note
When you receive a call, the phone first of all searches for a corresponding entry in the local
directory. If the number doesn't appear there, the other directories are searched (if configured) (£ S. 99).
Dialling a number from a list
You have the following options for dialling a phone number from a list:
q Scroll through the list to the required name.
c Lift the receiver.
The number is dialled.
45elmeg IP120
Page 46

Or
Black, Susan
Back
Dial
+49(123)4567890
..789)12345678901
..89)987654321
ä
k
k
Options
Back
OK
Copy to Directory
Delete Entry
Delete List
Copy to Directory
Back
OK
<New Entry>
Brown, Tim
Forster, Fred
Options
Back
OK
Copy to Directory
Delete Entry
Delete List
q Scroll through the list to the required name.
§§View§§ Press the display key to show the entry.
q Select the number if multiple numbers are
available
c Lift the receiver.
Or
§§Dial§§ Press the display key.
The number is dialled.
Copying an entry from the call list to the directory
q Scroll through the list to the required
name.
§§Options§§ Press the display key.
q Select the Copy to Directory entry.
§§OK§§ Press the display key to confirm the
action.
The directory is opened.
You can create a new entry in the directory or edit
an existing one.
See directory
£ S. 48.
bintec elmegUsing the call lists
Deleting an entry or list
46
§§Options§§ Press the display key.
q Select the required action:
Delete Entry or Delete List
§§OK§§ Press the display key to confirm the
action.
You must confirm the action again.
elmeg IP120
Page 47

bintec elmeg Using directories
Black, Susan
Edit
Delete
+49(123)4567890
..789)12345678901
..7051)987654321
ä
k
l
Using directories
The options are:
u Local directory
u LDAP directory £ S. 50
u Personal or public online directory £ S. 51
Please note
u The local directory can also be accessed via the Web configurator (£ S. 109).
u The default directory is the local directory. This is the directory that you can open with the
Z key and the directory to which entries are saved using the "Copy to Directory" func-
tion.
u You can set a different directory as the default directory via the Web configurator
£ S. 103).
(
Using the local directory
You can save a total of 200 entries in the local directory.
Please note
You can handle the local directory also via the Web configurator (£ S. 109).
u Instead of the local directory, you can also download a central directory from your phone
system or from the server (
tical records will be overwritten by the central directory.
£ S. 102). You can still use your local directory, but any iden-
Directory entries
A directory entry contains the following information:
u First name, surname
u Up to six phone numbers
An icon in front of a phone number indicates
whether it is a home (
number (
l).
ä), office (k) or mobile
47elmeg IP120
Page 48

Opening the directory
Directory
View
Options
Adam
Black, Susan
Brown, Tim
New Entry
Û
Save
First Name:
Peter|
Abc
Peter Smith
Û
Save
Phone (Mobile):
09112890|
123
Open the directory in idle status with the Z key (navigation key s)
Or use the display menu
‰ ¢ Contacts ¢ Directory
Displaying an entry
q Scroll through the list to the required
name.
§§View§§ Press the display key. The entry is
shown as in the figure on S. 47.
Creating a new entry
§§Options§§ Press the display key.
§§OK§§ Press the display key to start the New Entry action.
An entry consists of:
– First Name and Name,
–2 x Phone (Home),
–2 x Phone (Mobile),
–2 x Phone (Office).
~ Enter the name and the phone numbers.
For information on entering text
q Scroll from line to line.
§§Save§ Save the directory entry if you have entered all the data.
bintec elmegUsing directories
£ S. 25.
Editing entries
48
q Scroll to the required directory entry.
§§Options§§ Press the display key
q Select Edit Entry.
Directory entry fields can be edited. The procedure
is the same as for Creating a new entry.
elmeg IP120
Page 49

bintec elmeg Using directories
Peter Smith
Back
Save
+345(678)345621
ä
0134567890
k
Changing the default number
The default phone number is the first number in the list and is dialled first. You can change the
default phone number.
q Scroll to the required directory entry.
§§Options§§ Press the display key.
q Select Change Default No..
§§§OK§§ Confirm the selection.
q Select the required number.
§§§Save§§ Press the display key to save the
change.
Deleting a directory entry or the entire directory
Deleting a selected entry from the list:
q Scroll to the required entry.
§§Options§§ Press the display key
q Select Delete Entry.
§§§OK§§ Confirm the selection.
Or
§§View§§ ¢ §§Delete§§ Press the display keys in sequence.
§Yes§ Confirm the deletion.
Deleting the entire list:
§§Options§§ Press the display key
q Select Delete List.
§Yes§ Confirm the deletion.
Dialling a number from the directory
q Scroll to the required entry.
c Lift the receiver.
The default number of the directory entry is dialled (£ S. 49).
49elmeg IP120
Page 50

bintec elmegUsing directories
LDAP Directory
Back
å
|
LDAP Directory
Back
View
Brown, Tim
å
Br|
Brown, Albert
Brown, Albert
Back
+49(123)4567890
..789)12345678901
..89)987654321
ä
k
k
Using an LDAP directory
If your corporate network provides a directory via an LDAP server, you can access this on your
phone (LDAP = Lightweight Directory Access Protocol).
Prerequisite: You have set up this function via the Web configurator (
The name of the LDAP directory can be chosen freely by the administrator. This will then appear
in the display in place of LDAP Directory. Ask your administrator, if applicable.
Opening an LDAP directory
You can open the LDAP directory in idle status via the display menu
‰ ¢ Contacts ¢ LDAP Directory
Or
Z Press and hold (navigation key s).
Searching for and displaying an entry
~ Enter the name (or first few letters).
For information on entering text £ S. 25
The search will automatically start as soon as you
stop inputting characters.
All matching entries are displayed. The search field
is displayed again if no matching entries are found.
You can start a new search.
£ S. 100).
Dialling from the LDAP directory
50
q Scroll to the required entry.
§§View§§ Press the display key.
The entry will be displayed.
Display the entry.
q Select the number.
c Lift the receiver.
The number is dialled.
elmeg IP120
Page 51

bintec elmeg Using directories
Using online directories
Online directories are available on the Internet. You can:
u Use public online directories that are available on the Internet, such as KlickTel or the Yellow
Pages and
u Create a personal online directory if your provider permits this.
Select which public online directory you want to use via the Web configurator (£ S. 99).
u White Pages
a public directory provided on the Internet
u Yellow P ag e s
yellow pages provided on the Internet
u Private NetDirectory
Some providers offer users the option of creating and managing a personal online directory
on the Internet.
You can use the personal online directory on your phone.
Prerequisite:
– You enter the data for the provider of your personal online directory in the Web configu-
£ S. 99)
rator (
– You must create and manage your personal online directory using your PC's Web browser.
Opening a online directory
You can open a online directory in idle status via the display menu
‰ ¢ Contacts ¢ Name of directory
Select the required public or private online directory. The directory name depends on the settings for the directory in the Web configurator. It can be the name the provider uses for their
directory or a name you have chosen yourself.
51elmeg IP120
Page 52

Searching for an entry in the online directory
Online
Name Search
Search
Surname:
|
Abc
Select City
Back
OK
Paris, France
Paris, Texas
Paris, AU
Online
Û
Search
Number:
012|
You can search for a phone number or a name.
Searching for a number
~ Enter the surname and city of the sub-
scriber you are looking for.
For information on entering text,
£ S. 25
q Scroll from line to line.
§§Search§§ Press the display key to start the search.
If several entries are found for the city, a list is displayed so that you can narrow down the location
search.
q Select city.
§§OK§ Start search.
Please note: The City field is not available in the private directory.
Searching for a name
bintec elmegUsing directories
§§Name Search§§
~ Enter the number for the entry you are
§§Search§§ Press the display key to start the search.
A message is displayed if no entry is found. You can then:
§§Change§§ Press the display key to change your search request.
Or
§New§§ Press the display key to start a new search.
52
Press display key.
searching for.
elmeg IP120
Page 53

bintec elmeg Using directories
Online
View
Refine
Brown, Tim
Avenue 34
89567 City
1/45
Online
Û
Search
Surname:
|
Abc
Susan Black
ß
New
+49(698)987654321
+345(678)345621
+377(098)1234567890
ä
k
l
Copy to Directory
Back
OK
<New Entry>
Brown, Tim
Forster, Fred
Search results
The search results are displayed as a list.
The first entry found is displayed with the name and
available address information. The number of the
displayed entry is shown in the top right corner
along with the total number of entries found.
If more than 99 entries are found, a message including the number of results found is displayed. You
can then refine the search or request for the entire
list to be displayed.
Refining a search:
§§Refine§§ Press the display key.
Specify your search request in the various fields.
Surname, First Name, Category / Name, City or
Street.
§§Search§§ Press the display key to restart the
search.
Displaying entry details:
q Scroll to the required entry.
§§View§§ Press the display key.
The entry contains the available phone numbers.
Dialling a number:
q Select the number.
~ Lift the receiver.
Transferring a number to the local directory
You can transfer entries from a online directory to your local directory.
ß Press the display key.
You can create a new entry in the directory or
edit an existing one.
See directory
£ S. 48.
53elmeg IP120
Page 54

bintec elmegManaging messages
Voice Mail
Back
OK
Account 1
Account 2
Account 3
§§4§§
§§3§§
§§1§§
Managing messages
You can access your voice mails on network mailboxes via the display menu.
The Message Centre also allows you to access voice mails and missed calls at the press of a key
£ S. 55).
(
Managing voice mails on the network mailbox
You can listen to your messages that have been recorded on a network mailbox. Each network
mailbox accepts incoming calls on the corresponding VoIP phone number. Network mailboxes
are provided by a hybird phone system, for example, or you can use a network mailbox offered
by an Internet provider.
Prerequisite: Voice mail boxes must be set up for your VoIP accounts on the phone system. You
can set up internet provider network mailboxes in the Web configurator (
If there are new messages on the network mailbox, these are indicated by the à icon. The
number of messages is displayed to the right.
You can also access your network mailbox via the Message Centre (
flashes if a new message has been received on the network mailbox and the Ó icon is displayed.
Playing voice mails
Play recorded messages via the display menu:
‰ ¢ Voice Mail
Play recorded messages via the Message Centre:
E ¢ Voice Mail
A list of available network mailboxes arranged in
order of VoIP accounts is displayed along with the
number of new and old messages.
q Scroll through the list to the required network
mailbox.
§§OK§§ Press the display key to connect to the net-
work mailbox.
£ S. 96).
£ S. 55). The E key
Voice mails are displayed in the following categories:
Inbox: Newly received voice mails.
Private: Voice mails from numbers marked as private in the directory.
Old: Messages that have already been played, or which have been moved to the "Old"
folder on the hybird telephone system.
q Select the desired category and confirm by pressing §§OK§§.
54
elmeg IP120
Page 55

bintec elmeg Managing messages
Play
Options
00561234567
for 56789
17.09.12, 18:08
Inbox 1/80
The stored messages are listed in chronological
order.
The number of the selected message and the number of entries in the list are shown in the top right
corner.
The sender‘s and the receiver‘s number are shown
along with the date and time when the message
received.
q Scroll from message to message.
Playing a message
§Play§ Press the display key to listen to the message.
The message is played via the loudspeaker. Alternatively, you can start playback
‰ or A.
with
Or
c Lift the receiver to start playback over the receiver.
Ending playback
§Stop§ Press the display key to end playback.
Alternatively, press the speaker key
A or replace the receiver.
q Select another voice mail with the navigation key. Current playback is ended and
playback of the newly selected message is started.
Please note
An incoming call ends playback.
Managing voice mails
Options Press the display key to display the options, and select the one you want with ‰:
Call back: Initiates a call if the phone number was transferred.
Delete Entry: Deletes the message.
Delete List: Deletes all messages.
Copy to Directory: Copies the number of the selected message into the local
directory.
55elmeg IP120
Page 56

bintec elmegManaging messages
Messages & Calls
Back
Select
Voice Mail
2 new messages
Ã
5 old calls
Accessing messages via the Message Centre
The Message Centre gives you quick access to newly-received messages at the press of a key. It
provides centralised access to the following messages:
u Voice mails (£ S. 54)
u Missed calls (£ S. 44)
The message key E flashes if a new entry is received for one of these message types. A new
entry is classed as anything that has been received since the corresponding list was last opened.
You use the Web configurator to specify which message types can be accessed via the Message
£ S. 97).
Centre (
Opening the Message Centre
You open the Message Centre with the E key.
q Toggle between the display of
à Voice Mail and
™ Missed Calls.
The number of stored new and old messages or
missed calls is shown.
§§Select§§ Press the display key to display the voice mail or missed calls list.
Voice mails
£ S. 54, missed calls £ S. 44.
56
elmeg IP120
Page 57

bintec elmeg Operating door interphones
Reject
Silence
Door Interphone
×
Open Door
End
Door Interphone
W
Operating door interphones
You can operate one or more door interphones using the phone.
Prerequisite: The door interphone must have been configured on the Web configurator or the
hybird phone system. You will need the the DTMF code of the door opener for configuration.
u Web configurator: use the following Web page for configuration
Settings
u hybird phone system: the door interphone is setup during phone configuration. If automatic
configuration is permitted, configuration is carried out automatically on your phone.
If someone rings the door interphone, this is displayed as an incoming call on the phone. In
addition, Door Interphone is displayed.
u If you are conducting a call at the same time, the ring at the door is signalled by Call Wait-
u An incoming call is signalled as a Call Waiting if you are already connected to the door
¢ Services ¢ Door Interphone (£ S. 98).
Switching the ringer off
§§Silence§§ Press the display key to switch off
the ringer. You can then decide
whether or not to open the door.
Ending the connection to the door
interphone
§§Reject§§ Press the display key or end key
I to reject the request.
Conduct a call over the door interphone
c Pick up the receiver to talk with the
person at the door. Alternatively
you can conduct the call using the
speaker key
B.
§Open Door§§ Press the display key to operate the
door opener.
§§End§§ Press the display key to end the call
without opening the door.
Please note
£ S. 38). You can either reject the call or accept and open the door. When the con-
ing (
nection to the door interphone is ended, the previous connection is restored. Toggling
between calls is not possible.
interphone. If you accept the call the connection to the door interphone is ended.
A or the headset
57elmeg IP120
Page 58

bintec elmegConfiguring basic settings
Date / Time
Back
Save
Date:
Date Format:
dd.mm.yyyy
Date / Time
Back
Save
dd.mm.yyyy
Date:
01.04.2011
Configuring basic settings
Your telephone is preconfigured, but you can change the settings to suit your individual
requirements.
Setting the date and time
The time is displayed, for example, on the idle display as well as for incoming calls. The date and
time must therefore be set accurately.
Please note
The address of a time server on the Internet or the local network is saved on your phone. The
date and time are taken from this time server provided that the phone is connected to the
network and synchronisation with the time server is activated. Manual settings are overwritten in this case.
The settings for the time server should be made via the Web configurator (
You use the display menu to manually set the date and time:
‰ ¢ Settings ¢ Date / Time
Date format:
r Select the date format:
dd.mm.yyyy: day, month, year
mm.dd.yyyy: month, day, year
£ S. 106).
58
Date:
~ Enter the day, month and year in eight-digit
format, e.g., for 14 January 2011:
For the date format dd.mm.yyyy:
14012011
For the date format mm.dd.yyyy:
01142011
elmeg IP120
Page 59

bintec elmeg Configuring basic settings
Date / Time
Back
Save
Time:
24-hour Clock:
On
Date / Time
Back
Save
Time:
09:10
Volu me
Back
Save
Call Volume:
Time format:
r Select the time format:
On: 24-hour format
Off: 12-hour format
Time:
~ Enter the time in four-digit format, e.g., 0715
for 07:15.
Time display for this setting in 24-hour for-
mat: 07:15
Time display for this setting in 12-hour for-
mat: 07:15 AM
§§Save§§ Press the display key to save your settings.
Setting the ringer
You can set the volume and melody of the ringer and completely silence the ringer for anonymous calls.
Setting the volume
The volume of the ringer for incoming calls can be adjusted over five levels.
Setting the volume in idle status
‰ ¢ Settings ¢ Audio Settings ¢ Ringer Settings ¢ Vol ume
r Select the required volume.
The volume is adjusted immediately. You can
test the setting by playing back the ringer
with the melody set at the selected volume
level.
§§Save§§ Press the display key to save the settings.
Setting the volume while the phone is ringing
You can adjust the volume while the phone is ringing using the H key. Each time you press
the key, the volume will increase or decrease by one level. The last setting is saved.
59elmeg IP120
Page 60

bintec elmegConfiguring basic settings
Melodies
Back
OK
Account 5
Account 6
All Calls
Melodies
Back
Select
Sound_3
Sound_4
Sound_5
Account 1
All Calls anonymous
Back
Select
On
Off
Selecting a ringer melody
You can choose various ringer settings from the resource directory (£ S. 111) and configure
different ringer settings for each VoIP account.
‰ ¢ Settings ¢ Audio Settings ¢ Ringer Settings ¢ Melodies
Each configured VoIP account is listed.
q Select the VoIP account you want to set
the ringer for. Select All Calls if you
want to set the same melody for all
accounts.
§§OK§§ Press the display key to confirm the
selection.
All of the melodies from the resource directory are
displayed.
At the top right-hand corner of the screen, you can
see which VoIP account you are editing or All Calls.
q Choose the melody.
The selected melody is played at the
set volume.
§§§Select§§§ Press the display key to confirm the
selection.
Please note
The same melody is set for all accounts by default. If you select another melody for any
account, All Calls is automatically set to Individual.
Silencing the ringer for anonymous calls
You can silence the ringer for external calls where the caller has withheld their number.
‰ ¢ Settings ¢ Audio Settings ¢ Ringer Settings ¢ All Calls anonymous
If this function is activated, the phone will not ring
if an anonymous call is received. The call is still
shown on the display.
q Select the desired option.
§§Select§§ Press the display key to confirm the
selection.
The change is made immediately.
60
elmeg IP120
Page 61

bintec elmeg Configuring basic settings
Advisory Tones
Back
Change
Key Tones
Confirmations
³
´
Audio Resource
Back
Options
My Tone 1
My Tone 2
My Tone 3
Activating/deactivating advisory tones
Your phone uses advisory tones to tell you about different activities and statuses. The following
advisory tones can be activated/deactivated independently of each other:
u Key Tones: Each key press is signalled acoustically.
u Confirmations: After completing an entry/setting and when a new entry appears in the net-
work mailbox or call list, when you make an incorrect entry or when you scroll to the top of
a menu.
‰ ¢ Settings ¢ Audio Settings ¢ Advisory Tones
q Select Key Tones or Confirmations.
§Change§ Press the display key to activate or
deactivate the selected function.
Renaming or deleting ring tones
You can rename or delete ring tones which have been loaded via the Web configurator
£ S. 111).
(
‰ ¢ Settings ¢ Audio Settings ¢ Audio Resource
All available ring tones are listed. You can only
change those which you loaded yourself.
q Select the desired ring tone.
§Options§ Press the display key to revise the ring
tone.
61elmeg IP120
Page 62

bintec elmegConfiguring basic settings
Audio Resource
Back
OK
Delete
Rename
Audio Resource
Û
OK
My Tone|
abc
Backlight
Back
Brightness:
Level 3
Save
Renaming ring tone
q Select the Rename option and press the §§OK§§
display key.
Û Delete existing characters.
~ Enter the new name.
For information on entering text
§§OK§§ Press the display key to save the changed
name.
Deleting ring tones
£ S. 25.
q Select the Delete option.
§§OK§§ Press the display key to delete the ring tone.
Setting the display
When setting the display, you can configure the backlight and the contrast.
Setting the backlight
The brightness of the backlight for the display can be set to one of three levels.
If the display backlight is deactivated, it can be reactivated by pressing any key or by an incoming call. In this situation, pressing the key has no further function.
‰ ¢ Settings ¢ Display ¢ Backlight
r Select the required brightness level. Your set-
ting is activated immediately so that you can
check it and correct it if necessary.
§Save§ Press the display key to save the settings.
62
elmeg IP120
Page 63

bintec elmeg Configuring basic settings
Contrast
Back
Valu e:
Level 4
Save
Language
Back
Select
Deutsch
English
Francais
Setting the contrast
The contrast of the display can be set to one of six levels.
‰ ¢ Settings ¢ Display ¢ Contrast
r Select the required contrast level 1-6. Your
setting is activated immediately so that you
can check it and correct it if necessary.
§Save§ Press the display key to save the settings.
Setting the language
You can view the display texts in different languages.
‰ ¢ Settings ¢ Language
The current language is indicated by a
q Select the required language.
§§Select§§ Press the display key to activate the
selected language.
The language is changed.
w.
63elmeg IP120
Page 64

bintec elmegConfiguring basic settings
Reset Button
Resetting the device to the default settings
If you give your device to a third party or change workstation, you can delete your individual
settings and data by resetting the device to the factory settings. All system settings are reset to
the default settings. User-specific data is deleted.
This means that network configurations, VoIP accounts, directories, call lists, data in the resource
directory and all of your individual settings are deleted or reset to the factory settings.
You need the administrator password before you can use this function (
‰ ¢ Settings ¢ Reset
£ S. 108).
~ Enter the administrator password.
§§OK§§ Press the display key. The password is verified.
If the password is correct, you must now confirm the operation.
§§Yes§§ Press the display key. The device is reset to the factory settings.
Resetting via device button
You can also reset the device by using the reset button on the underside of the device.
The reset button is located behind the small opening
labelled Reset. Use a pointed item, e.g., a paper clip.
¤ Reset: Press and hold the button for at least
5 seconds to return all settings to the factory settings.
Showing information on the device
The Info menu provides information on important settings of your phone.
‰ ¢ Info
SW Version Version of the firmware currently loaded on the phone. You can down-
load updates of the firmware to your phone (
Country Version Language currently set (
MAC Address LAN The phone's device address.
IP Address The phone's current IP address within the local network. The IP address
is usually set automatically by a DHCP server within the network
(£ S. 66).
For further information on the phone‘s settings and state please refer to the status display of the
Web configurator (
64
£ S. 115).
£ S. 63)
£ S. 113).
elmeg IP120
Page 65

bintec elmeg Configuring settings for the local network
Configuring settings for the local network
All of the settings for connecting your phone to the local network must be correct to enable
communication with other devices in the network and phone calls via the Internet.
Your phone can be connected to the local network using an Ethernet cable. When you first set
up the phone, the device will automatically try to connect to the local network (
This will work, if:
– You have connected the device to the network using an Ethernet cable (
– The gateway automatically assigns network IP addresses using DHCP
– The network uses IP protocol version 4 (IPv4).
The phone is then automatically assigned an IP address and is connected to the local network.
You can then continue configuring your phone via the Web configurator at a PC (
If the network connection is not e stablished automatically, you will initially not be able to access
the Web configurator. If this is the case, you will have to establish the network connection manually via the display menu:
u If your device is assigned a static IP address, your network administrator must tell you the IP
address of your device. You then assign this address to your phone (
u If your network uses IPv6, you have to set your phone to Internet protocol version 6 (IPv6)
£ S. 68). The connection is established if the address is assigned automatically. If a static IP
(
address should be assigned to your phone, your network administrator must inform you of
this. You then assign this to your phone.
Whether you configure the network settings when you initially set up the phone (
you start configuration via the display menu – the settings are the same.
£ S. 66).
£ S. 21).
£ S. 14)
£ S. 71).
£ S. 21) or
Warning
The connection may be interrupted if you change the configuration for a functioning network connection. You will then no longer be able to access the local network or the Web
configurator and you will no longer be able to make calls via the Internet.
65elmeg IP120
Page 66

bintec elmegConfiguring settings for the local network
Network Type
Back
Select
IPv4
IPv6
IP Address Type
Back
Select
Static
Dynamic
Local Network
Back
OK
IP Address
Subnet Mask
Standard Gateway
LAN settings
You start network configuration via the display menu:
‰ ¢ Settings ¢ Local Network
Please note:
To get access to network configuration you need to enter the administrator password. The
default setting is admin.
Selecting the network type
q Select Network Type.
§§OK§§ Press the display key to confirm the
selection.
q Select the IP protocol that is used in
your network (IPv4 or IPv6).
§§Select§§ Press the display key to confirm the
selection.
You may be asked to configure additional settings depending on your selection.
IPv4 configuration ¢ below, IPv6 configuration £ S. 68
§§Back§§ Press the display key to return to the Local Network menu from where you select
the next network configuration step.
IPv4 configuration
q Select IP Address Type.
§§OK§§ Press the display key to confirm the selection.
q Select Dynamic if your device receives the IP
address via a DHCP server. Select Static if
your device receives a fixed IP address.
§§Select§§ Press the display key to confirm the selection.
If the Dynamic setting is selected, all further settings are automatically configured. They are displayed and cannot be changed.
If you have selected Static as the address type, you
must now create the following settings:
– IP Address
–Subnet Mask
66
– Standard Gateway
– Pref. DNS Server and
– Altern. DNS Server
elmeg IP120
Page 67

bintec elmeg Configuring settings for the local network
IP Address
Ent er an IP address for your p hone. This IP address allow s your phone to be reached by other
subscribers in your local network (e.g., PC).
The IP address comprises four individual groups of numbers with decimal values from 0 to
255 that are separated by a dot, e.g., 192.168.2.1.
Please note:
– The IP address must be included in the address block used by the router for the local net-
work. The valid address block is defined by the router's IP address and the subnet mask
(see example).
– The IP address must be unique in the local network, which means that it must not be used
by another device connected to the router.
– The static IP address must not belong to the address block that is reserved for the router's
DHCP server.
Check the settings on the router or ask your network administrator.
Example:
Router IP address: 192.168.2.1
Network subnet mask 255.255.255.0
DHCP server address block 192.168.2.101 – 192.168.2.255
Possible IP addresses for the phone 192.168.2.2 – 192.168.2.100
Subnet Mask:
The subnet mask specifies how many parts of an IP address the network prefix must comprise.
For example, 255.255.255.0 means that the first three parts of the IP address must be the
same for all devices in the network, while the last part is specific to each device. In subnet
mask 255.255.0.0, only the first two parts are reserved for the network prefix. Enter the subnet mask that is used by your network.
Standard Gateway
Enter the IP address for the standard gateway through which the local network is connected
to the Internet. This is generally the local (private) IP address for your router (e.g.,
192.168.2.1). Your phone requires this information to be able to access the Internet.
Pref. DNS Server
Enter the IP address for the preferred DNS server. DNS (Domain Name System) allows you to
assign pu blic IP a ddres ses to sy mbolic name s. The DNS se rver is required to c onver t the DNS
name into the IP address when a connection is being established to a server.
You can specify the IP address for your router/gateway here. This forwards address requests
from the phone to its DNS server.
There is no default setting for a DNS server.
Altern. DNS Server
Enter the IP address for the alternate DNS server that should be used in situations where the
preferred DNS server cannot be reached.
¤ Once all the settings are complete, press the display key §§Back§§ to save the configuration set-
tings.
67elmeg IP120
Page 68

IPv6 configuration
IP Address Type
Back
Select
Static
Auto-Configuration
Local Network
Back
OK
IP Address
Prefix Length
Pref. DNS Server
q Select IP Address Type.
§§OK§§ Press the display key to confirm the selection.
q Select Auto-Configuration if your device
receives the IP address via a DHCP server.
Select Static if your device receives a fixed IP
address.
If the Auto-Configuration setting is selected, all further settings are automatically configured.
They are displayed here and cannot be changed.
If you have selected Static as the address type, you
must now create the following settings:
– IP Address
– Prefix Length and
–Pref. DNS Server
– Altern. DNS Server
Ask your network administrator for your network
settings.
IP Address
Ent er an IP address for your p hone. This IP address allow s your phone to be reached by other
subscribers in your local network (e.g., PC).
The IP address comprises 128 bits and is represented by eight blocks of hexadecimal figures
from 0 to FFFFFF that are separated by a colon, e.g., 2001:b021:189:0:205:5dff:fe6b:87.
The IP address comprises a prefix and an interface identifier. The length of the prefix (usually
64 bits) is determined by the Prefix Length value.
Prefix Length
The prefix length stipulates how many bits of the IP address are used for the network prefix.
Enter the prefix length that is used in your network.
Pref. DNS Server:
Enter the IP address for the preferred DNS server. DNS (Domain Name System) allows you to
assign pu blic IP a ddres ses to sy mbolic name s. The DNS se rver is required to c onver t the DNS
name into the IP address when a connection is being established to a server.
You can specify the IP address for your router/gateway here. This forwards address requests
from the phone to its DNS server.
There is no default setting for a DNS server.
Altern. DNS Server:
Enter the IP address for the alternate DNS server that should be used in situations where the
preferred DNS server cannot be reached.
¤ Once all the settings are complete, press the display key §§Back§§ to save the configuration set-
tings.
bintec elmegConfiguring settings for the local network
68
elmeg IP120
Page 69

bintec elmeg Configuring settings for the local network
Local Network
Back
OK
Pref. DNS Server
Altern. DNS Server
VLAN Settings
VLAN Settings
Back
OK
VLAN Tagging
LAN Port only
VLAN (LAN Port)
Back
OK
VLAN Identifier:
1024
Voice VLAN Priority:
VLAN tagging
A local network can be divided into logical subnetworks, so-called VLANs (Virtual Local Area
Network, standard IEEE 802.1Q). Multiple VLANs share a physical network and its components,
e.g., switches. Data packets of a VLAN are not forwarded to another VLAN. VLANs are often used
to separate the data traffic of different services (Internet telephony, Internet TV, ...) and to define
different priorities for the data traffic.
You can operate your phone and a PC connected to your phone’s PC port in two different VLANs.
You enter the VLAN identifiers (VLAN tag) here, which you get from your network operator.
Warning
u If you operate the PC and the phone in different VLANs, you can no longer access the
phone’s Web configurator directly from the PC.
u If you enter an incorrect value here, you must reset the phone to its default settings
£ S. 64). After this you must re-establish phone access to the local network.
(
‰ ¢ Settings ¢ Local Network
s Select VLAN Settings.
§§OK§§ Press the display key to confirm the selection.
r Select the required setting:
No If you do not use VLAN (default).
LAN Port only
If you operate the phone and the PC within
the same VLAN.
LAN and PC Port
If you operate the phone and the PC within
different VLANs.
§§OK§§ Press the display key to confirm the selection.
~ Enter the VLAN Identifier and confirm with
§§OK§§.
Value range: 1 – 4094
r Define the priority for the different services
and confirm with
Values: 1 – 7
§§OK§§ Press the display key to confirm the settings.
§§OK§§.
69elmeg IP120
Page 70

bintec elmegConfiguring settings for the local network
Priorities
Data packets from VLANs can be prioritised. The priority determines whether the data traffic
from a VLAN is given preferential treatment by the network components. For the LAN port you
can define the priority for voice and data separately. In the case of a local network with a lot of
data traffic, you can achieve better-quality phone connections by giving a high priority to voice
data.
LAN port:
PC port: ¤ For VLAN Priority, select the priority you want for the transfer of PC data.
Range of values and their Class of Service assignments (according to IEEE 802.1p):
0 No priority (Best Effort)
1 Background services, e.g., News Ticker (Background)
2 Not defined
3 General data services (Excellent Effort)
4 Control services, e.g., routing (Controlled Load)
5Video
6 Voice data (Voice)
7 Top priority for network control software (Network Control)
¤ For Voice VLAN Priority and Data VLAN Priority, select the priorities you want for
the transfer of voice and data.
¤ Once all the settings are complete, press the display key §§Back§§ to save the configuration set-
tings.
Please note
Further options for optimising the voice quality are available in the Web configurator under
QoS settings (Quality of Service)
£ S. 81.
70
elmeg IP120
Page 71

bintec elmeg Web configurator – configuring the phone on a PC
Web configurator – configuring the phone on a PC
The Web configurator provides you with a user interface that you can use to operate and configure your elmeg IP120 on the PC.
Prerequisite: Your phone is connected to the local network.
In most cases, this connection is established automatically as soon as you connect the device
with a network cable (
network via the display menu when you set the device up for the first time (
Please note
The Web configurator supports the following browsers:
– Mozilla Firefox, version 3.6 or higher
– Internet Explorer, version 7 or higher
– Apple Safari, version 5 or higher
Starting the Web configurator
You will need the IP address for your phone. You will find this via the phone’s display menu, in
the LAN settings:
‰ ¢ Settings ¢ Local Network (£ S. 66).
Please note
The IP address can sometimes change, depending on the settings of the DHCP server in your
network.
£ S. 14). If this is not the case, you establish the connection to the local
£ S. 21).
Accessing the Web configurator:
¤ Launch the Internet browser on your PC.
¤ Enter the IP address in the browser's address field:
Example:
The login screen appears.
¤ Select the appropriate language.
¤ Select the desired user type and enter the corresponding password:
User If you want to operate your phone on the PC.
Default password: user
Administrator If you want to configure your phone.
Default password: admin
¤ Click on OK.
The Web configurator will now start.
In the following all functions of the Web configurator are described. Please note that in User
mode not all functions are available.
Please note
For your security, you should change the default passwords (£ S. 108).
71elmeg IP120
Page 72

bintec elmegWeb configurator – configuring the phone on a PC
Select the function that you wish to use.
u Use the Settings tab to set or change individual functions on your phone (£ S. 74).
u Open the Status tab to obtain information about the status of your phone (£ S. 115).
Understanding the Web configurator menu tree
The following illustration shows the Web configurator menu tree. Functions that are available in
user mode are marked by an asterisk (*).
Settings * Network and Connections LAN Settings £ S. 75
Server and Phone Systems £ S. 80
QoS Settings £ S. 81
VoIP Settings £ S. 83
Security Settings £S. 84
Tel eph ony * Connections £ S. 86
Audio £ S. 91
Ring Tones * £ S. 92
Call Divert * £ S. 93
Local Settings * £ S. 93
Dialling Plans £ S. 95
Do Not Disturb * £ S. 96
Voice Mail Services £ S. 96
Messaging MWI Light £S. 97
Services Door Interphone £ S. 98
Online Directory £ S. 99
LDAP £ S. 100
Central Directory £ S. 102
Func tion Keys * £ S. 102
System * Date and Time £ S. 106
Security * £ S. 108
Display * £ S. 108
Local Contacts * £ S. 109
All Calls * £ S. 109
Upload Tones * £ S. 111
Reboot and Reset £ S. 112
Save and Restore £S. 112
Firmware Update £S. 113
72
elmeg IP120
Page 73

bintec elmeg Web configurator – configuring the phone on a PC
Status Device £ S. 115
System Log £ S. 115
SIP Protocol £S. 116
PCAP Logging £ S. 116
73elmeg IP120
Page 74

bintec elmegConfiguring phone settings via the Web configurator
Configuring phone settings via the Web configurator
The Settings menu of the Web configurator allows you to change settings that you have already
made using the phone's display menu, or that were the default settings when the phone was
delivered.
Information on auto-provisioning of the elmeg IP120 on a hybird please refer to the enclosed
administration poster or to www.bintec-elmeg
The menu offers the following functions:
u Network and Connections (£ S. 74)
Configure the settings for the local network, server and phone system, set up other VoIP
accounts and create the security settings.
u Te le ph o ny (£ S. 85)
Edit your configured VoIP accounts, optimise the quality of the voice connections, configure
phone functions such as call divert and dialling plans and set up blacklists and voice mail services.
u Messaging (£ S. 97)
Configure the Message Centre (MWI) for your device.
u Services (£ S. 98)
Create settings for using directories and set up a door interphone.
u Function Keys (£ S. 102)
Assign frequently used functions to the programmable keys on your phone.
u System (£ S. 106)
Change the basic settings on your phone, e.g., date/time or display settings. You can also
restart the system or add new firmware.
Network and connectors
Only available in administrator mode.
All of the settings for connecting your phone to the local network must be correct to enable
communication with other devices in the network and phone calls via the Internet.
If you use the Web configurator, your phone is already connected to the local network. You can
use the Network and Connections menu to change and extend these settings. You can also
configure additional VoIP accounts and create settings for phone connections:
u LAN settings (£ S. 75)
u Server and phone systems (£ S. 80)
u QoS settings (Quality of Service (£ S. 81)
u VoIP settings(£ S. 83)
u Security settings (£ S. 84)
74
elmeg IP120
Page 75

bintec elmeg Configuring phone settings via the Web configurator
LAN settings
Warning
If an error occurs when you are changing the LAN settings, the PC connection to the phone
may be cancelled and you will no longer have access to the Web configurator.
If this happens, you must re-establish phone access to the local network via the display
£ S. 66).
menu (
Settings ¢ Network and Connections ¢ LAN Settings
Assigning the network address
Network Type
¤ Select the IP protocol that is used in your network (IPv4 or IPv6).
You may be asked to configure additional settings depending on your selection.
IPv4 configuration
¤ Select Dynamic if your device receives the IP address via a DHCP server.
¤ Select Static if your device receives a fixed IP address.
If the Dynamic setting is selected, all further settings are configured automatically. They are displayed and cannot be changed.
If you selected Static as the address type, you must create the following settings:
75elmeg IP120
Page 76

IP Address
Ent er an IP address for your p hone. This IP address allow s your phone to be reached by other
subscribers in your local network (e.g., PC).
The IP address comprises four individual groups of numbers with decimal values from 0 to
255 that are separated by a dot, e.g., 192.168.2.1.
Please note:
– The IP address must be included in the address block used by the router/gateway for the
local network. The valid address block is defined by the IP address for the router/gateway
and the subnet mask (see example).
– The IP address must be unique across the network, which means that it must not be used
by another device connected to the router/gateway.
– The fixed IP address must not belong to the address block that is reserved for the DHCP
server for the router/gateway.
Check the settings on the router or ask your network administrator.
Example:
Router IP address: 192.168.2.1
Network subnet mask 255.255.255.0
DHCP server address block 192.168.2.101 – 192.168.2.254
Possible IP addresses for the phone 192.168.2.2 – 192.168.2.100
Subnet Mask
The subnet mask specifies how many parts of an IP address the network prefix must comprise.
For example, 255.255.255.0 means that the first three parts of an IP address must be the same
for all devices in the network, while the last part is specific to each device. In subnet mask
255.255.0.0, only the first two parts are reserved for the network prefix. Enter the subnet
mask that is used by your network.
Standard Gateway
Enter the IP address for the standard gateway through which the local network is connected
to the Internet. This is generally the local (private) IP address for your router/gateway (e.g.,
192.168.2.1). Your phone requires this information to be able to access the Internet.
Preferred DNS Server
Enter the IP address for the preferred DNS server. DNS (Domain Name System) allows you to
assign pu blic IP a ddres ses to sy mbolic name s. The DNS se rver is required to c onver t the DNS
name into the IP address when a connection is being established to a server.
You can specify the IP address for your router/gateway here. This forwards address requests
from the phone to its DNS server.
There is no default setting for a DNS server.
Alternate DNS Server
Enter the IP address for the alternate DNS server that should be used in situations where the
preferred DNS server cannot be reached.
bintec elmegConfiguring phone settings via the Web configurator
76
elmeg IP120
Page 77

bintec elmeg Configuring phone settings via the Web configurator
IPv6 configuration
IP Address Type
¤ Select Auto Configuration if your device receives the IP address via a DHCP server.
¤ Select Static if your device receives a fixed IP address.
If Auto Configurati on is selected, all further settings are made automatically. They are displayed
here and cannot be changed.
If you selected Static as the address type, you must create the following settings:
IP Address
Ent er an IP address for your p hone. This IP address allow s your phone to be reached by other
subscribers in your local network (e.g., PC).
The IP address comprises 128 bits and is represented by eight blocks of hexadecimal figures
from 0 to FFFFFF that are separated by a colon, e.g., 2001:b021:189:0:205:5dff:fe6b:87.
The IP address comprises a prefix and an interface identifier. The length of the prefix (usually
64 bits) is determined by the Prefix Length value.
Prefix Length
The prefix length stipulates how many bits of the IP address are used for the network prefix.
Enter the prefix length that is used in your network.
Preferred DNS Server
Enter the IP address for the preferred DNS server. DNS (Domain Name System) allows you to
assign pu blic IP a ddres ses to sy mbolic name s. The DNS se rver is required to c onver t the DNS
name into the IP address when a connection is being established to a server.
You can specify the IP address for your router/gateway here. This forwards address requests
from the phone to its DNS server.
There is no default setting for a DNS server.
Alternate DNS Server
Enter the IP address for the alternate DNS server that should be used in situations where the
preferred DNS server cannot be reached.
77elmeg IP120
Page 78

bintec elmegConfiguring phone settings via the Web configurator
VLAN tagging
A local network can be divided into logical subnetworks, so-called VLANs (Virtual Local Area
Network, standard IEEE 802.1Q). Multiple VLANs share a physical network and its components,
e.g., switches. Data packets of a VLAN are not forwarded to another VLAN. VLANs are often used
to separate the data traffic of different services (Internet telephony, Internet TV, ...) and to define
different priorities for the data traffic.
You can operate your phone and a PC connected to your phone’s PC port in two different VLANs.
You enter the VLAN identifiers (VLAN tag) here. You get them from your network operator.
Warning
If you operate the PC and the phone in different VLANs you cannot longer access the
phones’s Web configurator directly from the PC.
¤ Select
No If you don’t use VLAN (default).
LAN Port only If you operate the phone and the PC within the same VLAN.
LAN and PC Port If you operate your phone and the PC within different VLANs.
78
elmeg IP120
Page 79

bintec elmeg Configuring phone settings via the Web configurator
¤ Enter the VLAN tag of your virtual network in the VLAN Identifier (1..4094) field.
If you have selected LAN and PC Port enter the different VLAN identifiers under VLAN LAN
Port and VLAN PC Port.
Value range: 1 – 4094
Warning
If you enter an incorrect value here, you must reset the phone to its default settings
£ S. 64). After this you must re-establish phone access to the local network (£ S. 66).
(
¤ On the menus Voice Priority and Data Priority, select the priorities you want for the transfer
of voice and data of the LAN port.
¤ If you selected LAN and PC Port additionally select the VLAN Priority for PC data transfer.
VLAN priority
Data packets from VLANs can be prioritised. The priority determines whether the data traffic
from a VLAN is given preferential treatment by the network components. You can define the priority for voice and data separately. In the case of a local network with a lot of data traffic, you
can achieve better-quality phone connections by giving a high priority to voice data.
Range of values and their Class of Service assignments (according to IEEE 802.1p):
0 No priority (Best Effort)
1 Background services, e.g., News Ticker (Background)
2 Not defined
3 General data services (Excellent Effort)
4 Control services, e.g., routing (Controlled Load)
5Video
6 Voice data (Voice)
7 Top priority for network control software (Network Control)
Please note
Further options for optimising the voice quality are available under QoS settings (Quality
of Service)
Saving settings
£ S. 81.
¤ Click on Save to save your settings on the LAN Settings screen.
79elmeg IP120
Page 80

bintec elmegConfiguring phone settings via the Web configurator
Server and phone systems
If you operate a separate HTTP server or a phone system in your local network, use this screen
to configure access to your phone.
Settings
¢ Network and Connections ¢ Server and Phone Systems
Configure HTTP proxy
¤ Select whether you want to release a separate proxy server in the network for your phone.
¤ If Ye s, enter the IP address for the proxy server in the Proxy Server Address field.
¤ The Proxy Server Port is preset to 80. Change this if your server uses a different port.
Own HTTP server settings
¤ If you operate your own HTTP server, enter the communication data.
HTTP Port
Enter the number for the port to be used for communication by the HTTP server. The default
setting is 80
HTTPS Port
Enter the number for the port to be used for secure connections by the HTTP server. The
default setting is 443
HTTP Connection Type
Select which connections can be established:
HTTP Unsecured connection
HTTPS Secure connection
HTTP + HTTPS Both secure and unsecured connections
Automatic logout [min]
Enter the time (minutes) after which an HTTP connection should automatically end if no
entries are made.
Phone systems
If your phone is connected to a phone system, select what type of phone system it is.
Connected with phone system (sample selection)
hybird 600 The phone is connected to a hybird 600 phone system.This is the recom-
mended phone system to achieve an optimum support of the telephone features.
Standard The phone is connected to any phone system.
Asterisk
...
80
elmeg IP120
Page 81

bintec elmeg Configuring phone settings via the Web configurator
Call Manager
If your phone is connected to a hybird phone system:
¤ Select if you would like to automatically accept calls transferred by the phone system's call
manager. You have the following options:
–via Headset
– via Handsfree or
–not at all (No)
Incoming calls without Call Manager
Depending on the phone system, you can also set automatic acceptance of other incoming
calls:
¤ Select for incoming calls (without Call Manager) whether you would like to accept them
automatically. You have the following options:
–via Headset
– via Handsfree or
–not at all (No)
Outgoing calls via Function Key
You can also set for calls that you initiate via a function key (£ S. 103) whether you want to
make them
– via Headset or
–via Handsfree
Saving settings
¤ Click on Save to save your settings on the Server and Phone Systems screen.
QoS settings (Quality of Service)
On this screen you can optimise the voice quality of your IP telephone.
The voice quality depends on the priority of the voice data in the IP network. Prioritisation the
VoIP data packets is done using the QoS protocol DiffServ (Differentiated Services). DiffServ
defines a number of classes for the quality of service and, within these classes, various priority
levels for which specific prioritisation procedures are defined.
You can specify different QoS values for SIP and RTP packets. SIP packets (Session Initiation Protocol) contain the signalling data, while RTP (Real-time Transport Protocol) is used for the voice
transfer.
81elmeg IP120
Page 82

bintec elmegConfiguring phone settings via the Web configurator
Settings ¢ Network and Connections ¢ QoS Settings
¤ Enter your chosen QoS values in the SIP ToS/Diffserv (0..63) and RTP ToS/Diffserv (0..63)
fields. Value range: 0 - 63.
Common values for VoIP (default setting):
SIP 34 High service class for fast switching of the data flow
(Expedited Flow)
RTP 46 Highest service class for fast forwarding of data packets (Expedited Forward-
ing)
Warning
Do not change these values without consulting your network operator first. A higher value
does not necessarily mean a higher priority. The value determines the service class, not the
priority. The prioritisation procedure used in each case meets the requirements of this class
and is not necessarily suitable for transferring voice data.
Detailed information on the Diffserv protocol can be found in RFC 2474
and RFC 3168.
Saving settings
¤ Click on Save to save your settings on the QoS Settings screen.
82
elmeg IP120
Page 83

bintec elmeg Configuring phone settings via the Web configurator
VoIP settings
On this screen you configure the ports for establishing VoIP connections.
Settings ¢ Network and Connections ¢ VoIP Settings
"Listen ports" for VoIP connections
¤ Select the ports on which your phone expects incoming VoIP connections.
Use random ports
¤ Select Yes if the phone should use any available ports for the SIP port and RTP port instead
of fixed ports.
The use of random ports is advisable if you want multiple phones to be operated on the
same router/gateway with NAT. The phones must then use different ports so that the NAT for
the router/gateway is only able to forward incoming calls and voice data to one (the
intended) phone.
¤ If you click on No, the phone uses the ports specified in SIP port and RTP port.
SIP port
Specify the local communication port that the phone should use to send and receive signalling data. Specify a number between 1024 and 49152. The default port number for SIP signalling is 5060.
RTP port
Specify the local communication port that the phone should use to receive voice data. Enter
an even number between 1024 and 49152. The port number must not be the same as the
port number in the SIP port field. If you enter an odd number, the next lowest even number
will be selected automatically (e.g., if you enter 5003, then 5002 is set automatically). The
default port number for voice transmission is 5004.
ICE enabled
Choose whether or not to use ICE (Interactive Connectivity Establishment). ICE is similar to
£ S. 88), a Session Initiation Protocol (SIP) method for overcoming NAT firewalls.
STUN (
Saving settings
¤ Click on Save to save your settings on the VoIP Settings screen.
83elmeg IP120
Page 84

bintec elmegConfiguring phone settings via the Web configurator
Security settings
This screen is where you create security settings for your phone.
Settings ¢ Network and Connections ¢ Security Settings
Remote management
¤ Select whether you want to Allow access from other networks to the WEB configurator
(Ye s ) or not (No).
If you permit Remote Management, this increases the risk of unauthorised access to your
device settings.
¤ Select the network protocol to be used for the communication:
– TLS (Transport Level Security)
– UDP (User Datagram Protocol
– TCP (Transmission Control Protocol)
Security settings
On this screen you can download server certificates onto your phone, delete downloaded certificates and specify how invalid certificates should be handled.
Server certificates allow a server to be digitally identified via SSL (Secure Sockets Layer). Operating a server with SSL requires a server certificate both for one-way authentication (server to
the client) and for two-way authentication (between client and server). A server certificate has
to be downloaded onto your device so that the device can carry out authentication.
The Server Certificates and CA Certificates lists contain all downloaded certificates.
¤ Select a certificate from one of the lists.
¤ Click on Remove to delete the certificate from the list.
¤ Click on Details to display information about the certificate.
Import a local certificate
In order for a certificate to be downloaded to your phone, it must be available in your network.
¤ Click on Browse to search for the file on your PC or in your network. Select the required file.
¤ Click on Upload to download the file onto the device.
Invalid Certificates
The list contains all invalid certificates.
¤ Select a certificate from the list.
¤ Click on Accept to accept the certificate anyway.
¤ Click on Reject to reject the certificate.
Secure Real Time Protocol (SRTP)
The Secure Real-time Transport Protocol (SRTP) allows voice data transferred with the Real-time
Transport Protocol (RTP) to be encrypted.
¤ Activate or deactivate the Secure Real Time Protocol (SRTP).
¤ Select whether you want to Accept Non-SRTP Call or not. If this function is activated, you
also accept incoming calls from a number that does not use SRTP.
Saving settings
¤ Click on Save to save your settings on the Security Settings screen.
84
elmeg IP120
Page 85

bintec elmeg Configuring phone settings via the Web configurator
Tel ep hony
The Tel e ph on y menu provides the following setting options:
u Connections (£ S. 86)
This is where you can configure your VoIP connections and establish new connections.
u Audio (Voice quality) (£ S. 91)
On this screen you can optimise the voice quality of your VoIP connections.
u Ring tones (£ S. 92)
This screen is only available in user mode. This is where you can configure the ringtones for
your connections. In administrator mode, this setting can be found with the configuration
data for the connection (Tel e ph on y
u Call divert (£ S. 93)
On this screen you can define options for call divert and activate or deactivate this function.
u Dialling plans (£ S. 95)
The Dialling Plans screen is where you can define the use of area codes and VoIP connections
for outgoing phone calls and enter the international and local area code for your phone connection.
u Do not disturb (DND) (£ S. 96)
You can use the blacklists to block incoming calls from selected numbers and also to block
all anonymous calls.
u Voice mail services (£ S. 96)
On this screen you can configure your network mailbox.
¢ Connections).
85elmeg IP120
Page 86

bintec elmegConfiguring phone settings via the Web configurator
Connections
Only available in administrator mode.
You can establish up to 6 telephony connections (VoIP accounts) for your phone.
Settings ¢ Te l ep ho ny ¢ Connections
On this screen you can
– Set up a new connection via Auto Configuration
– See the status of the configured connections
– Activate or deactivate individual connections
– Define which of the connections are used by default for outgoing calls
– Change the configuration of connections or establish new connections
– Delete existing connections.
Setting up a new connection via Auto Configuration
¤ If you want to set up a new connection and your provider allows automatic configuration for
the account, click on Start.
When the process is complete, the connection is displayed in the list.
Connections for the elmeg IP120
The following information is shown for each configured connection:
Name/
Provider
Status Status of the connection. The following statuses are possible:
Name or number of the VoIP connection / Name of the VoIP provider
Registered The connection is registered with the provider.
Not registered The connection is not registered with the provider.
Registration failed An error occurred during registration.
Server not accessible The registrar server specified during configuration is not
available.
Disabled The connection is deactivated.
86
elmeg IP120
Page 87

bintec elmeg Configuring phone settings via the Web configurator
Activating/deactivating connections
Only activated connections can be used for Internet telephony.
¤ To use a configured connection, select Active.
Specifying a default line for outgoing calls
¤ Select Default Send Account for the connection that you want to use as the default line for
your phone calls. Only one can be selected.
Establishing new connections or editing existing ones
¤ Click on Edit in the row of a configured connection to change its configuration.
¤ Click on Edit in a row without a configured connection to establish a new connection.
Only one connection can be configured at a time for mobile phones.
Configuring the connections
To do this you need the relevant information about your provider for Internet telephony.
¤ In the Connection Name or Number field enter a name of your choice or the phone number
for this connection.
¤ Click on Start Profile Download to load a provider profile.
An assistant opens to guide you through the next steps.
¤ Select your Country and in the next step your Provider.
¤ If your provider is not in the list, select Other Provider.
¤ Click on Finish.
The selected provider profile is loaded.
Configuration without provider profile
If your provider is not on the list, select Other Provider.
¤ Select the required settings for your VoIP account on the following screens. Your provider will
supply you with this data.
General provider data
Domain
Specify the last part of your SIP address (URI).
Example: For the SIP address 987654321@provider.com you would enter provider.com.
Proxy Server Address
The SIP proxy is your VoIP provider's gateway server. Enter the IP address or the DNS name
of your SIP proxy server.
Example: myprovider.com.
Proxy Server Port
Enter the number of the communication port that the SIP proxy uses to send and receive signalling data (SIP port). Port 5060 is used by most VoIP providers.
Registration Server
Enter the IP address or the DNS name of your registrar server. The registrar is needed when
the phone is registered. It assigns your SIP address (username@domain) to the public IP
address/port number your phone uses to log in. With most VoIP providers, the registrar
server is identical to the SIP server.
Example: reg.myprovider.de.
87elmeg IP120
Page 88

bintec elmegConfiguring phone settings via the Web configurator
Registration Server Port
Enter the communication port used on the registrar. Port 5060 is used in most cases.
Registration Refresh Time [sec]
Enter the time intervals at which the phone should repeat the registration with the VoIP
server (SIP proxy) (a request will be sent to establish a session). The repeat is required so that
the phone's entry in the tables of the SIP proxy is retained and the phone can therefore be
reached. The repeat will be carried out for all activated VoIP phone numbers. The default is
120 seconds.
If you enter 0 seconds, the registration will not be repeated periodically.
Network provider data
The phone needs to know its public address in order to receive caller voice data.
The SIP protocol recognises the following options:
u The phone requests the public address from a STUN server on the Internet (Simple Transver-
sal of UDP over NAT). STUN can only be used with asymmetric NATs and non-blocking firewalls.
u The phone does not direct the connection request to the SIP proxy but to an outbound proxy
on the Internet that supplies the data packets with the public address.
The STUN server and outbound proxy are used alternately to work around the NAT/firewall in
the router/gateway.
¤ Enter the required data for the STUN server or outbound proxy:
STUN enabled
Click on Ye s if you want your phone to use STUN as soon as it is used on a router with asymmetric NAT.
STUN Server Address
Enter the DNS name or the IP address of the STUN server on the Internet. If you have selected
Ye s in the STUN enabled field, then you must complete this field.
STUN Server Port
Enter the number of the communication port on the STUN server.
The default port is 3478.
STUN Refresh Time [sec]
Enter the time intervals (seconds) at which the phone should repeat the registration with the
STU N ser ver. Th e repe at is required s o that th e phone's entry in the tables of the STUN server
is retained. The repeat will be carried out for all activated VoIP phone numbers. Ask your VoIP
provider for the STUN refresh time if necessary. The default setting is 30 seconds.
NAT Refresh Time [sec]
Specify the intervals at which you want the phone to update its entry in the NAT routing
table. Specify an interval in seconds that is a little shorter than the NAT session timeout. As a
rule you should not change the default value for the NAT update. The default setting is 20
seconds.
88
elmeg IP120
Page 89

bintec elmeg Configuring phone settings via the Web configurator
Outbound Proxy Mode
Specify when the outbound proxy should be used.
Always All signalling and voice data sent by the phone is sent to the outbound
proxy.
Automatically Data sent by the phone is only sent to the outbound proxy when the
phone is connected to a router with symmetric NAT or a blocking firewall.
If the phone is behind an asymmetric NAT, the STUN server is used. If you
have set STUN enabled to No, or if you have not entered a STUN server,
the outbound proxy will be used in all cases.
Never The outbound proxy is not used.
If you leave the Outbound Server Address field empty, the phone does not respond to the
selected mode and operates as if Never were selected.
Outbound Server Address
Enter the DNS name or the IP address of your provider's outbound proxy. With many providers, the outbound proxy is identical to the SIP proxy.
Outbound Proxy Port
Enter the number of the communication port used by the outbound proxy. The default port
is 5060.
Automatic Negotiation of DTMF Transmission
DTMF signalling is required, for example, for querying and controlling certain network mailboxes via digit codes or for remote operation of the local voice mail. Select whether the setting should be made automatically. If you select No, you must determine the setting for the
DTMF transfer yourself.
Send Settings for DTMF Transmission
To send DTMF signals via VoIP, you must define how the key codes are to be converted to
DTMF signals and sent:
Audio As audible information in the voice channel, i.e., it is not known which key has
been pressed.
RFC 2833 As a value (= key pressed) in an RTP packet.
SIP Info As an "SIP Info" message.
The value (= key pressed) is sent as an SIP data packet.
Ask your VoIP provider which type of DTMF transmission it supports.
Entering personal provider data
Now enter your personal login data that you received from your VoIP provider.
¤ Enter the following data:
– Authentication Name
– Authentication Password
– Username
– Display Name
89elmeg IP120
Page 90

bintec elmegConfiguring phone settings via the Web configurator
Advanced settings
You can find further parameters for configuring your VoIP connection under Advanced Settings.
¤ Click on Show next to Advanced Settings.
You will find detailed information on configuring a VoIP account in the section entitled Config-
uring phone settings via the Web configurator on S. 74.
Counting missed and accepted calls
Missed and accepted calls for this VoIP account are recorded in the call lists for the phone if this
function is activated (
£ S. 44).
¤ Open the Advanced Settings section.
¤ Select Yes for Missed/accepted calls count if you want to deactivate this function. The
default setting is Ye s .
Allowing or blocking Call Waiting
If you receive another incoming call during a call, this is indicated by Call Waiting by default. For
each connection, it is possible to set whether or not Call Waiting is permitted.
¤ Open the Advanced Settings section.
¤ If you want to deactivate the function, select No from the list.
Or
¤ Select the desired call waiting signal:
– Signal in display only or
– Signal with a beep. Select an interval for the beep: Beep once, Beep every 4 sec., Beep
every 10 sec., Beep every 20 sec. Default setting: Beep every 4 sec.
Setting a ring tone
You can set a ring tone for each connection (i.e. for each configured VoIP account). You can specify different ring tones for external and internal calls as well as for group calls, if this information
is available for incoming calls (depending on the telephone system).
¤ Open the Advanced Settings section.
¤ Choose a Melody for the desired call type.
¤ Click Te st to play your chosen melody.
Saving settings
¤ Click on Save to save your settings for the connection.
Deleting a connection
¤ Click on Delete connection to delete the displayed connection.
90
elmeg IP120
Page 91

bintec elmeg Configuring phone settings via the Web configurator
Audio (Voice quality)
Only available in administrator mode.
The voice quality of your VoIP calls is determined by the codec used for the transmission. To
increase the quality, more data must be transmitted. Depending on the bandwidth of your
Internet connection, this can then lead to problems with the volume of data – especially if two
VoIP calls are made simultaneously – so that the transmission no longer takes place smoothly.
The following settings allow you to adjust your elmeg IP120 to your individual Internet connection.
Settings
You can set the following parameters for the voice quality:
¢ Te le p ho ny ¢ Audio
Packed time for RTP packages
¤ Select the interval for sending RTP packets (20 or 30 ms).
RTP (Real-time Transport Protocol) is a protocol for the continuous transmission of audiovisual data (streams) via IP-based networks.
Voice quality
¤ Select the voice quality that matches the bandwidth of your DSL connection.
– Optimised for high bandwidth
– Optimised for low bandwidth
– Select Own Codec preference if you want to determine the codecs yourself.
Both parties involved in a phone connection (caller/sender and recipient) must use the same
voice codec. The voice codec is negotiated between the sender and the recipient when establishing a connection. You can influence the voice quality by selecting (bearing in mind the
bandwidth of your Internet connection) the voice codecs your phone is to use, and specifying
the order in which the codecs are to be suggested when a VoIP connection is established.
¤ Select the required codecs and define the sequence in which they should be used.
91elmeg IP120
Page 92

bintec elmegConfiguring phone settings via the Web configurator
The following voice codecs are supported by your phone:
G.722 The broadband voice codec G.722 works at the same bit rate as G.711 (64 kbit/s per
voice connection) but at a higher sampling rate (16 kHz) and therefore provides
excellent sound quality.
G.711 a law/G.711 μ law
Excellent voice quality (comparable with ISDN). The necessary bandwidth is 64 kbit/
s per voice connection.
G.726 Good voice quality (inferior to that with G.711 but better than with G.729). Your
phone supports G.726 with a transmission rate of
32 kbit/s per voice connection.
iLbc Average voice quality. This codec works with 30-ms or 20-ms blocks. The data rate is
13.33 kbit/s (30-ms blocks) or 15.2 kbit/s (20-ms blocks).
G.729A Average voice quality. The necessary bandwidth is less than or equal to
8 kbit/s per voice connection.
Silence suppression
Silence suppression means that no data packets are sent during a pause in speaking. This means
a lower data volume but call participants may interpret it as an interruption to the connection.
¤ Select No if you do not want silence suppression. The default setting is Yes .
Saving settings
¤ Click on Save to save your settings on the screen.
Ring tones
Only available in user mode. In administrator mode you set the ring tones when configuring the
connection (
You can set a ring tone for each connection (i.e. for each configured VoIP account). You can specify different ring tones for external and internal calls as well as for group calls, if this information
is available for incoming calls (depending on the telephone system).
Settings
An entry exists for each VoIP connection.
£ S. 90).
¢ Te le ph o ny ¢ Ring Tones
¤ Choose a Melody for the desired call type.
¤ Click on Te st to play back the selected melody.
Saving settings
¤ Click on Save to save your settings on the screen.
Please note
You can upload further ring tones from the PC to your telephone (£ S. 111).
92
elmeg IP120
Page 93

bintec elmeg Configuring phone settings via the Web configurator
Call divert
For each configured VoIP account you can automatically forward incoming calls to another
phone number.
Settings
¢ Te le p ho ny ¢ Call Divert
¤ Specify for each VoIP account in which cases a call should be diverted.
None No call divert
All Call divert for all incoming calls
No Answer Call divert if you do not answer the call
In the Waiting time for no answer (value range: 1 - 600 sec) field enter
the time in seconds after which call divert is to be activated.
When Busy Call divert if you are currently speaking to another participant
¤ Enter the Phone Number to which calls are to be forwarded.
¤ Click on Save to save your settings on the screen.
Local settings
On this screen, you provide details about the location of your phone. These are used to determine the international and local area dialling codes as well as country-specific tones (e.g., dialling tone or ringback tone).
Settings
¢ Te le ph on y ¢ Local Settings
Selecting the country
The time zone is determined automatically based on the country you select.
¤ Select the Country in which you are using your phone from the list.
93elmeg IP120
Page 94

bintec elmegConfiguring phone settings via the Web configurator
Setting dialling codes
Depending on your country selection, the international and (if relevant for that country)
national dialling codes are entered in the Prefix and Code Number fields automatically.
If your country is not offered in the list of countries enter the dialling code yourself. Save the
complete area code (with international code) for the area in which you are using the phone. In
general, you must always dial the area code for VoIP calls – even for local calls. To avoid having
to dial the area code for local calls, your phone prefixes all VoIP calls in the local area with the
area code entered, i.e., all numbers that do not begin with 0 – even when dialling numbers from
the directory and other lists.
Exceptions: Numbers for which you have set dialling plans.
¤ Select Other Country from the end of the Country list.
¤ Enter the full prefix for the country in which you use your phone. Otherwise errors may occur
with phone connections or during data exchange (e.g., between a fixed line network and a
mobile network).
The prefix consists of the international prefix (International: Prefix and Code Number, e.g.,
00 49 for Germany) and, if applicable, the prefix used for calls within the country (Local: Pre-
fix and Code Number, e.g., 0 for national long-distance calls in Germany).
Setting country-specific ringback and dialling tones
Tones, e.g., dialling tone, ringback tone, busy tone or call waiting tone, vary from one country or
region to another. You can choose from various tone groups for your phone.
The Tone Scheme is automatically determined on the basis of the country selected above. You
can change the setting.
¤ Select the country or region whose tone scheme should be used for your phone.
Saving settings
¤ Click on Save to save your settings on the screen.
94
elmeg IP120
Page 95

bintec elmeg Configuring phone settings via the Web configurator
Dialling plans
Only available in administrator mode.
You can use dialling plans to define which phone numbers should be called using which configured VoIP account and whether an area code should be dialled first.
Settings
¢ Te le p ho ny ¢ Dialling Plans
¤ Enter the Phone Number that the dialling plan is to apply to.
¤ Select Use Area Codes if you want to call this number with an area code.
¤ Select the connection that should be used to call this phone number.
¤ Enter a name for this dialling plan in the Comment field.
¤ Click on Add to add the rule to the list.
¤ Click on Delete to delete a rule from the list.
¤ Select Active if you want to activate the rule.
Access code
The prefix is automatically added to numbers during dialling.
¤ Define when it should be used:
– None (if you do not use an access code)
– With numbers from Directory & Call lists
–With All numbers
Saving settings
¤ Click on Save to save your settings on the Dialling Plans screen.
95elmeg IP120
Page 96

bintec elmegConfiguring phone settings via the Web configurator
Do not disturb (DND)
Block individual phone numbers and/or all anonymous calls. You will then be unavailable for
these calls; your phone will not ring.
Settings
¢ Te le ph o ny ¢ Do Not Disturb
¤ Select Yes to activate the Do Not Disturb function.
¤ Enter the Name and Phone Number for the call.
¤ Click on Add to save the entry to the do not disturb list.
¤ Click on Delete to delete an entry.
¤ Click on Delete all to delete all entries.
¤ Activate the Block anonymous caller option to block all anonymous calls.
¤ Click on Save to save your settings on this screen.
Voice mail services
Only available in administrator mode.
Some VoIP providers offer answering machines on the network – network mailboxes. These
accept incoming calls on the corresponding VoIP phone number. You can access voice mails on
the network mailbox via the display menu (£ S. 54) or the Message Centre (£ S. 55).
To record all calls, set up a network mailbox for each of your VoIP accounts.
Settings ¢ Te l ep ho ny ¢ Voice Mail Services
¤ Enter the Mailbox Number for the VoIP connection and activate the network mailbox.
¤ Click on Save to save the settings.
96
elmeg IP120
Page 97

bintec elmeg Configuring phone settings via the Web configurator
Messaging
Only available in administrator mode.
The Messaging menu provides the option to configure the behaviour of the Message Centre
key (MWI = Message Waiting Indication).
MWI light
The Message Centre allows you to access your voice mails, missed calls, e-mails and missed
alarms at the press of a key (
You can switch the flashing on or off for every message type. (MWI = Message Waiting Indication)
Settings
¢ Messaging ¢ MWI Light
E) (£ S. 55). This key flashes if a new message has been received.
¤ Select the message type for which the receipt of a new message should be indicated by a
flashing Message Centre key.
–Missed Calls
– Voice Mail
¤ Select whether the MWI notification (the receipt of a new message) should also be indicated
by a beep (beep) or only by flashing (silent).
¤ Click on Save to save the settings.
97elmeg IP120
Page 98

Services
Only available in administrator mode.
The Services menu offers the following functions:
u Setting up door interphones
u Assigning an online directory (£ S. 99)
u Assigning an LDAP directory (£ S. 100)
Door interphone
You can operate one or more door interphones with video surveillance using the phone
£ S. 57. Enter the data for the door interphone on this page.
Please note
The door interphone can also be set up for your phone using the hybird phone system. If
automatic configuration is permitted, configuration is carried out automatically on your
phone.
bintec elmegConfiguring phone settings via the Web configurator
Settings
¢ Services ¢ Door Interphone
¤ Enter a name and the SIP ID for the camera.
¤ Enter the code for the door opener in the DTMF code f ield . Thi s MFV code is requ ired to op er-
ate the door opener from the phone. The MFV code can be found in the description of your
door interphone.
¤ Click on Add to add a camera to the list.
¤ Click on Delete if you want to remove a camera from the list.
¤ Click on Save to save your settings.
98
elmeg IP120
Page 99

bintec elmeg Configuring phone settings via the Web configurator
Online directory
If you want to use an online directo ry (£ S. 51), select the provider on this screen who supplies
the directory on the Internet. Also specify which service you want to use.
Settings
The available provider directories are displayed.
¢ Services ¢ Online Directory
¤ Select the providers whose online directories you want to use by selecting the check boxes
under Select.
¤ If you select the Automatic look-up option, when a call comes in the online service automat-
ically looks up the name of the caller in the online directory. This function must be available
for the provider directory.
Configuring an additional provider
¤ To use the online services of another provider, enter the access data under Settings for addi-
tional provider:
– Provider Name
– Server Address
– Username
–Password
99elmeg IP120
Page 100

bintec elmegConfiguring phone settings via the Web configurator
¤ Select the service(s) you want to use:
– White Pages
public directory supplied on the Internet by the provider entered above
– Yellow Pa ge s
yellow pages supplied on the Internet by the provider entered above
– Private NetDirectory
directory managed by yourself, if enabled by your provider
You can enable one, two or all three services.
¤ Enter a name for each of the selected services in the Name of directory field. This is the name
under which the directory will be displayed on your device (
Saving settings
£ S. 51).
¤ Click on Save to save your settings on the Online Directory screen.
LDAP directory
If your corporate network provides a directory via an LDAP server, you can access this on your
phone (LDAP = Lightweight Directory Access Protocol). You can set up the function on this
screen. You will need information about the configuration of the LDAP server to do this.
Settings
¢ Services ¢ LDAP
¤ Enter a name in the Name of directory. This is the name under which the directory will be
displayed on your device (
£ S. 50).
¤ Select the LDAP directory.
¤ Select Yes for LDAP lookup for incoming calls if a search should be made for a caller in the
LDAP directory instead of in the local directory.
¤ Enter all the data for your LDAP server and the directory.
Max. Hits
Maximum number of search results to be displayed. Default setting: 50
Server Address
IP address for the LDAP server in your network.
Server Port
Port number that is used to provide the LDAP service. Default setting: 389
LDAP Search Base
Range in the hierarchical LDAP database where the search begins. All areas have defined
designations.
Username
Access ID for the LDAP server.
Password
Password for the access ID to the LDAP server.
100
elmeg IP120
 Loading...