

Page 1
Operating instructions
Bedienungsanleitung
Notice d'utilisation
Istruzioni per l'uso
Instrucciones de servicio
Bruksanvisning
Brukerveiledning
егчейсЯдйп чсЮузт
Betjeningsvejledning
Instrukcji obslugi
Handleiding
Manual de instruções
elmeg CS410 / CS410-U / CS400xt / IP-S400
English - Deutsch - Français - Italiano - Español - Svenska
Norsk - ЕллзнйкЬ - Dansk - Polski - Nederlands - Português
Page 2

Page 3

English . . . . . . . . . . . . . . . . . . . . . . . . . . . . . . . . . . . . . . 1
Telephone display and buttons . . . . . . . . . . . . . . . . . . . . . . . . . . . . . . . . . . . . . . . . . 2
Description and Installation . . . . . . . . . . . . . . . . . . . . . . . . . . . . . . . . . . . . . . . . . . . 3
Making Calls . . . . . . . . . . . . . . . . . . . . . . . . . . . . . . . . . . . . . . . . . . . . . . . . . . . 11
Telephone operation. . . . . . . . . . . . . . . . . . . . . . . . . . . . . . . . . . . . . . . . . . . . . . . 15
Configuration settings. . . . . . . . . . . . . . . . . . . . . . . . . . . . . . . . . . . . . . . . . . . . . . 17
Declaration of conformity and CE mark . . . . . . . . . . . . . . . . . . . . . . . . . . . . . . . . . . . 19
Deutsch . . . . . . . . . . . . . . . . . . . . . . . . . . . . . . . . . . . . . . 1
Display und Tasten des Telefons . . . . . . . . . . . . . . . . . . . . . . . . . . . . . . . . . . . . . . . . 2
Beschreibung und Installation . . . . . . . . . . . . . . . . . . . . . . . . . . . . . . . . . . . . . . . . . . 3
Telefonieren . . . . . . . . . . . . . . . . . . . . . . . . . . . . . . . . . . . . . . . . . . . . . . . . . . . 11
Telefon bedienen. . . . . . . . . . . . . . . . . . . . . . . . . . . . . . . . . . . . . . . . . . . . . . . . . 16
Einstellungen in der Konfigurierung . . . . . . . . . . . . . . . . . . . . . . . . . . . . . . . . . . . . . 17
Konformitätserklärung und CE-Zeichen . . . . . . . . . . . . . . . . . . . . . . . . . . . . . . . . . . . 19
Français . . . . . . . . . . . . . . . . . . . . . . . . . . . . . . . . . . . . . . 1
Afficheur et touches du téléphone. . . . . . . . . . . . . . . . . . . . . . . . . . . . . . . . . . . . . . . . 2
Description et installation . . . . . . . . . . . . . . . . . . . . . . . . . . . . . . . . . . . . . . . . . . . . 3
Téléphoner . . . . . . . . . . . . . . . . . . . . . . . . . . . . . . . . . . . . . . . . . . . . . . . . . . . . 11
Utilisation. . . . . . . . . . . . . . . . . . . . . . . . . . . . . . . . . . . . . . . . . . . . . . . . . . . . . 16
Réglages dans la configuration . . . . . . . . . . . . . . . . . . . . . . . . . . . . . . . . . . . . . . . . . 17
Déclaration de conformité et marque CE . . . . . . . . . . . . . . . . . . . . . . . . . . . . . . . . . . . 19
Italiano . . . . . . . . . . . . . . . . . . . . . . . . . . . . . . . . . . . . . . 1
Display e tasti del telefono . . . . . . . . . . . . . . . . . . . . . . . . . . . . . . . . . . . . . . . . . . . . 2
Descrizione e installazione . . . . . . . . . . . . . . . . . . . . . . . . . . . . . . . . . . . . . . . . . . . . 3
Telefonare. . . . . . . . . . . . . . . . . . . . . . . . . . . . . . . . . . . . . . . . . . . . . . . . . . . . . 11
Rubrica telefonica . . . . . . . . . . . . . . . . . . . . . . . . . . . . . . . . . . . . . . . . . . . . . . . . 16
Impostazioni nella configurazione. . . . . . . . . . . . . . . . . . . . . . . . . . . . . . . . . . . . . . . 17
Dichiarazione di conformità e marcatura CE. . . . . . . . . . . . . . . . . . . . . . . . . . . . . . . . . 19
Español . . . . . . . . . . . . . . . . . . . . . . . . . . . . . . . . . . . . . . 1
Pantalla y teclas del teléfono . . . . . . . . . . . . . . . . . . . . . . . . . . . . . . . . . . . . . . . . . . . 2
Descripción e instalación . . . . . . . . . . . . . . . . . . . . . . . . . . . . . . . . . . . . . . . . . . . . . 3
Telefonear. . . . . . . . . . . . . . . . . . . . . . . . . . . . . . . . . . . . . . . . . . . . . . . . . . . . . 11
Programar guía telefónica. . . . . . . . . . . . . . . . . . . . . . . . . . . . . . . . . . . . . . . . . . . . 16
Ajustes en la configuración . . . . . . . . . . . . . . . . . . . . . . . . . . . . . . . . . . . . . . . . . . . 17
Declaración de conformidad y símbolo CE . . . . . . . . . . . . . . . . . . . . . . . . . . . . . . . . . . 19
Svenska . . . . . . . . . . . . . . . . . . . . . . . . . . . . . . . . . . . . . . 1
Display och telefonens knappar . . . . . . . . . . . . . . . . . . . . . . . . . . . . . . . . . . . . . . . . . 2
Beskrivning och installation . . . . . . . . . . . . . . . . . . . . . . . . . . . . . . . . . . . . . . . . . . . 3
Telefonera. . . . . . . . . . . . . . . . . . . . . . . . . . . . . . . . . . . . . . . . . . . . . . . . . . . . . 11
Telefonkatalog programmering . . . . . . . . . . . . . . . . . . . . . . . . . . . . . . . . . . . . . . . . 16
Inställningar i konfigureringen. . . . . . . . . . . . . . . . . . . . . . . . . . . . . . . . . . . . . . . . . 17
Konformitetsförklaring och CE-märken . . . . . . . . . . . . . . . . . . . . . . . . . . . . . . . . . . . 19
I
Page 4

Norsk . . . . . . . . . . . . . . . . . . . . . . . . . . . . . . . . . . . . . . . 1
Telefonens display og taster . . . . . . . . . . . . . . . . . . . . . . . . . . . . . . . . . . . . . . . . . . . 2
Beskrivelse og Installation . . . . . . . . . . . . . . . . . . . . . . . . . . . . . . . . . . . . . . . . . . . . 3
Telefonering . . . . . . . . . . . . . . . . . . . . . . . . . . . . . . . . . . . . . . . . . . . . . . . . . . . 11
Betjening av telefonen . . . . . . . . . . . . . . . . . . . . . . . . . . . . . . . . . . . . . . . . . . . . . . 16
Innstillinger i konfigureringen . . . . . . . . . . . . . . . . . . . . . . . . . . . . . . . . . . . . . . . . . 17
Konformitetserklæring og CE-merker. . . . . . . . . . . . . . . . . . . . . . . . . . . . . . . . . . . . . 19
ЕллзнйкЬ .....................................1
Пиьнз кбйРлЮкфсб фзт фзлецщнйкЮт ухукехЮт ................................2
РесйгсбцЮ кбй егкбфЬуфбуз...........................................3
ЧсЮуз фзлецщнйкюн ухукехюн.........................................12
Чейсйуµьт фзлецюнпх ..............................................17
ЕрйлпгЭт фщн схиµЯуещн ............................................19
ДЮлщуз ухмцщнЯбт кбй уЮмб CE........................................21
Dansk . . . . . . . . . . . . . . . . . . . . . . . . . . . . . . . . . . . . . . . 1
Display og telefonens taster . . . . . . . . . . . . . . . . . . . . . . . . . . . . . . . . . . . . . . . . . . . 2
Beskrivelse og installation . . . . . . . . . . . . . . . . . . . . . . . . . . . . . . . . . . . . . . . . . . . . 3
Telefonering . . . . . . . . . . . . . . . . . . . . . . . . . . . . . . . . . . . . . . . . . . . . . . . . . . . 11
Betjening af telefonen . . . . . . . . . . . . . . . . . . . . . . . . . . . . . . . . . . . . . . . . . . . . . . 16
Indstillinger i konfigurationen . . . . . . . . . . . . . . . . . . . . . . . . . . . . . . . . . . . . . . . . . 17
Konformitetserklæring og CE-mærke . . . . . . . . . . . . . . . . . . . . . . . . . . . . . . . . . . . . . 19
Polski . . . . . . . . . . . . . . . . . . . . . . . . . . . . . . . . . . . . . . . 1
Opis i instalacja ..................................................2
Opis i instalacja ..................................................3
Wykonywanie po³¹czeñ .............................................11
Obs³ugiwanie telefonu..............................................16
Ustawienia w konfiguracji ...........................................17
Deklaracja zgodnoœci i symbol CE .......................................19
Nederlands . . . . . . . . . . . . . . . . . . . . . . . . . . . . . . . . . . . . 1
Display en toetsen van de telefoon . . . . . . . . . . . . . . . . . . . . . . . . . . . . . . . . . . . . . . . 2
Beschrijving en installatie . . . . . . . . . . . . . . . . . . . . . . . . . . . . . . . . . . . . . . . . . . . . 3
Telefoneren . . . . . . . . . . . . . . . . . . . . . . . . . . . . . . . . . . . . . . . . . . . . . . . . . . . . 11
Telefoon bedienen . . . . . . . . . . . . . . . . . . . . . . . . . . . . . . . . . . . . . . . . . . . . . . . . 16
Instellingen in de configuratie . . . . . . . . . . . . . . . . . . . . . . . . . . . . . . . . . . . . . . . . . 17
Conformiteitsverklaring en CE-teken . . . . . . . . . . . . . . . . . . . . . . . . . . . . . . . . . . . . . 19
Português . . . . . . . . . . . . . . . . . . . . . . . . . . . . . . . . . . . . . 1
Display e teclas do telefone . . . . . . . . . . . . . . . . . . . . . . . . . . . . . . . . . . . . . . . . . . . . 2
Descrição e instalação. . . . . . . . . . . . . . . . . . . . . . . . . . . . . . . . . . . . . . . . . . . . . . . 3
Telefonar . . . . . . . . . . . . . . . . . . . . . . . . . . . . . . . . . . . . . . . . . . . . . . . . . . . . . 11
Operar o telefone. . . . . . . . . . . . . . . . . . . . . . . . . . . . . . . . . . . . . . . . . . . . . . . . . 16
Ajustes na configuração . . . . . . . . . . . . . . . . . . . . . . . . . . . . . . . . . . . . . . . . . . . . . 17
Declaração de conformidade e o símbolo CE . . . . . . . . . . . . . . . . . . . . . . . . . . . . . . . . . 19
II
Page 5
Operating instructions
elmeg CS410 / CS410-U / CS400xt / IP-S400
English
1
Page 6
English
7
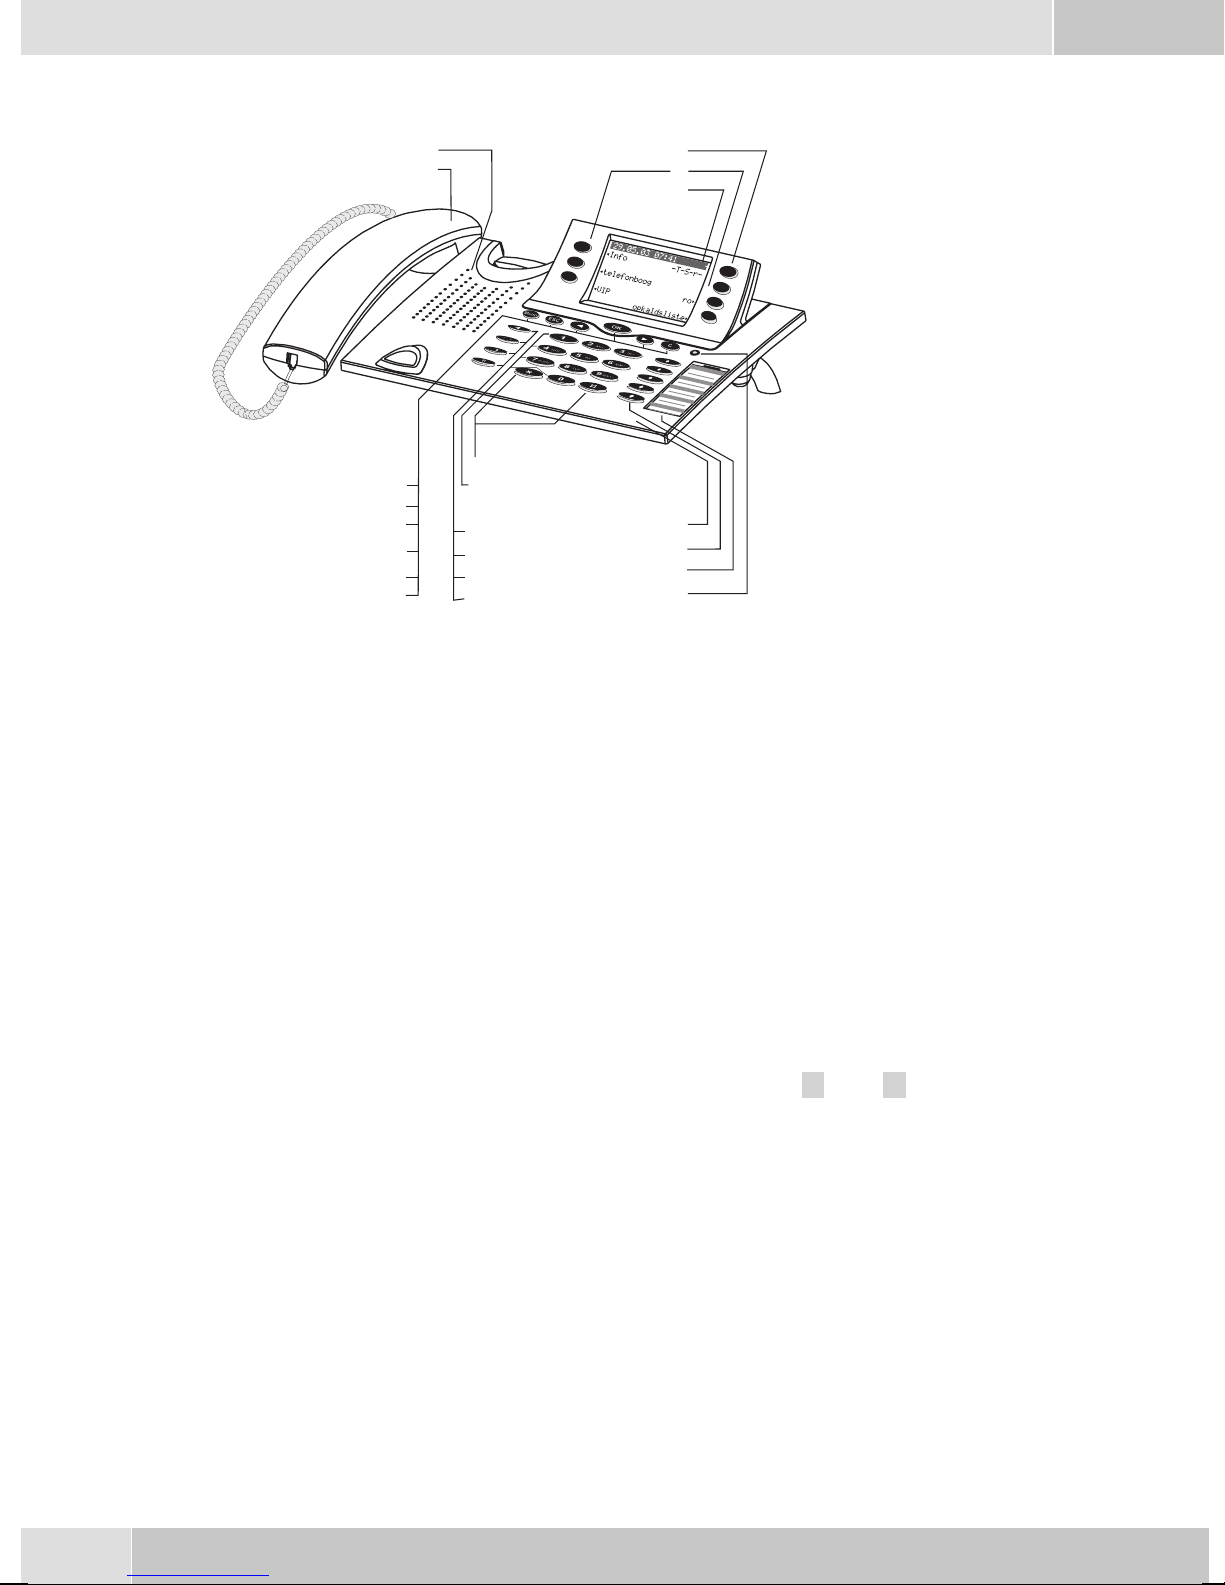
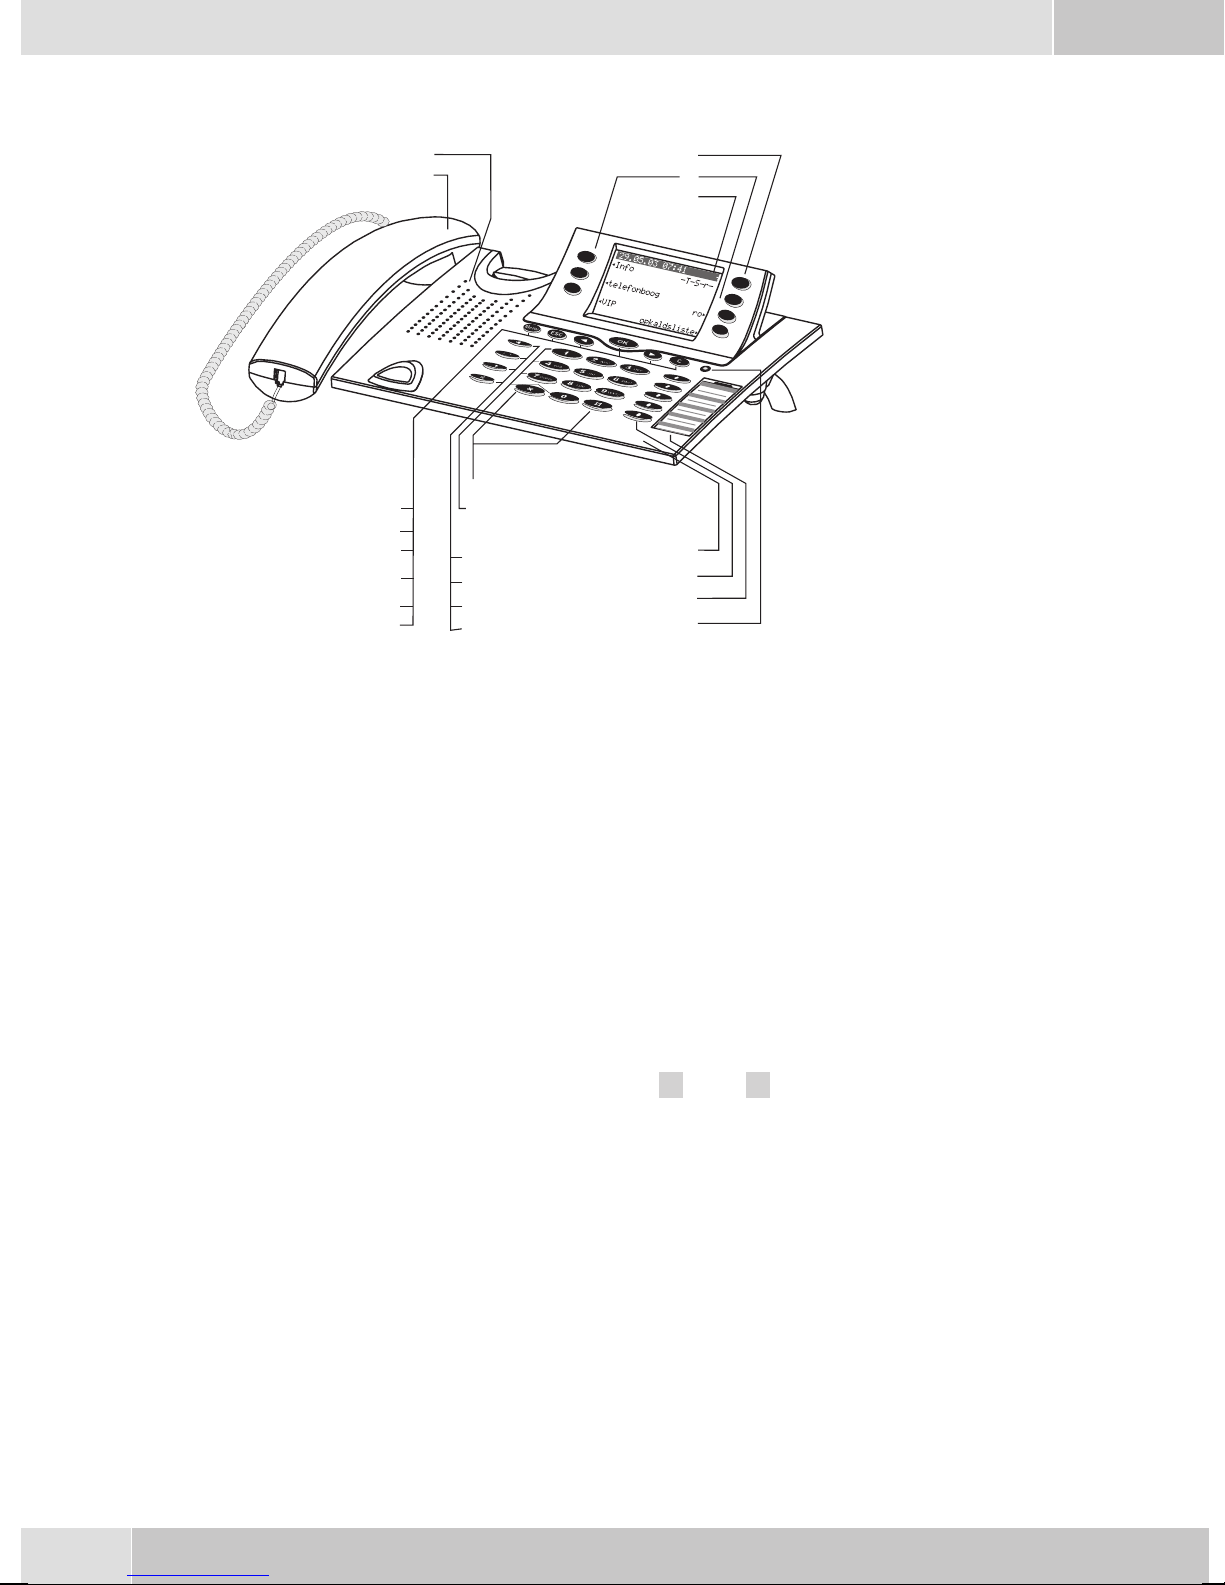
Telephone display and buttons
Figure 5
1 Speaker
10
11
1
2
3
4
5
12
6
7
8
9
13
14
15
16
1
18
19
20
21
2 Handsetwith connectingcord
3 Answering machine buttonon thetelephone (optionalmodule) or »PABXmenubut-
ton
4 6Softkeys
5 Seven-linebacklit display
6 Menukey:Thiskeyopenstheprogrammingmenu. Ifyouarealready locatedinamenu
and then press the key, eithermenu-specific functions are shown, or you are moved
backone programmingstep.
7 ESCkey: PressingtheEsc button duringprogrammingreturnsthetelephoneto itsidle
status.
8 / 10
9 OKkey: Pressingthis buttonconfirmsan entryor storesa settinginthetelephone.
11 Ckey:Pressthisbuttontomovebackonemenustep inthemenu. Ifyouare currentlyin
12 Asteriskkey/ hashkey
13 Dialbuttons
14 Openlistening/ hands-freebutton
Arrowbutton »Totheleft« /»To theright«:Thearrows » {«and »} «inthe rightcor
neronthetoplineofthedisplayindicatethatyoucancallupfurtherfunctionsonthelo
werlines usingthearrow buttons.
theinput mode,this buttoncan beused todelete individualcharacters.
-
-
15 Endinga call
16 Redialbutton
17 Enquirybutton
18 Microphone
2
Page 7
English
19 Five programmable function keys with LED: Eachbutton hasan insettwo-color LED
(level1 -red /level2- yellow).TheseLEDs can beusedto indicatecertain functions.
20 Labelpanel forfunction keys
21 Callsignaling (red)and answeringmachine(yellow) LED
Description and Installation
These operating instructions describe onlythe most important routines for using the telephone.
Detailed information and documentation can be found on the CD-ROM.
CS410
This systemtelephone isdesigned for connectionto an internal S0-port(4 wires) of anelmeg pabxsystem.
If youwish toconnect the telephoneto aninternal Up0-port, besure toinstall the internal Up0/S0-module
into the telephone or use the external Up0/S0-converter.
CS410-U
This system telephone is designed for connection to an internal Up0-port (2 wires) of an elmeg pabx sys
tem. The internal Up0/S0-module or the external Up0/S0- converter are then no longer required.
CS400xt
Thissystem telephoneisdelivered withakey extensionmodule(T400/2), providingyouwith 10additional,
freely configurable keys.
Itis designedfor connectionto aninternalS0 port(4-wire cable)ofa PABXsystem. Thesystem telephoneis
not equipped witha USB or serial portfor configuration or other uses. This phone must be configured via
the internalISDN port usingthe WinToolsProfessional Configurator.There arealso no»Audio functions«
implemented and you can not use the Answering machine or Up0 modules or functions. None of the
functions for this module are shown in the display, nor can they be used.
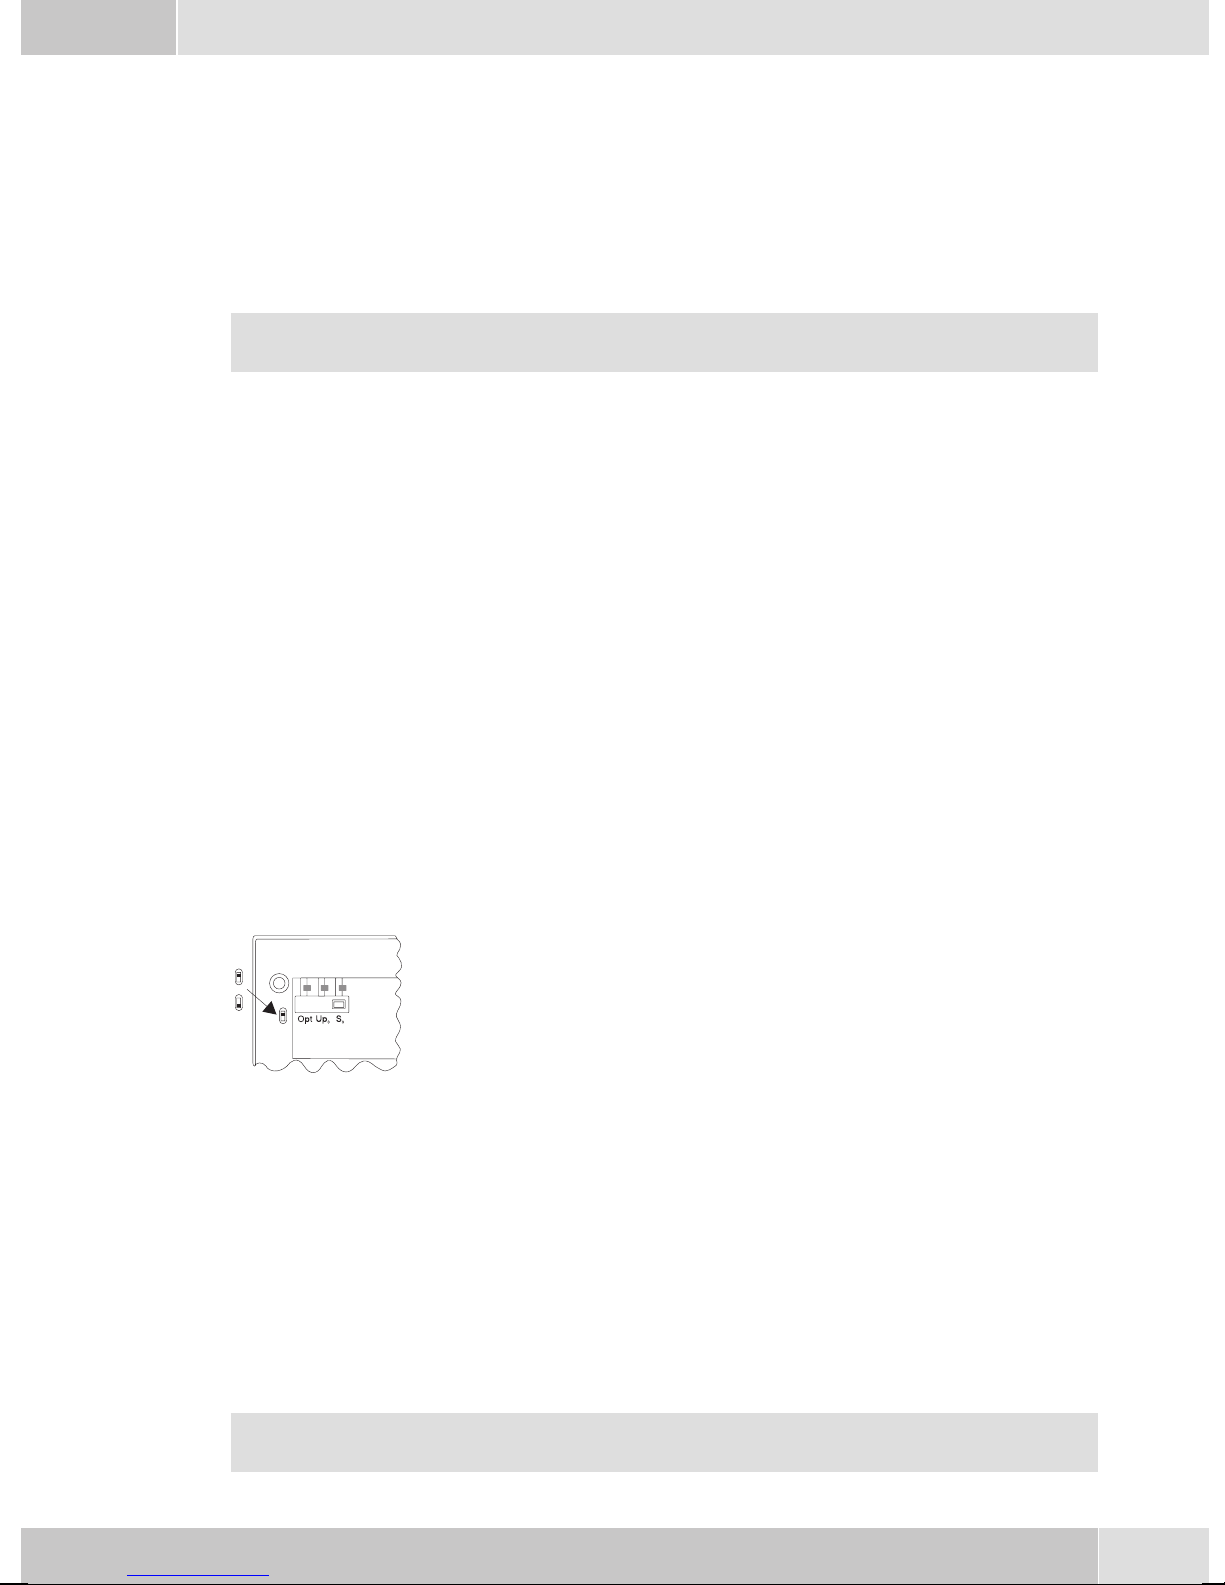
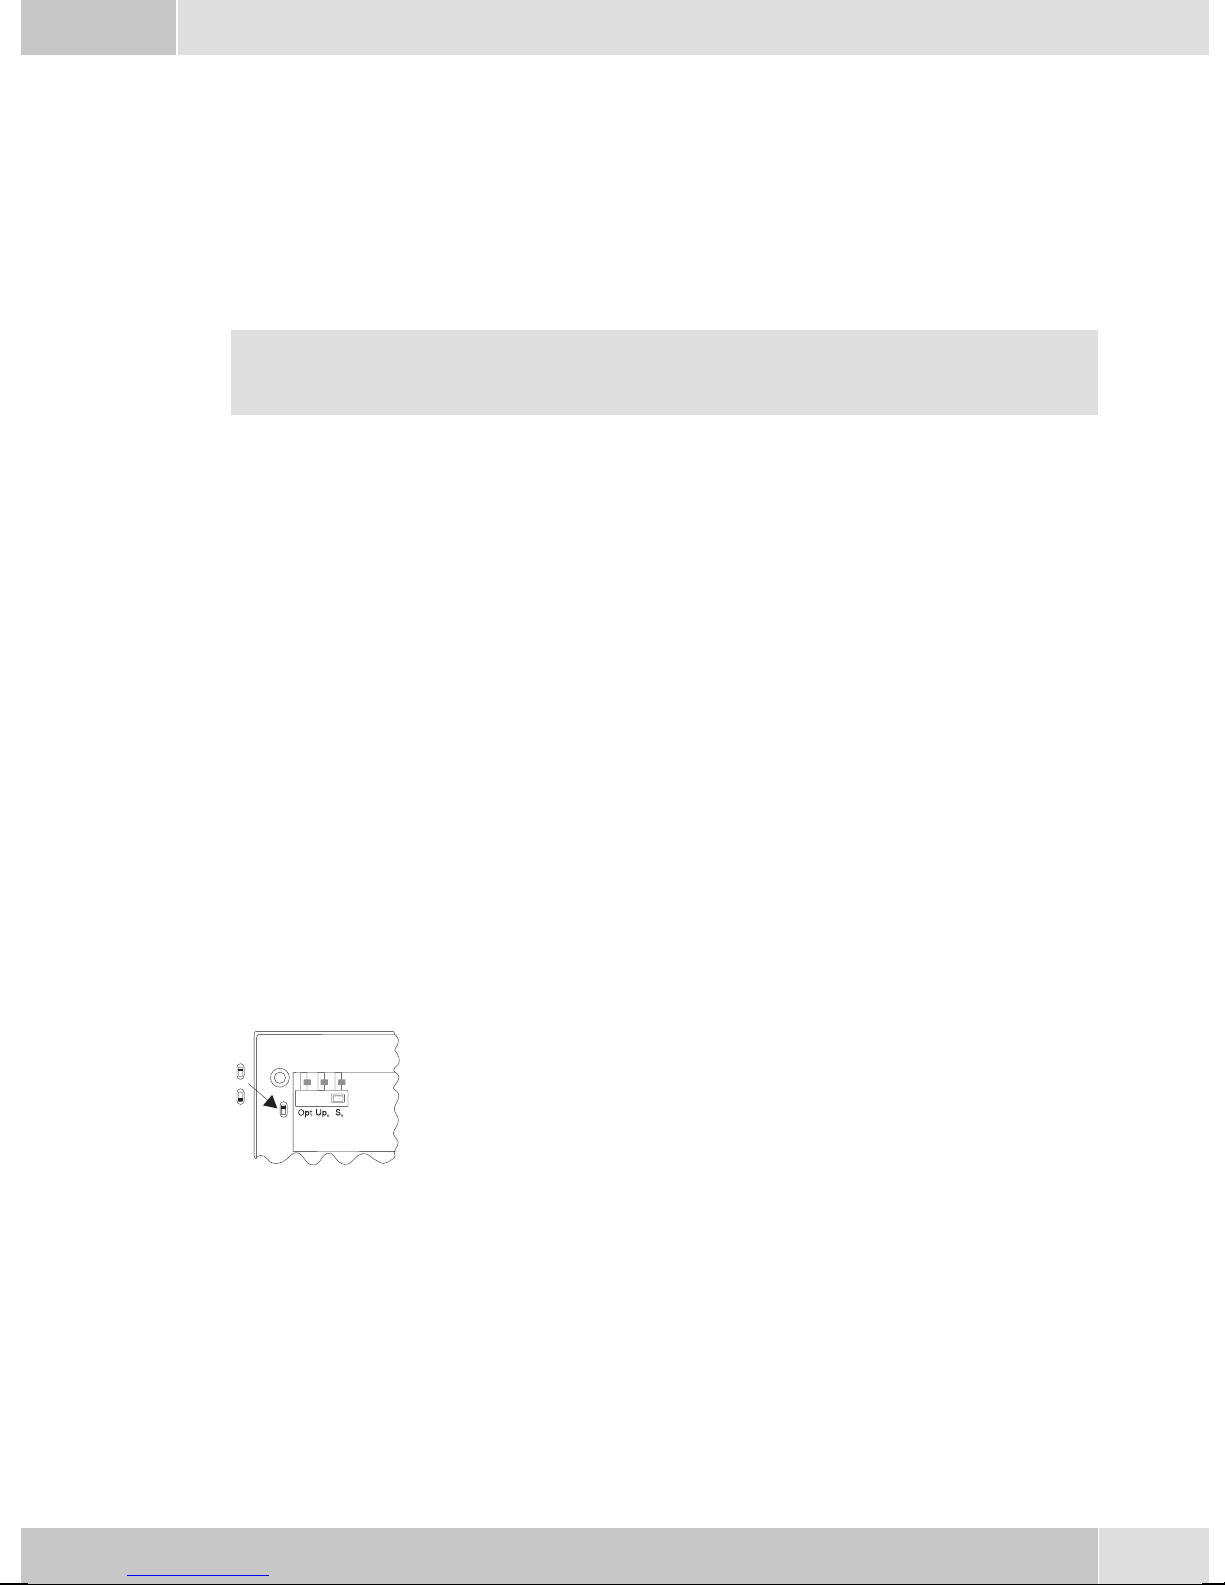
Thistelephone isequipped withthe function»Emergency operation«,mea
OFF
ON
ning it can be operated at NT via the PABX system on a loss of 230 V~ po
wer.Please notethat yourPABX systemsupports thisfeature andthat itcan
not be used via a Up0/S0 converter.
elmeg IP-S400
-
-
-
Connectthis systemtelephoneto thecorresponding LANport(or network)ofthe PABXsystem usingaCat.
5cable. Thesystemtelephone isequippedwith aPC outputthatcan beusedto connectotherIP terminalde
vices.
Setting up/ Configuring the system telephone
On the system telephoneitself you can only carry out a limitedconfiguration of the supported features. A
fullconfiguration isonly possiblewithan elmegtelephonesystem usingthe professionalWINtool configu
rator via the corresponding system telephone interface.
You will find additional information on the configuringof the system telephones in the detailed
instruction manual on the CD-ROM.
-
-
3
Page 8

English
System telephone extension modules
Modul Up0/S0(CS410)
•
Answeringmachine module(CS410)
•
Additional »T400«,»T400/2«keyboard (CS410,IP-S400)
•
Safety notes
Mind the storage and operation temperatures for the devicelisted inthe technicalspecifications.
•
Only connectthe devicewhen thepermissible ambientoperating temperaturehas beenreached.
Please notethat condensation onor in theunit must beprevented whenmoving from coldto warm
•
surroundings.Only removethe unitfrom thepackage whenthe permissibleambientoperating tem
perature hasbeen reached.
You should not make calls or connect or disconnect any linesduring thunderstorms.
•
Only attach theconnecting cordsat the connectionsprovided.
•
Make surephone cablesare installedin asafe mannerto preventtripping.
•
Avoid the following:
•
Direct sunlight
Sources ofheat (forexample radiators)
Electronic devices (for examplestereo components,office equipmentor microwavedevices
Ingress of moistureor liquids
Aggressive fluids or vapors
Dusty environment
-
• Do not usethe unitin excessivelyhumid roomsor hazardous locations.
• Only openthose sectionsof thedevice specified in theassembly /operating instructions.
• Do not touch plug connectors withpointed, metal, or moist objects.
• Ifyou donot permanentlymount thedeviceor anyaccessories, besureto placeit/them ona non-slip
surface.
•
When required, clean theunit witha slightlymoistened cloth.
•
Only useapproved accessories.
•
Onlyterminals withSELV and/orwhich complywithETS 300047may beconnectedto theunit. This
regulation is fulfilled whenapproved terminal devices are used as intended.
Plug-in power supply
•
Use only approved power plug-inunits (DSA-0101F-05 UPor L15D52 ABDDLAWO).
•
Do not usepower plug-inunits withvisible defectsor damage(fissures, cracks, etc.)
Elektrostatic charges
The telephone is supplied with enhanced ESD protection against theeffects of electrostatic discharge that
exceeds theprotection level cited in theapproval specification. Elevated ESDlevels should neverthelessbe
avoided to the greatest possible extent. In some cases, electrostatic discharge levelscan far exceed the ap
proval limitsor the resistance levelsalready implementedin your telephones.Eliminate the causes orcon
ditions that promote these elevated ESD levels, such as insufficient humidity or carpeting. The telephone
manufacturer does not assume any liability for damage caused under such circumstances.
-
-
4
Page 9
Unpacking and placing the telephone
Unpacking
ISDN system telephone
•
Handset with handset connecting cord
•
2 feet
•
ISDN connectingcord (approx.6 m)
•
PC-Connection cable(USB, ca. 3M), (notwithCS400xt)
•
PC-audio cable(3.5mm stereo plug, ca. 2.5m), (notwithCS400xt)
•
Adapter cordfor headsetswith a4 pinconnecting cord(8 pin/ 4pin)
•
Cable holder (self-adhesiveafter removingthe film), (not withCS400xt)
•
Operating instructions and labels for functionkeys
•
WIN-Tools CD-ROM with:
•
Professional Configurator, telephone, Download and Sound Manager,
TAPI-, USB-, CAPI-and NDISWAN-drivers, AdobeAcrobat Reader,
Operating instructions and Adobe Acrobat filefor theprinting ofindividual labels
English
Placing the telephone
Before placing the telephone, mount the rear feet at the positions (6) shown in figure 6.
Please notethat theplastic feetof your ISDNsystem telephonemay leavemarks on sensitivesurfaces, such
as furniture. The manufacturer of the ISDNsystem telephoneis notliable forany suchdamage. Therefore,
use appropriate non-skidding pads under the phone.
Cleaning the telephone
The ISDN system telephone has been manufactured for normal, everyday use. When required, clean the
ISDN system telephone witha slightly moistened cloth, or with an anti-static cloth. Never use a solvent to
clean thephone! Neveruse a drycloth. Electrostatic chargescould damagethe electronics inthe system. It
is essentialthat no liquidspenetrate into the insideof the ISDN systemtelephone, as this coulddestroy the
phone.
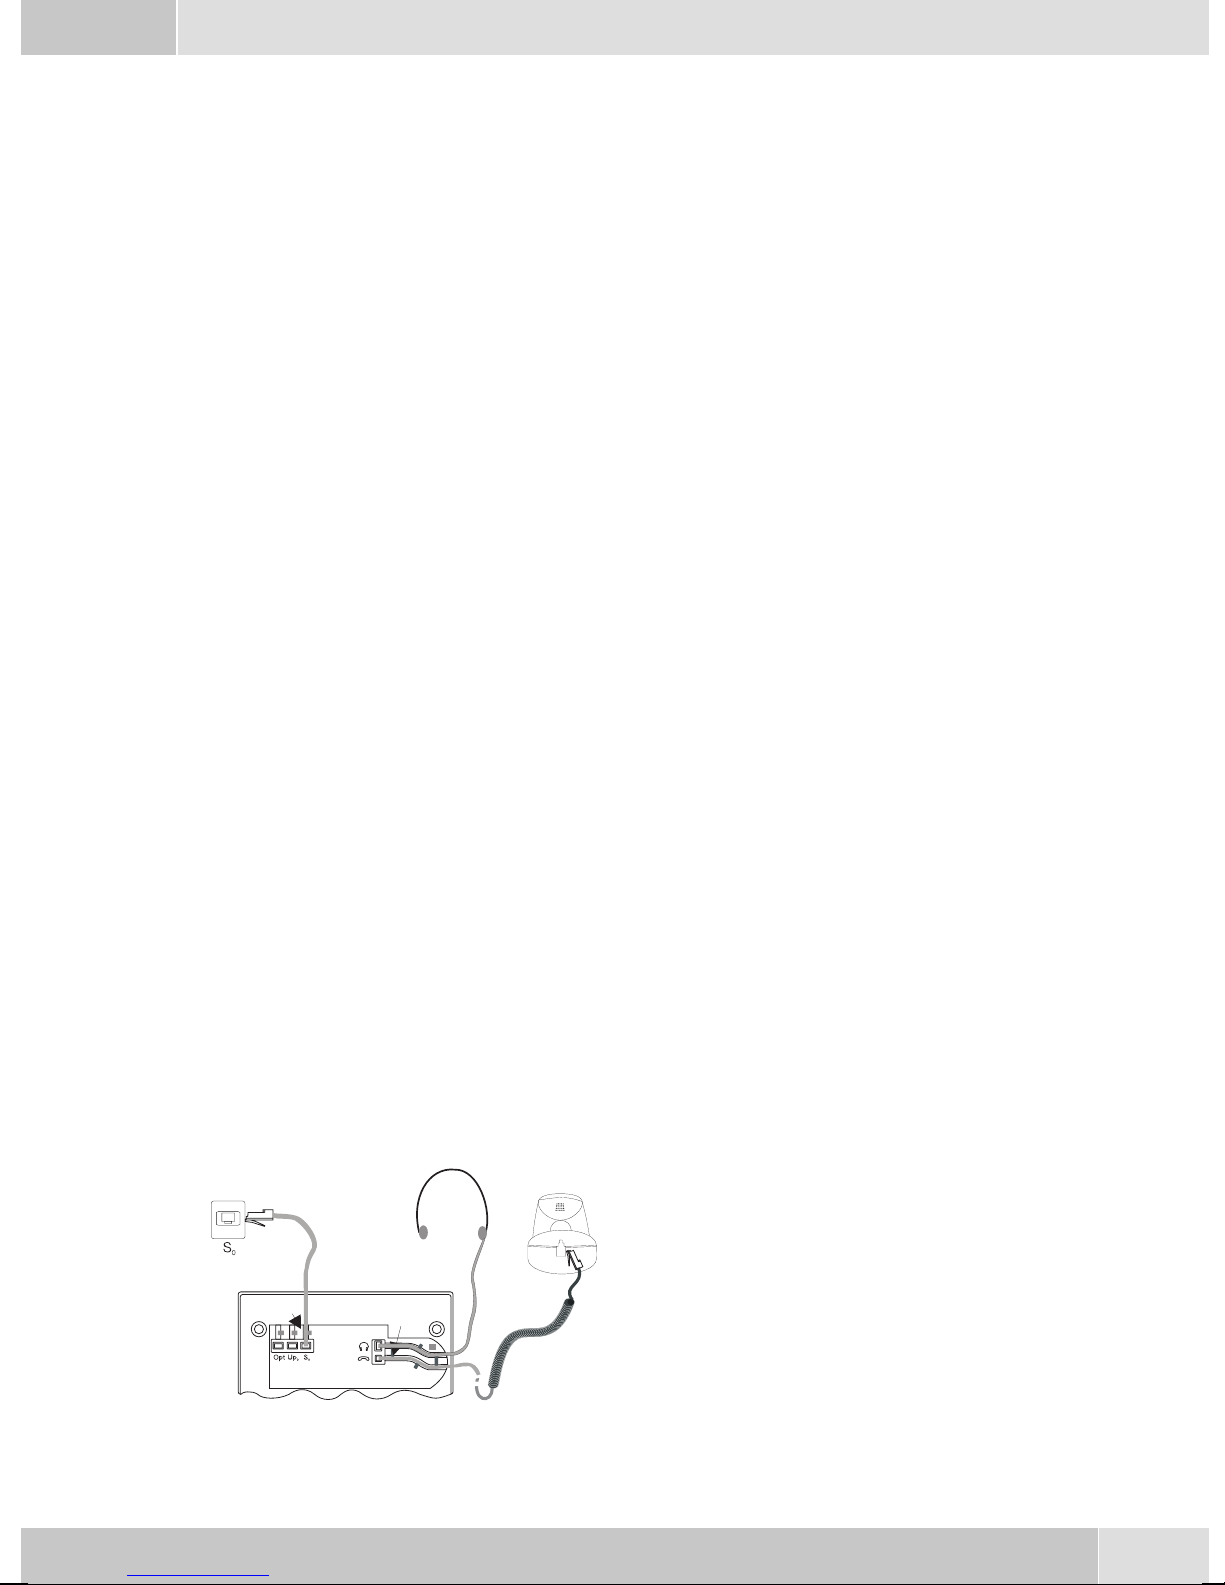
Connecting the telephone (ISDN and handset cords)
Pleaseconnect theISDNcable andthe handsetcable.Otherwiseyou willnotbe abletooperate thephone.
Connecting the handset connecting cord
Connect the handset cord (1) as shown in figure 6.
Lay the handsetcord inthe cordgroove (4)and lock
it below the two cord retainers (5).
2
4
6
5
5
4
Figure 6
3
6
4
7
1
5
Page 10
English
Connecting the ISDN cord
Connection to the S0 (CS400xt CS410)
Connect the ISDN cord (2) as shown in figure 6 (S0-connector). Ensure that thelonger ISDN connector is
plugged into theISDN socket and theshorter ISDN connectorinto theISDN socket onthe telephone. Then
lay the ISDN cord in the cord groove (4) and lock it below the two cord retainers (5).
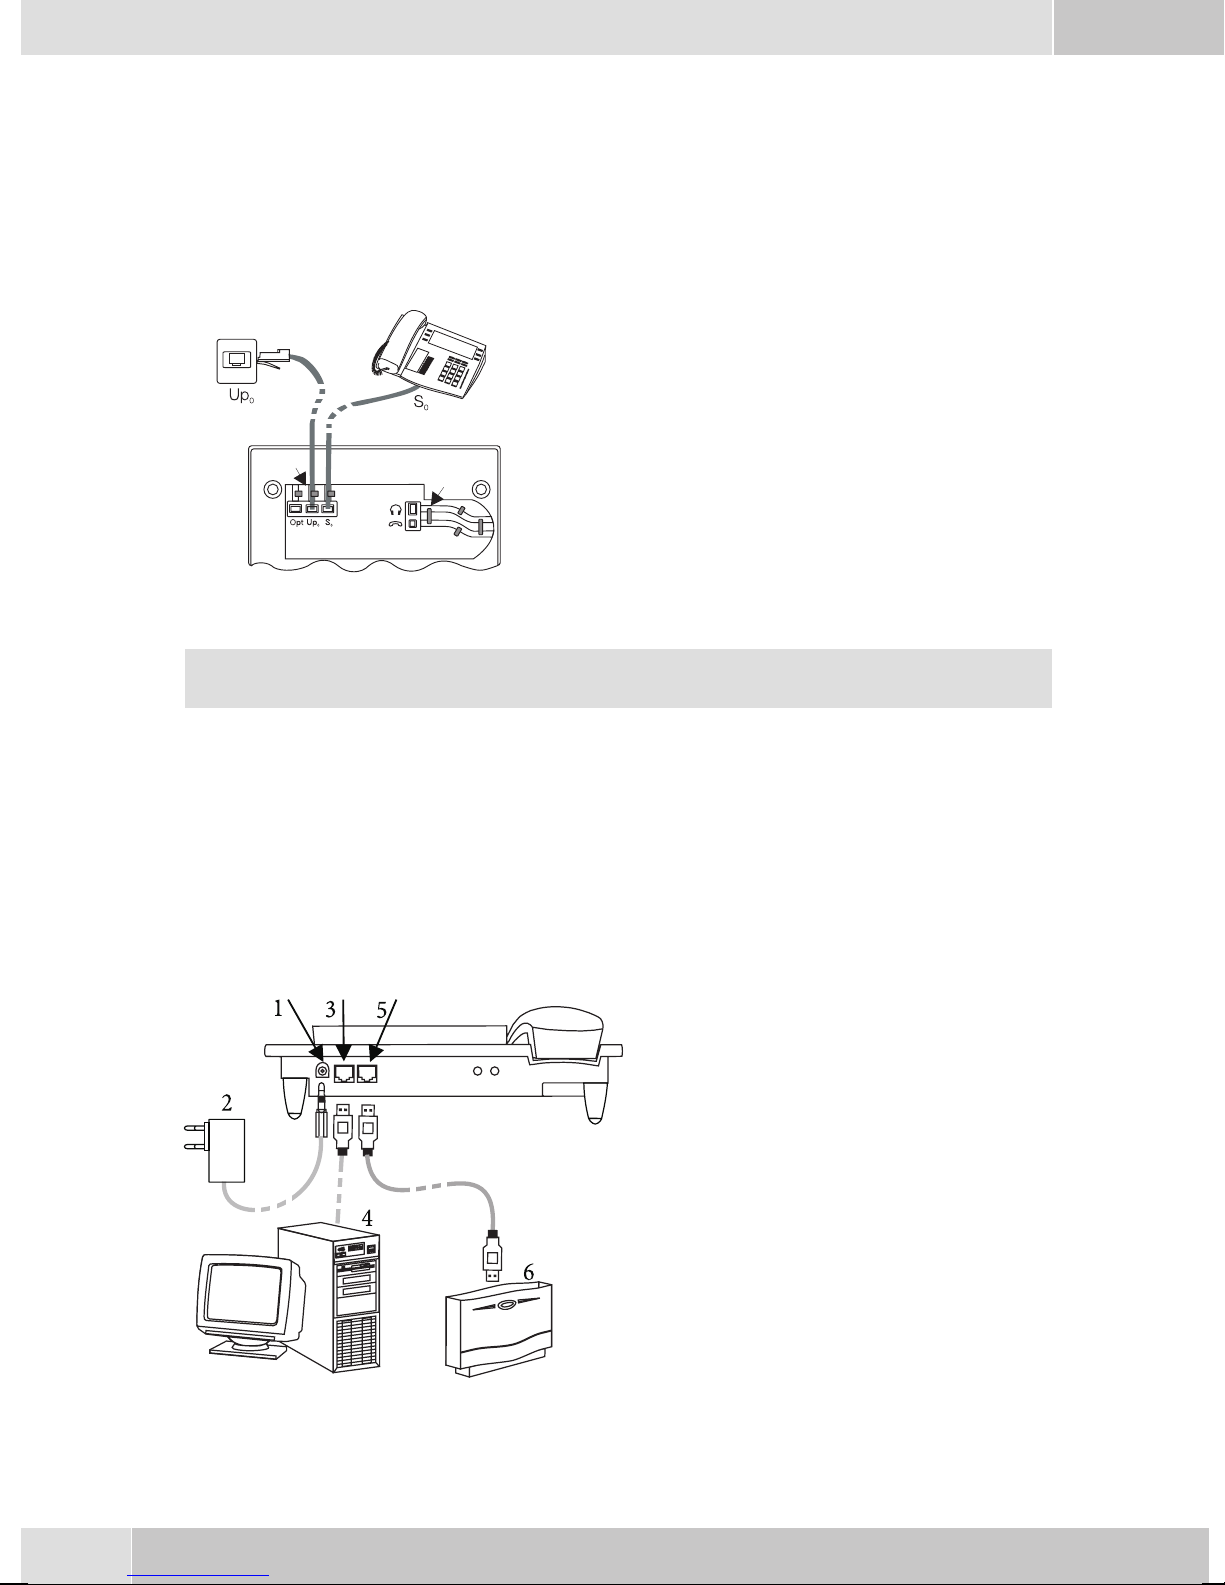
Connection to the Up0 (CS410-U)
Connect the ISDN cable (2) as shown in figure 3
(Up0-socket). Ensurethat the longerISDN connec
tor is plugged into the ISDN outlet and the shorter
ISDN connector into the ISDN socket on the tele
phone. Then lay the ISDN cord in the cord groove
(4) and lock it below the two cord retainers (5).
Figure 3
2
1
3
5
4
-
-
CS410 telephones equipped with a Up0/S0 module or CS410-U phones may not be connected
through the S
Important notes for the UP0-connection
• An ISDN terminaldevice equipped with S0-port can beconnected to thephone's S0-jack.
• The maximumline distance betweenthe elmeg CS410-Uand anydownstream ISDN terminal devi-
ces may not exceed 10 meters.
• Terminatingresistors may not beconnected.
0-socket (3) to the ISDN connection (e.g. internal ISDN port of the PABX) .
elmeg IP-S400 at the Ethernet-port
1
-
Connection for plug-in power
supply unit
2
-
Plug-in power supply unit
3
-
Ethernet PC-Connection
4
-
PC or other IP-telephone
5
-
Ethernet-port of the pabx
Figure 4
6
6
-
elmeg pbx
Page 11

English
Connecting to and operating the system telephone at the pabx system (basic function including
DHCP)
Consult theinstallation instructionsfor the PABXsystem todetermine which port can beused forconnec
ting the IP-S400. Connect this port with the Ethernet PABX port on the system telephone.
Configure your PABXsystem for usewith IPsystem telephones.
•
Define the MSNs for the IP system telephones withinthe PABXsystem.
•
Switch on the power(plug-in power supply unit)to the IP system telephoneand wait until thetele
•
phone has been initialized.
Oncethe IPsystem telephonehasbeeninitialized youwillbe requestedtoselect thelanguage inthe display.
Select the display language.
•
Press the buttons to view the available langua
ges.
-
Italiano
Deutsch
Française
Which Country? }
Español
®English
Nederland
• Enter one ofthe MSNs that has beeninput tothe PABXsystem (inthe exampleshown here,12) .
Confirm your entry by pressing
. Programm dial number
O
-
-
MSN-1>12
If no PIN has been entered in the system configuration, press button
again after being requested to do so.
O
O
and button
IPS login PIN for sys
server
MSN-1>
• Swtich to UseDHCP.
Select »on«. Use automatic IP
adress setting
off
on®
•
The telephoneand PABXsystem are synchronized.
If there is no connection tothe PABX system (noLAN link, or the telephone has not beenlogged
in),the symboll» -----/ /----‰ «willbe shownin thedisplay insteadofthe time.
You can now use the IP system telephone at the ISDN or UP0 port.
Changing the label
Thelabels forthe functionkeys areprovided onthe lastpage ofthis operatingmanual. Cutout thelabel you
wish to use.
To changethe label panel,press the flexiblecover together between your indexfinger and thumband lift it
out. The label panel can now be changed.
You can fillin thelabel panelvia yourPC yourself.The CDROM suppliedwith thesystem containsan Ado
be Acrobat file with templates.
-
7
Page 12

English
Pictograph
The pictographs (symbols)described asfollows havebeen usedin these operating instructions to illustrate
some petting and using the telephone.
b Liftup thehandsetorstart initializingselection.
a Replacehandset. Thetelephoneisidle.
l Acall issignaled.Theringing tonemelody sounds.
g Youare conductingacall.
d Athree-party conferencecallisinitiated.
q Youhear thepositiveornegative acknowledgementsignal.
t Selectthe number,code, characteror text.
09
Pressthe appropriatebutton onthepush-buttonset.
*#
Country-specific settings
Certain specificparameters need to be setif the telephoneis to beused in a country other than thecountry
configured as default.
This includes setting the language, the currency and certain default specific parameters for a country’s
ISDN network.
Check as describedas followswhether youneed toset country-specificparameters forthe countryin which
the telephone is to be used.
Begin as follows:
a
Ms s
Konfigu
ration
-
Service
s Press the arrow keys to view the countries, for
which specific settings are available.
Press the softkey for the desired country. For
example: »English«.
t
Telephone PIN
O>s
Country
Which Country? }
Italiano
Español
Deutsch
®English
Française
Nederland
All country-specific settings take effect imme
diately. The telephone data will not be dele
ted.
8
-
29.05.06 07:41 }
-
Tel. drctry
Quiet
VIP
Page 13
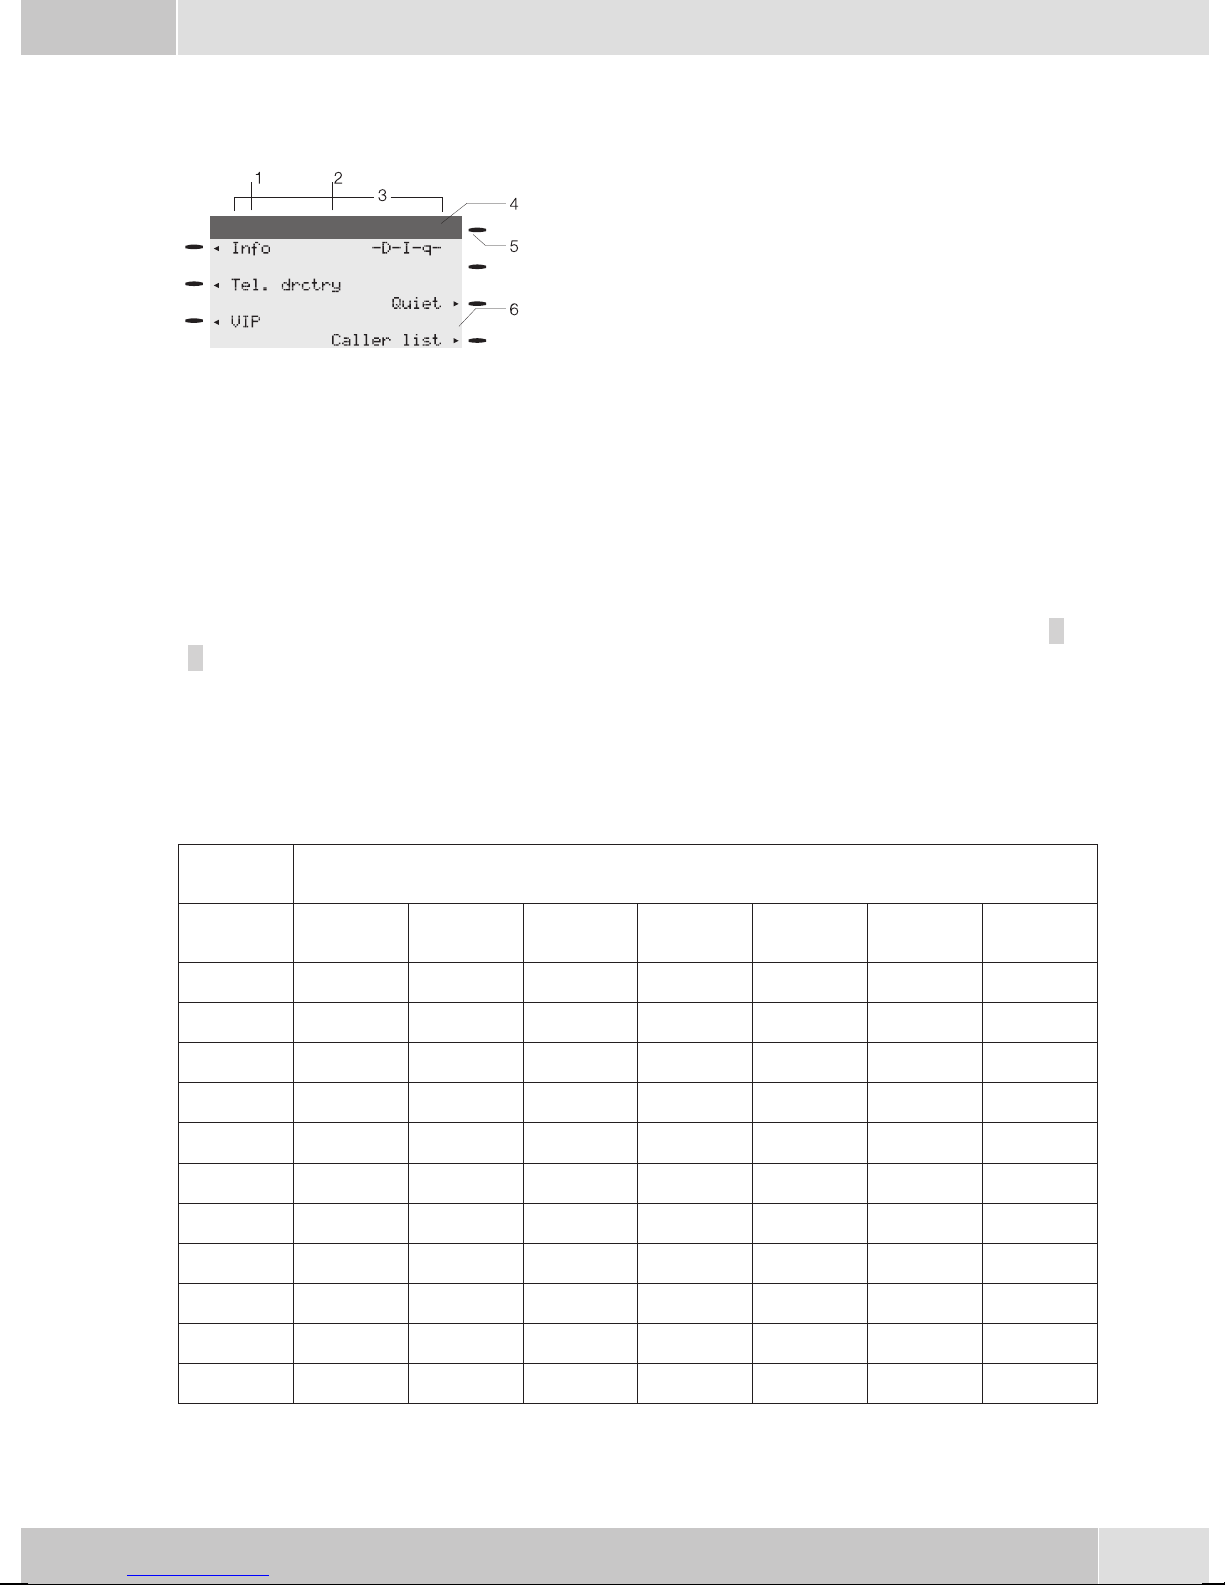
Telephone display
English
1
2
3
09.03.06 07:00
4
5
6
Figure 5
The telephone is equipped with a seven-line backlit display. Backlighting is automatically switched on or
off.
After you connect the system to the internal ISDN connection of your pabx system, the date and time are
shown on thetop line of the display. The date and time are imported automaticallyfrom the pabx system.
The text displayed for a function is always located next to the corresponding softkey. Whenyou press the
softkey, thenext level isdisplayed. If not allinformation fit intothe screen, thiswill be indicatedby »««or
»««. To view further characters, press the R key and then use the corresponding arrow key.
Date
-
Time
-
21 characters per line
-
Arrow: Further menu items accessible by using the ar
-
row keys.
Answering machine button on the telephone (optional
-
module) or »PABX menubutton
Arrow: Indication of the softkey that can be used in the
-
current menu.
-
Various telephone display shots are illustrated in this operator’s manual to help explain the different settingsand useofthe system.A wavyline atthetop orbottom ofan illustrationindicates thatnot allof the 7lines of that particular display are shown (only pertinent lines shown).
Use the buttons as follows when entering texts, letters digits or special characters:
Key Press
Key
1
2
3
4
5
6
7
8
1234567
1
ABC2ÄÅÆ
DEF3 €
GH I 4
JKL5
MNO 6 ÖØ
PQRS 7 ß$
TUV8Ü
9
*
#
WX Y Z 9 ¥
*
#
9
Page 14
English
0 Several special charactersare assignedto thebutton »0«.For specialcharacters, press
the0 key.
Forexampe.: »!«, »&«, »?«,»+«,»-«, »=«,»(«,»)«,»@«, »$«, ...
Input mode for entering letters
You havevarious possibilitiesfor enteringletters. The currentlyset inputmode is displayed on thetop half
of the display on the right-hand side (no display, »Abc« or »ABC«).
»Abc« Thenextletterthatyouenterisshownasacapital,all othersassmallcaseletters.Exam
ple:»Dean, James«.
no display Everyletter thatyouenteris showninsmall case.
Example:»dean, james«.
»ABC« Everyletter thatyouenteris shownascapitals.
Example:»DEAN, JAMES«.
When you startentering texts,the input mode is always»Abc«. Pressthe Rkey to changethe in
put mode. To insert a character while in »Abc« mode, press the C key.
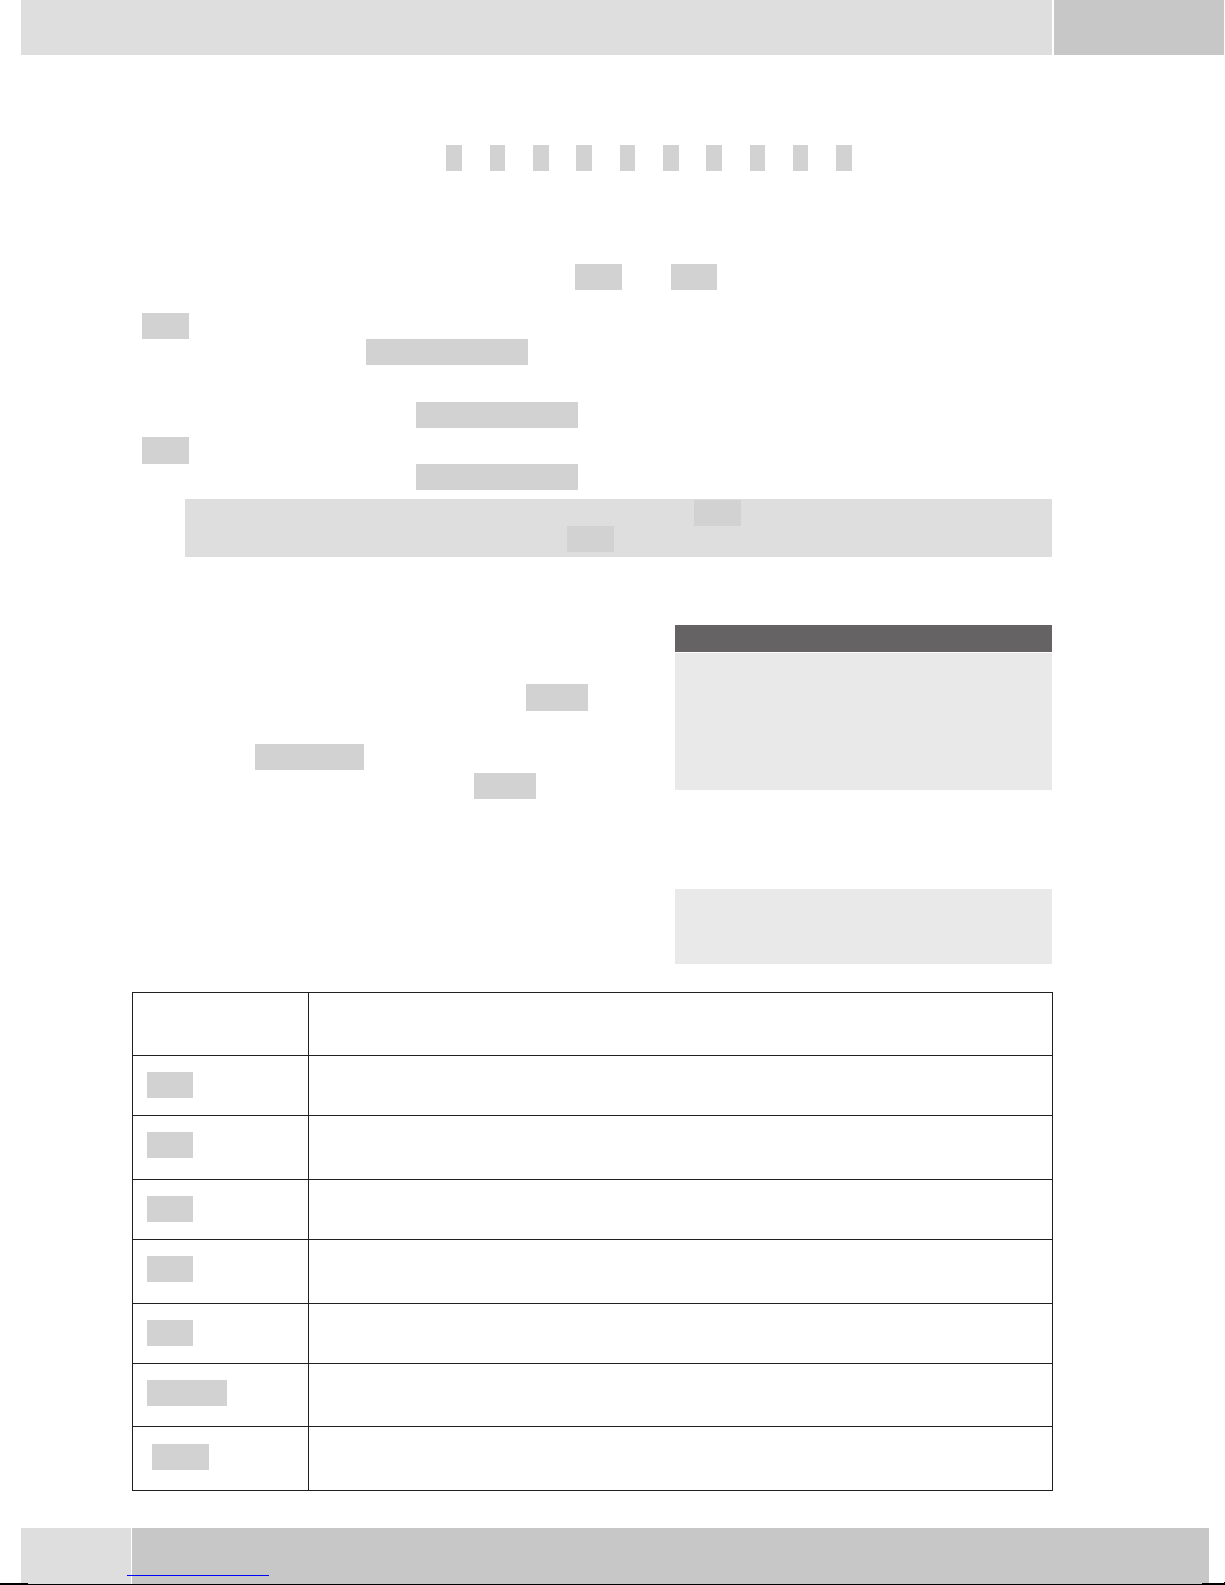
Displays for programmed features
s When the telephone is in the idle state, addi-
tional information about functions that have
been configured are shown on »Info« line
of the display. In this example:
»-D-I-q-«.
Press the softkey next to »Info« if you wish
to get more information about the configured
functions.
If you have programmed several features,
press the arrow buttons to view the various
settings.
29.05.03 07:21 }
Info -D-I-q-
Tel. drctry
Quiet
VIP
Caller list
ªªªªªªªªªªªªªªªªªªªªªª
Inhibit/Menu:
Guard for modificatio
¬¬¬¬¬¬¬¬¬¬¬¬¬¬¬¬¬¬¬¬¬¬
-
-
Display Configured function
»-D-«
»-I-«
Active appointment reminder set.
Dial ranges or call filter active,
Access to telephone menus is protected.
»-q-«
»-Q-«
Function »Station guarding« (only brief signal) active.
Function »Station guarding« (complete) active.
(All call signals are switched off)
»-U-«
» -i- «
Call forwarding active.
Information about programmed function keys
For example: Message enabled / inhibited.
» --«
Answering machine,time control, call forwardingsignaling orremote controlare ac
tivated (optional module).
10
-
Page 15
English
Making Calls
Starting a call
Dial number - no correction possible
btg
Dial number
Dial number - correction possible
atbg
Dial number
To changethe numberor tocorrect awrong entry,select thewrong figurewith thearrow buttonsand press
C key to delete it. Now enter the correct number.
If youwish to conduct the callusing the handset,just lift it up afterdialing the number. Any time during a
call you can switch back and forth between hands-free calling, speaker function and use of the handset.
After you have dialed the number you can also press the speaker button to have the number dialed and to
use hands-free calling.
If a call can not be put through(e.g. number is inhibited via the dial ranges control, or the account for the
number/MSN isempty), a correspondingmessage will appear inthe display. Forexample: »Inhibit.
: MSN ext.«, when the dial range filter is active.
Other options for dialing without lifting the handset
The option ofdialing withoutlifting thehandset andof correcting or addingto anumber alsoexists during
dialing:
• from the redialing memory.
• from the caller/ memolist.
•
from the telephone directory.
•
from the VIP memory.
•
from the direct dialing memory.
•
via CTI, TAPI (CS 410) features.
Ifyou areusing oneof theseoptions, youcan makefurther entriesprior toinitiating thecall. You candefine
which number (MSN), if any, is to be transmitted to the party being called.
Dialing from the pabx telephone directory
When you use this telephone witha system telephony supportingpabx system, you can dial from the tele
phone directory of the pabx.
a
Rs
drctry
Tel.
t
Enter first
letter
O<>O
Select
entry
-
b
11
Page 16
English
Dialing from the phone’s directory
You can store up to 250 names and numbers in the telephone directory. To select a name, you can page
through the directory using the arrow buttons, or enter the specific first letter(s) of the name using the
push-button set.
a
For informationon how to program andconfigure the telephonedirectory, please refer to page 15 ofthese
operating instructions.
Dialing from the VIP memory
Youcan programVIP numbersfor eachofthe tenbuttons1 …0 includinga name(20characters max.) and
a telephone number (26 digits max.).
a
For information on how to program VIP entries, please refer to page 16 of these operating instructions.
Direct dialing with function keys
Direct dialing is initiated using the direct dialing keys. Each of the keys can be programmed with two
functions or direct dialing numbers.
s
Tel. drctry
s
VIP
t
Enter first letter Select entry
O<> O
or
Select
VIP
destina
tion
-
Select VIP
destination
bg
tbg
a
Use the function keys to select the desired number.
Ifyou wishtodial anumberfrom thesecond level,press thecorrespondingkey twotimes. This mustbeexe
cuted at a short interval.
You canprogram thedirect dialing/ functionkeys viathe PCconfiguration programor theextended confi
guration of the telephone.
Dialing from the caller/memo list
The phone has a combinedcaller andmemo list. A maximum of 30 entries (calls, memosSMS messagesor
UUS1- messages) are stored in this list. Entries in thecaller or memo list are indicated by the »Caller
list« softkey.
a
Further functions
Accepting/rejecting a call
Z
Press the function key
s
Caller list
bg
b
Select entry
albg
-
-
12
Page 17
Rejecting a call
English
al
Forwarding a call (call deflection)
al
Calling line identification (anonymus call) restriction
at
Dial number
OM s
al
Starting a call with a set number (MSN)
at
Dial number
OMs s
s
transfer
s
Concealed
MSN MSN-1 ...
t
Dial number
Concealed
bg
MSN-10
s
reject
O
bg
bg
Extended redialing
In the extended redialing the numbersof the last 20 calls, connections (conversations) and text messages
are stored. You can view these by pressing the redial button or the arrow buttons and subsequently have
them redialed automatically.
a
Automatic redialing
If youplaced acall to asubscriber whosenumber isbusy or whodoes notanswer, you can thenactivate au
tomatic redialing which will call that same subscriber again after about 10 seconds.
btg
Dial number Subscriber
Deactivating automatic redialing
a
WWO
Select entry
or
W
busy
ss
Autom.repeat request Yes
bg
s
Autom.repeat
request
a
-
Activating/ muting the microphone
g
s
Mute speak
Room enquiry
s
g
13
Page 18
English
Speaker function
g
Hands Free Calling
a
Begin hands free calling Dial number End hands free calling
Headset use
For headsetoperation, oneof thefunctions buttonsmust beconfigured asa headsetkey. TheLED assigned
to this key indicates, whether the headset in switched on or off (LED on or off).
a
Message
a
Intercom
z
activate headset Dial number Call via headset deactivate headset
Ms>s
LL
Begin open listening End open listening
L
tg
Acou
stic
t
Message
tg
Dial internal
number
g
L
z
message
a
Automatic completion of call
Ms>s
btg
Dial number Subscriber busy or
Keypad
g
Tone Frequency Dialing (DTMF dialing)
g
Conducting calls with several parties
Call waiting
Acou
stic
does not answer
s
Keypad
s
dtmf
tg
Inter-
com
Dial internal
number
s
Clbckbusy
t
Input of character strings and digit
sequences
t
Input of character strings and digit
sequences
intercom
a
g
Call with subscriber 1
14
waiting call
(subscribers 2)
s
accept
g
Call with subscriber 2;
Party 1 is put on hold
Page 19
Enquiry Call
English
g
Call with subscriber Party 1 is put on hold Dial number Call with subscriber 2
Call transfer (switching)
g
Call with subscriber 1 Party 1 is put on hold Dial number Call with subscriber 2
Broker’s call
g
Call with sub
scriber
Three-party conference
g
Call with subscriber
1
>s
-
>s
R
Connection 1
Connection 4
R
...
Connection 2
Call with desi
red subscriber
tg
g
Call with subscriber
tg
transfer
>s
-
g
Connection 1
Connection 4
...
s
Conferen
2
ce
-
Call with desi
red subscriber
Conference with
subscribers 1 and 2
s
g
-
d
Telephone operation
Telephone directory
You can store up to 250 names and numbers in the telephone directory. To select a name, you can page
through the directory using the arrow buttons, or enter the specific first letter(s) of the name using the
push-button set.
If the nameof the caller is to be shown in the displayinstead of the caller’s number, this number
mustbe enteredinthe telephonedirectory withthat name(includingprefixand, whenused witha
PABX, the line access digit).
Display ofthe callername isonly madewhen thetransmitted numbercorresponds tothe number
stored in the phone directory.
Ifthe telephoneisdisconnected fromthe ISDN networkand thenreconnected,or ifthedata forthe telepho
ne directory are transferred tothe systemtelephone viathe PCprogram, thedirectory mustbe reorganized
internally. This processtakes place automatically andmay requirea fewminutes. During thistime, thete
lephone directory of your telephone is not available for use.
Settings for telephone book entries
•
Name and number
•
Outgoingnumber (MSNassignment)
-
-
•
Special dial (VIP tone)tone
•
Info text
15
Page 20

English
Adding an entry to the telephone book
Begin as follows:
a
t Enter the name.
In this example: »Dean«.
Confirm your entry by pressing
t Insert a number.
In this example: »0123456«.
Confirm your entry by pressing
Msss
Program nos. Tel. drctry New
Input telephone book
.
O
O
.
Name>Dean_
¬¬¬¬¬¬¬¬¬¬¬¬¬¬¬¬¬¬¬¬¬¬
Input telephone book
Number>0123456_
¬¬¬¬¬¬¬¬¬¬¬¬¬¬¬¬¬¬¬¬¬¬
VIP Memory
Youcan programVIP numbersfor eachofthe tenbuttons1 …0 includinga name(20characters max.) and
a telephone number (26 digits max.).
Making an entry into the VIP memory
Begin as follows:
a
t Enter the name of the VIP target. In this ex-
t Insert a number.
Station guarding
Ifyou donot wishcallsto besignaled withthe programmedmelodyand volume,you canactivethe »Station
guarding«feature. Dependingonthe specificsetting, allcallswill bedisplayed opticallyor alongwith abrief
acoustic signal. In theidle state an »q«or»Q« in thedisplay shows that thefunction »Station guarding« is
activated.
»No« Thefunction »Stationguarding« isdeactivated.
M s s s <> O
Program nos. VIP New
ample: »Dean«.
Confirm your entry by pressing OK.
In this example: »012345«.
Confirm your entry by pressing OK.
Program VIP name
V0>Dean_
¬¬¬¬¬¬¬¬¬¬¬¬¬¬¬¬¬¬¬¬¬¬
Program VIP number
V0>012345_
¬¬¬¬¬¬¬¬¬¬¬¬¬¬¬¬¬¬¬¬¬¬
Select VIP
destination
»Ringing
signal off«
»ok« Calls are signaled first by a brief acoustic signal and then only optically displayed
16
Callsare signaledopticallyonly(»Q« showninthedisplay).
(»q«).
Page 21

English
a
ss
Quiet No/Ringing signal off/ok
Configuration settings
Telephone numbers (MSN extension numbers)
Up to 10 MSN (extensionnumbers) can beconfigured on your telephone. When you enter anMSN or ex
tensionnumber inyour ISDNsystemtelephone youare essentiallydefiningthat yourISDN systemtelepho
ne iscalled using this MSNor extension numberwhen a call ismade. If youenter more than oneMSN ex
tension numberin your telephone,your phone willring each timeone of theseMSN extension numbersis
called.
Ifyou areusingyour telephoneonthe externalISDNport ofa pabx,enter itsinternalextension numberinto
the pabx. Please observe the instructions in the PABX manual.
When you calla subscriber,you can selecta certainnumber (MSN) thatis transmittedto the subscriber(e.
g. for separate charges). If you do notselect any number,the number (MSN) thathas been enteredfirst in
the phone (MSN-1) is used.
How to configure an MSN (extension number) is described as follows for »MSN-1«.
Begin as follows:
-
-
-
a
Entering or viewing an MSN extension number (MSN)
You can only enter the MSN extension numbers with the Professional Configurator supplied on the
WIN-Tools CD-ROM. However, you can have the programmed number displayed at the phone.
In the »Program MSN-1« menu, press the »MSN ext.« softkey.
O The programmed number is displayed.
Press OK to leave this menu.
You can onlymake further settings (e.g. call signalingmelody, volume, name) if the numberhas
already been previously configured.
Msss
Configurati-
on
Program MSN-1 }
transfer
MSN Name
MSN ext.
Program MSN-1 }
MSN-1:222
¬¬¬¬¬¬¬¬¬¬¬¬¬¬¬¬¬¬¬¬¬¬
MSN MSN-1
Volume
Sound
More settings for each MSN extension number (MSN)
s »Sound« Setting the melody
17
Page 22

English
s »Volume« Setting the volume
s »transfer« Programming a default call forwarding number
s »MSN name« Assign a name to the MSN extension number
s »Charge« Programming a charge limitation for a specific extension number
(MSN)
s »PIN« Assign a specific PIN for an externsion number (MSN)
Reset - Resetting to default state
You canreset the telephoneto its initial state usingthe procedure described as follows. All of thedata that
you have entered previously will be deleted.
If you have connected the elmeg T400, T400/2 key extension module to your phone all of the data for the
module will also be deleted when this procedure is executed.
Please note: Settings for the answering machine and any texts that have been stored will not be deleted.
Please refer also to the instruction manual supplied with your answering machine.
Begin as follows:
a
Ms s
Configu
ration
-
Service
s Press »ok« to reset the telephone to its initial
state. If you do not wish to have the data dele
ted press »No«.
When you press the »ok« softkey, the tele
phone is reset to the default state. All data are
deleted.
t
Telephone
PIN
-
-
Oss
Data ok
Sure to delete all?
No
^ok
¬¬¬¬¬¬¬¬¬¬¬¬¬¬¬¬¬¬¬¬¬¬
Which language }
Italiano
Español
Deutsch
English
Française
Nederlands
18
Page 23
Declaration of conformity and CE mark
This device meets the requirements of the following EC directive R&TTE 1999/5/EG:
»Directive 1999/5/EC of the European Parliament and of the Council of 9 March
1999 onradio equipmentand telecommunications terminalequipment andthe mu
tual recognition of their conformity«.
You can also request this EC declaration of conformity at the following Internet
URL: http://www.funkwerk-ec.com.
The waste container symbolwith the "X" through it onthe device indicates that the
devicemust bedisposedof separatelyfrom normaldomestic wasteatan appropriate
waste disposal facility at the end of its useful service life.
© 2006 Funkwerk Enterprise Communications gmbH - All rights reserved.
English
-
Reprintingof thisdocument, evenexcerpts, ispermitted onlywith theexpress consentof thepublisher and
with precise source information, regardless of the media used (mechanical or electronic).
Function descriptionsincluded in thisdocumentation which referto software productsof other manufacturers are based on the softwareused and valid at the datethe documentation was prepared or published.
The product and company names used in this documentation may be protected by trademarks.
19
Page 24

Repair Service
Tonfunk GmbH
Repair Service
Unternehmenspark 2 / Halle D
Woltorfer Str. 77
31224 Peine
Funkwerk Enterprise Communications GmbH
Südwestpark 94
D-90449 Nürnberg
http://www.funkwerk-ec.com
Subject to modifications
20
010806
Page 25

Bedienungsanleitung
elmeg CS410 / CS410-U / CS400xt / IP-S400
Deutsch
1
Page 26
Deutsch
Display und Tasten des Telefons
1
2
6
7
8
9
10
11
Bild 1
1 Lautsprecher
12
13
14
15
16
1
3
4
5
18
19
20
21
2 Hörermit Anschlussschnur
3 Anrufbeantwortertaste des Telefons (optionales Modul) oder Taste »TK-Anla-
gen-Menü«
4 6Softkeys
5 7zeiligesDisplay mitHintergrundbeleuchtung
6 Menu-Taste: Mit dieser Taste öffnen Sie das Programmier-Menü. Befinden Sie sich
bereits in einemMenü und betätigen dann die Taste , stehen Ihnen menüabhängige
Funktionenzur Verfügungoder SiegeheneinenProgrammierschritt zurück.
7 ESC-Taste: Durch Betätigen der Escape-Taste wird während des Programmierens
wiederder RuhezustanddesTelefonserreicht.
8 / 10
9 OK-Taste:MitBetätigendieserTaste wirdeineEingabebestätigtodereineEinstellung
11 C-Taste: Mitdieser Tastekönnen Sieim Menü jeweils einenMenü-Schritt zurückge
12 Sterntaste/ Rautetaste
Pfeiltaste »links« / »links«: Die Pfeile » {« und »} « in der rechtenEcke der oberen
Displayzeile zeigenIhnen an, dass Siemit den Pfeiltasten weitereFunktionen in den
unterenZeilen aufrufenkönnen.
imTelefon abgespeichert.
hen.Befinden Siesichin einemEingabe-Modus,können Siemitdieser Tasteeinzelne
Zeichenlöschen.
-
13 Wähltasten
14 Lauthör-/ Freisprechtaste
15 Trenn-Taste
16 Wahlwiederholungs-Taste
17 Rückfrage-Taste
2
Page 27
Deutsch
18 Mikrofon
19 5 frei programmierbare Funktionstasten mit Leuchtdioden: Jede Taste verfügt über
einezweifarbige Leuchtdiode(Ebene 1- rot/ Ebene2 -gelb). DieseLeuchtdiode kann
zurAnzeige vonbestimmtenFunktionen genutztwerden.
20 Beschriftungsfeldfür Funktionstasten
21 Leuchtdiodefür Anrufsignalisierung(rot) undAnrufbeantworter(gelb)
Beschreibung und Installation
In dieser Bedienungsanleitung sind nur die wichtigsten Bedienabläufe für die Inbetriebnahme
des Telefons und das Telefonieren beschrieben.
Ausführliche Informationen finden Sie in der Dokumentation auf der beiliegenden CD-ROM .
CS410
Dieses Systemtelefon ist für den Anschluss an einem internen S0-Anschluss (4adrige Verkabelung) einer
elmegTK-Anlage vorgesehen.Möchten Siedas Telefonan eineminternen Up0-Anschlussnutzen, müssen
Sie im Telefon das interne Modul Up0/S0 installieren oder den exteren Up0/S0-Converter verwenden.
CS410-U
Dieses Systemtelefonist fürden Anschlussan eineminternen Up0-Anschluss(2adrige Verkabelung)einer
elmegTK-Anlage vorgesehen.Siebenötigen dannnichtmehr dasinterne ModulUp0/S0 oderden externen
Up0/S0-Converter.
CS400xt
Dieses Systemtelefon wird mit einer Tastenerweiterung (T400/2) ausgeliefert und verfügt damit über 10
zusätzliche einrichtbare Tasten.
Es istfür denAnschluss aneinem internenS0-Anschluss (4adrigeVerkabelung) einerTK-Anlage vorgesehen. DasSystemtelefon verfügt über keinen USB-oder seriellen Anschlusszur Konfigurierung oder anderer Nutzung. Es muss über den internen ISDN-Anschluss mit dem Professional Configurator der
WIN-Tools eingerichtet werden. Weiterhin sind alle »Audio-Funktionen« nicht implementiert und die
Moduleund FunktionenAnrufbeantworter undUp0können nichtgenutztwerden. AlleFunktionen dieser
Module werden nicht im Display angezeigt oder können nicht genutzt werden.
Dieses Telefon verfügt über die Funktion »Notbetrieb«. Damit kann es bei
OFF
ON
einem 230 V~ Netzausfall weiterhin über die TK-Anlage am NT betrieben
werden. Bitte beachten Sie, dass Ihre TK-Anlage dieses Leistungsmerkmal
unterstützt und dass es nicht über einem Up0/S0-Converter zu nutzen ist.
elmeg IP-S400
Dieses Systemtelefon wird andem entsprechenden LAN-Anschluss (oder Netzwerk) der TK-Anlageüber
ein Cat. 5Kabel angeschlossen.Das Systemtelefonverfügt übereinen PC-Ausgang,an denweitere IP-End
geräte angeschlossen werden können. Das Systemtelefon verfügt über die Funktion Freisprechen.
Einstellen / Konfigurieren des Systemtelefons
Am Systemtelefon selbst können Sie nur eineeingeschränkte Konfigurierungder unterstützten Leistungs
merkmale vornehmen.Eine vollständige Konfigurierung ist nur mit dem Professional Configurator der
WIN-ToolsCD-ROM überdie USB-Schnittstelledes Systemtelefonsoder den internenISDN-Anschluss ei
ner elmeg TK-Anlage möglich.´
-
-
-
3
Page 28

Deutsch
Eine weitere Beschreibung zum Konfigurieren der Systemtelefone finden Sie in den ausführli
chen Bedienungsanleitungen auf der CD-ROM
Erweiterungen für das Systemtelefon
Modul Up0/S0(CS410)
•
Modul Anrufbeantworter( CS410)
•
Tastenerweiterung »T400«,»T400/2« (CS410, IP-S400)
•
Sicherheitshinweise
Beachten Sie die Umgebungstemperatur für Lagerung und Betrieb des Gerätes in den technischen
•
Daten. Das Gerät darf erst nach Erreichen der zulässigen Betriebs-Umgebungstemperatur ange
schlossen werden.
Beachten Siebitte, dass beimÜbergang von kaltenzu warmenTemperaturen Betauungam oder im
•
Gerät entstehen kann. Entnehmen Sie das Gerät erst aus der Verpackung, wenn die zulässige Be
triebs-Umgebungstemperaturerreicht ist.
Während eines Gewitterssollten Sie keineLeitungen anschließen odertrennen und nichttelefonieren.
•
SchließenSie dieAnschlussschnüre nuran dendafür vorgesehenenAnschlüssen an.
•
VerlegenSie dieAnschlussschnüre unfallsicher.
•
• VermeidenSie die folgenden Einflüsse:
Direkte Sonneneinstrahlung
Wärmequellen (z.B. Heizkörper)
Elektronische Geräte (z.B. HiFi-Geräte, Bürogeräteoder Mikrowellengeräte)
Eindringende Feuchtigkeitoder Flüssigkeiten
Aggressive Flüssigkeiten oder Dämpfe
Starker Staub
-
-
-
• BenutzenSie das Gerät nichtin Feuchträumenoder explosionsgefährdetenBereichen.
• Öffnen Sie nur die Bereiche des Gerätes, die in der Montage- / Bedienungsanleitung vorgegeben
sind.
•
Berühren Sie die Steckkontakte nicht mitspitzen, metallischenoder feuchtenGegenständen.
•
Wird das Gerät nicht fest montiert, stellen Sie das Gerät oder das Zubehörs auf einer rutschfesten
Unterlage auf.
•
ReinigenSie dasGerät nur miteinem leichtangefeuchteten Tuch.
•
Verwenden Sienur das zugelasseneZubehör.
•
An das Gerät dürfen nur Endgeräte angeschlossenwerden, dieSELV-Spannung (Sicherheits-Klein
spannungs-Stromkreis) liefern und/oder der ETS 300047 entsprechen. Die bestimmungsmäßige
Verwendungvon zugelassenenEndgeräten erfülltdiese Vorschrift.
Stecknetzgerät
•
Verwenden Sie nur das im Lieferumfang enthaltene oder als Zubehör erhältliche Steckernetzge
rät(DSA-0101F-05 UPoder L15D52 ABDDLAWO).
•
VerwendenSie keineSteckernetzgeräte,die sichtbareBeschädigung aufweisen (Brücheoder Sprün
ge imGehäuse).
Elektrostatische Aufladungen (ESD-Schutz)
Das Telefon wirdbereits mit einem überdie Zulassungswerte erhöhten ESD-Schutz gegenAuswirkungen
von elektrostatischen Aufladungen ausgeliefert. Vermeiden Sie trotzdem erhöhte statische Aufladungen.
Die elektrostatische Aufladungkann bei verschiedenen Ursachen Werteerreichen, die weit über den not
wendigen Zulassungswerten und der bereits realisierten Störfestigkeit des Telefons liegen. Die Ursachen
-
-
-
-
4
Page 29

Deutsch
oder Umstände, wie zum Beispiel zu geringe Luftfeuchtigkeit oder Teppichböden sind zu beseitigen. Der
Hersteller des Telefons übernimmt keine Gewährleistung bei Schäden, die auf diese Ursachen zurückzu
führen sind.
Telefon auspacken und aufstellen
Auspacken
ISDN-Systemtelefon
Hörer mit Hörerschnur
•
2 Gerätefüße
•
ISDN-Anschlussschnur (ca.6m)
•
PC-Anschlussschnur (USB, ca. 3m), (nichtCS400xt)
•
PC-Audioschnur (3,5mm Stereo-Klinkenstecker, ca. 2,5m), (nichtCS400xt)
•
Adapterschnur fürHeadsets mit4poliger Anschlussschnur(8polig /4polig)
•
Schnurhalter (nach Abziehen derSchutzfolie selbstklebend), (nichtCS400xt)
•
Bedienungsanleitungund Beschriftungschilderfür Funktionstasten
•
-
• WIN-Tools CD-ROM, enthaltend:
Professional Configurator, Telefonbuch,Download und Sound-Manager,
TAPI-, USB-, CAPI- undNDISWAN-Treiber, Adobe Acrobat Reader,
Bedienungsanleitungund Adobe-Acrobat-Dateifür denAusdruck eigenerBeschriftungsschilder
Reinigen des Telefons
Das Telefon wurdefür normale Gebrauchsbedingungen gefertigt. ReinigenSie, wenn nötig, das Gerät mit
einem leicht feuchten Tuch oder verwenden Sie ein Antistatiktuch. Benutzen Sie niemals Lösungsmittel.
VerwendenSie niemalsein trockenesTuch; dieelektrostatische Aufladungkönntezu Defektenin derElektronik führen. Achten Sieauf jeden Fall darauf, dass keine Feuchtigkeit eindringenkann und dadurch das
Telefon Schaden nimmt.
Aufstellen des Telefons
Vor dem Aufstellen des Telefons müssen die hinteren Gerätefüße des Telefons an den in Bild 4 gekenn
zeichneten Stellen (6) montiert werden.
Beachten Siebitte, dass die Kunststofffüße IhresTelefons auf empfindlichenOberflächen z.B.von Möbeln,
Spurenhinterlassen können.Der HerstellerdesTelefons kannfür solcheSchädennicht haften.Verwenden
Sie daher eine rutschfeste Unterlage für Ihr Telefon.
Telefon anschließen (ISDN-Anschluss- und Hörerschnur)
-
Damit Sie Ihr Telefon in Betrieb nehmen können, müssen Sie die Anschlussschnüre für den Telefonan
schluss und den Hörer einstecken.
-
5
Page 30

Deutsch
Anschließen der Hörerschnur
Schließen Sie die Hörerschnur (1) wie in Bild 4 ge
zeigt an. Legen Sie die Hörerschnur in die Schnur
führung (4)und klemmenSie sieunter denSchnur
haltern (5) fest.
2
4
6
5
5
4
4
3
6
7
1
Bild 4
Anschließen der ISDN-Anschlussschnur
S0-Anschluss (CS410,CS400xt)
Schließen Sie die ISDN-Anschlussschnur (2) wie in Bild 4 gezeigtan (Buchse S0). Bitte beachten Sie, dass
der längere ISDN-Stecker in die ISDN-Anschlussdose und der kürzere ISDN-Stecker in die ISDN-Buchse
des Telefons gesteckt wird. Anschließend legen Sie die ISDN-Anschlussschnur in die Schnurführung (4)
und klemmen Sie sie unter den Schnurhaltern (5) fest.
Up0-Anschluss (CS410-U)
-
-
-
2
1
3
5
4
Bild 3
Die Telefone CS410 mitModulsUp0/S0 und CS410-U dürfen nicht mehr über die S0-Buchse (3)
aneinen ISDN-Anschluss(z.B. internerISDN-Anschlussder TK-Anlage)angeschlossenwerden.
Wichtige Hinweise für den UP0-Anschluss
•
An die S0-Buchse des Telefons lässt sichein ISDN-Endgerätmit S0-Schnittstelleanschließen.
•
Die Leitungslänge zwischen dem elmeg CS 410-U und dem nachgeschalteten ISDN-Endgerät be
trägt max. 10 Meter.
•
Abschlusswiderstände dürfen nichtangeschaltet werden.
Schließen Sie die ISDN-Anschlussschnur (2)wie in
Bild 3 gezeigt an (Buchse Up0). Bitte beachten Sie,
dass der längere ISDN-Stecker in die ISDN-Anschlussdose und der kürzere ISDN-Stecker in die
ISDN-Buchse desTelefons gesteckt wird.Anschließend legen Sie die ISDN-Anschlussschnur in die
Schnurführung (4) und klemmen Sie sie unter den
Schnurhaltern (5) fest.
-
6
Page 31

elmeg IP-S400 am Ethernet-Anschluss
Deutsch
1
2
3
4
5
6
Bild 4
Anschließen und in Betrieb nehmen des Systemtelefons an der TK-Anlage (Grundfunktion mit
DHCP)
LesenSie inder Montagesanleitungder TK-Anlagenach,welche Anschlüssefürden Anschlussdes IP-S400
vorgesehen sind. VerbindenSie den Anschlussmit demEthernet TK-Anlagen-Anschluss des Systemtele
fons.
Steckernetzgerät-Anschluss
-
Steckernetzgerät
-
Ethernet PC-Anschluss
-
PC oder weiteres IP-Telefon
-
Ethernet TK-Anlagen-Anschluss
-
elmeg TK-Anlage
-
-
• KonfigurierenSie dieTK-Anlage fürden Einsatzvon IP-Systemtelefonen.
• LegenSie dieMSN der IP-Systemtelefone inder TK-Anlagefest.
• Schalten Sie die Versorgungsspannung (Steckernetzgerät) an das IP-Systemtelefon an und warten
Sie bisdas Telefon initialisiertist.
Ist das IP-Systemtelefon initialisiert, werden Sie im Display zur Auswahl der Sprache aufgefordert.
• Wählen Siedie Sprache für das Display aus.
Betätigen Sie die Tasten, um die verfügbaren
Sprachen auszuwählen.
•
GebenSie eineder inder TK-Anlageeingetragenen
MSN ein(im Beispiel12) .
Bestätigen Sie den Eintrag mit
. Rufnr. programmieren
O
Welche Sprache? }
Italiano
Español
Deutsch®
English
Française
Nederland
MSN-1>12
Wenn in der Anlagenkonfigurierung keine
PIN eingegeben ist, betätigen Sie
nach Aufforderung noch einmal
O
O
und
.
Sys-Server Log-In PIN
vom IPS
MSN-1>
7
Page 32

Deutsch
Schalten Sie DHCPnutzen ein.
•
Telefon undTK-Anlage werdensynchronisiert.
•
Wählen Sie »ein« aus. IP-Adresse automa-
tisch beziehen
Aus
Ein®
Besteht keineVerbindung zurTK-Anlage (keine LAN-Verbindungoder das Telefon istnicht an
gemeldet) wird im Display die Uhrzeit durch » -----/ /---‰ « ersetzt.
Sie können jetzt das IP-Systemtelefon wie ein Systemtelefon am ISDN oder UP0 nutzen.
Wechseln des Beschriftungsfeldes
Die Beschriftungsschilderfür die Funktionstastenfinden Sie auf der letzten Seitedieser Bedienungsanlei
tung. Trennen Sie das gewünschte Beschriftungsschild heraus.
Zum Wechseln desSchildes ziehen Sie die flexibleAbdeckung zwischen Daumen und Zeigefingerzusam
menund hebenSie dieAbdeckungnach obenab.Das Beschriftungsschildkann danngewechseltwerden.
Sie können das Beschriftungsfeld über Ihren PC selber beschriften. Auf der CD-ROM der TK-Anlagen be
findet sich eine Adobe Acrobat-Datei mit Vorlagen.
Piktogramme
UmIhnen indieserBedienungsanleitung einigeAbläufebei derEinstellungund BedienungdesTelefons zu
zeigen, wurden unter anderem die nachfolgend beschriebenen Piktogramme (Symbole) verwendet.
-
b Hörerabheben oder vorbereitendeWahlstarten.
a Hörerauflegen. DasTelefon befindetsichin Ruhe.
-
-
-
l EinAnruf wirdsignalisiert. DieTonrufmelodie erklingt.
g Sieführen einGespräch.
d EineKonferenzschaltung isteingeleitet.
q Siehören denpositiven oderden negativenQuittungston.
t Rufnummer,Kennziffer,Zeichen oderTextwählen.
09
*#
Länderspezifische Einstellungen
Soll das Telefonin einemvon derGrundeinstellung abweichendenLand genutztwerden, sindländerspezi
fische Einstellungen erforderlich.
Einebestimmte Taste derWähltastaturbetätigen.
-
8
Page 33

Deutsch
Hierbei werden z. B. die Sprache, die Währung und länderspezifische Besonderheiten im ISDN-Netz auf
die Grundeinstellung des gewählten Landes eingestellt.
Bitteprüfen Siewie nachfolgendbeschrieben, obfür dasLand, indem dasTelefon genutztwird, länderspe
zifische Einstellungen möglich sind.
Beginnen Sie wie folgt:
a
Ms s
Konfigu
ration
Service
-
s Betätigen Sie die Pfeiltasten, um die Länder
anzusehen, für die spezifische Einstellungen
verfügbar sind.
Betätigen Sie den Softkey des gewünschten
Landes. Z.B. »Deutsch«.
Die spezifischen Einstellungen des gewählten
t
Telefon PIN
O>s
Country
Which Country? }
Italiano
Español
Deutsch®
English
Française
Nederland
29.05.03 07:41 }
Landes werden sofort hergestellt.
Die Daten des Telefons werden dabei nicht
gelöscht.
Telefonbuch
Ruhe
VIP
-
Displays des Telefons
1
- Datum
2
-
12
29.05.06 07:41 }
S
¡ Info -T-S-r-
S
¡ Telefonbuch
S
¡ VIP
Anruferliste ¨
3
Ruhe ¨
S
S
S
S
3
4
5
6
Uhrzeit
-
21 Zeichen je Zeile
-
Pfeil: Weitere Menü-Punkte über Pfeil-Tasten erreichbar.
-
Anrufbeantwortertaste des Telefons (optionales Mo
dul) oder Taste »TK-Anlagen-Menü
-
Pfeil: Hinweis auf Softkey, der im aktuellen Menü betä
-
tigt werden kann.
Bild 5
Das Telefonverfügt überein 7zeiligesDisplay mitHintergrund
beleuchtung. Die Hintergrundbeleuchtung wird automatisch ein- oder ausgeschaltet.
Nach demVerbinden mitdem internen ISDN-Anschluss derTK-Anlage werden Ihnen in deroberen Zeile
des Displays Datum und Uhrzeit angezeigt. Datum und Uhrzeit werden automatisch aus der TK-Anlage
übernommen. In den weiteren Zeile befindet sich der angezeigteText füreine Funktionimmer nebendem
zugehörigenSoftkey. BetätigenSieden Softkey,wird dienächste Ebeneangezeigt.Können imDisplaynicht
alleZeichen angezeigtwerden,wird diesdurch »««oder »»«gekennzeichnet.Um dieweiterenZeichen an
zusehen, betätigen Sie die R-Taste und anschließend die entsprechende Pfeiltaste.
-
-
-
Zur Erläuterungvon Einstellungenund Bedienungenwerden indieser Bedienungsanleitungverschiedene
Displayanzeigen des Telefons abgebildet.Wenn dabei nur einzelneZeilen des Displays abgebildetwerden
(das Display wird nichtmit allen 7 Zeilen dargestellt), wird dies durch eine obere oder untereWellenlinie
gekennzeichnet.
9
Page 34

Deutsch
Für die Texteingabe von Buchstaben, Ziffern und Sonderzeichen sind die Tasten wie folgt belegt:
Taste Druck
1234567
1
2
3
4
5
6
7
8
9
*
#
1
ABC2ÄÅÆ
DEF3 €
GH I 4
JKL5
MNO 6 ÖØ
PQRS 7 ß$
TUV8Ü
WX Y Z 9 ¥
*
#
0 DieTaste 0istmitverschiedenen Sonderzeichenbelegt.
Z.B.:»!«, »&«, »?«,»+«,»-«, »=«,»(«,»)«,»@«, »$«, ...
Nach demersten Betätigender Taste0 wird einLeerzeichen eingefügt.Nach dem zweiten Betätigen dieser
Taste werden einige Sonderzeichen im Display angezeigt. Um ein Sonderzeichen auszuwählen, betätigen
Sie die zugeordneteTasten 1 … 9. Möchten Siesich weitereSonderzeichen ansehen,betätigen Siedie Taste
0.
Eingabemodus für Buchstaben
Beider EingabevonBuchstaben stehenverschiedeneMöglichkeiten zurVerfügung.Der eingestellteEinga
bemodus wird im oberen Teil des Displays auf der rechten Seite angezeigt (keine Anzeige, »Abc« oder
»ABC«).
keine Anzeige AlleeingegebenenBuchstaben werdenals Kleinbuchstabenangezeigt.
Beispiel:»mustermann, karl«.
»Abc« Dernächste eingegebenenBuchstabewirdals Großbuchstabeangezeigt,alleweiteren
Eingabenals Kleinbuchstaben.
Beispiel:»Mustermann, Karl«.
»ABC« AlleeingegebenenBuchstaben werdenals Großbuchstabenangezeigt.
Beispiel:»MUSTERMANN, KARL«.
Zu Beginneiner Texteingabeist immerder Eingabemodus»Abc« aktiv.Zum Änderndes Einga
bemodusbetätigen Siedie R-Taste.Zum Einfügeneines ZeichensbetätigenSie imModus »Abc«
zuerst die C-Taste.
-
-
10
Page 35

Displayanzeigen über eingerichtete Leistungsmerkmale
Deutsch
s Im Ruhezustand des Telefons werden in der
Zeile »Info« zusätzliche Informationen
über eingerichtete Funktionen / Leis
tungsmerkmale angezeigt. Im Beispiel:
»-T-S-r-«.
Um weitere Informationen über die einge
stellten Funktionen zu erhalten, betätigen Sie
den Softkey neben »Info«.
Sind mehrere Funktionen eingestellt, betäti
gen Sie die Pfeiltasten um die verschiedenen
Einstellungen anzusehen.
Displayanzeige Eingerichtete Funktion
»«
»«
»«
»«
Aktiver Termin eingestellt.
Wahlkontrolle oder Anruffilter eingeschaltet,
Zugriff auf Menüs des Telefons geschützt.
Funktion »Ruhe vor dem Telefon« (nur Aufmerkton) eingestellt.
Funktion »Ruhe vor dem Telefon« (komplett) eingestellt.
-
-
29.05.03 07:21 }
Info -T-S-r-
Telefonbuch
VIP
-
¬¬¬¬¬¬¬¬¬¬¬¬¬¬¬¬¬¬¬¬¬¬
ªªªªªªªªªªªªªªªªªªªªªª
Sperren/Menü:
Schutz vor Änderungen
Ruhe
Anruferliste
»«
»«
»«
Anrufweiterschaltung eingerichtet.
Informationen über programmierte Funktionstasten
z.B.: Durchsage erlaubt / nicht erlaubt.
Anrufbeantworter, Zeitsteuerung, Anrufweitermeldung oder Fernbedienung
(optionales Modul) eingeschaltet.
Telefonieren
Ein Gespräch einleiten
Rufnummer wählen - ohne Korrekturmöglichkeit
btg
Rufnummer wählen
Rufnummer wählen - mit Korrekturmöglichkeit
atbg
Rufnummer wählen
Um die Rufnummer zu ändern oder eine falsche Eingabe zu korrigieren, wählen Sie mit den Pfeil-Tasten
die falsche Ziffer ausund betätigenSie dieC -Taste,um diesezu löschen. Geben Sie danach dierichtige Zif
fer ein.
-
Möchten Siedas Gespräch über den Hörerführen, soheben Sienach der Eingabeder Rufnummerden Hö
rer ab.Sie können jederzeit währenddes Gespräches zwischenFreisprechen, Lauthören und Hörerbetrieb
hin- und herwechseln.
Nachdem Sie eine Rufnummer eingegeben haben, können Sie auch die Lautsprecher-Taste drücken, um
die Rufnummer wählen zu lassen und das Freisprechen zu nutzen.
-
11
Page 36

Deutsch
Ist derAufbau einesGespräches nicht möglich (z.B. Rufnummer über die Wahlkontrolle gesperrtoder das
Gebührenkontoder Rufnummer/MSNist leer),erscheint imDisplay desTelefons einentsprechender Hin
weis. Z. B.: »Gesperrt: Rufnummer«, wenn die Wahlkontrolle aktiviert ist.
Weitere Möglichkeiten für die Wahl bei aufliegendem Hörer
Die Möglichkeit, bei aufliegendem Hörer zu wählen und Rufnummern vor dem Wählen zu korrigieren
oder zu ergänzen, besteht auch beim Wählen:
aus dem Wahlwiederholungs-Speicher.
•
aus der Anrufer-/ Notizliste.
•
aus dem Telefonbuch.
•
aus dem VIP-Speicher.
•
aus dem Zielwahlspeicher.
•
über dieCTI (TAPI) -Funktionalität (CS 410).
•
-
WennSie einedergenannten Möglichkeitennutzen,können Sievor demEinleitender WahlweitereEinga
ben vornehmen. Sie könnenz.B. festlegen,ob eineRufnummer (MSN) zumAngerufenen übermitteltwer
den soll.
Aus dem Telefonbuch der TK-Anlage wählen
Nutzen Siedas Systemtelefonan einerelmeg TK-Anlagemit Systemtelefonie,können Sieaus demTelefonbuch der TK-Anlage wählen.
a
Aus dem Telefonbuch des Telefons wählen
Im TelefonbuchIhres Telefonskönnen Siebis zu250 Namenmit Rufnummernspeichern. ZurAuswahl ei
nes Namens können Sie mit den Pfeiltasten blättern oder über die Wähltastatur gezieltdie Anfangsbuch
staben des gesuchten Namens eingeben.
a
Rs
Telefon-
buch
s
Telefon
buch
-
t
Anfangsbuchsta
ben eingeben
t
Anfangsbuchsta-
ben eingeben
O<> O
-
O<> O
Eintrag
auswählen
bg
Eintrag
auswählen
b
-
-
-
-
Die Programmierung und Einrichtung des Telefonbuches ist auf Seite 15 dieser Bedienungsanleitung be
schrieben.
Aus dem VIP-Speicher wählen
Unter jeder der 10 Tasten 1...0 können Sie einen VIP-Eintrag, bestehend aus einem Namen (max. 20 Zei
chen) und einer Rufnummer (max. 26 Ziffern) programmieren.
a
Die Programmierung von VIP-Einträgen ist auf Seite 16 dieser Bedienungsanleitung beschrieben.
12
s<>
VIP
VIP-Ziel
auswählen
oder
-
-
tbg
VIP-Ziel
auswählen
Page 37

Deutsch
Zielwahl mit Funktionstasten
DieZielwahl wirdüberdie Funktionstasteneingeleitet.Unter jederder Tasten könnenSie zweiFunktionen
oder Zielwahlen programmieren.
a
Funktionstaste betätigen
Wählen Sie mit den Funktionstasten die gewünschte Rufnummer aus.
Möchten Sie eine Rufnummer in der zweiten Ebene wählen, führen Sie auf der gewünschten Taste einen
doppelten Tastendruck durch. Dieser muss im kurzen Abstand ausgeführt werden.
Die Programmierung der Zielwahl- /Funktionstasten erfolgt über die PC-Konfigurierung des Telefons.
Aus der Anrufer-/ Notizliste wählen
Das Telefon verfügtüber einekombinierte Anrufer-und Notizliste.In dieserListe sindmaximal 30Einträ
ge (Anrufe, Notizen, SMS-Kurznachrichten oder UUS1-Textnachrichten)möglich. Einträge in der Anru
fer-/ Notizliste werden im Display durch den Softkey »Anruferliste« angezeigt.
a
Weitere Funktionen bedienen
Einen Anruf annehmen
s<>
Anruferliste
Z
Eintrag auswählen
bg
bg
albg
-
-
Einen Anruf ablehnen
al
Einen Anruf weiterleiten (Call Deflection)
al
Rufnummer nicht übermitteln (Anonym anrufen)
at
Rufnummer wählen
OMs
al
Ein Gespräch mit fester Rufnummer (MSN) einleiten
at
Rufnummer wählen
OMs s
s
übergeben
s
Geheim
MSN MSN-1 - MSN-10
s
ablehnen
Rufnummer wählen
Geheim
t
O
bg
bg
bg
13
Page 38

Deutsch
Erweiterte Wahlwiederholung
In der erweitertenWahlwiederholung werdendie Rufnummernder letzten20 Anrufe,Verbindungen (Ge
spräche) oderTextnachrichten gespeichert.Sie könnendiese Einträgedurch Betätigender Wahlwiederho
lungs-Taste oder der Pfeiltasten ansehen und anschließend automatisch wählen.
a
Automatische Wahlwiederholung
Haben Sie einen Teilnehmerangewählt, der besetzt ist oderden Anrufnicht annimmt,können Sieeine au
tomatische Wahl einleiten, bei der der gewünschte Teilnehmer nach ca. 10 Sekunden erneut angewählt
wird.
atg
Automatische Wahlwiederholung ausschalten
a
Mikrofon aus-/ einschalten
WWO
Eintrag wählen
oder
W
Rufnummer
wählen
Teilnehmer ist
besetzt
ss
Autom.Wahlwiederhlg. Ja
Wahlwiederhlg.
bg
s
Autom.
a
-
-
-
g
Lauthören
g
Freisprechen
a
Headset nutzen
ZurBedienung desHeadsetswird eineFunktionstastedes TelefonsalsHeadsettaste eingerichtet.Diedieser
Taste zugeordnete Leuchtdiode signalisiert, ob das Headset ein- oder ausgeschaltet ist (LED ein-/ ausge
schaltet).
a
Headset einschalten Rufnummer wählen Gespräch über Headset Headset ausschalten
Durchsage
s
Mikrofon aus Mikrofon ein
LL
Lauthören beginnen Lauthören beenden
L
Freisprechen beginnen Rufnummer wählen Freisprechen beenden
z
Raumrückfrage
s
t
tg
g
g
L
z
-
a
14
Ms>s
Akustik Duchsage
tg
interne Rufnum
mer wählen
-
Druchsage
Page 39

Wechselsprechen
Deutsch
a
Automatischer Rückruf
Ms > s
Akustik Wechsel
bt g
Rufnummer wäh
len
Keypad
g
Tonwahl (MFV-Wahl)
g
Telefonieren mit Mehreren
s
Keypad
s
MFV
sprechen
Teilnehmer ist besetzt oder
meldet sich nicht
Zeichen- und Ziffernfolgen eingeben
Zeichen- und Ziffernfolgen eingeben
t
t
-
interne Rufnum
tg
Wechselsprechen
-
mer wählen
s
Rückruf
a
Anklopfen
g
Gespräch mit Teilnehmer 1
Rückfrage
g
Gespräch mit Teilnehmer Teilnehmer 1 wird gehalten Rufnummer wählen Gespräch mit Teilnehmer 2
Gesprächsübergabe (Vermitteln)
g
Gespräch mit Teil
nehmer 1
Makeln
g
Gespräch mit
Teilnehmer
-
Teilnehmer 1 wird
>s
anklopfendes Gespräch
(Teilnehmer 2)
R
R
Rufnummer wählen Gespräch mit Teilneh
gehalten
Verbindung 1
...
Verbindung 4
s
annehmen
tg
tg
mer 2
g
Gespräch mit
gewünschtem
Teilnehmer
>s
Verbindung 1
Verbindung 4
Gespräch mit Teilnehmer 2;
Teilnehmer 1 wird gehalten
-
...
g
s
übergeben
g
Gespräch mit
gewünschtem
Teilnehmer
Konferenz
g
Gespräch mit Teil
nehmer 1
>s
-
Verbindung 2
g
Gespräch mit
Teilnehmer 2
s
Konferenz
d
Konferenz mit Teil
nehmer 1 und Teil
nehmer 2
15
-
-
Page 40

Deutsch
Telefon bedienen
Telefonbuch
Im Telefonbuch Ihres Telefons können Sie bis zu 250 Namen und Telefonnummern speichern. Zur Aus
wahleines TelefonbucheintrageskönnenSie mitden Pfeiltastenblättern oderüber dieWähltastatur gezielt
die Anfangsbuchstaben des gesuchten Namens eingeben.
Sollbei einemkommenden Anruf anstelleder RufnummerdesAnrufers dessenName imDisplay
angezeigt werden, muss dieser im Telefonbuch mit Namen und Telefonnummer(incl. Vorwahl
und bei Betrieb an einer TK-Anlage incl. Amtskennziffer) eingetragen sein.
DieNamensanzeige desAnrufers erfolgtnur, wenndie übermittelteRufnummer mitderim Tele
fonbuch gespeicherten Rufnummer übereinstimmt.
Wird das Telefonvom ISDN-Netz getrennt und dann erneut gesteckt oder werden Datenfür das Telefon
buch über das PC-Programmzum Telefonbuch übertragen, wird das Telefonbuch intern neu organisiert.
Dieser Vorgang findet automatisch statt und kann bis zu mehrere Minuten dauern. Während dieser Zeit
steht Ihnen das Telefonbuch des Telefons nicht zur Verfügung.
Einstellungen für Telefonbucheinträge
Name und Rufnummer
•
• Gehende Rufnummer (MSN-Belegung)
• Sondertonruf (VIP-Tonruf)
• Infotext
-
-
-
Telefonbucheintrag hinzufügen
Beginnen Sie wie folgt:
a
t Geben Sie den Namen ein.
Im Beispiel: »Mustermann«.
Bestätigen Sie die Eingabe mit
t Geben Sie die Rufnummer ein.
Im Beispiel: »0123456«.
Bestätigen Sie die Eingabe mit
Msss
Nummernprog. Telefonbuch Neu
Telefonbuch eingeben
.
O
O
.
Name>Mustermann_
¬¬¬¬¬¬¬¬¬¬¬¬¬¬¬¬¬¬¬¬¬¬
Telefonbuch eingeben
Rufnr>0123456_
¬¬¬¬¬¬¬¬¬¬¬¬¬¬¬¬¬¬¬¬¬¬
VIP-Speicher
Unter jederder 10 Tasten1 … 0 könnenSie einenVIP-Eintrag, bestehend auseinem Namen(max. 20 Zei
chen) und einer Rufnummer (max. 26 Ziffern), programmieren.
VIP-Eintrag programmieren
-
Beginnen Sie wie folgt:
a
16
M s s s <> O
Nummernprog. VIP Neu
VIP-Ziel auswählen
Page 41

Deutsch
t Geben Sie den Namen für das ausgewählte
VIP-Ziel ein. Im Beispiel: »Mustermann«.
Bestätigen Sie die Eingabe mit
O
.
t Geben Sie die Rufnummer ein.
Im Beispiel: »012345«.
Bestätigen Sie die Eingabe mit
O
.
V0>Mustermann_
¬¬¬¬¬¬¬¬¬¬¬¬¬¬¬¬¬¬¬¬¬¬
VIP-Telefonnr. prog.
V0>012345_
¬¬¬¬¬¬¬¬¬¬¬¬¬¬¬¬¬¬¬¬¬¬
VIP-Name
programmieren
Ruhe vor dem Telefon
SollenAnrufe nichtmitder eingestelltenTonrufmelodieund -lautstärkesignalisiertwerden, könnenSie an
Ihrem Telefon die Funktion »Ruhe vor dem Telefon«einstellen. Alle Anrufe werdendann je nach Einstel
lung nur optisch (im Display) oder miteinem Aufmerkton signalisiert. DieLautstärke des Aufmerktones
kann wie auf Seite 18 beschrieben eingestellt werden. Im Ruhezustand des Telefons zeigt Ihnen ein »r«
oder »R« im Display, dass die Funktion »Ruhe vor dem Telefon« aktiviert ist.
»Nein« Die Funktion »Ruhe vor dem Telefon« wird ausgeschaltet.
»Ja, Rufton aus« Anrufe werden nur optisch signalisiert (»R« im Display angezeigt).
»Ja, mit Aufmerkton« Anrufe werdenzuerst mit einemkurzen Aufmerkton, danach nurnoch
optisch signalisiert (»r« im Display angezeigt).
-
a
ss
Ruhe Nein / Ja / Rufton aus
Einstellungen in der Konfigurierung
Rufnummern (MSN)
Sie könnenin Ihrem Telefon biszu 10 Rufnummern(MSN) eintragen. Mit demEintrag einer Rufnummer
in Ihr Telefon legenSie fest, dass IhrTelefon beiAnwahl mitdieser Rufnummer(MSN) erreichbarist. Tra
genSie mehrals eineRufnummerin IhremTelefon ein,klingeltIhr Telefonbei Anwahlmitjeder dereinge
tragenen Rufnummern.
Am internen ISDN-Anschluss einerTK-Anlage müssen Sie die interne RufnummerIhres Telefons an der
TK-Anlage eintragen. Bitte beachten Sie die Hinweise in der Bedienungsanleitung Ihrer TK-Anlage.
RufenSie einenTeilnehmeran,können Sieeinebestimmte Rufnummer(MSN)auswählen, diedem gerufe
nen Teilnehmer übermittelt wird (z.B. für getrennte Gebührenerfassung). Wählen Sie keine bestimmte
Rufnummer aus, wird die erste im Telefon eingetragene Rufnummer (MSN-1) verwendet.
Das Einrichten einer Rufnummer (MSN) ist im Folgenden am Beispiel der Rufnummer
»MSN-1« beschrieben.
Beginnen Sie wie folgt:
-
-
-
a
Msss
Konfiguration MSN MSN-1
17
Page 42

Deutsch
MSN-1 programmieren }
übergeben
Lautstärke
MSN Name
Klang
Rufnummer
Rufnummer (MSN) eintragen und ansehen
Die Rufnummern des Telefons können nur über den Professional Configurator der WIN-Tools CD-ROM
eingetragen werden. Am Telefon selbst können Sie die eingerichtete Rufnummer ansehen.
Betätigen Sie im Menü »MSN-1 programmieren« den Softkey »Rufnummer«.
O Sie sehen die eingerichtete Rufnummer.
Verlassen Sie das Menü durch Betätigen der
O
.
Taste
Die weiterenEinstellungen (z.B.Tonrufmelodie, Lautstärke, Name)können Sie nur vornehmen,
wenn die Rufnummer bereits eingerichtet ist.
Weitere Einstellungen für eine Rufnummer (MSN)
Rufnr. programmieren
MSN-1>222
¬¬¬¬¬¬¬¬¬¬¬¬¬¬¬¬¬¬¬¬¬¬
s »Klang« Tonrufmelodie einstellen
s »Lautst rke« Lautstärke der Tonrufmelodie einstellen.
s » bergeben« Voreinstellungeiner Rufnummerfür dasWeiterleiten vonAn-
rufen (Call Deflection).
s »MSN Name« Der Rufnummer (MSN) einen Namen zuweisen (max. 8 Zei-
chen), deranstelle der Bezeichnung»-MSN1« imDisplay an
gezeigt wird.
-
s »Kosten« Einrichten eines Gebührenkontos, das bei kostenpflichtigen
s »PIN« MSN-spezifische PIN, mit der eine Rufnummer für die Wahl
Reset - Grundeinstellungen wiederherstellen
Über dienachfolgend beschriebene Prozedurkönnen Sie dieGrundeinstellungen des Telefonswiederher
stellen. Alle von Ihnen eingegebenen Daten werden dabei gelöscht.
Haben Siean IhremTelefon die Tastenerweiterungelmeg T400,T400/2 angeschlossen, werdenbeim Aus
führen der nachfolgend beschriebenen Prozedur auch alle Daten der Tastenerweiterung gelöscht.
Achtung: Die Einstellungen des optionalen Anrufbeantworters und möglicherweise gespeicherte Texte
werden nicht gelöscht. Lesen Sie hierfür bitte die in der Dokumentation des Anrufbeantworters nach.
18
Gesprächen (bei Übermittlung dieser gehenden Rufnummer)
zum Telefonieren zur Verfügung steht.
freigegeben oder gesperrt werden kann.
-
-
Page 43

Beginnen Sie wie folgt:
Deutsch
a
Ms s
Konfigura
tion
Service
-
PIN des Telefons
s Betätigen Sie den Softkey »Ja«, um die
Grundeinstellungen wiederherzustellen.
Möchten Sie die Daten doch nicht löschen,
betätigen Sie den Softkey »Nein«.
Nach betätigen des Softkey »Ja« wird das
Telefon in die Grundeinstellung zurückge
setzt. Alle Daten sind gelöscht.
Konformitätserklärung und CE-Zeichen
-
t
Nein
¬¬¬¬¬¬¬¬¬¬¬¬¬¬¬¬¬¬¬¬¬¬
Italiano
Deutsch
Française
Oss
Daten Ja
Wirklich ALLES
löschen ?
Which language }
Ja
Español
English
Nederlands
Dieses Gerät erfüllt die Anforderungen der R&TTE-Richtlinie 1999/5/EG:
»Richtlinie 1999/5/EG des Europäischen Parlaments und des Rates vom 9. März
1999 überFunkanlagen undTelekommunikationsendeinrichtungenund diegegenseitige Anerkennung ihrer Konformität«.
DieKonformitätserklärung kannunter folgenderInternet-Adresse eingesehenwerden: http://www.funkwerk-ec.com.
Das aufdem Gerätbefindliche Symbolmit dem durchgekreuzten Müllcontainer be
deutet, dass das Gerät am Ende der Nutzungsdauer bei den hierfür vorgesehenen
Entsorgungsstellen getrennt vom normalen Hausmüll zu entsorgen ist.
© 2006 Funkwerk Enterprise Communications GmbH - Alle Rechte vorbehalten.
Ein Nachdruckdieser Dokumentation -auch auszugsweise- ist nurzulässig mit Zustimmung des Heraus
gebers und genauer Nennung der Quellenangabe, unabhängig von der Art und Weise oder den Medien
(mechanisch oder elektronisch), mit denen dies erfolgt.
Funktionsbeschreibungendieser Dokumentation, diesich aufSoftwareprodukte anderer Hersteller bezie
hen, basierenauf der zur Zeit derErstellung oder Drucklegungverwendeten Software. Die in dieserDoku
mentation verwendeten Produkt- oder Firmennamen sind unter Umständen über die Eigentümer ge
schützte Warenzeichen.
-
-
-
-
-
19
Page 44

Reparaturservice
Tonfunk GmbH
Reparaturservice
Unternehmenspark 2 / Halle D
Woltorfer Str. 77
31224 Pei
Funkwerk Enterprise Communications GmbH
Südwestpark 94
D-90449 Nürnberg
http://www.funkwerk-ec.com
Änderungen vorbehalten
010905
20
Page 45

Notice d'utilisation
elmeg CS410 / CS410-U / CS400xt / IP-S400
Français
1
Page 46

Français
7
Afficheur et touches du téléphone
6
7
8
9
10
11
Figure 1
1 Haut-parleur
1
2
3
4
5
12
13
14
15
16
1
18
19
20
21
2 Combinéavec cordonde raccordement
3 Toucherépondeurdutéléphone(moduleoptionnel)outouche»Menuautocommuta-
teur
4 6touches programmables
5 Ecranrétro-éclairé à7lignes
6 Touchede menu:Cette touchevous permetd’accéder aumenude programmation.Si
vousvoustrouvezdéjà dansle menudeprogrammation,etsi vousactionnezlatouche,
vouspouvezaccéderauxfonctionsspécifiquesdecemenuouvousrevenezàl’étapean
térieure.
7 ToucheESC:L’appuisurcettetouchefaitrevenirletéléphoneenpositionderepospen
dantla programmation.
8 / 10
9 Touchede validation:L' appuisurcette touchepermet deconfirmerou demémoriser
11 ToucheC: Cettetouchevous permetderevenir d’uneétapeen arrièredansle menu.Si
Touchede curseur»Agauche« /»Agauche«:Les flèches» {«et»} «dans lecoindroit
de la ligne supérieure de l’écran vous indiquent que vous pouvez appeler d’autres
fonctionsdans lasecondeligneavec lestouchesdecurseur.
unréglage dansle téléphone.
vousvoustrouvezenmodede saisie, vouspouvezeffacercertainssignesavec cette tou
che.
-
-
-
12 Toucheastérisque /touchedièse
13 Touchesde numérotation
14 Touched’écoute amplifiée/ mains-libres
15 Touchede coupurede lacommunication
16 Touchede répétitionde lanumérotation
2
Page 47

Français
17 Touche dedoublecommunication
18 Microphone
19 5 touches de fonction librement programmables avec diodes électroluminescentes:
Chacune de ces touches dispose d’une diode lumineusebi-colore (Niveau 1 - rouge /
Niveau2 -jaune).Cettediode lumineusepermetd’affichercertaines fonctions.
20 Etiquette derepéragepour lestouchesdefonction
21 Diodelumineusepourlasignalisationd’unappel(rouge)etpourlerépondeur(jaune)
Description et installation
Ce manuel d’utilisation décrit seulement lamise en service du téléphone et les fonctions les plus
importantes pour pouvoir téléphoner. Pour une description détaillée,veuillez-vous reporter à la
documentation fournie sur le CD-ROM join.
CS410
Ce téléphonede systèmeest conçupour être raccordéà laconnexion S0 (câble à4 brins)d’un autocommu
tateur elmeg.Si vous désirez utiliser votre téléphonesur une connexion Up0interne, vousdevez installer le
module Up0/S0 interne dans le téléphone ou utiliser le convertisseur Up0/S0 externe.
CS410-U
Ce téléphone desystème est conçu pour être raccordé à la connexionUp0 (câble à 2 brins) d’unautocommutateurelmeg. Vousn’avezplus besoindu moduleUp0/S0interne oudu convertisseurUp0/S0externe.
CS400xt
Ce téléphone de système est livré avec un clavier supplémentaire (T400/2) et dispose ainsi de 10 touches
programmables supplémentaires.
Ilest conçupour êtreraccordé àla connexionS0 (câbleà4 brins)d’un autocommutateurelmeg.Le téléphonede systèmene disposepasde portUSB nide raccordsériel pour laconfiguration ouuneautre utilisation.
Ildoit êtreconfigurédepuis laligneRNIS interneavec leProfessionalConfigurator desWIN-Tools. Deplus,
les »Fonctionsaudio« qui ne sont pasimplémentées et lesmodules et fonctions Répondeur etUp0 ne peu
vent pas êtreutilisées. Lesfonctions deces modulesne sontpas affichéessur l’écran ou bienne peuventpas
être utilisées.
Ce téléphonedispose de la fonction»Mode de serviced’urgence«. Ainsi, en
OFF
ON
cas de coupure de courant 230 V~, il peut être utilisé depuis
l’autocommutateur sur la TR. Veillez à ce que votre autocommutateur soit
compatibleavec cettefonctionet àcequ’il nesoitpas imposédel’utiliser par
l’intermédiaire d’un convertisseur Up0/S0.
-
-
elmeg IP-S400
Ce téléphone système est raccordé à la connexion LAN correspondante (ou »Réseau«) de
l’autocommutateur avec un câblecat. 5.Le téléphonesystème disposed’une sortiePC à laquelleil estpossi
ble de raccorder d’autres terminaux IP.
-
3
Page 48

Français
Réglage / Configuration du téléphone de système
Le téléphone de système permet uniquement une configuration limitée des fonctionnalités offertes.Une
configuration complète n’est possible qu’à l’aide d’un dispositif de configuration professionnel des outils
WIN via une interface correspondante du téléphone sur une installation téléphonique d’elmeg.
Vous trouverez une description plus préciseconcernant la configurationdes téléphones dans les
instructions de montage détaillées figurant sur le CD-ROM.
Extensions du téléphone de système
Module Up0/S0 (CS410)**//
•
Module répondeur (CS410)
•
Clavier supplémentaire »T400«,»T400/2« (CS410, IP-S400)
•
Remarques de sécurité
Veuillez tenir comptedes températures de service et destockage à ne pas dépasser, indiquées dans
•
les spécifications techniques. Veuillez laisser l’appareil atteindre la température ambiante
d’exploitation avant de leconnecter.
• Veuillez noter les éventuels effets de condensation lorsque la température ambiante augmente.
N’enlevez l’appareil de son emballage, que lorsque la température ambiante d’exploitation est atteinte.
• Vous ne devriez niraccorder ou débrancheraucun câblependant unorage nitéléphoner.
• Raccordez lescâbles auxbornes prévues à cet effet.
• Veillez àce que les cordons de branchementssoit posésde manièresûre.
• Evitez les situations suivantes:
Ensoleillementdirect
Sources dechaleur (p.ex.radiateurs)
Appareils électroniques (p.ex. appareils HiFi,appareils de bureautique oumicro-ondes)
Pénétration de liquides, humidité
Fluides ou vapeurs aggressive
Emplacements avec beaucoupde poussière
•
N’utilisez pas l’appareil dans des pièces humides oudans des lieuxà risques d’explosion.
•
Veuillez seulement ouvrir les parties de l’appareil qui sont indiquées dans le manuel de monta
ge/d’installation.
•
Veuillez ne pas toucher lescontacts de branchement avec des objets pointus, métalliques ouhumi
des.
•
Sivous nevoulez pasfixer l’appareil,veuillez placerl’appareil ouses accessoiressur unsupport anti
dérapant.
-
-
-
•
Nettoyez votreappareil avec unchiffon légèrementhumide.
•
Utilisez uniquementles accessoireshomologués.
•
Seulsles terminauxqui fournissentune tensionSELV (circuitde faibletensionde sécurité)et/ou qui
satisfont à la norme “ETS 300047" peuvent être raccordés à l’appareil. Une utilisation conforme de
terminaux homologuéspermet deremplir cettecondition.
4
Page 49

Boîte d’alimentation à fiche
Veuillezseulement utiliserlebloc d’alimentationlivré avecle téléphoneou bien lebloc disponibleen
•
accessoire (DSA-0101F-05 UPou L15D52 ABDDLAWO)..
Veuillez nepas utiliserde blocd’alimentation visiblementdéfectueux (parex. boîtiercassé).
•
Charges électrostatiques (protection contre les charges électrostatiques)
Français
Le téléphoneest livré avecune protection contreles charges électrostatiques supérieure auxvaleurs admi
ses. Veuillez tout de même éviter les surcharges électrostatiques. La charge électrostatique peut, selon les
causes, atteindredifférentes valeurs quisont largement supérieures auxvaleurs admises etqui se trouvent
ainsi au-delà dela résistanceaux perturbationsdéjà réalisée.Les causes ou circonstances, tellesque qu’une
humidité de l’air tropminime oumoquettes, doiventêtre absolumentéliminées. Lefabricant du téléphone
n’accordera pas de garantie pour les pannes ainsi causées.
Déballer et poser le téléphone
Déballage
Téléphonede système RNIS
•
Combinéavec cordon de raccordement
•
2 pieds
•
• Cordon RNIS(environ 6m)
• Cordon deraccordement PC(USB, environ3m), (paspourCS400xt)
• Cordon audiopour PC(prise femellestéréo 3,5mm,env. 2,5m),(pas pourCS400xt)
• Cordon adaptateurpour casquesavec cordond’alimentation à4 pôles(8 pôles/ 4 pôles)
• Fixation du cordon (autocollant après avoir ôté la pelliculede protection) (pas pourCS400xt)
• Notice d’utilisation et étiquettesde repérage pour les touches de fonction
Page annexéeavec desremarques de sécurité concernant letéléphone
Page annexéeavec desinformations surles fonctionnalitésoffertes par le téléphone
-
•
CD-ROM avec les WIN-Tools, y compris:
Professional Configurator, programme de gestion de l’annuaire téléphonique, programme de télé
chargementet Sound-Manager, Pilotes TAPI,USB, CAPIet NDISWAN, Adobe Acrobat Reader,
Notice d’utilisationet fichierAdobe Acrobatpour l’impressiond’étiquettes de repéragepersonnali
sées.
Mise en place du téléphone
Avant d’installer letéléphone, veuillezmonter lespieds arrièredu téléphoneaux endroits(6) montrésdans
la figure 6.
Nous attirons votre attention sur le fait que les pieds en plastiques de votre téléphone peuvent laisser des
traces sur des surfaces sensiblescomme les meubles par exemple. Le fabricant du téléphone déclinetoute
responsabilté pour de tels dommages. Nous vous invitons par conséquent à utiliser un support antidér
apant adéquat pour votre téléphone.
Nettoyage du téléphone
Letéléphone aétéfabriqué pourdes conditionsnormalesd’utilisation. Lorsquecelaest nécessaire,nettoyez
votre téléphone RNIS avec unchiffon légèrement humide ou utilisez un chiffon antistatique. N’utilisez ja
mais solvant! N’employez jamais un chiffon sec; la charge électrostatique pourrait entraîner des défauts
dans l’électronique de l’appareil. Veillez dans tous les cas à ce qu’aucune humidité ne pénètre et donc
n’endommage votre téléphone.
-
-
-
-
5
Page 50

Français
Raccordement du téléphone (RNIS et cordon du combiné)
Afin depouvoir utiliser votretéléphone, vous devez brancher lescordons de branchementpour la lignede
téléphone et pour l’écouteur.
Raccordement du cordon du combiné
Raccordez lecordon (1)du combinécomme celaest
montré dans lafigure .6Placez lecâble dans le canal
(4)prévu àcet effet etfixez-le sousles deuxergotsde
maintien (5).
2
4
6
5
5
4
4
Figure 2
Raccordement du cordon RNIS
3
6
7
1
Raccordement au bus S0 (CS400xt CS410)
Raccordez le cordon RNIS (2) commecela est montré dans la figure3 (prise S0). Veuillez tenir compte du
fait que le connecteur RNIS leplus long est inséré dans la prise femelleRNIS et le connecteur RNIS leplus
court dans laprise femelle RNIS du téléphone.Ensuite, placez le cordonRNIS dans le canal(4) prévu à cet
effet, puis fixez-le sous les deux ergots de maintien (5).
Raccordement au bus Up0 (CS410-U)
Raccordez lecordon RNIS (2)comme cela est montré dans la la figure 3 (prise Up0). Veuillez tenir
compte du fait que le connecteur RNIS le plus long
estinséré danslaprise femelleRNISet leconnecteur
2
1
3
5
4
RNIS le plus court dans la prise femelleRNIS du té
léphone. Ensuite, placez le cordon RNIS dans le ca
nal (4) prévu à cet effet, puis fixez-le sous les deux
ergots de maintien (5).
Figure 3
Lestéléphones CS410avec unmodule Up0/S0etles CS410-Une peuvent plusêtre raccordéspar la
prise S0 (3) à une connexion RNIS (par exemple à la connextion RNIS interne de
l’autocommutateur) .
-
-
Remarques importantes pour la connexion UP0
•
Il est possible de brancher unterminal RNIS équipé d’uneinterface S0 à laprise S0du téléphone.
•
La longueur de la ligne entre l’elmeg CS 410-Uet le terminal RNIS commuté en aval doit s’élever à
maximum10 mètres.
•
Les résistances de terminaisonne doiventpas être commutées.
6
Page 51

elmeg IP-S400 à la connexion Ethernet
Français
1
Connexion du bloc d'alimentati
-
on à fiche
2
3
4
5
bloc d'alimentation à fiche
-
Connexion Ethernet PC
-
PC ou autre téléphone IP
-
Connexion Ethernet de l'auto
-
-
commutateur
6
Autocommutateur elmeg
-
Figure 4
Raccordement et mise en service du téléphone de système à l'autocommutateur (fonction de base
avec DHCP)
Veuillez vérifier dans les instructions de montage de l’autocommutateur les branchementsqui sont prévus
pour laconnexion del’IP-S400.Reliez la connexionà laconnexion Ethernet del’autocommutateur du téléphone système.
-
• Configurez l’autocommutateur pour utiliser des téléphonessystème IP.
• Définissez leTNM des téléphonessystème IPdans l’autocommutateur.
• Branchez l’alimentation en courant (bloc d'alimentation à fiche)sur le téléphone système IP et pa-
tienter jusqu'à ceque letéléphone soit initialisé.
Une fois que le téléphone IP est initialisé, on vous demande de sélectionner votre langue sur l’écran.
•
Sélectionnez lalangue pourl’écran.
Actionnez les touches de curseur pour consul
ter les langues disponibles et validez en ap
puyant.
•
Entrez un TNM enregistrédans l'autocommutateur (dans cet exemple:12) .
Validez l'entrée en appuyant sur la touche
.
O
-
-
Which Country? }
Italiano
Español
Deutsch
English
Française®
Nederland
Programm dial number
MSN-1>12
7
Page 52

Français
Lorsque aucun code PIN n’est saisi dans la
configuration de l’installation, actionnez la
touche
le fois sur la touche
Commutez sur Utiliser DHCP.
Sélectionnez »mar.« . Use automatic IP
Le téléphoneet l'autocommutateur sont synchronisés.
•
S’il n’y a pas de connexionà l’autocommutateur (pas de connexion L AN ou bien si le téléphone
n’est pas activé), l’heure affichée sur l’écran est remplacée par le symbole
» -----/ /---‰«.
Vouspouvez maintenantutiliser letéléphonesystème IPcomme untéléphonesystème surla ligneRNISou
UP0.
Remplacement de l'étiquette
et, après invitation, une nouvel
O
.
O
IPS login PIN for sys
server
-
MSN-1>
adress setting
arrêt
mar®.
Les étiquettes d’inscription pour les touches de fonction se trouvent à la dernière page de cette notice
d’utilisation. Enlevez l'étiquette dont vous avez besoin.
Pourchanger d'étiquette,comprimezle cachesoupleentre lepouceet l'indexetsoulevez-le. L'étiquettepeut
alors être remplacée.
Vous pouvez faire vous-même vos entrées dans le champs d'entrée de données à l'aide de votre PC. Vous
trouverez sur le CD-ROM des autocommutateurs un fichier Adobe Acrobat avec des modèles.
Pictogrammes
Pour vous montrer dans ce mode d’emploi certaines procédures à respecter lors du paramétrage et de la
manipulation dutéléphone, lespictogrammes (symboles)décrits dans cequi suitont entre autres été utili
sés.
b Décrocherle combiné,lancer lanumérotation préparatoire.
a Raccrochezle combiné.Le téléphonesetrouve aurepos
l Letéléphone sonne.Vousentendez latonalité réglée.
g Vousconversez.
-
d Uneconférence aété initiée.
q Vousentendez latonalitépositiveou négativedevalidation.
t Sélectionnernuméro d’appel,code d’accès,caractère outexte.
8
Page 53

Français
09
Actionnezune toucheparticulière duclavier denumérotation.
*#
Paramétrages spécifiques à chaque pays
Si letéléphone estutilisé dansun paysayant desréglages debase différents,il estnécessaire d’entreprendre
les réglages usuels du pays.
Il fautpar exempleentreprendre lesréglages debase telsque lalangue, ladevise etles particularités dupays
pour le réseau RNIS.
Veuillezvérifier telque décritci-après s’ilest possibled’avoir recoursà desréglage spécifiquesau paysoù le
téléphone est utilisé.
Procédez de la manière suivante:
a
Ms s
Configu
ration
Service
-
s Actionnez les touches de curseur pour consul-
ter les pays, pour lesquels des réglages spécifiques sont disponibles.
Actionnez la touche programmable du pays
souhaité. Par exemple»Francaise«.
t
PIN du téléphone
Italiano
Deutsch
Francaise®
O>s
Country
Which Country? }
Español
English
Nederland
Les réglages spécifiques au pays choisi seront
immédiatement commutés.
Les données enregistrées dans le téléphone ne
seront pas effacées.
Affichages du téléphone
1
29.05.03 07:41 }
S
¡ Info -A-B-s-
S
¡ repertoire
S
¡ N°Abr.
2
liste d' app. ¨
Figure 5
3
Repos. ¨
S
S
S
S
29.05.03 07:41 }
repetoire
repos.
N°Abr.
1
-
Date
2
-
Heure
3
-
21 caractères max. par ligne
4
-
Flèche: Des menus supplémentaires sont disponibles
après l’appui sur les touches de curseur.
5
-
Touche répondeur du téléphone (module optionnel)
ou touche »Menu autocommutateur
6
-
Flèche: Indication de la touche programmable, que
vous pouvez utiliser dans le menu actuellement affiché.
Le téléphone dispose d' un écran rétro-éclairé à 7 lignes. Le rétro-éclaire est activé ou désactivé automati
quement par le système.
Une fois la liaison établie avecla connexion RNIS interne,la date et l’heure vous sont indiquées sur la pre
-
-
9
Page 54

Français
mière lignede l'écran. La date etl' heure sont prélevéesautomatiquement de l' autocommutateur.Le texte
affiché pour unefonction sur la ligne2 setrouve toujours à coté de la touche programmablecorrespondan
te.Actionnez latouche programmablepouratteindre lesecond niveaudes touches.Un »««ou»»«vous in
dique, quel’écran n’a paspu afficher tousles caractères. Pour afficher lesautres caractères ,appuyez sur la
touche R et ensuit sur la touche flèche correspondante.
-
-
Différents exemplesd’affichage surl’écran sontillustrés dans cemode d’emploiafin de faciliter la compré
hension desréglages et duservice. Si seulementune des lignes de l’écranest illustrée (l’écrann’est pas pré
senté avec les 7 lignes), ceci est indiqué par une ligne ondulée en haut ou en bas.
Pour la saisie de textes et de lettres, chiffres et caractères spéciales, les touches sont paramétrées de
la manière suivante:
Touche Actionnement
Touche 1234567
1
2
3
4
5
6
7
8
9
*
#
1
ABC2 ÄÅÆ
DEF 3 €
GHI 4
JKL5
MNO6 ÖØ
PQRS7ß$
TUV8Ü
WX Y Z 9 ¥
*
#
-
-
0 Latouche 0estprogramméeavec plusieurscaractèresspéciaux.
Parexemple:»!«, »&«, »?«,»+«,»-«,»=«, »(«, »)«, »@«,»$«,...
Après avoirappuyé une première fois surla touche 0 unespace estajouté. Après avoirappuyé une seconde
fois surcette touche,plusieurs caractères spéciaux apparaissent surl’écran. Poursélectionner uncaractère
spécial,appuyez surles touchesattribuées1 ...9. Sivoussouhaitez voird’autres caractèresspéciaux, appuy
ez sur la touche 0.
Mode de saisie des lettres
Vous avez le choix entre trois possibilités pour entrer des lettres. Le mode de saisie réglé est affiché sur
l’écran, à droite (sans affichage, »Abc« ou bien »ABC«).
»Abc« Laprochaine lettreentréeestune majuscule,lessuivantes sontdes minuscule.
Exemple:»Leclerc, Pascal«.
sans affichage Toutes leslettres entréessont affichéesen minuscules.
Exemple:»leclerc, pascal«.
»ABC« Toutes les lettres entrées sont affichées en majuscules. Exemple: »LECLERC,
PASCAL«.
Lorsque vous voulez entrer un texte, le mode d’entrée »Abc« est toujours actif. Appuyez sur la
touche R si vous désirez commuter le mode de saisie.
10
-
Page 55

Affichage sur l’écran des fonctionnalités programmées
Français
s Lorsque le téléphone est au repos, des infor
mations supplémentaires sur des fonctions /
caractéristiques programmées apparaissent
sur la ligne »Info«. Dans l’exemple:
»-D-V-r-«.
Afin d’obtenir des informations supplémen
taires sur les fonctions programmées, action
nez la touche programmable à côté de
»Info«.
Lorsque plusieures fonctions ont été pro
grammées, actionnez les touches de curseur
pour vous afficher les divers réglages.
Affichage sur l’écran Fonction réglée
»-D-«
»-V-«
Rendez-vous programmé.
Discrimination ou filtre d’appel activé,
l’accès aux menus du téléphone est protégé.
-
-
-
29.05.03 07:21 }
Info -D-V-r-
Répertoire
N° abr.
-
ªªªªªªªªªªªªªªªªªªªªªª
Verrouil./menu:
protect. contre modif
¬¬¬¬¬¬¬¬¬¬¬¬¬¬¬¬¬¬¬¬¬¬
Repos
Liste d'app.
»-r-«
»-R-«
»-U-«
»-i-«
»--«
La fonction »Ne pas déranger« (bref signal seulement) est active.
La fonction »Ne pas déranger« (complet) est active.
Transfert d’appel programmé.
Informations sur les touches de fonction programmées
par exemple: Message autorisé/ non autorisé.
Répondeur, commandedifférée, servicenotification oucommande àdistan
ce du répondeur actifs (module en option).
Téléphoner
Engager une conversation
Composition du numéro d’appel - sans possibilité de correction
btg
Composez le numéro d’appel
Composition du numéro d’appel - avec possibilité de correction
atbg
Composez le numéro d’appel
-
Pour modifierles numérosd’appel ouune entréeerronée, sélectionnez avec lestouches decurseur leschif
fres erronés et actionnez la touche
pour les supprimer. Entrez ensuite le bon chiffre.
C
-
11
Page 56

Français
Si vous voulezpoursuivre votre entretien parl’écouteur, veuillezdécrocher l’écouteuraprès lasaisie dunu
méro de téléphone. Vous pouvez passer à tout moment pendant l’entretien entre le mode mains libres, le
mode écoute amplifiée et le mode écouteur.
Une foisque vous avez saisi lenuméro detéléphone, vouspouvez égalementpresser latouche haut-parleur
pour laisser composer le numéro et utiliser la fonction mains-libres.
Si l’établissementd’une communicationn’est pas possible(par ex. numérod’appel verrouillépar discrimi
nation ou la limitede crédit programmée pour ce numérod’appel/multinuméro est atteinte), un message
correspondant est affiché sur l’écran du téléphone. Par exemple:»Verroui.: Num. d'appel«,
lorsque la discrimination est active.
Autres possibilités pour la composition avec l’écouteur raccroché
Il existeégalement lapossibilité decomposer desnuméros quand l’écouteurest raccrochéet decorriger ou
de compléter des numéros de téléphone avant de composer le numéro:
à partir de la mémoirede répétitiond’appel.
•
à partir dela listed’appels /de mémos.
•
à partir del’annuaire téléphonique.
•
• à partir de la mémoirede numérotationd’accès rapide.
-
-
• à partir de la mémoiredes numérosd’appel directs.
• par l’intermédiaire de lafonction CTI ,TAPI (CS 410).
Lorsque vous avez recours à unede ces possibilités,vous pouvez réaliser d’autres entréesavant de composer le numéro.Vous pouvez spécifier par exemple, si un multinuméro sera transmisou non à votre correspondant.
Numéroter à partir de l’annuaire téléphonique de l’autocommutateur
Lorsque vousutiliser votretéléphone desystème enconjonction avecun autocommutateur elmegqui supporte lesfonctions de la téléphonie de système,vous avez la possibilité denuméroter à partirde l’annuaire
téléphonique de l’autocommutateur.
a
Rs
Réper
toire
Composer un numéro d’appel à partir du répertoire téléphonique
Vouspouvez mémoriserjusqu’à250 nomsavecnuméro detéléphone.Pour sélectionnerun nom,vous pou
vezfeuilleter àl’aidedes touchesdecurseur oubien entrerla premièrelettredu nomque vouscherchez.
a
s
Réper
toire
-
-
Introduisez la pre
mière lettre
t
Introduisez la
première lettre
t
-
O<>O
Sélectionnez
l’entrée souhaitée
bg
O<>O
Sélectionnez
l’entrée souhaitée
bg
-
Pour la programmation et la configuration de l’annuaire téléphonique, veuillez consulter la page 15 de la
présente notice d’emploi.
Numéroter à partir de la mémoire des numéros d’accès rapide
Souschacune des10 touches1...0 vouspouvez programmerun numéroabrégé comprenantun nom(20 ca
ractères max.) et un numéro (26 chiffres max.).
12
-
Page 57

Français
a
Pour la programmation des numéros d’accès rapide, veuillez consulter la page 16 de la présente notice
d’emploi.
Numérotation directe par une touche de fonction
La numérotationdirecte est lancée parles touches defonctions. Sous chacune descinq touches, vouspou
vez programmer deux numéros d’appels directs ou deux fonctions.
Sélectionnez le numéro souhaité avec les touches de fonction.
Poursélectionner unnuméromémorisé surle deuxièmeniveau, appuyezdeuxfois surla toucheconcernée.
Le double clic doit être immédiatement effectué.
La programmation des touches de numérotation directe/de fonction s’effectue par l’intermédiaire de la
configuration PC du téléphone.
Numéroter à partir de la liste d’appels / de mémos
s
N°abr.
a
Sélectionnez le
numéro d’accès rapide
Z
Appuyer sur la touche de fonction
ou
tbg
Sélectionnez le
numéro d’accès rapide
bg
-
Votre téléphonedispose d’une liste combinéed’appels et demémos. 30 entrées (appels,mémos, messages
SMS ou messages UUS1) peuvent y être mémorisées. Lorsque des entrées sont présentes dans la liste
d’appels/de mémos, la touche programmable »Liste d'app.« est affichée sur l’écran.
a
Utilisation des fonctions supplémentaires
Prendre un appel
s<>
Liste d'app.
Sélectionnez l’entrée souhaitée
bg
a lbg
Refuser un appel
al
Transmettre un appel (Call Deflection)
al
s
Transm.
t
Composez le numéro d’appel
s
refusé
O
Réduction de la transmission du numéro d’appel (rester anonyme)
at
Composez le numéro d’appel
al
Initier une communication avec un multinuméro fixe
OMs
Secret
s
Secret
bg
bg
13
Page 58

Français
at
Composez le numéro
d’appel
Répétition d’appel élargie
Avec la répétition d’appel élargie,ce sont les 20 derniers appels, numéros de téléphonecomposés et com
munications (conversations) quisont mémorisés. Vous pouvez consulter ces entréeset les numéroter en
suite automatiquement par le biais de la touche bis ou par les touches de curseur.
a
Répétition automatique de numéro
Vous avez composé lenuméro de téléphone d’un correspondant, mais la ligne estdéjà occupée ou ilne ré
pond pas. Vous pouvezinitier une numérotationautomatique par le biaisde laquelle votrecorrespondant
sera rappelé au bout d’env.10 secondes.
WW O
bt g
Composez le nu
méro d’appel
-
OMs s
TNM TNM-1 …
Sélectionnez l’entrée souhaitée
ou
W
Le correspondant est
occupé
TNM-10
répétition
n° auto
bg
bg
s
a
-
-
-
Déconnecter le rappel automatique
a
répétition n° auto oui
Activer/ désactiver le micro
g
Ecoute amplifiée
g
Commuter sur écoute amplifiée Terminer l’écoute amplifiée
Mains-libres
a
Commuter sur mains-libres Composez le numéro d’appel Terminer mains-libres
Utilisation du casque téléphonique
Afin d’utiliserle casque, unetouche fonctiondu téléphone estconfigurée en tant quetouche casque. Ladi
ode de la touche correspondante signalise si le casque est activé ou désactivé (DEL allumée/éteinte).
s
Muet Parler
LL
L
ss
Interrogation dans la
salle
t
s
g
g
L
-
a
14
z
Activation du casque Composez le numéro d’appel Conversation avec cas
tg
-
que
z
Désactivation du cas
que
-
Page 59

Message
Français
a
Intercommunication
a
Rappel automatique
Ms > s
Acoust Message
Ms>s
Acoust. Intercom
bt g
Composez le numéro
d’appel
Clavier
g
Sélection multi-fréquences ( dtmf)
g
municat
Correspondant est occu
pé ou ne répond pas
s
clav.
s
DTMF
Composez le numéro
d’appel interne
-
Composez le numé
ro d’appel interne
s
Rp si oc.
-
Entrez les caractères et chiffres
Entrez les caractères et chiffres
tg
Message
tg
Intercommu
nication
-
a
t
t
Téléphoner à plusieurs
Signal d’appel
g
Conversation avec le cor
respondant 1
Double communication
g
Conversation avec le corre
spondant
Transfert de conversation (transmission)
g
Conversation avec le
correspondant 1
Va-et-vient
g
Conversation
avec le corre
spondant
>s
-
conversation annoncée par
un signal d’appel
(correspondant 2)
-
R
-
Le correspondant 1 est
maintenu
R
Le correspondant 1
est maintenu
Connexion 1
Connexion 4
...
s
Accepter
Composez le numéro
tg
Composez le numéro
d’appel
g
Conversation
avec le corre
spondant
-
g
Conversation avec le correspondant
2;Le correspondant 1 est maintenu.
tg
-
d’appel
Conversation avec le corre
spondant 2
s
Conversation avec le
correspondant 2
>s
Connexion 1
...
Connexion 4
Transm.
g
Conversation
avec le corre
spondant
-
15
Page 60

Français
Conférence
g
Conversation
avec le corre
spondant 1
>s
Connexion
-
2
g
Conversation
avec le corre
spondant 2
s
Conférence
-
d
Conférence avec
les correspon
dants 1 et 2
-
Utilisation
Répertoire
Vouspouvez mémoriserjusqu’à250 nomsavecnuméro detéléphone.Pour sélectionnerun nom,vous pou
vez feuilleter le répertoire avec lestouches de curseur ou entrerde manièreciblée lapremière lettredu nom
recherché à l’aide du clavier de.
Si vous désirez qu’à la place du numérode votre correspondant, son nom apparaisse à l’écran, il
faut que soientinscrits dans le répertoireson nom et numérode téléphone (avec préfixeet, pour
un raccordementà un autocommutateur, avec lecode d’accès au réseau). Si lenom et lenuméro
sont mémorisés dans le répertoire, le nom du correspondant apparaît à l’écran.
Si le téléphone est coupé du réseau RNIS puis de nouveau rebranché ou si les données du répertoire sont
transmises au téléphone par le biais du PC, le répertoire subit une réorganisation interne. Après la transmission des données, le répertoire subit une réorganisation interne. Cette procédure s’effectue automatiquement et peut durer plusieures minutes. Pendant ce laps de temps, le répertoire du téléphonen’est pas
disponible.
-
Réglages du répertoire téléphonique
• Nom et numérode téléphone
• Déterminer le numérod’appel (Attributiond’un multinuméro)
• Tonalité spéciale (tonalitéVIP)
•
Texte info
Ajouter une entrée dans le répertoire téléphonique
Procédez de la manière suivante:
a
Msss
Prog. num. Répertoire Nouv
t Entrez le nom.
Dans l’exemple: »Leclerc«.
Confirmez avec
O
.
t Entrez le numéro d’appel.
Dans l’exemple: »0123456«.
Confirmez avec
O
.
Entrer r pertoire
Nom>Leclerc_
¬¬¬¬¬¬¬¬¬¬¬¬¬¬¬¬¬¬¬¬¬
Entrer r pertoire
n° app.>0123456_
¬¬¬¬¬¬¬¬¬¬¬¬¬¬¬¬¬¬¬¬¬
16
Page 61

Français
Mémoire de numérotation d’accès rapide
Sous chacune des10 touches 1 … 0 vous pouvezprogrammer un numéro abrégécomprenant un nom (20
caractères max.) et un numéro (26 chiffres max.).
Programmation d’un numéro abrégé
Procédez de la manière suivante:
a
t Entrez un nom pour ce numéro abrégé sélec
t Entrez le numéro d’appel.
M s s s <> O
Prog. num. N°abr. Nouv
tionné. Dans l’exemple: »Leclerc«.
Confirmez avec
Dans l’exemple: »012345«.
Confirmez avec
O
O
.
.
-
Sélectionnez le nu
méro d’accès rapide
Programm. Nom N abr.
V0>Leclerc_
¬¬¬¬¬¬¬¬¬¬¬¬¬¬¬¬¬¬¬¬¬
Program. N abr.
V0>012345_
¬¬¬¬¬¬¬¬¬¬¬¬¬¬¬¬¬¬¬¬¬
-
Ne pas déranger
Sivous désirez,que lesappels nesoientpas signaléspar lamélodieet levolumeréglés, vousavez lapossibilité d’employer la fonction»Ne pasdéranger« survotre téléphone.En fonctiondu réglage, tous les appels serontainsi seulementsignalésde façonoptique (surl’écran)ou bienparun bipsonore. Al’étatde veilledutéléphone, laligne supérieurede l’écran vousindique »r«ou»R« quela fonction »Ne pasdéranger« est acti-
vée.
»Non« Lafonction »Nepasdéranger«est désactivée.
»Oui« Lesappels nesont d’abordindiqués quepar unbref signal,puis uniquementvisuelle
ment(»r«est affichésurl’écran).
»Ton.
d'appel arr.«
Lesappels nesontsignalésque visuellement(»R«estaffiché surl’écran).
a
ss
Repos Non/Oui/Ton. d'appel
arr.
Réglages dans la configuration
Multinuméros (Numero d’appel)
Votre téléphone peut utiliser jusqu’à 10 multinuméros. En entrant un des multinuméros dans votre télé
phone,vous déterminezle numérod’appel devotre téléphone.Si vous entrezplusieurs multinumérosdans
votre téléphone, ce dernier sonnera pour chacun d’entre eux.
Sivous avezbranché votretéléphone surla connexionRNIS interned’unautocommutateur, ilvous fauten
trer le numérode votre téléphone dans l’autocommutateur. Veuillezobserver les instructions de la notice
d’utilisation de votre autocommutateur.
Si vous appelezun correspondant, vous avezla possibilitéde choisirun multinuméroqui esttransmis àvo
tre correspondant (par exemple pour une saisie séparée des taxes). Lorsque vous ne choisissez aucun nu
méro, c’est le premier numéro programmé dans votre téléphone, qui est transmis (TNM-1).
-
-
-
-
-
17
Page 62

Français
L’exemple suivant décrit la configuration du numéro »TNM-1«.
Procédez de la manière suivante:
a
Entrer ou consulter le numéro d’appel (multinuméro)
Il est seulementpossible d’enregistrer les numéros du téléphonepar le biais du Professional Configurator
du CD-ROM comportant les WIN-Tools. Vous pouvez voir le numéro enregistré sur le téléphone.
Dansle menu»programmer TNM-1«appuyez surlatouche programmable»Num. d'appel«.
O Le numéro d’appel programmé est affiché.
Actionnez la touche
menu.
Il est seulementpossible d’effectuerd’autres réglages(par ex.mélodie d’appel, volume,nom) sile
numéro de téléphone a été configuré auparavant.
Msss
Configuration MSN MSN-1
TNM-1 programmer }
transm.
Volume
Nom TNM
tona
Numéro d'appel
Programmer n d'appel
pour quitter le
O
TNM-1>222
¬¬¬¬¬¬¬¬¬¬¬¬¬¬¬¬¬¬¬¬¬¬
Réglages supplémentaires pour un multinuméro
s »Tonalit « Régler la mélodie
s »Volume« Réglage du volume de la mélodie.
s »Transm.« Programmation d’un numéro de transfert (call deflection).
s »Nom TNM« Atribution d’un nomà un multinuméro (8caractères au maxi
mum), qui est affiché à la place de la désignation »-TNM1«.
s »Taxe« Configurer uncompte de frais étantdisponible pour les appels
coûtants (transfert de ce numéro en sortie) vers l’extérieur.
s »PIN« PIN spécifiqueà un multinuméro,qui vous permetd’autoriser
ou de verrouiller un numéro pour la numérotation.
Reset - Rétablir l’état de base
La procédure décrite ci-aprèsvous permet de remettre votretéléphone en état de base. Toutes lesdonnées
quevous avezsaisiessont effacées.Sivous avezraccordéle claviersupplémentaireelmeg T400-T400/2àvo
tretéléphone, toutesles donnéesduclavier supplémentairesont égalementeffacéeslors del’exécution de la
procédure décrite ci-après.
-
-
18
Page 63

Français
Attention:Les paramétragesdu répondeuren optionainsi quedes messagesymémorisés neseront pasef
facés. Consultez à ce sujet la documentation fournie avec le répondeur.
Procédez de la manière suivante:
a
Ms s
Configu
ration
Service
-
s Appuyez sur la touche programmable »oui«,
pour charger le nouveau produit de société. Si
vous préférez ne pas effacer les données, ap
puyez sur la touche programmable »Non«.
La réinitialisation du téléphone s’effectue
après actionnement de la touche »oui«. Tou
tes les données ont été effacées.
t
PIN du téléphone
-
¬¬¬¬¬¬¬¬¬¬¬¬¬¬¬¬¬¬¬¬¬¬
-
Oss
Data oui
Vraiment TOUT
effacer ?
Non
oui
Which language }
Italiano
Español
Deutsch
English
Française
Nederlands
Déclaration de conformité et marque CE
-
Ce dispositif répond aux exigences de la directive R&TTE 1999/5/EG:
»Directive 1999/5/CE du Parlement Européen et du Conseil Européen du 9mars
1999 surles équipementshertziens etdes équipements terminauxde télécommunications et la reconnaissance mutuelle de sa conformité«.
La déclaration de conformité peut être demandée à l'adresse Internet suivante:
HTTP://www.funkwerk-ec.com.
Le symbolese trouvantsur l'appareil etqui représenteun conteneurà orduressigni
fie que l'appareil, une fois que sa durée d'utilisation a expiré, doit être éliminé dans
des poubellesspéciales prévues à ceteffet, de manière séparéedes ordures ménagè
res courantes.
© 2006 Funkwerk Enterprise Communications GmbH - Tous les droits réservés.
L'impression de cette documentation, même sousforme d'extraits, n'est permise qu'avec l'autorisation du
constructeuret encitant exactementla source,indépendammentde lamanière oudes médias(mécaniques
ou électroniques) de la diffusion.
-
-
Lesdescriptions fonctionnellesde cettedocumentation concernantles produitslogiciels d'autresconstruc
teurs sont basées surle logiciel utilisé au moment de la fabrication oude la mise sous presse. Les nomsde
produits ou de sociétés utilisés dans cette documentation sont dans certaines circonstances des marques
commerciales protégées par les propriétaires.
-
19
Page 64

Service de réparation
Tonfunk GmbH
Service de réparation
Unternehmenspark 2 / Halle d
Woltorfer Str. 77
31224 Peine
Funkwerk Enterprise Communications GmbH
Südwestpark 94
D-90449 Nürnberg
HTTP://www.funkwerk-ec.com
Sous réserve de modifications
010806
20
Page 65

Instruzioni per l'uso
elmeg CS410 / CS410-U / CS400xt / IP-S400
Italiano
1
Page 66

Italiano
7
Display e tasti del telefono
6
7
8
9
10
11
Figura 1
1 altoparlante
1
2
3
4
5
12
13
14
15
16
1
18
19
20
21
2 Microtelefonocon cavodicollegamento
3 Tastovoice maildeltelefono(modulo opzionale)otasto »Menudel centralino
4 6softkey
5 Displayretroilluminato a7righe
6 Tasto Menu:Con questotasto vieneaperto ilmenu diprogrammazione. Seci sitrova
all’internodi unmenue sipremequesto tastosiaccede allerelativefunzioni oppuresi
tornaindietro nellaprogrammazione.
7 TastoESC:premendoiltasto ESCdurantelaprogrammazione,il telefonotornaadess
ereinattivo.
8 / 10
9 TastoOK:Questo tastoèpremuto perconfermaredeidati inseritio memorizzaredelle
11 Tasto C: Questo tasto permette di retrocedere di un passo alla volta all’interno del
12 Tastoasterisco /tasto cancelletto.Inoltrepermette diriprendereuna chiamatamessa
Tasto freccia»Verso sinistra«/ »Versosinistra = Le frecce» {« und»} « nell’angolo
destro della riga superiore del display indicano chel’utente può richiamare ulteriori
funzioninella secondariga deldisplay premendoitastifreccia
impostazionidel telefono.
menu.Nelmodooperativo diinserimentodatiquesto tastopermettedicancellare sin
golicaratteri
precedentementein attesa coniltasto R
-
-
13 Tastidi selezione
14 Tastoascolto amplificato/vivavoce
15 TastoTRASFERTA (perpassarela chiamata)
16 Tastodi ripetizionedellaselezione
17 TastoR (attesa)
2
Page 67

18 Microfono
Italiano
19 5 tastifunzioneprogrammabili condiodiluminosi:Ogni tastoèdotato diundiodo lu
minosobicolore(livello1-rosso/livello2-giallo).QuestoLEDsegnalal’impiegodide
terminatefunzioni.
20 Legenda pertastifunzione
21 Diodo luminosoperla segnalazionedi chiamate(rosso)e voice-mail(giallo).
Descrizione e installazione
Questo manuale contiene le principali procedure da messa in opera e d’uso del telefono.
Ulteriori informazioni sono fornite all’interno del CD-ROM in dotazione.
CS410
Il presentetelefono disistema è predisposto peril collegamentoad una portaS0 interna(cavo a 4fili) diun
centralino elmeg.Se sidesiderano collegare il telefono adun’interfaccia Up0interna, deve essereinstallato
il modulo interno Up0/S0 nel telefono oppure deve essere usato il convertitore Up0/S0 esterno.
CS410-U
Il presentetelefono disistema èpredisposto per il collegamentoad un’interfacciaUp0 interna(cavo a2 fili)
diun centralinoelmeg. Intal casonon devepiù essereutilizzato ilmodulointerno Up0/S0oppure ilconvertitore esterno Up0/S0.
-
-
Impostazione / configurazione del telefono di sistema
Al telefonodi sistema potrà essereeffettuata soltanto unaconfigurazione limitata dellefunzioni supportate. Una configurazione completa può essere effettuata soltanto con il Professional Configurator del
CD-ROM WIN-Tools attraverso l’interfaccia USBdel telefono di sistema oppure attraverso laporta ISDN
interna di un centralino elmeg (firmware a partire dalla versione 5.43, CD a partire dalla versione 3.30).
CS400xt
Ilpresente telefonodi sistema vienefornito conuna tastierasupplementare (T400/2)e disponequindi di10
ulteriori tasti configurabili.
Èprevisto peril collegamentoad unaporta S0interna(cablaggio a4fili) diun centralino.Questo telefonodi
sistema nonè dotatodi un’interfacciaUSB oppure seriale per laconfigurazione oper altrouso. Deveessere
configurato attraverso la porta ISDN interna con l’ausilio del Professional Configurator dei WIN-Tools.
Inoltre, tutte le»funzioni audio« non sono implementatee non possono essere utilizzati i modulie le fun
zioni relativialla voice maile ad Up0. Tuttele funzionidi questi modulinon sono visualizzatesul display o
non possono essere utilizzate.
Il presente telefono è dotato della funzione »Funzionamento in emergen
OFF
ON
za«. In tal modo, in caso di un’interruzione dell’alimentazione a 230 V~ si
potrà continuaread utilizzare iltelefono attraverso ilcentralino all’NT. Te
nere contoche il centralino supporta questa funzione e chenon deve essere
utilizzato attraverso un convertitore Up0/S0.
-
-
-
3
Page 68

Italiano
elmeg IP-S400
Il presente telefono di sistema viene collegato per mezzo di un cavo Cat. 5 alla corrispondente interfaccia
LAN (odi rete) del centralino.Il telefono di sistemaè dotato diun'uscita PC chepermette dicollegare ulte
riori dispositivi terminali IP.
Impostazione / configurazione del telefono di sistema
-
Al telefonodi sistema potrà essereeffettuata soltanto unaconfigurazione limitata dellefunzioni supporta
te.Unaconfigurazione completaè possibilesoltantocon ilProfessional ConfiguratordeiWIN-Tools trami
te l’apposita interfaccia del telefono di sistema ad un impianto telefonico elmeg.
Un’altra descrizione per configurare i telefoni di sistema è consultabile dettagliatamente nelle
istruzioni per l’uso presenti sul CD-ROM.
Moduli di espansione per il telefono di sistema
Modulo Up0/S0(CS410)
•
Modulo voicemail ( CS410)
•
Tastiera supplementare»T400«,»T400/2« (CS410,IP-S400)
•
Informazioni per la sicurezza
• Rispettare latemperatura ambienteindicata nei dati tecniciper lostoccaggio eper l’uso deldispositivo. Il dispositivova collegatosolo inambienti incui latemperatura ammessaper l’esercizio.
• Tenere presente che al passaggio da temperature fredde a temperature calde non dovrà formarsi
condensa sul o nel dispositivo. Rimuoverel’imballaggio soltanto dopo cheè stata raggiunta la temperatura d’esercizio.
• Durante un temporaleevitare di collegareo scollegarele lineee nontelefonare.
-
-
• Collegare icavi soltanto alle rispettive presepreviste.
• Posare i cordoni dicollegamento senzacreare alcun rischio di infortunio.
•
Evitare leseguenti situazioni:
irradiazione direttadei raggidel sole
fonti di calore (ad es.radiatori)
apparecchiature elettroniche(ad es.impianti stereo,apparecchiature d’ufficioo fornia microonde)
penetrazione di umiditào di liquidi
liquidi o vapori aggressivi
polvere forte
•
Non usare il dispositivo in ambientiumidi oin zonesoggette arischio dideflagrazione.
•
Aprire esclusivamente quelle parti del dispositivo indicate nelle istruzioni per il montaggio o per
l’uso.
•
Non toccare le spinemaschie conoggetti appuntiti,umidi ometallici.
•
Sel’apparecchio nonè montatoin modofisso, appoggiarel’apparecchio ogli accessori suuna super
ficie antiscivolo.
•
Per la puliziadel dispositivo usare esclusivamenteun pannoleggermente inumidito.
•
Utilizzare esclusivamentegli accessori omologati.
•
Al dispositivo vanno collegati esclusivamente dispositivi terminali dotati di tensione di tipo SELV
(circuitoa bassissimatensione disicurezza) e/oche sianoconformi allanorma ETS300047. Nelcaso
dell’uso appropriato deidispositivi terminaliomologati questanorma vienerispettata.
-
4
Page 69

Italiano
Alimentatore di rete a spina
Usare solo l’alimentatore di rete a spina in dotazione oppure quello disponibile come accessorio
•
(DSA-0101F-05 UPoppure L15D52 ABDDLAWO).
Non usare alimentatori di rete aspina che sono visibilmente difettosi (con spaccature o crepe nella
•
cassa).
Cariche elettrostatiche (protezione ESD)
Alla consegnail telefonoè giàdotato diuna protezionecontro glieffetti dicariche elettrostatiche,maggiore
diquanto richiestoper l’omologazione.Evitare ugualmentecariche elettrostaticheelevate. Indiverse situa
zioni lacarica elettrostatica può assumerevalori che vannoben oltre ivalori richiesti per l’omologazione e
tenuti in considerazione in fase di progettazione. Le rispettive cause o circostanze, come ad esempio
un’umiditàrelativa dell’ariatroppo bassaoppure moquettedovrannoessere eliminate.Il produttoredel te
lefono non si assume nessuna responsabilità per danni causati da queste circostanze.
Disimballare ed installare il telefono
Disimballare
Telefono di sistema ISDN
-
-
• Microtelefono con cavo
• 2 piedini
• Cavo dicollegamento ISDN (ca. 6m)
• Cavo dicollegamento al PC (USB,ca. 3m)
• Cavo PC-audio(connettore jackstereo 3,5mm,ca. 2,5m)
• Cavo adattatoreper cuffiecon cavodi collegamentoa 4poli (8poli /4 poli)
• Fissacavo (autoadesivodopo larimozione dellafoglia protettiva)
• Istruzioni ed etichetteper itasti funzione
•
WIN-Tools CD-ROM con:
Professional Configurator, rubrica telefonica, download e Sound Manager,
driver TAPI, USB, CAPIe NDISWAN, AdobeAcrobat Reader,
Manual efile Adobe Acrobat perla stampa di etichettepersonalizzate.
Luogo d’installazione del telefono
Prima di posizionareil telefonodovranno essere montatii piediniposteriori deltelefono neipunti (6)indi
cati nella figura 6.
Tenerepresente chei piedinidi plasticadi cuièdotato iltelefono possonolasciaretracce susuperfici delica
te, come ades. su mobili. Il produttoredeclina ogni responsabilità per questotipo di danni. Si consigliadi
utilizzare un supporto antiscivolo per il telefono.
-
-
Pulizia del telefono
Il telefono èstato sviluppato per un uso di tipo normale. Se necessariopulire il telefono con un panno leg
germente umidoo conun panno antistatico.Non utilizzare solventi.Non usare maipanni completamente
asciutti; la caricaelettrostatica potrebbecausare anomaliedi funzionamentoall’elettronica. Evitarein qua
lunque modo che penetri umidità nel telefono poiché potrebbe esserne danneggiato in modo definitivo.
-
-
5
Page 70

Italiano
Collegamento del telefono (cavo di collegamento ISDN e cavo del microtelefono)
Per poter mettere in servizio il telefono devono essere connessi i cavi per il collegamento deltelefono e del
microtelefono.
Collegamento del cavo del microtelefono
Collegare il cavo del microtelefono (1) come illu
strato nellefigura6. Inserire il cavo delmicrotelefo
no nella guida (4)e fissarlo sotto le due linguette di
fissaggio (5).
2
4
6
5
5
4
4
3
6
7
1
Figura 4
Collegamento del cavo ISDN
Porta S0 (CS400xt CS410)
Collegare ilcavo ISDN(2) come illustrato nellafigura 6 (presa S0).Il connettorepiù lungo va inseritonella
presa ISDN e quello più corto nella presa ISDN del telefono. Posare il cavo ISDN nell’incavo (4) e fissarlo
sotto le due linguette di fissaggio (5).
Interfaccia Up0 (CS410-U)
-
-
2
1
3
5
4
Figura 3
I telefoniCS410 dotati dei moduliUp0/S0 e CS410-U nonpossono più esserecollegati attraverso
la porta S0 (3) ad una porta ISDN (ad es. porta ISDN interna del PABX).
Informazioni importanti per l'interfaccia UP0
•
Alla presa S0del telefonopuò esserecollegato undispositivo terminaleISDN con interfaccia S0.
•
La lunghezza della linea tra elmeg CS 410-Ued il dispositivo terminale ISDN collegato a valle deve
essere di max.10 metri.
•
Le resistenze di terminazionenon devonoessere inserite.
Collegareil cavoISDN (2)comeillustrato nellafigura 3(presa Up0). Il connettore piùlungo va inserito
nellapresa ISDNe quellopiù cortonella presaISDN
del telefono. Posare il cavo ISDN nell’incavo (4) e
fissarlo sotto le due linguette di fissaggio (5).
6
Page 71

elmeg IP-S400 all'interfaccia Ethernet
Italiano
1
2
3
4
5
6
Figura 4
Collegamento e messa in servizio del telefono di sistema al centralino (funzione base con DHCP)
Consultare leistruzioni peril montaggiodel centralinoper rilevarequali interfacce sono previste per il col
legamentodell'IP-S400. Effettuareilcollegamento conl'interfacciacentralino Ethernetdeltelefono disistema.
Presa per l'alimentatore a spina
-
Alimentatore
-
Interfaccia ethernet per PC
-
PC o ulteriore telefono IP
-
Interfaccia ethernet per centrali
-
no
Centralino elmeg
-
-
-
• Configurare il centralino per l'utilizzo ditelefoni disistema IP.
• Definire l'MSN dei telefonidi sistema IP nel centralino.
• Collegare l'alimentazioneelettrica (alimentatorea spina) al telefonodi sistemaIP ed attendere l'ini-
zializzazione del telefono.
Dopo l'inizializzazione del telefono di sistema IP, il sistema chiede all'utente di selezionare la lingua.
•
Selezionare la linguaper ildisplay.
Azionare i tasti freccia per selezionare le lin
gue disponibili.
•
Inserire unodei multinumeri(MSN) inseritinel centralino(nell'esempio 12).
Confermare i dati inseriti con
Premere il tasto
azionare nuovamente il tasto
configurazione dell’impianto non viene inse
rito alcun PIN.
e una volta richiesto
O
O
O
, se nella
-
-
Which Country? }
Italiano®
Deutsch
Française
Programm dial number
MSN-1>12
IPS login PIN for sys
server
MSN-1>
Español
English
Nederland
7
Page 72

Italiano
Attivare l'utilizzodi DHCP.
•
Il telefonoed il centralino sono sincronizzati.
•
Selezionare »si«. Use automatic IP
adress setting
no
si®
Se non èpresente uncollegamento versoil centralino(nessun collegamentoLAN oppureil telefo
no non è connesso), sul display l'ora è sostituita dal simbolo » -----/ /----‰«.
Adesso iltelefono disistema IPpuò essereutilizzato comeun telefonodi sistemaall'interfaccia ISDNoppu
re UP0.
Cambiare la legenda
Le legendeper i tasti funzionesi trovano sull'ultima pagina delpresente manuale per l'utente. Ritagliarela
legenda desiderata.
Per sostituire lalegenda estrarre la copertura flessibiletendendola tra il pollice e l’indicee sollevarla verso
l’alto. La legenda può essere sostituita.
È inoltrepossibile creare la proprialegenda da PC. SulCD-ROM delcentralino si troveràun file di formato
Adobe Acrobat con modelli.
Simboli
Perillustrare alcuneprocedure diimpostazione odi comandodel telefonoall’interno delpresente manuale
sono stati usati i simboli di seguito descritti.
-
b Sollevareil microtelefonooppureinviarela selezionedigitata.
a Riagganciareil microtelefono.Il telefonoèacceso manonattivo.
-
l Vienesegnalata unachiamata. Suonalamelodia/cadenza di segnalazione.
g Sieffettua unaconversazione.
d Èstata avviataunaconferenza.
q Sisente iltonodiconferma positivoonegativo.
t Comporreil numerotelefonico,uncodice, premereuntasto o digitareuntesto.
09
*#
Impostazioni specifiche del paese
Sesi desideranousare iltelefono inunpaese diversodaquello impostatonelleimpostazioni base,ènecessa
rio impostare dei parametri specifici per il rispettivo paese.
Premereun determinatotasto diselezione.
-
8
Page 73

Italiano
Ad es. la lingua, la valuta e particolari condizioni della porta ISDN con l’impostazione base del rispettivo
paese.
Controllare nelmodo descrittoqui diseguito seè possibileeffettuare specificheimpostazioni peril paesein
cui viene usato il telefono.
Procedere come segue:
a
Ms s
Configurazione Servizi
s Premere i tasti freccia per visualizzare i paesi
per i quali sono disponibili particolari impos
tazioni.
Premere il softkey del paese desiderato. P.es.
»Italiano«.
Le impostazioni specifiche del paese selezio
nato vengono implementate subito.
I dati del telefono non vengono cancellati.
Display del telefono
1
-
Data
t
PIN del telefono
italiano®
-
Deutsch
français
-
29.05.03 07:41 }
rubrica
VIP
O>s
Coun
try
Which Country? }
español
english
nederland
escl.suon.
2
-
Ora
3
-
21 caratteri a riga
4
-
Freccia: ulteriori opzioni di menu richiamabili attraver
so i tasti freccia.
5
-
Tasto voice-mail del telefono (modulo opzionale)
6
-
Freccia: indicazione di un softkey che può essere pre
muto nell’attuale menu.
Figura 5
Il telefonoè dotatodi un display retroilluminato a7 righe.La retroilluminazione è inserita e disinseritaau
tomaticamente.
Dopo ilcollegamento alla porta ISDN internadel centralino nellaprima riga del display appaionola data e
l’ora. Ladata e l’ora vengono rilevate automaticamentedal centralino. Nellealtre righe iltesto visualizzato
per unafunzione sitrova sempre accantoal rispettivo softkey. Premereil softkey in questione pervisualiz
zareil livellosuccessivo. Dalmomento cheil displaynon puòvisualizzaretutte leinformazioni inunavolta,
sul display vienevisualizzato »««oppure »»«.Per visualizzarei caratteririmanenti, premereprima iltasto
R e quindi i tasti freccia.
Per spiegarele impostazionie funzioni deltelefono nelpresente manuale sonoillustrati vari display delte
lefono. Sesono stampatesoltanto singole righedel display(cioè il display nonè stampatocon tutte le7 rig
he), il bordo superiore o inferiore del display è interrotto da una linea ondulata.
-
-
-
-
-
-
9
Page 74

Italiano
Per l’inserimento di caratteri alfanumerici e di caratteri speciali utilizzare i tasti come segue:
Tasto
1
2
3
4
5
6
7
8
9
*
#
Quando si preme...
1234567
1
ABC2 ÄÅÆ
DEF 3 €
GHI 4
JKL5
MNO6 ÖØ
PQRS7ß$
TUV8Ü
WX Y Z 9 ¥
*
#
0 Iltasto 0vieneutilizzatoper differenticaratterispeciali.
P.es.:»!«, »&«,»?«,»+«, »-«,»=«,»(«,»)«, »@«, »$«,...
Quando si premela primavolta iltasto 0viene inseritounospazio. Allaseconda pressionedello stessotasto
il display visualizza alcuni caratteri speciali. Se si desiderano selezionare un carattere speciale, premere il
tasto rispettivo 1 … 9. Se si desiderano visualizzare ulteriori caratteri speciali, premere il tasto 0.
Modalità d’inserimento lettere
Perl’inserimento dilettere sihanno diverse possibilità. Lamodalità d’inserimentoattivata èindicata sulla
to destro della seconda riga del display (nessuno display, »Abc« o »ABC«).
nessuno display Tutti i caratterisonominuscoli.
Esempio:»bianchi, carlo«.
»Abc« Ilsuccessivo carattereèmaiuscoloe tuttiglialtri sonominuscoli.
Esempio:»Bianchi, Carlo«.
»ABC« Tuttii caratterisono maiuscoli.
Esempio:»BIANCHI, CARLO«.
All’inizio dell’inserimentodi caratteri è sempre attivala modalità »Abc«.Per modificare la mo
dalitàd’inserimento premereil tastoR. Perinserire uncarattere premerenella modalità»Abc«il
tasto C.
-
-
10
Page 75

Informazioni su funzioni impostate
Italiano
s Quando il telefono è inattivo nella riga
»info« sono visualizzate ulteriori informa
zioni su funzioni impostate. Nell’esempio:
»-A-B-s-«.
Per visualizzare ulteriori informazioni sulle
funzioni impostate premere il softkey accanto
a »Info«.
Se sono impostate diverse funzioni, premere i
tasti freccia per vedere le diverse impostazio
ni.
Display Funzioni impostate
»-A-«
»-B-«
»-s-«
»-S-«
Appuntamento attivo impostato.
Controllo alla selezione oppure filtro chiamate attivati.
Accesso protetto ai menu del telefono.
Funzione »esclusione suoneria« (solo un tono di avviso) impostata.
Funzione »esclusione suoneria« (totale) impostata.
29.05.03 07:21A}
-
-
Info -A-B-s-
rubrica
VIP
ªªªªªªªªªªªªªªªªªªªªªª
blocco/menu:
configurazione protet
¬¬¬¬¬¬¬¬¬¬¬¬¬¬¬¬¬¬¬¬¬¬
esci.suon
chiam non ri
»-D-«
»-i-«
»--«
Deviazione di chiamata impostata.
Informazioni su tasti funzione programmati
ad esempio: Annuncio permesso / non permesso.
Voice-mail,comando aorario, inoltrodi chiamataoppure comandoda remoto(modulo opzionale) attivati.
Telefonare
Effettuare una conversazione
Selezionare il numero - senza possibilità di correzione
btg
Selezionare il numero
Selezionare il numero - con possibilità di correzione
atbg
Selezionare il numero
Per modificare il numero telefonico o correggere un errore, scegliere la cifra sbagliata per mezzo dei tasti
freccia e premere il tasto C per cancellarla. Digitare quindi la cifra corretta.
Se sidesiderano effettuare la conversazioneper mezzo del microtelefono, sollevarlodopo aver compostoil
numero. Durante la conversazionesi potrà commutare sempre tra ascolto amplificato e conversazionecon
microtelefono.
Dopo aver composto ilnumero telefonico si potrà anchepremere il tasto vivavoce per avviarela selezione
del numero ed attivare la funzione vivavoce.
11
Page 76

Italiano
Senon risultapossibileeffettuare laconversazione (ades. perchèilcontrollo dellaselezioneimpedisce lase
lezionedi quelnumero oppureil budgeta disposizionedi quelnumero/MSN èesaurito) suldisplay deltele
fonoappare unavvertimento. Z.B.: »bloccato: numero tel«, seil controllodella selezioneèat
tivato.
Altre possibilità per la selezione del numero con microtelefono agganciato
Anche nelleseguenti situazioni si potrà comporreil numerotelefonico conil microtelefonoagganciato edi
correggere il numero o di aggiungere dei numeri prima della selezione:
dalla memoriadi ripetizionedella selezione.
•
selezione dalla lista delle chiamatesenza risposta/degli appunti.
•
selezione dalla rubrica telefonica.
•
selezione dalla memoria VIP.
•
selezione dalla memoria di selezionediretta.
•
attraverso lafunzione CTI,TAPI (CS410).
•
Sesi usufruiscediuna dellepossibilitàelencate inalto,prima dieffettuarela selezione, sipotrannoimposta
re altre funzioni. Si può stabilire a priori se e quale numero telefonico (MSN) dovrà essere trasmesso
all’utente chiamato.
-
-
-
-
Scegliere il numero telefonico dalla rubrica del centralino
Sesi collegail telefonodi sistemaad un PABXelmeg contelefonia disistemasi potràselezionare unnumero
dalla rubrica del centralino.
a
Selezione dalla rubrica telefonica del telefono
La rubrica telefonica deltelefono permettedi memorizzare un totale di 250 nomie numeritelefonici. Perla
selezionedi unnome,si potrannoscorrerele vociper mezzodei tastifrecciaoppure digitaredirettamente la
lettera iniziale del nome desiderato per mezzo della tastiera.
a
La programmazione ed impostazione della rubrica telefonica sono descritte a pagina 15 del presente ma
nuale.
Selezione dalla memoria VIP
Rs
Rubri-
ca
s
Rubri
ca
-
t
Inserire la lettera
iniziale
t
Inserire la let-
tera iniziale
O<>O
Scegliere
una voce
O<> O
Scegliere
una voce
b
bg
-
Perognuno dei10tasti 1...0sipotrà programmareunavoce VIP,compostada unnome(max. 20caratteri) e
da un numero telefonico (max. 26 cifre).
a
La programmazione dei numeri VIP è descritta a pagina 16 del presente manuale.
12
s<>
VIP
Destinazione VIP
auswählen
oppure
tbg
Destinazione VIP
auswählen
Page 77

Selezione diretta con tasti funzione
Italiano
La selezione diretta avviene per mezzo dei tasti funzione. Su ognuno dei cinque tasti possono essere pro
grammate due funzioni o selezioni dirette.
a
Premere il tasto funzione
Scegliere il numero telefonico desiderato con i tasti funzione.
Sesi desideranoselezionareil numerotelefonicodel secondolivello,premere duevolteil tastodesiderato. Il
tasto deve essere premuto rapidamente in successione.
La programmazione dei tasti di funzione/selezionediretta viene effettuata attraverso la configurazioneda
PC del telefono.
Selezione dalla lista delle chiamate senza risposta/degli appunti
Iltelefono disponedi unalista combinatadi chiamatesenza rispostae diappunti. Questalista puòcontene
re un massimo di 30 voci (chiamate, appunti, SMS o messaggi di testo UUS1). Con il softkey »chiam
non ri« idati contenuti nella lista delle chiamatesenza rispostae degli appunti vengono visualizzati sul
display.
a
s
chiam non ri
Z
seleziona voce
bg
bg
-
-
Ulteriori funzioni
Rispondere a una chiamata entrante
albg
Rifiutare una chiamata
al
Trasferta di una chiamata senza risposta (Call Deflection)
al
Non trasmettere il numero identificativo (chiamata anonima)
at
Selezionare il numero
OM s
al
s
trasferta
riservato
s
riservato
t
Selezionare il numero
bg
s
rifiuta
O
bg
Effettuare una chiamata con un determinato MSN uscente
at
Selezionare
il numero
OMs s
MSN MSN-1 …
MSN-10
bg
13
Page 78

Italiano
Ripetizione estesa della selezione
Nella ripetizione estesa della selezione vengono memorizzati gli ultimi 20 numeri chiamati, collegamenti
(conversazioni) emessaggi testuali. Premendoil tasto di ripetizionedella selezione oppurei tasti freccia si
potrà visualizzare e quindi selezionare automaticamente questi numeri.
a
Ripetizione automatica della selezione
Se è stato chiamat unoutente occupato o assente, èpossibile impostare la ripetizione automatica della sele
zione, funzione che consente di richiamare quel determinato derivato circa ogni 10 secondi.
bt g
Disattivare la ripetizione automatica della selezione
Disattivare/ attivare il microfono
g
WWO
Scegliere una voce
W
Selezionare il
numero
a
L’utente chiamato
è occupato
ss
ripetizione
automat.
consultazione
s
escl micr parlare
oppure
s
bg
s
ripeti
zione
automat.
-
Ja
a
g
-
Ascolto amplificato
g
Attivare ascolto amplificato Disattivare ascolto amplifi-
Viva voce
a
Usare una cuffia telefonica
Per l’utilizzo della cuffia un tasto funzione del telefono èconfigurato come tasto cuffia.Il tasto assegnato a
questo diodo luminoso segnala se la cuffia è attivata o disattivata (LED acceso/spento).
a
Annuncio
a
z
Attivare cuffia Selezionare il numero Conversazione con
Ms>s
LL
cato
L
Attivare viva voce Selezionare il numero Disattivare viva voce
tg
-
au
dio
t
annun
cuffia
cio
tg
-
Digitare
l’interno
g
L
z
Disattivare cuffia
Annuncio
14
Page 79

Funzione interfono
Italiano
a
Richiamata automatica
Ms>s
au
-
dio
bt g
Selezionare il nu
mero
Keypad
g
Postselezione (sequenza DTMF)
g
Telefonare con diversi interlocutori
Avviso di chiamata in attesa
g
Conversazione con l’interlocutore 1
L’utente chiamato è occupato
oppure non risponde
s
keypad
s
DTMF
chiamata in attesa
(Interlocutore 2)
inter
Richiamata su
occupato
s
accettare
tg
-
fono
s
Digitare
l’interno
interfono
a
t
Inserire cifre e simboli
t
Inserire cifre e simboli
g
Conversazione con interlocutore 2;
Interlocutore 1 viene messo in attesa
Chiamata intermedia
g
Conversazione con interlo-
cutore
Perriprendere l’ultimachiamata messain attesa(p.es. perche’l’altro interlocutorenon risponde),premere
il tasto C.
Trasferta della chiamata (passare una chiamata)
g
Conversazione con
l’interlocutore 1
Chiamata alternata
g
Conversazione
con interlocu
tore
Conferenza
>s
-
Interlocutore 1 viene messo
R
Interlocutore 1 viene
messo in attesa
collegam 1
...collegam 4
R
Selezionare il numero Conversazione con
in attesa
tg
Selezionare il numero Conversazione con
g
Conversazione
con interlocutore
desiderato
tg
l’interlocutore 2
T
trasferta
l’interlocutore 2
>s
collegam
1...
collegam 4
g
Conversazione
con interlocu
tore desiderato
-
g
Conversazione
con
l’interlocutore 1
>s
collegam 2
g
Conversazione
con
l’interlocutore 2
s
conferenza
d
Conferenza con
interlocutori 1 e 2
15
Page 80

Italiano
Uso del telefono
Rubrica telefonica
La rubrica telefonica deltelefono permettedi memorizzareun totale di 250 nomi enumeri telefonici.Per la
selezionedi unavoce dallarubrica telefonica,si potrannoscorrere levoci permezzo deitasti frecciaoppure
digitare direttamente la lettera iniziale del nome desiderato per mezzo della tastiera.
Se in caso di una chiamata entrante, sidesidera visualizzare suldisplay ilnome delchiamante inve
ce del numero telefonico, nella rubrica telefonica dovranno essere memorizzati sia il nome che il
numerotelefonico (inclusoilprefisso e,con l’usodi uncentralino, inclusoanche ilprefissodi acces
solinea). Il nomedel chiamanteviene visualizzatounicamentese ilnumero trasmessocorrisponde
al numero telefonico memorizzato nella rubrica telefonica.
Se il telefono viene staccato eriattaccato alla porta ISDN oppure se i dati della rubrica telefonica vengono
trasmessi nella rubrica telefonica per mezzo del programma PC, la rubrica telefonica viene riorganizzata
internamente. Questa procedura avvieneautomaticamente epuò durare alcuni minuti. Durante questa fa
se la rubrica telefonica del telefono non è disponibile.
Impostazioni per la rubrica telefonica
Nome enumero telefonico
•
• Numero telefonicouscente (impegnomirato MSN)
• Impostazione di untono speciale (tonoVIP) perun numerodella rubricatelefonica
• Messaggio informativo
Inserire nuove voci nella rubrica telefonica
Procedere come segue:
-
-
-
a
t Inserire il nome.
Nell’esempio: »Bianchi«.
Confermare con
t Digitare il numero.
Nell’esempio: »0123456«.
Confermare con
Msss
tasti&numeri Rubrica nuovo
inserire nuova voce
.
O
O
.
nome>Bianchi_
¬¬¬¬¬¬¬¬¬¬¬¬¬¬¬¬¬¬¬¬¬¬
inserire nuova voce
numero tel>0123456_
¬¬¬¬¬¬¬¬¬¬¬¬¬¬¬¬¬¬¬¬¬¬
Memoria VIP
Perognuno dei10tasti 1…0 sipotrà programmareuna voceVIP,composta daunnome (max.20caratteri)
e da un numero telefonico (max. 26 cifre).
Programmare un numero VIP
Procedere come segue:
a
M s s s<>O
tasti&numeri VIP nuovo
Selezionare la des
tinazione VIP
-
16
Page 81

Italiano
t Inserire il nome per la destinazione VIP sele
zionata. Nell’esempio: »Bianchi«.
Confermare con
O
.
t Digitare il numero.
Nell’esempio: »012345«.
Confermare con
O
.
-
V0>Bianchi_
¬¬¬¬¬¬¬¬¬¬¬¬¬¬¬¬¬¬¬¬¬¬
inserire numero VIP
V0>012345_
¬¬¬¬¬¬¬¬¬¬¬¬¬¬¬¬¬¬¬¬¬¬
inserire
programmare
Esclusione suoneria
Se le chiamate non devono esseresegnalate con la suoneriaed il volume impostati, si potrà attivare la fun
zione »esclusione suoneria« del telefono. In tal caso, in base all’impostazione, le chiamate sono segnalate
solo visivamente (sul display) oppure con untono brevedi segnalazione. Ilvolume del tono breve di segna
lazione chiamatapuò essereimpostato come descrittoa pagina. In questostato sul display appare»s«op
pure »S« per indicare che la funzione »esclusione suoneria« è attivata.
»no« Lafunzione »esclusionesuoneria«è disattivata.
»suoneria
spenta.«
»sì« Lechiamate vengonobrevementesegnalate conuntono acustico epoisolo suldisplay
Lechiamate vengonosegnalate solosul display(»S« suldisplay ).
(»s«sul display).
-
-
-
a
Esclusione suoneria No / Sì / Suoneria spenta
ss
Impostazioni nella configurazione
Multinumeri (MSN)
Si potrà inserireun totaledi 10numeri telefonici(MSN) neltelefono. Con l’inserimento di un numerotele
fonico nel telefono si stabilisce che il telefono è raggiungibile se viene selezionato tale numero telefonico
(MSN). Sesi inserisconopiù diun numerotelefonico, iltelefonosuona ognivolta cheviene selezionatouno
di questi numeri inseriti.
Alla portaISDN interna di unPABX deveessere inserito il numero internodel centralinoassegnato al tele
fono. Osservare le istruzioni ed avvertenze riportate nel manuale del centralino.
Per unachiamata uscente sipotrà scegliere undeterminato numero telefonico (MSN)che verrà trasmesso
al chiamato (ad es. per laregistrazione differenziatadegli addebiti).Se nonviene sceltoun determinatonu
mero telefonico, viene usato il primo numero inserito nel telefono (MSN-1).
L’impostazione delnumero telefonico(MSN) viene descritta nelseguente esempioper ilnumero
telefonico »MSN-1«.
Procedere come segue:
-
-
-
a
Msss
configura MSN MSN-1
17
Page 82

Italiano
impostazioni MSN-1 }
trasferta
volume
nome msn
suoneria
Numero tel
Inserire e visualizzare il numero telefonico (MSN)
I multinumeri del telefono possono essere inseriti soltanto con l’ausilio del Professional Configurator del
CD-ROM WIN-Tools. Il telefono permette di visualizzare il numero telefonico impostato.
All’internodel menu»impostazioni MSN-1« premereil softkey»Numero telefonico«.
O È visualizzato il numero telefonico impostato.
Uscire dal menu premendo il tasto
Per impostare le ulteriori funzioni(ad es. suoneria, volume, nome)il numerotelefonico deve ess
ere già impostato.
Altre impostazioni per un multinumero (MSN)
s »tono« Impostazione delle suonerie
s »volume« Impostare il volume per la melodia di segnalazione.
s »transf« Preimpostazione di unnumero telefonico per la trasferta delle
chiamate (Call Deflection).
s »nome_MSN« Assegnare un nome al numerotelefonico (MSN)(max. 8 carat-
teri) che viene visualizzato sul display invece di »-MSN1«.
s »addebiti« Impostazione diun contoaddebiti, che èdisponibile quandosi
effettua unachiamata soggettaad addebito(alla tramissione di
un numero telefonico uscente).
O
.
inserire il numero
MSN-1>222
¬¬¬¬¬¬¬¬¬¬¬¬¬¬¬¬¬¬¬¬¬¬
-
s »PIN« PIN specificoper il multinumero per abilitare/bloccare la sele
RESET - Ripristino delle impostazioni di base
Tramite la procedura seguenteè possibileripristinare leimpostazioni dibase del telefono. I dati inseritinel
telefono verranno cancellati.
Se al telefonoè stata collegata una DSS elmeg T400-T400/2 verrà cancellata anche laprogrammazione dei
relativi tasti.
Attenzione: Le impostazioni del voice-mail opzionale e i messaggi eventualmente memorizzati non ver
ranno invece cancellati. Consultare a tale scopo la documentazione del voice-mail.
Procedere come segue:
a
18
Ms s
configura Servizi
zione di determinati numeri telefonici.
t
PIN del telefono
Oss
-
-
dati Sì
Page 83

Italiano
s Premere il softkey »sì« per ripristinare le
impostazioni di base. Se non si vogliono per
dere i dati in memoria premere il softkey
»No«.
Se si preme il softkey »sì« il telefono ripris
tina le impostazioni di base. Tutti i dati ven
gono cancellati.
-
-
-
Cancellare
TUTTO ?
no
Sì
¬¬ ¬¬¬¬¬¬¬¬¬¬¬¬¬¬¬¬¬¬¬¬
Which language }
Italiano
Español
Deutsch
English
Française
Nederlands
Dichiarazione di conformità e marcatura CE
La presente apparecchiatura è conforme ai requisiti di cui alla direttiva R&TTE 1999/5/CE:
»Direttiva 1999/5/CE del Parlamentoeuropeo e del Consiglio, del9 marzo 1999, ri
guardante le apparecchiature radio, le apparecchiature terminali di telecomunica
zioneed ilreciproco riconoscimentodella loroconformità«.La dichiarazionedi con
formità può essere consultata al seguente indirizzo Internet: http://www.funk
werk-ec.com.
Il simboloraffigurante il bidone della spazzatura barrato acroce, riportatosull'apparecchiatura, indicache
allafine delsuoutilizzo l'apparecchiaturadovrà esseresmaltitanei rispettivipuntidi
raccolta differenziata, separata dai rifiuti domestici normali.
-
-
-
-
© 2006 Funkwerk Enterprise Communications GmbH - Tutti i diritti sono riservati.
La riproduzione totale o parziale di questa documentazione è permessa esclusivamente previa autorizzazione scritta dell'editore e solo con esatta citazione della fonte, indipendentemente dal modo o dal mezzo
(meccanico o elettronico) con cui avviene.
Le funzionalità descritte all'interno del presente manuale e facenti riferimento a prodotti software di altri
produttori fanno riferimento asoftware utilizzati al momento dellarealizzazione del dispositivo e delpre
sente manuale.Le denominazioni diprodotti e ditteusate all'interno delpresente manuale possonoessere
marchi registrati.
-
19
Page 84

Servizio di riparazione
Tonfunk GmbH
Servizio di riparazione
Unternehmenspark 2 / Halle D
Woltorfer Str. 77
31224 Peine
Funkwerk Enterprise Communications GmbH
Südwestpark 94
D-90449 Nürnberg
http://www.funkwerk-ec.com
Soggetto a modifiche
20
010806
Page 85

Instrucciones de servicio
elmeg CS410 / CS410-U / CS400xt / IP-S400
Español
1
Page 86

Español
7
Pantalla y teclas del teléfono
Figura 1
1 Altavoz
10
11
1
2
3
4
5
12
6
7
8
9
13
14
15
16
1
18
19
20
21
2 Auricularcon cordón
3 Teclade contestadordelteléfono(módulo opcional)otecla »Menúcentralita
4 6teclas
5 Pantallade 7líneasconiluminación defondo
6 TeclaMenú: Medianteesta teclausted abriráel menúdeprogramación. Siusted yase
encuentra enun menúy acontinuación pulsala tecla, tendrá asu disposición funcio
nesdependientes delmenú o retrocederáunpaso enlaprogramación.
7 TeclaESC: Al pulsarlateclaescape durantelaprogramación volveráaalcanzarseel es
tadode reposodelteléfono.
8 / 10
9 Tecla OK: Al activar esta tecla, una entrada se confirmará o una configuración se
11 TeclaC: Medianteestatecla ustedpodráretroceder unpasoenel menú.Siusted seen
12 Teclade asterisco/tecla #
13 Teclasde marcación
14 Teclaescucha /teclamanoslibres
Tecladeflecha»izquierdo«/»derecho«:Lasflechas» {«y»} «queseencuentranenla
esquina derecha de la líneasuperior de la pantalla le indicarán que puede seguir lla
mandofunciones enlas líneasinferiores mediantelas teclasde flecha.
guardaráen elteléfono.
cuentraen elmodo registro,puede utilizarestateclapara borraralgunoscaracteres.
-
-
-
-
15 Teclade corte
16 Teclade repeticióndelamarcación
17 Teclade consulta
18 Micrófono
2
Page 87

Español
19 5 teclas de función programmables con diodos luminosos:Toda tecla dispone de un
diodoluminosodedos colores(Nivel 1- rojo/Nivel2 -amarillo). EsteLED puedeutili
zarsepara indicarfuncionesdeterminadas.
20 Etiquetas parateclasde función
21 LED paraseñalizaciónde llamadas(rojo)y contestador(amarillo)
Descripción e instalación
Eneste manualde instruccionessólo se describenlas másimportantes secuenciasde manejopara
la puesta en servicio del teléfono y para efectuar llamadas. Usted encontrará una información
más detallada en el exhaustivo manual de instucciones del CD-ROM adjunto.
CS410
-
Este teléfono de sistemaes diseñado para ser conectado a la conexiónS0 interna (cableado de4 conducto
res) de unacentralita elmeg.Si deseautilizar elteléfono enuna conexiónUp0 interna,debe instalaren elte
léfono el módulo interno Up0/S0 o utilizar el convertidor Up0/S0 externo.
CS410-U
Esteteléfono desistema esdiseñado paraser conectadoa laconexión Up0interna (cableadode 2conductores) de una centralita elmeg. Novolverá a necesitar el módulo interno Up0/S0 o el convertidor Up0/S0 externo.
CS400xt
Esteteléfono desistemase suministraconuna ampliacióndeteclas (T400/2)y disponedeeste mododemás
de 10 teclas configurables adicionales.
Para laconexión auna conexión SO interna (cableadode 4hilos) hay previstauna centralita.El teléfono de
sistema nodispone de ninguna conexión USBo seriepara la configuraciónu otro uso.Debe configurarse a
través de laconexión RDSI interna conel Professional Configurator deWIN-Tools. Además, no están implementadas todaslas »Funciones de audio« yno puedenutilizarse los módulosy funcionesContestador y
Up0. Todas las funciones de estos módulos no se muestran en la pantalla o no pueden utilizarse.
Este teléfono dispone de la función »Funcionamiento de emergencia«. De
OFF
ON
este modo,en casode fallode redde 230V~ puedeseguir funcionandoen la
NT a través de la centralita. Debe tener en cuentaque su centralita soporta
esta característica de rendimiento y que no debe utilizarse a través de un
Up0/S0-Converter.
-
-
elmeg IP-S400
Este teléfono de sistema se conecta a la correspondienteconexión LAN(o red)de lacentralita pormedio de
un cableCat. 5. Elteléfono de sistemadispone de unasalida PC ala que puedenconectarse varios aparatos
terminales IP.
Ajuste / configuración del teléfono de sistema
En elteléfono de sistemasólo se puederealizar una configuración limitada de las prestaciones soportadas.
Una configuracióncompleta del teléfonode sistema enuna instalación elmegsólo es posiblecon un confi
gurador profesional (Professional Configurator) de WIN (WIN-Tools) através de un interfaz correspon
diente.
-
-
3
Page 88

Español
Otras descripcionespara la configuración del teléfonode sistemalas encuentra en las ampliasin
strucciones para el manejo en el CD-ROM.
Ampliaciónes para el teléfono de sistema
Módulo Up0/S0(CS410)
•
Módulo Contestador(CS410)
•
Teclado suplementario »T400«,»T400/2« (CS410,IP-S400)
•
Indicaciones de seguridad
Observe la temperaturadel entornopara el almacenamiento y el serviciodel aparatoindicada en las
•
características técnicas. El aparato sólodebe serconectado cuando se haya alcanzadola temperatu
ra ambiental defuncionamiento requerida.
Tenga encuenta que al pasar detemperaturas bajasa mayorespuede sucederque se forme una capa
•
de agua condensada alrededor oen el aparato. Desembaleel aparato sólodespués quese hayaalcan
zado la temperaturaambiental defuncionamiento requerida.
Durante una tormenta nodebe conectaro desconectar ningunalínea nitampoco telefonear.
•
Conecte el cordón de alimentación sólo en las conexionesprevistas.
•
• Coloque los cordones de alimentaciónde tal maneraque noprovoque accidentes.
-
-
-
• Evite las siguientesinfluencias:
Radiación solar directa
Fuentes de calor (por ejemplo:radiador calorífero )
Aparatos electrónicos(por ejemplo:aparatos HiFi,de oficinao demicro ondas)
Entrada dehumedad olíquidos
Líquidos ovapores agresivos
Gran cantidad depolvo
• No utilice elaparato en lugares húmedos o zonas con riesgos de explosión.
• Abra sólo las partes del aparato indicadas enlas instruccionespara elmontaje yel manejo.
•
No toque los contactos eléctricos con objetos puntiagudos o metálicos o húmedos.
•
Siel aparatono esmontado deforma fija,ponga elaparato olos accesoriossobreuna superficieanti
deslizante.
•
Limpie elaparato sólo conun paño ligeramentehúmedo.
•
Use sólo los accesorios autorizados.
•
Sólo se puedeconectar alapparato aparatosterminales quesuministren labaja tensiónde seguridad
o correspondan a la ETS 300047. El uso previsto de aparatos terminales homologados cumple con
esta directriz.
Bloque de alimentación
-
•
Usesólo elbloquede alimentaciónsuministrado oelobteniblecomo accesorio (DSA-0101F-05 UPo
L15 D52AB DDLAWO).
•
Nouseningún bloquedealimentación, queala vistapresente daños(rajaduras oroturas ensucarca
sa).
Cargas electrostáticas (protección electrostát.)
Elteléfono sesuministra conuna protecciónantiestática superiora losvalores dehomologación, contralos
efectos delas cargas electrostáticas. Apesar de ello,evite las cargasestáticas altas. Por diferentescausas, la
carga electrostáticapuede alcanzarvalores muysuperiores alos valoresde homologaciónnecesarios yde la
4
-
Page 89

Español
resistencia ainterferencias ya realizadadel teléfono. Lascausas o circunstancias,como por ejemplo,la hu
medad ambiental demasiado baja omoqueta deben eliminarse. El fabricante del teléfono no concede nin
guna garantía por los daños imputables a estas causas.
Desembalaje e instalación del teléfono
Desembalaje
Teléfono de sistema RDSI
Auricular con cordón
•
2 pies de equipo
•
Cable de conexiónRDSI (aprox.6m)
•
Cable de conexiónde PC(USB, aprox. 3m), (noCS400xt)
•
Cable de audio dePC (3,5mm clavija jack estéreo,aprox. 2,5m),(noCS400xt)
•
Cordón adaptadorpara cascocon cordónde conexiónde 4polos (8polos / 4 polos)
•
Soporte delcordón (despuésde quitarla láminaprotectora autoadhesiva), (noCS400xt)
•
Instrucciones de funcionamientoy etiquetas para teclas de función
•
• WIN-Tools CD-ROM, con:
Programa de configuración,Guía telefónica, Download ySound-Manager,
Controladores TAPI,USB, CAPIy NDISWAN,Adobe AcrobatReader,
Instrucciones de funcionamientoy archivo Adobe Acrobat para imprimiretiquetas propias
-
-
Instalación del teléfono
Antesde instalarel teléfonodebe habermontado lospies deequipo posteriores enlos lugaresmarcados (6)
en la figura .
Tenga en cuenta que las bases de plástico desu teléfonopueden dejarmarcas ensuperficies sensiblescomo
muebles. Elfabricante del teléfono noasumirá ningún tipo de responsabilidadsobre dichas marcas.Por lo
tanto, utilice una base antideslizante para su teléfono.
Limpieza del teléfono
Elteléfono seha diseñadopara condicionesnormales deuso. Limpieel aparatocuando seanecesario medi
ante unpaño ligeramentehumedecido oemplee unpaño antiestático.No utilicenunca disolventes.No uti
licenunca unpañoseco; lacargaelectrostática podríaoriginardefectos enelsistema electrónico.Comprue
be siempre de que no penetre la humedad para que el teléfono no sufra daños.
Conectar el teléfono (conexión RDSI y cordon del auricular)
Paraque puedaponer enservicio suteléfono,debe enchufarloscordones deconexiónpara laconexión tele
fónica y el auricular.
-
-
-
-
5
Page 90

Español
Conectar el cordón del auricular
Conecte el cordón (1) del auricular como se indica
en la figura . Cóloque el cordón del auricular en la
ranura (4) yfíjelo debajo de los dos soportes (5)del
cordón.
2
4
6
5
5
4
4
Figura 4
Conectar el cordón RDSI
Conexión S0 (CS400xt CS410)
Conecte elcordón de conexión RDSI (2)como se indica en lafigura (borne S0). Introduzca elclavija RDSI
más largo en la caja decontacto RDSIy elmás cortoen elcasquillo RDSIdel teléfono.A continuación,cóloque el cordón de conexión RDSI en la ranura (4) y fíjelo debajo de los dos soportes (5) del cordón.
3
6
7
1
Conexión Up0 (CS410-U)
Conecte elcordón deconexión RDSI(2) comose indica en la figura 3 (borneUp0). Introduzca elclavija
RDSI máslargo en la cajade contacto RDSIy el más
corto en elcasquillo RDSI del teléfono. A continua-
2
1
3
5
4
ción, cóloque el cordón de conexión RDSI en la ranura (4) y fíjelo debajo de los dos soportes (5) del
cordón.
Figura 3
Los teléfonos CS410con módulosUp0/S0 yCS410-U nodeben volvera conectarsea travésdel en
chufe S0 (3) en una conexión RDSI (p. ej. conexión RDSI interna de la centralita).
Notas importantes para la conexión a una conexión UP0
•
En la toma S0del teléfonose puede conectarun terminalRDSI con inteface S0.
•
La longitudde líneaentre elelmeg CS410-Uy elterminal RDSIconectado a continuación es de máx.
10 metros.
-
•
Los terminadores no puedenconectarse.
6
Page 91

elmeg IP-S400 en la conexión Ethernet
Español
1
2
3
4
5
6
Figura 4
Conexión a la centralita y puesta en funcionamiento del teléfono de sistema (funciones básicas con
DHCP).
Consulte las instruccionesde montaje de lacentralita para saber qué conexiones sedestinan a la conexión
del IP-S400. Una la conexión con la conexión Ethernet a centralita del teléfono de sistema.
Conexión del bloque de alimenta
-
ción
Bloque de alimentación
-
Conexión Ethernet PC
-
PC u otro teléfono IP
-
Conexión Ethernet de la centrali
-
ta
Centralita elmeg
-
-
-
• Configure la centralita para lautilización deteléfonos desistema
• Fije el MSN de losteléfonos de sistema enla centralita.
• Conecte elsuministro decorriente (bloquede alimentación) alteléfono desistema IPy espere hasta
que se inicialize.
Si el teléfono de sistema IP está inicializado, se le pedirá en la pantalla que seleccione el idioma deseado.
•
Escoja elidioma queprefiera parala pantalla.
Pulse las teclas de flecha para ver los idiomas
disponibles.
•
Indique uno de los MSN introducidos en la centralita (en el ejemplo, 12).
Confirme la entrada con
Si en la configuración de la instalación no se
ha entrado un PIN (número de identificación
personal), accione la tecla
solicitada de nuevo la tecla
. Programm dial number
O
y después de
O
.
O
Which Country? }
Italiano
®Español
Deutsch
English
Française
Nederland
MSN-1>12
IPS login PIN for sys
server
MSN-1>
7
Page 92

Español
Active la funciónUtilizar DHCP.
•
Seleccione »activo«. Use automatic IP
adress setting
inactivo
activo®
El teléfono yla centralita se sincronizan.
•
Si no existe conexión con la centralita (si no hay conexión LAN o si el teléfono no está dado de
alta), en la pantalla se mostrará el símbolo » -----/ /----‰ «en lugar de la hora.
Ahora puede utilizar el teléfono de sistema IP como un teléfono de sistema conectado a RDSI o UP0.
Modificación de la rotulación
Encontrará las etiquetas para las teclas de funciónen la últimapágina de estas instrucciones. Separela eti
queta deseada.
Para cambiarla etiqueta hayque contraer elrecubrimiento flexible entrepulgar y índicey levantarlo hacia
arriba. Ahora la etiqueta puede cambiarse.
Por mediode suPC puedeseleccionar diferentesinscripciones parala etiqueta. Enel CD-ROMsuministra
do encontrará un fichero Adobe Acrobat que contiene diferentes diseños.
Pictogramas
Para ilustrar algunosprocedimientos deconfiguración ymanejo delteléfono enestas instruccionesde funcionamiento, se emplearon, entre otros, los pictogramas (símbolos) que se describen a continuación.
b Descolgarel auricularo comenzarlamarcaciónpreparativa.
a Colgarel auricularElteléfonose encuentraenreposo.
l Seindica unallamada.Sonará lamelodía dellamada.
g Ustedestá enunaconversación.
d Seha iniciadounaconferencia.
-
-
q Ustedoirá eltonopositivo onegativode recibo.
t Seleccionarnúmero deteléfono, código,caracteres otexto.
09
*#
Ajustes específicos del país
Siel teléfonodebe utilizarseenun paísque noes élde laconfiguración básica,hayque efectuarajustes espe
cíficos de los diferentes países.
En ellose ajustan,por ejemplo elidioma, lamoneda y las particularidadesespécificas de los países diferen
tes en la red RDSI a la configuración básica del país seleccionado.
8
Pulsaruna tecladeterminadadelteclado.
-
-
Page 93

Español
Compruebe comose describea continuación,si esposible efectuarajustes específicosde lospaíses diferen
tes para el país en el cual debe utilizarse el teléfono.
Empiece de la siguiente manera:
a
Ms s
Configuración Sevicio
s Pulse las teclas de flecha, para ver los países
para los cuales están disponibles ajustes espe
cíficos.
Pulse la tecla del país deseado. Z.B. »Es
pañol«.
Se establecen inmediamente los ajustes espe
-
-
t
PIN del teléfono
Italiano
-
Deutsch
Française
29.05.03 07:41 }
O> s
Which Country }
Country
Español®
English
Nederland
cíficos del país seleccionado.
En ello no se borrarán los datos del teléfono.
directorio
silencio
VIP
-
Pantalla del teléfono
12
29.05.06 07:41 }
S
¡ Info -N-
S
¡ dirctorio
S
¡ VIP
lista llamad ¨
3
silencio ¨
S
S
S
S
1
2
3
4
5
6
Fecha
-
Hora
-
21 caracteres en una línea
-
-
Flecha: Puede accederse a otras opciones de menú a través de las teclas de flechas.
-
Tecla de contestador del teléfono (módulo opcional) o
tecla »Menú centralita
-
Flecha: La flecha en la pantalla apunta a la tecla que
puede pulsarse en el menú.
Bild 5
El teléfono dispone de una pantalla de 7 líneas con iluminación de fondo. La iluminación de fondo se en
ciende o se apaga automáticamente.
Después de conectarel sistemaa laconexión internaRDSI dela centralita,en lalínea superiorde lapantalla
apareceránla fechay lahora. Lafecha yla horase incorporarán automáticamentedesde lacentralitao lared
RDSI.El textorelativo auna funciónseencuentra siemprea laizquierda oa laderecha dela teclacorrespon
diente. Si usted pulsa la tecla, aparecerá el nivelsiguiente. Sila pantalla no puede mostrar todos loscaracte
res, éstose indicacon »««o»»«. Si usted desea ver loscaracteres restantes,pulse primerola tecla R y luego
las teclas de flecha correspondiente.
-
-
-
Para explicarlos ajustes y manejosse representan eneste manual deinstrucciones diferentes indicaciones
enpantalla delteléfono. Sisólo serepresentan líneasindividualesde lapantalla (lapantalla nose representa
con las 7 líneas completas), esto se señaliza por medio de una línea ondulada superior o inferior.
9
Page 94

Español
Para la entrada de letras y de cifras, las teclas están ocupadas de la manera siguiente:
Pulsada
Tecla 1234567
1
2
3
4
5
6
7
8
9
*
#
1
ABC2 ÄÅÆ
DEF 3 €
GHI 4
JKL5
MNO6 ÖØ
PQRS7ß$
TUV8Ü
WX Y Z 9 ¥
*
#
0 Latecla 0estárecubierta con caracteresespecialesdiferentes.
Porejemplo: »!«, »&«,»?«,»+«, »-«,»=«,»(«,»)«, »@«, »$«,...
Despuésde pulsarpor primeravezla tecla»0«, seinsiertaun carácterespacio. Despuésdepulsar latecla por
segunda vezse muestra algunos caracteresen la pantalla. Pulse lasteclas asignadas 1 …9 para seleccionar
un carácter especial. Pulse la tecla 0, cuando desee ver más caracteres especiales.
Modo de entrada para letras
Cuando introduzcaletras, disponede varias posibilidades.El modode entradaajustado se representaen la
parte superior de la pantalla, en el lado derecho (ninguna indicación, »Abc« oder »ABC«).
Sin inform. Todaslas letrasintroducidasse indicancomominúsculas.
Ejemplo:»molina, carlo«.
»Abc« Lapróxima letraentrada seindicacomomayúscula mientrasquetodaslas letrassigu
ientesse indicancomo minúsculas.
Ejemplo:»Molina,Carlo«.
»ABC« Todaslas letrasintroducidasse indicancomomayúsculas.
Ejemplo:»MOLINA,CARLO«.
Para iniciaruna entrada de textoestá siempre activoel modo de entrada»Abc«. Para modificar
elmodo deentrada, pulsela teclaR. Parainsertar uncarácter, enel modo»Abc«pulse primerola
letra C.
-
10
Page 95

Indicaciones en pantalla sobre las funciones configuradas
Español
s Cuando el teléfono no esté activo, en la línea
»Info« se presentan datos adicionales sobre
funciones configuradas. En el ejemplo:
»-T-S-r-«.
Para recibir más información sobre las fun
ciones configuradas, pulse la tecla al lado de
»Info«.
Si se han configurado más funciones, pulse las
teclas de flecha para ver las diferentes confi
guraciones.
Indicación en pantalla Función configurada
»-F-«
»-B-«
»-n-«
Cita activa configurada.
Control de marcación o filtro de llamadas activado,
Acceso protegido al menú del teléfono.
Función »Rechazo de llamadas« (sólo tono de aviso) configurada.
29.05.03 07:21 }
Info -F-B-n-
dirctorio
-
-
VIP
ªªªªªªªªªªªªªªªªªªªªªª
silencio:
Rechazo de llamadas
¬¬¬¬¬¬¬¬¬¬¬¬¬¬¬¬¬¬¬¬¬¬
Silencio
Lista llamads
»-N-«
»-U-«
»-i-«
»--«
Función »Rechazo de llamadas« (completo) configurada.
Desvío de llamadas configurado.
Información sobre funciones activas
por ejemplo: mensaje admite / no admite.
Contestador, controltiempo, transferenciade llamadaso mandoa distancia
(módulo opcional) activado.
Telefonear
Iniciar una llamada
Marcar número de teléfono - sin posibilidad de corrección
btg
Marcar un número
Marcar número de teléfono - con posibilidad de corrección
atbg
Marcar un número
Para modificar el númerode teléfono o corregir un registro incorrecto, seleccione la cifra incorrecta utili
zando las teclas de flecha y pulse la tecla C, para borrarla. Ahora introduzca la cifra correcta.
Si usted desearealizar la llamada utilizando elauricular, descuélguelo tras introducir elnúmero de teléfo
no. En cualquier momentode la llamada,usted podrá cambiarentre manos libres,escucha mediante alta
voz y funcionamiento con auricular.
-
-
-
11
Page 96

Español
Después de indicar elnúmero de teléfono, tambiénpodrá pulsar la teclaaltavoz para marcarlo y utilizarel
modo manos libres.
Si noes posibleestablecer unaconexión (p.ej. elnúmero deteléfono está bloqueadomediante elcontrol de
marcación o la cuenta de tarificación del número de teléfono/MSN está vacía), la pantalla del teléfono
mostrará el mensaje »Bloque: n llamada.« si está activado el control de marcación.
Otras posibilidades de marcar cuando no se haya descolgado el auricular
También existela posibilidad demarcar con el auricular colgado y decorregir o completarlos números de
teléfono antes de marcar cuando se marca:
a partir dela memoriade repeticiónde lamarcación.
•
a partir dela listallamadores/agenda.
•
a partir dela guíatelefónica.
•
a partir dela memoriaVIP.
•
a partir dela memoriade marcacióndirecta
•
mediante las funcionesCTI, TAPI(CS 410).
•
Siusted aprovechaalguna delas posibilidadesmencionadas,podrá procedera realizarotros registrosantes
deiniciar lamarcación.Por ejemplo,ustedpuede determinarsia lapersonallamada ledebetransmitirse un
número de teléfono (MSN).
Marcar a partir de la guía telefónica de la centralita
Siutiliza elteléfono desistema enuna centralitaelmeg conteléfonosde sistema,puede marcaren laguíatelefónica de la centralita.
a
Marcar a partir de la guía telefónica del teléfono
En la guíatelefónica desu teléfonousted podráguardar hasta 250nombres ynúmeros deteléfono. Parase
leccionar unnombre dela guíatelefónica, ustedpuede moverseen ellamediante lasteclas deflecha ointro
ducir directamente las letras iniciales del nombre buscado por medio del teclado.
a
Rs
direc
torio
s
direc
torio
-
t
Introducir letras
iniciales
-
t
Introducir le-
tras iniciales
O<> O
Seleccionar
registro
O<>O
Seleccionar
registro
b
bg
-
-
La programacióny configuración de la guíatelefónica se describeen la página15 de estas instrucciones de
funcionamiento.
Marcar a partir de la memoria VIP
Con cualquiera de las10 teclas 1...0 podráprogramar un registro VIP,compuesto por unnombre (máx.20
caracteres) y un número de teléfono (máx.26 cifras).
12
Page 97

Español
a
Laprogramación delosregistros VIPsedescribe enla página16de estasinstrucciones defuncionamiento.
Marcación directa mediante las teclas de función
Lamarcación directase iniciamediante lasteclasde función.Concualquiera delas cincoteclas Ustedpodrá
programar dos funciones o o teclas de función.
a
Seleccione con las teclas de función los números de teléfono deseados.
Si desea marcarun número de teléfonoen el segundo nivel, haga doble clicen la tecla deseada. Debereali
zarse a intervalos regulares.
Laconfiguración delasteclas demarcación directa/de funciónesposible através de laconfiguración dePC.
s<>
VIP
Selec
cionar
destino
VIP
Z
Pulse la tecla de función
-
o
tbg
Seleccionar
destino VIP
bg
-
Marcación a partir de Marcar número>la lista llamadores/agenda
El teléfono dispone deuna lista combinada llamadores/agenda. Esta listapuede contenerun máximode 30
registros(llamadas, anotaciones,mensajes cortosSMS omensajesde textoUUS1). Losregistros enla agenda/lista llamadores se muestran mediante la tecla »lista llamad«.
a
Otras funciones
Aceptar llamada
s
lista llamada
Seleccionar registro
bg
albg
Rechazar una llamada
al
Desviar una llamada (Call Deflection)
al
s
transmitir
s
rechazar
t
Marcar un número
No transmitir número de teléfono (Llamar anónimo)
at
Marcar un número
al
OMs
secreto
s
secreto
bg
bg
13
Page 98

Español
Iniciar una llamada con número de teléfono fijo (MSN)
at
Marcar un
número
Ampliación de la repetición de la marcación
En la ampliaciónde larepetición dela marcaciónse guardarán las 20últimas llamadas,conexiones (llama
das) ymensajes detexto. Ustedpodrá verestos registrosal pulsarla teclade repeticiónde la marcacióno las
teclas de flecha y marcar automáticamente a continuación.
a
Repetición de la marcación automática
Si hallamado aun abonadoque estácomunicando oque noacepta lallamada, ustedpodrá iniciaruna mar
cación automática de forma que se vuelva a llamar a este abonado después de unos 10 segundos.
WWO
bt g
Marcar un
número
Desactivar la repetición de la marcación automática
OMss
msn
Seleccionar registro
MSN-1 …
MSN-10
o
W
El usuario llamado
está ocupado
Repetición
bg
bg
s
automat
a
-
-
a
Repetición automat si
Desactivar/ activar micrófono
g
Escucha mediante altavoz
g
Comenzar escucha mediante altavoz Terminar escucha mediante altavoz
Manos libres
a
Comenzar modo manos libres Marcar un número Terminar modo manos libres
Utilizar casco
Para manejarel cascousted debede configuraruna teclade funcióncomo teclade casco.El LEDasignado a
esta tecla indica si el casco está activado o desactivado (LED activado/ desactivado).
s
mudo hablar
LL
L
ss
consulta dentro de la
sala
t
s
g
g
L
a
14
z
Activar casco Marcar un número Llamada a través del casco Desactivar casco
tg
z
Page 99

Mensaje
Español
a
Llamada intercomunicada
a
Rellamada automática
M s>s
acústica Mensaje
Ms>s
acústica Interco
bt g
Marcar un número El abonado está comuni
Teclado
g
Marcación por tonos (marcación dtmf)
g
cando o no contesta
s
Teclas
s
Tonos
tg
Marcar número in
terno
Mensaje
-
tg
-
mu
Rel.ocup.
-
Marcar núme
ro interno
s
Llamada inter
comunicada
a
t
Introducir secuencias de caracteres y cifras
t
Introducir secuencias de caracteres y cifras
-
Hablar con varios interlocutores
Aviso de llamada en espera
g
Llamada con el abonado 1
Llamada de consulta
g
Llamada con el abonado 1 Al interlocutor 1 se le man
Transmisión de una llamada
g
Llamada con el abo
nado 1
Alternar entre dos líneas
g
Llamada con el
abonado
-
>s
R
Al interlocutor 1 se le
mantiene en espera
conexión 1
conexión 4
llamada en espera
(abonado 2)
R
tiene en espera
Marcar un número Llamada con el abo
...
s
aceptar
tg
-
Marcar un número Llamada con el abonado 1
tg
g
Llamada con el
usuario deseado
>s
Llamada con el abonado 2;
Al interlocutor 1 se le mantiene en
-
nado 2
conexión 1
...conexión
4
g
espera
s
transmitir
g
Llamada con el
usuario deseado
15
Page 100

Español
Conferencia
g
Llamada con el abo
nado 1
>s
-
conexión 2
g
Llamada con el
abonado 2
s
Conferencia
d
Conferencia con abo
nado 1 y abonado 2
Utilización del teléfono
Programar guía telefónica
En laguía telefónica de suteléfono usted podráguardar hasta 250nombres y númerosde teléfono Para se
leccionaruna entradadela guíatelefónica,usted puedemoverseen ellamediante lasteclas deflechao intro
ducir directamente las letras iniciales del nombre buscado por medio del teclado.
Si desea que lapantalla muestre el nombredel llamador enlugar de su númerode teléfono, ambos
datos habrán de estar incluidos en la guía telefónica. (El número de teléfono debe ser introducido
consu indicativolocal(prefijo) yencaso deutilización concentralita,con elindicativode central).
El nombredel llamador se indica sólosi el número deteléfono transmitidocoincide con elnúmero
de teléfono guardado en la guía telefónica.
La guía telefónica sereorganizará internamentecuando elteléfono sedesconecte dela redRDSI yluego vu
elva a conectarse o se transmitan datos a la guía mediante el programa de PC. Este procedimiento se
realizaráde formaautomática ypuededurar variosminutos. Duranteesteperíodo ustedno dispondrádela
guía telefónica incluida en el teléfono.
Ajustes para un número de teléfono
-
-
-
-
• Nombre y número
• Número de teléfonosaliente (asignación MSN)
• Tonalidad especial(
• Texto de información
Añadir registro de guía telefónica
Empiece de la siguiente manera:
a
Msss
prog números. directorio Nuevo
t Introduzca un nombre.
En el ejemplo: »Molina«.
Confirme la entrada con
O
.
t Introduzca un número de teléfono.
En el ejemplo: »0123456«.
Confirme la entrada con
Registros VIP
O
.
Entrar guía
nombr>Molina_
¬¬¬¬¬¬¬¬¬¬¬¬¬¬¬¬¬¬¬¬¬¬
Entrar guía
número>0123456_
¬¬¬¬¬¬¬¬¬¬¬¬¬¬¬¬¬¬¬¬¬¬
Con cualquiera delas 10teclas 1… 0podrá programarun registroVIP, compuesto porun nombre(máx.20
caracteres) y un número de teléfono (máx.26 cifras).
16
 Loading...