

Page 1

Short reference elmeg C300 - CS300
Page 2

Table of contents
1 Description . . . . . . . . . . . . . . . . . . . . . . . 1
1.1 Safety instructions. . . . . . . . . . . . . . . . . . . . . . . . . . . 1
1.2 Contents of package . . . . . . . . . . . . . . . . . . . . . . . . . 2
1.3 Cleaning and maintenance . . . . . . . . . . . . . . . . . . . . . . 2
1.4 Placing the telephone . . . . . . . . . . . . . . . . . . . . . . . . . 2
1.5 User interface of your telephone . . . . . . . . . . . . . . . . . . . 3
1.6 Display, Buttons, LEDs, Pictographs and signals . . . . . . . . . . . 4
2 Installation of the telephone . . . . . . . . . . . . . . 8
2.1 Connection of the handset connecting cord . . . . . . . . . . . . . 8
2.2 Connection of the ISDN connecting cord. . . . . . . . . . . . . . . 8
2.3 Connection of the telephone to the PC. . . . . . . . . . . . . . . . 9
3 Settings . . . . . . . . . . . . . . . . . . . . . . . . 10
3.1 Telephone numbers (MSN or extension number) . . . . . . . . . . 10
3.2 Volume Settings (CD-ROM) . . . . . . . . . . . . . . . . . . . . . 11
3.3 Call forwarding (call rerouting) . . . . . . . . . . . . . . . . . . . . 12
3.4 Call waiting . . . . . . . . . . . . . . . . . . . . . . . . . . . . . . 13
3.5 Other Settings (CD-ROM) . . . . . . . . . . . . . . . . . . . . . . 14
3.6 Programming the phone directory . . . . . . . . . . . . . . . . . . 15
3.7 Programming VIP numbers . . . . . . . . . . . . . . . . . . . . . 17
3.8 Programming direct dialing numbers . . . . . . . . . . . . . . . . 18
3.9 Additional Information in the Display. . . . . . . . . . . . . . . . . 20
4 Settings at a PABX (CD-ROM) . . . . . . . . . . . . 21
5 Operation . . . . . . . . . . . . . . . . . . . . . . . 22
5.1 Starting a call . . . . . . . . . . . . . . . . . . . . . . . . . . . . 22
5.2 Accepting a call . . . . . . . . . . . . . . . . . . . . . . . . . . . 24
5.3 »Station guarding« . . . . . . . . . . . . . . . . . . . . . . . . . . 24
5.4 Redialing . . . . . . . . . . . . . . . . . . . . . . . . . . . . . . . 25
5.5 Caller and memo list . . . . . . . . . . . . . . . . . . . . . . . . . 26
5.6 Call waiting, Enquiry call, Broker`s call, three-party conference,
5.7 Other functions (CD-ROM) . . . . . . . . . . . . . . . . . . . . . . 31
5.8 Service Functions (CD-ROM) . . . . . . . . . . . . . . . . . . . . 31
call transfer, Call-Back on busy(CCBS) . . . . . . . . . . . . . . . 29
6 Declaration of conformity. . . . . . . . . . . . . . . 32
7 Index . . . . . . . . . . . . . . . . . . . . . . . . . . 33
Page 3

1 Description
These operating instructions describe the functions for both elmeg C300 and
elmeg CS300 ISDN telephones.
You can connect the ISDN telephone to the Euro-ISDN point-to-point connection
(DSS1 protocol)provided by your network service provider, or at the internal ISDNcon
nection (point-to-point connection DSS1 protocol) in a PABX system. The ISDN tele
phone is linkedtothe ISDN networkvia an ISDN jack(Western or RJ45). After beingcon
nected to the ISDN network, your ISDN telephone is immediately ready for operation
and can fully utilize its configured performance features.
-
-
-
Up toeight (8) ISDN terminal devices can be connected and managed at a network ter
mination of a network service provider. Of these eight (8) available lines, one supply line
(max. 4 W) is available for ISDN telephones without their own internal power supply. A
link can be setup simultaneouslyfor two(2) ISDNterminal devicesat eachbase access
terminal (2 B channels, 1 D channel).
An internal ISDN connection for a PABX system is comparable to an ISDN base access
terminal (point-to-point connection) of a network service provider. Up to eight (8) ISDN
terminal devices canbe connected and managedat each internalISDN connection. The
power available at this internal ISDN connectiondetermines howmany terminal devices
can besupplied with power by the PABX system. Refer to the operatinginstructions for
your PABX,or contact the PABX manufacturer for more details about this. A linkcan be
set up simultaneously for two (2) ISDN terminal devices at each internal ISDN connection.
The elmeg CS300ISDN telephone providessystem features when connected tocertain
elmeg PABX systems. The internal connection (S0 bus) on these PABX systems
automatically interfaces with the elmeg CS300 ISDN telephone. Please refer to the
operating instructions of your PABX to determine whether these typical system
performance features are provided with the various elmeg telephones.
The typical system performance features described in these operating instructions
apply only to the elmeg CS 300 ISDN telephone, and not to the elmeg C300 ISDN
telephone.
1.1 Safety instructions
-
•
Unauthorized opening of the system telephone and improper repairs may
result in risk of injury for the user.
•
Do not expose the inside of the system telephone to any liquids. This can
result in electric shock. If you expose the inside of the telephone to liquids
the telephone can be destroyed.
•
You should not connect or disconnect any lines during thunderstorms.
1
Page 4

To prevent mutual interference, do not installyour systemtelephone in the
•
immediate vicinity of electronic devicessuch as stereoequipment, electric
office equipment or microwave units.
Avoid installing your telephone near sources of excessive heat, e.g. radia
•
tors or in rooms with excessive humidity.
The ambient temperature must not be lower than 5° or above 40°C.
1.2 Contents of package
ISDN system telephone elmeg C300 or
•
ISDN system telephone elmeg CS300
handset with handset connecting cord
•
ISDN connecting cord (approx. 3m)
•
RS232 connecting cable RJ12 / D-SUB 9-pin (approx. 3m)
•
operating instruction
•
Label for direct dialing/function keys
•
elmeg WIN-Tools CD-ROM with: detailed operating instruction;
•
configuration manager, telephone directory manager, download and LCR
manager;
TAPI driver and TAPI application elmeg PC-Tel;
Adobe Acrobat-file (ccs300_int.pdf) for the printing of individual labels
1.3 Cleaning and maintenance
-
The ISDN system telephone has been manufactured for normal, everyday use. When
required, clean the ISDN system telephone with a slightly moistened cloth, or with an
anti-static cloth. Never use a solvent to clean the phone! Never use a dry cloth. Electro
static charges could damage the electronics in the system. It is essential that no liquids
penetrate into the insideof the ISDN systemtelephone, as this coulddestroy the phone.
1.4 Placing the telephone
Please note thattheplastic feet ofyourISDN system telephonemay leave marks onsen
sitive surfaces, such as furniture. The manufacturer of theISDN systemtelephone is not
liable for any such damage. Therefore, use appropriate non-skidding pads under the
phone.
2
-
-
Page 5
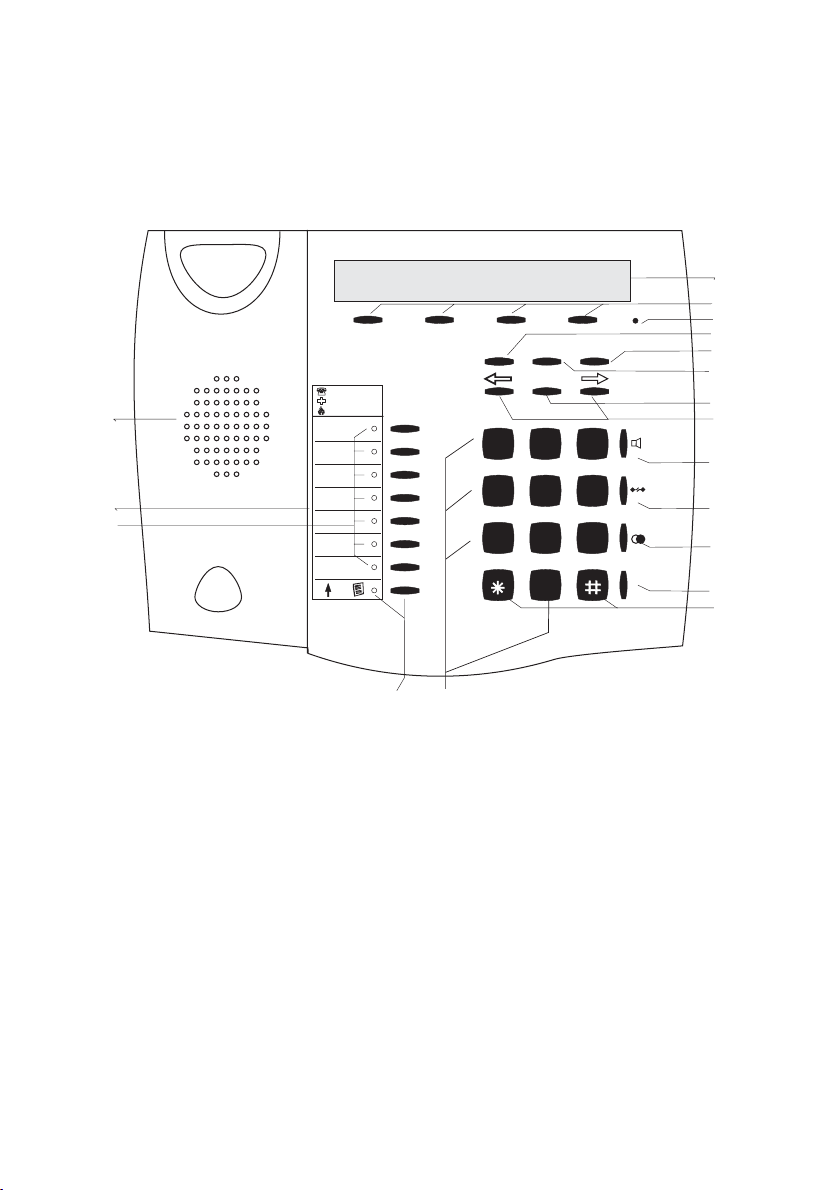
1.5 User interface of your telephone
1
2
3
1 Speaker
2 Label panel for VIP keys and
function keys
3 7 direct dialing/ function keys
with LED
4 Shift button with LED
5 Display
6 4 softkeys
7 Microphone
8 Function key
9 C-button
01.04.00\10:34\\\\\\\\\}
tbook vip quiet
ESC
OK
ABC
TUV
C
2
3
DEF
6
5
JKL
MNO
8
9
WXYZ
4
GHI
7
PQRS
F
1
1
0
4
18
10 Escape
11 Acknowledgement
12 Arrow buttons »left« / »right«
13 Open listening/ hands-free
14 Disconnect
15 Redial
16 Enquiry
17 Asterix button / number symbol
18 Dial / VIP buttons
5
6
7
8
9
10
11
12
13
14
15
R
16
17
Fig. 1: User interface of your telephone
3
Page 6

1.6 Display, Buttons, LEDs, Pictographs and signals
1.6.1 Display
Date
1st line
2nd line
Text assignment
to softkey
4 softkeys
Fig. 2: Display of your telephone
After you connectthe system totheISDN connection,
the date and time are shown on the topline ofthe display. The date and time are imported automatically
from the PABX system, or from the ISDN network.
Terms are displayed in capital and small letters on the
first line. The functions of the softkeysare displayed in
capital or small letters (depending on your settings) in
the second line.
The textdisplayed fora functionon line2 isalways lo
cated above the corresponding softkey. When you
press the softkey, the next level is displayed.
01.04.00\10:34\\\\\\\\\}
tbook\ vip \\quiet
SSSS
Time
Arrow: further menu items
accessible with arrow buttons
24 chars
ˆ01.04.00 10:34 }
ˆtbook vip quiet
-
ˆ Functions
ˆaudib adjust prog config
1.6.2 Buttons
F Function button: This key opens the pro
gramming menu. If you are already lo
cated in a menu and then press the
function key, either menu-specific func
tions are shown, or you are moved back
one programming step.
4
-
ˆ Functions
ˆaudib adjust prog config
-
-
Page 7

E Escape button: Pressing the Esc button
during programming returns the tele
phone to its idle status.
ˆ Functions
ˆaudib adjust prog config
-
O OK key:Pressing this button stores a setting in the telephone. You then hear
the acknowledgement signal.
C C-button: Press thisbutton tomove back one menu step in the menu. If you
are currently in the input mode, this button can be used to delete individual
characters.
<> Arrow button: The arrows »{« and »}«in
the right corner on the top line of the dis
play indicate that you can call up further
functions on the second line using the ar
row buttons.
Special feature for changing existing entries
You have various options available to you for changing existing entries (e.g. names or
numbers).
Example 1:
You wish to change an existing number / MSN ), as the telephone is to be used at a different ISDN connection.
t When you use the pushbutton set to enter
the first digit of the new number the exist
ing number is deleted completely.
ˆ01.04.00 10:34 }
ˆ vip quiet
-
ˆ01.04.00 10:34 {}
-
ˆunpark rate
ˆ Program dial number
ˆMSN1>123456
-
ˆ program dial number
ˆMSN1>9_
t Enter the other digits of the new number. ˆ program dial number
ˆMSN1>987654_
Example 2:
You wish to change parts of a name in a telephone directory listing (see Page 16), be
cause the name has changed (e.g. in the case of marriage).
<>
C
Using the arrow keys, first select the let
ters of the entry that are to be changed (in
this example: the surname »
delete this name using the C button.
Miller«) and
5
-
ˆChange tbook data input
ˆname>TINA_MILLER
ˆChange tbook data input
ˆname>TINA _
-
Page 8

t Now enter the new letters for the new
name (in the example the surname
»
PETERS«).
1.6.3 Entering figures and numbers
The following buttons are configuredforthe entry offiguresand numbers (e.g.telephone
directory, vip memory):
ˆChange tbook data input
ˆname>TINA PETERS_
Button
1
2
3
4
5
6
7
8
9
0
1.press 2.press 3.press 4.press 5.press 6.press 7.press
1
ABC2Ä
DEF3
GHI 4
JKL5
MNO6 Ö
PQRS7ß
TUV8Ü
WX Y Z 9
(space) . , - 0 / &
*
#
*
#
6
Page 9

1.6.4 Pictographs
The pictographs (symbols) described inthe following havebeen used in these operating
instructions to illustrate some procedures for setting and using the telephone.
b Liftupthehandset,activatehands free calling,orstartinitializingselec
tion.
a Hang up the handsetandend hands free calling.
The telephone is idle.
l A call is signaled.
The ringing tone melodysounds.
g You are conducting a call.
d A three-party conference call isinitiated.
q You hear the positiveornegative acknowledgement signal.
t Select the number,code, character or text.
0...9
*#
Pressthe appropriate button onthepushbutton set.
-
7
Page 10

2 Installation of the telephone
2.1 Connection of the handset connecting cord
Connect the handsetcordas shown inFigure 3. Laythehandset cord inthe cord groove
and lock it below the two cord retainers.
ISDN telephone seen from the bottom
Jack for connecting
the handset
Handset connector
Cord holder
Handset cord
Handset
Handset jack
Fig. 3: Connecting of the handset connecting cord
2.2 Connection of the ISDN connecting cord
Connect the ISDN cord as shown in Figure 4. Then lay the ISDNcord inthe cordgroove
and lock it below the two cord retainers. Ensure that the longer ISDN connector is
plugged into the ISDN jack and the shorter ISDN connector into the ISDN jack on the
telephone.
ISDN connectorr
(long)
Telephone seen from the bottom
ISDN connector
(short)
Cord holder
Jack for ISDN connecting cord
Fig. 4: Connecting of the ISDN connecting cord
8
Page 11
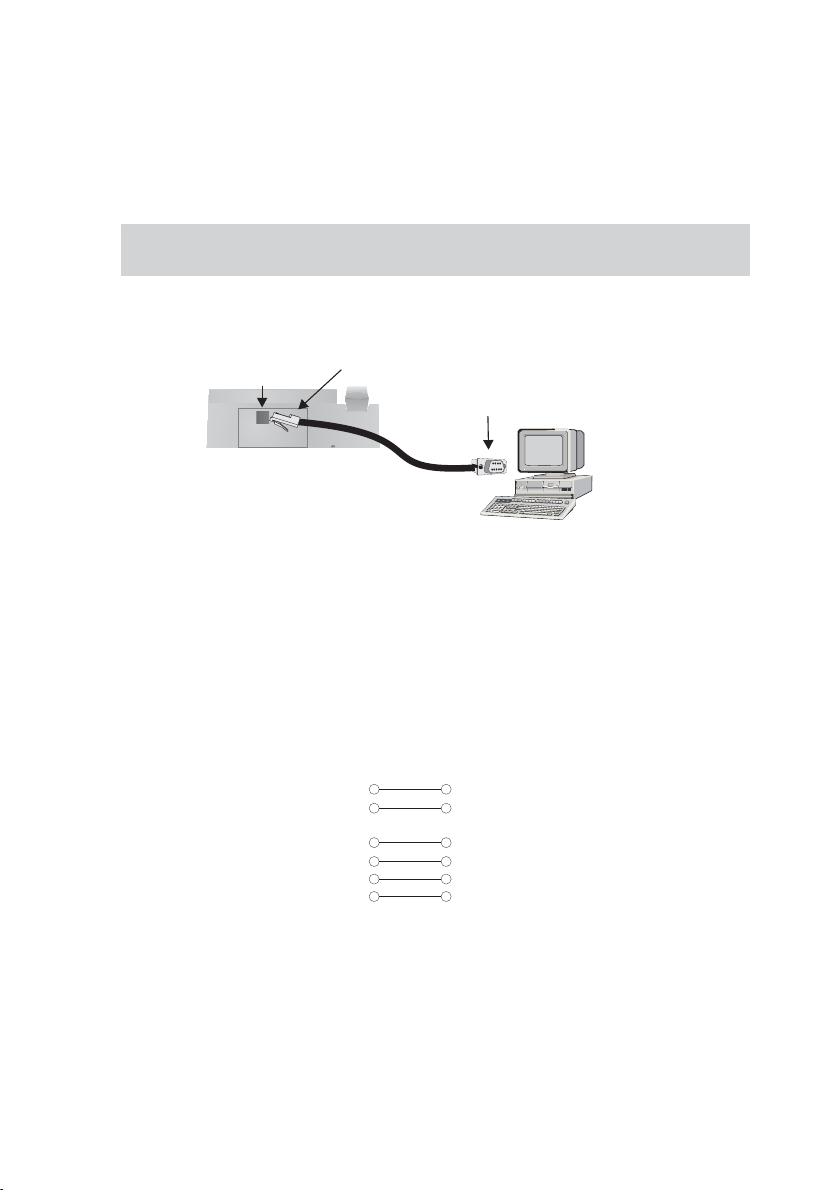
2.3 Connection of the telephone to the PC
Connect the cable RS232(V.24) as shown in figure 5. Plug the RJ12 connector into the
RJ12 jackon theback ofthe telephoneand the 9-pin D-SUB connector onto the corre
sponding connecting jack of your PC.
Only usethe RS232(V.24)cable deliveredwith the system, as this is not a standard
serial cable.
-
Jack(RJ12) for connecting
the RS232(V.24) cable
Telephone seen from
the back
RS232(V.24) connector
(RJ12)
Fig. 5: Connecting of the telephone to the PC
RS232(V.24)-cable
1
2
3
RS 232(V.24) connector
(9 poles)
4
5
6
7
8
9
RS232(V.24) connector
(D-SUB 9 poles)
3
4
RJ12 connector
6
(6-poles)
1
2
5
9
Page 12

3 Settings
3.1 Telephone numbers (MSN or extension number)
Up to 10 MSNs can be configured on your telephone. When you enter an MSN in your
ISDN system telephone you are essentially defining that your ISDN system telephone is
called using this MSN when a callis made. If you enter more thanone MSN in your ISDN
system telephone, your phone will ring each time one of these MSNs is called.
If you are using your telephone on the external ISDN port of your service provider, pro
gram your telephone with the MSNs allocated to you by the network service provider.
Usually your network service provider will provide you with 3 MSNs. You can apply for
further MSNs from your network service provider.
When you operate your telephone on the internal ISDN connection of a PABX you must
enter the internal instead of the external number of your telephone at the PABX. Please
observe the instructions in the PABX manual.
You can define and set a name, a specific melody andits volumefor eachMSN that you
enter. If, for example, you assign the name »elmeg« to a number, »
the display instead of »
When you calla subscriber, you can selecta certain number(MSN) that istransmitted to
the subscriber (e.g. for separate charges). If you do not select any number, the number
(MSN) that has been entered first in the phone (MSN-1) is used.
How to configure an MSN is described in the following example with MSN1.
msn-1« when that phone is called.
elmeg« will appear in
-
3.1.1 Entering MSNs (extension number)
Begin as follows:
a
t Dial the number (26 digits max.).
FSS<>SS
config msn msn-1 tnumb
ˆ Program dial number
Example: »
123456«.
ˆMSN-1>123456
O Confirm your entry by pressing OK. ˆ MSN-1 program }
ˆtnumb sound volume x-fer
10
Page 13

3.1.2 Other settings for each MSN (extension number)
Begin as follows:
a
FSSS
config msn msn-1
You can now make other settings for the
selected MSN.
ˆ MSN-1 program }
ˆtnumb sound volume x-fer
S »sound« Setting the call signaling melody
S »volume« Setting the volume of the call signaling melody.
S »x-fer« Default setting of an MSN for forwarding of calls
(Call Deflection).
S »msn_name« Assign a name to the MSN (max. 5 characters)
that is to be shown in the display instead of
»
msn-1«.
S »rate« Setting up of a charge detail account that is
available formaking chargedcalls (fortransferring
of this outgoing MSNs).
3.2 Volume Settings (CD-ROM)
You can make the following acoustic settings at this telephone:
•
Speaker volume, set or temporary
•
Repeat and volume of the call waiting signal
•
Acknowledgement tones, never, for wrong number, or always
•
Handset volume, set or temporary
•
Volume for the notice signal with the function »Don't disturb«
For more information about these acoustic settings refer to the detailed Operator’s
Manual on the enclosed CD.
11
Page 14

3.3 Call forwarding (call rerouting)
With thistelephone youcan bereached, evenif you are not in the vicinity of your phone.
This is made possible by automatic forwarding of calls to any other number.
Call rerouting can be configured separately forany of the entered numbers (MSNs). You
must have configured atleast one number inorder to utilize thecall rerouting function.
The following settings are possible for all MSNs.
»
delayed« Call forwarding delayed
»
busy« Call forwarding on busy:
»
fixed« Permanent call forwarding
The following example describes how to set up MSN 1 for permanent call forwarding.
All calls for the number for which delayed call forwarding has been
configuredaresignaledfor a defined time at theexchangeofficeorin
the PABXandare then forwarded when thisperiodexpires.
The calls for a defined number are forwarded only when the tele
phone is busy.
(For example: There are already two (2) connections made, or one
connection has been madeandcall waiting is notpermitted.)
All calls fora number forwhich “fixed” callforwarding has beenconfiguredarererouted.Yourtelephonewillnotring,whenthisnumberis
called.
-
3.3.1 Activating call forwarding
Begin as follows:
a
FSSSS
adjust forward fixed msn-1
t Enter the number to which the calls are to
be forwarded.
In this example: »
O Confirm your entry by pressing OK.
Call forwarding has been registered. The
three dots attheright lower cornerflash al
ternately.
0123456789«.
12
ˆ Call forwarding direct
ˆMSN-1>0123456789_
ˆ Call forwarding direct
ˆMSN1>0123456789 …
-
Page 15

Call forwarding has been configured. You
see this display for about 10 seconds.
3.3.2 Deactivating call forwarding
Begin as follows:
ˆMSN-1
ˆ Direct call forwarding!
ˆ call forwarding
ˆ off delayed busy fixed
a
FSSSS
adjust forward off msn1
3.4 Call waiting
If, during an ongoing call, a second call comes in for you, the second call is signaled
when “Call waiting on” is set. When “Call waiting off” is set, the caller only hears a busy
signal.
A waiting call is indicated by a brief acoustic signal in the handset and also displayed.
You can setthe volume of the callwaiting signal andselect whether awaiting call is to be
signaled only one time, or several times.
When »Station guarding« is set, the call is indicated as described on documentation at
CD-ROM. If you have configured “Hands-free calling” for an active connection, waiting
calls will only be signaled optically in the display.
Begin as follows:
a
FSS
adjust wait
Press the softkey below »no« to inhibit the
call waiting function. Use the softkey
below »
function.
ok« to enable the call waiting
ˆ Call waiting enable?
ˆ no ok
ˆ Settings }
ˆforward wait date
13
Page 16

3.5 Other Settings (CD-ROM)
You can also make the following settings at your telephone:
Appointments
•
Call filter
•
Date and time
•
Control settings (Softkey display, Headset, etc.)
•
Direct dial-in call
•
MSN display
•
Display during an ongoing call
•
Display language
•
Dialing filter
•
Safeguard configuration using PIN (Password)
•
Charge rate information /Tariff factor, Currency, etc.)
•
Least Cost Routing (LCR)
•
Standard Park code
•
Emergency operation
•
Making and using these settings is explained in the detailed Operator’s Manual on the
enclosed CD.
Important information about the implemented LCR procedure:
This performance feature can be used in Germany only.
The tariff data for the LCR feature can be
downloaded from TELEDATA-UPDATE
Gesellschaft für Telefon-Tarifdaten-Management
mbH using a dial-in number preset in your
telephone. ELMEG GmbH & Co. KG
Kommunikationstechnik cannot warrant that this
tariff data isup-to-date,complete and correctand
declines any liability resulting from the use of such
data.
14
Page 17

3.6 Programming the phone directory
You can store up to 250 names (20 characters max.) with telephone number (26 digits
max.) in the directory of your telephone. To select a name, you can page through the di
rectory using the arrow buttons, or enter the specific first letter(s) of the name using the
pushbutton set.
If thename of the caller is to be shown in the display instead of the caller’s number,
this number must be entered in the telephone directory with that name (including
prefix and, when used with a PABX the line access digit).
Display of the caller name is only made when the transmitted number corresponds
to the number stored in the phone directory.
If the telephone is disconnected from the ISDN network and then reconnected, or if the
data forthe telephone directory are transferred to the systemtelephone via the PC pro
gram, the directory must be reorganized internally. This process takes place automati
cally and may require a few minutes. During this time, the telephone directory of your
telephone is not available for use.
3.6.1 Directory entries
Each button of the pushbutton set is labelled with three or four letters of the alphabet.
You can advance through theletters by pressing the appropriate buttonrepeatedly (see
Page 6). If there are two consecutive letters on the same button of the pushbutton set,
press the right arrow button after entering the first letter and then enter the next letter.
You can also change the position where the letters are entered using the arrowbuttons
(e.g. for entering a space).
-
-
-
Begin as follows:
a
t
O
t
O
Enter the name.
In this example: »
Confirm your entry by pressing OK.
Enter the telephone number.
In this example: »
Confirm your entry by pressing OK.
If you wishto make furtherentries proceed
as described above.
FSSS
prog tbook new
ˆ Input telephone book
ELMEG HOTLINE«.
00190510110«.
15
ˆname>ELMEG HOTLINE
ˆ Input telephone book
ˆtnumb>00190510110
ˆ Telephone book
ˆ delete list new
Page 18

3.6.2 Editing entries in the directory
Begin as follows:
a
FSSS
prog tbook list
t Enter the first letter of the directory entry
and/ or search it with the arrow buttons.
O Confirm your entry by pressing ok.
C Delete the existing characters by pressing
t
O
C Delete the existing telephone number by
t
O
the C button.
Enter the new letters.
In this example: »
Confirm your entry by pressing ok.
pressing the C button.
Enter the new number.
In this example: »
Confirm your entry by pressing OK.
To edit further entries proceed as described above.
ELMEG MARKETING«.
001122334455«.
ˆ Make initial select.
ˆname>ELM_
ˆChange tbook data input
ˆname>ELMEG HOTLINE
ˆChange tbook data input
ˆname>ELMEG MARKETING
ˆChange tbook data input
ˆtnumb>00190510110_
ˆChange tbook data input
ˆtnumb>001122334455_
ˆN:ELMEG MARKETING
ˆT:001122334455
3.6.3 Further information about the phone directory
For further information about the telephone directoryfor yourphone refer to the detailed
Operator’s Manual on the enclosed CD. For example, deleting phone directory entries,
reorganization of the phone directory, assigning special call ringing signals to individual
phone directory entries.
16
Page 19

3.7 Programming VIP numbers
You can program VIP numbers for each of the ten buttons 1 ... 0 including a name
(20 characters max.) and a telephone number (26 digits max.).
3.7.1 Programming VIP entries
The followingexample describeshow toprogram aVIP entry for destination »V5«. If you
wish to program further entries, proceed as described for »
Begin as follows:
V5«.
a
t
O
t
O
F
Enter the name of the VIP entry »V5«.
In this example: »
Confirm your entry by pressing OK.
Enter the telephone number.
In this example: »
Confirm your entry by pressing ok.
SSS<>O
prog vip new
BEATRICE«.
0123456789«.
3.7.2 Editing VIP entries
Begin as follows:
a
C
t
O
FSSS<>O
prog vip list
Delete theexisting entryby pressing the C
button and enterthe new nameforthis VIP
entry.
In this example, the name is left un
changed.
Confirm your entry by pressing OK.
Select VIP
destination
ˆ Program VIP name
ˆV5>BEATRICE_
ˆ Program VIP number
ˆV5>0123456789_
ˆ Reprogram VIP {}
ˆV5:BEATRICE
Select VIP
destination
ˆ Program VIP name
ˆV5>BEATRICE
-
C Delete the existing telephone number by
pressing the C button.
17
ˆ Program VIP number
ˆV5>0123456789
Page 20

t
O
Enter the new number.
In this example: »
Confirm you entry by pressing OK.
0987654321«.
ˆ Program VIP number
ˆV5>0987654321_
ˆ Select VIP {}
ˆV5:BEATRICE
3.8 Programming direct dialing numbers
Direct dialingis initiatedusing thedirect dialing keys Z. Each of the 7 keys can be pro
grammed with two direct dialing numbers. Using the Shift button you can switch be
tween the two levels for direct dialing. Pressing the shift button is indicated by »
the top line in the display.
With the elmeg CS300 telephone you can also program other typical system functions
for the direct dialing buttons in addition to the ones described here.
[a]«on
3.8.1 Programming dtmf or keypad sequences
The followingexample describeshow to program the direct dialing button 5. If you wish
to configure further buttons proceed as described for Button 5.
Begin as follows:
a
t Enter the telephone number or the dtmf/
If youwish toprogram atone frequency or keypad sequence press the Shift button and
set the desired entry mode in the display before you input the digits.
(No character) Telephonenumber
»
T« DTMF sequence (Tonefrequencydialing)
»
V« Keypad sequence (Keypad function)
FSSS<>O
prog direct new
keypad sequence (26 digits max.).
In this example: Rufnummer »
0123456«.
Select direct
dial button
ˆ Program keys
ˆ5_> 0123456_
-
-
O Confirm your entry by pressing OK. ˆProg. new direct dial {}
ˆ5_: 0123456
18
Page 21

If you wish to change a programmedkey, proceedas described for programming of the
key.
3.8.2 Programming a function
You can program the following function for the direct dialing keys of your phone:
MSN assignment (transmitting of a defined MSN to the party you are
•
calling)
Carrier/Provider prefix (prefix fora defined network serviceprovider code)
•
Activating/Deactivating the call filter
•
Activating/Deactivating call rerouting
•
Activating direct dial-in calling
•
Programming function keys
The following exampledescribes how to program thefunction key 2a.If you wish to program other buttons, or edit an already programmed button, proceed as described for
Button 2a.
Begin as follows:
a
O
FSSS<>O
prog direct function
Use the arrow keys to select the desired
function.
In this example: »
Confirm your choice by pressing OK.
call forwarding«.
t Enter the index of the telephone number
(MSN) that is to be forwarded.
In this example: Telephone number with
index »
3«.
t Indicate the type of call rerouting.
»1« - permanent
»2« - delayed
»3« - on busy
In this example: »
2«.
19
Select direct
dial button
ˆ Function for key 2a? {}
ˆcall forwarding
ˆ2a / call forwarding
ˆnumber>3_
ˆ2a / call forwarding
ˆnumber>32_
Page 22

t Enter the number to which the calls are to
be forwarded.
In this example: »
123456«.
ˆ2a / call forwarding
ˆnumber>32123456
O Confirm your entry by pressing the OK
button.
You will then seethe button programming.
In this example: Call rerouting “delayed”
for number (MSN) 3 to the final number
123456.
ˆProg. new function {}
ˆ2a:F Callre MSN-3,delay»
3.8.3 Programming the elmeg T300 keyboard extension
If you are using your telephone with the elmeg T300 keyboard extension module, you
can also conduct two-level programming for a further 24 buttons. You can program
numbers, DTMF or keypad sequences (see Page18) and functions) for these buttons. If
you are using the elmeg CS300 with certain elmeg PABX systems, you can also program the typical system functions.
You can get to the second levelon the keyboard extension module by pressingthe Shift
button on your phone.
For more information about the direct dialing keys, programmable functions and
configuration of keys on theelmeg T300 key extension module,refer to the detailed
Operator's Manual on the enclosed CD.
3.9 Additional Information in the Display
When the telephone is in the idle state, additional in
formation about functions/performance features that
have been configured are shown on thetop lineof the
display. In the example: »
DVqC«.
-
ˆ01.04.00 10:34 DVqC }
ˆtbook vip quiet
>S To obtain further information about set
functions pressthe right arrow button and
then the softkey below »
If several functions have been set, press
the arrow button or the softkey below
»
info«, to view the various settings.
info«.
20
ˆ01.04.00 10:34 DVqC {}
ˆuntpark rate info
ˆCall forwarding direct{}
ˆ(1}0123456789) info
Page 23

Displays Configured function
D« Active date set
»
V« Dial control, call filter or configuration protection active
»
q« Function »Station guarding« (only brief signal) active
»
Q« Function »Station guarding« (complete) active
»
C« Call forwarding active
»
4 Settings at a PABX (CD-ROM)
You can make the following settings when you use your telephone at an internal ISDN
PABX system. Configuration of these settings is described in the detailed Operator's
Manual on the enclosed CD.
•
Max. MSN length that is to be assigned to the internal subscribers of a
PABX system
•
Automatic access to outside line
•
Line access digit (digit(s) that must be dialed to conduct calls to "outside"
lines)
•
Setting the type of PABX system
•
Emergency operation
•
Function keys and systems, for certain PABX systems
(elmeg CS300 only)
If youare using your telephone with certain elmeg PABX systems you canprogram
the existing direct dialing keys with functions that are typical for your system. With
some elmeg PABXsystems there is also aspecial menu availablecontaining further
functions standard for that particular system.
21
Page 24

5 Operation
5.1 Starting a call
5.1.1 Dial number - no correction possible
btg
Dial number
5.1.2 Dial number - correction possible
atbg
Dial number
To change thenumberor to correctawrong entry, selectthewrong figure withthe arrow
buttons and press
If you wish to conduct the call using the handset, just lift it up after dialing the number.
Any time during a call you can switch back and forth between hands-free calling,
speaker function and use of the handset.
After you have dialed the number you can also press the speaker button to have the
number dialed and to use hands-free calling.
If a call can not be put through, e.g. number is inhibited via the calling filter, or the account for the number/MSN is empty, this message will appear in the display »
inhibited
«.
C to delete it.
Number
5.1.3 Other options for dialing without lifting the handset
The option of dialing without lifting the handset and of correcting or adding to a number
also exists during dialing:
•
from the redialing memory (see page 25).
•
from the caller/memo list (see page 26).
•
from the telephone directory (see page 15).
•
from the short dialing memory (see page 17).
•
from the direct dialing memory (see page 18).
If you are using one of these options, you can make further entries prior to initiating
the call. Youcan define whichnumber(MSN), if any,is to betransmittedto the party
being called.
22
Page 25

Dialing from the telephone directory
a
Dialing from the short dialing memory
a
Dialing from the direct dialing memory
a
S
tbook
S<>
vip
Z
Press the direct
dialing key
t
Enter first letter
Select speed
dialing number
bg
and / or
or
<>
Select
entry
bg
tbg
Select speed
dialing number
5.1.4 Initiating a Initiating a call using a set number (MSN)
You can conduct an internal or external call such that a defined number (MSN) is transferred from your telephone to the party you are calling. This number must be entered
previously in your phone. When youcall, either number thatis transmitted is shownin the
second line of the display (»
number (MSN). You can initiate dialing using the set number (MSN) as explained in the
following, or you can use a programmed function key for this.
at
Dial number
msn1...msn10«) or the name that you have assigned to this
OFSS
msn
msn1
...
msn10
bg
5.1.5 No number transmission
During an external or internal call, you can prevent the number from being transmitted
(displayed) to the party youhave called. You can setthis function specifically for thenext
call, or permanently.
at
Dial number
OFS
secret
23
bg
Page 26

5.2 Accepting a call
In its initial state the telephone will accept all calls, regardless of the service or the se
lected MSN. If two calls are signaled simultaneously the first one is accepted when you
lift the handset.Thesecond call isthen no longer signaledor indicated inthe display. The
second caller will then hear the busy signal.
The telephonenumber of the caller is shown on the firstline in your display. The second
line shows the MSN on the right (
this particular telephone number is entered.
msn1...msn10), or the name of the MSN under which
albg
No number transmission
When a callissignaled, you candecide before accepting thecall whether yournumber is
to be transmitted to the caller. If your phone is the final destination of call rerouting you
can use thisprocedureto prevent thecallerfrom seeing thefinal destination phone number (i.e. yours).
You can set this function specifically for the next call, or permanently.
al
>S
5.3 »Station guarding«
secret
bg
-
You have the optionof settingyour ISDNsystem telephoneto “Stationguarding”. Inthe
idle state an »
guarding« is activated.
»
no« The function »Station guarding« is deactivated.
»
complete« Calls are signaled optically only(»Q«shown in the display).
»
ok« Calls are signaled first by a brief acoustic signal and then only opti
a
q«or»Q« in the upper line of the display shows that the function »Station
cally displayed (»
q«).
SS
quiet no/complete/ok
24
-
Page 27

5.4 Redialing
The previously dialed telephone number is stored in the redial memory.
If the connection between the ISDN system telephone and the ISDN network is in
terrupted, the redial memory is deleted.
ab
W
g
5.4.1 Expanded redialing
In the expanded redialing function the 20 previous calls, connections and dialed tele
phone numbersare stored. You can view these by pressing the
buttons and subsequently have them redialed automatically.
a
The last dialednumber isdisplayed. Atthe endof thesecond linethe statusof thisentry
is indicated by the letters displayed there.
»
v« connection
»
c« call
»
|« Calls configured for automatic redialing.
no entry Youplacedacalltosomebodybutdidnotreachhim/her,orhis/herline
If you wishto clear anMSN from the expanded automaticnumber redialing, toimport an
MSN into the memo list or phone directory, refer to the corresponding section in the
detailed Operator’s Manual on the enclosed CD.
WWO
Select entry
was busy.
bg
W button or the arrow
-
-
5.4.2 Automatic redialing
If you placed a call to a subscriber whose number is busy or who does not answer, you
can then activate automatic redialing which will call that same subscriber again after
about 10 seconds.
25
or
S
auto dial
a
bt g
Dial number
Subscriber busy or
does not answer
W
Page 28

After around 10 seconds the hands-free calling function of your phone is activated and
the number is dialed automatically.
This is repeated for up to around 2 minutes.
Up to 20 call attempts are made if the subscriber can still not be reached.
If you hearthe busy signal you cancancel automatic redialing by pressingthe redial
button.
Suspending automatic redialing
You can suspend automatic redialing that youhave started any time usingthe appropri
ate procedure andplace a normal call.To suspend automaticredialing, press the button
L during automatic redialing.
After the call automatic redialing starts again.
Deactivating automatic redialing
You can deactivate automaticredialing at any time.There are no furthercall attempts.
To deactivate automatic redialing during automatic dialing press
If you like to deactivate automatic redialing in the function “Station guarding” of the
phone, proceed as follows:
a
WFSS
auto ok
5.5 Caller and memo list
The phone has a combined caller and memo list. A maximum of 20 entries are stored.
Entries in the caller or memo list are indicated by the softkey »
the display. You always have the mostcurrent entries in the list. The mostrecent entry is
displayed first.
If the number in this entry is identical to a number in the telephone directory the name is
displayed insteadof the number. You can also view the timeand the date of an entry as
well information (if applicable) about it. If you lift up the handset of your phone while you
are viewing an entry in the list, that caller is then called automatically. Single entries can
be selected for deletion.
E.
list« in the lower row of
-
If the ISDN system telephone is disconnected from the ISDN network all of the en
tries in the list are canceled.
26
-
Page 29

Caller list
Calls that you do not accept, or that you specifically refuse, are stored in the caller list.
Entries in the caller list are indicated by the flashing LED of the Shift button.
A maximum of 20 calls are stored. Further calls will thenoverwrite theoldest entries. If a
call is set up with a partyin the caller list (You call them or they call you), thatentry is de
leted automatically from the caller list and stored in the redial memory.
Scratchpad memo
You can storea telephone numberunder a scratchpad memo.You can notinput letters.
A maximum of10entries can bestored. If a callis set up witha party inthememo list (you
call them or they call you), that entry is deleted automatically from the memo list and
stored in the redial memory.
You can enter a memoduring a call or inthe idle state. The followingentries in the list are
possible.
Manual entry.
•
Telephone number from short dialing memory.
•
Telephone number from directory.
•
Telephone number from direct dialing memory.
•
Telephone number from redial memory.
•
5.5.1 Viewing memos in the list
-
a The telephone is idle. The softkey»list«
in the lower row of the display indicates
ˆ01.04.00 10:34 }
ˆtbook vip quiet list
that a memo or an entry is present in the
list.
S Press the softkey below »list«. ˆ01.04.00 10:34 }
ˆtbook vip quiet list
The most current entry isshown in thedis
play.
In the upperrow of the displayyou see thetype of entry: (»Call-Box«or»Memo«) thedate
(for the first twodays »
today«or»yesterday«)and the time.Inthe lower rowyousee the
telephone number (and the name, if applicable) and the state of the entry.
»
*« New call
»
m« Memo
»
r« Call-Box
»
i« rejected/ ignored call
27
-
ˆCall today 07:55 {}
ˆ 1:JOHNSON,E. *
Page 30

When youview thecaller/memo listagain, entries that you have already viewed but
not deletedare no longer marked by »
by »
a«.
*« inthe bottom line of the display, but rather
You can viewother entries usingthe arrow
buttons.
F If you wish to view more information about
the entry, press the F button.
S You have the option to delete the entry or
view more. Press the softkey below
»
info«.
S On the top line of the display you can see
for which previously entered numbers
(MSNs) the entry was made.
S The number of calls is now displayed on
the bottom lineof the display(in this example:»
2«).
Press the softkey below »
viewing the information.
info« to stop
S If you want to delete the entry, press the
softkey below »
delete?«.
ˆMemo yesterday 15:42 {}
ˆ3:112233445566
ˆCall 29.03.00 08:04 {}
ˆ5:PETERS,J. r
ˆ 5/PETERS,J. r
ˆtbook delete? info
ˆ 5/ auf MSN-3 {}
ˆ info
ˆ 5/PETERS,J. {}
ˆ ( 2 C) info
ˆ 5/PETERS,J. r
ˆtbook elete? info
5.5.2 Select from the caller or memolist
28
or
L
g
a
For further information about the caller/memo list (deleting an entry, importing an
MSN into the phone directory, etc.) refer to the detailed Operator’s Manual on the
enclosed CD.
S<>
list
Select entry
b
Page 31

5.6 Call waiting, Enquiry call, Broker`s call, three-party
conference, call transfer, Call-Back on busy(CCBS)
Call waiting
If; during an ongoing call, a second call comes in for you, the second call is signaled
when “Call waiting on” is set (see page 13).
The “Call waiting” function isnot possible whenalready more than one connectionis es
tablished at your telephone.
-
g
call waiting
S
accept
or
R
g
call with subscriber 2;
Subscriber 1 is put on hold
Enquiry call
You havethe option of establishing up to three (3)other connections during an ongoing
call using the enquiry callfunction. You can also usethe MSN assignment key, a linekey
or a connection key to initiate an enquiry connection.
g
Call with sub-
scriber
R
Subscriber 1
is put on hold
tg
Dial number
Call with sub-
scriber 2
If you wish to set up further connections, proceed as described above. An active connection can be terminated bypressing
T.You can return to thecall that was previously
put on hold. If there are no other calls on hold, a new connection can then be set up.
Broker`s call
If you havemorethan one connectionactiveat your systemtelephone (call waiting oren
quiry call) (max. of four connections), you can talk to these parties alternately. For this,
there are up to four (4) softkeys available, depending on the number of connections on
hold.
g
Call with sub
scriber
>S
-
conn1
...
conn4
g
Call with sub
scriber
>S
-
conn1
...
conn4
g
Call with sub
scriber
>S
-
conn1
...
conn4
etc.
etc.
...
...
-
If you have configured connection and line keys (elmeg CS300 only) you can also carry
out Broker’s calls between different callers using these keys.
Additional information about the corresponding connections is displayed when you
press the shift key and the softkeys below»
To terminatean active connection, press
conn1«, »conn2«, »conn3« or »conn4«.
T. Youare then returned to the call that was
previously put on hold.
29
Page 32

Three-party conference
If you have an active connection and a connection on hold at your system telephone,
you can initiate a conference call with these two parties. All three parties can speak to
one another.
Conference calls are not possible with more than two (2) connections at your phone.
g
Call with sub
scriber 1
>S
-
conn2
g
Call with sub
scriber 2
S
-
conf
d
Conference with sub
scriber 1 and 2
-
To end thethree-partyconference, press thesoftkeybelow »back_to_«. Youarerecon
nected with the subscriberof the last previousactive connection. The othersubscriber is
then put on hold.
Call transfer(switching)
When a call is transferred, the active subscriber and the subscriber for the connection
previously put on hold are always connected with one another.
You can initiate an enquiry call yourself (e.g. in order to announce the call) and can then
transfer the call.
g
Call with 1
R
Subscriber 1
is put on hold
tg
Dial number
Call with sub-
scriber 2
S
x-fer
Please note that this performance feature (ECT - Explicit Call Transfer) must be supported by the PABX system when transferring two (2) external calls, or, when you use
your phone directly on the NTBA, by your network service provider.
Call-Back on busy(CCBS)
Using the function “automatic call-back on busy” you can reach a party whose line is
busy as soonas he/she hangsup the handset at theend of his/hercall. You arethen no
tified by the exchangeoffice that the partyfor which CCBS hasbeen configured can now
be reached. As soon as you accept this information, the selected party is called auto
matically. This feature must be applied for at your network service provider. You can
configure three call-backs at a time. The call-back is deleted after a time period defined
by the networkservice provider (approx. 45 minutes).If you areusing an LCRprocedure
(e.g. the LCR procedure of the phone), the »Call-back on busy« function is carried out
automatically via your standard network service provider.
-
-
-
btg
Dial number
Subscriber
busy
S
clbckbusy
a
If the ISDN system telephone is disconnected from the ISDN network, e.g. by parking a
call, a requested call-back on busy is canceled.
30
Page 33

5.7 Other functions (CD-ROM)
The detailed Operator's Manual on the enclosed CD described other functions
supported by this phone, for example:
Rejecting or forwarding of calls during a call phase
•
Muting (deactivating the microphone to,for example,make a room inquiry
•
call)
Speaker function (activating a built-in speaker while the ongoing call is
•
continued over the handset)
Hands-free calling (a call is conducted using the built-in microphone and
•
speaker instead of over the handset)
Operation of the telephone via an optional headset that can be connected
•
Announcement and intercom functions to other (system) telephones
•
(elmeg CS300 only)
Parking and unparking of calls on the same ISDN connection
•
Malicious call identification (MCID) during ongoing call and after the caller
•
has hung up the handset
Keypad or DTMF/ pulse dialing (controlling of function or performance
•
features from the exchange, or in a PABX system during an ongoing call)
Charges (view or clear charge detail accounts for individual MSNs, for the
•
previous call, or the sum of the charges accrued)
•
CTI via TAPI (Standard interfaces through which the telephone and
computer communicate and work together)
5.8 Service Functions (CD-ROM)
The following service functions are available in the telephone and are described in the
detailed Operator's Manual on the enclosed CD.
•
Read out firmware version and other information via the telephone
•
Setting the telephone using the programs on the elmeg WIN-Tools CD:
Configuration Manager, Phone Directory Manager, Download Manager
and LCR Manager
•
Download of new firmware via the RS232(V.24) interface, or the ISDN
connection
•
RESET - Clearing of all data to return to the initial status
31
Page 34

6 Declaration of conformity
32
Page 35

7 Index
A
Accepting a call . . . . . . . . . . 24
call waiting . . . . . . . . . . . 29
no number transmission
(COLR) . . . . . . . . . . . . . 24
Automatic redialing. . . . . . . . . 25
deactivate . . . . . . . . . . . 26
B
Broker's call . . . . . . . . . . . . 29
Buttons . . . . . . . . . . . . . . . 4
C
Call
transfer/switching . . . . . . . 30
using a set number (MSN) . . . 23
Call forwarding
activating. . . . . . . . . . . . 12
deactivating . . . . . . . . . . 13
Call rerouting. . . . . . . . . . . . 12
Call transfer . . . . . . . . . . . . 30
Call waiting. . . . . . . . . . . . . 29
inhibit / enable . . . . . . . . . 13
Call-Back on busy (CCBS) . . . . . 30
Caller list . . . . . . . . . . . . . . 26
select entry. . . . . . . . . . . 28
viewing entries . . . . . . . . . 27
Cleaning the telephone . . . . . . . 2
Conference . . . . . . . . . . . . 30
Connecting the handset connecting
cord . . . . . . . . . . . . . . . . . 8
Connecting the ISDN cord . . . . . 8
Connecting the RS232 cable . . . . 9
Connecting to the PC . . . . . . . . 9
Contents of package . . . . . . . . 2
D
Direct dialing . . . . . . . . . . . . 18
function keys . . . . . . . . . . 19
programming direct dial
numbers . . . . . . . . . . . . 18
programming dtmf sequence . 18
programming function keys . . 19
programming keypad
sequences . . . . . . . . . . . 18
Display . . . . . . . . . . . . . . . 4
E
elmeg keyboard extension T300
programming. . . . . . . . . . 20
elmeg T300
programming. . . . . . . . . . 20
Expanded redialing. . . . . . . . . 25
F
function keys. . . . . . . . . . . . 19
I
Installation of the telephone . . . . . 8
M
Maintenance . . . . . . . . . . . . 2
Memo list
select entry. . . . . . . . . . . 28
viewing entries . . . . . . . . . 27
MSN
enter . . . . . . . . . . . . . . 10
entering . . . . . . . . . . . . 10
MSN assignment. . . . . . . . . . 23
P
Pictographs . . . . . . . . . . . . . 7
Programming function keys . . . . 19
Programming the telephone directory
editing entries . . . . . . . . . 16
making entries . . . . . . . . . 15
R
Redialing. . . . . . . . . . . . . . 25
automatic . . . . . . . . . . . 25
expanded . . . . . . . . . . . 25
S
Safety instructions. . . . . . . . . . 1
33
Page 36

Starting a call . . . . . . . . . . . 22
no number transmission
(CLIR) . . . . . . . . . . . . . 23
Station guarding . . . . . . . . . . 24
Suspending automatic redialing . . 26
Switching a call . . . . . . . . . . 30
T
TELEDATA-UPDATE. . . . . . . . 14
Telephone
connecting the handset . . . . . 8
connecting the ISDN cord . . . 8
connecting to the PC . . . . . . 9
placing . . . . . . . . . . . . . 2
Telephone number (MSN) . . . . . 10
U
User interface . . . . . . . . . . . . 3
V
VIP number . . . . . . . . . . . . 17
editing . . . . . . . . . . . . . 17
programming. . . . . . . . . . 17
W
WIN-Tools CD-ROM . . . . . . . . 2
34
Page 37

Brief Description of Functions
Enquiry call
bg
Broker`s call
bg
Three-party conference call
bg
Call transfer with prior notice
R
R
R
btg
Dial number Dial number
Parking
bg
Unparking
a
Malicious call identification
>S
>S
unpark
tg
Dial number
tg
Dial number
tg
Dial number
R
tg
t
t
Enter parking
-
code
O
park
Enter par
king code
>S
conn1
...
conn4
S
conf
S
x-fer
O
a
bg
albg
Call forwarding
al
>S
x-fer
>S
mcid
t
Dial number
O
Page 38

Expanded redialing
a
Automatic redialing
WW
Search num
ber
btg
Dial number
Deactivate automatic redialing
Subscriber
busy
or
-
S
auto
<> O
Search
number
or
WO
bg
a
a
Call-back on busy
WFSS
auto ok
btg
Dial number Number busy
Selection of outgoing numbers (MSNs)
at
Dial number
Activate call forwarding
a
Deactivate call forwarding
a
Station guarding
FSSSS
FSSSSO
OFSS
adjust forward
adjust forward off
clbckbusy
S
a
msn
delayed
busy
fixed
msn1
...
msn10
msn1
...
msn10
msn1
...
msn10
bg
t
Dial number
O
a
Dialing from caller list, telephone directory or short dialing memory
a
SS
quiet no/ok complete
S<>
list/tbook/vip
bg
Select entry
Page 39

Warranty Declaration
Insofar as claims filed for elimination of deficiencies (applicable laws) are being processed, these
shall be handled via the contractual partners. In addition, elmeg provides the following manufac
turer’s warranty:
1. For this device, the company ELMEG GmbH & Co.KG Kommunikationstechnik grants a war
ranty period of 24 months, figured from the date of purchase from the dealer; this must be verified
by the original receipt, or other similar documents, in accordance with pertinent, existing guide
lines.
2. Warrantyclaims shallbe filedvia aspecialized elmegdealer. Alist ofthe elmegspecialized deal
ers is available for users on the Internet at www.elmeg.de, or via the elmeg information hotline.
3. The voluntary elmeg warranty covers the rectification of any damage or deficiency that occurs
during the warranty period and which is demonstrably due to material or production faults.
4. Not includedinthis voluntary warrantyaredamage and deficienciesresultingfrom incorrect con
nection, from improperhandling, from non-observance ofthe programming instructionsorinstruc
tions for use, or from force majeure. The voluntary elmeg warranty does not cover installation and
programming workperformed by the specialized dealer. In particular,no claimcan be made for in
stallation or programming worktobeperformed free of chargebythespecialized dealer. The volun
tary elmeg warranty does not cover deficiencies which have a negligible effect on the value or us
ability of the device. Further costs, such as for installation, transport and travel expenses are ex
pressly excluded from the elmeg warranty.
5. It isat the discretionofelmeg to replacethe device withanidentical one insteadof performing re-
pairs. Furtherclaims fordamage are not permissible. Any data stored in thedevice willbe lostafter
repair work or replacement of the device.
6. The voluntaryelmegwarranty is nullified ifchangesare made to theproduct,or when theproduct
is operated in a country for which it was not developed nor produced.
7. Fulfillment of the voluntary elmeg warranty presupposes that the device has been packed com-
plete and protected against breaking and impacts (if possible in the original packaging) and
shipped with the warranty certificate from the specialized dealer.
8. If testing reveals that there are no grounds for warranty claims, or that the product does not ex
hibit any deficiencies, the costs for repair work and testing shallbe borne by the user. The special
ized dealer processing the claimarising from the voluntary elmeg warranty is authorized to charge
these costs to the user.
9. Services arisingfromthe voluntary elmeg warrantyeffectneither an extension ofthewarranty pe
riod, nor do they mark the beginning of a new term for the voluntary warranty.
10. Warranty claims according to applicable law filed by the end customer shall neither be ex
cluded, nor restricted by this independent manufacturer’s declaration.
-
-
-
-
-
-
-
-
-
-
-
-
-
-
© 2002 ELMEG GmbH & Co. KG Kommunikationstechnik - All rights reserved.
Any reprint of thisdocumentation,evenexcerpts, is prohibited withouttheprior,express consent of
the publisher and exact designation of sources, regardless of the type and form of media used in
the process (mechanical or electronic).
Function and logic descriptions for this documentation which refer to software products of other
manufacturers are based on the software in use at the time of generation or print. Poduct and/or
company names used in this documentation may be registered trademarks.
Page 40

This device meets therequirements stipulated by theEC guidelines:
1999/5/EG R & TTE
The elmeg ISDN-telephone has therefore been given the CE mark.
ELMEG GmbH & Co.KG
Kommunikationstechnik
Vöhrumer Str. 30
D-31228 Peine
http://www.elmeg.com
Subject to changes 5160 037360.5 version 09-2002 / 10x4
elmeg C300 - CS300
 Loading...