

Page 1

Version 2
elmeg C310 - CS310 / elmeg C320 - CS320
Page 2

Important lnformation
These operating instructions describe the functions for elmeg C310 and elmeg
C320 ISDN telephones and for both elmeg CS310 and elmeg CS320 system
phones.
elmeg C-CS310:
These telephones are equipped with an RS232 (V.24) interface. Via this interface, you
can configure the phone or load new software.TAPI applications (if installed on your PC)
can also be used via this interface.
elmeg C-CS320:
These telephones are equipped with a USB port.Via this port, you can configure the
phone orloadnew software.CAPI andTAPI applications (ifinstalled on your PC)can also
be used via this interface.
Impemented LCR procedure.
This performance feature can currently be used in Germany only.
The tariff data for the LCR feature can be downloaded from
TELEDATA-UPDATE Gesellschaft für
Telefon-Tarifdaten-Management mbH using a dial-in number preset in your telephone. ELMEG GmbH & Co. KG
Kommunikationstechnik cannot warrantthat this tariff datais
up-to-date, complete and correct and declines any liability
resulting from the use of such data. KG
Kommunikationstechnik cannot warrantthat this tariff datais
up-to-date, complete and correct and declines any liability
resulting from the use of such data.
Page 3

Table of contents
1 Description and Installation . . . . . . . . . . . . . . 1
1.1 Safety instructions. . . . . . . . . . . . . . . . . . . . . . . . . . . 1
1.2 Cleaning and placing the telephone. . . . . . . . . . . . . . . . . . 1
1.3 Contents of package . . . . . . . . . . . . . . . . . . . . . . . . . 2
1.4 Connection of the handset connecting cord . . . . . . . . . . . . . 3
1.5 Connection of the ISDN connecting cord. . . . . . . . . . . . . . . 3
1.6 User interface of your telephone . . . . . . . . . . . . . . . . . . . 4
1.7 Display, Buttons, LEDs, Call signalling, Pictographs and signals . . . 5
1.8 Changing the label panel . . . . . . . . . . . . . . . . . . . . . . 10
2 Configuration settings . . . . . . . . . . . . . . . . 11
2.1 Telephone numbers (MSN or extension number) . . . . . . . . . . 11
2.2 Protecting the configuration by a PIN (password). . . . . . . . . . 14
2.3 Changing the PIN . . . . . . . . . . . . . . . . . . . . . . . . . . 14
2.4 Displays of the telephone . . . . . . . . . . . . . . . . . . . . . . 15
2.5 Additional information in the display . . . . . . . . . . . . . . . . . 16
3 Volume settings . . . . . . . . . . . . . . . . . . . . 17
3.1 Setting the acknowdledgement signals . . . . . . . . . . . . . . . 17
3.2 Speaker volume setting . . . . . . . . . . . . . . . . . . . . . . . 18
3.3 Setting the volume of the handset . . . . . . . . . . . . . . . . . . 18
3.4 Setting the call waiting signal . . . . . . . . . . . . . . . . . . . . 19
3.5 Settingthe volume of the the volume of the »Station
guarding« tone . . . . . . . . . . . . . . . . . . . . . . . . . . . . 19
4 Further settings . . . . . . . . . . . . . . . . . . . . 20
4.1 Call forwarding (call rerouting) . . . . . . . . . . . . . . . . . . . . 20
4.2 Call waiting . . . . . . . . . . . . . . . . . . . . . . . . . . . . . . 21
4.3 Direct dialing . . . . . . . . . . . . . . . . . . . . . . . . . . . . . 22
5 Programming telephone numbers and keys . . . . 23
5.1 Programming the phone directory . . . . . . . . . . . . . . . . . . 23
5.2 Programming VIP numbers . . . . . . . . . . . . . . . . . . . . . 25
5.3 Programming direct dialing numbers . . . . . . . . . . . . . . . . 26
6 Settings for a PABX System . . . . . . . . . . . . . 28
Page 4

7 Answering machine . . . . . . . . . . . . . . . . . . 29
7.1 Configuring the Answering Machine . . . . . . . . . . . . . . . . . 29
7.2 Announcements, info-texts and dictations. . . . . . . . . . . . . . 31
7.3 Activating message recording for individual MSNs . . . . . . . . . 33
7.4 Using the answering machine . . . . . . . . . . . . . . . . . . . . 36
7.5 Remote polling of the answering machine . . . . . . . . . . . . . . 38
8 Operation . . . . . . . . . . . . . . . . . . . . . . . 39
8.1 Starting a call . . . . . . . . . . . . . . . . . . . . . . . . . . . . 39
8.2 Accepting a call . . . . . . . . . . . . . . . . . . . . . . . . . . . 40
8.3 Station guarding . . . . . . . . . . . . . . . . . . . . . . . . . . . 41
8.4 Call rerouting / Call deflection . . . . . . . . . . . . . . . . . . . . 42
8.5 Redialing . . . . . . . . . . . . . . . . . . . . . . . . . . . . . . . 42
8.6 Caller and memo list . . . . . . . . . . . . . . . . . . . . . . . . . 44
8.7 Mute, Open Listening and Hands-Free Calling . . . . . . . . . . . 46
8.8 Call waiting, Enquiry call, Broker`s call and
8.9 Call transfer (switching) . . . . . . . . . . . . . . . . . . . . . . . 48
8.10 Call-Back on busy (CCBS) . . . . . . . . . . . . . . . . . . . . . . 48
8.11 Keypad and Tone Frequency Dialing (DTMF dialing) . . . . . . . . 48
8.12 Viewing and deleting call charges . . . . . . . . . . . . . . . . . 49
8.13 Downloading a new firmware . . . . . . . . . . . . . . . . . . . . 50
8.14 RESET - Resetting to default state. . . . . . . . . . . . . . . . . . 52
three-party conference . . . . . . . . . . . . . . . . . . . . . . . . 47
9 Telephone and PC. . . . . . . . . . . . . . . . . . . 53
9.1 Installing the programs from CD-ROM. . . . . . . . . . . . . . . . 53
10 Technical specifications . . . . . . . . . . . . . . . 55
11 Declaration of Conformity and CE symbol . . . . . 56
12 Index . . . . . . . . . . . . . . . . . . . . . . . . . . 57
Page 5

1 Description and Installation
These operating instructions describe only the most important routines for using the
telephone.
Detailed information and documentation can be found on the CD-ROM.
The elmeg CS310 and CS320 ISDN telephones provide system features when con
nected to certainelmeg PABX systems. Pleaserefer to the operatinginstructions of your
elmeg PABX to determine which of the typical performance features you can use.
1.1 Safety instructions
Unauthorized opening ofthe telephone andimproper repairs may resultin
•
risk of injury for the user.
Do notexpose the inside of the telephoneto any liquids. This would pose
•
a risk of electrical shock and If you expose the inside of the telephone to
liquids the telephone can be destroyed.
You should not connect or disconnect anylines duringthunderstorms.
•
• To prevent mutualinterference, do notinstall your systemtelephone in the
immediate vicinity of electronic devices such as stereo equipment, electric office equipment or microwave units.
•
Avoid installingnear sources of excessive heat,e.g. radiators or in rooms
with excessive humidity.
•
The ambient temperature must not be below 5° and should not exceed
40°C.
Description
-
1.2 Cleaning and placing the telephone
The ISDN systemtelephone has beenmanufactured for normal, everydayuse. When re
quired, clean the ISDN system telephone with a slightly moistened cloth, or with an
anti-static cloth. Never use a solvent to clean the phone! Never use a dry cloth. Electro
static charges could damage the electronics in the system. It is essential that no liquids
penetrate into theinside of theISDN system telephone,as this coulddestroy the phone.
Please note thatthe feet of your telephone may leave markson sensitive surfaces, such
as furniture. The manufacturer of the ISDN system telephone is not liable for any such
damage. Therefore, use appropriate non-skidding pads under the phone.
1
-
-
Page 6
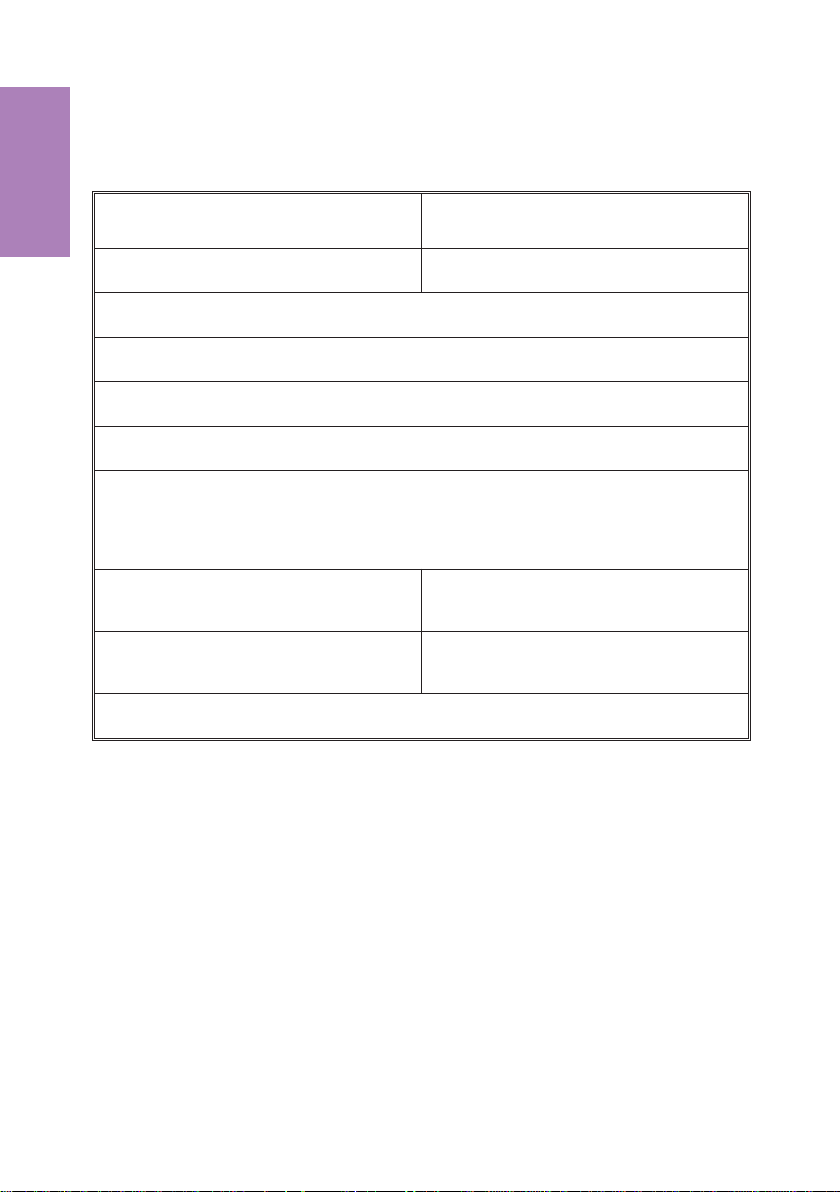
1.3 Contents of package
Description
elmeg C310 or CS310 ISDN phone elmeg C320 or CS320 ISDN phone
elmeg WIN-Tools CD-ROM, including:
detailed operating instruction, configuration manager, telephone directory manager, download and LCR manager, TAPI driver and CTI software, Adobe Acrobat
Reader, Adobe Acrobat file for printing of individual labels.
PC connecting cable (RS232/V.24)
RJ12 / D-SUB 9-pin (approx. 3m)
elmeg C-CS310 elmeg C-CS320
Handset with cable
ISDN connection cord (approx. 3m)
Set of operating instructions
Label for direct dialing/function keys
USB / CAPI and NDISWAN driver,
elmeg CAPI-Tools
PC connecting cable (USB)
(approx.. 3m)
Firmware for the telephone
2
Page 7
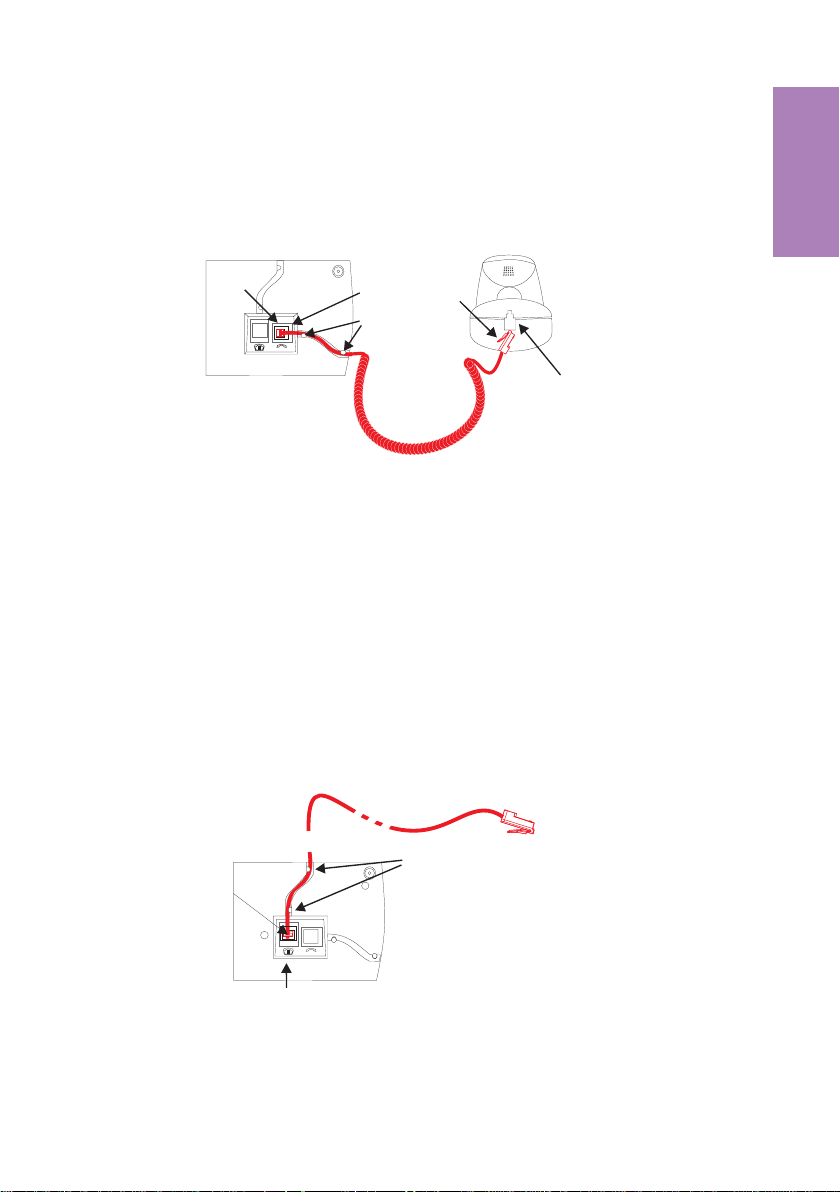
1.4 Connection of the handset connecting cord
Connect the handset cord as shown in figure 1. Laythe handsetcord inthe cordgroove
and lock it below the two cord retainers.
ISDN telephone seen from the bottom
Jack for connecting
the handset
Handset connector
Cord holder
Handset cord
Handset
Handset jack
Fig. 1
1.5 Connection of the ISDN connecting cord
Connect the ISDN cord as shown in figure 2. Ensure that the longer ISDN connector is
plugged into the ISDN jack and the shorter ISDN connector into the ISDN jack on the
telephone. Thenlay the ISDN cord in the cord groove and lockit below the two cordre
tainers.
ISDN connector
(long)
Description
-
Fig. 2
Telephone seen from the bottom
Cord holder
ISDN connector
(short)
Jack for ISDN connecting cord
3
Page 8
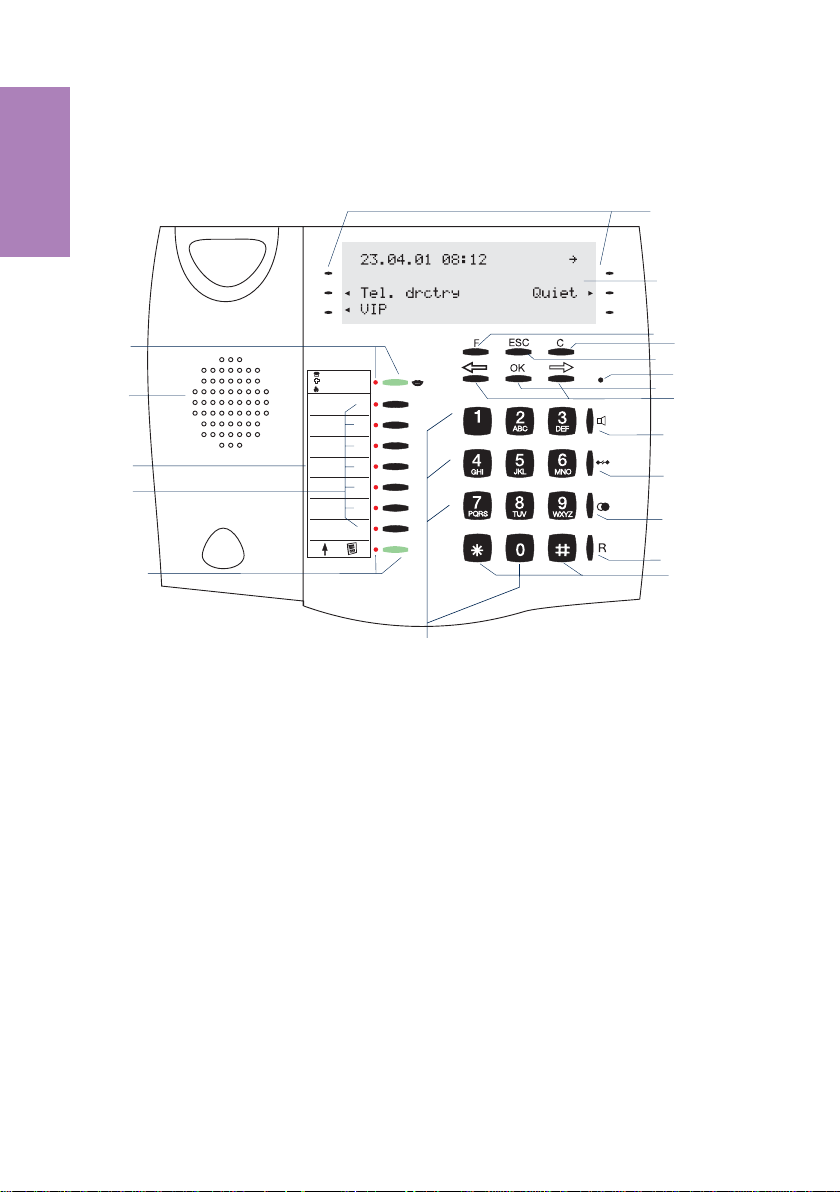
1.6 User interface of your telephone
Description
1
2
3
4
5
1
Answering machine button
with LED
2
Speaker
3
Label panel for VIP keys and
function keys
4
7 direct dialing/ function keys
with LED
5
Shift button with LED
6
6 softkeys
7
Display
8
Function key
9
C-button
19
10 Escape
11 Microphone
12 OK-key
13 Arrow buttons »left« / »right«
14 Open listening/ hands-free
15 Disconnect
16 Redial
17 Enquiry
18 Asterix button / number symbol
19 Dial / VIP buttons
6
7
8
9
1010
11
12
13
14
15
16
17
18
Fig. 3
4
Page 9
1.7 Display, Buttons, LEDs, Call signalling, Pictographs
and signals
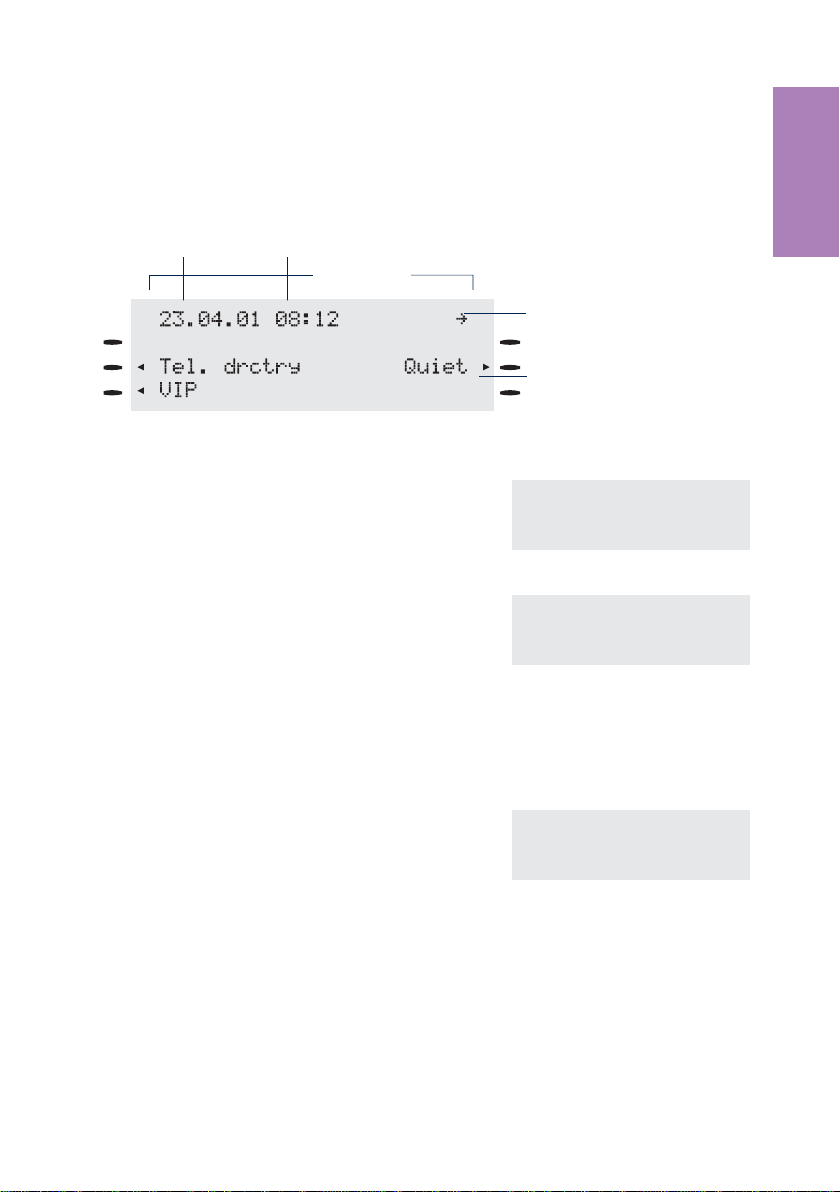
1.7.1 Display
Date
Fig. 4
Time
24 chars
Arrow: further menu items
accessible with arrow buttons
Arrow: Relates to the softkey,
that can be pressed in the
currently selected menu
Description
After you connectthe system to theISDN connection,
the date and time are shown on the top line of the display. The date and time are imported automatically
from the PABX system, or from the ISDN network
when you have successfully made your first call.
The text displayed for a function is always located to
the left or to the right of the corresponding softkey.An
arrow pointing to a softkey indicates that this softkey
can be pressed. When youpress thesoftkey, the next
level is displayed.
ˆ23.04.01 08:12 }
ˆ
ˆTel. drctry Quiet
ˆVIP
ˆ Functions
ˆAcoustic Configuration
ˆSetting Program nos.
1.7.2 Buttons
F Function button: This key opens the pro
gramming menu. If you are already lo
cated in a menu and then press the key,
either menu-specificfunctions are shown,
or you are moved back one programming
step.
-
ˆ Functions
-
ˆAcoustic Configuration
ˆSetting Program nos.
E Escapebutton: Pressing theEsc button duringprogramming returns thetele
phone to itsidlestatus.
O OK key:Pressing thisbutton stores a setting in the telephone. You then hear
the acknowledgement signal.
-
5
Page 10

C C-button: Press this button to moveback one menu step in themenu. If you
are currently in the input mode, this button can be used to delete individual
characters.
<> Arrow buttons: The arrows »{« and »}«in
Description
Special feature for changing existing entries
You have various options available to you for changing existing entries (e.g. names or
numbers).
Example 1:
You wish to change an existingnumber /MSN, asthe telephone is to be used at adifferent ISDN connection.
the right corner on the top line of the dis
play indicate that you can call up further
functions on the lower lines using the ar
row buttons.
t When you use thepushbutton set to enter
the first digit of the new number the existing number is deleted completely.
ˆ23.04.01 08:12 }
-
ˆTel. drctry Quiet
ˆVIP
-
ˆ23.04.01 08:12 {
ˆinhibit Memo
ˆunpark Charge
ˆPABX UUS
ˆ Program dial number
ˆMSN-1>123456
t Enter the other digits of the new number. ˆ Program dial number
ˆMSN-1>987654_
Example 2:
You wish to change parts of a name in a telephone directory listing (see page 24), be
cause the name has changed (e.g. in the case of marriage in the case of marriage).
>
C
Using the arrow keys, first select the let
ters of the entry that are to be changed (in
this example: the surname »MILLER«)
and delete this name using the C button.
t Now enter the new letters for the new
name (in the example the surname »PE
TERS«).
6
-
ˆChange tbook data input
ˆName>TINA_MILLER
ˆChange tbook data input
-
ˆName>TINA PETERS_
-
Page 11

Special feature for displaying lists in the display
Several entries are shown in the display as a list for certain settings or when using the
phone. After this, up to three entries will be displayed simultaneously in the lower three
lines of the display. These lists are displayed, for example for settings in the call filter, the
dialing filter, the phone directory or the VIP and direct dialing keys.
The settings of VIP keys are an example for a list display (see page 25).
Description
<> The active entryis indicated bythe flashing
arrows on the right and left edges of the
display. Press the arrow keys to mark
other entries.
<>
O
1.7.3 Entering letters and numbers
The following buttons are configured forthe entryof letters and numbers (e.g. telephone
directory, VIP-memory).
Button
If you have marked the entry »V2« the fol
lowing three entries are displayed after
you press the right arrow key.
Press OK to confirm the selection of a
marked entry.
1
2
3
4
5
6
7
8
1.
press
1
ABC2Ä
DEF3
GHI 4
JKL5
MNO6 Ö
PQRS7ß
TUV8Ü
2.
press3.press4.press
ˆ Select VIP {}
ˆV0: 0123456 ...........
ˆV1: BEATRICE ..........
ˆV2: ...................
ˆ Select VIP {}
-
ˆV3: ...................
ˆV4: ...................
ˆV5: ...................
5.
press6.press7.press
7
Page 12

Button
1.
press
2.
press3.press4.press
5.
press6.press7.press
9
Description
0
*
#
You have various possibilities for entering letters:
»«
»ABC«
»Abc«
Use the Shift key to set how you wish to enter characters. The selected input mode is
shown on the right on the first line of the display » «, »ABC« or »Abc«.
WX Y Z 9
(space) . , - 0 / &
*
#
Every letter that you enter is shownin smallcase.
•
Example: »tony miller«.
Every letter that you enter is shownas capitals.
•
Example: »TONY MILLER«:
The next letterthat youenter is shown asa capital, all othersas smallcase
•
letters.
Example: »Tony Miller«.
1.7.4 LEDs
To the left of each direct dialing and function key (total of 7) is located the associated
LED. These LEDs canbe usedto indicate certain functions. The shift key LED flashes to
indicate new callersin the callerlist, or remainslit when theshift key ispressed (active).
•
The LED lights up.
///////////////////////////////////////////
•
The LED flashes.
////////////____////////////____///////////
•
The LED flickers.
//__//__//__//__//__//__//__//__//__//__//_
1. second 1. second 1. second 1. second
8
Page 13

1.7.5 Pictographs
The pictographs (symbols) described in the following havebeen usedin theseoperating
instructions to illustrate some procedures for setting and using the telephone.
b Liftupthehandset,activate hands free calling, or start initializing selec
tion.
a Hang up thehandsetand end hands free calling.
The telephone isidle.
l A call issignaled.
The ringing tonemelodysounds.
g You areconducting a call.
d A three-party conferencecall hasbeen established.
q You hear the positive or negativeacknowledgementsignal or an infor-
mation signal.
t Select the number,code, character ortext.
X This symbol prompts you to selectacertain digit or character.
0...9
*#
1.7.6 Listen to acknowledgement signals
Pressthe appropriatebutton onthe pushbutton set.
-
Description
Depending on your settings, the input you make at your phone will be confirmed by an
acknowledgement signal (see page 17).
Before you begin making settings, you should listen to these two acknowledgement
signals of your telephone:
The positive acknowledgement signal indicates that your input has been accepted and
stored by the telephone. Example:
a
You will hear the negative acknowledgement signal when your input has not been ac
cepted by the telephone, or when invalid input has been made. Example:
SS
quiet No
q
9
-
Page 14
If no call is parked you hear the negative acknowledgement signal.
a
Description
>SO
unpark
q
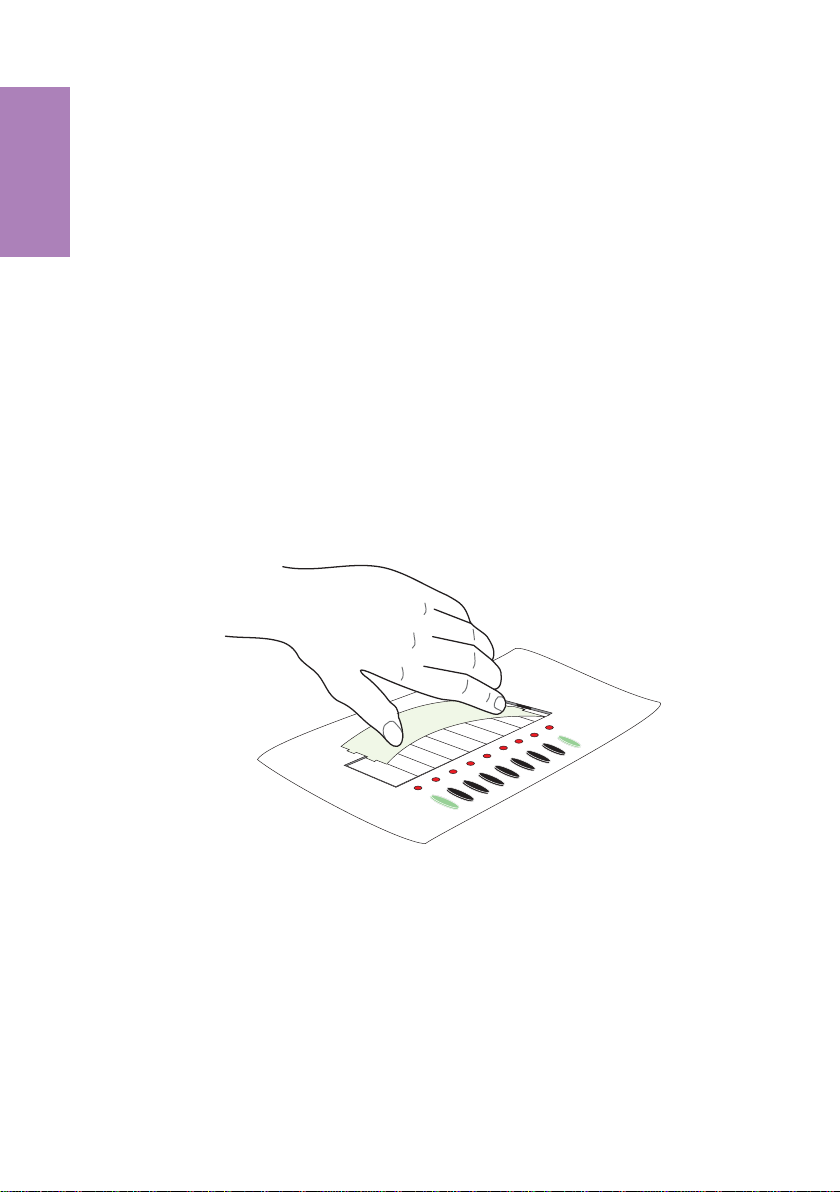
1.8 Changing the label panel
The label panels forthe directdial and function keys are included on a sheet enclosed in
the operating instructions. Remove the desired label panel.
To change the label panel, press the flexible cover together between your index finger
and thumb and lift it out. The label panel can now be changed.
You can fill in thelabel panel via yourPC yourself.The CD ROM suppliedwith thesystem
contains an Adobe Acrobat file with templates.
Move the mouse pointer to the first field (behind the symbol) »(«). You can then use the
PC keyboardto make input into thisfield. You can jump from field to field using the TAB
key and fill them in as required. After this you can print out a selected label panel, cut it
out and place it in the space provided for labels on your telephone.
Fig. 5
10
Page 15
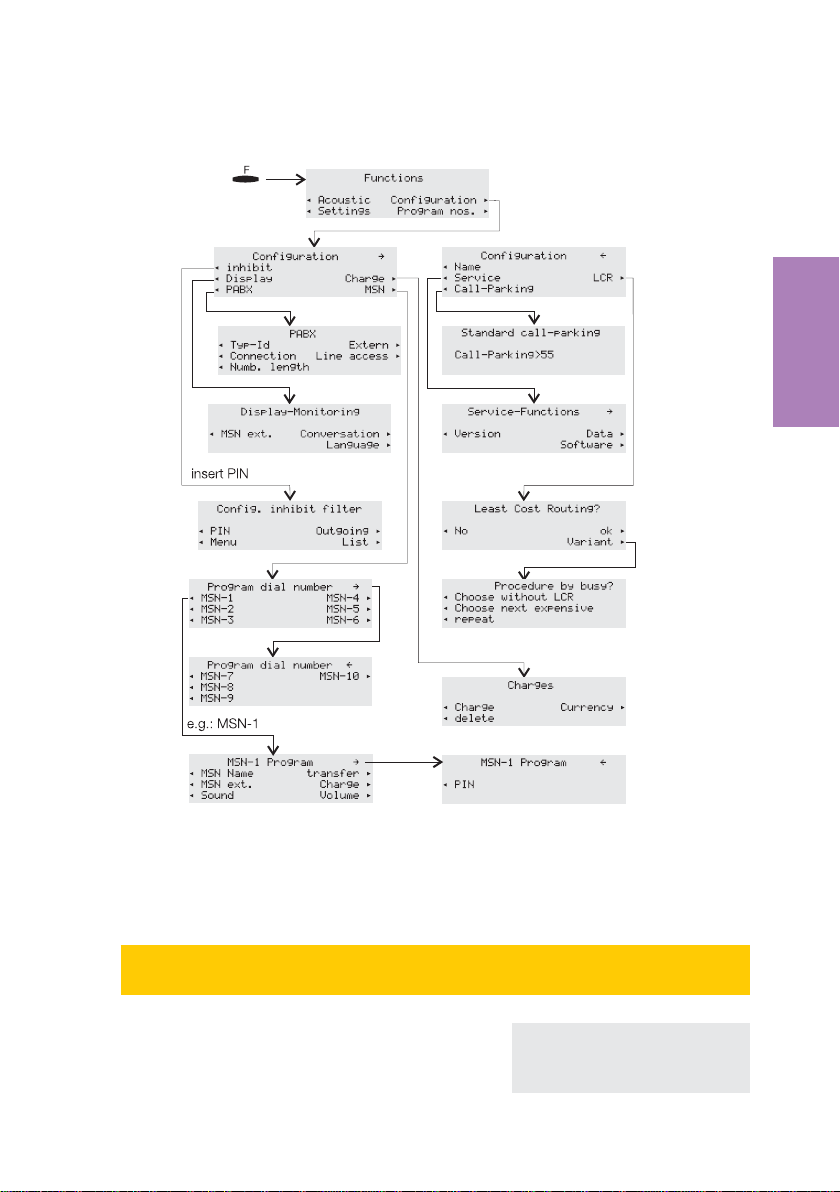
2 Configuration settings
Settings
Fig. 6
2.1 Telephone numbers (MSN or extension number)
How to configurean MSN(extension number) is describedin the following example
with »MSN-1«.
S To access the menu »Program dial
number« proceedas shown in figure 6 on
page 11. Press the softkey »MSN-1«.
11
ˆ Program dial number}
ˆMSN-1 MSN-4
ˆMSN-2 MSN-5
ˆMSN-3 MSN-6
Page 16

If youhaven’t yet entered any MSN exten
sion number, »number«is theonly softkey
displayed. The other softkeys are dis
played only whena numberhas been con
figured.
ˆ MSN-1 program }
-
ˆMSN Name transfer
ˆMSN ext. Charge
-
ˆSound Volume
-
2.1.1 Entering MSNs
In the menu »MSN-1 program« press the softkey »MSN ext.«.
t Enter the number (max. 26 digits).
Settings
In the example here: »123456«.
ˆ Program dial number
ˆMSN-1>123456_
O Confirm your entry by pressing OK.
2.1.2 Setting the melody for an MSN
In the menu »MSN-1 program« press the softkey »sound« and then the softkey »internal« or »external«.
<> Use the arrow buttons to set the desired
melody. The bar in the display indicates
the current status.
ˆ Select melody {}
ˆMSN-1
ˆ-¼------------------ 2
O Confirm your entry by pressing OK.
2.1.3 Setting the volume of the melody for an MSN
In the menu »MSN-1 program« press »Volume « and then »Internal«or»Exter
nal«.
-
<> Use the arrow buttons to set the volume.
The bar in the display indicates the current
status.
O Confirm your entry by pressing OK.
12
ˆ Select volume {}
ˆMSN-1 - ©©©--- +
Page 17

2.1.4 Default setting of a number for forwarding of calls
In the menu»MSN-1 program« press the softkey »transfer«.
t Enter the number. In the example:
»0123«.
If you want to delete an existing number,
press the C button.
ˆ Call forward. number
ˆMSN-1>0123_
O Confirm your entry by pressing OK.
2.1.5 Assigning a name to the MSN
In the menu»MSN-1 program« press the softkey »MSN name«.
t Enter the name (eight characters max.)
In this example:»ELMEG«.
ˆ Own MSN designation
ˆMSN-1>ELMEG
O Confirm your entry by pressing OK.
Once a name has been entered for a number, the softkey designations »MSN-1«…
»MSN-10« are replaced by the corresponding names in the menu.In this example here,
the name »ELMEG« is displayed instead of »MSN-1«.
2.1.6 Charges account for each number (MSN)
In the menu »MSN-1 program« press»charge«.
Settings
t
Enter the amount that is available for this
number for making calls.
In this example: »BP 20«.
Confirm your entry by pressing OK.
ˆDial inhib. by charge
ˆLimit/BP>20_
O
If youenter the amount available for making calls as »0«, the charge account is notacti
vated.
Attention: Not all service providers transfer charge rate information. If you make
calls using a service provider which does not transmit charge information, the
charge account is ineffectual.
13
-
Page 18

2.2 Protecting the configuration by a PIN (password)
The PIN can also be used to protect the configuration of the telephone and for deleting
the charges.
Access to the configuration menu is not restricted. The PIN must only be
•
entered when accessing the menu for callcontrol.
Access to theconfiguration menuand clearing of thecharge rate memory
•
are PIN-protected. After pressing the
figuration« , and prior to clearing the charges, you must enter your
PIN.
In the menu »Config. inhibit filter« press the softkey »Menu«.
Settings
S Press the softkey »Configuration«to
activate or deactivate the PIN protection
feature.
F button and the softkey »Con
ˆ Inhibit menu access
Configuration
-
A checkmark displayed next to »Configuration˜«indicates that the protection fea
ture is enabled.
To deactivate the feature press the softkey »Configuration« once again.
Accessing the configuration menu via the PIN:
In these operating instructions, accessto configuration is always described without the
use of a PIN. If you set the PIN protection for configuration, you can access the menu as
follows.
Begin as follows:
a
FS
Configuration
t
Enter PIN
O
Configuration of the requested performance
features possible in the configuration menu.
2.3 Changing the PIN
In the menu »Config. inhibit filter« press the softkey »PIN«.
t
O
Enter the new PIN.
In this example: »1234«.
Confirm your entry by pressing OK.
Please write down the entered PIN. If you forget your PIN, you will not beable toac
cess any ofthe PIN-protected settings. The PIN is also reset to (0000) afterexecut
ing the service reset for restoring the initial state (see page 52)
ˆ Change PIN
ˆ>1234_
-
-
-
14
Page 19

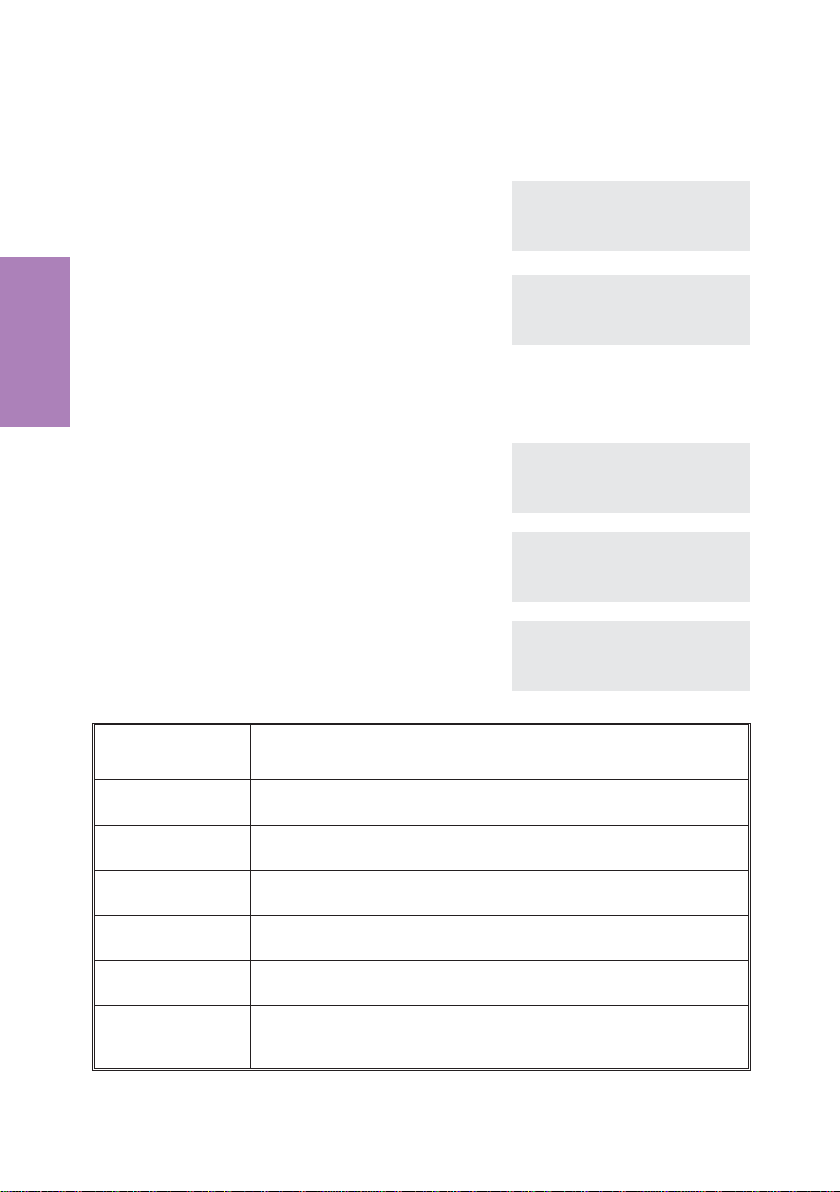
2.4 Displays of the telephone
The following displays are possible during a call:
Call display for phone number (»0123456«).
Call display for phone number (»0123456«) and time
(»19:22«).
Call display for phone number (»0123456«) and du
ration (»02.19«) of entire call.
Call display for phone number (»0123456«) and
charges (»0,36«).
Call display for date (»23.04.01«) and
time(»09:54«).
ˆ0123456 }
ˆedit Memo
ˆshow Keypad
ˆMute park
ˆ0123456 19:22 }
ˆedit Memo
ˆshow Keypad
ˆMute park
ˆ0123456 02.19 }
-
ˆedit Memo
ˆshow Keypad
ˆMute park
ˆ0123456 0.36 BP }
ˆedit Memo
ˆshow Keypad
ˆMute park
ˆ23.04.01 09:54 }
ˆedit Memo
ˆshow Keypad
ˆMute park
Correct charge display is shown only if you have applied at your network service provider for transmission of charges during calls.
When using an LCR procedure the charges are not registered properly, as they are not
transmitted by all providers.
View during a call
The displays during calls described in the following depend on your individual set
tings and can therefore be different for each connection.
Settings
-
g
During a call the display shows in the up
per row the phone number or the name of
the caller (»BEATRICE«) and the duration
of the entire call (»02.19«).
S
Press the softkey »display«.
You are then shown otherinformation available on the
current connection.
Date (»23.04.01«), Time (»09:56«),
associated number (»0987654321«),
charges (»0,36 BP«), duration of call (»02.55«).
15
-
ˆBEATRICE 02.19 }
ˆedit Memo
ˆshow Keypad
ˆMute park
ˆBEATRICE {}
ˆ23.04.01 09:56
0987654321
ˆ0.36 BP 02.55
Page 20
Press the arrow keys to display further information (if available).
If you arethe destination of call rerouting, you will be shown thenumber that is being re
routed (»U{123«), when it is transferred.
-
You see the normal display again during a
connection.
a When you terminate the call you see this
display for approximately 5 seconds.
Settings
2.5 Additional information in the display
When the telephone is in the idle state, additional in
formation about functions/performance features that
have been configured are shown on the top line of the
display. In the example: »DVqC׫.
S Press the softkey»Info« if you wishto get
more information about the configured
functions.
If several functions have been set, press
the arrow buttons The various settings are
shown one after the other.
Displays Configured function
ˆBEATRICE 03.33 }
ˆedit Memo
ˆshow Keypad
ˆMute park
ˆBEATRICE
ˆDuration 03.45
ˆ23.04.01 08:12 DVqC× }
-
ˆ Info
ˆTel. drctry Quiet
ˆVIP
ˆ23.04.01 08:12 DVqC× }
ˆ Info
ˆTel. drctry Quiet
ˆVIP
ˆCall forwarding direct{}
ˆMSN-1} 22
»D«
»V«
»q«
»Q«
»C«
»×«
Active date set
Dial control, call filter or configuration protection active
Function »Station guarding« (only brief signal) active
Function »Station guarding« (complete) active
call forwarding active
Answering machine: Time control, call forwarding signaling or
remote control activated
16
Page 21
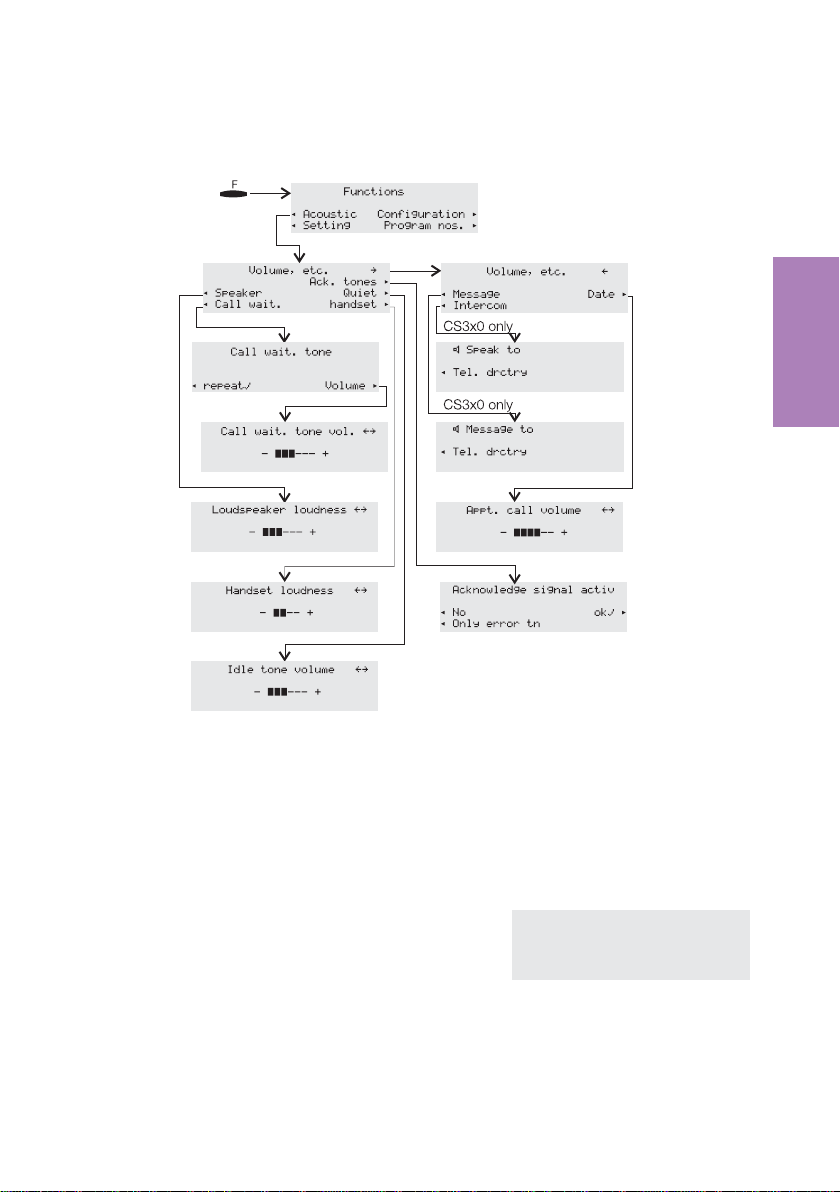
3 Volume settings
Settings
Fig. 7
3.1 Setting the acknowdledgement signals
In the menu »Volume etc.« press the softkey »Ack. tones«.
S Press the softkey below the desired func
tion:
»no«: Acknowledge signal active.
»ok«: Acknowledgement signal always
active.
»error«: Acknowledgment signal active
for erroneous input.
17
-
ˆAcknowledge signal activ
ˆNo ˜ok
ˆOnly error tn
Page 22

3.2 Speaker volume setting
Permanent volume setting
In the menu »Volume etc.« press the softkey »Speaker«.
<> Use the arrow buttons to set the volume.
The bar in the display indicates the current
status.
ˆ Loudspeaker loudness {}
ˆ - ©©©©-- +
O Confirm your entry by pressing OK.
Temporary volume setting
Settings
You are conducting a call. The loudspeaker is set to open listening.
F Press the F button.
Use the arrow buttonsto setthe volume of
the speaker. The bar in the display indicates the current status.
Press the E button in order toreturn tothe normal display during an ongoing call. If you
confirm your entry by pressing the
set value is overwritten by the newly set one.
O button instead of the E button, the permanently
3.3 Setting the volume of the handset
Permanent volume setting
In the menu »Volume etc.« press the softkey »handset«.
<> Use the arrow buttons to set the volume.
The bar in the display indicates the current
status.
ˆ Loudspeaker loudness {}
ˆ - ©©©©©©- +
ˆ Handset loudness {}
ˆ - ©©-- +
O Confirm your entry by pressing OK.
Temporary volume setting
You are conducting a call.
F
<>
Press the F button.
Use the arrow buttonsto setthe volume of
the handset. The bar in the display indi
cates the current status.
18
ˆ Handset loudness {
ˆ - ©©©© +
-
Page 23

Press the E button in order toreturn tothe normal display during an ongoing call. If you
confirm your entry by pressing the
set value is overwritten by the newly set one.
O button instead of the E button, the permanently
3.4 Setting the call waiting signal
In the menu »Call wait. tone« press the softkey »repeat«.
S The check mark next to »repeat˜« indi
cates that a waiting call wil be signaled re
peatedly.
If you press the softkey again, a waiting call is signaled only once. The check mark next
to »repeat« is deleted.
In the menu »Call wait. tone« press the softkey »Volume«.
<> Use the arrow buttonsto setthe volume of
the call waiting signal. The bar in the display indicates the current status.
ˆ Call wait. tone
-
-
ˆrepeat˜ Volume
ˆCall wait. tone vol. {}
ˆ - ©©©--- +
O Confirm your entry by pressing OK.
3.5 Settingthe volume of the the volume of the »Station
guarding« tone
You havevarious options of setting your telephoneto »Station guarding« (see page 41).
You can set your telephone to signal incoming calls by a brief acousticsignal while»Sta
tion guarding« is active. The volume of that idle tone is adjustable.
In the menu »Volume etc.« press the softkey »Quiet«.
<> Use the arrow buttons to set the volume.
The bar in the display indicates the current
status.
ˆ Idle tone volume {}
ˆ - ©©©--- +
Settings
-
O Confirm your entry by pressing OK.
19
Page 24

4 Further settings
Settings
Fig. 8
4.1 Call forwarding (call rerouting)
The following settings are possible for all MSNs or extension numbers.
»delayed«
»busy«
»fixed«
All calls for this number are signaled for a defined time at the ex
changeofficeorinthePABXandarethenforwardedwhenthisperiod
expires.
The calls for a defined number are forwarded only when the tele
phone is busy.
(Forexample.: Therearealreadytwo connectionsmade,orone con
nection has beenmadeand call waiting isnotpermitted)
All calls fora number for which»fixed« call forwardinghas been con
figuredarererouted.Yourtelephonewill not ring, whenthisnumber is
called.
20
-
-
-
-
Page 25

You can configure simultaneous delayed call rerouting andcall reroutingon busy. If
you have configureda set callrerouting, delete thissetting before you setup a differ
ent call rerouting function.
The followingexamples describes how to configure and deactivate set call reroutingfor
the number MSN 1.
You can get to the menu »Call rerouting« as described in the figure 8 on page 20.
In this menu, press »fixed« and then»MSN-1«.
4.1.1 Activating call forwarding
-
t Enter the number to which the calls are to
be forwarded.
In this example: »0123456789«.
O Confirm your entry by pressing OK.
Call forwarding has been registered. The
three dots atthe right lower cornerflash al
ternately.
Call forwarding has been configured. The
display shown here appears briefly.
ˆ Call forwarding direct
ˆMSN-1>0123456789_
ˆ Call forwarding direct
ˆMSN-1}0123456789 ...
-
ˆMSN-1
ˆ Direct call forwarding!
4.1.2 Deactivating call forwarding
In the menu »Call rerouting« click the softkey »Off« and, in the following display
screen the softkeyfor the number »MSN-1« for which you wishto deactivate call rerouting.
After you have deactivated call rerouting, the message »MSN-1 call rerouting
off!« will be shown briefly in the display.
4.2 Call waiting
To access the menu »settings« proceed as shown in figure 8 on page 20.
The following entries are possible for the call waiting feature:
Settings
(No character) With an ongoing connection or while a connection is being estab
»˜«
»*«
lished, no furthercallswill be signaled.
Callwaiting is possible whenthereisonly one activecallwaiting and no
other call iswaitingat your telephone.
Allcallsaresignaledby a call waitingtone. Twowaitingcallscanbe sig
naled at thesametime.
21
-
-
Page 26

S Press the softkey »Call wait.«. The
three settingoption (» «, »˜«or»*«) willbe
shown one after the other.
ˆ Setting }
ˆOperation Sp.ton. call
ˆCall forwarding Date
ˆCall wait.˜ Filter
4.3 Direct dialing
You can get to the menu »Activate direct cal?« as described in the figure 8 on
page 20.
Settings
4.3.1 Adjusting numbers for direct dialing
In the menu »Activate direct call? « press the softkey »Number«.
t
Enter the telephone number.
In this example: »098765«.
O
Confirm your entry by pressing OK.
4.3.2 Activate direct dialing
S Press the softkey »ok« to activate direct
dialing.
Direct dialing is now activated. The set direct call
number is shown on the second line of the display.
4.3.3 Deactivate direct dialing
F The display returns to idle with the direct
call-in feature enabled.
Press the button F.
t
O
Enter the programmed PIN (in this exam
ple: »0000«).
Confirm your entry by pressing OK.
ˆDir. call-in number
ˆDirect call>098765_
ˆ Activate direct call?
ˆNo ok
ˆ Number
ˆ14:46 Dir. call-in
ˆ098765
ˆ14:46 Dir. call-in
ˆ098765
-
ˆ Input PIN please
ˆ****_
22
Page 27

S Press the softkey»ok« todeactivate direct
dialing.
ˆ End direct call-in?
ˆNo ok
ˆ Number
5 Programming telephone numbers and keys
Settings
Fig. 9
5.1 Programming the phone directory
You can getto the menu»telephone book« as describedin the figure9 on page23.
23
Page 28

5.1.1 Directory entries
Each button of the pushbutton set is labelled with three or four letters of the alphabet.
You can advance through the letters by pressing the appropriate button repeatedly (see
page 7. If there are two consecutive letters on the same button of the push button set,
press the right arrow button after entering the first letter and then enter the next letter.
You can also change the position where the letters are entered using the arrow buttons
(e.g. for entering a space).
In the menu»telephone book« press the softkey »New«.
t
O
Settings
t
O
Enter the name desired name (max. 20
characters).
In the examplehere: »ELMEG HOTLINE«.
Confirm your entry by pressing OK.
Enter the number ( 26 digits max.).
In this example: »00190510110«.
Confirm your entry by pressing OK.
ˆ Input telephone book
ˆname>ELMEG HOTLINE
ˆ Input telephone book
ˆnumber>00190510110
5.1.2 Editing entries in the directory
In the menu»telephone book« press the softkey »list«.
t Enter the first letter of the directory entry
and/ or search it with the arrow buttons.
ˆ Make initial select.
ˆname>ELM_
O Confirm your entry by pressing ok. ˆ Select name please {}
ˆN:ELMEG HOTLINE
ˆ00190510110
O
O
Change the existing name as described
on page 6.
In this example: »ELMEG MARKETING«.
Confirm your entry by pressing OK.
Change the existing telephone number as
described on page 6.
In this example: »001122334455«.
Confirm your entry by pressing OK.
ˆ Change tbook data input
ˆname>ELMEG MARKETING
ˆ Change tbook data input
ˆnumber>001122334455
24
Page 29

5.1.3 Deleting entries from the directory
In the menu»telephone book« press the softkey »delete«.
t
Enter the first letter of the directory entry
and/ or search it with the arrow buttons.
O Confirm your entry by pressing ok. ˆ Delete tbook data {}
ˆ Make initial select.
ˆname>ELM_
ˆELMEG MARKETING ........
ˆPETERS,J. ..............
ˆWINKELMANN .............
5.2 Programming VIP numbers
You can get to the menu »Program VIPs« as described in the figure 9 on page 23.
5.2.1 Programming VIP entries
In the menu»Program VIPs« press the softkey »New«. Use the arrow buttons to select
a VIP destination (»V0:« … »V9:«) and confirm your selection by pressing OK.
t
O
t
O
Enter the name desired name (max. 20
characters) for the VIP entry.
In this example:»BEATRICE« for »V5«.
Confirm your entry by pressing
OK.
Enter the number ( 26 digits max.).
In this example: »0123456789«.
Confirm your entry by pressing OK.
ˆ Program VIP name
ˆV5>BEATRICE_
ˆ Program VIP number
ˆV5>0123456789_
Settings
5.2.2 Editing VIP entries
In the menu»Program VIPs« press the softkey »list«. Use the arrow buttons to se
lect the desired VIP destination and confirm your selection by pressing OK.
<>
O
Change the existing name as described
on page 6.
In this example the name remains un
changed.
Confirm your entry by pressing OK.
25
ˆ Program VIP name
ˆV5>BEATRICE
-
-
Page 30

<>
O
Change the existing telephone number as
described on page 6.
In this example: »0987654321«.
Confirm your entry by pressing OK.
ˆ Program VIP number
ˆV5>0987654321_
5.3 Programming direct dialing numbers
You can get to the menu »Program keys«as described in the figure 9 on page 23.
Settings
5.3.1 Programming dtmf or keypad sequences
In the menu »Program keys« pressthe softkey »New«. Usethe arrowbuttons to select
a key (»1_:« … »7a:«) and confirm your selection by pressing OK.
t Enter the telephone number or the dtmf/
keypad sequence ( 26 digits max.).
In this example: key 5 andtelephone number »0123456«.
If youwish to program a tone frequency or keypadsequence press the Shift button and
set the desired entry mode in the display before you input the digits.
(No character) Telephone number
»T«
»K«
O Confirm your entry by pressing OK. ˆProg. new direct dial {}
Editing direct dialing numbers
In the menu »Program keys« press the softkey »list«. Use the arrow buttons to se
lect a key (»1_:« … »7a:«) and confirm your selection by pressing OK.
Change the existing telephone number or
keypad / dtmf sequence as described on
page 6.
DTMF sequence (Tone frequencydialing; see page49)
Keypad sequence (Keypadfunction;see page 48)
ˆ Prog. new direct dial
ˆ5_: 0123456_
ˆ4_: 9876543210 ........
ˆ5_: 0123456 ...........
ˆ6_:- ...................
ˆ Prog. new keypad key
ˆ5_>K7_
-
26
Page 31

O Confirm your entry by pressing OK. ˆ Select direct dial {}
ˆ4_: 9876543210 ........
ˆ5_:K 721 ..............
ˆ6_:- ...................
5.3.2 Programming function keys
In the menu»Program keys« press the softkey»Function«. Use thearrow buttons to
select a key(»1_:«…»7a:«) andconfirm your selectionby pressing OK.In this example
key »2a«.
Use the arrow keys to select the desired
O
function.
In this example: »call forwarding«.
Confirm your choice by pressing OK.
t Enter the index of the telephone number
(MSN) that is to be forwarded.
In this example: Telephone number with
index »3«.
t Indicate the type of call rerouting.
»1« - permanent
»2« - delayed
»3« - on busy
In this example: »2«.
t Enter the number to which the calls are to
be forwarded.
In this example: »123456«.
O Confirm your entry by pressing OK. You
will then see the button programming.
In this example: Delayed call forwarding
for MSN 3 to the target 123456.
To obtain all information about this entry,
press the shift keyand thenthe right arrow
button.
ˆ Function for key 2a? {}
ˆMSN Assignment .........
ˆcall filter ...........
ˆCall forwarding ........
ˆ2a / call forwarding
ˆnumber>3_
ˆ2a / call forwarding
ˆnumber>32_
ˆ2a / call forwarding
ˆnumber>32123456_
ˆ Prog. new function {}
ˆ2a:F callre MSN-2,delay»
ˆ3a:- ...................
ˆ4a:- ...................
Settings
27
Page 32

You can program the following functions for the direct dialing buttons of your phone:
function Displays further entries
MSN assignment
Carrier / Provider pre
fix
msn-assignment
-
msn-assignment
Index of numbers (MSN 1...9)
that are to be transmitted
Index of the numbers (MSN
1...9) and code of the desired
provider
(e.g. 01033)
Settings
Call filter
Call forwarding
Direct call
call filter
call forwarding
dir. call-in
Index of numbers (MSN 1...9)
that are to be rerouted, type
of rerouting (1...3) and final
destination of call forwarding
6 Settings for a PABX System
You should make the following settings when you operate your telephone at the internal
ISDN connection of your PABX system. Configuration of these settings is described in
the in-depth documentation contained on the CD supplied with the system.
•
max. length (digits)for numbers that areassigned todifferent internal sub
scribers within your PABX system
•
Automatic exchange line acquisition
•
Line access digit (digit that is dialedto conductexternal calls
•
Enter the type of PABX
•
Emergency operation
•
Function keys and system menu at certain elmeg pabx systems (CS310
and CS320 only)
When youare using the phone together with certain elmeg pabxsystems, you can pro
gram the direct dial-inkeys fortypical system features. With some PABXsystems aspe
cial menu with further system-specific functions is available.
-
-
-
28
Page 33

7 Answering machine
Press the answering machine key to get the answering machine menu.
Activating/ Deactivating the answering machine
S The current status isshown onthe first line
in the display. Press the softkey »ON«, if
you wish to switch the answering machine
on.
On the first line of the display the status is
switched to »=ON« and the softkey in the
third line changes to »OFF«.
To switch off, press the softkey »OFF«.
You can only switch on the answering machine if recording of calls has been acti
vated for at least one MSN (see page 33).
ˆ Answering machine=OFF }
ˆ Remaining: 23:14
ˆMessages ON
ˆAnncs. Activate
ˆ Answering machine=ON }
ˆ Remaining: 23:14
ˆMessages OFF
ˆAnncs. Activate
7.1 Configuring the Answering Machine
A
-
machine
Answering
29
Page 34

»Calls sorted by MSN«:
•
You candefine whether recorded messages thatyou wish to listen to are
to be sorted by the MSN forwhich themessage was left.
»Automaticnotification (relaying)« forrecorded messages:
•
You can set the answeringmachine in such away thatafter a preset num
ber of recorded messages all further messages are transferred on to a
programmed telephone number.
»Remote control«:
•
You can also control the answering machine from a remote location, for
example for listening to recorded messages.
»Voice quality«:
•
There are three different voice quality settings to choose from for re
corded texts (announcements, information texts or dictations.Recording
capacity isdecreased as voice quality is increased. Recordedcalls (mes
sages) are always recorded in »Normal« quality.
»Listening«:
•
You can use the telephone speaker to listen to messages as they are be
ing recorded.
7.1.1 Deleting calls, Dictations or all texts
machine
Answering
In the menu »Answ. machine menu« press press the softkey »Delete texts«.
-
-
-
-
S Select whether you wish to delete calls,
dictations or all messages on the answering machine by pressing the corresponding softkey.
Forexample:»Delete all texts«.
S If you wishto continuewith deleting items,
press the softkey next to »OK«.
If youdo not wish the memorized calls de
leted press the softkey »No«.
Attention: When you activate »Delete all texts« all answering machine set
tings will bedeleted as well.Thisrestores the answeringmachine to itsinitial state.
30
ˆ Delete texts
ˆDelete all calls
ˆDelete all dictations
ˆDelete all texts
ˆDo you really want to
ˆdelete all texts?
-
ˆyes No
-
Page 35

7.2 Announcements, info-texts and dictations
A
machine
Answering
»Anncm.- «
»Info- «
»Dicts.«
»Sign-off«
»An mac full»
Recording of announcements, information texts or dictations are described in the
following by the example of announcement text 1.
You can record up to10 messages. Callerswill receive the announcement that hasbeenassigned to the dialedupnumber (MSN).
Recording of upto 5 texts (messages) that can be stored individually
and activated or deactivated as messages for other telephone users.
At the beginningof an automatic notification»Info-5« (see page 30)
is replayed as an information.
Recording of texts(max. 99, dependingon remainingstorage capac
ity) that are storedone after the other.
Special announcement given to a caller after he/she has left a mes
sage when recording is limitedto a certaintime.
Announcement that a caller receives oninadequate storagecapacity
of the answeringmachine.
1.) when lessthan30 seconds are available for leaving a message.
2.) when storage capacity is exhausted while a message is being re
corded.
31
-
-
-
Page 36

In the menu »Record announce.« press the softkey »Anncm.-1«.
bS
Lift the handset of your telephone and
then press the softkey »Record«.
S Record the announcement by speaking
into the handset of your phone. End re
cording by pressing the softkey »Stop«.
S If you want to listen into the announce
ment, press the softkey »listen«. Press
the softkey »Record« to record a new an
nouncement. The existing announcement
is then deleted.To deletethe recorded an
nouncement, press the softkey »de
lete«.
In the menu»Recording announcement« the check mark in front of an entry
machine
Answering
(e.g.»Anncm.-1˜«), indicates that a text (an announcement) has been recorded.
Special function for saved information texts and announcement when answering machine is full.
The saved information texts (max. of five) and the announcement for when the answering machine is full must be specifically activated.Once the information texts have been
activated, they appear in the menu »Polling« as activated. Once the announcement
for a full answering machine has been activated, the caller is given this announcement
when there is not enough memory left in the answering machine.
ˆ Anncm.-1 Record
ˆ Remaining: 21:03
ˆRecord
ˆ Anncm.-1 Record
ˆ------ Recording -------
-
ˆ Stop
ˆ Anncm.-1 Record
-
ˆ Remaining: 20:46
ˆRecord
-
ˆdelete listen
-
-
S The status for this text is shown on the first
line of the display (»= OFF«). Press the
softkey »ON« if you wish to activate the info
text for a full answering machine.
S On the first line of the display the status is
switched to »=ON« and the softkey in the
second line changes to »OFF«.
To switch off, press the softkey »OFF«.
32
ˆText ans.mac. full = OFF
ˆ Remaining: 20:32 ON
ˆRecord
ˆdelete listen
ˆText ans.mac. full = ON
ˆ Remaining: 20:32 OFF
ˆRecord
ˆdelete listen
Page 37

7.3 Activating message recording for individual MSNs
A
machine
Answering
If you have assigned a name to a phone number in the configuration of your tele
phone, the softkey designations »MSN-1« ... »MSN10« are replaced by the corre
sponding names in the menus.
In the menu»Activate announement« you can configurethe answering machine for
the numbers (MSNs) stored in your telephone. You can do this separately for each
MSN, or commonly for all MSNs stored in the telephone.
You can onlyeffect activation of individualMSNs if at leastone announcement hasprevi
ously been recorded and saved (see page 31).
Configuring of the answering machine is described in the following using MSN-1 as
an example.
33
-
-
-
Page 38

In the menu »Activate announcement« press the softkey »MSN-1«.
The upper display line shows the status of the an
swering machinefor the number that hasbeen dialed
(»MSN-01=off«). The various settings can then be
made on the other lines ofthe display using theasso
ciated softkeys.
ˆ Setting MSN-1=OFF
-
ˆSpeak
ˆAktiv after:10sec ON
ˆAnncm. dial Options
-
7.3.1 Setting the mode of operation
S Press the softkey »Speak«, toset theanswerings machine’s mode of opera
tion. The various options are shown one after the other when the softkey is
pressed.
»Speak«
»Speak+sign-off text«
machine
Answering
»Announcement only«
»Announc.+sign-off only«
First the caller hears the set announcement, and
can then leave a message after the acoustic
signal.
First the caller hears the set announcement, and
can then leave a message after the acoustic
signal. If the permissible message length is
reached anda sign-off has been stored, the caller
will hear the sign-off.
A caller hears only the set announcement and can
not leave a message.
A caller can not leave a message. First, the caller
hears the set announcement, followed by the
stored sign-off.
-
7.3.2 Setting the call signal duration
S Press the softkey»Active after:10sec« to set the time interval, after
which you wish the answeringmachine takethe call. By pressing thesoftkey,
the various optionsaredisplayed one afterthe other andcanbe set:
»:00sec«, »:02sec«, »:05sec«,...»:120sec«.
34
Page 39

7.3.3 Selecting an announcement
S Pressthe softkey»Select anncm.« to selectthe announcement youwish a
caller to hear.The storedannouncements are displayed one afterthe other by
pressing the softkey. At the same timeyou can hear the selected announce
ment over thespeakeror the handset ofthetelephone.
For example: »Anncm.-01«,»Anncm.-02«,...., »Anncm.-10«.
7.3.4 Activating an announcement for a specific MSN
S Press the softkey»ON«, ifyou wish to enable theannouncement for MSN-01.
Onthe firstline of the display thestatus is switchedto»=ON« and thesoftkey in
the third line changes to»OFF«.
To deactivate anannouncement, press the softkey »OFF«.
The display illustrated here is shown once you have
configured the answering machine.
7.3.5 Time control
Using a time-control function youcan define that different announcementsbe playedfor
callers atdifferent times of day.For this, you canconfigure nine different time periods for
your phone (»Time 1«, ...»Time 9») thatyou can then use for thetime-control functions
for the individual phone numbers (MSNs).
Time control »Daily«:
With this time-control function you can assign a defined time period to a certain phone
number (MSN) (so-called»Main time«), during which the caller receives a specific an
nouncement. For other times outside of this period (the so-called »Remaining«) you
can configure a different announcement. This time-control function applies for each day
and can be configured for all MSNs.
Time control »Weekly profile«:
As an alternative, you can define a weekly profile as the time-control function for the
numbers »MSN-1«, »MSN-2« and »MSN-3«.In a weekly profileyou canassign twodiffer
ent time periods to each day during which different announcements are played
(so-calledmain time).
In the timeoutside of theselected periods (so-called »Remaining«)you can configurea
different announcement. This announcement is identical for all days defined in the
weekly profile. In addition, you can also assign an operating mode in the weekly profile
for the »Remaining time« that is different than that for the »Main time«. For exam
ple, you can define that during the »Main time« messages can be left, while during the
»Remaing time« it is not possible to leave a message.
ˆ Setting MSN-1=ON
ˆSpeak+sign-off text
ˆActive after:20sec OFF
ˆAnncm.-02 Options
-
-
-
-
machine
Answering
The time-controlled function can only be activated, if you havealready switchedthe
answering machine on for that number (MSN).
35
Page 40

7.3.6 Message length
You can set the time available to a caller for leaving a
message. Depending on the set operating mode, re
cording is ended when the set time expires.
S
O
Press the C-button to leave the menu »Options«.
Press thesoftkey for the desired message
length setting . A check markindicates the
current setting.
Confirm your settings with OK to leave this
menu.
ˆMessage length
ˆlimit
-
ˆ30sec 120sec
ˆ60sec ˜infini
ˆMessage length
ˆlimit
ˆ30sec˜ 120sec
ˆ60sec ˜infini
7.4 Using the answering machine
If messages, dictations or information texts are present on the answering machine,
these will be signaled (whenthe answering machine isswitched on)by a flashing LED for
machine
the answering machine key. Information about the number of new messages is shown
Answering
on the second line of the display.
New messagesthat are shorter than 2 seconds will notbe stored by the answering
machine. For example:A caller invited to leave a message hangs up after the announcement text without actually leaving a message for you.
7.4.1 Changing the volume while listening to a message
You can change the volume of the speaker or of the handset while listening to mes
sages.
To do this, press the
return tothe normal display for listeningto messages. Your new setting will remain valid
until you quit the answering machine menu.
If you confirm your the volume setting change by pressing the
F key followed by the arrow keys. Pressthe E button in order to
O button instead of the
E button, the permanently set value is overwritten by the newly set one (see volume
settings).
-
7.4.2 Listening to new messages
S The number of new messages is shown
on the second line of the display.
Press the softkey »Messages AM:«.
36
ˆ23.04.01 08:12 }
ˆMessages AM:6
ˆTel. drctry Quiet
ˆVIP Caller list
Page 41

S You are then shown detailed information
about the type of new messages that are
present.
Press the softkeynext to the messagethat
you wish to listen to.
ˆ Answering machine
ˆ03=New calls
ˆ01=New dictations
ˆ02=Info- back
S If you have configured MSN sorting for lis
tening to announcements press the
softkey for the MSN for which the mes
sage is to be played.
Listening to messages is described in the following using new calls as an example.
Press the softkey »New calls«.
When this softkey is pressed, all new messages are
then played automatically one after the other. Auto
matic play-back is halted if you press a further
softkey. You can also manually control the play-back
of messages using the keys described below.
»<« or »>«
»Pause«
»repeat«
»Stop«
Once you have listened to a new message completely, it is deleted from the list of new
messages and moved to the list with the old messages.
The answering machine switches from the current to the previous
message (»
Pressthe softkey »Pause«, tohaltlistening to a message.
If you wish to continue withlistening to a message,press the softkey
»END PAUSE«.
Pressthesoftkey»repeat«,to listen to the samemessageagainfrom
the beginning.
Pressthe softkey »Stop«, toendplay-back of a message.
In thesubsequent menu you can listento a message again, delete a
message or view the number of the caller. Press the corresponding
softkey »listen«, »delete«or»number«.
<«) or tothenext one (»>«).
ˆ New calls, sorted }
-
ˆ00=MSN-1 MSN-4=01
ˆ02=MSN-2 MSN-5=01
-
ˆ01=MSN-3 MSN-6=00
ˆ New calls-02 {}
ˆDate: 02.07.00 12:35
-
ˆPause repeat
ˆdelete stop
machine
Answering
S Once you havelistened to all newcalls, the
display illustrated here is then shown
again. To listen to other messages, pro
ceed as described for »New calls«.
37
ˆ Answering machine
ˆ00=New calls
ˆ01=New dictations
-
ˆ02=Info- back
Page 42

7.4.3 Listening to all messages, dictations,info-texts or recordings
Press the answering machine key and then the softkey »Messages«.
> You see the type and number of new and
old (already listened to) messages.
When you press the right arrow key the
number of call logs (see Page 41) is dis
played.
ˆ Poll message }
ˆnew=2 Calls 00=old
ˆnew=3 Dicts. 00=old
ˆON=4 Infos 00=OFF
-
S Pressthe appropriate softkey to listento the message.To listen toother mes
sages, proceed as described onpage36.
7.4.4 Accepting a call from answering machine
The listening function (see page 30) must be activated in order to accept a caller who is
currently leaving a message on the answering machine.You can set the listening func
tion in the configuration program for all incoming calls, or during recording of individual
calls.
While the answering machine is recording a call, the
display illustrated here is shown.
machine
Answering
The listening status is shown on the bottom line.
»Listen. ON« indicates that the listening function
can be activated by pressing this key.
»Listen OFF« indicates that the listening function is
already activated andcan be deactivated by pressing
the corresponding softkey.
bg Toaccept thecall, lift upthe handset ofthe
telephone with the listening function ac
tive.
ˆ0123456
ˆ------ Recording ------ˆMSN-1
ˆListen ON
ˆ0123456
ˆ------ Recording ------ˆMSN-1
ˆListen OFF
ˆ0123456 00.24 }
ˆedit Memo
-
ˆshow Keypad
ˆMute park
-
-
7.5 Remote polling of the answering machine
You can initiate remoteaccess tothe answering machine from anytelephone: forexam
ple tolisten to messages.
Refer to the in-depth documentation contained on the CD supplied with the systemfor
the operating sequences for the answering machine. The sheet enclosed with the oper
ating instructions contains a card with the most important operating sequences and
codes for remote control. Remove the card for future reference.
Remote accessto the answering machine is protected by thetelephone PIN and is
possible only when remote polling has been activated at the telephone.
38
-
-
Page 43

8 Operation
8.1 Starting a call
8.1.1 Dial number
btg
Dial number
8.1.2 Dial number - correction possible
atbg
Dial number
To change thenumber or tocorrect a wrong entry,select the wrongfigure with thearrow
buttons and press
If you wish to conduct the call using the handset, just lift it up after dialing the number.
Any time during a call you can switch back and forth between hands-free calling,
speaker function and use of the handset.
After you have dialed the number you can also press the speaker button to have the
number dialed and to use hands-free calling.
If you wish to initiate a call while the answering machine is recording, the listening function for the answering machine must be deactivated.
If a call can not be put through, e.g. number is inhibited via the calling filter, or the account for the number/MSN is empty, the following message will appear in the display
»Inhibit.: dial number.«.
If you are conducting a call using the hands-free calling function of the phone, the
answering machine can not be reached while hands-free calling is active.
Hands-free calling can not be activated while a message is being recorded on the
answering machine.
Recording of a call is not possible during hands-free mode.
C to delete it. Now enter the correct number.
Operation
8.1.3 Other options for dialing without lifting the handset
The option of dialing without lifting the handset and of correcting or addingto a number
also exists during dialing:
•
from the redialing memory (see page 42).
•
from the caller/ memo list (see page44).
•
from the telephone directory (see page 23).
•
from the short dialing memory (see page25).
•
from the direct dialing memory (see page26).
39
Page 44

If you are using one of these options, you can make further entries prior to initiating
the call. You can define whether your number (MSN) is to be transmitted to the
party being called.
Dialing from the telephone directory
a
Dialing from the speed dialing memory
a
Dialing from the direct dialing memory
a
S
Tel. drctry
S<>
VIP
Z
Press the direct
dialing key
t
Enter first letter.
or
Select VIP
destination
bg
and / or
tbg
Select VIP
destination
8.1.4 Initiating a call using a set number (MSN)
at
Operation
Dial number
OFSS
MSN
<>
Select
entry
bg
bg
MSN-1
...
MSN10
8.1.5 No number transmission
at
Dial number
OF S
Concealed
bg
8.2 Accepting a call
The telephonenumber or the name ofthe caller is shown on thefirst line in your display.
The second line shows on the right the MSN (extension number) that the caller has di
alled.
40
-
Page 45

albg
No number transmission
al
Recording a call
You can log a call once you have accepted it. The logging of the call is stored in the an
swering machine for the telephone.
Attention: Inform the other party on the phone that you are logging the call.
You can only log calls with the hands-free function of the phone deactivated and no
call being recorded by the answering machine.
S
Concealed
bg
alb g
Call without re
S Press the softkey »edit«, to start record-
ing the call.
S Press the softkey »stop« to stop record-
ing the call and save it. If you wish to stop
recording without savingpress the softkey
»delete«.
cording
-
ˆ0123456789 00.31 }
ˆedit Memo
ˆshow Keypad
ˆMute park
ˆ Log-1
ˆ------- Recording ------
ˆdelete stop
-
Operation
g You can now continue with your call. The
display returns to normal state.
To replay a recorded call proceed as described on page 38 of this manual.
ˆ0123456789 03.48 }
ˆedit Memo
ˆshow Keypad
ˆMute park
8.3 Station guarding
a
»no«
SS
quiet no/complete/ok
The function »Stationguarding«is deactivated.
41
Page 46

»complete«
»ok«
Calls are signaled optically only(»Q«shown in the display).
Calls are signaled first by a brief acoustic signal and then only opti
cally displayed (»q«).
8.4 Call rerouting / Call deflection
Rejecting a call
-
al
Call Deflection (Call Deflection)
al
Transferring a call to the answering machine
al
S
reject
S
x-fer
S
x-fer to AM
t
Dial number
The calling party hears the busy signal.
O
The caller can leave a message on the answer-
The call is forwarded on to a differ
ing machine.
Operation
8.5 Redialing
The previously dialed telephone number is stored in the redial memory.
If the connection between the ISDN system telephone and the ISDN network is in
terrupted, the redial memory is deleted.
ent subscriber.
-
-
ab
W
g
8.5.1 Expanded redialing
In the expanded redialing function the 20 previous calls, connections and dialed tele
phone numbers are stored. You can view these by pressing the
buttons and subsequently have them redialed automatically.
42
W button or the arrow
-
Page 47

a
The last dialednumber is displayed. At the end of thesecond line the status of this entry
is indicated by the letters displayed there.
WWO
Select entry
bg
»v«
»A«
»|«
no entry You placed a calltosomebody but didnotreachhim/her,or his/herline
In the expanded redialing list, press
can then delete an entry or import any number listed into the memo list or into the tele
phone directory.
connection
Call-Box
Calls configured for automatic redialing.
was busy.
F to view more information about an entry. You
8.5.2 Automatic redialing
If you placed a call to a subscriber whose number is busy or who does not answer, you
can then activate automatic redialing which will call that same subscriber again after
about 10 seconds.
bt g
Dial number Number busy
After around 10 seconds the hands-free calling function of your phone is activated and
the number is dialed automatically. This is repeated for up to around 2 minutes.
Up to 20 call attempts are made if the subscriber can still not be reached.
If you hear the busy signalyou cancancel automatic redialing by pressing the redial
button.
W
or
S
AUTODIAL
a
-
Operation
Suspending automatic redialing
To interrupt automatic redialing press
You can then place a normal call. After the call automatic redialing starts again.
Deactivating automatic redialing
To deactivate automatic redialing during automatic dialing press
If you liketo deactivate automatic redialing in the idle stateof the phone, proceed as fol
lows:
L.
E
43
-
Page 48

a
WF SS
AUTODIAL ok
8.6 Caller and memo list
The phonehas a combined caller andmemo list. A maximum of30 entries are stored in
this list. Entries in the caller or memo list are indicated by the softkey »list« in the lower
row of the display. You always have the mostcurrent entries in the list. The most recent
entry is displayed first.
If the ISDN system telephone is disconnected from the ISDN network all of the en
tries in the list are canceled.
8.6.1 Viewing memos in the list
a
S
The telephone is idle. The softkey
»Caller list« in the lower row of the
display indicates that a memo or an entry
is present in the list.
Press the softkey »Caller list«.
The most current entry is shown in thedisplay.
ˆ23.04.01 08:12 }
ˆTel. drctry Quiet
ˆVIP Caller list
ˆCall Today 1:07 {}
ˆ New call
ˆ 1/06:JOHNSON,E....... *
ˆ 2/06:BEATRICE ....... *
Operation
In the upperrow of thedisplay you seethe type of entry (»call«or»Memo«), thedate (for
the first two days »today«or»yesterday«) and the time. In the lower rows you see
further information for this entry, e.g. the telephone number (and the name,if applicable)
and the state of the entry.
»*«
»n«
»a«
»i«
New call ornewtext message (UUS: CS310/CS320only)
Memo
Call-Box
rejected/ ignoredcall
-
When youview the caller/memo list again, entries thatyou have already viewed but
not deleted areno longer marked by »*« in the bottom lineof the display, but rather
by »a«.
44
Page 49

<>
F
You can view other entriesusing thearrow
buttons.
If you wishto view more information about
the entry, press the F button.
ˆCall yesterday 15:42 {}
ˆ 3/06:112233445566 ... n
ˆ 4/06:PETERS,J. ...... a
S You have the option to import the entry
into the telephone directory, to delete it or
view more. Press the softkey »info«.
The display now shows information about
the call. If not all information fit into the
screen, use the arrow keys to display
more.
ˆ 1/PETERS,J. a
ˆCall-Box 2:22 Info
ˆTel. drctry MSN-1
ˆdelete? more
ˆ 1/PETERS,J. {}
ˆ0987654321
ˆFOR MSN-1
ˆCall yesterday 15:42
8.6.2 Select from the caller or memo list
a
S<>
caller list
Select entry
b
g
L
or
8.6.3 Add entry to memo
The following example describes how a memo entry is made from the VIP memory. To
enter a memo from the telephone directory, or from the direct dialing memory, press the
corresponding softkey (»tbook«or»direct«). Entering a memo from the redialing
memory is done by pressing the
press the softkey »new«.
W key. If you want to enter the new memo manually,
Operation
Begin as follows:
a
C
t
You now have the option to change or ex
tend the telephone number. If you want to
delete the figures, press the C button
>SS <>O
Memo VIP
45
Select
VIP destination
-
ˆ Memo number create
ˆ>0123456_
Page 50

O Confirm your entry by pressing OK. ˆ Memo number create
ˆ>0123456_
8.7 Mute, Open Listening and Hands-Free Calling
Mute
g
Please note thatthe units orcharge counter continuesto run when»Mute« is activated.
Open listening
g
When you hangup the handsetwhile open listening isactive, both openlistening and the
call itself are terminated.
Hands Free Calling
SS
Mute
LL
Begin open
listening
Room enquiry
End open lis-
tening
speak
g
g
Operation
a
You can also switch from normal »handset« calling to hands free calling when you hang
up the handset after pressing the open listening / hands freebutton. During hands free
calling acoustic signals (e.g. call waiting signal) are not transmitted.
Please inform the party you are calling that open listening is active.
L
Begin hands
free calling
t
Dial number
L
End hands
free calling
If you are conducting a call using the hands-free calling function of the phone, the
answering machine can not be reached while hands-free calling is active.
Hands-free calling can not be activated while a message is being recorded on the
answering machine.
Recording of a call is not possible during hands-free mode.
46
Page 51

8.8 Call waiting, Enquiry call, Broker`s call and
three-party conference
An active connection can be terminated by pressing T. You can return to the call that
was previously put on hold.
Call waiting
g
Call with sub
scriber 1
Call waiting tone
call waiting
S
accept
g
call with subscriber 2;
Subscriber 1 is put on hold
If you wish to accept a waiting call at a later time press the softkey »wait«. The caller is
then put on hold and the call can be accepted at a later time by pressing the softkey
»wait-1«.
Enquiry call
You havethe option of establishing up to three (3) otherconnections during an ongoing
call using the enquiry call function.
g
Call with sub-
scriber 1
R
Subscriber 1
is put on hold
tg
Dial number
Call with sub-
scriber 2
Broker`s call
g
Call with sub
scriber
>S
-
connection1
...
connection4
g
Call with sub
scriber
>S
connection1
-
...
connection4
g
Call with sub
scriber
...
>
etc.
etc.
...
Additional information about the corresponding connections is displayed when you
press the shift key and the softkeys next to the desired connection.
Three-party conference
Operation
g
Call with sub
scriber 1
>S
-
connection2
g
Call with sub
scriber 2
S
-
Conference
d
Conference with sub
scriber 1 and 2
-
Conference calls arenot possible with more than two (2) connections at your phone. To
end the three-party conference, press the softkey »return_to_«. You are recon
nected with thesubscriber of thelast previous activeconnection. The othersubscriber is
then put on hold.
47
-
Page 52

8.9 Call transfer (switching)
When a call is transferred, the active subscriber and the subscriber for the connection
previously put on hold are always connected with one another.
g
Call with sub
scriber 1
Subscriber 1 is
put on hold
R
tg
Dial number
Call with sub
scriber 2
S
-
x-fer
8.10 Call-Back on busy (CCBS)
btg
Dial number
The call-back is deleted after a time period defined by the network service provider
(approx. 45minutes). If you are usingan LCR procedure (e.g. theLCR procedure of the
phone), the »Call-back on busy« function is carried out automatically via your standard
network service provider. If the ISDNtelephone isdisconnected from the ISDN network,
e.g. by parking a call, a requested call-back on busy is canceled.
Viewing and clearing call-back calls
When the phone is in idle, any call-back calls that are initiated can be viewed in the display by pressing the softkey»callback«. Pressthis softkey to view the call-back calls.
You can then view the individual call-back calls using the arrow keys. If you wish to delete a call-back call, select this call using the arrow key and then press the
Operation
lowed by the softkey »delete?«.
Subscriber
busy
S
clbckbusy
a
F key, fol
-
8.11 Keypad and Tone Frequency Dialing (DTMF dialing)
In the initial state of your telephone tone frequency suffix dialing is possible without
pressing the correspondingsoftkey. Ifthe display showsthe softkey»keypad« tone fre
quency suffix dialingis possible rightaway. If thesoftkey “DTMF” isdisplayed, DTMF dial
ing is possible only after you press this softkey.
Keypad
g
S
keypad
t
Input of character strings
and digit sequences
48
-
-
Page 53

Tone Frequency Dialing (DTMF dialing)
g
S
dtmf
t
Input of character strings
and digit sequences
8.12 Viewing and deleting call charges
View/Delete charges of the individual MSNs
Begin as follows:
a
S
<
>S>S
charge
You can view the sum of the charges accrued. In the example: »MSN-6«.
If you wish to view the charges for other
MSNs, press the corresponding softkey.
If you wish to delete the charges accrued
for an MSN, press the left arrow button.
MSN-1
...
MSN10
ˆMSN-6: 4.72 BP{}
ˆMSN-1 MSN-4
ˆMSN-2 MSN-5
ˆMSN-3 MSN-6
S Press the softkey »delete?«. ˆMSN-6: 4,72 BP }
ˆLast conn. Total
ˆdelete?
Operation
Press the right arrow button to view the
charges for other MSNs or extensions
numbers. Proceed as described for
MSN-3 if you wish to delete these
charges.
Viewing/deleting the charges for the last call or the sum of the charges.
Begin as follows:
a
>S
charge
49
ˆMSN-3 0,00 BP }
ˆLast conn. Total
ˆdelete?
Page 54

S
The charges for the last connection are
shown in the display.
If you wish to view the sum of all of the cur
rently accrued charges press softkey be
low »Total«.
ˆLast conn. 1,44 BP }
ˆLast conn. Total
-
ˆdelete?
-
S If you wish to delete the charges for the
last call or for all calls, press the appropri
ate softkey and then press »delete?«.
If the sum of all the accrued charges is deleted, all MSN charge rate accounts are
deleted simultaneously.
ˆTotal: 0,00 BP }
-
ˆLast conn. Total
ˆdelete?
8.13 Downloading a new firmware
Do not press any keys (unless prompted to do so) or plugin orunplug any
•
connectors while datatransfer is in progress.If the connectingline is interrupted during a download, restartthe download program andproceed as
described previously.
•
Once the new firmware has been loaded completely the telephone performs a RESET and is then availablefor useagain.
•
Under some circumstances all of the data in your phone may be deleted
after a firmwaredownload. If thisis the case,a notice isgiven prior to starting the download. Please backup the configuration data of your phone
Operation
8.13.1 PC interface of the telephone
You can load the newestfirmware versions into your telephonevia thephone’s PC inter
face and using the elmeg WIN-Tools CD ROM supplied with the system.
before starting.
•
Connect the phone to the PC.
•
Load the new firmware into your PC(e.g. fromthe Internet).
•
Start the elmeg WIN-Tools download program.
•
In the field »Type of connection« setthe interfacefor data exchange
(C-CS310: COM1...COM10, C-CS320: USB)
•
If you wish to load the newest firmware into several telephones simulta
neously via the available serial PC ports, enter the number of telephones
and set the appropriate port foreach telephone (C-CS310 only).
•
Go to »File«, »Open« and select the directory where the new firmware is
stored.
•
In the field »Status« click »Start Download« tobegin downloadingthe new
firmware.
-
-
50
Page 55

8.13.2 Downloading a new firmware via elmeg’s server PC.
ELMEG GmbH & Co.KG provides a server PC which can be used for loading new firm
ware into your telephone.In thiscase, the firmware is downloaded via theISDN connec
tion. Download can take eightminutes approximately,depending on the sizeof thefirm
ware file. Please note that there is a charge for loading firmware via an external ISDN
connection.
Important notice for export variants:
Please ask your specialized dealer/distributor for the access numer of the
download server for your country!
Download server Telephone number
elmeg server (Germany) ++49-(0)5171-901190
Initiating download of new firmware on the telephone:
If you have changed the telephone PIN (see page 14), you must first enter this PIN, before you can access the »Service« menu.
Begin as follows:
a
FS >SSS
Configuration Service Software ok
-
-
-
Operation
The telephone then restarts from the BIOS.
S Press the softkey »Update«. ˆelmeg bios 1.00a
ˆInfo
ˆUpdate Set
t Enter the number of the Server PC:
»05171901190«.
If you are using your telephone with a
PABX system, first enter the line access
digit to obtain external line access.
To cancel a download already in progress
press thesoftkey »Abort«orthe
ton.
E but
51
ˆPlease dial
ˆ05171901190
ˆ Abort
-
Page 56

Under some circumstances all of thedata inyour phone may be deleted after afirmware
download. If this is the case, the following notice is given prior to starting the down
load:»All data will be deleted Continue?«. The firmware download is started only after
you have confirmed this prompt by pressing the softkey »ok« If the data for the tele
phone are not deleted during the download, the download is started without first dis
playing the above prompt.
8.14 RESET - Resetting to default state
-
-
-
You can reset the telephone to its initial state using the procedure described in the fol
lowing. All of the data that you have entered previously will be deleted.
If you have connected the elmeg T300 key extension module to your phone all of the
data for the module will also be deleted when this procedure is executed.
Settings for the answering machine and any texts that have been stored will not be
deleted. The initial status of the answering machine is restored as described on
page 30.
If you have changed the telephone PIN (see page 14), you must first enter this PIN, before you can access the »Service« menu.
Begin as follows:
a
FS >SS
Configuration Service Data
Operation
S Press the softkey »ok« to reset the tele
phone to its initial state. If you do not wish
to have the data deleted press the softkey
»No«.
The telephone is reset to its initial state. All data are deleted.
-
ˆ Sure to delete all?
ˆNo ok
-
52
Page 57

9 Telephone and PC
9.1 Installing the programs from CD-ROM
System requirements:
elmeg C-CS310 elmeg C-CS320
IBM PC or 100% compatible
Pentium processor or equivalent with min. 133 MHz clock frequency
min. 32 MB RAM
CD-ROM drive
free RS232(V.24) port free USB port
Operating systems Windows
95 / 98 / ME / NT4 / 2000
min. 80 MB free memory for installation
•
Start your PC.
•
Place the CD ROM in the appropriatedrive inyour PC.
•
Wait a moment until the program starts automatically. If the autostart
function is deactivated on your PC, start the file »setup.exe« directly from
the main directory on the CD ROM in Windows Explorer (double click on
file), or using the option »Run« inthe Windowsstart menu.
•
The welcome screen for the CD isdisplayed afteryou start the file.
Operating systems, that support USB
Windows 98 / ME / 2000 (as of 01/01)
PC
Telephone and
53
Page 58

Installation sequence:
elmeg C-CS310 elmeg C-CS320
(configuration manager, telephone directory manager, LCR and download man
When you install the Win-Tools programs, the CAPI driver for the TAPI driver, the
USB driver for the C-CS320 is also installed automatically.
WIN-Tools Programs
ager)
CAPI driver
CAPI tools
NDISWAN driver
TAPI driver
CTI software
• Connect the telephone to your PC.
You can now use your telephone together with the installed PC programs.
C-CS310: Ensure thatyou use the correctRS310(V.24) port on yourPC. The Win-Tools
programs supplied with the system support several COM ports.
C-CS320: You do not need an additional ISDN card in your PC. The telephone is
equipped with an integrated USB port for connecting with the PC. Based on the pro
grams and drivers you have installed, you can use the telephone, for example to surf the
Internet conductdata exchange, send/receive fax messages, orimplement an answer
ing machine via the PC.
PC
Important notice for all PC applications which utilize the USB port of the tele
phone via the CAPI driver:
Telephone and
•
Only one B channel isavailable forall applications, to ensure that the tele
phone can be reached at all times. The applications that are concerned
(for example CAPI tools programs) mayuse theB channel in sequence.
•
Do not use the same MSNs for these PC applications that have been as
signed for the telephone.
If a CAPI application is active on the PC and is using the available B channel, the mes
sage »ONLINE« isshown in the telephonedisplay. During thistime, only one Bchannel is
available for telephony applications.
-
-
-
-
-
-
-
54
Page 59

10 Technical specifications
Dimensions L x W x B: approx. 250 x 205 x 70 mm
approx. 360 x 205 x 70 mm including elmeg T300
keyboard extension
Weight: approx. 0.9 kg
capprox.. 1.2 Kg including elmeg T300 keyboard
extension
Temperature range: 5° C … 40° C
ISDN connection
Length of ISDN connection cord: approx. 3 meters
ISDN connection: DSS1 protocol, point-to-multipoint access
Channel structure: B + B + D
ISDN power consumption: =< 1 Watt
Emergency operation (C-CS310)
ISDN connection: DSS1 protocol, point-to-multipoint access
DSS1 protocol, point-to-point access
Channel structure: B + B + D
ISDN power consumption: =< 0.390 watts (when active)
RS232 (V.24) interface (C-CS310)
Length of RS232 interface cable: approx. 3 meters
Speed: 57.600 bps
USB port (C-CS320)
Length of USB connection cord: approx. 3 meters
Terminal device: Self powered terminal device
Speed class: Full Speed
55
Appendix
Page 60

11 Declaration of Conformity and CE symbol
This equipment complies with the requirements of the R&TTE Directive 1999/5/EC:
»Directive 1999/5/EC ofthe European Parliament andof the Council of
9 March 1999 on radio equipment and telecommunications terminal
equipment and the mutual recognition of their conformity«
You can see the Declaration of Conformity in the Internet under:
http://www.elmeg.com/products/conformity/
Appendix
56
Page 61

12 Index
A
Accepting a call . . . . . . . . . . 40
call waiting . . . . . . . . . . . 47
no number transmission
(COLR) . . . . . . . . . . . . . 41
recording/logging . . . . . . . 41
Acknowledgement signals. . . . . . 9
setting . . . . . . . . . . . . . 17
Activating/ Deactivating the
answering machine . . . . . . . . 29
Activating/Deactivating listening . . 30
Answering machine . . . . . . . . 29
activating/ deactivating. . . . . 29
Activating/Deactivating
listening . . . . . . . . . . . . 30
configuration . . . . . . . . . . 29
deleting texts. . . . . . . . . . 30
listening to messages . . . . . 38
Listening to messages . . . . . 36
message length . . . . . . . . 36
time control . . . . . . . . . . 35
Automatic notification for new AM
messages
setup. . . . . . . . . . . . . . 30
Automatic redialing. . . . . . . . . 43
deactivate . . . . . . . . . . . 43
B
Broker's call . . . . . . . . . . . . 47
Buttons . . . . . . . . . . . . . . . 5
C
Call
accepting from answering
machine . . . . . . . . . . . . 38
recording/ logging . . . . . . . 41
transfer/switching . . . . . . . 48
Call Deflection . . . . . . . . . . . 42
Call display
view . . . . . . . . . . . . . . 15
Call filter . . . . . . . . . . . . . . 28
Call forwarding
activating. . . . . . . . . . . . 21
deactivating . . . . . . . . . . 21
Call rerouting . . . . . . . . . . 20,42
activating. . . . . . . . . . . . 21
deactivating . . . . . . . . . . 21
Call transfer . . . . . . . . . . . . 48
Call waiting. . . . . . . . . . . . . 47
inhibit / enable . . . . . . . . . 21
setting . . . . . . . . . . . . . 19
Call-Back on busy (CCBS) . . . . . 48
Caller list . . . . . . . . . . . . . . 44
select entry. . . . . . . . . . . 45
viewing entries . . . . . . . . . 44
CAPI (tools & driver) . . . . . . . 2,54
Carrier prefix . . . . . . . . . . . . 28
CCBS (Call-Back on busy) . . . . . 48
CE symbol . . . . . . . . . . . . . 56
Changing the label panel. . . . . . 10
Cleaning the telephone . . . . . . . 1
Conference . . . . . . . . . . . . 47
Configuration for remote control
of the AM . . . . . . . . . . . . . 30
Configuring a charge account for
each number (MSN) . . . . . . . . 13
Configuring the answering machine
for MSNs. . . . . . . . . . . . . . 33
activating/ deactivating. . . . . 35
call signal duration . . . . . . . 34
message length . . . . . . . . 36
mode of operation . . . . . . . 34
selecting announcement . . . . 35
time control . . . . . . . . . . 35
Configuring the time control . . . . 35
Connecting the handset connecting
cord . . . . . . . . . . . . . . . . . 3
Connecting the ISDN cord . . . . . 3
Contents of package . . . . . . . . 2
Contents of the CD-ROM . . . . . . 2
57
Page 62

CTI software . . . . . . . . . . . 2,54
D
Data, technical . . . . . . . . . . . 55
Declaration of Conformity . . . . . 56
Deleting the answering machine's
memory . . . . . . . . . . . . . . 30
Dial control
changing the PIN. . . . . . . . 14
Dictations
deleting . . . . . . . . . . . . 30
listening . . . . . . . . . . . . 36
recording. . . . . . . . . . . . 31
Direct call . . . . . . . . . . . . . 28
Direct dialing . . . . . . . . . . 22,26
activate. . . . . . . . . . . . . 22
deactivate . . . . . . . . . . . 22
function keys . . . . . . . . . . 27
programming direct dial
numbers . . . . . . . . . . . . 26
programming dtmf sequence . 26
programming function keys . . 27
programming keypad
sequences . . . . . . . . . . . 26
programming numbers. . . . . 22
Display . . . . . . . . . . . . . . . 5
displays during a call. . . . . . . . 15
Don't disturb feature . . . . . . . . 19
Downloading a new firmware . . . 50
via the ISDN port . . . . . . . . 51
DTMF dialing. . . . . . . . . . . . 49
E
Elmeg PABX systems . . . . . . . . 1
Enquiry call. . . . . . . . . . . . . 47
Expanded redialing. . . . . . . . . 42
F
Function keys . . . . . . . . . . . 27
call filter . . . . . . . . . . . . 28
Call rerouting. . . . . . . . . . 28
Carrier / Provider prefix. . . . . 28
Direct call . . . . . . . . . . . 28
MSN assignment. . . . . . . . 28
H
Hands Free Calling. . . . . . . . . 46
I
Info-texts
listening on the phone . . . . . 36
recording. . . . . . . . . . . . 31
Installation sequence of the
CD-ROM. . . . . . . . . . . . . . 54
K
Keypad . . . . . . . . . . . . . . 48
L
LEDs . . . . . . . . . . . . . . . . 8
Listening to messages
on the phone. . . . . . . . . . 36
Loading new firmware . . . . . . . 50
via the ISDN port . . . . . . . . 51
via the PC interface . . . . . . 50
M
Melody
for an MSN. . . . . . . . . . . 12
Memo list . . . . . . . . . . . . . 44
add entry. . . . . . . . . . . . 45
select entry. . . . . . . . . . . 45
viewing entries . . . . . . . . . 44
Microphone mute . . . . . . . . . 46
MSN . . . . . . . . . . . . . . . . 11
assigning a name . . . . . . . 13
enter . . . . . . . . . . . . . . 12
entering . . . . . . . . . . . . 12
Set charge account . . . . . . 13
setting the melody . . . . . . . 12
Setting the volume . . . . . . . 12
MSN assignment . . . . . . . . 28,40
Mute . . . . . . . . . . . . . . . . 46
58
Page 63

N
Number (MSN)
Set charge account . . . . . . 13
setting the melody . . . . . . . 12
Setting the Volume . . . . . . . 12
O
Open listening . . . . . . . . . . . 46
P
PC applications operating via the
CAPI driver. . . . . . . . . . . . . 54
PC requirements . . . . . . . . . . 53
Pictographs . . . . . . . . . . . . . 9
PIN (password)
change. . . . . . . . . . . . . 14
for configuration . . . . . . . . 14
Programming function keys . . . . 27
Programming the telephone
directory . . . . . . . . . . . . . . 23
deleting entries . . . . . . . . . 25
editing entries . . . . . . . . . 24
making entries . . . . . . . . . 24
Programs of CD-ROM. . . . . . . . 2
Protecting the configuration . . . . 14
Provider prefix . . . . . . . . . . . 28
R
Recording / logging a call . . . . . 41
Recording a call
initiate . . . . . . . . . . . . . 41
listening . . . . . . . . . . . . 38
Recording announcements . . . . 31
answering machine full . . . . . 31
sign-off. . . . . . . . . . . . . 31
Redialing. . . . . . . . . . . . . . 42
automatic . . . . . . . . . . . 43
expanded . . . . . . . . . . . 42
Remote polling of the answering
machine . . . . . . . . . . . . . . 38
Reset . . . . . . . . . . . . . . . 52
Resetting to default state
telephone . . . . . . . . . . . 52
S
Safety instructions. . . . . . . . . . 1
setting ringing tones . . . . . . . . 12
Setting the message length . . . . 36
Setting the mode of operation . . . 34
Setting the voice quality of the AM . 30
Setting the volume
handset . . . . . . . . . . . . 18
speaker . . . . . . . . . . . . 18
station guarding tone »Station
guarding« . . . . . . . . . . . 19
Setting the volume of the melody
for an MSN . . . . . . . . . . . . 12
Starting a call . . . . . . . . . . . 39
no number transmission
(CLIR) . . . . . . . . . . . . . 40
using a set number (MSN) . . . 40
Station guarding . . . . . . . . . . 41
Suspending automatic redialing . . 43
Switching a call . . . . . . . . . . 48
System requirements . . . . . . . 53
T
TAPI . . . . . . . . . . . . . . . 2,54
Technical specifications . . . . . . 55
Telephone
changing the label panel . . . . 10
connecting the handset . . . . . 3
connecting the ISDN cord . . . 3
placing . . . . . . . . . . . . . 1
Telephone number (MSN) . . . . . 11
Transferring a call to the AM . . . . 42
U
User interface . . . . . . . . . . . . 4
V
View/delete charges
last call . . . . . . . . . . . . . 49
59
Page 64

sum of the charges(MSN) . . . 49
Viewing and deleting call charges . 49
for individual MSNs. . . . . . . 49
VIP number . . . . . . . . . . . . 25
editing . . . . . . . . . . . . . 25
programming. . . . . . . . . . 25
W
Weekly profile . . . . . . . . . . . 35
WIN-Tools . . . . . . . . . . . . 2,54
60
Page 65

Brief Description of Functions
Enquiry call
bg
Broker`s call
bg
Three-party conference call
bg
Call transfer with prior notice
R
R
R
btg
Dial number Dial number
Parking
bg
Unparking
a
>S
S
parking
unpark
tg
Dial number
tg
Dial number
tg
Dial number
R
t
Enter parking
code
t
Enter par
king code
tg
O
O
-
>S
connection1
…
connection4
S
Conference
S
x-fer
a
bg
Call forwarding
al
Transferring a call to the answering machine
al
S
x-fer
S
x-fer to AM
t
Dial number
O
Page 66

Expanded redialing
a
Call-back on busy
WW
Search number Search number
btg
Dial number
Selection of outgoing numbers (MSNs)
at
Dial number
Activate call forwarding
a
Deactivate call forwarding
a
Station guarding
FS S S S
FS S SSO
Number
busy
clbckbusy
OFSS
Setting
Setting
call
rerout.
call
rerout.
or
S
<> O
a
off
MSN1...
MSN10
MSN1...
MSN
delayed
busy fixed
MSN1
MSN10
MSN10
bg
bg
t
...
Dial number
O
a
Dialing from caller list, telephone directory or short dialing memory
a
Recording a call on the answering machine
g
Call without rec
ording
SS
quiet no/ok/complete
S<>
Caller list /
Tel.drctry / VIP
S
-
edit
g
Recording a
call
Select entry
S
stop
bg
g
Call without rec
ording
-
Page 67

Warranty Declaration
Insofar as claims filed for elimination of deficiencies (applicable laws) are being processed, these
shall be handled via the contractual partners. In addition, elmeg provides the following manufac
turer’s warranty:
1. For this device, the company ELMEG GmbH & Co.KG Kommunikationstechnik grants a war
ranty period of 24 months, figured from the date of purchase from the dealer; this must be verified
by the original receipt, or other similar documents, in accordance with pertinent, existing guide
lines.
2. Warrantyclaims shall be filed via a specializedelmeg dealer. A list of the elmegspecialized deal
ers is available for users on the Internet at www.elmeg.de, or via the elmeg information hotline.
3. The voluntary elmeg warranty covers the rectification of any damage or deficiency that occurs
during the warranty period and which is demonstrably due to material or production faults.
4. Not includedin this voluntarywarranty aredamage and deficienciesresulting from incorrectcon
nection, from improperhandling, fromnon-observance of theprogramming instructions or instruc
tions for use, or from force majeure. The voluntary elmeg warranty does not cover installation and
programming workperformed bythe specialized dealer. In particular, no claim can be made for in
stallation or programmingwork to be performedfree of chargeby the specializeddealer.The volun
tary elmeg warranty does not cover deficiencies which have a negligible effect on the value or us
ability of the device. Further costs, such as for installation, transport and travel expenses are ex
pressly excluded from the elmeg warranty.
5. It is at thediscretion of elmegto replacethe device withan identicalone instead ofperforming repairs. Furtherclaims for damage are not permissible. Any data stored in thedevice willbe lost after
repair work or replacement of the device.
6. The voluntaryelmeg warranty isnullified if changesare made tothe product, orwhen the product
is operated in a country for which it was not developed nor produced.
7. Fulfillment of the voluntary elmeg warranty presupposesthat the device has been packed complete and protected against breaking and impacts (if possible in the original packaging) and
shipped with the warranty certificate from the specialized dealer.
8. If testing reveals that there are no grounds for warranty claims, or that the product does not ex
hibit any deficiencies, the costs for repair work and testingshall be borne by the user. The special
ized dealer processing the claim arising from the voluntary elmeg warranty is authorized to charge
these costs to the user.
9. Services arisingfrom the voluntaryelmeg warranty effectneither an extensionof the warrantype
riod, nor do they mark the beginning of a new term for the voluntary warranty.
10. Warranty claims according to applicable law filed by the end customer shall neither be ex
cluded, nor restricted by this independent manufacturer’s declaration.
-
-
-
-
-
-
-
-
-
-
-
-
-
-
© 2002-2003 ELMEG GmbH & Co. KG Kommunikationstechnik - All rights reserved.
Any reprint ofthisdocumentation, even excerpts,is prohibited withoutthe prior, express consentof
the publisher and exact designation of sources, regardless of the type and form of media used in
the process (mechanical or electronic).
Function and logic descriptions for this documentation which refer to software products of other
manufacturers are based on the software in use at the time of generation or print. Poduct and/or
company names used in this documentation may be registered trademarks.
Page 68

ELMEG GmbH & Co.KG
Kommunikationstechnik
Vöhrumer Str. 30
D-31228 Peine
http://www.elmeg.com
elmeg C310 - CS310 / elmeg C320 - CS320
Sublect to changes 5160 038254.0 / 05-2003 / 20x4
 Loading...