

Elmdene GEN2-08 Series, GEN2-08-B, GEN2-18-B, GEN2-08-A, GEN2-18 Series Instruction Sheet
...
1
Technical Support: +44(0)23 9269 6638 (option 3) PAK200545_03B May 2016 ©2016 ELMDENE INTERNATIONAL LTD
13.8Vdc Switch Mode Power Supply
GEN2-08-y
#
for 8Ah Battery and up to 1.0A* Continuous Load Current
GEN2-18-y#
for 18Ah Battery and up to 1.5A* Continuous Load Current
F
EATURES
High efficiency cost effective power supply suitable for use in systems designed to comply with
PD6662:2010 and EN50131-6:2008 Grade 2 and Environmental Class II requiring 8Ah or 18Ah standby
battery capacity. Two independent output signals are provided for loss of mains fault (EPS**), and
general fault (including APS** fault). Self-diagnostics can detect blown output and battery fuses and
low battery voltage (APS fault). The PSU incorporates a battery management system comprising low
battery voltage detection and deep discharge protection to ensure that the battery is not permanently
damaged through excessive discharge. A brownout filter ensures that short mains voltage dips do not
create a false loss of mains alarm. Two LEDs assist with quick and easy installation by showing
presence of mains, correct battery charging and a fault condition. Comprehensive protection is built-in
as standard including mains transient filtering, electronic output overload protection and fuses on the
load and battery outputs.
• PD6662:2010 and EN50131-6:2008
Type A, Security Grade 2
Environmental Class II Compliant
• Low quiescent battery monitoring current during standby operation
• Fault signals for loss of mains, power supply fault, and battery low voltage warning
• Battery Deep Discharge Protection
• Protection against reverse battery connection
• LED for comprehensive diagnostics
• Thermal protection of power circuitry
• Mains transient suppression and brown-out filter
• Fully enclosed lid tamper circuit
#
“y” Denotes enclosure size – see overleaf
* See table overleaf to determine continuous standby battery current available for given standby times
** EN50131 Definitions: EPS = External Power Source APS = Alternative Power Source
Elmdene International Ltd
Tel: +44(0)23 9269 6638
3 Keel Close, Interchange Park, Fax: +44(0)23 9266 0483
Portsmouth, Hampshire, PO3 5QD, UK
Web: www.elmdene.co.uk
2
Technical Support: +44(0)23 9269 6638 (option 3) PAK200545_03B May 2016 ©2016 ELMDENE INTERNATIONAL LTD
S
PECIFICATION
Mains Input
Rated Voltage / (Operational Voltage) 100-240Vac / (90 – 265Vac)
Frequency 50/60Hz
Input current GEN2-08 & GEN2-18 < 1.0A at full load
Fuse T2A 20mm HRC
Output
GEN2-08-y
GEN2-18-y
Voltage at full load
Mains power
Battery standby
12.8 –14.2Vdc (13.8Vdc nominal)
9.8 – 13.0Vdc
Ripple
<400
mV
pk –
pk max @ Rated Voltage
Fuse
Load
Battery
F1.0A
F1.0A
F1.6A
F1.6A
Continuous Output Current
*
Mains
Battery for 12 hours
1.0 A
0.6A with 8Ah Battery
1.5A
1.5A with 18Ah Battery
*See below for quiescent current of PSU under battery when calculating total system standby current resources.
Mechanical
Product
Reference
GEN2-08-A
GEN2-08-B
GEN2-18-B
GEN2-08-C
GEN2-18-C
Enclosure Dimensions
w x h x d (mm)
230 x 200 x 80
355 x 330 x 80
330x 275 x 80
Weight (kg)
excluding battery
2.0 4.0 3.3
Material
1.2mm steel white powder
coated
Environmental
Temperature -10 to +40°C (operating) 75% RH non-condensing
-20 to +80°C (storage)
Standby Battery Management
Warning: risk of explosion if incorrect battery type fitted
Maximum Battery Size GEN2-08: 8Ah 12V Valve Regulated Lead Acid
(Not supplied with unit) GEN2-18: 18Ah 12V Valve Regulated Lead Acid
Intelligent Battery Recharge Time: < 72 hours to 80% - A heavily discharged battery having a
terminal voltage > 9.0V will attempt to be charged.
Testing: Battery Not Present: <9.0V battery voltage
Low battery voltage: <11.5V (no mains present)
Protection: Reverse battery connection protection
Deep discharge protection - Battery disconnect at 10.6V battery
terminal voltage
Quiescent Current: 64 mA when running on battery - less than 1 mA after deep
discharge protection.
Battery Cold Start (BCS) Momentarily link BCS pins together to connect battery to load if
PSU commissioned without any mains
3
Technical Support: +44(0)23 9269 6638 (option 3) PAK200545_03B May 2016 ©2016 ELMDENE INTERNATIONAL LTD
S
IGNALLING OUTPUTS
Rating: 0.10A @ 60Vdc 16Ω solid state relay contacts, volt free.
EPS Fault: Open if Loss of mains for >8s
GEN Fault: Open if Battery terminal voltage < 11.5v (when operating in standby with no
mains present), battery not present or Output and/or battery fuse blown
Tamper: 0.5A @ 30Vdc volt free contact. Open when lid is open.
C
ONNECTIONS
O/P +, - Connection to equipment to be powered (Observe polarity)
EPS Fault: Relay output for mains fail. Open if loss of mains.
GEN Fault: Relay output for General Fault. Open in fault condition
BATT +, - Connection to standby battery. Use cables provided (Observe polarity)
I
NSTALLATION AND COMMISSIONING
This unit is only suitable for installation as permanently connected equipment. This PSU is NOT SUITABLE for
external installation. EQUIPMENT MUST BE EARTHED. Before installation, ensure that external disconnect
device is OFF. The PSU should be installed according to all relevant safety regulations applicable to the
application.
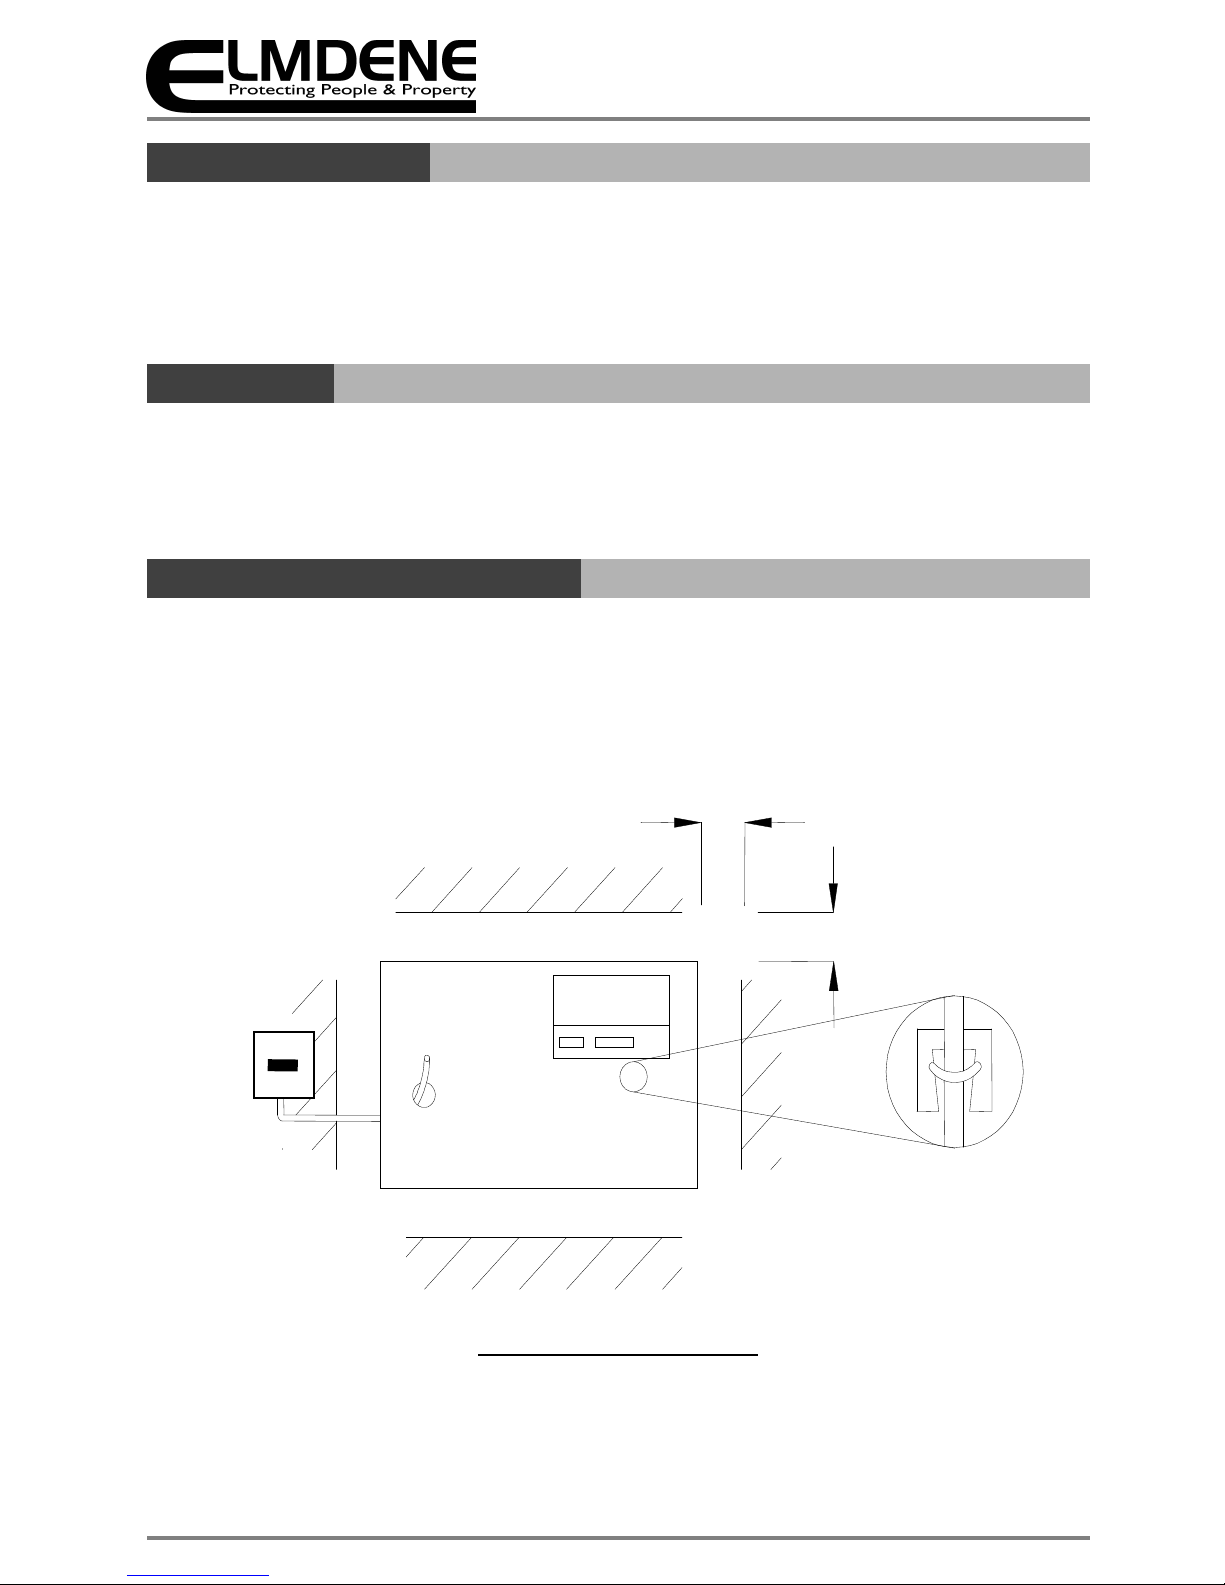
Fig 1 Mounting of Power Supply
L E N
Min 10cm clearance
Fasten cables
using cable tie
3A min
FUS
ED
SPUR
Load output cable:
Current rating to
match maximum load
Mains Input cable rated:
3A, 300Vac minimum

4
Technical Support: +44(0)23 9269 6638 (option 3) PAK200545_03B May 2016 ©2016 ELMDENE INTERNATIONAL LTD
Mounting
1) Mount securely in correct orientation allowing minimum clearance – see Fig. 1.0.
2) Ensure that the rear tamper is not in a position that will affect its operation, for example over a mortar
course, recess or raised area on the wall.
3) Route mains and low voltage output cables via different knockouts and/or cable entry holes.
4) Use bushes and cable glands rated to UL94 HB minimum.
Mains Power Up
5) Attach correctly rated mains cable (minimum 0.5mm2 [3A], 300/500Vac). Fasten with cable ties.
6) Apply mains power.
Check for 13.8V on load outputs.
Check green Mains LED is ON.
7) Disconnect mains power.
Load Output
8) Loop correctly rated load cable through supplied ferrite (1 turn) and attach to terminal block, note
polarity. Fasten with cable ties.
Fig 2 Position of ferrite
9) Apply mains power.
Check Green Mains LED is ON.
NOTE: Red Fault LED may flash to indicate no battery has been connected, this is normal.
Verify load is operating correctly.
10) Disconnect mains power.
Signalling
11) Connect EPS and GEN fault outputs to appropriate inputs of control and indicating equipment (CIE).
Standby Battery
12) Attach supplied battery cables to terminal block and batteries.
NOTE: ensure correct polarity of battery connections: +ve use Red lead, -ve use Black lead.
13) Position the battery as shown in Figures 2 - 6 below, avoiding the cover earth connection spades and
the cover retaining screws. Fold up ‘Tabs’ to locate battery and secure with the rubber band supplied.
Fig 2 GEN2-08-A
Battery
Fold up ‘Tabs’ to locate
battery and secure with the
rubber band supplied

5
Technical Support: +44(0)23 9269 6638 (option 3) PAK200545_03B May 2016 ©2016 ELMDENE INTERNATIONAL LTD
Fold up ‘Tabs’ to locate
battery and secure with
the rubber band supplied
Fold up ‘Tabs’ to locate
battery and secure with the
rubber band supplied
Fig 3 GEN2-18-B Fig 4 GEN2-08-B
Fig 5 GEN2-18-C Fig 6 GEN2-08-C
14) Apply mains power.
Check that Green Mains LED is ON.
Check there is no fault indicated by the Red Fault LED, refer to diagnostic table on page 6.
15) Disconnect mains power.
Check that the batteries continue to supply voltage and current to the output load.
Check that Green Mains LED is OFF and the control panel displays a Loss of Mains (EPS) fault
NOTE: Batteries must have sufficient charge to supply the output load
16) Reconnect mains power.
Check that Green LED is ON.
17) Remove Output fuse.
Check that Red Fault LED is indicating a fault, refer to diagnostic table on page 6, and that the
control panel shows a General PSU fault.
18) Replace Output fuse.
Check that Red Fault LED is OFF and General PSU fault has cleared at control panel.
Battery
Batter
y
Battery
Fold up ‘Tabs’ to locate
battery and secure with
the rubber band supplied
Fold up ‘Tabs’ to locate
battery and secure with
the rubber band supplied
Battery

6
Technical Support: +44(0)23 9269 6638 (option 3) PAK200545_03B May 2016 ©2016 ELMDENE INTERNATIONAL LTD
Tamper
19) Connect tamper switch to appropriate inputs of control and indicating equipment (CIE).
Fig 7 Position of tamper assembly on ‘hinged lid’ style enclosures
Fig 8 Position of tamper assembly on ‘clam shell’ style enclosures
20) Close the lid and fasten with screw supplied. Alternatively fit the cover in place, the correct orientation
is with the cover retaining feature engaging over the bottom lip of the base, fasten with screws
supplied.
21) Check that the tamper switch is:
CLOSED when the lid/cover is closed and the retaining screws are fitted.
OPEN when the retaining screws are removed the lid/cover is open.
Use fine adjustment screw if necessary to align set position indicator with set point.
22) Close the lid/cover and fasten.
23) Re-check tamper circuit is closed at control panel.
Tamper Switch Connections
Set position indicator
Fine adjustment screw
Lid Fixing Screw
(Sets tamper switch)
Lid Fixing Screw
(Sets tamper switch)
Tamper switch Connections
Fine adjustment screw
Set position indicator

7
Technical Support: +44(0)23 9269 6638 (option 3) PAK200545_03B May 2016 ©2016 ELMDENE INTERNATIONAL LTD
O
PERATING INSTRUCTIONS
In the event of loss of mains, a battery fault or a GEN fault, the corresponding Fault signal contacts will open.
If the output of the PSU fails, the cause of the failure should be investigated e.g. short circuit load,
connection of a deeply discharged battery. The fault should be rectified before restoring power to the PSU. If
any of the fuses require replacing, ensure the correct fuse rating and type is used.
M
AINTENANCE
Maintenance
This unit is intended for use by Service Personnel only. There are NO USER SERVICEABLE parts inside.
There is no regular maintenance required of the PSU other than periodic testing, and replacement of the
standby battery. Reference should be made to the battery manufacturer's documentation to determine
typical/expected battery life with a view to periodic replacement of the battery.
D
IAGNOSTICS
Local Diagnostics
Green LED On = Mains Present
Red LED Fault Diagnostics according to table:
Red LED
(fault)
Green LED
(mains)
Status
OFF ON Normal: Battery fully charged
One short flash
every second
ON Normal: Battery charging but not fully charged
Flashing:
1second On
1 second Off
ON
Fault:
Output fuse or battery fuse blown, or
battery missing
OFF Fault: No mains, output fuse blown
One short flash
every 3 seconds
OFF Fault: No mains, battery supplying load.
OFF OFF
Fault:
No mains
, No output
, Batteries
disconnected or completely discharged

8
Technical Support: +44(0)23 9269 6638 (option 3) PAK200545_03B May 2016 ©2016 ELMDENE INTERNATIONAL LTD
C
OMPLIANCE
This power supply unit meets the essential requirements of the following EU Directives:
EMC: 2014/30/EU Low Voltage: 2014/35/EU WEEE: 2012/19/EU RoHS2: 2011/65/EU
This product is suitable for use in systems designed to comply with
PD6662:2010 at Grade 2 and Environmental Class II
EN50131-6:2008 Type A Security Grade 2
Environmental Class II
Certification Body: Telefication B.V.
Edisonstraat 12A
Zevenaar, 6902 PK
The Netherlands
+31 (0) 316 - 583 180
http://www.telefication.com
D
ISPOSAL OF PRODUCT AT END OF LIFE
This product falls within the scope of EU Directives 2012/19/EU Waste Electrical and Electronic Equipment
(WEEE) and 2013/56/EU (Battery). At the end of life, the product must be separated from the domestic
waste stream and disposed via an appropriate approved WEEE disposal route in accordance with all national
and local regulations.
Before disposal of the product, any batteries must be removed, and disposed separately via an appropriate
approved battery disposal route in accordance with all national and local regulations. Package used batteries
safely for onward transport to your supplier, collection point or disposal facility.
Caution: Risk of fire or explosion
if bare battery wires are allowed to touch.
See Specification for battery type information. The battery is marked with the crossed out wheelie bin
symbol, which may include lettering to indicate cadmium (Cd), lead (Pb), or mercury (Hg).
For more information see: www.recyclethis.info
The packaging supplied with this product may be recycled.Please dispose of packaging accordingly
.
 Loading...