

Page 1

Electronic Shape-Cutting Machine
and Handheld Remote Control
USER’S GUIDE
Now you’re in control.
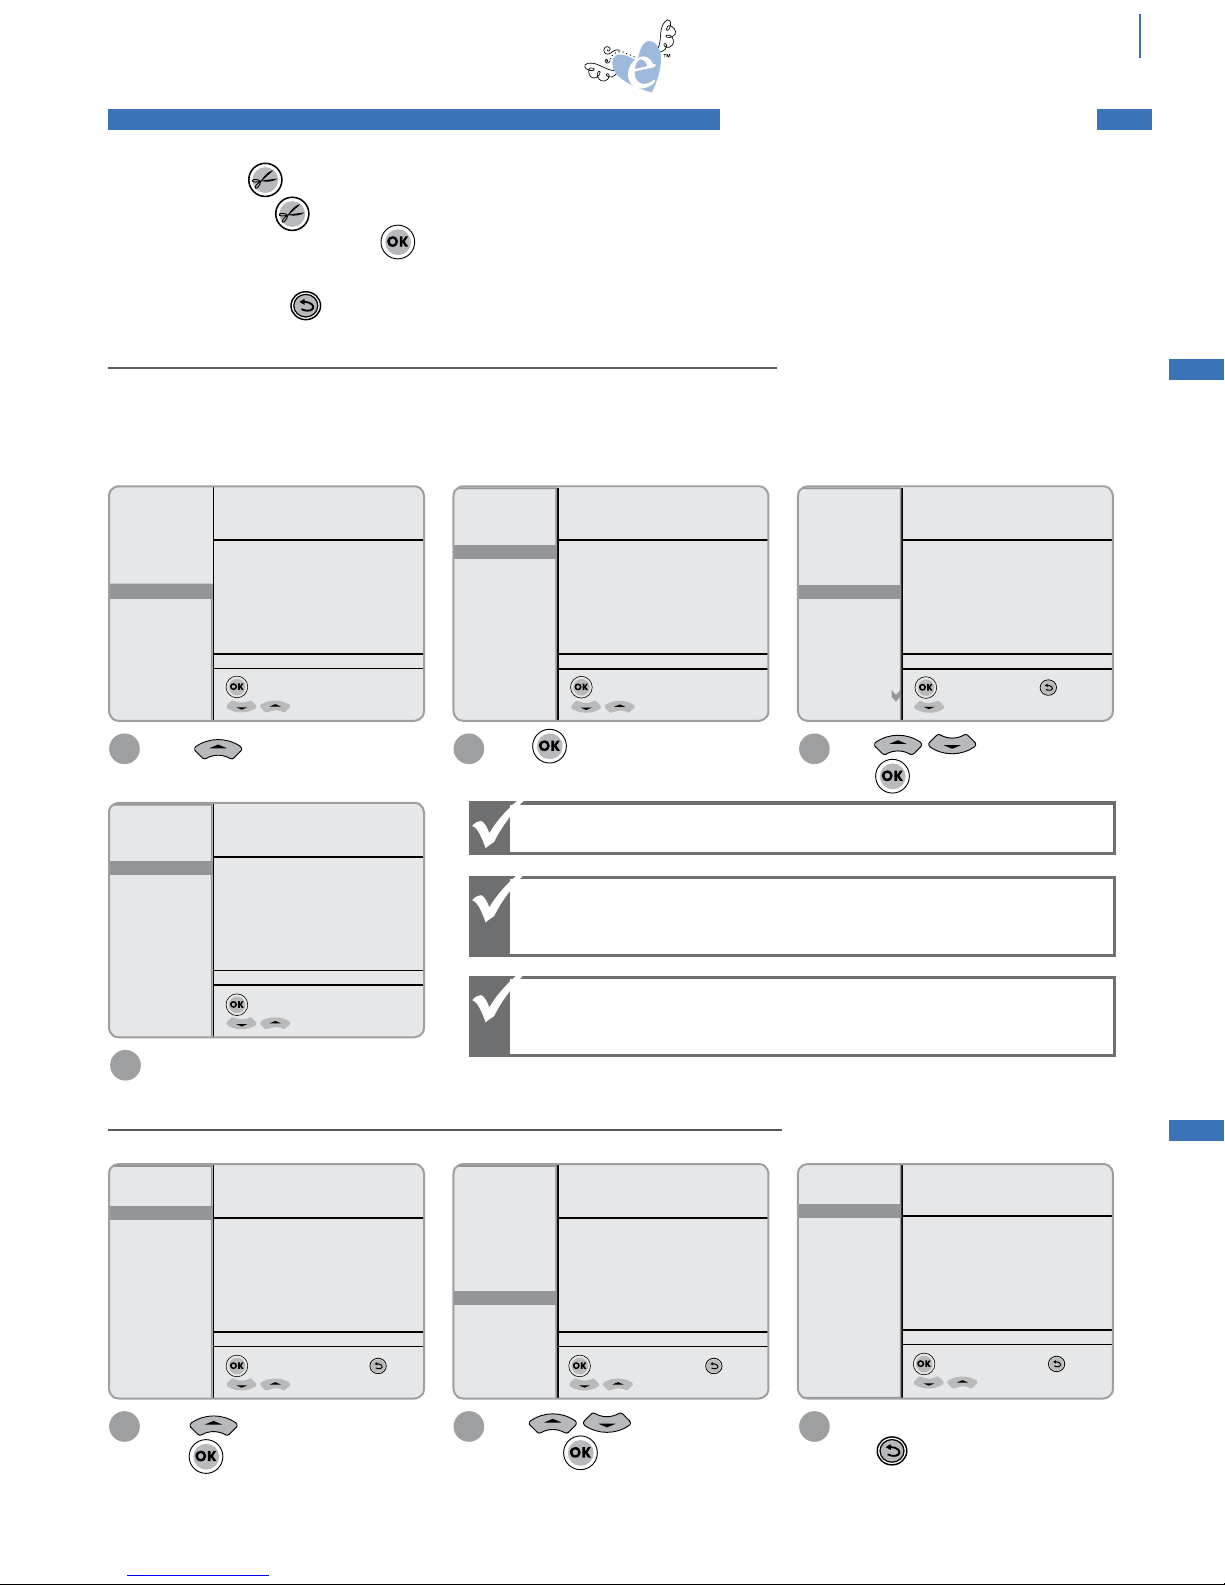
MAINTENANCE
CUTTING BLADE MAINTENANCE
CLEANING ThE CUTTING BLADE
internal use only V.2.02
For software updates,
SUBSECTION
please visit
Sizzix.com/eclips
Version 2.0 Software
Read Guide Before Operating Product.
Save for Reference.
Page 2

2
WELCOME
WELCOME
Brace yourself for the total eclips!
It all starts with one touch. e eclips™ Electronic Shape-Cutting Machine and Handheld Remote
Control combines the creativity of award-winning Sizzix artwork with the amazing cutting
precision and remote-controlled intelligence of our most innovative creative product ever.
With just the touch of a button, you can create spot-on shapes and letters to adorn almost
anything imaginable. In addition, several different image-enhancing features help transform any
shape into a customizable creation. Want to change things up a bit? Just change the cartridge
and change your possibilities! Best of all, everything you need to get started is right here –
no computer required!
But there’s more … much more! With Version 2.0, we’ve incorporated many new changes to
enhance your user experience. Among the highlights is a Pen Holder accessory to draw any shape
with virtually any felt tip, ballpoint or glue pen. Also, for the first time, you can cut and score
easy fold lines at once to create albums, bags, boxes, cards and envelopes. And with Print2Cut
Creative Software, feel free to colorize, design and print an eclips shape from your home
computer and printer and cut it with the eclips Machine.
For Tips & Tricks, software updates and more, visit Sizzix.com.
Want to learn more about an eclips feature?
At Sizzix.com/eclips, there’s a video that corresponds to
almost any topic in the Table of Contents.
Page 3

TABLE OF CONTENTS
TABLE OF CONTENTS
3
Welcome . . . . . . . . . . . . . . . . . . . . . . . . . . . . . . 2
Important Safety Instructions . . . . . . . . . . . . . . 4
Contents . . . . . . . . . . . . . . . . . . . . . . . . . . . . . . 5
Accessories . . . . . . . . . . . . . . . . . . . . . . . . . . . .5
Set Up
Connecting . . . . . . . . . . . . . . . . . . . . . . . . . . . .6
Setting Your Blade Depth . . . . . . . . . . . . . . . . . .
Inserting Blade in Blade Holder . . . . . . . . . . . . .
Installing the Cutting Blade Holder . . . . . . . . . . .
Workspace . . . . . . . . . . . . . . . . . . . . . . . . . . . .8
Starting the Machine . . . . . . . . . . . . . . . . . . . . .
Cutting Mat . . . . . . . . . . . . . . . . . . . . . . . . . . . .
Placing Material on Cutting Mat . . . . . . . . .
Loading Cutting Mat in Machine . . . . . . . . .
Handheld Remote Control . . . . . . . . . . . . . . . . 9
Introduction Screen . . . . . . . . . . . . . . . . . . . . .
Inserting a Cartridge . . . . . . . . . . . . . . . . . . . .
Easy Start Basics . . . . . . . . . . . . . . . . . . . . . . . 11
Selecting Material Type . . . . . . . . . . . . . . . . . .
Selecting Material Size . . . . . . . . . . . . . . . . . . . 11
Selecting a Shape . . . . . . . . . . . . . . . . . . . . . .
Cutting . . . . . . . . . . . . . . . . . . . . . . . . . . . . . . 12
Selecting a Font . . . . . . . . . . . . . . . . . . . . . . . .
Font Spacing and Line Breaks . . . . . . . . . . .
Additional Font Features . . . . . . . . . . . . . .
Blue and Red ALT keys . . . . . . . . . . . . . . . . . . .
Beyond the Basics . . . . . . . . . . . . . . . . . . . . . . 14
Options Menu . . . . . . . . . . . . . . . . . . . . . . . . .
Solid . . . . . . . . . . . . . . . . . . . . . . . . . . . . .14
Outline . . . . . . . . . . . . . . . . . . . . . . . . . . .14
Shadow . . . . . . . . . . . . . . . . . . . . . . . . . . .14
Pieces . . . . . . . . . . . . . . . . . . . . . . . . . . . . 14
Embellishments . . . . . . . . . . . . . . . . . . . . .14
Border . . . . . . . . . . . . . . . . . . . . . . . . . . . . 15
Add to Queue . . . . . . . . . . . . . . . . . . . . . . . . .
Edit Queue . . . . . . . . . . . . . . . . . . . . . . . .
. . . . . . . . . . . . . . . . . . . . . . . . . . . . . . . 6
6
7
7
8
8
8
8
10
10
11
12
12
13
13
13
14
15
15
Function Keys . . . . . . . . . . . . . . . . . . . . . . . . .
Setup . . . . . . . . . . . . . . . . . . . . . . . . . . . .16
Fill . . . . . . . . . . . . . . . . . . . . . . . . . . . . . . .16
Fit . . . . . . . . . . . . . . . . . . . . . . . . . . . . . . .16
PIP . . . . . . . . . . . . . . . . . . . . . . . . . . . . . .
Mirror
Actual . . . . . . . . . . . . . . . . . . . . . . . . . . .
Load/Unload . . . . . . . . . . . . . . . . . . . . . . . 18
Last Pt. . . . . . . . . . . . . . . . . . . . . . . . . . . .
Repeat . . . . . . . . . . . . . . . . . . . . . . . . . . . .19
Search . . . . . . . . . . . . . . . . . . . . . . . . . . .
Advanced . . . . . . . . . . . . . . . . . . . . . . . . . . . . . 19
Speed Settings . . . . . . . . . . . . . . . . . . . . . . . . .
Pressure Settings . . . . . . . . . . . . . . . . . . . . . . .
Scoring Adjustment . . . . . . . . . . . . . . . . . . . . .
Adjusting for the Perfect Cut . . . . . . . . . . . . . .
Blade & Material Positioning . . . . . . . . . . . . . .
Paper Saver . . . . . . . . . . . . . . . . . . . . . . . . . . .
Laser Calibration Setup . . . . . . . . . . . . . . . . . .
Dimensions Setting . . . . . . . . . . . . . . . . . . . . .
Laser Setting . . . . . . . . . . . . . . . . . . . . . . . . . .
Pop-Up Menu . . . . . . . . . . . . . . . . . . . . . . . . .
Add to Favorites . . . . . . . . . . . . . . . . . . . .
Blade Holder . . . . . . . . . . . . . . . . . . . . . . .
Center Point . . . . . . . . . . . . . . . . . . . . . . .
Double Cut . . . . . . . . . . . . . . . . . . . . . . . .
Laser Cut Preview . . . . . . . . . . . . . . . . . . . .
Pen Holder . . . . . . . . . . . . . . . . . . . . . . . . .
Print2Cut . . . . . . . . . . . . . . . . . . . . . . . . . .27
Rotate . . . . . . . . . . . . . . . . . . . . . . . . . . . .28
Frequently Asked Questions . . . . . . . . . . . . . . 29
Maintenance . . . . . . . . . . . . . . . . . . . . . . . . . . 30
Cutting Blade Maintenance . . . . . . . . . . . . . . .
Cleaning the Machine . . . . . . . . . . . . . . . . . . .
Troubleshooting . . . . . . . . . . . . . . . . . . . . . . . 32
End User License Agreement . . . . . . . . . . . . . . 33
Warranty . . . . . . . . . . . . . . . . . . . . . . . . . . . . . 34
. . . . . . . . . . . . . . . . . . . . . . . . . . . .17
16
17
18
18
19
19
20
20
20
21
21
22
22
23
23
24
24
25
25
26
26
30
31
Page 4
4
IMPORTANT SAFETY INSTRUCTIONS
important safety instructions
Important safety InstructIons
THIS DEVICE IS INTENDED FOR HOUSEHOLD USE ONLY!
WARNING
To reduce the risk of fire, electrical shock or personal injury, read and understand all the instructions
and warnings that come with your eclips™ Electronic Shape-Cutting Machine and Handheld Remote
Control (“Product”).
ELECTRICAL SHOCK HAZARD
Product is an electrical device. Use with caution. Observe the following precautions:
• Do not operate Product on wet surfaces or near any water sources (tub,
shower, sink, etc.).
• Keep liquids and beverages away from Product.
• Unplug Product from outlet when not in use or before cleaning.
• Unplug Product when removing or installing Blades and/or Blade Holder.
PINCH HAZARD
Cutting Carriage can pinch fingers or hand. Feed Rollers can catch hair or clothing.
• Keep fingers away from moving parts.
• Keep hair and clothing away from moving parts.
CUTTING HAZARD
Cutting Blades are sharp. Handle with care.
• Keep fingers away from exposed blade.
Keep away from Children
• Choking hazard. Small parts.
This product has a Class 1 laser and complies with International Standards EN 60825-1; a Class 1 laser
product is safe under reasonably foreseeable conditions of operation. Use of controls or adjustments
or performance of procedures other than those specified herein may result in hazardous radiation
exposure.
• Do not disassemble the device.
• Do not shine the laser on a reflective surface.
• Do dispose of the product according to the local laws and regulations of your region.
• Do not look directly at laser at any time.
GENERAL SAFETY RULES:
• Read and understand all the instructions and warnings that come with the Product.
• Always operate Product on a dry, clean, level surface.
• Do not operate Product with wet hands.
• Keep area of operation well lit.
• Do not operate Product near flammable liquids or gases.
• Do not operate Product out of doors.
• Do not unplug Product by tugging or pulling the power cord.
SAVE THESE INSTRUCTIONS AND WARNINGS and keep them near your eclips™ products.
Please visit Sizzix.com for more information about your eclips products.
NOTICE
The device complies with Part 15 of the FCC Rules. Operation is subject to the following two
conditions: (1) this device may not cause harmful interference, and (2) this device must
accept any interference received, including interference that may cause undesired operation.
Page 5

6
5
6
1
6
0
A
LL
O
C
C
AS
I
O
NS
6
5
6
1
6
6
B
AB
Y
MI
L
E
ST
ON
E
S
65
61
72
V
AC
A
T
I
O
N
CONTENTS
5
CONTENTS
2
1
7
5
8
6
11
CONTENTS
1. eclips 12" (30.5cm) Shape-Cutting Machine
(Model # EC-C1200)
2. eclips Handheld Remote Control (Model # EC-R1200)
3. eclips Handheld Remote Control Cradle
4. eclips User‘s Guide – Multi-Language
5. Universal Power Supply
6. Power Cord
SOLD SEPARATELY –
14. Shape and Font Cartridges – More shapes in fun
themes, styles and occasions
15. eclips Replacement Blades – Keeps cutting crisp
16. 12" x 24" (30.5cm x 61.0cm) Cutting Mat –
For longer cuts such as borders
17. Tool Kit – Set of useful tools to enhance shapes and
ensure easy removal from Cutting Mat
18. Spatula/Burnisher – Lifts shapes off Cutting Mat,
plus burnishes rub-on designs
Available at your local Sizzix retailer or online at Sizzix.com.
4
3
10
9
12
13
7. eclips Blade Holder
8. eclips Blades, Standard, 2 Pack
9. eclips Cartridge Easy-Store Case
10. eclips 12" x 12" (30.5cm x 30.5cm) Cutting Mat
11. 6' (1.8m) USB 2.0 Cable
12. eclips Starter Design and Font Cartridge
13. eclips Starter Design and Font Cartridge Booklet
ACCESSORIES
19. Die Pick – Helps remove tiny cut pieces from Cutting Mat
20. Craft Knife – For precision cutting and trimming
21. Mini USB Cable – Connects Handheld Remote
Control to your computer for future software upgrades
22. Pen Holder – Holds most felt tip, ballpoint or glue pens
to draw a shape
23. Print2Cut Software – design and print an eclips shape
from your home computer
14
15
16
17
19
21
18
20
22
Page 6

6
Back of
Handheld Remote Control
Back of machine
Depth Selection
Arrow
set up
SET UP
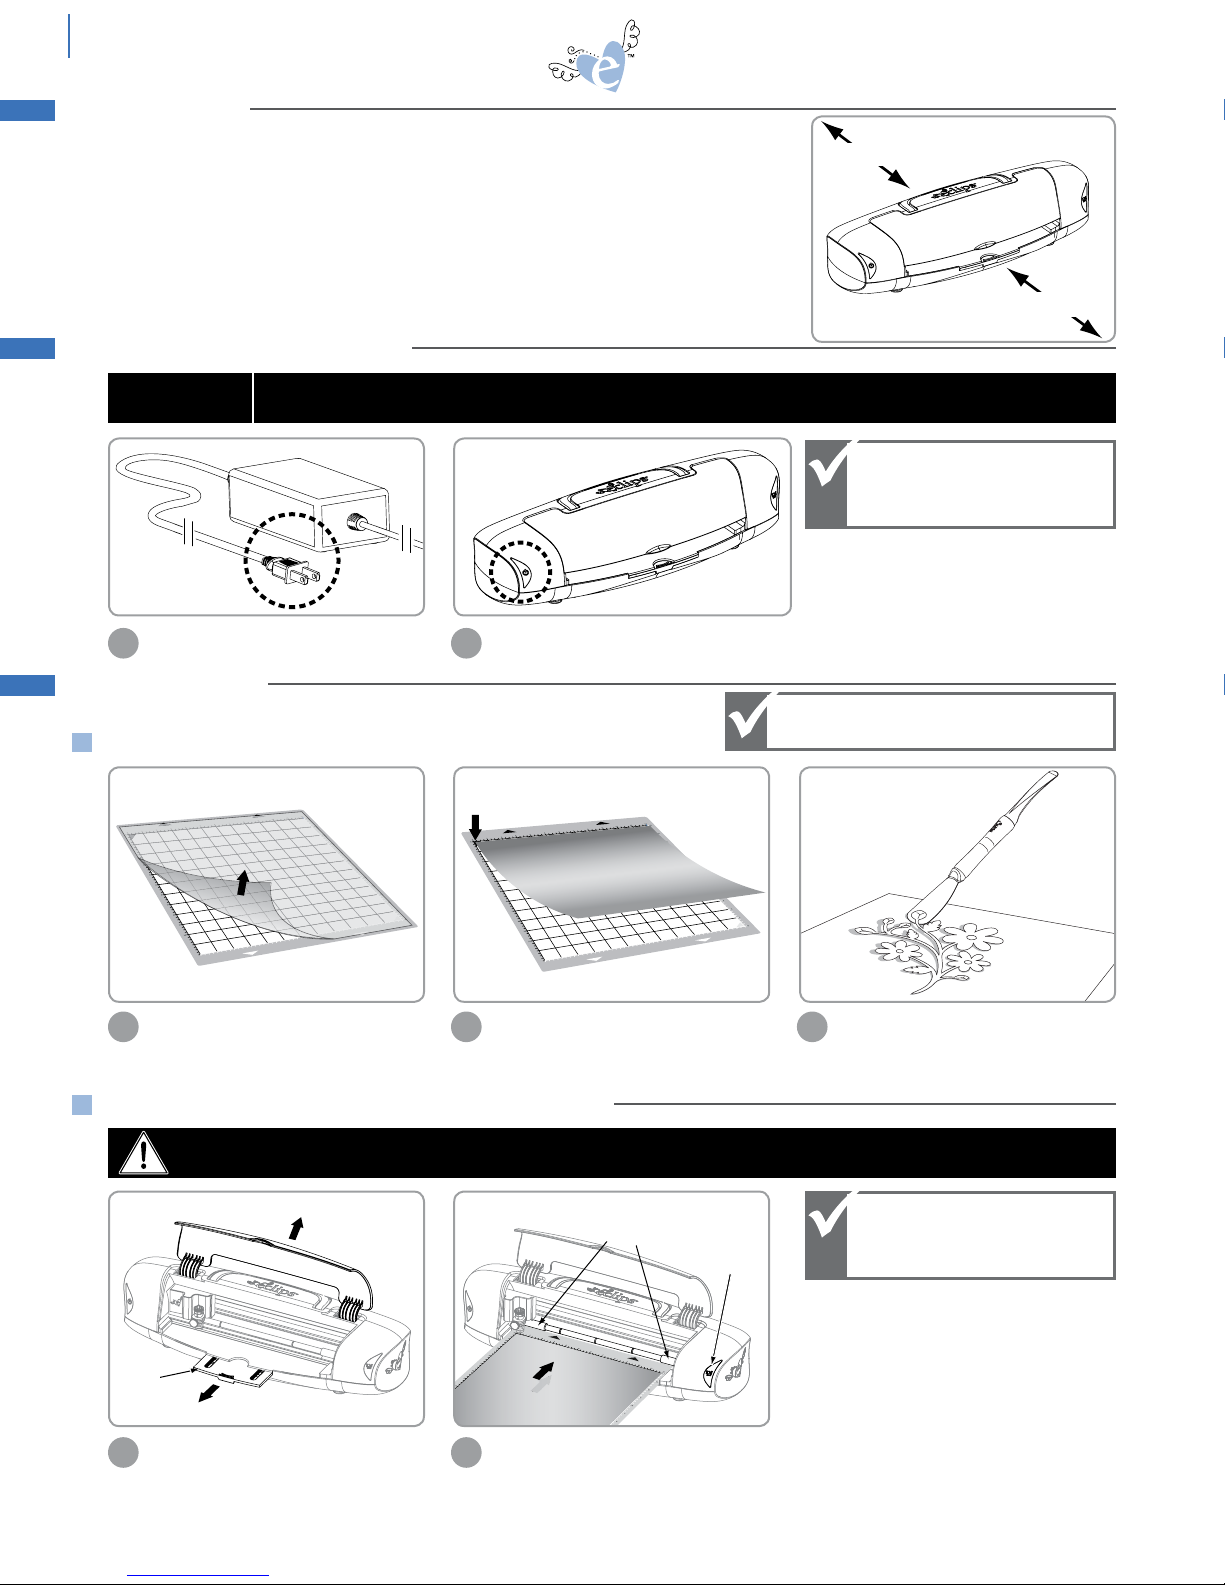
CONNECTING
3
2
1. Plug Power Cord into Universal Power Supply.
2. Plug Universal Power Supply into back of eclips Machine.
3. Plug USB cable into back of eclips Machine.
4. Plug flat end of the USB cable into Handheld Remote Control.
SETTING YOUR BLADE DEPTH
NOTICE
DO NOT adjust blade depth while Machine is operating.
4
1
Printed on a ring around the Blade Holder top are Blade Depth Settings. Ranging from 1 to
6, these numbers can be selected individually by turning the wheel to the number relative
to the material you are using.
As a general rule, thinner materials such as paper and vinyl require a lower number
Blade Depth Setting, while thicker materials such as light chipboard and heavy cardstock
require a higher number Blade Depth Setting. For optimal results, try a test cut and make
necessary adjustments to the Blade Depth Setting before performing the final cut.
Lower number = Thinner material.
Higher number = Thicker material.
Page 7

Clamp Screw
Top edge of Clamp
Depth Selection
White Ring
Arrow
Angled
Cutting edge
Blue
Safety Cap
Insert this end
into Blade Holder
Non-cutting side
Clamp Screw
White Ring
Clamp
set up
INSERTING BLADE IN BLADE HOLDER
7
CAUTION: CUTTING HAZARD Blade is sharp, handle with care.
Carefully remove Blue Safety Cap from
1 2 3
Blade, exposing angled cutting edge.
Carefully insert non-cutting side of
Blade into hole at bottom of Blade
Holder. Blade is held in place
magnetically.
CUTTING BLADE MAINTENANCE
INSTALLING THE CUTTING BLADE HOLDER
WARNING: MOVING PARTS Keep fingers, hair and clothing away.
CAUTION: Always unplug Machine before removing or installing Blade Holder.
Note that blade is exposed but barely
visible when inserted properly.
CAUTION: CUTTING HAZARD Keep fingers away from exposed blade.
Lift open Machine cover to expose
1 2 3
Carriage and Blade Holder Clamp.
Loosen Clamp by turning Clamp Screw
counterclockwise approximately 1/4 of
a turn. (Important: Spring on end of
Clamp Screw MUST be kept in place.)
Place Blade Holder into Clamp, making
sure that Depth Selection Arrow is
facing out.
Tighten Blade Holder by turning the
4
Clamp Screw clockwise until Blade
Holder is secure.
Page 8
8
12" – 24"
12"
Rollers
Load Button
Tray
set up
WORKSPACE
PLACEMENT
Leave 12" to 24" clear space behind your eclips Machine to allow full Cutting Mat movement.
Place your eclips Machine at least 12" from the edge of your table to prevent it from tipping
over and causing possible injury.
ENVIRONMENT
Place eclips Machine on clean, level, dry and sturdy surface.
STARTING THE MACHINE
NOTICE
Plug Power Cord into wall outlet.
1
DO NOT unplug USB cable from Handheld Remote Control while Machine is
in use. This will cause data loss.
Press Power button (front of Machine shown).
2
CUTTING MAT
PLACING MATERIAL ON CUTTING MAT
Pressing Power button
again will turn the
Machine OFF.
Replace plastic cover on
Cutting Mat when not in use.
Peel back and remove plastic cover from
1 2
Cutting Mat.
LOADING CUTTING MAT IN MACHINE
WARNING: MOVING PARTS Keep fingers, hair and clothing away.
Open cover and extend tray. (The Cutting
1 2
Mat can also be loaded with the Machine
cover closed.)
Align material to be cut with top left edge
of Cutting Mat. Press evenly into place.
Align top edge of Cutting Mat against rollers and
push Load button. The Machine will automatically
move the Cutting Mat to Start position.
3
When removing more intricate shapes
from Cutting Mat, an eclips Spatula is
recommended (sold separately).
Push the Load button
again to remove Cutting
Mat from Machine.
Page 9
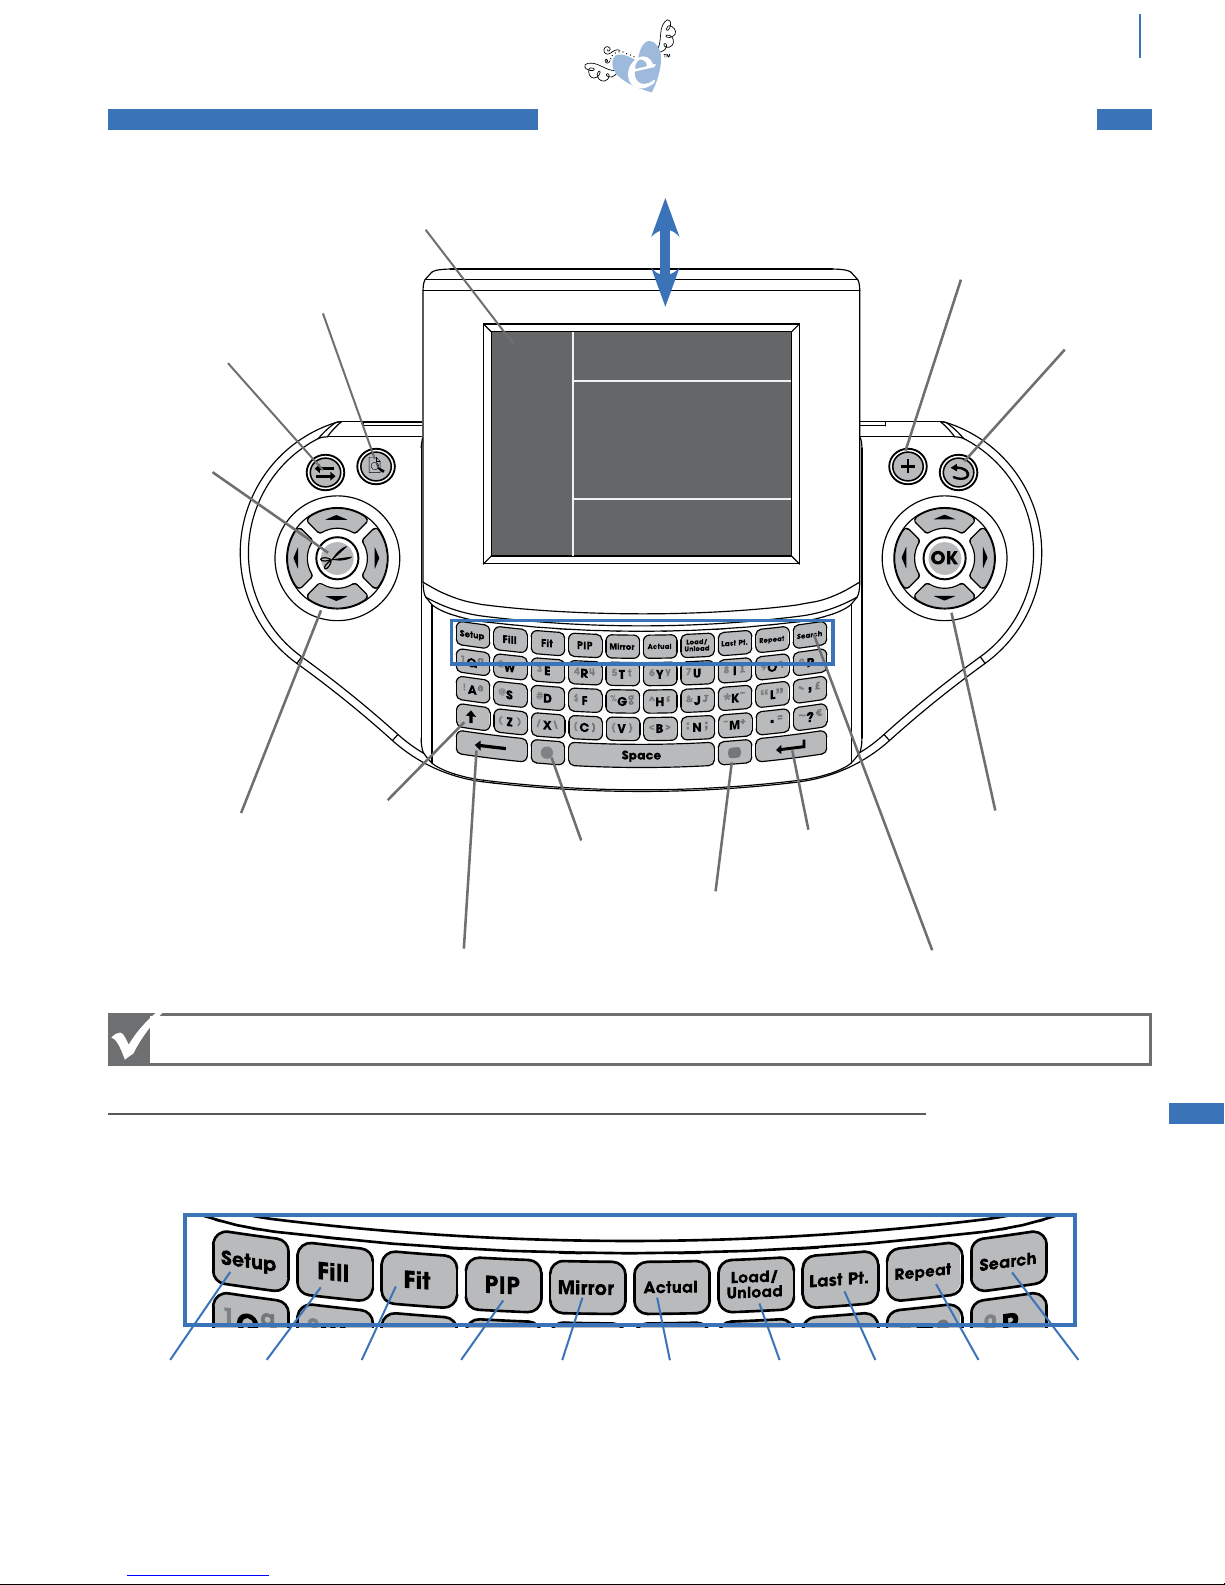
Display Window
HANDHELD REMOTE CONTROL
HANDHELD REMOTE CONTROL
Screen slides up
9
Toggle
Cut
Blade
Positioner
Control
Pop-Up
Menu
Shift
Delete
Options
Menu
ALT Red
Circle
Queue Display
Main Display
Selection Display
ALT Blue
Rectangle
Return
Add to Queue
Escape
Screen
Navigator
Control
Function
Keys
ALT keys add options to keypad. When highlighted, red or blue keypad characters are active.
The Function Keys along the top of the keypad access additional features.
View the pages indicated below for details on how to use these keys.
Page 16 Page 16 Page 16 Page 17 Page 17 Page 18 Page 18 Page 18 Page 19 Page 19
FUNCTION KEYS
Page 10
10
Setup
Space
P
R
P
R
P
R
Setup
Space
P
R
Setup
Space
P
R
Setup
Space
P
R
English
Spanish
German
French
Select default language and
press
Inches
Millimeters
Select default dimension and
press
Please enter your name and
press
Megan
SPEED: 4
PRESSURE: 3
12"x12"
CARDSTOCK M
H: 1.50" W: 1.50" QTY: 1
Please insert Cartridge
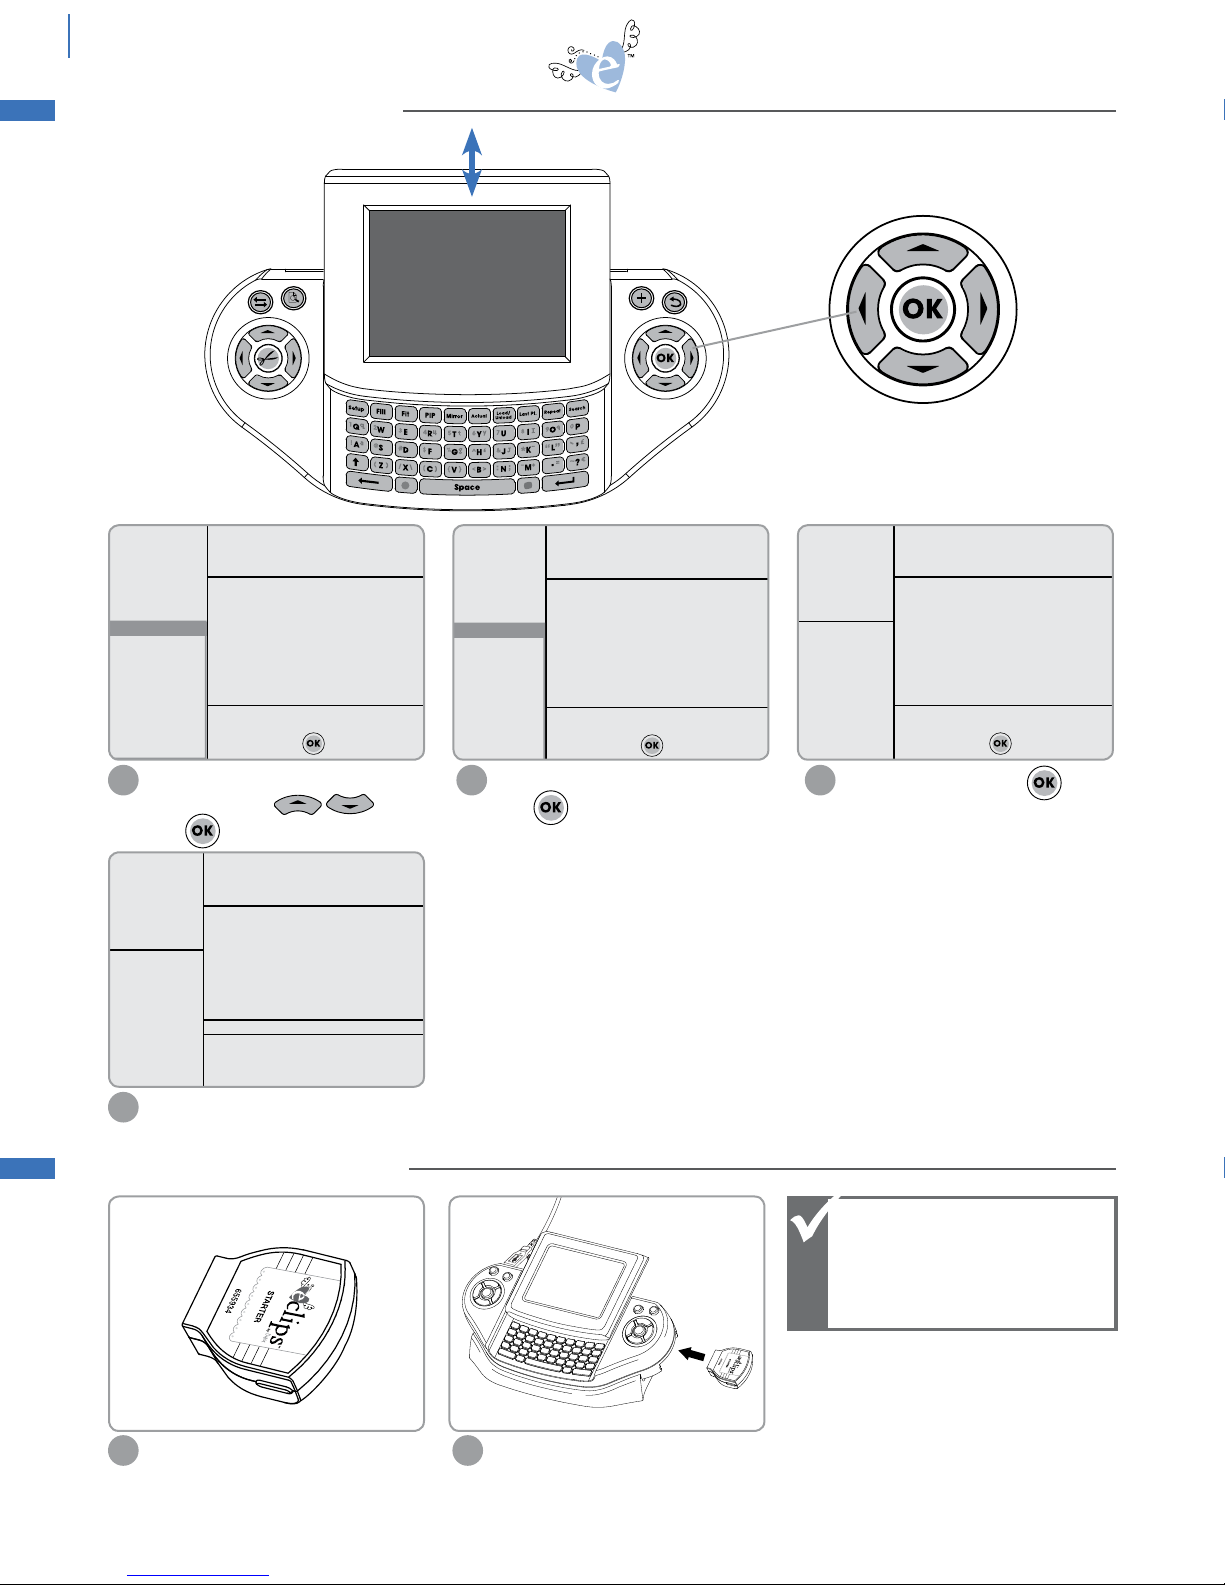
handheld remote control
INTRODUCTION SCREEN
Screen slides up and down
Screen Navigator
Control
Select default language using Screen
1
Navigator Control and
press .
Insert a cartridge to begin.
4
INSERTING A CARTRIDGE
Select default dimensions and
2
press .
Enter your name and press .
3
Note that cartridges are
interchangeable while
Machine is on except
when warning message
appears.
1
Select eclips cartridge with logo side up.
Slide eclips cartridge into right side of
2
Handheld Remote Control.
Page 11
Setup
Space
P
R
SPEED: 4
PRESSURE: 3
12"x12"
Cardstock M
Flowers
Frames
Phrases
Rockin’ Janie.f
Shapes
H: 1.50" W: 1.50" QTY: 1
to open category
for more options
Select artwork from category
SPEED: 4
PRESSURE: 3
12"x12"
Cardstock M
H: 1.50" W: 1.50" QTY: 1
to see material options
for more options
Setup
Space
P
R
SPEED: 4
PRESSURE: 2
12"x12"
Cardstock L
H: 1.50" W: 1.50" QTY: 1
to see material options
for more options
P
R
P
R
P
R
Setup
Space
P
R
SPEED: 4
PRESSURE: 2
12"x12"
Cardstock L
H: 1.50" W: 1.50" QTY: 1
to select material size; to Esc
for more options
SPEED: 4
PRESSURE: 2
12"x12"
Cardstock L
H: 1.50" W: 1.50" QTY: 1
to select material size; to Esc
for more options
12"x12"
8 1/2"x11"
8"x8"
6"x6"
A4
12"x24"
Dimensions
Laser
SPEED: 4
PRESSURE: 2
8"x8"
Cardstock L
H: 1.50" W: 1.50" QTY: 1
to select material size; to Esc
for more options
Setup
Space
P
R
P
R
P
R
P
R
Setup
Space
P
R
SPEED: 4
PRESSURE: 3
12"x12"
Cardstock M
H: 1.50" W: 1.50" QTY: 1
to select material; to Esc
for more options
Cardstock L
Cardstock M
Cardstock H
Chipboard
Vellum L
Vellum H
Vinyl
Fabric
Setup
Space
P
R
Setup
Space
P
R
easy start basics
easy start basics
To CUT: Press to send design or font selection to Machine.
To PAUSE: Press again to pause Machine.
To RESUME Cutting: Press to resume cutting.
To POSITION CUTTING BLADE: Use Blade Positioner Control to move Cutting Blade.
To ESCAPE: Press to go back one screen.
SELECTING MATERIAL TYPE
The eclips Machine can cut a variety of materials from paper and vellum to construction paper, cardstock, vinyl, foam and
light chipboard. Select the material to be cut in the Options Menu as shown below.
11
Press in Options Menu.
1
Press to see materials options.
2
Press to highlight material.
3
Press to apply changes.
Cardstock L (Light), M (Medium), H (Heavy)
Speed and Pressure adjust automatically based on
material selected. To manually adjust these settings,
please see pgs. 19-20.
Begin with preset settings for Speed and Pressure.
Try a test cut on similar material weight. Please see
pg. 20 for more suggestions.
Selected material now appears on screen.
4
SELECTING MATERIAL SIZE
Press in Options Menu.
1 3
Press to see material size options.
Press to highlight material
2
size. Press to apply changes.
Selected material now appears on screen.
Press to continue.
Page 12

12
Setup
Space
P
R
SPEED: 4
PRESSURE: 2
8"x8"
Cardstock L
Flowers
Frames
Phrases
Rockin’ Janie.f
Shapes
H: 1.50" W: 1.50" QTY: 1
to open category
for more options
Select artwork from category
SPEED: 4
PRESSURE:2
8"x8"
Cardstock L
Shadow
Pieces
Embellishment
H: 1.50" W: 1.61" QTY: 1
Starter and Rockin’
Janie
suggested min
height=2.5"
Starter and Rockin’
Janie
H: 2.50" W: 1.61" QTY: 1
to edit height; to Esc
to apply changes; to width
Setup
Space
P
R
suggested min
width=2.7"
Starter and Rockin’
Janie
H: 2.25" W: 2.42" QTY: 1
to edit width; to Esc
to apply to height to QTY
P
R
P
R
P
R
Setup
Space
P
R
P
R
P
R
Setup
Space
P
R
Starter and Rockin’
Janie
H: 2.25" W: 2.42" QTY: 1
to edit qty; to Esc
to apply; to width
Setup
Space
P
R
P
R
P
R
Setup
Space
P
R
SPEED: 4
PRESSURE: 2
8"x8"
Cardstock L
Flowers
Frames
Phrases
Rockin’ Janie.f
Shapes
H: 2.25" W: 2.42" QTY: 2
to open category
for more options
Select artwork from category
SPEED: 4
PRESSURE: 2
8"x8"
Cardstock L
H: 2.25" W: 2.25" QTY: 2
Please enter characters using keypad
Starter and Rockin’
Janie
SPEED: 4
PRESSURE: 2
8"x8"
Cardstock L
Solid
Shadow
Tag
Charm
H: 2.25" W: 1.44" QTY: 2
Starter and Rockin’
Janie
easy start basics
SELECTING A SHAPE
Highlight a category from Options
1
Menu and press .
Press to edit width. Use
4
to change width incrementally or use red
numbers on Keypad for exact cutting size.
Press to apply changes.
CUTTING
WARNING: MOVING PARTS Keep fingers, hair and clothing away.
Press to send the shape to be cut to
the Machine.
Press again to pause the Machine.
Press from right Screen
2
Navigator Control to highlight a shape.
Press to send the shape to be cut. To
change the size or quantity, press .
See pg. 14 for more options.
Press to edit quantity. Use
5
to change quantity or use red numbers on
Keypad for specific quantity. Press
to apply changes.
Blade Positioner
Control
Use to edit height
3
incrementally or use red numbers on
Keypad for exact cutting size. Press
to apply changes.
When editing size, the
Options Menu displays
suggested minimums,
which should be used
for optimum results.
For smaller sizes,
perform test cut.
Change height or width
but not both; when one
dimension is changed,
the other adjusts
automatically.
SELECTING A FONT
Fonts are available on selected eclips cartridges. Fonts have a unique option that allows you to cut individual letters out of
tags and charm shapes. These can be placed together to form words.
Highlight a font from Options Menu
1
and press .
Use Keypad to select a letter. Use
2
to capitalize a letter.
Press to send to Machine. (See pg.
3
14 for more options.)
Page 13

EASY START BASICS
SPEED: 4
PRESSURE: 2
8"x8"
Cardstock L
H: 2.25" W: --" QTY: 1
Starter and Rockin’
Janie
SPEED: 4
PRESSURE: 2
8"x8"
Cardstock L
H: 2.25" W: --" QTY: 1
Starter and Rockin’
Janie
SPEED: 4
PRESSURE: 2
8"x8"
Cardstock L
Solid
Shadow
Tag
Charm
H: 2.25" W: 1.79" QTY: 1
Starter and Rockin’
Janie
SPEED: 4
PRESSURE: 2
8"x8"
Cardstock L
Solid
Shadow
Tag
Charm
H: 2.25" W: 1.68" QTY: 1
Starter and Rockin’
Janie
P
R
Setup
Space
P
R
Setup
Space
P
R
SPEED: 4
PRESSURE: 2
8"x8"
Cardstock L
Solid
Shadow
Tag
Charm
H: 2.25" W: 1.17" QTY: 2
Starter and Rockin’
Janie
Setup
Space
P
R
FONT SPACING AND LINE BREAKS
Font Spacing and Line Breaks: When using the negative space of the paper as a stencil, a non-cutting space and line
break can be added.
13
Press the key to add a space
1
between letters. A space character will
appear in the Display Window but will
not cut.
Press the key to add a line break
2
between letters. A return character will
appear in the Display Window but will
not cut.
ADDITIONAL FONT FEATURES
Additional Font Features add shortcuts and tricks to simplify using fonts.
Using Keypad to edit size
allows more exact sizes.
Height of a font is
measured by tallest
character.*
Lowercase letters cut in
proportion to selected
To cut several letters at once, use Keypad
to input letters in Selection Display. Press
and all letters will move up to Queue Display.
Press to cut. (See pg. 15 for more
information about the Queue.)
Fonts have two unique options of Tag and
Charm. Press then to select Tag or
Charm. The Tag or Charm will be cut at the size
selected with the letter smaller to fit within. (For
more options see pg. 14.)
alphabet size.
*Heights of other letters may vary.
BLUE AND RED ALT KEYS
The Keypad contains additional options beyond the standard alphabet. These can be accessed using the ALT Red Circle key
and the ALT Blue Rectangle key located on the Keypad.
Here is an example from the Rockin’ Janie font.
Not every Keypad option
is available for every
font.
For lowercase G, press
For capital G, press and
Numbers are created using ALT Red Circle key and second row of keys.
For Percent symbol,
press (ALT Red Circle key) and
For lowercase G option,
press (ALT Blue Rectangle key) and
Page 14

14
SPEED: 4
PRESSURE: 2
12"x12"
Cardstock L
Solid
Outline
Shadow
Pieces
H: 2.25" W: 2.73" QTY: 2
Starter and Rockin’
Janie
Starter and Rockin’
Janie
SPEED: 4
PRESSURE: 2
12"x12"
Cardstock L
Solid
Outline
Shadow
Pieces
H: 2.25" W: 2.86" QTY: 2
P
R
P
R
SPEED: 4
PRESSURE: 2
12"x12"
Cardstock L
Solid
Outline
Shadow
Pieces
H: 2.25" W: 2.67" QTY: 2
Starter and Rockin’
Janie
SPEED: 4
PRESSURE: 2
12"x12"
Cardstock L
Solid
Outline
Shadow
Pieces
H: 2.25" W: 2.72" QTY: 2
Starter and Rockin’
Janie
All
SPEED: 4
PRESSURE: 2
12"x12"
Cardstock L
Solid
Outline
Shadow
Pieces
H: 2.25" W: 2.72" QTY: 2
Starter and Rockin’
Janie
All
SPEED: 4
PRESSURE: 2
12"x12"
Cardstock L
Solid
Outline
Shadow
Pieces
H: 2.25" W: 2.72" QTY: 2
All
Starter and Rockin’
Janie
SPEED: 4
PRESSURE: 2
12"x12"
Cardstock L
Shadow
Pieces
Embellishment
H: 2.25" W: 2.42" QTY: 2
Starter and Rockin’
Janie
SPEED: 4
PRESSURE: 2
12"x12"
Cardstock L
Shadow
Pieces
Embellishment
H: 2.25" W: 2.42" QTY: 2
All
Starter and Rockin’
Janie
SPEED: 4
PRESSURE: 2
12"x12"
Cardstock L
Shadow
Pieces
Embellishment
H: 2.25" W: 2.42" QTY: 2
All
Starter and Rockin’
Janie
Setup
Space
P
R
Setup
Space
P
R
P
R
P
R
P
R
P
R
P
R
Beyond the Basics
BEYOND THE BASICS: Intermediate
For even more creative possibilities, use the Options Menu to modify basic shapes. Options vary by design, and not all
options are available on all shapes.
OPTIONS MENU
Sol i d: the shape fully filled in
without details.
Highlight shape and press to toggle to
Options Menu. Highlight Solid option.
Press to cut.
Pie c eS:
all parts of a design that individually comprise some shapes. This feature allows the option to cut separate pieces
of a selected shape.
outline: a hollow version of the
shape.
Use to scroll through Options
Menu. Highlight Outline option.
Sha d ow: proportionately larger solid
shape to layer behind an Original or
Solid shape.
Use to scroll through Options
Menu. Highlight Shadow option.
Highlight shape and press
1
Use to toggle to Selection Display. Highlight ALL or press to
2 3
to toggle to Options Menu.
Use to scroll through
Menu to highlight Pieces.
emb e lliShmentS:
additional pieces of a design available for some shapes. This feature allows the option to cut
additional pieces of a selected shape for decorative purposes.
Highlight shape.
1
Press to toggle to Options Menu.
2 3
Use to highlight Embellishment.
highlight a single piece. Press
to cut.
Press to toggle to Selection
Display. Highlight ALL or press
to highlight a single shape.
Press to cut.
Page 15

P
R
Setup
Space
P
R
6"
6" 12" 18" 24"
SPEED: 4
PRESSURE: 2
12"x12"
Cardstock L
Solid
Shadow
Border
H: 2.31" W: 6.00" QTY: 1
Starter and Rockin’
Janie
6"
SPEED: 4
PRESSURE: 2
12"x12"
Cardstock L
Solid
Shadow
Border
H: 2.31" W: 6.00" QTY: 1
6" 12" 18" 24"
Starter and Rockin’
Janie
6"
to edit size; to Esc
to apply changes; to QTY
H: 2.31" W: 6.00" QTY: 1
Starter and Rockin’
Janie
Starter and Rockin’
Janie
SPEED: 4
PRESSURE: 2
12"x12"
Cardstock L
Outline
Shadow
Pieces
H: 2.25" W: 1.51" QTY: 1
Starter and Rockin’
Janie
SPEED: 4
PRESSURE: 2
12"x12"
Cardstock L
Solid
Shadow
H: 2.25" W: 4.04" QTY: 1
Setup
Space
P
R
Setup
Space
P
R
P
R
P
R
SPEED: 4
PRESSURE: 2
12"x12"
Cardstock L
Solid
Shadow
Tag
Charm
H: 2.25" W: 1.79" QTY: 1
Starter and Rockin’
Janie
Setup
Space
P
R
P
R
H: 2.25" W: 2.95" QTY: 1
Starter and Rockin’
Janie
H: 2.25" W: 4.04" QTY: 1
Starter and Rockin’
Janie
to edit height to Esc
to apply to width
H: 2.25" W: 2.95" QTY: 1
Starter and Rockin’
Janie
suggested min
height=2.5"
Setup
Space
P
R
Setup
P
R
Setup
Space
P
R
beyond the basics
Bor d er: option on some shapes to create a repeated design in lengths of 6" (15.2cm), 12" (30.5cm), 18" (45.7 cm) or
24" (61.0 cm). An optional 24" Cutting Mat is needed to cut 18" and 24" Borders.
15
For shapes that include a Border option,
1
press to toggle to Options Menu.
Use to highlight Border option.
Press to toggle to Selection
2
Display. Press to highlight desired
Border length. Press to cut.
Note: Border size (height) cannot be
3
edited. To change quantity, press
and use to change
quantity.
ADD TO QUEUE
When cutting multiple shapes, the Machine can temporarily store a number of shapes into the Queue before modifying them
or cutting them all at once.
Highlight shape and press to add to
Queue. Shape will now appear in Queue
Display at top of screen.
You can also change the style, size or
21
quantity of any shape before adding it
to Queue.
For fonts, add all characters to
3
Selection Display and press
to add everything to Queue.
Shapes will remain in Queue when a cartridge is removed and another is inserted. This way, shapes from multiple cartridges
can be added to the Queue.
From Selection Display, press
1
to go to Queue Display.
Use to scroll through items in
2
Queue and highlight to edit. Press
to delete.
EDIT QUEUE
To edit size or quantity, press .
3
Page 16

16
Setup
Space
P
R
Setup
Space
P
R
Setup
Space
P
R
SPEED: 4
PRESSURE: 2
12"x12"
Cardstock L
Outline
Shadow
Pieces
H: 2.25" W: 1.51" QTY: 1
Starter and Rockin’
Janie
suggested min
height=4.0"
H: 4.00" W: 1.51" QTY: 1
Starter and Rockin’
Janie
to edit height to Esc
to apply to width
SPEED: 4
PRESSURE: 2
12"x12"
Cardstock L
Outline
Shadow
Pieces
H: 4.00" W: 2.68" QTY: 8
Starter and Rockin’
Janie
SPEED: 4
PRESSURE: 2
12"x12"
Cardstock L
Shadow
Pieces
Embellishment
H: 4.00" W: 4.30" QTY: 1
Starter and Rockin’
Janie
H: 4.00" W: 4.30" QTY: 4
Starter and Rockin’
Janie
to edit qty to Esc
to apply to width
SPEED: 4
PRESSURE: 2
12"x12"
Cardstock L
Shadow
Pieces
Embellishment
H: 5.49" W: 5.90" QTY: 4
Starter and Rockin’
Janie
Setup
Space
P
R
Setup
Space
P
R
Setup
Space
P
R
to see greeting options
for more options
SPEED: 4
PRESSURE: 2
12"x12"
Cardstock L
+ Greetings
+ Languages
+ Dimension
Version
Scoring Adj.
+ Sound
+ Cart. Name
+ Paper Saver
H: 2.25" W: 1.92" QTY: 1
to set as default
for more options
SPEED: 4
PRESSURE: 2
12"x12"
Cardstock L
+ Greetings
- Languages
English
Spanish
German
French
+ Dimension
Version
H: 2.25" W: 1.92" QTY: 1
Select artwork from category
to open category
for more options
SPEED: 4
PRESSURE: 2
12"x12"
Cardstock L
Flowers
Frames
Phrases
Rockin’ Janie.f
Shapes
H: 2.25" W: 1.92" QTY: 1
Setup
Space
P
R
Setup
Space
P
R
Setup
Space
P
R
beyond the basics
FUNCTION KEYS
At the top of the eclips Keypad is a row of ten Function keys. The following pages offer a brief summary of each Function key.
SETUP
SETUP allows you to change Greetings, Language, Dimensions, Sound and Cartridge Name appearance.
Setup
Press to view Setup Menu.
1 2 3
Use to scroll through
options.
FILL
Press to open a menu. Make
changes and press to apply.
Press at any time to return to
previous Selection display.
FILL takes the selected shape and automatically fills the material with as many as possible.
This function can also be used to cut multiple shapes from the Queue.
Highlight shape.
1 2 3
Press and edit size. Press to
apply changes or press to Escape.
Fill
Press and quantity automatically
changes to fill selected material size.
To ensure function works correctly, check material size.
FIT
FIT takes the selected shape(s) and automatically fits it inside the material to be cut. This function can also be
used for multiple shapes in Queue.
Highlight shape. Press and to edit quantity. Press
1 2 3
To ensure function works correctly, check material size.
Fit
Press and size automatically
to apply changes.
changes to fit selected material size.
Page 17

Setup
Space
P
R
to edit size; to Esc
to apply to width
suggested min
height=3.5"
H: 4.00" W: 4.00" QTY: 1
Starter and Rockin’
Janie
SPEED: 4
PRESSURE: 2
12"x12"
Cardstock L
H: 4.00" W: 4.00" QTY: 1
Starter and Rockin’
Janie
SPEED: 4
PRESSURE: 2
12"x12"
Cardstock L
Outline
Shadow
Pieces
H: 4.00" W: 4.00" QTY: 1
Starter and Rockin’
Janie
Setup
Space
P
R
Setup
Space
P
R
beyond the basics
Setup
Space
P
R
SPEED: 4
PRESSURE: 2
12"x12"
Cardstock L
Solid
Shadow
Tag
Charm
H: 2.25" W: 1.49" QTY: 1
Starter and Rockin’
Janie
SPEED: 4
PRESSURE: 2
12"x12"
Cardstock L
Solid
Shadow
Tag
Charm
H: 2.25" W: 1.49" QTY: 1
Starter and Rockin’
Janie
SPEED: 4
PRESSURE: 2
12"x12"
Cardstock L
Solid
Shadow
Tag
Charm
H: 2.25" W: 1.49" QTY: 1
Starter and Rockin’
Janie
Setup
Space
P
R
PIP (Picture in Picture) – takes the selected shape and encloses it inside of a circle, square, flower, star or any number of
shapes. These are easy to choose by scrolling through the Selection Display on the Handheld Remote Control.
17
PIP
Highlight design. Press to edit
1 2 3
Size. The size you select will be the size
of the outer shape. Press .
PIP
Press to view Picture in Picture
feature. Use to scroll through
shapes in Selection Display.
MIRROR displays the selected design or font in reverse.
Highlight design or font.
1 2
Mirror
Press to view a mirror image of
highlighted design or font.
Pressing Mirror key once = ON
Pressing again = OFF
Press to select. The inside design
will now cut out of the outside shape.
To turn off the feature, press .
MIRROR
Press to add mirror image to
3
Queue. When Mirror feature is turned
off, mirror image will remain in Queue.
PIP
Page 18

18
P
R
to edit height to Esc
to apply to width
suggested min
height=4.0"
H: 4.00" W: 3.63" QTY: 1
Starter and Rockin’
Janie
SPEED: 4
PRESSURE: 2
12"x12"
Cardstock L
Solid
Outline
Shadow
Pieces
H: 4.00" W: 4.84" QTY: 1
Starter and Rockin’
Janie
All
Actual = ON
Actual = OFF
Actual = ON
Setup
Space
P
R
beyond the basics
ACTUAL
ACTUAL ignores scale and instead sizes selected shape at
selected size not relative to accompanying shapes.
USING ACTUAL WITH SHAPES:
Press . Select a shape and then
1 2
select a size. Press .
USING ACTUAL WITH FONTS:
Actual
Pressing Actual key once = ON
Pressing again = OFF
Selected piece will be cut at the
selected size and not relative to other
shapes.
Actual: Off
1 2
LOAD/UNLOAD
LOAD/UNLOAD loads or unloads the Cutting Mat into or out of Machine using the Keypad.
LAST POINT
LAST POINT realigns the Cutting Blade at the last point before Cutting Mat was unloaded. Reload the Cutting Mat,
Last Pt.
press and the blade will align to begin cutting the next shape at the point where it ended. This function optimizes
the use of the cutting material.
Actual: On
You can also load/unload Cutting
Mat using the button on front right
side of Machine.
Page 19

REPEAT stores the last shape that was cut into the Queue.
Use keypad to enter search word
to enter highlighted word
to Esc search
SPEED: 4
PRESSURE: 2
12"x12"
Cardstock L
H: 3.75" W: 4.92" QTY: 1
sn
snow
snowflake
Use keypad to enter search word
to enter highlighted word
to Esc search
SPEED: 4
PRESSURE: 2
12"x12"
Cardstock L
H: 3.75" W: 4.92" QTY: 1
s
scroll filigree frame
simple scroll frame
skeleton
snow
snowflake
spring
SPEED: 4
PRESSURE: 2
12"x12"
Cardstock L
Solid
Shadow
Border
H: 3.75" W: 3.25" QTY: 1
Starter and Rockin’
Janie
Setup
Space
P
R
SPEED: 4
PRESSURE: 2
12"x12"
Cardstock L
Outline
Shadow
Pieces
H: 4.00" W: 2.68" QTY: 1
Starter and Rockin’
Janie
Starter and Rockin’
Janie
SPEED: 4
PRESSURE: 2
12"x12"
Cardstock L
Solid
Shadow
H: 4.19" W: 5.50" QTY: 1
Starter and Rockin’
Janie
SPEED: 4
PRESSURE: 2
12"x12"
Cardstock L
Solid
Shadow
H: 4.19" W: 5.50" QTY: 1
SPEED: 4
PRESSURE: 2
12"x12"
Cardstock L
H: 3.75" W: 3.25" QTY: 1
to select speed options
for more options; Esc
P
R
P
R
Setup
Space
P
R
SPEED: 7
H: 3.75" W: 3.25" QTY: 1
to change speed 1-9
to select; to Esc
Setup
Space
P
R
advanced
REPEAT
19
Select and cut a shape. Press
1
Repeat Repeat
and same shape will appear in Queue
again.
SEARCH lets you search through a cartridge to find a particular shape.
Press . Use the Keypad to input
1 2 3
Search
letters until your selection appears in
the list. Press to scroll
through list.
It is also possible to select other shapes
2 3
and add them to Queue.
Searches can also be conducted by
inputting the first letter of word. An
alphabetical list is generated.
Press again and last cut shape
will appear in Queue again.
SEARCH
Press on highlighted word. Shapes
that fit your Search criteria appear in
Selection Display.
advanced
Beyond the basic and intermediate settings, the advanced settings provide more access and more control to Speed,
Pressure, Scoring and Laser settings, as well as allow a number of advanced cutting options in the Pop-Up Menu. Please
note: material option will change to Custom on the screen as material settings are manually changed.
For even more control of cutting various materials, the Speed Option allows manual adjustment of cutting speed to
produce the best result.
Scroll up in the Options Menu and
1 2
highlight Speed. Press .
When cutting lighter materials or simple shapes, increase cutting speed.
For thicker materials or more intricate cuts, decrease cutting speed.
SPEED SETTINGS
Higher number =
Faster cutting speed.
Lower number =
Slower cutting speed.
Enter a number between 1 and 9 using
Keypad or and press
to apply. Material now appears as Custom.
Page 20

20
SPEED: 7
PRESSURE: 2
12"x12"
CUSTOM
H: 3.75" W: 3.25" QTY: 1
to select pressure options
for more options Esc
PRESSURE: 4
H: 3.75" W: 3.25" QTY: 1
to change pressure 1-6
to select Esc
Setup
Space
P
R
P
R
P
R
Setup
Space
P
R
P
R
Setup
Space
P
R
P
R
Setup
Space
P
R
SPEED: 7
PRESSURE: 2
12"x12"
CUSTOM
+ Greetings
+ Languages
+ Dimension
Version
Scoring Adj.
+ Sound
+ Cart. Name
+ Paper Saver
H: 3.75" W: 3.25" QTY: 1
Adjust scoring pressure value ID
specify: 5
SPEED: 7
PRESSURE: 2
12"x12"
CUSTOM
+ Greetings
+ Languages
+ Dimension
Version
Scoring Adj.
+ Sound
+ Cart. Name
+ Paper Saver
H: 3.75" W: 3.25" QTY: 1
advanced
PRESSURE SETTINGS
This option controls how hard the blade presses through the material to be cut. Pressure settings should be varied relative
to the material being used. For example, copy paper and vinyl generally work well at settings of 1 or 2. Cardstock and
vellum work best at 2 to 4, depending on material. Shrink film and light chipboard work best between 5 and 6.
Also check your blade
depth to ensure it is
adjusted to the
appropriate material.
Higher number =
Greater pressure.
Lower number =
Lesser pressure.
Scroll down to highlight Pressure.
1 2
Press .
SCORING ADJUSTMENT
Designs on some cartridges contain easy scoring lines for simple folding. These lines are indicated with a dotted line in
the Display Window.
Scoring adjustment should be varied relative to the material being used. (The age of the blade also affects the scoring quality.)
If the default setting is not scoring deeply enough for a clean fold, the depth should be increased to a higher number.
If the material has been cut along the scoring lines, then the scoring depth should be set to a lower number.
Press on Keypad. Press
1 2
Setup
to highlight Scoring Adj. Press .
ADJUSTING FOR THE PERFECT CUT
To make cutting easy, the Machine has preset adjustments for various materials that may be selected. Choose a material,
and the Pressure and Speed (and Scoring on selected designs) are automatically adjusted for you.
However, since there are so many options of material thicknesses, the Machine gives you the ability to manually adjust
settings for the perfect cut (see pg. 19 for details). We suggest that you begin with the preset options and do a test cut
on a similar weighted material.
Some other general cutting guidelines to keep in mind:
Enter a number between 1 and 6 using Keypad
or and press to apply.
Material now appears as Custom.
Check that your correct
material type is selected
in the Options Menu.
Higher number =
deeper scoring.
Lower number =
lighter scoring.
Enter a number between 1 and 9 using
Keypad or and press
to apply.
• If material wrinkles as it cuts, then Speed should be manually set at a slower, lower number. Material will also wrinkle
if Cutting Mat has lost its adhesion. In this case, replace the Cutting Mat.
• If material is not cutting all the way through, try increasing Pressure or Blade Depth number.
• If material appears scraped or bruised near Blade, try decreasing Pressure.
• If shape being cut is simple, try increasing Speed.
• If shape is highly detailed, try decreasing Speed.
• Adjust the Blade Depth for a deeper or shallower cut (see pg. 6 for details).
• For optimal results, try a test cut first and make necessary adjustments to settings before making final cut.
Page 21

advanced
P
R
to hide paper saver options
for more options
SPEED: 7
PRESSURE: 2
12"x12"
CUSTOM
+ Greetings
+ Languages
+ Dimension
Version
Scoring Adj.
+ Sound
+ Cart. Name
+ Paper Saver
H: 3.00" W: 1.82" QTY: 1
to set as default
for more options
SPEED: 7
PRESSURE: 4
12"x12"
CUSTOM
+ Dimension
Version
Scoring Adj.
+ Sound
+ Cart. Name
- Paper Saver
On
Off
H: 3.00" W: 1.82" QTY: 1
Paper Saver = ON
Space saved with
Paper Saver
Paper Saver = OFF
Setup
Space
P
R
PRP
R
Setup
Space
P
R
Setup
Space
P
R
BLADE & MATERIAL POSITIONING
Up Vertical
The Blade Positioner Control (shown here) controls the positioning
of the Cutting Blade in the four directions indicated.
Left
Horizontal
Right
Horizontal
Top left corner of material must be perfectly
aligned to top left corner of Cutting Mat for
blade guidance system to work properly.
Down Vertical
To move slowly, press and hold directional arrows.
To move quickly, press twice quickly and hold.
PAPER SAVER
By default, shapes and fonts cut from the queue are aligned along a base line, which allows the paper to be used as a
stencil. The Paper Saver option aligns the tops of the designs for more economical paper use.
21
Setup
Press on Keypad. Press
1 2
to highlight Paper Saver. Press
USING PAPER SAVER WITH FONTS:
Paper Saver: Off
Press to select “On” and press
Press to Escape.
Paper Saver: On
Page 22

22
SPEED: 4
PRESSURE: 3
12"x12"
Cardstock M
H: 3.00" W: 3.00" QTY: 1
to select material size; to Esc
for more options
SPEED: 4
PRESSURE: 3
12"x12"
Cardstock M
H: 3.00" W: 3.00" QTY: 1
to select Custom Dimensions
for more options; to Esc
12"x12"
8 1/2" x 11"
8"x8"
6"x6"
A4
12"x24"
Dimensions
Laser
SPEED: 4
PRESSURE: 3
12"x12"
Cardstock M
H: 3.00" W: 3.00" QTY: 1
Place top left corner of material on the
Blade Starting Point of cutting mat
to continue
12"x12"
8 1/2" x 11"
8"x8"
6"x6"
A4
12"x24"
Dimensions
Laser
Setup
Space
P
R
Setup
Space
P
R
Setup
Space
P
R
SPEED: 4
PRESSURE: 3
D6.35 x0 "
Cardstock M
H: 3.00" W: 3.00" QTY: 1
Use keypad to enter material width
to continue
12"x12"
8 1/2" x 11"
8"x8"
6"x6"
A4
12"x24"
Dimensions
Laser
SPEED: 4
PRESSURE: 3
D6.35x7.62"
Cardstock M
H: 3.00" W: 3.93" QTY: 1
Starter and Rockin’
Janie
Solid
Shadow
Setup
Space
P
R
to start Laser Calibration
for more options
SPEED: 4
PRESSURE: 3
12"x12"
Cardstock M
+ Languages
+ Dimension
Version
Scoring Adj.
+ Sound
+ Cart. Name
+ Paper Saver
Laser
H: 3.00" W: 3.00" QTY: 1
to cut the x
Esc
SPEED: 4
PRESSURE: 3
12"x12"
Cardstock M
+ Languages
+ Dimension
Version
Scoring Adj.
+ Sound
+ Cart. Name
+ Paper Saver
Laser
H: 3.00" W: 3.00" QTY: 1
Move laser to center of the X
and press . Esc
SPEED: 4
PRESSURE: 3
12"x12"
Cardstock M
+ Languages
+ Dimension
Version
Scoring Adj.
+ Sound
+ Cart. Name
+ Paper Saver
Laser
H: 3.00" W: 3.00" QTY: 1
P
R
Setup
Space
P
R
Setup
Space
P
R
Setup
Space
P
R
advanced
LASER CALIBRATION SETUP
To ensure that Cutting Blade and Laser are aligned, a one-time, initial calibration may need to be performed.
Setup
Press on Keypad. Press
1
to highlight Laser. Press .
DIMENSIONS SETTING
This option lets you input the width and length of material to be cut so that Machine will cut to custom size.
Press on Blade Positioner Control to
2
cut a small X on your material.
Use Blade Positioner Control to move
3
laser point to center of small X.
Press . Press twice to Escape.
In Options Menu, select material size
1 2 3
option.
Use Keypad to enter width. Press .
4 5
Enter height and press .
Scroll down and press to select
Dimensions.
Move Cutting Blade to top left of material.
The machine will now keep the size of the
design within the dimensions given.
Place top left corner of material on
Blade Starting Point in top left corner
of Cutting Mat. Load Cutting Mat into
Machine. Press .
Page 23

ADVANCED
SPEED: 4
PRESSURE: 3
12"x12"
Cardstock M
H: 3.00" W: 3.93" QTY: 1
to select Laser Dimensions
for more options; to Esc
12"x12"
8 1/2" x 11"
8"x8"
6"x6"
A4
12"x24"
Dimensions
Laser
Setup
Space
P
R
Setup
Space
P
R
SPEED:4
PRESSURE: 3
12"x12"
Cardstock M
H: 3.00" W: 3.93" QTY: 1
Use Blade Navigator to move laser
position to lower right of material
to select
12"x12"
8 1/2" x 11"
8"x8"
6"x6"
A4
12"x24"
Dimensions
Laser
SPEED: 4
PRESSURE: 3
12"x12"
Cardstock M
H: 3.00" W: 3.93" QTY: 1
Use Blade Navigator to move laser
position to upper left of material
to select
12"x12"
8 1/2" x 11"
8"x8"
6"x6"
A4
12"x24"
Dimensions
Laser
Setup
Space
P
R
SPEED: 4
PRESSURE: 3
L7.92"x5.63"
Cardstock M
H: 3.00" W: 3.93" QTY: 1
to select material size; to Esc
for more options
suggested min
height=2.5"
H: 3.00" W: 5.39" QTY: 1
to edit height; to Esc
to apply changes; to width
Starter and Rockin’
Janie
Setup
Space
P
R
Setup
Space
P
R
Setup
Space
P
R
LASER SETTING
This option allows further customizing of material size. Use this option when cutting an odd-sized (i.e., scrap) piece of
material or when wanting to confine a design to one area of the material. Just input top left corner and bottom right
corner of area to be cut. The Machine will now stay within this area.
Blade Holder
Laser Point
23
Place custom-size material at upper left
1 2
corner of Cutting Mat. Load Cutting
Mat into Machine.
Use Blade Positioner Control to place
4
Laser light on upper left corner of
desired cutting area of material.
Press to select.
In the Options Menu, select material size
option. Press to select Laser.
The Laser light is located left of Cutting
3
Blade Holder and will appear as a red dot
on material to indicate where Blade will cut.
Move Laser light to the lower right corner of desired cutting area of material and press .
5
This directs Machine to stay within specified dimensions.
The custom dimension now appears
6
as material size. Press and select
a design. The Machine will cut within
specified dimensions.
Press to open the Pop-Up Menu to reveal several advanced cutting functions. The items in the Pop-Up Menu can
be selected with either and or with a “hot key” by pressing the underlined letter in each item. To
exit the Pop-Up Menu, press at any time.
If you edit shape size larger than material
7
dimensions, the Machine will revise size
to the largest possible to fit.
POP-UP MENU
Page 24

24
Clamp
Blade Holder
Setup
Space
P
R
SPEED: 4
PRESSURE: 2
12"x12"
Cardstock L
Solid
Shadow
Pieces
Embellishment
H: 3.00" W: 2.59" QTY: 1
Starter and Rockin’
Janie
SPEED: 4
PRESSURE: 2
12"x12"
Cardstock L
Solid
Shadow
Pieces
Embellishment
H: 3.00" W: 2.59" QTY: 1
Starter and Rockin’
Janie
Add to Favs
Blade Holder
Center Point
Double Cut
Laser Cut Preview
Pen Holder
Print 2 Cut
Rotate
SPEED: 4
PRESSURE: 2
12"x12"
Cardstock L
Solid
Shadow
Pieces
Embellishment
H: 3.00" W: 2.59" QTY: 1
Starter and Rockin’
Janie
Select artwork from category
to open category
for more options
SPEED: 4
PRESSURE: 2
12"x12"
Cardstock L
FAVORITES
Flowers
Frames
Phrases
Rockin’ Janie.f
Shapes
H: 3.00" W: 2.59" QTY: 1
SPEED: 4
PRESSURE: 2
12"x12"
Cardstock L
Solid
Shadow
Pieces
Embellishment
H: 3.00" W: 2.59" QTY: 1
Starter and Rockin’
Janie
SPEED: 4
PRESSURE: 2
12"x12"
Cardstock L
Solid
Shadow
Pieces
H: 3.00" W: 3.54" QTY: 1
Starter and Rockin’
Janie
Setup
Space
P
R
P
R
Setup
Space
P
R
Setup
P
R
Setup
Space
P
R
SPEED: 2
PRESSURE: 1
12"x12"
Pen - Marker
H: 3.00" W: 2.59" QTY: 1
Starter and Rockin’
Janie
Flowers
Frames
Phrases
Rockin’ Janie.f
Shapes
to open category
for more options; to Esc
Select artwork from category
Add to Favs
Blade Holder
Center Point
Double Cut
Laser Cut Preview
Pen Holder
Print 2 Cut
Rotate
SPEED: 4
PRESSURE: 2
12"x12"
Cardstock L
H: 3.00" W: 2.59" QTY: 1
Flowers
Frames
Phrases
Rockin’ Janie.f
Shapes
to open category
for more options
Select artwork from category
P
R
Setup
Space
P
R
P
R
ADVANCED
ADD TO FAVS
To easily locate a shape again and again, there’s no need to search through the cartridge every time to find it. Just add it
to your Favorites! (Please note: Favorites are saved to cartridge, not Machine.)
TO ADD TO FAVORITES
Highlight favorite shape and press
1 2 3
to go to Pop-Up Menu.
Make sure Add to Favs is highlighted. Press to add shape to FAVORITES
folder. Selection is added when Pop-Up
Menu disappears.
TO EDIT OR CUT FROM FAVORITES
Press to return to Options Menu
1 2 3
where a FAVORITES category
now appears. Use to scroll
up to FAVORITES. Press .
Designs that were selected in Add to
Favs now appear in Selection Display.
To cut, highlight and press .
To delete shape from FAVORITES,
press to highlight. Press
on Keypad.
BLADE HOLDER
Selecting this function will toggle from the Pen Holder function (see pg. 26) to using a cutting blade.
1
Remove the Pen Holder from the clamp
and replace with the Blade Holder (see
pg. 7).
Press . Press to highlight and
2 3
to select, or press to select
Blade Holder.
The blade settings will revert to the
last speed and pressure settings used
before the Pen Holder was selected.
Page 25

ADVANCED
SPEED: 4
PRESSURE: 2
12"x12"
Cardstock L
Shadow
Pieces
Embellishment
H: 5.00" W: 5.38" QTY: 1
Starter and Rockin’
Janie
All
SPEED: 4
PRESSURE: 2
12"x12"
Cardstock L
Shadow
Pieces
Embellishment
H: 5.00" W: 5.38" QTY: 1
Starter and Rockin’
Janie
All
Add to Favs
Blade Holder
Center Point
Double Cut
Laser Cut Preview
Pen Holder
Print 2 Cut
Rotate
Setup
Space
P
R
SPEED: 4
PRESSURE: 2
12"x12"
Cardstock L
Center Point
Shadow
Pieces
H: 2.00" W: 1.64" QTY: 1
Starter and Rockin’
Janie
All
SPEED: 4
PRESSURE: 2
12"x12"
Cardstock L
Center Point
Shadow
Pieces
Embellishment
H: 5.00" W: 5.38" QTY: 1
Starter and Rockin’
Janie
All
P
R
P
R
CENTER POINT
This function makes it easy to center a shape inside (or around) another shape or within a particular area of a shape. Have
fun with this function and discover its countless options!
Blade Holder
Laser Point
25
Select the desired shape, as well as its
1 2
size and options.
Press . Press to highlight and
to select, or press to select
The Laser will turn on next to the Blade
3
Holder in the Machine.
Center Point.
Center Point
”Center Point” will appear on the
4
screen.
Move laser to desired center of shape.
5
Press to cut the shape. At the end
of the cut, the laser will return to the
center point of the shape.
Only one shape can be
added to the Queue at
a time while using
Center Point.
Use Laser Cut Preview
(see pg. 26) to ensure
your cut will fit in the
area desired.
To cut another shape, select the shape
6
and press . The shape will use the
same center point as the previous shape
unless you move the laser.
Center Point is active
until turned off in Pop-Up
Menu by selecting Center
Point again.
Select this function when using thick materials or intricate designs that may not be completely cut through.
Cut the shape as normal, then move the cut shape with the Blade Positioner Control just enough to check the cut. If the cut
is not completely through the material, select Double Cut from the Pop-Up Menu to cut exactly over the previous cut. This
option may be used as many times as necessary to completely cut through the material.
Do not remove Cutting Mat from Machine before using Double Cut.
DOUBLE CUT
Page 26

26
SPEED: 4
PRESSURE: 2
12"x12"
Cardstock L
H: 5.00" W: 5.38" QTY: 1
Flowers
Frames
Phrases
Rockin’ Janie.f
Shapes
to open category
for more options
Select artwork from category
Starter and Rockin’
Janie
Pen Holder
- Pen Marker
- Pen Ball Point
- Pen Glue
SPEED: 2
PRESSURE: 1
12"x12"
Pen - Marker
H: 5.00" W: 5.38" QTY: 1
Flowers
Frames
Phrases
Rockin’ Janie.f
Shapes
to open category
for more options
Select artwork from category
Setup
Space
P
R
P
R
P
R
P
R
Pen Holder
Clamp
SPEED: 2
PRESSURE:1
12"x12"
Pen - Marker
Solid
Outline
Shadow
Pieces
H: 5.00" W: 6.05" QTY: 1
Starter and Rockin’
Janie
ADVANCED
LASER CUT PREVIEW
This function lets you preview the shape selected before cutting by using a laser to illustrate the path of the shape onto
the material. Watch as the laser moves across the material. If the laser crosses over an area previously cut or over the edge
of the paper, adjust the start point or image size.
Have Machine lid open during Laser Cut Preview.
PEN HOLDER
Selecting this function changes the speed and pressure settings so that most types of pens can be used with the Pen Holder
(sold separately) in the eclips Machine.
The Marker settings use the least pressure and can be used for felt tip markers or soft lead pencils. The Ball Point settings
use medium pressure and work with most types of ballpoint pens. The Glue settings use heavy pressure for plunger-type
writing tools like glue pens.
Press . Press to highlight
1 2
and to select, or press to
open pen options.
Select the desired shape and press
4
to draw.
If Pen Holder function is not used, the pen will be pushed into the Cutting Mat and
will be ruined.
Select the appropriate pen type with
either or the “hot key.” The pen
type selected now appears as the mate-
rial type selection in the Options Menu.
Remove the Blade Holder from the
3
Clamp and replace with the Pen Holder.
Page 27

ADVANCED
SPEED: 4
PRESSURE: 2
12"x12"
Cardstock L
Solid
Shadow
H: 7.25" W: 9.51" QTY: 1
Starter and Rockin’
Janie
Setup
Space
P
R
SPEED: 4
PRESSURE: 2
12"x12"
Cardstock L
Solid
Shadow
H: 7.25" W: 9.51" QTY: 1
Starter and Rockin’
Janie
Add to Favs
Blade Holder
Center Point
Double Cut
Laser Cut Preview
Pen Holder
Print 2 Cut
Rotate
P
R
P
R
Setup
Space
P
R
Setup
Space
P
R
PRINT2CUT
This function must be used with the eclips Print2Cut Creative Software (sold separately) on your home computer and
printed with your home printer.
27
Place printed paper on Cutting Mat
1 2
with registration marks on left side of
shape. Load Mat into Machine.
Select same shape on eclips Machine. To
cut around the printed shape and leave
the interior intact, choose Solid, Shadow
or Outline.
Press . Press to highlight and
3
to select, or press twice
to select Print2Cut. The laser will turn
on next to the Blade Holder in the
Machine.
Use Blade Positioner Control to move
4
the laser to the top left registration mark
on the material and press .
Use Blade Positioner Control to move
5
the laser to the lower left registration
mark on the material and press .
Press to cut the shape.
If more than one shape is printed on material, select shape and options and press Cut.
Follow steps 4 & 5.
Print2Cut and Center Point function cannot be used simultaneously.
Print2Cut is active until turned off in Pop-Up Menu by selecting Print2Cut again.
Page 28

28
P
R
R
Setup
Space
P
R
Setup
Space
P
R
Starter and Rockin’
Janie
SPEED: 4
PRESSURE: 2
12"x12"
Cardstock L
Outline
Shadow
Pieces
H: 4.00" W: 2.68" QTY: 1
Add to Favs
Blade Holder
Center Point
Double Cut
Laser Cut Preview
Pen Holder
Print 2 Cut
Rotate
Starter and Rockin’
Janie
SPEED: 4
PRESSURE: 2
12"x12"
Cardstock L
Rotate: (54˚)
Outline
Shadow
Pieces
H: 4.00" W: 2.68" QTY: 1
Starter and Rockin’
Janie
SPEED: 4
PRESSURE: 2
12"x12"
Cardstock L
Rotate: (54˚)
Outline
Shadow
Pieces
H: 4.00" W: 2.68" QTY: 1
Setup
Space
P
R
ADVANCED
ROTATE
This function rotates an image up to 360 degrees to save paper, to change PIP orientation or to align cutting on patterned
paper, just to name a few uses!
Press . Press to highlight
1
and to select, or press to
select Rotate.
Press to rotate the shape in
2
45-degree increments.
OR
Press to apply.
3
Press to rotate the shape
in 1-degree increments.
OR
Use the Keypad to select the exact
rotation from 0 to 360 degrees.
The Main Display and Queue Display will show the rotated shape.
Rotate can be used with the Center Point function.
Page 29

FREQUENTLY ASKED QUESTIONS
Setup
Space
P
R
FREQUENTLY ASKED QUESTIONS
• What types of materials does the eclips Machine cut?
The eclips is designed to cut a wide range of materials – from paper, vinyl, construction paper, cardstock (light, medium and
heavy), adhesive cardstock (light, medium and heavy), vellum and light chipboard.
• What is the cutting range of the eclips?
The eclips cuts thousands of shapes ranging in sizes from approximately .01" (.025cm) to 24" (61.0cm). The Cutting Mats allow
you to cut paper sizes up to 12" x 12" (30.5cm x 30.5cm) or 12" x 24" (30.5cm x 61.0cm).
• How long does an eclips Cutting Blade last?
Each Cutting Blade typically lasts for 2,500 inches (6,350cm) worth of cuts, depending on the types of materials cut.
• Do I need a surge protector for my eclips?
A surge protector is recommended to protect your investment.
• How do I get power to the eclips?
Please make sure that all connections are secure and that Machine is connected to a functioning power outlet.
• How do I insert and remove the Cutting Mat?
Open Machine cover and extend tray. (The Cutting Mat can also be loaded with Machine cover closed.) Align top edge of
Cutting Mat against rollers and push Load button on front right side of Machine. The Machine’s roller will start to rotate.
To remove Cutting Mat, push Load button again. You can also load/unload by pressing Load/Unload button on Handheld
Remote Control Keypad.
29
• How can more intricate cuts be easily removed from the Cutting Mat?
The set of useful tools in the Tool Kit (sold separately) helps enhance shapes and ensures easy removal from Cutting Mat.
• Why can’t I change the quantity when I’ve selected FILL?
When using FILL, you cannot change the quantity because the eclips will automatically calculate the quantity of shapes based on
size of material entered and size of shape.
• Why doesn’t shape I’ve selected have a Pieces or Embellishments option?
Not all designs have Pieces or Embellishment options.
• How do I try a new search?
If a search has been unsuccessful, press to begin a new one.
• If I erase a shape from FAVORITES, will it be deleted from the cartridge?
If you erase a shape from the FAVORITES folder, it will only be removed from this folder. To find this item again, look in its
original location in the respective artwork folder.
• Where are Add to Favs stored?
Your selected favorites are stored in the cartridge that was used when Add to Favs was pressed. This helps save numerous
favorites on many different cartridges. To see our wide selection of cartridges, visit Sizzix.com.
• Why did shape size change after I input my material size?
If the shape size is larger than material size, the machine will reset shape size to largest possible on the given material size.
You can either reduce shape size or enlarge material size.
• I have several designs in my Queue. How will I know if they will all fit on my material size?
If the designs in your Queue are too large to fit on material, the Machine will prompt you to use more than one sheet to continue.
• How do I get back to the place I last cut?
If your Cutting Mat has been unloaded, then reload your Cutting Mat and press Last Point. If you have moved your Cutting Blade
away from the place you last cut, simply press Last Point.
For Tips & Tricks, software updates and more, visit Sizzix.com.
Page 30

30
Clamp Screw
Blade Ejection Pin
Blade
Non-cutting side
MAINTENANCE
MAINTENANCE
CUTTING BLADE MAINTENANCE
CLEANING THE CUTTING BLADE
CAUTION: Always unplug Machine before removing or installing Blade Holder.
After prolonged use, the Cutting Blade may not cut as it once did and may be in need of cleaning. To help prolong the
life of the Cutting Blade, remove it from Blade Holder and clean with Isopropyl alcohol (rubbing alcohol) poured onto
a clean paper towel. Remove any material fragments collected inside Cutting Blade Holder by using Blade Pick from
optional Tool Kit. Visit Sizzix.com to see complete selection of accessories.
ADJUSTING THE CUTTING BLADE DEPTH
CAUTION: CUTTING HAZARD Blade is sharp, handle with care.
WARNING: CHOKING HAZARD Small parts. Keep away from children.
Printed on a ring around the Blade Holder top are Blade Depth Settings ranging from 1 to 6. These numbers may be
selected individually by turning the wheel to the number relative to the material you are using. Refer to pg. 21 for a
more detailed description of how to adjust for the perfect cut.
REPLACING THE CUTTING BLADE
CAUTION: CUTTING HAZARD Keep fingers away from exposed blade.
Loosen Blade Holder clamp by turning
1 2 3
Clamp Screw counterclockwise.
Remove Blade Holder.
Push down on Blade Ejection Pin to
reveal Blade. Carefully remove and
discard used blade.
Carefully insert new Blade into hole at
bottom of Blade Holder. Blade is held in
place magnetically. Replace Blade Holder
as shown on pg. 7.
Page 31

MAINTENANCE
CLEANING THE MACHINE
CLEANING YOUR ECLIPS SYSTEM COMPONENTS
CAUTION: Always unplug Product before cleaning.
CLEANING THE MACHINE
Over time, and due to normal use, the Machine may become dirty or dusty.
To clean, use only Isopropyl alcohol (rubbing alcohol) poured onto a clean paper towel. Do not pour liquid onto the
Machine. Rub over the Machine Cover and Cutting Blade Track until it evaporates. Remove any material fragments col-
lected around the Cutting Blade and Blade Track. Use cotton swabs to get into areas the paper towel doesn’t reach.
With clean, dry paper towel, wipe off any residue.
It is a good idea to clean the Machine every time the Cutting Mat is changed. Never use bleach, solvents or abrasive
cleaners on the Machine.
31
CLEANING THE CUTTING MAT
Use the Spatula, available separately, to remove debris from the Cutting Mat and maintain the sticking ability of the
Cutting Mat surface.
CLEANING THE HANDHELD REMOTE CONTROL
Over time, and due to normal use, the Handheld Remote Control may become dirty or dusty. To clean, use only
Isopropyl alcohol (rubbing alcohol) poured onto a clean paper towel. Do not pour liquid directly onto the Machine.
Rub over the Handheld Remote Control until it evaporates. Use cotton swabs to get into areas the paper towel doesn’t
reach. With clean, dry paper towel, wipe off any residue. Never use bleach, solvents or abrasive cleaners on the
Handheld Remote Control or LCD screen.
CLEANING THE LCD SCREEN
Use 50% distilled water and 50% Isopropyl alcohol (rubbing alcohol) mixture to clean the LCD screen. Place solution on
cloth (a microfiber cloth is ideal) and gently clean screen.
CLEANING THE HANDHELD REMOTE CONTROL CRADLE
To clean, use only Isopropyl alcohol (rubbing alcohol) poured onto a clean paper towel and rub over the Remote
Control Cradle until it evaporates. Use cotton swabs to get in to areas the paper towel doesn’t reach. With clean,
dry paper towel, wipe off any residue. Never use solvents, bleach or abrasive cleaners on the Remote Control Cradle.
Page 32

32
TROUBLESHOOTING
TROUBLESHOOTING
• Problem: Machine is not cutting with its usual pristine quality.
Try this: Your Cutting Blade may be worn and need replacing (see pg. 25).
Or this: Choose only the material type that corresponds with the material you are using from the list of recommended materials
accessed from the eclips Handheld Remote Control.
Or this: If you are using a material not listed on the Options Menu, you can manually change the Speed, Pressure and Blade
Depth to customize the Machine to cut through your desired material. Please note that not all materials will be compatible with
the Machine.
• Problem: Cutting Blade does not cut all the way through material.
Try this: Make sure Cutting Blade is installed properly (see pg. 7).
Or this: Make sure material to be cut is from list of recommended materials accessed from Handheld Remote Control.
Or this: Increase cutting pressure or decrease cutting speed (see pg. 20). If Blade does not cut through the recommended
material, the Blade is in need of adjustment (see pg. 6) or replacement (see pg. 25).
• Problem: The corners of the cutouts are wrinkled.
Try this: If your corners are wrinkling when using any of the recommended materials accessed, then your blade may need to be
replaced for a sharper cut. Other possibilities for a wrinkled cut include:
• Cutting Mat has lost its adhesion
• Pressure setting is too high (change to a lower number for lesser pressure)
• Speed setting is too fast (change speed to a slower, lower number)
• the Blade Depth setting is too high (change Blade Depth to a lower number)
• Problem: Machine is cutting outside of paper.
Try this: Use the Cut Preview button to preview the image to be cut and to see how it will fit on the size of paper you are
working with.
Or this: Use Blade Positioner Control to move Blade to starting cutting position at upper left corner of material.
• Problem: Material keeps shifting from its original position during cutting.
Try this: If your material is no longer adhering to the Cutting Mat, it is time to replace the Cutting Mat.
Or this: If you are using a material that has an adhesive side covered by a protective, slippery backing, turn it with the adhesive
side facing up so that the material can better adhere to Cutting Mat. Be sure to use Mirror feature to reverse artwork to proper
orientation.
• Problem: eclips system will not turn on.
Try this: Unplug system from wall outlet before troubleshooting. Make sure all components and connectors are plugged in
properly (see pg. 6). When everything is connected, plug system into wall outlet and press power ON.
• Problem: Nothing shows on Handheld Remote Control screen.
Try this: Make sure power is off and the USB cable is plugged into the Handheld Remote Control and Machine. Now press power ON.
• Problem: eclips Machine freezes up.
Try this: Turn off Machine and restart.
• Problem: Material does not stick to Cutting Mat.
Try this: Remove clear protective sheet from Cutting Mat. Using the Spatula included in the optional Tool Kit, make sure all
debris has been removed from the Cutting Mat. Align material to top left corner of Cutting Mat and press into place across
entire Cutting Mat. If material will not stick to Cutting Mat, it is time to replace it. (Cutting Mat can become worn and lose
sticking ability if in regular use for 4−6 months or sooner if used extensively.*)
• Problem: Cutting Mat will not load into Machine.
Try this: The built-in Cutting Mat sensor may not recognize the Cutting Mat being inserted. Make sure all edges of Cutting Mat
are flat and uncurled before inserting against rollers and pushing the Load button on front right side of Machine.
(Load/Unload can also be accessed on Handheld Remote Control Keypad.)
• Problem: Cutout from Cutting Mat cannot be removed.
Try this: Make sure to use the Spatula when removing your cutouts from Cutting Mat.
For latest updates to User's Manual, please visit Sizzix.com.
* Results based on factory life test data. Your results may vary.
Page 33

END USER LICENSE AGREEMENT
END USER LICENSE AGREEMENT
33
ECLIPS™ ELECTRONIC SHAPE-CUTTING
MACHINE,
HANDHELD REMOTE CONTROL AND
DESIGN/FONT CARTRIDGES
Ellison Educational Equipment, Inc., doing business as
Sizzix (“Sizzix”) is willing to grant to you a license to use
the eclips™ Electronic Shape-Cutting Machine, Handheld
Remote Control and any Design/Font Cartridges (the
“Product”) subject to your acceptance of the following
terms and conditions. Please read the terms of this
Agreement carefully. Your use of the Product or any
components will constitute acceptance of the terms of this
Agreement. If you do not agree to these terms, you may
not use the Product and you should contact Sizzix for
instructions regarding the return of the Product.
1. License. Subject to the terms of this Agreement, Sizzix
hereby grants you a non-exclusive, non-transferable,
royalty-free, limited license to use the Product and
any associated components, software, firmware, and
documentation for personal, non-commercial purposes
solely in connection with the use of the Product for
its intended purpose as described in the applicable
documentation. You may assign this license only as part
of a sale or transfer of the Product and all components,
and only if the recipient agrees to comply with the terms
of this Agreement. Your rights under this Agreement will
terminate upon such assignment.
2. Restrictions. Except to the extent expressly permitted
under applicable law, you may not reverse engineer,
decompile, or otherwise attempt to make a copy of,
or publish, the software, firmware or documentation
included with the Product. Sizzix retains ownership of
the Product design and associated software, firmware
and documentation, together with all related intellectual
property rights, subject only to the limited rights granted
to you in this Agreement. No right to use Sizzix, eclips
or any other brand of Ellison Educational Equipment is
granted under this Agreement. You agree to comply with
all export laws and regulations applicable to the Product
and its components.
3. Warranty. e product is subject to the Limited
Warranties included in the Product documentation, which
is hereby incorporated into this Agreement.
4. General. is agreement is governed by the laws
of the State of California. All disputes relating to
the Product or this Agreement shall be subject to the
exclusive jurisdiction of the state and federal courts in
Orange County, California. is Agreement is the entire
agreement between you and Sizzix relating to the Product,
and supersedes any prior communications and any
conflicting terms contained in any purchase order, quote or
acknowledgement. No amendment to this Agreement shall
be binding unless signed by Sizzix and you.
5. Contacting Sizzix. For Product inquiries, please
contact:
North America:
Sizzix.com
866-742-4447 toll-free in USA
949-598-5897 outside USA
Revised: LGL/030210/v1
Page 34

34
WARRANTY
WARRANTY
SIZZIX™ ECLIPS ELECTRONIC SHAPE-CUTTING MACHINE
AND HANDHELD REMOTE CONTROL
90-DAYS LABOR, ONE-YEAR PARTS LIMITED
WARRANTY
What Does is Warranty Cover? is Limited Warranty
covers only manufacturing defects in material and
workmanship in the hardware components of your eclips
Electronic Shape-Cutting Machine and Handheld Remote
Control (the “Product”).
How Long Does e Warranty Last?
Labor: For a period of 90 days from the original date of
purchase of the Product (“Labor Warranty”).
Parts: For a period of 1 year from the original date of
purchase of Product (“Parts Warranty”). You should retain
your receipt as proof of purchase, which may be required
in connection with obtaining warranty service.
What Will Sizzix Do?
Labor Warranty: Sizzix will, at our option, repair or
replace with new or refurbished product or parts, product
determined to be defective. If Sizzix elects to replace the
product after this Labor Warranty has expired but while
the Parts Warranty below is still in effect, it will do so for
the applicable labor charge.
Parts Warranty: Sizzix will supply new or refurbished
replacement parts in exchange for parts determined to be
defective.
“Refurbished” means a product or part that has been
returned to its original specifications. In the event of a
defect, these are your exclusive remedies. Any parts or
product replaced under this Limited Warranty will become
the property of Ellison Educational Equipment, Inc.
(“Sizzix”).
What Does is Warranty Not Cover? It does not cover
technical assistance for hardware, firmware or software
usage and it does not cover any software products whether
or not contained in the Product. Any such software is
provided “AS IS”. Please refer to the End User License
Agreement included with the Product for your rights
and obligations with respect to the software. Further,
this Limited Warranty does not cover damages or defects
caused by misuse or abuse of the Product; modification
of or to any part of the Product; use of any third-party
software, firmware and/or hardware with the Product; acts
of God; limitations of technology, or use of the Product
for commercial, rather than personal, applications. e
cartridges, cutting blades, blade housing, cutting mats,
and any accessories are also excluded from this Limited
Warranty. Opening any of the Product housing or
tampering with the Notice label on the underside of the
housing will automatically void the warranty.
Disclaimers. SIZZIX SHALL NOT BE LIABLE
FOR CONSEQUENTIAL AND INCIDENTAL
DAMAGES, DAMAGES FOR BODILY INJURY
(INCLUDING DEATH) AND DAMAGE TO
PROPERTY. THE DURATION OF ANY IMPLIED
WARRANTIES SHALL BE LIMITED TO THE
DURATION OF THE EXPRESS WARRANTY
SET FORTH ABOVE. SOME STATES DO NOT
ALLOW THE EXCLUSION OR LIMITATION OF
INCIDENTAL OR CONSEQUENTIAL DAMAGE,
DAMAGES FOR PERSONAL INJURY, OR THE
LENGTH OF IMPLIED WARRANTIES, SO THESE
LIMITATIONS MAY NOT APPLY TO YOU. THIS
WARRANTY GIVES YOU SPECIFIC LEGAL
RIGHTS, AND YOU MAY ALSO HAVE OTHER
RIGHTS WHICH VARY FROM STATE TO STATE.
How Do You Get Warranty Service? If you believe
that there is a manufacturing defect in material and
workmanship in the hardware components packaged
with your Product during the Limited Warranty Period,
please contact Sizzix Customer Relations at the following
telephone number or website:
North America:
Sizzix.com
866-742-4447 toll-free in USA
949-598-5897 outside USA
A Return Authorization (RA), along with shipping
information, will be issued. Following a determination
by Sizzix that a fault covered by this Limited Warranty
may have occurred, Sizzix will: (a) ship you replacement
parts or (b) ship you a replacement Product. Product not
covered by this Limited Warranty will be returned at your
expense.
Revised: LGL/031010/v1
Page 35

WARRANTY
SIZZIX™ ECLIPS DESIGN AND/OR FONT CARTRIDGE
35
90-Day LIMITED WARRANTY
What Does is Warranty Cover? is Limited Warranty
covers manufacturing defects in material and workmanship
in the hardware components of your eclips design and/or
font cartridge (the “Product”).
How Long Does e Warranty Last? is Limited
Warranty lasts for 90 days following your original date of
purchase of the Product. You should retain your receipt as
proof of purchase, which may be required in connection
with obtaining warranty service.
What Will Sizzix Do? Sizzix will either repair or replace
the Product at its sole discretion.
What Does is Warranty Not Cover? Please refer to
the End User License Agreement included with your
eclips Electronic Shape-Cutting Machine and Handheld
Remote Control product for your rights and obligations
with respect to the software. is Limited Warranty does
not cover damages or defects caused by misuse or abuse of
the Product; modification of or to any part of the Product;
use of any third-party software, firmware and/or hardware
with the Product; acts of God; limitations of technology;
or use of the Product for commercial, rather than personal,
applications. Opening the Product housing or tampering
with the Product label will automatically void the warranty.
Disclaimers. SIZZIX SHALL NOT BE LIABLE
FOR CONSEQUENTIAL AND INCIDENTAL
DAMAGES, DAMAGES FOR BODILY INJURY
(INCLUDING DEATH) AND DAMAGE TO
PROPERTY. THE DURATION OF ANY IMPLIED
WARRANTIES SHALL BE LIMITED TO THE
DURATION OF THE EXPRESS WARRANTY
SET FORTH ABOVE. SOME STATES DO NOT
ALLOW THE EXCLUSION OR LIMITATION OF
INCIDENTAL OR CONSEQUENTIAL DAMAGE,
DAMAGES FOR PERSONAL INJURY, OR THE
LENGTH OF IMPLIED WARRANTIES, SO THESE
LIMITATIONS MAY NOT APPLY TO YOU. THIS
WARRANTY GIVES YOU SPECIFIC LEGAL
RIGHTS, AND YOU MAY ALSO HAVE OTHER
RIGHTS WHICH VARY FROM STATE TO STATE.
How Do You Get Warranty Service? If you believe
that there is a manufacturing defect in material and
workmanship in the Product during the Limited Warranty
Period, please contact Sizzix Customer Relations at the
following telephone number or website:
North America:
Sizzix.com
866-742-4447 toll-free in USA
949-598-5897 outside USA
A Return Authorization (RA), along with shipping
information, will be issued. Following a determination
by Ellison that a fault covered by this Limited Warranty
may have occurred, Ellison will: (a) ship you replacement
parts or (b) ship you a replacement Product. Product not
covered by this Limited Warranty will be returned at your
expense.
Revised: LGL/030210/v1
Page 36

©2010 Ellison Educational Equipment, Inc. All rights reserved.
 Loading...