

Page 1

Ellison® Die Storage Wall Rack
Mounting Instructions
(2)
(4)
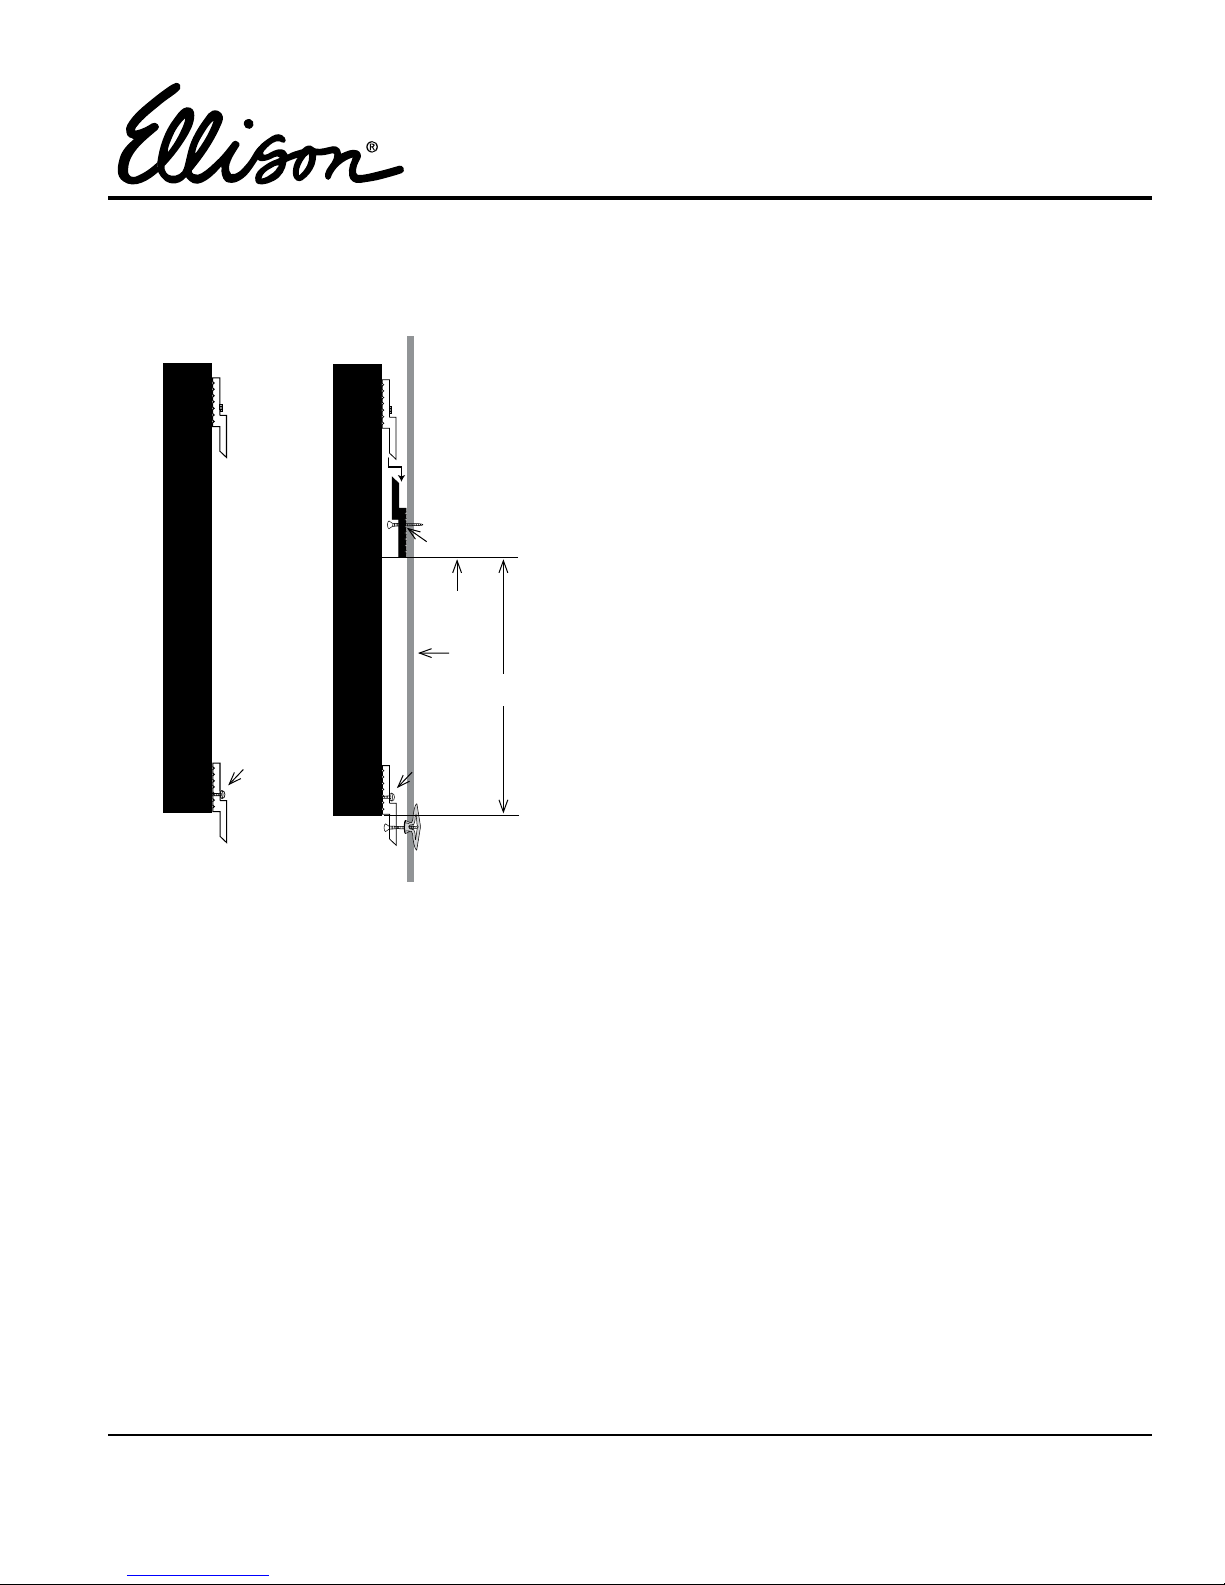
Black Line
Step 2
Level Line
(2)
Z-Bar
Parts included:
Item: Qty:
(1) 60-Slot Die Storage Wall Rack 1
(36" x 15" x 5")
(2) Z-Bar 1
Wall
(3) Z-Clip (3 pre-installed) 5
(4) 2" Wood Screw 6
11"
(5) 1" Wood Screw 4
(6) Wall Anchor 2
Wall Rack
Step 1
Allowance for
Wall Anchors and
unevennes of floor
or countertop.
(1)
Distance measured in Step 4 Distance measured in Step 4
Tools Required (not included):
3
Electric Drill & Bits " & "
/
1
16
/
8
Level
Measuring Tape
Pencil
Screwdriver
Stud Locating Device
34"
Figure A
Figure B
Note: Carefully Read All Instructions Before Starting
1. Determine location of Wall Rack, on the wall, allowing space for bottom Wall Anchors and unevenness of floor
or counter top when mounting. Make a light pencil mark at the bottom of the Wall Rack (Figure A, Step 1).
Consideration should be made for possible interference with electrical outlets, door swings, windows, protrusions
from and imperfections in the flatness of the wall.
Note: If mounting more than one Wall Rack, start measuring for the bottom rack first.
2. From the mark made in Step 1, measure up 11" and draw a level line 36" long. (Figure A, Step 2).
3. Along this line, using a stud locating device, find and mark three stud locations on the wall. If the wall has studs
positioned every 24" instead of every 16", the third hole location will have to be made to receive a Wall Anchor
(not provided). The importance of having three points of attachment needs to be stressed as the rack may be
holding up to 80 lbs of dies!
4. Measure the distances between the stud locations on the wall and transfer these dimentions to the 34" Z-Bar
(Figure B). The Z-Bar has a black line pre-drawn on the back side. Make sure the stud locations transferred to the
Z-Bar intersect this black line. Keep in mind that since the black line is on the back side of the Z-Bar, the stud
locations being transferred to it must be reversed.
5. Drill three holes, " in diameter, in the Z-Bar from markings made in Step 4 (Figure B).
©2008 Ellison All rights reserved.
3
/
16
Continued
25862 Commercentre Drive • Lake Forest, CA 92630-8804 USA
Within USA 800.253.2238 • Outside USA 949.598.8822
ellison.com
Page 1 of 2
160 75
Page 2
Ellison® Die Storage Wall Rack
(1)
(3)
(1)
(3)
6. Place grooved bottom edge of Z-Bar on wall level line (Figure A).
Secure one end of the Z-Bar (Item 2) to the wall using 2" Wood
Screws provided (Item 4). (Do not completely tighten this Screw,
but leave a little play to allow for leveling). Level the Z-Bar and
drive a second 2" Wood Screw (Item 4) onto the other end of the
Black Line
Step 2
(4)
Z-Bar. Finish tightening the first 2" Wood Screw and drive the
third Screw into the middle stud or wall anchor (Figure B).
7. Insert the 1" Wood Screws (Item 5) into the pre-drilled holes at
Level Line
Wall
11"
the bottom of the Wall Rack in order to attach the grooved
bottom edge of the two remaining Z-Clips (Figure C, Item 3).
(The Wall Rack comes with three Z-Clips installed along the top
of the backside).
8. Place Wall Rack onto the Z-Bar, making sure the pre-mounted
(3)
(5)
(3)
(5)
Z-Clips on back interlock securely with the Z-Bar (Figure D).
9. Once the Wall Rack is in final position, mark and drill a " hole
through the two bottom Z-Clips (installed in Step 7) into the wall.
Secure to wall using remaining 2" Wood Screws (Item 4). If the
Wood Screws are not in studs, use a Wall Anchor (Item 6) to
secure them to the wall (Figure D).
Figure C
(4)
Figure D
(6)
Step 1
Note: The two Z-Clips are not bearing any of the Wall Rack's weight but are there to prevent any unintentional lifting of the Wall Rack, which can cause it to become of the Wall Rack, which can cause it to become
disengaged from the Z-Bar. When installing multiple racks, the two Z-Clips on the bottom of each additional
Wall Rack are not attached to the wall. Insted, the Z-Cips tuck behind the Wall Rack below to prevent it from
becoming disengaged from the wall.
1
/
8
10. For mounting additional Wall Racks in a stacked position, repeat steps 3 through 8, using the top of the previously
hung Wall Rack as the starting point from which to measure up 11".
Ellison will repair or replace this product if, within one year of our purchase of this product, you discover a manufacturing defect and return the product to
Ellison along with your written proof of purchase. All returns must be made within one year of your purchase of this product. Unless otherwise specified in
writing, all such returns must be made to Ellison Educational Equipment, Inc., 25862 Commercentre Drive, Lake Forest, California 92630 USA. This warranty
is expressly limited to manufacturing defects and does not include any damage or defect caused in any manner after your purchase of this product. Other
than the express limited warranty set forth above, to the maximum extent permitted by applicable law, Ellison and its affiliates disclaim all express or implied
warranties. NO WARRANTIES ARE MADE WITH RESPECT TO MERCHANTABILITY OR FITNESS FOR A PARTICULAR USE.
©2008 Ellison All rights reserved.
LIMITED WARRANTY
16580 Ellison 60 Slot Die Storage Wall Rack
25862 Commercentre Drive • Lake Forest, CA 92630-8804 USA
Within USA 800.253.2238 • Outside USA 949.598.8822
ellison.com
Page 2 of 2
160 75
 Loading...