

Elliott Roto-Jet II Series, Roto-Jet II 0650R, Roto-Jet II 0750, Roto-Jet II 0650, Roto-Jet II 0750R Operating And Maintenance Instructions Manual
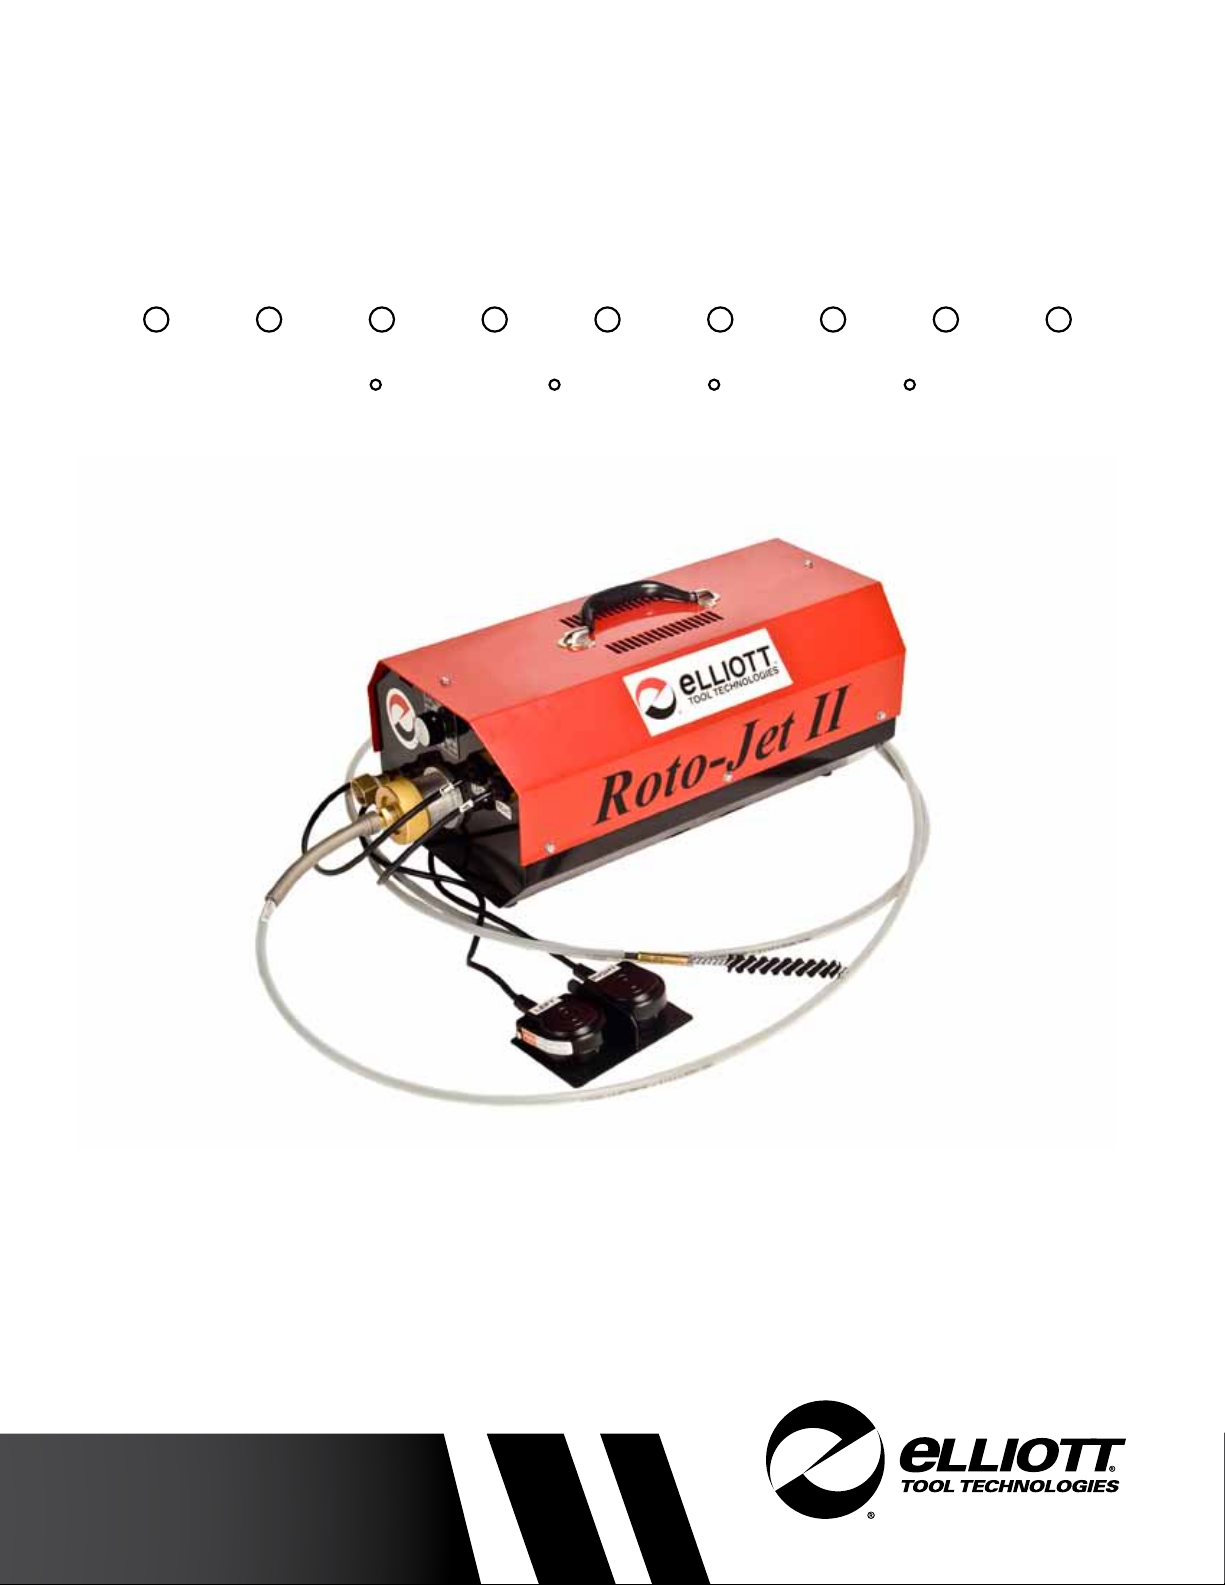
Roto-Jet II
0650 / 0650R (110V) & 0750 / 0750R (220V)
Tube & Pipe Cleaners Tube Testers Tube Plugs Tube Removal Tube Installation
Operating and Maintenance Instructions
www.elliott-tool.com


TABLE OF CONTENTS
Introduction .......................................................................................................... 4
Safety Guidelines ................................................................................................. 5
Grounding Instructions ......................................................................................... 6
Start-Up ................................................................................................................ 8
Operation Instructions .......................................................................................... 9
Parts List & Diagrams ......................................................................................... 10
Maintenance Instructions ................................................................................... 18
Troubleshooting .................................................................................................. 19
Flexshaft Repair ................................................................................................. 21
Technical Information ......................................................................................... 22
Warranty ............................................................................................................. 23

INTRODUCTION
Thank you for purchasing this Elliott product. More than 100 years of experience have been employed
in the design and manufacture of this control, representing the highest standard of quality, value and
durability. Elliott tools have proven themselves in thousands of hours of trouble-free eld operation.
If this is your rst Elliott purchase, welcome to our company; our products are our ambassadors.
If this is a repeat purchase, you can rest assured that the same value you have received in the past
will continue with all of your purchases, now and in the future.
The Roto-Jet II has been designed for the following types of equipment:
Heat Exchangers
Condensers
Chillers
Evaporators
Air Conditioners
If you have any questions regarding this product, manual or operating instructions, please call Elliott
at +1 800 332 0447 toll free (USA only) or +1 937 253 6133, or fax us at +1 937 253 9189
for immediate service.
4 Roto-Jet II
SAFETY GUIDELINES
Read and save all instructions. Before use, be sure everyone using this machine reads and
understands this manual, as well as any labels packaged with or attached to the machine.
WARNING
!
When using electric tools, certain safety precautions
are required to reduce the risk of electrical shock
and personal injury.
WARNING
!
To reduce the risk of injury, always unplug your
machine before performing any maintenance. Never
disassemble the machine or try to do any wiring on
the electrical system. Contact Elliott for all repairs.
• Those unfamiliar with the Elliott Roto-Jet II® should read this operation manual
thoroughly before use. Know your equipment. Consider the applications, limitations
and the potential hazards specic to your unit.
• Always wear safety glasses, protective gloves, safety shoes and protective clothing.
• Do not allow other people in the area of the machine unless they are wearing suitable
protective clothing and equipment.
• Avoid dangerous environments. Do not use your Elliott Roto-Jet II® in or around the
presence of explosive atmospheres (gaseous fumes, dust or ammable materials).
Remove materials or debris that may ignite.
• Always use properly grounded electrical outlets. Do not use this machine without a
grounded prong.
• To prevent voltage drop, do not use an extension cord unless absolutely necessary.
Then, make certain the cord is or equal rating or larger than the machine power cord.
• Check power cords before using. Damaged cords can reduce performance or cause a
fatal electric shock.
• Unplug the power cord from the outlet when not in use and prior to doing any tool
changes or maintenance. Do not pull on the cord to disconnect from the outlet.
• Avoid accidental starts. Make sure the power switch is in the “OFF” position before
plugging the unit into an outlet.
• To allow free air circulation, the unit should not be covered during operation.
• Do not operate the machine if there appears to be damage to the machine, if screws
are loose or missing, or if performance appears to be unsatisfactory.
• Never use your Elliott Roto-Jet II®, or any other power tool when under the inuence
of drugs, alcohol or medication that decreases concentration and impairs operator
control.
Roto-Jet II 5

GROUNDING INSTRUCTIONS
This machine must be grounded. If it should malfunction or breakdown, grounding provides a path of
least resistance for electric current to reduce the risk of electric shock. This product is equipped with a
GFI plug. The plug must be plugged into an appropriate outlet that is properly installed and grounded
in accordance with all local codes and ordinances.
WARNING
!
Warning: Improper connection of this equipment-grounding conductor
can result in a risk of electrocution. Check with a qualied electrician or
service technician if you are in doubt as to whether the outlet is properly
grounded. Do not modify the plug provided with this product. If it will not
t the outlet, have a proper outlet installed by a qualied electrician.
G.F.I. Plug Operating Instructions (Not supplied on 220 Volt units)
1. The GFI plug has been designed to prevent lethal electric shock by interrupting the circuit
whenever fault-to-ground occurs.
2. The GFI plug instantly opens the circuit when it senses an imbalance of 4-5 milliamps and
it constantly monitors electrical current to a connected load.
3. The GFI plug also offers instant protection from open-neutral conditions that can be
created when a break occurs in the neutral conductor or the power source.
WARNING
!
1. This unit offers NO protection against electrical shock hazard
resulting from defects or faults in any wiring supplying power to the
machine.
2. Ground fault interrupters DO NOT protect against electrical shock
resulting from contact between hot (line) and common (neutral)
conductors of an electrical circuit.
3. If the GFI tests properly without load equipment connected, but
trips each time load equipment is connected, then the equipment
has a ground fault and needs to be repaired or replaced. If that
condition exists, DO NOT BYPASS the GFI as a real shock hazard
may be present.
4. The GFI plug is designed for protective purposes, do not utilize it as
an On/Off switch.
6 Roto-Jet II
5. Test the GFI plug before each use to ensure proper operation.

Manual Reset
1. Plug the GFI into a 3-wire 120 Volt grounded receptacle.
2. Fully press the reset button marked (marked “R”) and release. The unit should power up
and the amber “POWER ON” light should glow.
3. Fully press the test button (marked “T”) and release. The power light should go off.
4. Press and release the reset button again. Verify that the power light is on and the GFI is
now operational.
5. If the GFI fails to reset, or fails to turn off when all appropriate buttons are pressed, check
to make sure that:
a.) You have fully depressed and released the proper buttons.
b.) There are no loose wire strands or foreign materials in the access chamber of the
GFI plug that may cause a fault.
6. If the GFI still cannot complete the cycle described in steps 2 through 4 above and after
checking the items in step 5,the unit is not functioning. Contact Elliott for repairs.
Roto-Jet II 7
START-UP
Unpacking
Your Elliott Roto-Jet II® is shipped in a well-packed carton with the electric supply cord attached and
the foot pedal detached. Upon receiving your new machine, inspect the unit for damage. If damage is
discovered notify Elliott and the carrier. DO NOT discard the carton or any packaging. Inspectors will
need to examine both the carton and the contents.
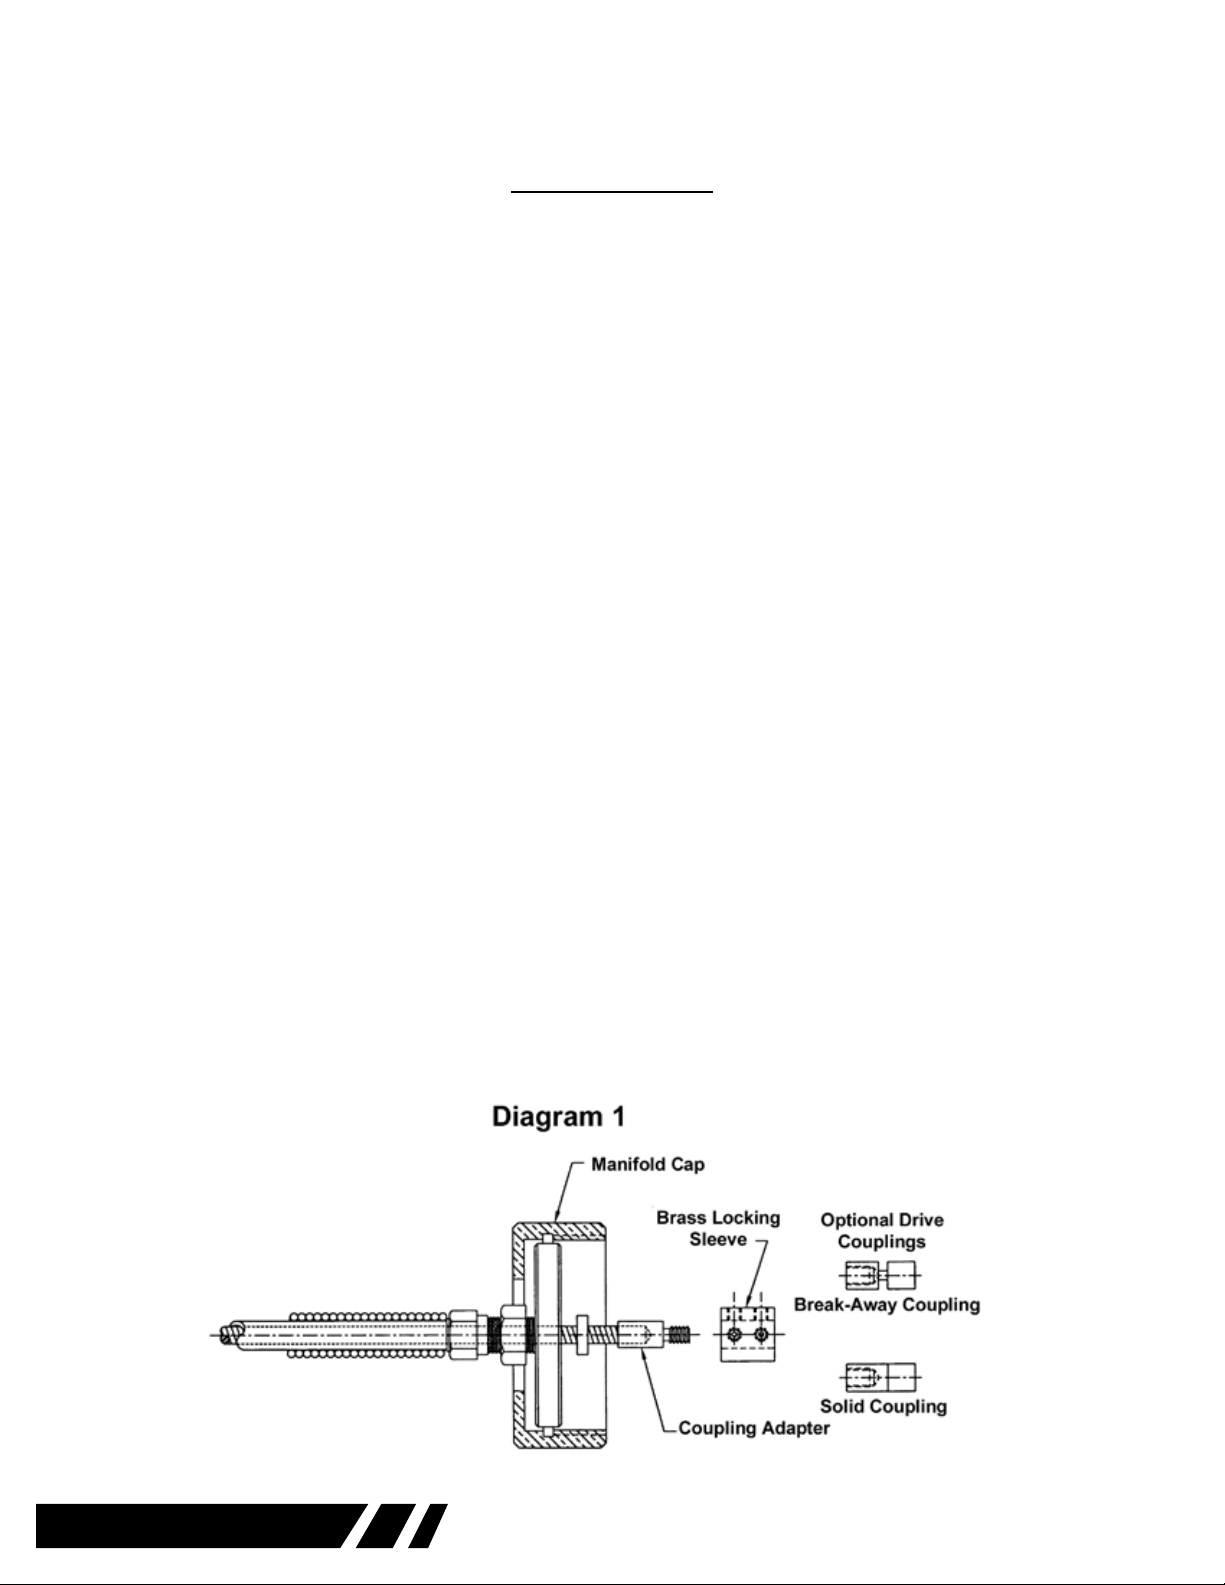
Connecting Instructions (See diagrams on pages 13 & 15)
1. Uncoil the air tubes that are attached to the foot pedal and insert the air tube into the air
port. In the case of a reversing unit, attach the tube of the “right” foot pedal to the “right”
barbed air port on the machine and the tube of the “left” foot pedal to the “left” barbed air
port.
2. Uncoil the exible shaft. Never operate a exible shaft that is coiled. Install the drive
coupling onto the exible shaft. (See diagram 1) Remove the protective cap from the
manifold. Make certain the o-ring is properly installed in the groove of the manifold. Insert
the drive coupling into the drive socket inside the manifold, tighten the manifold cap onto
the manifold. Firm hand tightening will be sufcient.
3. Connect a standard garden hose to the water inlet on the front of the machine. Make sure
the ltered washer is properly installed prior to connecting the water hose. The water
supply may be turned on at any time after connection is made, water will not ow through
the manifold until the exible cable is activated.
4. Select and install the appropriate cleaning attachment to the tool coupling of the exible
shaft.
5. Uncoil the power cord and plug the GFI plug into a properly wired, grounded outlet.
6. Move the power switch located on the opposite end of the unit to the “ON” position.
Depress the foot pedal to test the operation of the exible shaft.
NOTE: Once the exible shaft is activated water will begin to ow through the shaft
casing and exit at the tool end. Make certain that no water is leaking from the manifold
connection or from inside the machine.
Your Elliott Roto-Jet II® is now ready to brush tubes clean.
8 Roto-Jet II
 Loading...