

Ellion HMR-350H User Manual

HMR-350H
HD MEDIA RECORDER & PLAYER
www.elliondigital.com
USER'S MANUAL
P/N : 63020013800
Precautions
Precautions
2
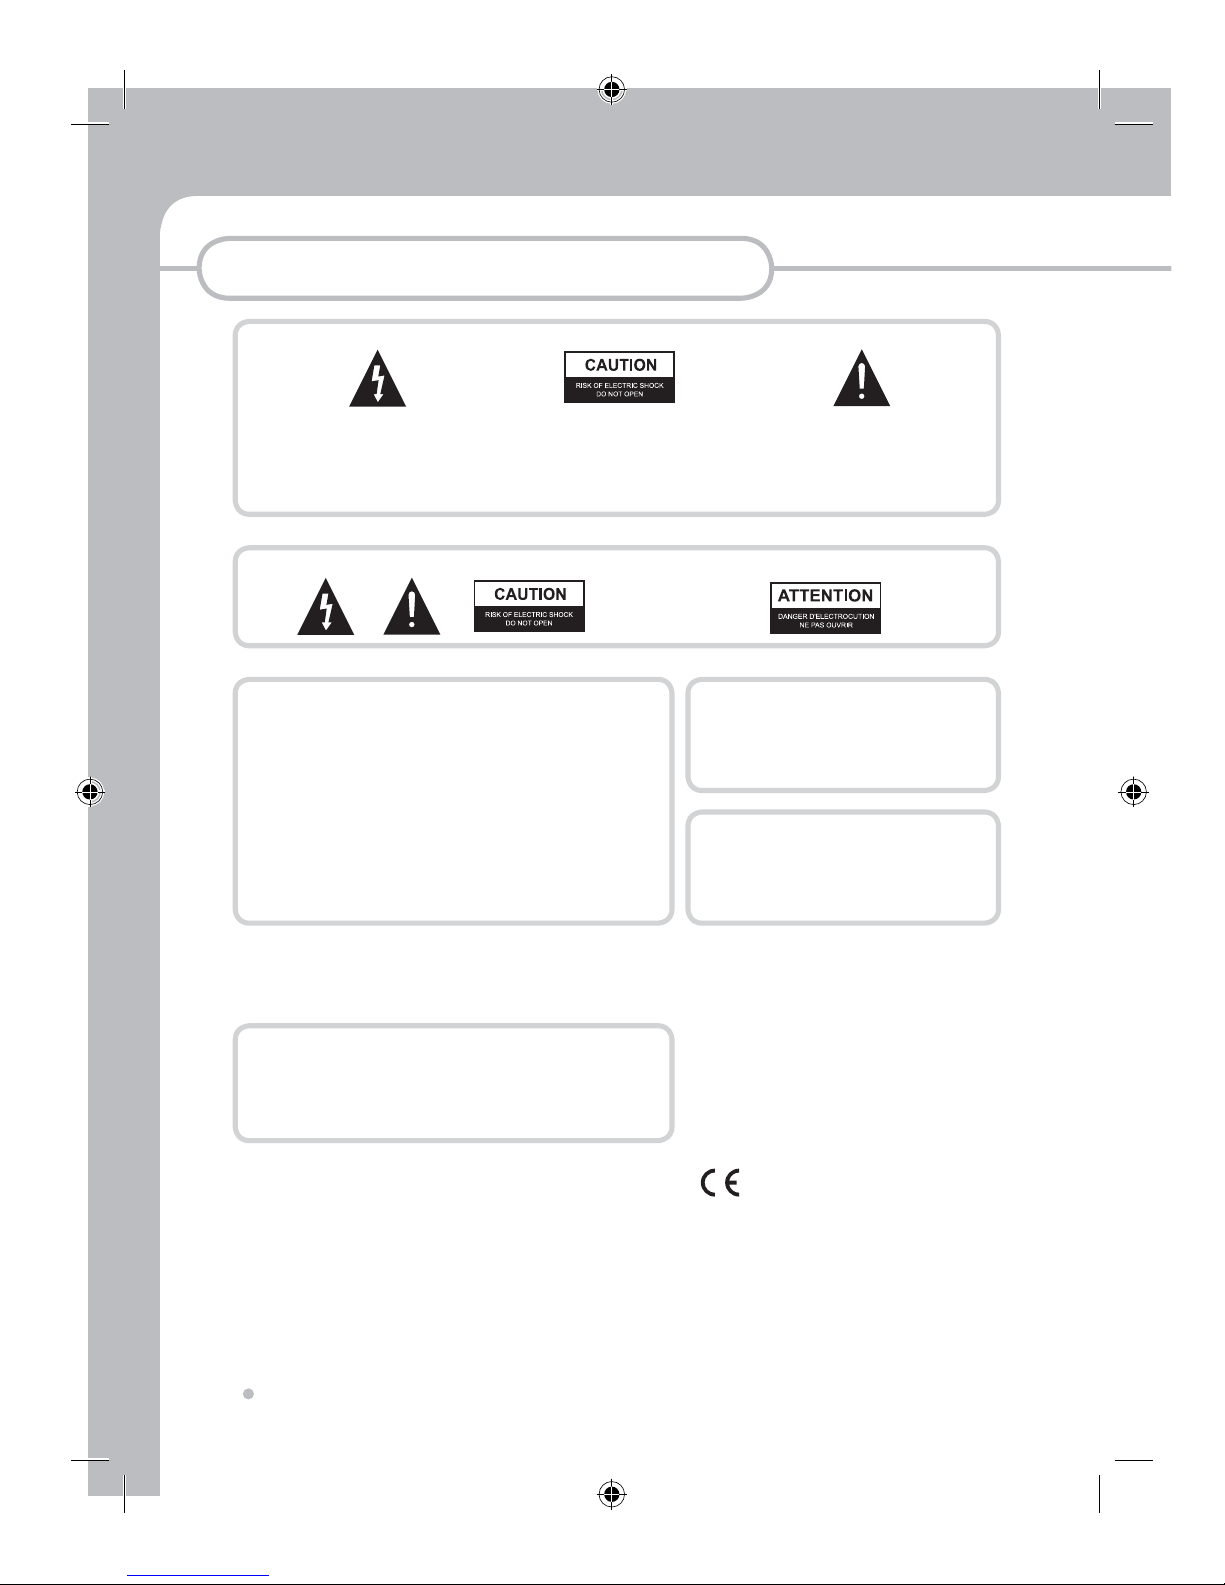
IMPORTANT
The lightning flash with arrowhead symbol, within
an equilateral triangle, is intended to alert the user
to the presence of uninsulated dangerous voltage
within the product's enclosure that may be of
sufficient magnitude to constitute a risk of electric
shock to persons.
CAUTION : TO PREVENT THE RISK
OF ELECTRIC SHOCK, DO NOT
REMOVE COVER (OR BACK). NO USER
SERVICEABLE PARTS INSIDE. REFER
SERVICING TO QUALIFIED SERVICE
PERSONNEL.
The exclamation point within an
equilateral triangle is intended to alert
the user to the presence fo importantoperating and maintenance(servicing)
instructions in the literature
accompanying the appliance.
Note : This equipment has been tested and found to comply with the limits for
a Class B digital device, pursuant to Part 15 of the FCC Rules. These limits
are designed to provide reasonable protection against harmful interference in
a residential installation. This equipment generates, uses and can radiate radio
frequency energy and, if not installed and used in accordance with the instructions,
may cause harmful interference to radio communications. However, there is no
guarantee that interference will not occur in a particular installation. If this equipment
does cause harmful interference to radio or television reception, which can be
determined by turning the equipment off and on, the user is encouraged to try to
correct the interference by one or more of the following measures:
- Reorient or relocate the receiving antenna.
- Increase the separation between the equipment and receiver.
- Connect the equipment into an outlet on a circuit different from that to which the
receiver is connected.
- Consult the dealer or an experienced radio/TV technician for help.
TO PREVENT FIRE OR SHOCK HAZARD, DO NOT EXPOSE THIS APPLIANCE TO RAIN OR MOISTURE.
APPARATUS SHALL NOT BE EXPOSED TO DRIPPING OR SPLASHING AND NO OBJECTS FILLED WITH
LIQUIDS, SUCH AS VASES, SHALL BE PLACED ON THE APPARATUS.
CAUTION
This product satisfies FCC regulations when shielded
cables and connectors are used to connect the unit to other
equipment. To prevent electromagnetic interference with
electric appliances such as radios and televisions, use
shielded cables and connectors for connections.
CAUTION
• Use of controls or adjustments or performance of
procedures other than those specified here may result in
hazardous radiation exposure.
• The use of Optical instruments with this product will
increase eye hazard.
CAUTION
This product contains a laser diode of higher class than 1. To ensure continued
safety, do not remove any covers or attempt to repair. Refer all servicing to qualified
personnel.
The following caution appears on rear of the unit.
These labels can be found on the unit's rear panel. Ces étiquelttes se trousent sur le fond de Pappareil.
WARNING
CAUTION
VISIBLE AND INVISIBLE LASER RADIATION WHEN OPEN. AVOID
EXPOSURE TO BEAM (WARNING LOCATION: INSIDE ON LASER
COVERSHIELD)
This product is in conformity with the EMC directive
and low-voltage directive.
Important Safety Instructions
3
Important Safety Instructions
• READ THESE INSTRUCTIONS - All the safety
and operating instructions should be read before
the product is operated.
• KEEP THESE INSTRUCTIONS -
The safety and
operating instructions should be retained for future
reference.
• HEED ALL WARNINGS -
All warnings on the
product and in the operating instructions should
be adhered to.
• FOLLOW ALL INSTRUCTIONS -
All operating
and use instructions should be followed.
• CLEAN ONLY WITH A DAMP CLOTH -
Unplug
this product from the wall outlet before cleaning.
The product should be cleaned only with a
polishing cloth or a soft dry cloth. Never clean with
furniture wax, benzene secticides or other volatile
liquids since they may corrode the cabinet.
• DO NOT USE THIS APPRATUS NEAR WATER
- Do not use this product near water - for example,
near a bathtub, wash bowl, kitchen sink, or laundry
tub; in a wet basement; or near a swimming pool;
and the like.
• ACCESSORIES -
Only use the attachments/
accessories specified by the manufacturer.
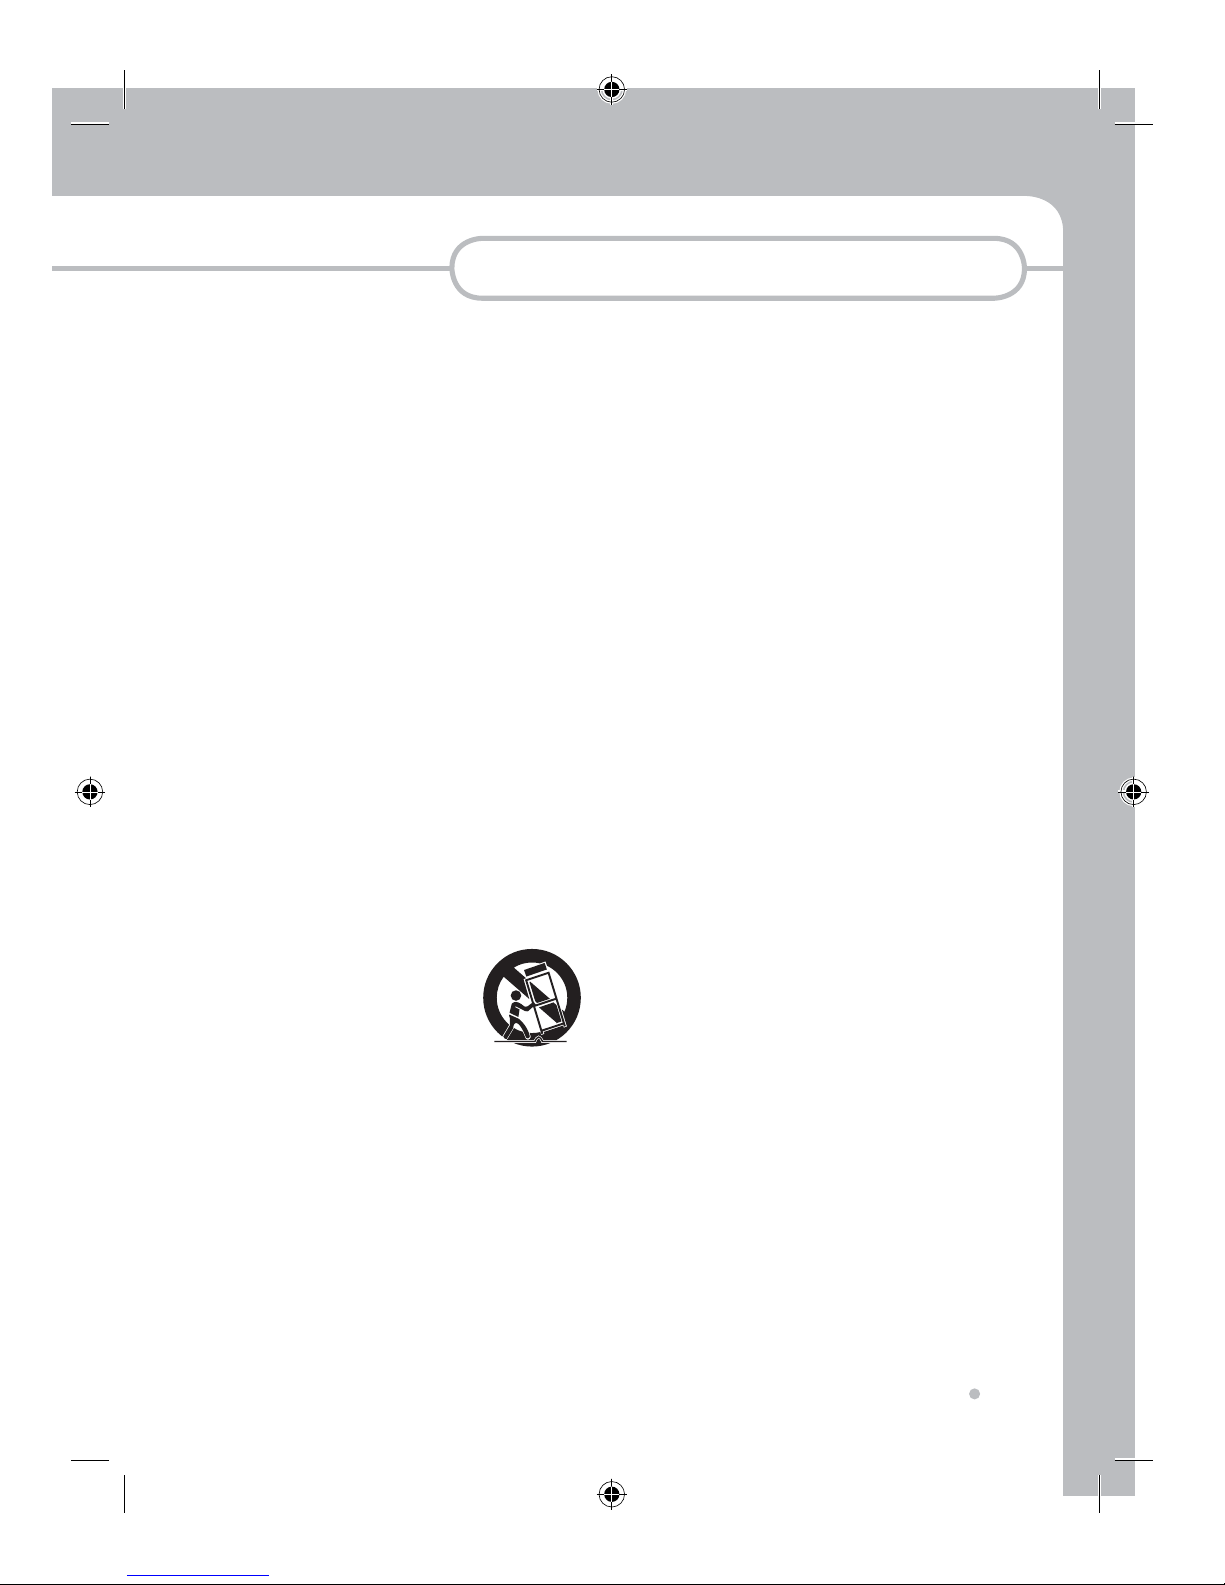
• CART -
Use only with a cart, stand, bracket,
or table specified by the
manufacturer, or sold with
the apparatus. When a cart
is used, use caution when
moving the cart/apparatus
combination to avoid injury
from tip-over.
• VENTILATION -
Do not block any of the
ventilation openings. Install in accordance with the
manufacturer's instructions.
• GROUNDING OR POLARIZATION -
Do not
defeat the safety purpose of the polarized or
grounding type plug. A polarized plug has two
blades with one wider than the other. A grounding
type plug has two blades and a third grounding
prong. The wide blade or the third prong is
provided for your safety. When the provided plug
does not fit into your oulet, consult an electrician
for replacement of the obsolete outlet.
• POWER-CORD PROTECTION -
Protect the
power cord from being walked on or pinched
particularly at plugs, convenience receptacles, and
the point where they exit from the apparatus.
• LIGHTNING -
Unplug this apparatus during
lightning storms or when unused for long periods
of time.
• SERVICING -
Refer all servicing to qualified
service personnel. Servicing is required when the
apparatus has been damaged in any way, such
as power supply cord or plug is damaged, liquid
has been spilled over, objects have fallen into the
apparatus, the apparatus has been exposed to
rain or moisture, does not operate normally, or has
been dropped.
• HEAT -
Do not install near any heat sources
such as radiators, heat registers, stoves, or other
apparatus(including amplifiers) that produce heat.
• HARD DISK DRIVE -
We will not be liable in any
way for damages as a consequence of loss or
recovery of information in the hard disk. Besides,
in case of repairing or substitution due to any
malfunction, We will not be liable for any personal
or confidential information stored in the hard disk
or in any other storage device damaged or lost,
neither the recovery of this data. Customers are
urged to back up their data before returning hard
disk or any other recordable media product for
repair.
We will not be liable for the compatibility of newly
developed or produced HDD after the date
of production of this unit. It is also Customers
responsibility to find the compatible HDD for
this unit when the customers purchase HDD
separately from this unit.
Before You Start
What’s in the box
.................................................
5
Putting the batteries in the remote control
....
5
Using the remote control
...................................
5
File System
...........................................................
6
Supported AV format
..........................................
6
Control & Name
Front
.......................................................................
7
Rear-Scart version
..............................................
8
Rear-Standard Version
......................................
9
Remote Control
...................................................
10
GUIDE Menu
Guide
......................................................................
27
File Copy
As an External HDD Connecting HMR to PC through USB
target Port
......................................................
28
As a Host Multi way file copy
.........................................
29
Editing
Editing recorded contents in HDD
(in UDF Partition)
...........................................
36
Editing AV File (in FAT32 File System)
..........
42
Using Set Up Menu
Video
......................................................................
51
Record
...................................................................
53
Time Shift
Time Shift
..............................................................
44
Playback
AV File Playback
.................................................
46
Recorded Title Playback
...................................
49
Advanced Playback
............................................
50
Additional Information
F/W upgrading
.....................................................
55
Specification
.........................................................
56
Trouble shooting
..................................................
57
Table of Contents
Table of Contents
4
Recording
Recording Quality
...............................................
31
Basic Recording(Scart version)
.......................
32
Basic Recording(Standard Version)
...............
33
OTR ( On Touch Recording)
............................
34
Simultaneous Recording and Playback
........
34
Recording From Digital Camcorder
...............
34
Recording from TV
.............................................
35
How to see the recorded contents
..................
35
Connection
Rear-Scart version
..............................................
13
Rear-Standard Version
......................................
18
HDD Installation
HDD Installation
..................................................
22
HDD Format
HDD Format
.........................................................
24
Initial Setting
Initial Setting
.........................................................
26

What's in the box
Using the remote control
Thank you for buying this product. Please confirm
that the following accessories are in the box when
you open it.
1
3
Close the cover.
2
Insert two AAA/R03 batteries into
the battery compartment
following the indications
(+, -) inside the
compartment.
Open the battery compartment
cover on the back of
the remote control.
Putting the batteries in the remote
control
Incorrect use of batteries can result in hazards such
as leakage and bursting. Please observe the following:
• Don't mix new and old batteries together.
• Don't use different kinds of batteries together-although
they may look similar, different batteries may have
different voltages.
• Make sure that the plus and minus ends of each battery
match the indications in the battery compartment.
• Remove batteries from equipment that isn't going to be
used for a month or more.
• When disposing of used batteries, please comply with
governmental regulations or environmental public
instruction’s rules that apply in your country or area.
NOTE
Keep in mind the following when using the
remote control :
• Make sure that there are no obstacles between
the remote and the remote sensor on the unit.
• Remote operation may become unreliable if
strong sunlight or fluorescent light is shining on
the unit's remote sensor.
• Remote controllers for different devices can
interfere with each other. Avoid using remotes for
other equipment located close to this unit.
• Replace the batteries when you notice a fall off in
the operating range of the remote.
Remote control
AAA dry cell batteries x 2
USB cable
Operating instruction
(this manual)
Audio/Video cable
Before You Start
5
Before You Start
POWER cable
utility CD
• The Power Plug is subject to the each counry
specification.
NOTE
Power Adaptor
Screw x 4 Screw x 2
Before You Start
Before You Start
6
File System
1
Installed HDD
You may find 3 file systems during enjoying HD
Media Recorder (HMR)
1-1
UDF (Universal Disk Format)
Most of the recording data from AV input
of HMR are into UDF File system which
allows you to edit the recorded data.
You can enjoy most of necessary editing
functions like Delete, AB delete, Merge
and rename. It will be partitioned during
HDD format when you select Recording
Disc partition in HDD.
• Windows base computer will not read this partition when
HMR is connected to PC as an external HDD.
NOTE
1-2
FAT 32 (File Allocation Table 32Bit)
HMR support FAT32 system for easy
access of the computer based contents in
the connected storage. You can record and
enjoy time shift with this file system. You
can copy the files and folders by remote
control as well as by computer.
It will be made during HDD format when
you select Multimedia Disc partition in HDD
2
USB connected external HDD
2-1
FAT 32 (File Allocation Table 32Bit)
You can copy, record (less than 4GB in
single file size) and enjoy time shift as well
as you can playback the contents inside
• It is recommended that USB storage has an FAT 32
partition in order to enjoy recording, time shift and file
copy into it. Please copy the files by computer if you want
NTFS only in your USB storage. In this case, Recording
or Timeshift are not available.
NOTE
2-2
NTFS (NT File System)
You can playback the contents inside.
Recording, File Copy and Timeshift are not
available with NTFS File System
Supported AV format
• Some of files in above format may not be played back
depending on the encoding method.
• You are kindly requested to make transcoding them
again with the general methods by computer with proper
utility program.
NOTE
•
HD Video : MPEG2 HD Video (TS. TP), HD
DivX (AVI) HD Xvid (AVI)
•
Video : MPEG1/2/4 (MPG, IFO,VOB,AVI),
DivX (AVI), XVID (AVI)
•
Audio : Dolby Digital, AC3, WMA, OGG
•
Photo : JPEG, BMP (16bit/32bit)
1-3
NTFS (NT File System)
You can playback the contents inside.
File copy to NTFS system is only available
by computer while connecting this unit as
an external HDD. This partition is mainly
designed when you want to copy an file
whose size is more than 4GB because
FAT32 has the limit of 4GB of single file size.
Recording and Time Shift are not available
with NTFS File System.
It will be made during HDD format
procedure.
3
Functions by file system
File System UDF FAT32 NTFS
Playback OK OK OK
Record OK OK X
File Copy X OK X
File System UDF FAT32 NTFS
File Recognition X OK OK
File Copy
(single file size under 4GB)
XOKOK
File Copy
(single file size over 4GB)
XXOK
By remote control as a Host
By computer (Windows) as a Target

ࣜࣜ
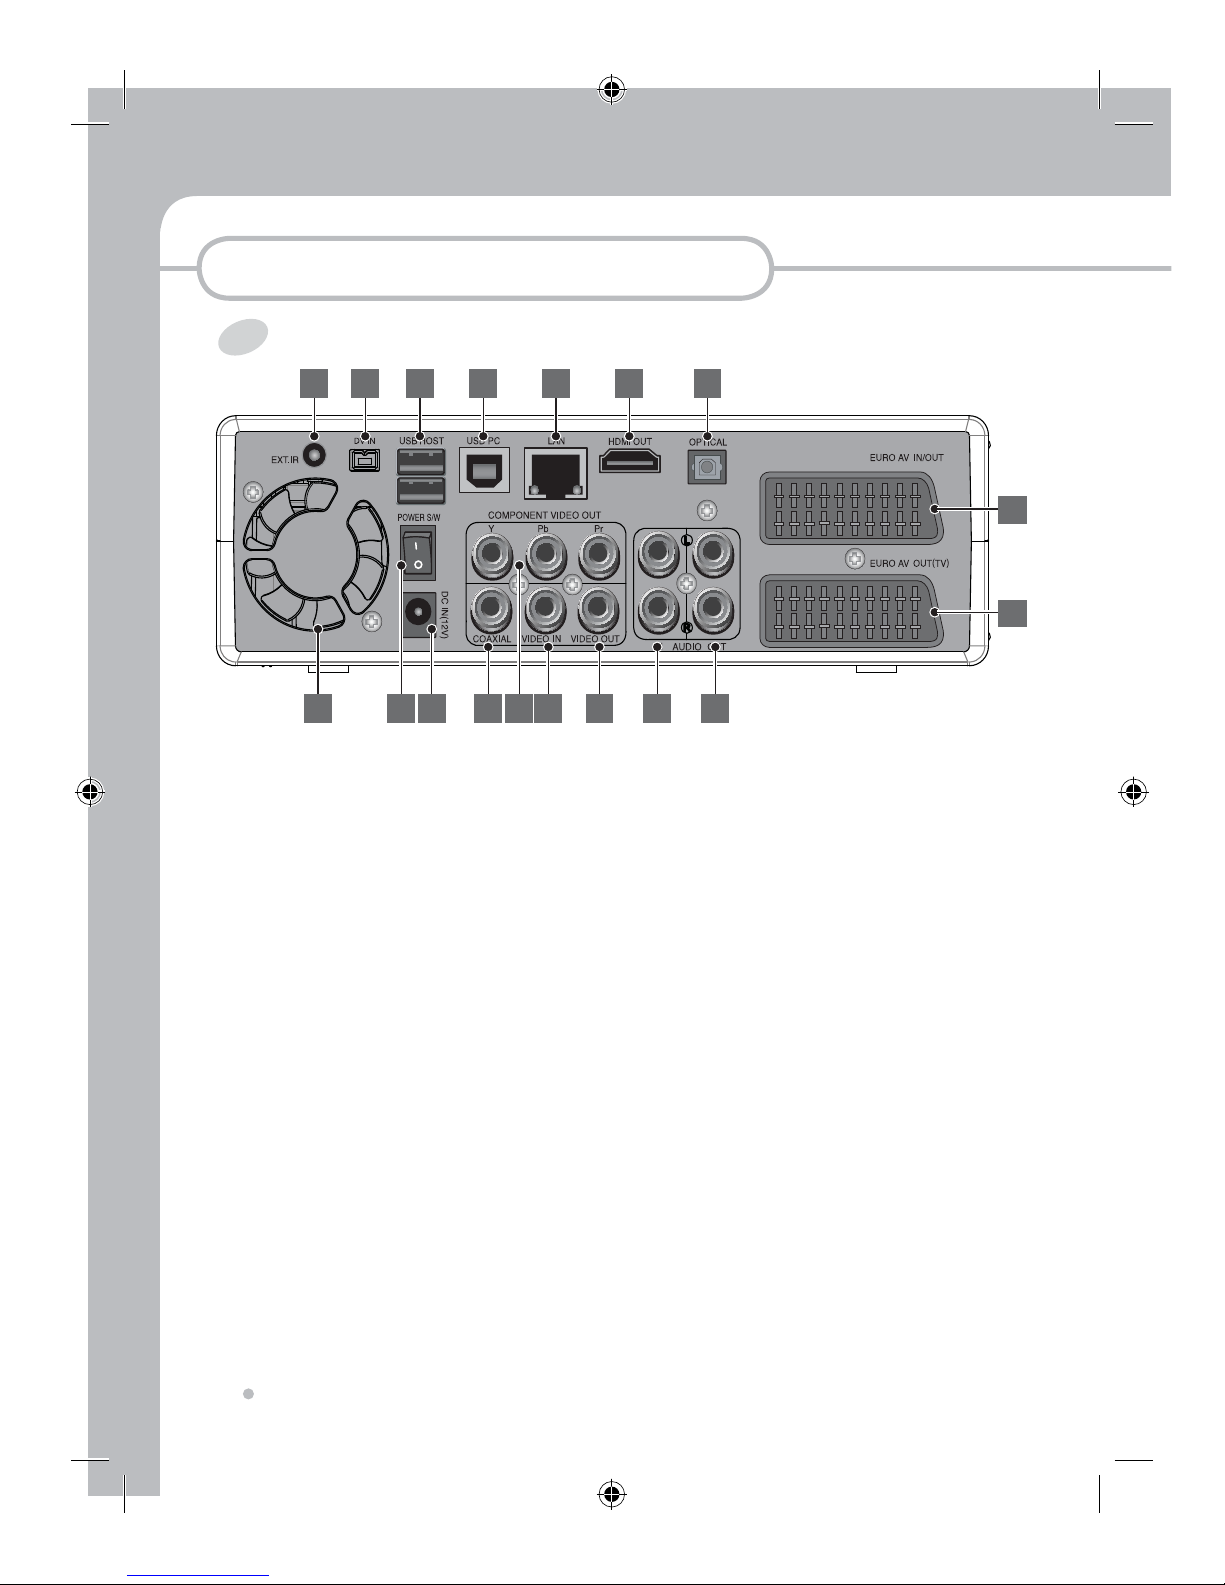
Control & Name
7
Control & Name
Front
5
Arrow button
To move
◄,►,▲,▼
6
REC LED
4
Guide
To display Guide Menu.
3
IR receiving part
To receive IR signal from remote control
7
Stand by/ Power On
To Switch HMR Power On or into Stand by
mode
1
Power LED
1 2 43 5
7 6
2
VFD Display
Control & Name
Control & Name
8
Rear - Euro Scart Verion
8
FAN
Cooling Fan
1
EXT. IR
For the extension IR cable
3
USB HOST
Digital Input jack for USB Storage (USB
external HDD or USB memory) It can be
used for the Digital TV or Wireless Option.
16
AUDIO OUT
To Connect to Audio Inputs (L, R) of TV
15
AUDIO IN
To Connect to Audio out of AV device such as
Set Top Box or VCR.
4
USB PC
To Connect to USB host of Computer for
using HMR as an external HDD
5
LAN
To Connect to LAN cable
12
COMPONENT VIDEO OUT
To Connect to Component Video Input of TV
14
VIDEO OUT
To Connect to Composite Video Input of TV
13
VIDEO IN
To Connect to Composite Output of AV
device such as Set Top Box or VCR
6
HDMI OUT
To Connect to HDMI input of TV
11
COAXIAL
To Connect to Coaxial Input of Digital Amplifier
7
OPTICAL
To Connect to Optical Input of Digital Amplifier
17
EURO AV IN/OUT
To Connect to Scart Output of AV device
such as Set Top box or VCR
18
EURO AV OUT (TV)
To Connect to Scart Input of TV
9
Power S/W
Mechanical Power Switch to supply power to
HMR or to cut it off
10
DC IN (12V)
To Connect Power Adapter cable
2
DV In
Digital Input jack (IEEE1394) for Digital
Camcorder
17
18
1 2 3 4 5 6 7
8 9 10 11 141312 15 16

Control & Name
9
Control & Name
Rear - Standard Version
8
FAN
Cooling Fan
1
EXT. IR
For the extension IR cable
3
USB HOST
Digital Input jack for USB Storage (USB
external HDD or USB memory) It can be
used for the Digital TV or Wireless Option.
4
USB PC
To Connect to USB host of Computer for
using HMR as an external HDD
5
LAN
To Connect to LAN cable
6
HDMI OUT
To Connect to HDMI input of TV
7
OPTICAL
To Connect to Optical Input of Digital Amplifier
9
Power S/W
Mechanical Power Switch to supply power to
HMR or to cut it off
2
DV In
Digital Input jack (IEEE1394) for Digital
Camcorder
1 2 3 4 5 6 7
8 9 10 11 141312 15 16
16
AUDIO OUT
To Connect to Audio Inputs (L, R) of TV
15
AUDIO IN
To Connect to Audio out of AV device such as
Set Top Box or VCR.
12
COMPONENT VIDEO OUT
To Connect to Component Video Input of TV
14
VIDEO OUT
To Connect to Composite Video Input of TV
13
VIDEO IN
To Connect to Composite Output of AV
device such as Set Top Box or VCR
11
COAXIAL
To Connect to Coaxial Input of Digital Amplifier
10
DC IN (12V)
To Connect Power Adapter cable

Control & Name
Control & Name
10
Remote Control
A-B
To repeat a certain section.
A
AUDIO
To select Audio language or Audio channel
ARROW (
▲▼◄ ►
)
To select an item of menu.
DV
To go to DV input mode for Digital Camcorder
CM SKIP
To jump to 30 seconds forward
C
D
DISPLAY
To view the information on current working status.
To make it disappear pressing one more time
ENTER
To execute the selected function
EDIT
To edit the selected title or files
E

Control & Name
11
Control & Name
NG
I
P
R
NEXT
To jump to next chapter or next pre-specified point
PREV
To jump back to previous chapter or previous prespecified point
GOTO
To go back or forward to the specific point
NUMERIC (0~9)
To select number or to type the number
INS REPLAY
To jump to 10 seconds backward
PAUSE/STEP
To pause playing to view the still picture. To view
the next video frame by each time pressing
PLAY
To view the selected titles and files
REC
To start recording. To select one touch recording
step by pressing additionally
REPEAT
To select the repeat mode of the title or files being
played
RETURN
To get out of the current mode, To go to one
directory back in the file directory
H
HDD
To go to REC list
GUIDE
To show the guide menu
L
LAN
To go to browsing folders or files of connected LAN
M
MUTE
To turn on or off the sound
POWER
To turn on or off from stand by mode
S
SCAN-FWD
To go forward fast during playback
SCAN-REV
To go backward fast during playback
SLOW
To go slowly during playback
SOURCE
To select input mode and to go to it
STOP
To stop the playback
SUBTITLE
To select and to view the subtitle
Control & Name
Control & Name
12
TIME SHIFT
To start Time Shift or To stop Time Shift
T
TV SYSTEM
To select TV system. It toggles NTSC
PAL
NTSC Progressive Scan (480P) PAL
Progressive Scan(576P)
720P 1080i
NTSC
U
TV/HMR
To select TV signal or HMR signal when they are
connected with Scart Cable.
It works only they are connected with Scart cable.
It is useful especially if your Scart TV has Scart
Auto Detect function
USB
To go to browsing folders or files of connected
USB storage
• You can not see the picture if you select the wrong TV
system that your TV do not support
NOTE
V
VOLUME -
To volume down
Z
ZOOM
To start and to select Zooming functions
VOLUME +
To volume up
Connection
13
Connection
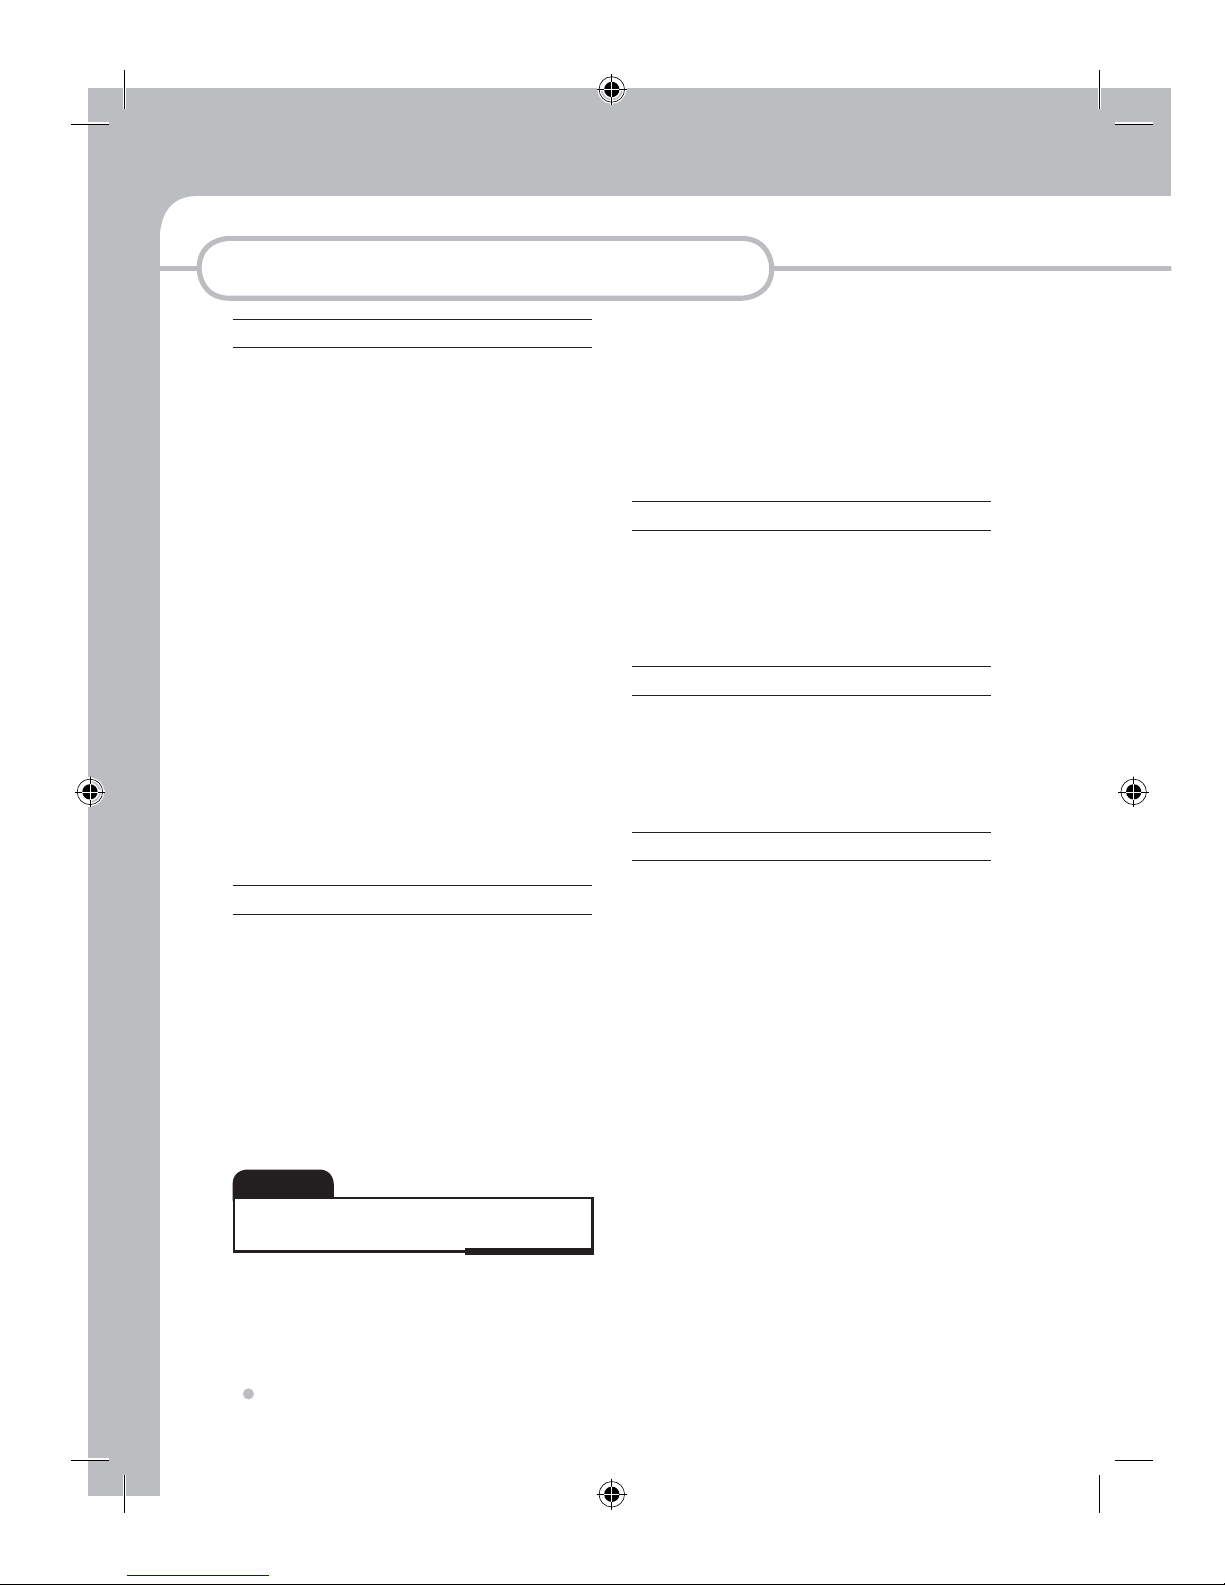
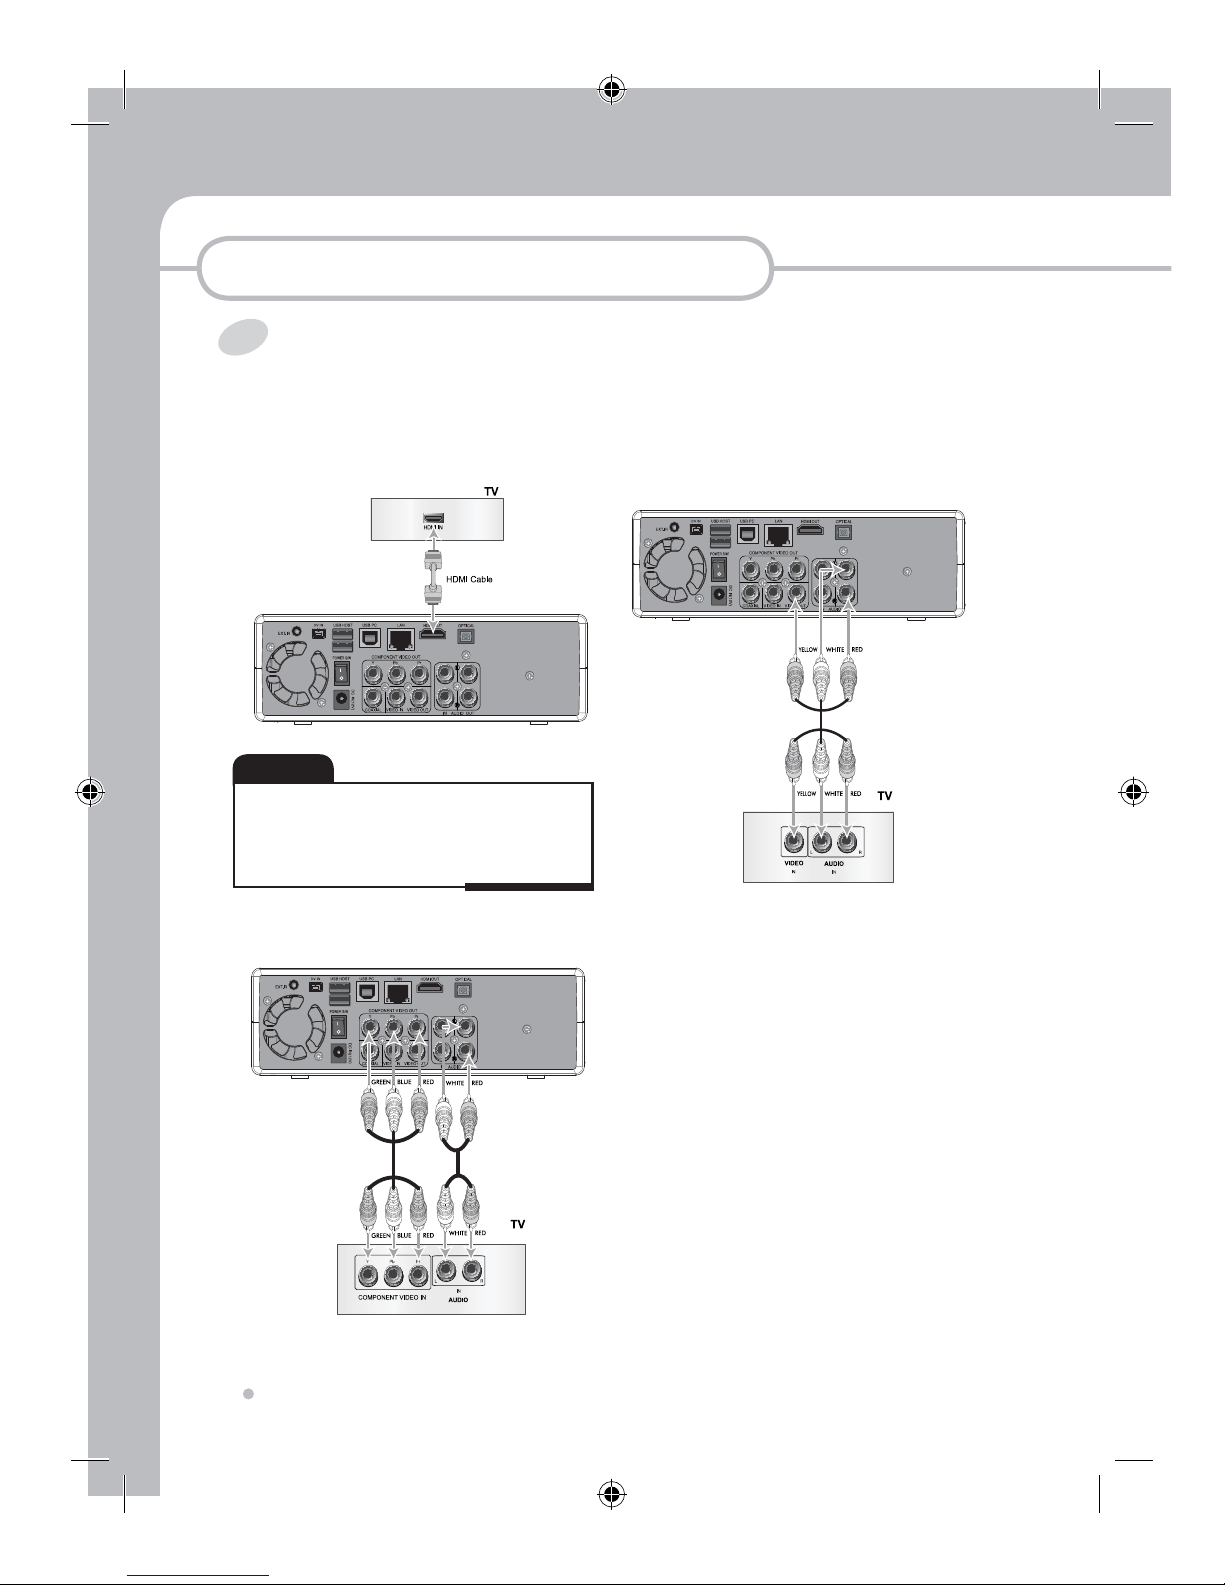
1
Connection to TV
1-1
HDMI
1-3
A/V (Composite Video and 2ch Audio)
1-4
Component Video and 2ch Audio
1-2
Scart
Rear - Euro Scart Verion
• Most of HDMI TV do not support interlaced signal
(576i/480i) which is default video output setting in this
unit. Please press TV system button on remote control
in order to get the right signal when you connect TV with
HDMI cable.
NOTE

Connection
Connection
14
2
Connection to AV Input with AV device
(Satelite, Digital Terestrial, or Cable Set
Top box, VCR etc.)
2-1
Scart Input
2-2
AV Input (Composite Video and 2ch
Audio)
Connection
15
Connection
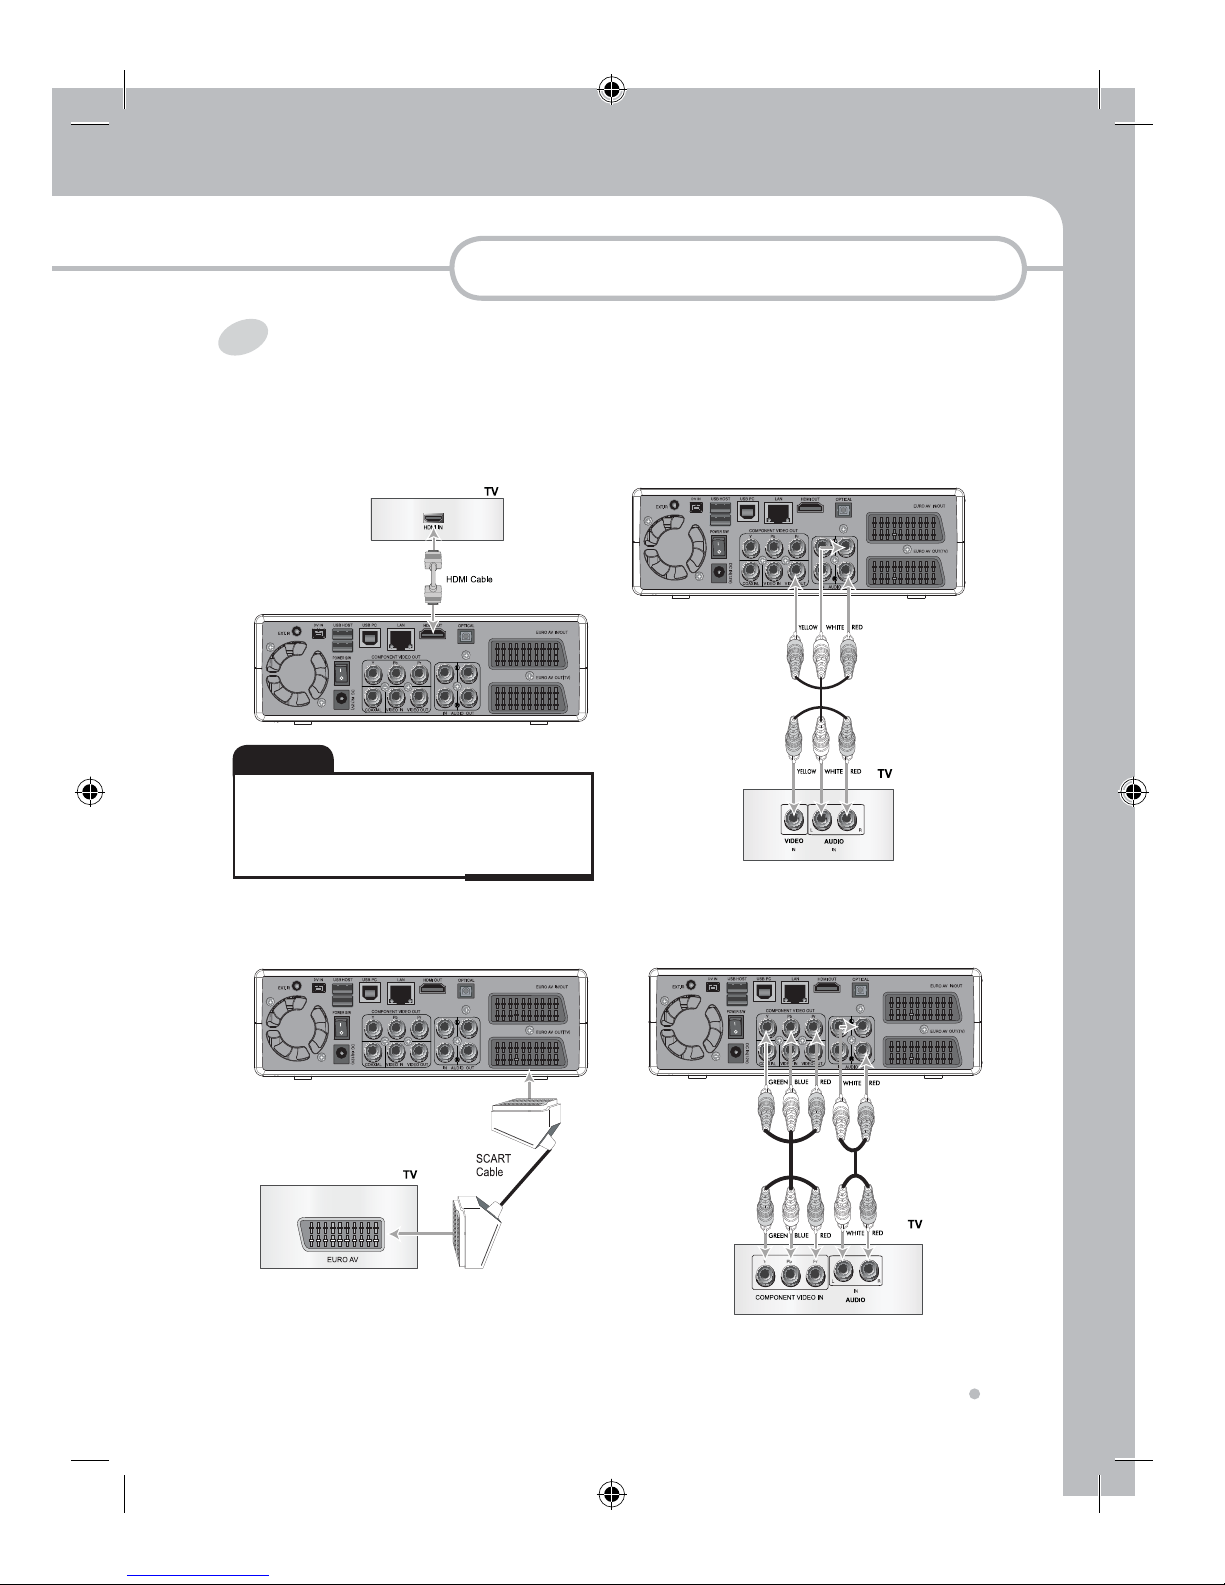
3
Connection to Digital Amplifier
3-1
Coaxial Audio Out
3-2
Optical Audio Out
4
Connection to Computer
• Please connect HMR to USB 2.0 port in order to get the
high speed (Upto 480Mbps) file transfer.
• HMR shall work only USB 1.1 speed if it is connected to
USB 1.1 port in your computer
NOTE
Connection
Connection
16
6
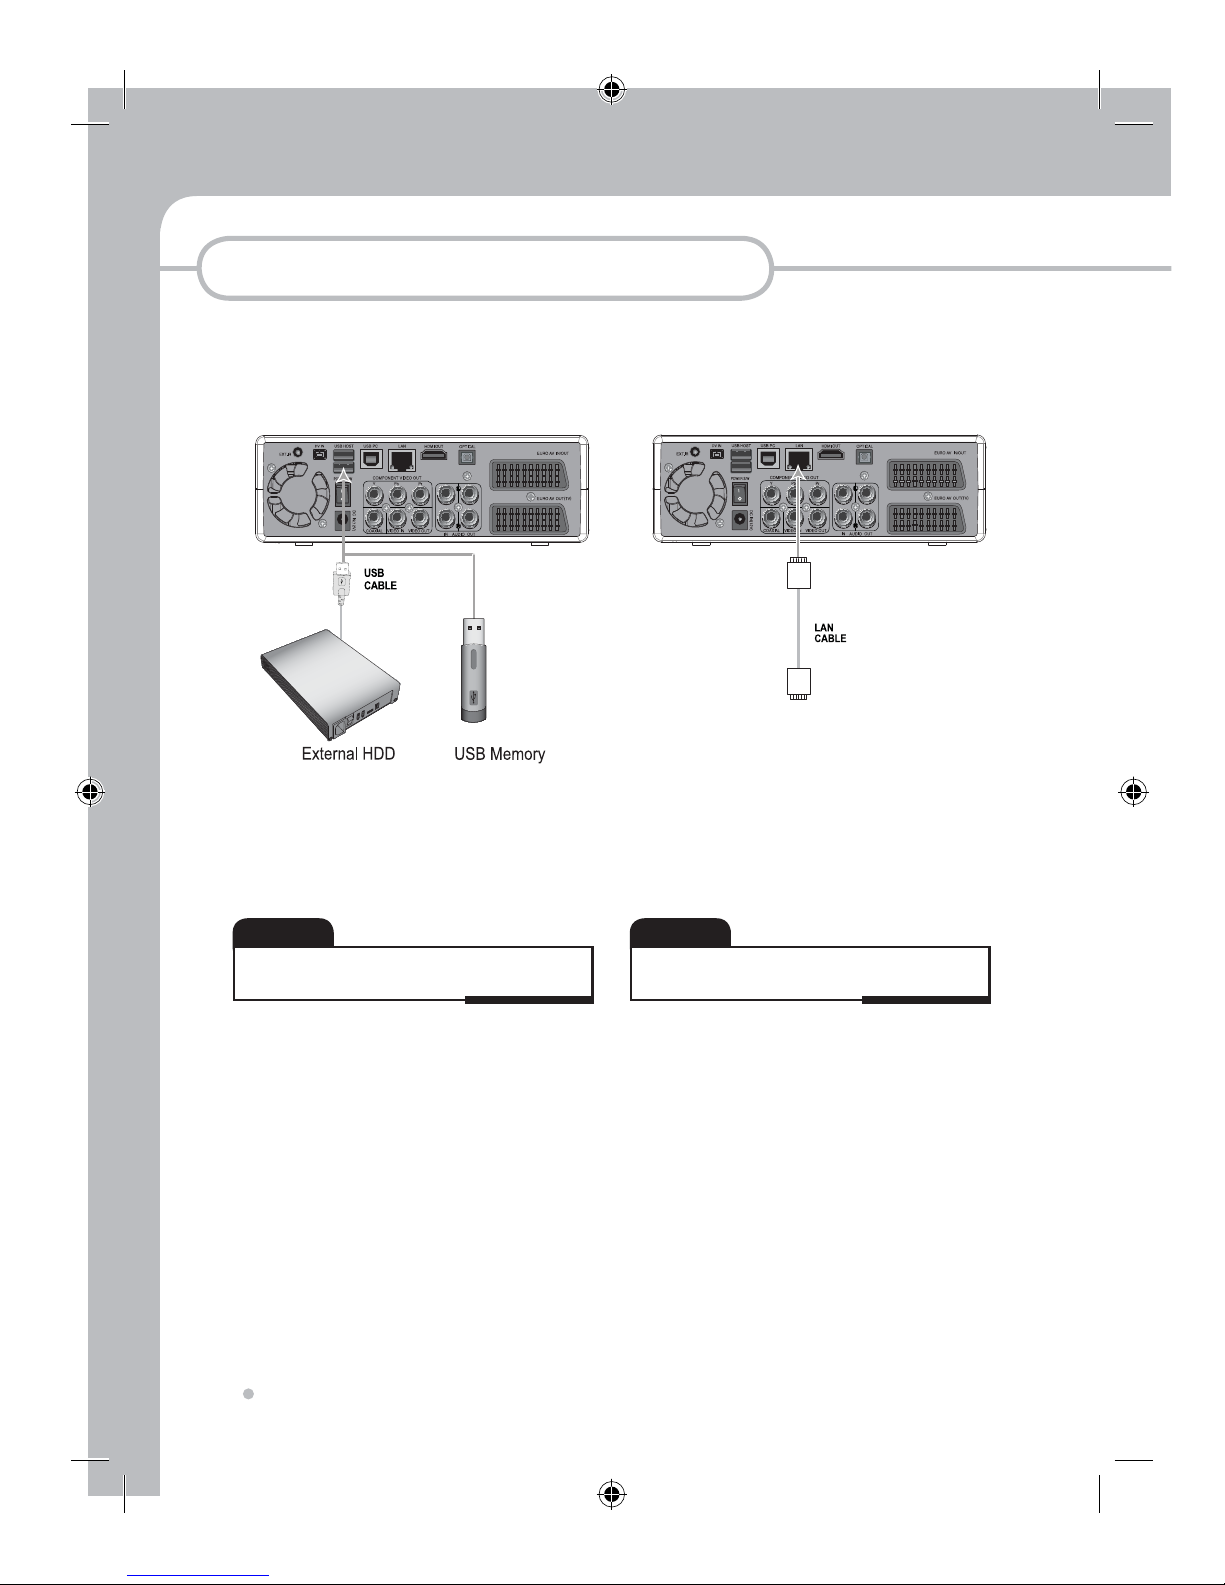
Connection with LAN
• Please refer to Network explanation in Using the SET UP
Menu (Network Section)
NOTE
5
Connection to USB external HDD or USB
Memory (2 port)
• You can also connect the Digital TV USB Dongle and
Wireless Dongle which are optional accessories.
NOTE
Connection
17
Connection
7
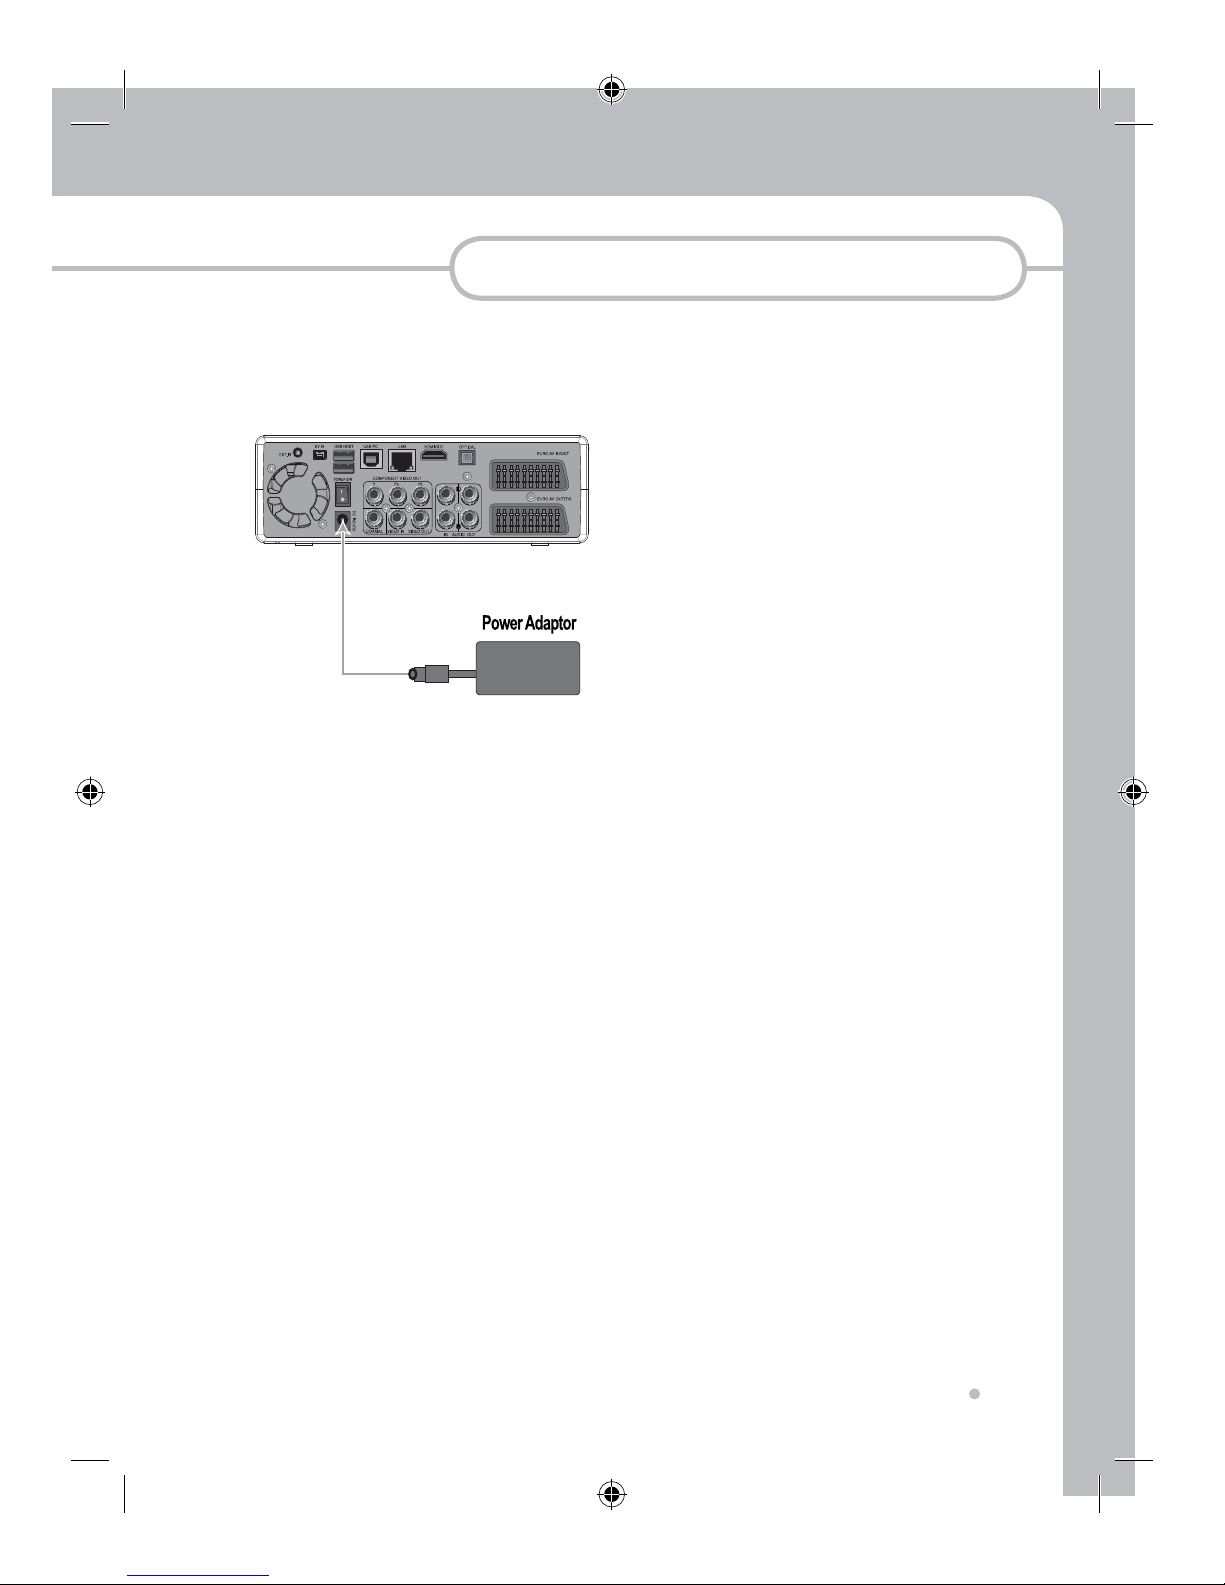
Connection for Power Adaptor
Connection
Connection
18
1
Connection to TV
1-1
HDMI
1-3
A/V (Composite Video and 2ch Audio)
1-2
Component out
Rear - Standard Version
• Most of HDMI TV do not support interlaced signal
(576i/480i) which is default video output setting in this
unit. Please press TV system button on remote control
in order to get the right signal when you connect TV with
HDMI cable.
NOTE
 Loading...