

Page 1
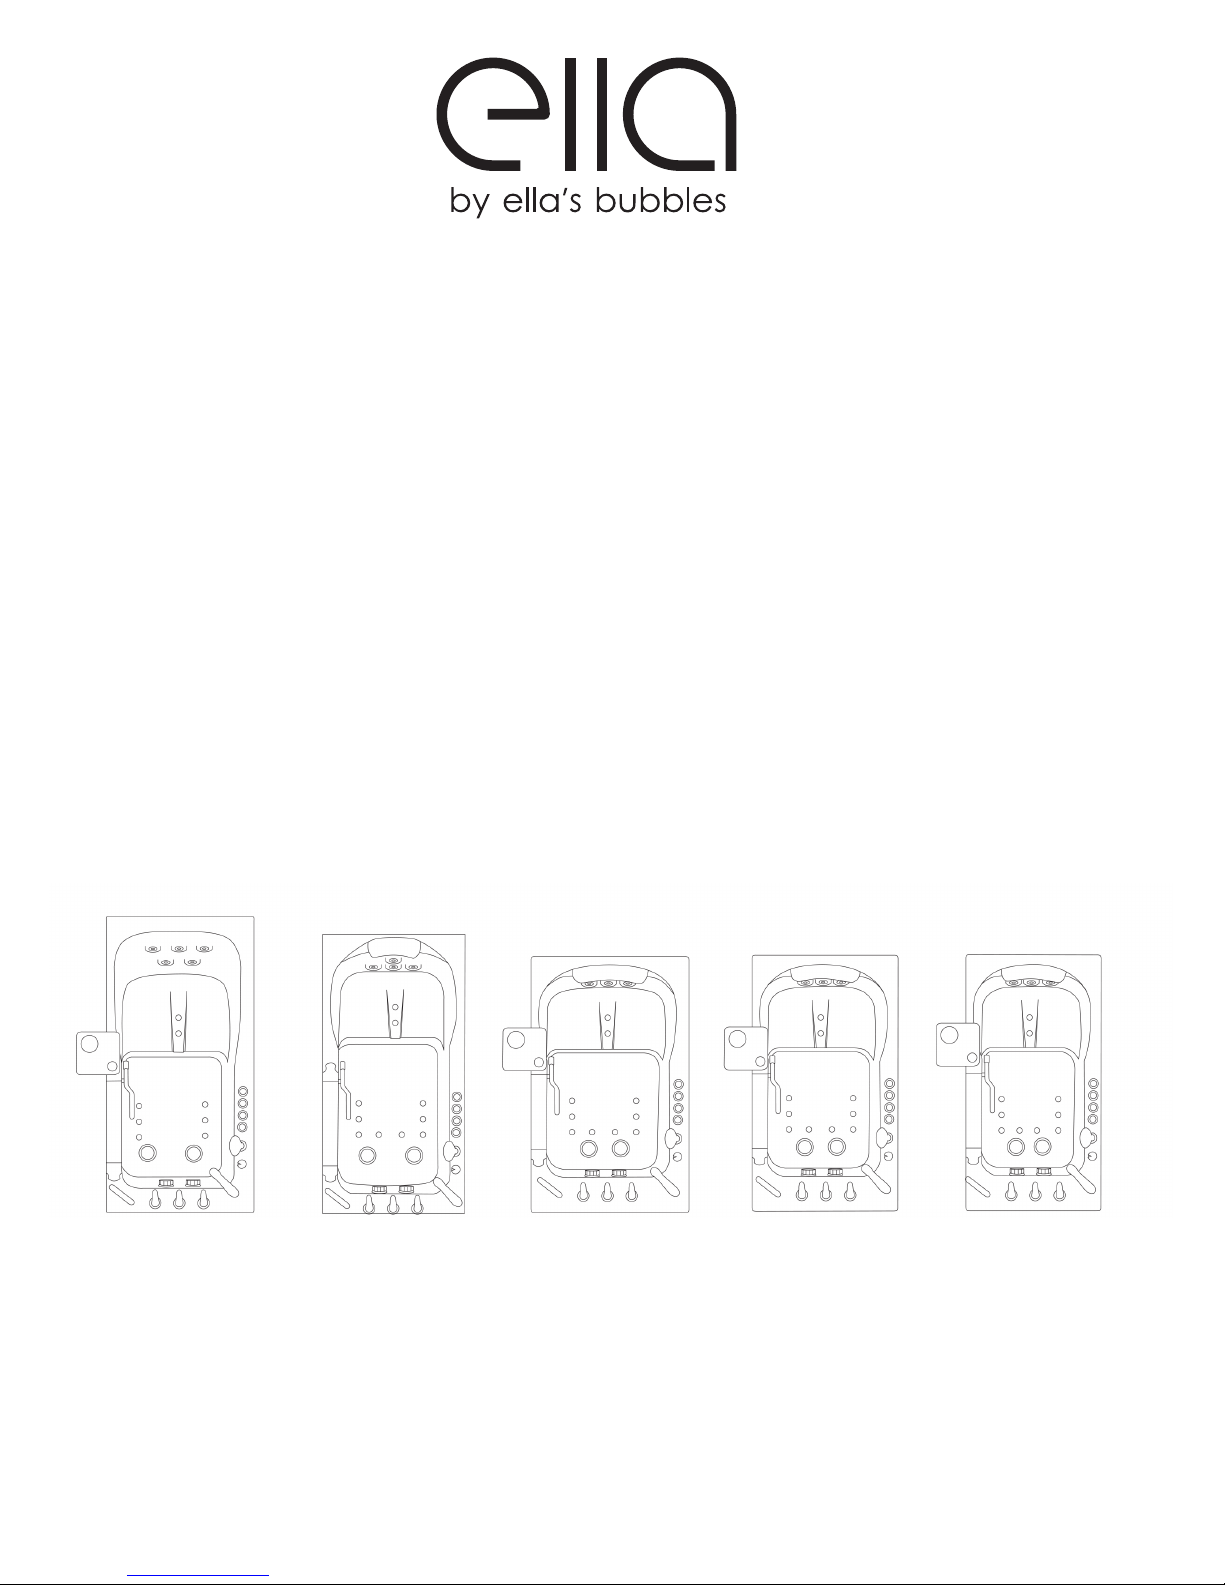
ELLA ACRYLIC WALK IN BATHTUBS
OWNERS MANUAL
Ultimate Deluxe Elite Petite
93057 L / 93058 R 93107 L / 93108 R 93167 L / 931688 R 93217 L / 93218 R
Royal
93117 L / 93118 R
Page 2
Table of Contents
ww w.ellasbubbles.com 03/18
IMPORTANT
Warranty Activation Form MUST be completed for both the Owner and Installer to validate
the warranty.
Failure to complete both pages (p.18 and p.19) will void the warranty on this bathtub.
Completed Ella Warranty Activation Forms can be emailed to [email protected],
faxed to 312.666.3551, OR mailed to 2101 S. Carpenter St., Chicago, IL 60608
Page 3
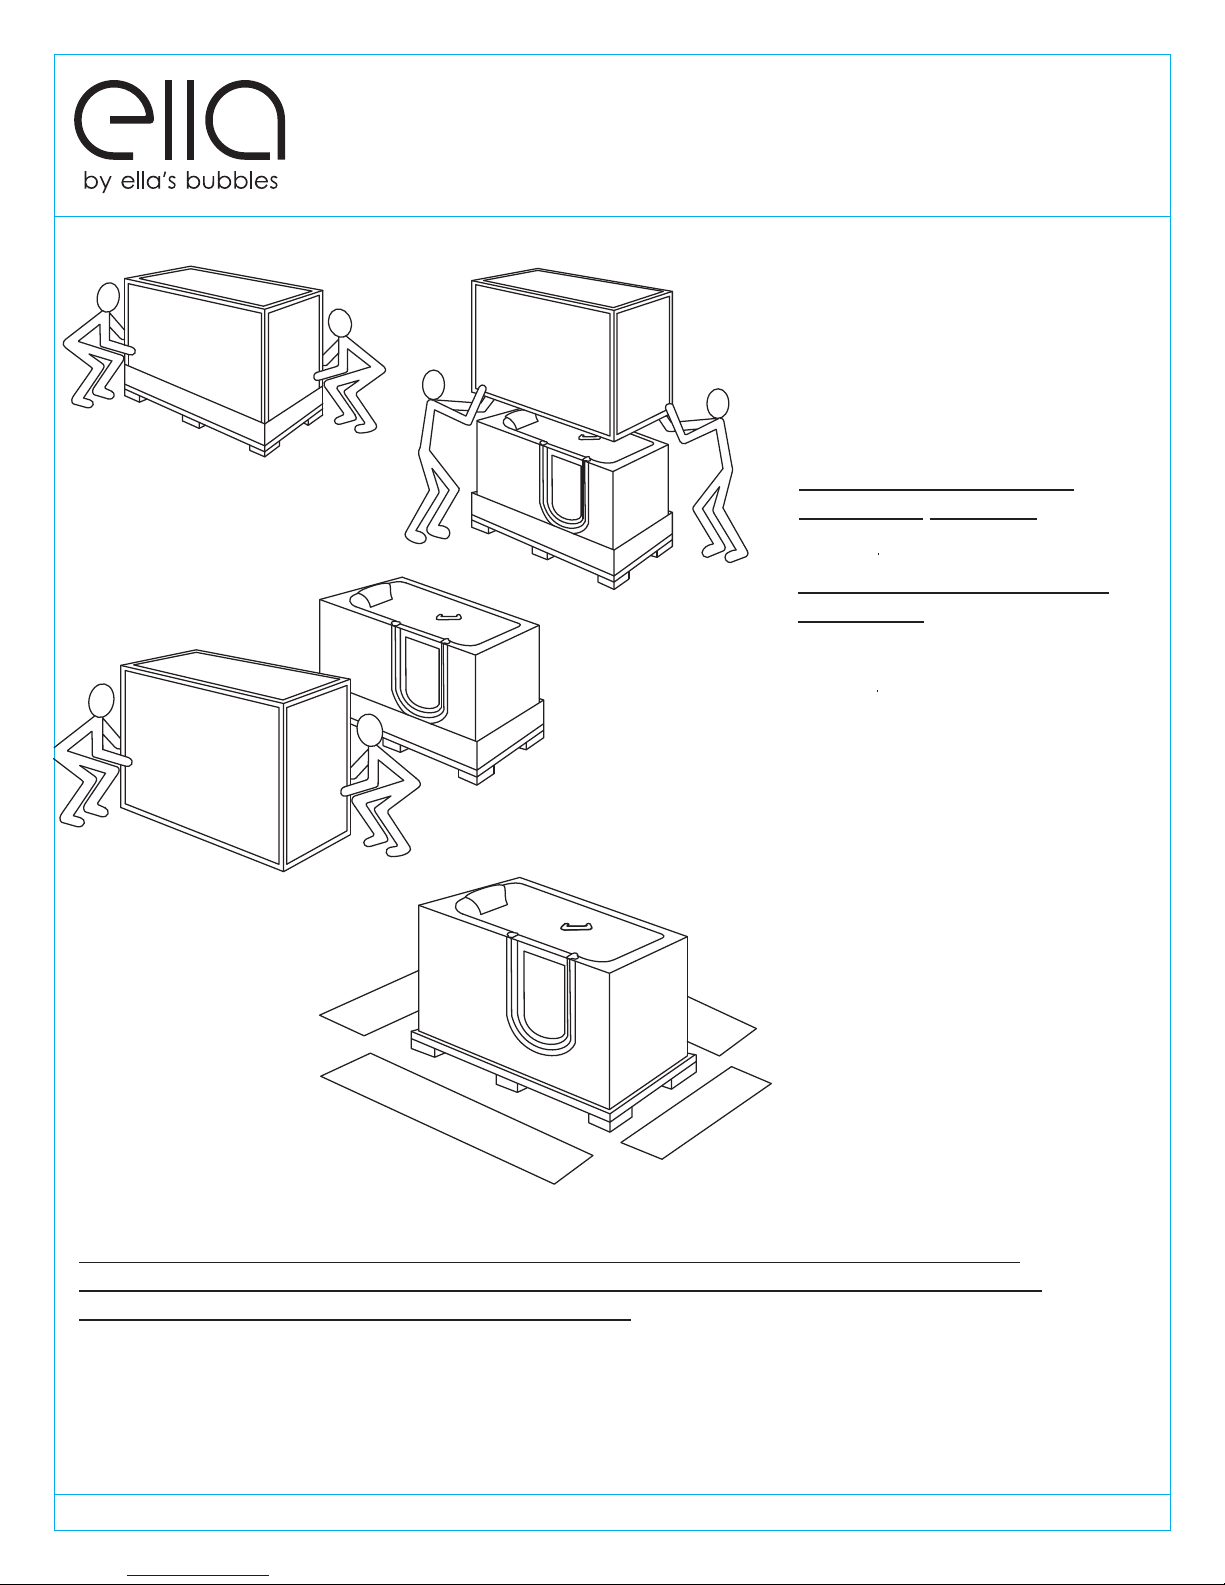
Unpacking and Inspecting
Inspect the carton for
damage: Take a picture if
possible.
CAREFULLY RECORD ALL
PERCEIVED DAMAGE
DO NOT LIFT THE
PLUMBING.
result in leaks, for which the
installer is responsible. All
Walk-In Tubs are water tested
before they leave our
factory and the bath tub you
have purchased has passed
inspection.
Inspect the plumbing for any
fittings that may have
loosened in transit.
TUB BY THE
Doing so can
You must follow all the instructions in this manual.
FAILURE TO READ AND COMPLY WITH ALL INSTRUCTIONS CAN RESULT IN PRODUCT
DAMAGE OR INJURY TO BOTH INSTALLER AND HOMEOWNER. IT WILL ALSO RESULT IN
ASSUMPTION OF ALL LIABILITY BY SAID INSTALLER
NOTE: Returns are only accepted in original packaging used for shipping. Use caution so as
not to damage cardboard crate or its wooden pallet. Do not dispose of shipping material
until installation is complete. Please visit our website, www.ellasbubbles.com for complete
details of return/exchange policy.
ww w.ellasbubbles.com Page 1 03/18
Page 4
Warnings and Labels
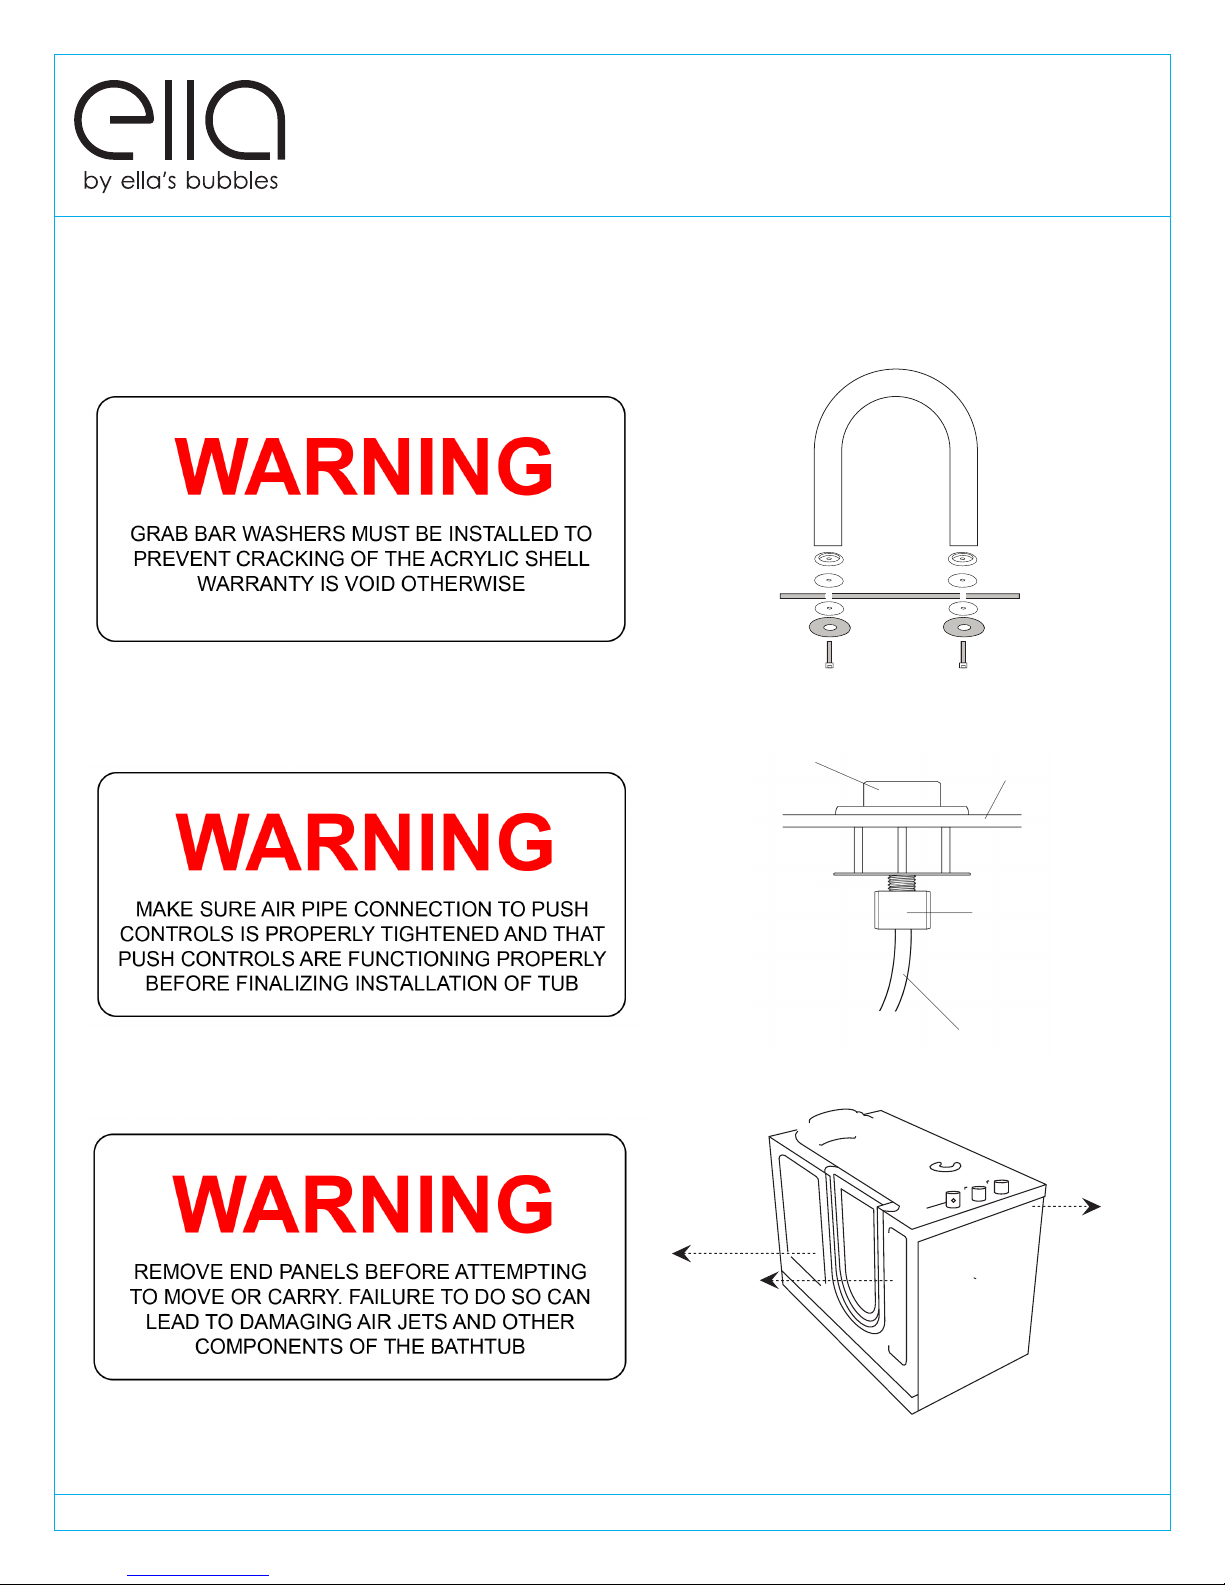
Your Ella's bathtub comes with several warning label stickers throughout and are as follows:
Details on Page 12
Push Control
Acrylic Shell
Back nut
Air hose
Details on Page 3
ww w.ellasbubbles.com Page 2 03/18
Page 5
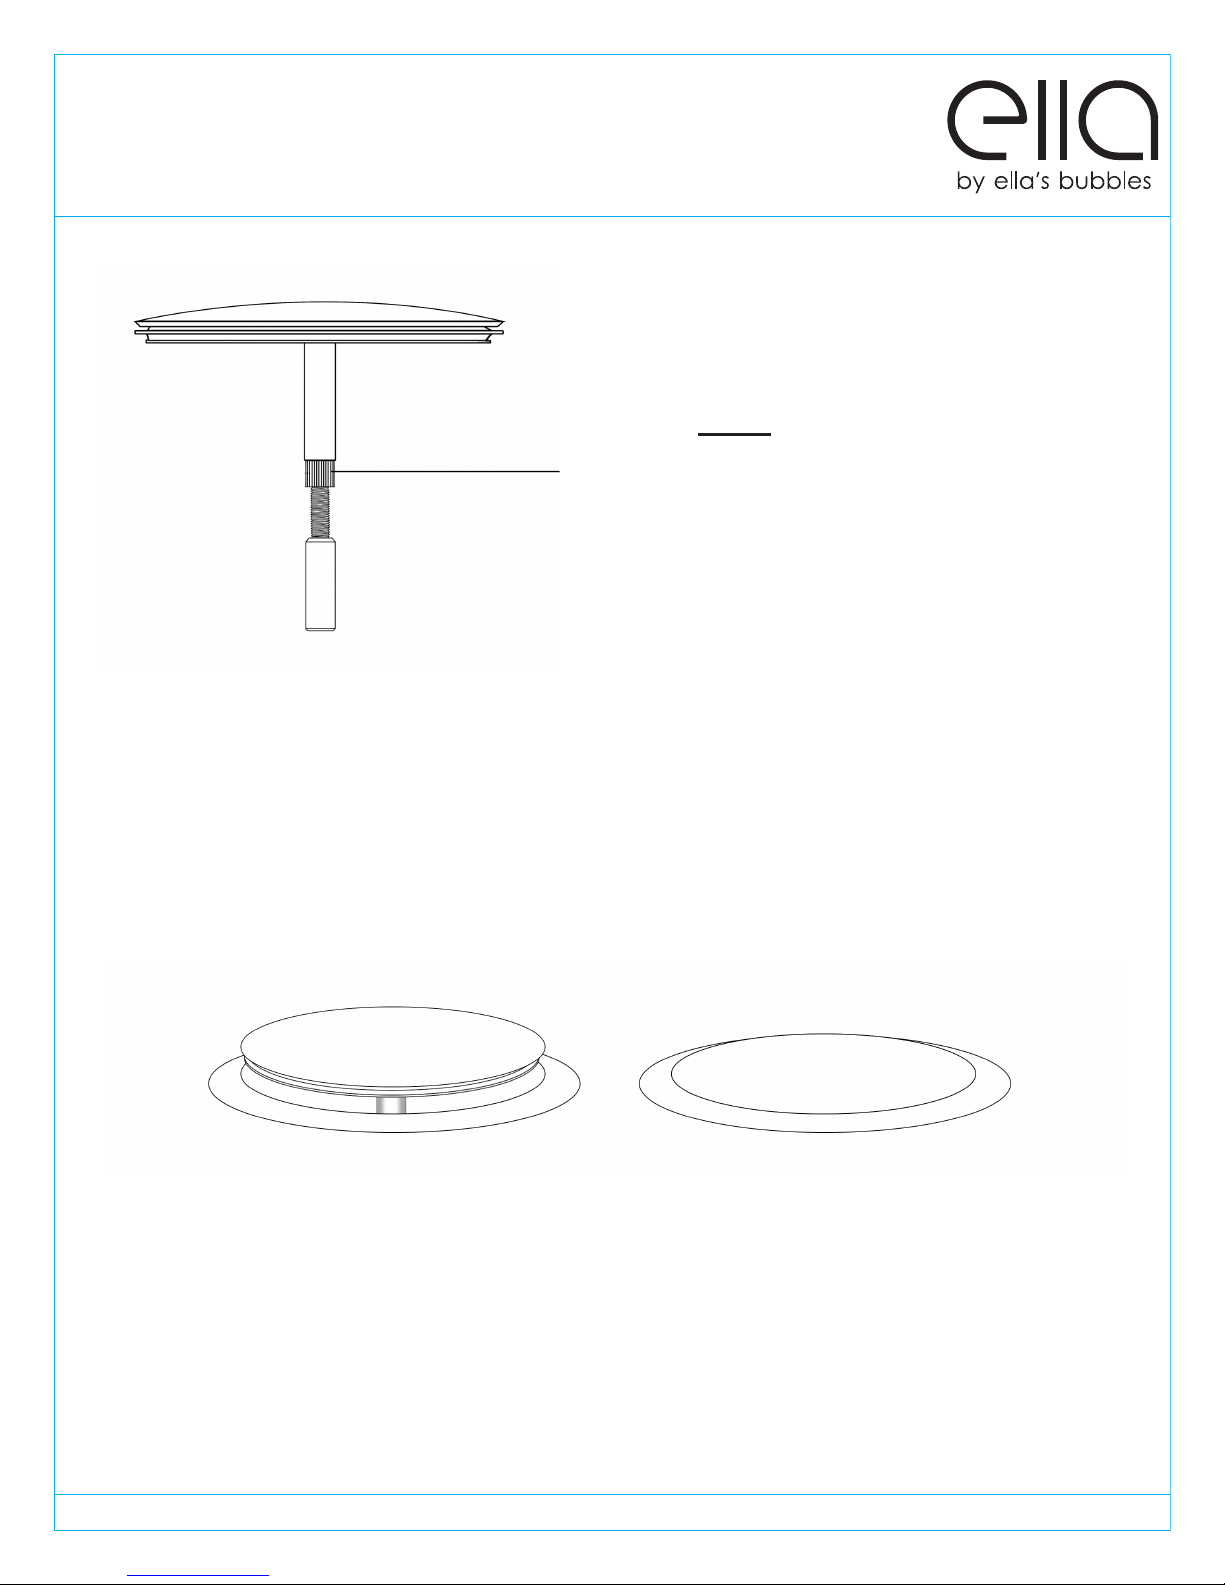
Warnings and Labels continued
Backnut MUST be securely tightened.
Failure to do so will cause loosening
over time resulting in it coming apart
and falling down the drain.
Drain open
all the way
Drain closed
completely
Drain must open completely to drain
properly and close completely to avoid
unnecessary drainage.
ww w.ellasbubbles.com Page 3 03/18
Page 6
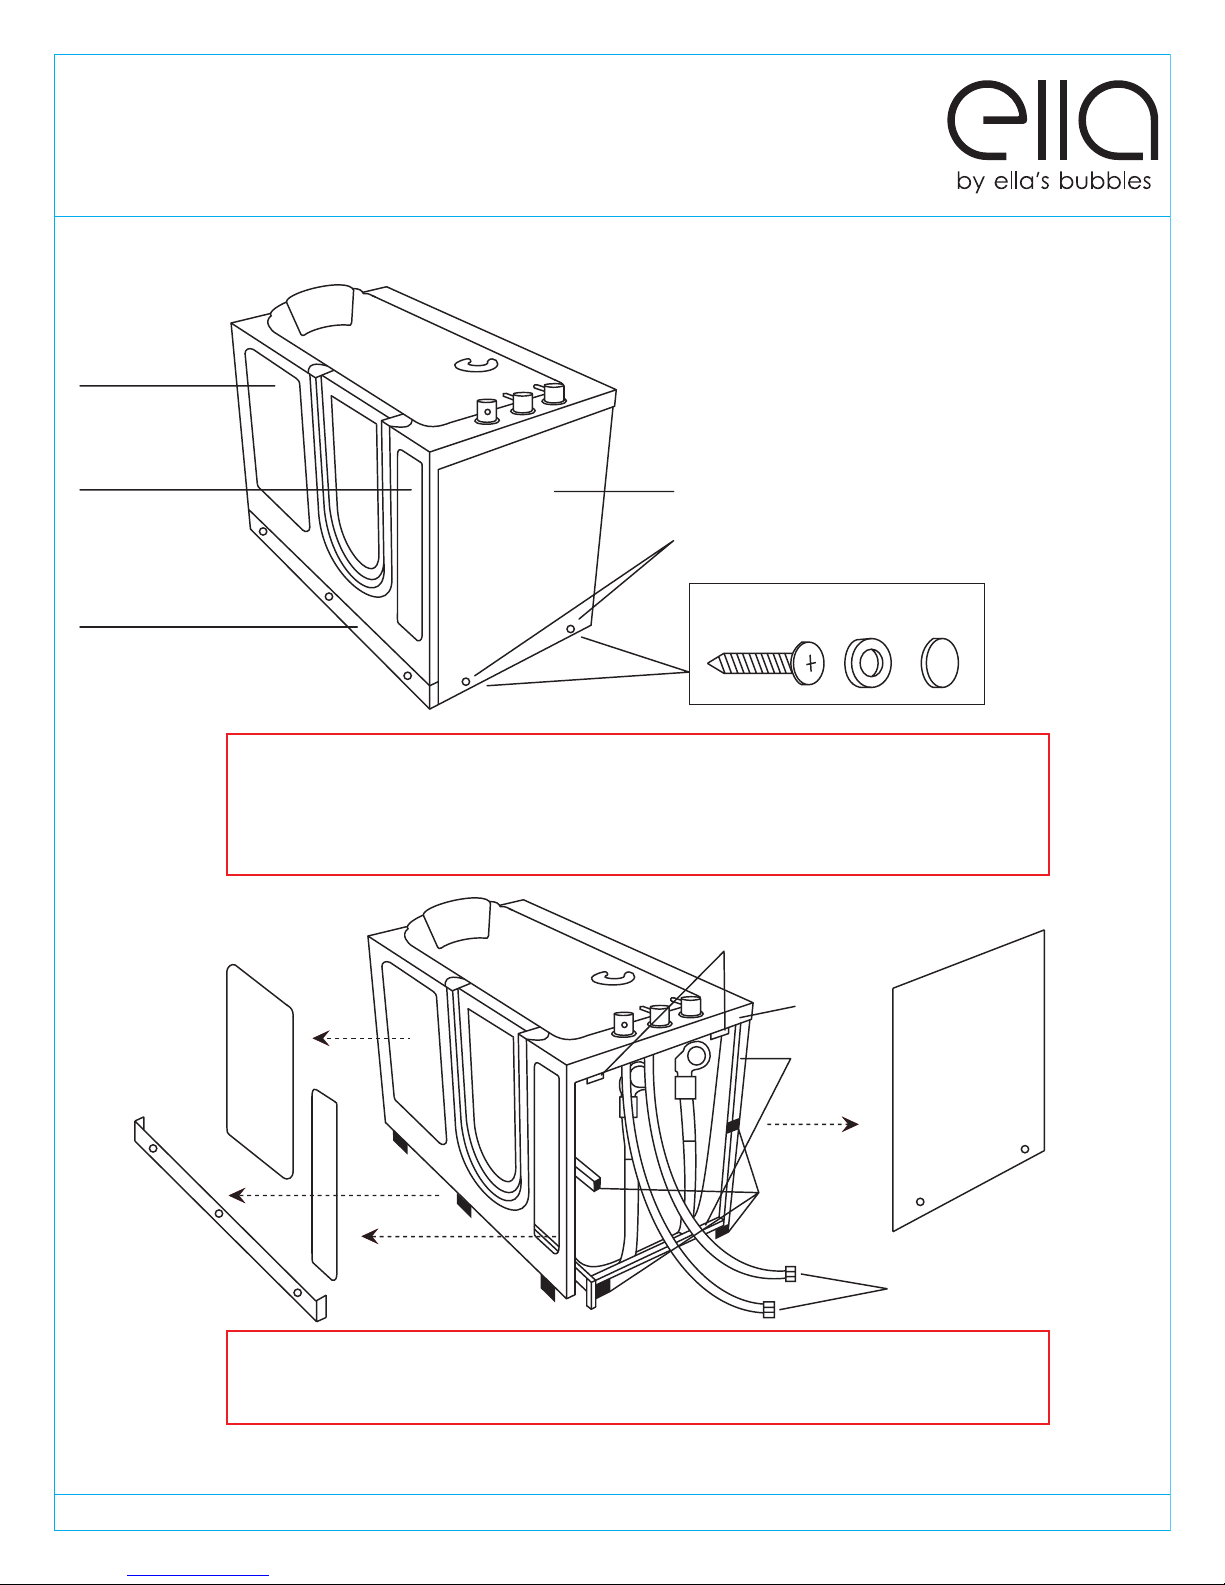
Large Access Panel (1)
Small Access Panel (2)
End Access Panel (4)
White Screw Caps
Toe Kick Access (3)
- Access to parts
- Option to lower the Threshold
•Remove all four (4) access panels before
moving the tub
•Take off the screw caps
•Unscrew the screws with a
Philips head screwdriver
•Remove the end access panel
Screw Washer Cap
WARNING: Do not carry the walk in tub by the panels. Be careful when carrying
the tub, avoid front panel contact with the floor or stairs to prevent damages.
Make sure no loose parts are hanging down. Remove all four (4)access panels
before carrying the tub to prevent them from falling out and breaking.
Slide On Brackets
Deck
Frame
Access Panel
Screw-On
Support Brackets
Water Supply Lines
End Access
Panel
WARNING: Lift and carry the tub only by the frame. Protect the bottom of the
tub to avoid breaking the air jets positioned on the bottom of the tub.
Moving your Ella Walk in Bath
ww w.ellasbubbles.com Page 4 03/18
Page 7
Important Safety Instructions
WARNING:
***Read through the entire manual completely before beginning installation.***
Contract a licensed plumber and electrician for installation. Be sure you and your
contractor are aware and follow all local plumbing and electrical codes. Your Ella Walk
in Bath is not intended for outdoor use. Install the tub in accordance with the instructions
in the manual. Use ONLY the parts and accessories provided or as recommended by the
manufacturer.
CAUTION:
When using this product, basic precautions should always be followed. Read and follow
all instructions pertaining to risk of re, electric shock and injury. Make sure and have your
licensed electrician test all connections to the dedicated line, including the GFCI.
Risk of electric shock; Do not permit electric appliances within 3 feet (1.5m) of the tub. i.e.:
hair dryers, lamps, phones, radios, televisions, etc.
To reduce the risk of injury, do not permit children or persons with disabilities to use this
product unless they are supervised by an able-bodied adult at all times. Never drop or
insert any objects into any openings.
Do not turn on the Hydro jets without water reaching the waterline. The waterline is the point
where all jets are covered with water.
DANGER:
Temperature in excess of 100.4 Fahrenheit (38 Celsius) may be harmful to your health. Check
and adjust the temperature before use. Consult your physician before using your Ella Walk in
Bath if you have a heart condition or other health issues. People using medications, herbal
remedies, sleep aids, and/or having adverse medical history should consult a physician
before using this product.
Pregnant women should NOT use this product before consulting their physician. Avoid the
use of alcohol, drugs or other medications while using your walk in bath.
Be aware, hyperthermia is a risk when raising body temperature. Do no keep body
submerged in heated bath for extended periods of time. The symptoms of hyperthermia
include an increase in body temperature which can cause dizziness, lethargy, drowsiness
and fainting. Avoid using the heated bath after strenuous activity.
Exercise caution while entering and exiting your Ella Walk in Bath.
ww w.ellasbubbles.com Page 5 03/18
Page 8
Important Safety Instructions
WARNING:
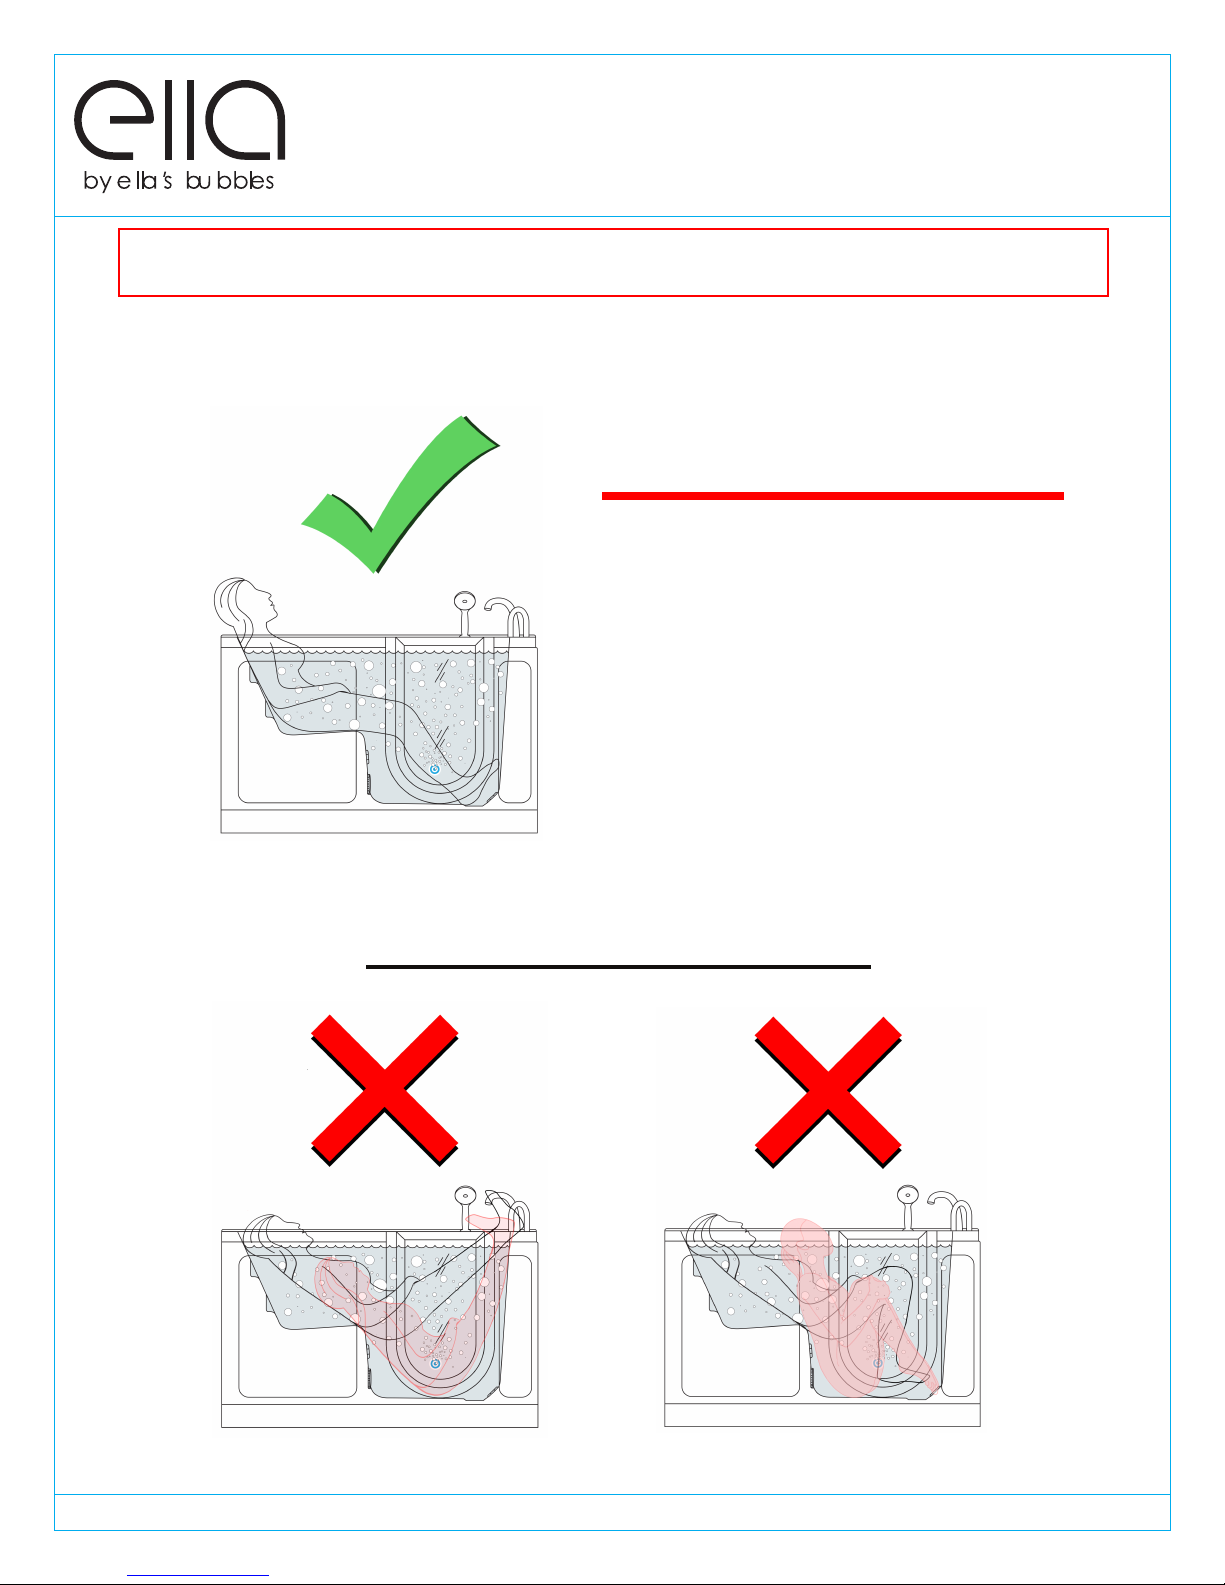
***USE TUB ONLY AS INTENDED! FAILURE TO DO SO CAN LEAD TO INJURY OR DEATH***
CORRECT
WARNING
BATHER SHOULD ONLY SIT AS SHOWN IN FIGURE TO
THE LEFT. SIT FULLY IN SEAT WITH BACK ON THE
BACKREST. DO NOT ATTEMPT TO SLOUCH OR LIE
DOWN IN THE FOOT WELL AREA! DO NOT ATTEMPT
TO PUT YOUR FEET UP ON OPPOSITE SIDE OF TUB!
In the case of bathers who do not have all
functioning limbs or are paralyzed, bather must
be attended by caregiver at all times and use an
installed safety belt at all times.
WRONG POSITIONING
ww w.ellasbubbles.com Page 6 03/18
Page 9

Required Steps Prior to Installation
Protecting the Bath
Cover and protect the bath shell and fixtures from scratches or other damages during the
installation and tests. Remove the access panels when moving the Walk in Bath and
always lift the bathtub from the frame.
Electrical
The unit MUST be connected to a circuit protected by a ground fault circuit interrupter
(GFCI) provided and installed by a licensed electrician and tested periodically (refer to
instructions provided by GFCI manufacturer). Electrical requirements vary based on
package; please refer to package diagrams included in the specifications. A licensed
electrician for your area is required to install and test the electrical installation process. DO
NOT use any kind of extension cords to power the unit.
Operating the pumps without first filling the bath to above the jets can cause permanent
damage to your equipment.
Push the GFCI “test” button into “reset” mode. If the GFCI fails to operate in this manner,
there is a ground current flow or a device malfunction, indicating the possibility of electrical
shock. If this occurs, turn OFF the power and do not use the bathtub until the source of the
problem has been identified and corrected.
Water Test
It is important to test that the Hydro and Air Pumps are functioning properly before final in-
wall installation to avoid unnecessary repairs or removal.
Place the tub on a completely flat surface in an area where it may be drained after
A.
testing.
Using a clean rag and warm water wipe down seal to insure it is free of debris.
B.
Seal the drains (this can be done with tape) and fill the tub to at least three inches
C.
above the highest jet, or to the bottom of the grab bar if no jets are present.
Allow the water to stand in tub for 30 minutes and then inspect all plumbing and seals for
D.
leaks.
Using appropriately rated three-prong extension cords, all plugged in to separate outlets,
E.
operate all electrical components (air blower, water pump, and heater if applicable) for
another 30 minutes and inspect for leaks again. Inspect the unions around the pump and
heater.
If a leak persists at a union after tightening, it may have been over-tightened or might
F.
have a displaced O-ring. Disassemble it and make sure the O-ring was seated properly.
Do the same if a leak persists at the heater. Verify that the heater threads match the
pipe threads.
ww w.ellasbubbles.com Page 7 03/18
Page 10
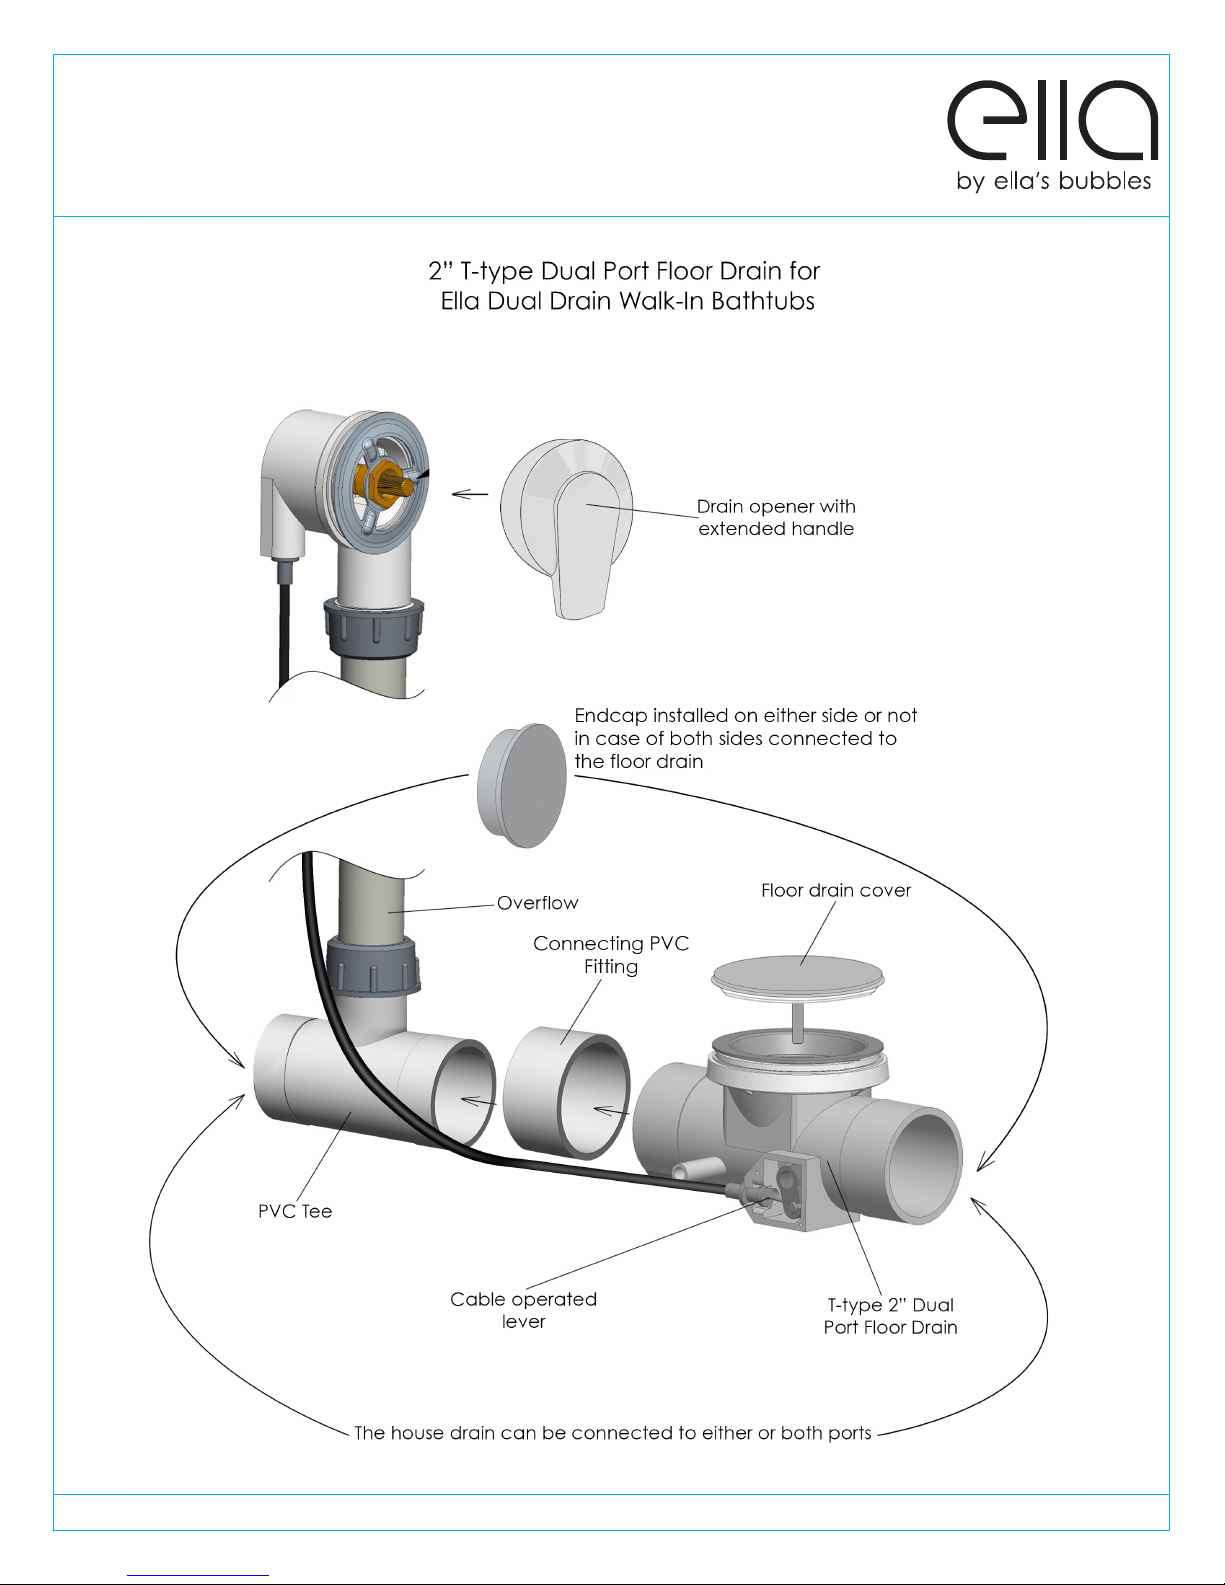
Drain and Plumbing Positioning Options
ww w.ellasbubbles.com Page 8 03/18
Page 11
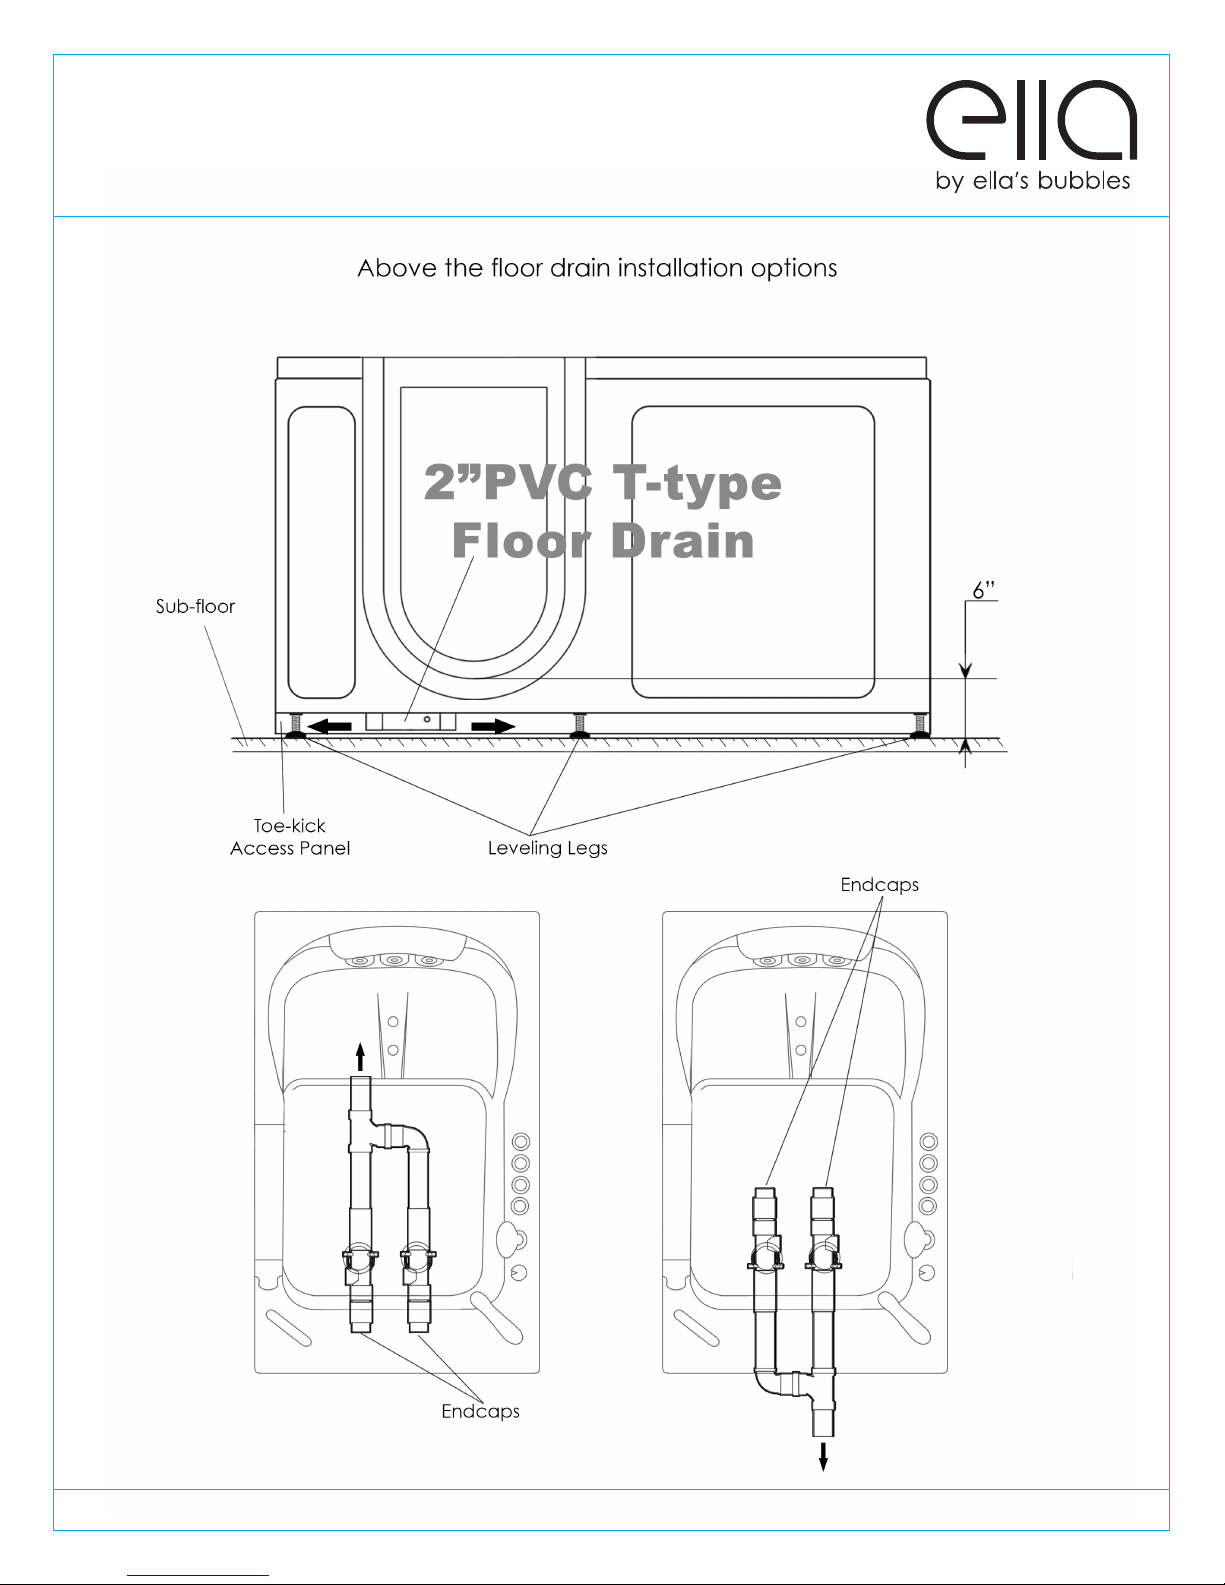
Drain and Plumbing Positioning Options
ww w.ellasbubbles.com Page 10
Page 12
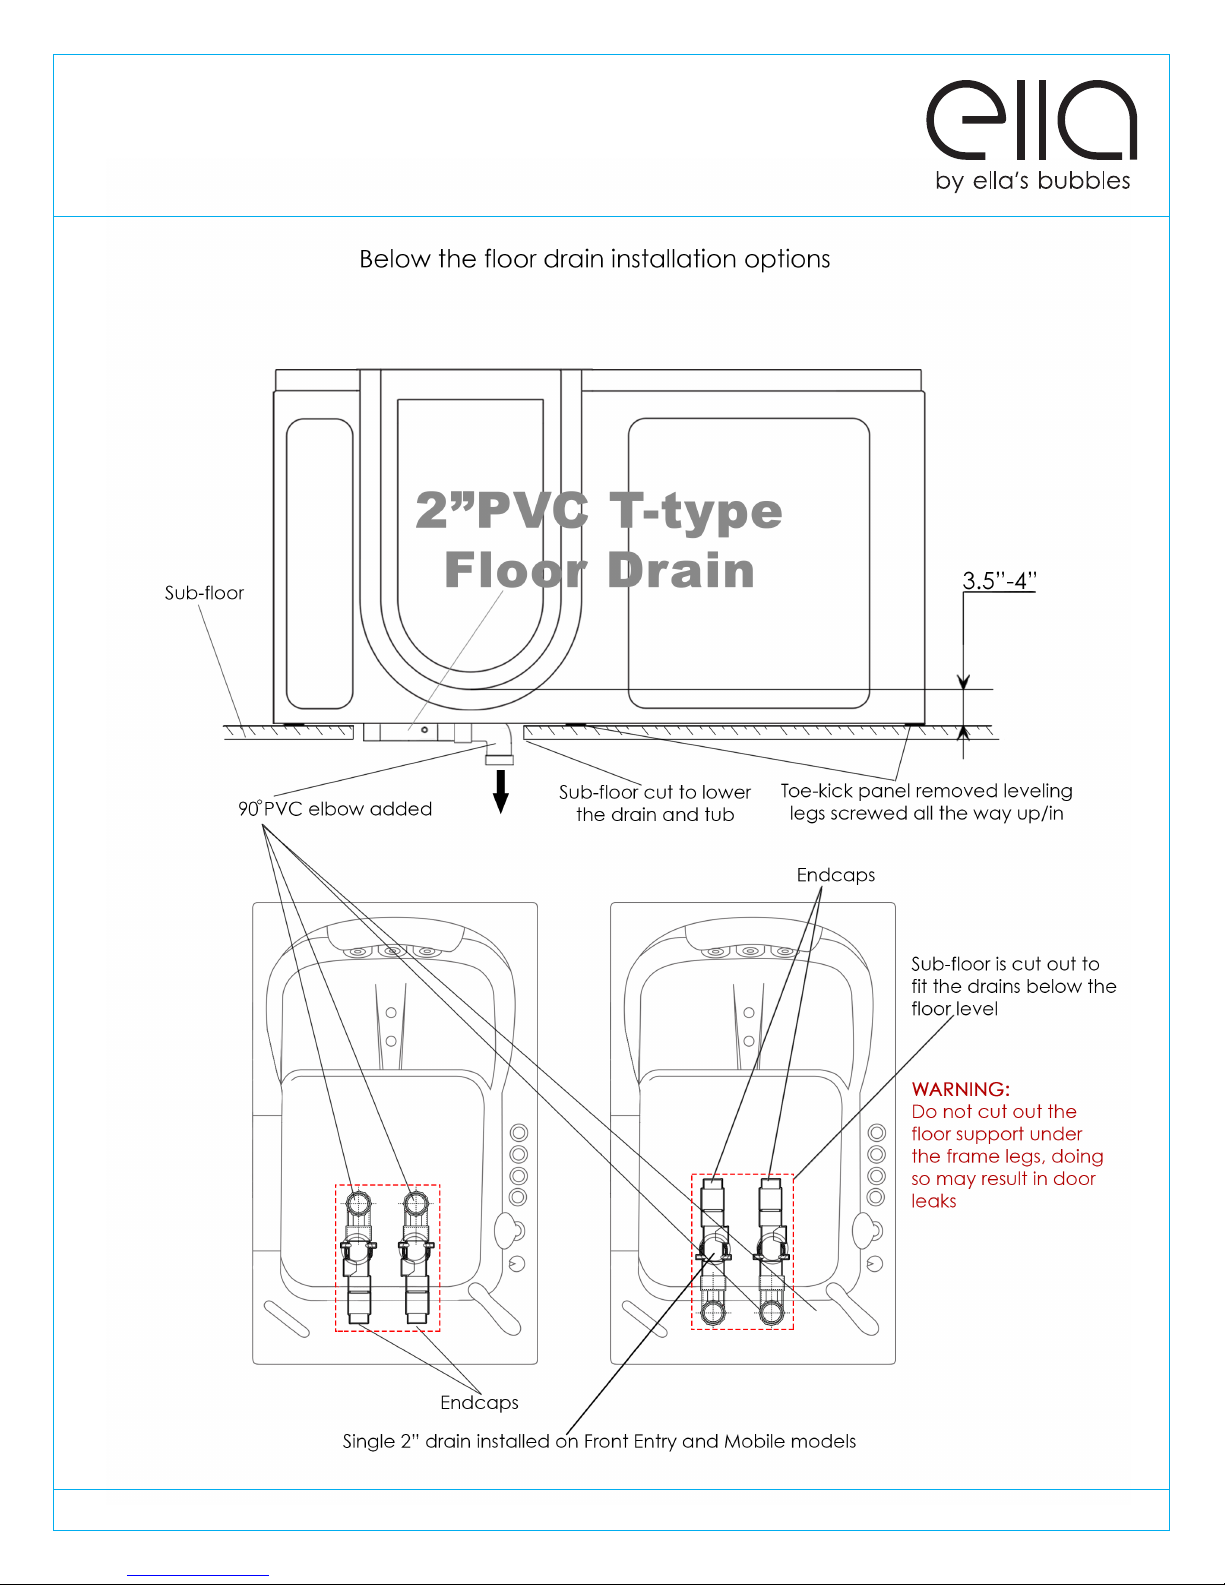
Drain and Plumbing Positioning Options
ww w.ellasbubbles.com Page 11
Page 13
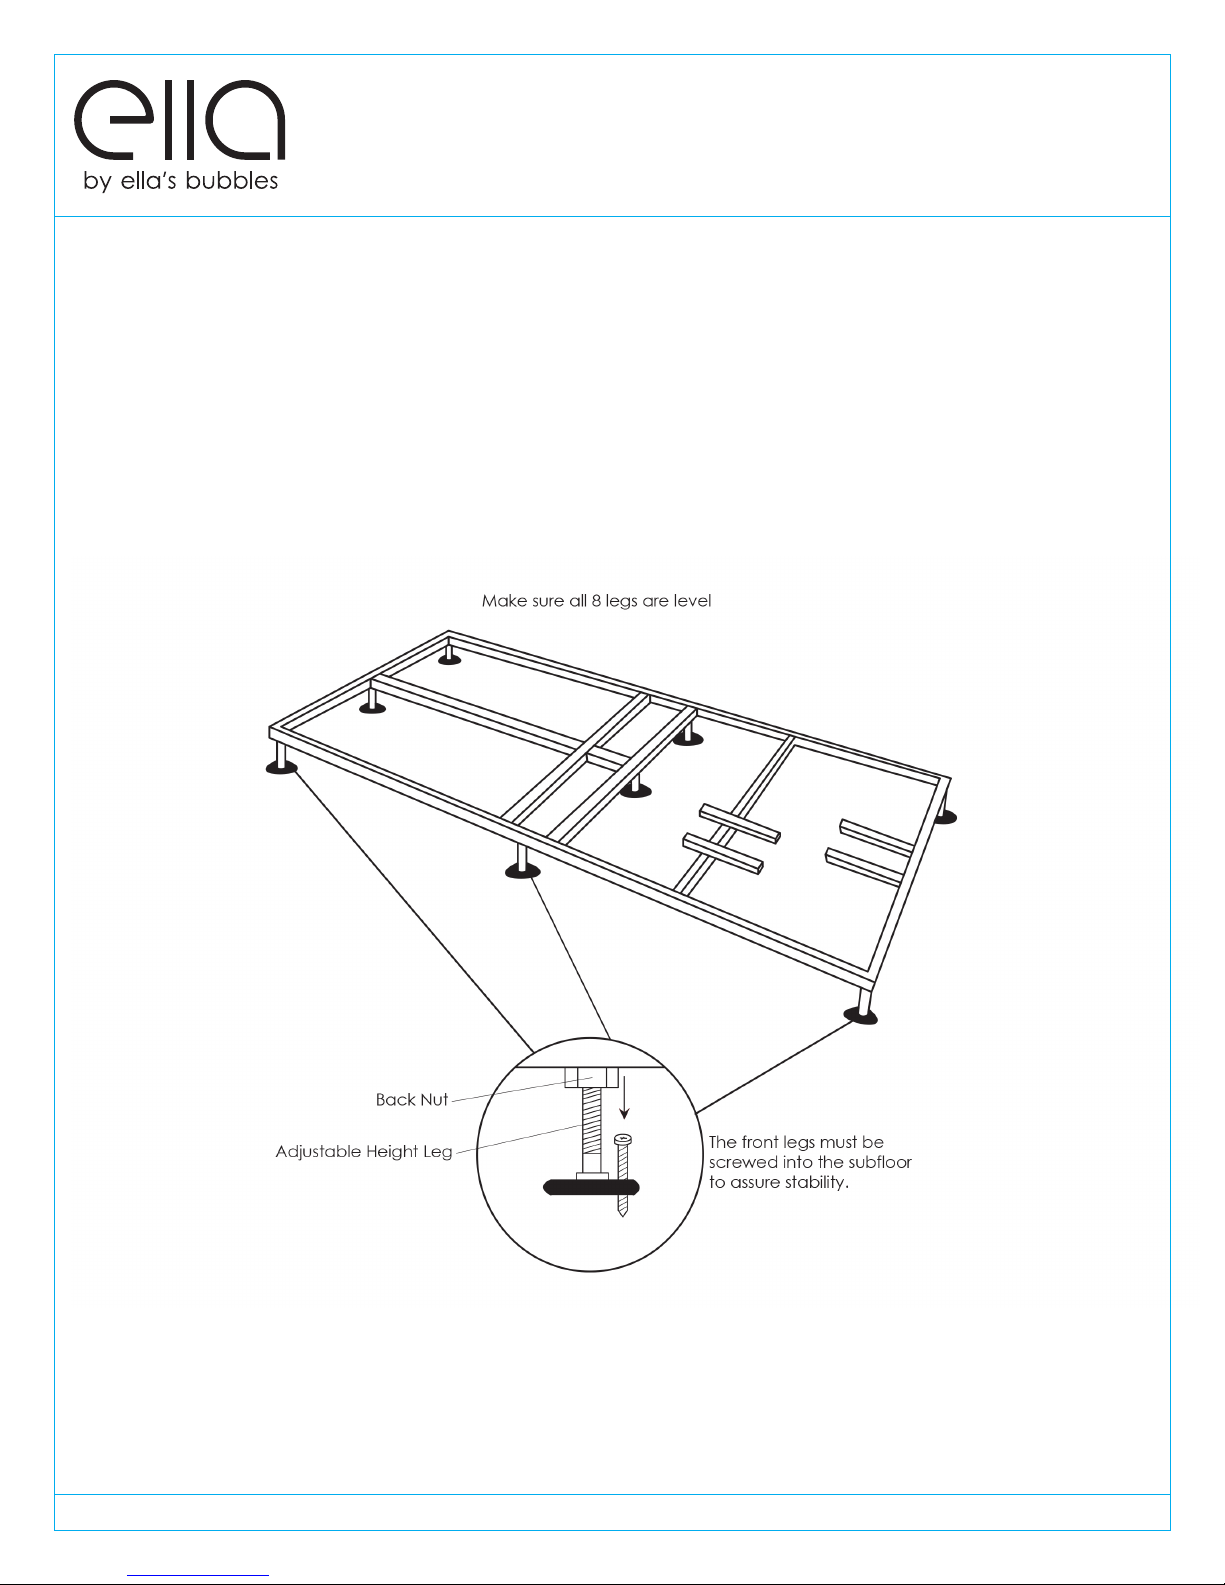
Door and Frame Adjustments
Prepare the sub-floor for the drain and ensure that the area is level. The supporting sub-floor
must be able to support the total weight of the bathtub, bather and water and must meet
local construction code requirements.
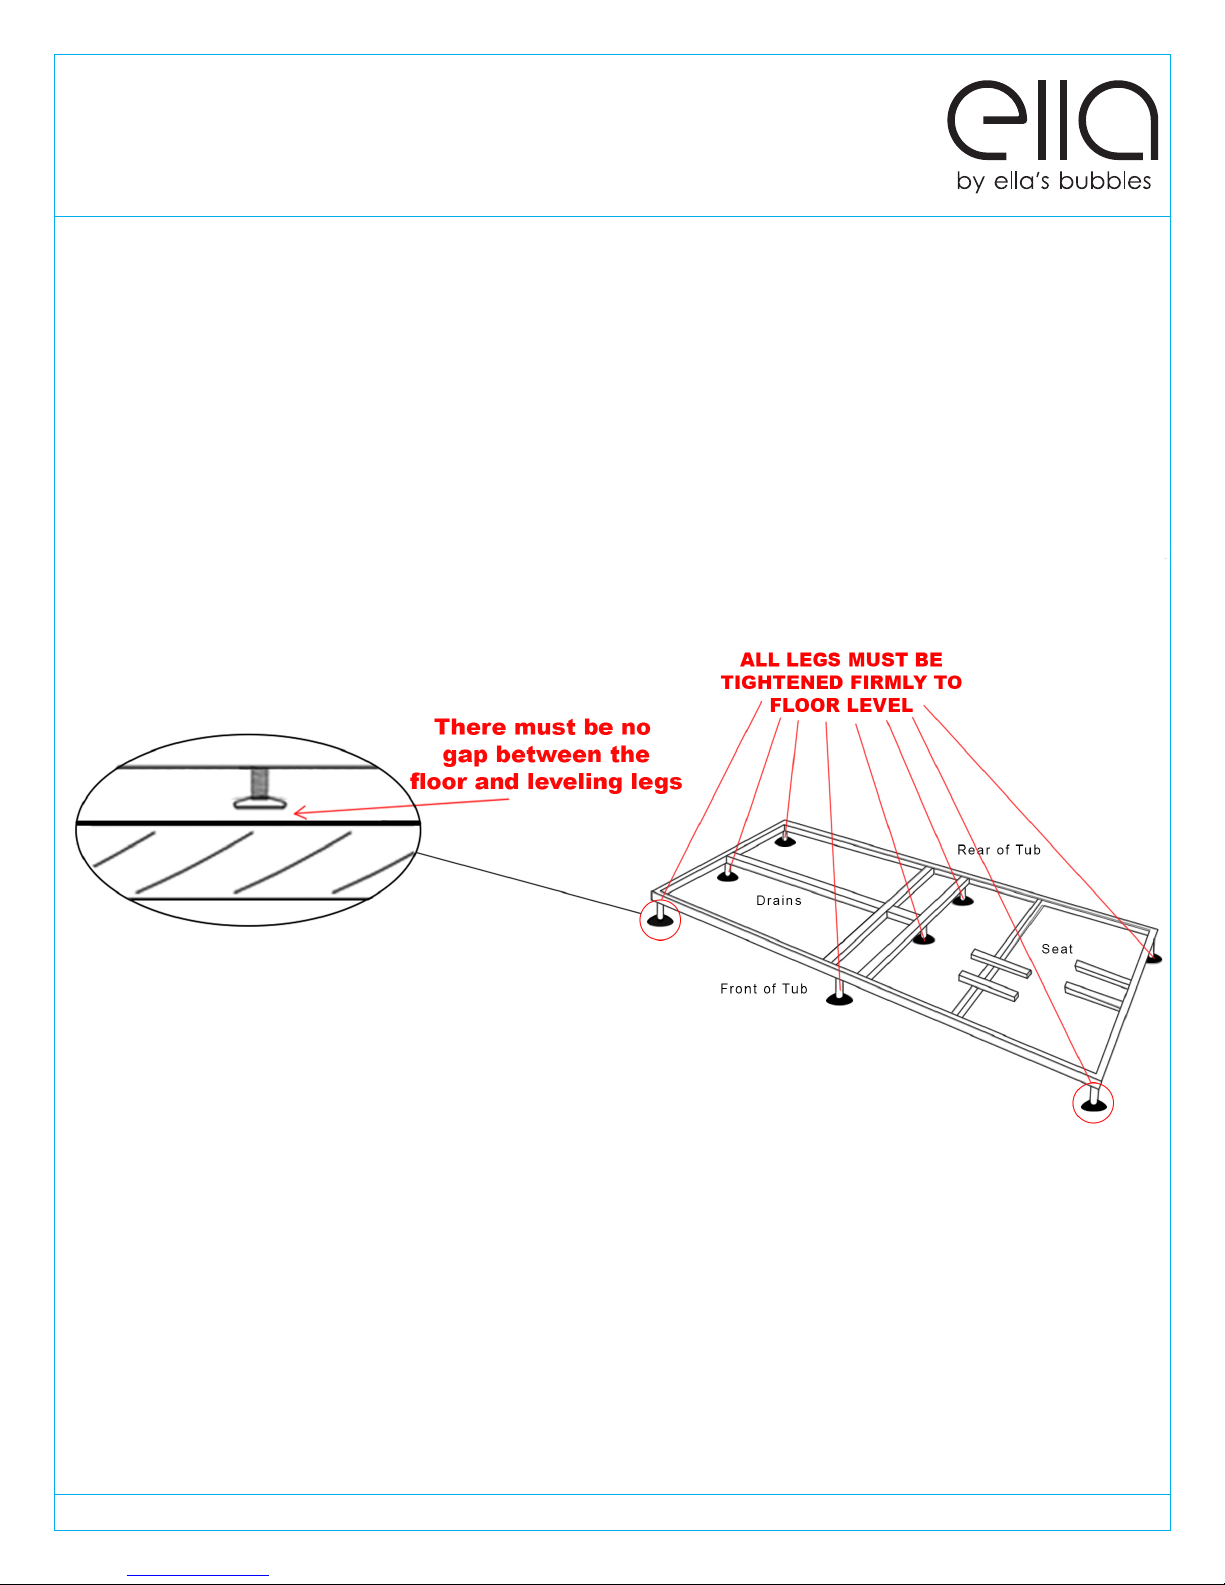
Use a level and make sure that the sub-floor below the tub is leveled. If the floor is not
perfectly level, adjust the appropriate leveling legs to re-align the tub to perfect level. It is
important that all of the leveling legs are completely supporting the tub (touching the floor
with equal weight distribution) and the tub is leveled for the door seal to work properly. If the
tub is not perfectly leveled, it may cause frame and shell warping which can cause
changes in door alignment resulting in water leakage and void the warranty.
DISCLAIMER: The frame specifications and configuration vary based on model. If the sub-
floor does not support the total weight of the bath, bather and the water, it can result in
warping of the shell, misalignment of the door and/or create leaks and could lead to
damage of your home.
ww w.ellasbubbles.com Page 9 03/18
Page 14
Door and Frame Adjustments
Your walk in bathtub has been tested and leveled properly before leaving our facility. Our
walk in bathtubs have been set on a perfectly level surface to ensure no leaks and proper
door closing. It is up to your installer to test and make any adjustments necessary to ensure
that all leveling legs support the tub frame and that the door is aligned correctly to prevent
any leaks. The door must close smoothly to create a water tight seal.
Extending or shortening the legs will help
between the door and the frame. Please call us immediately if any issues arise or if you
have any concerns. 1-800-480-6850.
correct any alignment issues to close the gap
DISCLAIMER: The frame specifications and configuration vary based on model. If the sub-
floor does not support the total weight of the bath, bather and the water, it can result in
warping of the shell, misalignment of the door and/or create leaks and could lead to
damage of your home.
ww w.ellasbubbles.com Page 10 03/18
Page 15
Door and Frame Adjustments
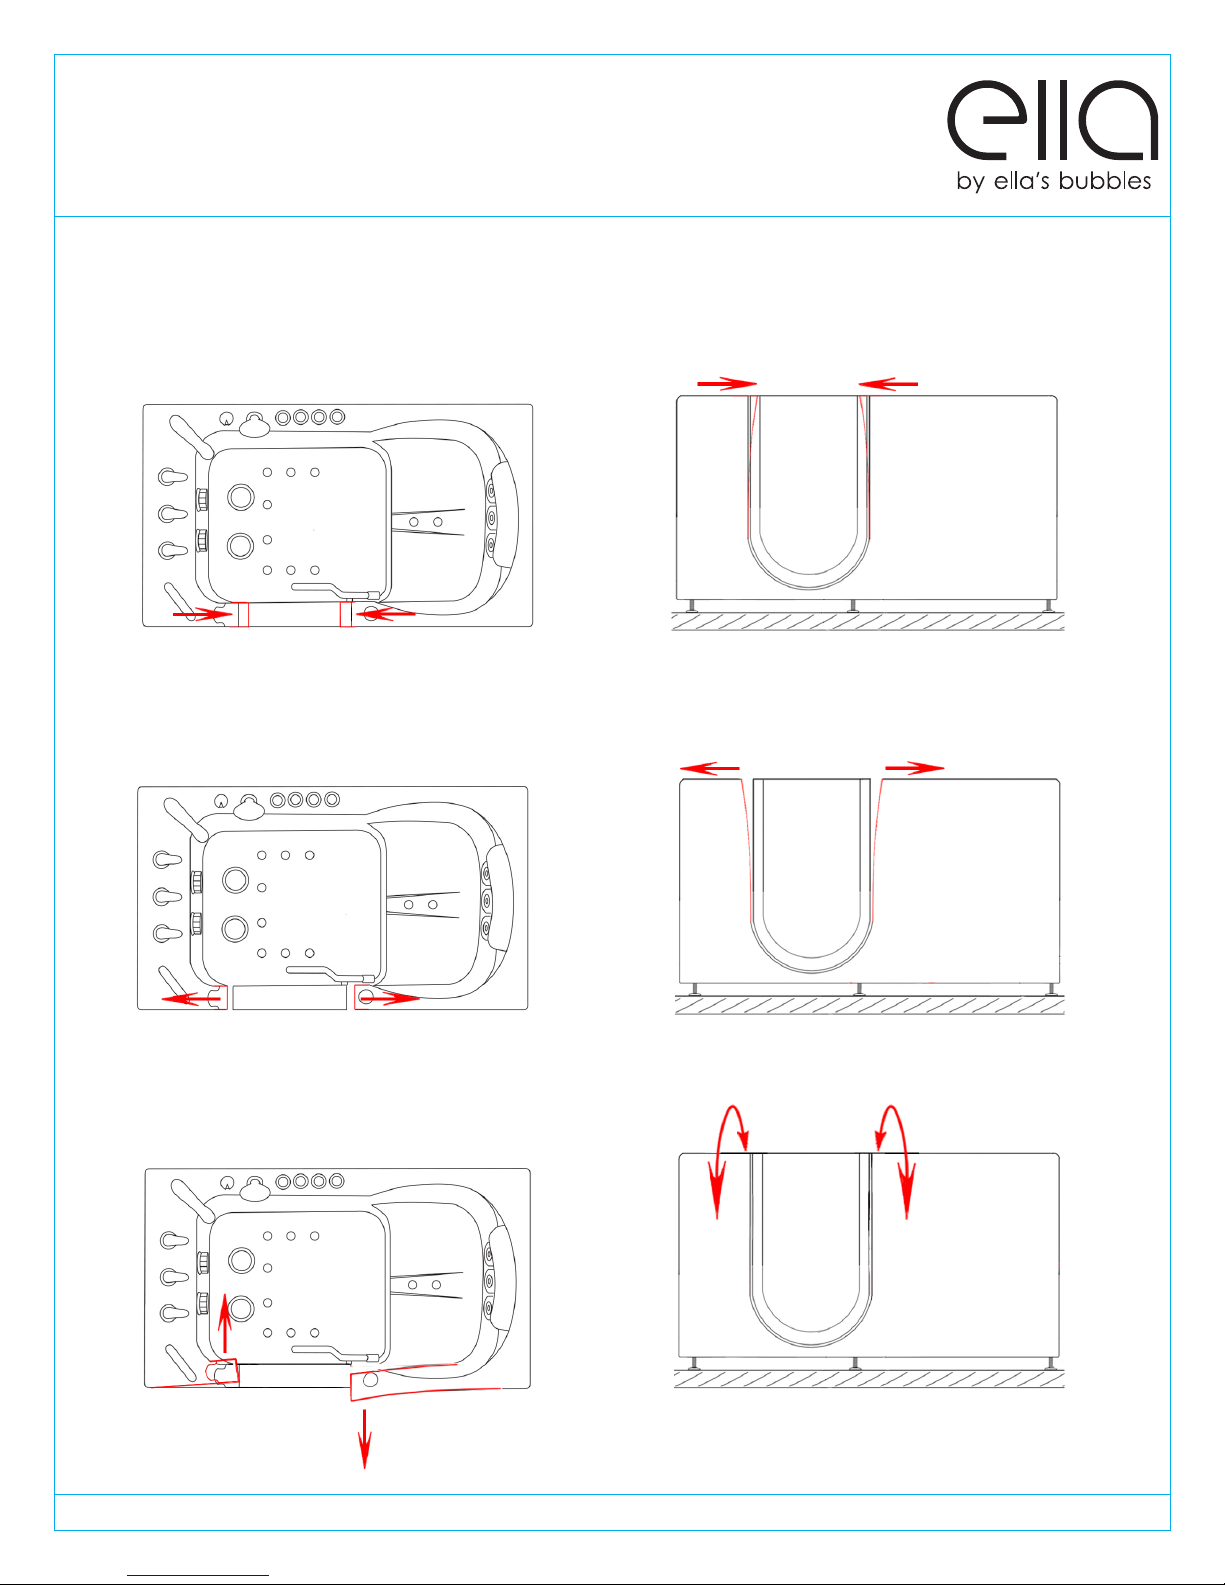
WARNING: Failure to level the tub correctly WILL RESULT IN MISALIGNMENT! The drawings
below illustrate some examples of what types of frame warping will occur if the legs are
not level with the floor.
ww w.ellasbubbles.com Page 10
Page 16
Service Access and Ventilation
It is the responsibility of the installer or owner to provide access for service required, per
code. Ella is not responsible for any costs related to obtaining access for repair. The owner
shall assume responsibility for such costs, and if appropriate, must seek recovery from the
instal ler.
Do not insulate around the tub equipment. The tub, frame and all parts have been
engineered to provide the proper ventilation. Any obstructions may cause the pumps or
other electrical components to overheat.
Door Seal
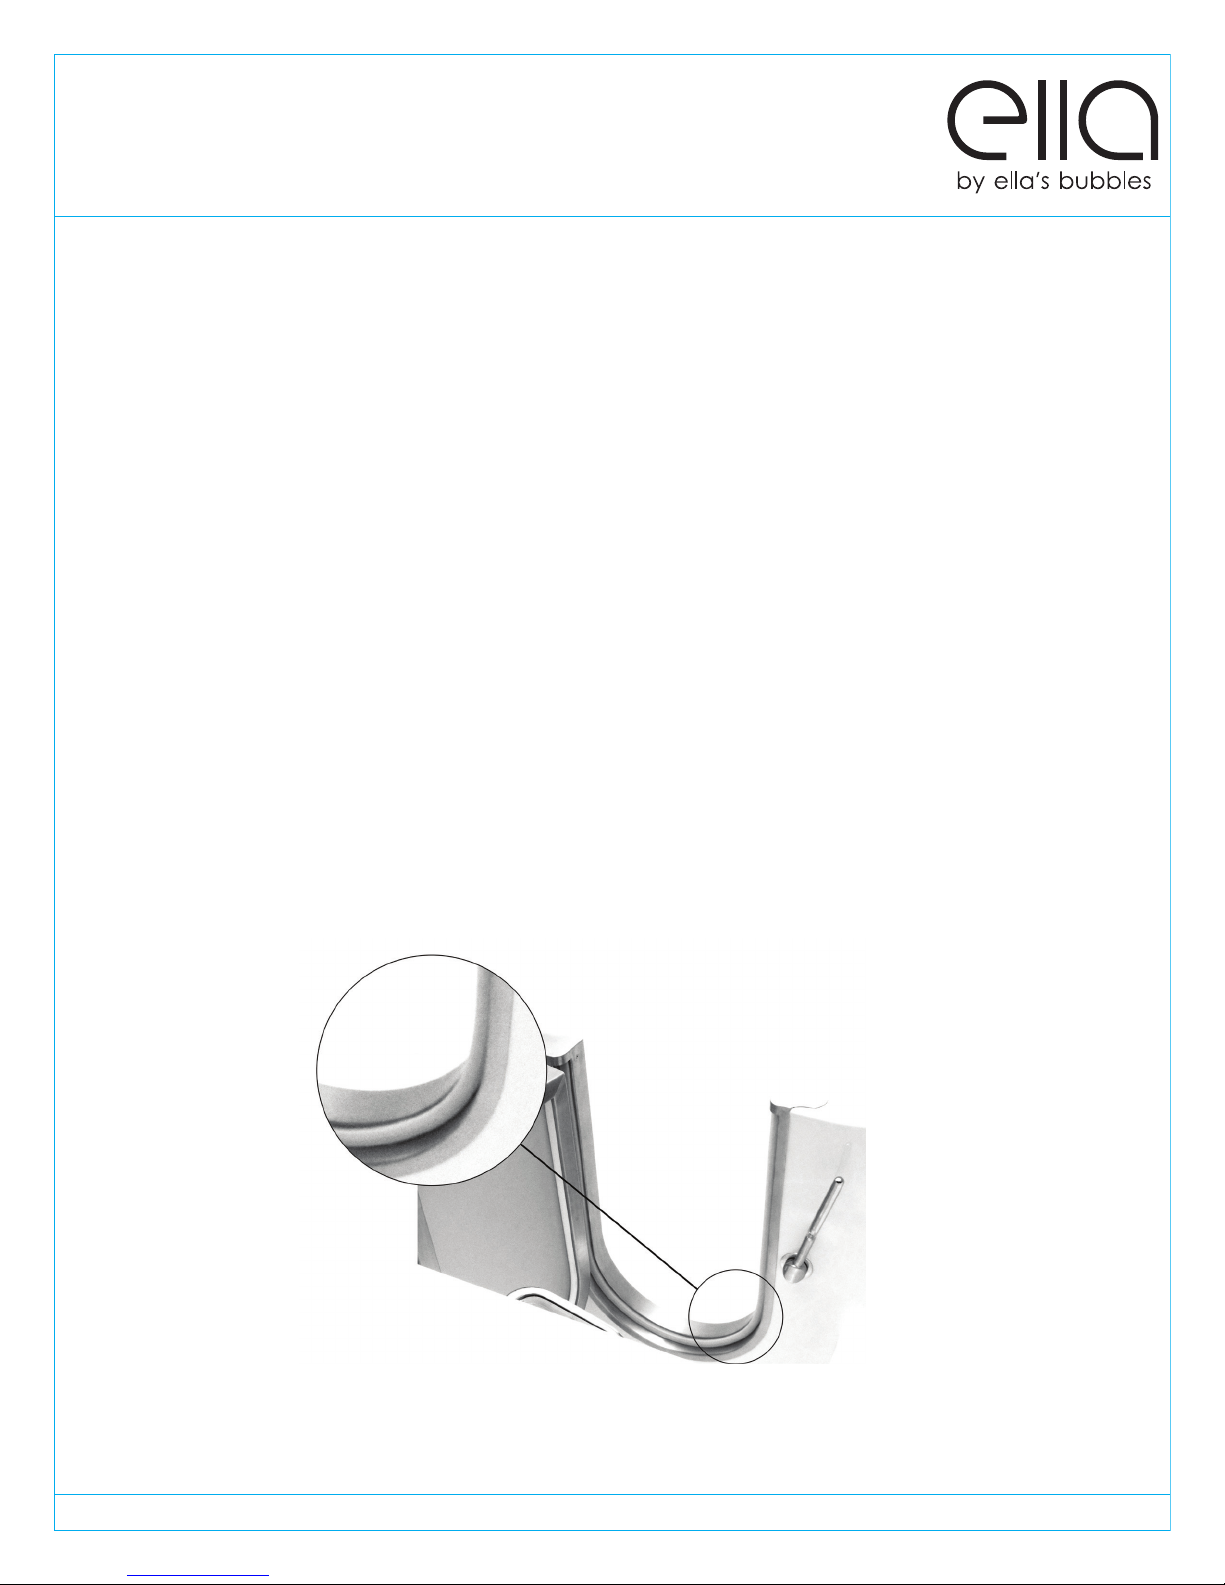
Please keep in mind that the door has been closed for an extended period of time
throughout shipping and the bathtub has been stored in various temperatures. It is possible
for the silicone seal to stick to the frame when stored for extended periods of time. When
the bathtub is received, the door seal should be checked for deformations from shipping
and re-formed and adjusted where necessary. To restore the door seal, the seal must be
released and allowed to relax with the door open. This is done by squeezing the seal with
your nger tips and pulling it away from the door frame to regain its exibility and original
form. It is recommended that the door be kept open when not in use to increase the lifetime
of the door seal and maintain its exibility.
ww w.ellasbubbles.com Page 11
Page 17
Installation of Deck Mount Grab Bar
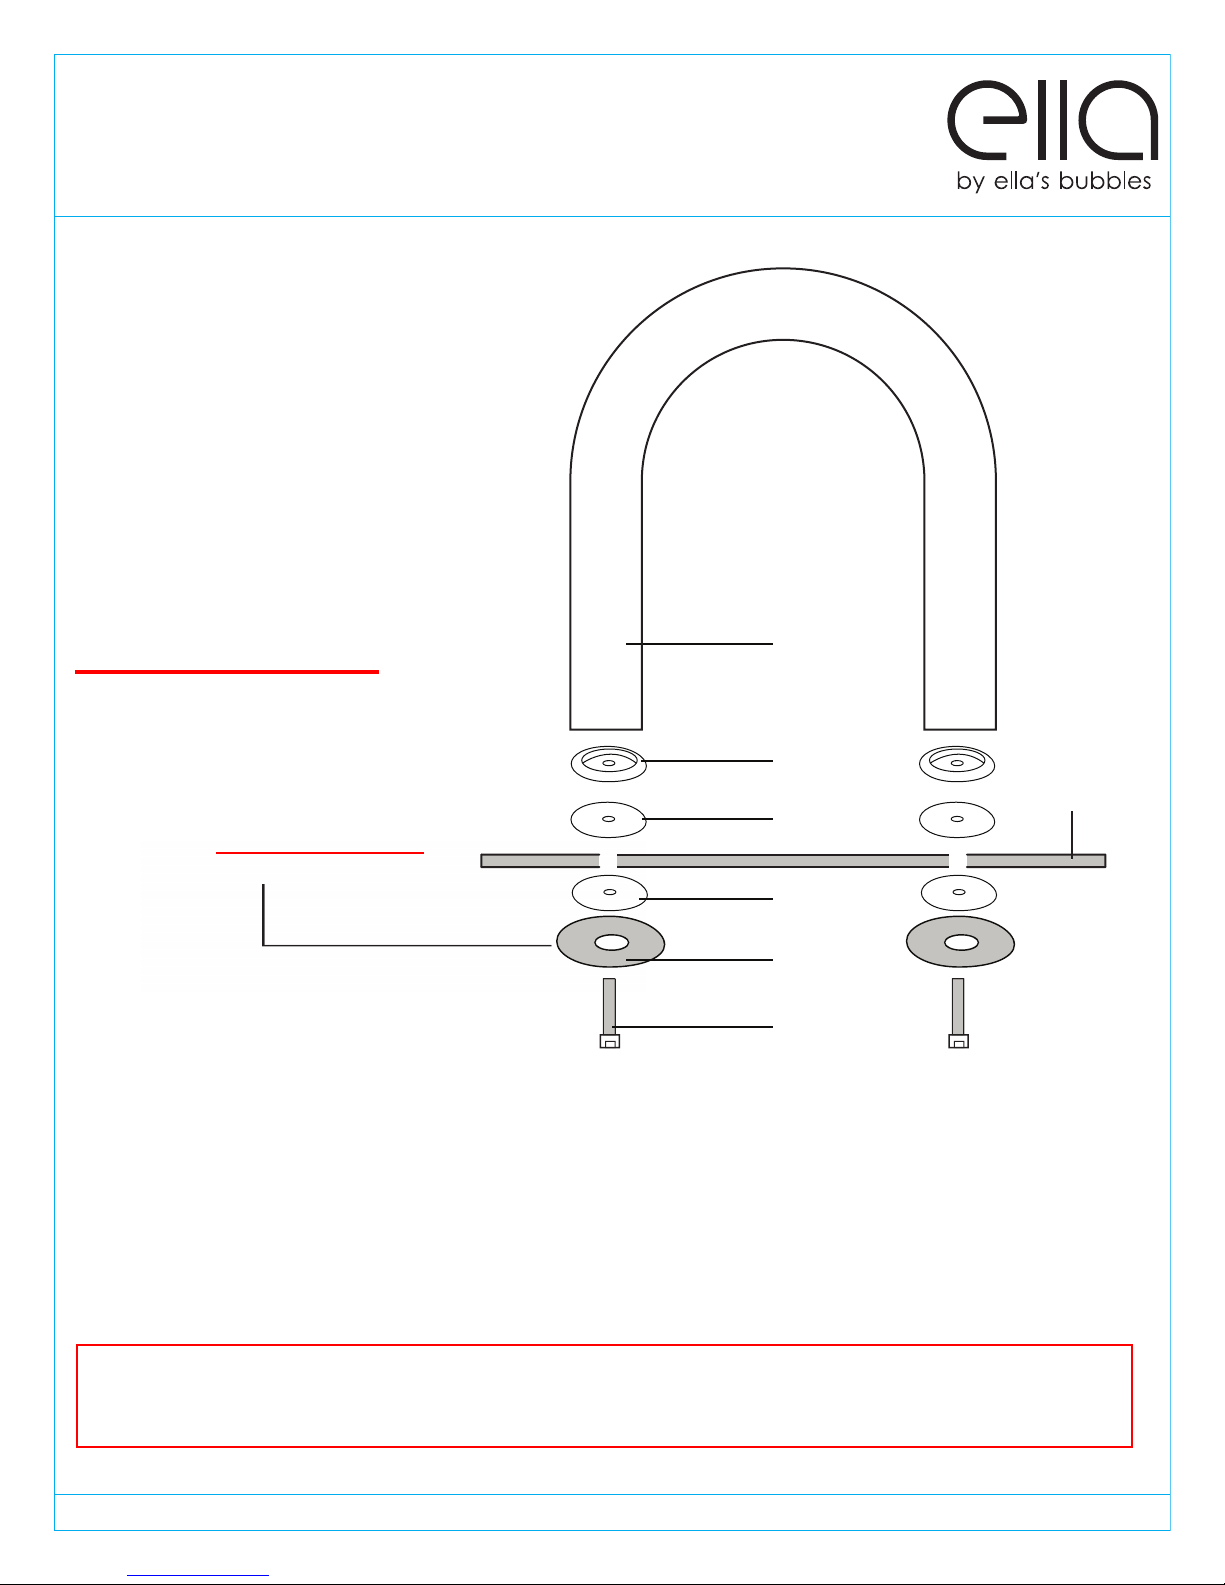
Parts List: Chrome grab bar x (1)
Escutcheon x (2)
Rubber washers x (4)
Metal washers x (2)
Bolts x (2)
WARNING
Grab Bar
GRAB BAR WASHERS MUST BE INSTALLED TO
PREVENT CRACKING OF THE ACRYLIC SHELL,
FAILURE TO DO SO WILL VOID THE WARRANTY
*THE LARGER METAL WASHER IS THE MOST
IMPORTANT OF THE WASHERS, THIS ONE
ABSOLUTELY MUST BE INSTALLED TO
PREVENT ACRYLIC SHELL DAMAGE
To install the supplied grab bar first locate all the parts needed for installation. See drawing
shown above. Ready the bolt assembly by rst placing a metal washer onto the bolt
followed by a rubber washer. Feed the bolt up through the tub shell and place another
rubber washer over the extruded bolt followed by the escutcheon. You may start the
threading into the grab bar to hold the assembly loosely in position and then repeat the
process for the second bolt. Once the entire assembly is in place, tighten the bolts with the
supplied Allen wrench.
Escutcheon
Rubber
Washer
Rubber
Washer
Metal
Washer
Bolt
*
Tub Shell
WARNING: Under no circumstances install the grab bar without the large metal washer
underneath the tub shell. Doing so will leave the tub shell vulnerable to cracking and void
the warranty.
ww w.ellasbubbles.com Page 12
Page 18
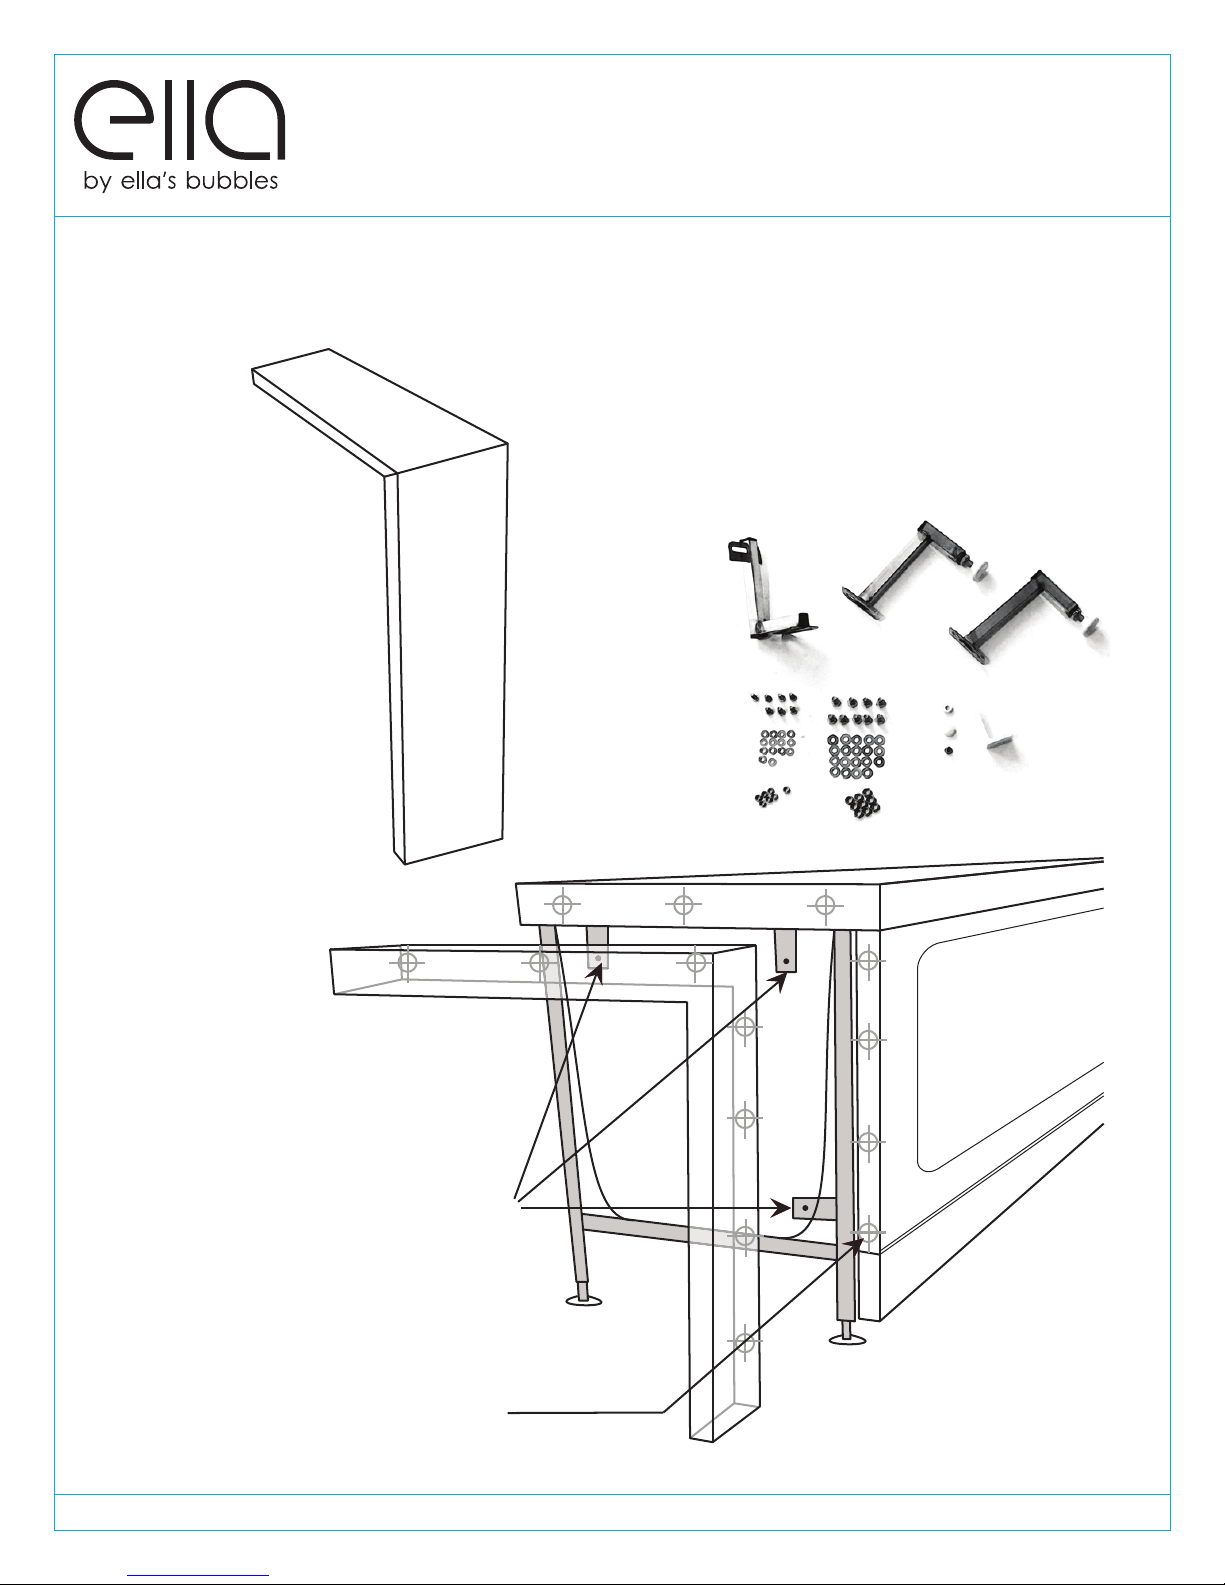
Installing Extension Kits
Deluxe Dimensions: 5" W x 29 1/2"L x 37"H
Elite Dimensions: 7"W x 29 3/4"L x 37 3/4"H
Royal Dimensions: 7 "W x 31 3/4"L x 37 3/4"H
Petite Dimensions: 7 "W x 27 2/4"L x 37 3/4"H
L" Stainless Steel Brackets ...........................
L" Acrylic Bracket ........................................
1" x 1/8" Bolts ...............................................
1" x 1/4" Bolts ...............................................
1" Screw .......................................................
1/2" Nuts .......................................................
3/8" Nuts .......................................................
Medium Washers .........................................
Small Washers ..............................................
Plastic Washer .............................................
Plastic Cap ...................................................
Qty (3)
Qty (1)
Qty (7)
Qty (7)
Qty (1)
Qty (9)
Qty (7)
Qt y (14)
Qt y (14)
Qty (1)
Qty (1)
1. Install 3 extension support
brackets
provides in the kit.
2. Clamp in place, the
extension panel to the walk
in tub shell, lining up the
facade of top and front.
3. Pre-drill (+3/8") slightly wider
holes than mounting screws
to allow for nal adjustment
to the panel.
4. Mount extension with 7
screws, washers and bolts.
5. Apply Silicone or white
caulking as needed.
1.
3. & 4.
The extension kit can be installed as needed. Opening can be lled as desired.
ww w.ellasbubbles.com Page 13
Page 19
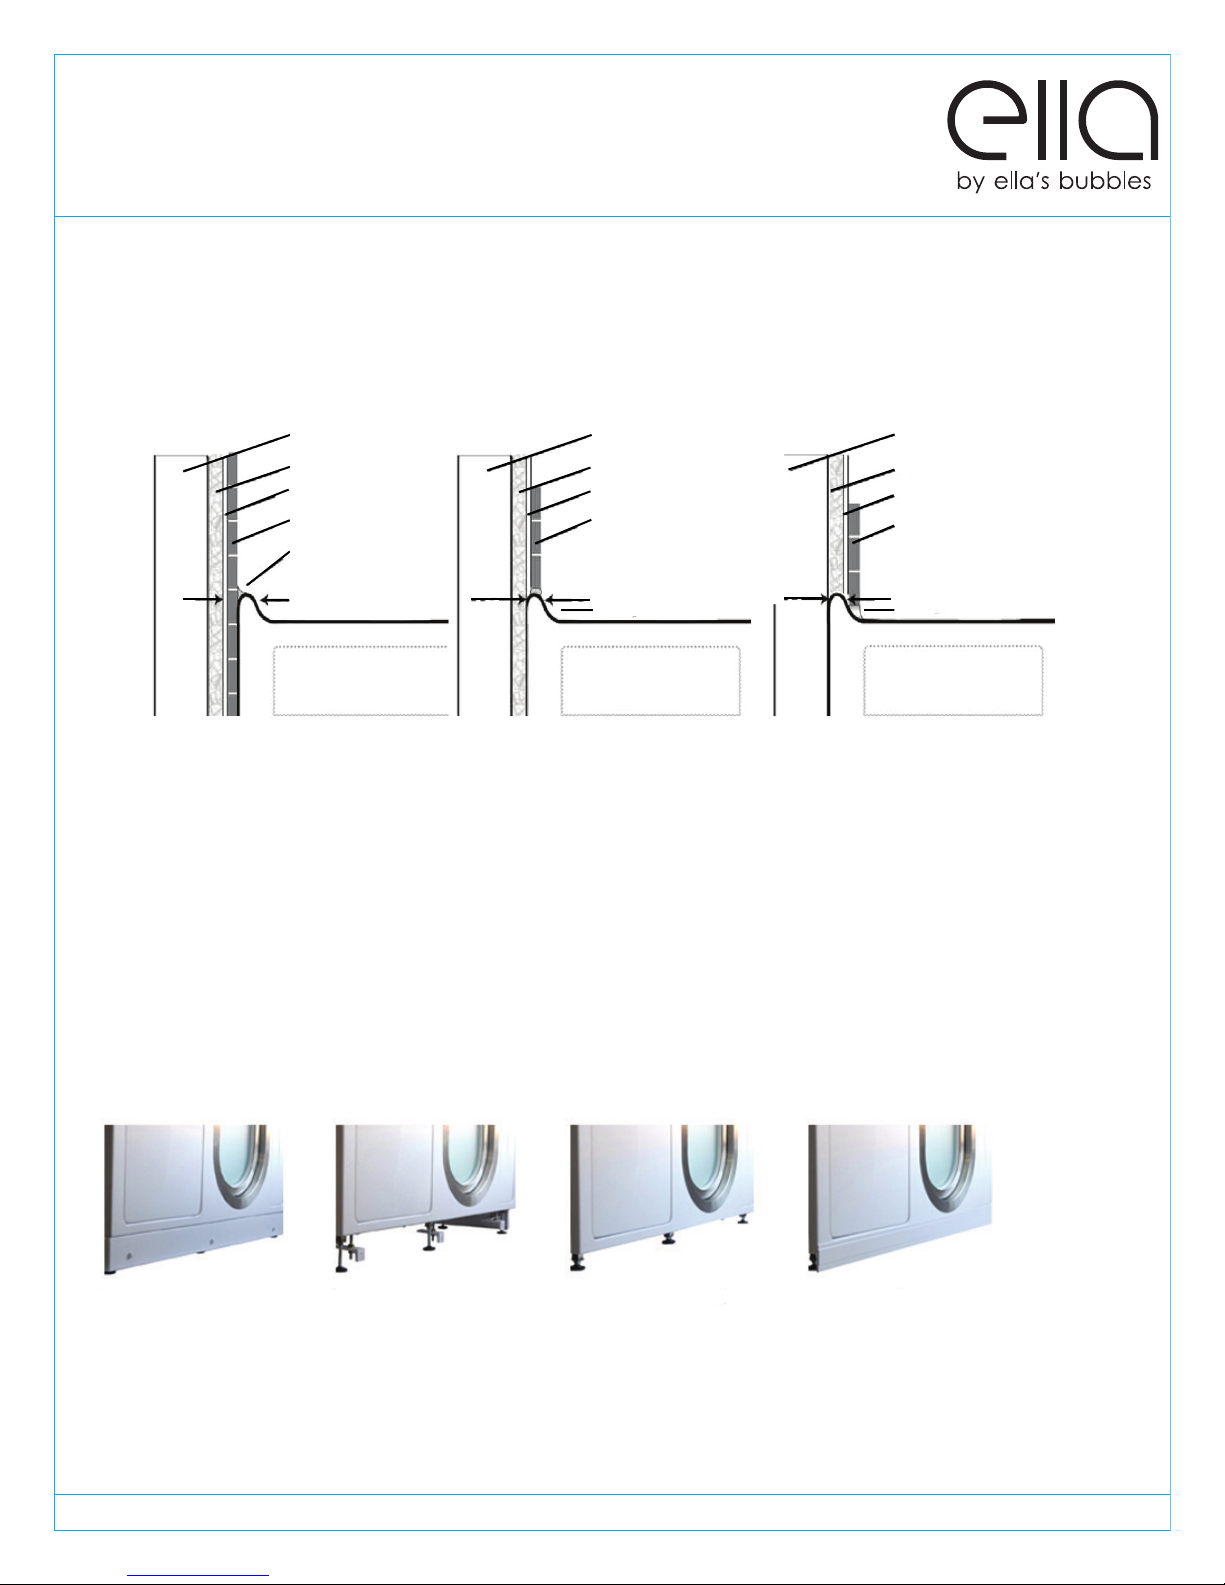
Finishing Installation
After all of the water and electrical testing is completed and all xtures are checked, the
tub can be installed to the surrounding wall or walls. Ella Walk in Baths come with low
rise tile ange which allows for two or one wall installations. The extension panel of the
bathtub can be installed as needed for 60" openings.
Stud
Dry wall
Glue
Tile
Caulki ng
5/8”Tub Lip
Stud
Dry wall
Glue
Tile
5/8”Tub Lip
Caulki ng
Stud
Dry wall
Glue
Tile
5/8”Tub Lip
Caulki ng
The tub can be nished and tiled over as shown in images. Caulking must be applied to
joints as needed after the bathtub is installed.
Threshold Lowering Option
Lowering the threshold is an option that can be chosen during installation. Because your
Ella Walk in Bath is set up for easy installation, lowering the threshold requires the drain
option to be set up below the floor. To lower the Walk in Bath threshold; First, remove the
toe kick panel to expose the adjustable leg supports. Adjust the height of the tub while
keeping the Walk in Bath plumb level on all four corners. Finish the installation
with baseboard.
Panel On Panel Off Lowered Threshold Baseboard On (not supplied)
NOTE: Any alterations or installed additions are the responsibility of the installer. Ella
Accessible Bathrooms is not responsible for any damage to the unit or for water damage,
which could occur due to improper installation.
ww w.ellasbubbles.com Page 14
Page 20
Cleaning and Maintenance
Recommended Acrylic Cleaners
Use only cleaning products whose labels
state that they are SAFE for ACRYLIC.
Always test products on a small are of skirt
before applying to complete bath area.
• White Vinegar & Water
(Recommended)
• ZEP Professional strength shower
tub & tile cleaner
• Dawn dish detergent
• Rubbermaid commercial strength
shower tub & tile cleaner
• Home Depot HDX shower tub & tile
cleaner
• Scrub free original soap scum remover
• Kaboom shower tub & tile cleaner with
oxy clean
• Simple green all purpose cleaners
(any scent)
• Simple green lime scale remover
• Simple green natural bathroom cleaner
• All tilex products
• All Pine-Sol Products
• All Fragranzia Products
DO NOT USE the following on your
ACRYLIC Bath System. The use of the
following chemicals will cause a dull
surface or chemical cracks. The use of
these products will VOID YOUR WARRANTY.
• Any product containing ammonia
• Dow scrubbing bubbles
• Abrasive Cleaners
• Ajax
• Comet
• Fantistik
• Soft Scrub
• Mr. Clean
• Nail Polish Remover
• Scouring Pads
• Ammonia
• Tough Act
• Powder or Crystal Drain Cleaners
• Greenworks Bathroom Cleaner
• Scrub Free w/Bleach
• Seventh generation bathroom
cleaner - regular
• Magic Eraser
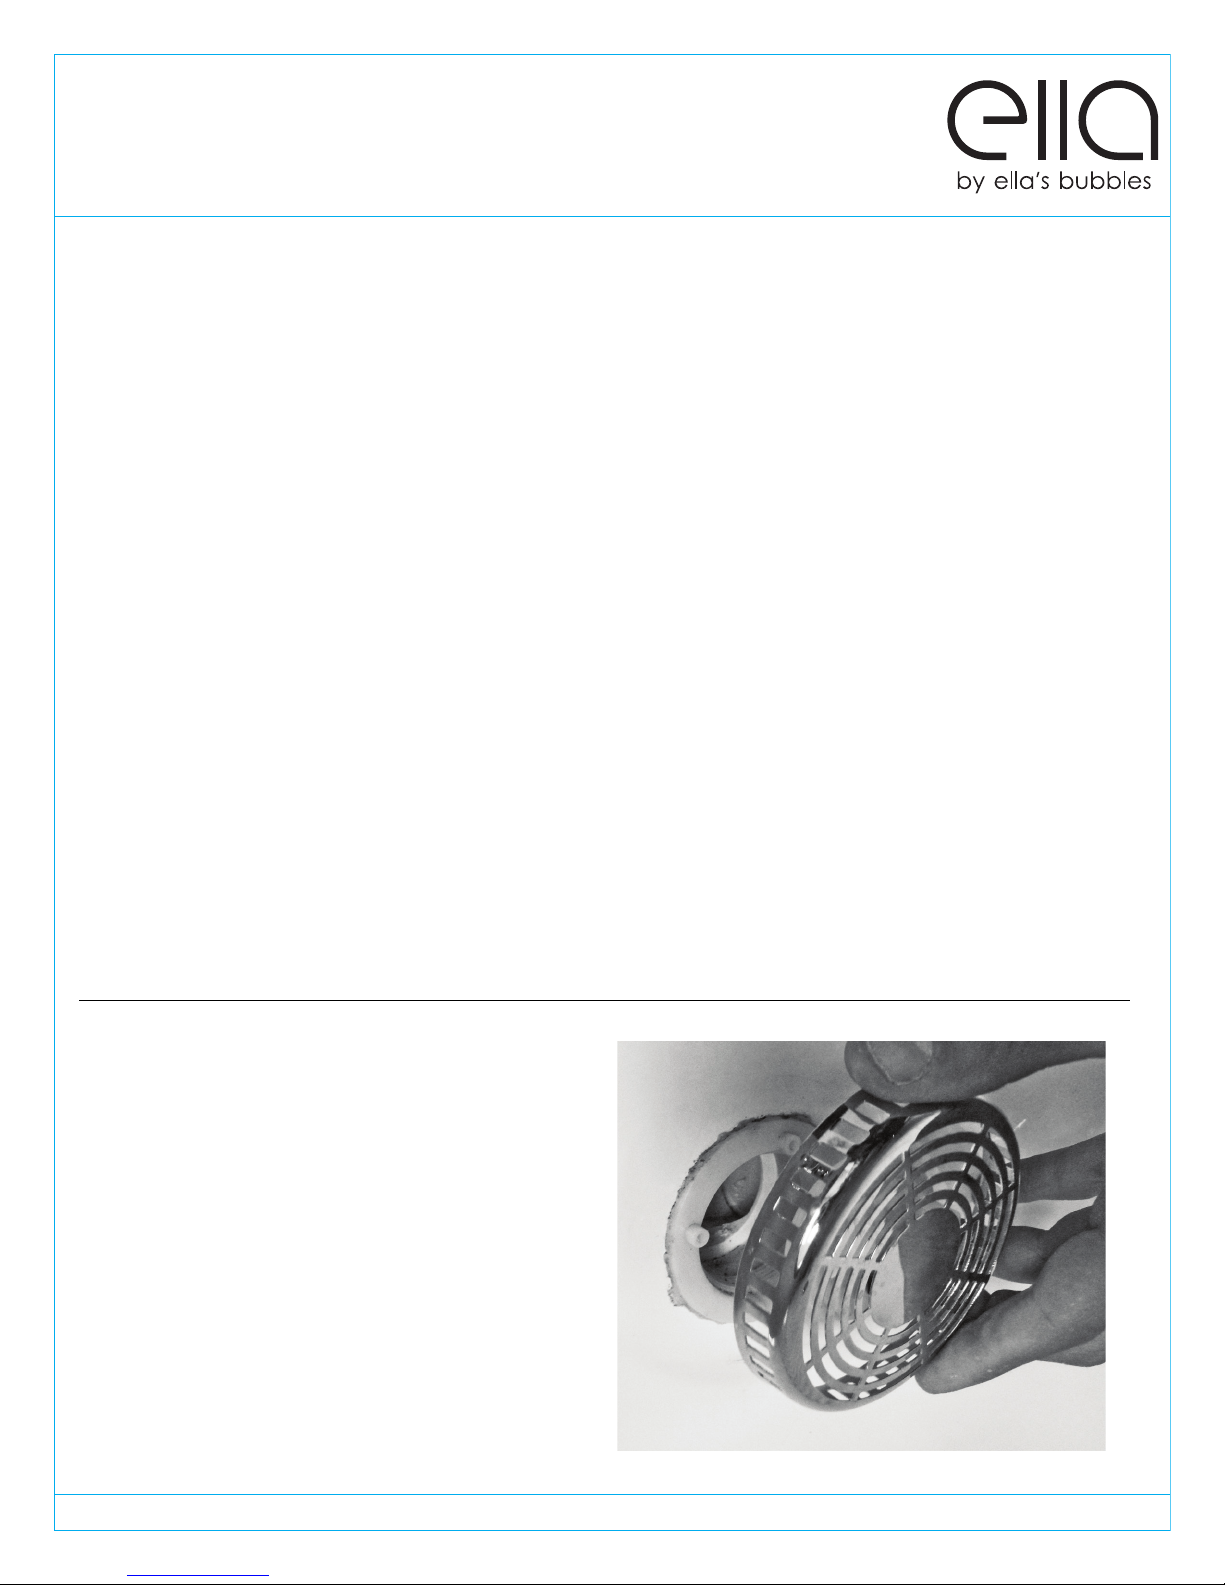
Monthly Maintenance
It is recommended that once a month
the tub is ushed. As well, with every
month of normal use, clean out
the pumps inlet cover (shown right)
by unscrewing the cover (counter
clockwise) and removing any hair and
debris from the cover and housing.
Remount the cover in place. Never
operate the system with the cover off,
as the pump creates a strong suction
and damage to the pump or injury may
occur.
ww w.ellasbubbles.com Page 15
Page 21
Ella Acrylic Walk In Bath Warranty Informaon
This limited lifeme warranty is extended to the rst purchaser to be free from defects in workmanship and material under normal use and condions
from the date of the original purchase. This warranty is nontransferable and applies only to the original owner and to the original installaon place
– address only and does not extend to products previously used as display models or products that have been modied or repaired by anyone else
but Ella’s Bubbles. The warranty is void if the ownership or original installaon locaon is changed (tub is relocated). This warranty relates to all
ngs and components included with the tub from the manufacturer. The bathtub shell, frame, door seal, and nish are covered by limited lifeme
warranty. The door is covered by a limited lifeme warranty under normal use and condions. All supporng equipment, motors, pumps, xtures,
electronic controls, faucet, waste, overow, and all plated nishes, are covered by a limited ve (5) year warranty. This warranty is nontransferable
and applies only to the original owner. The nish warranty does not apply to fading, cracking, delaminang or blistering due to excessive wear, sun
fading or scouring due to cleaning. This warranty shall not apply to any failure resulng from negligence, abuse, misuse, misapplicaon, alteraon,
or modicaon or improper maintenance. The door warranty is valid only if the alignment of the door is not changed by applying pressure or user’s
weight hold user’s weight to the door or by wrong installaon. The door is designed to hold its own weight and not designed to hold user’s weight.
Should service be required for any reason of any defect or malfuncon of the product during the rst ve years, Ella’s Bubbles will ship the part to
the original customer’s address without charge (subject to vericaon of the defect or malfuncon). Ella’s Bubbles will not be liable for any incidental
expenses or material charges in connecon with removal or replacement of the product or parts. Delivery me is based on parts availability and
locaon. Normally parts are sent out immediately. Emailed or mailed photos of defecve product and descripon of the problem is required.
defecve product and descripon of the problem is required.
All mailing nocaon must be sent via cered mail to:
Ella’s Bubbles, LLC.
2101 S. Carpenter Street Chicago, IL 60608
Email: [email protected]
The Manufa cturer will not b e responsible for any wa ter damage to struc tures or proper ty for any reas on including but no t limited to manufac turer defec t
or improper installaon. Manufacturer will assume no responsibility for the loss of the system, inconvenience due to loss, damage to real or personal
property or any other consequenal damage. Manufacturer will not be liable for any incidental expenses or material charges in connecon with removal
or replacement of the purchased part or any part or parts of the system. This warranty shall not apply to any type of failure resulng from negligence,
abuse, misuse, misapplicaon, improper installaon, alteraon or modicaon, chemical corrosion or improper maintenance. There will be a charge
for replacement parts or replacement of the enre electrical unit of the defecve unit is returned for any of the reasons listed above. Ella’s Bubbles
reserves the sole authority to make any type of warranes or representaons concerning its products and will not be responsible for any warranes or
representaons made by any outside source including dealers, retailers, distributors or contractors. Ella’s Bubbles does not warrant the installaon of
any of our products. Items include: all plumbing or electrical related connecons, improper or negligent installaon of the product. Alteraon made of,
or alt er aons or mo di c aons made to the sys tem, may cause the produc t or the sy st em to ma lf un c o n. Suc h problems are not covere d by war ranty.
TO THE EXTENT PERMITTED BY LAW, ALL IMPLIED WARRANTIES INCLUDING THOSE OF MERCHANTABILITY AND FITNESS FOR A PARTICULAR
PURPOSE ARE HEREBY DISCLAIMED.
Ella’s Bubbles and seller hereby disclaim any liability for special, incidental, or consequenal damages. Some states/provinces do not allow limitaons
on how long an implied warranty lasts, or the exclusion or limitaon of special, incidental or consequenal damages, so these limitaons and
exclusions may not apply to you. This warranty gives you specic legal rights. You may have other rights, which vary from state/province to state/
province.
Disclaimer: Limited lifeme or 5 year parts warranty does not apply to thermostac control valve (TCV).
TCV warranty is (1) year limited warranty which does not cover cartridge malfuncon due to contaminated water with calcium, iron or other found
heavy parcles in the water resulng in cartridge geng stuck and TCV not operang properly. The TCV must be protected with lter or mesh in
the water lines which must be cleaned periodically. Ella's Bubbles oers cleaning service for the cartridges for a nominal fee: labor + shipping. The
cartridge cleaning is done at Ella's Bubbles facility, or it can be done by the contractor hired by customer. The removal and cleaning of TCV should
only be performed by a licensed and insured contractor or plumber following online instrucons here:
2018 TOLL FREE: 800-480-6850
Page 16
Page 22
Warranty Activation Form 1 of 2
INSTALLER'S INFORMATION
_______________________________________________________________________________________
Name
Page 1
_______________________________________________________________________________________
Address City State Zip
_________________________________ _________________________________________________
Telephone Email
_________________________________ _________________________________________________
Date Signature
Upon completing the installation of an Ella Walk In Bath, the following Warranty
Activation Form must be completed, signed by both the customer and installer, and
returned to Ella’s Bubbles, LLC. In order for the Warranty to be activated (faxed, scanned,
or emailed, or hard copy mailed).
To be initialed by the installer(s)
____Tub is level in all directions and all support legs are touching the ground.
____Tub is installed on a dedicated 20 Amp GFCI protected circuit using 10 gauge wire
____Frame of the tub has been properly grounded.
____ Door Sea
l has been cleaned with rubbing alcohol to remove any dust or debris left
over from construction.
____Temperature Control Valve operated on both hot and cold settings.
____Both diverters function properly.
____Hand Shower functions on all settings without leaking.
____All supply lines have been checked for leaks while both diverters are on.
____ Drain
stoppe
s open and close properly, and the locking nut has been tightened on both
rs.
____Door seal is water tight after tub has been lled for a minimum of 20 minutes.
____ After running for a minimum of 20 Minutes both the Hydro and Air Pumps are
functioning properly and all connections to the pumps and jets are water tight.
____ Chromatherapy Light and the Ozone Sterilization are working properly. (When the
Ozone is on by itself it will make a light humming noise).
____All drain ttings have been checked for leaks while the tub is draining.
____Unit is installed with access to both plumbing and electrical connections.
ww w.ellasbubbles.com
Page 17
Page 23
Warranty Activation Form 2 of 2
OWNER'S INFORMATION
_______________________________________________________________________________________
Name
_______________________________________________________________________________________
Address City State Zip
_________________________________ _________________________________________________
Telephone Email
_________________________________ _________________________________________________
Date Signature
Model:
Purchase Date: ___________________________ Purchase Price: _____________________________
Place of Purchase: _____________________________________________________________________
Contact Name: ___________________________ Phone Number: _____________________________
___________________________________ Serial Number: ______________________________
Copy of sales receipt must be included
with warranty activation forms.
To activate manufacturer's warranty, please complete both pages and
use one of the options below to submit.
Via mail: Ella's Bubbles, LLC.
Warranty Department
2101 S. Carpenter St., Chicago, IL 60608
Via fax: 1-312-666-3551
Via email: [email protected]
ww w.ellasbubbles.com
Page 18
 Loading...