

Page 1
DRKR14C
:
:
:
INSTALLATION, CARE & USE MANUAL
Countertop Fountains
INSTALLER
!
CAUTION
!
WARNING
!
WARNING
NOTE: It is common practice to ground electrical hardware such as telephones, computers and other devices
to available water lines. This can, however , cause electrical feedback in the plumbing circuit, which
results in an “electrolysis” effect occurring in the fountain. This may result in water which has a metallic
taste to it or has a noticeable increase in the metallic content of the water .
When inspecting plumbing circuit, remember the line may be grounded some distance from the
installation, and may occur outside the building or area in which the unit is being installed.
This condition can be avoided (in most cases) by using recommended materials during installation. Any
drain fittings provided by the installer should be made of plastic which will electronically isolate the
fountain from the remainder of the building’s plumbing circuits.
Review these instructions before beginning installation. Be sure that installation
conforms to all plumbing, electrical and other applicable codes.
When installation is complete, ensure these instructions are left in the plastic bag
provided inside the installed unit for future reference.
Service to be performed by authorized service personnel only .
Page 1
98140C (Rev. - 3/05)
Page 2
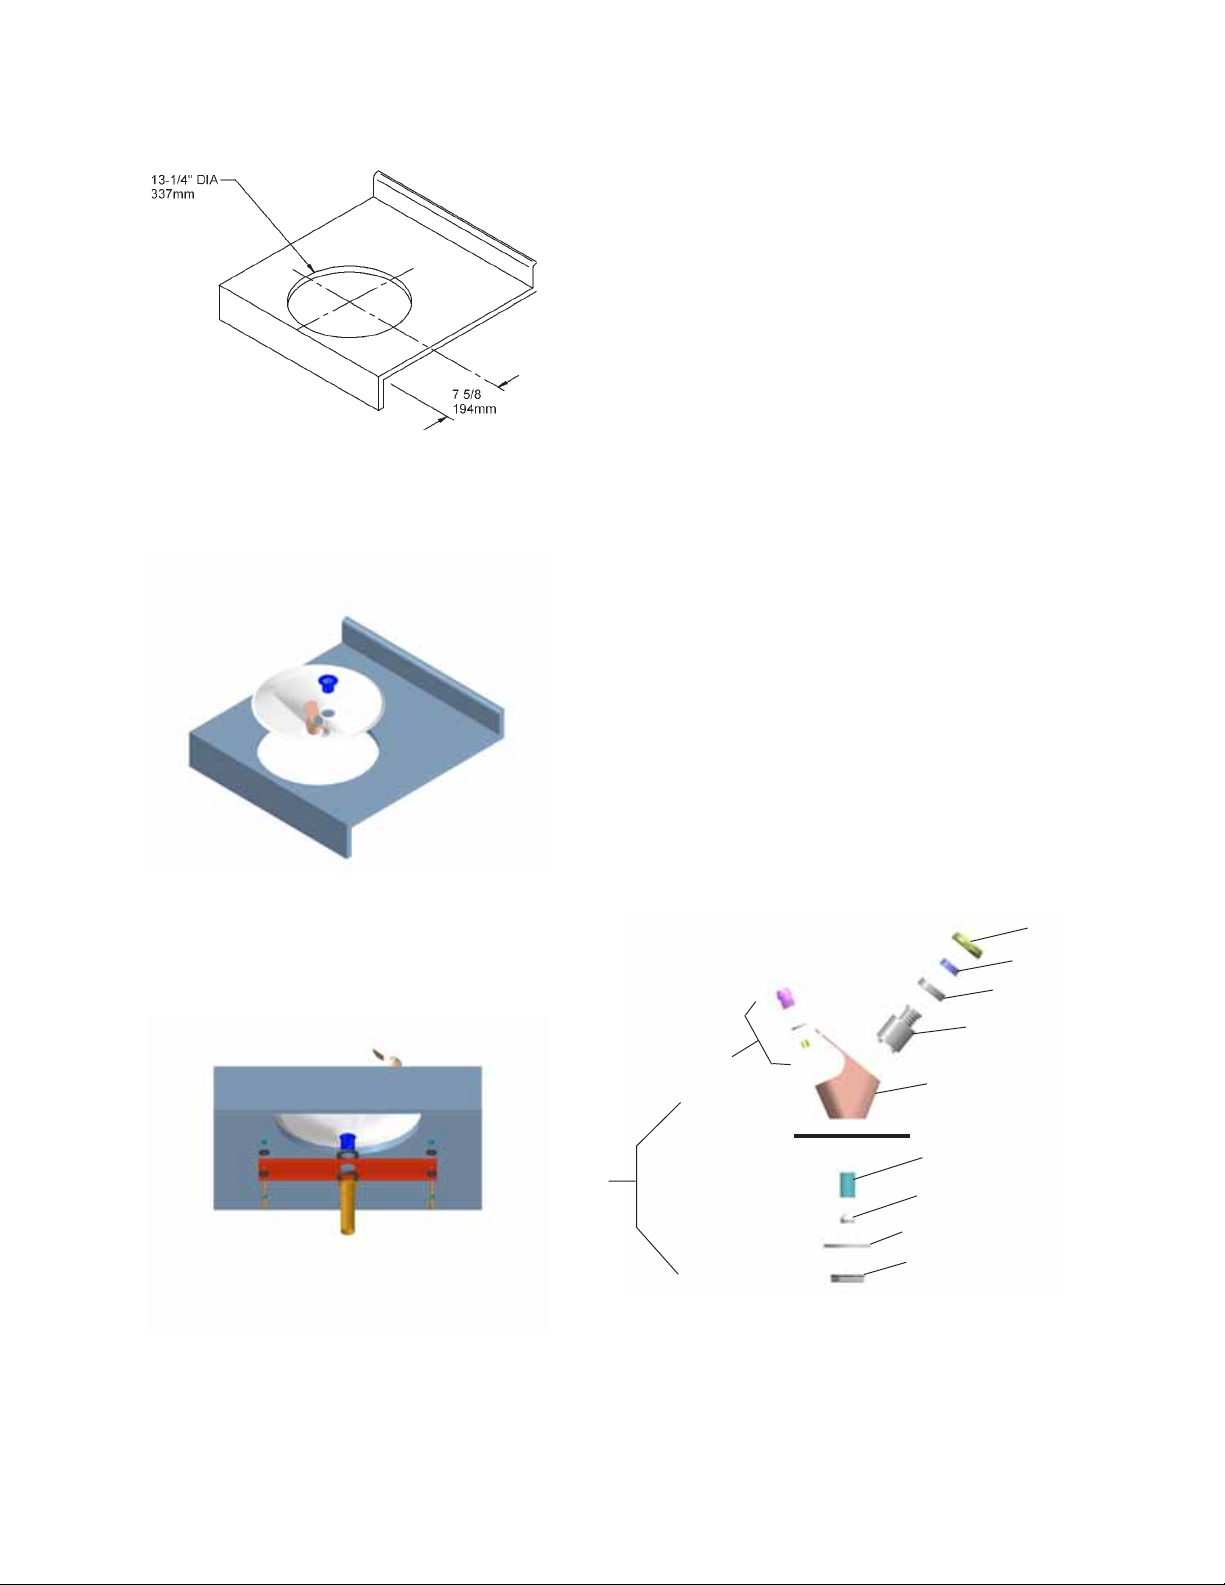
Figure 1
DRKR14C
1. Make 13-1/4” (337mm) diameter cutout in desired location
on countertop. Maintain the 7-5/8” (194mm) dimension
from the front edge for ADA compliance. (See Figure 1)
2. Install bubbler assembly to fountain. Align recess in
underside of bubbler with dimple in fountain.
3. Apply caulk (not provided) around cutout and waste
opening.
4. Place fountain over opening and drop in strainer.
(See Figure 2)
5. From underside, position and secure tiedown bracket
using waste fitting. (See Figure 3)
6. Use screws with nuts and washers (provided) to tighten
unit to countertop. Wipe off excess caulking.
(See Figure 3)
7. Determine required length of waste line and cut to
appropriate length. 1-1/4” O.D. waste tube furnished.
1-1/4” slip trap, waste elbow and extension not
provided.
8. Make water supply connections from service stop to the
3/8” O.D. unplated brass nipple coming out of the
bubbler. Turn on water supply and check for leaks. Newly
installed water supply line should be insulated after leak
check is completed.
Figure 2
9. These products are designed to operate on 20-105
PSIG supply line pressure. If the supply pressure is
above 105 PSIG, a pressure regulator must be installed
in the supply line. Any damage caused by reason of
connecting these products to supply line pressures
lower than 20 PSIG or higher than 105 PSIG is not
covered by warranty.
6
7
8
9
2
Basin
1
11
5
3
10
4
98140C (Rev. - 3/05)
Figure 3
BUBBLER DETAIL
NOTE:
When installing replacement bubbler and pedestal, tighten
nut (Item 4) only to hold parts snug in position. Do Not
Overtighten.
Figure 4 - Bubbler Details
Page 2
Page 3

Accepts Countertop
Thickness Up T o 1-5/8”
DRKR14C
Figure 5
Figure 6
Page 3
98140C (Rev. - 3/05)
Page 4

See Fig. 4
:
DRKR14C
8
10
18
19
18
17
ITEM NO.
1
2
3
4
5
6
7
8
9
10
11
12
13
14
15
16
17
18
19
16
15
12
PAR T NO.
LK142
40322C
A54888
70012C
A54800
40089C
40048C
10031C
61313C
72460042
45675C
LK128
40038C
40619C
50074C
55000963
74080022
74080005
74080006
18
Figure 7
P ARTS LIST
DESCRIPTION
Bubbler Assembly
Orifice Assmbly
Screen
Nut - 3/8-18 Lock nut
Nipple - Lead Free
Nut Cover Cap
Button Cap
Retaining Nut
Regulator Assembly
Metal Washer
Bubbler Body
Complete Drain Fitting
Grid Strainer
Strainer Body
Rubber Washer
Tie Down Bracket
1/4-20 x 2-1/2 Screw
1/4-20 Hex Nut
1/4 Washer
13, 14
19
18
17
15
TROUBLESHOOTING & MAINTENANCE
Orifice Assembly: Mineral deposits on
orifice can cause water flow to spurt or not
regulate. Mineral deposits may be removed from
the orifice by poking with a small round file not
over 1/8” diameter, or using a small diameter
wire.
!
CAUTION
DO NOT file or cut orifice
material.
Stream Regulator: If orifice is clean,
regulate flow as in Step 10, Page 2 of the installation instructions. If replacement is necessary ,
see parts list for correct regulator part number .
PRINTED IN U.S.A.
FOR PARTS, CONTACT YOUR LOCAL DISTRIBUTOR OR CALL 1.800.323.0620
ELKAY MANUFACTURING COMPANY • 2222 CAMDEN COURT • OAK BROOK, IL 60523 • 630.574.8484
98140C (Rev. - 3/05)
Page 4
 Loading...