

Page 1
Instruction Guide
BROOK DESIGN HARDWARE LTD
BDH
BDH
BROOK DESIGN
HARDWARE LTD
BDH
BROOK DESIGN
HARDWARE LTD
–
OUTDOOR
ILLUMINATED
TOUCH TIMER
560A -1
3 wire
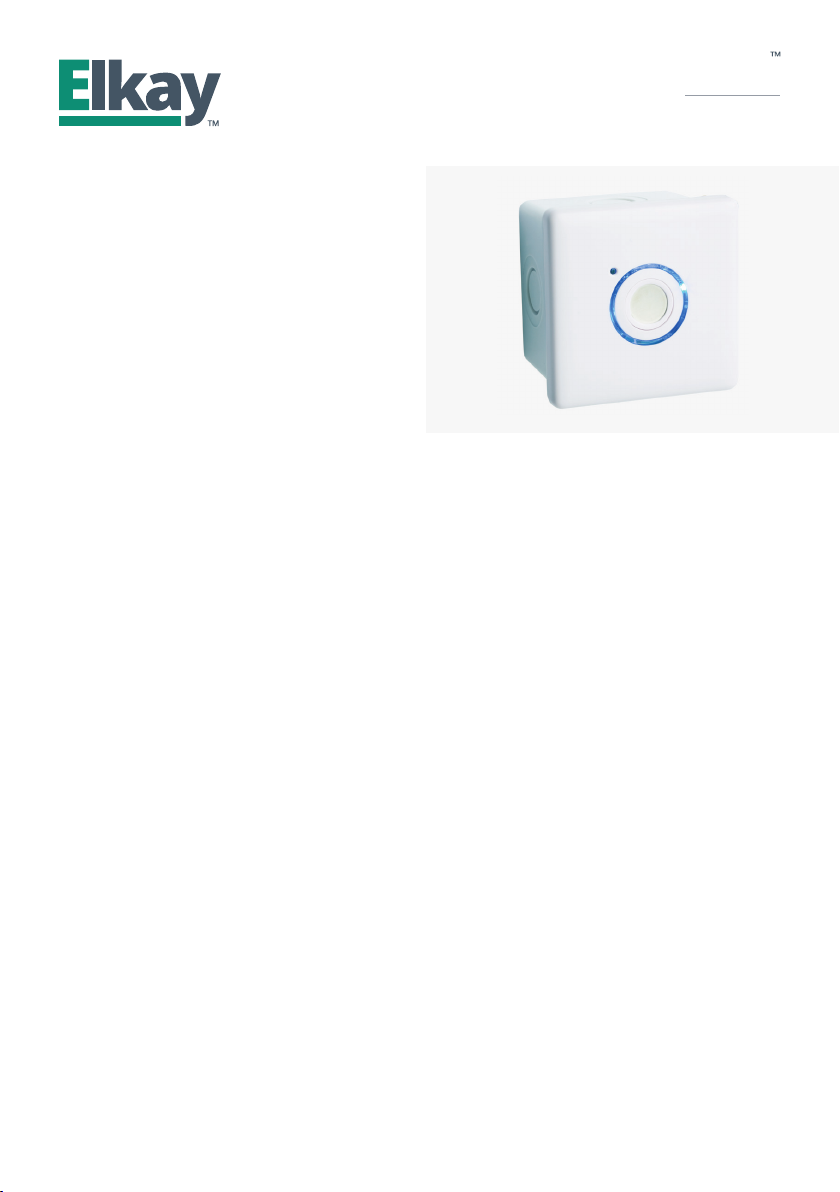
The Outdoor Illuminated Touch Timer
(3 wire) is part of the Elkay family of switches,
timers and detectors which save energy
and increase convenience in and around
your home, garden or premises.
Rating at 240V ac
• All load ty pes 16A
• Time Delay: 2 min - 2 hrs
• Featherlight touch
• Re-trigger function
• Blue Locator ring
• IP66
Usage
The touch sensor is a general purpose time control.
Applications for suitable use include lighting,
heating and ventilation. The timers can be used
independently or as a master unit when using
Activator trigger switches.
Mounting and Installation
IMP OR TAN T Please note that it is essential
that the Live In wire and switch Live Out
is identifi ed prior to commencing installation. Turn
off mains supply for installation. Your Elkay unit is
compatible w ith a single gang, 25mm deep, British
Standard accessory plate. Please ensure that
the top and bottom lugs are removed, if fi t ted,
from metal wall boxes prior to fi tting. Ensure that
there is adequate space for wiring.
Step 1
Place the Live In wire into the left hand
position of the connector, the switched Live Out
wire into the second from left position of the
connector and neutral into right hand position of
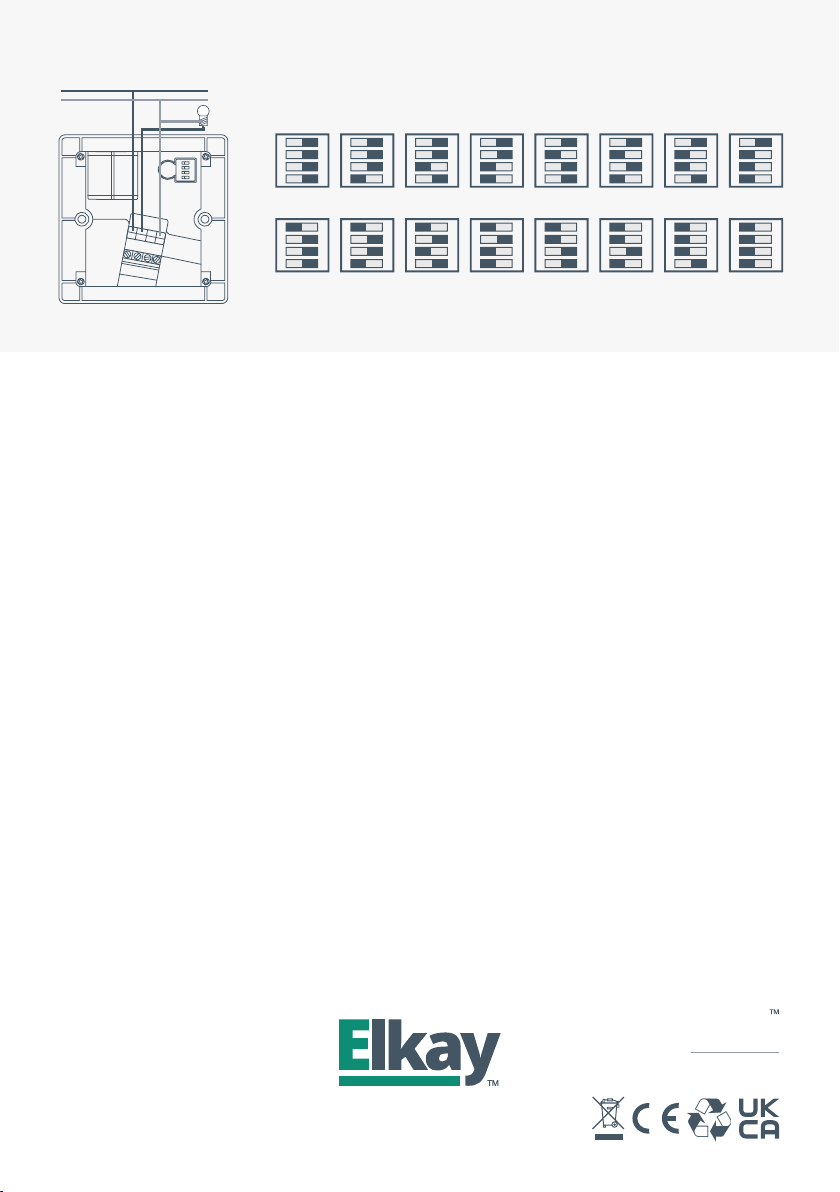
connector (see diagram 1).
Step 2
Set the timing as per timing table (see diagram 2).
The black square illus trates where t he dip sw itch
should be situated. For example:
10min 1 = OFF, 2 = ON, 3 = OFF, 4 = OFF
Step 3
Re-apply mains supply. The blue locator ring will light
up around the touch pad. Your light source or
appliance, will now be switched off . Please refe r to
operation section.
Outdoor Installation
Outdoor Unit can only be used in conjunc tion with
the surface mount box supplied. Take the surface
mount box and remove the knock out section.
It is recommend the hole is cut with a 20mm hole
saw for cleanest eff ect. If required and to ensure
IP66 waterproof rating , please use a suitable M20
cable gland use appropriate sealing washers.
Mount the sur face mount box on a secure sur face
using the mounting pack supplied. Place screw
cover seals over the mounting screws. It is essential
that the correct IP 66 rated connections are made
to keep the integrit y of the IP rated back box
maintained. Mount timer unit onto surface mount
box using the four screws at all four corners ensuring
even connection w ith the seal-Place screw cover
seals over lef t and right screw cavities. Clip on front
fascia plate.
Continued overleaf...
Page 2
BROOK DESIGN HARDWARE LTD
BDH
B
BDH
BROOK DESIGN
HARDWARE LTD
Diagram 1
LIVE IN
NEUTRAL
LIVE OUT
5 - 7m
4 - 6m
5 - 7m
3 - 4m
5 - 7m
4 - 6m
5 - 7m
3 - 4m
LIVE IN
LIVE OUT
NEUTRAL
7 metres approx
.
2.4 metres
7 metres approx.
CEILING
FLOOR
LIVE IN
NEUTRAL
LIVE OUT
LIVE IN
LIVE OUT
Battery
LIVE IN
LIVE OUT
DIL
switches
Battery
NEUTRAL
Diagram 2 – Time settings
Please note:
The black bar denotes
the position of the d ip switch .
ON DIP
4
3
2
1
ON DIP
4
3
2
1
ON DIP
4
3
2
1
ON DIP
4
3
2
1
ON DIP
4
3
2
1
ON DIP
4
3
2
1
ON DIP
4
3
2
ON DIP
1
2 mins 5 mins 10 mins 15 mins 20 mins 25 mins 30 mins 40 mins
ON DIP
4
3
2
1
ON DIP
4
3
2
1
ON DIP
4
3
2
1
ON DIP
4
3
2
1
ON DIP
4
3
2
1
ON DIP
4
3
2
1
ON DIP
4
3
2
ON DIP
1
50 mins 60 mins 70 mins 80 mins 90 mins 100 mins 110 mins 120 mins
4
3
2
1
4
3
2
1
Flexible Cable – It is always bet ter to use cable
glands with fl exible cable, with the gland co nnec te d
Operation of the Unit
1. Press the push button/touch pad and the red
at the bottom, rather than through the top.
Ensure sealing washers are used with all connections
and all glands and connections are done up
tightly with a spanner to ensure water tightness.
SWA Glands – SWA glands can be used but must
be IP rated. The IP rating for the SWA gland
guarantees only the connections to the SWA cable.
You will still need a nylon sealing washer to
maintain the IP rating from the gland to the switch
will now be switched on.
2. At any time during the working of the light source
originally set time, e.g. when the timing period
is 30 minutes, if push button/touch pad is
housing back box. A s a general rule, nylon washers
work best with this type of application. Rubber
3. To end the timing sequence prematurely, press
washers can deform when used with metal glands.
Connections must be done up tightly with a
spanner to ensure water tightness.
4. At one minute prior to the end of the timing
sequence, the red LED will begin to fl ash
continuously for the last minute of operation.
Important Notice
All wiring should be carried out by a competent
person or a qualifi ed electrician and should be
fi tted to current IEE wiring regulations BS 7671.
The circuit should be isolated before carrying out
any work. Failure to adhere to the instructions
will invalidate the warranty.
Brook House,
Dunmurry Industrial Estate,
Dunmurry,
Belfast BT17 9HU
T +44 (0)28 9 061 6505
F +44 (0)28 9 061 6518
E [email protected]
Elkay ( Europe), 51C Milic ka, Trzebnic a, 55-100, Pola nd
Technical Helpline
For fu rther help o r assista nce or informa tion on this o r other prod ucts in the r ange
please call the Elkay Tec hnica l team on + 44 (0 )28 9061 6505. Ple ase cal l the
Technica l helpline be fore re turni ng any pr oduc ts to yo ur stockis t. These
are available in other languages. Please refer to our website www.elkay.co.uk
Instrukcje są również dostępne w innych językach. Prosimy o zapoznanie się z naszą
stroną internetową www.elkay.co.uk lub www.elkaypolska.pl
elkay.co.uk
LED light up briefl y. Your light source or appliance
or appliance, the push button/touch pad can be
pressed to reset the timing sequence to the
pressed 15 minutes into the sequence, the timer
will re -set for a further 30 minutes.
and hold the push button/touch pad until the
red LED fl ashes continuously indicating the last
minute of operation. Your light source or appliance
will be s witched off , after one minute.
The blue locator ring will then illuminate once
the light source or appliance has gone off .
instructions
DH
BROOK DESIGN
HARDWARE LTD
 Loading...