

Elium Elipsus CI 230 T YUV, Elipsus CI 250 S SDI, Elipsus CI 240 S DVI, Elipsus CI 240 C DVI, Elipsus CI 250 C SDI Operating Instructions Manual
...
Operating Instructions

We thank you for your confidence in our product and congratulate you to the
purchase of your Digital Receiver of ELIUM GmbH.
As this product is provided with an immense array of features, we recommend
that before you begin hookup and operating that you review the contents of this
manual before proceeding.
The following devices of Digital Receivers of ELIUM GmbH are described in this
Operating Instructions:
▪ Elipsus CI 230 S YUV (for digital Satellite receiving DVB-S)
▪ Elipsus CI 230 C YUV (for digital Cable receiving DVB-C)
▪ Elipsus CI 230 T YUV (for digital Terrestrial receiving DVB-T)
▪ Elipsus CI 240 S DVI (for digital Satellite receiving DVB-S)
▪ Elipsus CI 240 C DVI (for digital Cable receiving DVB-S)
▪ Elipsus CI 240 T DVI (for digital Terrestrial receiving DVB-T)
▪ Elipsus CI 250 S SDI (for digital Satellite receiving DVB-S)
▪ Elipsus CI 250 C SDI (for digital Cable receiving DVB-C)
▪ Elipsus CI 250 T SDI (for digital Terrestrial receiving DVB-T)
▪ Elipsus DVR 3208 S (for digital Satellite receiving DVB-S)
▪ Elipsus DVR 3208 C (for digital Cable receiving DVB-C)
▪ Elipsus DVR 3208 T (for digital Terrestrial receiving DVB-T)
▪ Elipsus DVR 3218 S YUV (for digital Satellite receiving DVB-S)
▪ Elipsus DVR 3218 C YUV (for digital Cable receiving DVB-C)
▪ Elipsus DVR 3218 T YUV (for digital Terrestrial receiving DVB-T)
▪ Elipsus DVR 3228 S DVI (for digital Satellite receiving DVB-S)
▪ Elipsus DVR 3228 C DVI (for digital Cable receiving DVB-S)
▪ Elipsus DVR 3228 T DVI (for digital Terrestrial receiving DVB-T)
▪ Elipsus DVR 3238 S SDI (for digital Satellite receiving DVB-S)
▪ Elipsus DVR 3238 C SDI (for digital Cable receiving DVB-C)
▪ Elipsus DVR 3238 T SDI (for digital Terrestrial receiving DVB-T)
© ELIUM GmbH
All rights, in particular the right of duplication and broadcasting as well as translation, reserved. No part of these User manual my be reproduced, processed,
multiplied or broadcasted without written permission by ELIUM GmbH.
Errors, printer´s errors and changes excepted.
DiSEqC™ is a registered trade mark of EUTELSAT.
DVB™ is a registered trade mark of DVB Digital Video Broadcasting Projekt
(1761).
1

1. Information
1.1 Accessories . . . . . . . . . . 3
1.2 Datasheets . . . . . . . . . . 4
1.3 Safety Regulations . . . . . . 11
1.4 Equipment . . . . . . . . . . 13
1.4.1 Elipsus CI 230 YUV. . . . . . 13
1.4.2 Elipsus CI 240 DVI . . . . . . 14
1.4.3 Elipsus CI 250 SDI . . . . . . 15
1.4.4 Elipsus DVR 3208 . . . . . . 16
1.4.5 Elipsus DVR 3218 YUV . . . . 17
1.4.6 Elipsus DVR 3228 DVI . . . . 18
1.4.7 Elipsus DVR 3238 SDI . . . . 19
1.4.8 External Power Supply . . . . 20
1.4.9 Remote Control . . . . . . . 21
2. Connections
2.1 Connecting to Antenna . . . . 22
2.2 Connecting to TV . . . . . . . 22
2.3 Connecting to AV Receiver . . . 22
2.4 Connecting to Power . . . . . 22
3. Installation
3.1 OSD configuration . . . . . . 23
3.2 Antenna only DVB-S . . . . . . 24
3.3 Search for channels DVB-S . . 25
3.4 Search for channels DVB-C . . 26
3.5 Search for channels DVB-T . . 27
4. Menu
4.1 Configuration . . . . . . . . . 28
4.1.1 Edit TV channels . . . . . . . 29
4.1.2 Edit Radio channels . . . . . . 31
4.1.3 Search for channels . . . . . 33
4.2 Configuration . . . . . . . . . 33
4.2.1 Antenna only DVB-S . . . . . 33
4.2.2 Add Source only DVB-S . . . . 34
4.2.3 Positioner 1.2 only DVB-S . . 34
4.2.4 USALS only DVB-S . . . . . . 35
4.3 TV parameter . . . . . . . . 36
4.4 TV out . . . . . . . . . . . . 37
4.5 Time and Date . . . . . . . . 38
4.6 User . . . . . . . . . . . . 38
4.6.1 Favourite TV . . . . . . . . . 39
4.6.2 Favourite Radio . . . . . . . . 39
4.6.3 OSD . . . . . . . . . . . . 39
4.6.4 Password . . . . . . . . . . 39
4.6.5 Users management . . . . . . 40
4.6.6 Add new user . . . . . . . . 40
4.6.7 Delete user . . . . . . . . . 40
4.6.8 TV access rights . . . . . . . 41
4.6.9 Radio access rights . . . . . . 41
4.7 Change active user . . . . . . 41
4.8 Access Module . . . . . . . . 41
5. Channel selection
5.1 Channel selection by list . . . . 42
5.2 Channel selection by number . . 42
5.3 Channel selection by name . . . 42
6. Additional function
6.1 Auto Zapping . . . . . . . . . 43
6.2 Zoom function . . . . . . . . 43
6.3 EPG . . . . . . . . . . . . . 44
6.4 Info button.. . . . . . . . . . 44
6.5 Technical Menu . . . . . . . . 45
A. Addenda Elipsus DVR Models
DVR Function
A.1.1 Recording . . . . . . . . . . 46
A.1.2 Playback of records . . . . . . 47
A.1.3 Different options . . . . . . . 47
A.1.4 Marking function . . . . . . . 48
A.1.5 Timer function . . . . . . . . 49
MP3 Player Software
A.2.1 Transfer of MP3 files . . . . . 50
A.2.2 Playback of MP3 files . . . . . 50
JPEG Photoalbum Software
A.3.1 Transfer of JPEG files . . . . 51
A.3.2 Playback of JPEG files . . . . 51
B. Addenda Elipsus YUV Models
B.1.1 Connecting to Display . . . . . 52
B.1.2 Output parameters . . . . . . 52
C. Addenda Elipsus DVI Models
C.1.1 Connecting to Display . . . . . 53
C.1.2 Output parameters . . . . . . 53
D. Addenda Elipsus SDI Models
D.1.1 Connecting to Display . . . . . 54
D.1.2 Output parameters . . . . . . 54
Table of contents
2

▪ Digital Receiver Elipsus
▪ Remote Control
▪ Batteries
▪ External Power Supply
▪ Power Supply Cord
▪ Operating Instructions
Information
1.1 Accessories
3

Elipsus CI 230 S YUV CI 230 C YUV CI 230 T YUV
Tuner DVB-S DVB-C DVB-T
Frequency Range 950 - 2120 MHz 47 - 862 MHz
Input Resistance 75 Ohm
Input Connector F-Typ Jack Antenna Jack
Input Symbol Rate 1 - 45 MS/s 4 - 7 MS/s
Modulation QPSK QAM 16 - 256 COFDM QAM 16, 64
Show Signalquality Yes
Loop through Output Yes
LNB Power 13V / 18V, 500 mA - -
DiSEqC Version 1.0 / 2.0 - -
Positioner DiSEqC1.2 / USALS - -
Channel Memory 3600 TV / 1800 Radio
User max. 16
OSD: Languages German, English, Italian
Teletext Generated or looped through to TV
Timer max. 20
EPG By Channel / Transponder
CI / CA 2 Common Interface Slots Free To Air
Software Update RS232 via USB Adapter
Parental Control By User Accounts
Other Features
Grafics Display 100 x 100 Pixel, Timer, EPG for whole week
Auto Zapping, Zoom Function
Volume memory for each channel
Video Output Scart: RGB, S-Video, CVBS Output
YUV Output YUV (Y/Pb/Pr) Progressive
Resolution 576p 50 Hz · 720p 50 Hz · 720p 60 Hz
Video Decoder MPEG1, MPEG2, MP@ML
Video Format 4:3 and16:9
Audio Output L + R Analog in Scart, Digital Audio Coax: Stereo PCM, AC-3
Audio Decoder MPEG1, MPEG2 Layer I, II, MP3
Bitstream out Dolby Digital 2.0 and 5.1
RS232 Interface via USB Adapter
USB Input Port Yes
Mains Switch Power Jack
Input Voltage DC 12V / 3A, AC 100 - 240V
Power Consumption 6 W / 11,5 W
Measure (W, D, H) 215 x 245 x 75 mm
Weight 1,80 kg
Information
1.2 Datasheets
4

Elipsus CI 240 S DVI CI 240 C DVI CI 240 T DVI
Tuner DVB-S DVB-C DVB-T
Frequency Range 950 - 2120 MHz 47 - 862 MHz
Input Resistance 75 Ohm
Input Connector F-Typ Jack Antenna Jack
Input Symbol Rate 1 - 45 MS/s 4 - 7 MS/s
Modulation QPSK QAM 16 - 256 COFDM QAM 16, 64
Show Signalquality Yes
Loop through Output Yes
LNB Power 13V / 18V, 500 mA - -
DiSEqC Version 1.0 / 2.0 - -
Positioner DiSEqC1.2 / USALS - -
Channel Memory 3600 TV / 1800 Radio
User max. 16
OSD: Languages German, English, Italian
Teletext Generated or looped through to TV
Timer max. 20
EPG By Channel / Transponder
CI / CA 2 Common Interface Slots Free To Air
Software Update RS232 via USB Adapter
Parental Control By User Accounts
Other Features
Grafics Display 100 x 100 Pixel, Timer, EPG for whole week
Auto Zapping, Zoom Function
Volume memory for each channel
Video Output Scart: RGB, S-Video, CVBS Output
DVI Connecting DVI-I (24+5) Progressive
Resolution 576p 50 Hz · 720p 50 Hz · 720p 60 Hz · SVGA · XGA
Video Decoder MPEG1, MPEG2, MP@ML
Video Format 4:3 and 16:9
Audio Output L + R Analog in Scart, Digital Audio Coax: Stereo PCM, AC-3
Audio Decoder MPEG1, MPEG2 Layer I, II, MP3
Bitstream out Dolby Digital 2.0 and 5.1
RS232 Interface via USB Adapter
USB Input Port Yes
Mains Switch Power Jack
Input Voltage DC 12V / 3A, AC 100 - 240V
Power Consumption 6 W / 11,5 W
Measure (W, D, H) 215 x 245 x 75 mm
Weight 1,80 kg
Information
1.2 Datasheets
5

Elipsus CI 250 S SDI CI 250 C SDI CI 250 T SDI
Tuner DVB-S DVB-C DVB-T
Frequency Range 950 - 2120 MHz 47 - 862 MHz
Input Resistance 75 Ohm
Input Connector F-Typ Jack Antenna Jack
Input Symbol Rate 1 - 45 MS/s 4 - 7 MS/s
Modulation QPSK QAM 16 - 256 COFDM QAM 16, 64
Show Signalquality Yes
Loop through Output Yes
LNB Power 13V / 18V, 500 mA - -
DiSEqC Version 1.0 / 2.0 - -
Positioner DiSEqC1.2 / USALS - -
Channel Memory 3600 TV / 1800 Radio
User max. 16
OSD: Languages German, English, Italian
Teletext Generated or looped through to TV
Timer max. 20
EPG By Channel / Transponder
CI / CA 2 Common Interface Slots Free To Air
Software Update RS232 via USB Adapter
Parental Control By User Accounts
Other Features
Grafics Display 100 x 100 Pixel, Timer, EPG for whole week
Auto Zapping, Zoom Function
Volume memory for each channel
Video Output Scart: RGB, S-Video, CVBS Output
SDI Connecting SDI (BNC) Interlace
Resolution 576i 50 Hz
Normen SMPTE 259M ITU-R BT 656
Video Decoder MPEG1, MPEG2, MP@ML
Video Format 4:3 and 16:9
Audio Output L + R Analog in Scart, Digital Audio Coax: Stereo PCM, AC-3
Audio Decoder MPEG1, MPEG2 Layer I, II, MP3
Bitstream out Dolby Digital 2.0 and 5.1
RS232 Interface via USB Adapter
USB Input Port Yes
Mains Switch Power Jack
Input Voltage DC 12V / 3A, AC 100 - 240V
Power Consumption 6 W / 11,5 W
Measure (W, D, H) 215 x 245 x 75 mm
Weight 1,80 kg
Information
1.2 Datasheets
6

Elipsus DVR 3208 S DVR 3208 C DVR 3208 T
Tuner DVB-S DVB-C DVB-T
Frequency Range 950 - 2120 MHz 47 - 862 MHz
Input Resistance 75 Ohm
Input Connector F-Typ Jack Antenna Jack
Inputs-Datenrate 1 - 45 MS/s 4 - 7 MS/s
Modulation QPSK QAM 16 - 256 COFDM QAM 16, 64
Show Signalquality Yes
Durchschleif-Output Yes
LNB-Steuerung 13V / 18V, 500 mA - -
DiSEqC Version 1.0 / 2.0 - -
Positioner DiSEqC1.2 / USALS - -
Channel Memory 3600 TV / 1800 Radio
User max. 16
OSD: Languages German, English, Italian
Teletext Generated or looped through to TV
Timer max. 20
EPG By Channel / Transponder
CI / CA 2 Common Interface Slots Free To Air
Festplatte 120 GB
Software Update RS232 via USB Adapter
Parental Control By User Accounts
Other Features
Grafics Display 100 x 100 Pixel, Timer, EPG for whole week
Auto Zapping, Zoom Function, Timeshifting
Volume memory for each channel, Slow Motion, Marking Function
MP3 Software Yes
JPEG Software Yes
Video Output Scart 1: RGB, S-Video, CVBS Output / CVBS Input
Video Output Scart 2: S-Video, CVBS Output / CVBS Input
Video Decoder MPEG1, MPEG2, MP@ML, JPEG
Video Format 4:3 and 16:9
Audio Output L + R Analog in SCART, Digital Audio Coax: Stereo PCM, AC-3
Audio Decoder MPEG1, MPEG2 Layer I, II, MP3
Bitstream out Dolby Digital 2.0 and 5.1
RS232 Interface via USB Adapter
USB Input Port Yes
Mains Switch Power Jack
Input Voltage DC 12V / 3A, AC 100 - 240V
Power Consumption 6 W / 11,5 W
Measure (W, D, H) 215 x 245 x 75 mm
Weight 2,20 kg
Information
1.2 Datasheets
7

Elipsus DVR 3218 S YUV DVR 3218 C YUV DVR 3218 T YUV
Tuner DVB-S DVB-C DVB-T
Frequency Range 950 - 2120 MHz 47 - 862 MHz
Input Resistance 75 Ohm
Input Connector F-Typ Jack Antenna Jack
Input Symbol Rate 1 - 45 MS/s 4 - 7 MS/s
Modulation QPSK QAM 16 - 256 COFDM QAM 16, 64
Show Signalquality Yes
Loop through Output Yes
LNB Power 13V / 18V, 500 mA - -
DiSEqC Version 1.0 / 2.0 - -
Positioner DiSEqC1.2 / USALS - -
Channel Memory 3600 TV / 1800 Radio
User max. 16
OSD: Languages German, English, Italian
Teletext Generated or looped through to TV
Timer max. 20
EPG By Channel / Transponder
CI / CA 2 Common Interface Slots Free To Air
Festplatte 120 GB
Software Update RS232 via USB Adapter
Parental Control By User Accounts
Other Features
Grafics Display 100 x 100 Pixel, Timer, EPG for whole week
Auto Zapping, Zoom Function, Timeshifting
Volume memory for each channel, Slow Motion, Marking Function
MP3 Software Yes
JPEG Software Yes
Video Output Scart: RGB, S-Video, CVBS Output
YUV Output YUV (Y/Pb/Pr) Progressive
Resolution 576p 50 Hz · 720p 50 Hz · 720p 60 Hz
Video Decoder MPEG1, MPEG2, MP@ML
Video Format 4:3 and 16:9
Audio Output L + R Analog in Scart, Digital Audio Coax: Stereo PCM, AC-3
Audio Decoder MPEG1, MPEG2 Layer I, II, MP3
Bitstream out Dolby Digital 2.0 and 5.1
RS232 Interface via USB Adapter
USB Input Port Yes
Mains Switch Power Jack
Input Voltage DC 12V / 3A, AC 100 - 240V
Power Consumption 6 W / 11,5 W
Measure (W, D, H) 215 x 245 x 75 mm
Weight 2,30 kg
Information
1.2 Datasheets
8

Elipsus DVR 3228 S DVI DVR 3228 C DVI DVR 3228 T DVI
Tuner DVB-S DVB-C DVB-T
Frequency Range 950 - 2120 MHz 47 - 862 MHz
Input Resistance 75 Ohm
Input Connector F-Typ Jack Antenna Jack
Input Symbol Rate 1 - 45 MS/s 4 - 7 MS/s
Modulation QPSK QAM 16 - 256 COFDM QAM 16, 64
Show Signalquality Yes
Loop through Output Yes
LNB Power 13V / 18V, 500 mA - -
DiSEqC Version 1.0 / 2.0 - -
Positioner DiSEqC1.2 / USALS - -
Channel Memory 3600 TV / 1800 Radio
User max. 16
OSD: Languages German, English, Italian
Teletext Generated or looped through to TV
Timer max. 20
EPG By Channel / Transponder
CI / CA 2 Common Interface Slots Free To Air
Festplatte 120 GB
Software Update RS232 via USB Adapter
Parental Control By User Accounts
Other Features
Grafics Display 100 x 100 Pixel, Timer, EPG for whole week
Auto Zapping, Zoom Function, Timeshifting
Volume memory for each channel, Slow Motion, Marking Function
MP3 Software Yes
JPEG Software Yes
Video Output Scart: RGB, S-Video, CVBS Output
DVI Connecting DVI-I (24+5) Progressive
Resolution 576p 50 Hz · 720p 50 Hz · 720p 60 Hz · SVGA · XGA
Video Decoder MPEG1, MPEG2, MP@ML
Video Format 4:3 and 16:9
Audio Output L + R Analog in Scart, Digital Audio Coax: Stereo PCM, AC-3
Audio Decoder MPEG1, MPEG2 Layer I, II, MP3
Bitstream out Dolby Digital 2.0 and 5.1
RS232 Interface via USB Adapter
USB Input Port Yes
Mains Switch Power Jack
Input Voltage DC 12V / 3A, AC 100 - 240V
Power Consumption 6 W / 11,5 W
Measure (W, D, H) 215 x 245 x 75 mm
Weight 2,30 kg
Information
1.2 Datasheets
9

Elipsus DVR 3238 S SDI DVR 3238 C SDI DVR 3238 T SDI
Tuner DVB-S DVB-C DVB-T
Frequency Range 950 - 2120 MHz 47 - 862 MHz
Input Resistance 75 Ohm
Input Connector F-Typ Jack Antenna Jack
Input Symbol Rate 1 - 45 MS/s 4 - 7 MS/s
Modulation QPSK QAM 16 - 256 COFDM QAM 16, 64
Show Signalquality Yes
Loop through Output Yes
LNB Power 13V / 18V, 500 mA - -
DiSEqC Version 1.0 / 2.0 - -
Positioner DiSEqC1.2 / USALS - -
Channel Memory 3600 TV / 1800 Radio
User max. 16
OSD: Languages German, English, Italian
Teletext Generated or looped through to TV
Timer max. 20
EPG By Channel / Transponder
CI / CA 2 Common Interface Slots Free To Air
Festplatte 120 GB
Software Update RS232 via USB Adapter
Parental Control By User Accounts
Other Features
Grafics Display 100 x 100 Pixel, Timer, EPG for whole week
Auto Zapping, Zoom Function, Timeshifting
Volume memory for each channel, Slow Motion, Marking Function
MP3 Software Yes
JPEG Software Yes
Video Output Scart: RGB, S-Video, CVBS Output
SDI Connecting SDI (BNC) Interlace
Resolution 576i 50 Hz
Normen SMPTE 259M ITU-R BT 656
Video Decoder MPEG1, MPEG2, MP@ML
Video Format 4:3 and 16:9
Audio Output L + R Analog in Scart, Digital Audio Coax: Stereo PCM, AC-3
Audio Decoder MPEG1, MPEG2 Layer I, II, MP3
Bitstream out Dolby Digital 2.0 and 5.1
RS232 Interface via USB Adapter
USB Input Port Yes
Mains Switch Power Jack
Input Voltage DC 12V / 3A, AC 100 - 240V
Power Consumption 6 W / 11,5 W
Measure (W, D, H) 215 x 245 x 75 mm
Weight 2,30 kg
Information
1.2 Datasheets
10

Pay attention to the following before using this unit. To be sure read these
instructions carefully and use the set properly. Be sure to keep this manual for
future reference, should any question or problem arise.
Power Cord
Handle the Power Cord carefully. Hold the plug when unplugging
the cord. Do not use damaged Power Cord. Do not plug the
Power Cord until all connections have be completed.
Input Voltage
Use only at Voltage of 85 - 240V.
Playing childs
Pay attention that nobody let foreign objects in the ventilation
openings. That risks of electric shock.
Ventilation
Avoid high temperatures. Allow for sufficient heat dispersion
when installed on a rack. Do not obstruct the ventilation openings. The ventilation should not be impeded by covering the ventilation openings with items, such as newspapers, table-cloths,
curtains or other electrical devices. For heat dispersal, leave at
least 10 cm of space between the top back and sides of this unit
and the wall or other components.
Opening the unit
Do not open the unit or try to disassemble or modify the unit in
any way. That risks of electric shock. No user serviceable parts
inside. Refer servicing to qualified service personnel. No liability
for electric shock to persons or accidant damage of user when
cover of unit was removed or opend.
Insolation
Do not install the unit near heat sources which is radiator, fan
heater or stove heating. Do not let in direct insolation. Keep
care that the unit is not used bei low temperature. The ideal
temperature is between 10°C – 45°C.
Moisture
Keep the unit free from moisture, water and dust. The unit
should not be used in moist rooms, wet rooms or near a bath.
The ideal humidity is between 10% – 70%.
Information
1.3 Safety Regulations
11
10 c m

Cleaning
Before cleaning the Power Cord must be unplugged. Use only a
dry and clean cloth. Do not let insecticides, benzine, thinner or
strong detergents come in contact with the unit.
Longer absence
Unplug the Power Cord when not using the unit for long periods
of time. Also unplug the Antenna from input.
Earthing
The Parabol Satellite Antenna must be earthed. Please observe
the relevant regulations.
Information
1.3 Safety Regulations
12

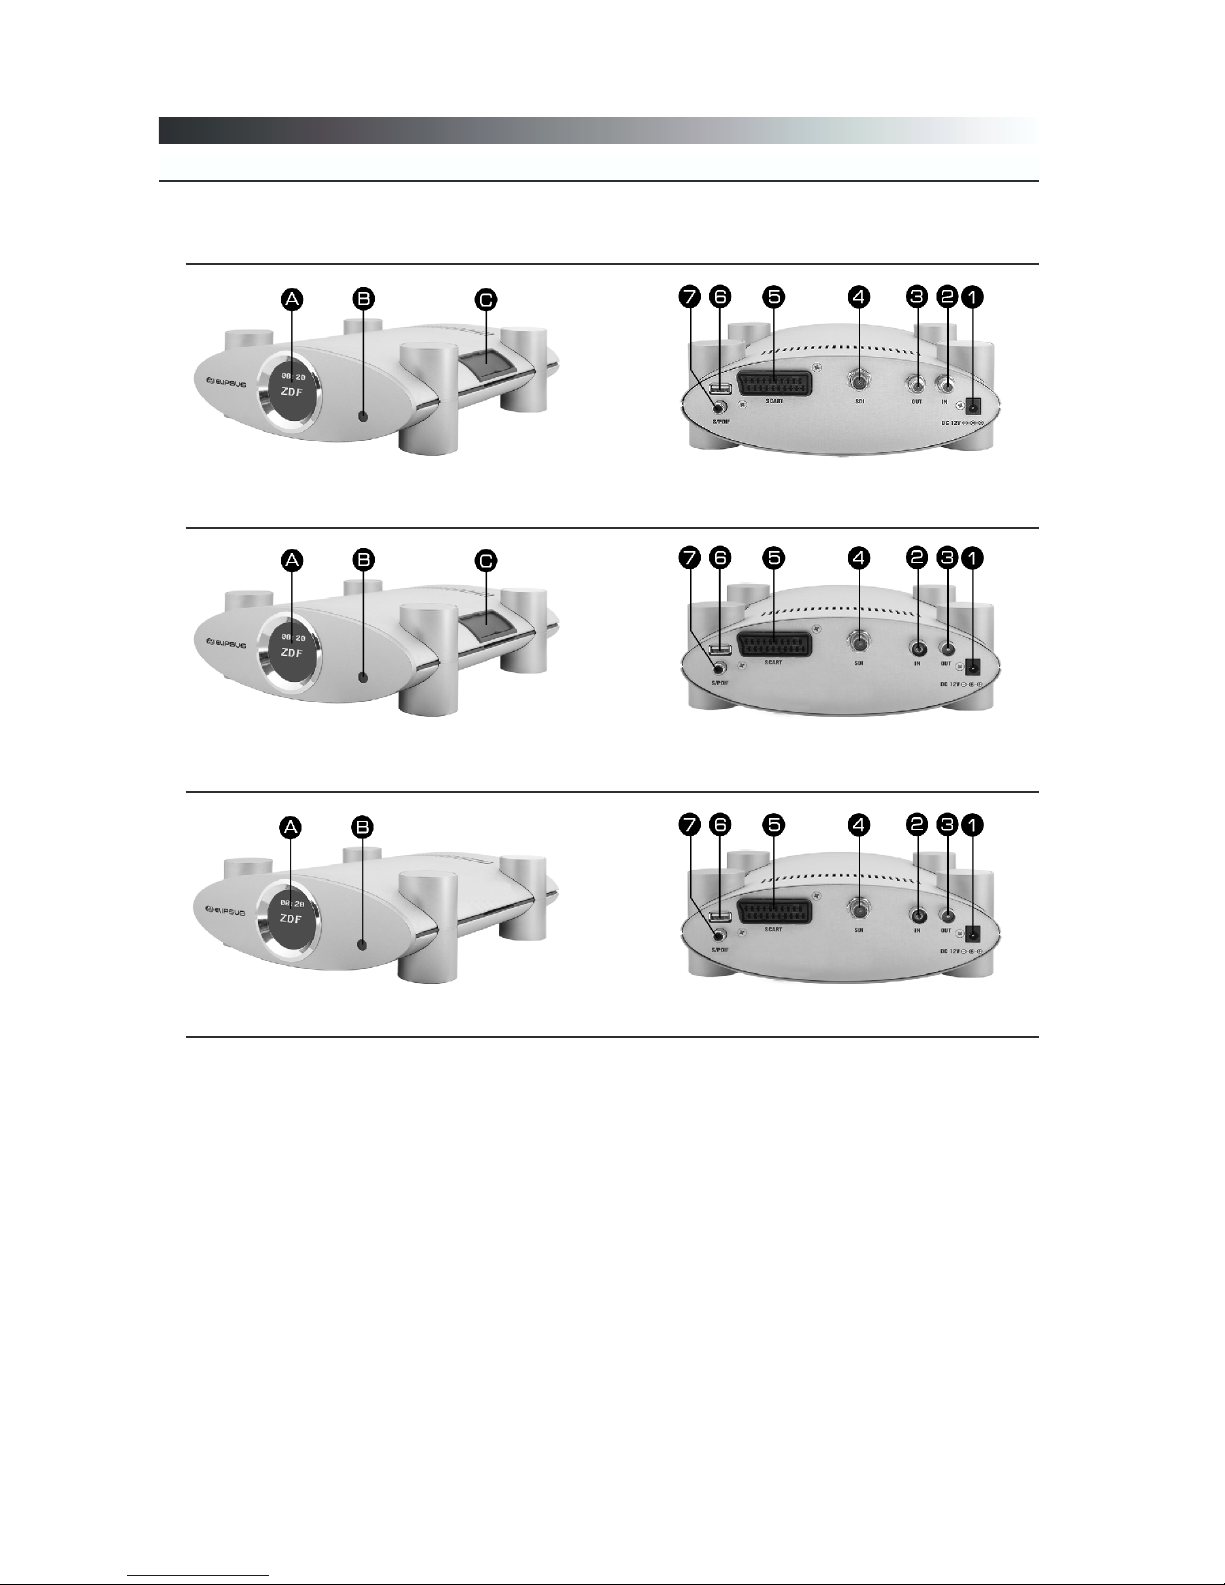
Information
1.4.1 Equipment
The Equipment of Elipsus CI 230 YUV.
Reception by DVB-S
Reception by DVB-C
Reception by DVB-T
Legend
A - Grafics Display
B - Infra-red receiver
C - Common Interface Slots
1 - 12V Power Jack
2 - Antenna Input
3 - Antenna Output
4 - YUV Output
5 - Scart Output
6 - USB Input Port
7 - SPDIF AC3 Output
13

1.4.2 Equipment
Information
The Equipment of Elipsus CI 240 DVI.
Reception by DVB-S
Reception by DVB-C
Reception by DVB-T
Legend
A - Grafics Display
B - Infra-red receiver
C - Common Interface Slots
1 - 12V Power Jack
2 - Antenna Input
3 - Antenna Output
4 - DVI Output
5 - Scart Output
6 - USB Input Port
7 - SPDIF AC3 Output
14
1.4.3 Equipment
Information
The Equipment of Elipsus CI 250 SDI.
Reception by DVB-S
Reception by DVB-C
Reception by DVB-T
Legend
A - Grafics Display
B - Infra-red receiver
C - Common Interface Slots
1 - 12V Power Jack
2 - Antenna Input
3 - Antenna Output
4 - SDI Output
5 - Scart Output
6 - USB Input Port
7 - SPDIF AC3 Output
15
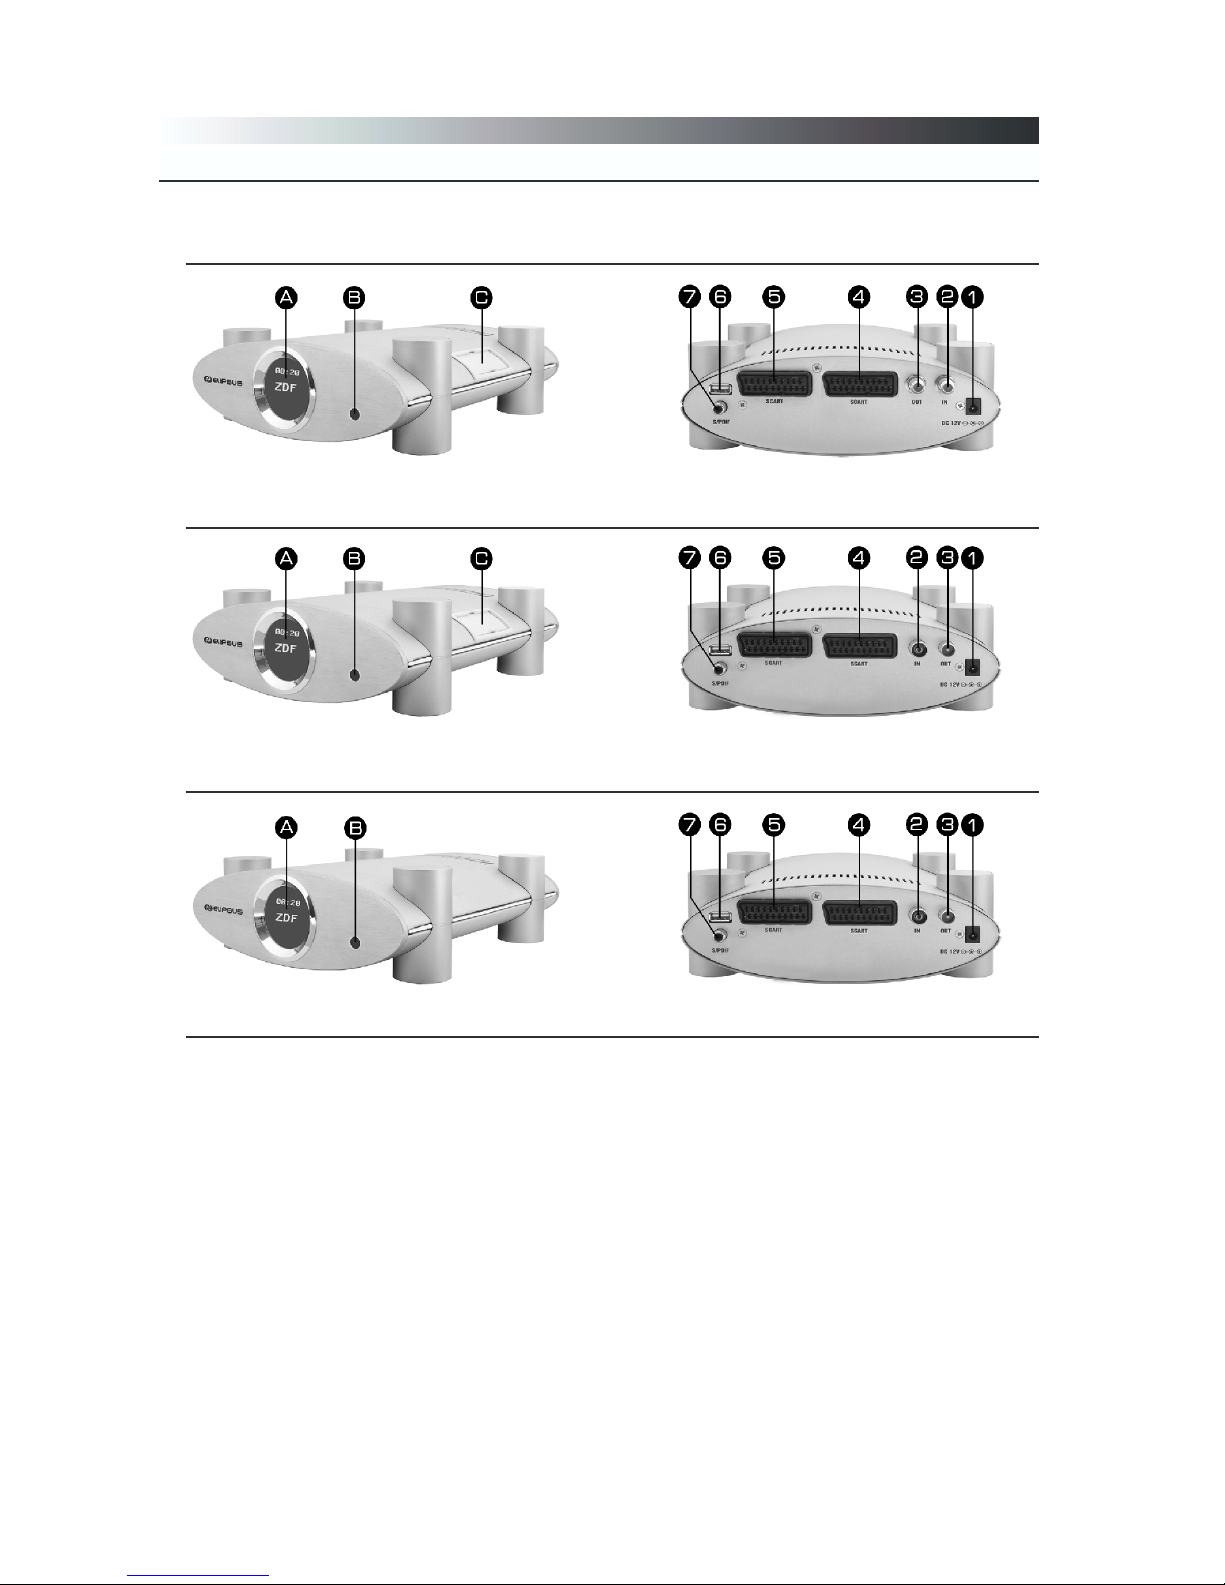
1.4.4 Equipment
Information
The Equipment of Elipsus DVR 3208.
Reception by DVB-S
Reception by DVB-C
Reception by DVB-T
Legend
A - Grafics Display
B - Infra-red receiver
C - Common Interface Slots
1 - 12V Power Jack
2 - Antenna Input
3 - Antenna Output
4 - Scart Output
5 - Scart Output
6 - USB Input Port
7 - SPDIF AC3 Output
16

1.4.5 Equipment
Information
The Equipment of Elipsus DVR 3218 YUV.
Reception by DVB-S
Reception by DVB-C
Reception by DVB-T
Legend
A - Grafics Display
B - Infra-red receiver
C - Common Interface Slots
1 - 12V Power Jack
2 - Antenna Input
3 - Antenna Output
4 - YUV Output
5 - Scart Output
6 - USB Input Port
7 - SPDIF AC3 Output
17

1.4.6 Equipment
Information
The Equipment of Elipsus DVR 3228 DVI.
Reception by DVB-S
Reception by DVB-C
Reception by DVB-T
Legend
A - Grafics Display
B - Infra-red receiver
C - Common Interface Slots
1 - 12V Power Jack
2 - Antenna Input
3 - Antenna Output
4 - DVI Output
5 - Scart Output
6 - USB Input Port
7 - SPDIF AC3 Output
18

Information
1.4.7 Equipment
The Equipment of Elipsus DVR 3238 SDI.
Reception by DVB-S
Reception by DVB-C
Reception by DVB-T
Legend
A - Grafics Display
B - Infra-red receiver
C - Common Interface Slots
1 - 12V Power Jack
2 - Antenna Input
3 - Antenna Output
4 - SDI Output
5 - Scart Output
6 - USB Input Port
7 - SPDIF AC3 Output
19

Information
1.4.8 Equipment
The Euipment of external 12V Power Supply
Legend
a - Power Jack
b - AC Cord Jack
c - Power Plug
d - AC Cord Plug
20

The Remote Control enables the interaction with the Elipsus Receiver. Therefore
it is very important to know about the main functionality.
1 - On / Off (StandBy)
2 - Direct channel selection
or data input in Menu
3 - Switch between TV and Radio mode
4 - Not active
5 - RCL return to last channel
6 - Mute
7 - Up and Down Scroll in channel list
or move in Menu
8 - Plus/Minus Volume adjustment
or change in Menu
9 - Exit Return to last Menu
or stop recording (only DVR)
10 - OK confirm or select
11 - Main Menu or save
12 - Not active
13 - DVR Digital Video Recorder
14 - MP3 and JPEG Menu
15 - Not active
16 - Fast reverse search
17 - Fast forward search
18 - Play / Pause Function
19 - Skip reverse search
20 - Skip forward search
21 - Direct recording
22 - Information
23 - Teletext
24 - EPG
25 - Timer Menu
26 - Not active
27 - Multifeed and Multilanguage
28 - Freeze Picture
29 - Zoom
Information
1.4.9 Equipment
21

Connecting
2.1 Connecting to Antenna
Reception by DVB-S
▪ To reduce noise or disturbance install the Elipsus as far as possible from
other electronic equipment.
▪ Connect the antenna cable with the antenna input (2).
▪ If you want to pass through the also received analog signal to an other
analog receiver you have to connect the other unit with the antenna output (3).
Reception by DVB-C
▪ To reduce noise or disturbance install the Elipsus as far as possible from
other electronic equipment.
▪ Connect the antenna cable with the antenna input (2).
▪ If y o u w ant t o p ass t h r ough t h e a l so r e c eiv e d a nalo g s i g n a l t o an a n a l o g T V
tuner you have to connect this other unit with the antenna output (3).
Reception by DVB-T
▪ To reduce noise or disturbance install the Elipsus as far as possible from
other electronic equipment.
▪ Connect the antenna cable with the antenna input (2).
▪ Connect the Scart cable with the Scart input of the TV set and also with
the Scart output (5).
▪ If you use a Digital Audio (AC3) System you have to connect it with the
SPDIF Digital Audio output (7) using a 75 Ohm coaxial cable.
▪ Connect the Power Jack of external Power Supply (a) with the Power Jack
of the Elipsus (1).
▪ Connect the AC Cord Plug (d) with the AC Cord Jack (b) and the Power
Plug (c) with the socket.
▪ Insert the batteries properly in the Remote Control. Be sure the polarities
are correct. See the illustration inside the battery compartment.
Now the Elipsus is in StandBy Mode. To set up the system you have to switch
on the TV Set and also the Elipsus by pressing the StandBy button (1) of the
Remote Control.
After starting the Elipsus the TV set should switch automatic to AV mode, if
not please do it manual.
2.2 Connecting to TV
2.3 Connecting to AV Receiver
2.4 Connecting to Power
22

Installation
3.1 OSD Installation
After switching on the Elipsus with the StandBy button (1) of the Remote Control you should see on the TV set a welcome screen. Now you can start set up
the installation.
As followed the OSD installation is shown.
▪ To move between the different input windows
press the Up and Down button (7).
▪ To change the settings of an input window
press the Plus/Minus button (8).
▪ To enter a username in the input window you
have to press the Numeric buttons (2) repeated till you receive the correct character.
▪ Values you can set up:
›
Language: Here you can select between 4 OSD languages: German, English, French or Italian.
›
Username: (see above)
›
Remote Control: Here you can adjust if by zapping with the Up and Down
button (7) the current channel will be switched plus one or minus one. That
means if you zapp up by pressing the Up button (7) that should be switched upwards (-1) or downwards (+1).
›
Audio: Here you can select between t wo formats: MPEG (as Standard)
or AC3 (if you use a connection to a Digital AC3 AV Receiver).
›
Audio Language: Here you can select between three languages for chan-
nels which are broadcastet in multilanguage which is for example the european channel Arte.
›
Transparency: Here you can adjust the transparency of the OSD (On
Screen Display).
›
OSD Timeout: Here you can adjust the lenght of the OSD should be
shown on screen.
›
Position: Here you can adjust the position of the display. You can select
between 0°, -90° and +90°, if you place the Elipsus on one of sites.
›
HDD Sleep: Here you can adjust after what time the Harddisk Drive
should go in sleep mode when it is not used.
›
Display: Here you can adjust if the name of a channel or the title of a pro-
gram should be shown on the display.
›
Brightness: Here you can adjust the brightness of display when the Elip-
sus is on as well as the Elipsus is in StandBy mode.
›
Contrast: Here you can adjust the contrast of the display.
▪ To save the adjustment of the OSD installation you have to press the
Menu button (11).
▪ To leave the OSD installation set up you have to press the Exit button (9).
You can change at any time the set up of OSD installation using the path Main
Menu / User / OSD.
23

Installation
3.2 Antenna only DVB-S
The Elipsus is programmed for Astra Satellite but you can set up the antenna
installtion as well as the channel search for other satellites.
▪ To move between the input windows press
the Up and Down button (7).
▪ To change the settings of an input window
press the Plus/Minus button (8).
▪ If you use only one LNB you have to select at
the option LNB Connection: Direct.
Otherwise if you use several LNB or several
Antenna connected to a Multiswitch you have to
assign to each seperate LNB or Antenna an own
DiSEqC connection.
The following illustration shows you an example:
For the correct set up of the above illustration you have to adjust the following
parameter.
▪ Select the satellite you want to receive.
▪ Select the LNB Number for example: Antenna 1 correspond to LNB Number
1, Antenna 2 correspond to LNB Number 2 .....
▪ Select the DiSEqC for example DiSEqC A correspond to Sat System A,
DiSEqC correspond to Sat System B .....
▪ Press the Menu button (11) to save the parameter.
Example: Hotbird - LNB number 2 - LNB connection DiSEqC B and Astra
- LNB number 1 - LNB connection DiSEqC A. After correct set
up you will see after some seconds the signal quality shown at the
OSD.
24

3.3 Channel search DVB-S
Installation
In the following the channel search is described:
After correct set up of the antenna on the screen of your TV set the next
installation Menu „channel search“ is shown.
▪ With the Plus/Minus button (8) you can change the satellite. Here you have to
select the satellite you have set up in the antenna installation Menu.
In this Menu the signal strength and quality is indicated. Also it is indicated with
an acoustic sound. If the strength and quality increase the acoustic sound get
higher. For acceptable receiption the indication should reach the green coloured
area.
There are four options for the channel search:
▪ Automatic: All on the satellite available chan-
nels are searched.
▪ Automatic FTA: All on the satellite available
Free TV channels are searched.
▪ Semi Automatic: Searching for particular
channels of a transponder.
The following parameter must be adjusted:
›
Frequency: Set up the transponder
›
Polarisation: H (horizontal); V (vertical)
›
SR: Symbol Rate
▪ Manual: Searching for a particular channel.
The following parameter must be adjusted:
›
Frequency: Set up the transponder
›
Polarisation: H (horizontal); V (vertical)
›
SR: Symbol Rate
›
Name (of the particular Channel)
›
Video PID
›
Audio PID
›
PCR PID
After finished search you have to save the found
channels by pressing the Menu button (11).
Channel search on an other satellite
▪ To search channels on an other satellite you have to repeat the above set
up. But before you have to install the new satellite in the antenna installation.
▪ Go to Main Menu / Configuration / Installation / Antenna and repeat the set
up instruction in paragraph 3.2 described.
▪ Go to Main Menu / Configuration / Channel search.
▪ Now you can search for channels on an other satellite using the instruc-
tion above.
25

Installation
3.4 Channel search DVB-C
In the following the channel search is described:
After correct set up of the OSD installation on the screen of your TV set the
next Installion Menu „channel search“ is shown.
In this Menu the signal strength and quality is indicated. Inside the yellow frame
a frequency is shown to which the signal strength and quality belongs. To proof
the available signal quality and signal strength you have to change the frequnecy
by pressing the Plus/Minus (8) button.
There are four options for the channel search:
▪ Automatic: All in the cable network available
frequencies are searched for and listed using
the following standard parameters.
›
Symbol Data Rate: 6.875 and 6.900
› Modulation: QAM 16 and 256
After this a channel search on the found frequencies will be done.
▪ Automatic FTA: All in the cable network avai-
lable frequencies are searched for and listed
using the following standard parameters.
›
Symbol Data Rate: 6.875 and 6.900
› Modulation: QAM 16 and 256
After this a channel search limited to free
channels on the found frequencies will be
done.
▪ Semi Automatic: Searching for particular
non standard frequencies.
The following parameter must be adjusted:
›
SR: Symbol Data Rate
› Modulation: QAM 16 - 256
▪ Manual: Searching for particular channels.
The following parameter must be adjusted:
›
Frequency: Set up the frequency
›
SR: Symbol Data Rate
› Modulation: QAM 16 - 256
After finished search you have to save the found channels by pressing the Menu
button (11).
26

Installation
3.5 Channel search DVB-T
In the following the channel search is described:
After correct set up of the OSD installation on the screen of your TV set the
next installation Menu „channel search“ is shown.
In this Menu the signal strength and quality is indicated. Inside the yellow frame
a frequency is shown to which the signal strength and quality belongs. To proof
the available signal quality and signal strength you have to change the frequnecy
by pressing the Plus/Minus (8) button.
There are four options for the channel search:
▪ Automatic: All available frequencies are sear-
ched for and listed using the following standard parameters.
› Modulation: COFDM QAM 16 and 64
After this a channel search on the found frequencies will be done.
▪ Automatic FTA: All available frequencies are
searched for and listed using the following
standard parameters.
› Modulation: COFDM QAM 16 and 64
After this a channel search limited to free
channels on the found frequencies will be
done.
▪ Semi Automatic: Searching for all channels
of a particular frequencies.
The following parameter must be adjusted:
› Frequency: Set up the channel
▪ Manual: Searching for a particular channel.
The following parameter must be adjusted:
›
Frequency: Set up the channel
› Modulation
: COFDM QAM 16 or 64
›
Name (of the particular channel)
›
Video PID
›
Audio PID
›
PCR PID
After finished search you have to save the found channels by pressing the Menu
button (11).
27

Menu
4.1 Configuration
To open the Main Menu you have to press the Menu button (11). In the Main
Menu the following options are available.
▪ To select an option you have to press the Up and Down button (7) or the
Plus/Minus button (8).
▪ To confirm the option you have to press the OK button (10).
After selecting the option Configuration the following options
are shown.
28

Menu
4.1.1 Edit TV channels
Option: Main Menu / Configuration / TV edit.
At this Menu there are three options:
▪ Edit TV channels
▪ Sort by providers
▪ Edit TV volume
To select one of the above options you have to move with the
Up and Down button (7) and confirm with the OK button (10).
Edit TV Channels
▪ Delete selected channels:
To select the channels you want to delete
move with the Up and Down button (7) and
mark each channel by pressing the OK button (10). The selected Channels are shown
grey coloured. To save this set up you have
to press the Exit button (9) and confirm with
Menu button (11).
▪ Delete Pay-T V channels:
To select all Pay-TV channels you have to
press the TXT button (23). Now all Pay-T V
cha n n els a r e m ar k e d a ut o mat i c . To s a v e this
set up you have to press the Exit button (9)
and confirm with Menu button (11).
▪ Delete all channels:
To delete all channels you have to mark them pressing the EPG button (24)
or the Info button (22). Also you can remark all channels using these buttons. To save this set up you have to press the E xit button (9) and confirm
with Menu button (11).
▪ Move channels in the Radio Channel list:
The Elipsus searchs for channels and stores them in two lists: TV Chan-
nel list and Radio Channel list. Some Radio channels are broadcastet with
wrong information from provider so that they are stored in the TV Channel list.
With the Radio / T V button (3) you can move these Radio channels to the
Radio Channel list.
›
Select the wrong sorted Radio channel using the Up and Down but ton
(7).
›
To mark these channels press the Radio/TV but ton (3), now these chan-
nels are green coloured. To save this set up you have to press the Exit
button (9) and confirm with Menu button (11).
29

Menu
4.1.1 Edit TV channels
▪ Sort T V channels in the Channel list:
Select with the Up and Down button (7) the channel you want to move to
an other channel place. Press the Numeric but ton (2) and a small Input
window opens in which you can type the channel number to which you want
to move the channel. To move the channel you have to confirm with the
OK button (10). Repeat to sort your Channel list. With the zero button of
Numeric buttons (2) it moves to the first place.
Searching for Channels in the Channel list:
›
Press the MP3 button (14) and a small Input window opens in which you
can type with the Numeric but tons (2) the characters of the channel you
want to search.
›
Confirm with the OK button (10).
›
Now all channels with these characters are listed and you can place them
to an other channel place like described above.
›
To leave the search mode you have to press again the MP3 button
(14) .
Sort by provider
Each provider offers a package of digital channels. So it is also possible to
sort the Channel list by provider.
There are following options:
▪ Sort provider:
Select with the Up and Down but ton (7) the provider you want to move.
Press the Numeric button (2) and type the place you want to move these
provider. With the zero button it moves to the first place.
▪ Delete provider:
Select with the Up and Down button (7) the provider you want to delete
and mark them pressing the OK button (10). To save this set up you have
to press the Exit button and confirm with Menu button. Please mention
that also all channels of these provider will be deleted.
Edit TV volume
This unit enables you to adjust the volume for each channel seperate and
durable, because these settings are stored in memory.
Select with the Up and Down button (7) the channel you want to adjust the
volume. You can also use the search function by pressing the MP3 button
(14). All small input window opens in which you can enter with the Numeric
button (2) the name of channel you search.
With pressing the EPG button (24) or the Info button (22) you can adjust the
volume of this channel durable.
To save this set up you have to press the Exit button and confirm with Menu
button (11).
30

4.1.2 Edit Radio channels
Menu
Option: Main Menu / Configuration / Radio edit.
At this Menu there are three options:
▪ Edit Radio channels
▪ Sort by providers
▪ Edit Radio volume
To select one of the above options you have to move with the
Up and Down button (7) and confirm with the OK button (10).
Edit Radio channels
▪ Delete selected channels:
To select the channels you want to delete
move with the Up and Down button (7) and
mark each channel by pressing the OK button (10). The selected channels are shown
grey coloured. To save this set up you have
to press the Exit button (9) and confirm with
Menu button (11).
▪ Delete Pay-Radio channels:
To select all Pay-Radio channels you have to
press the TXT button (23). Now all Pay-Radio
cha n n els a r e m ar k e d a ut o mat i c . To s a v e this
set up you have to press the Exit button (9)
and confirm with Menu button (11).
▪ Delete all channels:
To delete all channels you have to mark them pressing the EPG button (24)
or the Info button (22). Also you can remark all channels using these buttons. To save this set up you have to press the E xit button (9) and confirm
with Menu button (11).
▪ Move channels in the TV Channel list:
The Elipsus searchs for channels and stores them in two lists: TV Channel
list and Radio Channel list. Some TV channels are broadcastet with wrong
information from provider so that they are stored in the Radio Channel
list.
With the Radio/TV button (3) you can move these TV channels to the TV
Channel list.
›
Select the wrong sorted TV channel using the Up and Down button (7).
›
To mark these channels press the Radio/TV but ton (3), now these chan-
nels are green coloured. To save this set up you have to press the Exit
button (9) and confirm with Menu button (11).
31

Menu
4.1.2 Edit Radio channels
▪ Sort Radio channels in the Channel list:
Select with the Up and Down button (7) the channel you want to move to
an other channel place. Press the Numeric but ton (2) and a small input
window opens in which you can type the channel number to which you want
to move the channel. To move the channel you have to confirm with the
OK button (10). Repeat to sort your Channel list. With the zero button of
Numeric button (2) it moves to the first place.
Searching for channels in the Channel list:
›
Press the MP3 button (14) and a small input window opens in which you
can type with the Numeric but ton (2) the characters of the channel you
want to search.
›
Confirm with the OK button (10).
›
Now all channels with these characters are listed and you can place them
to an other channel place like described above.
›
To leave the search mode you have to press again the MP3 button
(14) .
Sort by provider
Each provider offers a package of digital channels. So it is also possible to
sort the channel list by provider.
There are following options:
▪ Sort provider:
Select with the Up and Down but ton (7) the provider you want to move.
Press the Numeric button (2) and type the place you want to move these
provider. With the zero button it moves to the first place.
▪ Delete provider:
Select with the Up and Down button (7) the provider you want to delete
and mark them pressing the OK button (10). To save this set up you have
to press the Exit button and confirm with Menu button. Please mention
that also all channels of these provider will be deleted.
Edit Radio volume
This unit enables you to adjust the volume for each channel seperate and
durable, because these settings are stored in memory.
Select with the Up and Down button (7) the channel you want to adjust the
volume. You can also use the search function by pressing the MP3 button
(14). All small input window opens in which you can type with the Numeric
button (2) the name of channel you search.
With pressing the EPG button (24) or the Info button (22) you can adjust the
volume of this channel durable.
To save this set up you have to press the Exit button (9) and confirm with
Menu button (11).
32

Menu
4.1.3 Channel search
Option: Main Menu / Configuration / Channel search.
These function is described in Section 3.3.
4.2 installation
Option: Main Menu / Configuration / Installation.
In this Menu you can set up the following options:
Antenna, add Source, Positioner, Positioner USALS, TV Parameter, TV Out.
4.2.1 Antenna only DVB-S
The Installation of antenna is described in Section 3.2.
33

Menu
4.2.2 Add Source
Option: Main Menu / Configuration / Installation / add Source.
Here you can add manual new satellites which are currently not
integrated in the Elipsus firmware.
▪ Enter the name and the position of the satellite you want to add by pressing
the Numeric button (2) of Remote Control.
▪ Select the position of the new satellite using the Plus/Minus button (8) for
the West (W) and the East (E) postition.
▪ To move between the input windows press the Up and Down button (7).
▪ To save the settings press the OK button (10).
▪ The parameter of the new satellite are saved now and you can start with
the installation of the antenna which is described in Section 3.2 and with
the channel search like described in Section 3.3.1.
4.2.3 Positioner 1.2
Option: Main Menu / Configuration / Installation / Positioner.
Here you can set up your positioner.
Before set up you have to check if the positioner is activated in
the antenna installation.
▪ Select the satellite you want to receive using
the Plus/Minus button (8).
▪ With the Numeric button 1 and 3 you can
move the postioner to West and to East. An
acoustic sound and the signal indicated helps
you to find the correct position.
▪ When the signal is correct indicated you have
to stop the positioner by pressing the Numeric button 2.
▪ With the Numeric button 4 and 6 you can
addtional start the fine tuning.
▪ The correct position of the satellite you can save by pressing the Numeric
button 8.
▪ To calculate the position of an other satellite based on the current position
you have to press the Numeric button 7.
▪ To move the positioner to the zeropoint as reference position you have to
press the Numeric button 9.
▪ To save the set up you have to press the Menu button (11).
34

4.2.4 Positioner USALS
Menu
Option: Main Menu / Configuration / Installation / Positioner
USALS
To use these option you must have a positioner using the USALS
standard.
▪ The satellite dish and the positioner must be
aligned at 0°.
▪ Select the satellite which position you want
to calculate.
▪ To move between the input windows use the
Up and Down button (7).
▪ You have to enter in the input windows your
position with correct longtitude and latitude.
▪ The longtitude and latitude you can change as
follow:
›
Plus/Minus button (7) to move 0,1° -0,1°.
›
MP3 button (14) and Radio/TV button (3) to move 1,0° or -1,0°.
▪ Now you can move to selected satellite using the RCL button (5). After a
few seconds signal strength and quality is indicated.
▪ To change the frequency of the satellite you have to press the EPG button
(24) or Info button (22).
▪ To save the set up you have to press the Menu button (11).
▪ To leave this option you have to press the Exit button (9).
35

4.3 TV Parameter
Menu
Option: Main Menu / Configuration / Installation / TV Parameter
Here you can set up the TV parameter.
Picture Aspect Ratio
Following options are available:
▪ Standard Format (4:3)
▪ Wide Screen Format (16:9)
▪ Auto
Here you can set up the video format and also
correct the format depending on the TV set
you are using. If your TV set is equipped with
an automatic video format it is recommendable
to select Auto. If you use a 4:3 standard TV
set you have to select standard format and
if you use a Wide Screen TV set you have to
select Wide Screen format.
Next you have to proof in which video format the programm is broadcasted by
the provider. Normally it is the standard Format 4:3. If a programm is broadcasted in Wide Screen format 16:9 it is characterized.
If you select the automatic video format function at your TV set normally it
uses the correct video format configuration.
Picture format
If it is not possible to set up the correct video format because of your TV set
doesn´t support the correct format or an other video format is broadcasted
for example the Cinema format (20:8,5) it is possible to adjust the format
to your TV set.
Following Options are available:
▪ Option Letterbox
With this option the original video format including the black random to fill
out the TV screen is used.
▪ Option Pan & Scan
With this option the original video format is enlarged to fill out the TV screen
without any black random.
▪ Option Combined
This option is a combination of the options Letterbox and Pan & Scan. The
orignal video format is partial enlarged but also small black randoms are
used.
To save the set up you have to press the Menu button (11).
36

Menu
4.4 TV Out
Option: Main Menu / Configuration / Installation / TV Out.
Here you can set up the Euroscart configuration.
The unit supports two standard formats: CVBS + RGB and YC.
CVBS + RGB format is used for standard TV sets with an Euroscart and RGB
input.
YC format is used for TV sets which are equipped with a S-VIDEO input.
▪ To move between the input windows you have to press the Up and Down
button (7).
▪ To change the value of the input window you have to press the Plus/Minus
button (8).
In the line Standby you can set up the Scart configuration of the unit when it
is in StandBy mode. In the standard configuration for StandBy both Scart connectors are inactive.
Following options are available:
▪ Scart 2 » 1 loop through
With this option in StandBy mode of the unit
an external signal for ecample of a VCR is
looped through from Scart 2 to Scart 1 to
be visible at the TV screen (if the TV Set is
connected to Scart 1.
▪ Scart 2 « 1 loop through
Use this option to loop through an external
signal if the TV set is connected to Scart 2.
In the line operation you can set up the Scart configuration of the Elipsus when
it is in operation.
Following options are available:
▪ Scart 1: CVBS + RGB - Scart 2: YC
▪ Scart 1: YC - Scart 2: CVBS + RGB
Additonal you can adjust the following Audio and Video settings:
▪ Audio Scart 1: Stereo or Mono
▪ Audio Scart 2: Stereo or Mono
▪ Balance: Audio balance between the right and the left stereo speaker
▪ Contrast: Contrast adjustment
▪ Brightness: Brightness adjustment
▪ Saturation: Saturation adjustment
To save the set up you have to press the Menu button (11).
37

4.5 Time and Date
Menu
Option: Main Menu / Configuration / Time and Date.
Here you can adjust manual the Time and Date of the Elipsus
also the Time Zone.
To adjust Time and Date follow this instruction:
▪ To move between the input windows you have to press the Up and Down
button (7).
▪ To change a value in the input window you have to press the Numeric but-
ton (2) repeated till you receive the correct character.
▪ Important is the correct installation of the Time Zone. In the middle line the
GMT (Greenwich Mean Time) is shown. Depending on the Time Zone the
Elipsus is located you have to select the correct Time Zone.
For Germany (Middle Europe):
›
In the summer time you have to enter the value 2. That means that to the
current GMT Time 2 hours are added.
›
In the winter time you have to enter the value 1. That means that to the
current GMT Time 1 hour is added.
▪ To save the set up you have to confirm with the OK button (10).
▪ To leave this option without any changes you have to press the Exit button
(9).
4.6 Users
Option: Main Menu / Users.
After selecting this option in Main Menu the follwowing options
are shown:
38

Menu
4.6.1 Favourite TV
Option: Main Menu / Users / Favourite TV.
Here you can create your own Channel list including only your
favourite TV channels.
The function of the option TV favourite is similar to the function of the option
edit TV channels (described in Section 4.1.1). Only the function Sort by Provider is not available.
This option enables to create for each user a own favourite TV Channel list to
get a faster and sorted access to the TV channels.
4.6.2 Favourite Radio
Option: Main Menu / Users / Favourite Radio.
Here you can create your own Channel list including only your
favourite Radio channels.
The function of the option Radio favourite is similar to the function of the option edit Radio channels (described in Section 4.1.2). Only the function sort by
provider is not available.
This option enables to create for each User a own favourite Radio Channel list
to get a faster and sorted access to the Radio channels.
4.6.3 OSD
Option: Main Menu / Users / OSD.
The set up of the OSD Installation is described in Section 3.1.
4.6.4 Password
Option: Main Menu / Users / Password.
Here you can activate or deactivate proctection for each user
account using a password.
To protect an user account follow this instruction:
▪ To enter a value in the input window you have to press the Numeric button
(2) repeated till you receive the correct character.
▪ To save the set up you have to press the OK Button (10).
▪ To leave the option you have to press the Exit button (9).
If a a user account including the channels acces rights is protected by password
this is also a kind of Parental Control.
39

Menu
4.6.5 Users Management
Option: Main Menu / Users / Users Management
After selecting this Option of the Menu Users Management the
following options are available.
4.6.6 Add new User
Option: Main Menu / Users / Users Management / Add new
User.
Here you can add new users.
To add a new user account follow this instruction:
▪ To enter a name in the input window you have to press the Numeric but-
ton (2) repeated till you receive the correct character.
▪ Activate the new user account by pressing the OK button (10).
4.6.7 Delete User
Option: Main Menu / Users / Users Management / Delete User.
Here you can delete an user account or the password of an
user account.
To Delete an acitive user account or a password follow this instruction:
▪ Select the user by pressing the Up and Down button (7).
▪ To delete this user you have to press the OK button (10).
▪ To delete only his password you have to press the MP3 button (14).
▪ To save and leave this set up you have to press the Exit button (9).
40

Menu
4.6.8 TV Access rights
Option: Main Menu / Users / Users Management / TV Access
rights.
This option you can use to denied access to special TV channels
for user. This enables parental control.
To denied access for an user to some special TV channels follow this instruction:
▪ In the yellow coloured part you can see all installed users and the accompa-
nying numbers.
▪ Select the channel you want to denied access for an user by pressing the
Up and Down button (7). Following you have to enter the accompaniying
number of the user you want to denied access to this channel and after a
small blue button at the users name is shown.
▪ To save the set up you have to press the Menu Button (11).
4.6.9 Radio Access rights
Option: Main Menu / Users / Users Management / Radio Access
rights.
This option you can use to denied access to special Radio channels for user. This function is similar to the function of the Option TV Access rights described in Section 4.6.8.
4.7 Change active User
Option: Main Menu / Change Active User.
If there are installed different user accounts you can change
between the users by selecting this option. Select the user account you want to activate by pressing the Up and Down button
(7) and confirm with OK button (10).
4.8 Access Module
Option: Main Menu / Access Module.
Here you can get access to Conditional Access Modules. Here
you can set up the settings of these modules depending on the
kind of Access Module.
41

Channel selection
5.1 Channel selection by Channel list
In this Section are described the different possibilities of channel selection.
▪ To open the Channel list you have to press
the OK button (10).
▪ To select between the TV Channel list and
the Radio Channel list you have to press the
Radio/TV Button (3).
▪ To move inside the Channel list you have to
press the Up and Down button (7). On the
left random of the screen you can see a bar
which shows you the current position inside
the Channel list.
▪ To select a channel you have to press the OK
button (10).
▪ To move with fast speed in the Channel list you have to press the DVR but-
ton (13) or the RCL button (5).
▪ To switch between channels without opening the Channel list you have to
press the Up and Down button (7).
5.2 Channel selection by number
▪ To open the Channel list you have to press the OK button (10) following you
can select a channel by using the Numeric button (2).
▪ With the enter of the first Numeric button a small input window opens
where the number you entered is shown. After 2 seconds the last numeric
button was pressed the Elipsus switches automatic to this channel. If you
don´t want to wait you can also confirm your enter with the OK button (10)
and the unit switches immediately.
▪ If you make a typing error inside the input window you have to press the
Plus/Minus button (8) to delete the number and press the Numeric button
again to get the correct number.
5.3 Channel selection by name
▪ To open the Channel list you have to press the OK Button (10).
▪ After you have to press the MP3 Button (14) and on the screen a small
input window opens. To enter the name of channel you search you the press
the Numeric button (2) repeated till you receive the correct character.
▪ If you make a typing error inside the input window you have to press the
Plus/Minus button (8) to delete the character and press the Numeric button
again repeated to get the correct character.
▪ For example if you search for the channel Pro7 you have to enter the cha-
racter „pro“ and confirm by pressing the OK button (10).
▪ Now all available channels with this characters are listed in a seperately list
and you can select the channel Pro7. After confirming by pressing the OK
button (10) the Elipsus switches to the channel.
42

Additional function
6.1 Auto Zapping
This option enables you to get a quick overview of the current programm at your
complete Channel list. The Elipsus automatic switches each 3 seconds to the
next channel of the Channel list
▪ To start the Auto Zapping Up function you have to hold the MP3 Button
(14) pressed for 2 seconds.
▪ To start the Auto Zapping Down function you have to hold the Radio/TV
button (3) pressed for 2 seconds.
▪ To stop the Auto Zapping function you have to press the Exit button (9).
6.2 Zoom function
This option enables you to see your „great stars“. Use this function to enlarge
or to reduce the size of the video.
▪ To activate the Zoom function you have to press the Zoom button (29).
▪ To enlarge the video you have to press repeated the Numeric button 1.
▪ To reduce the video you have to press repeated the Numeric button 3.
▪ To get the original size you have to press the OK button (10).
▪ To leave the Zoom function you have to press the Exit button (9).
You can also the stretch the video horizontal or vertical.
▪ To stretch the video you have to press the Numeric button 7 and a small
blue arrow symbol is shown on the screen. To stretch horizontal and vertical you have to press the Numeric button 1 and 3.
To move the enlarged, the reduced or stretched
video horizontal or vertical you have to press the
Numeric button 2, 4, 6 or 8.
▪ To move up press Numeric button 2
▪ To move left press Numeric button 4
▪ To move right press Numeric button 6
▪ To move down press Numeric button 8
You can also use the Zoom function in the DVR
Digital Video Recorder mode (play records).
▪ To enlarge the video you have to press repeated the Numeric button 1.
▪ To reduce the video you have to press repeated the Numeric button 3.
▪ To get the original size you have to press the OK button (10).
To create a still picture you have to press the Numeric button 0, to delete the
still picture and continue with live TV you have to press the Numeric button 0
again.
43

Addtional function
6.3 EPG
To start the Eletronic Programm Guide EPG you have to press the EPG button
(24). After a few seconds you get accompanying to the available channels of the
current transponder a programme overview up to one week.
▪ To move inside the EPG overview you have
to press the Plus/Minus button (8) and the
Up and Down button (7).
▪ If you want to see a detailed description of the
a programme you have to select and press the
Info button (22), if you want to get back to
EPG overview without switching to the selected Channel you have to press the Exit button (9).
A short description of the programme is
shown (depending on the informantion brodacastet by the provider).
To switch to the selected channel you have to
press the OK button (10).
▪ To program the Timer using the EPG informa-
tion you have to select the programme you
want to record and press the Record button
(21) and to confirm with by pressing the Ok
button (10).
The programme is automatic programmed in
the Timer. The Elipsus starts recording using
the EPG information (only DVR Models).
▪ The EPG is also equipped with a search func-
tion. You can use this function to search for
specific programme using keywords. By pressing the MP3 Button (14) you get a topic overview of the available programme for example:
Shows, Comedy, Thriller or Sports (if this
information is broadcasted by the provider).
To start the search function you have to press the TXT button (23) and
enter with the Numeric buttons (2) the category you search.
To get an overview of the programme depending to the searched category
you have to press the MP3 Button (14).
▪ To leave the EPG you have to press the Exit button (9).
6.4 Info Button
On your Remote Control you can find an Info button (22). By pressing this button you get access to detailed information regarding the current programme
and technical information like Video Data Rate and Audio Data Rate.
To get access to further information like Multifeed or Multilanguage option or
Subtitling you have press the Info button (22) again.
44

Addtional function
By pressing the Info button (22) the following options are available depending on
information broadcastet by the provider.
6.4 Info Button
Here you can select the following options.
▪ Language: Here you use the Multilanguage option if available.
▪ Teletext: Here you can use the Teletext function.
▪ EPG: Here you get EPG information to the current channel.
▪ Subtitle: Here you can use the Subtitle function if available.
▪ Video: Here you can use the Multifeed option if available.
▪ Technical Information: Here you can find detailied technical information
regarding the Elipsus and the current channel like Firmware version and
frequency of the satellite.
▪ To leave the Info Menu you have to press the Exit button (9).
6.5 Technical Menu
▪ To get access to the Technical Menu follow this instruction:
›
Switch on the Elipsus from StandBy pressing the StandBy button (1).
›
Hold the TXT button (23) pressed till the Technical Menu OSD is shown on
the screen.
▪ In the Technical Menu you can set up the following options:
›
Reset Elipsus: Reset the Elipsus (to do after each Firmware update)
›
HDD Format: Format the Harddisk Drive (only DVR Models)
›
Test Signal: A test signal for adjustment of saturation, brightness ...
›
Datenbase update: Import and Export of Channel list
›
Remote Control: Change code to handle two Elipsus with one RC
›
RS232: Activate the RS 232 Control option
▪ To use one of the above options you have to:
›
Select the option by pressing the Up and Down button (7).
›
Confirm by pressing the OK button (10).
›
Confirm again by pressing the Numeric button 0.
45

A. Addenda DVR Models
A.1.1 Recording
All Elipsus DVR Models are equipped with a 120 GB Harddisk Drive as a Digital Video Recorder (DVR). These enables the recording of TV and Radio programme including Timeshift function.
To record a TV or Radio programme you have to press the Direct Record button (21). The recorded programme will also be playback direct using the Timeshift function. So you can pause the playback during the recoding and continue
the playback at later time.
On the screen of the TV set the following symbols are shown:
▪ at the bottom left: Playback speed of the cur-
rent record
▪ at the bottom left: 3 yellow bars showing the
limited time to record
▪ at the bottom middle: Playback time of the
current record
▪ at the bottom right: Recorded time of the
current record
If you want to limlit the current record started by pressing the Direct Record
button (21) you have to press this button repeated. After each press a recording time of 15 min. is added (15 min...30 min...). The limitation in minutes is
shown yellow coloured instead of the 3 yellow bars.
To get detailed information regarding the current
record or later the playback you have to press the
OK button (10). Now you can see the recording
time, the title of the record and other information.
To get access to all recorded programmes you
have to press the OK Button (10) again. Now all
records are listed in a playlist, the current record
is shown red coloured.
During a record you can also playback an other
recorded programme at the same time. The current record is continued.
▪ Select with the Up and Down button (7) the record you want to playback and
confirm the selection by pressing the OK button (10).
▪ To get back to the playlist you have to press the OK button (10) twice.
▪ To stop the current record you have to press the Exit button (9).
46

A. Addenda DVR Models
A.1.2 Playback of records
You can get at every time access to the records of the Elipsust. To playback a
record follow this instruction:
▪ To open the playlist with all records you have
to press the DVR button (13).
▪ Select the reocord you want to playback by
pressing the Up and Down button (7) and confirm your selection by pressing the OK button
(10). Now the selected record is playback.
At the bottom of the screen you can see the
playback speed and playback time.
▪ To get access to detailed information of the
current playback you have to press the OK
button (10).
▪ To get access to the playlist you have to press the OK Button (10) agian.
▪ To delete a record you have to select the record by pressing the Up and
Down button (7). Confirm your select by pressing the TXT button (23). Now
the record is deleted.
▪ To leave the playback function you have to press the Exit button (9).
A.1.3 Different options
During the record of a programme or during the playback the following options
are available:
▪ To generate a Still picture of the current record or playback you have to
press the Pause Button (18).
▪ To stop the record or playback you have to press the Exit button (9).
▪ To get detailed information regarding the record or playback you have to
press the OK button (10), to leave this option press the Exit button (9).
▪ You can reduce the playback speed by pressing the Fast Reverse button
(16) repeated. The current playback speed is shown at the bottom left of
the screen. If you get a value smaller than x1.0 the playback speed is reduced and smaller than x0.0 means fast reverse. The normal playback speed
is x1.0.
▪ You can increase the playback speed by pressing the Fast Forward button
(17) repeated. The current playback speed is shown at the bottom left
of the screen. If you get a value higher than x1.0 the playback speed is
increased. The normal playback speed is x1.0.
▪ To skip the current playback reverse by 1 minute you have to press the Skip
Reverse button (19). To skip reverse repeated you have to hold the button
pressed.
▪ To skip the current playback forward by 1 minute you have to press the
Skip Forward button (20). To skip forward repeated you have to hold the
button pressed.
47

A. Addenda DVR Models
A.1.4 Marking function
The Marking function enables you to mark parts of a record direct during the
record or later after finishing the record. By playback these record the marked
part is not shown, so it is possible to fade out commercial breaks or othe parts
of the record.
▪ To use the Marking function during a current
record you have to press the OK button (10),
to get access to the detailed information.
▪ To use the Marking function at a recorded
event you have to press the DVR button (13)
to get access to the playlist.
Select the record by pressing the Up and
Down button (7) and start playback by pressing the OK button (10). After you have to
press the OK button (10) again to get acces
to the detailed information.
There are different options to set the marks:
▪ by pressing the Numeric button 1 you set
the red coloured start mark of the part you
want to fade out.
▪ by pressing the Numeric button 3 you set
the blue coloured end mark of the part you
want to fade out.
▪ by pressing the Numeric button 4 you can
move to left mark.
▪ by pressing the Numeric button 6 you can
move to right mark.
▪ by pressing the Numeric button 7 the cur-
rent playback will start at the mark before.
▪ by pressing the Numeric button 9 the current playback will start at the
mark after.
To edit the placed marks you have to:
▪ by pressing the Numeric button 2 all marks are deleted.
▪ by pressing the Numeric button 5 all placed marks will invert. That mens
that the start mark gets an end mark and the end mark gets a start
mark,
48

A. Addenda DVR Models
A.1.5 Timer function
Option: Main Menu / Timer.
Here you can add Timer events that starts recording TV and
Radio programms automatic.
To add Timer events follow this instruction:
▪ Press the Timer button (25)
▪ To move between the input windows you have
to press the Up and Down button (7).
▪ To change the value inside the input windows
you have to press the Plus/Minus button (8).
▪ Inside of the first input window you can set
up the following options:
›
Record+StandBy (the unit switch in StandBy
mode after recording the event).
›
Record (the unit don´t switch in StandBy
mode afer recording the event).
›
Switch (the Unit switch at the programmed time to the selected channel)
›
Switch off (the Unit switch in StandBy mode at the programmed time).
›
Switch on (the Unit switch on at the programmed time).
▪ Inside the other input windows you can set up the following options:
›
TV or Radio Channel
›
Channel you want to select
›
Start time and Date
›
Pretime in minutes
›
End time and Date
›
Extra time in minutes
›
Audio Format MPEG or AC3
›
Period (once, daily, weekly or monthly)
›
Titel (here you can enter the title of a record
if you don´t want to use the original broad-
castet title).
▪ To save the Timer settings you have to press the OK button (10).
▪ Now all Timer events including symbols are listed in the Timer list. The sym-
bols are explained inside the yellow bar on the left side of the screen.
▪ To edit a Timer event you have to select the Timer by pressing the Up and
Down button (7) and to confirm with the OK button (10).
▪ To delete a Timer event you have to press the TXT button (23).
49
A. Addenda DVR Models
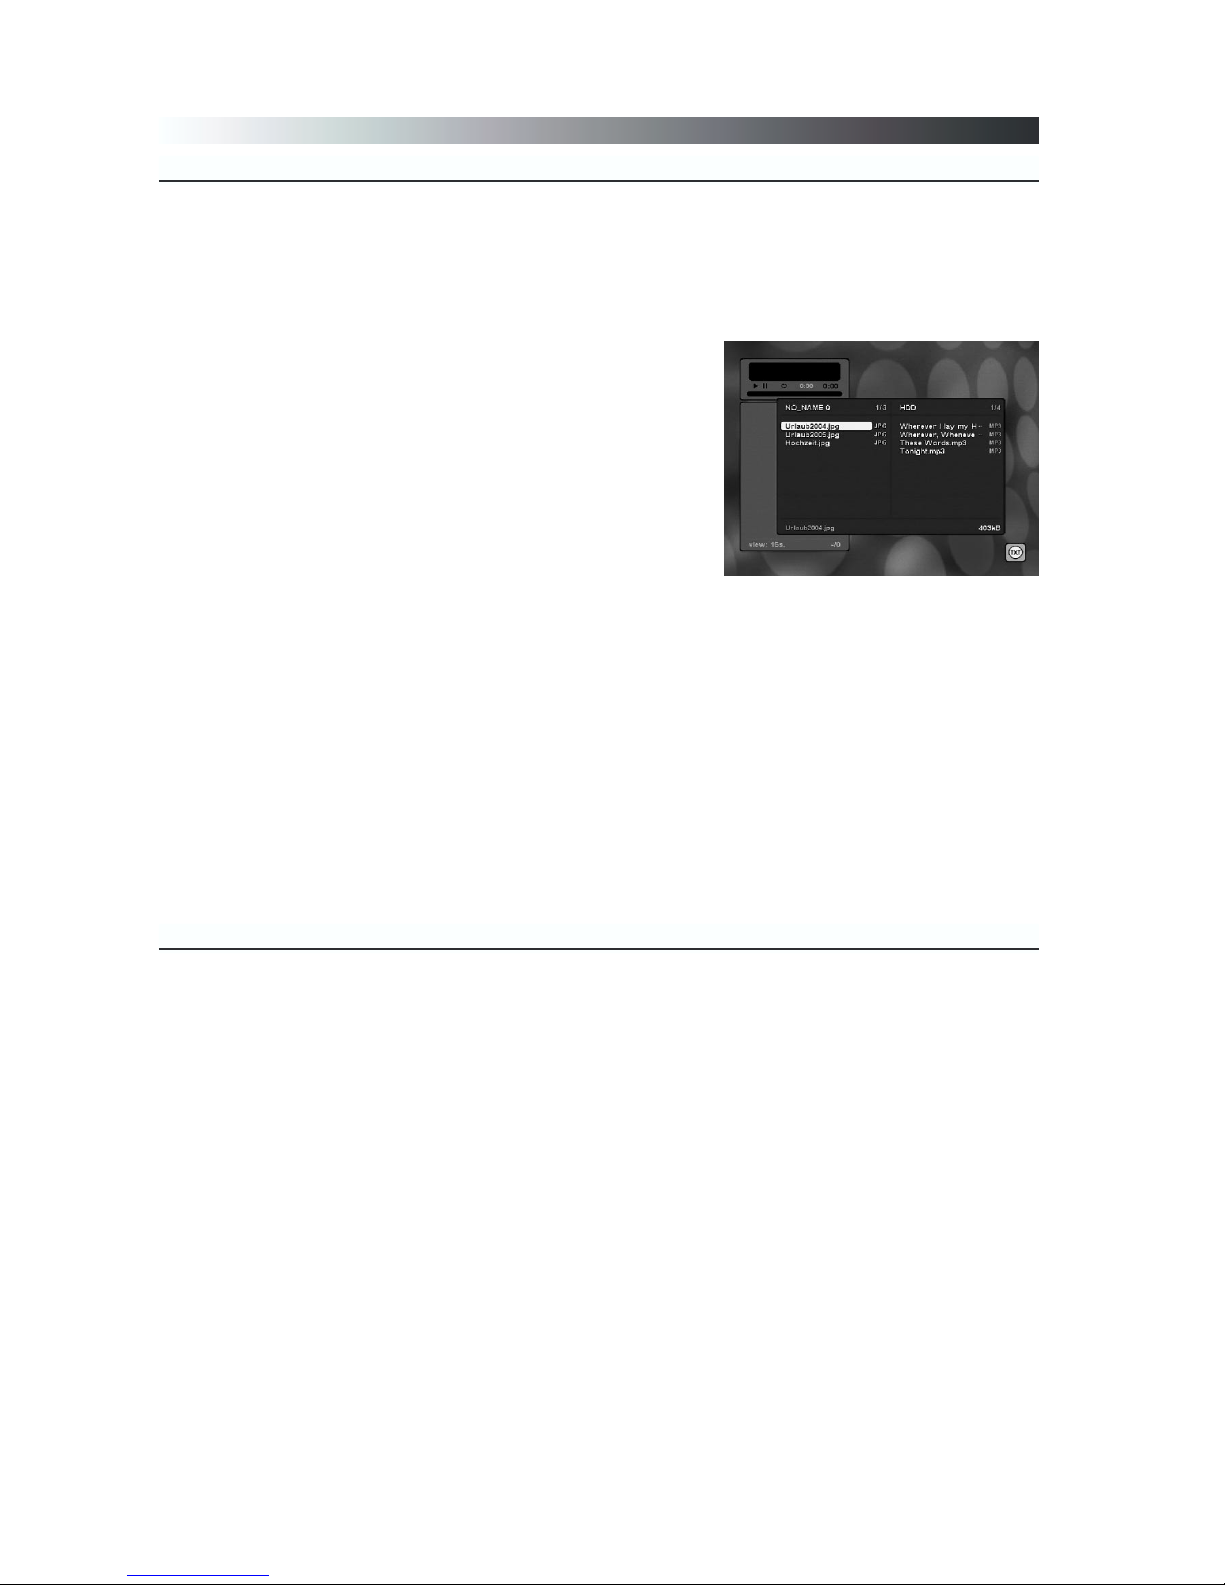
A.2.1 Transfer of MP3 files
Connect the external data carrier (MP3 Player USB Stick) to the USB Input
Port of the Elipsus. Please mention that this function is only possible if the
external data carrier is supported and compatible to the Unit.
To get access to the MP3 option you have to press the MP3 Button (14).
▪ On the screen of your TV set the MP3 Menu
is shown.
▪ To get an explanation of the function you
have to press the TXT Button (23).
There are shown 2 windows:
▪ Inside the right window all TV and Radio
records are listed.
▪ If you are inside the left window you can copy
the file list of the external data carrier by
pressing the Numeric button 1.
▪ To move between the both windows you have
to press the RCL button (5).
To transfer MP3 files to the HDD of the Elipsus follow this instruction:
▪ Select the external data carrier by pressing the Numeric button 1. Select
the data carrier called „no name“.
▪ Select the files you want to transfer by pressing the Radio/TV Button (3).
The selected files are shown green coloured.
▪ To start the transfer of the selected files you have to press the Numeric
button 5.
▪ To delete MP3 files from the Units Harddisk Drive (HDD) you have to press
the Numeric button 8.
▪ After finished transfer you can disconnect the external data carrier from
the Unit.
A.2.2 Playback of MP3 files
The following options for playback the files are available:
▪ Direct: You can playback the files direct by selecting with the Up and Down
button (7) and confirmation by pressing the OK button (10).
▪ Play list: You can transfer the files to a play list by selecting with the Up and
Down button and confirmation by pressing the MP3 button (14).
Play list:
▪ To start the playback of the Play list you have to press the DVR button
(13).
▪ To skip to the file before you have to press the EPG button (24).
▪ To skip to the next file you have to press the Info button (22).
Attention: After switching the Elipsus in StandBy mode the Play list is deleted.
50

A.3.1 Playback of JPEG files
A. Addenda DVR Models
Connect the external data carrier (MP3 Player USB Stick) to the USB Input
Port of the Elipsus. Please mention that this function is only possible if the
external data carrier is supported and compatible to the Unit.
To get access to the JPEG option you have to press the JPEG Button (14).
▪ On the screen of your TV set the JPEG Menu
is shown.
▪ To get an explanation of the function you
have to press the TXT Button (23).
There are shown 2 windows:
▪ Inside the right window all TV and Radio
records are listed.
▪ If you are inside the left window you can copy
the file list of the external data carrier by
pressing the Numeric button 1.
▪ To move between the both windows you have
to press the RCL button (5).
To transfer JPEG files to the HDD of the Elipsus follow this instruction:
▪ Select the external data carrier by pressing the Numeric button 1. Select
the data carrier called „no name“.
▪ Select the files you want to transfer by pressing the Radio/TV Button (3).
The selected files are shown green coloured.
▪ To start the transfer of the selected files you have to press the Numeric
button 5.
▪ To delete JPEG files from the Units Harddisk Drive (HDD) you have to press
the Numeric button 8.
▪ After finished transfer you can disconnect the external data carrier from
the Unit.
A.3.2 Abspielen der JPEG Dateien
The following options for playback the files are available:
▪ Direct: You can playback the files direct by selecting with the Up and Down
button (7) and confirmation by pressing the OK button (10).
▪ Play list: You can transfer the files to a play list by selecting with the Up and
Down button and confirmation by pressing the JPEG button (14).
Play list:
▪ To start the playback of the Play list you have to press the DVR button
(13).
▪ To skip to the file before you have to press the EPG button (24).
▪ To skip to the next file you have to press the Info button (22).
Attention: After switching the Elipsus in StandBy mode the Play list is deleted.
51

B. Addenda Elipsus YUV Models
B.1.1 Connecting to Display
Because of the technical equipment the Elipsus YUV Models can be connected
suitable to high quality displays like Plasma TV, LCD TFT or Beamer.
The YUV (Y/Pb/Pr) progessive connection enables a picture resolution of best
quality and can be optimized to the connected display.
▪ Connect the YUV (4) output with YUV input of the displaying device using a
high quality YUV cable.
B.1.2 Output parameters
Option: Main Menu / Configuration / Installation / Digital output.
Here you can set up the output of the YUV interface.
▪ Resolution: Here you can select between the following values;
›
576p (720 × 576) 50 Hz
›
720p (1280 x 720) 50 Hz
›
720p (1280 x 720) 60 Hz
▪ Offset:
›
V (Vertical): Here you can move the picture
vertical to the left or to the right side.
›
H (Horizontal): Here you can move the pic-
ture up or down.
▪ Size: Here you can enlarge the picture hori-
zontal or vertical.
▪ Sharpness: Here you can adjust the sharpness
of the picture.
▪ Motion: Here you adjust the motion of the picture. It could be helpful for
video with very fast pictures to reduce picture noise.
▪ Gamma: Here you can adjust the additional colour settings.
›
R for red colour
›
G for green colour
›
B for blue colour
▪ Addtional you can set up the following options:
›
Contrast
›
Brightness
›
Saturation
▪ Standard configuration:
To set all options to the standard configuration you have to pres the RCL
button (5).
52

C. Addenda Elipsus DVI Models
Because of the technical equipment the Elipsus DVI Models can be connected
suitable to high quality displays like Plasma TV, LCD TFT or Beamer.
The DVI-I (24+5) digital progessive connection enables a picture resolution of
best quality and can be optimized to the connected display.
▪ Connect the DVI-I (4) output with DVI input of the displaying device using a
high quality DVI cable.
C.1.1 Connecting to display
C.1.2 Output parameters
Option: Main Menu / Configuration / Installation / Digital out.
Here you can set up the output of the DVI interface.
▪ Resolution: Here you can select between the following values:
›
576p (720 × 576) bei 50 Hz
›
720p (1280 x 720) bei 50 Hz
›
720p (1280 x 720) bei 60 Hz
› SVGA (800 x 600) bis 100 Hz
› XGA (1024 x 768) bis 85 Hz
▪ Offset:
›
V (Vertical): Here you can move the picture
vertical to the left or to the right side.
›
H (Horizontal): Here you can move the pic-
ture up or down.
▪ Size: Here you can enlarge the picture hori-
zontal or vertical.
▪ Sharpness: Here you can adjust the sharpness
of the picture.
▪ Motion: Here you adjust the motion of the picture. It could be helpful for
video with very fast pictures to reduce picture noise.
▪ Gamma: Here you can adjust the additional colour settings.
›
R for red colour
›
G for green colour
›
B for blue colour
▪ Additional you can set up the following options:
›
Contrast
›
Brightness
›
Saturation
▪ Standard configuration:
To set all options to the standard configuration you have to pres the RCL
button (5).
53

D. Addenda Elipsus SDI Models
D.1.1 Connecting to display
Because of the technical equipment the Elipsus SDI Models can be connected
suitable to professional displays like Plasma TV, Beamer or Scaler.
The SDI (BNC) digital connection enables a picture resolution of best quality and
can be optimized to the connected display.
▪ Connect the SDI (4) output with SDI input of the displaying device using a 75
Ohm Coaxial cable.
The output format is 576i (720 x 576) 50 Hz according the norms SMPTE
259M and ITU-R BT 656.
D.1.2 Output parameters
Note:
Batteries should never be thrown away or incinerated but disposed of in accordance with your local regulations concerning chemical wastes.
Used up batteries do not belong in the dust bin.
You can dispose them at a collection point for used up batteries or special
waste. Contact your council for details.
Attention !
54

ELIUM GmbH
Benzstr. 1a
D-51381 Leverkusen
Tel.: +49 2171 3608-0
Fax.: +49 2171 3608-90
Mail: info@elium.de
Web: www.elium.de
 Loading...