

Page 1
Smart Security Hub
ECSPHB
are compatible with the Clicksmart+ APP
Products bearing this mark
General
Our products are designed to comply with the recommended
codes and practice, and is to be installed and serviced by
competent persons in accordance with the relevant
regulations.
Contents
The Smart hub is supplied separately and as part of a
kit, please check the packaging to ensure all required
accessories are included.
The Smart hub is supplied with a power adapter, the
accessories with the required batteries and screw
pack.
Installation
For best performance the final installation site of the
hub will be at the central point of the system.
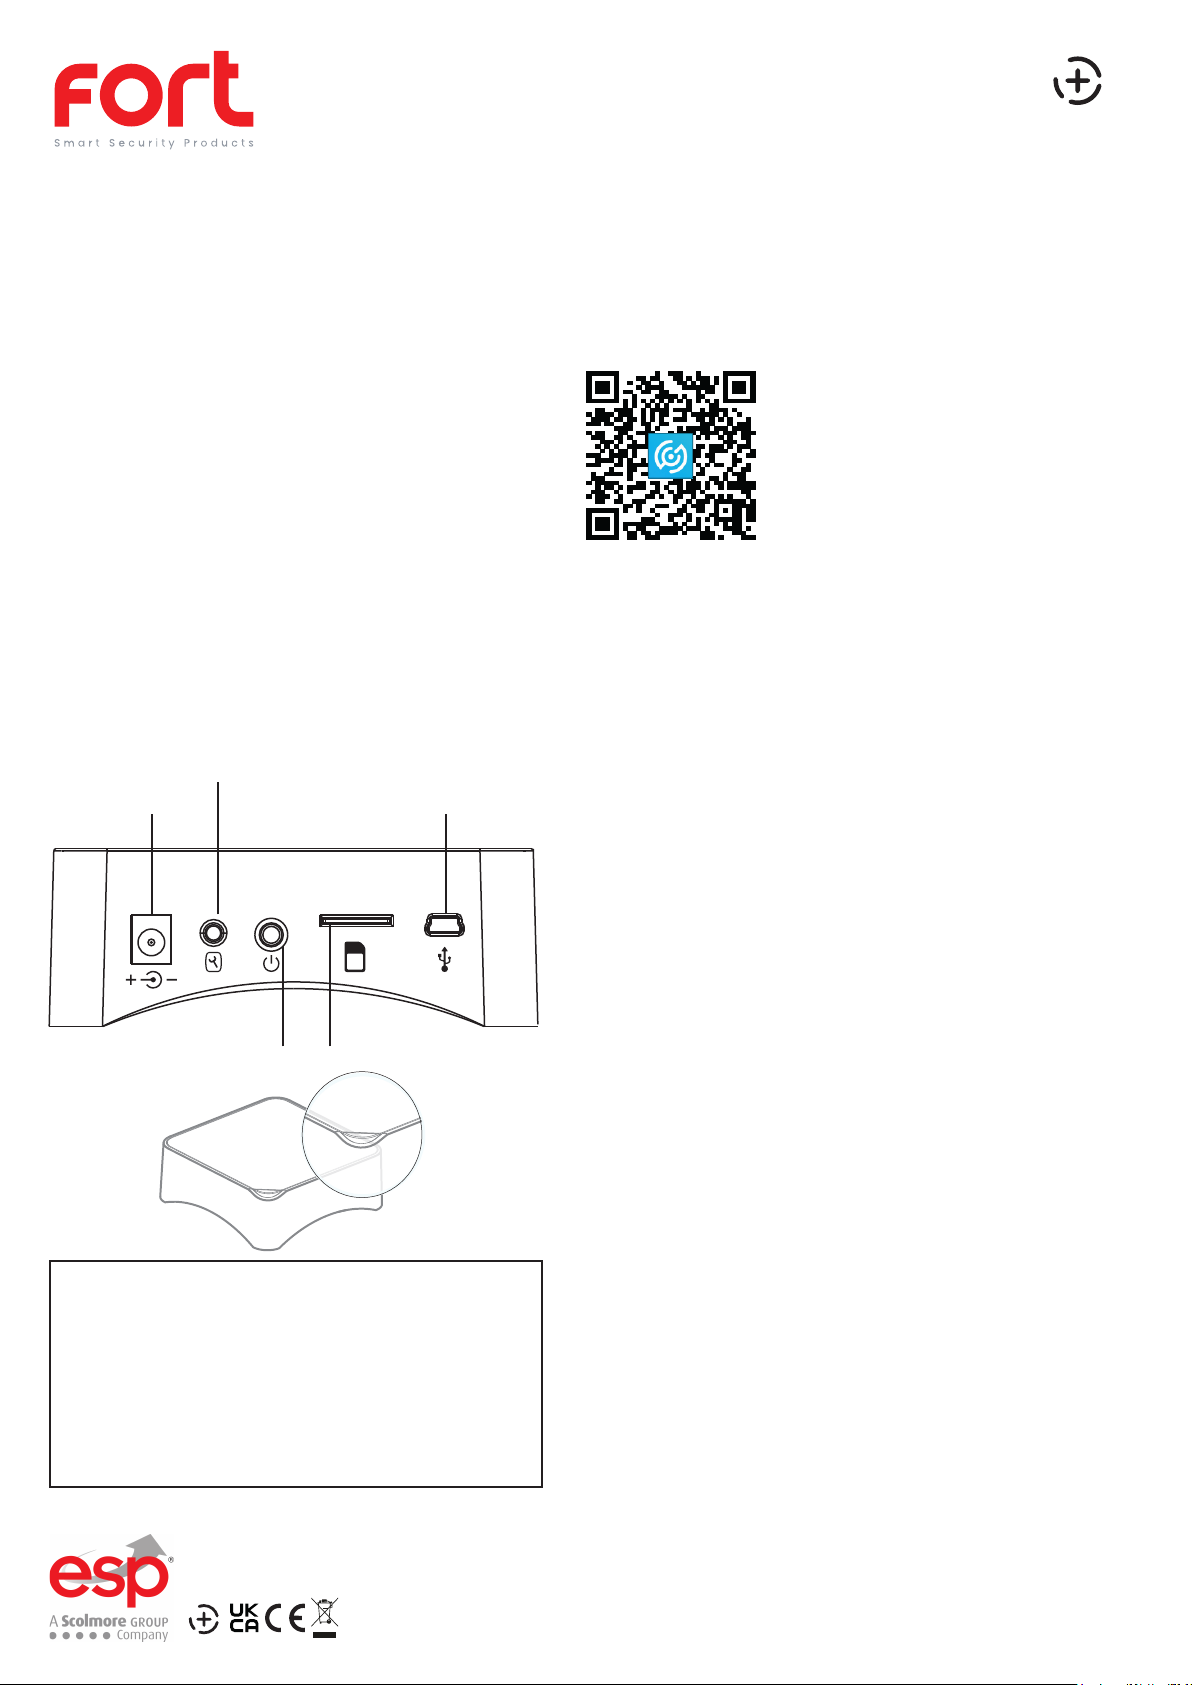
Connect the supplied power adapter to the hub and
apply power, the hub will operate after 60secs.
Connection button
Power adapter input USB Interface
Preparation For Use
Ensure that the smart phone is connected to the same Wi-Fi
network that you would like to attach the device.
Ensure that you have a mobile device running iOS 8 or higher
or Android 4.1x or higher and a 2.4GHzWi-Fi connection.
Download the ClickSmart+ App on your
mobile device from the App Store or
Google Play.
Sign in or Register following the
instructions on the ClickSmart+ App.
Adding Accessories
If the hub has been supplied as part of a kit the accessories will
be pre-paired for convience. For additional accessories;
PIR
1. Select your ESP Hub in the ClickSmart+ app, click on
“Accessories” along the bottom, then click on “Detectors”
at the top, then click on “+ Add”, finally press the test button
on the back of the PIR.
2. The control panel will beep once to acknowledge the
connection, or twice if this PIR has already been paired.
SIM
Power switch
HUB LED Indications
Red Flashing/Fixed: System Armed
Blue Flashing/fixed: System armed in home mode
Green Flashing/fixed: System disarmed
Red/Blue/Green fixed: Connected to the server
Red/Blue/Green Blink Slowly: Wi-Fi network disconnected
Green Blink Fast: Wi-Fi network settings EZ mode
Blue Blink Fast: Wi-Fi network settings AP mode
White fixed: RF connection mode
SIM card slot
(Full size)
Door/Window Contact
1. Select your ESP Hub in the ClickSmart+ app, click on
“Accessories” along the bottom, then click on “Detectors”
at the top, then click on “+ Add”, finally seperate the magnet
from the transmitter.
2. The control panel will beep once to acknowledge the
connection, or twice if this Door Contact has already been
paired.
Remote Control
1. Press once on the “Connection Button” on the your ESP Hub
2. Press “Arm” on the Remote control
3. The control panel will beep once to acknowledge the connection, or twice if this Remote Control has already been paired.
Siren
1. Press the “Connection Button” on your siren for one second.
The LEDs should illuminate, the siren is now in connection mode
for 20 seconds.
2. Press “ARM” or SOS” on your control panel (not VIA a remote
control). you should hear one beep; the siren is now connected.
Elite Security Products
Redditch B98 8YN
Page 2
APP Pairing
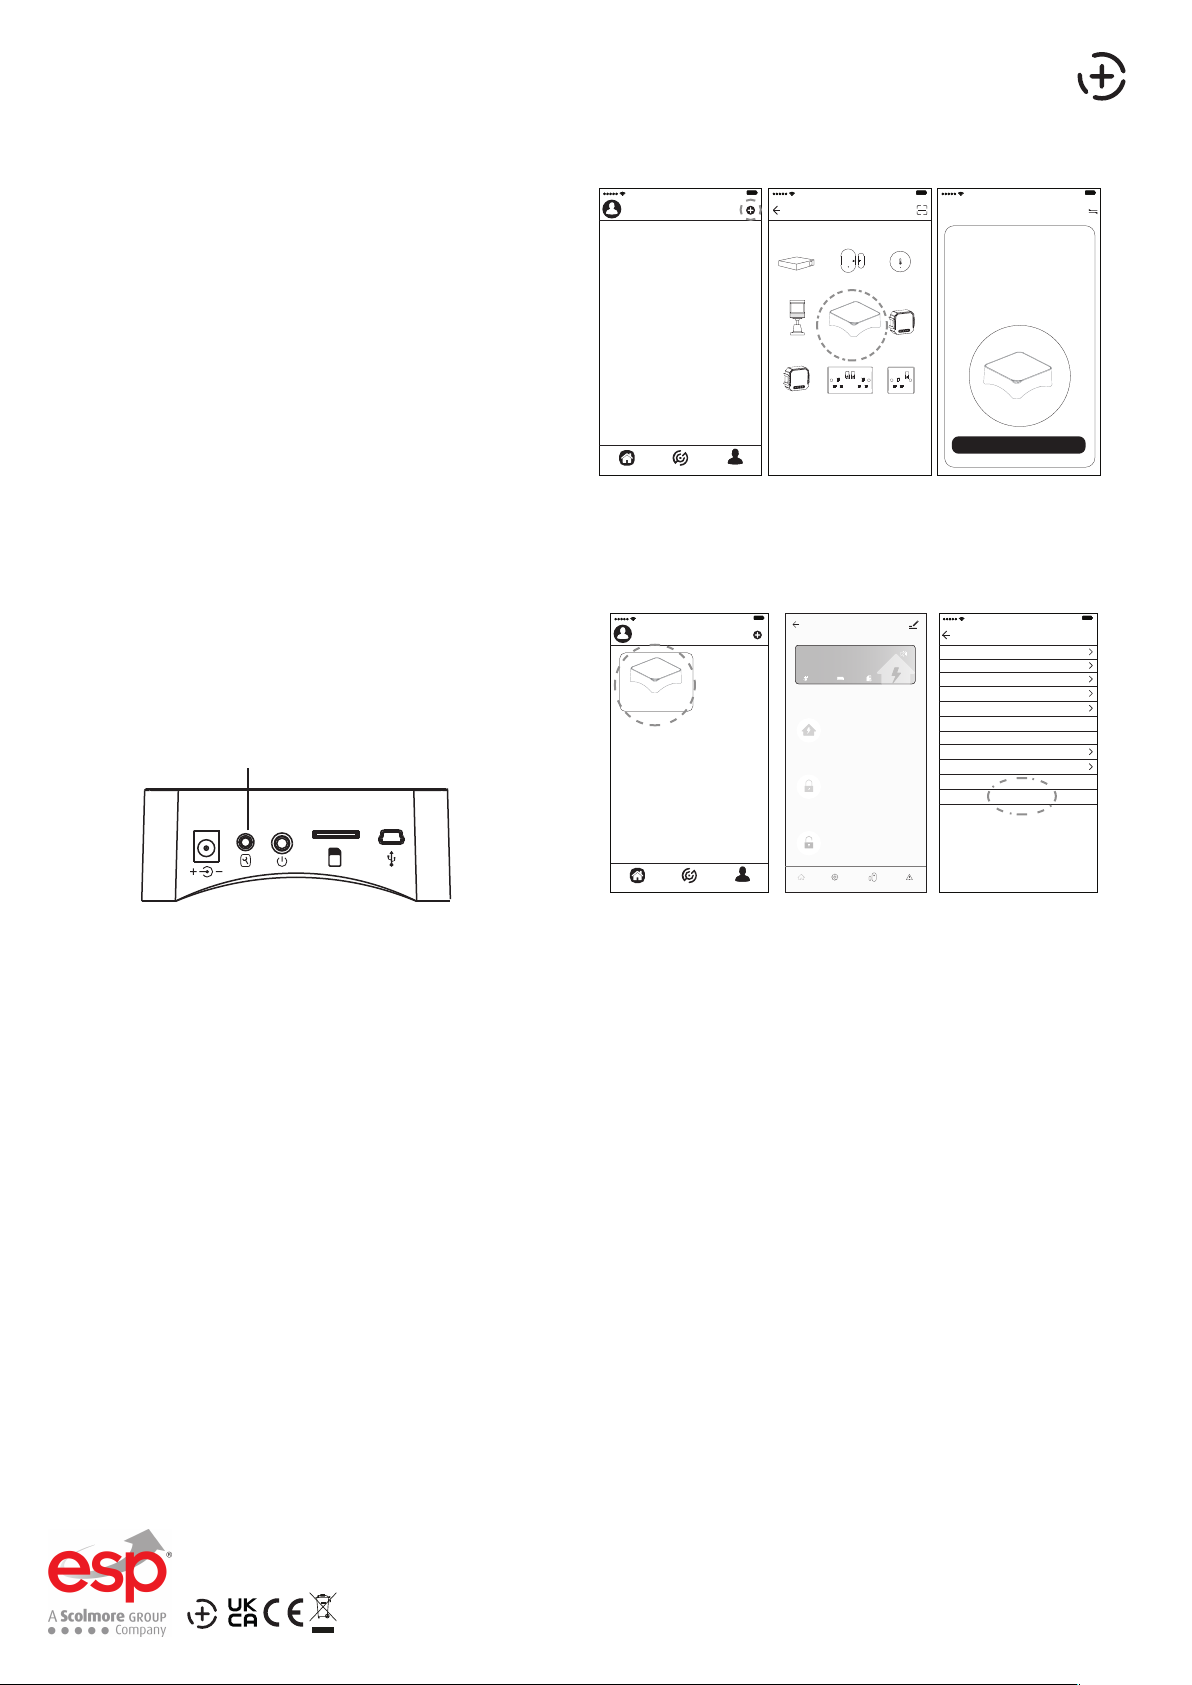
1. Using the supplied AC Adapter, plug in the power plug into
your hub, and push the power button.
2. Long press the “Connection Button”, until you hear
1 beep, the LED will start to flash green, you hub is now
ready to be connected to your router.
9:41 AM
100%
9:41 AM
Add Manually Auto Scan Cancel Net Pairing Mode
ClickSmart+
Window &
Hub
Door Sensor
100%
Humidity &
Temperature...
Reset the device first.
①Set up the device as per the
installation instructions
②Hold the connection button for 5 seconds.
The LED should rapidly flash green.
③ The device is now in pairing mode.
3. On the Clicksmart+ app, click on the add icon “+”, then
click “Wi-Fi Hub”, and then follow on screen instructions.
PIR Smart Hub 2G Switch
Module
The ClickSmart+ app will guide you through:
Entering the Wi-Fi Network and Password.
Using the Camera to scan a QR code.
Connecting the Device.
Home Smart Me
2G Dimming
Module
Smart Double
Socket
Smart Single
Socket
Confirm Indicator Is Blinking
Resetting the Device
If the Hub needs to be reset, connected to a new Wi-Fi network, or if it needs to be paired with a new master
account, remove the device from the app, prior to resetting the device.
Turn the Control panel on, press the “Connection Button”
5 times, within 5 seconds of the Hub being turned on,
the Hub will then be restored to factory settings.
The system settings and all connected accessories will
be restored.
Connection button
9:41 AM
ESP HUB
100%
ESP HUB
Disarmed
Current state
Standard 100% No SIM Card
Home Mode
Arm you system in Home Mode. All
detectors are active expect those assigned
to a Home Zone.
Arm
When your system is armed, all detectors are
active
Device Name ESP HUB
Share Device
Device Infromation
Use Echo
Basic Function Settings
FAQ & Feedback
Firmware Infromation
Remove Device
9:41 AM
9:41 AM
Settings
100%
100%
Disarmed
When your system is disarmed, all detectors
are inactive expect those assigned to a 24H
SIM
Home Smart Me
zone.
Control Settings Accessories Record
Functionality
The system can be operated differently dependent on the type of components and setup configured.
For the full manuals please visit the ESP website: www.espuk.com
Guidance
>Unit requires a minimum of 2 Mbps (upload/download)
>If the signal strength of your Wi-Fi router is weak: Change
router/hub relative position to receive better signal, Use Wi-Fi
repeater/extender to maximize the range of your Wi-Fi router.
>Smart alarm accessories are specified a maximum of 80meters
line of sight in open air. For every obstacle the signal strength
is reduced.
>If the network has changed the hub will require a reset
>Battery life depends on working and environmental factors
>If the hub needs to be added to a new account, unbind the
device from the first account prior to resetting the device.
For more product information please visit the ESP website
Elite Security Products
Redditch B98 8YN
Telephone : 01527 51 51 50
Fax: 01527 51 51 43
Email : [email protected]
Web : www.espuk.com
E&OE - Errors and omissions excepted.G21
 Loading...