

Page 1

Yard Master Pro B Series
Indoor/Outdoor Portable Projection Screen
User’s Guide
Thank you for choosing the Yard Master Pro portable projection screen! Please read through this user
guide before utilizing the screen. Correct usage and maintenance will ensure a long product life
For a visual demonstration of the assembly and disassembly for the
Yard Master Pro (Models under 150"), please view our video at:
http://www.elitescreens.com/ympro_assembly
OR scan the QR Code provided:
Care & Use In struction s
◆ Elite highly recommends two people to assemble the Yard Master Pro screen.
◆ Please be sure to distinguish between the front and back of the screen fabric when setting up the
projection screen. CineWhite® UHD (front projection) and Wraith Veil (rear projection) are both labeled
front, back.
◆Dust, dirt and scratches on the projection surface will affect the picture quality, please take note o f the
points below to prevent that from occurring:
1. Do not touch the projection surface with your hands
2. Do not write or draw on the projection surface
3. Do not use fingers or sharp objects to point on the projection surface; this will damage the screen
material.
4. Use a soft-damp cloth to clean the projection surface; do not use chemical cleaning agents or
alcohol.
5. Use clean water when dampening the cleaning cloth and do not rub against the material to clean it.
◆After using the screen, disassemble it and store it in the carrying bag provided.
◆To avoid damage and injury, the screen should only be operated by adults.
Product Description
Design: The aluminum frame is designed to be light weight and easily operated making i t easy t o carry,
assemble and disassemble.
Screen Fabric: The screen fabric is attached to the rectangular frame and held in place by several pegs
along the frame, which ensure an evenly stretched and flat surface. The CineWhite® UHD (front
projection) and Wraith Veil (rear projection) screen materi als are durable and can be folded many times
without causing damage or distortion to the surface.
Re v. 090618 1 ELITESCREENS.com
Page 2
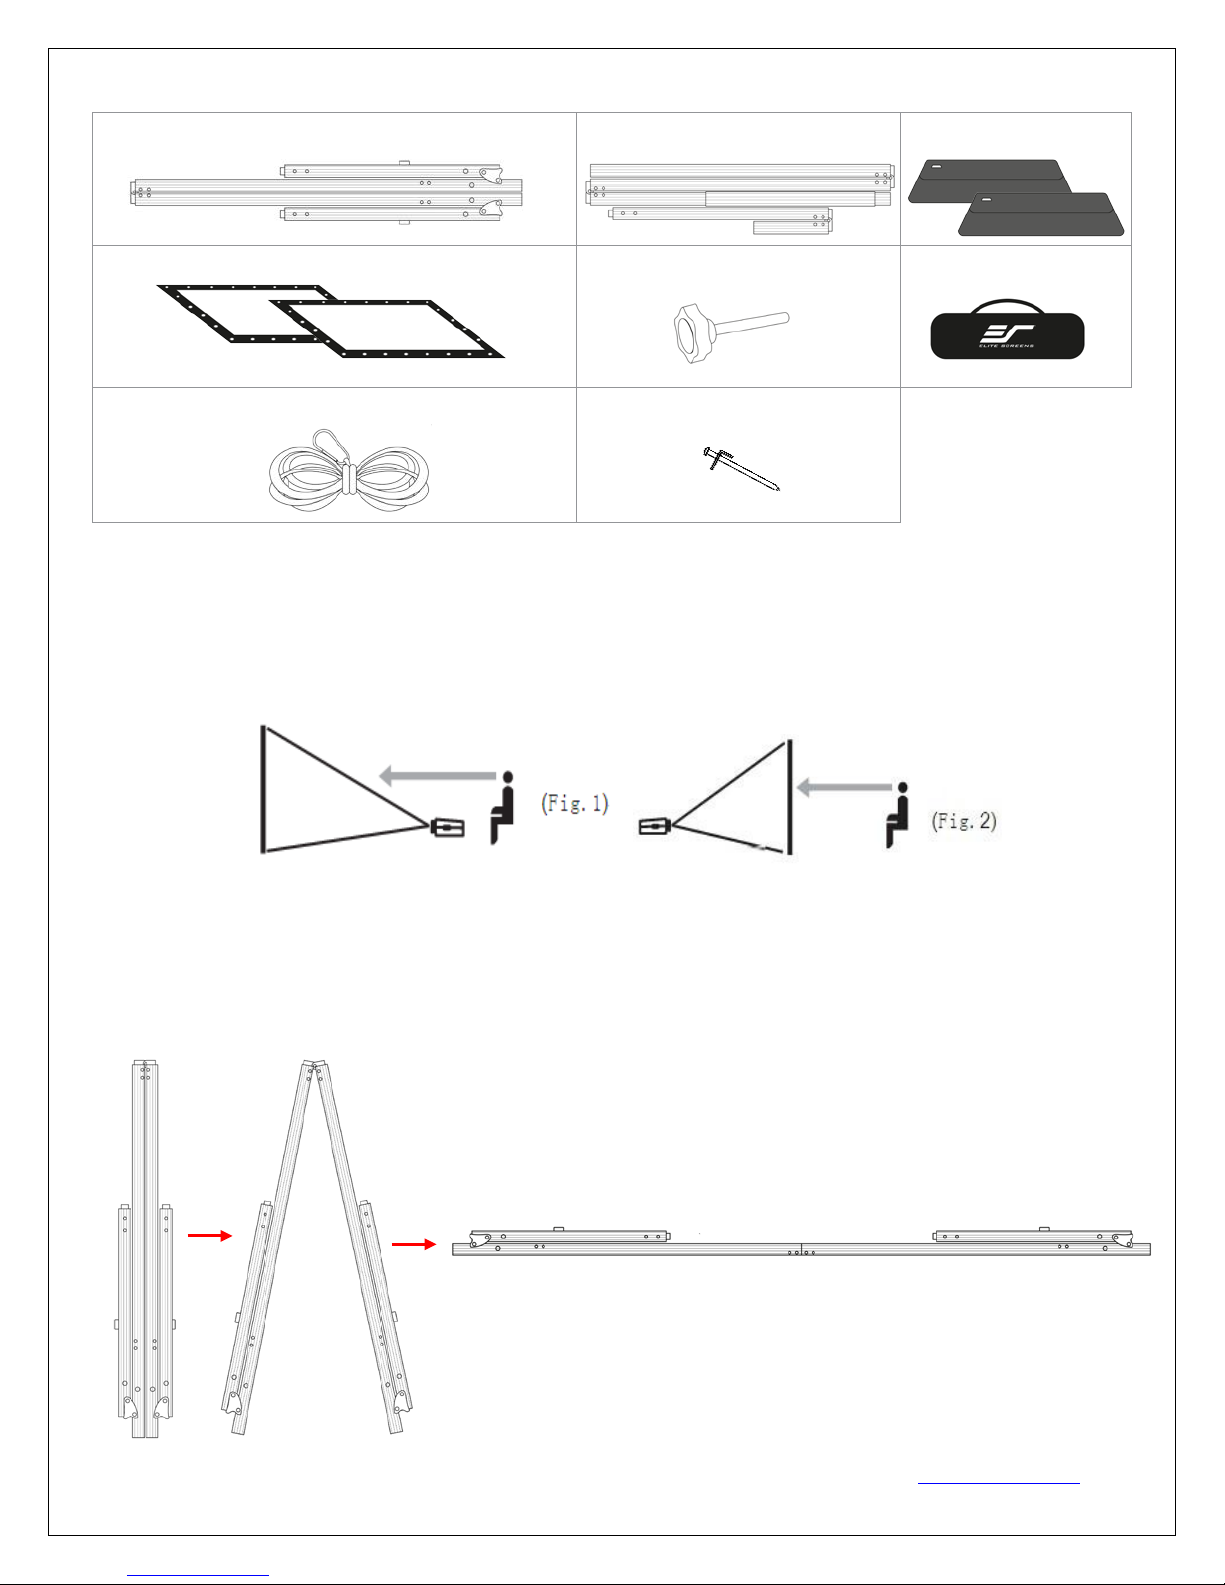
Parts Diagram
CineWhite™ UHD (front projection)/Wraith Veil (rear projec tion)
A. Folding fra me x1
D. Projection screen material x2
G. Rope with ring x4
B. Left and right folding legs x2 C. Screen material bag x2
E. Knob scr ew x6
H. Stake x4
Note: The parts list above is subject to change without notice.
Correct usage of the projection screen will ensure better viewing results.
For front projection, assemble and view the screen as indicated in Fig.1.
For rear projection, assemble and view the screen as indicated in Fig.2.
F. Carrying Bag x1
Frame Assembly
1. Take the folding frame (A) out o f the carrying bag (F) and place it on a flat surface. Fully unfold the
frame from the center, as shown below
.
Re v. 090618 2 ELITESCREENS.com
Page 3
2. Next, unfold the smaller sections out.
Side View
Warning: The additional support sections, located at the bottom of the legs, may unfold on its own. Please be sure
to use caution while removing/placing the legs from/to the bag
3. Lastly, unfold one half of the frame from the other, as shown.
Note: When unfolding the frame and legs, be sure the latches on the hinges "click " into place. Please als o
make sure all 4 corners of the frame are at a 90° angle and the hinged support bar is straight and not bent.
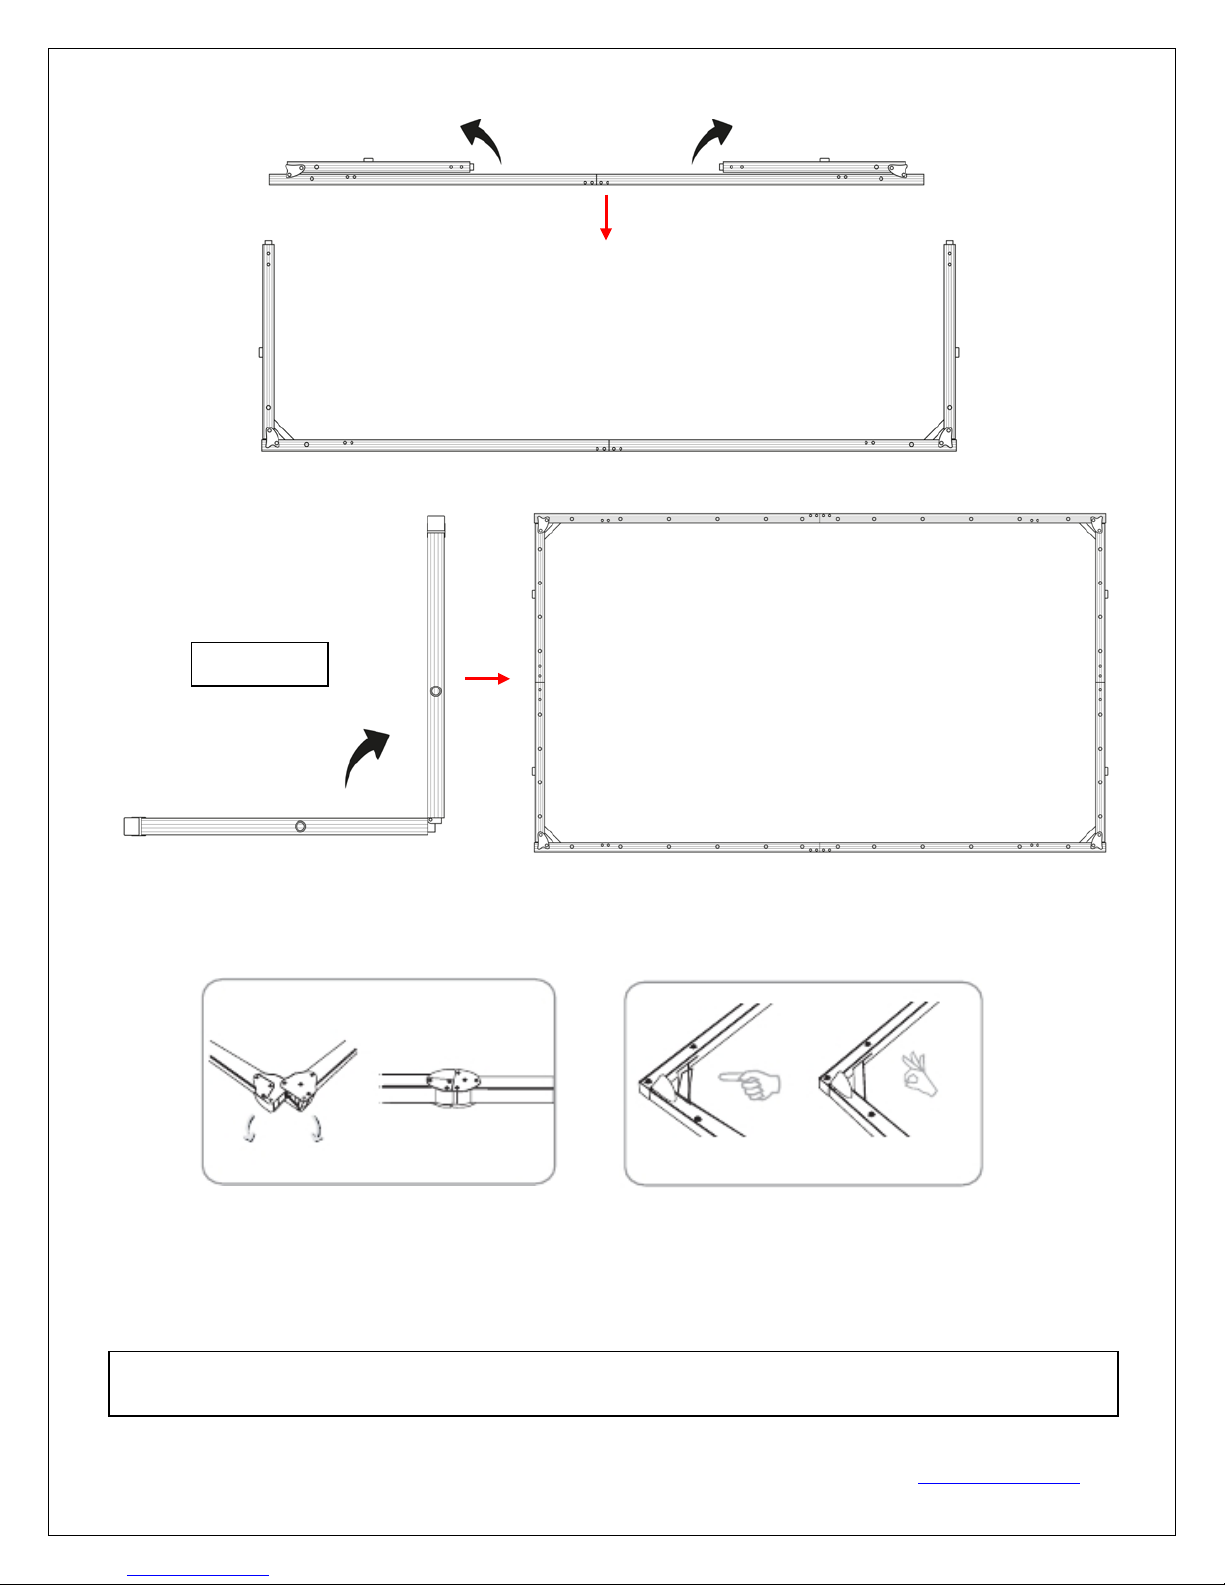
Leg and Screen Material Att achment
4. Carefully take the left and right folding legs (B) out of the carrying bag (F) and place it on a flat
surface. Unfold the vertical leg sections as shown.
Re v. 090618 3 ELITESCREENS.com
Page 4

Note: Be sure to place the
5. At the bottom of the legs, unfold the additional support sections as shown below.
6. Line up the correlating screw holes on the frame and legs and secure using the knob screws (E)
provided. See below.
legs in which the eye
loops are facing outward
from the frame. These eye
loops will be utilized with
the rope and clip (G) to
help secure your screen in
windy applications.
Re v. 090618 4 ELITESCREENS.com
Page 5

7. To attach the screen material (D), first utilize the attached pull tabs at the corners to easily hook the
1 1 1 1 2 2 2 2 3 3 3
3
holes on the material to the pegs on frame (1). Next, attach the middle sections of sides (2). Th e n, fol l ow
with the rest of the sections (3). Please follow this order, shown in the diagram below. (1→2→3)
8. After the screen material is fully secure, attach the ropes and rings (G) to each side of the legs at the
top of the frame (1 at each eye and loop).
9. Open one side of each folding leg and carefully lift the top of the frame to stand up the screen. While
keeping a hold on the screen, open the other side of each folding leg. Two people are needed for this step.
10. To secure the screen, hammer the stakes (H), at your
desired location, into the ground.
11. Finally, tie the 4 ropes (G) to the stakes (H) to prevent
the screen from tilting or falling over. Your screen should
look like figure shown (right).
Re v. 090618 5 ELITESCREENS.com
Page 6

Screen Disassembly
1. Remove ropes (G) and stakes (H) from the ground.
2. Unlatch the hinged support bars on front side of each leg so that it is bent and fold that half of the legs
up. Slowly lower the screen to the ground (towards the closed legs). Two people are needed for this step.
3. Unlatch the hinged support bars and fold down other half of legs.
4. Loosen and remove the ropes (G) and knob screws (E) from each leg.
5. Remove the folding legs (B). Fold and place them inside the car rying bag (F) provided.
6. Detach the screen material (D) from the folding frame (A) by carefu l l y pulling and lifting the edges to
unhook the material from the pegs.
Re v. 090618 6 ELITESCREENS.com
Page 7

7. Fold screen material (D) in half, folding the bottom of the screen towards the top. Then, fold in half
Side View
again in the same way. Lastly, fold the material into thirds to condense the length and place i t into the
screen material bag (C).
*If you prefer to roll the material, instead of folding into thirds, roll from one end to the other after
folding in half twice.
8. Unlatch the hinged support bars in each corner of the folding frame (A).
9. Press in the black locking buttons, near the folding joints, and carefully fold the frame.
10. Store the screen in the provided carrying bag (h). Be sure to place folding frame, legs, and smaller
parts into the carrying bag first and place the material on top to keep material from creasing or tear ing .
For more information, technical support or your local EliteScreens contact, please
Re v. 090618 7 ELITESCREENS.com
visit
ELITESCREENS.com
 Loading...