

Page 1

Reflexion Series
Portable Floor Pull-up Projection Screen
User’s Guide
Precautions:
The Reflexion portable floor pull-up projection screen series is an easy to use product that has the
ability to be used as a free-standing projection screen. For best results, please read the checklist below
before using the Reflexion projection screen.
Use only manufacturer approved accessories with this product.
Keep this product dry and away from excessively humid operating conditions.
Avoid keeping the screen in direct sunlight; it is destructive to vinyl and plastic.
Do not touch the screen with sharp or abrasive objects.
In order to maintain cleanliness of the screen, use mild soapy water with a soft cotton cloth and
avoid unnecessary skin contact with the material.
Do not wash the screen material or its black masking with strong solvents.
Keep this product clear from an open flame or other heat sources.
The images below are an example of what not to do with the Reflexion series.
Rev. 091412-JA
www.elitescreens.com info@elitescreens.com 1
Page 2
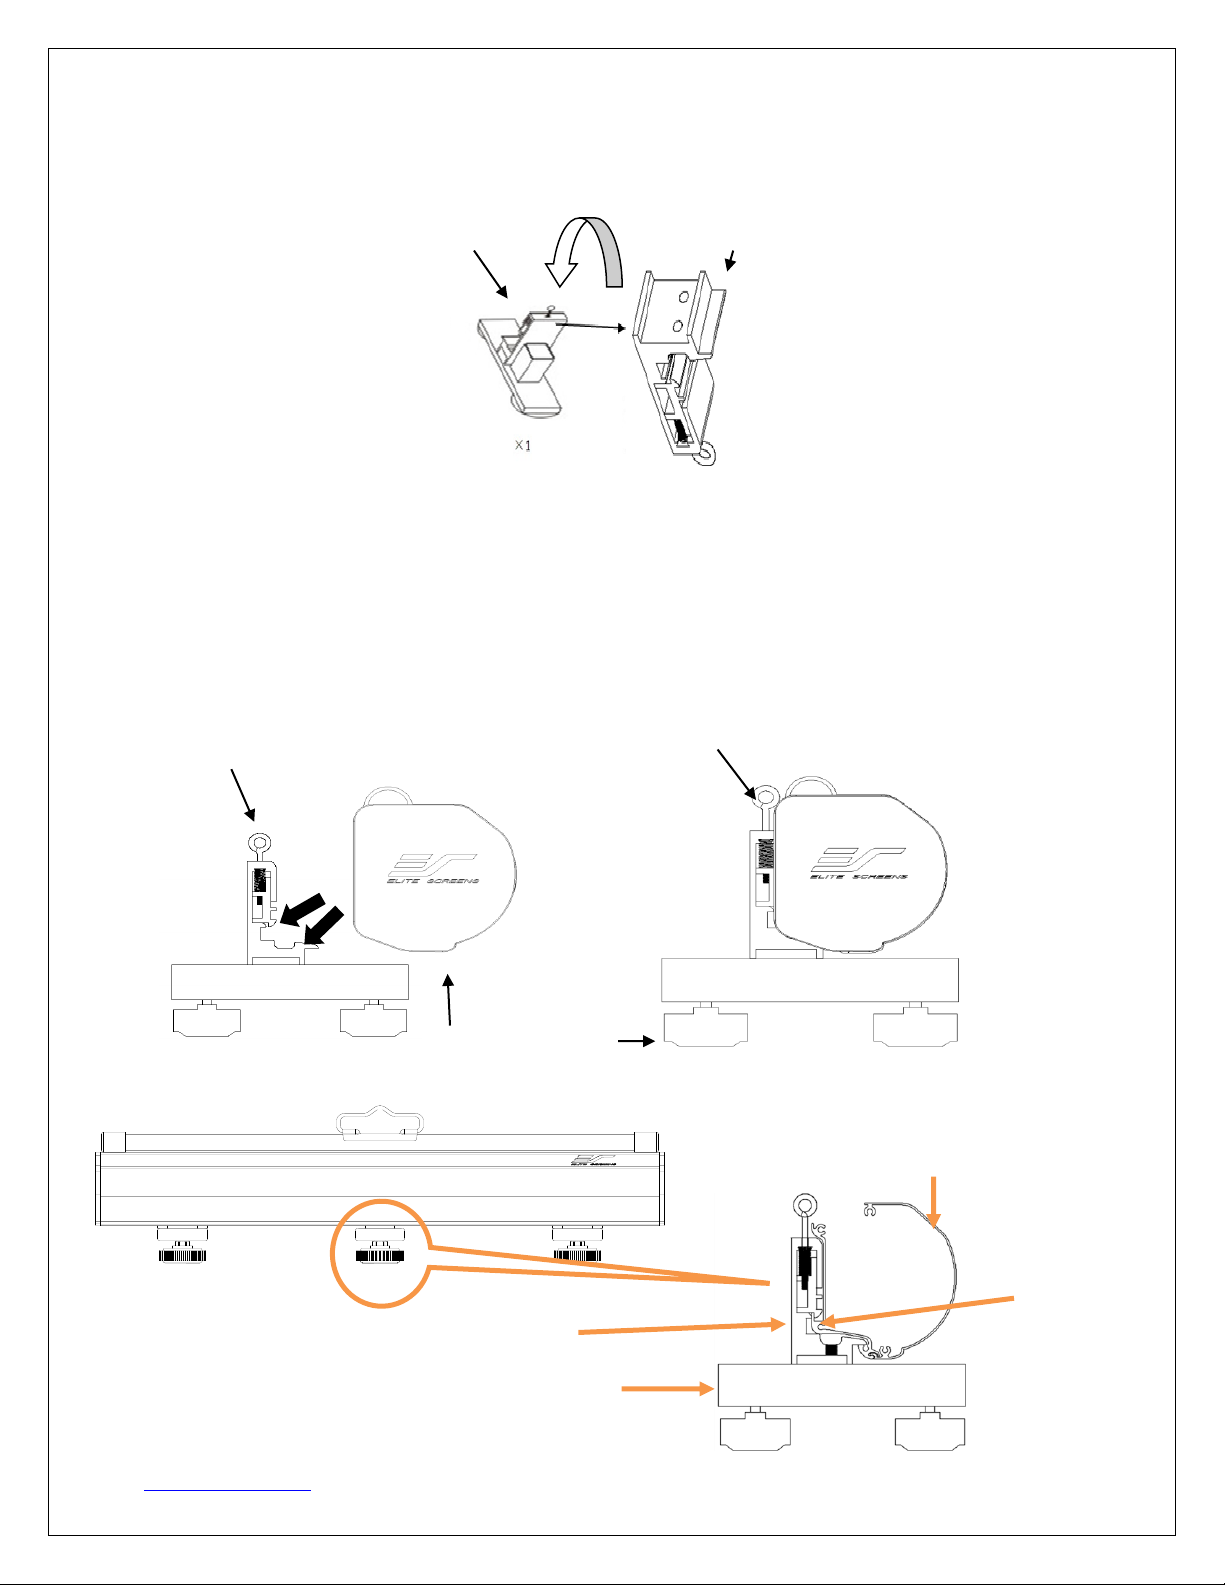
Components Set up
Pull up on the spring-loaded ring to disengage the cleat
on the bracket. Connect the cleat with the sliding rail
on the back of the screen’s metal casing.
Release the ring and “click” the metal
casing into position with the bracket.
Center Base Foot
Spring Cleat
Screen Case
Bracket
Example of the installation bracket attached to the side of the base feet.
Base Foot Bracket
Installation
Each installation bracket has an adjustable spring-mounted cleat that can be loosened by a “loop” or
eye-bolt. Pulling on the loop releases the cleat allowing the bracket to attach to the railing and click into
place on the back of the casing. Gently ease together the brackets and railing on the back of the metal
casing until you hear a “click” and double-check to make sure that the connections are firm.
Case Base Foot
Rev. 091412-JA
www.elitescreens.com info@elitescreens.com 2
Page 3

Detach the screen case from the base feet
Pull up the suspension loop to disengage
Lift screen assembly up and away from the base foot
Pull up the loop (eye-bolt) to release the spring-cleat and tilt the projection screen’s metal casing
forward away from the brackets. Lift the entire projection screen assembly up and away from the
bracket/cleat assembly.
Erecting the upright support
1. Remove the telescoping upright support from its cradle.
2. Insert the upright support into the socket on the center base foot.
3. Hang the suspension handle of the screen from either of the notches of the upright support.
Rev. 091412-JA
www.elitescreens.com info@elitescreens.com 3
Page 4

4. Twist the locking ring counter-clockwise to loosen the telescoping function of the upright
support and raise the screen to its desired level.
5. Rotate the locking ring clockwise to lock the upright support at its desired height setting.
6. Here is a front view of the Reflexion projection screen when the set-up is complete.
Rev. 091412-JA
www.elitescreens.com info@elitescreens.com 4
Page 5

Retracting the screen
1. Take hold of the top span of the upright support and with your free-hand, twist the locking
ring in the counter-clockwise direction. This will release the lock and allow the upright support
to telescope back into its compact form.
2. Lift the support handle up and out of the “notches” and guide the material back down into
the casing. Release the handle when the screen material has fully retracted.
3. Rotate the locking ring clockwise to secure the upright support and remove it from the socket
on the center base foot.
Rev. 091412-JA
www.elitescreens.com info@elitescreens.com 5
Page 6

4. Return the upright hook to its cradle.
5. The Reflexion is now packed and ready for its next use.
For US Customer Service and Technical Support questions, please contact Elite Screens at:
Telephone: (877) 511-1211 service@elitescreens.com
Fax: +1-(562) 926-8433 techsupport@elitescreens.com
Remember to register your product at: www.elitescreens.com/register
Rev. 091412-JA
www.elitescreens.com info@elitescreens.com 6
 Loading...