

Page 1
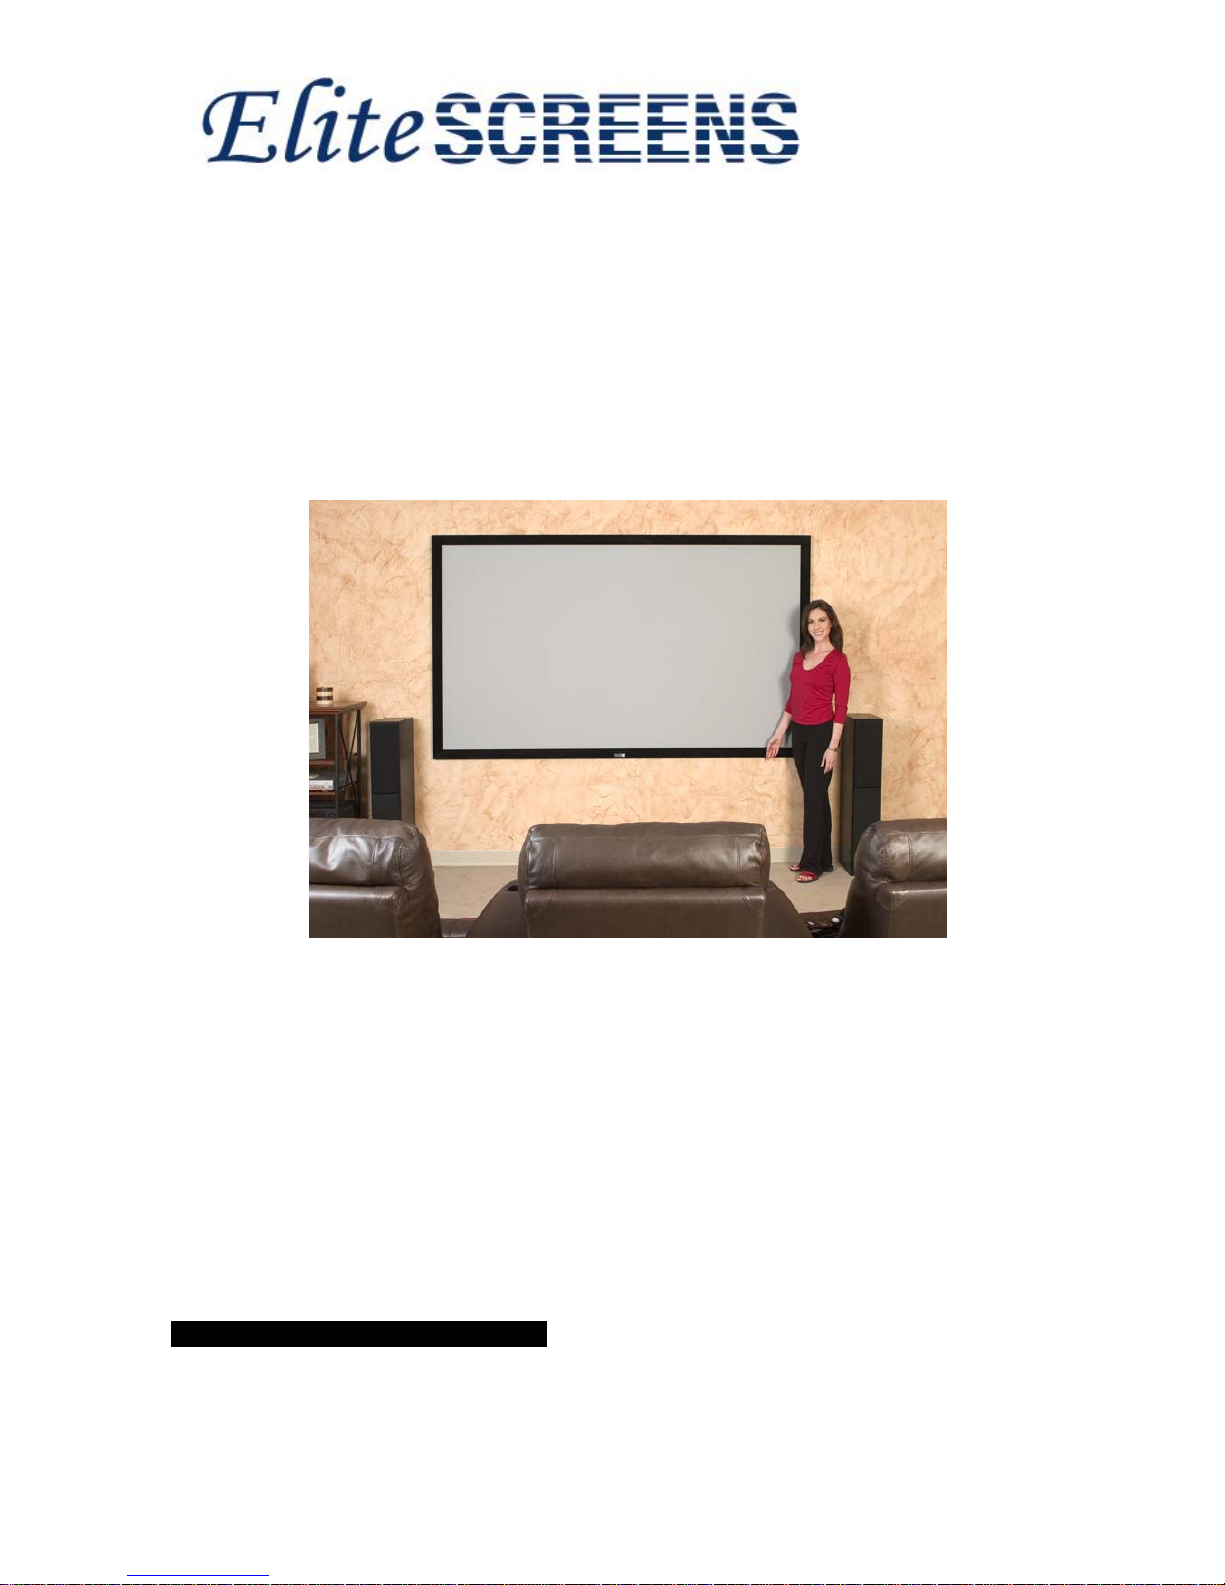
Fixed Frame Screen
Elite Ez-Frame Series
User’s Guide
MATTE WHITE & HIGH CONTRAST GRAY
Page 2
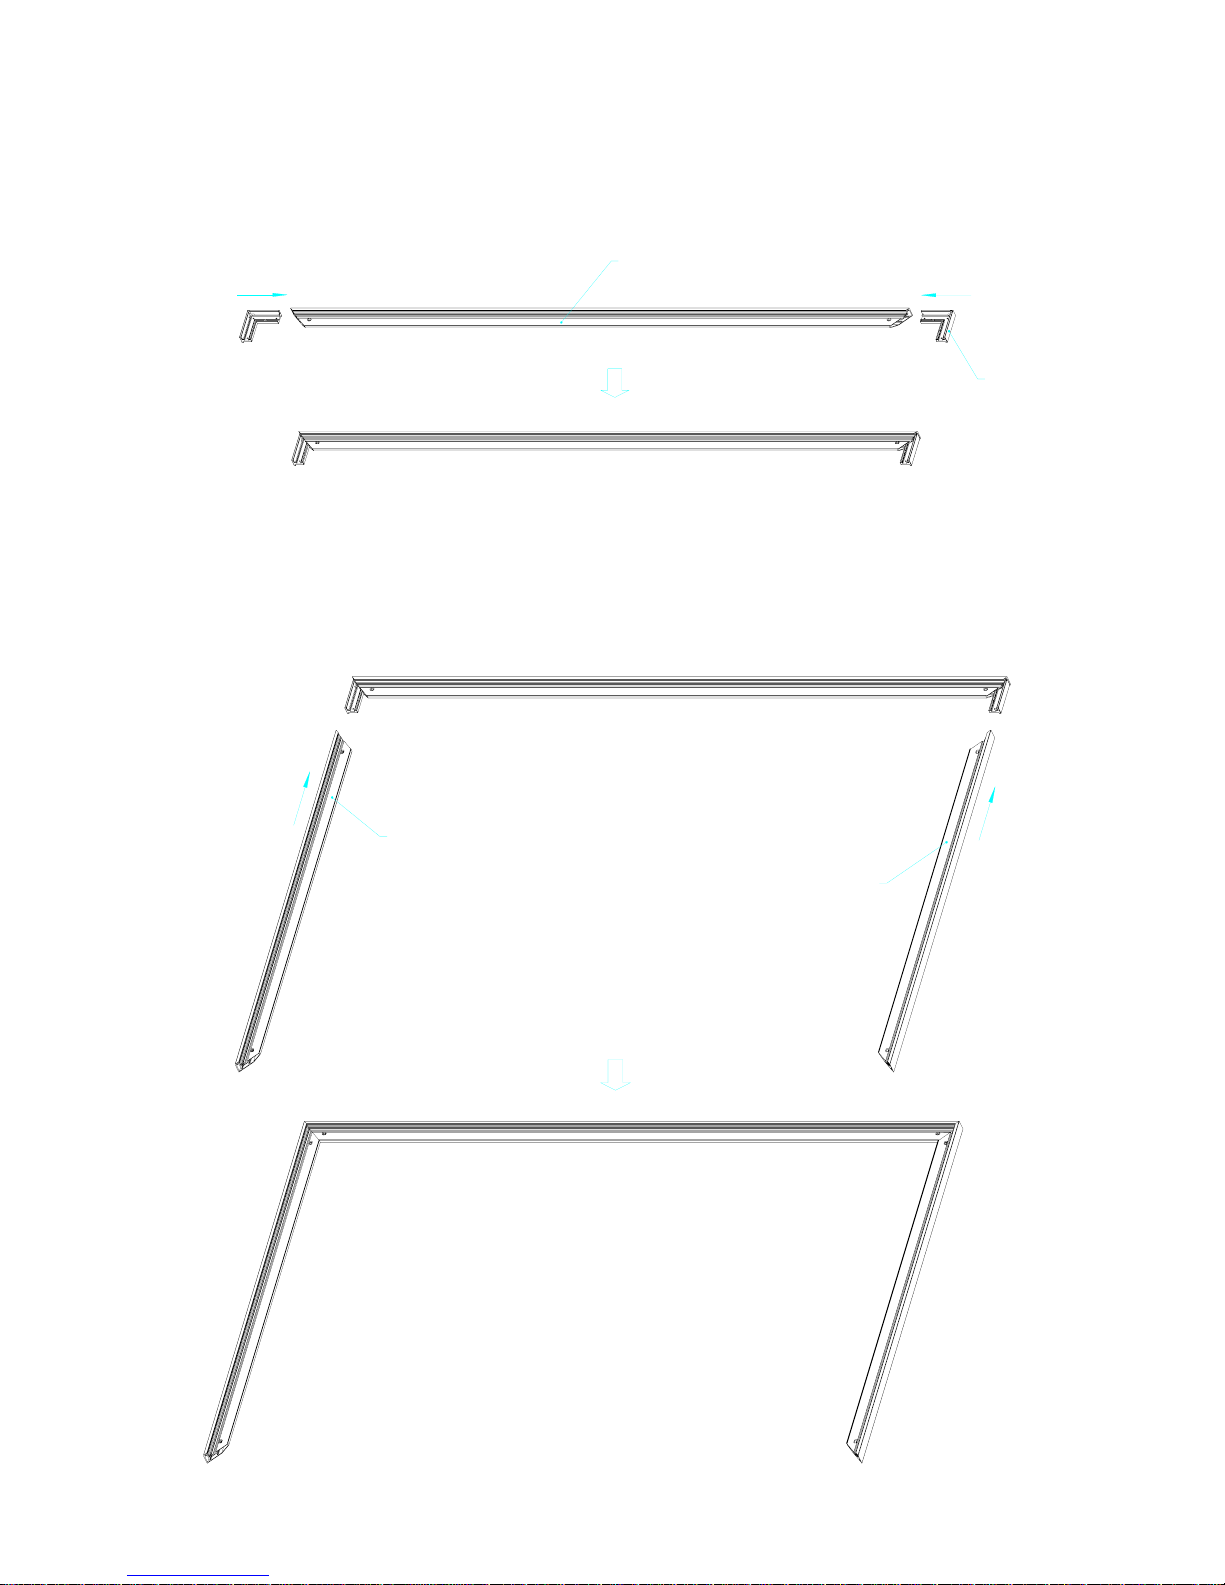
ASSEMBLING
1. Insert both corner joint connectors into the long (horizontal) frame (see fig.1)
Push
Push
Joint
Long frame
( fig.1)
2. Join all four frame parts together following the steps showed below. (fig.2)
Push
Push
Short frame
Short frame
Page 3
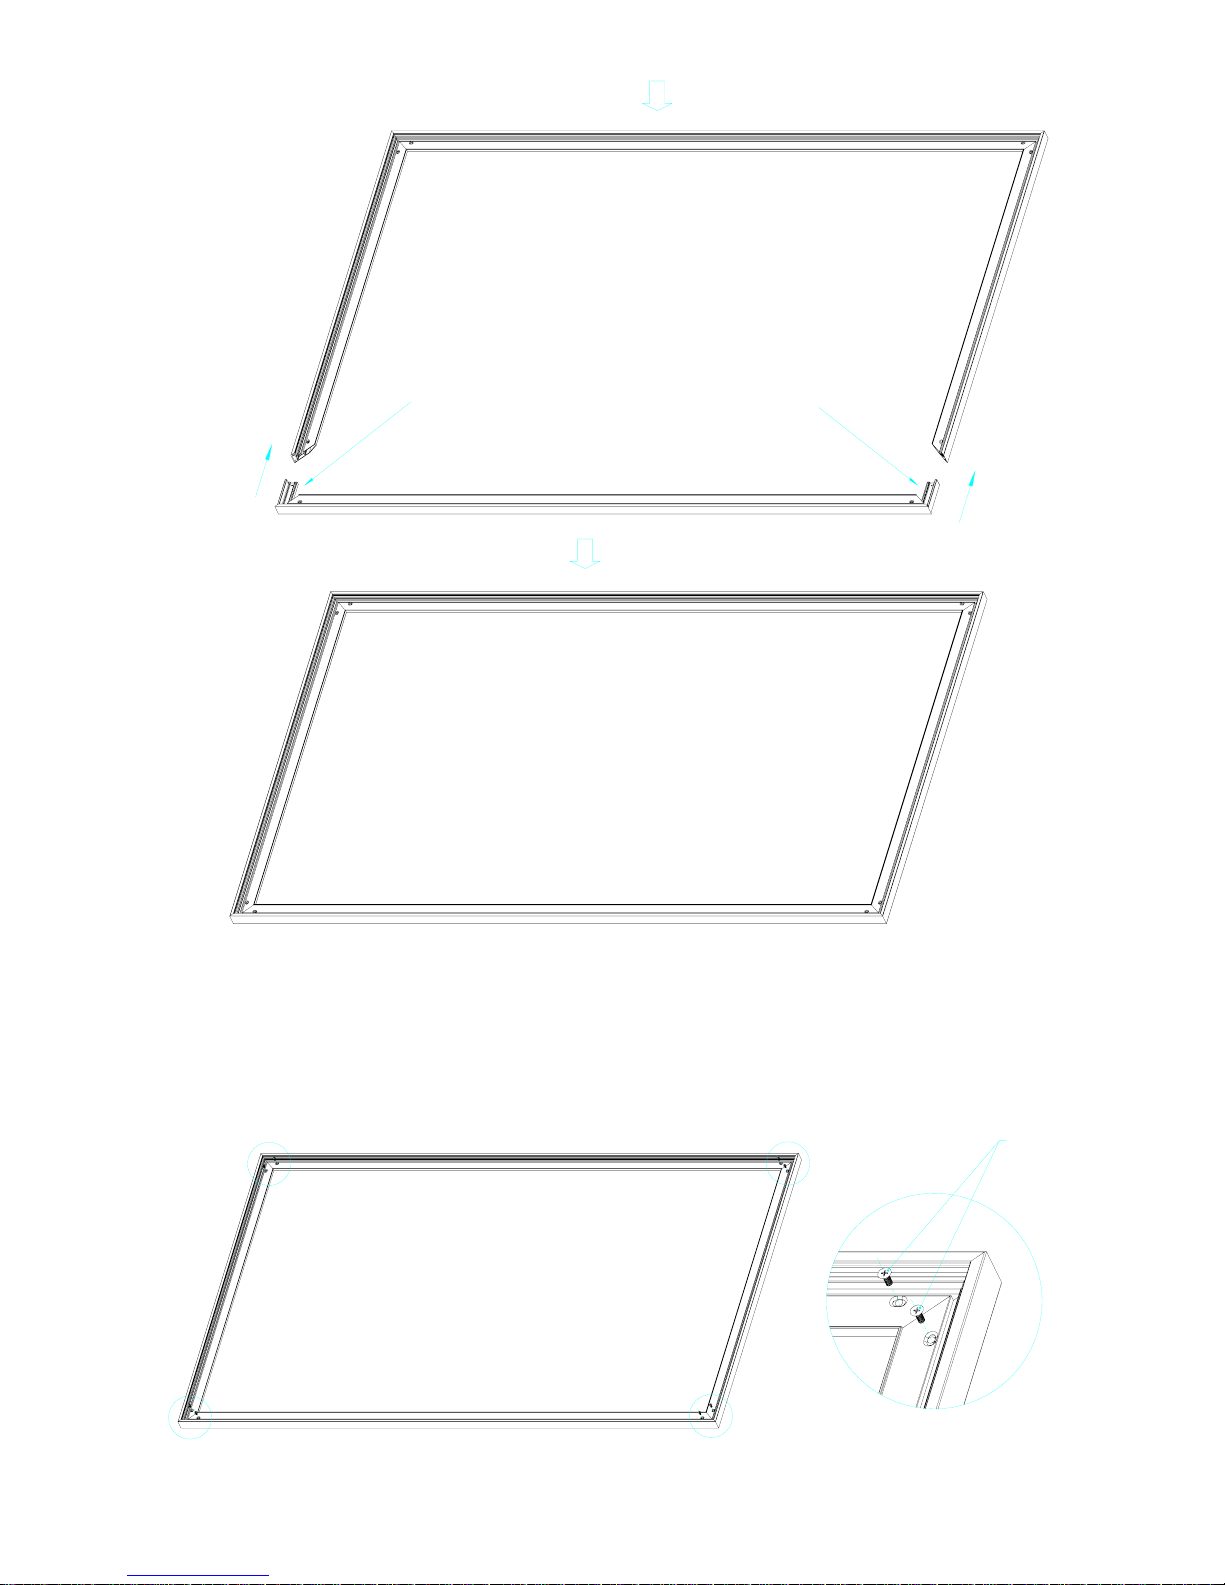
Push
Push
( fig.2)
Insert the exposed ends of the joint conn ecto rs
into the short (vertical) frame and align the four
corners so that they meet at perfect right angles
3. After making sure that all four corners join at right angles to form a perfect rectangle,
fasten the four angles together by using the (x8) joint screws included. (see fig.3)
Screw
( fig.3)
Page 4
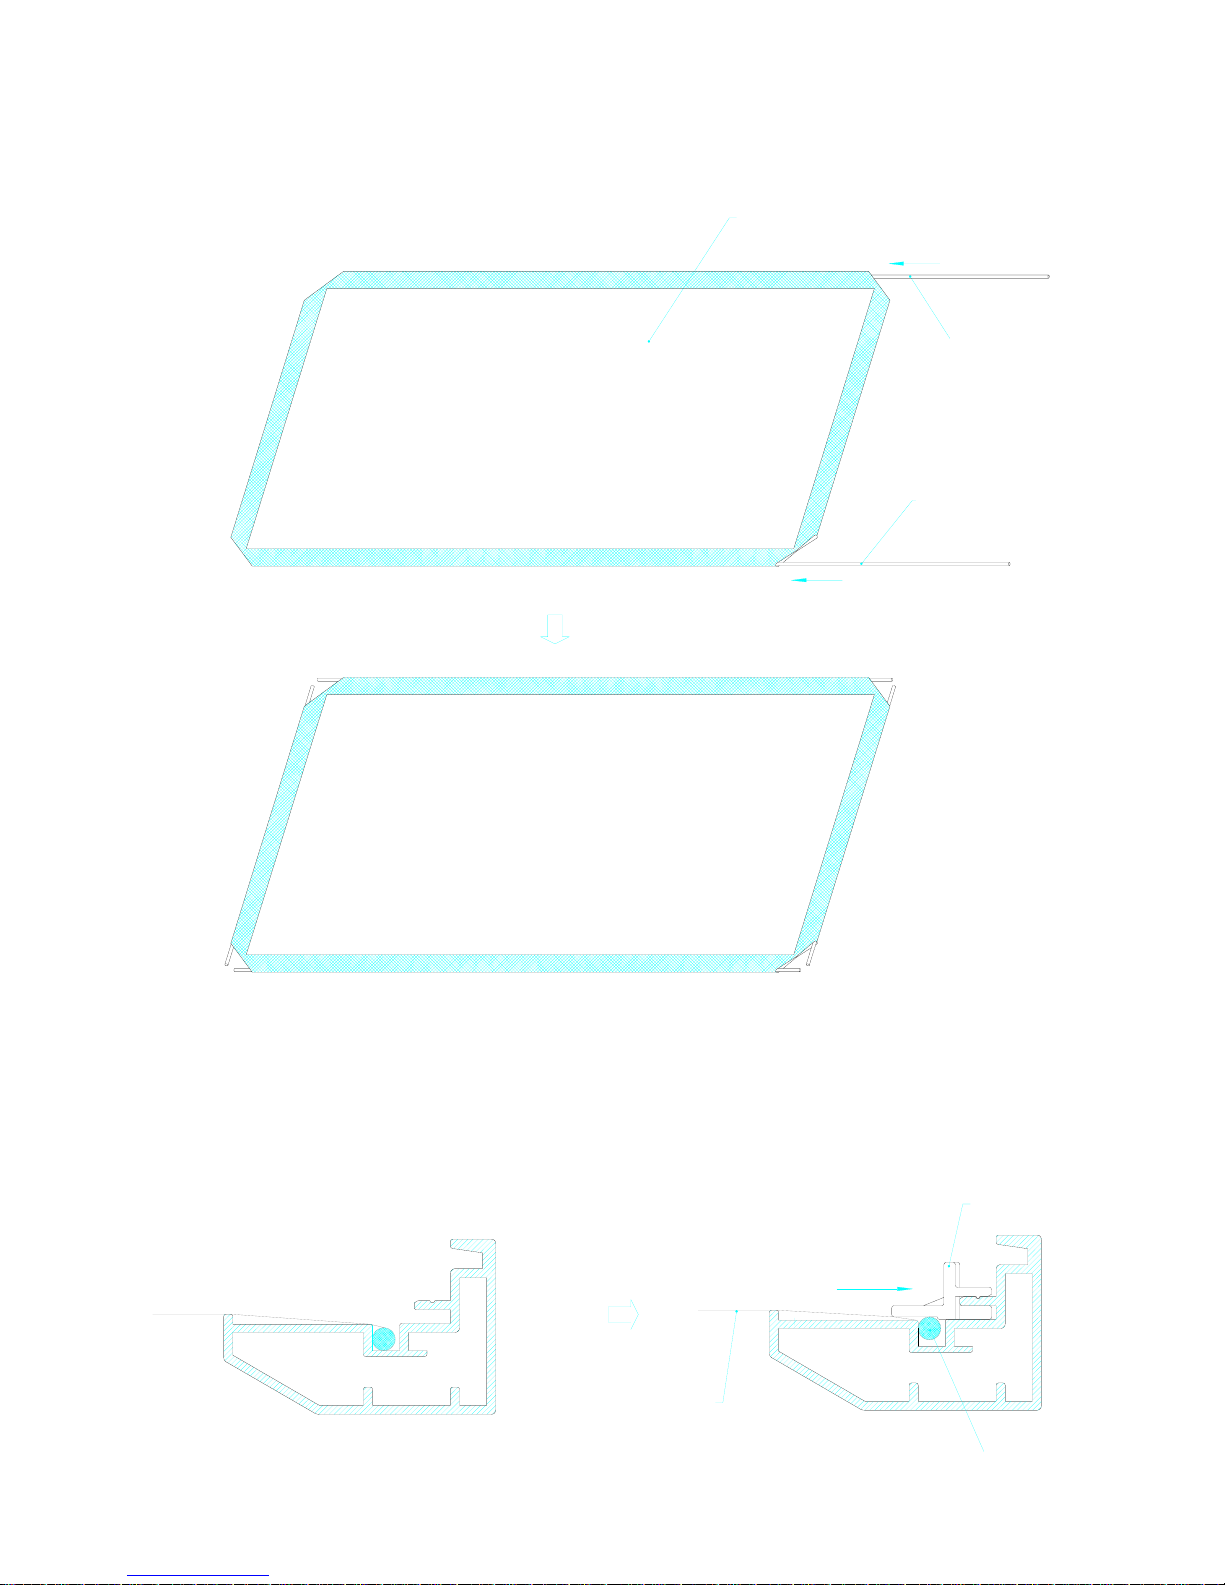
4. Lay out the screen and tension rods on a clean and dry surface. Pass the screen tension
rods through the sleeves according to their corresponding lengths on each edge of the
screen as seen below. (see fig.4)
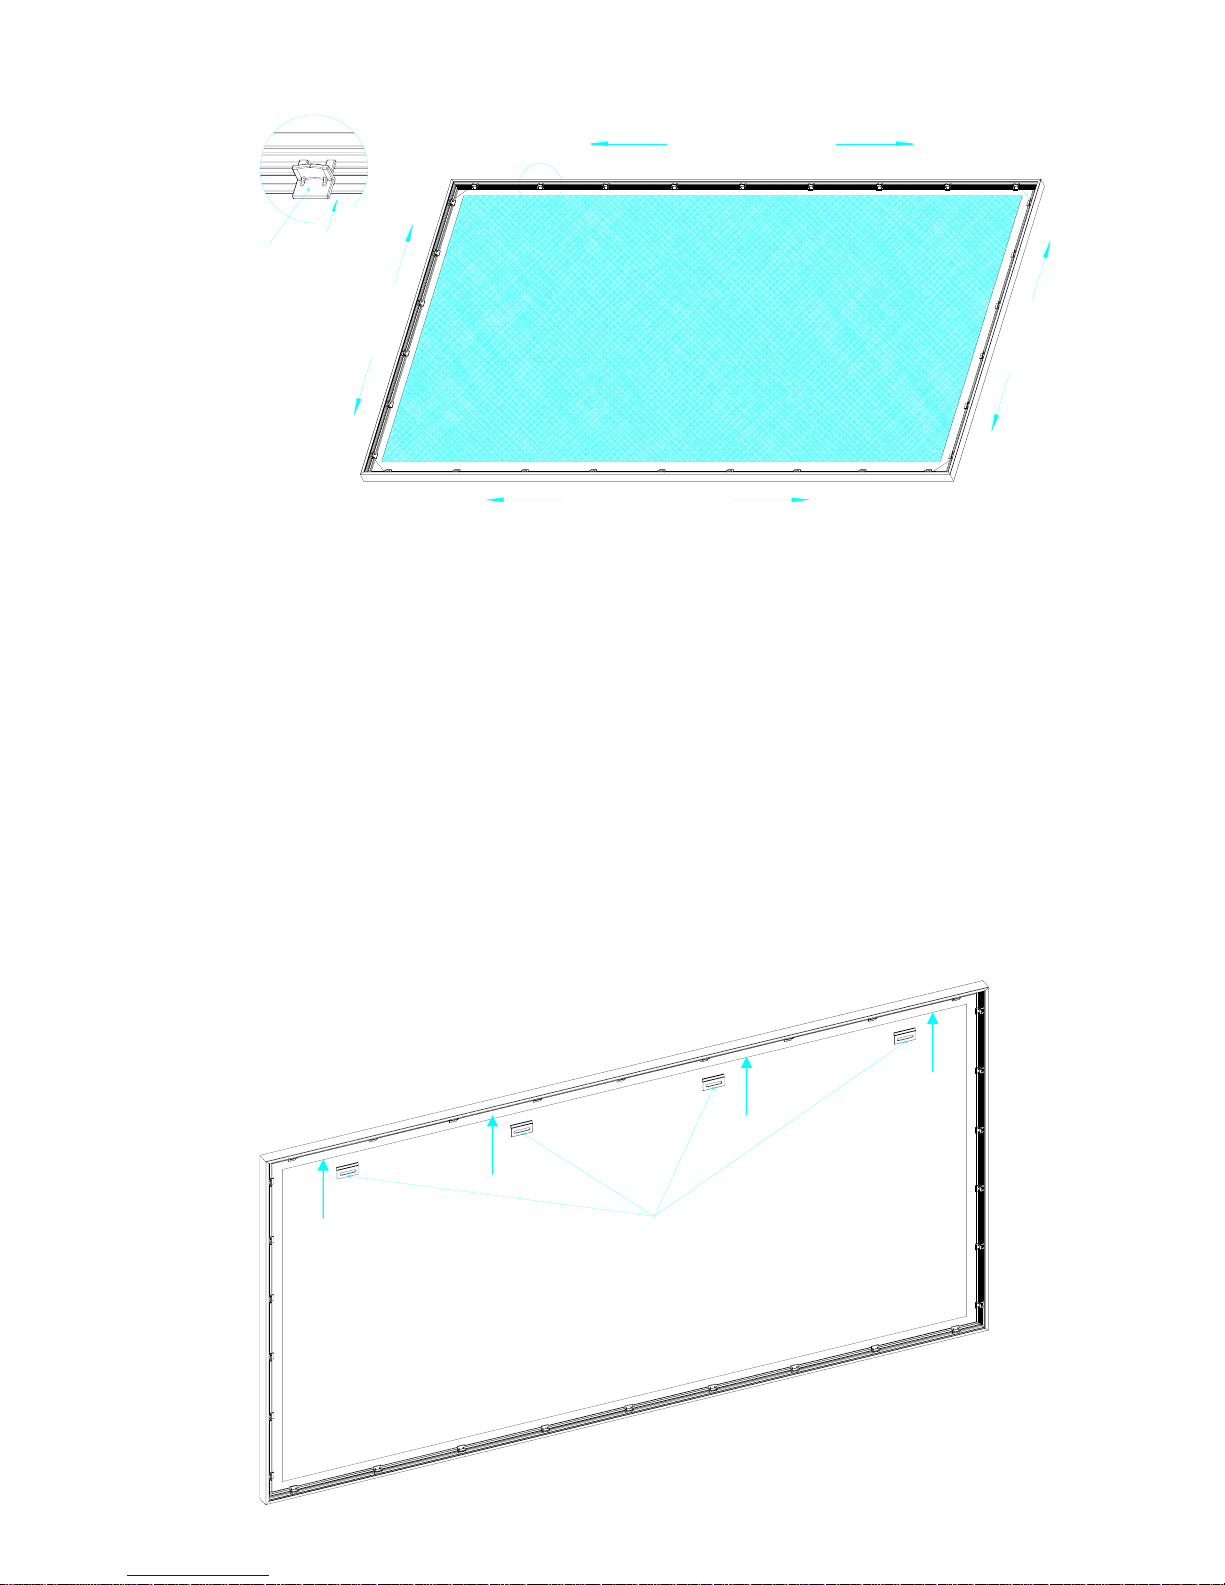
5. Slip the screen tension rods into the grooves running along each side on the back of the
frame. Clip on the fix plates to the back of the frame to secure the rods into place forming a
tight and flat surface(see fig5 & fig6)
Steel rod
Push
( fig.4)
Steel rod
Screen
Push
Tension Rod
Tension Rod
Push
( fig.5)
Viewing surface
(Front of screen)
Steel rod
fix plate
Tension Rod
Page 5
⑦
⑧
⑧
⑥
⑥
⑤
④
③
④
②
②
①
( fig.6)
Push
Fix plate
*Note: Numbers 1-8 indicate the
recommended order that you should
attach your fix plates.
Attaching Fix Plates
1. Start at the left side working toward the right and then from top to bottom of the frame
attaching the screen material. Start securing the fix plates at the center of each side
working outward (fig.6)
2. Some people prefer to use an alternate method in attaching the fix plates. Start on the left
side and then match the opposing sides fix plate piece by piece instead of doing one entire
side at a time.
INSTALLATION
small wall bracket
4pcs
( fig.7)
Me th od 1 ( smaller tha n 13 5 " d ia go n a ls)
Page 6
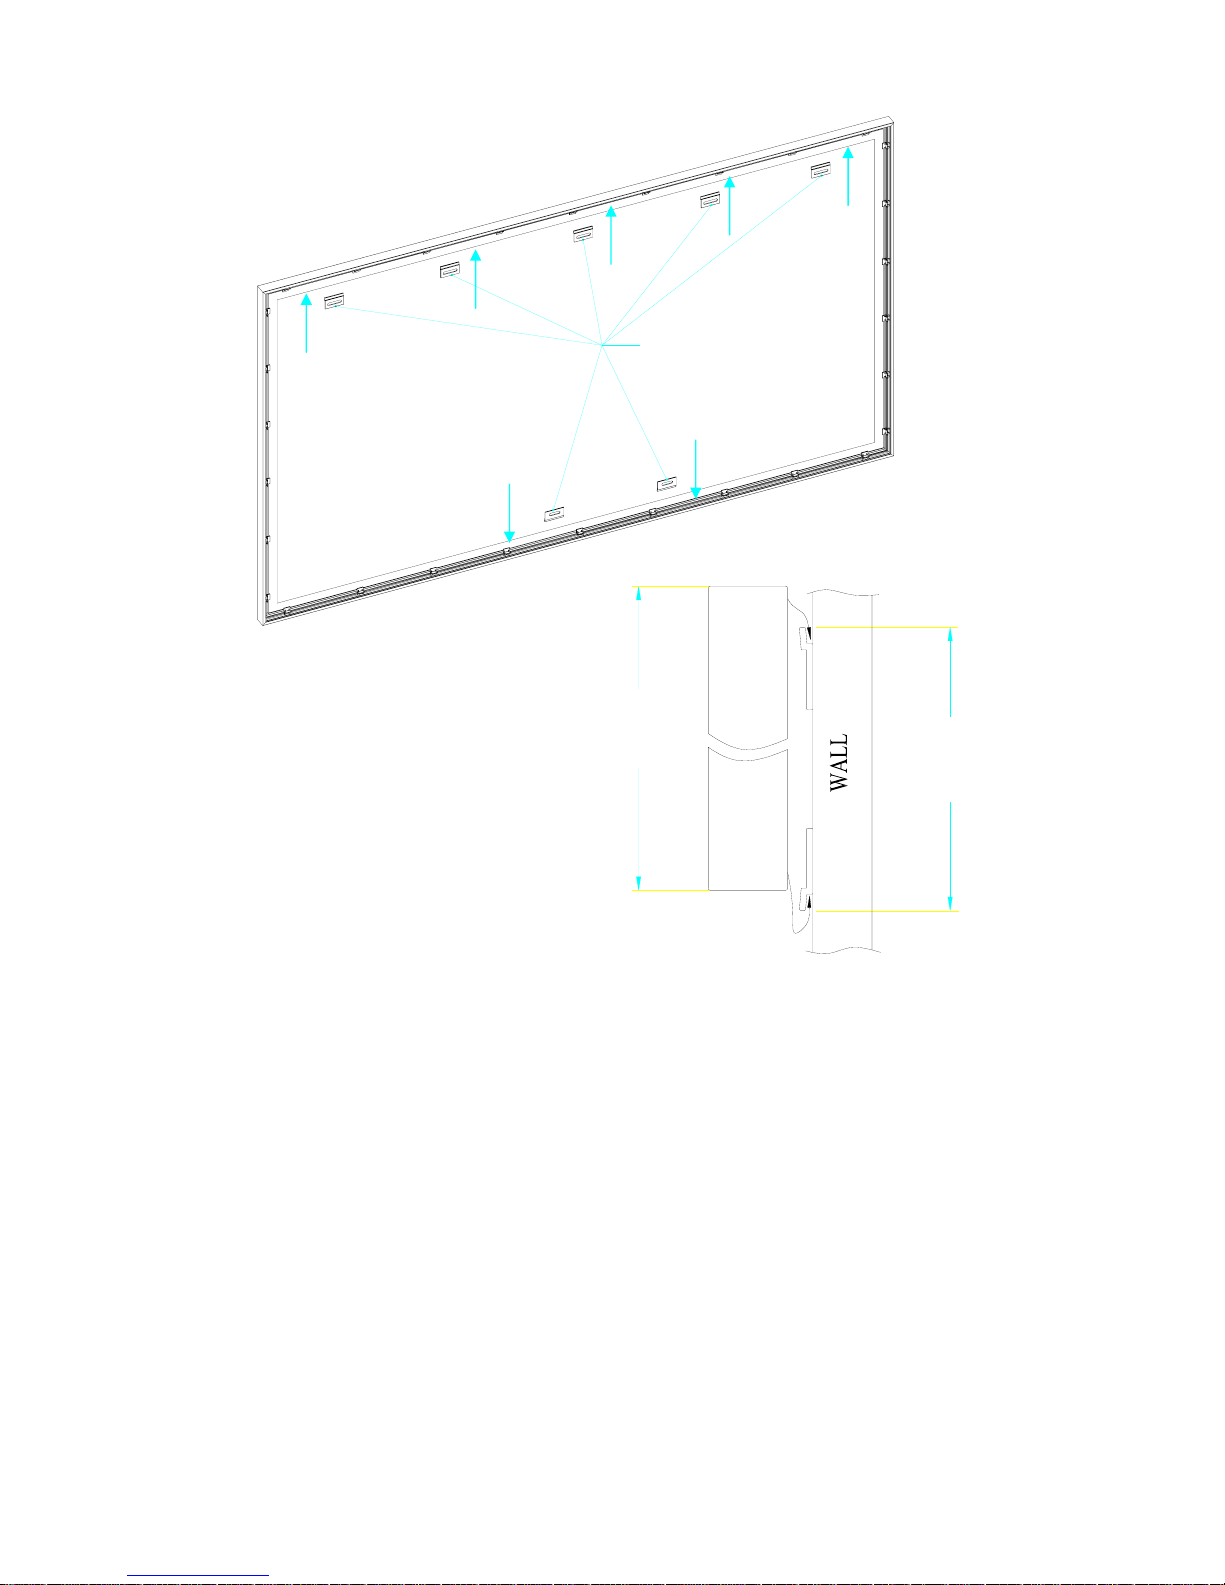
small wall bracket
7pcs
Position the screen with the
attached surface onto the top
wall bracket as shown in (fig.8).
Push down at the center of the
bottom frame rail to hook onto
the lower wall bracket
( fig.8)
2
1
OVERALL
HEIGHT - 1/4"
OVERALL
HEIGHT
Method 2 (larger than 135" diagonals)
CAUTION
Please follow these instructions carefully to ensure proper maintenance and safety
with your EZ-Frame Screen
1. When hanging the screen up, please make sure that no other objects such as power switches,
outlets, furniture, ladders, windows, etc. occupy the space designated for your Fixed-Frame screen.
2. Regardless if the screen is hung on or installed into the wall, make sure that the proper mounting
anchors are used and that the weight is supported appropriately by a strong and structurally sound
surface just as any large and heavy picture frame should. (Please consult a home improvements
specialist for the best advice on installation)
3. Frame parts are made of high quality velour-surfaced aluminum and should be handled with care.
4. When not in use, cover over the screen with a furniture sheet to protect it from dirt, grime, paint or
any other impurities.
5. When cleaning, use a damp soft cloth with warm water to remove any marks on the frame or
screen surface.
6. Never attempt to use any solutions, chemicals or abrasive cleaners on the screen surface.
7. In order to avoid damaging the screen, avoid touching it directly with your fingers, tools or any
other sharp or abrasive objects.
8. Spare Parts should be placed out of reach for small children's in accordance with household safety
guidelines.
Page 7

Components List
1. Frame Part 4 pcs (2 long edges + 2 short edges)
2. Tension Rod 4 pcs (2 long rods + 2 short rods)
3. Screen 1 pcs
4. Joint 4 pcs
5. Fix Plate 30~60 pcs
6. Wall bracket 4~7 pcs
7. Screw 8 pcs
8. Manual 1 pcs
WARNING
The projection screen frame is made of high-quality aluminum alloy and should be handled
with care.
Use a soft cloth with warm water to remove any spots on the screen surface.
To avoid damaging the screen material, never attempt to use any solutions, chemicals or
abrasive cleaners on the screen itself and never attempt to touch screen with your fingers or
sharps/abrasive objects.
Warranty Policy - Manual, Tripod, Floor Pull-up, and Fixed Frame Screens
*Valid in the United States of America. All international claims must go through their
international distributor.
• Two (2) year warranty on parts and labor from purchase date as follows (except for refurbished
units as specified below):
• Refurbished
units carry a 90-day parts and labor warranty.
•
Demo units or open box items
are “AS IS” items and do not carry a warranty.
• Each party will be responsible for one way shipping during the warranty return/exchange.
•
DOA (Defective on Arrival): Must be reported within 7 business days of receipt
. An RMA
(Return Merchandise Authorization) number must be issu ed i n order to process a repl acemen t.
Elite Screens will replace the DOA (Defective on Arrival) unit with a brand new replacement
*(see exceptions below) after the DOA unit is received and/or confirmed defective. Once the
product is received, Elite Screens will send out a new *unit to the customer by ground service
(subject to inventory availability). Should a problem be reported after the 7-day grace period,
the item must be shipped to us for warranty repair.
• Missing Parts must be reported within the 7-day (DOA) grace period. If reported after 7 days,
customer will be only be responsible for shipping and handling fees up to 30 days. If reported
after 30 days of receipt, customer is responsible for cost of the parts and shipping & handling
fees.
Please visit the link below for full warranty information
http://www.elitescreens.com/services.html
Page 8
REGISTER YOUR ELITE PRODUCT
TWO WAY TO REGISTER YOUR WARRANTY WITH ELITE SCREENS INC.
A. On Line (Faster and Easier) www.elitescreens.com/register.html
B. Fill out & Fax to (562) 483-8498, Attn: Customer Service Dept.
*Your Name: _______________________________________________________
Address: ______________________________ ______________________________
City/State/Zip ________________________________________________________
*Email Address: ______________________________________________________
*Phone: _____________________________________________________________
*Screen Model: _________________________ ______________________________
*Serial Number: _____________________ __________________________________
*Date of Purchase: _________________________ ____________________________
*Dealer / Reseller Purchased from (name of the reseller): _____________________
What is your Projector Model: ____________________________________________
Application: ___ Home ___ Education ____ Corporation _____ Government
___ Others
How would you rate this screen? ___ Excellent ___ Good __ _ Ok __ _ Improvement needed
Comments:
Contact info:
If you have pictures of your screen you’d like to share with us, please email your pictures to
or call us at 877-511-1211 EXT 203 or EXT 233
www.elitescreens.com
For any technical inquiries,
 Loading...