

Page 1
Elite
SCREENS
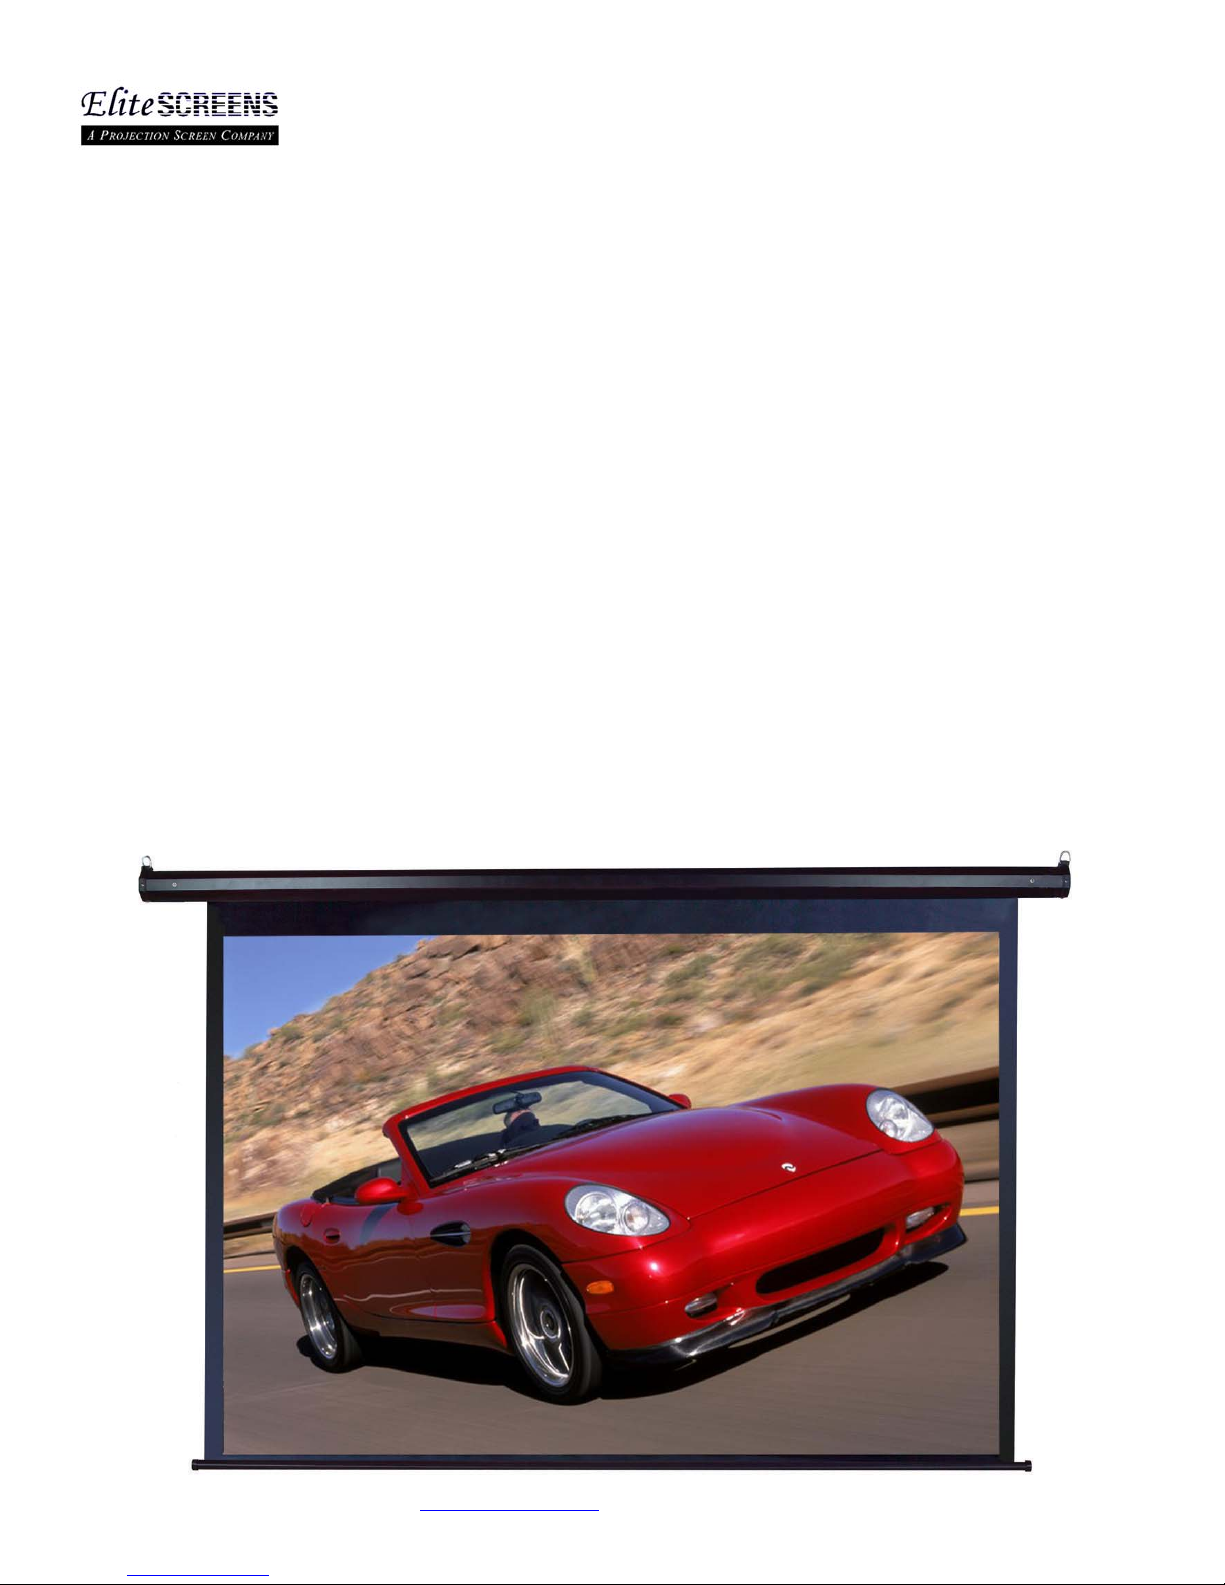
Spectrum Series / Vmax2 Series
Users Guide
www.elitescreens.com
/ eliteinfo@elitescreens.com
Page 2

Important Safety and Warning Precautions:
1. Be sure to read this manual before use and follow the procedures as specified:
Put this manual in a safe place where it can be easily obtained for future reference.
To avoid possible product damage, do not use the accessories not recommended by the manufacturer.
Handle the device carefully during transportation and installation.
Do not set up the screen on an uneven or inclined location.
Do not set any heavy objects on the power cord and arrange it properly to avoid it becoming a trip hazard.
To prevent electrical shock or fire, do not overload the power cord.
Do not allow any liquids or moisture into the electric mechanism. Never handle any electrical devices if you
are wet or in direct contact with any other water source.
2. Always disconnect the power when replacing any accessories in order to avoid risks of a short circuit or an
electric shock.
3 There are no user serviceable accessories in the device. Only an authorized Elite Screens technician is
permitted to open the product casing and work on the internal parts. Failure to do so will void the warranty.
(User Tip) Make sure that the product voltage connection is compatible with the power source outlet. The
rating label on the product indicates the voltage rating.
(Environmental Tip.) In compliance with EPA regulations, please utilize the appropriate facility when in need
of product disposal at the end of its operational lifetime.
4. Do not use this product under the following circumstances:
1) During a heavy storm, wind, rain, thunder or lightning.
2) To ensure a maximum product life, avoid direct sunshine, water or moisture.
3) Keep away from fire sources and high temperatures to prevent overheating.
4) Disconnect the power supply first before transportation or maintenance.
www.elitescreens.com
/ eliteinfo@elitescreens.com
Page 3
f
/
PRE-INSTALLATION 1
1. Position the power cord so it will not be; near any heat source or in a position to be pulled on or tripped
over.
2. To avoid suffering an electric shock, do not attempt to disassemble this appliance by yourself.
3. In the event of technical trouble, please contact Elite Screens’ service dept. for help with any technical
troubleshooting or warranty claim.
4. Please disconnect the power supply when the screen will not be in use for a prolonged period of time.
This is good general advice for any electric hardware.
Important:
To avoid possible injury and/or an electric shock, do not attempt to use the screen if there is obvious
damage or the presence of broken parts.
PRE-INSTALLATION 2
1. Carefully unpack the screen.
2. Always handle the screen in a leveled position on a clean surface.
3. In order to protect the screen from exposure to stains and other impurities, keep the screen out of contact
with foreign particles such as dirt, sawdust and liquids.
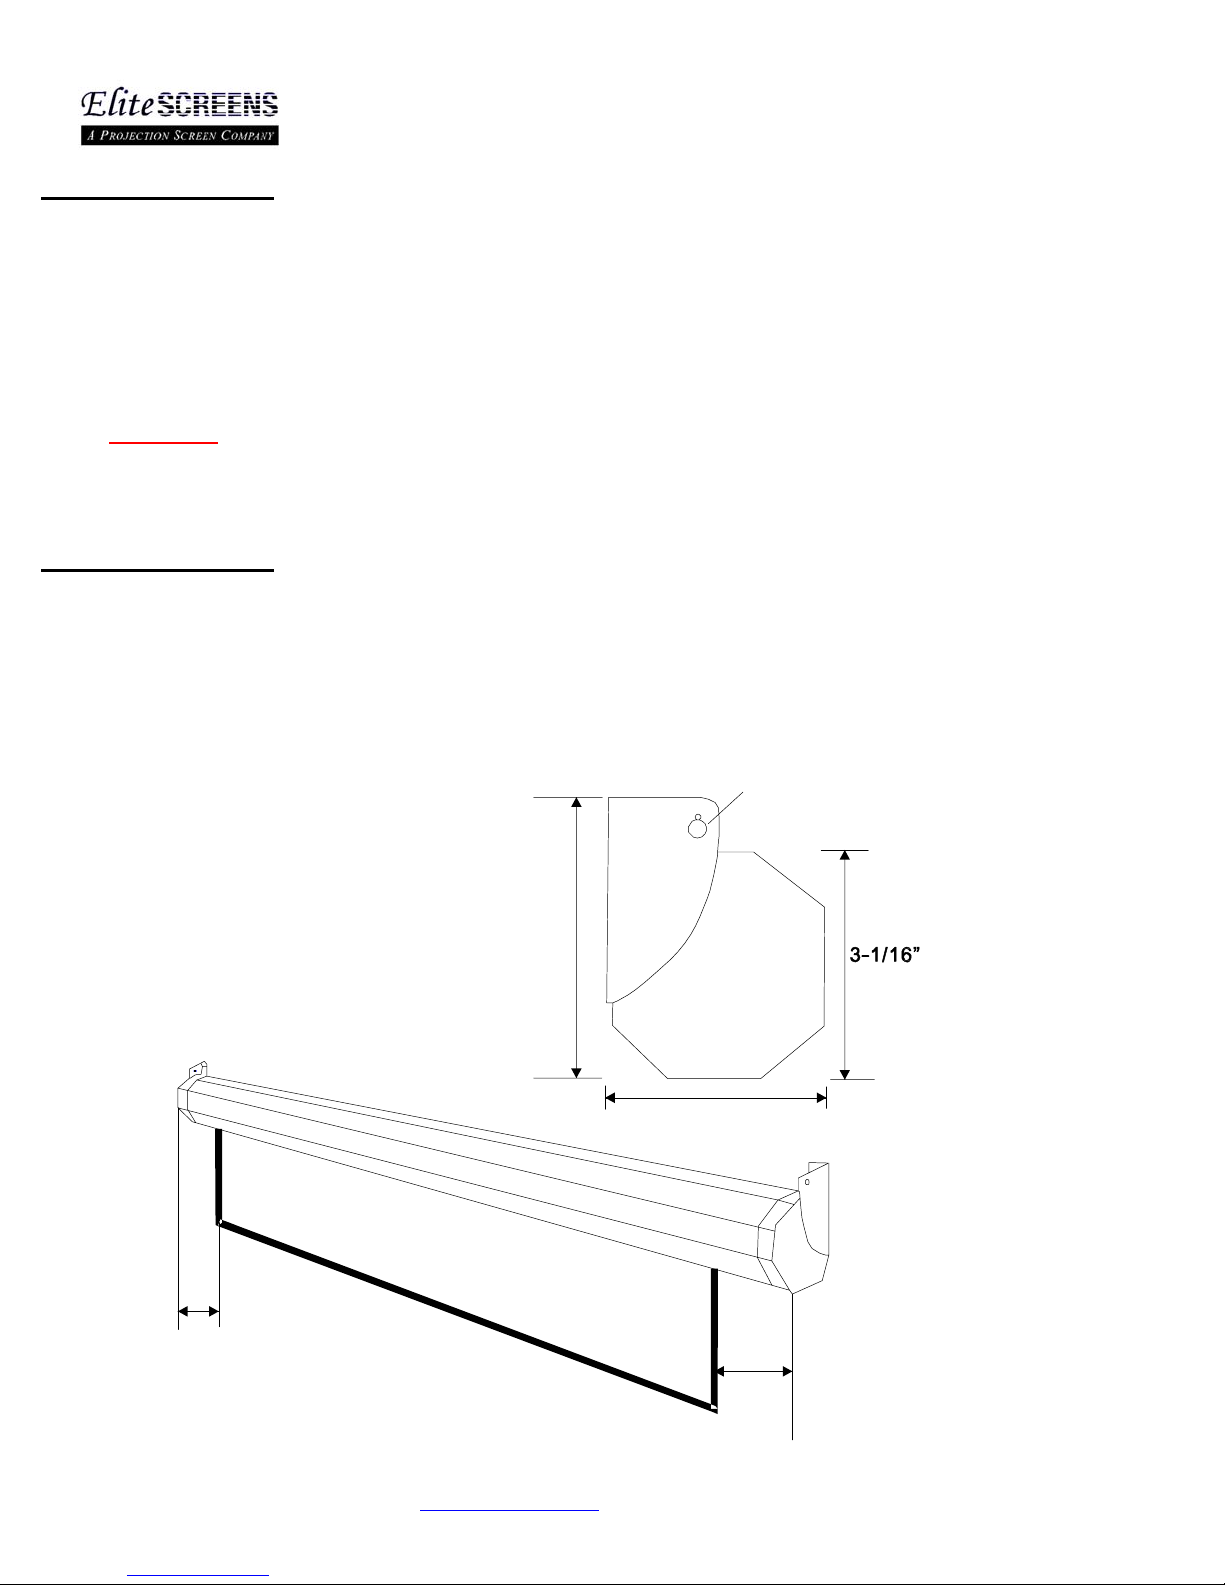
Top keyholes for ceiling
mounting(R3MM, R2MM)
Keyhole for flush mounting to
Walls (R5MM, R2MM)
3-5/8” Height o
end cap
3-1/8” Width of
end cap
4”
www.elitescreens.com
3-3
4”
/ eliteinfo@elitescreens.com
Page 4
1. Select the location for your screen so that it has access to a good power source as well as a
functioning angle and throw distance for your projector.
2.
For the best installation results, it is ideal to secure your screen into the studs of your house's
internal wooden framework. If studs are not available in your preferred point of installation, use
the hollow wall anchors for mounting your wall-screws into the drywall. If you are installing into
a concrete structure, use the concrete bolts for securing your screen into the walls. ( Note*
Always consult a professional installer or hardware store specialist for the correct
screws and bolts)
3. Make sure that the screen is perfectly level. Always use a leveling tool to ensure that the
screen runs in perfect alignment with its center of gravity.
4. Position the washers at the head of the wall-screw. The washers give added stability and
ensure that the casing is firmly anchored to the wall.
5. The screen casing is designed to accept the wall screws directly. If not using the optional L-
brackets, be sure to position the washer between the head of the wall-screw and the anchor
slots on the projector casing.
Regardless of mounting method, screens should be securely supported so that vibration oreven
abusive pulling on the viewing surface will not cause case to work loose or fall. Installers must
insure that the fasteners used are of adequate strength and suitable for the mounting surface
chosen.
www.elitescreens.com
/ eliteinfo@elitescreens.com
Page 5

1. Using a tape measure, mark the keyholes that are located at the back of the screen's case end cap.
2. After marking the area and predrilled hole, insert the screw and leave about 1/8” of an inch from the
wall to mount the screen. (Fig. 1)
Fig. 1
Optional installation using a chain to hang the screen from the ceiling.
Fig. 2.
1. You can also hang the screen on a ceiling by using a chain with s-hooks (not included) and
hang it by the two loops located on each end of the case as shown on (Fig. 2).
www.elitescreens.com
/ eliteinfo@elitescreens.com
Page 6

f
g
VMAX2/Spectrum optional accessories; The L-Brackets for Wall & Ceiling
Installation and 12-Volt Trigger for Synchronized Projector-Screen Operation
Wood/Dry Wall installation: Use wood
screws (B) Or use hollow wall anchors
(E) provided with the installation kit as
shown on Fig.1
L-Brackets
Fig. 1
Fi
Masonry/ Cement wall
installation: Use “D” bolts
provided for installing your
screen on a cement wall as
shown on Fig.2.
. 2
Top view o
L-bracket
*Once the L-brackets are in place, the screen can be hung from the vertical hooks.
Please note that these are only example illustrations and additional hardware may be
required for your particular installation. Also, the screen is generally hung directly on the
wall screws or bolts without using the optional L-brackets.
www.elitescreens.com
/ eliteinfo@elitescreens.com
Page 7

r
V
y
–
The VMAX2 and Spectrum Screens have the capability of using a 12-Volt
Trigger. This accessory is optional for Spectrum Screens and can be purchased
separately.
Connect ion pins
in side of case
To Projector
Orange
DC12V
Wall-mounted Receive
(Extension Sensor –
Optional for Spectrum
Diagram A
Wall Box with I R Remote
12-Volt Trigger Assembly
ideo Projection Interface
1. Bubble Level
a small bubble level that can be useful in determining if the
screen is perfectly level when installing.
: Included with the installation package is
Bubble Level
2. Below is the RF remote with a range of 30 Ft.
(Radio Frequency)
Optional for Spectrum
Series
Note: When you get the optional RF, you should
follow the instruction and adjust the code.
Diagram B
Infrared “E
e” Sensor with
3. Below is the IR remote (Infra Red)
With a range of 15 Ft.
(Infra Red)
Note: The light on this remote does not turn on
when the buttons are depressed unlike the RF
www.elitescreens.com
/ eliteinfo@elitescreens.com
Page 8

p
Note:
If the electric screen does not move, please check the following:
1. Check the power supply and fuse first. The screen will not move without po wer.
2. Make sure the power cord is plugged to the power outlet.
3. Check all cable connections to see any are disconnected.
4. If the screen works well with the line switch but not with the remote control, make sure that the
remote has good batteries in it.
FAQ's
1. Q: How is the Matte White or High Contrast screen material cleaned?
A: The Matte White or Elite High Contrast screen material can be cleaned with mild soap
and water.
2. Q: What type of batteries do the remote controls require?
A: The IR and RF remote controls use AAA alkaline batteries
3. Q: Can you manually pull down the screen?
A: Absolutely not, manually pulling down the screen will damage the electronic motor rolling
system.
4. Q: Can the electric screen be used in 220-volt outlets?
A: No, the screen can only be used in 110-volt outlets (common household outlet). The 220 volt
outlets are for industrial tools and machinery.
5. Q: What is the gain on the matte white screen material?
A: The matte white material has a gain of 1.1.
Note: For more U
date FAQ, please visit www.elitescreens.com
www.elitescreens.com
/ eliteinfo@elitescreens.com
Page 9

k
A
One (1) year warranty parts and labor from purchase date as follows (except for
refurbished units as specified below):
• Refurbished units carry a 90-day parts and labor warranty.
• Demo units or open box items are AS IS items and do not carry a warranty.
• Each party will be responsible for one way shipping during the warranty period.
An RMA (Return Merchandise Authorization) number must be issued in order to process a
replacement. Elite Screens will replace the DOA (Defective On Arrival) unit with a brand
new replacement *(see exceptions below) after the DOA unit is received and confirmed
defective. Elite Screens will send out a *new unit to the customer by ground service
(subject to inventory availability). Should a problem be reported after the 7-day grace
period, the item must be shipped to us for warranty repair.
• DOA (Defective On Arrival): Must be reported within 7 business days of delivery.
Missing Parts must be reported within the 7-day (DOA) grace period. If reported after 7
days, customer will be only responsible for shipping and handling fees. If reported after
30 days of receipt, customer is responsible for cost of the parts and shipping & handling
fees.
Please visit lin
below for full warrant yinformation
http://www.elitescreens.com/service.htm
Please visit link below for warrantyclaim
http://www.elitescreens.com/service_form.htm
*
new or refurbished replacementwill besent outto thecustomer depending on the
type of purchase (new or refurbished) or based on stock availability.
www.elitescreens.com
/ eliteinfo@elitescreens.com
Page 10

T
_
_ _
_ _
_ _
_ _
___
_
_
r
wo ways to register your warrantywith Elite Screens Inc.
A. On Line (Faster and Easier) www.elitescreens.com/register.html
B. Fill out & Fax to (562) 483-8498, Attn: Customer Service Dept.
*Your Name:
Address:
City/State/Zip _ _
*Email Address:
*Phone:
*Screen Model: _ _
*Serial Number:
*Date of Purchase: ____ _
*Dealer / Reseller Purchased from (name of the reseller):
What is your Projector Model :
Application: ___ Home ___ Education ____ Business Government ___ Othe
How would you rate this screen? ___ Excellent ___ Good ___ Ok ___ Improvement needed
Comments:
If you have pictures of your screen you'd like to share with us, please email your pictures to:
Or call us at 877-5 11-1211 – Sales and Marketing Div.
For any technical inquiries, please email to
techsupport@elitescreens.com or 877-511-1211 – Customer Service Div
For any warranty claim inquires, please email to
rma@elitescreens.com o r 877-511-1211 – Customer Service Div.
eliteinfo@elitescreens.com
www.elitescreens.com
/ eliteinfo@elitescreens.com
Page 11

Ver 4.0
Elite Screens - Spectrum / VMAX2 Series Dimension Table
Unit: Inches
VMAX2 Model Case L (A) Hanging L(A1)
Screen W(A2) View W(A3) Bottom Edge(B3)
Screen Material to Bottom
Bar ( B1)
View H(B2) Screen TTL H(B) Case H(C) Case W(D)
Screen Material to
Wall/Case Back(
D1)
G G1G2G3G4G5G6G7
84H 83.98 83.15 77.17 73.23 3.23 54.41 41.18 58.46 3.07 2.99 0.67 3.66 3.07 1.42 0.39 3.11 3.03 0.79 0.35
92H 91.77 90.94 83.94 80.00 3.23 54.33 45.12 58.39 3.07 2.99 0.67 3.66 3.07 1.42 0.39 3.11 3.03 0.79 0.35
100H 98.78 97.95 91.10 87.17 3.23 62.24 49.02 62.28 3.07 2.99 0.67 3.66 3.07 1.42 0.39 3.11 3.03 0.79 0.35
120H 116.38 115.55 108.54 104.61 3.23 68.03 58.82 72.09 3.07 2.99 0.67 3.66 3.07 1.42 0.39 3.11 3.03 0.79 0.35
125H 120.79 119.96 112.95 109.02 3.23 69.02 61.30 73.07 3.07 2.99 0.67 3.66 3.07 1.42 0.39 3.11 3.03 0.79 0.35
84V 77.99 77.17 71.10 67.17 3.23 63.62 50.39 57.68 3.07 2.99 0.67 3.66 3.07 1.42 0.39 3.11 3.03 0.79 0.35
100V 91.77 90.94 83.94 80.00 3.23 68.23 60.00 72.28 3.07 2.99 0.67 3.66 3.07 1.42 0.39 3.11 3.03 0.79 0.35
120V 107.80 106.97 99.92 95.98 3.23 79.21 71.97 83.27 3.07 2.99 0.67 3.66 3.07 1.42 0.39 3.11 3.03 0.79 0.35
135V 119.76 118.94 111.93 107.99 3.23 88.23 80.98 92.28 3.07 2.99 0.67 3.66 3.07 1.42 0.39 3.11 3.03 0.79 0.35
150V 131.77 130.94 123.94 120.00 3.23 97.24 90.00 101.30 3.07 2.99 0.67 3.66 3.07 1.42 0.39 3.11 3.03 0.79 0.35
113S 91.77 90.94 83.86 79.92 3.23 86.14 79.92 90.28 3.07 2.99 0.67 3.66 3.07 1.42 0.39 3.11 3.03 0.79 0.35
136S 106.77 105.94 100.12 96.18 3.23 102.40 96.18 118.27 3.07 2.99 0.67 3.66 3.07 1.42 0.39 3.11 3.03 0.79 0.35
153S 119.76 118.94 112.13 108.19 3.23 114.41 108.19 118.54 3.07 2.99 0.67 3.66 3.07 1.42 0.39 3.11 3.03 0.79 0.35
www.elitescreens.com 1
Page 12

4/23/2007
Elite Electric/Motorized Screen Feature Comparision Table
Feature / Elite Screens Series Spectrum VMAX VMAX Plus VMAX2 VMAX2 Plus Home Home2 CineTension CineTension2 Home3 CineTension3
IR ( Infrared) Remote Control
●● ● ● ● ●● ● ● ● ●
RF (Radio Frequency) Remote Control
Optional
●●● ● ●● ● ● ●
Low-Voltage 3-Way Wall Switch with ( RJ45 Connection)
Optional
N/A N/A
●●●● ●●●
Black Eye - Extended IR Receiver ( RJ45 connection )
Optional N/A N/A
●●
N/A
●
N/A
●●●
Internal IR & RF Receiver ( Eliminates Hanging Receiver Beside Screen)
●
External 3-Way
Wall Box
Receiver
External 3-Way
Wall Box
Receiver
● ●
External 3-Way
Wall Box
Receiver
●
External 3-Way
Wall Box
Receiver
●●●
Elite Screens IR Universal Learning Remote Control ( Multi-Media Control
for Screen, Projector, TV, DVD…. Etc.)
Optional N/A N/A Optional Optional Optional Optional Optional Optional
●●
Built-In 12V Trigger ( RJ 45 Connection), synchronizes screen drop/rise
with the projector's power cycle
●
N/A N/A
● ●
Optional
External Adapter
●
Optional External
Adapter
●●●
12V Trigger Adaptor ( with RJ45 Connection)
●
N/A N/A
●●
N/A
●
N/A
●●●
Aluminum Casing with Sliding Installation Brackets
N/A N/A N/A N/A N/A
●● ● ● ● ●
Fiber Glass-Backed Screen Material ( Fiber glass backing provides a flatter
projection surface for higher end projectors)
N/A N/A N/A N/A N/A
●●
N/A N/A
●
N/A
3-Types of tension screen materials; CineGray, CineWhite and PowerGain
N/A N/A N/A N/A N/A N/A N/A N/A
●
N/A
●
Two Year Warranty for ProAV and CEDIA Channels ( Requires Custom
Installer Pre-Register )
Optional Optional Optional Optional Optional N/A Optional Optional Optional
●●
Synchronized Motor ( Quiet, Slower & Power Efficient)
●●
N/A
●
N/A N/A N/A N/A N/A N/A N/A
Tubular Motor (Faster operation with a higher weight threshold)
N/A N/A
●
N/A
●●●● ●●●
Screen Size Available for immediate orders
84"-125" 84"-180" 180"-235" 84" - 180"
180"-235" /
Custom Size
75"- 200" 75"- 200" 84"-135" 84"-150" 75"- 200" 84"-150"
Aspect Ratios (Formats) Available
4:3 / 16:9 1:1 / 4:3 / 16:9 1:1 / 4:3 / 16:9 1:1 / 4:3 / 16:9 1:1 / 4:3 / 16:9 1:1 / 4:3 / 16:9 1:1 / 4:3 / 16:9 4:3 / 16:9 4:3 / 16:9 1:1 / 4:3 / 16:9 4:3 / 16:9
Channels
.com / Retailer
/ Dist.
.com / Retailer /
Dist.
Installer
Dist. / Retailer /
Installer
Installer Installer Installer / Dist. Installer Installer / Dist.
Custom Install
Only
Custom Install
Only
Self-Installation
Easy Easy Installer Needed Easy Installer Needed Easy Installer Prefer Easy Installer Prefer Installer Needed Installer Needed
Available Screen Material Types
PearlWhite
PearlWhite,
SilverGrey
PearlWhite Matte White Matte White Matte White Matte White
CineWhite,
CineGrey,
PowerGain
CineWhite,
CineGrey,
PowerGain
Matte White
CineWhite,
CineGrey,
PowerGain
MSRP Price Range
$249 - $389 $369 - $739 $1159 - $1999 $399 - $949 $1159 - $1999 $789 - $1699 $789 - $1699 $789 - $1699 $789 - $1699 $789 - $1699 $799 - $1999
Availability
In Stock In Stock In Stock In Stock In Stock In Stock May . 2007 In Stock In Stock May. 2007 In Stock
● Standard ( Included)
Optional : Not Included, but Optional to Purchase
N/A: Not Included and No Optional to Purchase
Picture of Universal Remote Control
(
Model: ZR800D
)
Picture of Spectrum, VMAX (2) (Plus) in White Case Picture of Home (2,3) Series Picture of CineTension (2,3
)
Ver 4.1 www.elitescreens.com 1
 Loading...