


EMS OPERATION AND INSTALL A T I O N M A N U A L
Energy Management System Operation
and Installation Manual
Elite Power Solutions 21411 N. 11th Ave, Suite 3 Phoenix, AZ 85027
www.elitepowersolutions.com

EMSOPERATION AND INST A L L A T I O N M A N U A L
Table of Contents
1 Introduction ______________________________________________________ 1
2. Packing List _______________________________________________________ 3
3. Specifications _____________________________________________________ 4
4. Installation _______________________________________________________ 6
Heartbeat LED ____________________________________________________________ 7
Isolated Battery & Shunt Connections _________________________________________ 7
12v Car Battery ___________________________________________________________ 8
Page Select Switch Input____________________________________________________ 8
Sense Board Wiring ________________________________________________________ 9
Making your own cables ___________________________________________________ 12
Video Output ____________________________________________________________ 13
5. Programming ____________________________________________________ 14
6. Usage __________________________________________________________ 15
Video Display ___________________________________________________________ 16
Home Page _____________________________________________________________________ 16
Detail Page _____________________________________________________________________ 19
Alarms and Warnings _____________________________________________________ 20
Controlling Other Devices with Alarm Outputs _________________________________ 21
Battery Balancing ________________________________________________________ 22
7. Capacity Algorithm ________________________________________________ 23
8. CAN Interface ____________________________________________________ 24

EMSOPERATION AND INST A L L A T I O N M A N U A L
9. Trouble Shooting _________________________________________________ 26
Appendix A. Enclosure Mounting ______________________________________ 28
Warning! Read ALL of the instructions before attempting
installation. All connections should be made when the system is
OFF. No connections of energized wires should be made.
Revised 3/3/11

EMS OPERATION AND INSTALLATION MANUAL
Section
1
T
1 Introduction
NOTE: It is important that you read this manual before
installing or operating any of these components.
Thank you for purchasing Elite Power Solutions Energy Management System
(EMS). This manual covers operating and installation information for the Elite
Power Solutions Energy Management System.
he EMS system has everything needed to display the condition and maintain
the health of your lithium batteries. It consists of two major components, the
computer and the cell sense boards. The computer will tell you many things
about the condition of your batteries. It will tell you overview information like the
battery state-of-charge, battery current, battery voltage as well as the voltage and
temperature of individual cells.. The cell sense boards mount on each individual cell
to read voltage and temperature. They also have a battery balancing circuit to
equalize the charge of all the cells in a battery pack. There are programmable outputs
from the computer for battery over voltage and battery under voltage interlocks.
These can be used to control other systems in the vehicle such as battery chargers
and motor controllers. In addition, there are warnings to let you know that error
conditions are approaching.
One of the important safety features of the EMS is ground fault detection. When an
inadvertent connection is made between the battery pack and the vehicle chassis, it
is detected and a warning is shown on the screen.
The EMS is designed so that the battery monitoring is completely isolated from the
regular vehicle 12V system. The EMS is powered by a powerful, 8 core 32-bit
- 1 -

EMS OPERATION AND INSTALLATION MANUAL
microprocessor that is capable of outputting composite video. A CAN interface
option is available to display the EMS information on a CAN display. Many options in
the EMS are programmable and can be customized for your car.
- 2 -

EMS OPERATION AND INSTALLATION MANUAL
Section
2
2. Packing List
1x – EMS Computer
1x – Composite video cable
1 per cell - Battery Sense Boards
Wiring Harness(es)
1x- Current Shunt
1x – Installation Guide & User’s Manual
Note: The number of battery sense boards and the wiring harness
vary based on the number of cells in your system.
- 3 -

4
Section
3
EMS OPERATION AND INSTALLATION M A N U A L
3. Specifications
Items Displayed............................Voltage, Current, Battery Capacity (Main Screen)
Cell number, cell voltage, cell temperature (Detail
Screen)
Computer Power…………….......8 - 20V, 20mA or 8 - 85V as an option
Battery Voltage…………..…......36-500V
Shunt Input…………..………….500A = 50mV
Voltage Resolution………………0.01V
Current Resolution ………………1A
Temperature Measurement Range -99°F to +199°F or -146°C to +92°C
Battery Types Supported…...……Lithium Iron Manganese Phosphate
Video Output…………………....Composite Video, Color, NTSC
RS-170
Programming Port………….........Asynchronous Serial, TTL levels,
Measurement accuracy………….. Better than 1%
115200, n, 8, 1

5
EMS OPERATION AND INSTALLATION M A N U A L
Measurement speed …………….. Voltage and current 3 times per second main screen
Voltage and Temperature 1 time per second detail screens
Number of cells supported ………128
Cell Voltage………………………2.5 to 4.5
Balancing Threshold ……………..3.6V
Balancing Current ………………..0.5A
Digital Output Current……………200mA
Output Delay (default)……………30 seconds
Optional Display Interface……….CAN
Connection Fault Detection ………2mA (5000 Ohm/Volt)
6
Section
4
T
EMS OPERATION AND INSTALLATION M A N U A L
4. Installation
ALWAYS USE HIGH CAUTION WHEN WORKING ON AN
ELECTRIC VEHICLE. ALWAYS DISABLE THE CIRCUIT BREAKER
WHEN THE ENGINE BAY IS OPEN (THIS WILL HELP MINIMIZE
RISK OF SHOCK). ALWAYS TAKE NOTE WHERE THE HIGH
VOLTAGE LINES ARE.
he Elite Power Solutions EMS is designed to make installation easy. All of the
connections to it are made with convenient pluggable ¼” quick disconnect terminals.
The EMS computer should be installed as close to the shunt as possible. The shunt
sense wires should be less than 1’ long and twisted around each other. Mounting holes
for the computer box are shown in Appendix A. After the installation is complete, you
must completely charge the car before the capacity will read correctly (see Section 7.
Capacity Algorithm for more details).
On models equipped with Connection Fault Detection, it is important that the screw with
the chassis wire be attached to the metal chassis of the car. This will enable the
Connection Fault Detection to work properly.
7
EMS OPERATION AND INSTALLATION M A N U A L
Heartbeat LED
When the EMS is correctly connected to 12V, the heartbeat indicator will blink about once
per second.
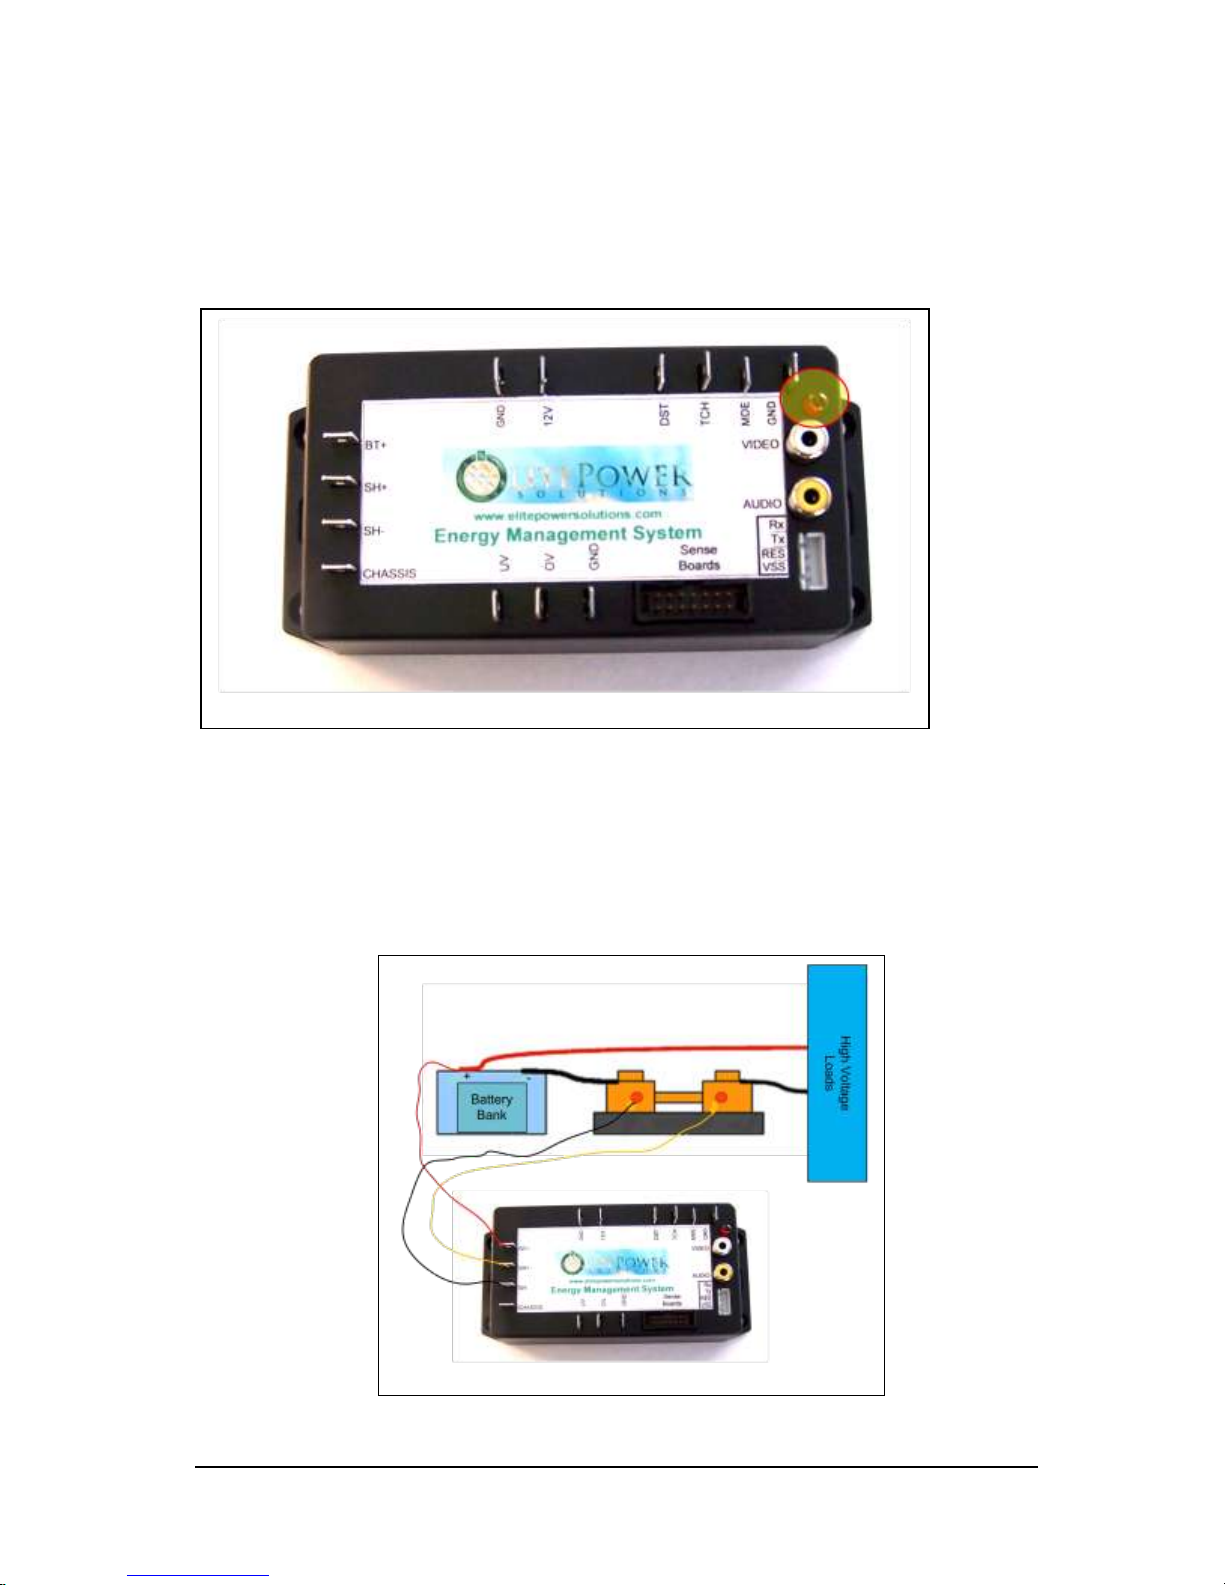
Isolated Battery & Shunt Connections
The Terminals on the left side of the computer are used for making the High-Voltage and
shunt connections. Refer to the figure below for these connections. The connections
between the battery bank, shunt and high voltage loads are usually large wire like 2/0.
The connections to the EMS from the battery and the shunt can be smaller gauge like 18
or 20.
High Voltage Connections

8
Page Select Pins
EMS OPERATION AND INSTALLATION M A N U A L
12v Vehicle Battery
The 12V supply to the computer is connected on terminals on the top and left of the
computer as shown below. This connection should be made through a fused circuit to an
always-on point in the 12V system. If the computer looses 12V power then the capacity
will reset to 99% (see Section 7. Capacity Algorithm for further details). When 12V power
is applied, the red “Heartbeat” LED will blink.
12V Connections
Page Select Switch Input
In order to display the voltage and temperature of the individual batteries, a switch to
select the appropriate display page is needed. This can be any normally open momentary
switch. The switch is connected to the mode (MDE) and ground (GND) pins as shown
below. There is no polarity on the switch. You may use small wire (18 or 20 gauge) for the
switch connections.

9
EMS OPERATION AND INSTALLATION M A N U A L
Sense Board Wiring
The sense boards are connected to the computer via a 14 conductor ribbon cable.
There are 2 types of ribbon cables: a cable with a 6 foot end for connecting the
computer to the first 8 batteries and an “extension” cable for connecting subsequent
groups of 8. The ribbon cable plugs into the computer as shown below:
The ribbon cable connector has a key to prevent it from being plugged in the wrong
way. When correctly inserted, the cable will go towards the edge of the box.
The summary screen will show how many sense boards are connected. You can
connect the sense boards one at a time while the system is powered up to verify that
they are working. The sense board that is plugged into the connector closest to the
computer is number 1, as they go down the line to the end away from the computer,
they increment. As an aid to trouble shooting, it may be useful in a system with
many cells to write the ID number on each battery cell. Should the summary screen
show less than the full number of cells, you can locate the problem by going to the
last cell registering on the screen or the next higher number up.

10
EMS OPERATION AND INSTALLATION M A N U A L
Before installing the first sense board, plug in the ribbon cable and then bring the
cable under the board, then attach it to the cell. You can have cell number 1 be
either the most positive or the most negative cell. Be sure to note pin 1 on the
board, it needs to be plugged into pin 1 on the ribbon cable (denoted with the stripe).
The first board will look like this when it is plugged in and attached to the first cell:
It will not harm the board to connect it backwards, however it will not work. When
the board is installed correctly, the green light will light up. There is also a red LED
which indicates that the board is balancing. Normally, this LED will not light. It will
come on when the voltage is above 3.6V.
The sense boards, like the cells they attach to, alternate + and – for the series
connection. The ribbon cable is set up to go underneath the boards and alternately
have the stripe of the ribbon cable on the side of pin 1 and pin 14.

11
EMS OPERATION AND INSTALLATION M A N U A L
The extension cable should be connected like this:

12
EMS OPERATION AND INSTALLATION M A N U A L
Making your own cables
Should the need arise to make your own cables, you can do so easily. You will need
to procure 14 Pin Ribbon Cable, 14 pin connectors, and 14 pin headers (for the
extension cables). You can buy them from us or most good electronics distributors.
You cut the cable to the desired length, locate the connectors where you want them,
and crimp the connectors with a small bench vise or a crimping tool for that purpose.
If you are making your own cables, you can make 1 cable to run the entire length of
your project, you need not use extension cables.
There is a signal that goes in and out of the sense boards. It is important to cut these
wires on every other connector to prevent the signals from interfering with each
other. Here is what the input and extension cables look like:

13
EMS OPERATION AND INSTALLATION M A N U A L
Video Output
The composite video output of the computer is accessed through the connector shown
below, labeled “Video”. This can be fed to any composite video display including many indash DVD players. With many models you can even feed the composite video to the backup camera input. You can then add a switch to tell the receiver whether to display the
computer (receiver thinks it’s the back-up camera) or just the normal receiver display. If
you need to reconnect the video coax cable to J3 then the outer shield wire is connected
to the 12V Ground and the center wire is connected to VIDEO.

14
Section
5
EMS OPERATION AND INSTALLATION M A N U A L
5. Programming
Many parameters in the system can be programmed. Please use this form to tell us how
to program your EMS computer.
Contact Name _________________________ Phone ___________________
Email ________________________________ Date ____________________
Over Voltage Alarm ___________________ Under Voltage Alarm _______
Over Current Alarm ___________________ Over Temp Alarm _________
Battery Capacity (AH) __________________ Centigrade/Fahrenheit _____
Main Screen Title _______________________________________________
Other Parameters ______________________________________________
_____________________________________________________________
Comments ____________________________________________________
______________________________________________________________

15
Section
6
Main Screen
EMS OPERATION AND INSTALLATION M A N U A L
6. Usage
When properly installed, the EMS shows the status (Voltage, Current, and Battery
Capacity) of your Electric Vehicle. Here is an example of what you see on the display.

16
EMS OPERATION AND INSTALLATION M A N U A L
Video Display
The EMS has at least two pages of information it can display. The first is a summary
page which has information for the entire system and then one or more detail pages.
The detail page shows voltage and temperature for each cell. The number of detail
pages is determined by the number of cells. Twenty cells are displayed per page.
Home Page
Battery Voltage is the total voltage of the battery system. This value is updated in
real time. When something happens that changes the battery voltage,
like accelerating the car, this value changes immediately. The voltage
is displayed as a bar graph from 2.8V x the number of cells to 3.6V x
the number of cells. The voltage is also displayed as a number which

17
EMS OPERATION AND INSTALLATION M A N U A L
gives a precise reading. The graph is green when the voltage is above
3.0V per of maximum, and it changes to red when it is below. If the
voltage goes outside the range of the graph, a warning (off scale high
or off scale low) will show instead of a bar.
Battery Current is the total current being drawn from or put into the battery system.
It is updated in real time, just like the battery voltage. The voltage is
displayed as a bar graph from 0 to the maximum expected value and a
number which gives a precise reading. The graph is green when the
current is below 40% of maximum, and it changes to red when it is
above. When the battery is being charged, the graph changes to white
and the notation “(charging)” appears. When charging, the scale also
changes.
Battery Capacity is the state of charge of the battery (0 to 100%). It works by
counting the amount of energy drawn from and put into the battery.
It also uses voltage as a “sanity” check. If the battery is being charged,
and the voltage goes above 3.7V x the number of cells, the display will
automatically show 100%. Similarly, if the battery voltage falls to 2.5V
x the number of cells then the display will show 0%. When the system
is powered up for the first time it will show 100%. The graph bar is
green when there is more than 50% of battery capacity available, and
red when it is below 50%.
Number of Cells is the number of sense boards the computer finds. It is updated
once every few seconds. This is useful for when connecting the sense
boards during installation. As the sense boards are connected, the
number will increase.
Minimum Cell Voltage is the minimum of the readings of the individual cell voltages.
This value is updated after each scan of the individual cells, every 1-2
seconds.

18
EMS OPERATION AND INSTALLATION M A N U A L
Maximum Cell Voltage is the maximum of the readings of the individual cell voltages.
This value is updated after each scan of the individual cells, every 1-2
seconds.
Maximum Cell Temperature is the maximum of the readings of the individual cell
temperatures. This value is updated after each scan of the individual
cells, every 1-2 seconds. The Letter F or C indicates whether the
temperature is in Fahrenheit or centigrade.
Version Number is the software release number. This number is changed whenever
there is a change in the software release.
Alarms and Warnings are displayed below the cell voltages and temperature when
an alarm or warning condition occurs. There are 5 alarms and
warnings: over voltage, under voltage, over current, over temperature
and connection ground fault. They are described in more detail below.

19
EMS OPERATION AND INSTALLATION M A N U A L
Detail Page
The data for up to 20 cells is displayed on each page as two columns of up to 10.
Cell number is the ID number of the cell. The ID numbers start with the cell
connected closest to the computer.
Cell Voltage is the actual voltage on each cell. This value is updated every 1-2
seconds. The number is shown in green if it is above 2.5V and below
3.7V. If it is outside this range, it changes to red.
Cell Temperature is the actual temperature of each cell. If it is less than a set point
value, it is shown in green otherwise it is shown in red. The
temperatures are normally shown in Fahrenheit, but it may be set to
Centigrade. The temperatures are in the same units as on the
summary page. The set point for the numbers to change from green
to red is normally 150F.

20
EMS OPERATION AND INSTALLATION M A N U A L
Alarms and Warnings
To protect the battery pack, there are a number of alarms and warnings. These are based
on Voltage, Current, Temperature and connection ground fault. As one or more of these
parameters go out of spec, a warning will first appear on the screen. If the parameter
goes more out of spec, an alarm indication will appear on the screen and an output will be
activated.
The set points can be programmed at the factory. The defaults for those set points are as
follows:
OC Over Current 800A
OT Over Temperature 150F
OV Over Voltage 3.7V
UV Under Voltage 2.5V
The connection ground fault alarm is activated when a connection between the battery
pack and the chassis is detected.

21
EMS OPERATION AND INSTALLATION M A N U A L
Controlling Other Devices with Alarm Outputs
There are 2 outputs available on the EMS for controlling other devices. These
outputs will supply up to 200 mA to drive a relay. In this way, these outputs can
signal an alarm when there is an error condition or have the voltage go away when
there is an error condition. When power is removed from the EMS computer, the
outputs will not supply power.
These outputs can directly drive relays without a suppression diode.
There are two error outputs: Over Voltage and Under Voltage. These outputs have a
time delay so that the condition causing the error must be present for 30 seconds for
the output to activate, and absent for 30 seconds for the output to de-activate.
Over Voltage is active when the pack voltage is too high. It is typically used to turn
off a charger when the battery is charged.
Under voltage is active when the pack voltage is too low. It is typically used to turn
off a motor controller when the battery is discharged.
The other error conditions of Over Current and Over Temperature will cause both the
Over Voltage and Under Voltage outputs to become active after the 30 second delay.

22
EMS OPERATION AND INSTALLATION M A N U A L
The alarm outputs are located as shown below:
Battery Balancing
When the cell voltage rises above a predetermined threshold (see specifications for
this value), a small current is drawn from it. This will bring all the batteries in the
pack to the same level of charge. When the balancing function is active, the red light
will come on.

23
Section
7
EMS OPERATION AND INSTALLATION M A N U A L
7. Capacity Algorithm
The EMS keeps track of the capacity of the battery bank by tracking the current in and out
of the battery (integrating the current over time). However, there are corrections to the
calculation to allow for a more accurate reading over time. Because the EMS is keeping
track of all current in or out of the battery, it must powered at all times. When the EMS
first powers up, it sets the capacity to 50% so it will not read correctly until after the first
complete charge. Subsequent charges must reach a voltage of 3.7V per Cell volts in order
to reset the EMS Display to full charge. If the battery voltage falls below 2.5V per cell, the
capacity reads as zero. These values can be changed by EPS (see chapter 5 Programming).
The cell capacity (Amp Hours) must be programmed
to the right value for the capacity algorithm to work
properly.

24
Section
8
EMS OPERATION AND INSTALLATION M A N U A L
8. CAN Interface
A CAN BUS interface is available as an option for the EMS computer. The CAN BUS Interface
transmits all the summary information on the main page, alarm status, and the information
on the detail page about the sense boards continuously over the BUS, so that a display device
can present the data in graphical form. The video output is also operational, so that the data
can be verified. Elite Power Solutions also offers a version of the computer with the data
acquisition section removed to be used as a remote display.
The CAN BUS is electrically isolated from 12V to reduce interference in the data transfer from
chargers and motor controllers.
You can identify whether this option is installed by the presence of the CAN BUS connector
on the side of the computer:
The green terminal block can be unplugged for easy wiring. Simply insert wires into
the terminal block and tighten the screws.

25
EMS OPERATION AND INSTALLATION M A N U A L
The signals available on the interface are as follows:
12V the 12V input
CAN H the normally high CAN signal in the differential pair
CAN L the normally low CAN signal in the differential pair
GND isolated ground
NC make no connection to this pin
The typical connection to another CAN device, or to the CAN bus will be only CAN H,
CAN L and GND. This connection is best made with a shielded 2 conductor cable. The
shield is connected to GND. This cable is typically 22ga.
There are two status indicators to indicate traffic on the BUS, RX (received data), on
the right and TX (transmitted data), on the left. The blinking lights indicate that data
traffic is present. If they are always on or always off, there is a fault on the bus.
The CAN interface uses a subset of the “Open CAN” protocol. Full details of the data
transfer are available on request from us. Other protocols are also supported; please
contact us for more information.

26
Section
9
EMS OPERATION AND INSTALLATION M A N U A L
9. Trouble Shooting
When the system does not work we suggest that you check the items below:
The red light does not blink Check 12V connection
No Video Check that the video output is present with
another monitor
Check video cable is fully plugged in
Sense Boards not detected Check wiring
Check first board and verify green light on,
if not, check board is oriented on battery
correctly or board is defective
Incorrect number of boards Check wiring
detected Check first not working board and verify green
light on, if not, check board oriented on battery
correctly or board is defective
board showing -225 degrees Temperature sensor on bottom of board broken
Not reading pack voltage Check battery + and – wiring
Check Bat+ is fully plugged in

27
EMS OPERATION AND INSTALLATION M A N U A L
Not reading pack current Check battery + and – wiring
Check wiring to shunt, may be reversed
Check shunt + is fully plugged in
Current display wrong polarity Shunt wires reversed
“Snow” on video display Check grounding on monitor

28
EMS OPERATION AND INSTALLATION M A N U A L
Appendix A. Enclosure Mounting
 Loading...