

Page 1
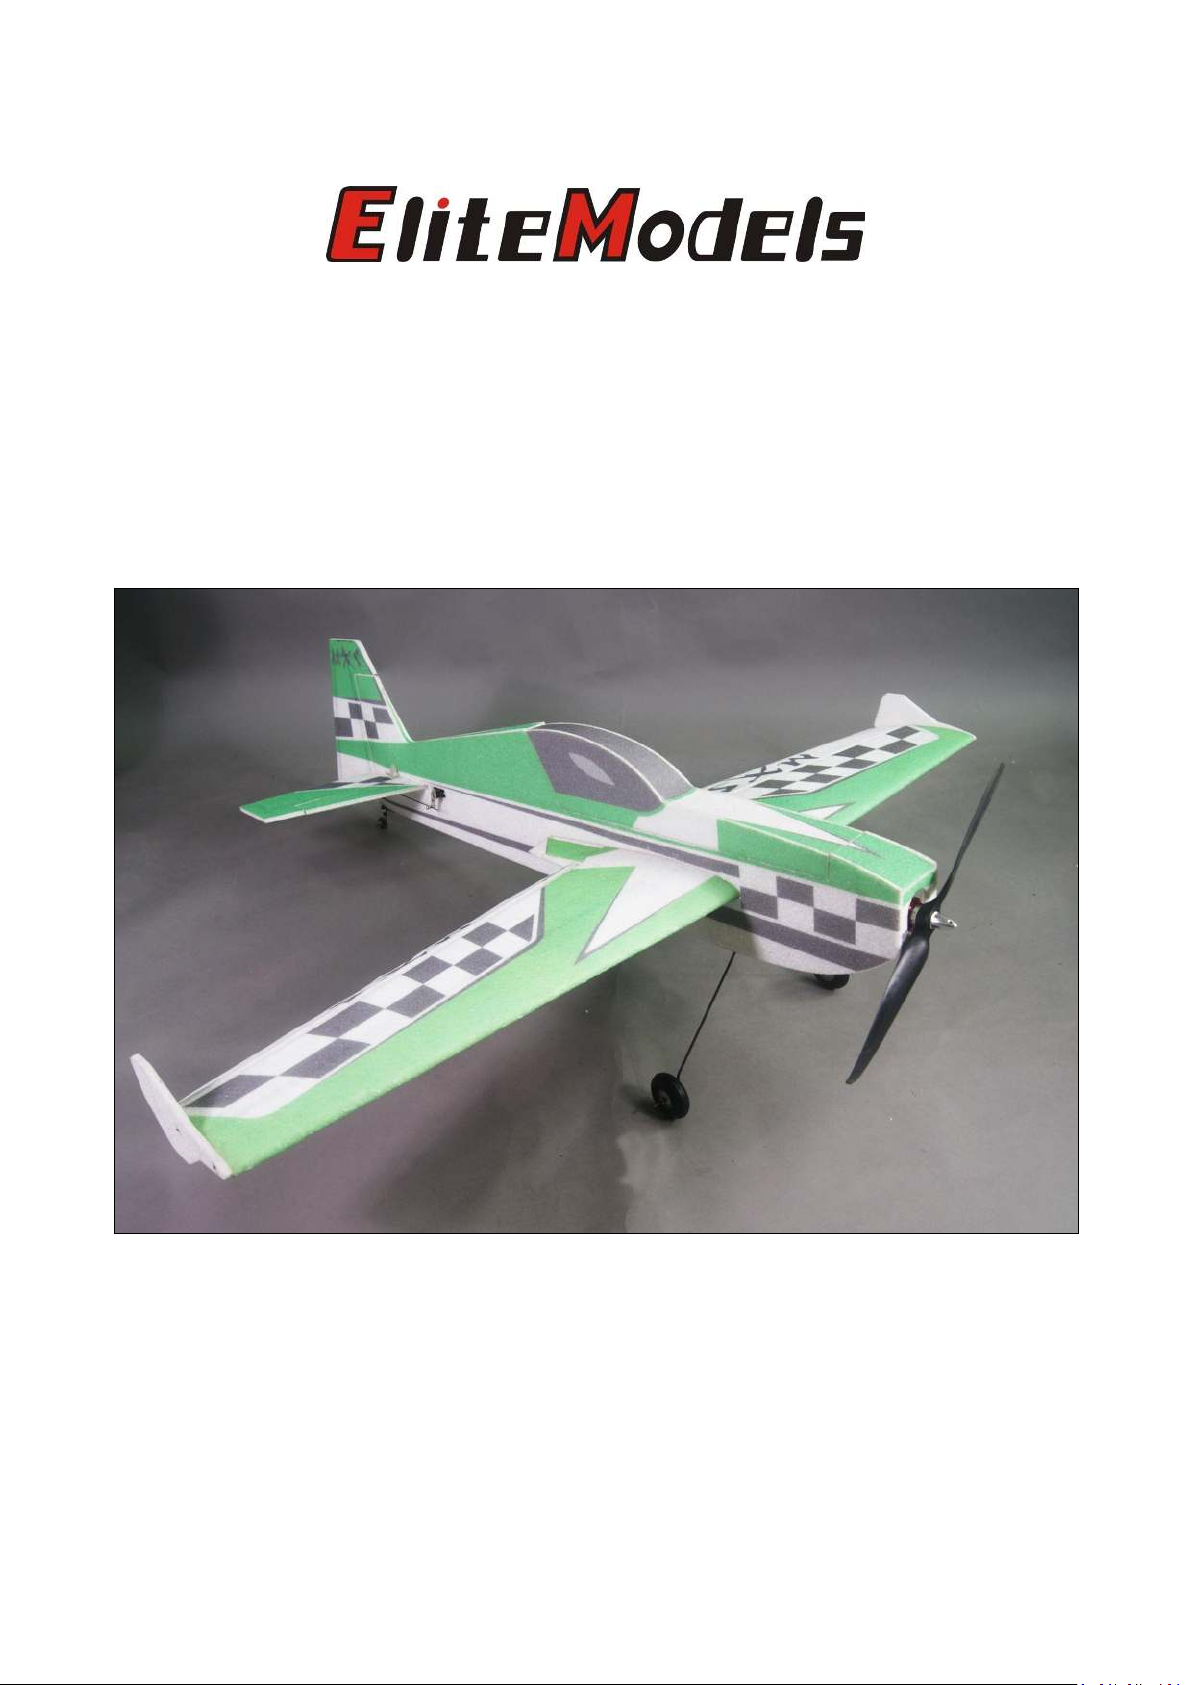
48in EPP MXS
Almost‐Ready‐to‐Fly
INSTRUCITION MANUAL
Specifications
Wingspan: 48 in (1230mm)
Length: 46in (1170mm)
Wing Area: 471sq in (30.4sq dm)
Flying Weight: 1.8-2.0lb (800-900g)
Page 2

www.valuehobby.com/48in-mxs-epp.html
Dear Customer,
Congratulations on your purchase of 48in EPP MXS ARF from Value Hobby. We thank you for your generous
support, and hope you enjoy your new airplane.
At Value Hobby, we hope to offer competitive prices, good performance, and products that you can setup and
use with ease. That’s why we extensively researched and tested this airplane, and suggested all the products
necessary for you to setup properly. We understand that you have many choices when purchasing, and we are
grateful you choose to buy from us.
As vendors, one of the most gratifying things for us is to hear from our customers. We would welcome any
suggestion to help us improve. Please make us aware of any errors and imperfections in the airplane or the
instructions, or about the setup that we suggested. We hope you’ll find our setup suggestions to be helpful, and
enjoy flying your new airplane. Please feel free to contact us at (630) 948‐0947 or email us at
Disclaimer
By purchasing and/or building this model, user assumes ALL liability and risk involved with this product. This
model should be built and flown by an experienced pilot and only flown at AMA sanctioned sites.
Value Hobby guarantees this model to be free of defects in materials and workmanship at the date of purchase.
This warranty does not cover any parts damaged by use or modifications. In no way shall Value Hobby’s liability
exceed the original cost of the purchased model. Further, Value Hobby reserves the right to modify this
warranty without notice. Value Hobby has no control over the final stages of assembly or the material used for
the final assembly. No liability shall be assumed nor materials used for the final user‐assembled product. By the
act of using the final product the user accepts all resulting liability. Value Hobby, as a R/C product vendor,
provides a top quality airplane and instructions to complete the model. The quality and flight characteristics of
the finished model depend greatly on how it is built; we cannot guarantee the performance for the completed
model and representations are expressed or implied as to the performance of the completed model. If the buyer
is not prepared to accept the liability associated with the use of this product, the buyer is advised to return this
kit immediately, in new and unused condition.
Safety in Assembly
During assembly of this aircraft, you will be asked to use sharp knives and hobby adhesives. Please follow all
safety procedures recommended by the manufacturers of the products you use, and always follow these
important guidelines:
ALWAYS protect your eyes when working with adhesives, knives, or tools, especially power tools. Safety
glasses are the best way to protect your eyes.
ALWAYS protect your body, especially your hands and fingers when using adhesives, knives, or tools, especially
power tools. Do not cut toward exposed skin with hobby knives. Do not place hobby knives on tables or benches
where they can roll off or be knocked off.
ALWAYS have a first‐aid kit handy when working with adhesives, knives, or tools, especially power
tools. ALWAYS keep hobby equipment and supplies out of the reach of children.
Page 3

www.valuehobby.com/48in-mxs-epp.html
Safety in Flying
This is NOT a toy! It is a very high‐performance RC airplane capable of high speeds and extreme maneuvers. It
should only be operated by a competent pilot in a safe area with proper supervision.
ONLY fly your aircraft in a safe, open area, away from spectators and vehicles–and where it is legal to
fly. NEVER fly over an unsafe area, such as a road or street.
Never fly too close to yourself or spectators.
Never run your motor inside a house or building with the propeller attached – Remove the prop for safety.
Required Items
CA Glue – Thin and Thick
Epoxy glue
Hobby Knife
Small Phillips Screwdriver
Set Metric Allen Wrenches
Scissors
Small Pliers
Wire Cutters
Masking tape
Before Starting Assembly
Examination
Unpack your airplane and examine the components. Check for damage of any kind. If you see any
damage, please contact Value Hobby immediately.
Page 4

www.valuehobby.com/48in-mxs-epp.html
Product
SKU
Quantity
Radio
Flysky I6 6CH transmitter and receiver set
FLY-RC-4572
1
Servo
Towerpro MG90s metal gear micro servo
TWP-SV-0358
4
Servo Extension
Universal (Futaba/JR) Servo Extension 26AWG 12in
AMS-AC-0560
2
Y-Harness
Universal (Futaba/JR) Servo Y-Harness 26AWG 6in
AMS-AC-2397
1
Product
SKU
Motor
GForce G15 3542-1100KV brushless motor
LEO-MT-3463
ESC
Hobbywing SkyWalker-50A ESC w/ 3A BEC
HWG-SC-3537
Battery
GForce Elite Series 30C 2200mAh 3S 11.1V LiPO
FLM-LP-1874
Prop
12 x 6 E prop
VHB-MP-3757
Product
SKU
Charger
GT Power C6 6S LiPO Charger
GTP-CH-1427
Thin CA Glue
Quickie Thin CA
VHB-AC-2097
Foam Glue
Thin Safe Foam Glue
VHB-AC-2511
Watt Meter
130A Watt Meter and Power Analyzer
GTP-AC-0591
Connector
T Connector Female
AMS-AC-1914
T Connector Male
AMS-AC-1913
LiPO Bag
LiPO Charging Bag
RFI-AC-2725
RECOMMENDED RADIO EQUIPMENT
RECOMMENDED POWER SETUP
OPTIONAL ACCESSORIES:
Page 5
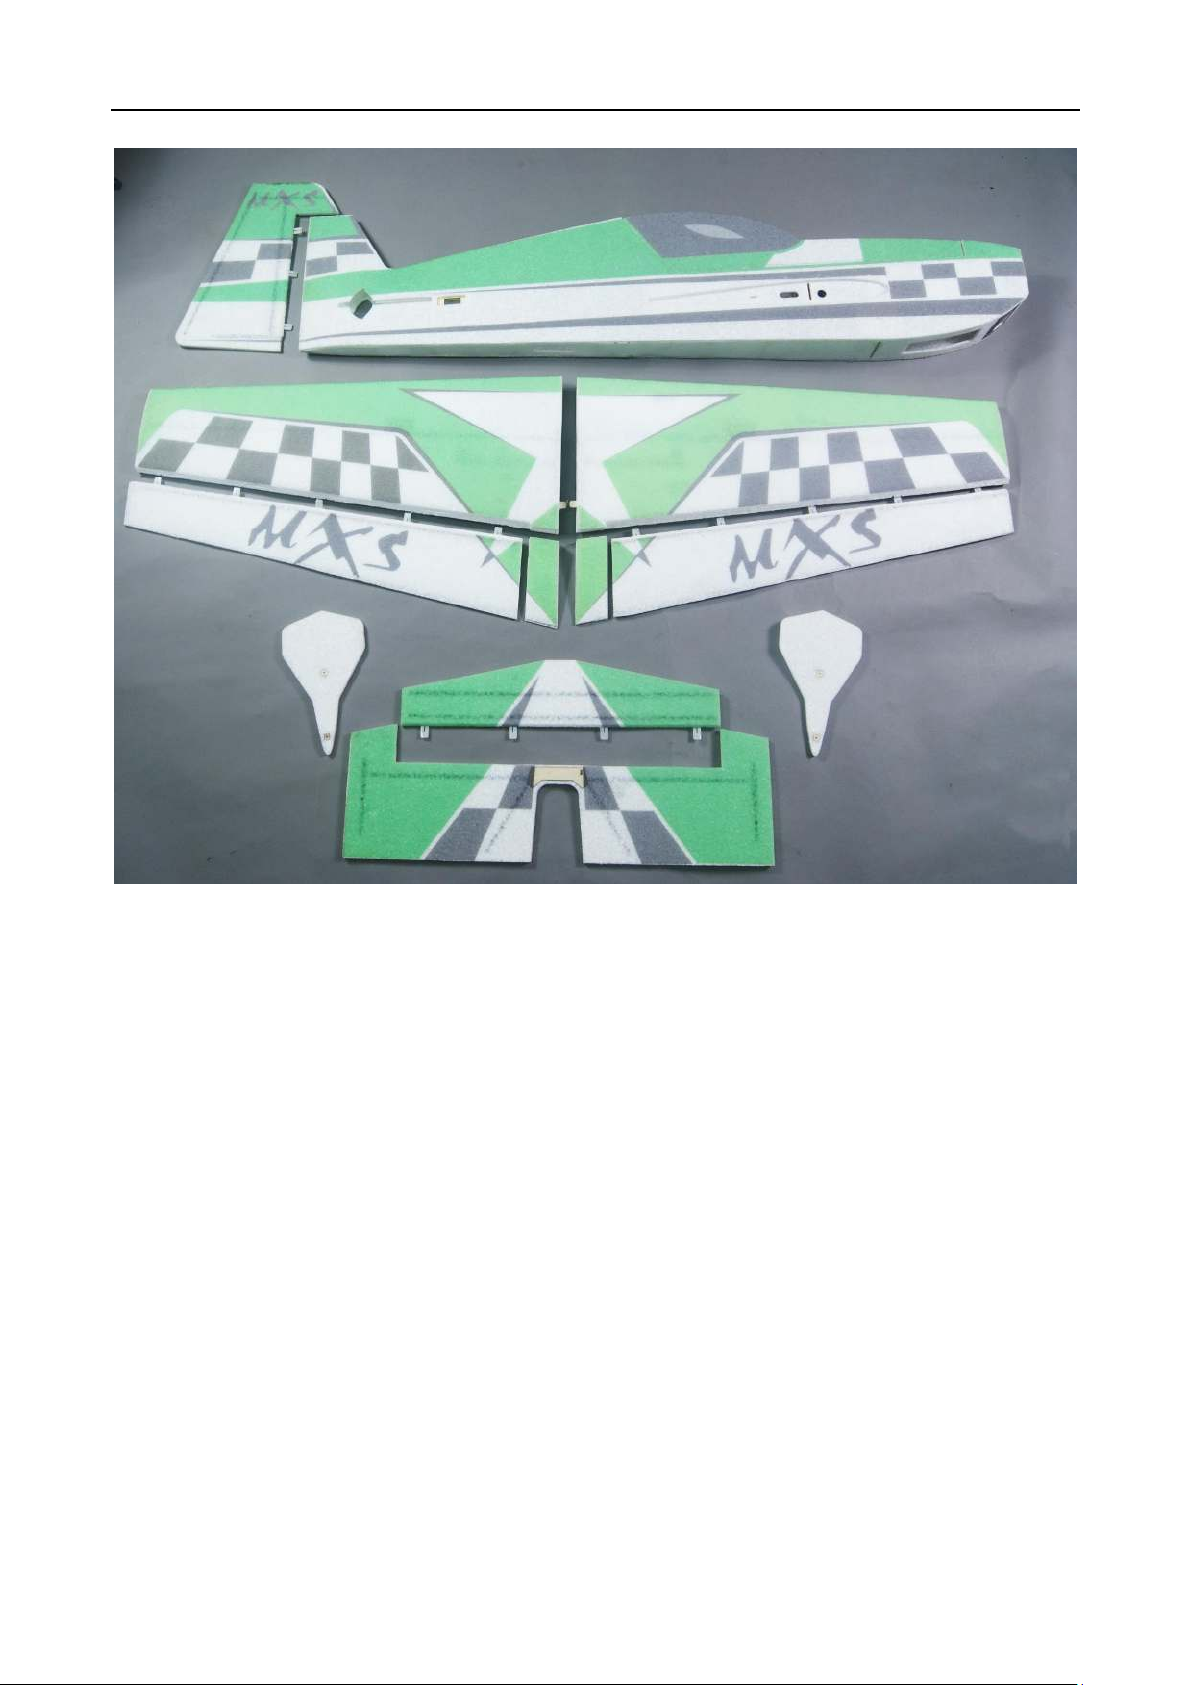
Main Parts of Airplane
www.valuehobby.com/48in-mxs-epp.html
Fuselage x 1
Wing panel x 2
Aileron x 2
Horizontal Stabilizer x 1
Vertical Stabilizer x 1
Elevator x 1
Rudder x 1
SFG x 2
Page 6
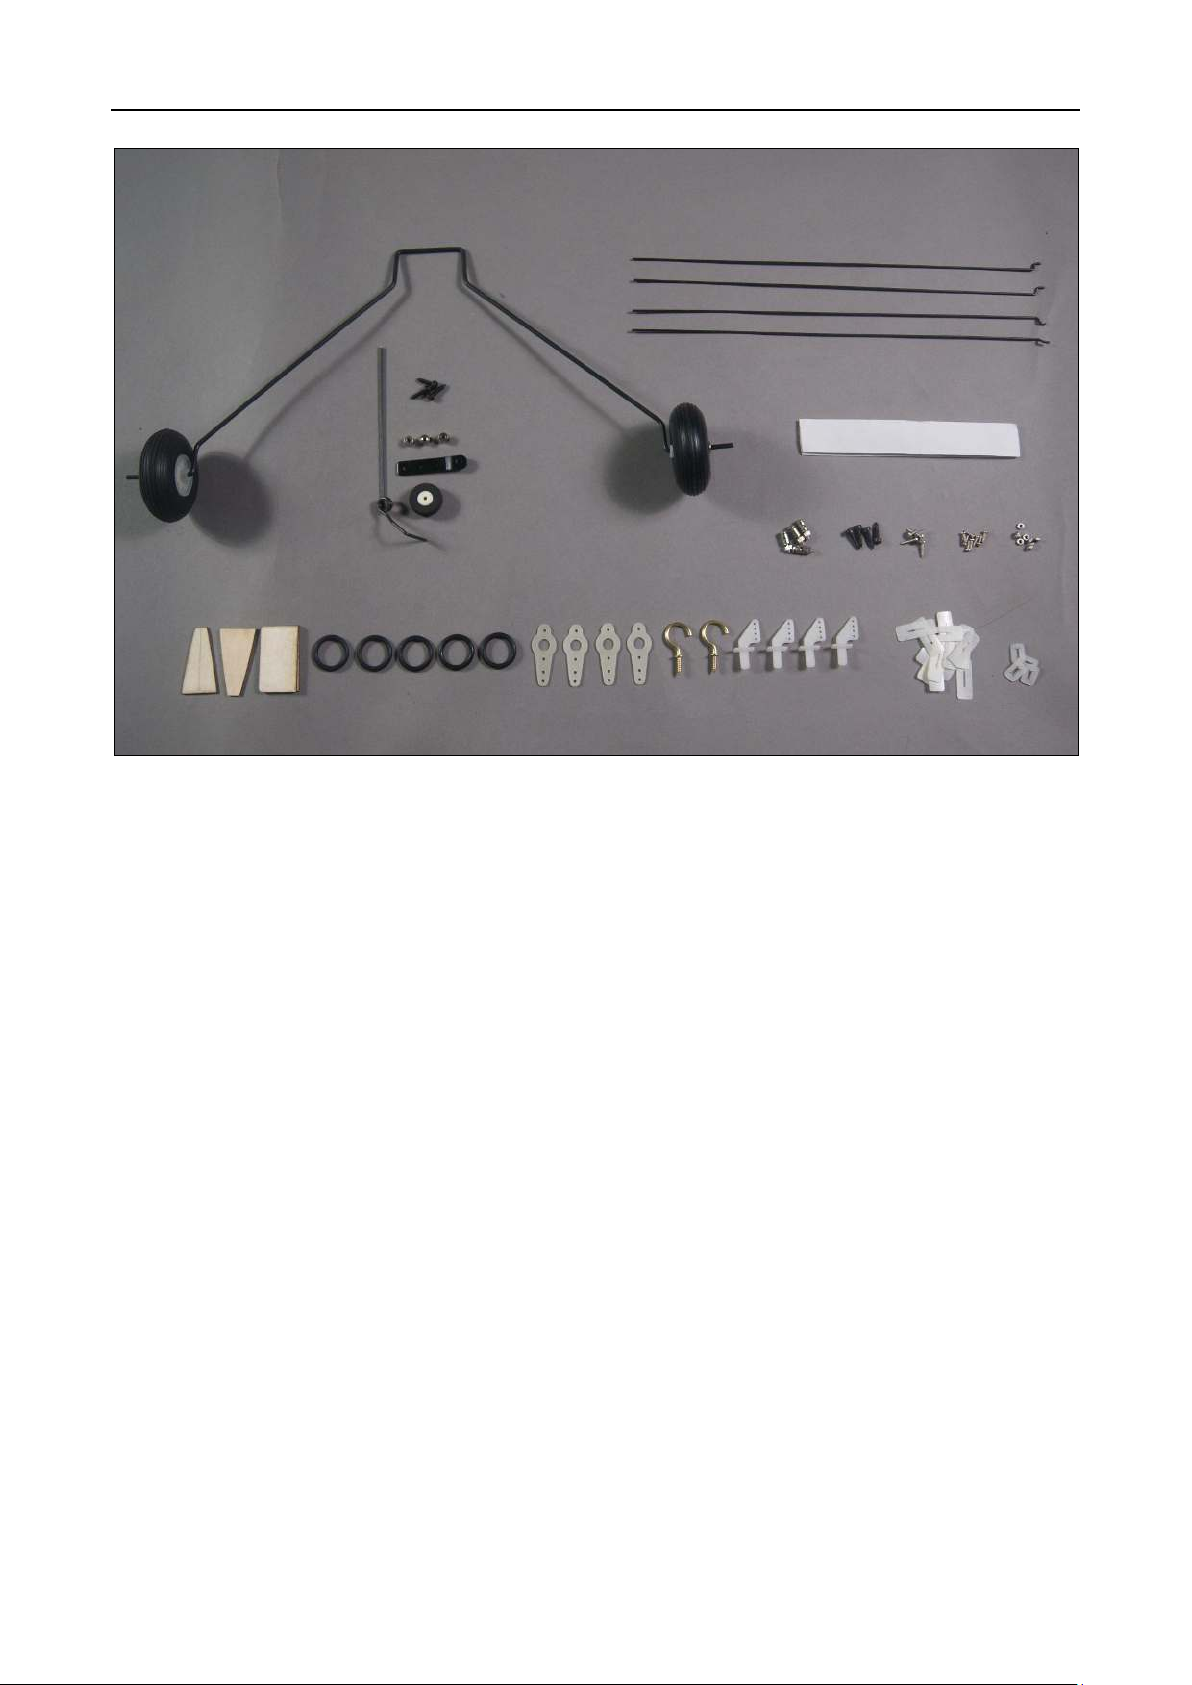
Small Parts and Accessories:
www.valuehobby.com/48in-mxs-epp.html
Main landing gear x 1
Plywood inserts x 1
Wheel tail assembly x 1
Plywood bracket x 1
450mm Wing tube x 1
Wing retainer hook x 2
Rubber band x 4
Long servo arm x 4
Control horn x 4
1.8 x 150mm pushrod x 4
M2 x 6mm screws for servo arm x 8
M2 nut x 8
2.1mm pushrod connector x 4
Hook&loop strap x 1
Hinge x 1 bag
M3 x 12mm self-tapping socket screws for mounting motor x 4
M2.6 x 12mm screws for SFGs x 4
Page 7
www.valuehobby.com/48in-mxs-epp.html
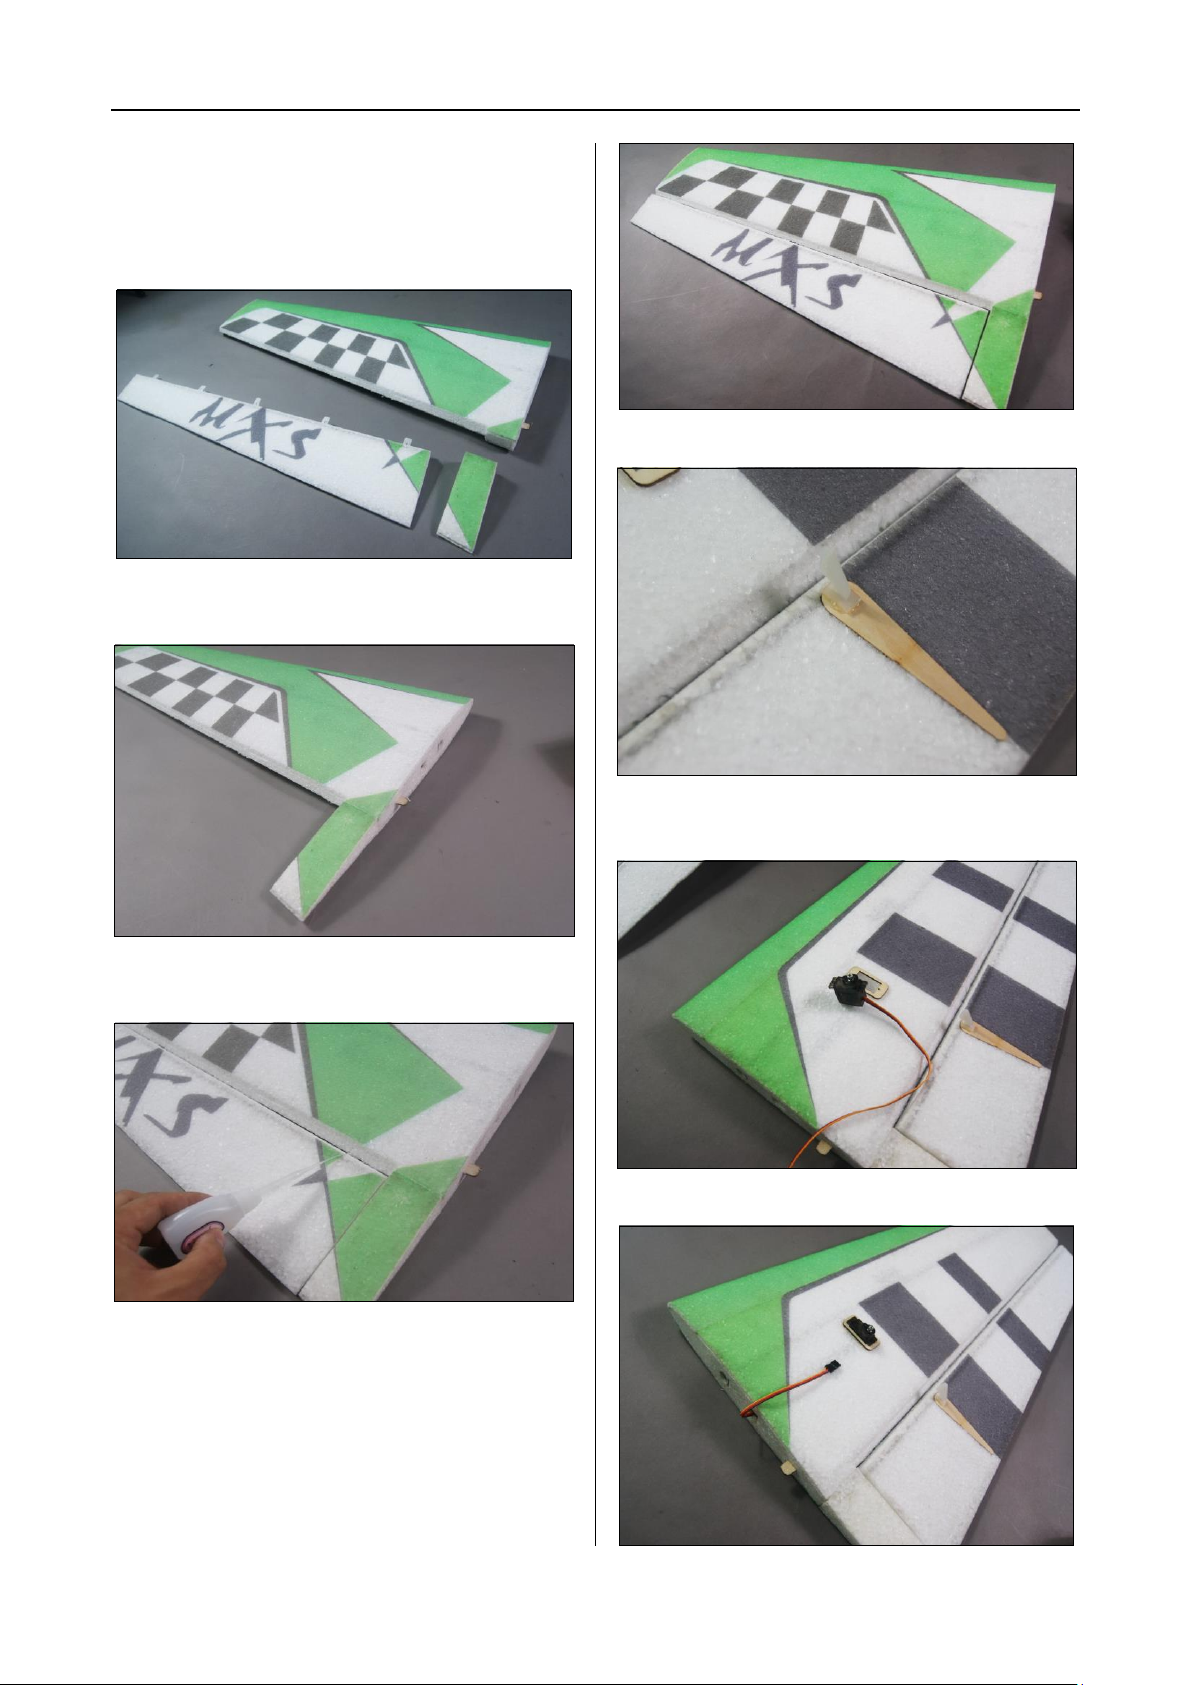
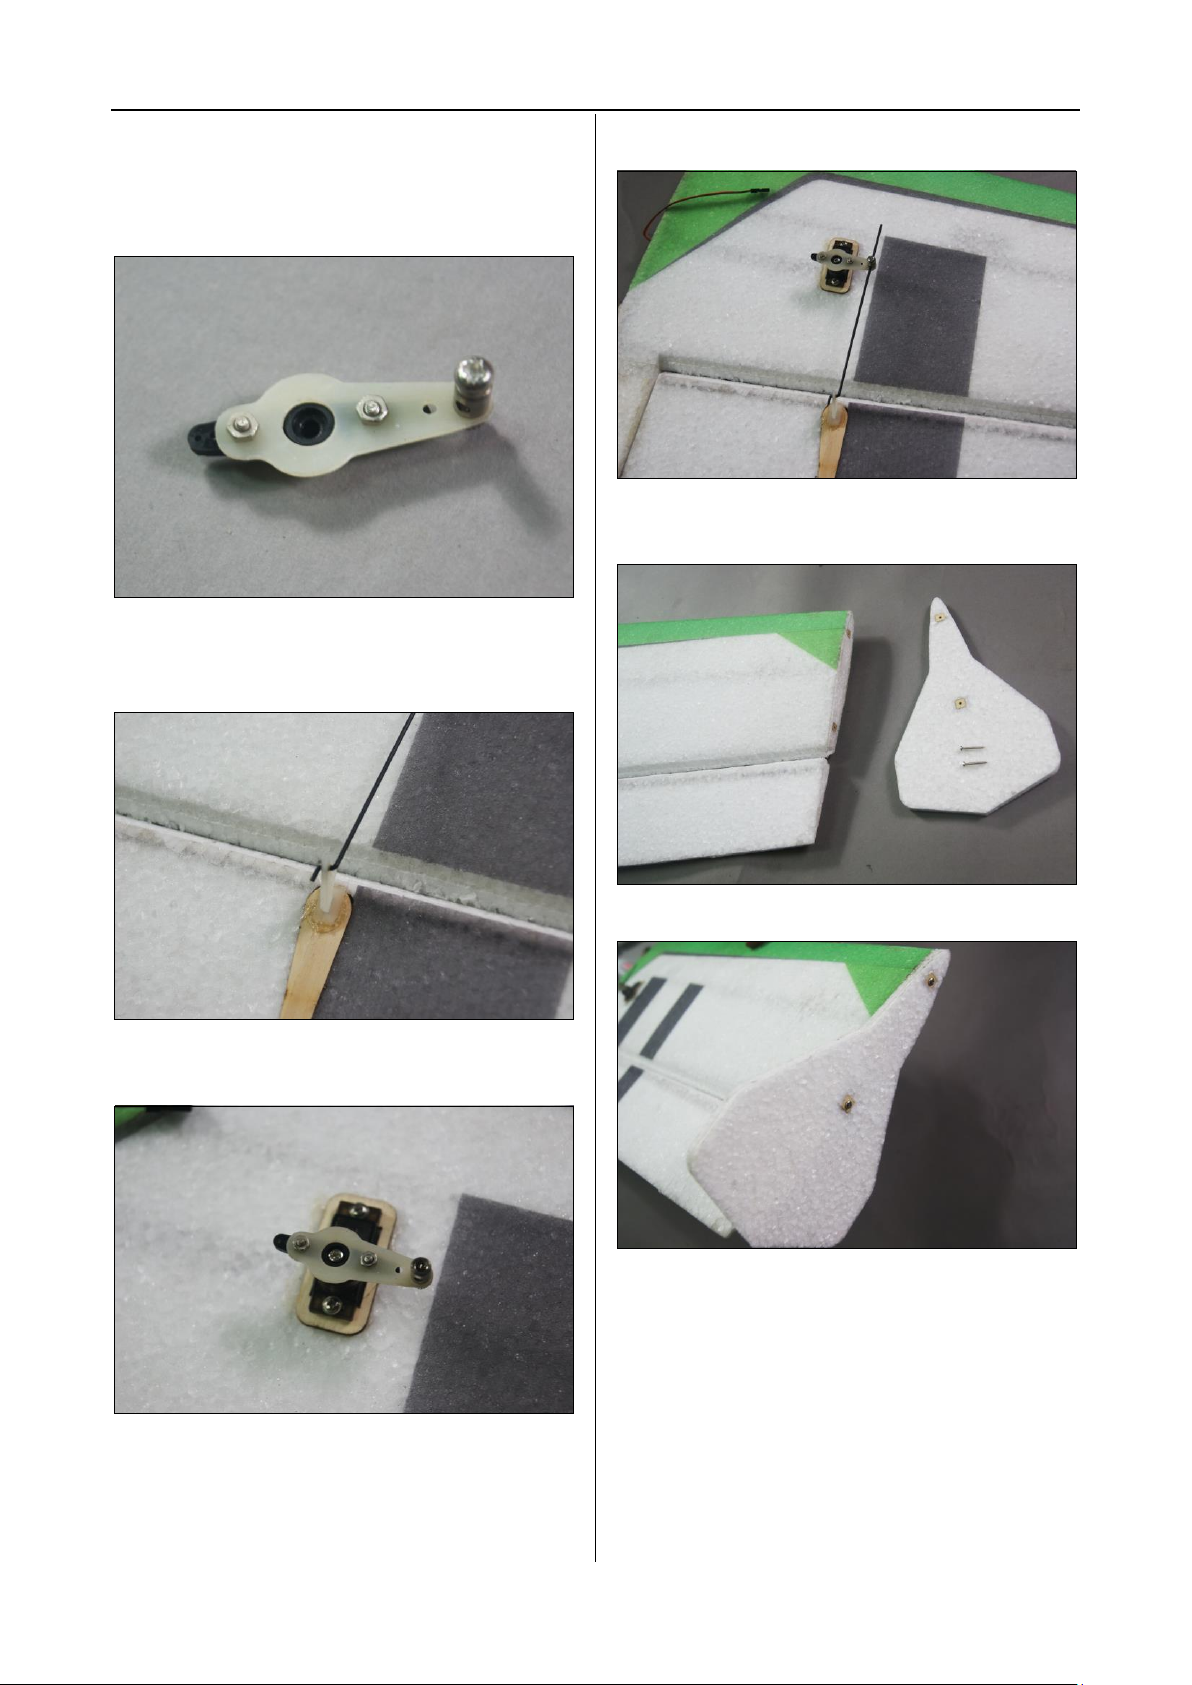
Section1. Aileron and Aileron Servo
installation
Step1. Locate the wing panel, aileron and small
trailing edge foam.
Step2. Use the foam glue to glue the foam
piece to the wing panel.
Step4. Apply the epoxy to the control horn,
and insert it to the plywood stiffener.
Step3. Attach the aileron to the wing, and drip
the CA to the hinges.
Step5. Thread the servo wire through the wing
and install the servo to the servo mount.
Page 8
www.valuehobby.com/48in-mxs-epp.html
Step6. Use two M2*6mm screws and two nuts
to install the long servo arm to the stock servo
arm.
Install the pushrod connector to the long servo
arm.
Step7. Attach the pushrod to the control horn,
and use glue to install the control horn into the
plywood stiffener.
Step9. With aileron centered, connect the
pushrod to the servo arm.
Step10. Use two M2.6x12 screws to install the
SFGs to the wing.
Step8. Install the servo to the servo mount
using the screw supplied with the servo.
Step11. Repeat the step1 to step10 for the
right wing panel.
Page 9
www.valuehobby.com/48in-mxs-epp.html
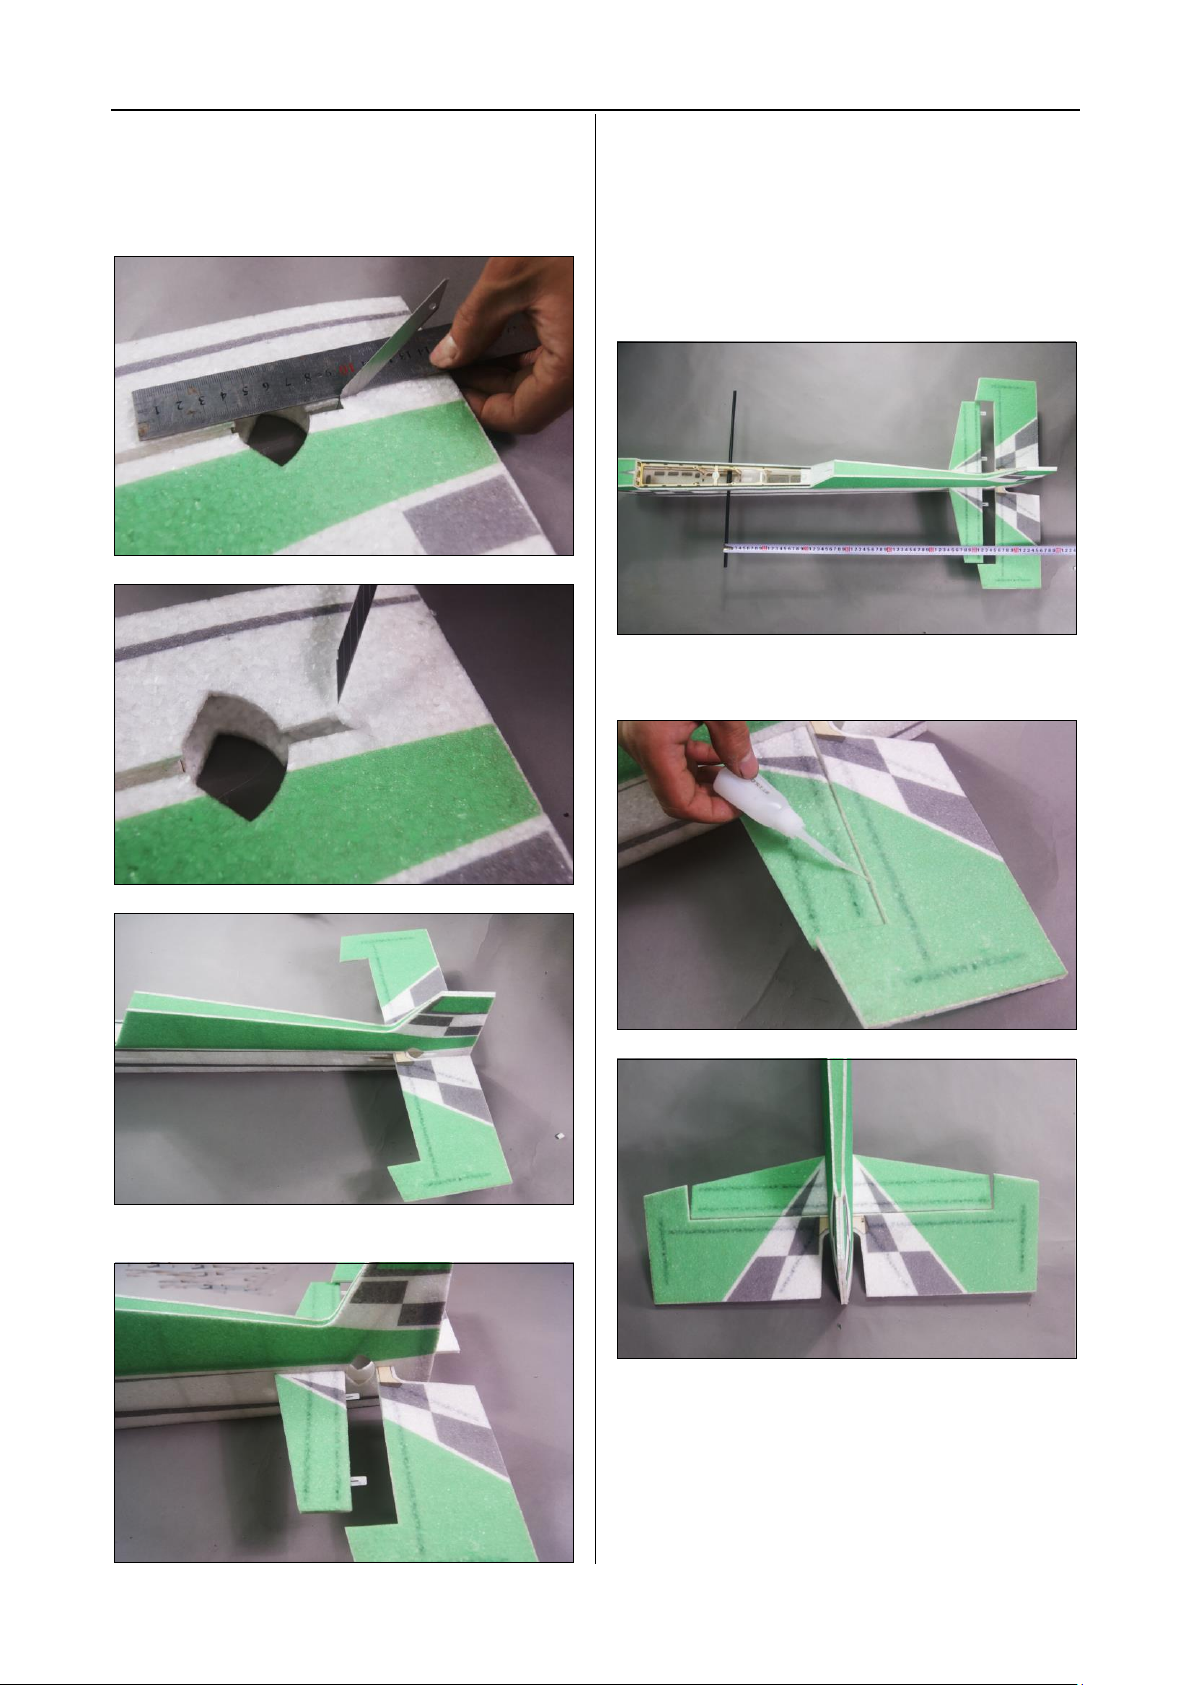
Section2. Horizontal stabilizer and vertical
stabilizer installation
Step1. Cut 10mm length foam piece from the
rudder post
Step4. Insert the wing tube into the fuselage
and make it centered.
Slide the stabilizer in the place and measure to
make sure the distance from the tube to the
stabilizer is the same on the both side, and
make sure the stabilizer is centered.
Once satisfied, use foam glue to glue the
stabilizer to the fuselage
Step5. Use the thin CA to attach the elevator
to the stabilizer.
Step2. Insert the elevator into the fuselage.
Step3. Insert the horizontal stabilizer to the
fuselage.
Page 10
www.valuehobby.com/48in-mxs-epp.html
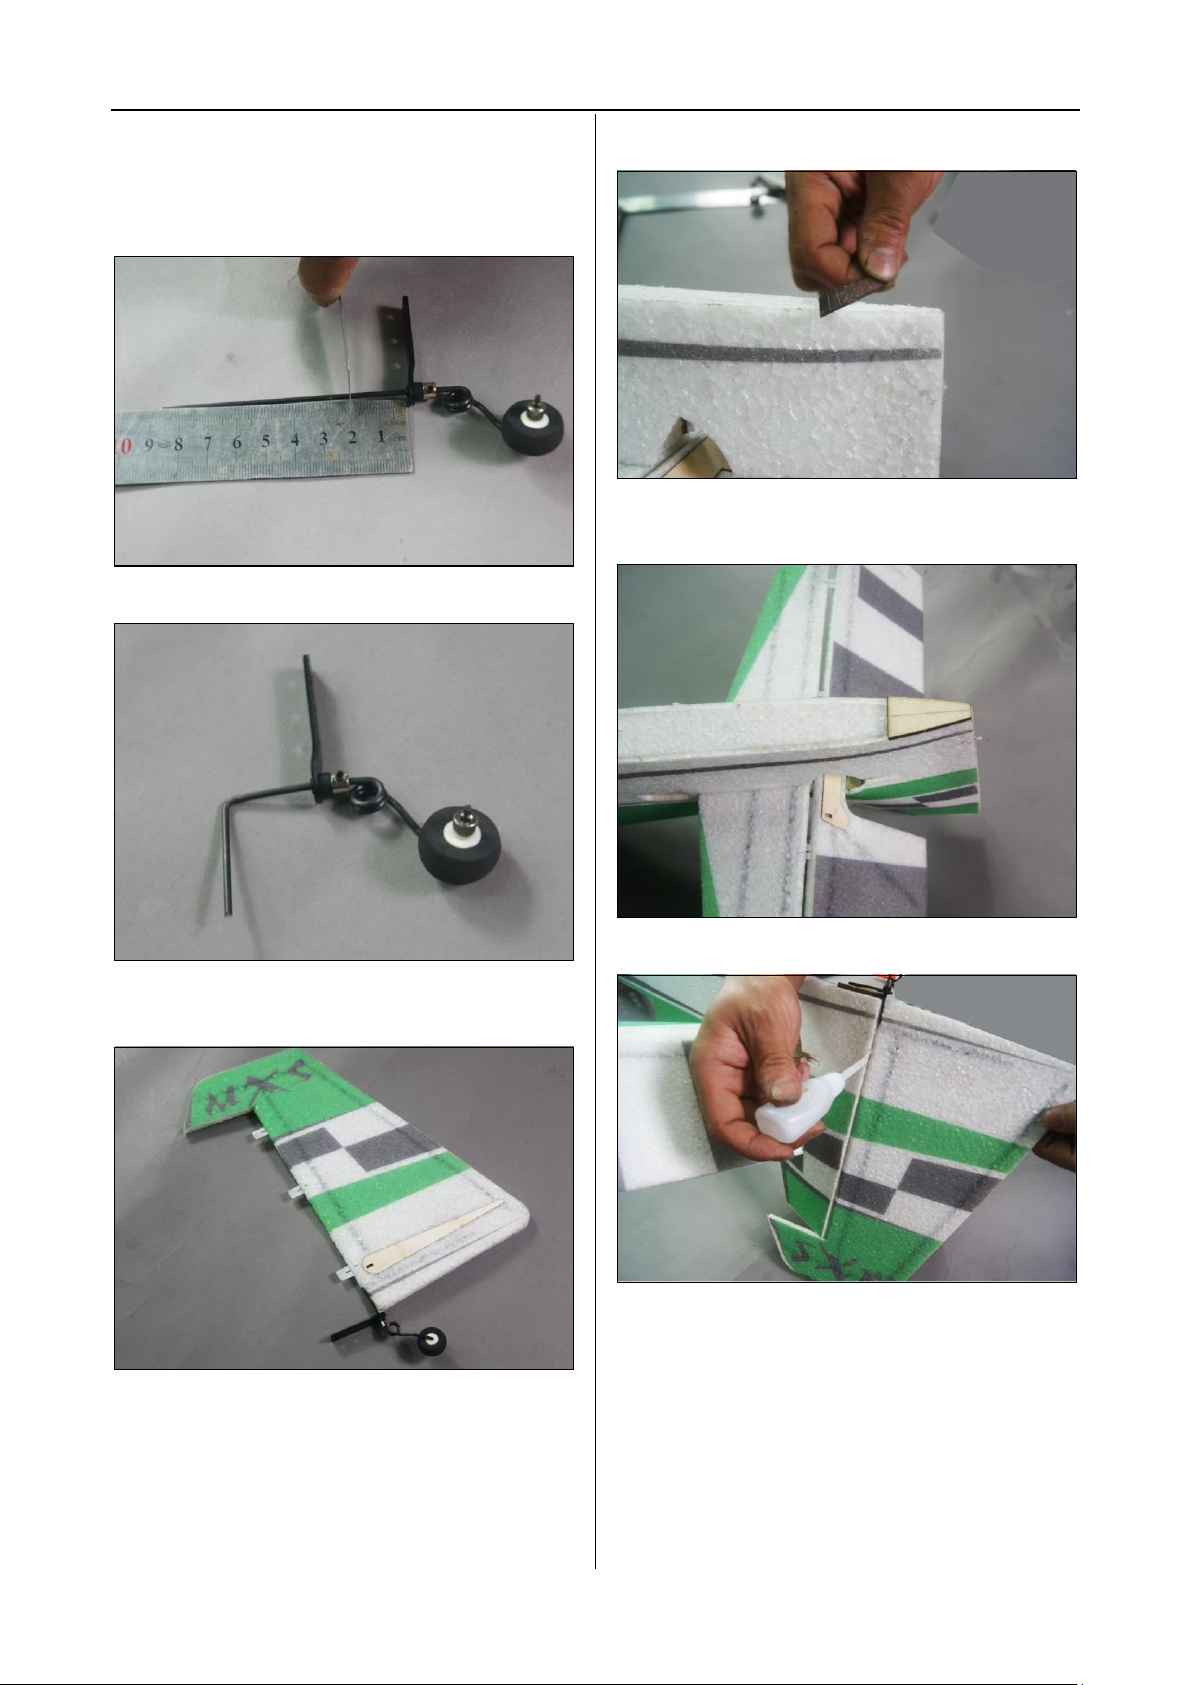
Section3. Tail Wheel and Rudder Installation
Step1. Assemble the tail wheel as shown and
make a mark on the wire (20mm from the
metal bracket).
Step2. Bend the wire 90 degree as shown.
Step4. Use a hobby knife to trim the bottom of
the vertical stabilizer to make sure it is flat.
Step5. Glue a plywood bracket onto the
vertical stabilizer.
Step3. Glue the tail wheel wire into the
reinforcement tube in the rudder.
Step6. Attach the rudder to the stabilizer.
Page 11
www.valuehobby.com/48in-mxs-epp.html
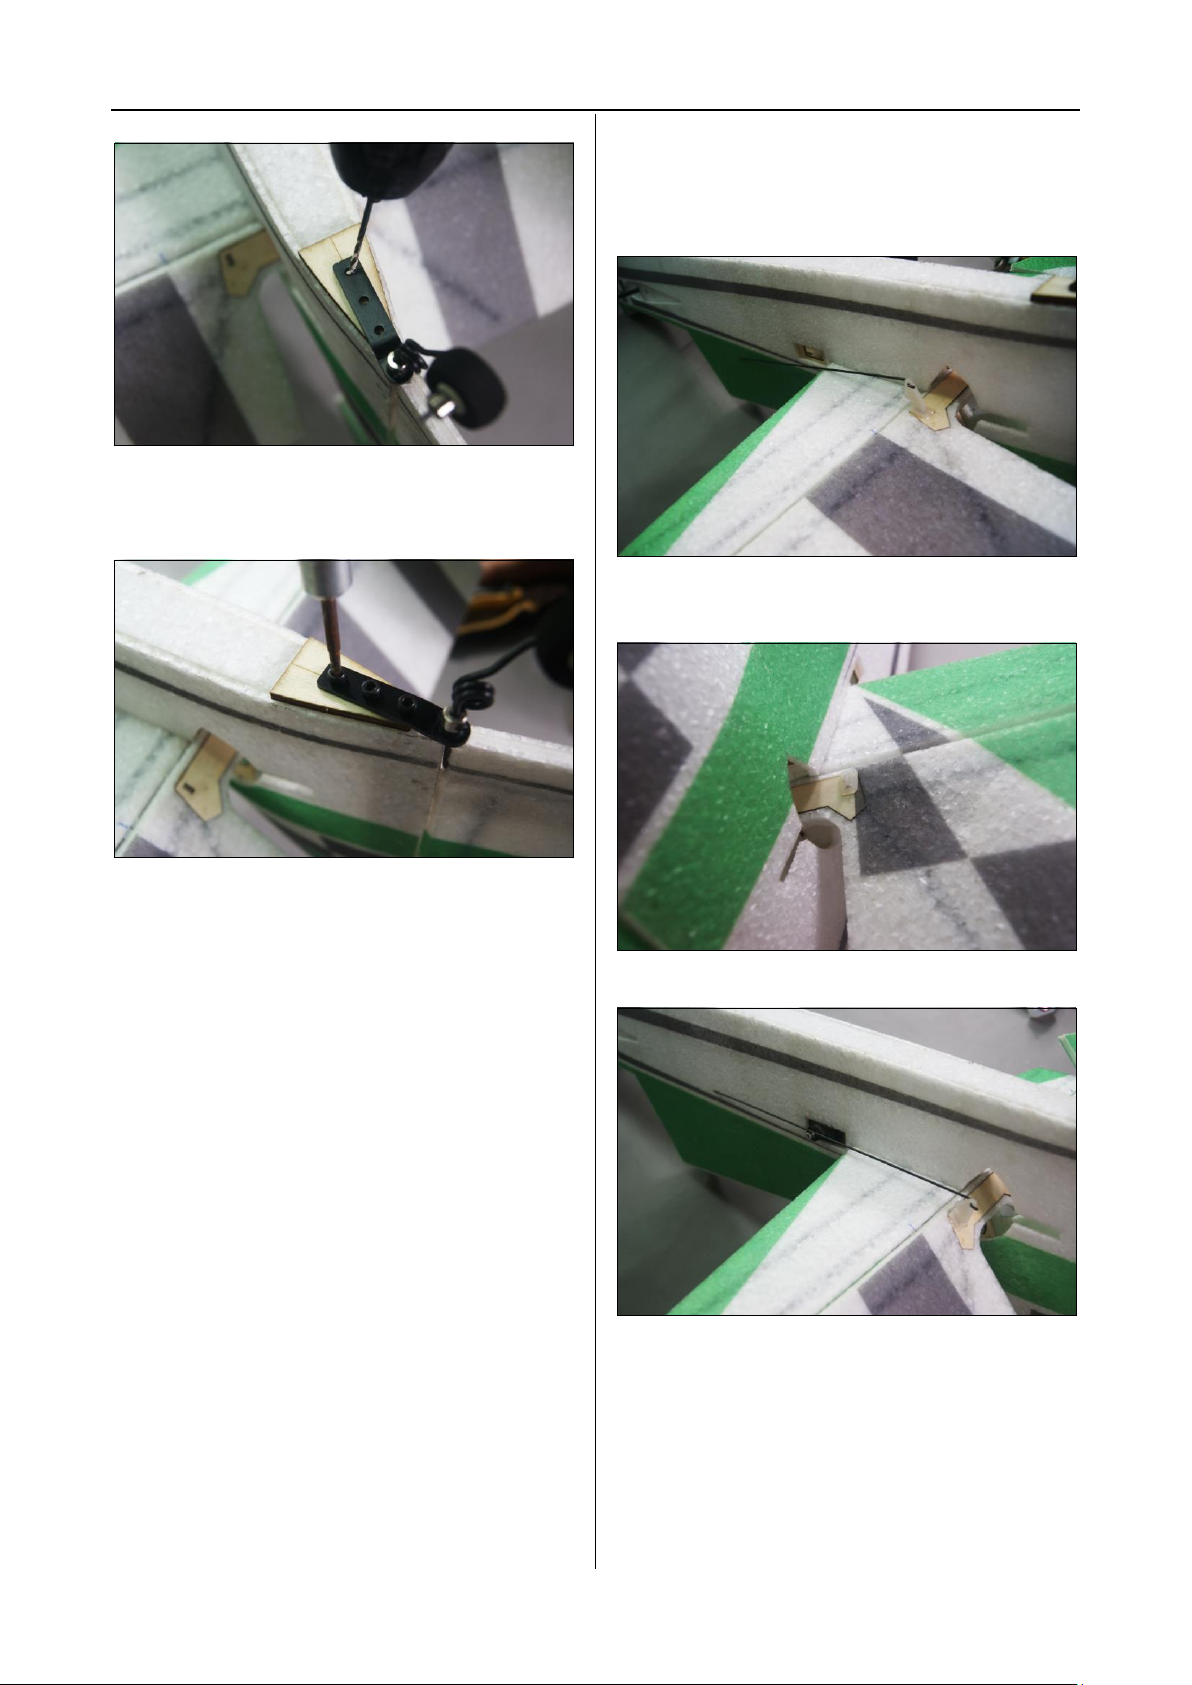
Step7. Drill the mounting holes on the bracket.
Step8. Secure the tail wheel to the bracket
using the screws supplied in the tail wheel
assembly bag.
Section4. Elevator Rudder Installation
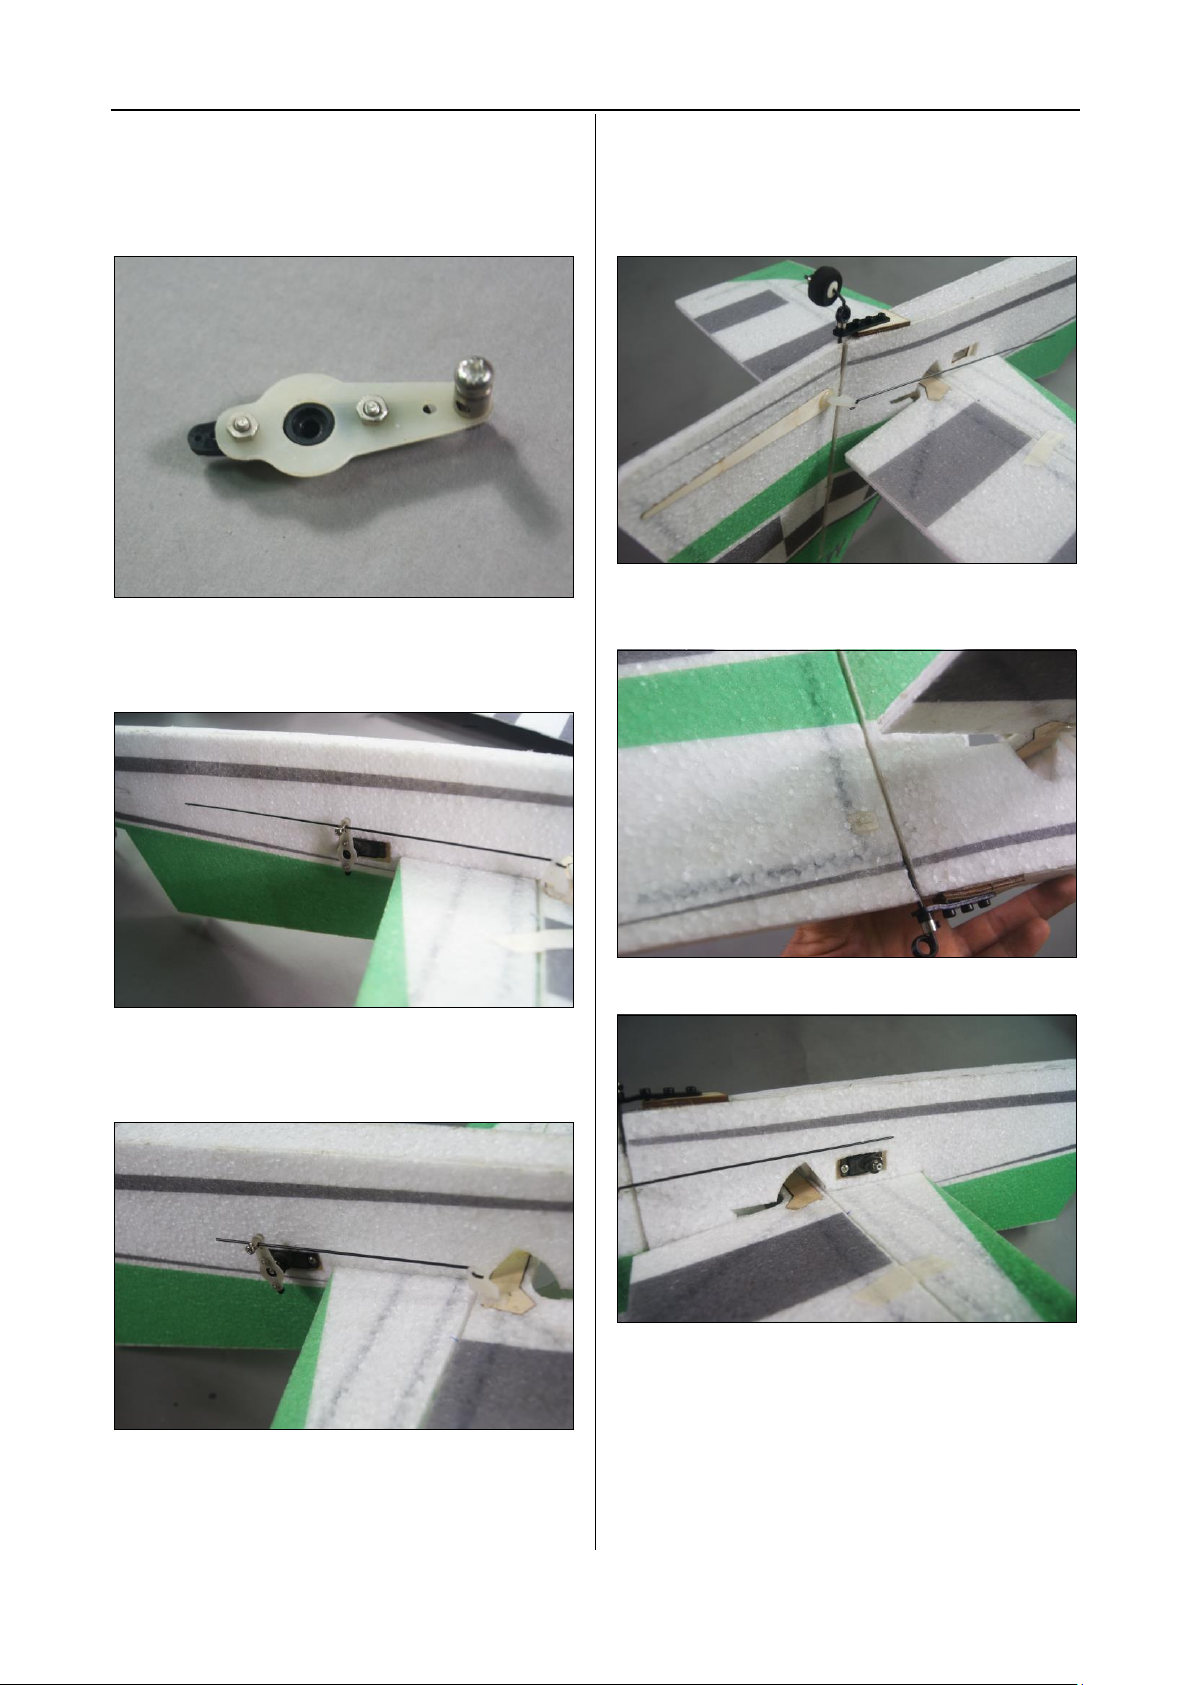
Step1. Attach the pushrod to the control horn,
and use glue to install the control horn into the
plywood stiffener.
Step2. Snap the backplate onto the control
horn.
Step3. Install the elevator servo in place.
Page 12
www.valuehobby.com/48in-mxs-epp.html
Step4. Use two M2*6mm screws and two nuts
to install the long servo arm to the stock servo
arm.
Install the pushrod connector to the long servo
arm.
Step5. Install the servo arm to the servo, and
slide the pushrod through the pushrod
connector.
Section5. Rudder Servo Installation
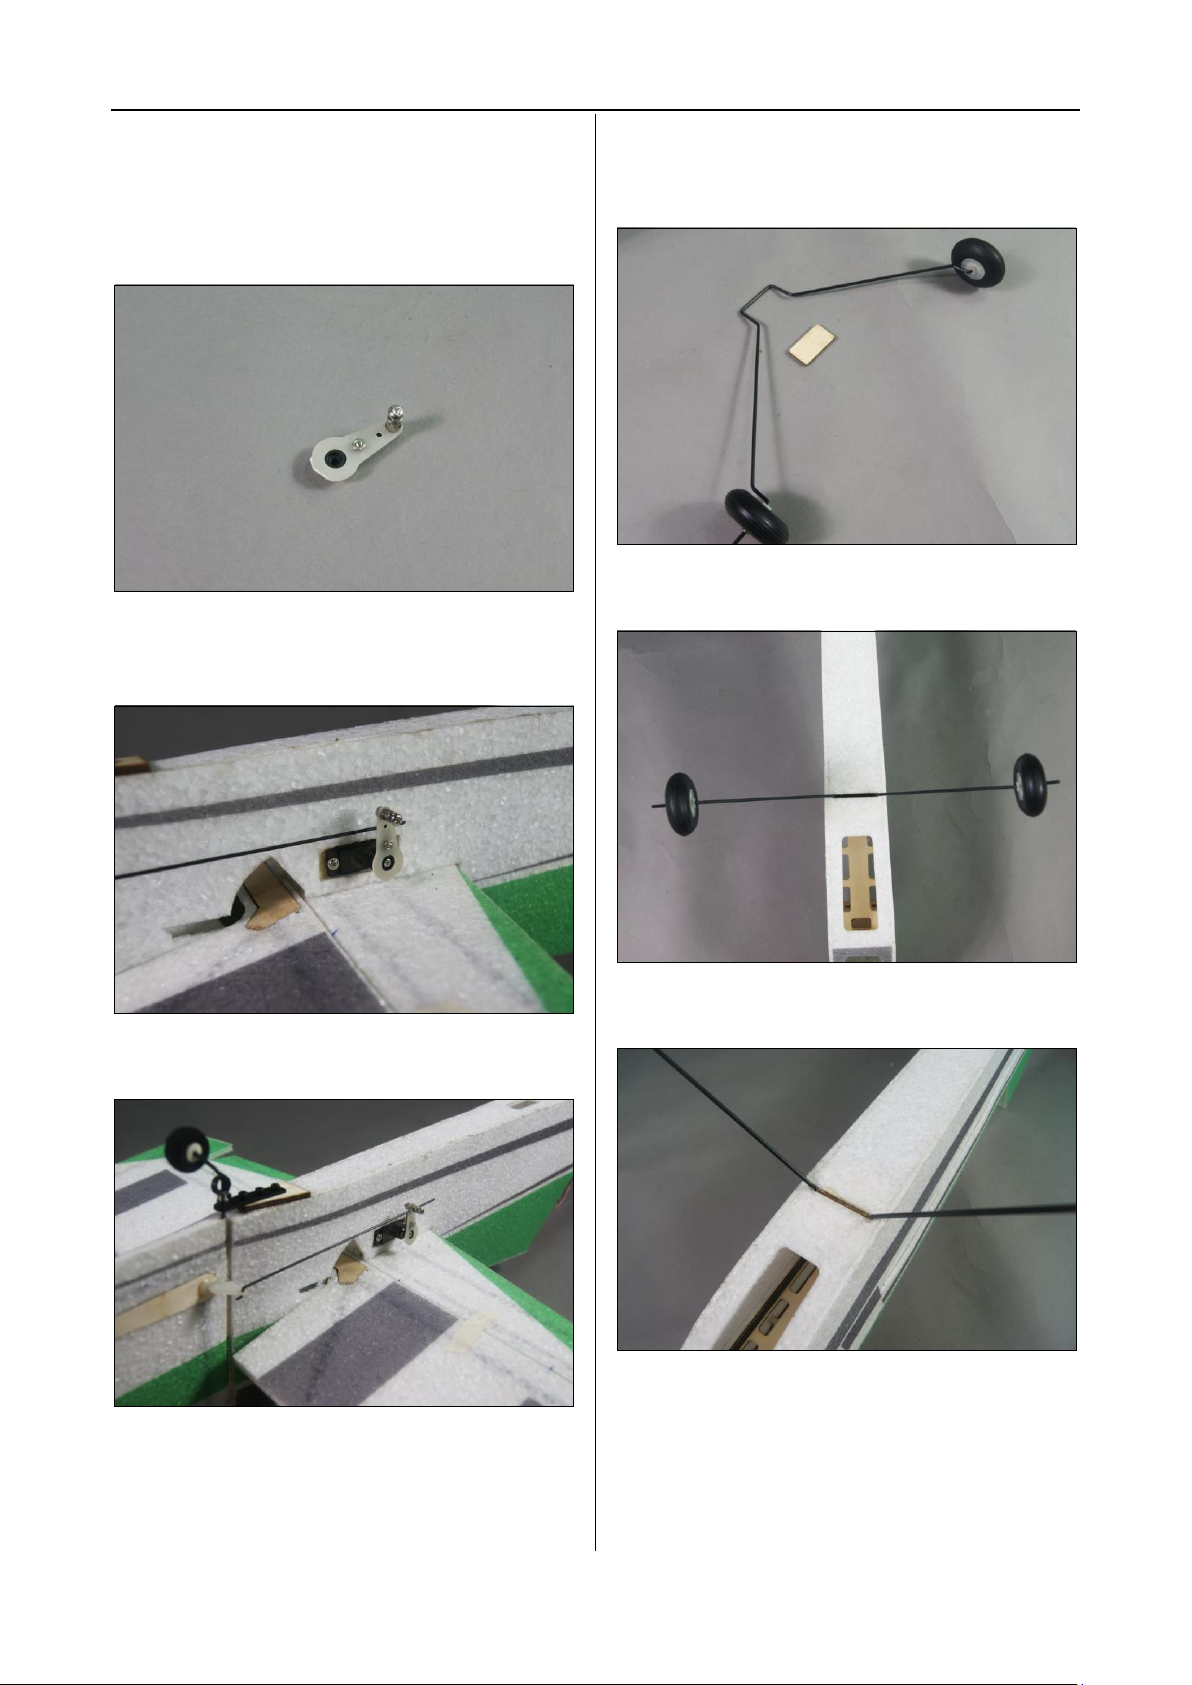
Step1. Attach the pushrod to the control horn,
and use glue to install the control horn into the
plywood stiffener.
Step2. Snap the backplate onto the control
horn.
Step6. Cut the excessive the pushrod wire.
With the elevator centered, tighten the screw
of the pushrod connector.
Step3. Install the rudder servo in place.
Page 13
www.valuehobby.com/48in-mxs-epp.html
Step4. Use one M2*6mm screws and one to
install the long servo arm to the stock servo
arm.
Install the pushrod connector to the long servo
arm.
Cut off the servo arm on the opposite side.
Step5. Install the servo arm to the servo, and
slide the pushrod through the pushrod
connector.
Section6. Landing Gear Installation
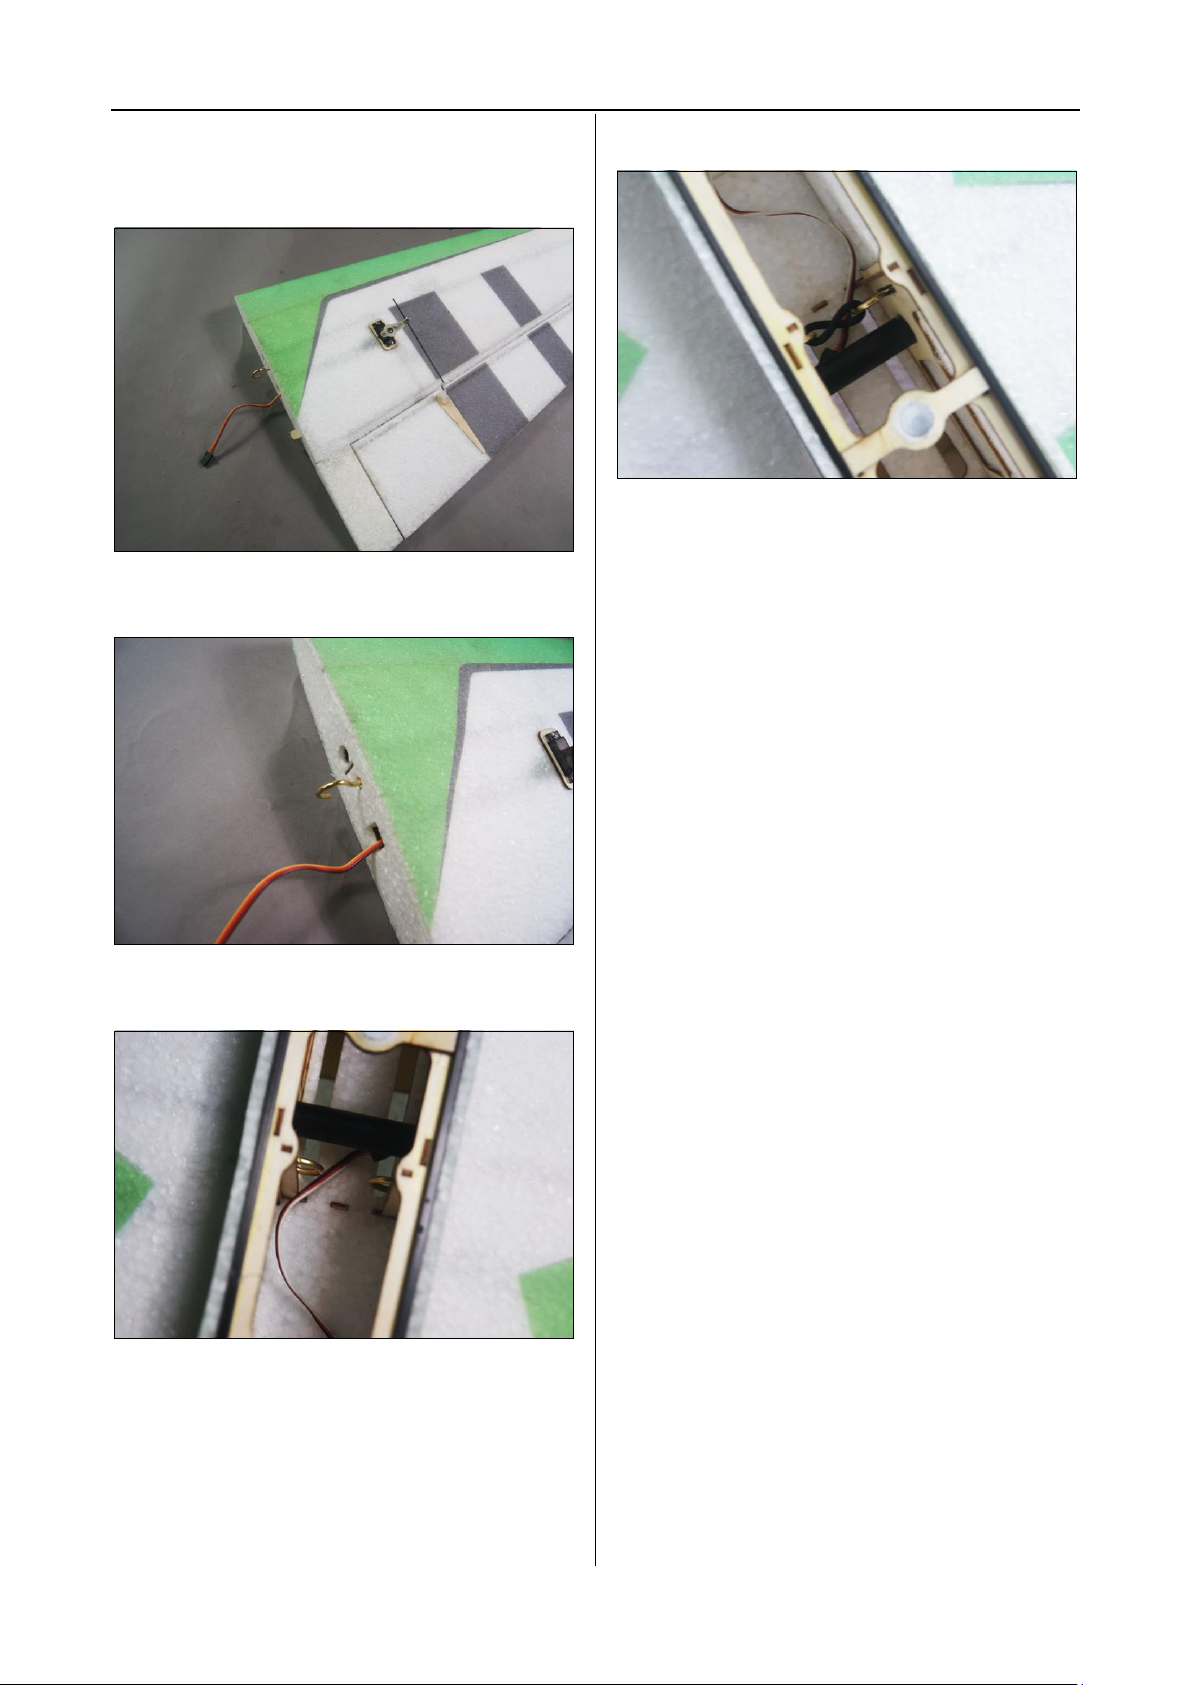
Step1. Locate the assembled landing gear and
plywood insert.
Step2. Insert the landing gear into the slot in
the fuselage.
Step6. With the rudder centered, tighten the
screw of the pushrod connector.
Step3. Apply epoxy to the plywood insert and
insert it to the fuselage.
Page 14
www.valuehobby.com/48in-mxs-epp.html
Section7. Wing Installation
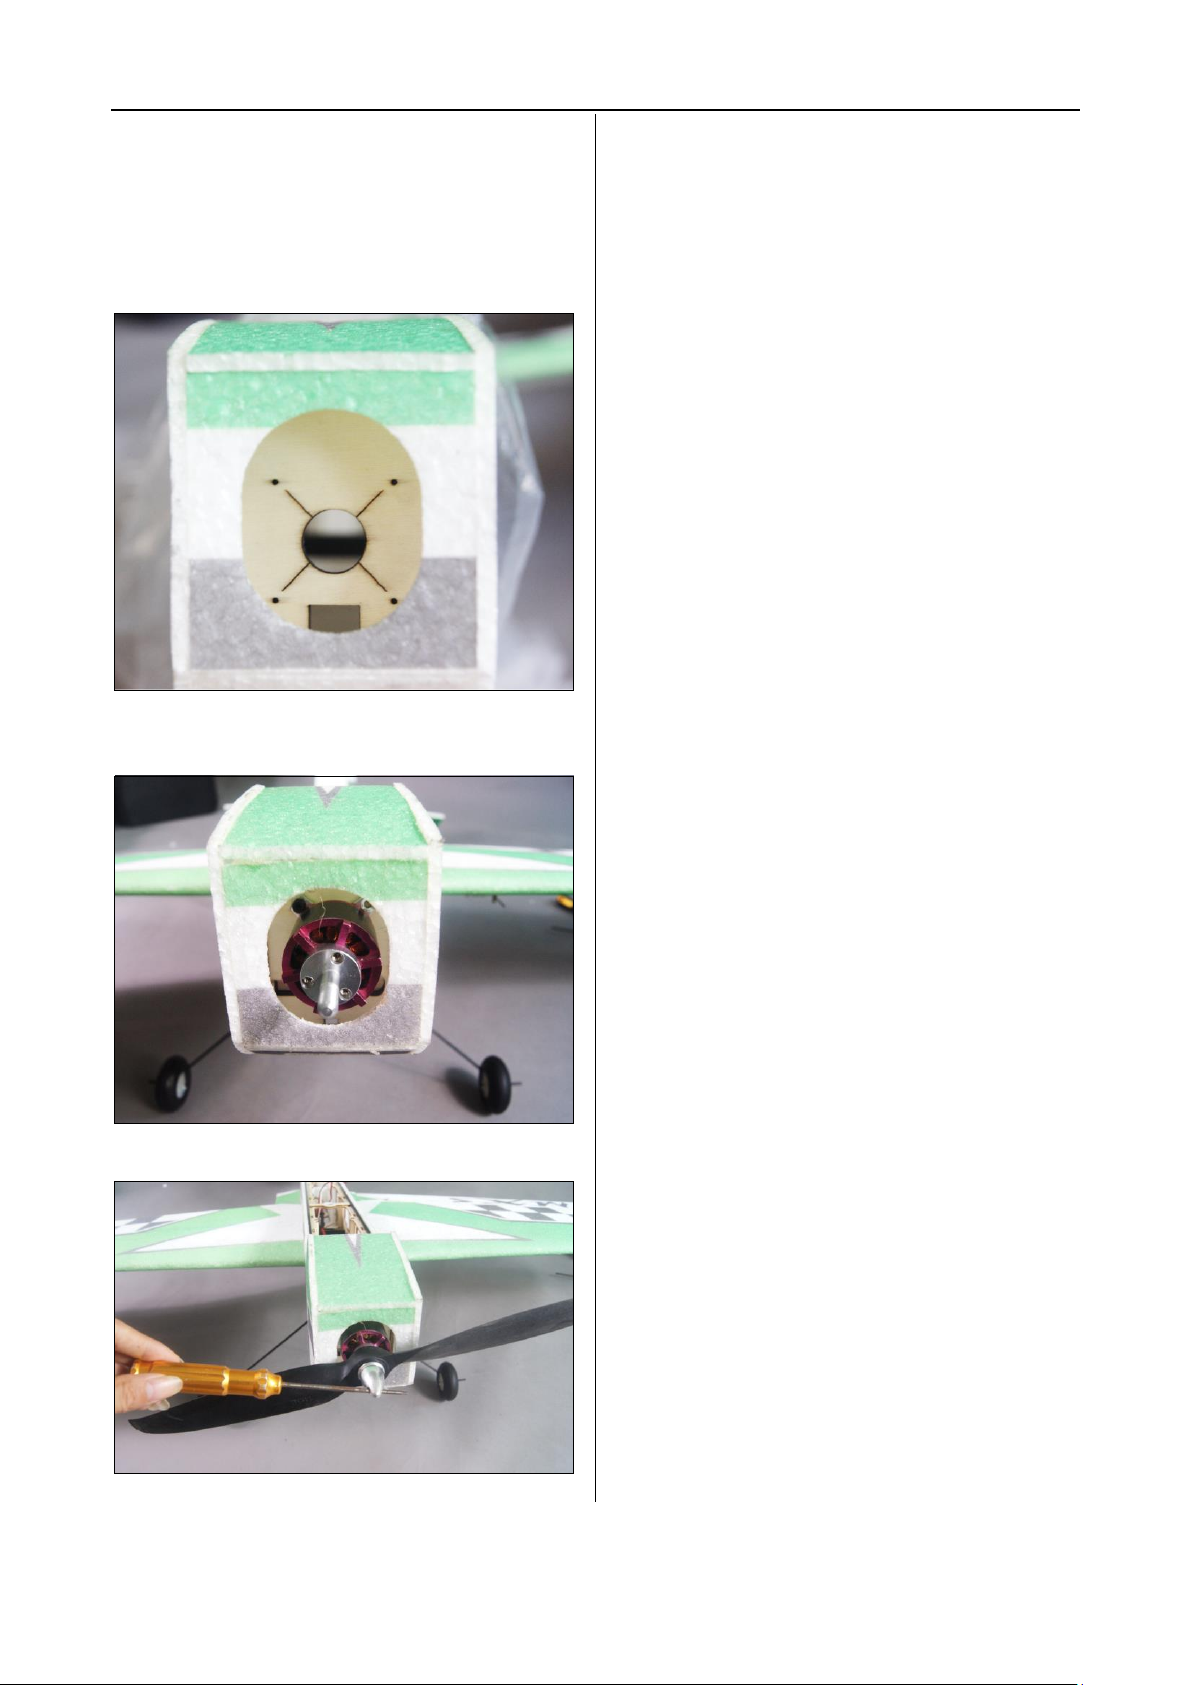
Step1. Glue the wing retainer hook to the wing
root.
Step2. Be sure the open end of the hook points
the top side of the wing.
Step3. Attach two wing panels to the fuselage
through the wing tube.
Step4. Use rubber band to connect the hook
together.
Page 15
www.valuehobby.com/48in-mxs-epp.html
Section8. Motor Installation
Step1. Put the motor in position on the firewall
and use a felt-tipped pen to mark the locations
for mounting holes.
Remove the motor and drill four mounting
holes on the marked locations.
Step2. Use four M3x12mm self-tapping screws
to install the motor to the fire wall.
Step3. Install the 12*6 prop to the motor.
Section9. Control throws and Exponential
1. Low/Precision Rates (in degrees and
inches) and Corresponding Exponential
Aileron: 15 degrees (0.75in) 30% Expo
Elevator: 13 degrees (1.25in) 30% Expo
Rudder: 45 degrees (3.5in) 75% Expo
2. High/3D Rates (in degrees and inches) and
Corresponding Exponential
Aileron: 35 degrees (2in) 75% Expo
Elevator: 45 degrees (3in) 75% Expo
Rudder: 45 degrees (3.5in) 75% Expo
The above throw measurements were taken at
the aft edge of the ailerons and elevator, and
from the bottom aft edge of the rudder. Keep
in mind that even the low throws mentioned
here are relatively aggressive, so be sure to
also program the matching exponential listed
to help soften the model’s feel around center
stick.
Section10. Center of Gravity
Balance your Extra at a point 4.5in behind the
leading edge of the wing where the wing
meets the fuselage.
This is a good starting point. As you become
accustom to the aircraft, you can adjust the CG
to suit your preference.
Page 16

www.valuehobby.com/48in-mxs-epp.html
2015.07.27
 Loading...