

Page 1

V300
User’s Manual
Page 2

Copyright
This publication, including all photographs, illustrations and software, is protected under
international copyright laws, with all rights reserved.
Neither this manual, nor any of the material contained herein, may be reproduced without the
express written consent of the manufacturer.
Disclaimer: The information in this document is subject to change without notice. The
manufacturer makes no representations or warranties with respect to the contents hereof and
specifically disclaims any implied warranties of merchantability or fitness for any particular
purpose. Further the manufacturer reserves the right to revise this publication and to make
changes from time to time in the content hereof without obligation of the manufacturer to notify
any person of such revision or changes.
Software Licenses
The software described in this document is furnished under a License Agreement, which is
included with the product. This Agreement specifies the permitted and prohibited uses of the
product.
Trademarks
♦ Microsoft, Windows, Windows logo, Windows XP, Microsoft Internet Explorer, MS, MSN,
Outlook, and Microsoft Office are either registered trademarks or trademarks of Microsoft
Corporation in the United States and/or other countries.
♦ VGA, OS/2, PS/2 are registered trademarks of International Business Machines.
♦ All other product names and any registered and unregistered trademarks in this document are
used for identification purposes only and remain the exclusive property of their respective
owners.
General Guidelines
♦ Read all of these instructions.
♦ Save these instructions for future use.
♦ Follow all warnings and instructions marked in the computer.
♦ Except as explained elsewhere in this manual, do not attempt to service the computer yourself.
Opening or removing covers that are marked “Do Not Remove” might expose you to
dangerous voltage points or other risks. Refer all servicing of marked components to
qualified personnel.
Page 3

Power Cord Set Requirements
The power cord set (appliance coupler, flexible cord, and wall plug) you received with the
computer meets the requirements for use in the country where you purchased the equipment.
Power cord sets for use in other counties must meet the requirements of the country where you
use the computer. For more information on power cord set requirement, contact your local
authorized dealer, reseller, or service provider.
About the AC Adapter
The AC adapter serves as a converter from AC (Alternating Current) to DC (Direct Current) power
because your computer runs on DC power, but an electrical outlet usually provides AC power.
The AC adapter is Auto-sensing so that your V300 can operate through the AC adapter connected
to any available power supply in a wall outlet. The AC adapter is also used to recharge the
rechargeable battery pack when connected to AC power.
The AC adapter operates on any voltage in the range of 100 ~ 240V AC.
1. AC Power Cord
2. Power indicator light
3. DC (Direct Current) Cable
Warning: Connecting the AC adapter to other devices can damage the adapter or devices.
Because of this AC adapter is designed for use with your V300 only.
Page 4
Battery (Lithium)
NOTE: The following caution statement is located in the service and operating manual or on
the label adjacent to the battery.
1. English
CAUTION: DANGER OF EXPLOSION IF BATTERY IS INCORRECTLY REPLACED. REPLACE
ONLY WITH SAME OR EQUIVALENT TYPE RECOMMENDED BY THE MANUFACTURER.
DISCARD USED BATTERIES ACCORDING TO THE MANUFACTURER'S INSTRUCTIONS.
2. French
IL Y A DANGER D'EXPLOSION S'IL Y A REMPLACEMENT INCORRECT DE LA BATTERIE.
REMPLACER UNIQUEMENT AVEC UNE BATTERIE DU MÊME TYPE OU D'UN TYPE
RECOMMANDÉ PAR LE CONSTRUCTEUR. METTER AU RÉBUT LES BATTERIES USAGÉES
CONFORMÉMENT AUX INSTRUCTIONS DU FABRICANT.
3. German
VORSICHT ! Explisionsgefahr bei unsachgemäßen Austausch der Batterie.
Ersatz nur durch denselben oder einem vom Hersteller empfohlenem ähnlichen Typ.
Entsorgung gebrauchter Batterien nach Angaben des Herstellers.
4. Swedish
Explosionsfara vid felaktigt batteribyte.
Använd samma batterityp eller en ekvivalent typ som rekommenderas av
apparattillverkaren. Kassera använt batteri enligt fabrikantens instruktion.
5. Danish
Lithiumbatteri- Eksplosionsfare ved fejlagtig håndtering.
Udskiftning må kum ske med batteri af samme fabrikat og type.
Lever det brugte batteri tilbage til leverandoren.
6. Norwegian
Ekspolsjonsafe ved feilaktig skifte av batteri.
Benytt samme batteritype eller en tilsvarende type anbefalt av apparatfabriknten.
Brukte batterier kasseres i henhold til fabrikantens instruksjoner.
7. Finnish
Paristo voi räjähtää, jos se on virheellisesti asennettu.
Vaihda paristo ainostaan laitevalmistajan suosittelemaan tyyppiin.
Hävitä käyteet paristo valmistajan ohjeiden mukaisesti.
Page 5
FCC Statement
This equipment has been tested and found to comply with the limits for a Class B digital
device, pursuant to part 15 of the FCC Rules. These limits are designed to provide
reasonable protection against harmful interference in a residential installation. This
equipment generates, uses, and can radiate radio frequency energy, and if not installed and
used in accordance with the instructions, may case harmful interference to radio
communications. However, there is no guarantee that interference will not occur in a
particular installation. If this equipment does cause harmful interference to radio or
television reception, which can be determined by turning the equipment off and on, the user
is encouraged to try to correct the interference by one or more of the following measures:
♦ Reorient or relocate the receiving antenna.
♦ Increase the separation between the equipment and receiver.
♦ Connect the equipment into an outlet on a circuit different from that to which to receiver is
connected.
♦ Consult the dealer or an experienced radio/TV technician for help.
Use of shielded cable is required to comply with Class B limits in Subpart B of Part 15 of the
FCC rules. Do not make any changes or modifications to the equipment unless otherwise
specified in the manual. If such changes or modifications should be made, you could be
required to stop operation of the equipment.
FCC Caution:
1. The device complies with Part 15 of the FCC rules. Operation is subject to the following two
conditions:
(1) This device may not cause harmful interference.
(2) This device must accept any interference received, including interference that may
cause undesired operation.
2. This Transmitter must not be co-located or operating in conjunction with any other antenna
or transmitter.
3. FCC RF Radiation Exposure Statement
This device has been tested for compliance with FCC RF Exposure (SAR) limits. The
equipment complies with FCC RF radiation exposure limits set forth for an uncontrolled
environment.
4. Changes or modifications to this unit not expressly approved by the party responsible for
compliance could void the user authority to operate the equipment.
VCCI
Page 6

Page 7

Table of Contents
Chapter 1 ...................................................................1
Welcome to V300! .................................................1
Product Features.............................................2
Installation Restrictions....................................3
For Safe Use of Your V300 System.....................5
Routine Care.............................................................5
Battery Care .............................................................5
AC-DC Adapter Care ..................................................6
TFT LCD Display Care.................................................6
Travel Care ...............................................................7
Shipping Care ...........................................................7
Chapter 2 ...................................................................9
Getting Started .....................................................9
Unpacking the Package.................................. 10
Checking List................................................ 10
Preparing the Power Supply............................ 11
Using Battery ..........................................................11
Using the AC-DC Adapter..........................................12
Chapter 3 ................................................................. 13
System Overview.................................................13
Front View ................................................... 14
Left Side View .............................................. 17
Right Side View ............................................18
Top View...................................................... 20
Page 8

Bottom View ................................................ 22
Rear View .................................................... 23
Chapter 4 ................................................................. 25
Using Battery Pen................................................ 25
Using Your Battery Pen Correctly ..................... 26
Use the pen instead of a mouse ................................27
Right-click equivalents .............................................27
Tips for using battery pen.........................................28
Changing the Battery for Battery pen............... 29
Appendix A ............................................................... 31
System Specifications .......................................... 31
Technical Specifications.................................. 32
Appendix B ............................................................... 37
AC-DC Adapter Guideline...................................... 37
Maintaining Your AC-DC Adapter Correctly ........ 38
WARNING............................................................... 38
CAUTION................................................................38
Appendix C ............................................................... 41
Troubleshooting................................................... 41
Page 9

C
C
h
h
a
a
p
ptt
e
err
1
1
W
Weellccoo
m
mee ttoo
V
V330000
Congratulations on your purchase of V300 System.
V300 System is the secure, efficient and economical way to manage
your technology. The V300 System's reliability, scalability,
productivity and manageability make it an ideal solution for mission
critical situations without costing a fortune.
Page 10

V300 System User’s Manual
2
Product Features
Tablet PCs are the evolution of today's laptops, extending their
capabilities with the addition of pen input, handwriting and speech
technologies. With these new capabilities, the Tablet PC will be the user's
primary PC, performing additional tasks such as taking notes, annotating
documents and reading information online. The main product features of
V300 System including:
• Sleek Design and Space Saving: Attractive design appropriate
for company and home. The V300 System is designed with
economy in mind. The space saving design makes installation
possible even in the most crowded home or office.
• Staying Connection from Anywhere: If always staying an
Internet connection from anywhere is your dream, then V300
System could be the answer to your prayers. V300 System is
equipped with one RJ11 port, one 10/100 Ethernet LAN port and
supports 802.11b WLAN (optional) for you to rapid access to
Internet from anywhere
• Best Economics: V300 System is the evolution of today's
laptops, extending their capabilities with the addition of pen input,
handwriting and speech technologies. With these new capabilities,
the V300 System will be the user's primary PC, performing
additional tasks.
• Break the Tradition: Tablet PCs allow users to dispense with the
usual keyboard and mouse and instead, using a pen. This tablet
PC is an astounding mobile computing device with a range of input
and communication options.
Please read this User’s Manual carefully before unpacking and setting up
V300 System. You can use this User’s Manual as a comprehensive library
for your V300 System. Please refer to this User’s Manual first if you
encounter any problems. Please keep this User’s Manual on hand and
enjoy your time.
Page 11

Chapter 1 - Welcome to V300!
3
Installation Restrictions
Please read the following general guidelines carefully before assembly or
disassembly your V300 System.
1. Follow all warnings and instructions marked on the product.
2. Unplug this product from the wall outlet before cleaning. Do not use
liquid cleaners or aerosol cleaners. Use a damp cloth for cleaning.
3. Do not place this product on an unstable cart, stand, or table. The
product may fall, causing serious damage to it.
4. Avoid using a telephone (other than a cordless type) during an
electrical storm. There may be remote risk of electric shock from
lightning.
5. Slots and openings in the cabinet and the back or bottom are
provided for ventilation; to ensure reliable operation of the product
and to protect it from overheating, these openings must not be
blocked or covered. The product should never be placed near or over
a radiator or heat register, or in a built-in installation unless proper
ventilation is provided.
6. This product should be operated from the type of power indicated on
the marking label. If you are not sure of the type of power available,
consult your dealer or local power company.
7. Do not allow anything to rest on the power cord. Do not locate this
product where persons will tread on the cord.
8. If an extension cord is used with this product, make sure that the
total ampere rating of the equipment plugged into the extension
cord does not exceed the extension cord ampere rating. Also, make
sure that the total rating of all products plugged into the wall outlet
does not exceed the fuse rating.
9. Never push objects of any kind into this product through cabinet
slots as they may touch dangerous voltage points or short out parts
that could resulting a fire or electronic shocks. Never spill liquid of
Page 12

V300 System User’s Manual
4
any kind on the product.
10. Always disconnect all telephone lines & all power cords from the wall
outlet before servicing or disassembling this product. And, refer it
for servicing to qualified service personal under the following
conditions:
a. When the power cord or plug is damaged or frayed.
b. If liquid has been spilled into the product.
c. If the product has been exposed to rain or water.
d. If the product does not operate normally when the operating
instructions are followed. Adjust only those controls that are
covered by the operating instructions, since improper
adjustment of other controls may result in damage and will
often require extensive work by a qualified technician to restore
the product to normal condition.
e. If the product has been dropped or cabinet has been damaged.
f. If the product exhibits a distinct change in performance,
indicating a need for service.
IMPORTANT:
If you want to upgrade your system for installing or replacing a
new component, please purchase the suitable the component
modules from your vendor. Not do to so may cause the damages
to your V300 System Unit.
Page 13

Chapter 1 - Welcome to V300!
5
For Safe Use of Your V300 System
Sufficient attention has been paid to the safety of this product but please
pay particular attention to the warnings indicated by the following
guidelines during use.
Routine Care
To keep your V300 System working properly, please follow these
guidelines:
• Do not attempt to disassemble or modify your V300 System.
• Do not place anything on top of the device at any time to prevent
screen damage.
• Avoid using or storing in places where static electricity or
electrical noise is likely to occur.
• Avoid using or storing in places where there are sudden
temperature variations or condensation, or in direct sunlight.
• Keep the device away from excessive moisture and temperature
extremes. Do not expose the device to liquids or precipitation.
• Operate the device with the main battery pack installed, even
when using external power. This ensures system will have the
necessary power to operate when disconnected from external
power.
• Store the device in its docking station when not in use.
Battery Care
• Do not heat or attempt to disassemble a battery, and do not place
a battery in water or in a fire.
• Do not subject batteries to strong impacts, such as hitting them
with a hammer, stepping on them or dropping them.
• Do not drop, puncture or disassemble batteries.
• Do not attempt to open or service the battery pack.
• Replace only with the battery pack designed for this product.
Page 14

V300 System User’s Manual
6
AC-DC Adapter Care
• Always be sure to use the AC adapter which comes with this
product, or optional from the manufacturer. Any other adapter
may cause damage to V300 System, which is not covered under
the warranty.
• Grasp the adapter, not the cord, when unplugging the adapter
from a wall socket.
• If the power cord becomes damaged (exposed or severed wires,
etc.), please purchase a new AC-DC adapter. Use of a damaged
cord may cause fire or electrical shock.
• Power off and disconnect V300 System from the AC-DC adapter
before unplugging it from the wall socket.
TFT LCD Display Care
• Do not spray liquid directly on the screen or allow excess liquid to
drip down inside the device.
• Do not place anything on the screen at any time to prevent screen
damage, for example, drink or food.
• Do not scratch the surface of the screen with any hard objects.
• Keep the device away from direct sunlight or strong ultraviolet
light for extended periods of time.
• To clean the device, wipe the screen and the exterior with a soft,
damp cloth moistened only with water. Do not using soap or
other cleaning products on the screen, it will discolor the finish
and damage the screen.
Page 15

Chapter 1 - Welcome to V300!
7
Travel Care
• Take the AC-DC adapter that comes with V300 System with you.
• Hand-carry V300 System in the carrying bag or a protective case.
Do not check it with your luggage.
• Do not use V300 System on an airplane. The radio may function
even though you are working off-line.
• Be aware of the possible effect of airport security devices on your
device. There are three types of airport security devices: X-ray
machines, magnetic detectors (the device you walk through), and
security magnetic wands. It is recommended that you prevent
exposure of your device to magnetic detectors and security
magnetic wands.
Shipping Care
• Safeguard your data by making a backup copy.
• Turn off V300 System and disconnect all external devices.
• Pack V300 System and all external devices (e.g., power cords and
AC-DC adapter) in the original packing boxes or in similar
packaging with sufficient protective packing material.
Page 16

V300 System User’s Manual
8
Page 17

C
C
h
h
a
a
p
ptt
e
err
2
2
G
Geettttiinngg SSttaarrtteedd
Page 18

V300 System User’s Manual
10
Unpacking the Package
Before unpacking the V300 System, prepare a suitable workspace for
your computer. Provide a steady, level and clean surface, near an
electrical wall outlet.
When opening the box of the computer, make sure not to damage the
box, as you may need to keep it and all packing material for future
shipping needs.
Unpacking the box, make sure the following components are included in
the box and are in good condition. If you find that any of these
components are missing or appear damaged, please contact the system
dealer immediately.
Checking List
V300 System Unit
This User’s Manual
Software CD
AC Power Adapter
AC Power Cord
Cables, TBD
External USB Keyboard (Optional)
External Optical Device (Optional/USB Interface)
Page 19

Chapter 2 - Getting Started
11
Preparing the Power Supply
This V300 System features a two-way power supply that lets you use
either battery or a household AC current.
Using Battery
The primary source of this V300 System power is a Lithium-Ion battery
pack.
The battery pack is visible and accessible from bottom of V300 System.
Recharging is available using the AC-DC adapter provided with it. It is
not necessary to access the battery pack except to replace a fresh
battery pack.
To remove the battery pack, follow these steps:
• Turn off V300 System power.
• Slide the latch first, and then slide the battery from right to left
orientation as shown in [Figure 1] below.
• Remove battery cover, then remove the discharged batteries as
shown in [Figure 2] and replace with new Lithium battery.
• Turn on V300 System power.
Figure 1
Page 20

V300 System User’s Manual
12
Figure 2
Using the AC-DC Adapter
If you prefer to operate V300 System on AC power, use the AC-DC
adapter that comes with this product. Simply connect the power
adapter into the DC-in jack on V300 System, and then plug the power
adapter to a wall socket.
The DC-in jack connects the AC-DC adapter provided to recharge the
battery. The AC-DC adapter can be used if the battery is low or while
V300 System is positioned in its docking station.
Page 21

C
C
h
h
a
a
p
ptt
e
err
3
3
SSyysstteem
m
O
Ovveerrvviiee
w
w
Page 22

V300 System User’s Manual
14
Front View
Features are shown in [Figure 3], and are described as follows.
Figure 3
1. TFT LCD display:
The wide 8.4’’ TFT-LCD LVDS with 1 CCFL backlight integrates touch
panel and provides portrait and landscape mode support makes
V300 System ideal for Internet browsing on the go.
Data can be entered from the touch screen using the battery pen
and soft keyboard. The soft keyboard is displayed by tapping the
bottom-left area on the screen. Data can also be entered via a USB
keyboard plugged into the USB port of V300 System. The USB
ports of V300 System support most USB keyboards and pointing
devices.
2. Battery Pen:
A Battery Pen included with V300 System is used to activate the
touch screen surface. This Battery Pen comes in slim size, and there
is a button on it to emulate the right button of the mouse. You can
Page 23

Chapter 3 - System Overview
15
remove this Battery Pen from its slot on the edge of the LCD display
as shown in [Figure 4] below. It is partially visible on the top left
front corner. Please do not use anything other than the tip of the
Battery Pen to interact with the display or you may damage the
display surface.
Figure 4
3. Power On/Off & Battery charge indicator:
The LED indicator lights green when the computer is on. Lights
orange when the battery is being charged.
4. HDD operation indicator:
The LED indicator blinks when HDD is being accessing.
5. System sleep/suspend status indicator:
The LED indicator lights when the computer enters sleep/suspend
mode.
6. WLAN communication indicator:
• Blinks rapidly when the Wireless LAN capabilities are enabled.
• Blinks slowly when the Wireless LAN capabilities are searching
such as AP (Access Point).
• Lights off when Wireless LAN is inactive.
Page 24

V300 System User’s Manual
16
Figure 5
7. Up button:
Press one Up to display the text and other information that extends
beyond the area of the LCD screen. This button is also used together
with Fn button to invoke the tablet applications. Such as Fn + Up =
Increases the screen brightness.
8. Down button:
Press one Down to display the text and other information that
extends beyond the area of the LCD screen. This button is also used
together with Fn button to invoke the tablet applications. Such as
Fn + Down = Decreases the screen brightness.
Figure 6
Page 25

Chapter 3 - System Overview
17
Left Side View
Features are shown in [Figure 7], and are described as follows.
Figure 7
1. Microphone in jack:
Plug the microphone into this jack for recording or voice-control
functions.
2. Headphone out (Earphone) jack:
Connect audio devices such as headphones or speakers to this jack.
3. Battery release latch:
Unlatches the battery cover to remove the battery pack.
Page 26

V300 System User’s Manual
18
Right Side View
Features are shown in [Figure 8], and are described as follows.
Figure 8
1. Camera unit:
This V300 System is equipped with a digital camera. You can rotate
lens around to focus on the objects you want.
2. Record button:
Press the record button to take a picture.
Figure 9
3. USB port x 2 @ 480 Mbit:
Connect USB peripheral devices to these 2 ports to take advantage
of the universal functionality and flexibility of Plug and Play
technology. The USB port supports most USB mouse and keyboard
devices. It is recommended that the V300 System be stored in the
Page 27

Chapter 3 - System Overview
19
docking station when working on the USB keyboard or when using a
USB mouse.
4. Network jack (RJ45):
Connects to an Ethernet 10/100 Base-T network.
5. Modem jack (RJ11):
Supports a 56kbps v.90 internal modem, US and international for
you to connect to a phone line.
6. VGA-Out port:
Connects an external (VGA) display monitor.
Figure 10
7. DC-in jack:
Plug the AC-DC adapter into this jack and to power the system.
Before you plug the AC power cord, you must first check the voltage
toggle switch setting is appropriate for your geographical area.
Figure 11
Page 28

V300 System User’s Manual
20
Top View
Features are shown in [Figure 12], and are described as follows.
Figure 12
8. Battery Pen holder:
Secures the Battery Pen to your V300 System. To use the Battery
Pen, remove it from its holder and hold it the same way you hold a
pen or pencil.
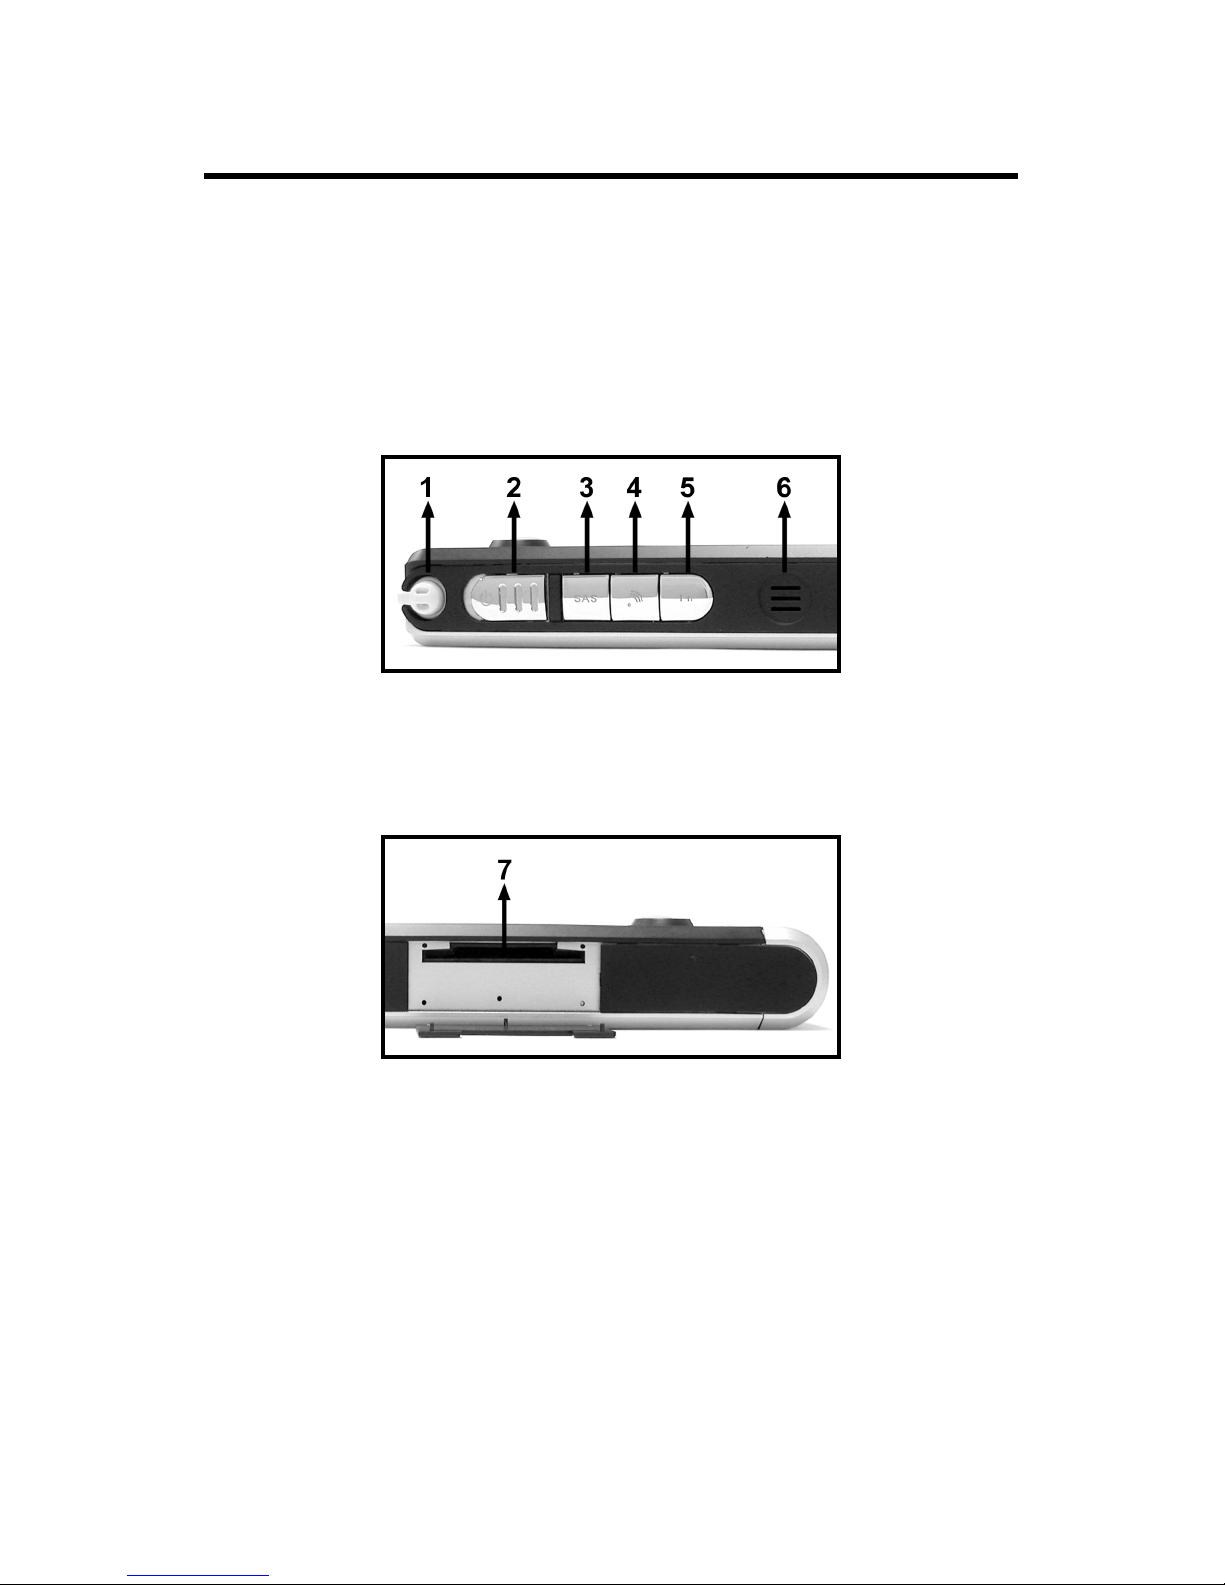
9. Power on/off button:
Turns on/off the computer power.
• Turn on the computer (Full Power Off) by pressing and holding
the power switch 4 seconds until the Power indicator turns on.
• Turn off the computer from the full power on mode via pressing
and quick-release the power switch.
10. SAS button:
This button is used to emulate the CTRL+ALT+DEL combination
key, which brings the Windows Task Manager dialog box for you
to monitor the performance of computer or close some tasks. User
can’t configure this button since this button is set.
11. WLAN stop button:
Press this button to stop a WLAN connection.
12. Fn button:
BIOS setup key.
Page 29
Chapter 3 - System Overview
21
13. Internal speaker:
A built-in speaker. It supports audio features in the software
applications. You can set the volume control though the operating
system or the application. For example, in the Windows XP taskbar,
you may double tap the volume icon and brings up the Master
Volume dialog to set the volume settings. Sound from the speaker
is muted when a headphone is used.
Figure 13
14. 4-in-1 card reader:
Supports SD, MMC, Memory Stick, Smart-Media flash memory card.
Figure 14
Page 30

V300 System User’s Manual
22
Bottom View
Features are shown in [Figure 15], and are described as follows.
Figure 15
1. Battery cover:
Houses the computer's battery pack.
Page 31

Chapter 3 - System Overview
23
Rear View
Features are shown in [Figure 16], and are described as follows.
Figure 16
2. Rubber foots:
Prevents V300 System from moving on uneven surfaces.
3. USB KB docking port:
Connects your V300 System to the USB keyboard docking.
Page 32

V300 System User’s Manual
24
Page 33

C
C
h
h
a
a
p
ptt
e
err
4
4
U
Ussiinngg
B
Baatttteerryy PPeenn
Page 34

V300 System User’s Manual
26
Using Your Battery Pen Correctly
To interact with your tablet computer, This V300 System offers a unique
input tool, a Battery Pen, that you can use it in place of a mouse or a
standard keyboard. Instead of using a mouse, you can use your Battery
Pen to interact with items on your screen. The Battery Pen moves the
cursor without even touching the LCD screen. You can move items, open
them, change them, delete them, and more.
It is also equipped with pressure sensitive option that allows for great
writing experiences. Tapping the button on Battery Pen emulates "right
clicking" with a mouse. See [Figure 17].
Figure 17
Page 35

Chapter 4 – Using Battery Pen
27
Use the pen instead of a mouse
You can use your battery pen to do many things you're used to do with
mouse. That includes the pointer on the screen, clicking the left mouse,
and clicking the right mouse.
Use single-tap anywhere you would normally single-click with the mouse.
Where you would double-click using the mouse, you now double-tap with
the battery pen.
There are four basic actions that you can perform with your battery pen.
Pen actions correspond to mouse actions as follows:
Battery pen Action Mouse Action
Point Point
Tap Click
Double-tap Double-click
Press and hold Right-click
Drag Drag
Right-click equivalents
You can use your battery pen to use features that you would normally
access with a right mouse button, such as shortcut menus. There is a
button on your battery pen as a right-click equivalent. Or, you can use
another one battery pen action called "press and hold".
1. Using battery pen button as a right-click equivalent
You can use the battery pen button to display shortcut menus or
access other program-specific right-click features.
• To use the battery pen button for right-click, press the battery
pen button and hold it as you tap the screen of your V300
System, and then release the battery pen button.
• To right-drag an item, press the battery pen button, hold it as
you drag the item to the location of your choice, and then
release the choice.
Page 36

V300 System User’s Manual
28
2. Using press and hold for right-click
You can also use a tablet pen action called "press and hold" to
perform right-click equivalents.
To use press and hold as a right-click equivalent, press the tip of the
tablet pen into the screen, hold it down until the mouse icon appears,
and then lift the tablet pen. The pop-up menu appears and then you
may tap your choice now.
Tips for using battery pen
• Hold the battery pen in the same way that you hold a pen or pencil
when writing on paper.
• Rest the palm of your hand on the screen and hold the battery pen
near the tip when you tap or perform other actions.
• To tap successfully, tap and lift your pen quickly off the screen.
Avoid pushing items with your pen.
• When tapping, watch the pointer as it moves on the screen, not the
tip of the battery pen. This will help you more accurately tap what
you're aiming at on the screen.
• To get the best reaction with the LCD screen while using the battery
pen, please tap the selected item vertically on the screen.
Page 37

Chapter 4 – Using Battery Pen
29
Changing the Battery for Battery Pen
If the battery pen runs out of power, you have to replace a new battery
for it.
Following the steps to replace a new battery:
1. Rotate the battery pen as the direction (1) as shown in [Figure 18].
2. Gently pull the battery cover off as the direction (2).
3. Replace a new battery.
Figure 18
Page 38

V300 System User’s Manual
30
Page 39

A
A
p
p
p
p
e
e
n
n
d
dii
x
x
A
A
SSyysstteem
m SSppeecciiffiiccaattiioonnss
Page 40

V300 System User’s Manual
32
Technical Specifications
ITEM DESCRIPTION
DIMENSION 240(L) x 180(W) x 25(H) mm
CPU Transmeta Course TM5500 800MHzs
Integrated 64KB L1 instruction cache, 64KB L1
data cache, and 256K -byte L2 write-back caches
Integrated Northbridge core logic features
facilitate compact system designs
Compact 474-pin ceramic BGA packages
0.4-1.0 W @ 367-800 MHz, 0.95-1.3V running
typical multimedia applications
CORE LOGIC South-bridge: VIA VT8235PCI
Support AC97 v2.2 Audio Codec and Modem
Codec
ACPI 2.0 and APM 1.2 compliant
Support USB 2.0 up to 6 ports
Support dual IDE channels with ATA
133/100/66/33
Support up to 6 PCI Masters
Integrated RTC, Keyboard/PS2 mouse controller
LPC 1.0 interface
MEMORY Main Memory
1 DDR SODIMM memory slots
DDR 266s
Maximum 512Mbytess
Ship with 128Mbytes memory
ROM
Phoenix BIOS Code
MASS STORAGE HDD
ATA interface @ 100 MHz, maximum 133 MHzs
2.5", 9.5 mm maximum heights
Support 4,200 rpm
Page 41

Appendix A - System Specifications
33
Card Reader
ITE 8228Es
Support SD/MMC, Memory stick, Smart-Media
flash memory card
LCD DISPLAY Support 8.4” TFT LCD with 1 CCFL backlights
LVDS interface
GRAPHIC/VIDEO Graphic Memory
4 MB Built-in Memory
Features
2 Pixel Rendering Pipelines and 4 Texture 3D
Graphic Engines
PCI interfaces
Advanced HW Acceleration for DVD playback
AUDIO Codecs
AC-links
Realtek 202 Codec
Features
Support built-in speakers
Support stereo headphone
Support stereo audio with simultaneous V.90 HSP
modem operation
Support multiple audio Codec + one modem
Codec
STANDARD
PORTS
Two USB 2.0 port @ 480 Mbit
One DC input port for external AC adapter
One VGA-Out port
One headphone out port
One microphone in port
One RJ-11 port, support 56kbps internal modem,
US and international
One RJ-45 port, support Ethernet 10/100 Base-T
Page 42

V300 System User’s Manual
34
I/O DEVICES Keyboard module with Touch Pad (Optional)
Communications
♦ 56kbps v.90 internal modem US and
international
♦ 10/100 Mbps Ethernet
♦ 802.11b USB1.1 WLAN (Optional)
4 in 1 Flash memory card reader (Support SM,
MS, SD, MMC memory card)
SYSTEM
SOFTWARE
Operating System
Windows ME, 2000, XP or XP Tablet Edition
Digitizer Panel software
Free Note
Office Ink
Power Presenter
Power
Management
System
ACPI 2.0 and APM 1.2 compliant
Power
Subsystem
AC Adapter
Universal type AC adaptor output maximum 50W,
19V 2.64A
Smart Battery
3 x 2200 mAh Lithium-Ion battery pack @ 24.42
Whr
Removable and rechargeable
SMBus interface to smart battery pack
LED INDICATOR Power On/Off & Battery charge LED (Power On:
Green Light / Batt. Charge: Orange Light)
HDD LED
System Sleep/Suspend LED
WLAN LED
Page 43

Appendix A - System Specifications
35
Button Power on/off button
Hold function (Mechanization)
SAS (Ctrl+Alt+Del) button
Up/Down button (Fn + Up/Down = Brightness
adjustment)
Fn button (BIOS setup key)
WLAN Stop button
Digitizer Panel 8.4” Digitizer Panel
Battery Pen
Optional Items External USB keyboard module (USB Interface)
External Optical device (USB Interface)
Digital still Camera (CMOS, 800x600 res.)
Wi-Fi 802.11b WLAN module
Accessories Quick Guide manual with 8 languages and print
materials
20V, 50 W power adapter
Cables, TBD
CD of bundled software
Regulation Safety
System: cUL, TUV, CB, 3C
Adapter: cUL, TUV-GS, CB, 3C, T-mark, Nordic,
Poland
EMI
System: CE, FCC (DoC), VCCI, BSMI, MIC
Adapter: CE, FCC (DoC), VCCI, BSMI, MIC
MTBF 35K hrs, 90% confidence level
All contents in the specifications are subjected to change without
notice.
Page 44

V300 System User’s Manual
36
Page 45

A
A
p
p
p
p
e
e
n
n
d
dii
x
x
B
B
A
A
C
C--
D
D
C
C
A
Addaapptteerr
G
Guuiiddeelliinnee
Page 46

V300 System User’s Manual
38
Maintaining Your AC-DC Adapter Correctly
This AC adaptor is a dedicated accessory to be used exclusively with
V300 System, please make sure to read this guideline before use.
WARNING
• Do not use the product at a voltage other than the specified voltage,
otherwise can cause fire or electrical shock.
• Continuing to use the product after an abnormality such as
generation of smoke or a strange odor has occurred can cause a fire
or electrical shock.
• Do not attempt to disassemble or modify the product. This can
cause a fire or electrical shock.
• If water should happen to get inside the product, immediately
unplug the power cord. Continuing to use the product can cause a
fire or electrical shock.
• Wipe off the plug of the power cord if it should become covered with
dust. Failure to do so can cause a fire or electrical shock.
• The total ampere ratings of the equipment plugged in should not
exceed the ampere rating of the cord if you are using an extension
cord. Also, the total current rating of all equipment plugged into a
single wall outlet should not exceed the fuse rating.
CAUTION
• Do not place heavy objects on power cord, allow heavy objects to
drop onto it or allow the power cord to become damaged due to
excessive bending.
• Do not short or touch the output terminals of the product while it is
still plugged in.
• Do not plug in the power cord with wet hands. This can cause an
electrical shock.
Page 47

Appendix B - AC-DC Adapter Guideline
39
• Do not subject the product to strong impacts or allow it to drop onto
a hard surface. This can cause a malfunction.
• For countries with a different shaped outlet, you are recommended
to purchase a suitable AC Adapter.
Page 48

V300 System User’s Manual
40
Page 49

A
A
p
p
p
p
e
e
n
n
d
dii
x
x
C
C
TTrroouubblleesshhoooottiinngg
Page 50

V300 System User’s Manual
42
Question: V300 System does not turn on when not connected to
AC power
Solution: The power may be too low to run your V300 System, the
Power LED Indicator starts blinking. Turn off V300 System
to replace a fresh battery or connect to AC power.
Question: Auto power off
Solution: Power is too low or run out. Use the Battery pen to tap on
the screen to see if the display activates. You can replace a
fresh battery or plug the AC-DC adapter in to charge V300
System.
Question: V300 System does not turn on or the TFT LCD display
appears to be off, even though the power is on.
Solution:
T
he display brightness and contrast are too low. Use
the Fn + Up button to adjust the brightness level of
screen image.
V300 System is in Suspend mode. Use the Battery pen
to tap on the screen to see if the display activates.
V300 System has run out of power. Plug the AC-DC
adapter in to charge V300 System.
Question: Screen is blank
Solution:
Adjust the LCD display brightness and contrast by using
the Fn + Up/Down button. The screen can be
darkened or lightened until V300 System appears to be
powered off.
Restart V300 System.
Charge the device by connecting to AC power.
Question: Screen is dark
Solution: Prolonged exposure to direct sunlight can cause your V300
System’s LCD screen to temporarily darken. This is normal
for LCD SCREENS AND IS NOT PERMANENT.
Question: Display is difficult to see in sunlight or in dark rooms
Solution: Use the Fn + Up/Down button to adjust contrast and
brightness level for optimal viewing.
 Loading...