

Page 1

TA80CA1
Quick Start Guide
!
Page 2
1
TA80CA1
Quick Start Guide
!
Federal Communication Commission Interference
Statement
This device complies with Part 15 of the FCC Rules. Operation is
subject to the following two conditions: (1) This device may not
cause harmful interference, and (2) this device must accept any
interference received, including interference that may cause
undesired operation.
This equipment has been tested and found to comply with the
limits for a Class B digital device, pursuant to Part 15 of the FCC
Rules. These limits are designed to provide reasonable protection
against harmful interference in a residential installation. This
equipment generates, uses and can radiate radio frequency
energy and, if not installed and used in accordance with the
instructions, may cause harmful interference to radio
communications. However, there is no guarantee that
interference will not occur in a particular installation. If this
equipment does cause harmful interference to radio or television
reception, which can be determined by turning the equipment off
and on, the user is encouraged to try to correct the interference
by one of the following measures:
- Reorient or relocate the receiving antenna.
- Increase the separation between the equipment and receiver.
- Connect the equipment into an outlet on a circuit different from
that to which the receiver is connected.
- Consult the dealer or an experienced radio/TV technician for
help.
Page 3
2
FCC Caution: Any changes or modifications not expressly approved
by the party responsible for compliance could void the user's
authority to operate this equipment.
This transmitter must not be co-located or operating in
conjunction with any other antenna or transmitter.
FOR PORTABLE DEVICE USAGE
Radiation Exposure Statement:
The product comply with the FCC portable RF exposure limit set
forth for an uncontrolled environment and are safe for intended
operation as described in this manual. The further RF exposure
reduction can be achieved if the product can be kept as far as
possible from the user body or set the device to lower output
power if such function is available.
FOR COUNTRY CODE SELECTION USAGE
Note: The country code selection is for non-US model only and is
not available to all US model. Per FCC regulation, all WiFi product
marketed in US must fixed to US operation channels only.
CAUTION
Risk of explosion if battery is replaced by an incorrect type.
Dispose of used batteries according to the instructions.
Package contents
If any of the items is missing or damaged, please contact your
dealer immediately:
• One Tablet • One AC adapter • One USB cable • This guide
Page 4
3
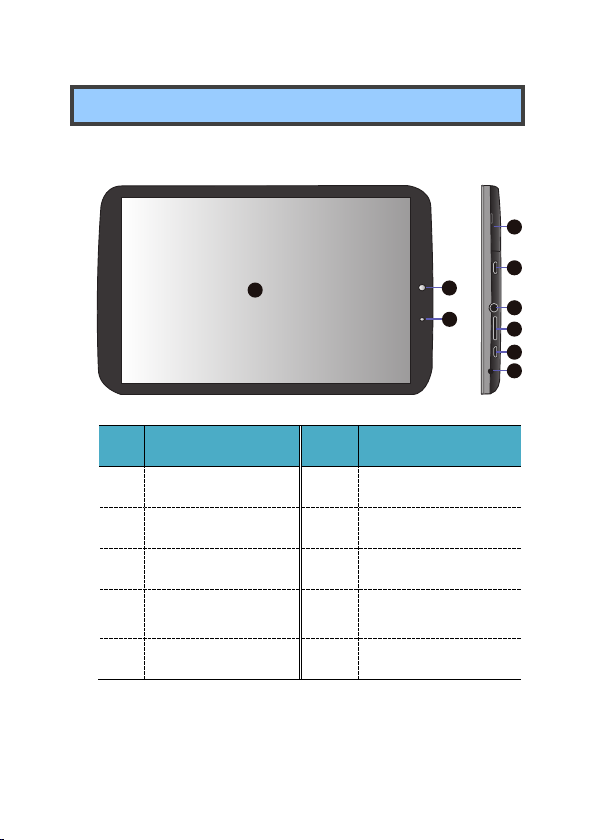
Tablet layout
No.
Name
No.
Name
1
Touchscreen
6
Headphone plug
2
Front facing camera
7
Micro SD card slot
3
Light sensor
8
Mini HDMI port
4
Mobile network
card slot
9
Microphone
5
Micro USB port
2
3
1
7
8
6
5
4
9
Page 5

4
!
No.
Name
No.
Name
1
Rear facing camera
4
Power Button
2
Speaker
5
Volume up/down
3
Mobile network
card slot
!
! !
1
2
4
5
3
Page 6
5
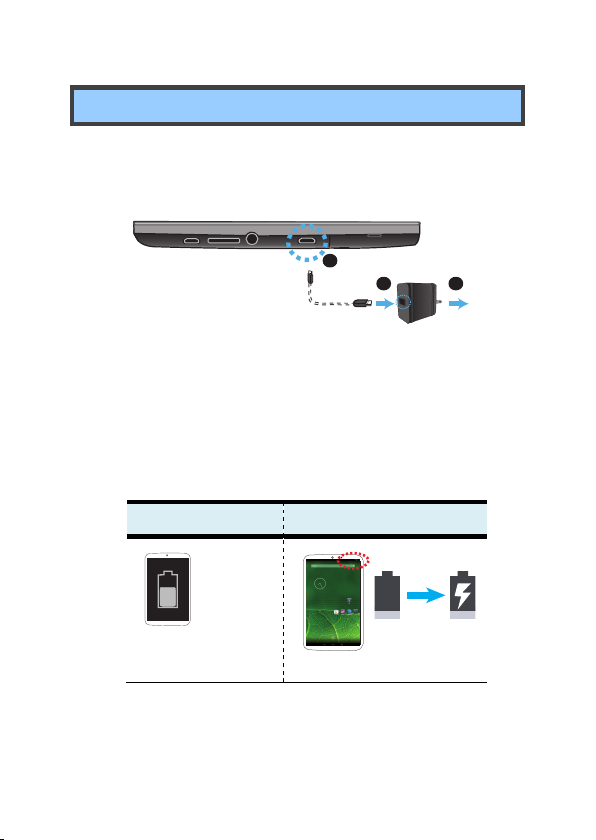
Charging your tablet
If your tablet is just being unpacked from the box, you need to
charge the tablet first. It will take around 4 to 5 hours to be
fully charged.
1. Plug the USB head of the cable into the adapter.
2. Plug the micro-USB head of the cable into the
micro-USB port on your tablet.
3. Plug the adapter into a wall-socket.
4. If the battery starts charging, you will see:
When power off
When power on
A large
icon appears for a
few seconds.
3
1
2
Page 7
6
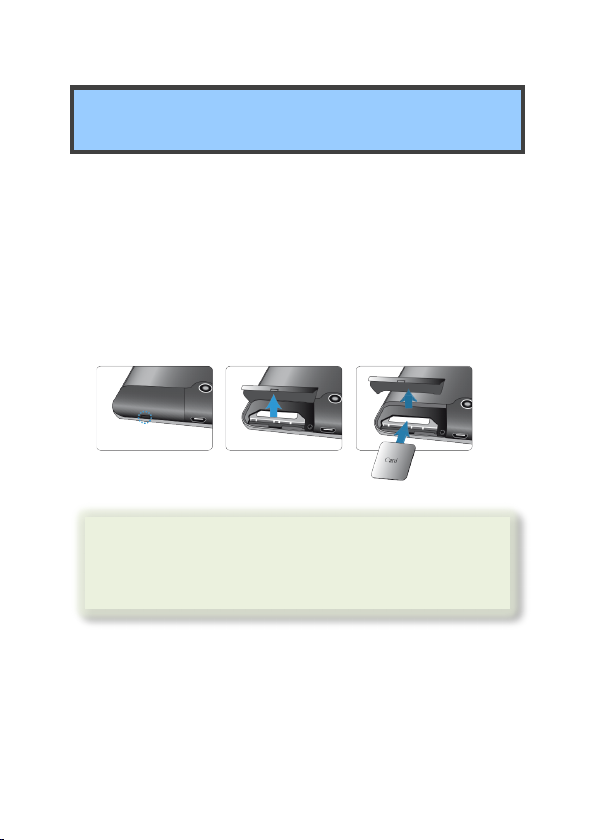
Inserting your mobile network card
(optional)
For the optional mobile network card, follow the steps below
to install it.
1. Turn off your tablet.
2. Flip open and remove the cover of the card slot.
3. Insert your mobile network card.
4. Close the cover.
! ! !
Note
:
Whether or not a mobile network card is
installed, keep the cover closed at all
times.
Page 8

7
Powering ON/OFF your tablet
To power on your tablet
Press and hold the power
button down until the
screen turn on.
To power off your tablet
1. Press and hold the power button until the power
options menu appears on the screen.
2. Tap and choose OK from the menu.
Page 9

8
Inserting a storage card
Your tablet supports micro-SD cards with storage space
ranging from 128M to 32G. You can insert the micro SD card
and pull it out without powering down the tablet. To do so,
follow the steps below.
Install your Micro SD Card
1. Hold your tablet with front side up.
2. Insert your micro SD card in the direction as shown.
Remove your Micro SD Card
1. Push and release the micro SD card. This will unlock
the card.
2. Pull out the micro SD card.
Page 10

9
Specifications
Processor
! Intel Clovertrail+ Z2560
Memory
! 1 GB or 2 GB (optional)
LPDDR2
Storage
! 16GB
Wireless
! WLAN, Bluetooth
! Mobile Network
Display
! 8-inch 800x1280 screen
! Support10-pointsmulti-touch
Cameras
! Front camera: 2.0 M
! Rear camera: 5.0 M
Battery
! 1Cell,1S1P
! Li-polymer
! 4150 mAh
! TCL:TA80-1S4150-T1T2
Input/Output
! 1 x micro-USB 2.0, OTG port
(Type A/B)
! 1 x Mic/head phone jack
combo
! 1 x mini-HDMI 1.3a type C
! 1 x micro-SD card slot
(128M-32G)
! 1 x Analog MIC
Speaker & Mic
! Build-in Speaker x 2
! Internal Analog MIC x 1
Page 11

10
Mobile Network
(optional)
! HSUPA/HSDPA/WCDMA:
2100(900/850)
! GSM: 1800, 900
! HSDPA:
14.4Mbps(DL)/5.76Mbps(UL)
! Data only
AC-Adapter
! DC Output: 5V/2A
! Input Voltage: 100 ~
240VAC
! Input Frequency: 47 ~ 63Hz.
! Chicony:
W12-010N3A, W12-010N3B
W12-010N3C, W12-010N3D
W12-010N3E
Dimension (mm)
! 123 (W) x 201.5 (H) x 8.8 (D)
Weight
! 305 g (w/o adapter)
 Loading...