

Page 1

RCW600WIFI
USER MANUAL
Android APP
Scan the QR code or
download on the Google play
Page 2

Overview
Features
Technical Parameters
RCW-600WiFi is a two-channel temperature monitor based on IoT technology. It can be
widely used in foodstus, catering, logistics and HACCP industries. With a combination of
WiFi, Elitech App and Cloud platform, users can remotely view, monitor and manage data
online via any web browsers or smart phones.
The wireless monitor equipped with two temperature sensors and a built-in rechargeable
lithium battery that can continuously provide real-time data uploading and alarm notica-
tions even after power outages or blackouts.
◆ High sensitivity probe, short response time.
◆ Keep running up to 6 hours after power supply cut-o.
◆ Congurable alarm thresholds. Audio and visual alerts when beyond thresholds.
◆ Congurable uploading interval between 1 minute to 24 hours.
◆ 20,000 recording points on device, unlimited recording points on the Cloud server.
◆ WiFi access points for real-time data collecting and upload to the Cloud platform.
◆ Flexible data exporting, can export in multiple formats via the Cloud platform.
◆ Power supply: 5V/1A(DC)
◆ Measurement range: Temperature: -40℃~80℃
◆ Accuracy: Temperature: ± 0.5℃ (-20℃~ 40℃); ± 1℃(others)
◆ Temperature resolution: 0.1℃
◆ Loging interval: 1 minute to 24 hours
◆ Memory capacity: 20,000 recording points
◆ Alarm output: LED indicator, buzzer, e-mails, Cloud platform/App push notication etc.
◆ Uploading mode: WiFi
◆ Battery: 3.7V, 1100mAH rechargeable lithium battery
1
Page 3
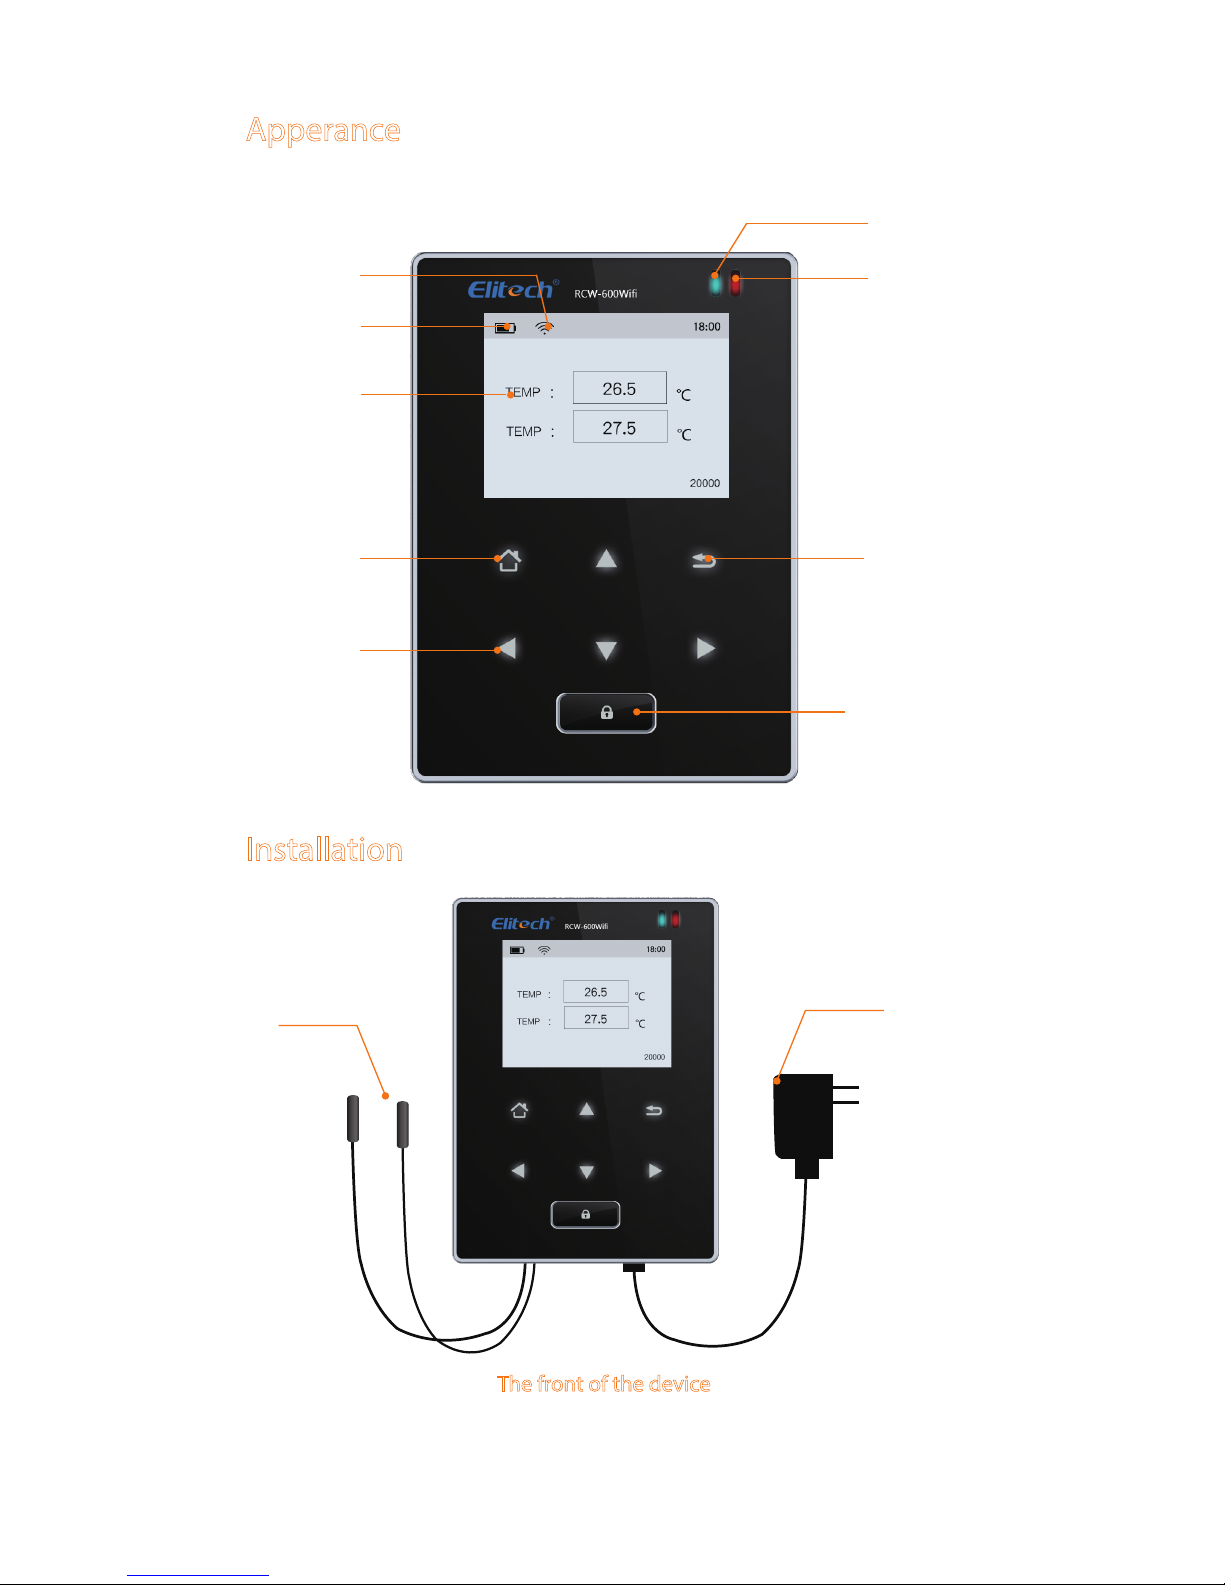
Apperance
Installation
Power adapter
Temperature sensors
The front of the device
WiFi signal
Battery level
Temperature
values
Menu button/
Conrm button
Navigation
button
Power indicator
Alarm indicator
Return button
Lock/unlock screen
2
Page 4

3
Touch Buttons
enter the selected menu.
shift left/right to change the parameter.
How to install the sensor
Plug the Temperature-humidity
sensor into the sensor port by
matching the correct pins.
shift up/down to select the desired menu option.
back to previous windows.
lock/unlock the screen.
OFF ON
ON
Reset hole
Temperature
sensor port
Power ON/OFF
The back of the device
Power adapter
port
Page 5

4
Open Network and Sharing Center
Connect automatically
Daili-up and VPN
LAN
WLAN
Connected
ATK-CFBE
600WIFI471881
Connect
Information sent over this network
might be visible to pthers.
PCs
GUID Information
WiFi Conguration
Get device GUID
Please turn ON the monitor rst and follow the setup steps below.
Step 1: Click Menu button on
the device.
Step 2: Move the cursor to
‘5. ABOUT THIS PRODUCT’
by using Up and Down key.
Step 3: Click Menu to
conrm this option and
view the GUID (20-digit
numbers).
1. Connect to device’s network
Use a smart phone or PCs to search and connect corresponding device’s WiFi under the
name of: '600wif*****'.
Phones
Settings
Wi-Fi
Wi-Fi
CHOOSE A NETWORK...
600WIFI471881
00
106F3F57AF50-1
B-LINK-4EF9
jcdq3
Lenovo
Mr xiao
jcrb_iot
lin shi
Page 6

http://192.168.2.1/
3. IP address
Type in IP address in any web brower: http://192.168.2.1/.
4. Login
Default user name: admin
Default password: admin.
Windows Security
The server 192.168.2.1 at USER LOGIN requires a username
and password.
Warning:The server is requesting that your username and password be
sent in an insecure manner (basic authentication without a secure connection)
Remember my credentials
admin
●●●●●
×
OK Cancel
√
5
2. Reset
Prick the Reset hole for 5 seconds to reset the device if you want change device’s WiFi access.
Keep the device on, prick the Reset hole
for 5 seconds to restart the device.
The symbol will shows after reboot.
OFF ON
ON
Reset
Wi-Fi
Page 7

6
5. Settings
Step 1: Select “STA mode” and click “Next”.
Select Mode:
Select Mode
Next
STA mode
Step 2: Click“Scan”.
Site Survey
SSID BSSID
MR xiao 90:C7:D8:E6:13
88:25:93:3A:CF:BE
2:1A:11:FB:2C:7E
78:EB:14:7D:7:B2
45 4
6
6
6
86
49
49
ATK-CFBE
yl
FAST-07B2
RSSI
Channel
OK
Please select your cerrent wireless network
Refresh
Step 3: Select a desired WLAN, such as“ATK-CFBE”.
Step 4: Click“OK”.
UPGRADE-AP
DisableEncryption Method
Scan
Enable
0.0.0.0
0.0.0.0
0.0.0.0
10.10.100.254
Network Name(SSID)
Note:case sensitive
Obtion an IP address
automatically
IP Address
Subnet Mask
Gateway
DNS Server Address
Save
Page 8

7
Step 5: Enter WLAN password.
Step 6: Click “Save”.
ATK-CFBE
WPA2PSKEncryption Method
Encryption Algorithm
Show the password
Save
Scan
AES
●●●●●●●●
Enable
0.0.0.0
0.0.0.0
0.0.0.0
10.10.100.254
Netwok Name(SSID)
Note: case sensitive
Password
Obtion an IP address
automatically
IP Address
Subnet Mask
Gateway Address
DNS Server Address
Step 7: Click“Restart”.
Step 8: Rebooting Successful! The device is restarted.successfully.
Saved Successfully!
Configurations will take effect after restart.
After restart, you will need to re-login the configuration interface
for other settings,so it is recommended to restart after completing
all settings.
Please click [Restart] to restart now, or click [Back] to continue
setting.You can restart after all configuration.
Resart
back
Rebooting Successful!
You can choose to manually close the page or
reconnect the WIFI module of network and then login
to the configuration interface.
Page 9

8
2. Add Device
Follow the steps below and repeat the procedures in 'WiFi Conguration' to network
the devices.
1. Download and Login:
Please scan the QR code on the front of the manual or search Elitech on App Store
or Google Play to download Elitech app.
Register and login to your account.
Login
Remember password
Register now Forgot password?
Enter username
Enter password
Device
+
Query
Online
Search
Device Nema
Model
Sensor Data
GUID
RCW-600WIFI
RCW-600WIFI
1
94780240044317******
Device
Alarm
Project
More
①Click "+".
②Click and scan the QR code
on the back of the device.
③Click "Add" and the
device will be added.
Add Device
Add
Device GUID
Device Name
Click the QRcode on top right to automatically
scan and add.
Add Device
Device Name
2712586328626513****
Add
Click the QRcode on top right to automatically
scan and add.
Elitech App
1. Login Cloud Portal
Please type in the URL http://www.i-elitech.com to login for more operation.
Click ‘Help’ to obtain Cloud and App operation instructions.
2. Top up SIM card (only for GPRS Version)
If your device is not a Wi-Fi one, please refer to the App Instruction Manual to
rechargeyour SIM card. You may experience it for two month for free.
Elitech Cloud
Page 10

Elitech Technology. Inc.
1551 McCarthy Blvd Suite 112 Milpitas CA 95035
Sales Support:sales@e-elitech.com
Tech Support: info@e-elitech.com
http://www.elitechlog.com
RCW-2000
 Loading...