

ELITE BISTRO EPC-202 SERIES Instruction Manual
4 QT. DIGITAL PRESSURE
COOKER
Model: EPC-414(A~Z)
INSTRUCTION MANUAL
Before operating your new appliance, please read all instructions carefully and keep for future
reference.

IMPORTANT SAFEGUARDS
When using pressure cookers, basic safety precautions should always be followed:
1. Read all instructions before operation.
2. Do not touch hot surfaces. Use handles or knobs and a potholder.
3. This appliance should not be used by or near children or individuals with
certain disabilities.
4. NEVER ATTEMPT TO OPEN LID WHILE THE UNIT IS OPERATING. Do not open the pressure cooker
until the unit has cooled and all internal pressure has been released. If lid is difficult to rotate,
this indicates that the cooker is still pressurized. Do not force it to open. Any pressure in the
cooker can be hazardous. See "OPERATING INSTRUCTIONS" section in this manual.
5. Do not place the pressure cooker in a heated oven or on any stovetop.
6. Extreme caution must be used when moving a pressure cooker containing hot liquids.
7. Do not use pressure cooker for other than intended use.
8. This appliance cooks under pressure. Improper use may result in scalding injury. Make certain
unit is properly closed before operating. See "INSTRUCTIONS FOR USE" section in this manual.
9. To protect against electrical shock, do not immerse cord, plugs, or outer vessel in water or
other liquids.
10. Do not fill unit over 2/3 full. When cooking foods that expand during cooking such as rice,
legumes, beans, or dried vegetables, do not fill the unit over 1/2 full. Overfilling may cause a
risk of clogging the pressure limiting valve and developing excess pressure. Failure to follow
this procedure can result in injury to person(s) and/or damage to the unit. See
"INSTRUCTIONS FOR USE" section in this manual.
11. Be aware that certain foods, such as applesauce, cranberries, pearl barley, oatmeal or other
cereals, split peas, noodles, macaroni, rhubarb, or spaghetti can foam, froth, and sputter, and
clog the pressure release device (steam vent). These foods should not be cooked in a pressure
cooker unless following a Maxi-Matic® approved pressure cooker recipe.
12. Always check the pressure release devices for clogging before use.
13. Do not use this pressure cooker for pressure frying oil.
14. DO NOT tamper with the Steel Ring in the Lid (2) with any tools or external forces. If the Steel
Ring is damaged, please stop using immediately and replace the Lid.
15. Clean the Filter (17) regularly to keep the cooker clean.
16. NEVER use additional weight on the Pressure Limiting Valve (3) or replace the Pressure
Limiting Valve (3) with anything not intended for use with this unit.
17. The surface of contact between the Inner Pot (6) and the Electronic Heating Plate (14) should
always be clean. DO NOT use the Inner Pot with other heating sources. DO NOT replace the
Inner Pot with a container other than what is recommended by the manufacturer.
18. The Inner Pot consists of a non-stick layer surface. To avoid scratching the non-stick surface,
please use wooden or plastic utensils.
19. Unplug from outlet when not in use and before cleaning. Allow to cool before putting on or
removing parts.
20. Do not operate this appliance with a damaged cord or plug or after it malfunctions or has
been damaged in any manner. Return appliance to the nearest authorized service facility for
examination, repair or electrical or mechanical adjustment.
21. Always attach plug to appliance first, then plug cord into the wall outlet. To disconnect, turn
control to off, then remove plug from wall outlet.
22. Do not use outdoors.
23. The use of accessories not specifically recommended by Maxi-Matic® may cause injuries or
damage to the unit.
24. Some countertop and table surfaces, such as Corian®, wood and / or laminates, are not
designed to withstand prolonged heat generated by certain appliances. It is recommended
www.maxi-matic.com
1
info@maxi-matic.com

IMPORTANT SAFEGUARDS (cont.)
by countertop manufacturers and Maxi-Matic® that a hot pad or trivet be placed under your
appliance to prevent possible damage to the surface.
25. Do not use under hanging cabinets; steam from pressure release may cause damage.
26. Do not operate your appliance in an appliance garage or under a wall cabinet. When storing
in an appliance garage always unplug the unit from the electrical outlet. Not doing so could
create a risk of fire, especially if the appliance touches the walls of the garage or the door
touches the unit as it closes.
SAVE THESE INSTRUCTIONS
FOR HOUSEHOLD USE ONLY
GROUNDING INSTRUCTIONS: This appliance must be grounded. It is equipped with a 3-pronged
cord having a grounded plug. The plug must be plugged into an outlet which is properly installed
and grounded.
Warning: Improper use of the grounded cord can result in the risk of electric shock. Consult a
qualified electrician if necessary. Do not attempt to defeat this safety feature by modifying plug.
A short power-supply cord is provided to reduce the hazards resulting from entanglement or
tripping over a longer cord. If it is necessary to use an extension cord, it should be positioned such
that it does not drape over the counter or tabletop where it can be pulled on by children or tripped
over and:
A. Use only 3-pronged extension cord with 3-blade grounding plug.
B. The marked rating of the extension cord must be equal to or greater than the
rating of this appliance. The electrical rating is listed on the bottom of this
unit.
www.maxi-matic.com
2
info@maxi-matic.com

ABOUT PRESSURE COOKING
This digitally controlled and automatic Pressure Cooker uses advanced technology so you and your
family can enjoy the benefits of better, faster and healthier cooking. Your Elite Platinum Pressure
Cooker seals in steam to cook hotter and faster while maintaining important nutrients for healthier
meals. Cooking fast and with less water saves vital natural resources and energy! The unit features
easy touch-button settings, a countdown timer, and a cooking pot big enough for family
gatherings! It’s the easiest pressure cooker to use on the market. It may seem like a complicated
unit but rest assured, this pressure cooker is simple to use, makes meals quick and easy, and overall
it saves you money! Please accept our thanks for purchasing an Elite Platinum Pressure Cooker and
Enjoy!
ELECTRICAL SAFETY WARNING
There is a potential risk of fire, electric shock or injury to persons if the product is not used as
instructed. Protection against electric shock is assured only if the main power cord is
connected to a properly grounded 120V | 60Hz power receptacle.
This product is to be used in an indoor environment only and is not intended for commercial
use. Dry locations only.
All parts and accessories for this appliance must be used properly according to the
instructions. All parts and accessories must be the original provided from manufacturer. All
other parts or accessories that is not intended for use with this appliance is strictly prohibited.
The use of an extension cord, power adapter or other electric devices is highly not
recommended.
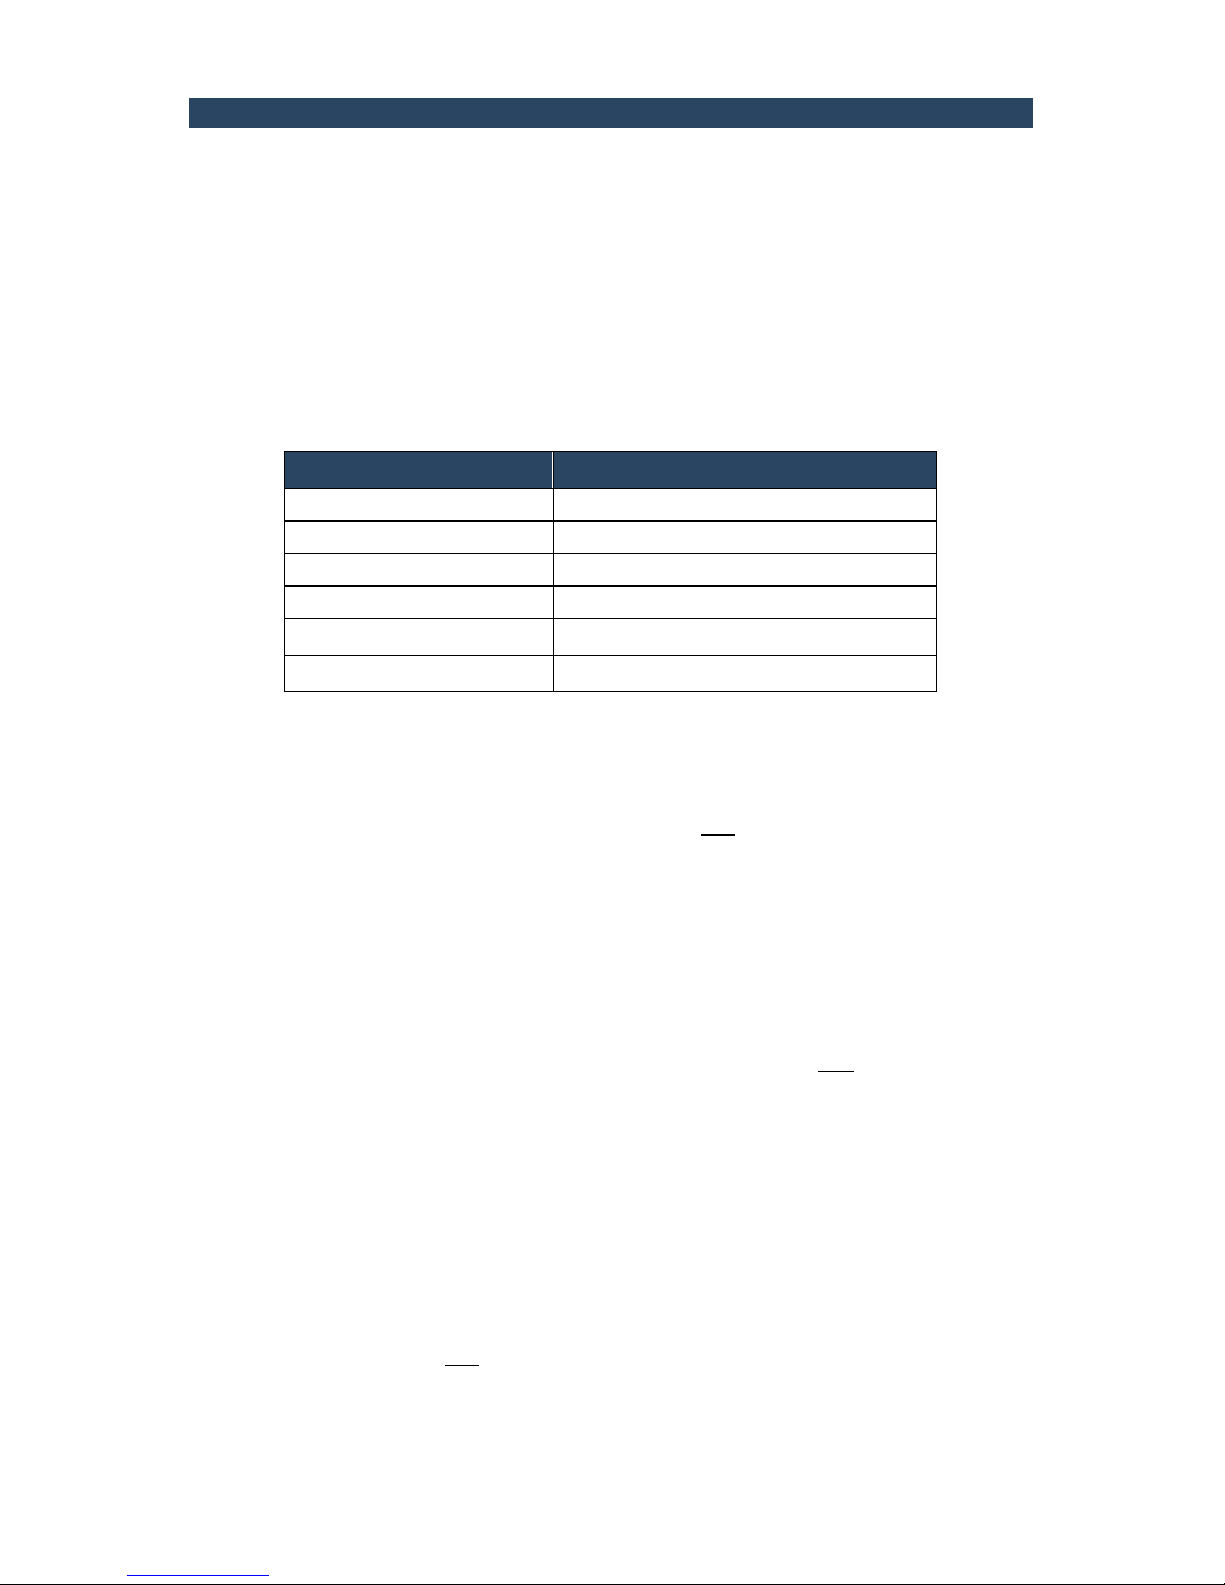
LED ERROR INDICATOR
If any of the below error codes appear on the pressure cooker display, unplug the power cord
and re-plug after 10 minutes. If the error code remains, contact the manufacturer for a
replacement part.
See Troubleshooting #11 on page 17 for instructions regarding an E4 error.
Indicator Code
Problems/Causes
E1
Open Circuit of the Sensor
E2
Short Circuit of the Sensor
E3
Overheating
E4
Signal Switch Malfunction
www.maxi-matic.com
3
info@maxi-matic.com

TABLE OF CONTENTS
1 important safeguards
3 about pressure cooking
3 electrical safety warning
3 E1 - E4 error indicator
5 parts identification
6 - rubber seal ring assembly/ pressure cooker lid markings
7 - pressure limiting valve warning/condensation cup assembly
8 additional safety tips
9 before first use
9 - lid assembly/water test
10 instructions for use
11 operating instructions
11 - after selecting a menu button
11 - after selecting pressure cook time
12 - auto-warm/dips feature
12 - reset/cancel function
12 - removing the lid after cooking
13 - preparing white rice
13 - how to brown/sauté
14 safety features
14 how to cook with frozen foods
15 cleaning and maintenance
16 troubleshooting
18 helpful tips
19 cooking time chart
23 recipes
23 - savory pressure cooker recipes
32 - dessert recipes
34 warranty and return instructions
www.maxi-matic.com
4
info@maxi-matic.com
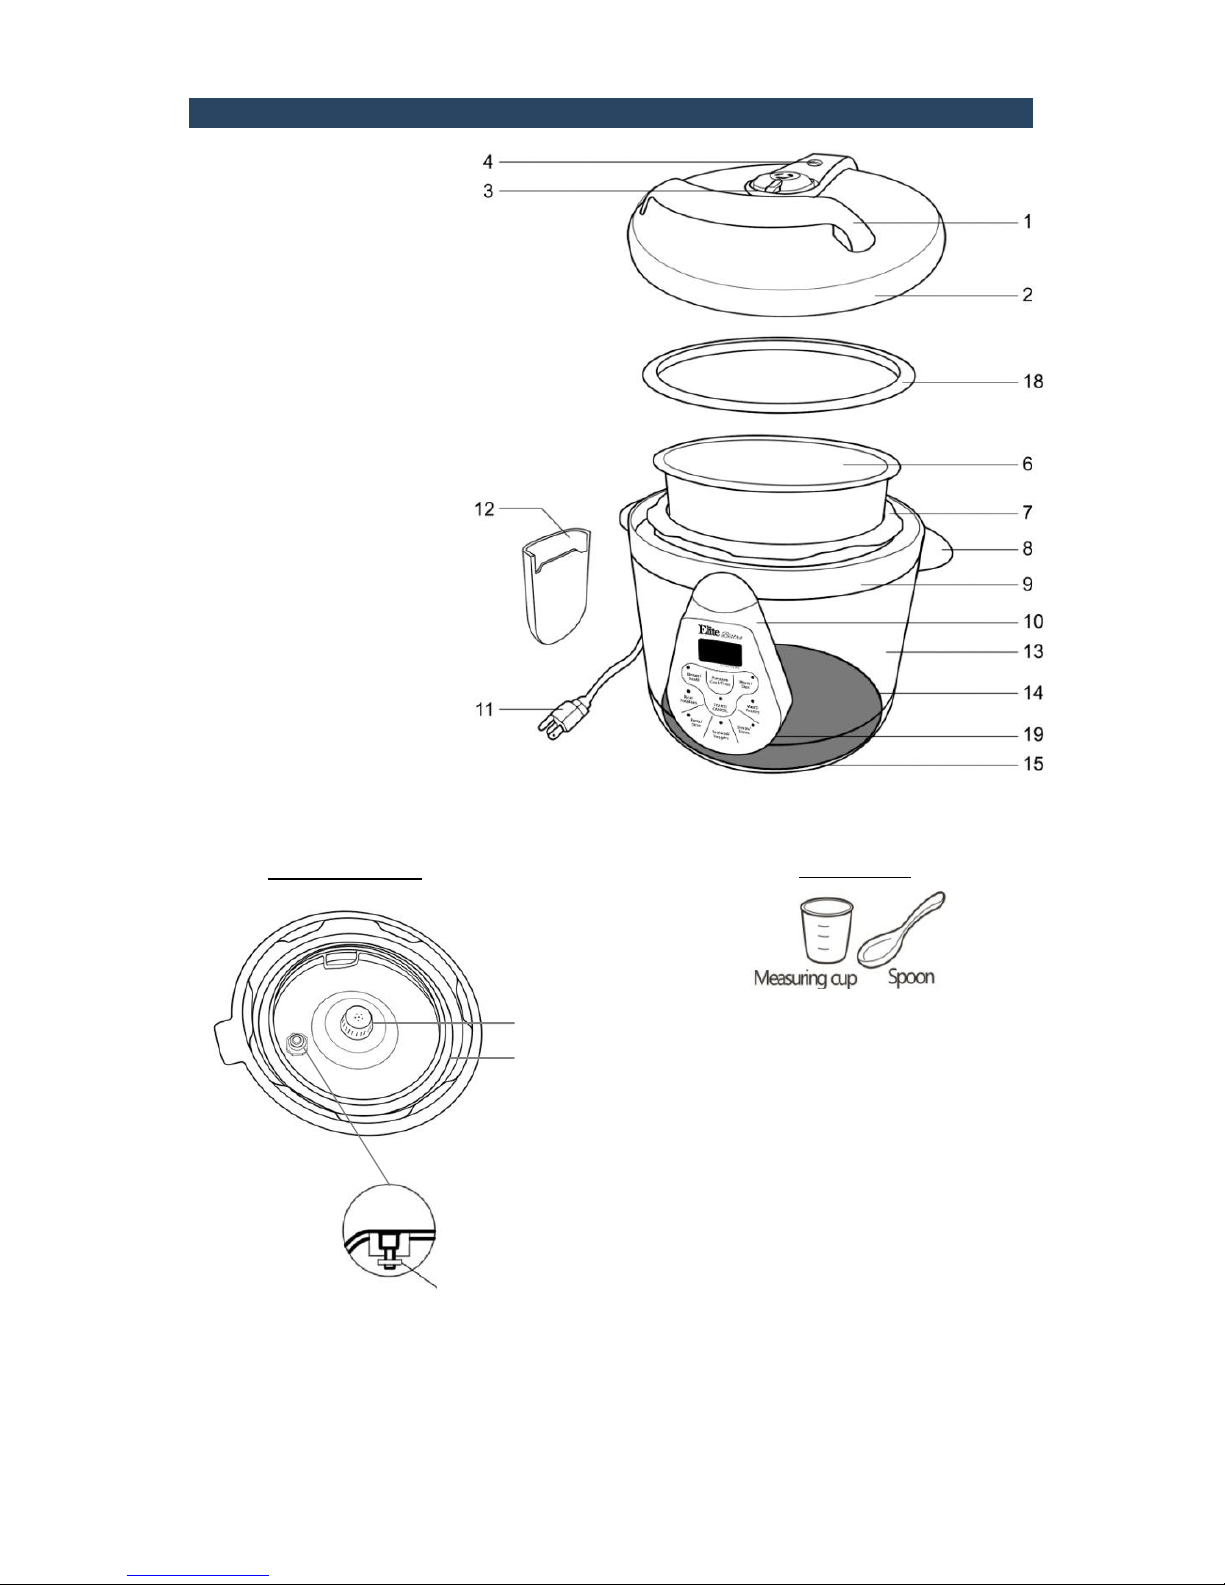
PARTS IDENTIFICATION
1. Handle
2. Lid
3. Pressure Limiting
Valve
4. Float Valve
(external view)
5. Float Valve
(internal view)
6. Inner Pot
7. Outer Pot
8. Handle
9. Upper Ring
10. Control Panel
11. Power Cord
12. Condensation Cup
13. Main Body
14. Heating Plate
15. Bottom Ring
16. Seal Ring for Float
Valve
17. Filter
18. Rubber Seal Ring
19. Sensor
UNDERSIDE OF LID
5
16
17
18
ACCESSORIES
www.maxi-matic.com
5
info@maxi-matic.com

PARTS IDENTIFICATION (cont.)
RUBBER SEAL RING ASSEMBLY
Always ensure the Rubber Seal Ring (18) is
properly and securely fitted onto the
metal ring in the interior of the Lid (2).
The Rubber Seal Ring (18) should be
placed into the Lid (2) by fitting it around
the outer part of the entire metal ring
making sure that the crease in the Rubber
Seal Ring (18) meets with the metal ring
all the way around (Figures 1–2).
PRESSURE COOKER LID MARKINGS
Please note the "OPEN" and "CLOSE"
markings on the Upper Ring (9) of the
pressure cooker body (13) and the“ ”on
the rim of the Lid (2). To properly close
and secure the pressure cooker Lid (2),
always line up the "CLOSE" marking on
the Upper Ring (9) and the “ ”on the
rim of the Lid (2) (Figure 3).
www.maxi-matic.com
6
info@maxi-matic.com

PARTS IDENTIFICATION (cont.)
PRESSURE LIMITING VALVE WARNING
WARNING: Avoid serious injury. Always
use tongs or a long kitchen tool to set the
valve to EXHAUST (Figure 4).
CAUTION HOT STEAM: KEEP HANDS AND
FACE AWAY FROM THE PRESSURE
LIMITING VALVE WHEN ROTATING TO
EXHAUST.
CONDENSATION CUP ASSEMBLY
The Condensation Cup is the clear plastic
piece that snaps into the back side of the
pressure cooker as shown in Figure 6.
Place condensation cup in rear of the unit
until it locks into place; it is part 12 in the
diagram on page 5.
www.maxi-matic.com
7
info@maxi-matic.com

ADDITIONAL SAFETY TIPS
Always keep hands and face away from Pressure Release Device when releasing
pressure.
Use extreme caution when removing the lid after cooking. Always tilt the lid away
from you, so any remaining steam is away from your face.
Never attempt to open lid while cooking, or before the Red Float Valve (4) has
dropped. Do not attempt to defeat this safety feature by forcing lid open.
Do not cover or block the pressure valves.
Do not touch the pot or lid except for the handle immediately after using.
To avoid burns, allow food to cool before tasting. The temperature of the food gets
considerably hotter than with conventional cooking.
Ensure that the gasket is properly in place and is free of food particles or is not
damaged in any way.
WARNING! Do not release steam manually with recipes containing lots of liquid, such as
soups and stews. Make sure the "KEEP WARM" indicator light is on and unplug the
cooker. Allow to sit until the lid turns without any resistance.
Do not fill unit over 2/3 full. When cooking foods that expand during cooking such
as rice, legumes, beans, or dried vegetables, do not fill the unit over 1/2 full.
Overfilling may cause a risk of clogging the pressure limiting valve and developing
excess pressure. Failure to follow this procedure can result in injury to person(s)
and/or damage to the unit. See "INSTRUCTIONS FOR USE" section in this manual.
Be aware that certain foods, such as applesauce, cranberries, pearl barley, oatmeal
or other cereals, split peas, noodles, macaroni, rhubarb, or spaghetti can foam, froth,
and sputter, and clog the pressure release device (steam vent). These foods should
not be cooked in a pressure cooker unless following a Maxi-Matic® approved
pressure cooker recipe.
This appliance cooks under pressure. Improper use may result in scalding injury.
Make certain unit is properly closed before operating. See "INSTRUCTIONS FOR USE"
section in this manual.
Always check the pressure release devices for clogging before use.
Do not use the pressure cooker without liquid; this could damage the pressure
cooker severely.
Do not use pressure cooker for storage purposes nor insert any utensils.
This is NOT a Stovetop Pressure Cooker. Under NO circumstances should this
Pressure Cooker or any of its parts or components be placed ON or NEAR a Stovetop,
Range, or Open Flame. Doing so will cause serious damage to the Pressure Cooker
and/or injury to person.
www.maxi-matic.com
8
info@maxi-matic.com
BEFORE FIRST USE
1. Remove packaging materials such as cardboard, plastics or Styrofoam and discard
appropriately.
2. Clean all the parts by wiping with a soft damp cloth or sponge and dry thoroughly.
3. Thoroughly clean the cooking pot in the dishwasher or with warm soapy water. Rinse,
towel or air-dry, and place in the pressure cooker.
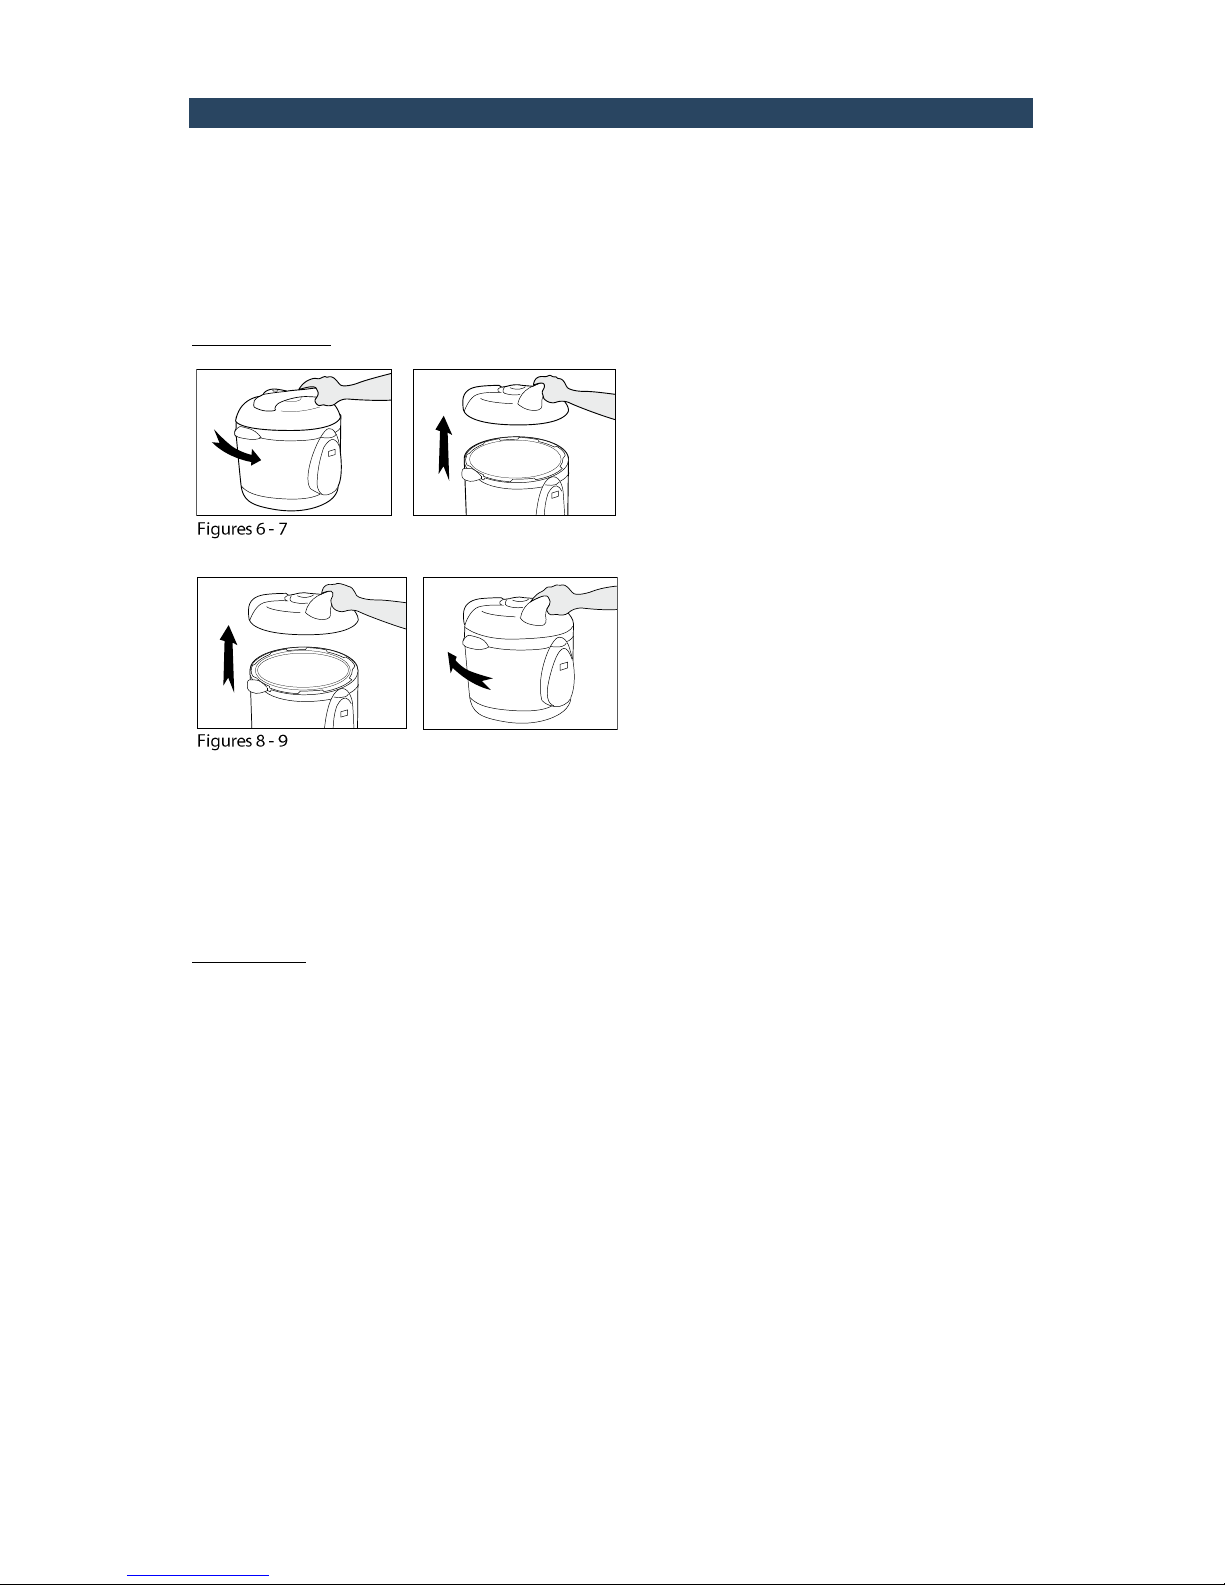
LID ASSEMBLY:
replace). To lock lid in place, remove any food residue from upper rim of cooking pot to
ensure a proper seal. Hold the handle (1) and close it downwards at the Opened Lid position
(Figure 8). Turn clockwise until you reach the "CLOSE" position (Figure 9). (A clamping sound
can be heard. Note: To ensure you are properly closing the lid (2), see "PRESSURE COOKER LID
MARKINGS" on page 6).
WATER TEST
For the first use, to ensure correct assembly of the Rubber Seal Ring (18),it is recommended to
read the following instructions and fill the Inner Pot (6) with water to the 2/3 line and
program to pressure cook for 30 minutes. Once completed, pour out the water. Rinse and
towel dry the Inner Pot (6). The pressure cooker is now ready for use.
How to open the lid: Hold the handle (1)
firmly, turn the lid (2) counter-clockwise until
it loosens and lift vertically (Figures 6-7).
Note: For new units, the seal of the lid (2) may
be slightly stronger than normal and may be
slightly difficult to unlock. Once the lid (2) has
been opened and closed several times, it will
loosen up.
How to close the lid: Observe the Rubber Seal
Ring (18) inside the lid (2) and ensure that it is
fitted onto the outer part of the metal ring all
the way around. (Caution: If the rubber seal
ring is damaged, do not use the pressure
cooker. Contact Customer Service to repair or
www.maxi-matic.com
9
info@maxi-matic.com
INSTRUCTIONS FOR USE
COOKING POT MARKINGS
Inside the removable cooking pot are two sets of markings. One side is marked "2/3 MAX
PRESSURE COOK", which indicates the maximum fill line when cooking any food, other than rice in
the pressure cooker. The other marking is MAX RICE CUP and is used when cooking rice. When
pressure cooking rice, never fill the pressure cooker with water past the 2 cup marking.
1. Open lid, remove cooking pot from
pressure cooker and add food and liquids
as the recipe directs.
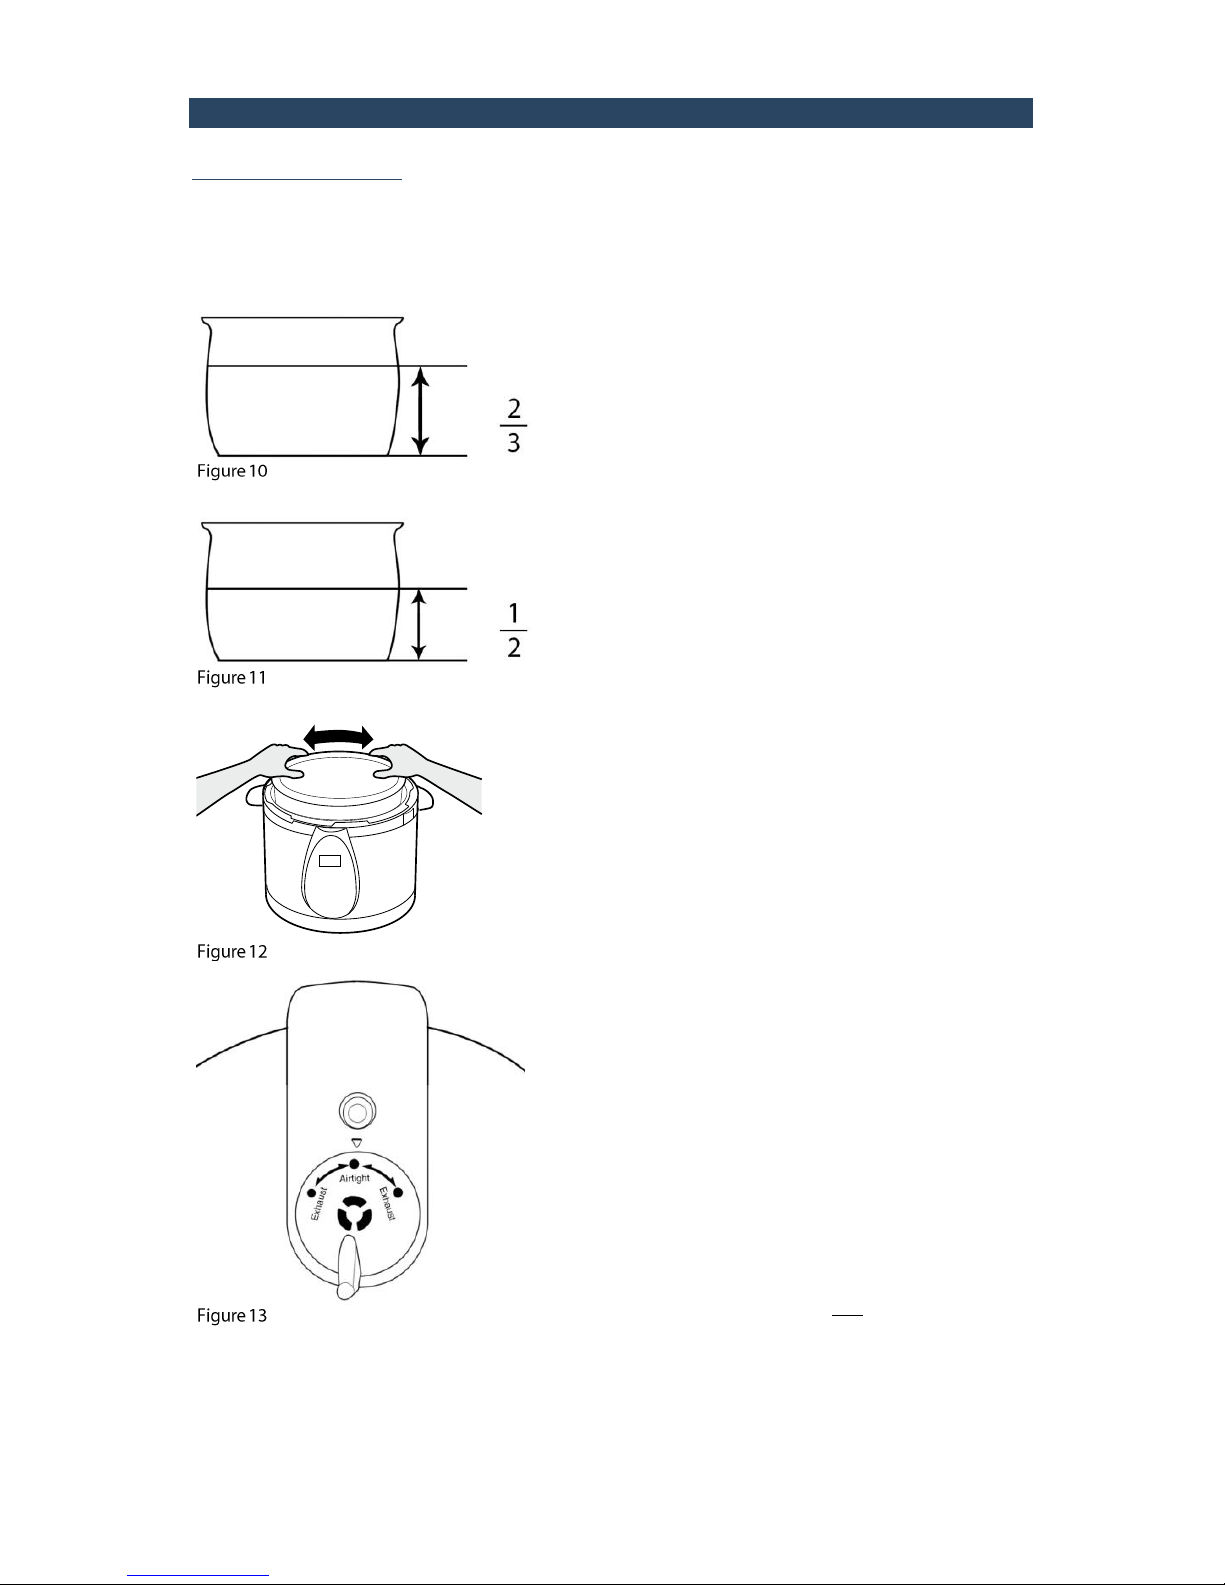
NOTE: The total volume of food and liquid
must not exceed 2/3 of the capacity of the
cooking pot (Figure 10). For foods such as
dried vegetables and beans, or rice and
grains, the total volume must not exceed
1/2 the capacity (Figure 11). Overfilling
may clog the pressure limit valve, which
can cause excess pressure to develop.
Always use at least ½ cup liquid when
pressure cooking.
WARNING: To avoid a serious burn injury
when cooking foods other than rice, never
exceed the 2/3 MAX PRESSURE COOK mark
of the combined volume of liquids and
solids.
2. Be certain the inner receptacle, where the
heating plate (14) is located, is clean and
dry before inserting the Inner Pot (6) into
the pressure cooker and adjust the pot left
and right to ensure optimal contact
between the Inner Pot and the heating
plate (14) (Figure 12).
3. Close and lock the lid.
4. Adjust the Pressure Limiting Valve (3) to
the “Airtight” position, and ensure that the
Red Float Valve (4) sinks.
5. When adjusting the Pressure Limiting
Valve (3) to either the "Airtight" or the
"Exhaust" positions, line up the marking
on the Pressure Limiting Valve (3) with the
arrow on the Handle (1) as shown in Figure
13.
6. Plug the power cord into the pressure
cooker and then into the wall outlet. The
LED display will show 000.
www.maxi-matic.com
10
info@maxi-matic.com
OPERATING INSTRUCTIONS
With the lid secured, unit on and the LED displayed, select the button for the desired
cooking function by reading the following instructions.
There are seven MENU BUTTONS programmed for your pressure cooker. They are
RICE/POTATOES, PASTA/ORZO, SEAFOOD/VEGGIES, SOUPS/STEW, MEAT/POULTRY, and
WARM/DIPS. Each of the default times is programmed to detect the weight of food
being cooked and how much liquid is inside the pot during the cooking cycle. The unit
will automatically build up the pressure, cook the food and go to KEEP WARM when
cooking is complete.
MENU BUTTON
DEFAULT COOKING TIMES
RICE / POTATOES
11 MIN
PASTA / ORZO
7 MIN
SEAFOOD / VEGGIES
4 MIN
SOUPS / STEWS
25 MIN
MEAT / POULTRY
22 MIN
WARM / DIPS
N/A
AFTER SELECTING A MENU BUTTON (RICE/POTATOES, PASTA/ORZO, SEAFOOD/VEGGIES,
SOUPS/STEWS, MEAT/POULTRY)
1. The Default Cook Time will display for the selected setting. For example, if
RICE/POTATOES is selected, the display will show 011. Press START once you have
selected the desired MENU Function.
2. As the unit heats up and pressure builds, the Red Float Valve (4) will rise. The
amount of liquid and other ingredients in the pressure cooker determines the
length of time needed for full pressure to build - generally 5 to 20 minutes,
depending on the recipe.
3. While the unit is building up pressure the LED screen will display scrolling dashes.
The LED screen will not begin to countdown until pressure has built to capacity.
When proper pressure is achieved, the LED screen will display P11 for cooking
RICE/POTATOES as an example and the cook-time will begin to count down.
4. The raised Red Float Valve (4) indicates you are cooking under pressure. The lid is
now locked and cannot be opened. YOU SHOULD NEVER ATTEMPT TO OPEN THE LID
WHILE PRESSURE COOKING.
AFTER SELECTING PRESSURE COOK TIME
1. Press the PRESSURE COOK TIME button to increase in 1 minute increments. Hold the
button down for rapid increase of cooking time up to 99 minutes. The desired cook
time will show on the display. For example, if 70 minutes of cook time is selected,
the display will show 070.
2. Follow steps 2-4 from above.
www.maxi-matic.com
11
info@maxi-matic.com
 Loading...