

WHAT IS IN THE BOX
Your A4-8 package contains the following:
Elite Acoustics Engineering
A4-8 Live-Performance Studio Monitor
with 4 Channels, Mixer, Effects,
and Bluetooth
®
Quick Start Guide
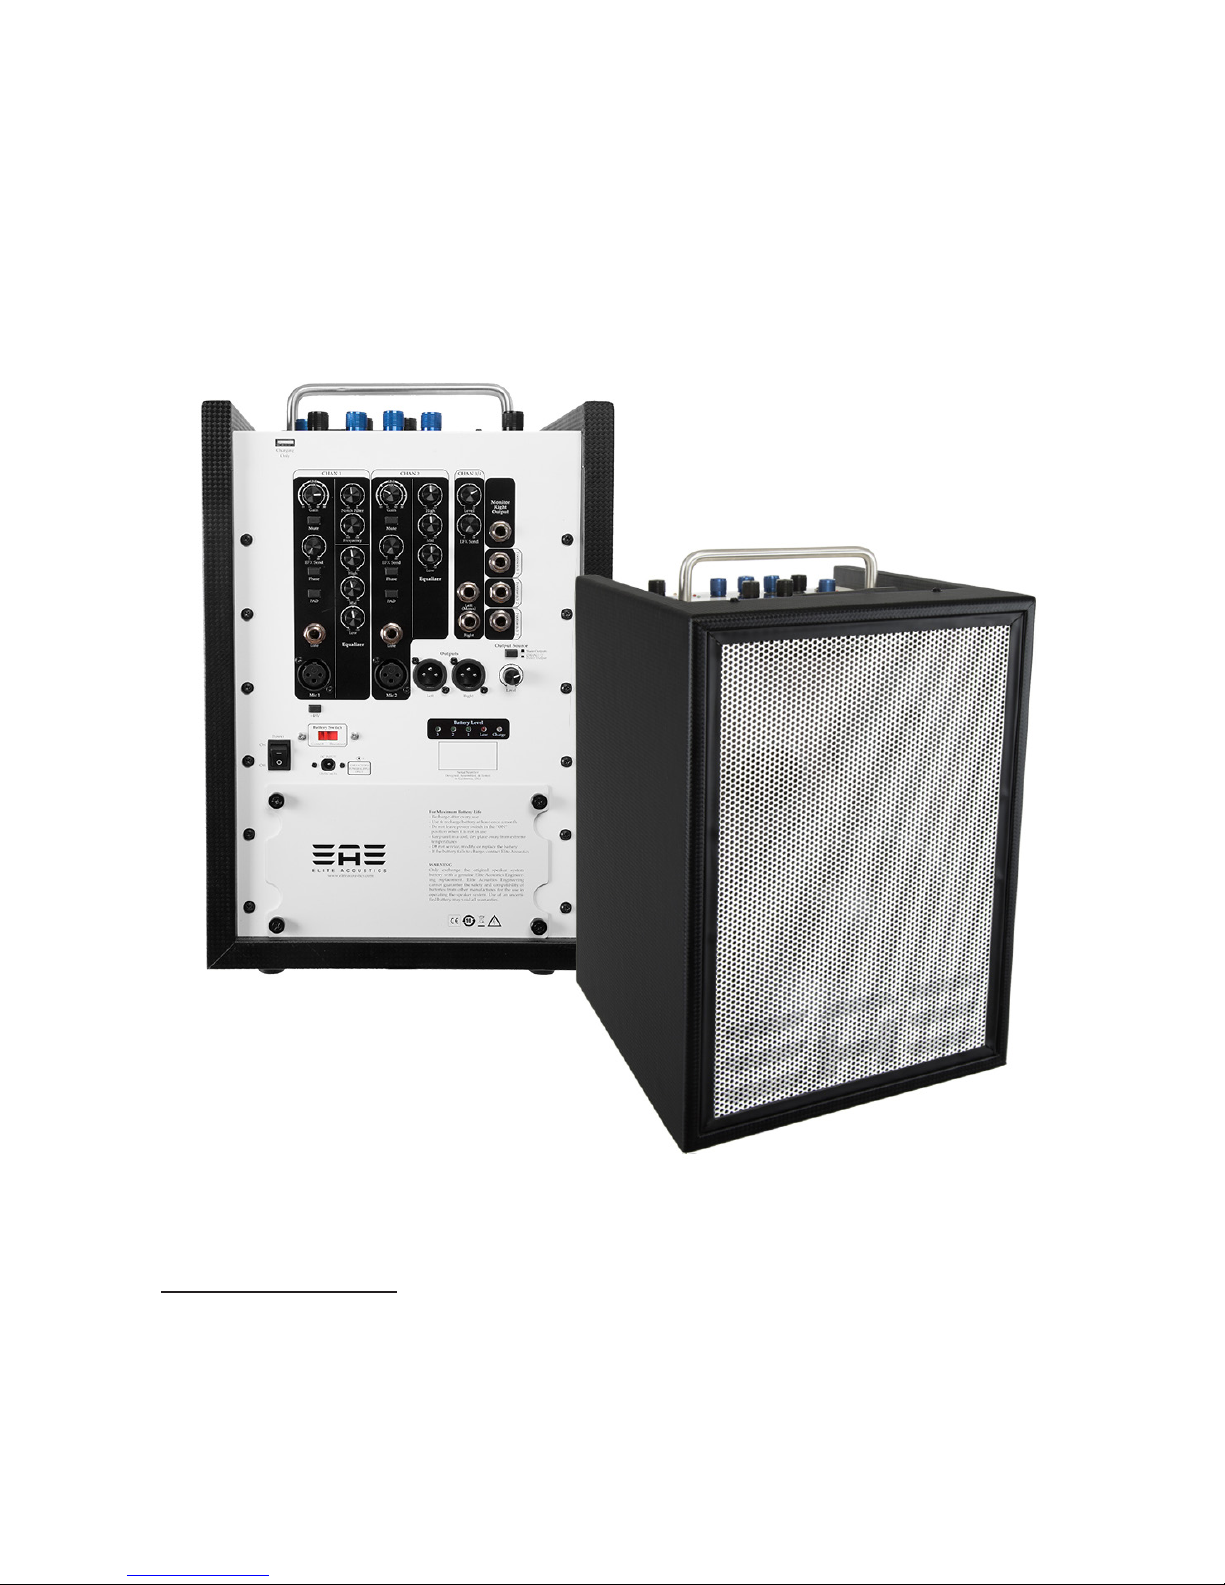
(1) Speaker
(1) 12V AC Power Supply Adapter
(1) 12V DC Car Battery Supply Adapter
(1) Quick Start Guide
(1) Registration Card (USA ONLY)
(1) Speaker Handle Grip
The Bluetooth word mark and logos are registered trademarks owned by Bluetooth SIG, Inc. and any use of such marks
by Elite Acoustics Engineering, Inc is under license
NOTE: Due to continuous development and improvements of our products, features and specications are subject to
change without notice. All weights and measures are approximate.

QUICK START
1. Battery Switch [37] is set to Connect. (Battery Switch is set to Disconnect position to
preserve battery life for transit or storage.)
2. Make sure the SPEAKER VOLUME [3] control is down before you turn the POWER [38]
on.
3. Connect the input of your microphone to the MIC IN [18]. Or you can connect a ¼” line
input from an instrument [17]. You can also connect an additional mono or stereo [20].
All EQ knobs (21) should be set to 12 o’clock (FLAT EQ), Notch Filter knob (19) should
be also in the 12 o’clock. MUTE switch (13) and Phase switch (15) is out. EFX send level
(14) should be at minimum.
4. Turn on the POWER [38] switch, battery meter should be all GREEN (indicate battery is
fully charged)
5. EFX MIX knob (8) should be set to 12 o’clock. EFX should be bypassed until you are
ready to test EFX. Monitor EQ (6) should be set to 12 o’clock “FLAT EQ”
6. Turn up GAIN [12] until there is a solid green light showing “signal”[CHAN 1 meter] at
desired level, without a red “peak”[CHAN 1 meter] light, indicating too much signal.
Some MIC or INPUTs can distort the Speaker even with Gain Knob (12) at Minimum.
Press the PAD switch (16) to reduce the input signal level to avoid distortion if input
signal level is too high.
7. Adjust the SPEAKER VOLUME [3] to a comfortable level.
8. If you want to test Bluetooth® streaming, Connect device to Bluetooth® [40]
9. Recommended Monitor EQ (6) setting for Bluetooth playback - High and Mid (12 o’clock)
Low (1 - 2 o’clock)
10. Note if you are using an iPhone or iPad via Bluetooth®, set the volume on your device
about halfway. Maximum volume will distort. The Monitor Sigle (GREEN) LED is a good
indication of a good input level from your Bluetooth or AUX inputs.
11. Use Channel 1 for your Acoustic Guitar and Channel 2 for your vocal.
12. when you are getting a good sound without CHAN EQ or EFX, time to start playing with
the CHAN EQ and EFX - start with these recommended setting and adjust to achieve the
tone you prefer.
13. Acoustic Guitar EQ setting recommendations.
Low Volume - High (1 o’clock) Mid (12 o’clock) Low (1 o’clock)
14. Acoustic Guitar EQ setting recommendations.
Medium Volume - High (2 o’clock) Mid (11 o’clock) Low (2 o’clock)
15. Acoustic Guitar EQ setting recommendations.
High Volume - High (12 o’clock) Mid (9 o’clock) Low (12 o’clock)
16. Set you vocal EQ FLAT to start and ajdust EQ as you need.
17. Release the EFX mute switch (11)
18. Set EFX send level knob (14, 24, 31) on each channel to about 3 o’clock.
19. Select R2 - Reverb - Dark Cavern.
20. Turn EFX Parameter Knob (9) to 12 o’clock.
21. Turn Mix Knob (11) to 5 o’clock. Slowly turn it CCW to achieve the level of EFX you
prefer.

Power LED:
BLUE [1]: Indicate unit is ON
+48V LED [2]: Indicates Phantom Power is on -- for Both Chan 1 and Chan 2.
Monitor Output Controls
Speaker Volume [3]: Control speakers’ volume level
Mono [4]: Changes speaker output to Mono sound
Monitor Equalizer [6]: Adjust Speaker High, Mid, and Low Frequency response
Peak LED [5]: RED indicate Signal Clip
Signal LED [5]: GREEN indicate Signal
Aux Input/Level [7]: Connect audio source with 1/8” jack from MP3/CD player.
Top Panel View
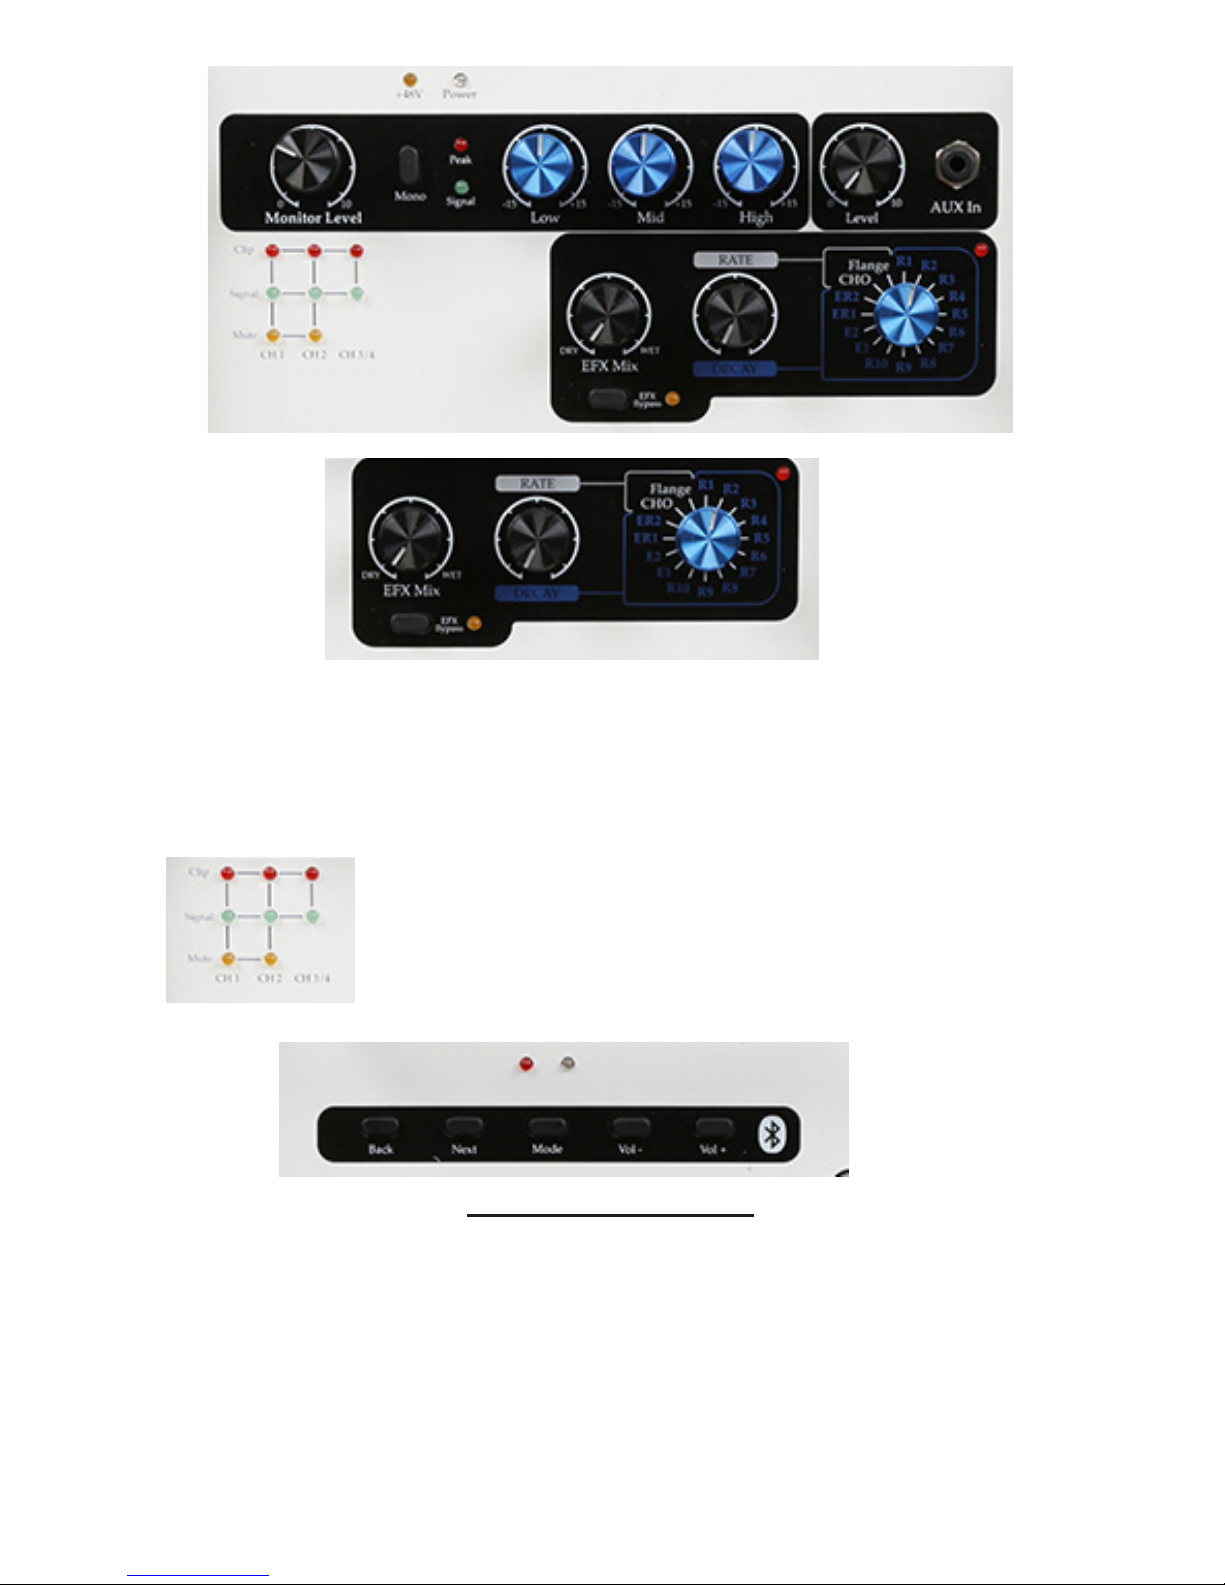
BLUETOOTH® FUNCTION
• To turn ON/OFF Bluetooth® function
PRESS/HOLD down MODE button for approximately 5 seconds
Both LEDs will ash at the simultaneously
• To pair device to the speaker system
Bluetooth® needs to be turned ON
QUICK TAP the MODE button once
Both Flashing LED: indicate Bluetooth® is ready to be paired
Flashing Blue LED only: indicate Bluetooth® is connected
Extend the Bluetooth Antenna to increase range for Bluetooth.
Metering
Chan 1 Signal, Clip and Mute LED
Chan 2 Signal, Clip and Mute LED
Chan 3 Signal and Clipping LED
Use Signal and Clip LEDs to monitor the input signals to help
prevent distortion.
Effects Controls
Effects Mix [8]: Amount of effect being applied to Input, Dry and Wet mix. There is no
EFX if knob is completely on DRY position.
Rate/Decay [9]: Controls the duration of the effect
Effects Knob Selector [10]: Select effect of choice

Channel 1
Gain [12]: Gain level control
Mute [13]: Mute channel
EFX Send Level [14]: How much output effect is being sent
out
Phase [15]: Change in phase of waveform
PAD [16]: Attenuate if needed
Line In [17]: 1/4” TRS inputs Balanced
Mic In [18]: XLR for Microphone Input Balanced
Notch Filter [19]: Adjust feedback
Frequency [20]:
Equalizer [21]: Controls Low, Mids, and High
Tips.
USB Charge only is for
charging your phone or
MP3 players on the go.
Use only approved EAE
power adaptors.
DO NOT leave Power
Switch on the “ON”
position for a long period of
time, it will drain the battery
if battery is connected.
Battery won’t charge after
it is completely drain.

Battery Switch[37] : Built in Slide Swtich to preserve battery life.
Connect: Enable battery power when using unit
Disconnect: Disable battery power when storing unit to preserve battery life
Battery Meter - Level 1, 2, 3, Low (RED). BLUE charge LED.
Channel 2
Gain [22]: Gain level control
Mute [23]: Mute channel
EFX Send Level [24]: How much output effect is being sent
out
Phase [25]: Change in phase of waveform
PAD [26]: Attenuate if needed
Line In [27]: 1/4” TRS inputs Balanced
Mic In [28]: XLR for Microphone Input Balanced
Equalizer [29]: Controls Low, Mids, and High
Chanel 3/4
Gain [30]: Gain level
control
EFX Send Level
[31]: How much output
effect is being send out
Left/Right Input [32]:
1/4” TRS Input
Monitor Output: Connect with extra
speakers/monitors
Monitor Right Output [33]: Connect to
another speaker using 1/4” TRS
Foot Switch[36] : Connect up to 3
Foot Switches Footswith #1 is for EFX
bypass. #2 is for Mute Chan #1 and
#3 is for Mute Chan #2. “FootSwitch
controller is optional and not included.”
Output Source [34]:Assigns Main Output or
Channel 1/2 Direct Output
Main Output [35]: XLR Left/Right Output
Main Output Level control

The Monitor Right Output (33) allows you to add a secondary active monitor while preserving the stereo image. The Monitor unit will play the Left Channel content and the secondary
monitor will play the Right Channel. If stereo imaging is not desired, simply engage the
Mono button on the A4-8’s top panel. Note that the Monitor Right Output (33) will not drive a
passive speaker; it is a Line-level output that can drive ampliers or active monitor systems.
Connect Master Speaker Right output (33) to Secondary speaker Chan 3/4 Line input (32).
Set Secondary Speaker Gain (30) to 3 0’clock. Then set Secondary Monitor Level (3) to
balance the Left (Master speaker) and Right (Secondary speaker) channels. EQ on Secondary Speaker should be FLAT and EFX (11) should be bypassed.
CONNECTING TO ANOTHER SPEAKER FOR STEREO
CONNECTING TO ANOTHER ACTIVE SPEAKER (HOUSE PA)
FROM DIRECT OUTPUTS OR MAIN MIX OUTPUTS
The XLR output jacks can be used for MAIN MIX outputs (seperate from the Monitor Speaker Output) or Direct Outputs for Chan 1 “Left” (35) and Chan 2 “Right” (35) with Level Control. Switch
(34) control Main (Switch Out) or Direct Out (Switch pressed in).
For Maximum Battery Life
- Recharge after every use
- Use & recharge battery at least once a month
- Do not leave power switch in the “ON”
position when it is not in use
- Keep unit in a cool, dry place away from extreme
temperatures
- Do not service, modify, or replace the battery
- If the battery fails to charge, contact EliteAcoustics
WARNING
Only exchanget he original speaker system
battery with ag enuine EliteA coustics Engineeringr eplacement.E liteA coustics Engineering
cannotg uarantee thes afetya nd compatibilit yo f
batteries from otherm anufacturesf or theu se in
operatingt he speaker system.U se of an uncertified battery may void all warranties.
www.eliteacoustics.com
ELIT EA COUSTICS
Mute
EFX Send
Phase
Mic 1
Line
01 0
Gain
01-0 10 50 3
Notch Filter
-100
Frequency
100 450
High
-15+ 15
Mid
-15+ 15
Low
-15+ 15
Equalizer
Mute
EFX Send
Phase
Mic 2
Line
01 0
High
-15+ 15
Mid
-15+ 15
Low
-15+ 15
Level
01 0
EFX Send
01 0
Left
(Mono)
Right
Monitor
Right
Output
Battery Level
Equalizer
32 1L ow Charge
Gain
01-0 10 50 3
CHAN 1 CHAN 2 CHAN 3/4
EFX
Bypass
CHAN 1/2
Mute
Outputs
Output Source
Main Outputs
CHAN 1/2
Direct Output
Level
01 0
Left Right
+48V
On
Off
Power
DC INPUT
12VDC 2A
Connect Disconnect
Battery Switch
Serial Number
Designed,Assembled, & Tested
in California, USA
Charging
Only
TIP - CHAN 1
RING - CHAN 2

A4-8
Live-Performance Studio Monitor
with 4 Channels, Mixer, Effects,
and Bluetooth
®

FOR MAXIMUM BATTERY LIFE
• Recharge after every use
• Use & recharge battery at least once a month
• DO NOT leave power switch in the “ON” position when it is not
in use. Doing so after a long period of time will damage the
battery
• If unit is always plugged in, it is recommendate to put Battery
Swtich in Disconnected position, but make sure to recharge unit
monthly.
• Keep unit in a cool, dry place away from extreme temperatures
• Do not service, modify, or replace the battery
• If the battery fails to charge, contact Elite Acoustics Engineering
Battery
Level
3
2
1
Low
Charge
EAE BATTERY & RECHARGING INFORMATION
1. To fully charge a unit –
a. Set Battery Switch to “CONNECT”
b. Turn Power Switch OFF
c. Connect “AC” adaptor to Power Jack.
d. Blue “Charge” LED should be lit, Charge time can vary from 24 – 36 hours
depending on model and also surrounding temperature. In some case, Battery
will be 99% charged after 24-36 hours, but the charge light will remain on.
2. When unit is powered with “AC” adaptor, Battery Switch should be in “CONNECT”
position.
3. Battery Switch should be on “DISCONNECT” when unit is packed for transit or unit
is in storage. Make sure battery is fully charged before UNIT is put into storage. We
recommend fully charging the battery at least once each month.
4. SLA battery lifetime is typically 1 – 2 years depending on usage.
5. DO NOT OVERDRAIN the battery by leaving unit ON for a long period of time.
CAR ADAPTOR
• Unit can operate normally when plug into the Car Adaptor.
• Battery can also be charged by using the Car Adaptor.
• It is not recommedate that you leave the unit plugged in while car is not running.

HOW TO DEAL WITH ACOUSTIC FEEDBACK
Simply put, the annoying shrilling howl of growing and untamed feedback is the result of “inphase” frequencies getting together and being reinforced by the sound system and environment.
Phase Switch – since the purpose of the Phase Switch is to reverse the polarity, the rst line
of defense is to change the phase, which can sometimes be a cure all by itself. This has the
effect of changing the phase relationship between the amplied signal and live sound, which
can break up some “in-phase” reinforcing components. On the other hand, it’s preferred if we
can leave the phase set to provide the most natural and balanced sound.
Notch Filter – Another way to prevent “in-phase” reinforcement is to simply nd and “notch”
out the offending frequency. The approach is straight forward; with the Notch set to full “cut”
(counter clockwise), slowly rotate the Notch Frequency to align with and cancel the offensive
tone.
Phase and Notch – probably the most widely used approach is to start without the notch
lter engaged, and to bring up the gain and or volume to encourage feedback. Changing the
Phase will change the frequency of the feedback. Leave the Phase set to whichever setting
produces the higher pitched note.
Next, use the aforementioned Notch technique to hone in on and prevent the feedback. Keep
in mind, ghting feedback in this manner may or may not appeal to your taste in overall tone.
It’s certainly fair to experiment and try it the other way around, i.e., Phase switch to stop HF
tone and Notch to cutout the LF tone. After all, Live Sound is an Art and when it’s all said and
done tone is King.
ABOUT EQ AND PHASE SETTINGS
High – used to add sibilance and crispness to your sound, with the knob at 12:00, there is no
boost or cut to the high frequency content.
Mid – Helps control the clarity of your overall mix and should be adjusted to suit lower or
higher volume performance levels. Boosting the mids helps speech clarity and intelligibility at
lower volumes while cutting the mids produces a more natural sound at higher volumes. The
Mid frequency selection knob allows for a range extending from high LF to low HF. When set
to 12:00 the Mid frequency peak is around 1.2k Hz, with +/- 12dB of boost or cut depending
on the setting of the Mid knob. Here again, with Mid set to 12:00 the mid control is effectively
out of the circuit.
Low – In general, lower volumes can benet from LF boost to help bring out the bass at
these lower settings, but it is usually left at or even slightly cut for high playback levels.
Notch – When it comes to the mechanics, Notch ltering is very much like the adjustable
mid frequency described above. However, the frequency range is much lower, and the lter
itself is much tighter, hence the term “notch.” When used in “cut” mode, this is very effective
in managing feedback, which is explained in some detail in our Feedback section. However,
the notch can be set to cut or boost to allow for the full range of possibilities. Many times
feedback is not an issue, and the artist can take advantage of a particular notch setting to
effectively tweak a nal mix to accommodate specic room or instrumentation considerations.
Phase – Use the phase setting that best supports your overall sound and system integration
considerations. For example, Phase can be set to facilitate the best bass response at low
volumes, and it can also be effective as a feedback deterrent, which will be reviewed in our
Feedback section.

DIGITAL EFX
16 DIGITAL EFX PROGRAMS
•
• There are 16 total Digital EFX programs
• R1 to R10 - REVERB
• E1 and E2 - ECHO
• ER1 and ER2 - Echo and Reverb
• CHO - Chorus
• FLange - Flanger
•
• Program select Encoder (10) is for program change.
• Parameter knob (9) to change rate or
delay time for the program that is set.
• Mix knob (8) is to ne turn the amount of
EFX you want in output mix.
• EFX can be bypassed by Pressing the
bypass switch (9)
• EFX send levels for each channel is set
by on the rear panel ( 14, 24, and 31)
that correspond to each channel.
•
TIPS
• Distorted Sound
• 1) Check input level to make sure input Signal Light is in GREEN and not CLIPPING RED. Reduce Input by turn down GAIN knob (12, 22, 30), input Gain can
also be reduced by Pressing “PAD” (16, 26), some MIC or PRE-AMPs have very
high output level, using the PAD switch for those devices and will help you reduce the chance of distortion. Make sure all EQ knobs are set to Middle. (FLAT)
• 2) Check Monitor Signal Light is also GREEN and not Clipping. Reduce Speaker
Level by turning Monitor Knob (3), make sure EQ is set to middle (FLAT)
•
• No Sound
• 1) Check LED signal lights. Green means there is Signal on the input.
• 2) Make sure MIX knob is at 12 o’clock position.
• 3) Make sure Channel is un-muted.
• 4) Make sure +48V is on when using a Condenser Mic. Make sure to MUTE
when turning on +48V to prevent loud POP sound.
•
• Battery not Holding Charging
• 1) Power unit off and charge the unit for 24 hours with Battery switch in Connected position. If problem still persist, contact info@eliteacoustics.com for battery
replacement instructions.
•
•

SYSTEM SPECIFICATIONS
Speakers:
Woofer = 8”
Tweeter = 1” Silk-Dome
Optimized front ports for extended low-frequency response
Frequency response 70Hz - 20k Hz
103 dB SPL
Cabinet: MDF or Plywood.
Amplier:
Ultra High-Efciency Class D 40W Bi-AMP
EQ Controls:
Low +/- 12dB @ 50Hz (shelving)
Mid +/- 12dB @ 200Hz – 4k Hz (resonant)
High +/- 12dB @ 10k Hz (shelving)
Notch +/- 12dB @ 80Hz – 400 Hz (high-Q resonant)
Battery:
Built-in SLA type, rechargeable [12V, 9Ah]
Typical recharge time ~ 20 hours
Play time ~ 6 to 8 hours
Power Supply:
DC 12V, 3000 mA
Physical:
Dimensions: 9.0”L x 9.0”W x 14.5”H
Weight: 24 lbs
•
• Nominal output level (1 kHz): Right Channel Link out: -10 dBu Main/Direct Output: +4dBu
• Channel controls: CH1 & 2: EFX Send Level knob, Gain knob, Mute switch, Phase, Pad
Notch Filter,Frequency, & EQ(Channel 1 EQ includes Mid Frequency) CH3/4: Level Knob &
EFX Send Level
• EFX Effect controls: Dry/Wet knob, Decay/Rate knob, 16 different effects(Bright/Dark
Cavern, Bright/Dark Hall, Bright/Dark Room, Bright/Dark Plate, Ambience1, Ambience2,
Echo, Repeat Echo, Echo/Rev1, Echo/Rev2, Chorus, Flange)
• Master controls: Volume Knob, Mono Switch, Equalizer (Low, Mid, High knob), Effect Mix,
Decay/Rate, Effects
• Stereo Inputs: 1/4” Left/Right input jacks
• Phantom Power: +48V
• Aux in control: Level knob
• Indicators: signal clip, power, +48V, EFX Bypass, Bluetooth
®
• Connectors: CH1 & 2: Input jacks (XLR type, 1/4” TRS phono type), CH3/4: Left/Right
stereo input (1/4” TRS phono type), AUX in: input jacks (1/8” jack), Right channel output: line
out jack Right (XLR type), DC in jack
• Power Switch
• Other features:
Playback from Bluetooth device
USB charging dock
Optimized front ports for extended low-frequency response
Magnetic shielding eliminates interference with other electronic equipment
Rechargeable Battery can be recharged from Car battery when using DC car
adaptor cord that is included
Built-in pole-mount, 35mm receptacle on bottom of unit
• Accessories: AC cord, AC adaptor, DC cord for the car, Owner’s manual

WARRANTY (USA ONLY)
Contact the Distributor in your area for service and warranty info.
Elite Acoustics Engineering Inc. warrants this product to be free of defects in material and workmanship (excluding
battery) for a period of 1 year from the date of original retail purchase. Elite Acoustics Engineering Inc. warrants
the Speaker’s Battery for 90 days from the date of original retail purchase. This warranty is enforceable only by the
original retail purchaser. To be protected by this warranty, the purchaser must complete and return the enclosed
warranty card within 14 days of purchase. During the warranty period EAE shall, as its sole and absolute option,
either repair or replace, free of charge, any product that proves to be defective on inspection by EAE or its authorized
service representative. To obtain warranty service, contact Elite Acoustics Engineering Technical Support via email:
RMA@eliteacoustics.com. PRE-AUTHORIZATION MUST BE OBTAINED BEFORE SENDING ANY PRODUCT
TO AN ELITE ACOUSTIC ENGINEERING SERVICE CENTER. All inquires must be accompanied by a description
of the problem. All authorized returns must be sent to the EAE repair facility postage prepaid, insured and properly
packaged. EAE reserves the right to update any unit returned for repair. EAE reserves the right to change or
improve the design of the product at any time without prior notice. This warranty does not cover claims for damage
due to abuse, neglect, alteration, or attempted repair by unauthorized personnel and is limited to failures arising
during normal use that are due to defects in material or workmanship in the product. Any implied warranties,
including implied warranties of merchantability and tness for a particular purpose, are limited in duration to the
length of this limited warranty. Some states do not allow limitations on how long an implied warranty lasts, therefore
above limitation may not apply to you. In no event will EAE be liable for incidental, consequential, or other damages
resulting from the breach of any express or implied warranty, including among other things, damage to property,
damage based on inconvenience or on loss of use of the product, and, to the extent permitted by law, damages
for personal injury. Some states do not allow the exclusion of limitation of incidental or consequential damages,
so the above limitation or exclusion may not apply to you. This warranty gives you specic legal rights, and you
may also have other rights, which vary from state to state. This warranty only applies to products sold and used in
the United States of America. For warranty information in all other countries please refer to your local distributor.
©Elite Acoustics Engineering Inc.
THIS DEVICE COMPLIES WITH PART 15 OF THE FCC RULES. OPERATION IS SUBJECT TO
THE FOLLOWING TWO CONDITIONS.
1. THIS DEVICE MAY NOT CAUSE HARMFUL INTERFERENCE, AND
2. THIS DEVICE MUST ACCEPT ANY INTERFERENCE RECEIVED, INCLUDING
INTERFERENCE THAT MAY CAUSE UNDESIRED OPERATION.
 Loading...