

Page 1
Elite12 SERIES INSTALLATION GUIDE
Page 2

FEDERAL COMMUNICATIONS COMMISSION
WARNING: This equipment was tested and found to comply with the limits for a Class B digital device, pursuant to Part 15 of the FCC Rules. These limits are designed to provide reasonable protection against harmful
interference in a residential installation. This equipment generates, uses, and can radiate radio frequency energy and, if not installed and used in accordance with the instructions in this manual, may cause harmful interference to radio communications. However, there is no guarantee that interference will not occur in a particular installation. For more information about radio frequency interference, refer to the section of this manual on
Radio and TV interference.
CANADIAN REGULATIONS
This equipment is a Class B digital apparatus that complies with the Radio Interference Regulations, CRC c.
1374.
IMPORTANT: Changes or modifications to this product not authorized by GCC Technologies Inc. could void
the FCC Certification and negate your authority to operate the product. This product was tested for FCC Compliance under conditions that included the use of shielded cables and connectors between system components. It is important that you use shielded cables and connectors to reduce the possibility of causing interference to radios, television sets, and other electronic devices. You can obtain the proper shielded cables from
GCC Technologies or from an Authorized GCC Technologies dealer.
CLASS 1 LASER PRODUCT
LASER SAFETY: This printer is certified as a Class 1 laser product under the U.S. Department of Health and
Human Services (DHHS) Radiation Performance Standard according to the Radiation Control for Health and
Safety Act of 1968. This means that the printer does not emit hazardous radiation. Since radiation emitted
inside the printer is completely confined within protective housings and external covers, the laser beam cannot escape from the machine during any phase of user operation. The Center for Devices and Radiological
Health (CDRH) of the U.S. Food and Drug Administration implemented regulations for laser products on August
1, 1976. These regulations apply to laser products marketed in the United States. The label on the printer indicates compliance with the CDRH regulations and must be attached to the laser products marketed in the United
States.
Caution - Use of controls, adjustments, or performance of procedures other than
those specified in this manual may result in hazardous radiation exposure.
EPA ENERGY STAR COMPUTERS AWARD
The Elite 12 Series printer is designed to conserve electricity.
With its power-saving design, the Elite 12 Series qualifies for the
U.S. Environmental Protection Energy Star Computers Award.
CREDITS
© Copyright GCC Technologies Inc., 1999. All rights reserved.
The Elite 12 Series Installation Guide was written by David Field, Laurie Freitas, Wendi LeBlanc,
and Tom Linzey. It was edited by Donna Atwood, Kevin Curran, Lee Doron, Laurie Freitas, Wendi
LeBlanc, Tom Linzey, and David Nicholson. Illustrations by Bill Krech and Kathy Shackelford,
Cover design and layout by Adam DeFanti.
Fonts used in this documentation are from the Bitstream 45 collection that ships with the Elite 12 Series printer.
Installation Guide printed in USA. Part number 030.16463 Rev A.
Page 3
11
INTRODUCTION
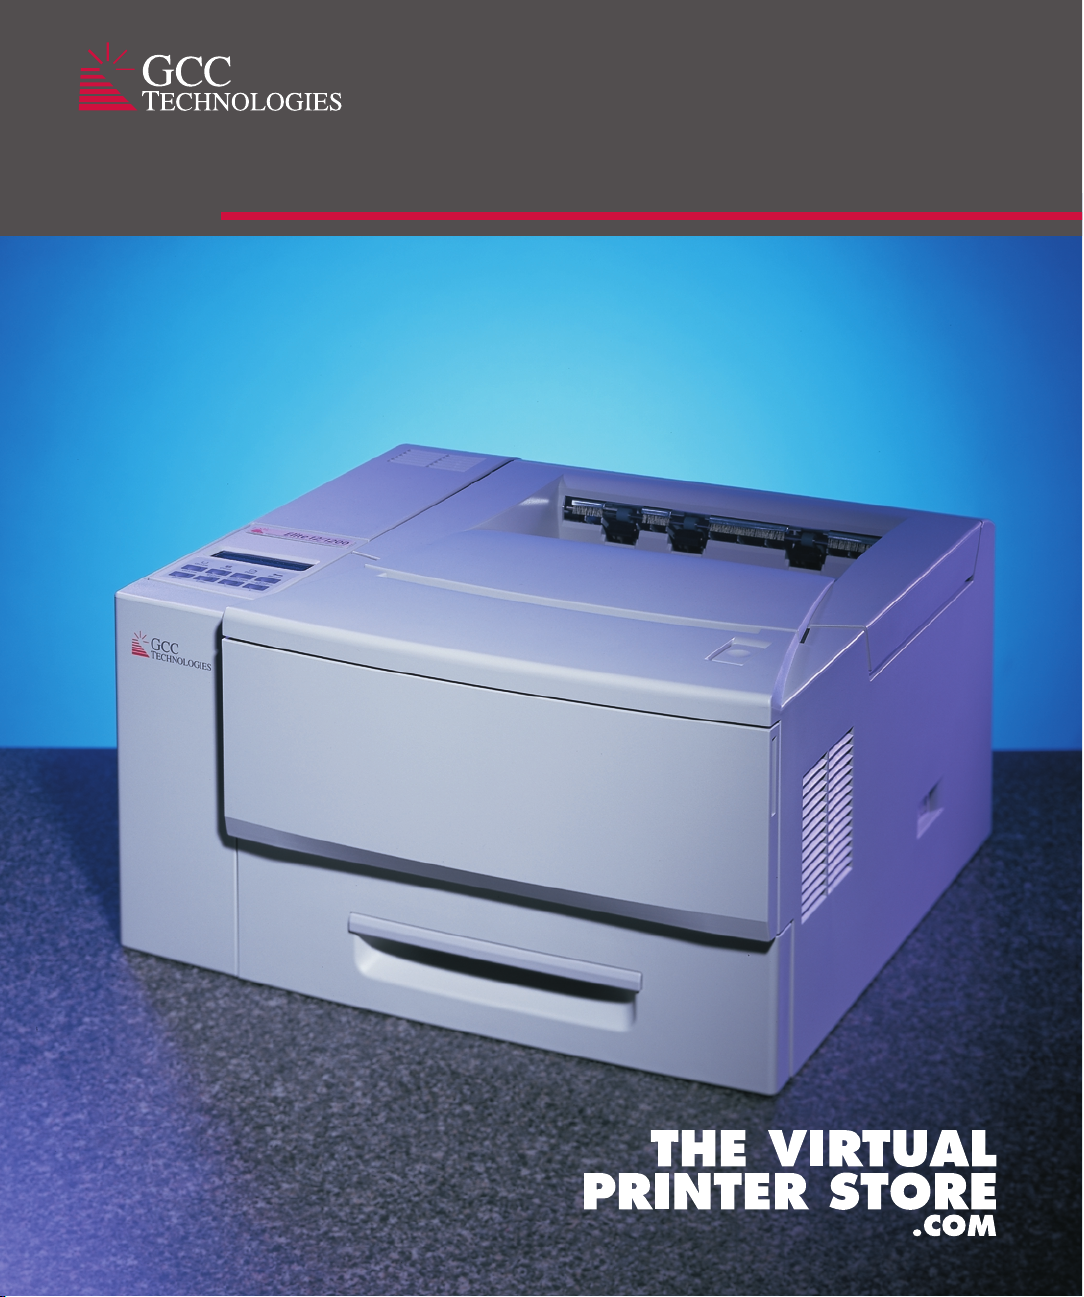
Congratulations on your purchase of a GCC Technologies Elite 12 Series laser printer. You now
have a high-quality, versatile solution to all of your printing needs. The purpose of this guide
is to show you how to set up your printer and install the software on the computer(s) that will
be using it.
CONFIGURATIONS
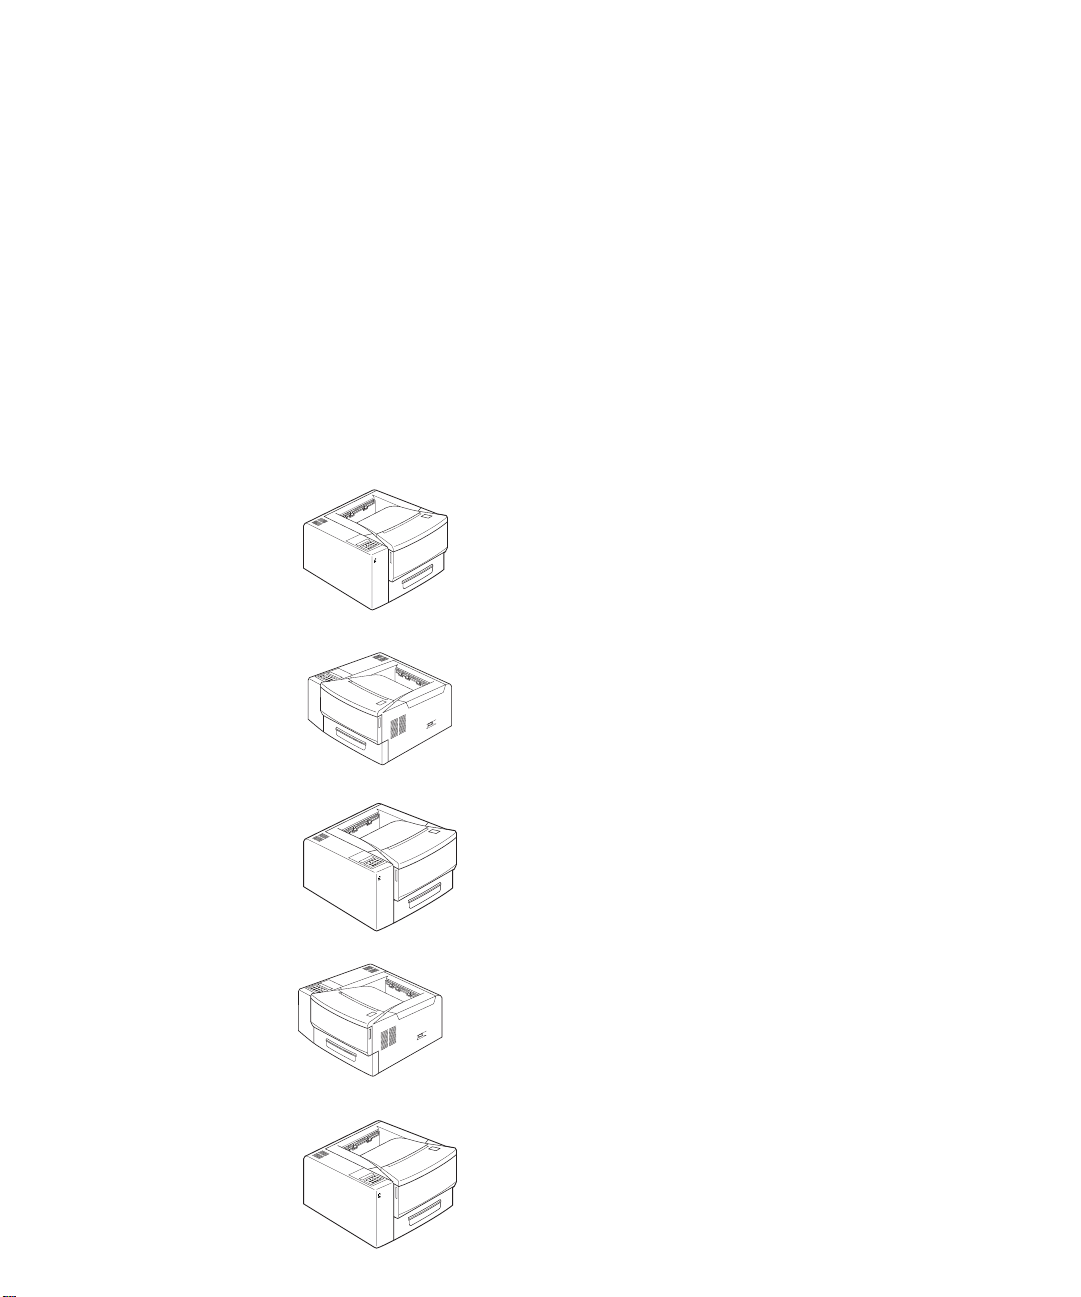
This printer is available in five configurations, as described below:
Elite 12/600 USB
Elite 12/600 N
Elite 12/600
Elite 1212
G
CC
T
ECHNOLOGIES
A 600 dpi laser printer with both USB and
Parallel ports.
A networkable 600 dpi laser printer with USB,
Parallel and Ethernet ports.
A 600 dpi networkable laser printer with LocalTalk,
Parallel and Ethernet ports.
A high-resolution, networkable 1200 dpi laser printer
with LocalTalk, Parallel and Ethernet ports.
G
CC
T
ECHNOLOGIES
Elite 12/1200 N
A high-resolution, networkable 1200 dpi laser printer
with USB, Parallel and Ethernet ports.
G
CC
T
ECHNOLOGIES
Page 4

2
WHERE TO LOOK FOR MORE INFORMATION
Several references are available for use with this printer. For additional copies of this guide,
contact GCC direct at 1.800.422.7777 (North America only, outside of North America refer
to the back cover) or contact your GCC authorized dealer. Additional information is available
at www.thevirtualprinterstore.com/support
2
Page 5

3
INSTALLATION CHECKLIST
3
For proper installation please complete each section in order:
STEP 1CHECK PACKAGE CONTENTS
STEP 2PREPARE PRINTER LOCATION
STEP 3LOCATE PRINTER PARTS
STEP 4REMOVE INTERNAL PACKAGING
STEP 5INSTALL TONER CARTRIDGE
STEP 6LOAD TRAY
STEP 7ATTACH THE POWERCORD
STEP 8CONNECT THE PRINTER CABLES
STEP 9INSTALL PRINTING SOFTWARE
STEP 10 VERIFY PRINTER SETUP
Page 6
4
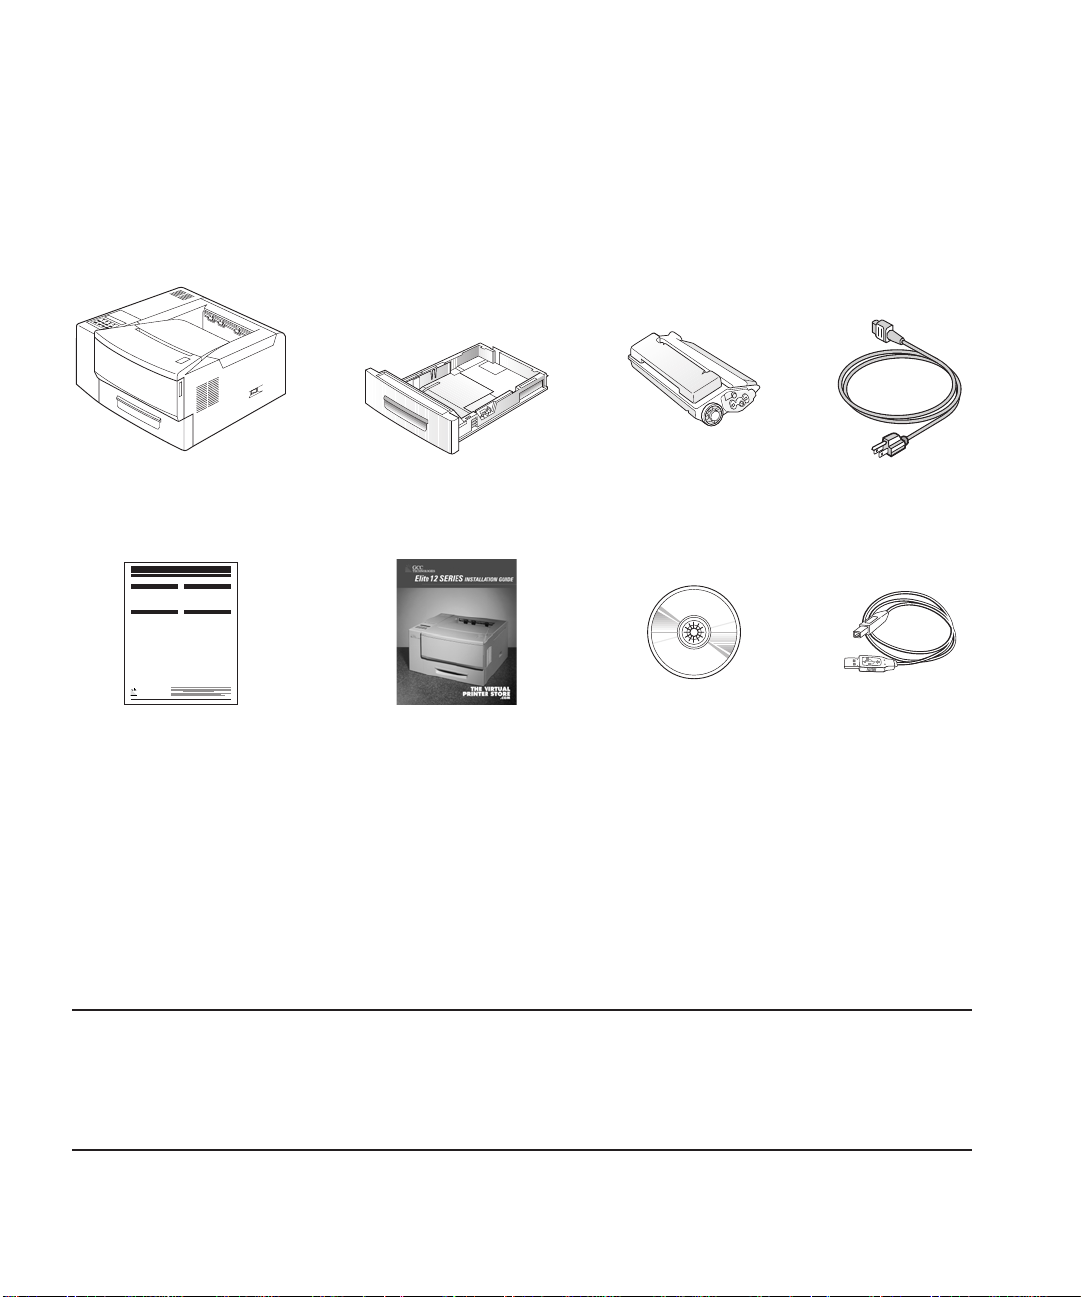
STEP 1. CHECK PACKAGE CONTENTS
4
NOTE
* The Elite 12/600 USB ships with a USB cable. A printer cable is not included with
any other 12 series model. For information on ordering cables contact GCC at
1.800.422.7777 (North America only. Outside of North America refer to the back cover)
or www.thevirtualprinterstore.com
Elite™12ppm
Configuration Page
Printer Information
Paper Handling
Language: English
Print Darkness: Normal
AppleTalk Name: Model
Default Source: Upper Tray
Page Count: 20
Default Size: Letter
RAM Installed: 8MB
Jam Recovery: Disabled
Hard disk: No disk
Paper Reserve: Enabled
OS Version: 2.3
Manual Feed Timeoutt: 5 Minutes
PostScript Level 2 Version: 2.3
ROM Version: 2.3
H/W Version: 1.0
AccuGray: Enabled
Interfaces
Emulations
8-pin Serial: LocalTalk
PS/PCL Sensing: PostScript Only
RS422 Serial (Inactive)
Port Emulation
Baude Rate: 9600
Parallel Port: Auto Switch
Data Bits: 8
RS232 Port: Auto Switch
Stop Bits: 1
RS422 Port: Auto Switch
Parity: None
LocalTalk Port: PostScript Only
Flow Control: Xon/Xoff
PostScript
RS232 Serial (Active)
Default Resolution: 800
Baude Rate: 9600
Job Cancel: Enabled
Data Bits: 8
Start Page: Disabled
Stop Bits: 1
Wait Timeout: 300 Seconds
Parity: None
Flow Control: Xon/Xoff
PCL
Resolution: 600
Parallel Port (Active)
Copies: 1
Font Source: Internal
Font Number: 1
Pitch: 10.0
Point Size: 12.0
Orientation: Portrait
Page Length: 60
Symbol Set: Roman-8
Wait Timeout: 120 Seconds
Line Wrap: Disabled
Line Termination: Normal
G
CC
T
ECHNOLOGIES
AC power cordToner cartridgeUniversal paper trayElite 12 printer
Configuration page Installation guide Elite 12 Series CD-ROM USB cable*
Page 7
5
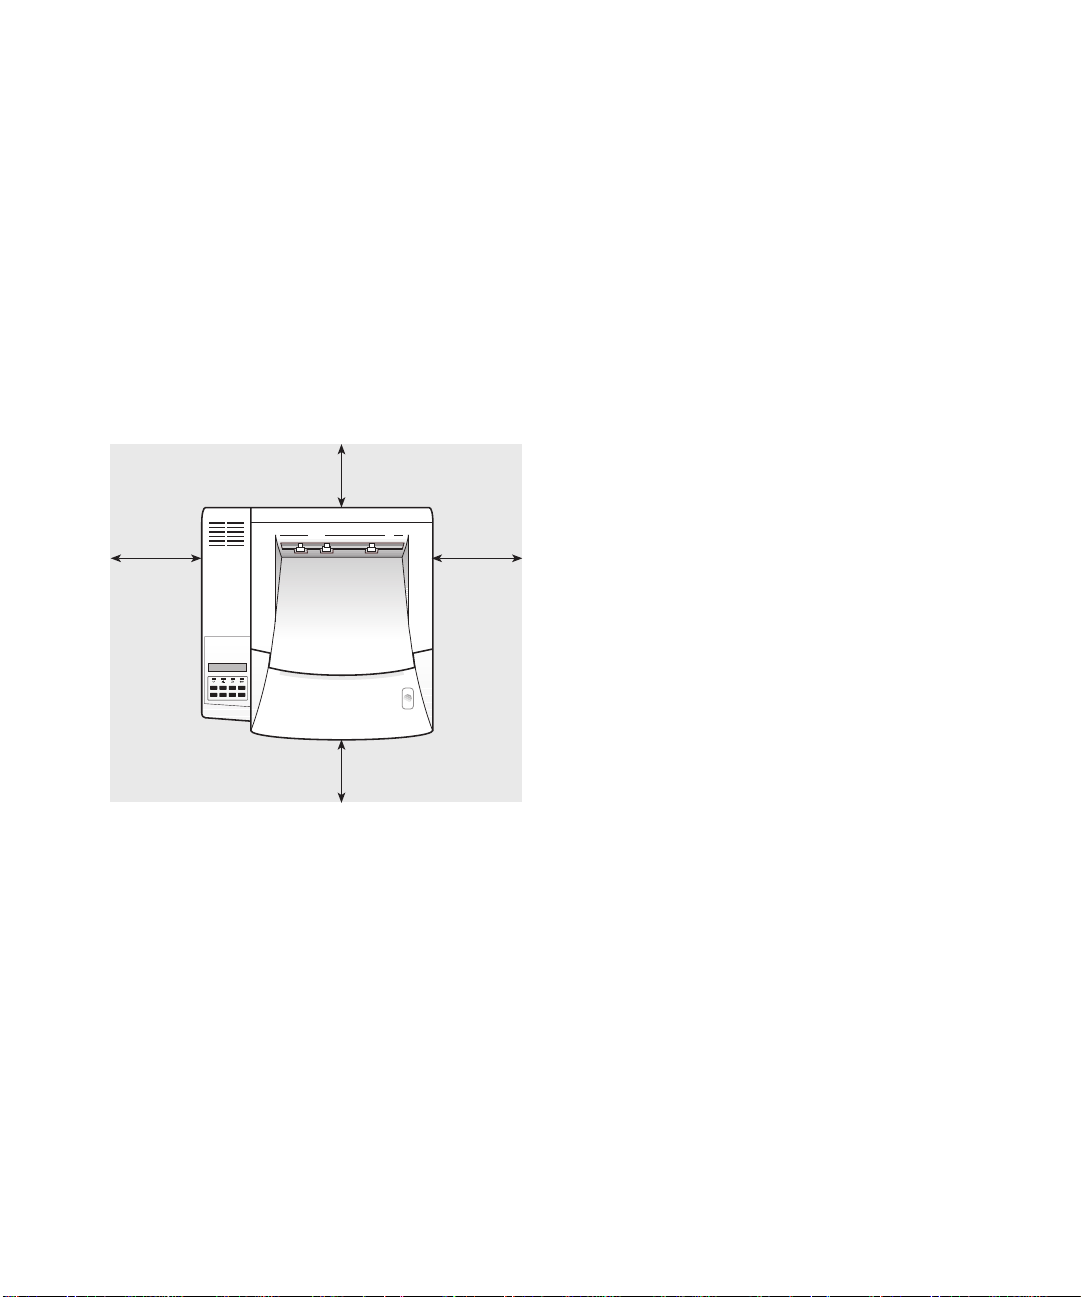
STEP 2. PREPARE PRINTER LOCATION
Minimum recommended clearances.
Place the printer on a flat level surface in a well-ventilated area away from direct sunlight or
areas where the air temperature and humidity can vary widely. Do not obstruct the fan vent
on the right side of the printer.
1 inch
(25mm)
16.6 inches (422mm)
minimum overhead
clearance.
12.2 inches
(310mm)
10.6 inches
(270mm)
7.1 inches
(180mm)
Page 8
66
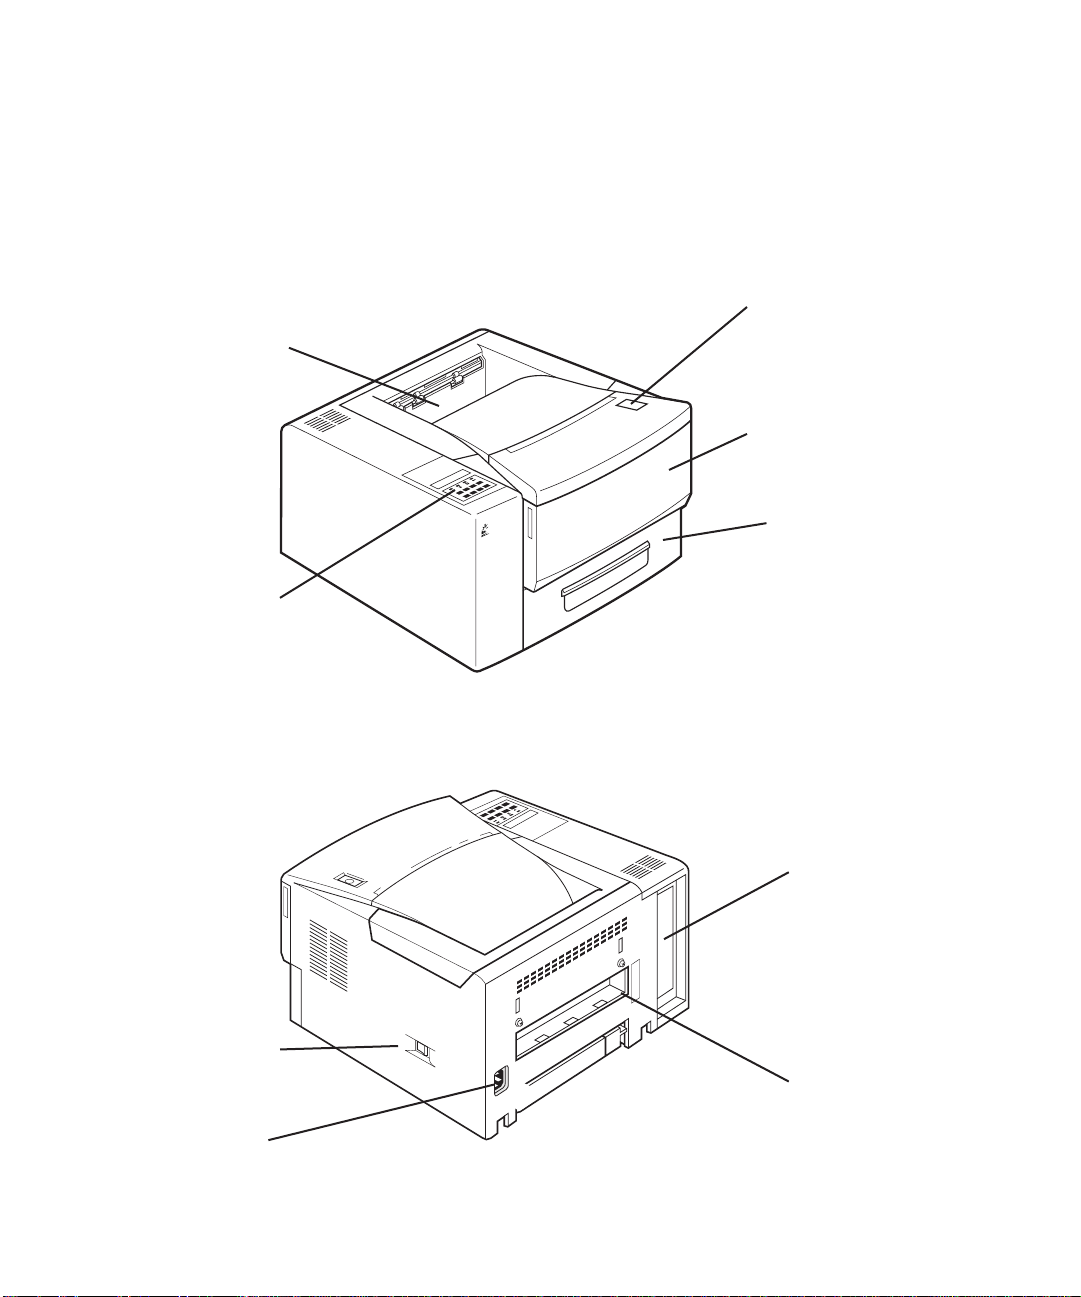
STEP 3. LOCATE PRINTER PARTS
G
CC
T
ECHNOLOGIES
Top output tray
Cover release
Multi-purpose tray
Paper tray
Control panel
Connectivity ports
Rear output
Power switch
Power outlet
FRONT VIEW
REAR VIEW
6
Page 9
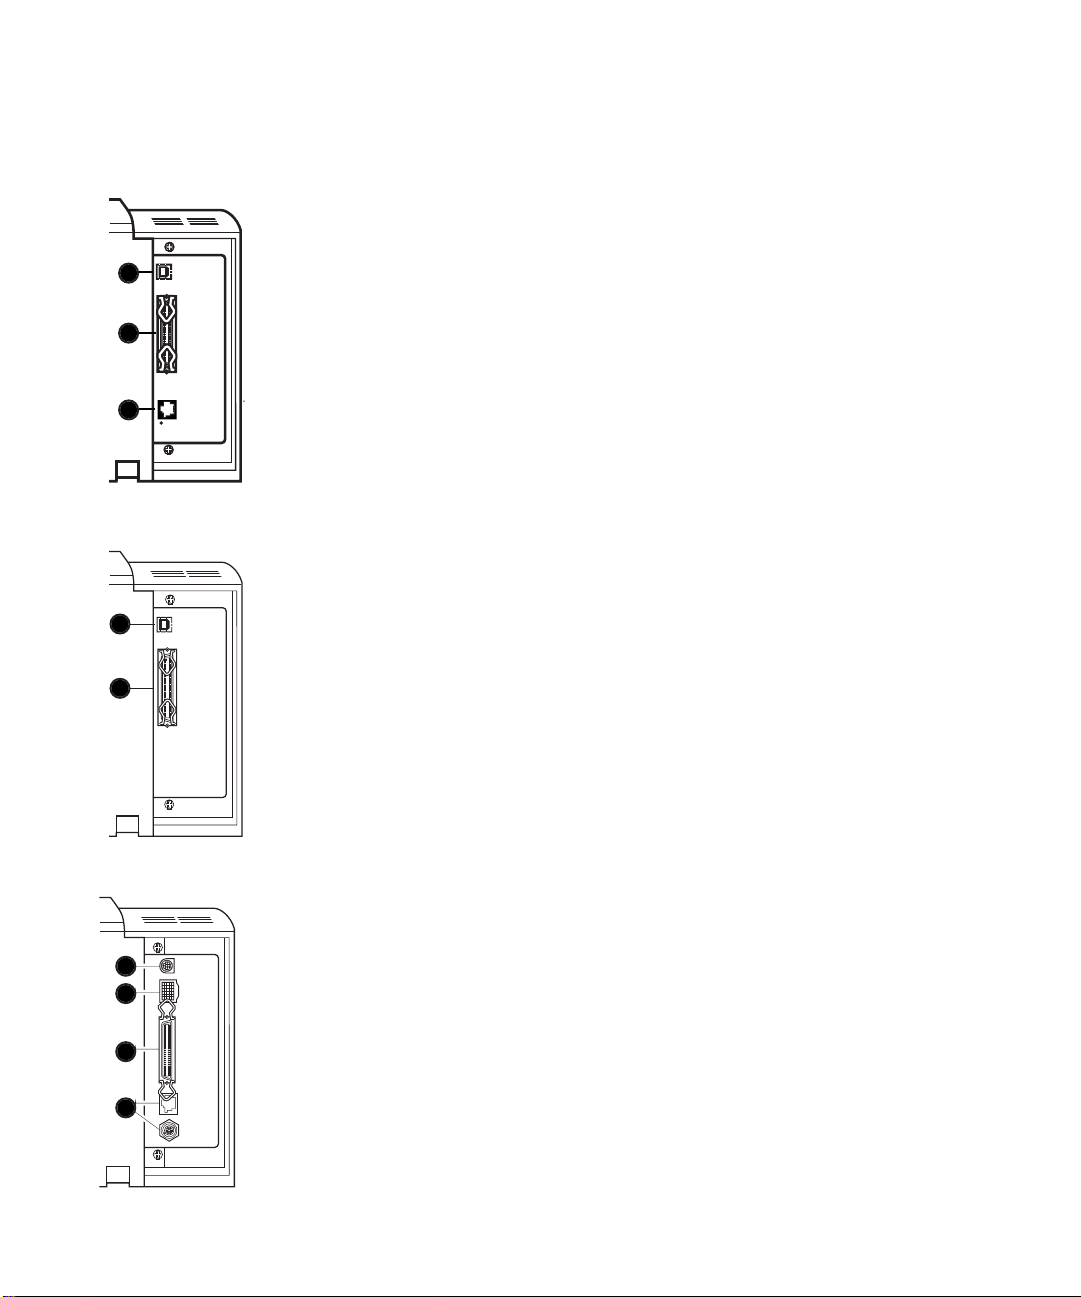
77
A: Serial/LocalTalk
B: HD30* (for font hard drive)
C: Parallel
D: Ethernet
(10 BaseT [top], 10 Base2* [bottom])
*1212 model only
ELITE 12/600 USB
E
LITE 12/600, ELITE 1212
A: USB
B: Parallel
A: USB
B: Parallel
C: Ethernet 10 BaseT
ELITE 12/600 N, ELITE 12/1200 N
CONNECTIVITY PORTS
A
B
C
D
7
With the printer’s
all ports active feature, all
the interfaces are
simultaneously active,
which means you can
connect more than one
interface at a time. You
don’t have to select a port;
this feature works
automatically.
A
B
A
B
C
USB
A
B
PARALLEL
10-BASE-T
C
A
USB
B
A
B
PARALLEL
Serial/
LocalTalk
HD 30
C
D
Parallel
Ethernet
Page 10
8
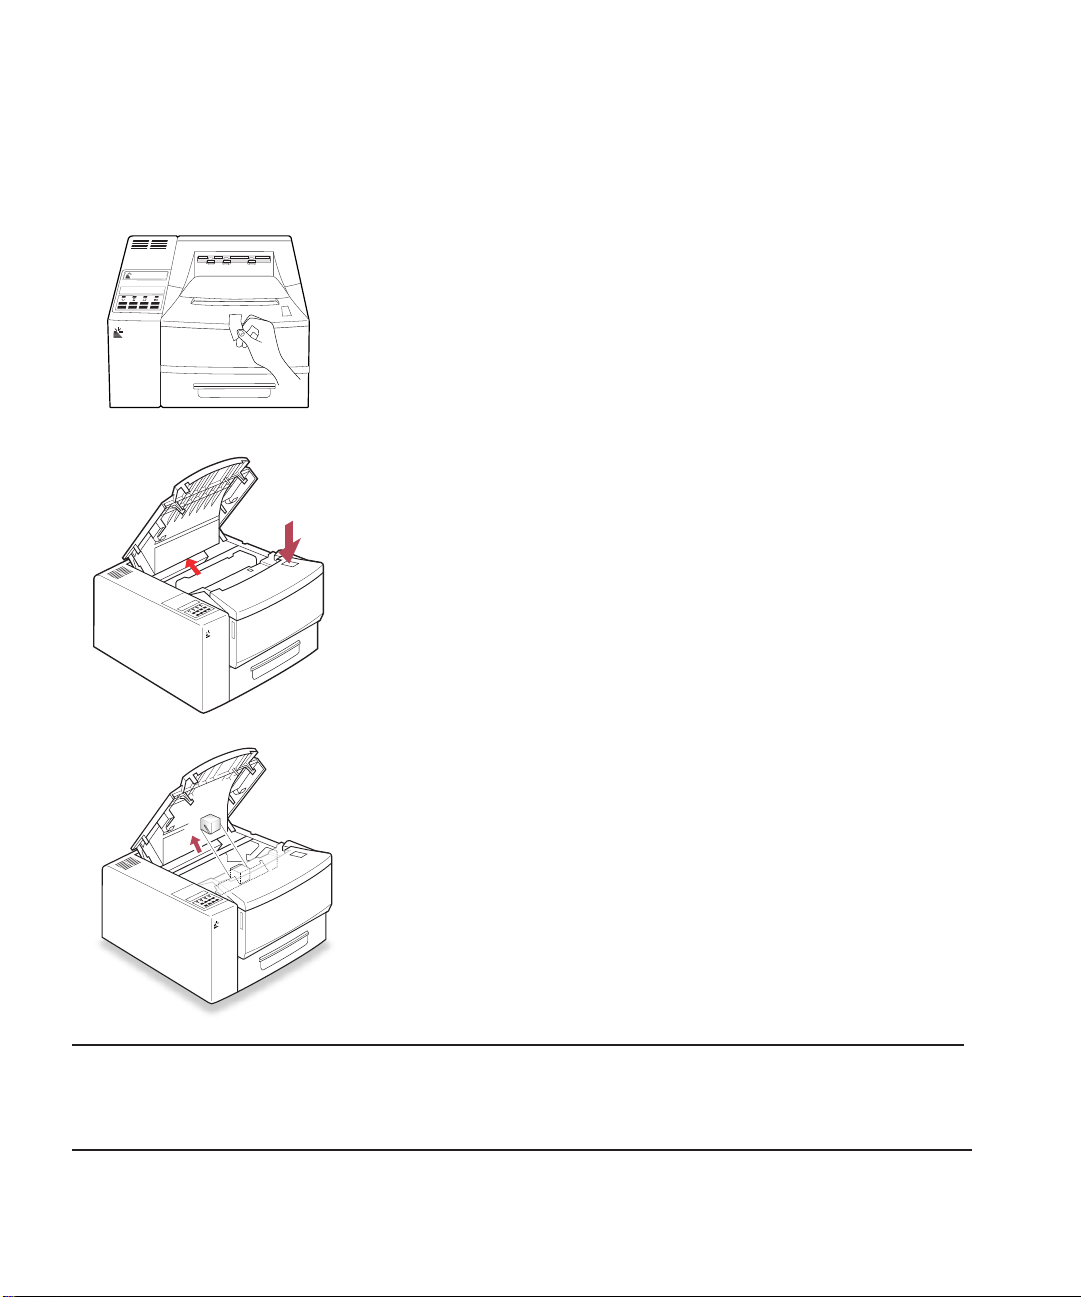
STEP 4. REMOVE INTERNAL PACKAGING
Elite
12/600U
G
CC
T
ECHNOLOGIES
G
CC
T
ECHNOLOGIES
1. Remove the tape from the printer’s top cover.
NOTE
Save all packaging material, you may need to repack the printer at a later date.
2. Press the release button on the top right of
the printer.
3. Lift open the printer cover.
4. Remove the plastic foam block.
G
CC
TECHNOLOGIES
Page 11
99
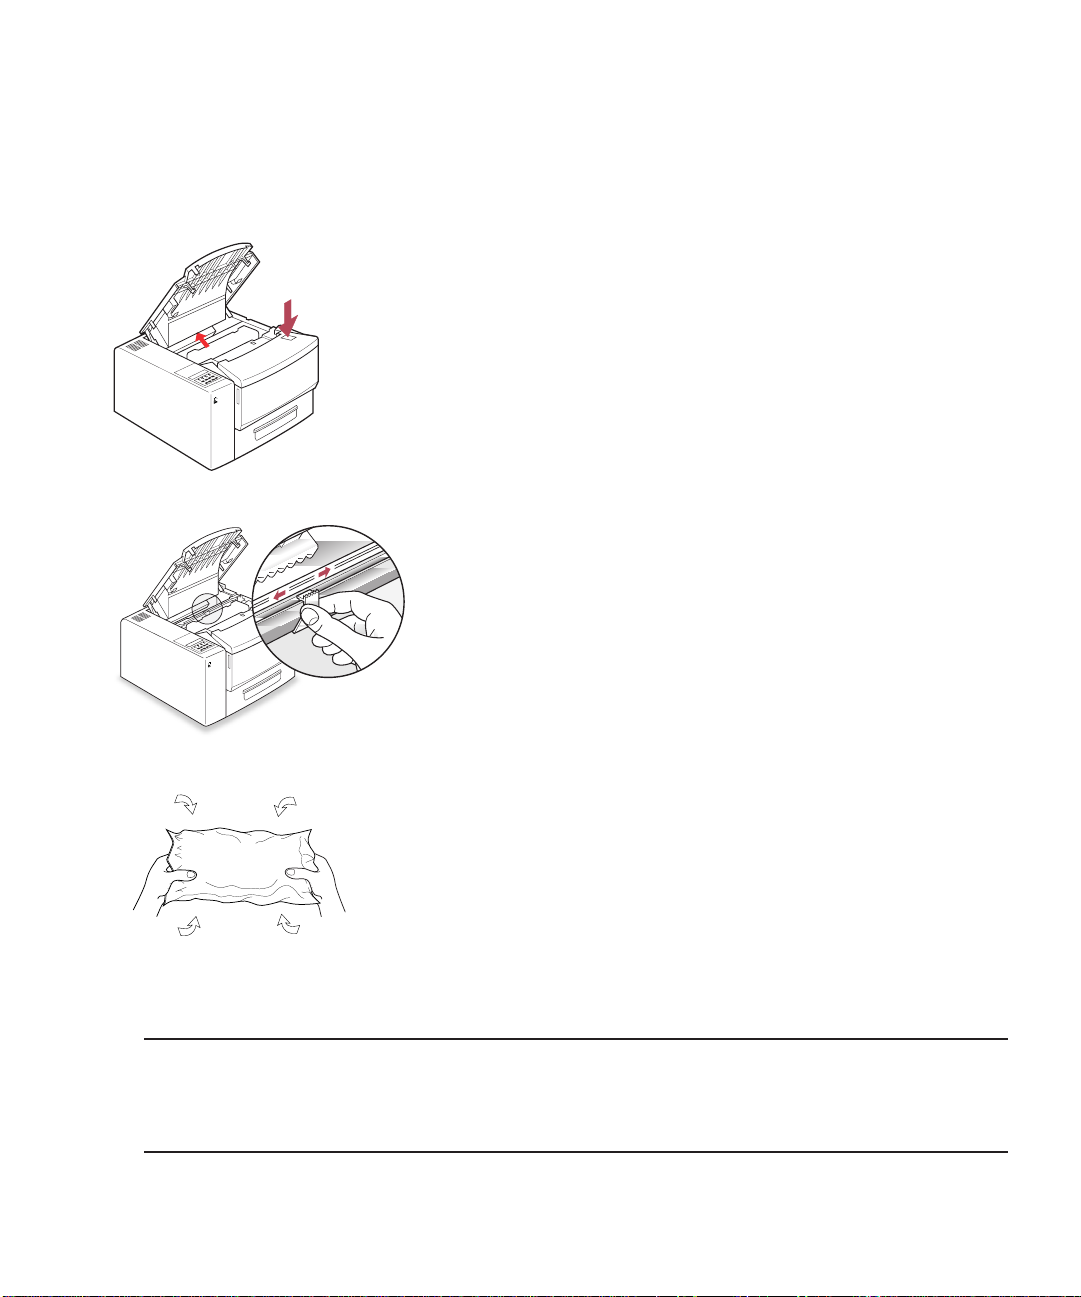
STEP 5. INSTALL TONER CARTRIDGE
G
CC
T
ECHNOLOGIES
NOTE
The toner cartridge contains a microfine plastic powder that is fused to the paper during
the printing process. If toner gets on your clothing wipe it off with a dry cloth and wash
clothing in cold water. (Hot water sets toner into fabric.)
1. Press the release button on the top right of
the printer.
2. Lift open the printer cover.
G
CC
T
ECHNOLOGIES
3. Move the yellow plastic slider from left to
right a few times to remove any dust or
particles, then position back to the far right.
4. Locate wrapped toner cartridge. Rotate and
gently shake from side to side to evenly
distribute the toner.
9
Page 12

1010
6. Firmly pull the tab straight out from the
cartridge to remove the entire length of tape.
Avoid touching any black toner on the tape.
7. There is an arrow on the left side of the
cartridge. There is a similar arrow on the left
of the printer. Align these two arrows and
insert the cartridge down and into the printer.
8. Close the top cover. If the cartridge is installed
properly, the cover will close easily.
G
CC
T
ECHNOLOGIES
5. Unwrap the toner cartridge.
G
CC
T
ECHNOLOGIES
10
Page 13

111111
STEP 6. LOAD TRAY
•Letter
•Executive
•Legal 13"
•Legal 14"
•A4
•B5
You can use smaller sizes of paper in the Multipurpose feeder – see the section titled “Using
the Multipurpose Feeder on page 85 for details. The standard paper tray will also handle up
to 50 transparency or label sheets in Letter or A4 size.
The standard paper tray holds up to 250 sheets of 20 lb. copier-type paper. It can handle the
following sizes of paper:
1. Pull the tray completely out of the printer.
2. Adjust the guides at the rear of the paper
tray to accommodate the length of the paper
you intend to use. Adjust the smaller guide
at the left (A) to accommodate paper up to
A4 size.
8.5 X 11"
7 1/4 X 10.5"
B5
A4
A
Page 14

12
3. For sizes larger than letter/A4, extend both of
the guides (B).
4 Make sure that the paper fits underneath the
plastic tab at the rear of the tray and under
the metal bracket at the front (C).
5. Place the paper in the paper tray and move
the paper width guide (D) so that it lies next
to the paper. Don’t move the guide so close
that it holds the paper tightly, because this
may cause jams.
6. Replace the tray in the printer.
12
8.5 X 14"
8.5 X 13"
B
C
D
Page 15
1313
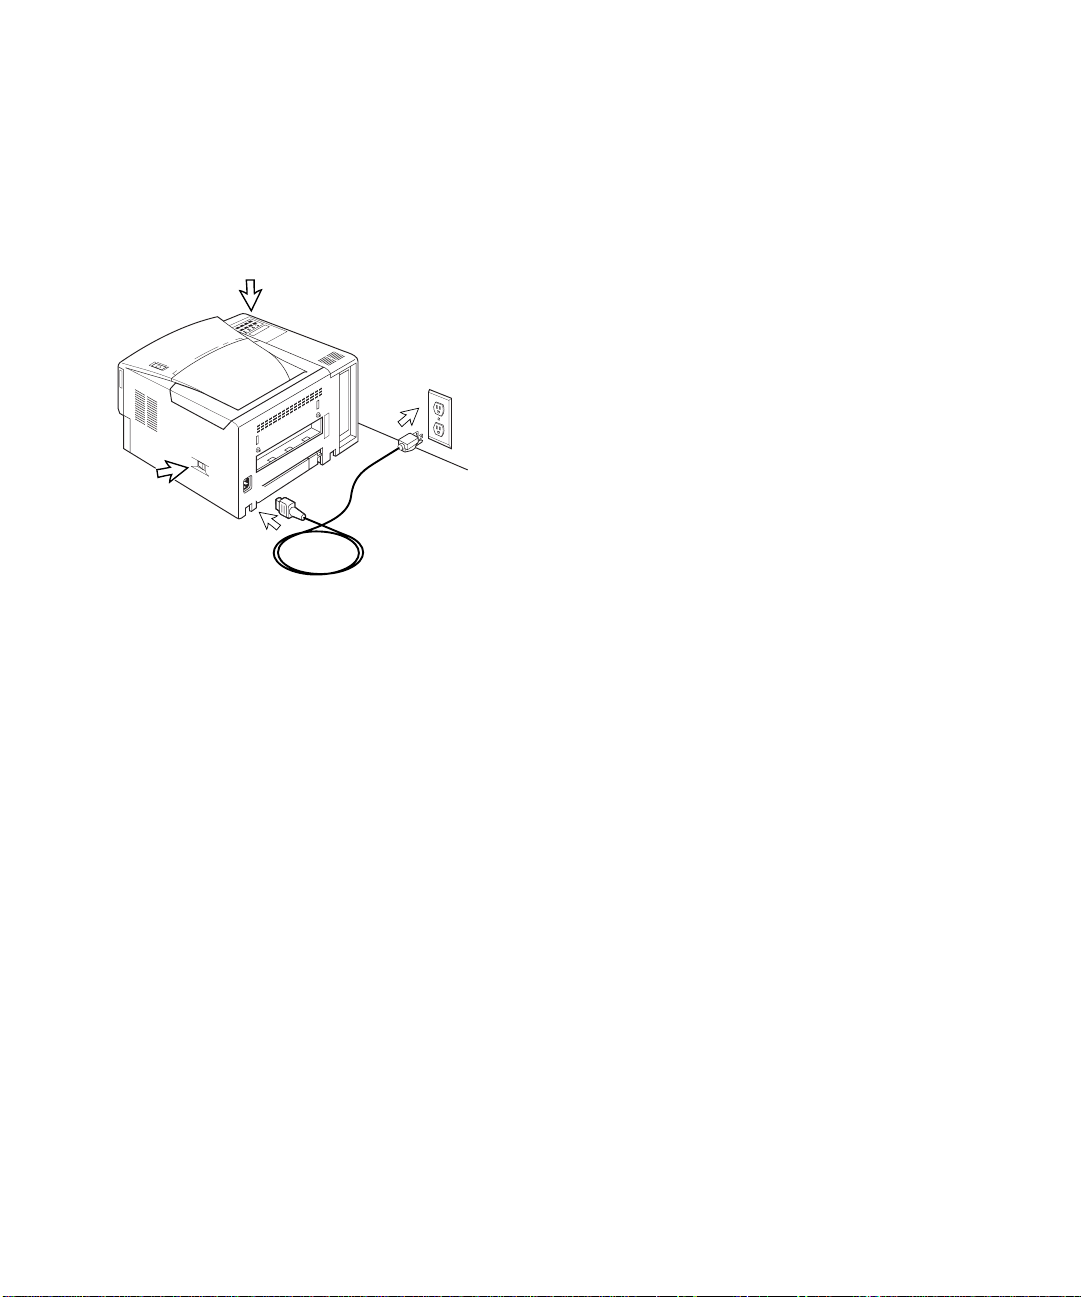
STEP 7. ATTACH THE POWERCORD
1. Locate the power switch on the side of the
printer. Make sure the printer is switched off.
2. Connect the power cord to the printer and a
grounded power strip or AC outlet.
3. Switch the printer on.
4. After the printer warms up, the “Ready”
message should be visible on the control
panel display and the on line light will
remain on.
Page 16

1414
CONNECTING CABLES CORRECTLY
Most cables come with some kind of locking device to insure that the connection is made. Be
sure to use these locking devices, otherwise you may experience intermittent errors or the
printer will fail to operate altogether.
• USB cables are keyed and can only be inserted one way.
• There is no locking device on LocalTalk or RS-422 Serial connectors. Make sure the
connector is inserted all the way into the socket.
• When you have inserted a Parallel port connector, lock the connector by lifting up
the wire clips at either end of the socket so that they fit into the slots on the sides of
the connector.
• 10 BaseT connectors have a locking tab similar to connectors on telephone cords.
When the plug is fully inserted the tab clicks into place.
• 10 Base2 connectors (Elite1212 only) have a rotating collar. Inserts the connector
onto the threaded socket, then rotate the collar clockwise to lock it.
Improperly inserted cables are the cause of many networking and printer-related problems.
UNIVERSAL SERIAL BUS (USB) CONNECTION (ELITE 12/600 USB, ELITE 12/600 N AND ELITE 12/1200 N ONLY)
USB connection ports can be found on nearly all new computers. USB technology allows
faster communication than traditional serial connections and is easily expandable through
interconnected hubs. All USB cables are the same. One end of the cable fits into the
computer or hub only and the other end fits into the printer only. You cannot connect the
cable incorrectly.
STEP 8. CONNECT PRINTER CABLES
Page 17

1515
BI-DIRECTIONAL PARALLEL CONNECTION
The bi-directional parallel connection between the printer and a PC needs a standard
36-pin bi-directional cable (to IEEE 1284 standards). The length of this cable can be up to
2 meters or 6.5 feet.
ETHERNET NETWORK CONNECTION (ELITE 12/600N, ELITE 12/1200N, ELITE 12/600 AND ELITE 1212)
The Ethernet interface on your printer lets you connect to an Ethernet network via one of
two types of Ethernet cables: 10 BaseT, and 10 Base2 (Elite 1212 only).
10 BASET - UNSHIELDED TWISTED-PAIR OR UTP
Your printer connects to 10 BaseT Ethernet via the 10 BaseT (RJ-45) connector . The
cabling used is Unshielded Twisted-Pair (UTP).
10 BASE2 - RG-58, THIN COAX, OR THINNET (ELITE 1212 ONLY)
Your printer connects to 10 Base2 Ethernet via the 10 Base2 (BNC) connector. The
cabling used is called RG-58 or Thin Coax.
Page 18
1616
LOCALTALK CONNECTION (ELITE 12/600 AND ELITE1212)
The LocalTalk cable system connects to AppleTalk-compatible networks. This connection
forms a chain; do not connect devices so that it forms a circle.
Important: You need a connector kit for each device on the network. Therefore, you need
two connector kits to connect the printer to one computer, and so forth.
To plug in LocalTalk cables:
1. Switch off the printer.
2. Connect one LocalTalk connector box to the
LocalTalk port on the printer.
3. Connect one LocalTalk connector box to the
printer port (identified by a printer icon) on
the back of the Macintosh.
4. Connect the LocalTalk boxes together with
one of the LocalTalk cables. You will only
need one LocalTalk cable (for one Macintosh
and one printer).
5. You may need to install terminator resistors
that were included in your kit.
6. Switch on the printer.
7. Verify the printer’s LocalTalk setting. The 8-pin
serial submenu, accessed from the printer’s
control panel, should be set to LocalTalk.
LocalTalk is the factory default, so you should
not need to change the setting.
SERIAL CONNECTIONS (ELITE 12/600 AND ELITE 1212 ONLY)
See Elite 12ppm users manual
PhoneNET
Connector box
Resistor
Terminator
Cable
Page 19

17
SUPPORTED NETWORK PROTOCOLS
ETHERTALK
EtherTalk is Apple’s name for the AppleTalk network protocol running over
Ethernet cabling.
TCP/IP
TCP/IP is a networking protocol used by various vendors of network software. If you
need to know more about these protocols, refer to the Elite 12 Series CD-ROM. You’ll
also see how to connect your printer to make it available on other networks.
Page 20

1818
STEP 9. INSTALL PRINTING SOFTWARE
Once you have the printer physically set up, you’ll install software on every computer that will
use it. This includes:
•Installing the printer driver on a Macintosh or Windows computer.
•Installing PPD (PostScript Printer Description) and other files, if necessary.
•Configuring the control panel, driver, and ports, if necessary.
Page 21
19
STEP 9A. INSTALL MACINTOSH PRINTING SOFTWARE
USING THE ELITE 12 SERIES WITH A MACINTOSH
You must install GCC printer software on your Macintosh to use your Elite 12 printer. This
software is on the Elite 12 Series CD-ROM that shipped with your printer. Follow the
software installation instructions that correspond to your printer connection.
INSTALLATION FOR PRINTERS CONNECTED BY USB
(REQUIRES MACINTOSH OPERATING SYSTEM 8.6 OR HIGHER)
Before installing this software, be sure that the printer is connected to the Mac using an
appropriate cable and that both the printer and the Mac are powered on. Also confirm that
all the steps in the Hardware Setup section of this manual have been followed.
PART ONE - INSTALLING THE GCC DRIVER SOFTWARE AND FONTS
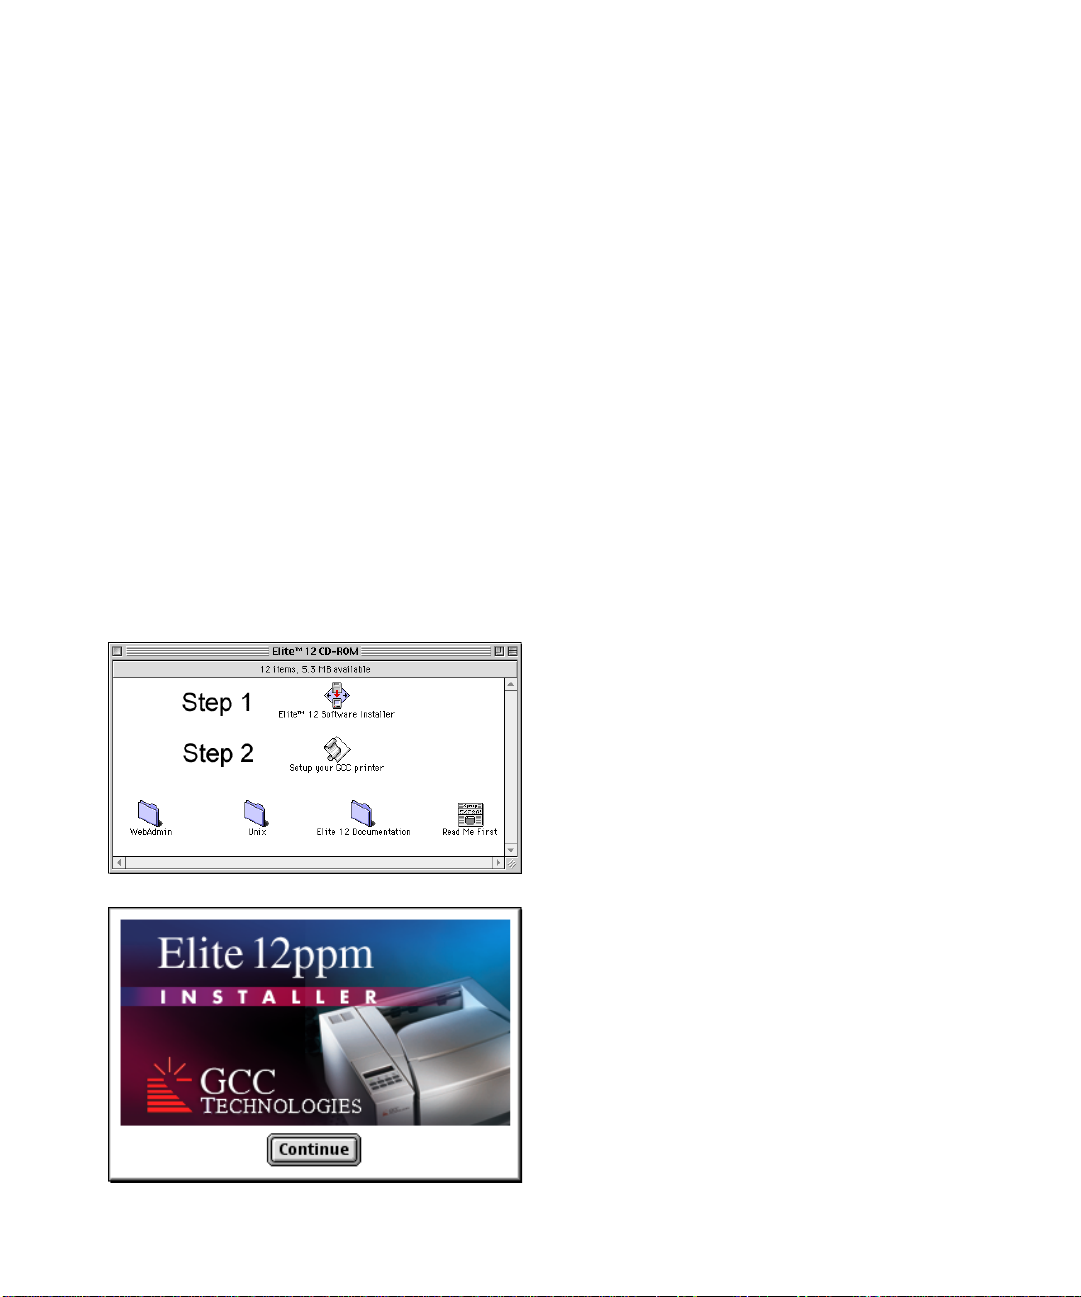
1. Close any open programs.
2. Open the CD drawer, insert the
GCC CD-ROM, and close the drawer.
3. A window opens on the Mac screen called
"Elite 12 Series CD-ROM”
4.
Double-click on the "Elite 12 Software
Installer" icon.
5. The title screen of the installer opens.
Click the Continue button.
Page 22
20
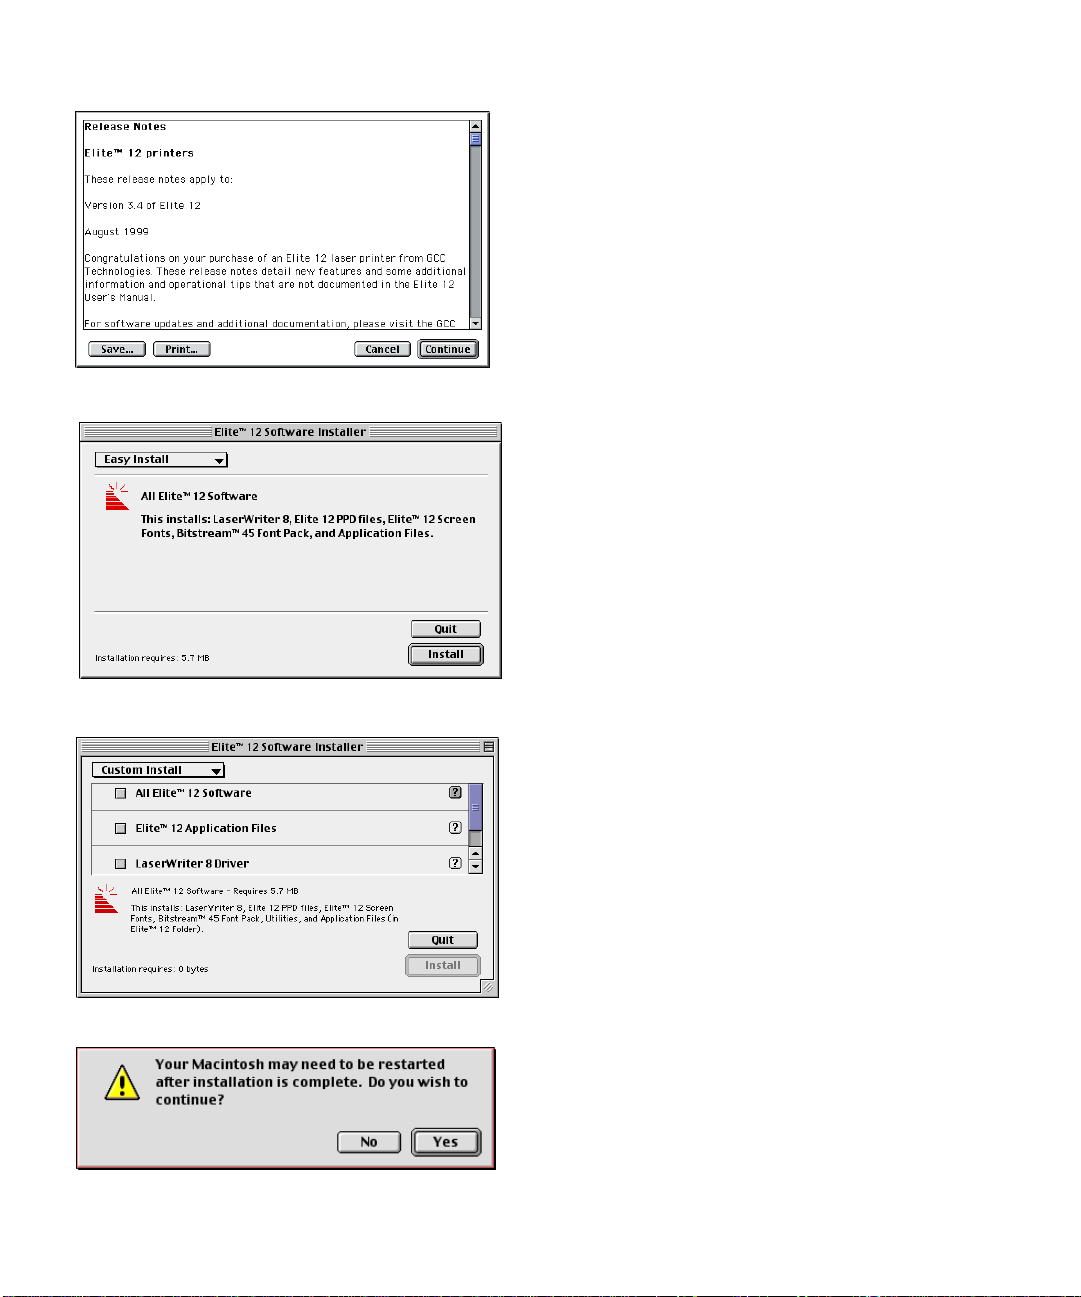
6. The Release Notes window opens. This
window contains new information that is not
included in the written documentation here.
Note any new instructions.
Click the Continue button.
7. The Elite 12 Software Installer window
opens.
• Unless you have special printing
requirements, GCC recommends that
you leave the setting at "Easy Install."
Click the "Install" button at the bottom
right of the dialog box and go to step 8.
• Experienced users may want to install
only parts of the software. In this case,
choose Custom Install. Select the items
you want to install and click the "Install"
button.
8. A dialog box warns you that your Macintosh
will be restarted and asks "Do you wish to
continue?"
Click the Yes button.
Page 23
21
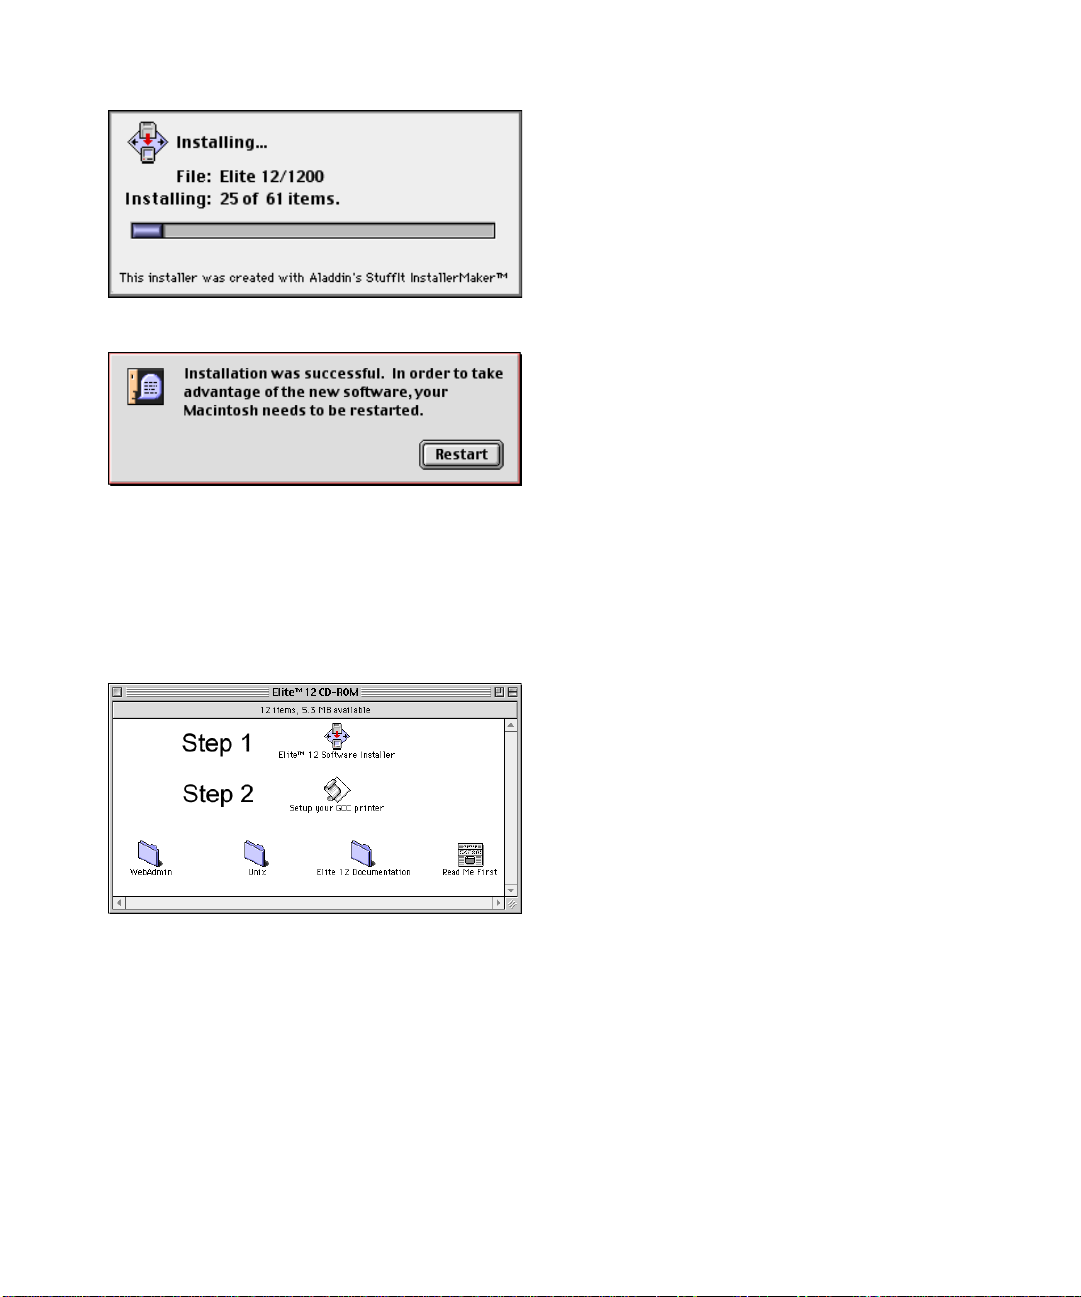
9. A window opens showing you the progress
of the installation.
10. A dialog box will ask you to restart your
Macintosh.
Click the Restart button.
11. Your Macintosh restarts. You’ve now
completed the software installation. Continue
to Part Two
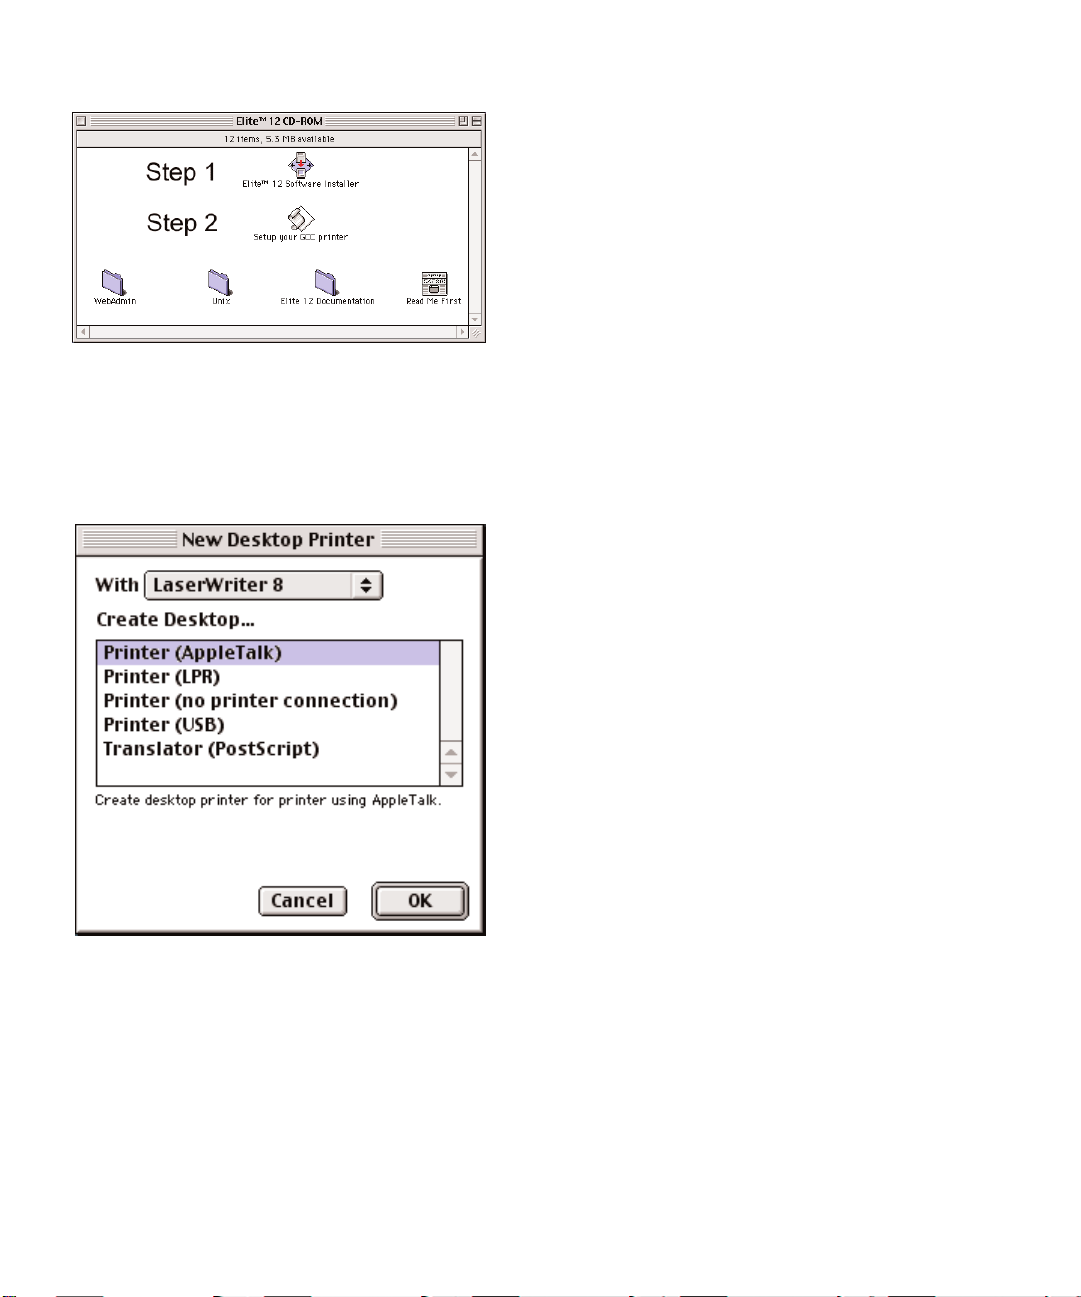
PART TWO - CREATING YOUR DESKTOP PRINTER
12. In the "Elite 12 ppm Installer" window on your
Macintosh screen,
double-click the "Setup
your GCC Printer" icon.
Page 24

22
13. The "New Desktop Printer" dialog box opens.
14. Highlight the "Printer (USB)" item in the list.
Click OK.
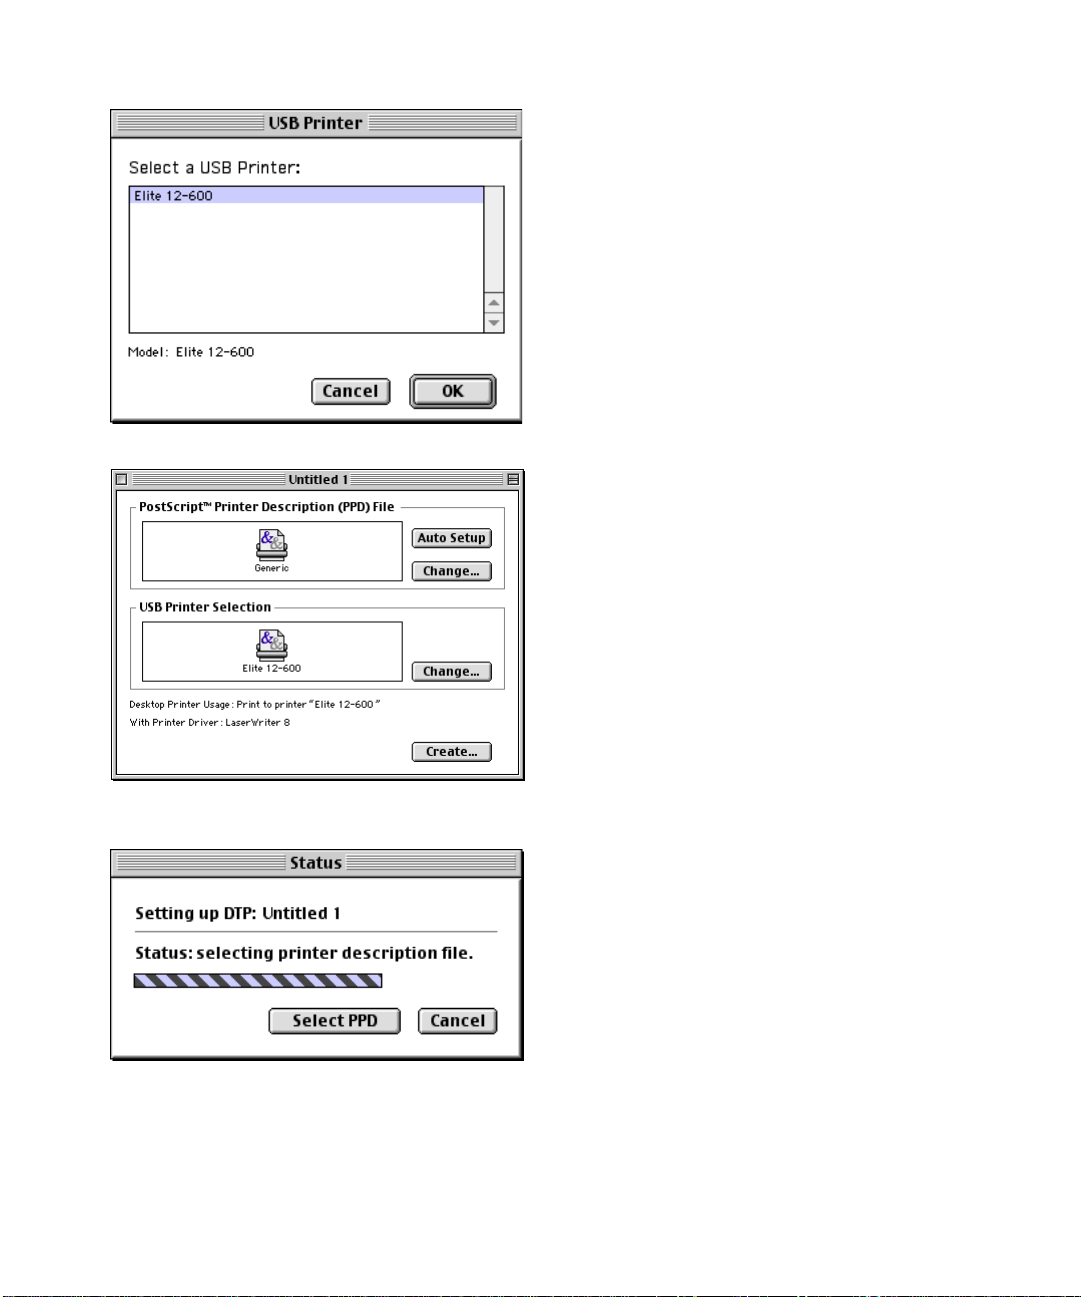
15. A dialog box called "Untitled 1" opens.
16. You will see two printer icons.
Double-click
on the icon in the "USB Printer Selection"
box.
Page 25
23
17. A dialog box called "USB Printer" opens.
Click on your printer model then
click the "OK" button.
18. You will be returned to the "Untitled 1"
dialog box.
19. Click on the "Auto Setup" button.
20. A window opens showing you the progress
of the installation.
Page 26
24
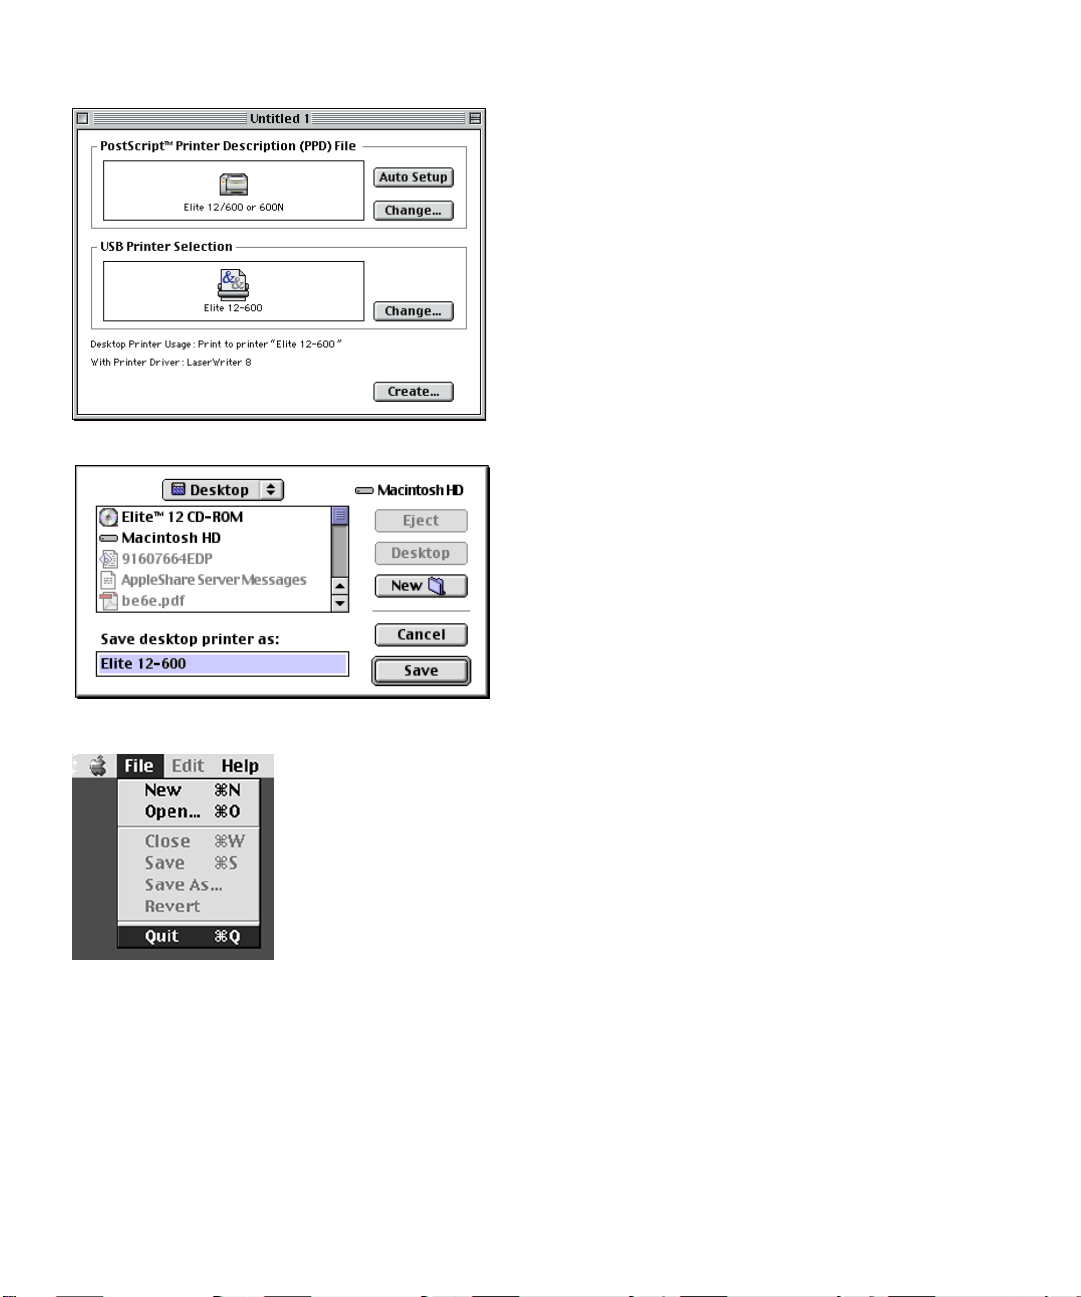
21 You return to the "Untitled 1" dialog box. The
icon in the top section of the dialog box now
shows your printer.
22.
Click the "Create" button.
23. A dialog box opens which displays
"Save desktop printer as:(your printer model)".
You may rename the printer or accept the
default name.
Click Save.
24. Go to the menus at the top of the screen.
Click on the word "File" and then choose
"Quit" from the menu.
25. Click on the Close box at the top left of the
Elite 12 CD-ROM folder.
26. Drag the GCC CD icon from the Macintosh’s
desktop to the "Trash" icon. The CD-ROM
ejects from the drive. Replace the CD-ROM in
its jewel case and push the CD-ROM drive
drawer closed.
The installation is complete and you can now print to your GCC printer.
Page 27
25
INSTALLATION FOR PRINTERS CONNECTED BY APPLETALK (VIA LOCALTALK OR ETHERNET)
Before installing this software, be sure that the printer is connected to the Mac using an
appropriate cable and that both the printer and Mac are powered on. Also confirm that all
the steps in the Hardware Setup section of this manual have been followed.
These instructions show Mac OS 8.6. If you are using OS 8.5.1 or earlier, some instructions
are slightly different.
1. Repeat Part One (steps 1-11 on pages 19-21)
- Installing the GCC driver software and fonts
for Printers Connected by USB.
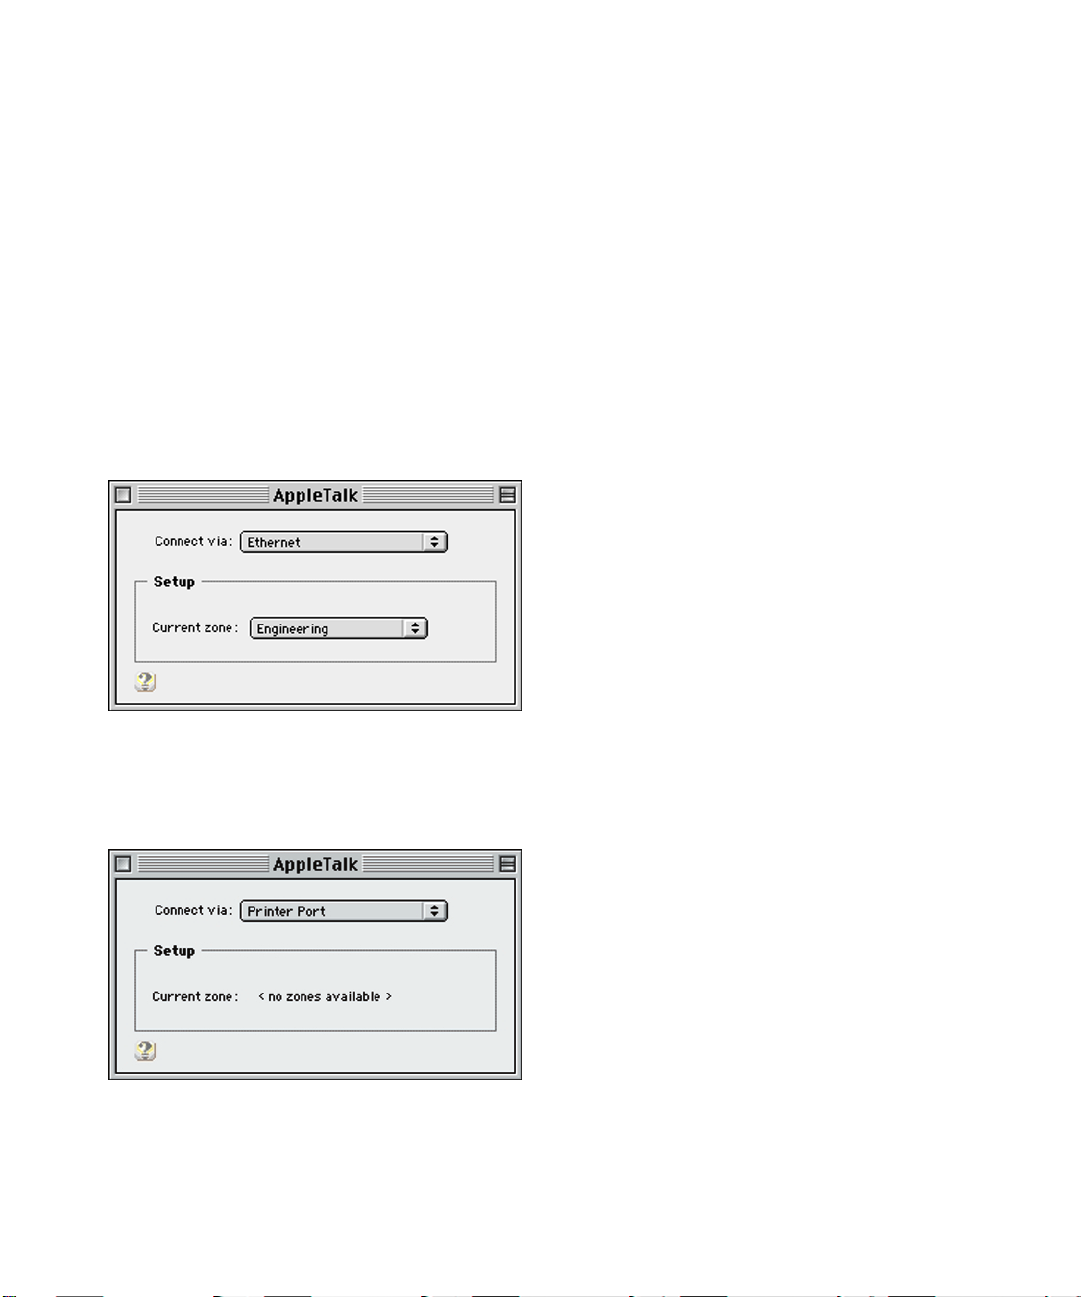
2. For AppleTalk installation only:
• If you are using an Ethernet port on your
Macintosh to communicate to your
printer, open control panels on the
Macintosh and go to AppleTalk. Set the
AppleTalk connection to Ethernet. Close
the AppleTalk control panel. If prompted
to save your new configuration,
click Save.
• If you are using a LocalTalk port on your
Macintosh to communicate to your
printer, open control panels on the
Macintosh and go to AppleTalk. Set the
AppleTalk connection to Printer Port or
Modem Port, depending on which port
your LocalTalk network is connected to.
Close the AppleTalk control panel. If
prompted to save your new configuration,
click Save.
Page 28
26
3. In the window on your Macintosh screen,
double click the "Set up your GCC Printer"
icon.
4. The "New Desktop Printer" dialog box opens.
5.
Click on the "Printer (AppleTalk)" item in the
list. Click OK.
Page 29
27
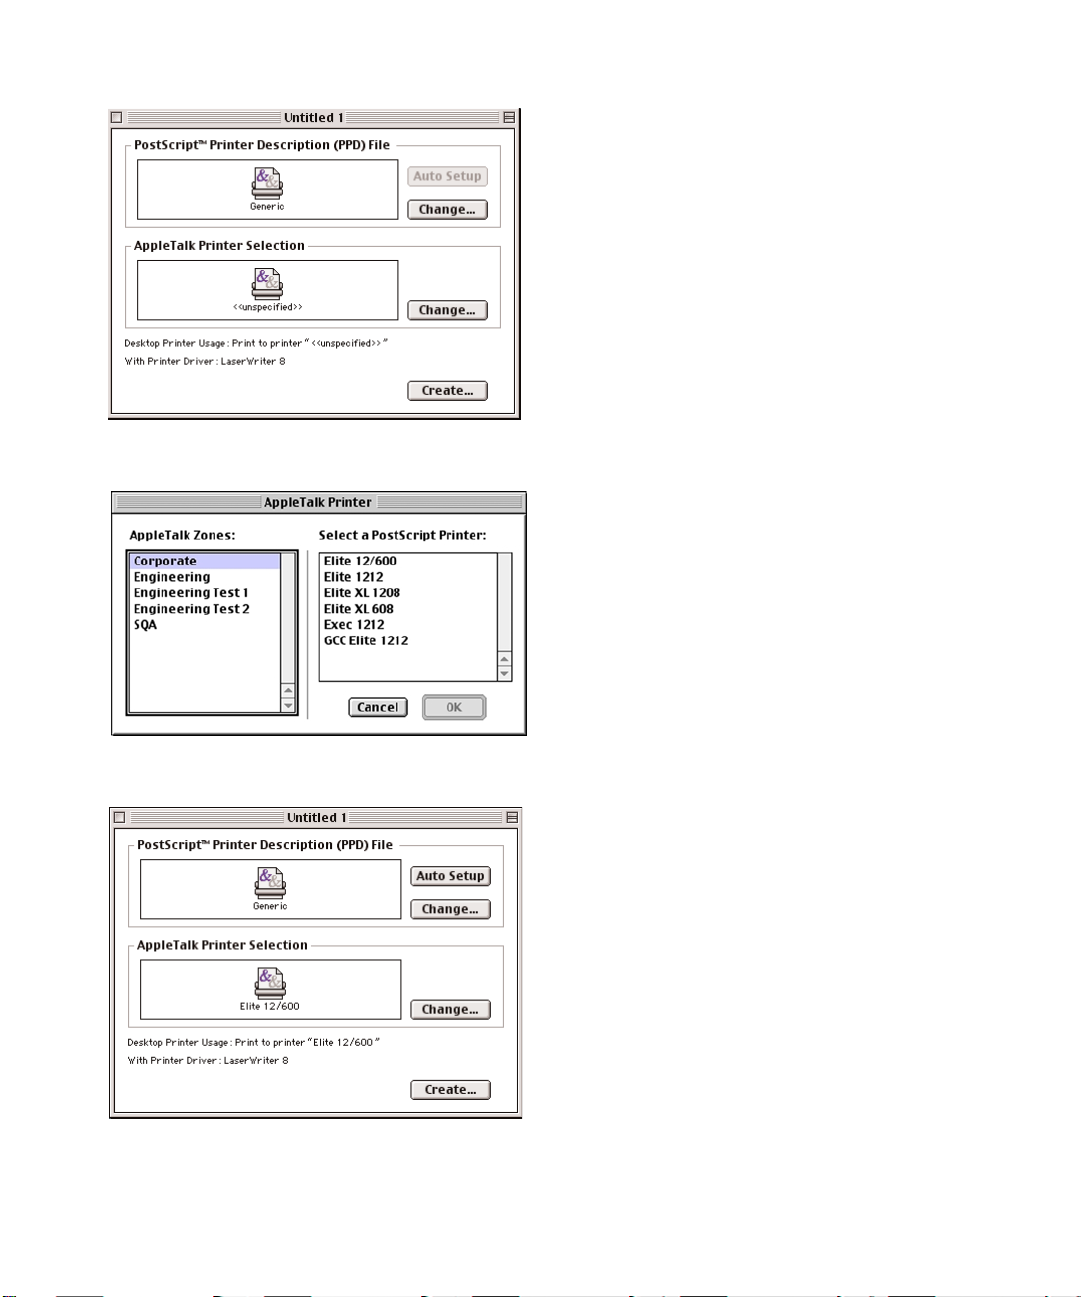
6. A dialog box called "Untitled 1" opens.
7. There are two buttons marked "Change."
Click on the lower "Change" button.
8. A dialog box called "AppleTalk Printer" opens.
If you do not see your printer in the list
choose the correct Zone. Click on your
printer, then click the "OK" button.
9. You return to the "Untitled 1" dialog box.
10. Click on the "Auto Setup" button. If you are
using OS 8.5.1 or earlier, click on the upper
"Change" button, select your printer from the
list, and click the "Select" button.
Page 30

28
11. A window opens showing you the progress
of the installation.
12. You return to the "Untitled 1" dialog box. The
icon in the top section of the dialog box now
shows your printer.
13. Click the "Create" button. If you are using
OS 8.5.1 or earlier, go to the file menu and
choose
"Save" from the File menu.
14. A dialog box opens which displays "Save
desktop printer as:
(your printer model)". You may
rename the printer or accept the default
name. Click the "Save" button.
15. Go to the menus at the top of the screen.
Click on the File menu and choose Quit.
16. Click on the Close box of the Elite 12 CD-ROM
folder.
17. Drag the GCC CD icon from the Macintosh’s
desktop to the Trash.
The installation is complete and you can now print to your GCC printer.
Page 31

29
INSTALLATION FOR PRINTERS CONNECTED BY LPR
If you intend to use LPR, your GCC printer must be configured through its control panel.
Your System Administrator may need to perform the installation.
Before installing this software, be sure that the printer is connected to the Mac using the
appropriate cable and that both the printer and Mac are powered on. Also confirm that all
the steps in the Hardware Setup section of this manual have been followed.
These instructions show Mac OS 8.6. If you are using OS 8.5.1 or earlier, some instructions
are slightly different.
1. Repeat Part One (steps 1-11 on pages 19-21)
- Installing the GCC driver software and fonts
for Printers Connected by USB.
2. In the window on your Macintosh screen,
double click the "Setup your GCC Printer"
icon.
3. The "New Desktop Printer" dialog box opens.
4. Click on the "Printer (LPR)" item in the list.
Click OK.
Page 32

30
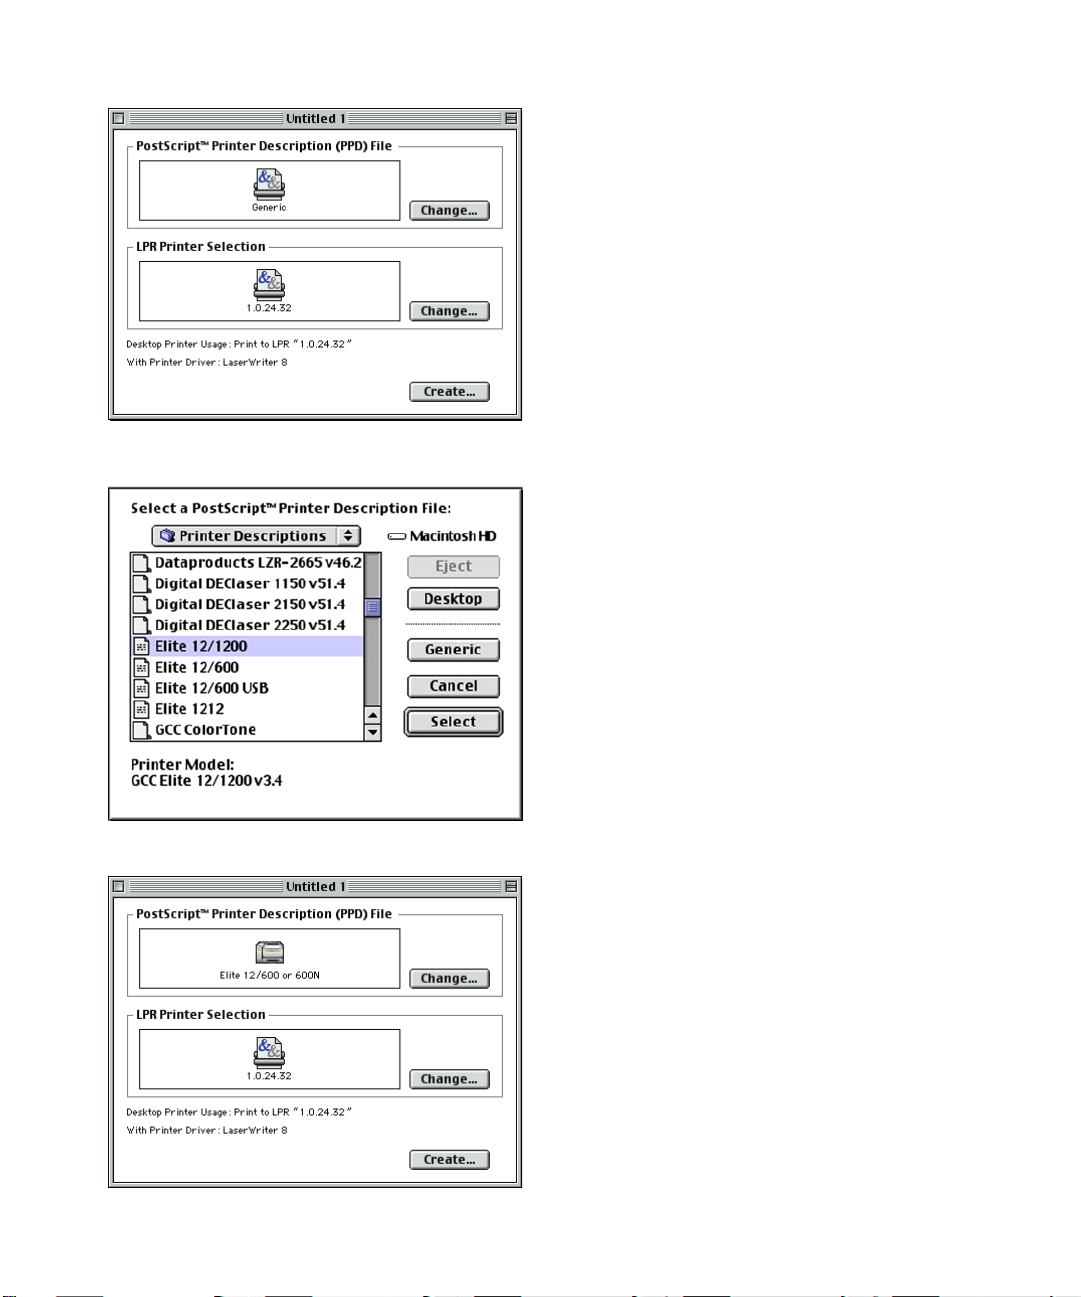
5. A dialog box called "Untitled 1" opens.
6. There are two buttons marked "Change."
Click
on the lower "Change" button.
7. A dialog box called "Internet Printer" opens.
Enter a valid IP address (Your network
administrator will supply this).
8. If a queue name is being used, contact your
network administrator.
9.
Click on the "Verify" button. If the printer is
configured and the IP address is correct, the
message "The printer is located at [the IP
address you entered]" appears in the dialog
box. If not, the message "The printer cannot
be verified" appears. Check the IP address
you entered and the configuration of the
printer.
10.
Click OK.
Page 33
31
11. You return to the "Untitled 1" dialog box.
12.
Click on the top "Change" button of the
dialog box.
13. A dialog box opens, called "Select a
PostScript Printer Description File."
Choose your printer model from the list.
14. Click the "Select" button.
15. You return to the "Untitled 1" dialog box. The
icon in the top section of the dialog box now
shows your printer.
16. Click the "Create" button. If you are using
OS 8.5.1 or earlier, go to the file menu and
choose "Save" from the File menu.
Page 34

32
17. A dialog box opens which displays "Save
desktop printer as:". You may rename the
printer or accept the default name.
Click the "Save" button.
18. Go to the menus at the top of the screen.
Click on the File menu and choose Quit.
19. Click on the Close box of the Elite 12 CD-ROM
folder.
20. Drag the GCC CD icon from the Macintosh’s
desktop to the Trash.
The installation is complete and you can now print to your GCC printer.
Page 35

3333
OVERVIEW
You will need to set up your Windows or DOS computer to use the Elite 12 Series by
installing the Elite 12 Series software for PC-compatible computers. This software is on the
Elite 12 Series CD-ROM. The CD-ROM includes customized Windows PostScript printer
drivers for Windows 3.1 (and Windows for Workgroups), Windows 95/98 and Windows NT
3.51 and 4.0. It also has printer description files that let you use all the printing and paper
handling features of the Elite 12 Series.
This section details installation and printing instructions for Windows 95/98 and DOS.
Information on Windows NT 3.51, Windows NT 4.0, and networking printers with
Windows is on the Elite 12 Series CD-ROM.
Important: Read the release notes contained in the READ ME.TXT file before installing the
printer software. This file includes important last-minute feature and compatibility
information about the Elite 12 Series.
STEP 9B.INSTALL WINDOWS AND DOS
PRINTING SOFTWARE
Page 36

34
WINDOWS 98 PRINTING SOFTWARE OVERVIEW
The software required to set up your Windows 98 computer is located on the Elite 12 Series
CD-ROM. For Windows 95 software installation instructions, go to page 42.
You can install the Elite 12 Series software on your computer using Plug and Play. This will
work if you are installing the software on a computer which is connected to the printer
through the parallel port.
If the printer is not connected to the computer through the parallel port, go to the section
“Using Add Printer” immediately following Plug and Play instructions.
Windows 98 uses a Wizard to help you install printer software. A Wizard is a series of dialog
boxes. In each dialog box you make configuration choices then click the Next button to
move to the next dialog box.
Part of the software you will need is contained on the Windows 98 CD-ROM or floppy
disks. If your computer was not supplied with the disk(s), follow the special instructions
provided when you reach this step of the installation process.
WINDOWS 98 PLUG AND PLAY INSTALLATION
Part of the software you will need is on the Windows 98 CD-ROM. You must have
this disk ready, along with the Elite 12 Series CD-ROM, when you install the Elite
12 Series software on your Windows 98 computer.
1. If the computer is running, shut it down.
2. With the computer powered off, attach the
printer cable to the computer and printer. Add
paper to the paper tray.
3. Turn on the printer. Verify that the printer LCD
panel reads “READY”. Start the computer.
Page 37
35
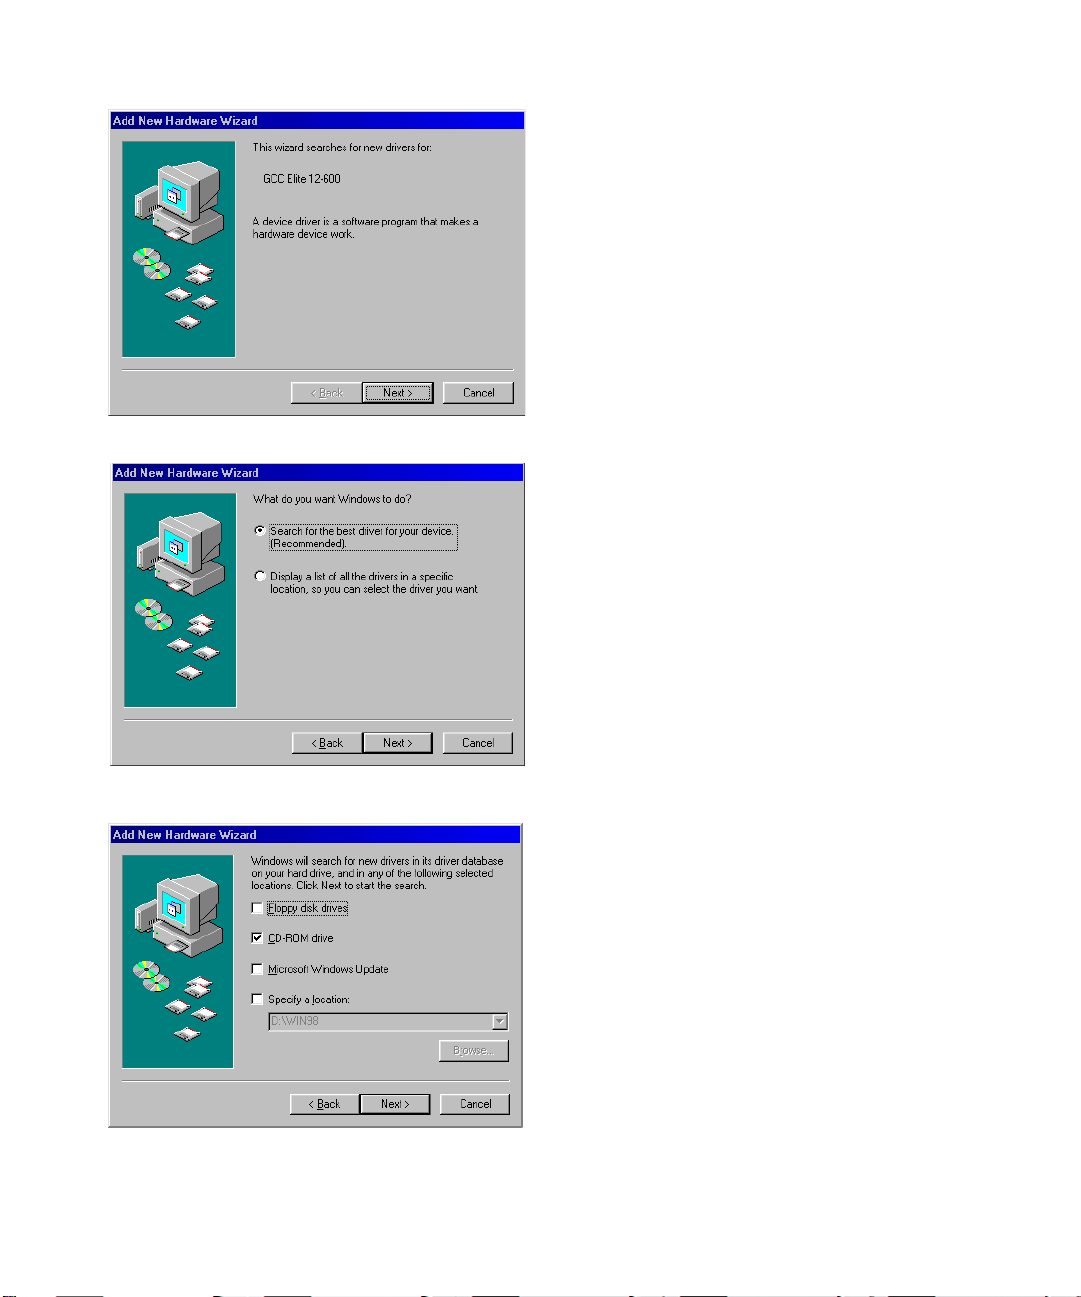
4. You will see a dialog box saying that
Windows 98 has found new hardware. The
Add New Hardware Wizard appears showing
the printer model to be installed. Insert Elite
12 Series CD-ROM.
Click Next.
5. The Wizard will ask “What do you want
Windows to do?” Choose “Search for the best
driver for your device.”
Click Next.
6. In this screen, Windows is searching for new
drivers. Make sure “CD-ROM drive” is the
only box checked off. Click Next.
Page 38

36
7. The Wizard will display the driver that it
found.
Click Next.
8. Go to step 8 in the Using Add Printer section
for Windows 98 found on page 40.
USING ADD PRINTER
To install the printing software without using Plug and Play, make sure that the printer is
switched on, has paper, and is connected to the computer or network. Start your computer.
1. Click on the Start button in Windows 98.
• You’ll see the Start menu. Click on
Settings, then click on Printers in the
submenu.
• You’ll see the Printers folder.
Double-click the Add Printer icon.
• You’ll see the first screen of the Add
Printer Wizard dialog box.
Click the Next
button
at the bottom of the dialog box,
and you’ll see the local/network dialog
box (if you see a list of printer manufacturers and printer models, go to
step 4).
Page 39
37
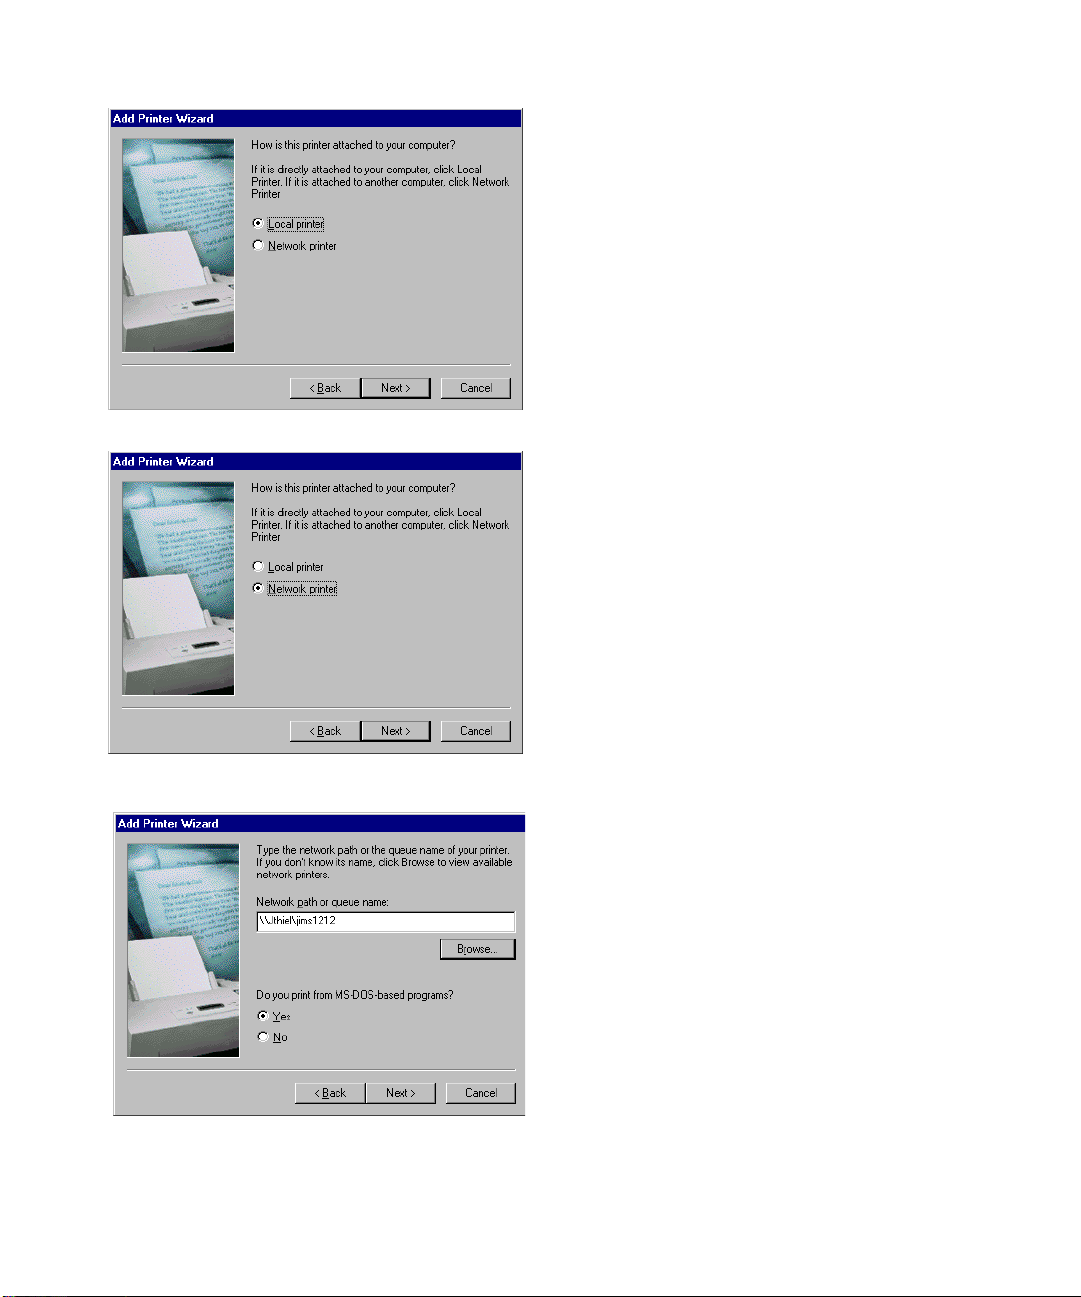
2. Chose a connection:
• Select Local if your printer is attached
directly to your computer, even if you
may intend others to use it through a
network.
•
If you select Local, click Next and
go to step 4.
• Select Network only if your printer is not
attached directly to your computer.
• If you selected Network, click Next and
go to the next step.
3. You’ll see the network path dialog.
• Type in the path or queue name of the
printer, which you may obtain from your
system administrator. You can click
Browse to display a visual representation
of your site’s network and the printer’s location on it.
• Click the Yes radio button if you print
from MS-DOS based programs.
• If you selected No for the MS-DOS
printing question, click Next and go to
step 4. If you selected Yes, click Next and
go to the next step.
Page 40
38
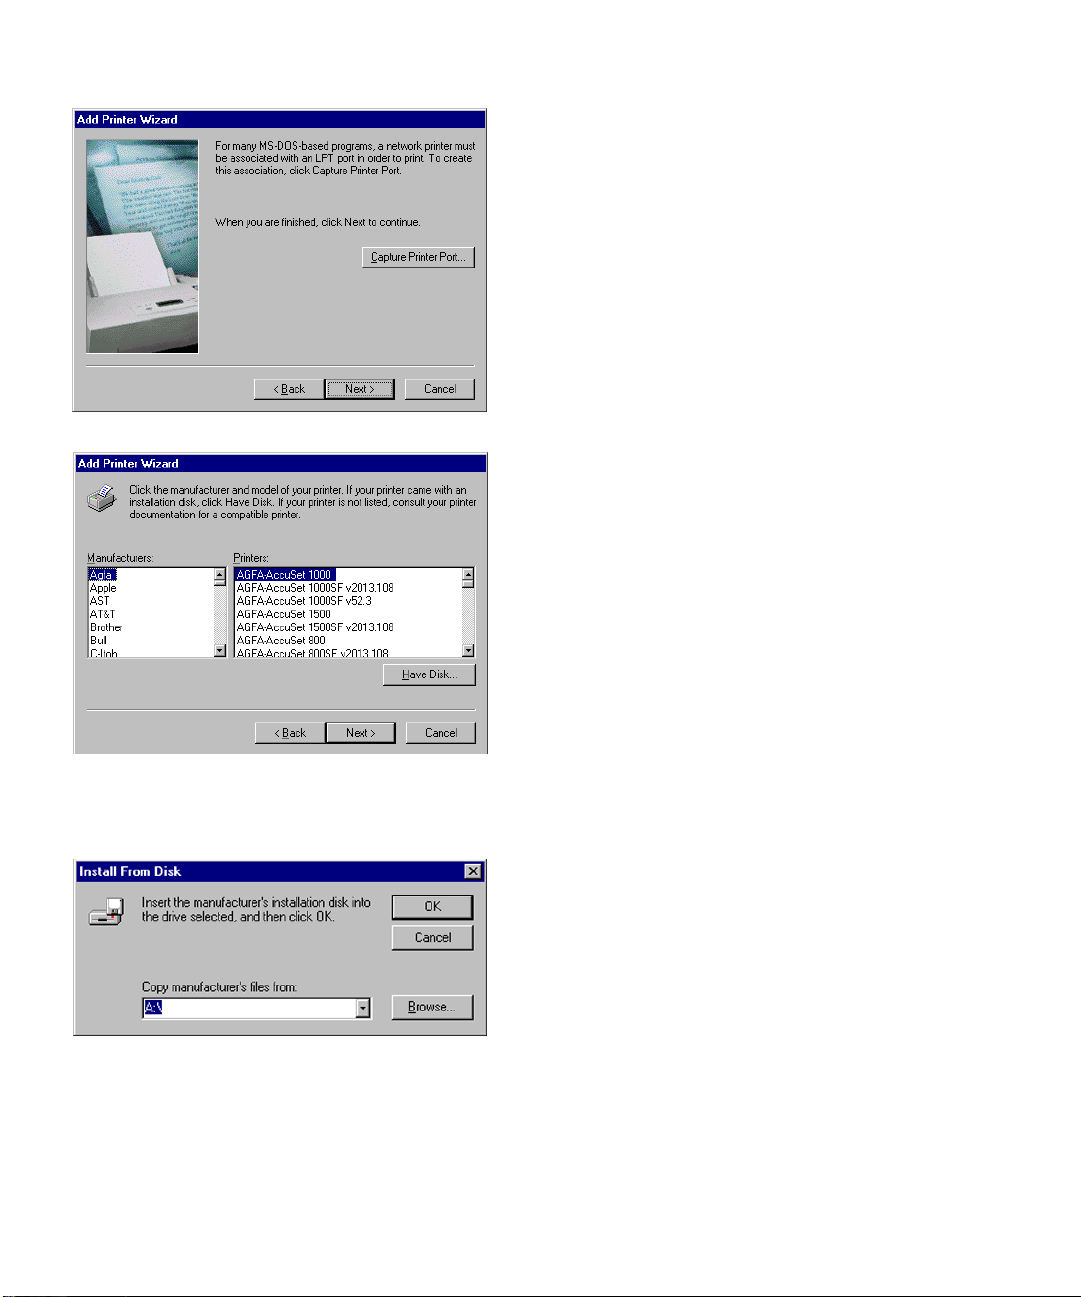
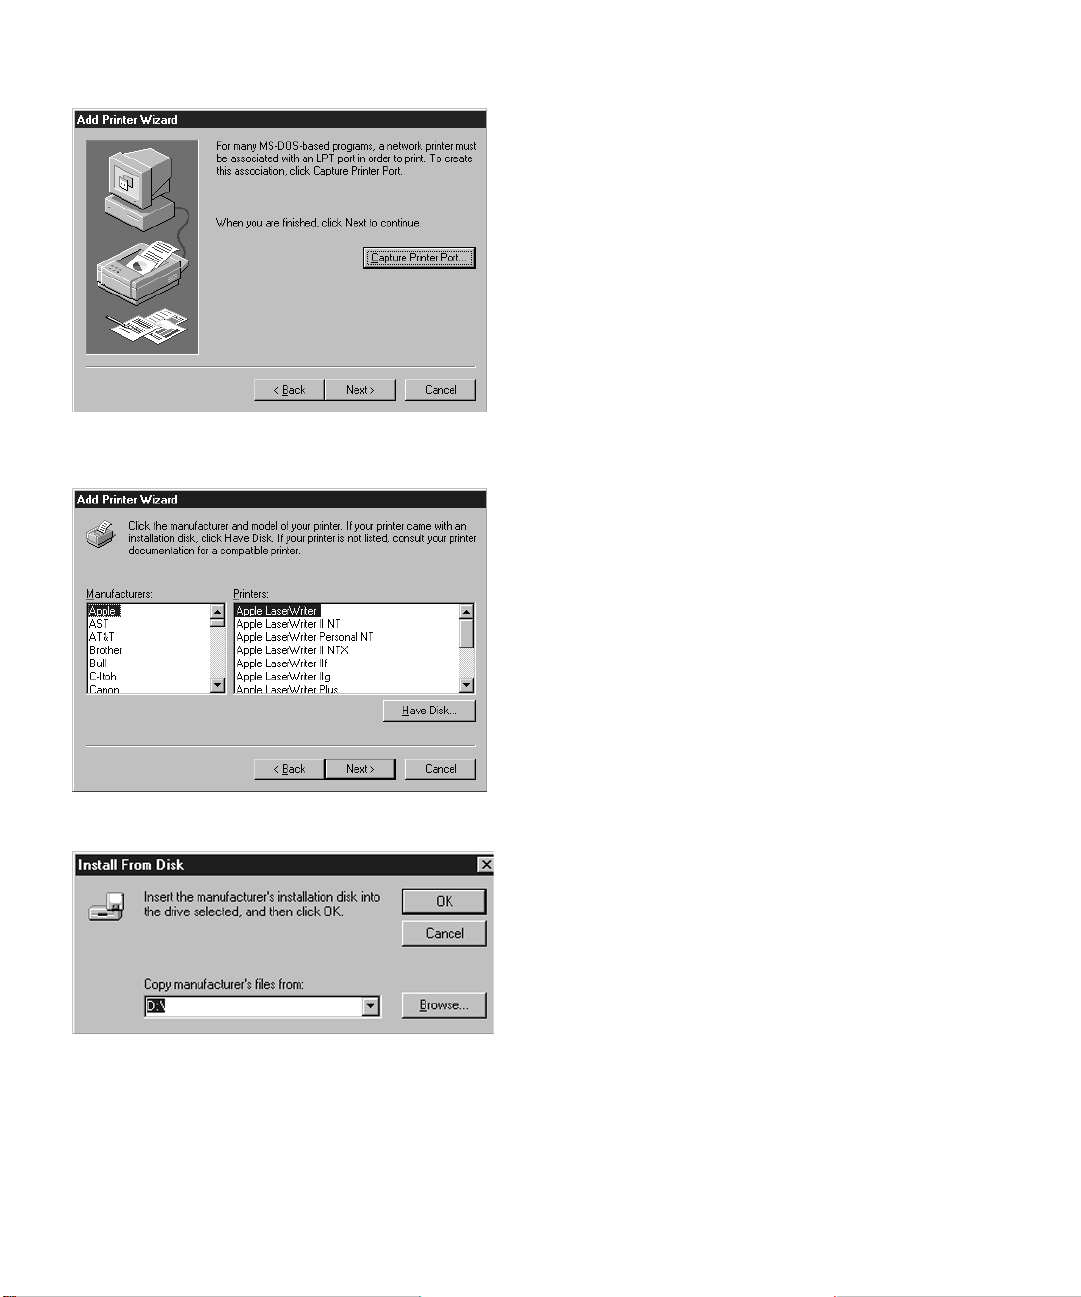
• You’ll see a dialog box that lets you print
from MS-DOS applications to a network
printer.
Click the Capture Printer Port
button select an appropriate LPT port
and confirm print queue. Click OK.
• Click Next.
4. You’ll see the manufacturer/model selection
dialog box.
• This dialog box contains lists of printer
manufacturers and their printer models.
• Put the Elite 12 Series CD-ROM into the
CD-ROM drive of your computer, wait for
a few seconds.
• Ignore the settings in the boxes, and
click the Have Disk button.
5. You’ll see the Install From Disk dialog box.
• Change the drive letter in the box at the
bottom of the dialog box to the drive
letter of your CD-ROM drive.
You may find the drive by double clicking on the
my computer icon on your desktop. You will see
the icon of the CD-ROM drive in your My Computer
window. The icon will be loaded with your
drives letter.
• Then click OK
Page 41
39
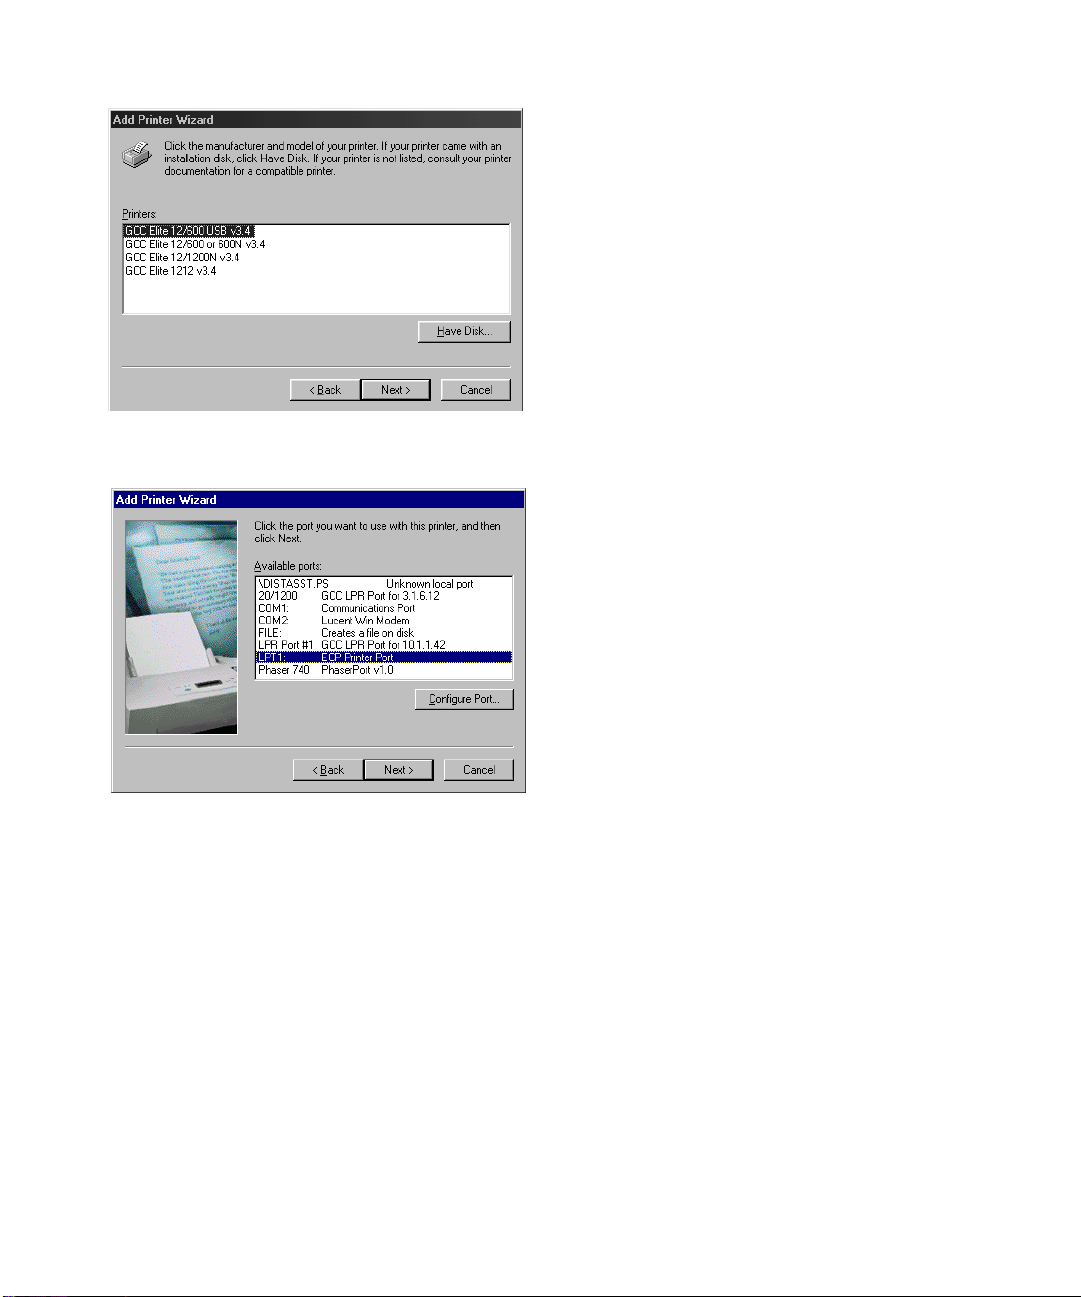
6. You’ll see a dialog box with the names of one
or more Elite 12 Series printers.
• Select your Elite 12 Series printer model
from the list.
• If you selected Network in step 2, click
Next and go to step 8. If you selected
Local, click Next to go to the next step.
7. You’ll see the port selection dialog box.
• Select LPT1 for a parallel port connection
• Select LPR port for a TCP/IP Ethernet
connection.
• See system adminstrator for other port
connections.
• After selecting a port, click Next.
Page 42

40
8. You will see the name printer dialog box.
• You can enter a new name for your
printer if you wish, or you can accept the
default name. If there are printers
currently installed on your system, you
will be asked if you want to make this
your default printer. If you say Yes, the
Elite 12 Series will be the printer selected
every time you print from a Windows
application. If this is the first printer you
are installing, you will not see this
prompt.
• Click Next.
9. You’ll see the Print a Test Page dialog box.
• Select “Ye s” to print a test page now.
• Click Finish.
Page 43

41
10. The software installation will now commence.
You may be asked to insert either the
Windows 98 CD-ROM, floppy disk or the Elite
12 Series CD-ROM. The kind of disk you need
depends on whether Windows 98 was
originally installed from a CD-ROM or from
floppy disks.
• If you are prompted to insert a CD-ROM,
remove the Elite 12 Series CD-ROM, insert
the Windows 98 CD-ROM and click OK.
• If you are prompted to insert a floppy
disk, insert the appropriate Windows 98
floppy disk into the drive and click OK.
• If Windows can not locate the specified
file, the Copy Files dialog box will appear.
You will need to enter “d:\win98” and
click OK in order to continue.
• If you do not have the Windows 98
software, or the installation halts because
a file cannot be found, go to the section
entitled “Solutions to Possible Software
Installation Problems”.
• If you chose to print a test page,
Windows will ask if the test page printed
properly. Click Yes. (assuming the test
page printed correctly.)
• If you are installing the software using
Plug and Play, click Finish.
The installation is complete and you can now print to your GCC printer.
Page 44

42
WINDOWS 95 PRINTING SOFTWARE OVERVIEW
The software required to set up your Windows 95 computer is located on the Elite 12 Series
CD-ROM. For Windows 98 software installation instructions, go to page 34.
You can install the Elite 12 Series software on your computer using Plug and Play. This will
work if you are installing the software on a computer which is connected to the printer
through the parallel port.
If the printer is not connected to the computer through the parallel port, go to the section
“Using Add Printer” immediately following the Plug and Play instructions.
Windows 95 uses a Wizard to help you install printer software. A Wizard is a series of dialog
boxes. In each dialog box you make configuration choices then click the Next button to
move to the next dialog box.
Part of the software you will need is contained on the Windows 95 CD-ROM or floppy disks.
If your computer was not supplied with the disk(s), follow the special instructions provided
when you reach this step of the installation process.
WINDOWS 95 PLUG AND PLAY INSTALLATION
Part of the software you will need is on the Windows 95 CD-ROM. You must have this
disk ready, along with the Elite 12 Series CD-ROM, when you install the Elite 12 Series
software on your Windows 95 computer.
1. If the computer is running, shut it down.
2. With the computer powered off, attach the
printer cable to the computer and printer. Add
paper to the paper tray.
3. Turn on the printer. Verify that the printer LCD
panel reads “READY”. Start the computer.
Page 45

43
4. You will see a dialog box saying that
Windows 95 has found new hardware. The
Update Device Driver Wizard appears
showing the printer model to be installed.
Insert Elite 12 Series CD-ROM.
Click Next.
5. The Wizard searches for your printer software
and indicates that an updated driver has been
found.
Click Finish.
6. Go to step 8 in the “Using Add Printer”
section.
Page 46

44
USING ADD PRINTER
To install the printing software without using Plug and Play, make sure that the printer is
switched on, has paper, and is connected to the computer or network. Start your computer.
1. Click on the Start button in Windows 95.
• You’ll see the Start menu. Click on
Settings, then click on Printers in the
submenu.
• You’ll see the Printers folder. Double-click
the Add Printer icon.
• You’ll see the first screen of the Add
Printer Wizard dialog box. Click the Next
button at the bottom of the dialog box,
and you’ll see the local/network dialog
box (if you see a list of printer manufacturers and printer models, go to
step 4).
Page 47

45
2 Choose a connection:
• Select Local if your printer is attached
directly to your computer, even if you
may intend others to use it through a
network.
• If you select Local, click Next and go to
step 4.
• Select Network only if your printer is not
attached directly to your computer.
• If you selected Network, click Next and go
to the next step.
3. You’ll see the network path dialog.
• Type in the path or queue name of the
printer, which you may obtain from your
system administrator. You can click
Browse to display a visual representation
of your site’s network and the printer’s location on it.
• Click the Yes radio button if you print
from MS-DOS based programs.
• If you selected No for the MS-DOS
printing question, click Next and go to
step 4. If you selected Yes, click Next and
go to the next step.
Page 48
46
• You’ll see a dialog box that lets you print
from MS-DOS applications to a network
printer.
Click the Capture Printer Port
button, select an appropriate LPT port
and confirm print queue. Click OK.
• Click Next.
4. You’ll see the manufacturer/model selection
dialog box.
• This dialog box contains lists of printer
manufacturers and their printer models.
• Put the Elite 12 Series CD-ROM into the
CD-ROM drive of your computer, wait for
a few seconds.
• Ignore the settings in the boxes, and
click the Have Disk button.
5. You’ll see the Install From Disk dialog box.
• Change the drive letter in the box at the
bottom of the dialog box to the drive
letter of your CD-ROM drive.
You may find the drive by double clicking on the
my computer icon on your desktop. You will see
the icon of the CD-ROM drive in your My Computer
window. The icon will be loaded with your
drives letter.
• Then click OK
Page 49

47
6. You’ll see a dialog box with the names of one
or more Elite 12 Series printers.
• Select your Elite 12 Series printer model
from the list.
Click Next
• If you selected Network in step 2, click
Next and go to step 8. If you selected
Local, click Next to go to the next step.
7. You’ll see the port selection dialog box.
• Select LPT1 for a parallel port connection
• Select LPR port for a TCP/IP Ethernet
connection.
• See system adminstrator for other port
connections.
•
After selecting a port, click Next.
8. You’ll see the name printer dialog box.
• You can enter a new name for your
printer if you wish, or you can accept the
default name. If there are printers
currently installed on your system, you
will be asked if you want to make this
your default printer. If you say Yes, the
Elite 12 Series will be the printer selected
every time you print from a Windows application. If this is the first printer you are
installing, you will not see this prompt.
• Click Next.
Page 50

48
9. You’ll see the Print a Test Page dialog box.
•
Select “Ye s” to print a test page now.
• Click Finish.
Page 51
49
10 The software installation will now commence.
You may be asked to insert either the
Windows 95 CD-ROM, floppy disk or GCC
Elite 12 Series CD-ROM during this step. The
kind of disk you need depends on whether
Windows 95 was originally installed from a
CD-ROM or from floppy disks.
• If you are prompted to insert a CD-ROM,
remove the Elite 12 Series CD-ROM, insert
the Windows 95 CD-ROM and click OK.
• If you are prompted to insert a floppy
disk, insert the appropriate Windows 95
floppy disk into the drive and click OK.
• If Windows can not locate the specified
file, the Copy Files dialog box will appear.
You will need to enter “d:\win95” and
click OK in order to continue.
• If you do not have the Windows 95
software, or the installation halts because
a file cannot be found, go to the section
entitled “Solutions to Possible Software
Installation Problems”.
• If you chose to print a test page,
Windows will ask if the test page printed
properly. Click Yes (assuming the test
page printed correctly.)
• If you are installing the software using
Plug and Play, click Finish.
Page 52

50
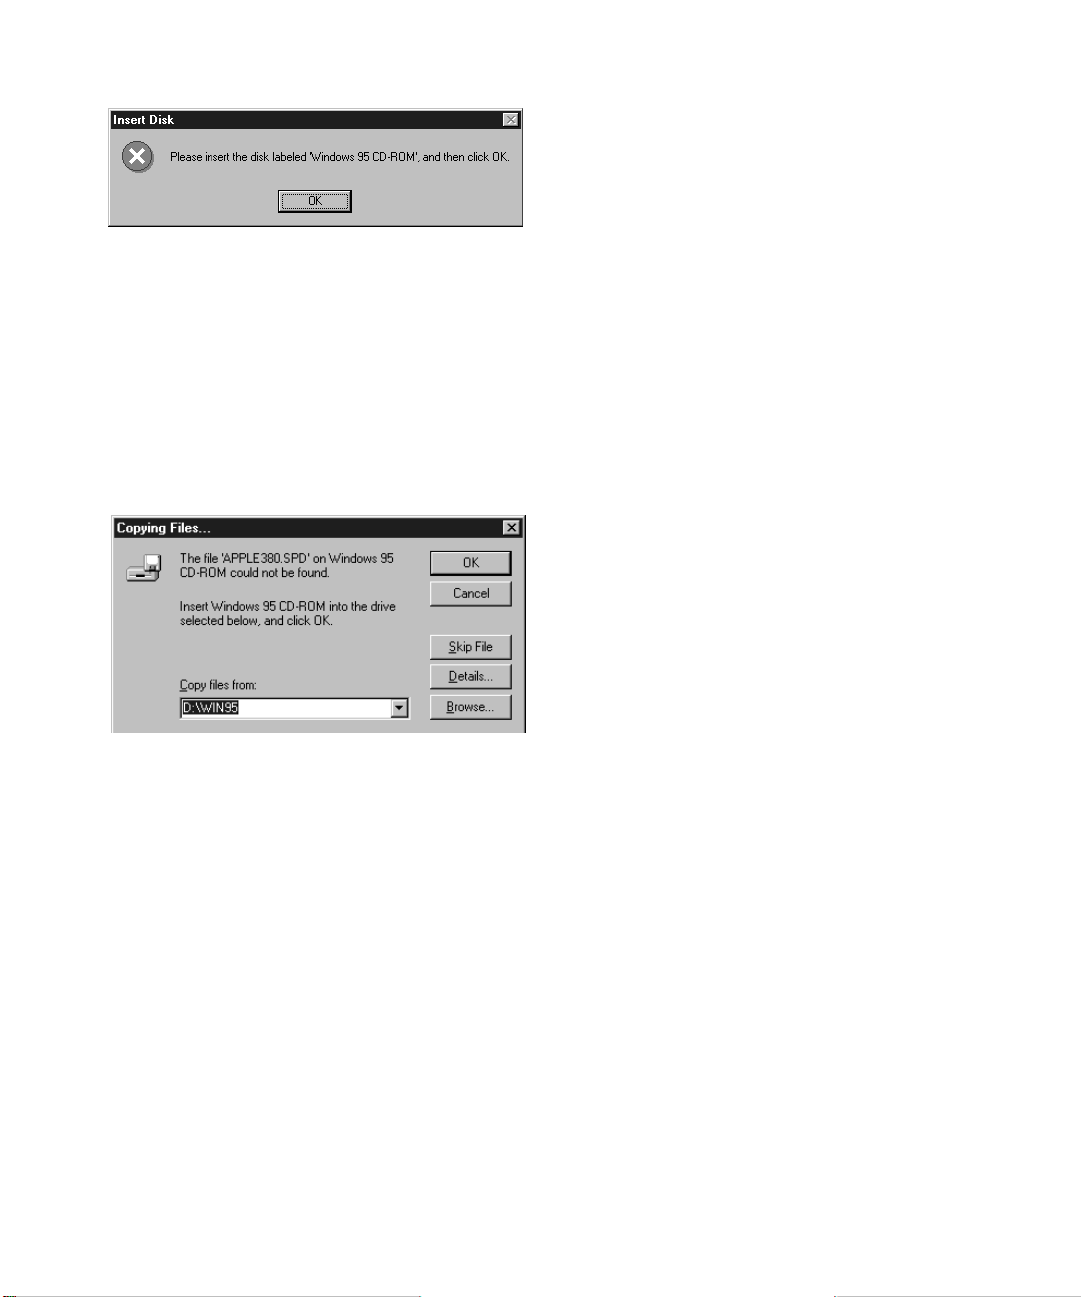
SOLUTIONS TO POSSIBLE SOFTWARE INSTALLATION PROBLEMS
In some cases you may not be able to complete the software installation process when you
click the Finish button in step 9 of the Windows 95/98 installation. Normally, the program
stops and asks you to insert a Windows 95 or Windows 98 CD-ROM or floppy disk. Once
you have removed the Elite 12 Series CD-ROM (if necessary) and insert the Windows 95/98
disk, the program continues and the installation is complete.
Two things may prevent this:
• You may have a Windows 95/98 computer that was not supplied with the program
on floppy disks or CD-ROM.
• In some cases you may find that after you have inserted the Windows 95/98 CDROM in the drive and clicked OK, the printer installation does not continue and
you’re prompted to insert the Windows 95/98 CD-ROM again.
The installation process requires you to install files that are found on the Windows 95/98
CD-ROM or disks. Some versions of the Windows 95/98 CD-ROM have these files in
different places than others, and you have to show the install program where these files are
located.
If you use the original Windows CD-ROM that came with your computer this problem
should not arise.
Page 53

51
IFYOUDONOTHAVEWINDOWS 95/98 ON DISK OR CD-ROM,
YOU MAY BE ABLE TO COMPLETE THE INSTALLATION IN THIS WAY:
1. Click on the Browse button at the bottom
right of the Copying Files dialog box.
2. In the Open dialog box, choose drive C in the
Drives window at the bottom center.
3. In the Folders list, scroll down untill you see
the windows folder.
4. Click on the folder name “windows” then
click OK.
5. In the Folders list, scroll down until you see
the options folder.
6. Click on the folder name “options” then
click OK.
7. Click on the folder name “cabs.”
8. Click OK to accept this folder. You’ll see a file
name similar to win95_15.cab
(or win98_15.cab.)
9. Click OK again to accept this file name.
10. Click OK in the Copying Files dialog box.
11. The installation will continue. Go back to step
10in the installation instructions.
NOTE
The pictures shown are specific to Windows 95 however, will apply to Windows 98.
Page 54

52
IFYOUDONOTHAVEAWINDOWS 95/98 CD-ROM AND THE INSTALLATION STILL DOES NOT CONTINUE
Yo u ’ll see the Copying Files dialog box again. Make sure that you have the Windows 95/98 CD-ROM
in the drive and continue the installation:
1. Click on the Browse button at the bottom
right of the Copying Files dialog box.
2. In the Open dialog box, scroll down the list of
folders in the center pane until you see a folder called win95 or win98.
3. Click on the folder name win95 or win 98.
4. Click OK to accept this folder. You’ll see a file
name similar to win95_15.cab (or
win98_15.cab.)
5. Click OK again to accept this file name.
6. Click OK in the Copying Files dialog box.
7. The installation will continue. Go back to step
10 in the installation instructions.
Page 55

5353
THIS GUIDE CONTAINS INSTRUCTIONS FOR INSTALLING AND USING THE GCC
LPR
UTILITY FOR DIRECTLY NETWORKING PRINTERS IN WIN’95 AND WIN ‘98.
WHAT IS LPR AND WHY WOULD I USE IT?
LPR allows you to connect a printer directly to a TCP/IP network and assign it an IP
address. GCC’s LPR utility configures your computer to send jobs by way of an LPR Port
to your GCC Printer on the network. You no longer need to connect the printer using a
parallel port. You can connect multiple printers on your network, as long as each printer
has a unique IP address. LPR is already part of Windows NT and recent Macintosh
system software. The GCC LPR Utility will not function in Windows 3.x or Windows
3.xx for workgroups..
PRINTERS SUPPORTED BY THIS UTILITY
This utility has been written for and tested with the following printers:
• Elite XL 20/600, 20/800, and 20/1200 with ROM versions 3.3 and later
• Elite 12/600, 1212, 12/600 N and 12/1200 N with ROM versions 3.2 and later
• Elite XL 608, 808, 616, and 1208 with ROM versions 2.94/3.02 and later
THE INSTALLATION AND CONFIGURATION PROCESS
Before installing LPR please make sure you have properly installed and configured your
network hardware and established a valid network connection. You may need to speak
to your network administrator before installing and configuring an IP address on the
printer.
To install and configure your GCC printer for TCP/IP:
• Physically install the printer on the network.
• Give the printer an IP address.
• Install the GCC Windows 95/98 printer software.
• Install and configure the LPR utility.
• Configure the printer properties in Windows 95/98 for the LPR Port.
Connect your GCC printer to an Ethernet network using the instructions in the previous
section of the Installation Guide or User Manual.
Page 56

5454
SETTING AN IP ADDRESS ON THE PRINTER
If an IP address has already been set on your printer (usually by your network administrator)
you do not need to follow these steps. To check to see if a network address has been set:
1. Turn the printer on.
2. Press the On Line button to take the printer off line.
3. Press the Menu button 8 times until you see the words “Printer Information” with the
word ‘configuration’ on the second line in the display.
4. Press the Enter Key once. The printer will print a configuration page.
5. Press the On Line button to take the printer back on line.
6. If the printer already has an IP address you will see it in the TCP/IP part of the
Interfaces section of the Configuration Page. If the IP address is 0.0.0.0 then an IP
address has not been assigned.
• Consult your network administrator to obtain a valid IP Class, Subnet Mask,
Address, Broadcast and Default Router Address for the printer.
To set your printer information do the following:
1. Turn the printer on.
2. Press the On Line button on the printer’s control panel to take the printer off line.
3. Press the Menu button 7 times until you see the word “Interfaces” in the display.
Press the Enter button.
4. Press the Menu button until you see the word “TCP/IP” in the display.
5. Press the Enter Button; you will see the word “Disabled” in the display.
6. Press the + (plus) button. The word “Enabled” will appear in the display.
7. Press the Enter button. An asterisk will appear to the right of the display; this
indicates that the setting has been saved.
EACH TIME YOU MAKE A CHANGE, USE THE + (PLUS) OR - (MINUS) BUTTONS TO CHANGE THE VALUES. YOU WILL
NEED TO PRESS
ENTER AND LOOK FOR THE ASTERISK TO CONFIRM THAT THE SETTING HAS BEEN SAVED.
8. Press the Menu Button until IP Class appears in the display. The Network Guide on
the CD-ROM can give you detailed information on Classification of Addresses. The
default is C.
9. Press the Menu button and set the Subnet Mask using the + or - buttons. Press
Enter when you have set the entire Subnet Mask and look for the asterisk to confirm
that the setting has been saved.
10. Press the Menu button and set the IP address. Press Enter to move from group to
group. Press Enter to save the settings.
Page 57

5555
11. Press the Menu button and set the Broadcast Address. Press Enter to save the
settings.
12. Press the Menu button to set the Default Router. If you don’t have a default router
address enter a dummy address (i.e. 1.1.1.1) A Default Router Address MUST be
entered for the printer to communicate. Press Enter to save the settings.
13. Press the Menu button to set the Syslog Host. Press Enter to save the settings.
14. Press the Menu button to set whether or not to print a header page at the beginning
of each print job. The default is Disabled. Press Enter to save the settings.
15. Press the On Line key to bring the printer back on line.
16. Switch the printer off, wait ten seconds, and then switch it on again.
17. If you want to check that your changes are now in effect, print a configuration page.
INSTALLING WINDOWS 95/98 SOFTWARE
If the GCC Windows 95/98 printer software has not been installed on your computer, follow
the instructions in the previous section of this guide. Complete that installation installing
your printer as a Local Printer to the LPT Port.
INSTALLING THE LPR UTILITY
If you have installed an earlier version of the LPR utility, you must deinstall it before
upgrading to a newer version. Use the deinstall.exe program in the GCC LPR folder on the
Elite 12 Series CD-ROM, then restart the computer.
When you install the program you will be asked if you want to create a port during the
installation process. Although you can create a port at a later date, we recommend that you
create a port during installation. If you want to create a port you must have the printer’s IP
address.
1. Close all applications before installing the LPR
program using the setup.exe file
. Click on
File, Run and enter the path for the install
(i.e. D:\lpr)
Page 58

56
2. At the end of the setup program you will be
asked if you want to create a port. If you do
not want to create a port, click No, Restart
Windows and go to step 7.
3. If you click yes, you will see a dialog box that
gives you the opportunity to change the port
name. Enter the Port Name or accept the
default listed under LPR port name. You must
enter the IP address. Enter the whole IP address of the printer including all periods.
• If the printer already has an IP address,
is powered on, and is connected to the
network, you can check that it is recognized by clicking on the Check
connection button.
4. If the printer is recognized you will see a
dialog box saying “Remote printer responded.”
Click OK in that dialog box.
5.
Click OK in the Add LPR port dialog box. You
will see a dialog box that tells you that the
port was successfully created.
Click OK.
56
Page 59
57
6. You will see a dialog box that asks if you want
to restart Windows. In order to print through
the LPR Port you must
restart Windows first.
• You have now created an LPR printer port
(assuming that you chose Yes in step 2). You
will need to make changes in the printer’s
properties before print jobs will be correct.
7. On the Start menu,
choose Settings and then
Printers (Windows 98), or Control Panel and
then
double-click the Printers icon (Windows
95).
8.
Right-mouse-button click on the printer icon
in the dialog box and choose Properties from
the menu.
9.
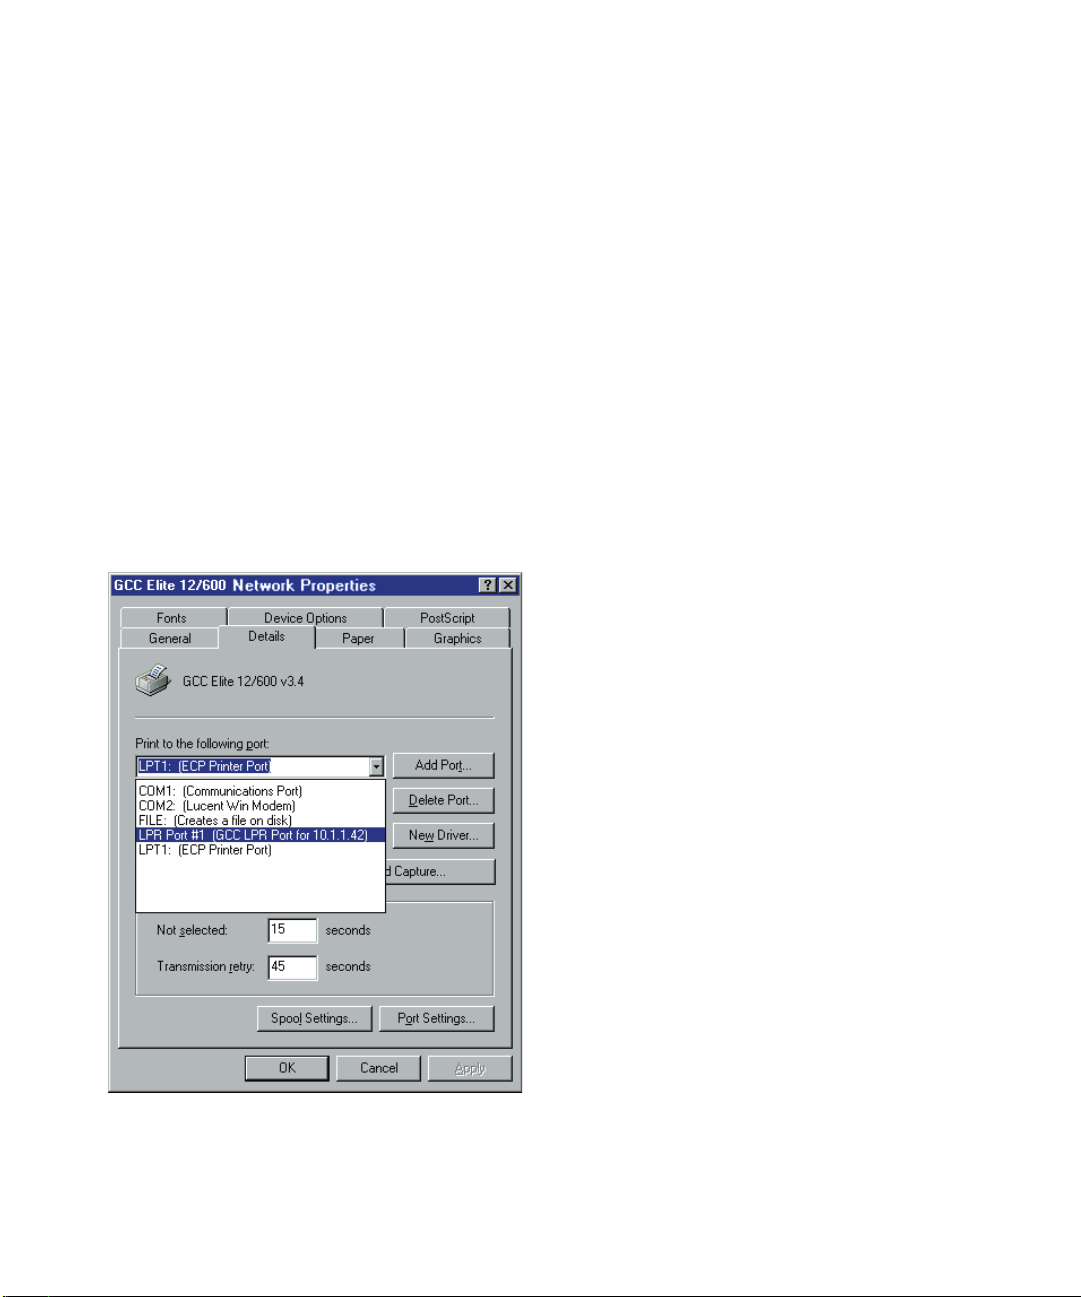
Select the Details tab at the top of the dialog
box and drop down the list that says “Print to
the following port.” If you did not create an
LPR port (by clicking No in step 2) go to step
1 in the next section.
57
Page 60

58
10. Choose the LPR port you created.
11. Click on the PostScript tab at the top of the
dialog box.
12. Click on the Advanced button at the bottom
of the dialog box.
13. In the Data format section of the dialog box,
click on the button marked “Pure binary
data.” Click OK.
58
Page 61

59
14. You are returned to the Postscript properties
window.
Click Apply.
15. Click on the General tab at the top of the
dialog box. Click the “Print test page” button.
16. Click OK. After a few seconds, the printer will
produce a test page. If you wish to add
further printers using LPR see the next
section. Otherwise, your computer is now
ready to print to the printer using LPR.
Page 62

60
ADDING PRINTER PORTS USING THE WINDOWS PRINTER PROPERTIES DIALOG BOX
If you did not create a printer port when you installed the LPR utility or you want to add
another LPR port for an additional printer, you can do this in the Printer Properties dialog box.
1. Click the Add port button in the Details page of the properties dialog box of the
printer you wish to use with LPR.
2. In the dialog box select Other, then choose “GCC LPR printer.”
3. You will see a dialog box that gives you the opportunity to change the port name if
necessary. You must enter the IP address. Enter the entire IP address of the printer
including all periods.
4. If the printer already has an IP address, is switched on, and is connected to the network, you can check that it is recognized by clicking on the Check Connection button. If the printer is recognized you will see a dialog box saying “Remote printer
responded.” Click OK in that dialog box.
5. Click OK in the Add LPR port dialog box. You will see a dialog box that tells you that
the port was successfully created. Click OK.
You have now created an LPR printer port. Remember you will need to set the printer’s
properties before print jobs will be correct.
Page 63

61
PRINTING WITH DOS
There are two ways to print from DOS — within a DOS application or from the DOS command line. In some cases you may want to save a file in a form that can be copied from DOS
directly to the printer. This process is called
PRINTING TO FILE or PRINTING TO DISK.
OVERVIEW OF SETUP AND PRINTING FROM A DOS APPLICATION
You cannot configure DOS once for all applications, like Windows. You have to configure each DOS application individually with a printer driver and port setting
information. Furthermore, you must configure the port once in every DOS session.
You can do this either in the command line (at the prompt) or include a line in your
AUTOEXEC.BAT file to do this automatically. See the Port Configuration section.
When you print, the printer driver formats your print job so that the Elite 12 Series
knows whether to use PostScript or PCL.
When you want to configure DOS printing from an application:
1. Select an emulation mode on the printer’s control panel. When you print, your
print job will be formatted for either PostScript or PCL; set the PS/PCL Sensing
submenu to either PostScript Only, PCL Only, or Auto Switch.
2. Select a printer driver from within the DOS application. DOS applications typically give you a choice of printer drivers. Select the Apple LaserWriter II NTX driver
for PostScript printing or the HP LaserJet III driver for PCL printing. If the
LaserWriter II NTX driver isn’t offered by your DOS application, (in decreasing
order of preferance) choose LaserWriter II NT, LaserWriter Plus, or Laserwriter. If
the LaserJet III driver isn’t offered by your DOS application, choose LaserJet II, or
LaserJet.
3. Check the application’s port settings. We recommend that you select the parallel
ports. If you select the serial port (Elite 12/600 and Elite 1212 only), then the
application’s port settings and the Elite 12 Series control panel RS422 serial port
settings must match.
This DOS application is now ready to print. You can either print the job directly to
the Elite 12 Series or print it to a disk file; later, you can send this file to the printer
directly from DOS.
Page 64

62
OVERVIEW OF SETUP AND PRINTING FROM DOS COMMAND LINE
If you want to print a job that has been printed to a file on disk, you need to
use the DOS command line:
1. Check the port settings. We recommend that you select the parallel ports. If
you select the serial port (Elite 12/600 and Elite 1212 only), then the serial
port settings on the Elite 12 Series control panel and your computer must
match.
2. Select an emulation mode on the printer’s control panel. When you print,
your print file will be formatted for either PostScript or PCL; set the PS/PCL
Sensing submenu through the Elite 12 Series control panel to either
PostScript Only, PCL Only, or Auto Switch.
3. Use the DOS Copy command to send the print file to the Elite 12 Series. See
“Using the Copy command” later in this section.
PORT CONFIGURATION – DOS
If you want to print from DOS, you must configure a port once in every DOS session. Most users add the commands to their AUTOEXEC.BAT file so that this is
done automatically. The port you configure must be the same as the port that is
specified in the DOS application.
If you have used another printer to print from DOS, you may find that your
AUTOEXEC.BAT file already includes one of the commands shown in the next
sections.
Your PC and the Elite 12 Series are connected through either a parallel or RS-422
serial interface.
PARALLEL PORT
To set up the parallel port for communication between the Elite 12 Series and the
PC, type the following MS-DOS command before printing:
MODE LPT1:,,P
This command allows the Centronics busy signal to be active for extended
periods of time so that the computer does not abort long print jobs. If you are
printing through a parallel port other than LPT1, substitute that port’s number in
the above MODE command.
Page 65

63
SERIAL PORT (APPLIES TO THE ELITE 12/600 AND ELITE 1212)
One way to set up the RS-422 serial port for communication between the Elite 12
Series and the PC is to type the following MS-DOS command before printing:
MODE COM1:9600,N,8,1
The above MODE command configures the PC serial port for a baud rate of
9600, no parity, 8 data bits, 1 stop bit, and for XON/XOFF flow control. These
settings match the Elite 12 Series’s RS-422 front panel factory default settings.
XON/XOFF flow control is widely used, but check your application’s documenta-
tion to see if that handles this protocol. It is important that the application
support XON/XOFF because standard DOS commands such as PRINT and COPY
cannot.
However, we recommend that instead of XON/XOFF flow control, you use DTR
flow control. DTR flow control is preferred because DOS has better support for
it, as it matches the flow control preferred by Windows and thus provides more
reliable communication when sending PCL jobs to the printer. To use DTR flow
control, type the following MS-DOS command before printing:
MODE COM1:9600,N,8,1,P
Note: You will need to change the Elite 12 Series’ RS422 Flow Control submenu
setting to DTR if you use this MODE command.
Note: In both the parallel and serial MODE command examples shown in this section, the
P switch at the end of the command may be replaced by the B switch. The B switch is
available with MS-DOS version 4.0 and later.
(NOT ALL APPLICATIONS SUPPORT THE B SWITCH.)
R
EDIRECTING DOS TO A SERIAL PORT (APPLIES TO THE ELITE 12/600 AND ELITE 1212)
DOS and some DOS applications only print through a parallel port. If you set up
the Elite 12 Series to print through the RS-422 serial port, you will need an
additional MODE command to redirect your output to the serial port. The
following command should be typed after the previous serial port MODE
command:
MODE LPT1: = COM1:
This command redirects to serial port COM1 the output that DOS or your DOS
application would normally send to the parallel port. If you use a different serial
port (i.e., COM 2, 3, or 4) substitute that number.
Note: A more efficient way of using the MODE commands is to add them to
your AUTOEXEC.BAT file. Refer to your PC documentation for information about
editing the AUTOEXEC.BAT file.
Page 66

64
SELECTING A PRINTER DRIVER
POSTSCRIPT
If an application supports PostScript, we recommend that you configure the application to use a PostScript printer driver. Printing using a PostScript printer
driver enables the application to use the 11 high quality PostScript font families
included with the Elite 12 Series at all available resolutions. We recommend that
you use the LaserWriter II NTX printer driver if it is available with your application. If not, use LaserWriter II NT, LaserWriter Plus, or LaserWriter. Refer to the
application’s documentation for more information.
PCL 5
The Elite 12 Series also includes PCL 5/HP-GL/2 emulation software, which
provides LaserJet III text and graphics compatibility plus the ability to print at
600 dpi. If you are using a PCL application, we recommend that you configure
the application to print to a LaserJet III. If a LaserJet III driver is not available, use
a driver for the LaserJet II, or else LaserJet. Refer to the application’s documenta-
tion for more information.
NOTE: If your document uses 300 dpi user-defined patterns or 300 dpi bitmap
fonts, the Elite 12 Series will only be able to print these at 300 dpi even if 600 dpi
PCL is selected. Also, the Elite 12 Series includes 15 PCL fonts that are
compatible with those in the HP LaserJet III. These fonts consist of 7 bitmap and
8 scalable fonts. If you have configured your Elite 12 Series to print PCL at 600
dpi, the internal bitmap fonts will only print at 300 dpi. The internal scalable fonts
will print at 600 dpi, as will any downloaded scalable font.
NOTE: In PCL 5 emulation, the Elite 12 Series can print at either 300 or 600 dpi resolution. The default resolution is 300 dpi. Resolution is set via the Resolution
submenu. Also, although most PCL applications send the necessary commands
specifying font, character pitch, point size, etc., the Elite 12 Series front panel
can be used to set many PCL print characteristics.
The PCL 5 printer language was developed by Hewlett-Packard. For more information about commands supported by PCL 5, see the HP PCL 5 Printer Language Technical Reference Manual (Manual Part No. 5961-0509).
USING THE COPY COMMAND
If you printed a job to a file from a DOS application, you must use the DOS
COPY command to make the printer print the file. The following command is a
typical example:
Page 67

65
COPY /B myfile.prn LPT1
This sends the print job in the file myfile.prn to the parallel port LPT1 and to the
device connected to that port. The binary mode switch /B is needed so that all
control characters are sent to the printer as data.
NOTE: GCC recommends that you don’t use the DOS PRINT command. Although
this command can allows you to continue using DOS while the file is printing, it
can not print files that contain certain control characters. This can cause printing
problems with complex files. However, if you are sending simple text files, the
PRINT command may work.
Page 68

6666
STEP 10. VERIFY PRINTER SETUP
The easiest way to verify that the installation has been completed successfully is to print a
document from a software application.
1. Load a software application of your choice and open or create a simple document.
2. Make sure the correct printer driver is selected.
3. Print the document.
If the document prints, installation is complete. If nothing printed, repeat steps 1 -9
and/or refer to the Maintenance and Troubleshooting section on page 87
of this guide. If you still have difficulty getting a document to print contact GCC technical
support at 781.276.8620 (U.S. only; outside the U.S. refer to the back cover) or
www.thevirtualprinterstore.com or contact your authorized GCC dealer.
Page 69

67
ADDITIONAL INFORMATION
THE ELITE 12 SERIES CONTROL PANEL PG 68
FONTS PG 72
A
DDING MEMORY TO YOUR PRINTER PG 74
U
SING THE CD-ROM WITH ADOBE ACROBAT PG 83
U
SING THE MULTI-PURPOSE FEEDER PG 85
MAINTENANCE AND TROUBLESHOOTING PG 87
Page 70
68
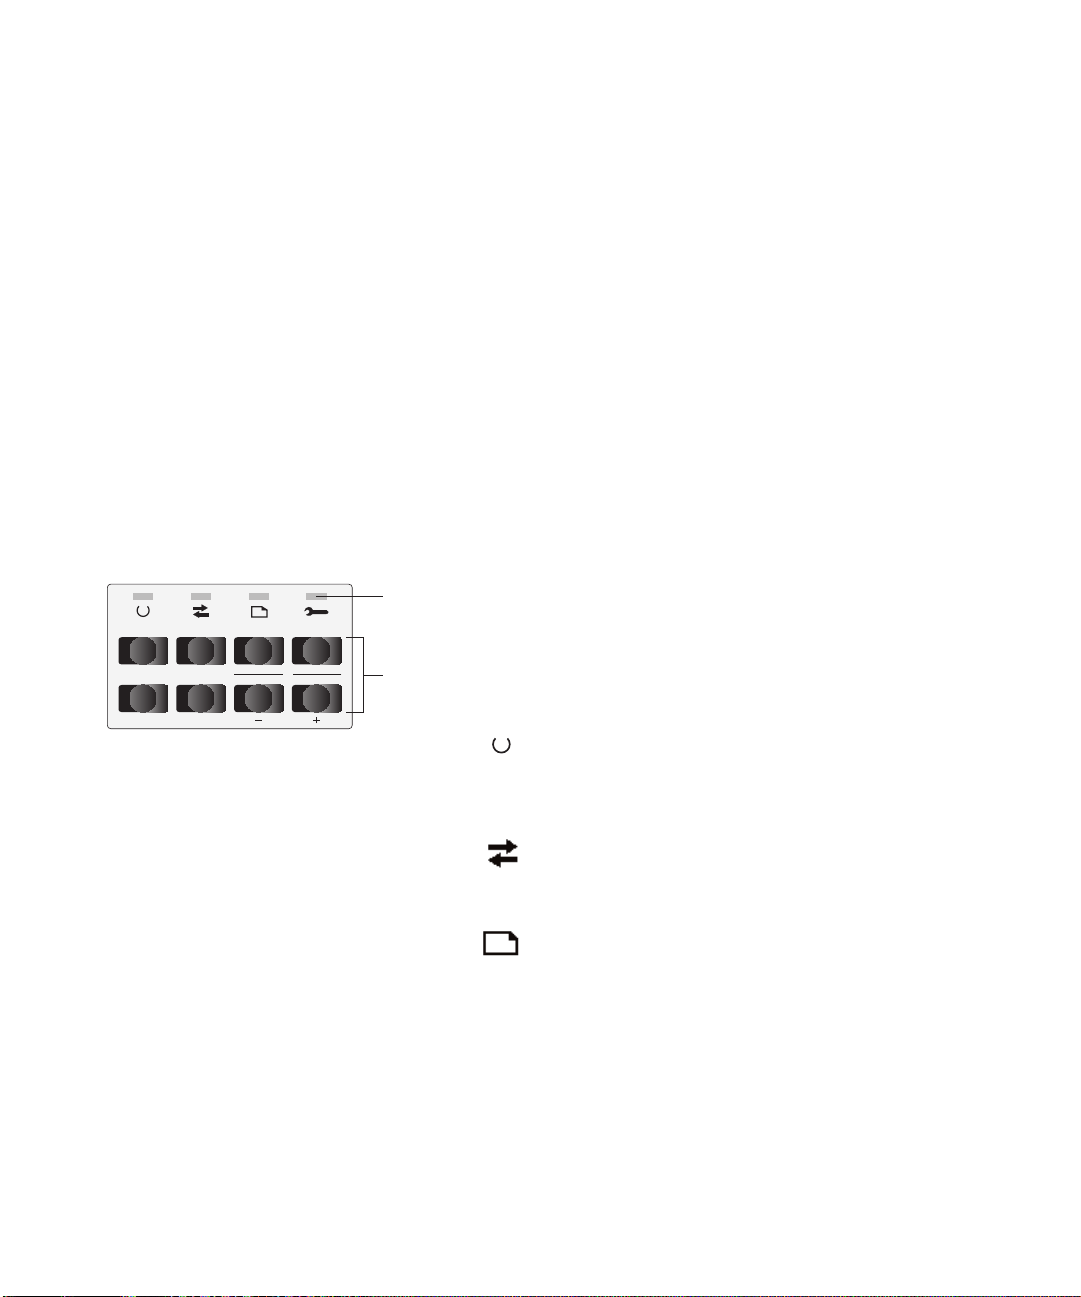
CONTROL PANEL STATUS LED'S
The control panel status LED's show you
the following:
When the On Line LED is solid (lit and not
flashing), the Elite 12 Series is ready to receive
data and print.
When the Comm LED flashes, one of the Elite
12 Series interface ports is receiving or
transmitting data.
When the Paper LED is solid:
• The printer is out of paper, or
• The wrong size paper is loaded in the
paper tray, or
• The printer is waiting for you to insert
paper because you specified manual feed in
the paper source section of your
application’s Print dialog box.
THE ELITE 12 SERIES CONTROL PANEL
INTRODUCTION TO THE ELITE 12 SERIES CONTROL PANEL
You use the Elite 12 Series control panel to get information about your printer and to
adjust specific printer functions. It includes an LCD display window, four LED's that show
the status of the printer at all times, and eight push buttons. For more detailed
information on the control panel, see the Elite 12 Series CD-ROM.
CONTROL PANEL (LCD) DISPLAY WINDOW
The LCD display window shows you the current status of the printer. When the printer is
not printing, you’ll see the printer’s name and “Ready” in the display window. The
display window can also show the Elite 12 Series menus and submenus. See “The Elite 12
Series menu system” on the Elite 12 Series CD-ROM for more information.
On Line Comm
Paper
Status LEDs
Service
Manual
On Line
Menu Enter
Feed
Form Feed
Cancel
ResetContinue
Function keys
Page 71

69
When the Service LED is flashing, you need
to perform some type of simple service
procedure in order to continue printing. If this
LED is solid, the printer needs to be serviced
by GCC authorized service personnel.
When an LED indicates that the printer needs
attention, you’ll see a message explaining the
problem in the display.
CONTROL PANEL FUNCTION KEYS
ON LINE KEY
You use the On Line key to switch the printer between being on line or off line.
The printer is normally on line
– that is, ready to receive data from computers
and print it. If you need to use the control panel menu system, you must set the
printer off line. Press the On Line key to set the printer off line. After you’ve
finished using the menu system, press the On Line key again to set the printer
back on line.
MANUAL FEED KEY
You use the Manual Feed key:
• When you select manual feed as the paper source for the document in your
application’s Print dialog box.
• When the control panel requests you to load a paper size that is not loaded
in the printer’s paper trays.
In both cases, you load the multipurpose feeder with the correct size paper and
press the Manual Feed key.
FORM FEED/CONTINUE KEY
You use the Form Feed/Continue key:
• When the printer needs a Form Feed command for PCL5 print jobs from
certain applications.
• When you want the printer to print on the paper in the standard paper tray,
even though it does not hold the specified paper size.
• When you need to run a cleaning sheet through the printer.
Page 72

70
CANCEL/RESET KEY
You use the Cancel/Reset key:
• To cancel a PostScript job that is either processing or waiting to print.
• To reset the control panel menu and submenu settings to the factory
settings (the printer must be off line).
MENU KEY
You use the Menu key to get to the menu system. First, you must press the On
Line key to take the printer off line. You can only get to the menu system when
the printer is off line.
Yo u ’ll use the printer’s menus if you need to configure printer functions or get information about current settings. Full details of menu settings are on the Elite 12
Series CD-ROM.
Note: You’ll only need to change the settings on the menus if you have
specialized printing or connection needs. The factory settings suit most users.
ENTER KEY
You use the Enter key:
• To see submenus.
“Press Enter…” appears in the display window to prompt you to press the Enter
key to see a submenu(s).
• To save changes when you change main menu or submenu settings.
After you make a change to a main menu setting or submenu setting, press
the Enter key to save the new setting. An asterisk (*) will appear in the
display window to the right of the setting to confirm that the new setting
has been saved.
• To find out which port is being used for the current print job.
Press the Enter key when the Elite 12 Series is processing a job (the Comm LED
is flashing). The LCD display window shows the name of the interface port that
is receiving data.
+ AND – KEYS
You use the + and – keys to move through main menu and submenu settings.
You can use these keys only when the printer is off line.
Page 73

71
TO NAVIGATE THE CONTROL PANEL MENU SYSTEM
Press the Menu key to cycle through the nine main menus.
If a main menu has submenus, “Press Enter…” appears in the display window. Press the
Enter key to access the submenus, and then press the Menu key repeatedly to cycle
through the submenus.
Press the On Line key at any time to exit the menu system and place the printer on line.
THE ELITE 12 SERIES MENU SYSTEM
The menu system consists of nine main menus. Some main menus contain submenus.
Some menus only give you information, while others let you change settings. Note: For a
complete description of the menus and submenus, see Chapter 2 on the Elite 12 Series
CD-ROM.
Reminder: Press the Enter key to save a new setting. An asterisk (*) will appear next to
the new setting confirming that your changes have been saved.
The main menu items are:
1. LANGUAGE
2. PRINT HELP PAGE
3. PRINT (1) SAMPLE PAGE(S)
4. PRINTER INFO
5. PAPER HANDLING
6. EMULATIONS
7. INTERFACES (NOT ON THE ELITE 12/600 USB)
8. INFO PAGES
9. PRINT CONTROL
Page 74

72
FONTS
INTRODUCTION
Fonts come in several formats. You can use PostScript (Type 1 format), TrueType®, and
PCL 5 fonts with your printer.
There are 35 PostScript fonts and 15 PCL fonts in the printer’s hardware. The Elite 12
Series CD-ROM installs these fonts onto your computer when you install the rest of the
printer software.
Unless you’re certain that you will be using PCL, leave this setting at the factory default
of “PostScript Only.” This will save memory resources. If you use PostScript fonts,
TrueType fonts, or a combination of the two, the PostScript Only setting allows you to
print these fonts.
USING ADOBE TYPE MANAGER (ATM) AND POSTSCRIPT (TYPE 1) FONTS
Adobe Type Manager is a software utility sold by Adobe for Type 1 format fonts. It
displays fonts on your computer screen as closely as possible to how they’ll look when
printed. It is also required for printing with Type1 fonts in PCL print jobs. Type 1 fonts
are available from many font vendors, including Bitstream
®
.
USING TRUETYPE FONTS
TrueType font control is included in Windows and the Mac OS. Like Adobe Type
Manager, one of its functions is to display fonts as close as possible to how they’ll look
when printed. TrueType fonts are available from many font vendors, including Bitstream.
USING PCL 5
PCL 5 fonts are generally found on PC-compatible computers. They behave in a similar
fashion to TrueType fonts. PCL 5 fonts are available from a limited number of font
vendors.
RESIDENT POSTSCRIPT FONTS
The Elite 12 Series comes with 11 high quality PostScript font families installed in the
printer’s ROM: Times, Helvetica, Courier, Symbol, Helvetica Narrow, Palatino, Avant
Garde, Bookman, New Century Schoolbook, Zapf Chancery, and Zapf Dingbats. These
fonts are designed by Bitstream and are similar to Adobe Type 1 fonts.
Page 75

73
RESIDENT PCL 5 FONTS
For PCL 5 users, the Elite 12 Series comes with two high quality PCL outline font
families and two 300 dpi bitmap fonts. The outline fonts are designed by Bitstream to
match the AGFA Intellifont
®
fonts found in the Hewlett-Packard LaserJet III printer.
DOWNLOADING FONTS
In addition to the fonts already installed on the printer, the Elite 12 Series includes 45
downloadable fonts, also designed by Bitstream.
When you print a document, the fonts you need must be present in the printer’s
internal memory (RAM or ROM). If you use fonts which are not built into the printer,
they are automatically downloaded from your computer along with the print job.
You can also manually download fonts to the printer’s RAM from the Mac OS by using
the LaserWriter Utility, included with the Elite 12 Series software, or downloaders included with many font packages. Manually downloading fonts can make printing faster.
When fonts are manually downloaded to the printer, they remain in the printer’s RAM
and available for all print jobs sent to the printer for as long as the printer is switched on;
the fonts are removed from RAM when the printer is switched off. For more information
on downloading fonts, see the Elite 12 Series CD-ROM.
USING AN EXTERNAL HARD DISK WITH THE ELITE 12 SERIES (ELITE 1212 ONLY)
The Elite 1212 provides a SCSI port so you can connect an external hard disk. This disk
is used to store additional PostScript and TrueType fonts. Using an external disk for font
storage is faster than downloading from the computer each time and it leaves more
available memory. This improves performance. If necessary, you can install up to seven
hard disks to your printer. For more information on connecting an external hard disk to
the Elite 1212, see the Elite 12 Series CD-ROM.
The SCSI interface on the printer has an HDI 30 connector. The cable that has an HDI
30 plug is often sold as an “Apple PowerBook” SCSI cable.
Page 76

74
ADDING MEMORY TO YOUR PRINTER
You can print more complex documents and download more fonts to your printer if you add
RAM. To do this you have to open up the printer and insert a SIMM (Single Inline Memory
Module). The printer can hold up to 64 MB of RAM, in two SIMM sockets. There is already
at least one SIMM installed in the printer.
SPECIFICATIONS
You can add SIMMs of any size from 2 MB to 32 MB. SIMMs must be non-parity 72-pin, 70
nanoseconds or faster, non-composite, symmetrical, low-profile, 5-volt, and tin leaded. This
kind of memory is readily available from many sources, or you can order upgrade kits direct
from GCC. Use only EDO (extended data out) or FPM (fast page mode). You cannot use
DIMMs, SDRAM, or other special RAM technologies. Do not use gold plated connectors.
SIMMs do not have to be installed in pairs, nor do you have to add a SIMM of the same size
as that already installed. You can install any capacity SIMM in either socket.
WHY WOULD I NEED TO ADD MEMORY TO THE ELITE 12 SERIES?
You can print virtually any 600 dpi page with 8 MB of RAM and virtually any 1200 dpi
page with 16 MB (if your Elite 12 Series model supports this resolution).
You will reduce available RAM by setting the printer to Auto Switch between PostScript and
PCL 5. Options like TCP/IP, WebAdmin, and NEST use additional RAM; together with
Auto Switch, these utilized approximately 4MB of the available RAM, there by reducing the
RAM freely available for print jobs..
In addition, you’ll need printer RAM for any fonts you download. These require as much
RAM as the space they occupy on the hard drive of your computer. In general, each font
occupies 50 -100k of RAM.
You will continue to obtain minor performance improvements as you add additional memory
up tp a maximum of 64 MB of RAM.
REQUIRED TOOLS AND SAFETY PRECAUTIONS
You should not need any tools to add memory to your printer. However, you should guard
against static discharges. Your body can easily accumulate a static charge; if you touch a sensitive
piece of circuitry, you can destroy it without realizing.
GCC strongly recommends that you use a grounding wrist strap. You can buy one from any
computer parts outlet. If you do not have a grounding wrist strap, touch the perforated
metal chassis of the printer to discharge any static electric charge your body may have.
Page 77

75
INSTALLING THE RAM INTO THE ELITE 12 SERIES
1. Switch off the printer.
2. Unplug the interface cables from the back of
the printer. Do not unplug the power cord
from the AC outlet.
3. If necessary, move the printer so that you
have clear access to its left side.
4. Remove the paper tray.
5. Open the top cover by pressing the release
button on the top right of the printer.
6. You need to remove the side cover. Unscrew
the two thumbscrews at the rear of the printer
(A). If these are tight, you may need to use a
#2 Phillips screwdriver.
7. Reach inside the case. Pull the edge of the
cover (B) toward you, then move the cover
away from the rest of the printer to prevent it
from latching again.
C
A
A
B
B
Page 78

76
8. Place both hands on the top of the side cover
(C). Lift the edge of the cover next to the top
cover; this unlatches the cover, and you
should be able to slide the cover away from
the printer.
9. IMPORTANT: Attach a grounding wrist strap
to the perforated metal chassis, or touch the
chassis regularly to dissipate static
electricity from your body.
C
Page 79

77
10. The ROM and RAM cards are at the right of
the controller board. Remove the ROM card
to get better access to the RAM slots.
(Your controller board may vary from the
one shown)
a. Place your index fingers under the back
edge of the ROM card.
b. Using your thumbs, slowly push the two
retaining clips outward until the clips clear
the top surface of the ROM card.
c. Pivot the ROM card away from the
retaining clips and remove the ROM card
from the socket.
d. The ROM card has a notch in it; this must
be at the top of the contacts when you
reinstall it.
e. Put the ROM card in a safe place; after
you have installed the RAM you will need
to reinstall it.
Notch
ROM
SIMM
Remove
RAM
SIMM
RAM
Socket
RAM
SIMM
Install
RAM
SIMM
Notch
Page 80

78
11. Install the RAM SIMM.
a. Position the SIMM so that the notch is
toward the top.
b. Place the SIMM in the socket so that the
top of the SIMM is angled toward your
left. Gently press the SIMM down into the
socket.
c. Pivot the SIMM so that it moves upright.
The retaining clips will snap into place. If
the retaining clips will not snap into place,
you have not inserted the SIMM correctly.
12. Reinsert the ROM card in the same way that
you inserted the SIMM.
Warning: If the RAM SIMM and ROM card are
not correctly inserted completely into
the socket, your printer may display an
error message when you turn it on, and it will
not operate.
13. If you are having trouble inserting the SIMM
or ROM card:
• Make sure that the cards are in the
correct sockets. The ROM card is slightly
shorter than the RAM SIMM.
• Make sure that the notch in each card is
toward the top.
Notch
RAM SIMMROM card
Page 81

79
14. Remove the grounding wrist strap from the
printer (if necessary), and reinstall the
printer’s side cover. Don’t tighten the
thumbscrews. Turn on the printer and wait to
see if the control panel shows the “Ready”
message. If it does, turn the printer off and go
on to the next step.
• If the “Ready” message doesn’t appear,
turn off the printer and remove the cover.
Gently try to rock the ROM card and
SIMMs. If they are inserted correctly, they
should not move. Carry out steps 11, 12
and 13 again, replace the cover and turn
the printer on.
• If the “Ready” message still doesn’t
appear, and you are confident that you
have installed the ROM card and SIMM
correctly, contact GCC technical support
at 781.276.8620 (U.S. only; outside the
U.S. see back cover),
www.thevirtualprinterstore.com, or your
authorized GCC dealer.
15. If the printer is ready, tighten the
thumbscrews (at the rear of the side cover)
by hand. Make certain that the printer is
switched off. Reinstall the interface cables
(if necessary, insert the parallel port plug
first).
16. Turn the printer on again. If the “Ready”
message shows in the control panel, the
physical installation succeeded. Now confirm
the installation and update the printer driver
on all computers that use this printer.
Page 82

80
CONFIRMING THE INSTALLATION OF RAM
These steps confirm that the printer recognizes the additional memory.
1. Switch on the printer.
2. Press the On Line button on the control panel; you’ll see the message “Off Line”
in the display panel.
3. Press the Menu key four times; “Printer Info” appears in the display panel.
4. Press the Enter key; you’ll see the total amount of RAM that the printer
recognizes. If this is the same as the new total of RAM, press the On Line key
and the printer goes back on line.
If this figure is not the same as the total amount of RAM, turn the printer off, and remove
the side cover. Now carry on from step 14 in the previous steps, starting from “If the ready
message doesn’t appear . . .”
UPDATING LASERWRITER 8 PRINTER DRIVER (MACINTOSH ONLY)
After you have installed extra memory you must update the LaserWriter 8 driver configuration on every Macintosh that uses the printer.
1. Switch the printer on.
2. Select the Chooser from the Apple () menu.
3. Click the LaserWriter 8 icon in the upper left area of the Chooser. You’ll see the
name of your Elite 12 Series in the upper right area of the Chooser below “Select
a PostScript printer.” If the name is not highlighted click on it to highlight it.
4. Click on the Setup button. You’ll see the Setup dialog box.
5. Click on the Auto Setup button. You’ll see a message box telling you that the
computer is communicating with the printer.
6. After a few seconds you’ll see the Setup dialog box again. Click the OK button to
return to the Chooser, and then close the Chooser.
7. Repeat the preceding six steps on every Macintosh that will use the printer.
Page 83

81
UPDATING WINDOWS DRIVERS (ALL VERSIONS)
After you have installed extra memory you must update the Windows printer driver on every
Windows computer that will use the printer.
First, you need to carry out the next four steps once. This method works for all versions of
Windows, and provides a memory figure for you to enter.
1. Switch the printer on.
2. Open a DOS Window by clicking on the MS-DOS prompt icon on the
Windows 95/98 (or NT 4.0) Start menu, or the MS-DOS Prompt icon in the
Windows 3.1 (or NT 3.51) Main Window.
3. Assuming that your printer is on LPT1 and that Windows is installed on the
C drive, type the following:
copy c:\windows\system\testps.txt lpt1
If your printer is connected to another port, or Windows is installed on a drive
other than C, change the references. Do not use any Windows print commands;
you must execute this command in DOS.
4. Type EXIT and press the Return key to return to Windows.
The printer will have printed a page which shows “Max Suggested VM (KB):” This is the
maximum suggested Virtual Memory for the printer in kilobytes. Now you need to enter this
figure in the Printers section of Windows Control Panel on every Windows computer that
uses the printer. The way you do this varies between versions of Windows.
WINDOWS 95/98
1. Choose Settings from the Start menu, and choose Printers from the submenu.
2. You’ll see the Printers window; use the right mouse button to click on the
Elite 12 Series icon.
3. You’ll see a menu; choose Properties from this list.
4. You’ll see the Properties tabbed dialog box; click on the Device Options tab.
5. At the top of the dialog box is a section marked Available printer memory (in KB).
Enter the suggested virtual memory into this box, and click OK.
6. Repeat the preceding five steps on every Windows 95/98 computer that uses
the printer.
Page 84

82
WINDOWS NT 4.0
1. Choose Settings from the Start menu, and choose Printers from the submenu.
2. You’ll see the Printers window; use the right mouse button to click on the
Elite 12 Series icon.
3. You’ll see a menu; choose Properties from this list.
4. You’ll see the Properties tabbed dialog box; click on the Device Options tab.
5. In the window, click on Virtual Memory.
6. Enter the suggested virtual memory figure into the box, and click OK.
7. Repeat the preceding six steps on every Windows NT 4.0 computer that uses
the printer.
Page 85

83
USING THE CD-ROM WITH ADOBE ACROBAT 4
This installation guide is intended for you to set up your printer. The CD-ROM contains
more information about your printer, in Adobe Acrobat format files. The CD-ROM comes
with Macintosh and Windows versions of the Adobe Acrobat Reader program; you can
install this program on your computer and read the documents on the CD-ROM.
You can print pages from Acrobat documents, and also copy and paste text from Acrobat
files into other applications, and make full text searches within the document.
INSTALLING ADOBE ACROBAT READER
1. Put the Elite 12 Series CD-ROM in your CD-ROM drive.
2. (Windows only) Open File Manager (Windows 3 and NT 3.51) or
Explorer (Windows 95/98 and NT 4.0).
3. Open the Folder or Directory of the CD-ROM called Manuals.
4. Open the Folder or Directory that corresponds to your language. Languages
available are English, French, Italian, and Spanish.
5. Run the program called Acroread.mac (Mac) or Acroread.exe (Windows).
This installs the Reader program; follow the instructions on the screen.
OPENING DOCUMENTS WITH ACROBAT READER
Acrobat documents are stored as Portable Document Format (.pdf) files. Open them in the
same way as you open files in other applications.
UNDERSTANDING THE ACROBAT SCREEN
The Acrobat screen is divided into two parts; bookmarks on the left and pages on the right.
Treat the bookmarks as a table of contents. If a bookmark has a triangle to the left of it, you
can click on the triangle to show a list of subtopic bookmarks. Click on the triangle again to
hide the subtopics. If you click on a bookmark, you’ll jump to the first page in that section.
There is a scroll bar at the bottom of the bookmarks so that you can see all the text in a
bookmark.
Depending on the size of your computer’s screen, you may need to magnify the page. You
can choose the magnification you want by clicking on the magnification box in the status bar
at the bottom center of the screen.
• Fit Page shows the entire height of the page.
Page 86

84
• Fit Width shows the entire width of the page. You won’t be able to see some of the
top or bottom of the page.
• Fit Visible is similar to Fit Width, but shows the width of the page between margins.
You can also choose percentage views from the list, or choose Other to create a specific
percentage view. You can also use the magnifying glass button in the tool bar to drag over an
area of the page you want to enlarge.
When you change the magnification it remains at that setting for all pages until you change
it again.
MOVING THROUGH PAGES
You can move forward and backward through the sections of the Elite 12 Series manual by
dragging the vertical scroll bar. When you do this you’ll see a window telling you which page
you’re selecting.
If you click in the background area of the vertical scroll bar you’ll move one page at a time.
If the magnification you’ve chosen shows less than a full page, you’ll see the top part of each
page followed by the bottom part.
You can also use the tool bar buttons to move from page to page.
The GCC manual has a table of contents with underlined entries in red; click on these to go
to that section of the manual.
FINDING TEXT
Just as you can think of the bookmarks as a table of contents, the Find tool takes the place of
an index. If you want to find a word:
1. Click on the Find button in the tool bar.
2. You’ll see the Find dialog box. Enter the word(s) you want to find.
3. Click OK; the program takes you to the next place the word appears.
4. If you don’t find the information you’re looking for, press Command-G (Macintosh) or
Control-G (Windows) to go to the next place the word appears.
Page 87

85
USING THE MULTIPURPOSE FEEDER
The multipurpose feeder holds up to an extra 80 sheets of 20 lb. copier-style paper, 40 transparencies, 40 sheets of labels, 10 envelopes or 25 postcards. You can also manually feed single
sheets of paper or other media. The multipurpose feeder handles the following paper sizes
that can also be placed in the main paper tray:
• Letter • Legal 13" • Legal 14" • Executive • A4 •B5
The following paper sizes can only be used in the multipurpose feeder:
• Postcard
You must use the multipurpose feeder for envelopes, which can be in the following sizes:
• Commercial #10 (Comm. #10) • Monarch • DL • C5
You have to select the multipurpose feeder from a computer’s Print dialog box (assuming you
specified the main paper tray as the default paper source). See “Paper Source” in the CDROM sections on Macintosh and Windows for how to select the multipurpose feeder.
To use the multipurpose feeder:
1. Open the cover of the multipurpose feeder; it
folds down to a 45º angle. If one side of the
cover doesn’t unlatch, push the cover gently
toward that side.
2. Pull the tab to slide out the extension.
G
CC
T
ECHNOLOGIES
Page 88

86
3. When the extension is fully extended, lift the
tab up and toward you so that the folding part
of the extension is in place.
4. If necessary, slide the paper guide so that it
lays against the edge of the paper.
5. Insert paper (or other media).
Insert letterhead face up with the top toward
the printer. Insert envelopes face up with the
flap down and to the right.
GCC strongly recommends that you use the straight-through paper path when printing
envelopes (see next section).
When you close the multipurpose feeder, first move the paper guide back to the right side.
Then fold the extension and slide it back into the main part of the feeder. Now close the
cover; this lifts the feeder back to the upright position.
NOTE :
If you are using legal-size paper, you may need to support the stack to help it
feed properly.
STRAIGHT-THROUGH PAPER PATH
This gives you a straight-through paper path (which you need for envelopes and thicker
media) in conjunction with the multipurpose feeder. You can change the output from the
top to the rear in the printer software.
On the Macintosh, select “Printer-specific Options” or “Features” in the Print dialog box. In
Windows 95 and 98, in the printer properties choose the Device Options tab and then look
in Printer Features.
G
CC
T
ECHNOLOGIES
G
CC
T
ECHNOLOGIES
A5 B5 A4
Page 89

87
MAINTENANCE AND TROUBLESHOOTING
Your Elite 12 Series is exceptionally easy to maintain. Wipe the outer surfaces of the printer’s
case with a damp cloth from time to time to remove dust. Do not use ammonia or alcoholbased cleaners on or around the printer.
TONER SPILLS
Wipe small toner spills with a damp cloth. Don’t use hot water; you may set the toner and
cause stains on clothing and furniture. You should remove larger amounts of spilled toner
with a vacuum cleaner. If you spill very large amounts inside the printer, contact
GCC Technologies or your authorized dealer or service provider for cleaning.
PRINTING PROBLEMS
PAPER JAMS
When a paper jam happens, the red Service LED on the printer’s control panel flashes and
one of three messages appears in the display. The messages are:
• Paper feed jam
• Paper path jam
• Paper exit jam
You must clear the jam, and open and close the printer’s top cover to reset the printer and
resume printing.
PAPER FEED JAM
This usually happens when paper is misfed from the paper tray. If you remove the paper tray
you should see a loose sheet of paper.
PAPER PATH JAM
This happens when paper is being moved past the toner cartridge. If you remove the toner
cartridge you should see the jammed paper.
PAPER EXIT JAM
This happens when a printed sheet jams as it exits the printer. The jammed paper should be
partly visible exiting the printer into the output tray on top of the printer.
Page 90

88
CLEARING A PAPER JAM
1. Open the top cover of the printer.
2. Locate the jammed paper. If the message says Paper Feed Jam, remove the paper
tray; if the message says Paper Path Jam, remove the toner cartridge.
3. Grasp the jammed paper with both hands and slowly remove it from the printer by
pulling in the direction that the paper normally takes. If the sheet tears, make sure
you remove all the pieces.
4. Discard the jammed paper. If the jam happened at the paper tray, be sure that all the
paper is beneath the metal bracket at the left front of the paper tray.
5. Check the “Paper Jam Checklist.” below.
6. Replace the paper tray in the printer (if necessary) and close the top cover of the
printer.
After a minute or so the printer will warm up and resume printing.
PAPER JAM CHECKLIST
• Did you remove all the packing material from inside the printer when you set it up?
• Is the paper flat and dry?
• Have you removed the stack of paper and fanned it to make sure that pages are free
to move?
• Are the paper’s edges flush?
• Is the paper under the brackets in the paper tray?
• Is there too much paper in the paper tray? The 250-sheet limit for the standard paper
tray is for 20 lb. (75 g/m2) sheets.
• Are you using the Multipurpose feeder and the rear output for heavy sheets and
envelopes?
• Are the paper length and width guides in the paper tray correctly adjusted?
• Is the paper width guide in the paper tray next to (but not tight against) the paper?
• Is the paper in the tray the same size as in the Page Setup dialog box of
your application?
• Have you removed all traces of paper from previous jams?
• Is the paper path free from any obvious obstructions?
Page 91

89
OTHER PRINTER PROBLEMS
Some problems with printing may actually be problems with applications. Typical application
problems include:
• A graphic appears on my screen, but when I print only the text shows
TRY COPYING THE GRAPHIC TO A SEPARATE PAGE AND PRINT THAT PAGE ONLY.
• The quality of fonts is very poor
USUALLY A PROBLEM WITH MACINTOSHES THAT ONLY HAVE SCREEN FONTS INSTALLED; INSTALL THE PRINTER FONTS.
• The computer crashes when I print a document
TRY PRINTING ANOTHER DOCUMENT FROM THAT APPLICATION; IF THIS PRINTS SUCCESSFULLY, THIS PROBABLY MEANS
THAT THE ORIGINAL DOCUMENT IS CORRUPT
. IFNOT, TRY PRINTING FROM ANOTHER APPLICATION; IF THIS PRINTS
SUCCESSFULLY
, THIS PROBABLY MEANS THAT THE ORIGINAL APPLICATION IS THE PROBLEM.
You may have problems related to printer or system setup:
• The printer is not listed as available
THE PRINTER MAY NOT BE ON LINE, THE PRINTER SOFTWARE IS NOT INSTALLED CORRECTLY, OR ANY NETWORK
CONNECTION TO THE PRINTER MAY BE HAVING PROBLEMS
.
PROBLEMS WITH THE PRINTER ITSELF
Typical problems which are directly related to the printer include:
• The printer is not available
THERE’S PROBABLY SOME ERROR AT THE PRINTER; CHECK THE CONTROL PANEL TO MAKE SURE THAT THE PRINTER IS
ON LINE AND NOT DISPLAYING ANY ERROR MESSAGE
.
• Output is gray rather than black, or there’s nothing on the page at all
THE TONER CARTRIDGE IS ALMOST EMPTY OR COMPLETELY EMPTY.
• Random areas of the page are blank, or have marks on them
OFTEN THIS MEANS THAT THE TONER CARTRIDGE IS DAMAGED; TRY REPLACING IT.
A more detailed trouble-shooting guide is on the Elite 12 Series CD-ROM.
Page 92

SERVICE AND SUPPORT
You can contact GCC for technical assistance in several ways.
• Technical Support phones: 781-276-8620.
(U.S. only; outside the U.S. refer to back cover)
• Fax: 781-275-1115.
• GCC’s World Wide Web site: www.thevirtualprinterstore.com
• Internet email: support@gcctech.com
GCC’S WORLD WIDE WEB SITE
GCC’s Web site offers a wealth of information. The full manual for the Elite 12 Series of
printers is here, along with technical bulletins that deal with any problems that arise over the
life of your printer. Check www.thevirtualprinterstore.com to see if your problem has a
solution.
DEALER AND SERVICE CENTER SUPPORT
GCC offers worldwide services from its dealers and service centers. They are supported by
training, technical documentation, and technical support.
EXTENDED WARRANTIES
GCC offers extended warranty programs for all its products. These extend the limited warranty and cover all parts of the printer (except consumables, like the toner cartridge). You
can purchase an extended warranty during the limited warranty period, and renew it year
after year.
SOFTWARE UPGRADES
You can download software upgrades from GCC’s web site.
TRANSPORTING YOUR PRINTER
Full instructions on packing the printer for transport are on the Elite 12 Series CD-ROM, in
the section on Maintenance and Troubleshooting. Always remove the toner cartridge from
the printer before transporting it.
CONSUMABLES, ACCESSORIES, AND UPGRADES
You can purchase consumables such as toner cartridges, accessories, and upgrades direct from
GCC by calling, 1.800.422.7777 (U.S. only; outside the U.S. refer to back cover)or on the
web at www.thevirtualprinterstore.com.
Page 93

91
SOFTWARE LICENSE AGREEMENT
OPENING THE BAG CONTAINING THE SOFTWARE OR INSTALLING THE SOFTWARE FROM THE DISTRIBUTION MEDIA
(the “Software”) WHICH ACCOMPANIES THIS MANUAL INDICATES YOUR ACCEPTANCE OF THE TERMS AND CONDITIONS CONTAINED IN THIS LICENSE AGREEMENT. THE TERMS OF THIS LICENSE AGREEMENT APPLY TO YOU AS THE
ORIGINAL LICENSEE OF THE SOFTWARE AND THE RELATED USER DOCUMENTATION (the “Documentation”) AND TO
ANY SUBSEQUENT LICENSEE THEREOF.
IF YOU DO NOT ACCEPT OR AGREE TO THE TERMS OF THIS LICENSE AGREEMENT YOU MAY RETURN
THE PRODUCT, WITH DATED PROOF-OF-PURCHASE OF THE PRODUCT, TO YOUR DEALER WITHIN 10
DAYS FOR A FULL REFUND OF PURCHASE PRICE THEREOF. ALL RETURNED SOFTWARE MUST BE
UNUSED AND IN THE UNOPENED PLASTIC BAG.
LICENSE
In return for payment of the purchase price of your GCC Technologies Product (“the Product”), you have been granted a
limited, non-exclusive license (“License”) to use the Software and the Documentation on the terms set forth in this
License Agreement.
GCC Technologies, Inc. (“GCC”) retains ownership of these copies of the Software and the Documentation. These copies
of the Software and the Documentation are licensed to you according to the following terms:
PERMITTED USES
YOU MAY:
1. Use the Software with any appropriate GCC product.
2. Copy the Software onto a single hard disk drive.
3. Transfer the Software to another party, if the other party agrees to the terms and conditions of this License Agreement and completes and returns a Registration Card to GCC. The Registration Card may be obtained by writing to
GCC’s Customer Service department at the address set forth below. If you transfer the Software to any other party,
you must transfer all copies and the Documentation to such party.
4. Make a single copy of the Software on another diskette for backup purposes only.
PROHIBITED USES
THE LICENSE OF THE SOFTWARE AND THE DOCUMENTATION GRANTED TO YOU IS LIMITED, AND YOU MAY NOT:
1. Make copies of any of the Documentation or make copies of the Software other than as expressly set forth above.
2. Alter, modify or adapt the Software or the Documentation, including translating, decompiling, disassembling, creating derivative works, or merging the Software with other software.
3. Use any backup media you have made or allow someone else to use any backup media unless the Software on the
original media is defective.
4. Rent, sublicense, assign or otherwise transfer any interest in any of the Software or the Documentation except as
set forth above.
5. Modify or erase any copyright, trademark or proprietary rights notice on any medium containing the Software or
the Documentation or copy or reproduce any of the Software or the Documentation without all of GCC’s copyright,
trademark and proprietary rights notices.
The License is effective until terminated. You may terminate it at any time by destroying all copies of the Software you
have and mailing your original Software media and the Documentation to GCC. The License and your right to use the
Software will automatically terminate upon your failure to comply with any provision of this License Agreement or upon
GCC’s election to terminate the License as set forth below. You agree upon such termination to destroy all copies of the
Software which you have and to mail your original Software diskettes and the Documentation to GCC.
GCC retains all rights and title to the Software and the Documentation except for the limited license contained herein.
The Software and the Documentation are protected by the copyright laws of the United States. There are severe penalties, civil and criminal, for copyright infringement. Nothing in this License Agreement constitutes a waiver of GCC’s rights
under the copyright laws of the United States or any other law.
Page 94

92
LIMITED SOFTWARE WARRANTY
WARRANTY
If you discover physical defects in the medium on which the Software or the Documentation are distributed, at its option,
GCC will either replace the medium at no charge to you or terminate the License and require the return of your Product,
and upon such return, refund to you the purchase price thereof. To qualify for this warranty, you must return the defective medium with proof-of-purchase to GCC during the one year period after you acquired the Software.
Except as set forth in the immediately preceding paragraph, GCC PROVIDES THE SOFTWARE AND THE DOCUMENTATION “AS IS” AND WITHOUT WARRANTY OF ANY KIND, EITHER EXPRESS OR IMPLIED, INCLUDING, BUT NOT LIMITED
TO, ANY IMPLIED WARRANTIES OF MERCHANTABILITY OR FITNESS FOR A PARTICULAR PURPOSE OR WARRANTIES
OF QUALITY OR PERFORMANCE. YOU THE LICENSEE ARE ASSUMING THE ENTIRE RISK AS TO THE QUALITY OF THE
SOFTWARE AND THE DOCUMENTATION AND THE RESULTS OF ITS USE. Your exclusive remedy with respect to the
Software, the Documentation and this License Agreement, shall be limited to the replacement of any defective medium,
or refund of the purchase price of your Product, as set forth above.
APPLE COMPUTER, INC. MAKES NO WARRANTIES, EITHER EXPRESS OR IMPLIED, REGARDING THE ENCLOSED COMPUTER SOFTWARE PACKAGE, ITS MERCHANTABILITY OR ITS FITNESS FOR ANY PARTICULAR PURPOSE. THE EXCLUSION OF IMPLIED WARRANTIES IS NOT PERMITTED BY SOME STATES. THE ABOVE EXCLUSION MAY NOT APPLY TO
YOU. THIS WARRANTY PROVIDES YOU WITH SPECIFIC LEGAL RIGHTS. THERE MAY BE OTHER RIGHTS THAT YOU
HAVE WHICH VARY FROM STATE TO STATE.
IN NO EVENT WILL GCC BE LIABLE FOR DIRECT, INDIRECT, SPECIAL, INCIDENTAL, OR CONSEQUENTIAL DAMAGES
ARISING OUT OF THE USE OR INABILITY TO USE THE SOFTWARE OR DOCUMENTATION, even if advised of the possibility of such damages. In particular, GCC shall have no liability for any programs or data stored or used with the
Software, including the costs of recovering such programs or data. In no event shall GCC’s liability with respect to the
Software, the Documentation and this License Agreement, in contract, tort (including negligence) or otherwise, exceed
the original price paid by you for your Product.
THE WARRANTY AND REMEDIES SET FORTH ABOVE ARE EXCLUSIVE AND IN LIEU OF ALL OTHERS, ORAL OR WRITTEN, EXPRESS OR IMPLIED. No GCC dealer, agent, or employee is authorized to make any modification or addition to
this warranty.
SOME STATES DO NOT ALLOW THE EXCLUSION OF IMPLIED WARRANTIES OR LIABILITY FOR INCIDENTAL OR CONSEQUENTIAL DAMAGES, SO THE ABOVE LIMITATION OR EXCLUSION MAY NOT APPLY TO YOU. THIS WARRANTY
GIVES YOU SPECIFIC LEGAL RIGHTS, AND YOU MAY ALSO HAVE OTHER RIGHTS WHICH VARY FROM STATE TO
STATE.
GENERAL
This License Agreement is governed by the laws of the Commonwealth of Massachusetts. This License Agreement constitutes the entire agreement between
GCC and you concerning the Software and the Documentation, and supersedes all prior communications, agreements and understandings, written or oral,
between GCC and you with respect thereto.
Should you have any questions concerning this License Agreement, the Software or the Documentation, you may contact GCC by writing to Customer Service,
GCC Technologies Inc., 209 Burlington Road, Bedford, MA 01730-9143. For the name of the nearest GCC service center or representative, call (800) 422-7777.
TRADEMARKS
GCC Technologies and the GCC Technologies logo are registered trademarks of GCC Technologies Inc. Elite is a trademark of GCC Technologies, Inc. Apple,
AppleTalk, LocalTalk, LaserWriter, EtherTalk, Macintosh, and the Apple logo are registered trademarks of Apple Computer, Inc. Finder and TrueType are trademarks
of Apple Computer, Inc. PostScript is a registered trademark of Adobe Systems Incorporated. Adobe and Illustrator are registered trademarks of Adobe Systems
Incorporated. Adobe Type Manager, ATM, and Separator are trademarks of Adobe Systems Incorporated. Aldus, PrePrint, PressWise, FreeHand, and PageMaker
are registered trademarks of Aldus Corp. MacPaint and MacWrite are registered trademarks of Claris Corp. LetraSet is a registered trademark of Esselte Pendaflex
Corp. DesignStudio is a trademark of Esselte Pendaflex Corp. IBM is a registered trademark of International Business Machines Corp. Helvetica, Palatino, and
Times are registered trademarks of Linotype-Hell AG Corp. Phoenix Technologies, PhoenixPage, and Multi-grey are registered trademarks of Phoenix
Technologies. Centronics is a registered trademark of Centronics Data Computer Corp. Ethernet is a registered trademark of Xerox Corp. Microsoft and Word are
registered trademarks of Microsoft Corp. Windows and Windows 95 are trademarks of Microsoft Corp. Bitstream is a registered trademark of Bitstream Inc.
Speedo, Bitstream Dutch, Bitstream Swiss, Bitstream Swiss Narrow, and Bitstream Zapf Calligraphic are trademarks of Bitstream Inc. ITC Avant Garde, ITC
Bookman, ITC Zapf Chancery, and ITC Zapf Dingbats are registered trademarks of International Typeface Corporation. New Century Schoolbook is a registered
trademark of Kingsley-ATF Type Corp. Helvetica, Palatino, and Times are registered trademarks of Linotype-Hell AG Corporation. Tyvek is a registered trademark
of Dupont Chemical Corp. PhoneNET is a registered trademark of Farallon Corp. Cheapernet is a registered trademark of National Semiconductor. CHAMP is a
trademark of Amp Inc. Canvas is a trademark of Deneba Systems. Quark and QuarkXpress are trademarks of Quark Inc. Ready,Set,Go is a registered trademark of
Manhattan Graphics Corp. PCL is a registered trademark of Hewlett-Packard Company. NetWare is a registered trademark of Novell Corp.
Page 95

93
Limited Hardware Warranty
GCC Technologies, Inc. (“GCC”) warrants, for the limited period of one year from the date of original purchase, the Elite
12 Series sold by GCC and any accompanying media on which GCC software is recorded (the “Product”) to be free from
defects in materials and workmanship. During the warranty period, GCC or its authorized representative will, at its
option, repair, replace or refund the purchase price of any defective product at no additional cost, provided you return it
during the warranty period, transportation charges prepaid, to GCC or an authorized GCC dealer or representative. You
must attach your name, address and telephone number, a description of the problem, and a dated proof-of-purchase
bearing the serial number for each product returned for warranty service.
This Warranty is limited to the original purchaser of the product and is not transferable unless otherwise agreed by GCC
in writing. This Warranty does not apply to any product which has been damaged by accident, abuse, or misuse, which
has been modified without the prior written permission of GCC.
GCC MAKES NO WARRANTY OR REPRESENTATION, EITHER EXPRESS OR IMPLIED, WITH RESPECT TO THE SOFTWARE SUPPLIED WITH THE PRODUCT, ITS QUALITY, PERFORMANCE, MERCHANTABILITY, OR FITNESS FOR A PARTICULAR PURPOSE. AS A RESULT, THE SOFTWARE IS LICENSED “AS IS,” AND YOU THE LICENSEE ASSUME THE ENTIRE
RISK AS TO ITS QUALITY AND PERFORMANCE.
EXCEPT AS EXPRESSLY SET FORTH ABOVE, GCC MAKES NO OTHER WARRANTIES WITH RESPECT TO THE PRODUCT,
EXPRESS OR IMPLIED, INCLUDING BUT NOT LIMITED TO, ANY IMPLIED WARRANTIES OF MERCHANTABILITY OR FITNESS FOR A PARTICULAR PURPOSE.
UNDER NO CIRCUMSTANCES SHALL GCC’S LIABILITY ARISING OUT OF OR IN CONNECTION WITH THE PRODUCT OR
THE USE OF, OR THE INABILITY TO USE, THE PRODUCT, IN CONTRACT, IN TORT (INCLUDING NEGLIGENCE), OR OTHERWISE EXCEED THE PURCHASE PRICE OF THE PRODUCT, AND IN NO EVENT SHALL GCC BE LIABLE FOR SPECIAL,
INCIDENTAL OR CONSEQUENTIAL DAMAGES INCLUDING, BUT NOT LIMITED TO, DAMAGES FOR DOWNTIME OR LOST
PROFITS, BUSINESS, USE OF SOFTWARE OR EQUIPMENT, OR GOODWILL, WHETHER OR NOT GCC HAS BEEN
ADVISED OF THE POSSIBILITY OF SUCH DAMAGES.
Some states do not allow the exclusion or limitation of implied warranties or liability for incidental or consequential damages, or do not allow limitations on how long an implied warranty lasts, so the above limitations or exclusions may not
apply to you. ANY IMPLIED WARRANTIES, INCLUDING ANY IMPLIED WARRANTIES OF MERCHANTABILITY OR FITNESS FOR A PARTICULAR PURPOSE, ARE LIMITED IN DURATION TO ONE YEAR FROM THE DATE OF ORIGINAL PURCHASE OF THIS PRODUCT. This warranty gives you specific legal rights, and you may also have other rights which vary
from state to state.
No GCC dealer, representative, agent or employee is authorized to make any modification, extension or addition to this
warranty on behalf on GCC. THE WARRANTIES AND REMEDIES SET FORTH ABOVE ARE EXCLUSIVE AND IN LIEU OF
ALL OTHERS, EXPRESS OR IMPLIED.
For the name of the nearest GCC service facility or representative, call GCC at (800) 422-7777, or write to:
Vice President of Customer Service, GCC Technologies Inc., 209 Burlington Road, Bedford, MA 01730-9143.
Page 96

AUSTRALIA
5/585 Blackburn Road
Notting Hill,
Melbourne, VIC, 3168
Tel: +61 3 9562 1800
Fax: +61 3 9562 1900
UNITED KINGDOM
729 London Road
Hounslow, Middlesex,
England TW3 1SE
Tel: +44 181 754 6000
Fax: +44 181 754 6060
GERMANY
Vertriesburo Deutschland
Hahnsbuschweg 2-4,
24147 Klausdorf Bei,
Kiel, Germany
Tel: +49 431 7997 610
Fax: +49 431 7997 666
UNITED STATES
209 Burlington Road
Bedford, MA 01730-9143
Tel: 781.275.5800
Fax: 781.275.1115
TO ORDER SUPPLIES OR ACCESSORIES VISIT OUR
WEBSITE WWW
.THEVIRTUALPRINTERSTORE.COM
OR GCC SALES AT 1.800.422.7777
OUTSIDE NORTH AMERICA CONTACT YOUR LOCAL OFFICE.
INTERNET
SALES & SUPPLIES: WWW.THEVIRTUALPRINTERSTORE.COM
SUPPORT: WWW.THEVIRTUALPRINTERSTORE.COM/SUPPORT
 Loading...