

Page 1
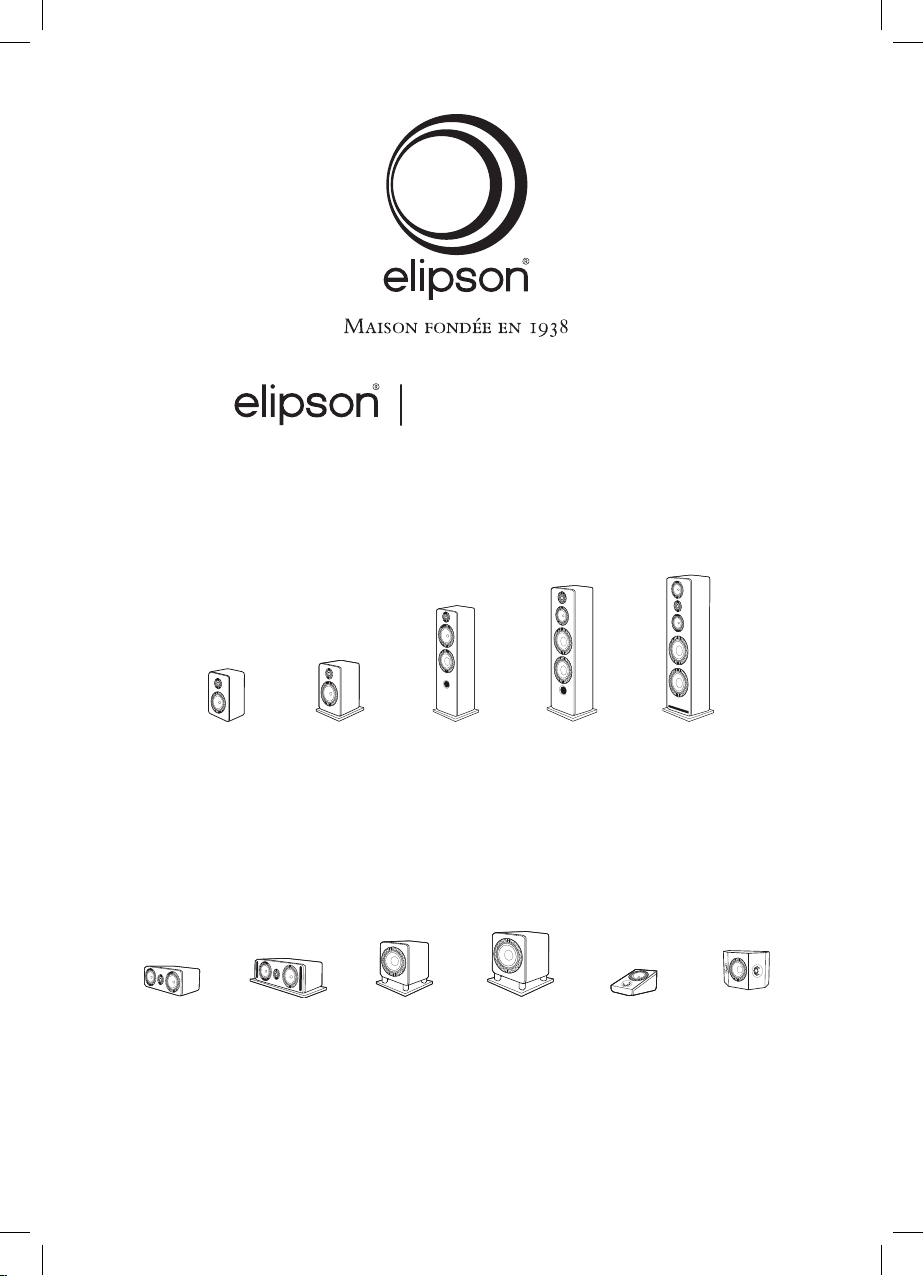
Prestige Facet
PF 6B PF 24F
PF 11C
PF SUB10 PF 6ATM PF 7SR
PF 8B PF 34F
PF 14C
PF 14F
PF SUB8
Page 2
FR
Merci d’avoir choisi les produits Elipson.
Cher Client,
Prenez le temps de lire attentivement ce mode d’emploi avant d’installer vos enceintes.
Il contient des conseils pour en tirer le meilleur prot et des instructions pour les utiliser sans risque.
Nous vous recommandons vivement de conserver l’emballage et ce mode d’emploi
pour d’éventuels usages ultérieurs.
I. CONTENU
• 1 enceinte :
PF14F / PF24F / PF34F/ PFSUB8
PFSUB10 / PF11C/ PF14C
• 2 enceintes :
PF6B / PF8B / PF6ATM / PF7SR
• 1 socle amovible (PF8B, PF14F, PF24F, PF34F, PFSUB8, PFSUB10, PF14C)
• 1 grille aimantée amovible
• 4 vis (PF8B, PF14F, PF24F, PF34F, PFSUB8, PFSUB10, PF14C)
• 1 mode d’emploi
• 4 patins en caoutchouc par enceinte
(PF6B,PF8B,PFSUB8, PFSUB10, PF11C,PF14C,PF6ATM,PF7SR)
• 4 pointes de découplage par enceinte (PF14F, PF24F, PF34F)
II. PRÉPARATION
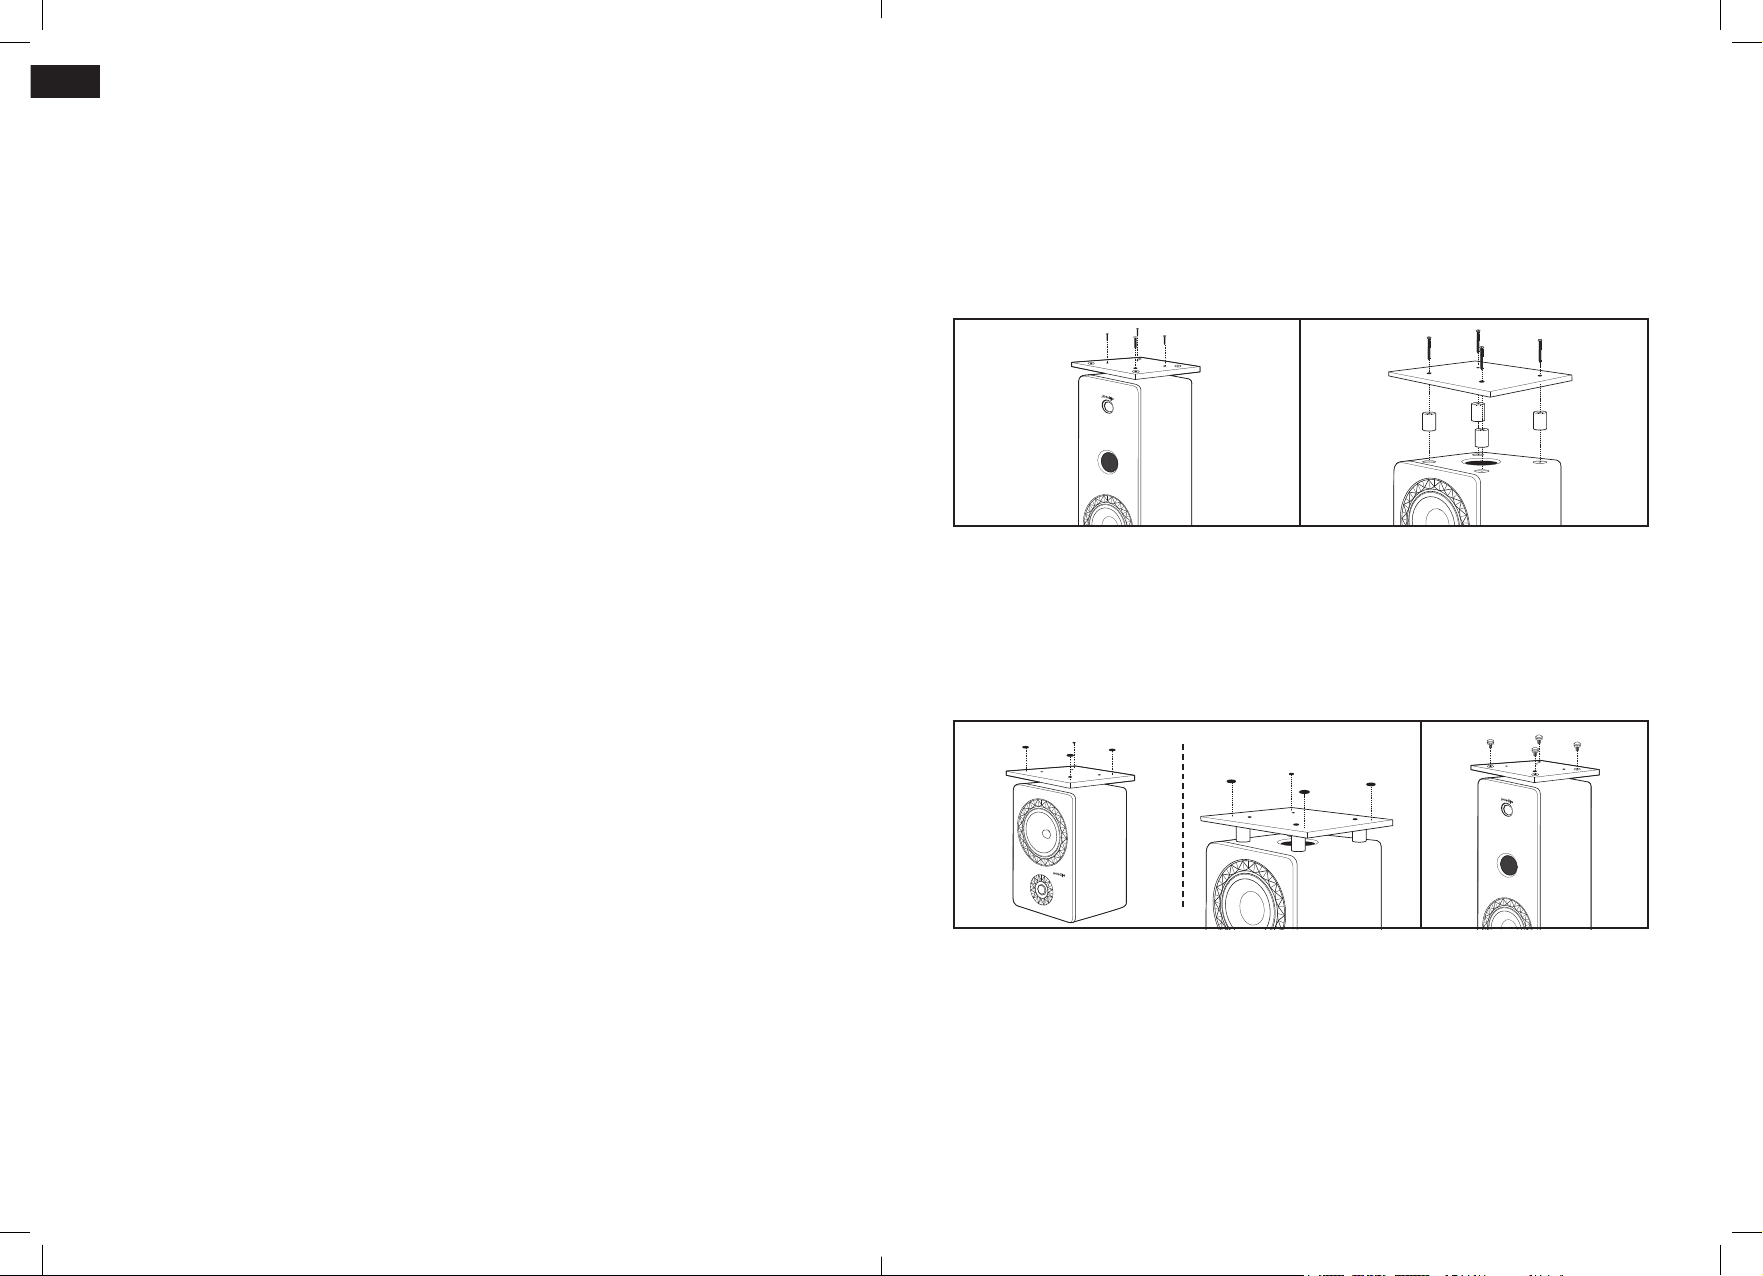
1a 1b
1a. Fixation du socle sur l’enceinte (PF8B, PF14F, PF24F, PF34F, PF14C)
Retournez avec précaution l’enceinte et posez-la sur le sol préalablement recouvert des
mousses d’emballage, ou d’un tapis, an de ne pas abîmer sa partie supérieure. Prenez
soin de ne pas endommager l’ébénisterie, la façade laquée ou les haut-parleurs pendant
l’opération. Posez le socle sur l’enceinte et xez-le à l’aide des vis fournies.
1b. Fixation du socle sur le caisson de basse (PFSUB8, PFSUB10)
Commencez par positioner les cylindres en aluminium dans les creux prévus à cet effet.
Posez le socle sur les cylindres et xez-le à l’aide des vis fournies.
2a 2b
2a. Fixation des patins (PF8B, PF14C, PFSUB8, PFSUB10)
Nous préconisons de coller les patins en caoutchouc pour les enceintes prévues avec le socle
amovible. Si vous utilisez les enceintes sans le socle amovible, il est nécessaire de mettre les
patins en caoutchouc au niveau des inserts prévus à cet effet, an d’éviter tout dommage.
En règle générale, il vous est possible de coller les patins en caoutchouc en-dessous de
l’enceinte ou de son socle an de protéger l’enceinte elle-même et son support.
2b. Fixation des pointes de découplage (PF14F, PF24F, PF34F)
Après avoir xé le socle de l’enceinte, vissez les pointes de découplage sur celui-ci (pas
d’outillage nécessaire).
Remarque : La xation de patins ou de pointes de découplage permet de limiter les
vibrations transmises au sol.
2 3
Page 3
FR
III. INSTALLATION STÉRÉO
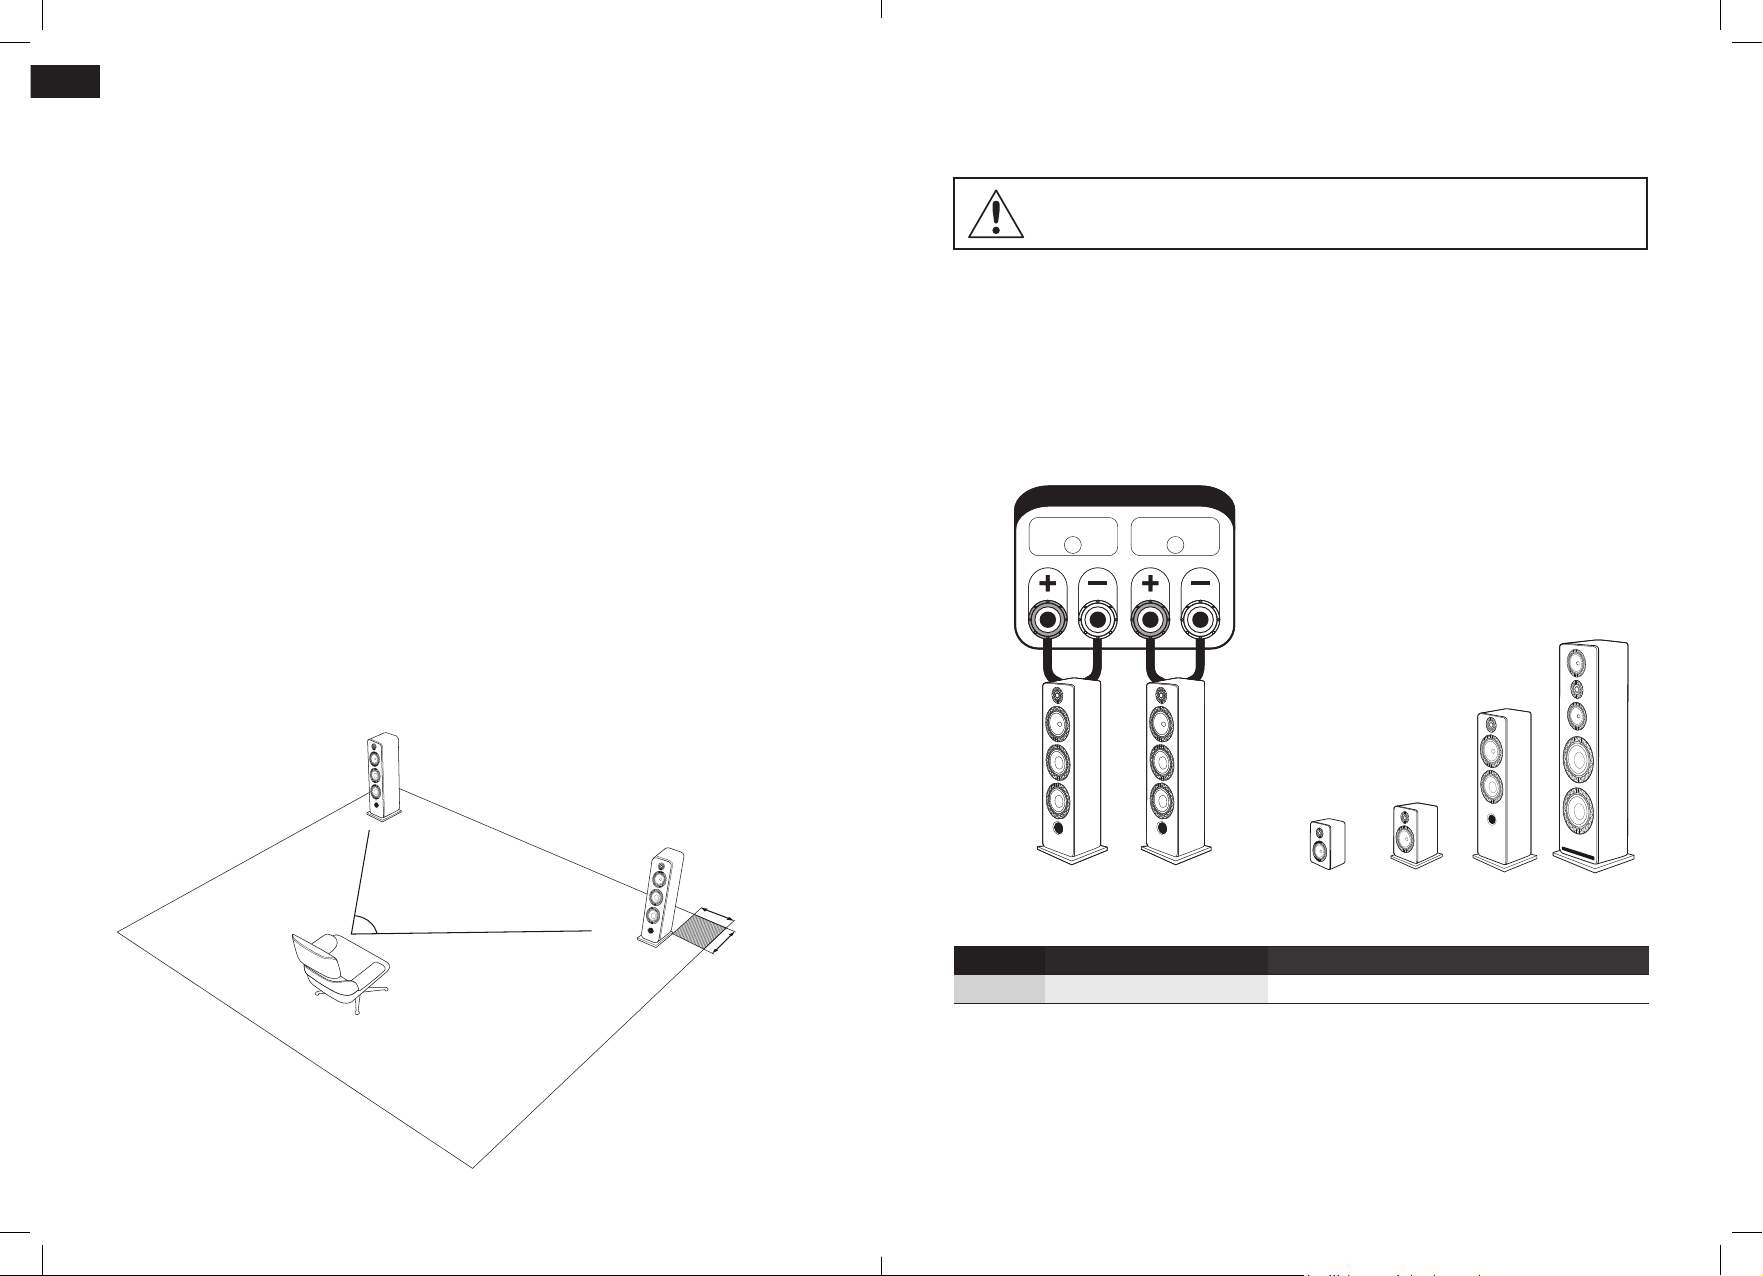
1. Placement des enceintes FL/FR
Les enceintes Prestige Facet ont été étudiées pour restituer le plus dèlement possible tous types
de musique, à condition de respecter quelques règles an d’optimiser leurs performances et
obtenir une scène sonore réaliste.
Idéalement, les enceintes doivent être placées de façon symétrique face à la position
d’écoute, de manière à former un triangle équilatéral. Les deux enceintes doivent être placées
à la même hauteur et à la même distance du mur arrière et des surfaces latérales adjacentes.
An d’optimiser le couplage enceinte/pièce d’écoute, nous vous préconisons les essais
suivants :
•Avant tout, évitez de positionner les enceintes dans les angles de votre pièce. Il en résultera
une augmentation articielle du niveau de grave, masquant la rapidité et le suivi mélodique
(articulation) de ce registre.
•Dans un premier temps, ajuster l’écartement des deux enceintes, an de trouver l’équilibre
réaliste entre une scène sonore large (enceintes éloignées) et scène sonore respectant la
ponctualité des voix (enceintes proche).
•Dans un second temps, éloigner les enceintes du mur arrière par pas de 10 cm an de trouver
l’équilibre entre profondeur de l’image sonore (loin du mur) et production de l’extrême grave
(proche du mur).
•Enn, ajuster l’orientation des enceintes en les pivotant progressivement vers le centre de
la zone d’écoute. Si vous laissez les enceintes parallèles, vous pouvez être amené à les
rapprocher mutuellement, si vous les orientez à plus de 30°, vous pouvez augmenter leur
écartement.
2. Branchements sur amplicateur Hi-Fi
TOUS LES BRANCHEMENTS DOIVENT ÊTRE EFFECTUÉS AVEC L’AMPLIFICATEUR ÉTEINT.
Le respect de la polarité des enceintes est impératif. Assurez-vous de bien connecter le
pôle « + » de l’enceinte (Rouge) au pôle « + » de l’amplicateur. Puis assurez-vous de bien
connecter le pôle « - » de l’enceinte (Noir) au pôle « - » de l’amplicateur. Une erreur de
branchement provoquerait une image stéréo brouillée et une perte de graves. Utilisez du
câble de bonne qualité prévu pour le branchement des enceintes. Les enceintes Elipson
sont livrées pour un branchement en simple et bi-câblage. La bi-amplication est aussi
possible (voir page 12)
SPEAKERS
FRONT
R
FRONT
L
Selon vos modèles
•FL
~60°
•FR
> 30cm
> 30cm
•FR
*
PF24F
Enceintes Entrée
•FR/FL FRONT RIGHT/LEFT
•FL
PF24F
*
ou
Description
Enceintes principales droite(R) /gauche (L)
4 5
PF6B PF8B PF14F PF34F
Page 4
FR
IV. INSTALLATION HOME-CINEMA 5.1
1. Placement des enceintes principales FL/FR
Avant de poursuivre l’opération, merci de congurer votre installation en suivant les
instructions des pages précédentes
2. Placement de l’enceinte centrale C (PF11C, PF14C)
L’enceinte centrale doit être placée à proximité de l’écran pour une restitution réaliste des
dialogues. Idéalement, elle est placée sous le téléviseur si le meuble TV le permet.
Si un écran de projection standard est utilisé, l’enceinte centrale devra être placée au
pied de l’écran an de garantir un son optimal. Si un écran micro-perforé est utilisé, elle
pourra alors être placée derrière l’écran, dans la moitié basse de celui-ci.
3. Placement du caisson de basse SW (PFSUB8, PFSUB10)
Le caisson de basse se place idéalement entre les 2 enceintes frontales, indifféremment à
gauche ou à droite de l’enceinte centrale, légèrement décollé du mur également.
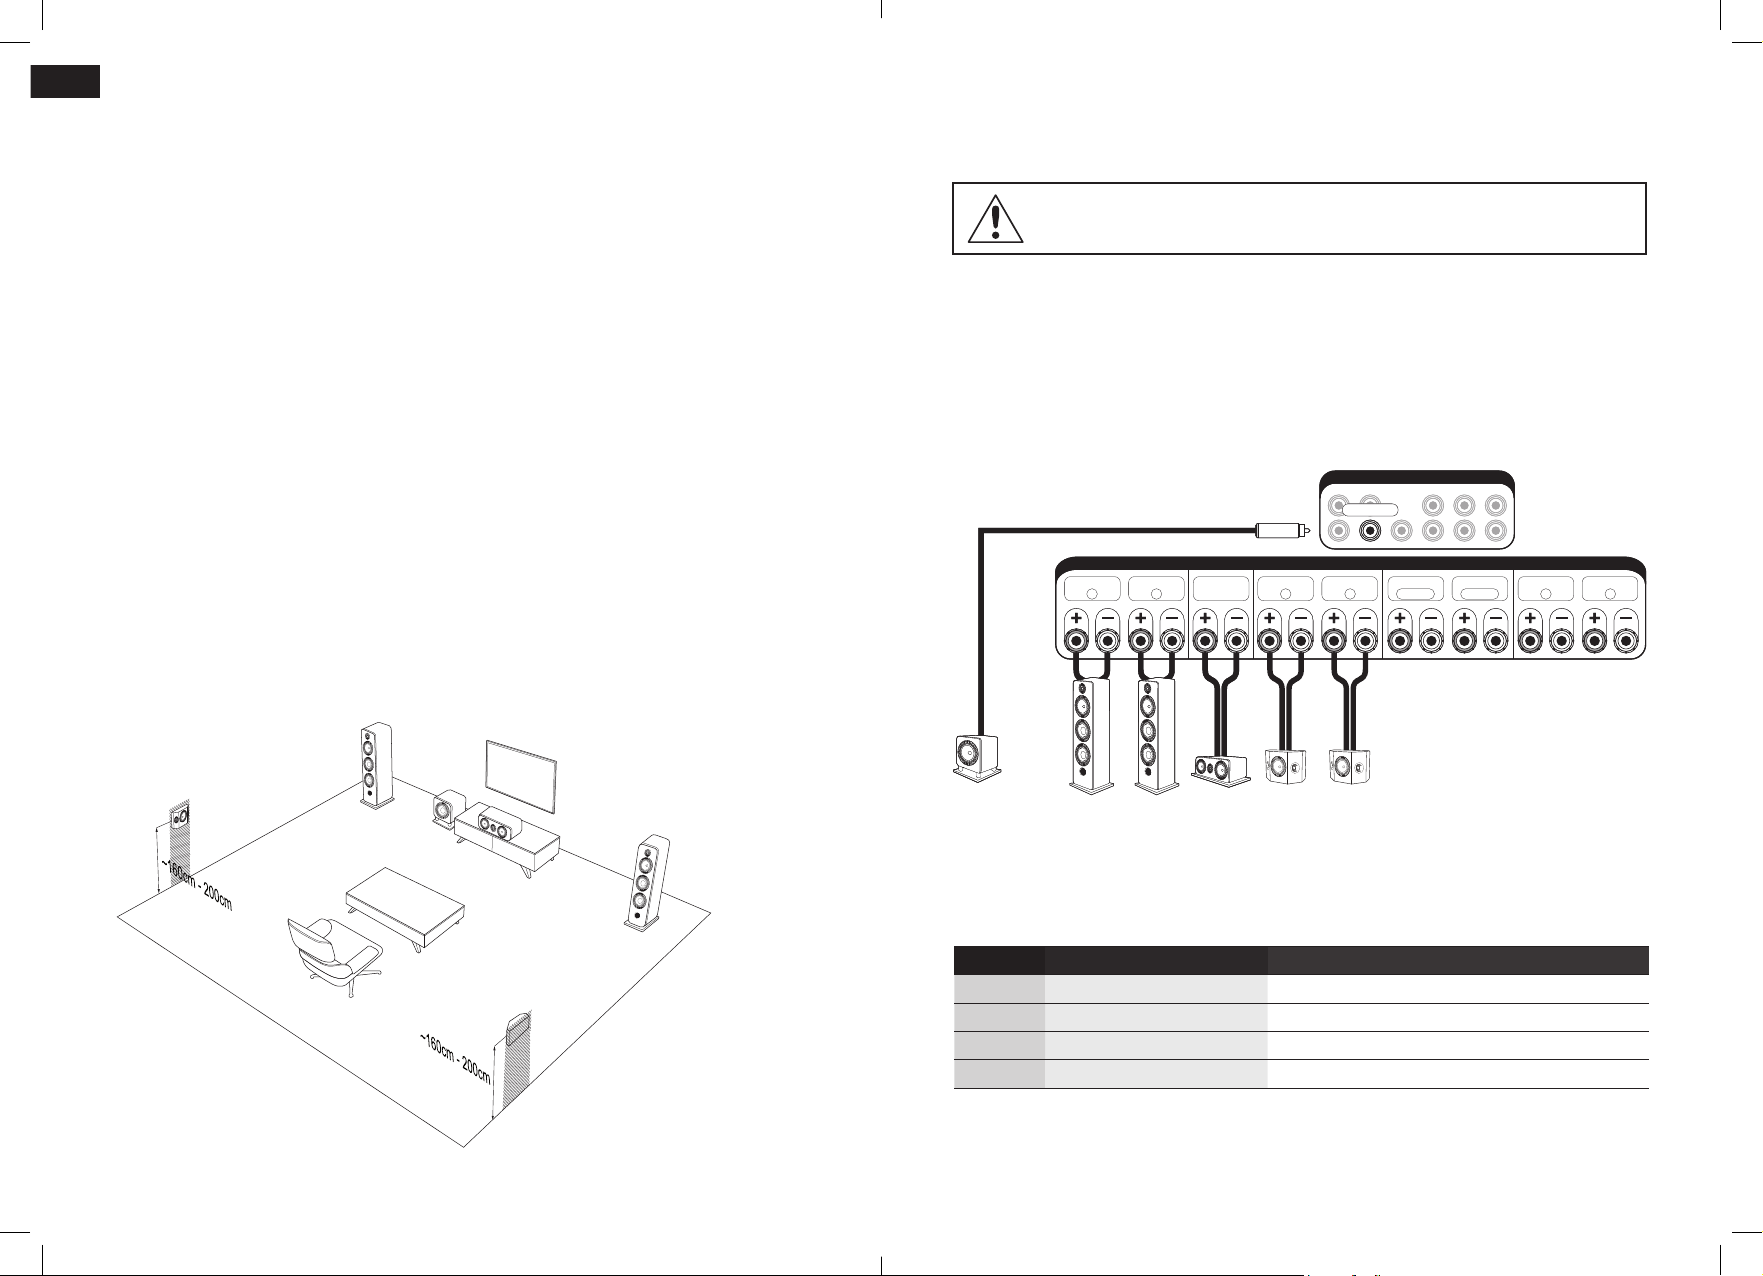
6. Branchements sur amplicateur Home-Cinéma et pré-amplicateur Home-Cinéma
TOUS LES BRANCHEMENTS DOIVENT ÊTRE EFFECTUÉS AVEC L’AMPLIFICATEUR ÉTEINT.
Le respect de la polarité des enceintes est impératif. Assurez-vous de bien connecter le
pôle « + » de l’enceinte (Rouge) au pôle « + » de l’amplicateur. Puis assurez-vous de bien
connecter le pôle « - » de l’enceinte (Noir) au pôle « - » de l’amplicateur. Une erreur de
branchement provoquerait une image stéréo brouillée et une perte de graves. Utilisez du
câble de bonne qualité prévu pour le branchement des enceintes. Les enceintes Elipson
sont livrées pour un branchement en simple et bi-câblage. La bi-amplication est aussi
possible (voir page 12).
4. Placement des enceintes surround SL/SR (PF7SR)
Les enceintes surround dipôlaires se placent indépendamment sur les murs latéraux, dans
l’axe du point d’écoute. Elles doivent être positionnées à une hauteur de 60 cm au dessus
du point d’écoute. Veuillez respectez le placement des enceintes PF7SR en utilisant les
indications situées à l’arrière de celles-ci.
•FL
•SL
•SW
•C
•FR
•SR
FRONT RFRONT LCENTER
•SW
PFSUB8
ou
PFSUB10
•FR
PF24F
ou
PF14F
ou
PF34F
•FL
PF24F
ou
*
*
PF14F
ou
PF34F
*
*
Enceintes Entrée
•FR/FL FRONT RIGHT/LEFT
•C CENTER
•SR/SL SURROUND RIGHT/LEFT
•SW SUBWOOFER
CENTER
•C
PF11C
ou
PF14C
PRE OUT
PRE OUT
SUBWOOFER
SUBWOOFER
RCA SUB
RCA SUB
SPEAKERS
SURROUND
PF7SR
*
•SR
SPEAKERS
SURROUND
R
SURROUND
L
BACK R
SURROUND
BACK L
•SL
PF7SR
Description
Enceintes principales droite(R) /gauche (L)
Enceinte centrale
Enceintes surround droite(R) /gauche (L)
Caisson de basse
HEIGHT RHEIGHT
L
*Selon votre modèle
6 7
Page 5
FR
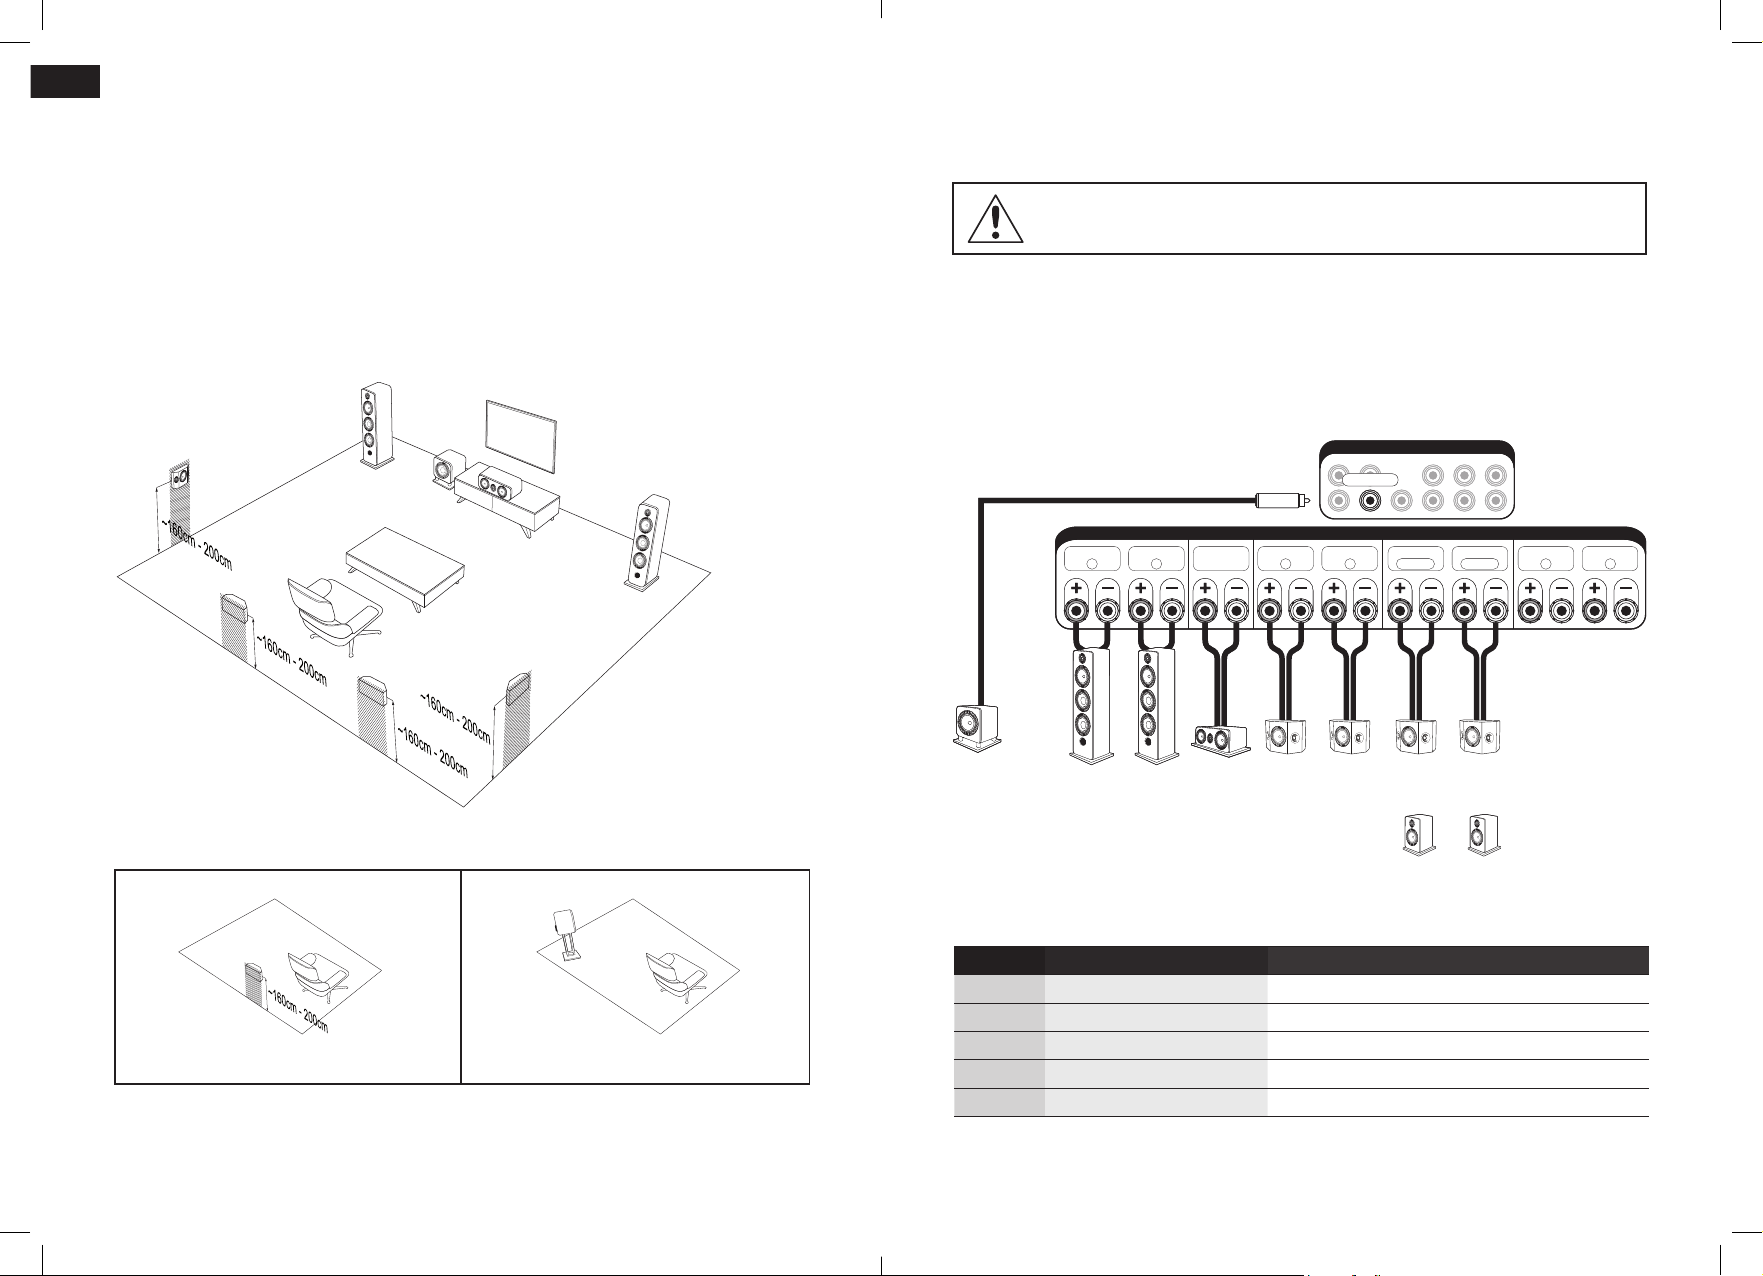
V. INSTALLATION HOME-CINEMA 7.1
1. Placement des enceintes 5.1
Avant de poursuirvre l’opération, merci de congurer votre installation en suivant les
instructions des pages précédentes
2. Placement des enceintes surround Back SBL/SBR (PF6B/PF8B ou PF7SR)
Les enceintes surround back doivent idéalement être placées en arrière de la position
d’écoute. Veuillez respectez le placement des enceintes PF7SR en utilisant les indications
situées à l’arrière de celles-ci. Si la disposition de la pièce ne permet pas un placement
arrière des enceintes surround back, il vous est possible d’utiliser les enceintes bibliothèque
PF6B ou PF8B (voir schéma - solution 2) an de satisfaire au mieux la conguration 7.1)
•FL
•SL
•SBL
•SW
•C
•FR
3. Branchements sur amplicateur Home-Cinéma et pré-amplicateur Home-Cinéma
TOUS LES BRANCHEMENTS DOIVENT ÊTRE EFFECTUÉS AVEC L’AMPLIFICATEUR ÉTEINT.
Le respect de la polarité des enceintes est impératif. Assurez-vous de bien connecter le
pôle « + » de l’enceinte (Rouge) au pôle « + » de l’amplicateur. Puis assurez-vous de bien
connecter le pôle « - » de l’enceinte (Noir) au pôle « - » de l’amplicateur. Une erreur de
branchement provoquerait une image stéréo brouillée et une perte de graves. Utilisez du
câble de bonne qualité prévu pour le branchement des enceintes. Les enceintes Elipson
sont livrées pour un branchement en simple et bi-câblage. La bi-amplication est aussi
possible (voir page 12).
PRE OUT
PRE OUT
SUBWOOFER
SUBWOOFER
RCA SUB
RCA SUB
FRONT RFRONT
L
CENTER
SPEAKERS
SURROUND
SPEAKERS
SURROUND
R
SURROUND
L
BACK R
SURROUND
BACK L
HEIGHT RHEIGHT
L
•SBR
•SR
•SBL
•SBL
Solution 1 Solution 2
Remarque : Sur le placement des enceintes surround Back, il est possible de placer des
enceintes bibliothèque PF6B ou PF8B à l’arrière de la position d’écoute. Il est cependant
préférable de les placer en hauteur, idéalement sur pied.
8 9
•SW
PFSUB8
ou
PFSUB10
•FR
PF24F
ou
PF14F
ou
PF34F
•FL
PF24F
*
PF14F
*
PF34F
ou
ou
*
*
•C
PF11C
ou
PF14C
Enceintes Entrée
•FR/FL FRONT RIGHT/LEFT
•C CENTER
•SR/SL SURROUND RIGHT/LEFT
•SBR/SBL SURROUND BACK RIGHT/LEFT
•SW SUBWOOFER
*Selon votre modèle
•SR
PF7SR
*
•SL
PF7SR
•SBR
PF7SR
•SBR
PF6B
ou
PF8B
•SBL
PF7SR
•SBL
PF6B
ou
PF8B
*
*
Description
Enceintes principales droite(R) /gauche (L)
Enceinte centrale
Enceintes surround droite(R) /gauche (L)
Enceintes surround arrière droite(R) /gauche (L)
Caisson de basse
Page 6
FR
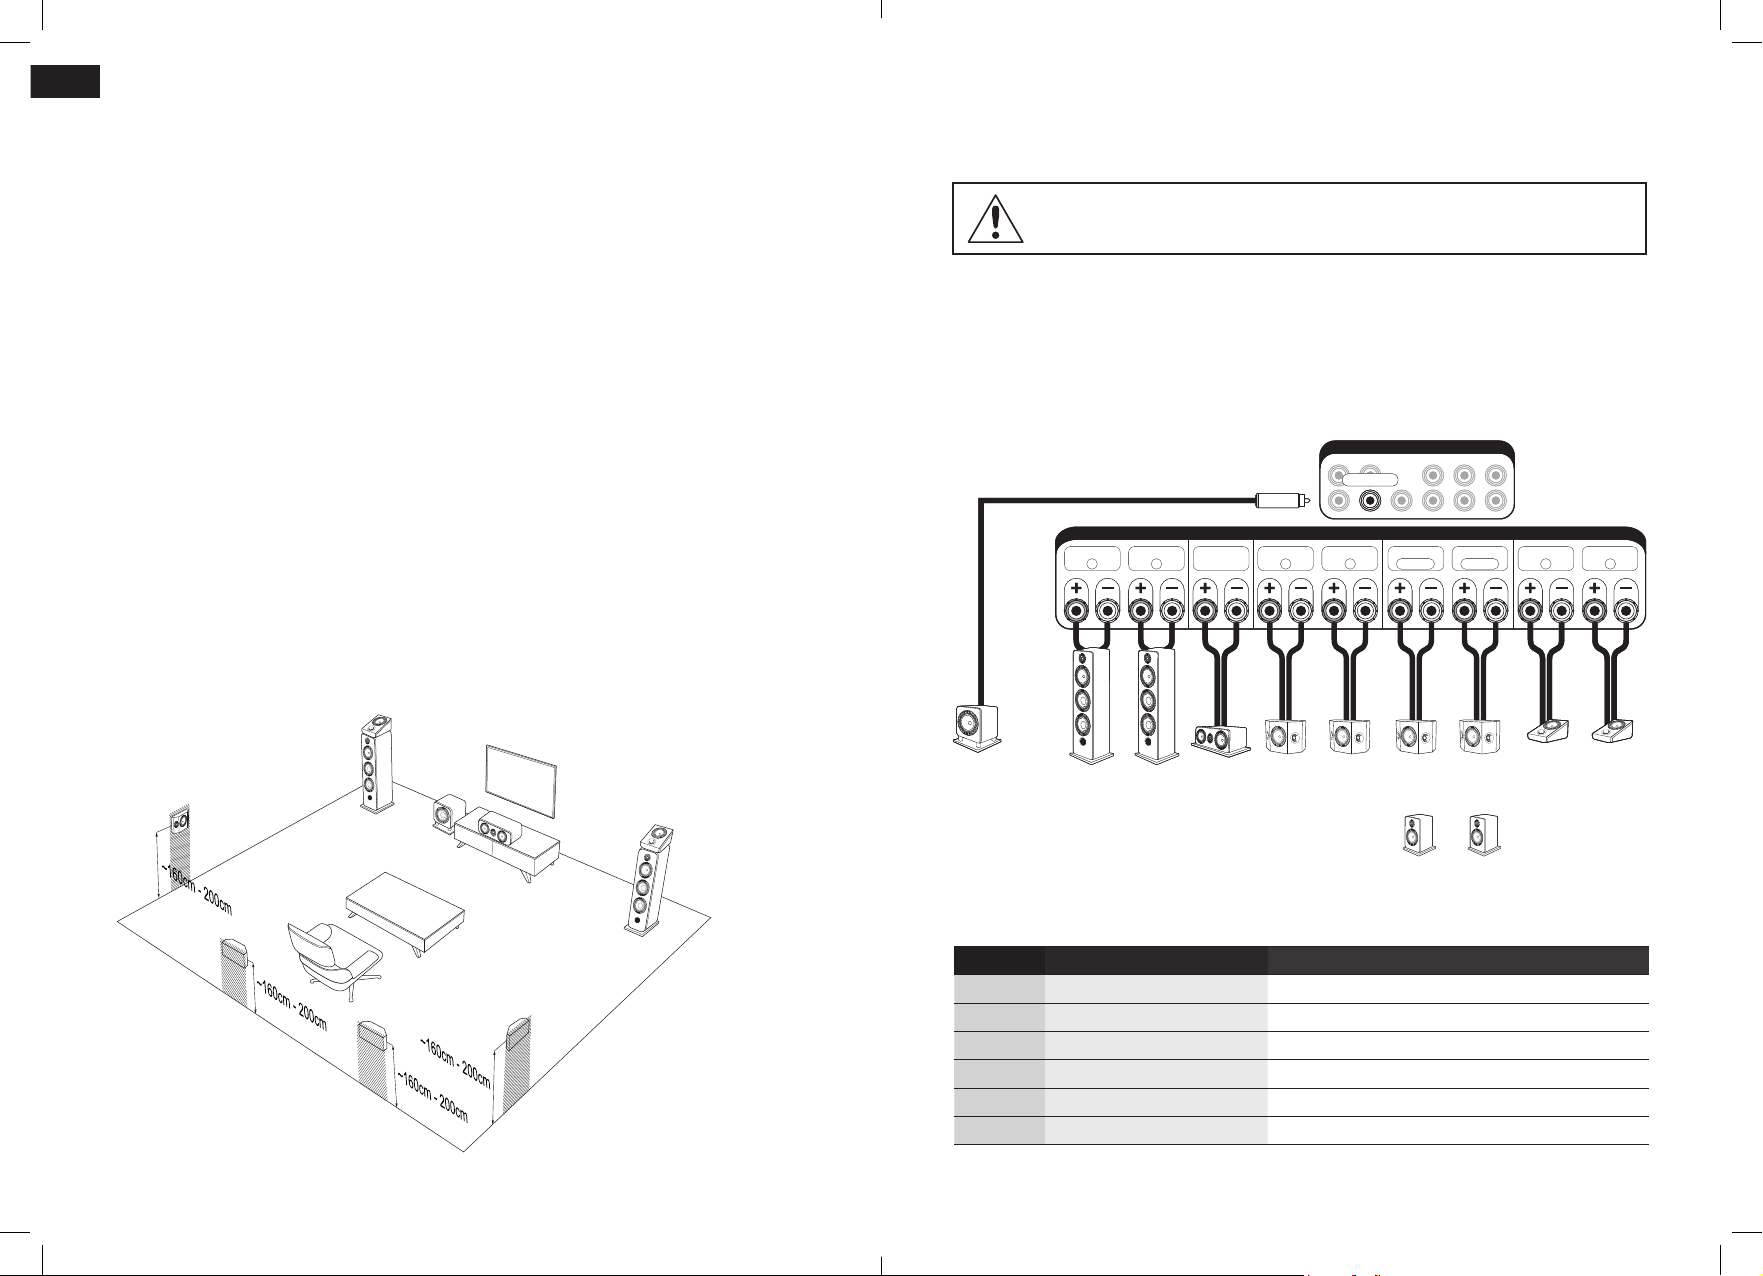
VI. EXTENSION INSTALLATION HOME-CINEMA 7.1.2
1. Placement des enceintes Atmos FHL/FHR (PF6ATM)
Les enceintes Atmos Prestige Facet se placent au-dessus des enceintes colonnes ou
bibliothèques.
Certication DOLBY ATMOS
DOLBY ATMOS® est une technologie de reproduction du son surround pour le cinéma et
le home-cinéma. Le procédé DOLBY ATMOS® permet la gestion de la verticalité du son
en plus des formats format Dolby 5.1 ou 7.1 (plan horizontal) et crée donc une immersion
sonore totale.
Pour avoir accès à cette technologie et vivre l’expérience DOLBY ATMOS®, il faut donc
vous équiper, en plus de votre système 5.1 ou 7.1, d’enceintes dédiées an d’émettre
le son verticalement. Il existe des enceintes s’installant directement au plafond, mais
qui peuvent nécessiter d’importants travaux d’installation, et des enceintes spéciques
qui orientent le son vers le plafond depuis le sol. C’est cette deuxième solution, certiée
DOLBY ATMOS®, que Elipson a adopté, simpliant ainsi votre installation.
Ces enceintes, dont les haut-parleurs sont spéciquement ltrés et inclinés, émettent un
champ sonore vers le plafond qui doit impérativement être rééchissant. Les ondes se
reètent ainsi sur le plafond pour faire proter l’auditeur de cette dimension verticale
du son. Le rendu est ultra réaliste, pour une expérience en immersion totale au cœur de
votre lm. An de proter pleinement du son DOLBY ATMOS®, votre amplicateur doit être
compatible avec cette technologie, et disposer du nombre sufsant de canaux et des
traitements numériques associés.
Attention : Un amplicateur capable de décoder les informations Dolby Atmos est indispensable
au bon fonctionnement des enceintes. Contactez votre revendeur pour plus d’informations.
®
2. Branchements sur amplicateur Home-Cinéma et pré-amplicateur Home-Cinéma
TOUS LES BRANCHEMENTS DOIVENT ÊTRE EFFECTUÉS AVEC L’AMPLIFICATEUR ÉTEINT.
Le respect de la polarité des enceintes est impératif. Assurez-vous de bien connecter le
pôle « + » de l’enceinte (Rouge) au pôle « + » de l’amplicateur. Puis assurez-vous de bien
connecter le pôle « - » de l’enceinte (Noir) au pôle « - » de l’amplicateur. Une erreur de
branchement provoquerait une image stéréo brouillée et une perte de graves. Utilisez du
câble de bonne qualité prévu pour le branchement des enceintes. Les enceintes Elipson
sont livrées pour un branchement en simple et bi-câblage. La bi-amplication est aussi
possible (voir page 12).
PRE OUT
PRE OUT
SUBWOOFER
SUBWOOFER
RCA SUB
RCA SUB
FRONT RFRONT
L
CENTER
SPEAKERS
SURROUND
SPEAKERS
SURROUND
R
SURROUND
L
BACK R
SURROUND
BACK L
HEIGHT RHEIGHT
L
•SL
•SBL
•FHL
•FL
•SBR
•SW
•C
•SR
•FHR
•FR
•SW
PFSUB8
ou
PFSUB10
•FR
PF24F
ou
PF14F
ou
PF34F
•FL
PF24F
*
PF14F
*
PF34F
ou
ou
*
*
•C
PF11C
ou
PF14C
Enceintes Entrée
•FR/FL FRONT RIGHT/LEFT
•C CENTER
•SR/SL SURROUND RIGHT/LEFT
•SBR/SBL SURROUND BACK RIGHT/LEFT
•SW SUBWOOFER
•FHR/FHL HEIGTH RIGHT/LEFT
•SR
PF7SR
*
Description
Enceintes principales droite(R) /gauche (L)
Enceinte centrale
Enceintes surround droite(R) /gauche (L)
Enceintes surround arrière droite(R) /gauche (L)
Caisson de basse
Enceintes atmos avant droite(R) /gauche (L)
*Selon votre modèle
10 11
•SL
PF7SR
•SBR
PF7SR
•SBR
PF6B
ou
PF8B
•SBL
PF7SR
•FHR
PF6ATM
•FHL
PF6ATM
•SBL
PF6B
ou
PF8B
*
*
Page 7

FR
VII. UTILISATION
1. Rodage
Sorties de leur emballage, les enceintes Prestige Facet ne sont pas encore capables de
reproduire avec la même efcacité l’ensemble des fréquences qu’elles sont censées
diffuser. Les haut-parleurs utilisés dans la gamme Prestige sont des éléments mécaniques
complexes qui nécessitent une période d’adaptation pour fonctionner au mieux de
leurs possibilités et s’adapter aux conditions de température et d’humidité de votre
environnement. Cette période de rodage peut se prolonger sur plusieurs semaines,
mais vous pouvez l’accélérer en faisant fonctionner vos enceintes entre 20 et 50 heures
consécutives, à niveau modéré et en diffusant une station de radio.
2. Bi-câblage et bi-ampication (Tous modèles sauf PF6ATM et PF7SR)
Le bi-câblage peut améliorer les performances de vos enceintes. Un seul amplicateur
est utilisé mais des câbles séparés sont utilisés pour le grave et l’aigu de chaque enceinte.
Des câbles de haute qualité sont nécessaires pour en tirer prot.
Les enceintes Prestige Facet disposent d’un bornier de 4 bornes permettant l’utilisation de
ces deux congurations.
Les bornes du haut sont utilisées pour restituer les fréquences aigus et celles du bas pour
les fréquences graves.
Pour une utilisation mono-amplication, relier les bornes via les straps métalliques et
brancher les câbles sur 2 bornes seulement.
Pour la bi-amplication, deux amplicateurs sont utilisés indépendamment pour séparer les
registres aigus et graves.
Remarque : Les modèles PF7SR et PF6ATM disposent d’un bornier simple.
3. Choix des câbles
Choisissez des câbles de qualité de section appropriée à la longueur. Nous vous conseillons
aussi de remplacer les straps métalliques d’origine par des straps constitués du même type
de câbles qui alimentent vos enceintes. Votre revendeur Elipson saura vous conseiller.
4. Choix de l’amplicateur
Votre type d’installation (stéréo ou home-cinema) déterminera le choix de l’amplicateur
approprié. Votre revendeur pourra vous conseiller sur l’amplicateur le plus adapté à votre
sytème.
5. Entretien
An d’améliorer la durée de vie de vos enceintes, nous vous conseillons un entretien
régulier de celles-ci. Pour le dépoussiérage, un chiffon doux sufra. Si l’enceinte est tâchée,
nous vous recommandons simplement l’utilisation d’un chiffon humide, avec un peu de
savon doux si nécessaire. La façade laquée peut être nettoyée avec un chiffon doux et
un nettoyant pour vitres classique.
Ne jamais utiliser de solvants, détergents, alcools ou produits corrosifs, grattoirs ou ustensiles
récurant qui pourraient endommager l’enceinte.Ne placez pas vos enceintes trop proches
d’une source de chaleur.
VIII. CARACTÉRISTIQUES
Prestige Facet
6B
Type
Haut-parleurs
Réponse en
fréquence
(±3dB)
Sensibilité
Impédance
Puissance
Puissance
d’amplication
recommandée
Dimensions
avec socle
(LxHxP)
Poids unitaire
/avec socle
Bibliothèque
2 voies
bass-reex
Tweeter
25 mm
Grave-Médium
140 mm
57Hz - 25kHz 47Hz - 25kHz 38Hz - 25kHz 28Hz - 25kHz
90dB/1W/1m 91dB/1W/1m 92dB/1W/1m 93dB/1W/1m
6 Ohms 6 Ohms 6 Ohms 6 Ohms
70 W RMS
20 - 100 W
176x298x223 mm 230x361x348 mm 238x1011x325 mm 274x1121x383 mm
5,6 kg 8 kg / 9,3 kg 19 kg / 20,5 kg
Prestige Facet
8B
Bibliothèque
2 voies
bass-reex
Tweeter
25 mm
Grave-Médium
170 mm
85 W RMS
30 - 120 W
Prestige Facet
14F
Colonne
2½ voies
bass-reex
Tweeter
25 mm
Grave-Médium
170 mm
Grave
170 mm
150 W RMS
40 - 200 W
Prestige Facet
24F
Colonne
3½ voies
bass-reex
Tweeter
25 mm
Médium
170 mm
Grave
2 x 210 mm
250 W RMS
50 - 350 W
27,7 kg / 29,5 kg
12 13
Page 8

FR
Réponse en
fréquence
(±3dB)
Puissance
d’amplication
recommandée
Dimensions
avec socle
(LxHxP)
Poids unitaire
/avec socle
Prestige Facet
34F*
Colonne
3½ voies
bass-reex
Tweeter
25 mm
Médium
2 x 170 mm
Grave
2 x 250 mm
25Hz - 25kHz 55Hz - 25kHz 43Hz - 25kHz 65Hz - 25kHz 65Hz - 25kHz
93dB/1W/1m 92dB/1W/1m 93dB/1W/1m 90dB/1W/1m 87dB/1W/1m
4 Ohms 6 Ohms 6 Ohms 6 Ohms 8 Ohms
300 W RMS 120 W RMS 150 W RMS 70 W RMS 70 W RMS
355x1331x470 mm
46.9 kg / 49,7 kg
Type
Haut-parleurs
Réponse en
fréquence
(±3dB)
Puissance
de sortie
Filtre
subsonique
Fréquence
de coupure
variable
Phase variable
Veille
Entrées
Dimensions
avec socle
(LxHxP)
Poids
Prestige Facet
SUB8
Caisson de grave
bass-reex
down-ring
Grave
210 mm
35Hz - 150Hz 27Hz - 150Hz
150 W RMS
Classe D
40Hz à 150Hz 50Hz à 150Hz
Automatique Automatique
Ligne L/R
LFE
350x374x405 mm 405x424x469 mm
16 kg 22 kg
Prestige Facet
SUB10
Caisson de grave
bass-reex
down-ring
Grave
260 mm
250 W RMS
Classe D
24dB à 20Hz24dB à 20Hz
0°-180°
Ligne L/R
LFE
TypeType
Haut-parleursHaut-parleurs
Réponse en
fréquence
(±3dB)
SensibilitéSensibilité
ImpédanceImpédance
PuissancePuissance
Puissance
d’amplication
recommandée
Dimensions
avec socle
(LxHxP)
Poids unitaire
/avec socle
Prestige Facet
11C
Centrale
2 voies close
Tweeter
25 mm
Grave-Médium
2 x 140 mm
30 - 150 W70 - 350 W 40 - 200 W 30 - 120 W 30 - 120 W
470x176x180 mm 623x228x275 mm
8,4 kg 11,9 kg / 14,9 kg N/C 5 kg / 11,1 kg
Prestige Facet
14C
Centrale 2 voies
bass-reex-laminaire
Tweeter
25 mm
Grave-Médium
2 x 170 mm
Prestige Facet
6ATM*
Atmos
2 voies close
Tweeter pavillon
25 mm
Grave-Médium
140 mm
207x181x290 mm 380x220x170 mm
Prestige Facet
7SR
Surround
2 voies bass-reex
Tweeters pavillon
2 x 25 mm
Grave-Médium
140 mm
*Disponible prochainement
*Disponible prochainement
14 15
Page 9

FR
AVERTISSEMENT
Déballage
L’emballage (cartons et mousses) a été conçu pour protéger efcacement vos enceintes et
votre électronique Elipson lors des transports et expéditions. Nous vous invitons à les conserver
pour un usage ultérieur. Protégez l’environnement : si vous souhaitez vous débarrasser de
l’emballage, notez que celui-ci est recyclable. Nous vous invitons à prendre les dispositions
pour le meilleur respect de l’environnement suivant les possibilités qui vous sont offertes
(tri sélectif par exemple). À la n de sa vie, cet appareil ne doit pas être jeté dans une
poubelle classique. Il doit être retourné dans un centre de recyclage pour équipements
électroniques. Ce symbole sur le produit indique qu’il est conçu pour être recyclé suivant
un procédé particulier. Vous ferez ainsi un contribution très signicative pour la
préservation de l’environnement. Cet appareil respecte la directive européenne
RoHS. Cela signie qu’il ne dégage pas de substances polluantes lors du recyclage
(Plomb, Mercure, Cadmium, Chrome hexavalent, Polybromobiphenyles,
Polybromodiphenyléthers).
Précautions d’usage
Ce produit est construit suivant des normes rigoureuses et en respectant les standards de
sécurité. Vous devez cependant l’utiliser dans des conditions normales comme décrit ci-
dessous. Vériez la tension d’alimentation électrique avant de le raccorder à l’alimentation
secteur. Cette électronique a été conçue pour pouvoir fonctionner dans divers pays.
Nous vous conseillons de brancher complètement votre produit avant de le raccorder au
secteur. Manipulez le cordon d’alimentation avec précaution. Quand vous débranchez le
cordon d’alimentation d’une prise secteur, faites-le en tirant sur la che et non sur le câble.
Si vous envisagez de ne pas utiliser cet appareil pendant une période
prolongée, débranchez-le du secteur. N’ouvrez pas le boîtier. Cet
appareil ne contient aucune pièce changeable par l’utilisateur. L’accès
à l’intérieur peut provoquer des chocs électriques. Toute modication du
produit aura pour conséquence d’invalider la garantie. Si un objet ou un
liquide tombe dans le boîtier, prenez contact avec votre revendeur pour
qu’un technicien le retire de l’appareil en toute sécurité.
Comment faire réparer un produit sous garantie
Prenez simplement contact avec votre revendeur agréé. Pour garantir un transport dans
de bonnes conditions, utilisez toujours l’emballage d’origine. Si vous utilisez un produit dans
un autre pays que celui où vous l’avez acheté, prenez contact avec l’importateur de votre
pays de résidence qui vous orientera vers un centre technique agréé.
La liste des distributeurs agréés est disponible sur le site :
http://www.elipson.com
Pour valider votre garantie, vous devez produire comme preuve d’achat l’original de votre
facture contenant la date de votre achat et le cachet de votre revendeur.
GARANTIE
Les enceintes Elipson sont conçues et fabriquées suivant les meilleurs standards de qualité.
Si votre enceinte Elipson présente un défaut, Elipson ou un revendeur agréé pourra prendre
en charge la réparation dans les limites de cette garantie.
La garantie est de 2 ans à partir de la date d’achat chez un revendeur agréé.
Dénition de la garantie
La garantie est limitée à la réparation de l’équipement Elipson. En aucun cas, le transport,
les coûts associés ainsi que l’installation ne sont couverts par la garantie.
La garantie n’est applicable qu’au premier propriétaire et n’est pas transférable.
La garantie ne s’applique pas dans les cas suivants :
- Le dommage est causé par une installation ou un branchement incorrect.
- Le dommage est causé par un usage incorrect, autre que celui décrit dans ce manuel,
par négligence, ou modication du produit par une personne non autorisée par Elipson.
- Les dommages causés par des accidents, la foudre, l’eau, le feu, une chaleur excessive
ou toutes autres causes ne pouvant être contrôlées par Elipson.
- Dans le cas d’une réparation par du personnel non autorisé.
Cette garantie complète les garanties légales en vigueur dans le pays du revendeur agréé.
16 17
© Elipson 2017
Elipson is a registered trademark of AV Industry.
Page 10
UK
Thank you for choosing an Elipson audio product.
Dear Customer,
Please read carefully the following information before using your new loudspeakers.
It contains tips to get the most of it and instructions for safety use.
We strongly recommend that you keep the packaging and this user manual for further use.
I. CONTENT
• 1 speaker :
PF14F / PF24F / PF34F/ PFSUB8
PFSUB10 / PF11C/ PF14C
• 2 speakers :
PF6B / PF8B / PF6ATM / PF7SR
• 1 removable base (PF8B, PF14F, PF24F, PF34F, PFSUB8, PFSUB10, PF14C)
• 1 removable magnetic grid
• 4 screws (PF8B, PF14F, PF24F, PF34F,PFSUB8, PFSUB10, PF14C)
• 1 user manual
• 4 rubber pads per speaker
(PF6B,PF8B,PFSUB8, PFSUB10, PF11C,PF14C,PF6ATM,PF7SR)
• 4 decoupling spikes per speaker (PF14F, PF24F, PF34F)
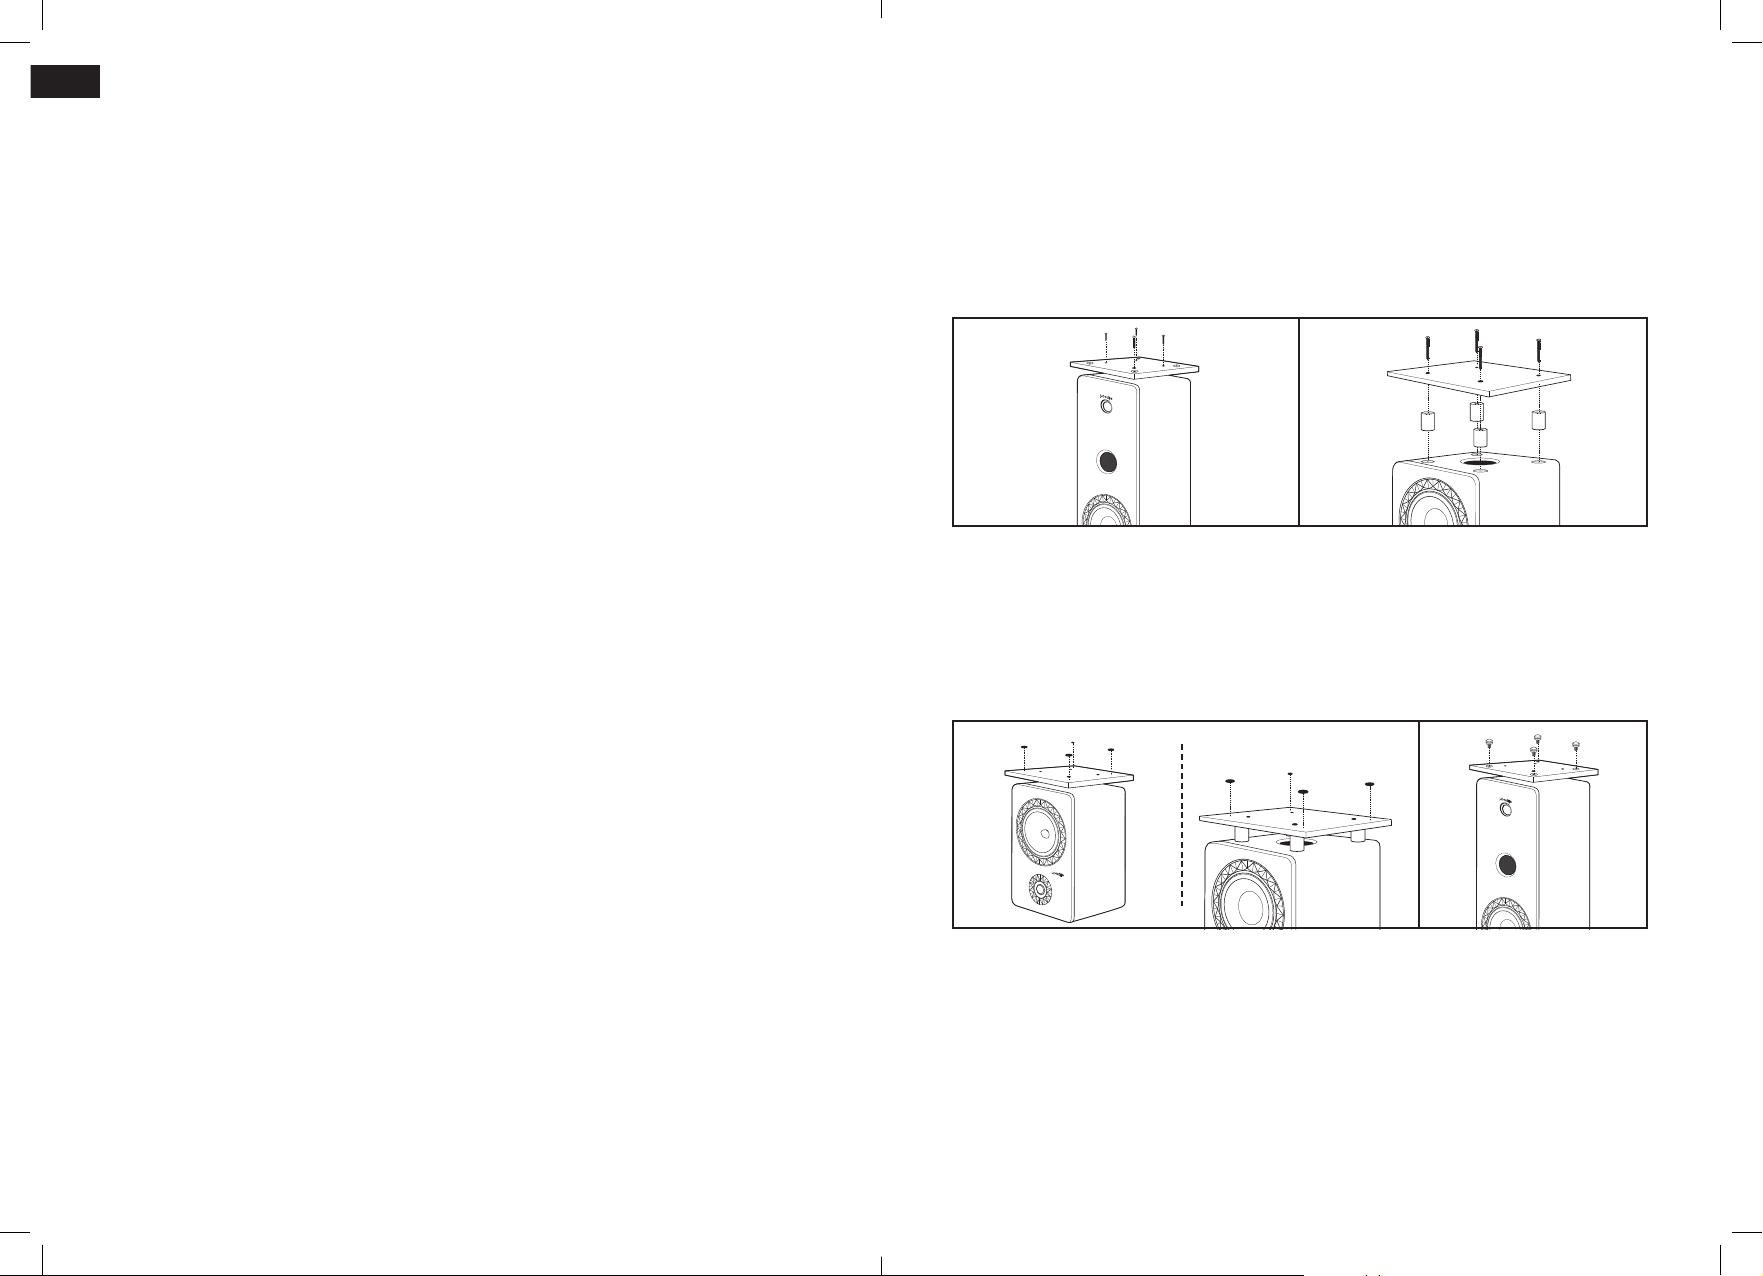
II. PREPARATION
1a 1b
1a. Mounting the removable base on the cabinet (PF8B, PF14F, PF24F, PF34F, PF14C)
Carefully turn the cabinet over and place it on the packaging foams, or on a carpet,
to avoid any damage on the top part. Take care not to damage the woodworking, the
lacquered front or the loudspeakers during this operation. Adjust the base on the cabinet
and screw it using the four provided screws.
1b. Mounting the removable base on the subwoofer cabinet (PFSUB8, PFSUB10)
Start by positioning the aluminum cylinders in the recesses provided for this purpose. Place
the base on the cylinders and secure with the provided screws.
2a 2b
2a. Sticking the rubber pads (PF8B, PF14C, PFSUB8, PFSUB10)
We recommend that you stick the rubber pads, provided with the removable base, on
the loudspeakers. If you use the loudspeakers without the removable base, you should
place the rubber pads on the provided inserts, to avoid any damage.
As a rule, you can stick the rubber pads under the loudspeakers or under its base in order
to protect the loudspeaker itself and its base.
2b. Putting spikes (PF14F, PF24F, PF34F)
After mounting the base of the speaker, screw the spikes on it (no required tools).
Note : The presence of pads or decoupling spikes prevents vibrations to be transmitted to
the oor.
18 19
Page 11
UK
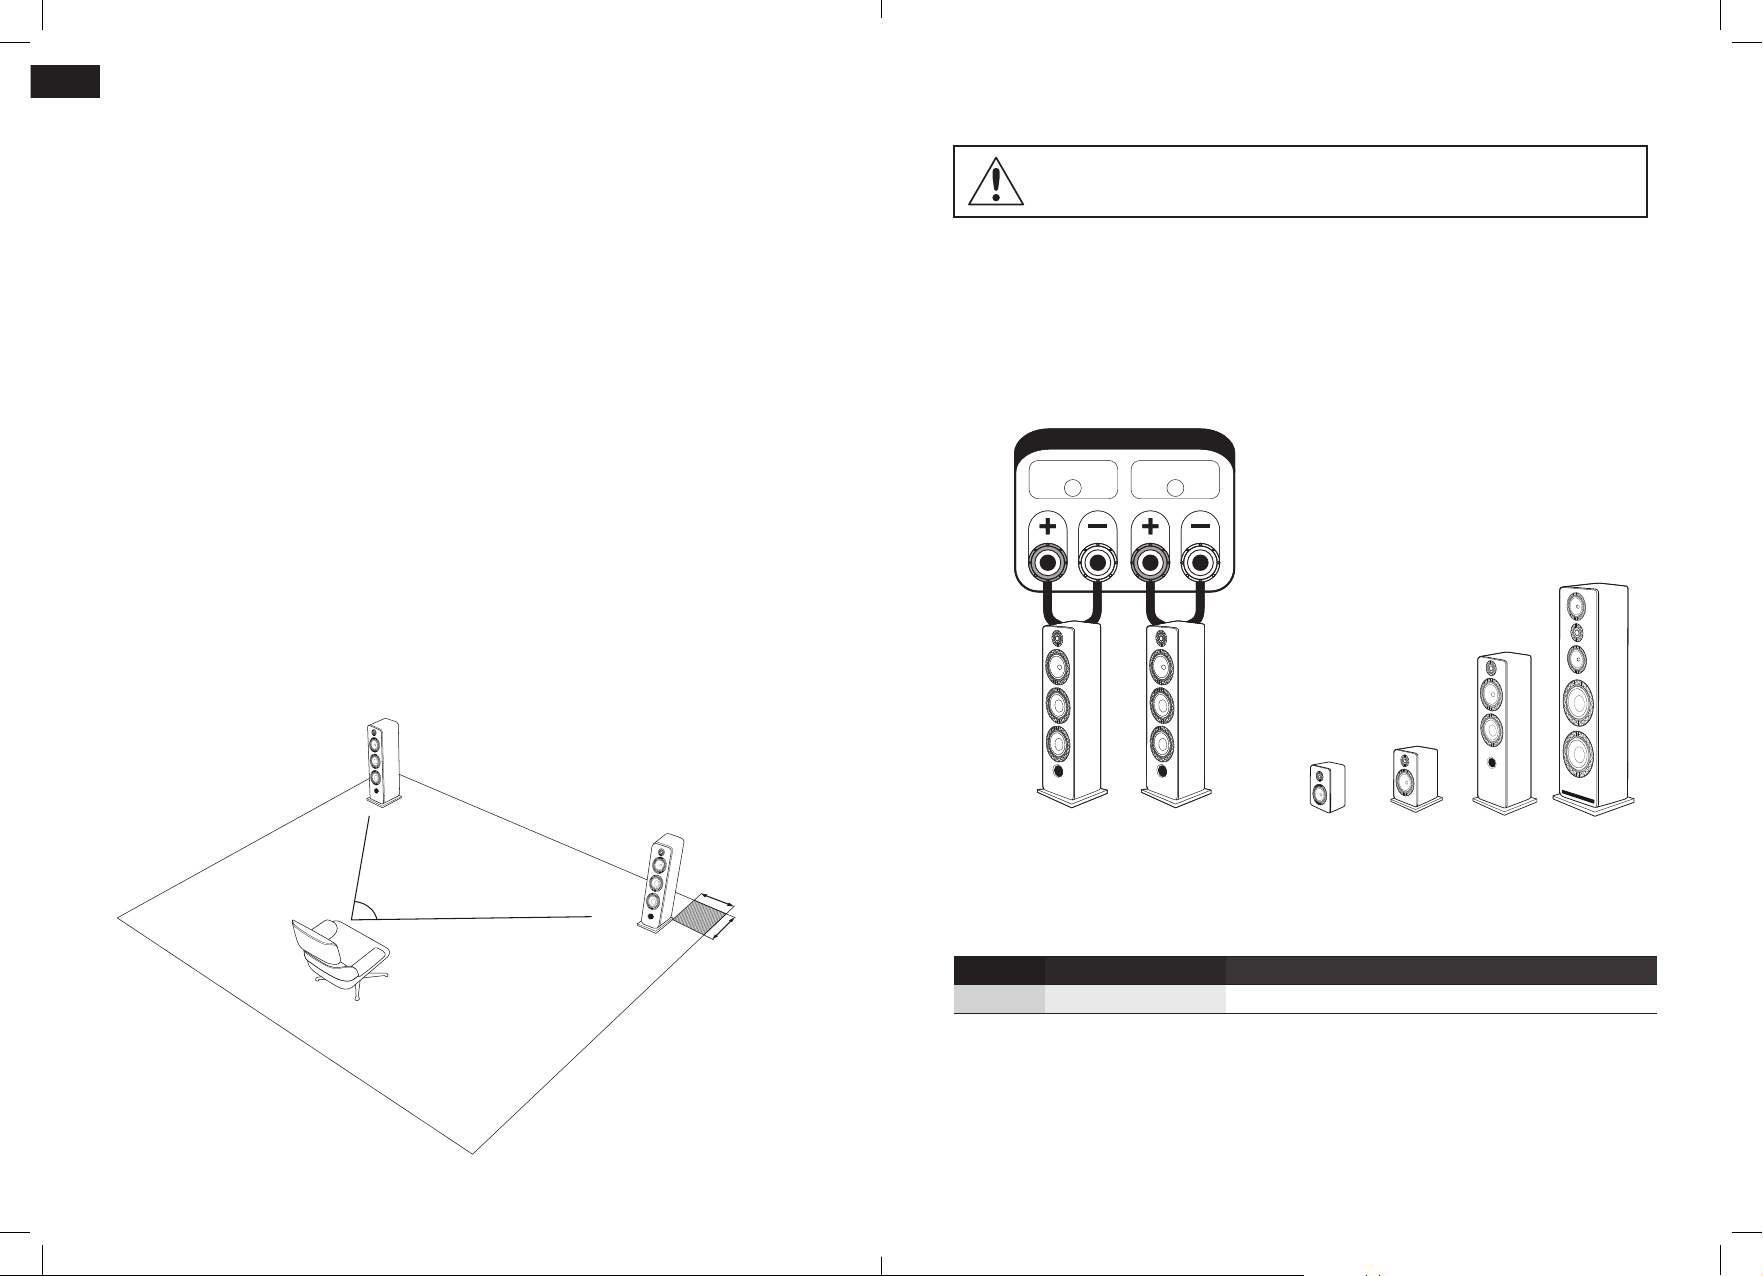
III. STEREO SETUP
2. Connections
1. Position of the speakers FL/FR
The Prestige Facet loudspeakers have been designed to reproduce all types of music
as accurately as possible, provided that a few rules should be followed to optimize
performance and achieve a realistic sound image.
Ideally, the speakers should be placed symmetrically in front of the listening position to form
an equilateral triangle. The cabinets should be placed at the same height and the same
distance from the rear wall and the adjacent side surfaces.
In order to optimize the setup of the speakers in your listening room, we recommend the
following tests :
•Above all, you should avoid positioning the loudspeakers in the corners of your room. The
result will be an articial increase in the level of bass, masking the speed and details of
this range.
•First, adjust the spacing of the two speakers in order to nd the realistic balance between
a wide sound image (wide apart speakers) and a sound image respecting the punctuality
of the voices (close speakers).
•Secondly, move the speakers away from the rear wall by steps of 10 cm to nd the
balance between the depth of the sound image (far from the back wall) and the level of
the extreme low frequencies (close to the back wall).
•Finally, adjust the loudspeakers orientation by turning them gradually toward the center
of the listening area. If you leave the speakers parallel, you may want to bring them closer
together, if you orient them more than 30°, you may increase their spacing.
•FL
ALL THE CONNECTIONS MUST BE MADE WITH THE EQUIPMENT TURNED OFF.
It is essential to connect the speakers using the correct polarity. Make sure to connect the
« + » terminal of the speaker (Red) to the « + » output terminal of the amplier. Then, make
sure to connect the « - » terminal of the speaker (Black) to the « - » output terminal of the
amplier. A wrong connection would cause a cribled stereo image and loss of bass. Use
high quality speaker cable. Elipson speakers are supplied congured for use in a single
wired mode or bi-wiring. Bi-amp is also possible (see page 28).
SPEAKERS
FRONT
R
FRONT
L
*Depending your model
~60°
•FL
PF24F
*
ou
•FR
•FR
PF24F
*
> 30cm
> 30cm
Speaker Enter
•FR/FL FRONT RIGTH/LEFT
20 21
Description
Speaker Front right(R) /Left (L)
PF6B PF8B PF14F PF34F
Page 12
UK
PRE OUT
PRE OUT
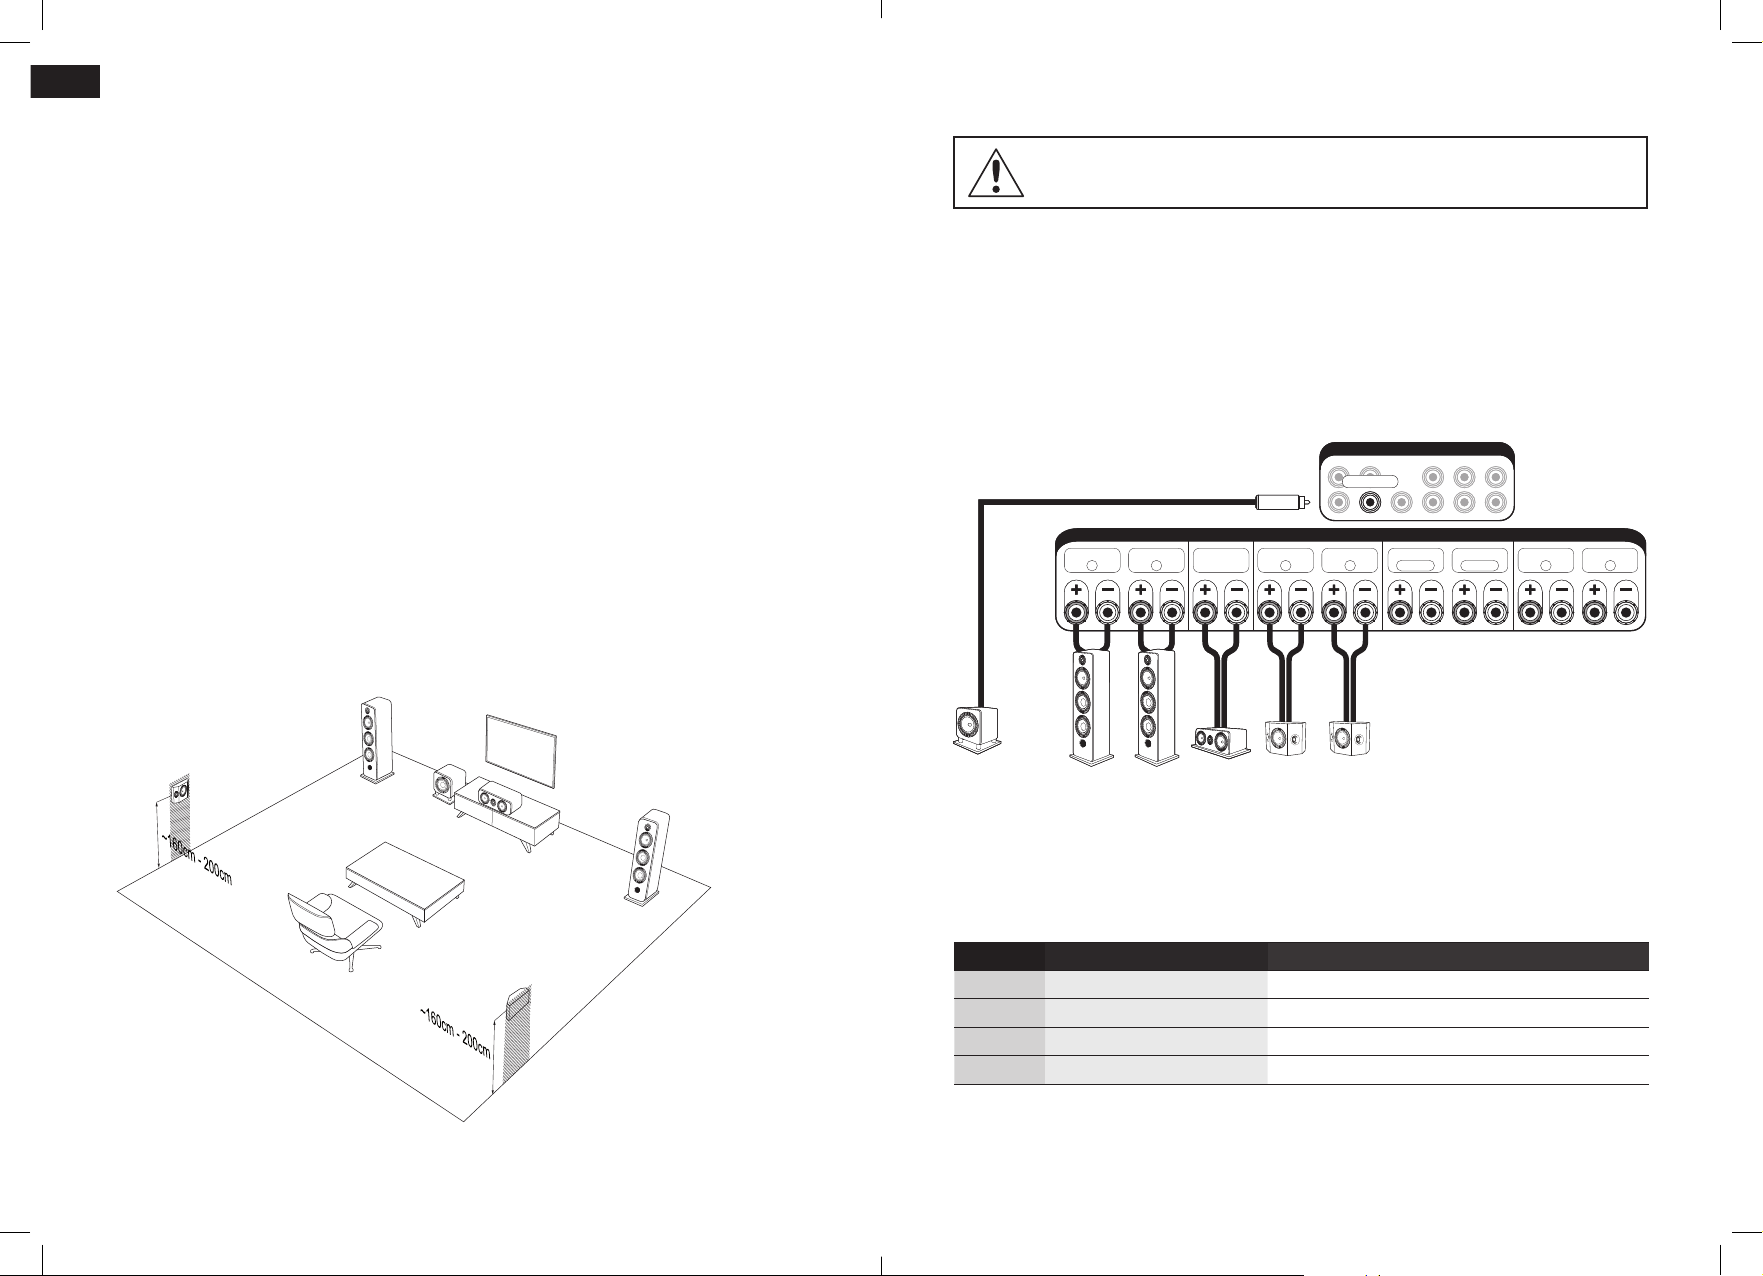
IV. HOME-CINEMA SETUP 5.1
1. Position of the speakers FL/FR
Before continuing the operation, please congure your installation by following the
instructions on the previous pages
6. Connections on Home-Cinema amplier and Home-cinema preamplier
ALL THE CONNECTIONS MUST BE MADE WITH THE EQUIPMENT TURNED OFF.
2. Position of the center speaker C (PF11C, PF14C)
The center speaker must be positioned near the screen for realistic reproduction of
dialogue. Ideally, it is placed under the TV set if the TV stand enables it.
If a standard projection screen is used, the center speaker should be placed at the bottom
of the screen for best results. If a microperforated screen is used, it can be positioned
behind the screen, towards the bottom half of the screen.
3. Position of the subwoofer SW (PFSUB8, PFSUB10)
The subwoofer should be placed between the two front speakers, either on the left or right
of the center speaker, and away from the wall.
4. Position of Surround speaker SL / SR (PF7SR)
The dipole surround speakers are placed independently on the side walls. They must be
positioned at a height of 60 cm above the point of listening. Please, respect the position of
PF7SR speakers, using the indications written at their back
•FL
•SL
•SW
•C
•FR
It is essential to connect the speakers using the correct polarity. Make sure to connect the
« + » terminal of the speaker (Red) to the « + » output terminal of the amplier. Then, make
sure to connect the « - » terminal of the speaker (Black) to the « - » output terminal of the
amplier. A wrong connection would cause a cribled stereo image and loss of bass. Use
high quality speaker cable. Elipson speakers are supplied congured for use in a single
wired mode or bi-wiring. Bi-amp is also possible (see page 28).
SUBWOOFER
SUBWOOFER
RCA SUB
RCA SUB
•SW
PFSUB8
ou
PFSUB10
FRONT RFRONT LCENTER
•FR
PF14F
PF24F
PF34F
ou
ou
•FL
PF14F
*
PF24F
*
PF34F
ou
ou
*
*
CENTER
•C
PF11C
ou
PF14C
SPEAKERS
SURROUND
PF7SR
*
•SR
SPEAKERS
SURROUND
R
SURROUND
L
BACK R
SURROUND
BACK L
HEIGHT RHEIGHT
L
•SL
PF7SR
•SR
Speaker Enter
•FR/FL FRONT RIGTH/LEFT
•C CENTER
•SR/SL SURROUND RIGTH/LEFT
•SW SUBWOOFER
Description
Speaker Front rigth(R) /Left (L)
Central Speaker
Surround speaker rigth(R) /Left (L)
Subwoofer
*Depending your model
22 23
Page 13
UK
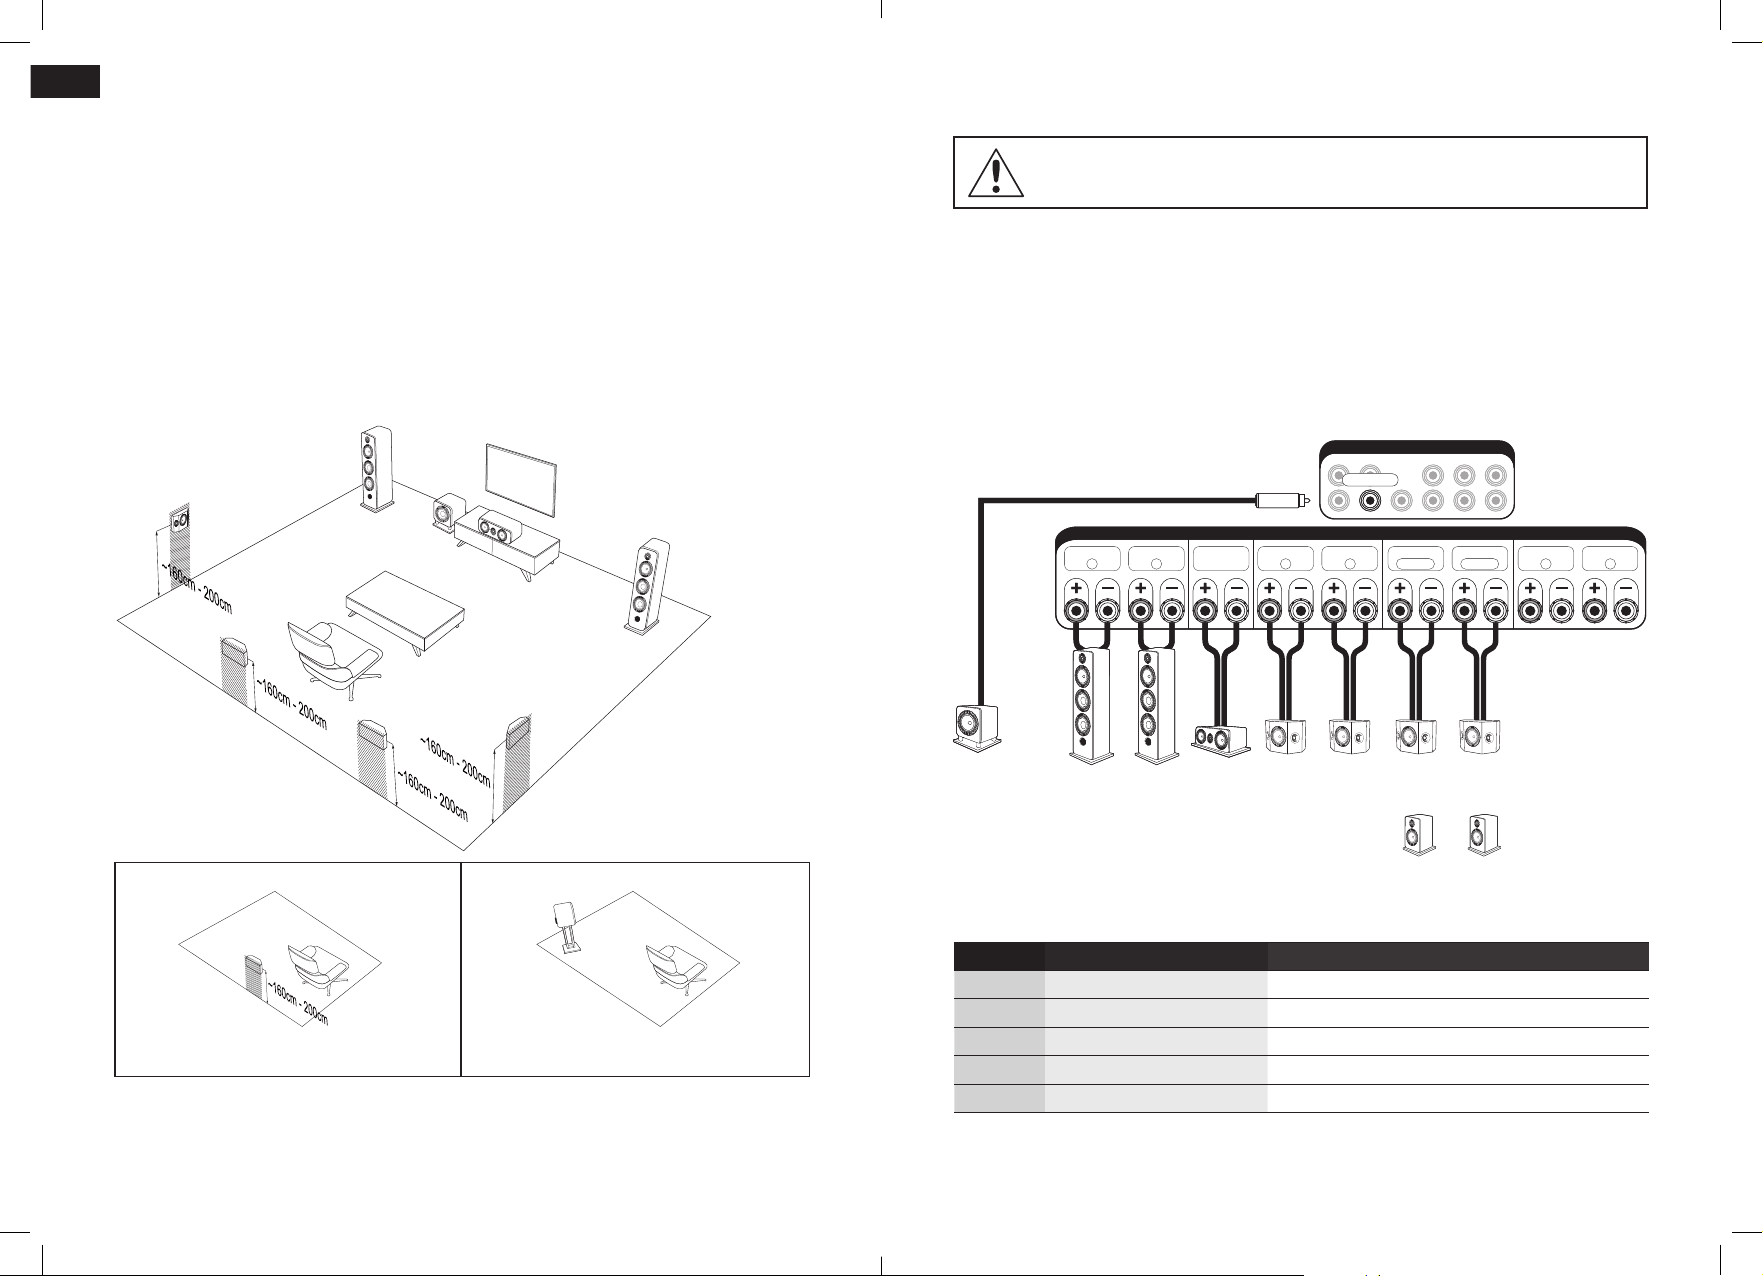
V. INSTALLATION SETUP 7.1
3. Connections on Home-Cinema amplier and Home-cinema preamplier
1. Position of setup 5.1
Before continuing the operation, please congure your installation by following the
instructions on the previous pages
2. Position of the back surround speakers SBL / SBR (PF6B / PF8B or PF7SR)
Surround back speakers should ideally be placed behind the listening position. Please,
respect the position of PF7SR speakers, using the indications written at their back. If the
room layout does not allow a backward placement of the back surround speakers, you
can use the PF6B or PF8B bookshelve speakers (see layout - solution 2) in order to nish
properly the conguration 7.1
•FL
•SL
•SBL
•SBR
•SW
•C
•FR
•SR
ALL THE CONNECTIONS MUST BE MADE WITH THE EQUIPMENT TURNED OFF.
It is essential to connect the speakers using the correct polarity. Make sure to connect the
« + » terminal of the speaker (Red) to the « + » output terminal of the amplier. Then, make
sure to connect the « - » terminal of the speaker (Black) to the « - » output terminal of the
amplier. A wrong connection would cause a cribled stereo image and loss of bass. Use
high quality speaker cable. Elipson speakers are supplied congured for use in a single
wired mode or bi-wiring. Bi-amp is also possible (see page 28).
PRE OUT
PRE OUT
SUBWOOFER
SUBWOOFER
RCA SUB
RCA SUB
FRONT RFRONT
L
CENTER
SPEAKERS
SURROUND
SPEAKERS
SURROUND
R
SURROUND
L
BACK R
SURROUND
BACK L
HEIGHT RHEIGHT
L
•SBL
•SBL
Solution 1 Solution 2
Note : When placing the surround Back speakers, you can place the PF6B or PF8B
bookshelve speakers on the back of the listening position. It is however better to place
them in height, ideally on stand.
24 25
•SW
PFSUB8
or
PFSUB10
•FR
PF14F
or
PF24F
or
PF34F
•FL
PF14F
*
PF24F
*
PF34F
•C
PF11C
or
or
*
PF14C
or
*
Speaker Enter
•FR/FL FRONT RIGTH/LEFT
•C CENTER
•SR/SL SURROUND RIGTH/LEFT
•SBR/SBL SURROUND BACK RIGTH/LEFT
•SW SUBWOOFER
*Depending your model
•SR
PF7SR
*
•SL
PF7SR
•SBR
PF7SR
•SBR
PF6B
or
PF8B
•SBL
PF7SR
•SBL
PF6B
or
*
PF8B
Description
Speaker Front rigth(R) /Left (L)
Central Speaker
Surround speaker rigth(R) /Left (L)
Surround back speaker rigth(R) /Left (L)
Subwoofer
*
Page 14
UK
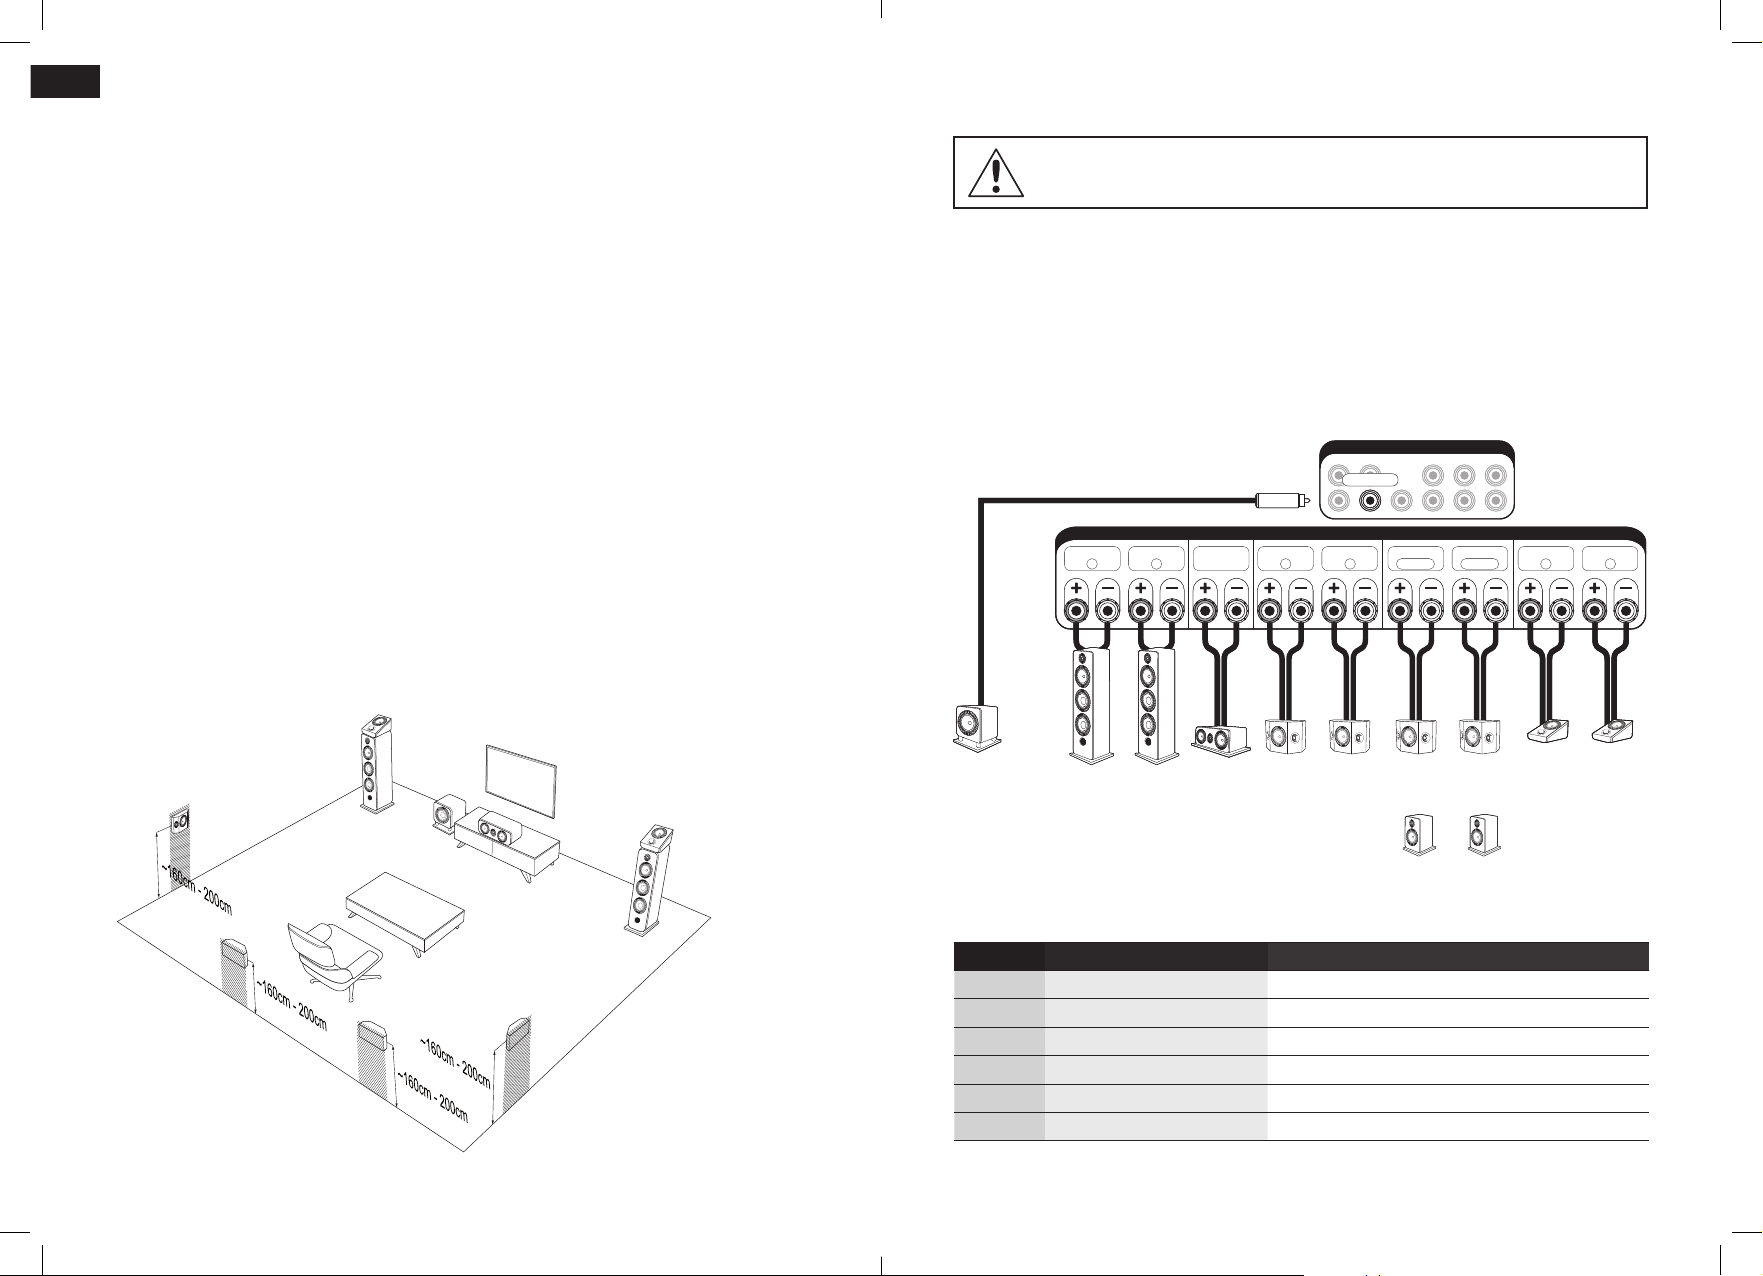
VI. EXTENSION INSTALLATION HOME - 7.1.2
2. Connections on Home-Cinema amplier and Home-cinema preamplier
1. Position of the Atmos speakers FHL/FHR (PF6ATM)
The Prestige Facet Atmos speakers are placed on top of the oor or bookshelf speakers.
DOLBY ATMOS® is a new technology meant to reproduce surround sound for cinema and
home cinema. This DOLBY ATMOS® process creates vertical sound channels in addition to the
Dolby 5.1 or 7.1 format (horizontal plane) and thus offers a totally immersive audio experience.
In order to have access to this technology and experience the emotion of DOLBY ATMOS®,
you have to equip yourself, in addition to your 5.1 or 7.1 system, with dedicated loudspeakers
in order to emit sound vertically. There are speakers that are positioned directly in the
ceiling, but these require a considerable amount of time and effort to install. There are also
specic speakers that direct the sound to the ceiling from the oor. It is this second solution,
certied DOLBY ATMOS®, that Elipson has adopted, simplifying the installation process. These
loudspeakers, whose drivers are specically ltered and tilted, emit a sound eld towards the
ceiling which must imperatively be reective. The sound waves are thus reected off of the
ceiling to allow the listener to benet from this vertical sound dimension. The rendering is ultra
realistic, for a completely immersive experience in the heart of your movie. You can buy one
or two pairs of ATM speakers, placed at the front (1st pair) and also at the back (2nd pair) of
your dedicated home cinema room, directly on your main speakers or surround speakers. You
can also opt for the IXATM oorstanding loudspeaker with a built-in DOLBY ATMOS® module.
In order to fully enjoy the DOLBY ATMOS® sound, your amplier must be compatible with this
technology, and have enough channels and the associated digital processing technology.
Caution : A Dolby Atmos compliant amplier is essential to the proper use of the speakers.
Contact your dealer for more informations.
•FHL
•FL
ALL THE CONNECTIONS MUST BE MADE WITH THE EQUIPMENT TURNED OFF.
It is essential to connect the speakers using the correct polarity. Make sure to connect the
« + » terminal of the speaker (Red) to the « + » output terminal of the amplier. Then, make
sure to connect the « - » terminal of the speaker (Black) to the « - » output terminal of the
amplier. A wrong connection would cause a cribled stereo image and loss of bass. Use
high quality speaker cable. Elipson speakers are supplied congured for use in a single
wired mode or bi-wiring. Bi-amp is also possible (see page 28).
PRE OUT
PRE OUT
SUBWOOFER
SUBWOOFER
RCA SUB
RCA SUB
FRONT RFRONT
L
CENTER
SPEAKERS
SURROUND
SPEAKERS
SURROUND
R
SURROUND
L
BACK R
SURROUND
BACK L
HEIGHT RHEIGHT
L
•SL
•SBL
•SBR
•SW
•C
•SR
•FHR
•FR
•SW
PFSUB8
or
PFSUB10
•FR
PF14F
or
PF24F
or
PF34F
•FL
PF14F
*
PF24F
*
PF34F
•C
PF11C
or
*
PF14C
or
*
Speaker Enter
•FR/FL FRONT RIGTH/LEFT
•C CENTER
•SR/SL SURROUND RIGTH/LEFT
•SBR/SBL SURROUND BACK RIGTH/LEFT
•SW SUBWOOFER
•FHL/FHR HEIGTH RIGTH/LEFT
•SR
PF7SR
or
*
Description
Speaker Front rigth(R) /Left (L)
Central Speaker
Surround speaker rigth(R) /Left (L)
Surround back speaker rigth(R) /Left (L)
Subwoofer
Atmos speaker Front rigth(R) /Left (L)
*Depending your model
26 27
•SL
PF7SR
•SBR
PF7SR
•SBR
PF6B
or
PF8B
•SBL
PF7SR
•FHR
PF6ATM
•FHL
PF6ATM
•SBL
PF6B
or
PF8B
*
*
Page 15

UK
VII. USE
1. Burn-in period
When you take them out of the packaging, the Prestige Facet speakers are not yet able to
reproduce with the same efciency all the sound frequencies they are supposed to play.
The Prestige Facet range loudspeakers are complex mechanical assemblies which need a
period of adaptation (“burn-in”) to operate at their best and become acclimatised to the
temperature and humidity conditions of your environment. This burn-in period may last for
some weeks, but you can quicken it by operating the speakers between 20 and 50 hours
consecutively, on a moderate volume and broadcasting a radio station.
2. Bi-wiring and bi-ampication (All models, except PF6ATM and PF7SR)
Bi-wiring can increase the performance of your loudspeakers. Only one amplier is
necessary, but two distinct cables are used to, individually, powered the treble drivers
and the bass drivers on the speaker. Good quality cables are required for an efcient bi-
wiring. The Prestige Facet speaker have a 4 terminals binding post, allowing bi-wiring and
bi-amplication.
Top terminals for treble, bottom terminals for bass. For a mono-amplication use, connect
the terminals with the metallic straps and connect the cables on 2 terminals.
For a bi-amp, two ampliers are used separately for treble and bass
Note: The PF7SR and PF6ATM models have a single binding terminal.
3. Choice of cables
Choose high quality cables with a cross-section appropriate to their length. You can also
replace the provided metallic straps by a strap using the same speaker cable you use to
connect your loudspeakers to your amplier. Your Elipson dealer will be able to advise you.
4. Choice of amplier
Your setup type (stereo or home-cinema) will determine the choice of the appropriate
amplier. Your dealer will be able to advise you on the most suitable amplier for your system.
VIII. SPECIFICATIONS
Prestige Facet
6B
Type
Loudspeakers
Frequency
response
(±3dB)
Sensitivity
Impedance
Bookshelf speaker
2-way
bass-reex
Tweeter
25 mm
Mid-woofer
140 mm
57Hz - 25kHz 47Hz - 25kHz 38Hz - 25kHz 28Hz - 25kHz
90dB/1W/1m 91dB/1W/1m 92dB/1W/1m 93dB/1W/1m
6 Ohms 6 Ohms 6 Ohms 6 Ohms
Prestige Facet
8B
Bookshelf speaker
2-way
bass-reex
Tweeter
25 mm
Mid-woofer
170 mm
Prestige Facet
14F
Floor speaker
2½-way
bass-reex
Tweeter
25 mm
Mid-woofer
170 mm
Woofer
170 mm
Prestige Facet
24F
Floor speaker
3½-way
bass-reex
Tweeter
25 mm
Mid range
170 mm
Woofer
2 x 210 mm
5. Cleaning instructions
To improve the lifetime of your speakers, we recommend regular cleaning. A soft cloth will
be enough for dusting. If the speaker is stained, we recommend simply using a damp cloth
with some mild soap if necessary. The lacquered front panel can be cleaned with a soft
cloth and standard glass cleaning product.
Never use solvents, detergents, alcohol-based or corrosive products, scrapers or scourers
to avoid any damage on the speaker surface.
Keep the loudspeakers away from sources of heat.
28 29
Power
Recommended
amplier power
Dimensions
with stand
(WxHxD)
Weight
(unit/with stand)
70 W RMS 85 W RMS 150 W RMS 250 W RMS
20 - 100 W
176x298x223 mm
5,6 kg 8 kg / 9,3 kg 19 kg / 20,5 kg
30 - 120 W
230x361x348 mm
40 - 200 W
238x1011x325 mm
50 - 350 W
274x1121x383 mm
27,7 kg / 29,5 kg
Page 16

UK
Prestige Facet
34F*
Type Type
Loudspeakers Loudspeakers
Frequency
response
(±3dB)
Sensitivity Sensitivity
Impedance Impedance
Power Power
Recommended
amplier power
Dimensions
with stand
(WxHxD)
Weight
(unit/with stand)
Floor speaker
3½-way
bass-reex
Tweeter
25 mm
Bass-medium
2 x 170 mm
Woofer
2 x 250 mm
25Hz - 25kHz 55Hz - 25kHz 43Hz - 25kHz 65Hz - 25kHz 65Hz - 25kHz
93dB/1W/1m 92dB/1W/1m 93dB/1W/1m 90dB/1W/1m 87dB/1W/1m
4 Ohms 6 Ohms 6 Ohms 6 Ohms 8 Ohms
300 W RMS
70 - 350 W
355x1331x470 mm
46.9 kg / 49,7 kg
Type
Loudspeakers
Frequency
response
(±3dB)
Output power
Subsonic lter
Variable cut-off
frequency
Adjustable
phase
On/Off
Inputs
Dimensions
with stand
(WxHxD)
Weight
Prestige Facet
SUB8
Subwoofer
bass-reex
down-ring
Woofer
210 mm
35Hz - 150Hz 27Hz - 150Hz
150 W RMS
Class D
40Hz at 150Hz 50Hz at 150Hz
Auto Auto
Stereo line level
LFE
350x374x405 mm 405x424x469 mm
16 kg 22 kg
Prestige Facet
SUB10
Subwoofer
bass-reex
down-ring
Woofer
260 mm
250 W RMS
Class D
24dB at 20Hz24dB at 20Hz
0°-180°
Stereo line level
LFE
Frequency
response
(±3dB)
Recommended
amplier power
Dimensions
with stand
(WxHxD)
Weight
(unit/with stand)
Prestige Facet
11C
Center speaker
2-way sealed
Tweeter
25 mm
Mid-woofer
2 x 140 mm
120 W RMS 150 W RMS 70 W RMS
30 - 150 W 40 - 200 W
470x176x180 mm 623x228x275 mm
8,4 kg 11,9 kg / 14,9 kg N/C 5 kg / 11,1 kg
Prestige Facet
14C
Center speaker
2-way
laminar ported
Tweeter
25 mm
Mid-woofer
2 x 170 mm
Prestige Facet
6ATM*
Atmos
2-way closed
Horn Tweeter
25 mm
Bass-medium
140 mm
70 W RMS
30 - 120 W 30 - 120 W
207x181x290 mm 380x220x170 mm
Prestige Facet
7SR
Surround
2-way
bass-reex
Horn Tweeter
2 x 25 mm
Bass-medium
140 mm
70 W RMS
*Available soon *Available soon
30 31
Page 17

UK
WARNING
Packaging
The packaging (box and packing) was designed for effective protection of your Elipson
loudspeakers and electronics during transportation and shipping. Please save them for
later use. Protect the environment : if you wish to dispose of the packaging, please do so
in the most environmentally responsible manner possible according to available measures
(for example, sorted recycling). At the end of its life, this device should not be disposed of
the same way as household refuse. It should be returned to a center for the recycling of
electronic equipment.
This symbol on the product indicates that it has been designed so that it can
be recycled according to specic procedures. You will therefore be making a
signicant contribution to the protection of the environment. This device respects
the RoHS European directive. This means that it does not emit polluting substances
when it is recycled (such as lead, mercury, cadmium, hexavalent chromium,
polybromobiphenyles, polybromdiphenylethers).
Precautions for proper use
This product was designed according to rigorous norms and complies with safety standards.
It should only be used under normal conditions as described below. Verify the electrical
voltage before connecting it to a power source. This electronic device was designed to
work in numerous countries. We advise you to hook it up completely before connecting it to
the AC power source. Take care when unplugging the power cord. When you unplug the
power cord from the power source, do so by pulling on the head of the plug rather than on
the cable. If you do not expect to use this device for a prolonged period
of time, you are advised to unplug it from the power source. Do not open
the case. This device contains no parts that can be exchanged by the
user. Accessing the inside of this device’s case can lead to electric shock.
Any modication to the product will nullify the guarantee. If a foreign
object or liquid falls into the case, contact your retailer to arrange for a
technician to remove it from the device safely.
- For products, which serial number has been altered, deleted, removed or made illegible.
- In case of repair and service executed by an unauthorized service person.
This warranty complements any national/federal/regional law obligations of local
distributors/dealers and does not affect your statutory rights as a customer.
To claim repair under warranty
To claim repair or service under warranty you simply have to contact your local Elipson
dealer, from whom your equipment has been purchased. To ensure that you will be able to
ship your damaged product in correct manner, always retain the original packaging of your
Elipson equipment. If you cannot contact your original dealer, or if you are using your Elipson
product outside the purchase country, you should contact Elipson national distributor in the
residence country, who will advise where the equipment can be serviced.
You can also visit our web site to check our contact information :
www.elipson.com
To validate your warranty, you need to produce, as a proof of purchase, your original
purchase invoice specifying the date of purchase and stamped by your dealer.
WARRANTY
Elipson speakers has been designed and manufactured to the highest quality standards.
If something goes wrong with your product, Elipson or its authorized distributor / dealer will
handle the service and repair under these limited warranty terms. This limited warranty is
valid for a 2-year period from original purchase date from an authorized Elipson dealer.
Terms of limited warranty
The warranty is limited to equipment repair. Neither transportation, nor any other costs, nor
any risk for removal, transportation and installation of products is covered by this warranty.
The warranty is only valid for the original purchaser and is not transferable. The warranty
will not apply in cases other than defects in materials and / or workmanship at the date of
purchase and will not be applicable in the following cases :
- Damages caused by wrong or incorrect installation or connection.
- Damages caused by incorrect use, other use than the one described in the owner’s
manual, negligence, unauthorized modication or use of parts or of accessories that are
not authorized by Elipson.
- Damages caused by unauthorized, unsuitable or faulty ancillary equipment.
- Damages caused by accidents, lightning, water, re, heat or any other disturbance that
would not be under Elipson control or responsibility.
32 33
© Elipson 2017
Elipson is a registered trademark of AV Industry.
Page 18

Page 19

www.elipson.com
16/10/2017
 Loading...