

Page 1
Visible Light PIR Camera OSD Menu Tree eLineTechnology.com
Visible Light PIR Camera OSD Menu Tree
MENU SUB MENU AND DEFUALT SETTING
DC
LENS
EXPOSURE
WHITE BAL
DAY&NIGHT
3DNR ON,OFF LEVEL 0~100
SPECIAL
VIDEO
MANUAL
SHUTTER
AGC OFF,LOW,MIDDLE,HIGH
SENS-UP
BLC OFF,BLC,HSBLC
D-WDR
ATW
AWB
AWC→SET
MANUAL
INDOOR
OUTDOOR
AUTO
COLOR
B/W
EXIT
CAM TITLE ON,OFF
D-EFFECT
AUTO,1/50,FLK,1/250,1/500,1/1000,1/2000,1/5000,1/10000,1/1
00000, x2,x4,x8,x16,x32,x64,x128,x256
OFF
AUTO x2,x4,x8,x16,x32,x64,x128,x256
LOW-LEVEL 0~15
INDOOR
HIGH-LEVEL 0~15
LOW-LEVEL 0~15
OUTDOOR
HIGH-LEVEL 0~15
BLUE 0~100
RED 0~100
DELAY 0~63
D→N (CDS) 48~255
N→D (CDS) 0~207
BURST ON,OFF
GAIN 0~15
IR SMART
AREA POSITION, SIZE
FREEZE ON,OFF
MIRROR OFF,MIRROR,V-FLIP,ROTATE
D-ZOOM D-ZOOM x1.0~x32
1
Page 2
Visible Light PIR Camera OSD Menu Tree eLineTechnology.com
MENU SUB MENU AND DEFUALT SETTING
PAN -100~100
RS485
MOTION
PRIVACY
SYNC INT
LANGUAGE ENGLISH,KOREAN,JAPANESE,CHINESE1,CHINESE2
DEFECT
SHARPNESS 0~31
ADJUST
RESET FACTORY RESET
EXIT
※ Depending on setting of sub menu, the default value may be changed.
MONITOR
OSD COLOR 0~15
NEG. IMAGE ON,OFF
CAM ID 000~255
ID DISPLAY ON,OFF
BAUD RATE 2400,4800,9600,19200,38400,57600
AREA SEL. AREA1~4
AREA DISPLAY ON,OFF
SENSITIVITY 0~40
MOTION VIEW ON,OFF
AREA SELECT AREA1~8
AREA DISPLAY ON,OFF
COLOR 0~15
SENS-UP x4,x8,x16,x32,x64
DIFF 1~6
START COVER THE LENS THEN PRESS ENTER KEY
CRT
LCD
USER
TILT -100~100
LEVEL 0~63
BLUE GAIN 0~100
RED GAIN 0~100
GAMMA USER,0.5~1.0
LEVEL 0~63
BLUE GAIN 0~100
RED GAIN 0~100
GAMMA USER,0.5~1.0
LEVEL 0~63
BLUE GAIN 0~100
RED GAIN 0~100
2
Page 3
Visible Light PIR Camera OSD Menu Tree eLineTechnology.com
Menu Control
1. Please press the SET button of the OSD control button.
2. You can select a function by use of the UP or DOWN buttons.
3. You can setup a chose item by use of the LEFT or
4. For finishing the setting, please choose ‘EXIT’ and
※ --- icon is unavailable because of function
You can choose
the function by
use of UP or
Down button
You can change
the status value n
by using the LEFT
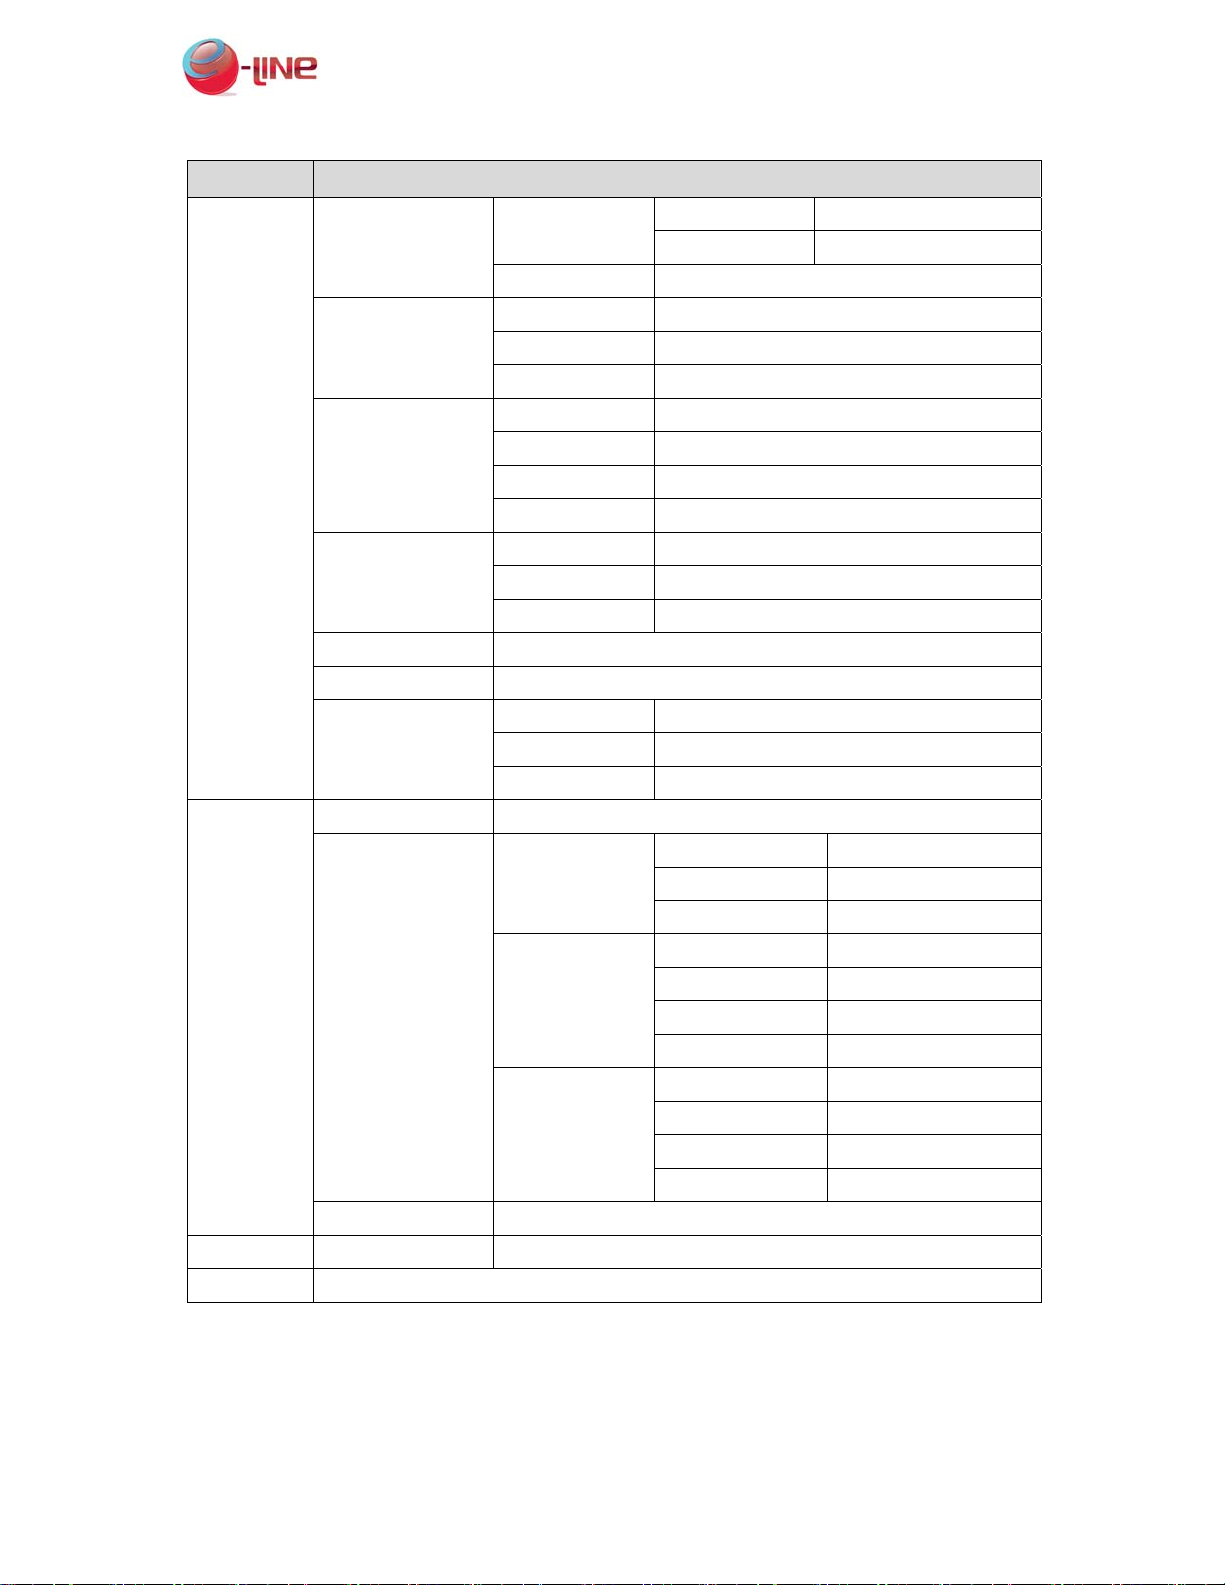
1.LENS
You can select the type of lens you wish to use by pressing the LEFT or RIGHT button.
(DC / VIDEO / MANUAL)
Page 4
Visible Light PIR Camera OSD Menu Tree eLineTechnology.com
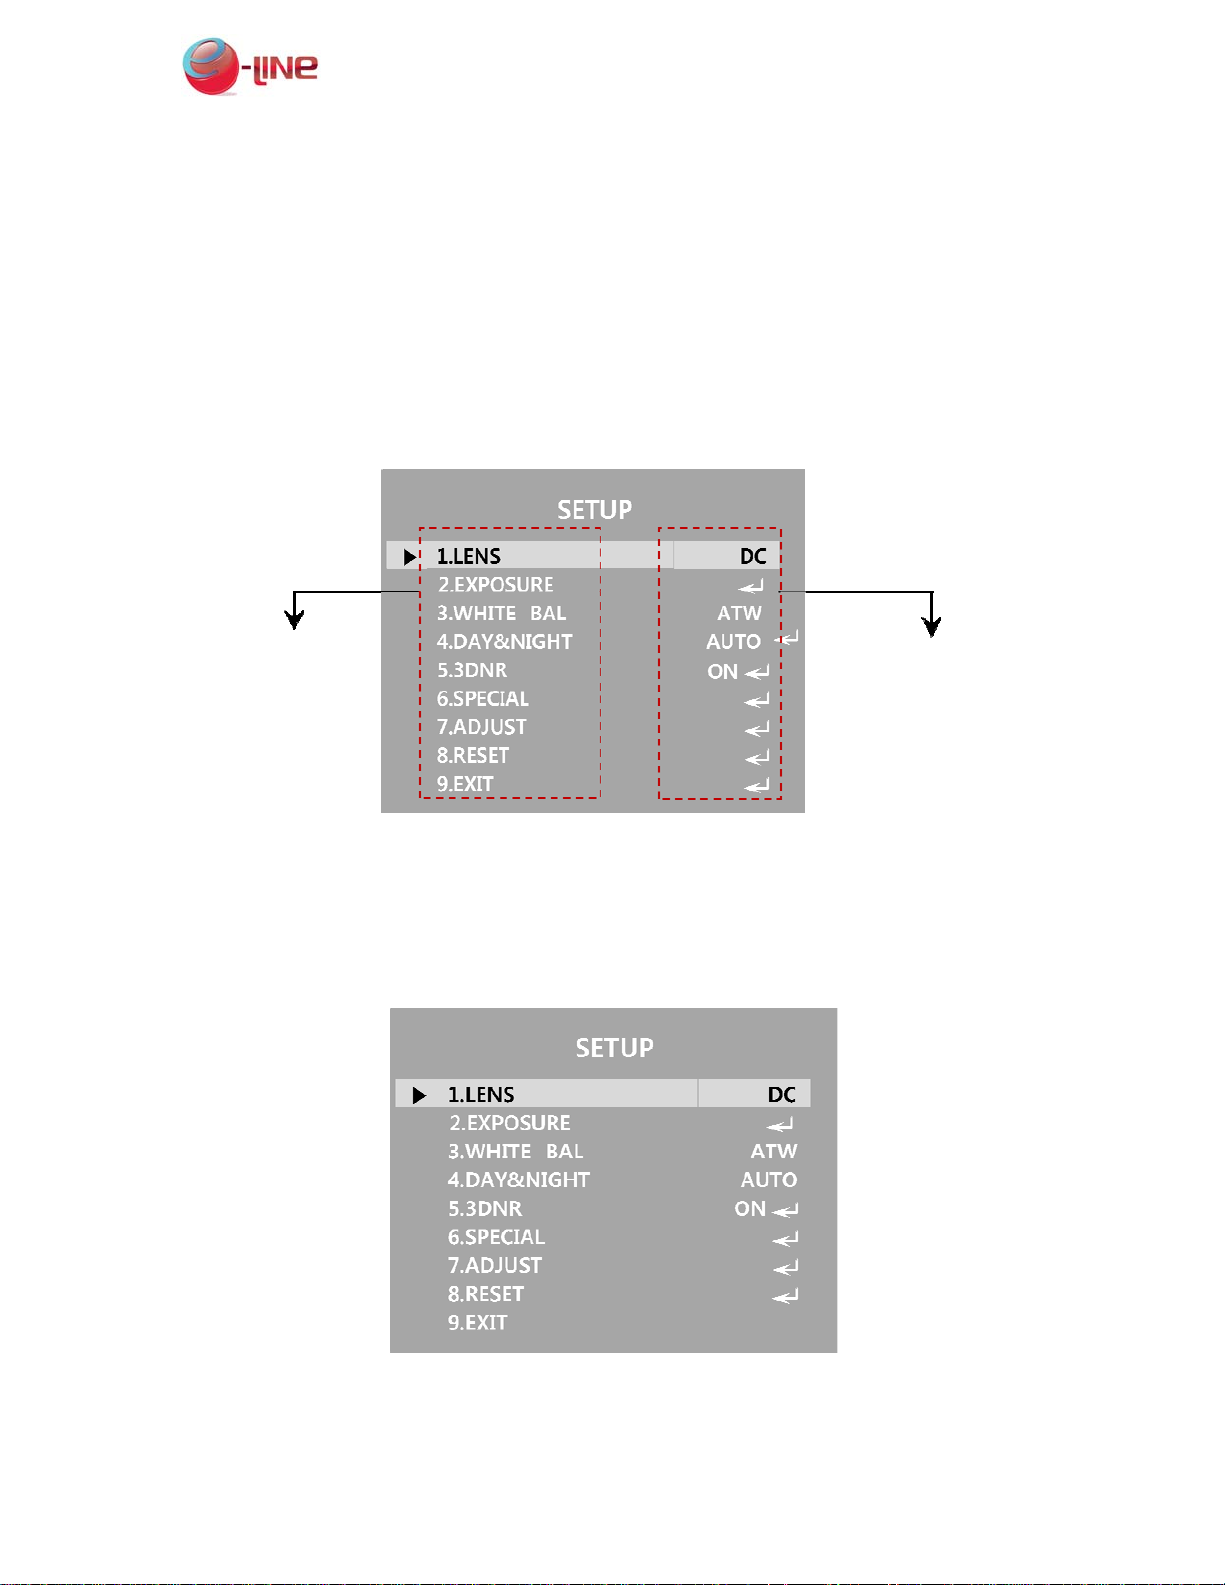
2. EXPOSURE
1. Once the SETUP menu screen is displayed, choose ‘ EXPOSURE’ by using the Up or Down
buttons in order to indicate the arrow ‘EXPOSURE’
2. You can select wanted mode by using the Up or Down buttons.
● SHUTTER : You can select condition and speed control of the SHUTTER.
AUTO : Select this to control the shutter speed automatically. Once ESC is selected, the shutter
speed is automatically controlled depending on the ambient illumination of the subject.
FLK : You are able to select when you experience picture flicker, which can happen when there
is a clash with the frequency of the installed lighting.
MANUAL: You can control shutter speed manually. (1/60(50)~1/100,000, x2,x4,x8,x16, x32,x64,
x128, x256)
● AGC (Auto Gain Control) : The higher the gain level, the brighter the screen. But the higher
the noise.
OFF : Deactivates the AGC function
LOW : Allows automatic gain control from 5.3dB to 26dB.
MIDDLE : Allows automatic gain control from 5.3dB to 32dB.
HIGH : Allows automatic gain control from 5.3dB to 37dB.
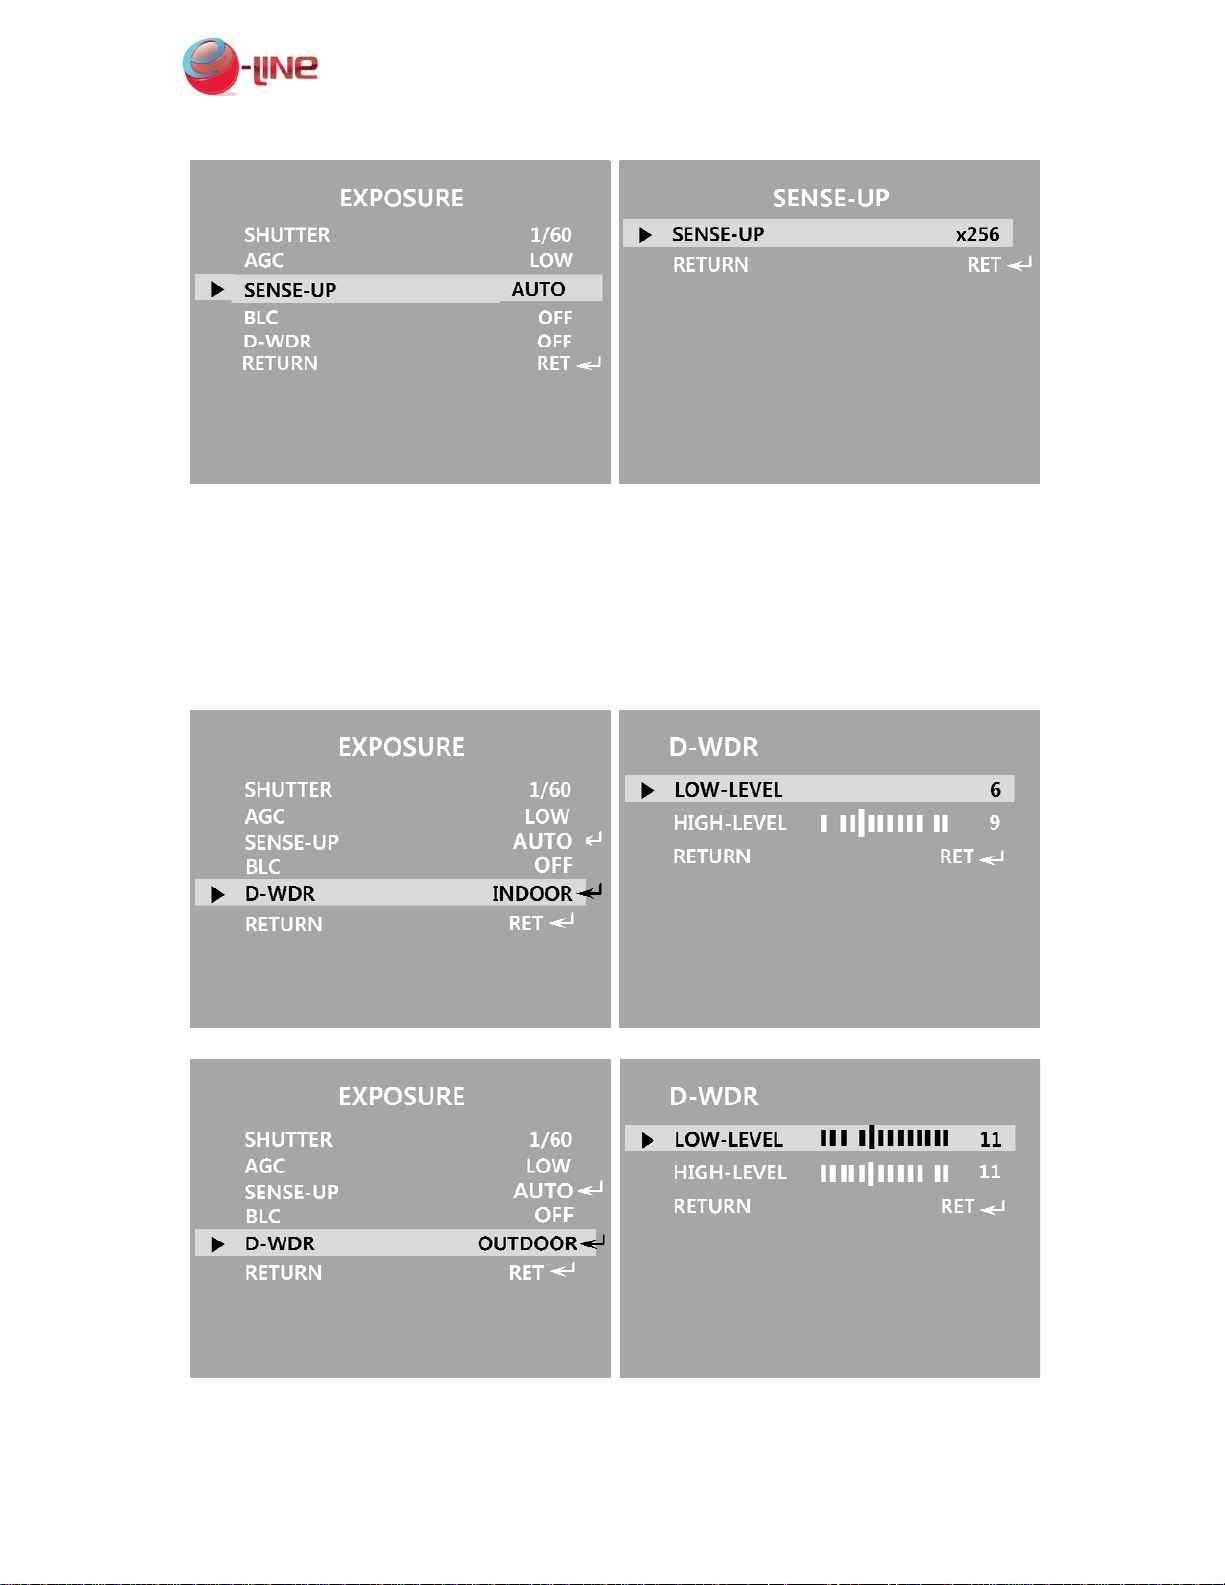
● SENSE-UP: When it is night or dark circumstance, the camera automatically detects the light
level and maintains a clear picture if this mode is operated.
OFF : Deactivates the SENSE-UP function.
AUTO : Activated the SENSE-UP function.
※ You can choose the SENSE-UP value from x2 to x256.
_ _ _ : When the AGC function is to set by OFF, SENSE-UP can't be changed the setting.
Page 5
Visible Light PIR Camera OSD Menu Tree eLineTechnology.com
● BLC : It Enables a user to choose a wanted area on a picture and view that area more clearly.
You can select the function BLC or HSBLC.
● D-WDR : The D-WDR function illuminates darker areas of an image during retaining the same
light level for brighter areas to even out the overall brightness of images with high contrast
between bright and dark areas.
● RETURN : Please select this to save the changes in the EXPOSURE menu and return to the
SETUP menu.
Page 6

Visible Light PIR Camera OSD Menu Tree eLineTechnology.com
3. WHITE BALANCE
To adjust the screen color, you can use the White Balance function.
1. Once the SETUP menu screen is displayed, choose ‘WHITE BAL’ by using the Up and
Down buttons in order to indicates the arrow ‘WHITE BAL’
2. You can select a wanted mode by using the Up and Down buttons.
※ Please select one of the following 5 modes, as appropriate for your purpose
● ATW : You can select this when the color temperature is between 2,000°K and 9,500°K.
● AWB : Auto White Balance.
● AWC→SET: To adjust the optimal luminance level for the current environment point the camera
towards a sheet of white paper and press the Function Setup switch. If the environment
changes, please readjust it.
● MANUAL : You can select this to fine-tune White Balance first by using the ATW or AWC
mode. Then, switch to MANUAL mode fine-tune the White Balance (BLUE, RED)
and then press the SET button.
● INDOOR : White Balance for indoor circumstance.
● OUTDOOR : White Balance for outdoor circumstance.
Page 7

Visible Light PIR Camera OSD Menu Tree eLineTechnology.com
4.DAY/NIGHT
You can display pictures in color or black and white.
1.Once the SETUP menu screen is displayed, kindly select ‘DAY/NIGHT’ by using the UP/DOWN
buttons in order to indicate the arrow ‘DAY/NIGHT’.
2.Select a wanted mode by using the LEFT/RIGHT buttons according to the picture display you
want.
● AUTO : The mode is switched to ‘Color’ in a normal circumstance, but switches to ‘BW’ Mode
when ambient illumination is low. To set up the switching time for AUTO mode, press the SET
button. You can turn on or off the burst signal in B/W mode.
DELAY : You can delay a switch time from color mode to B/W mode or from the B/W mode
to color mode.
D→N (CDS) : DAY→NIGHT setting of the CDS value. (48~255)
N→D (CDS) : NIGHT→DAY setting of the CDS value. (0~207)
● COLOR : The picture is always displayed in color.
● B/W : The picture is always displayed in black and white. You can turn on or off the burst
signal on B/W mode.
Page 8

Visible Light PIR Camera OSD Menu Tree eLineTechnology.com
BURST : You can choose whether to use of BURST at NIGHT MODE.
IR SMART : Setting of IR SMART related.
IR GAIN : The strength adjustment
of IR SMART.
AREA : The area size adjustment of
IR SMART.
5. 3DNR
The 3DNR reduces the background noise in a low lumination circumstances.
Page 9

Visible Light PIR Camera OSD Menu Tree eLineTechnology.com
1.Once the SETUP menu screen is displayed, you can choose ‘3DNR’ by using the UP/DOWN
buttons in order to indicate the arrow ‘3DNR’
2.Set the 3DNR mode to ‘ON’ and press the SET button. Then you can adjust the noise reduction
level by using the LEFT/RIGHT buttons.
6. SPECIAL
1.When the SETUP menu screen is displayed. You can choose ’special’ by using the UP or DOWN
buttons so that the arrow indicates ‘SPECIAL’
2.You can select a wanted mode by using the UP and DOWN buttons.
◆ CAM TITLE
If you enter a title, the title will appear on the monitor.
1.Once the SPECIAL menu screen is displayed, please use the UP/DOWN buttons so that the
arrow indicates ‘CAM TITLE’
2. Set in to ‘ON’ by using the Left and Right buttons.
3.Press the SET button.
4.Please use the 4 direction buttons to move to a wanted letter and select the letter by pressing
the SET button. Repeat this to enter multiple letters. You can enter up to 15 letters.
5.Enter a title, move the cursor to ‘POS’ and press the SET button. The entered title appears on
the screen. Select the position to display the title on the screen by using the 4 direction buttons
and press the SET button. Once the position is decided, please select ‘END’ and press the SET
button to return to the SPECIAL menu.
Page 10

Visible Light PIR Camera OSD Menu Tree eLineTechnology.com
◆ D-EFFECT
1.Once the SETUP menu screen is displayed, you can select ‘D-EFFECT’(Digital Effect) by using the
UP and DOWN buttons in order to indicate the arrow ‘D-EFFECT’
2.Please select a wanted mode by using the UP/DOWN buttons.
● FREEZE : You can freeze the live picture on screen when you press the button at ON. You can
release the frozen live view by pressing the button at OFF.
● MIRROR : OFF, MIRROR, V-FLIP, and ROTATE.
● D-ZOOM : You can use a digital zoom of x1~x32
● NEG. IMAGE : OFF, or ON.
● RETURN : You can select this function to save the settings for the D-EFFECT menu and to
return to the SETUP menu.
◆ RS485
1.RS485 is a function to setup when you want Camera to communicate with the outside
*Note :the function is disabled when camera doesn’t have IP support.
2.You can set up the mode by using the 4 direction buttons.
Page 11

Visible Light PIR Camera OSD Menu Tree eLineTechnology.com
◆ MOTION
This product has a feature that allows you to observe movement of object in 4 different areas on
the screen, and the words ‘MOTION’ appear on the screen when movement is detected. You can
monitor activity more efficiently.
1.Once the SPECIAL menu screen is displayed, please press the Up and Down buttons so that the
arrow indicates “MOTION”
2. You can set up the mode by using the 4 direction button.
AREA SELECT : You can select the area where motion is occurred.
AREA DISPLAY : It can show the area state.
SENSITIVITY : You can select sensitivity of the motion detection.
MOTION VIEW : It will be displayed the position where motion is occurred on the screen.
◆ PRIVACY
Mask an area you want to hide on the screen.
1.When the SPECIAL menu screen is displayed, please press the UP/DOWN buttons so that the
arrow indicates ‘PRIVACY’
2. You can set up the mode by using the 4 direction buttons.
Page 12

Visible Light PIR Camera OSD Menu Tree eLineTechnology.com
AREA SELECT : You can set up the PRIVACY area from AREA1 to AREA8.
AREA DISPLAY : Move the arrow down to AREA DISPLAY. AREA DISPLAY can be displayed on
screen ON or OFF by pushing the button LEFT or RIGHT. When set OFF of
each AREA, the color shades will not be display on screen. When set ON of
each AREA, the color shades will appear on screen.
COLOR : You can select your color shade from 15 colors.
◆ LANGUAGE
You can select the menu language according to your requirements.
You can change Display Language on [Language] of function Menu by operating LEFT/RIGHT
buttons. (ENGLISH,KOREAN,JAPANESE,CHINESE1,CHINESE2)
◆ DEFECT
You can compensate by using 'DEFECT' function if there is defect on CCD Sensor.
1.Once the SETUP menu screen is displayed, you can choose ‘DEFECT’ by using the UP/DOWN
buttons in order to indicate the arrow ‘DEFECT’
2.After finish set up the mode by use of SENS-UP, DIFF, press the 'START' button.
3.Cover the lens then press set key
Page 13

Visible Light PIR Camera OSD Menu Tree eLineTechnology.com
7. ADJUST
This function gives a various effect on the screen.
1.When the ADJUST menu screen is displayed, please press the UP/DOWN buttons so that the
arrow indicates ‘ADJUST’
2.You can set up the mode by using the 4 direction buttons.
● SHARPNESS
You may adjust picture sharpness of the screen by using the LEFT or RIGHT button on a scale
from 0 to 31.
● MONITOR
Please change the settings value of video appropriate to your monitor.
LCD : Please select this menu item when using on LCD monitor
CRT : Please select this menu item when using a CRT monitor.
USER : Please use this menu item when using a monitor other than standard ones. You can
change the gamma, PED level, and color gain in the sub menus.
● OSD COLOR
Adjustment of FONT COLOR of OSD, ID&TITLE. (16 Colors)
8. RESET
Initialize of the setting value.
Page 14

Visible Light PIR Camera OSD Menu Tree eLineTechnology.com
9. EXIT
You can select a desired EXIT mode by using the UP/DOWN buttons depending on the camera
purpose.
Page 15

Visible Light PIR Camera OSD Menu Tree eLineTechnology.com
THOUBLESHOOTING
PROBLEM SOLUTION
No picture
Camera with excessive
heat, abnormal motion of
black lines on the screen
Blinking Screen
Unclear Screen
No operation of Color Auto
mode
No operatio n of Motion
Detection
Inaccurate Color Insure that ‘White Balance’ is set properly.
Check if the power cable is connected properly.
Check if the video cable is connected correctly.
Check if the power supply meets the minimum requirements and that
the power supply is functioning property.
Check if the Camera faces the SUN or fluorescent lamp.
Check if the Auto Iris Lens connector is connected propertly.
Check if the Lens is dirty. If necessary, clean the lens with a soft cloth
or lens brush .
Check the camera positioning and setting.
Adjust the camera position if too much light is entering the iris.
Check the Back-Focus Setting.
Check if you set ‘Color’ mode ‘EXT/ON/OFF’
Check if you set ‘GAIN’ mode off.
Check if ‘Motion Detection’ mode is on
Check if the ‘MD Level’ is set too low.
Check if the ‘MD area’ is set property.
15
Page 16

Visible Light PIR Camera OSD Menu Tree eLineTechnology.com
Revised date : Feb. 10, 2012
16
 Loading...