

Page 1

eLineTechnology.com
IP WEB
User Guide
V1.0
Please read carefully before contacting your supplier.
Information is correct at time of printing, but can be subject to change without notice, whilst every effort
has been made for accuracy product improvements may enhance the features or functions.
Page 2

--CONTENT--
eLineTechnology.com
IPWEB Guide
FIRST CHAPTER WEB LOGGING IN ......................................................................................................................... 3
1.1 ACTIVEX CONTROL SETTING...................................................................................................................................... 3
1.2 WEB LOGIN ............................................................................................................................................................... 4
THE SECOND CHAPTER DEVICE CONFIGURATION............................................................................................ 4
2.1 LIVE VIDEO ................................................................................................................................................................ 4
2.2 EQUIPMENT INFORMATION ......................................................................................................................................... 5
2.3 STREAM CONFIGURATION ........................................................................................................................................... 6
2.4 ROUTE MAPPING ....................................................................................................................................................... 6
2.5 DEVICE CONFIGURATION ........................................................................................................................................... 7
2.5.1 Local Network ................................................................................................................................................. 7
2.5.2 Device port ...................................................................................................................................................... 8
2.5.3 ADSL Network ................................................................................................................................................ 8
2.5.4 multicast .......................................................................................................................................................... 9
2.5.5 camera ............................................................................................................................................................. 9
2.5.6 Date & time ................................................................................................................................................... 10
2.5.7 OSD settings ................................................................................................................................................ 10
2.5.8 Microphone setting ...................................................................................................................................... 11
2.5.9 Dome PTZ ..................................................................................................................................................... 11
2.5.10 system service ........................................................................................................................................... 11
2.5.11 system Configuration ................................................................................................................................. 12
2.6 EXTERNAL DEVICE .................................................................................................................................................. 12
2.6.1 PTZ ................................................................................................................................................................ 12
2.6.2 PTZ Keyboard .............................................................................................................................................. 13
2.6.3 cash Registers.............................................................................................................................................. 13
2.7 ALARM CONFIGURAT ION .......................................................................................................................................... 14
2.7.1 Alarm I/O Parameter Configuration ........................................................................................................... 14
2.7.2 Disk Alarm configuration ............................................................................................................................. 15
2.7.3 I/O Alarm Linkage configuration ................................................................................................................ 15
2.7.4 Motion Alarm configuration ......................................................................................................................... 16
2.8 LOCAL RECORD ....................................................................................................................................................... 17
2.8.2 Record Directory .......................................................................................................................................... 19
2.9 PRIVACY MASKING SETTING .................................................................................................................................... 21
2.10 NETWORK SERVICE ............................................................................................................................................... 22
2.10.1 NTP .............................................................................................................................................................. 22
2.10.2 PPPoE ......................................................................................................................................................... 23
2.10.3 DDNS .......................................................................................................................................................... 23
2.10.4 Update ......................................................................................................................................................... 24
2.11 SERVICE CENTER ................................................................................................................................................... 24
2.1 1.1 Alarm center................................................................................................................................................ 24
2.11.2 SMTP ........................................................................................................................................................... 25
2.12 PRIVILEGE MANAGER ............................................................................................................................................ 26
2.12.1 Authority group setting .............................................................................................................................. 26
-1-
Page 3

IPWEB Guide
eLineTechnology.com
2.12.2 user setting ................................................................................................................................................. 26
2.13 PROTOCOL ............................................................................................................................................................. 27
2.13.1 Protocol information .................................................................................................................................. 27
2.13.2 Security ....................................................................................................................................................... 27
2.13 DEVICE RESTART ................................................................................................................................................... 27
2.15 DEFAULT SETTINGS ................................................................................................................................................ 27
-2-
Page 4

First chapter web logging in
eLineTechnology.com
1.1 ActiveX control setting
Before the WEB log on, we need to set IE ActiveX controls first.
IPWEB Guide
Clicking the right mouse
Select “security”“Custom level”), system pop up dialog as follows:
,selecting “Attribute”,system pop up dialog as follows:
Put options "download unsigned Actives control” to be enabled. Or directly put t he Internet safety to a
minimum.
-3-
Page 5
IPWEB Guide
eLineTechnology.com
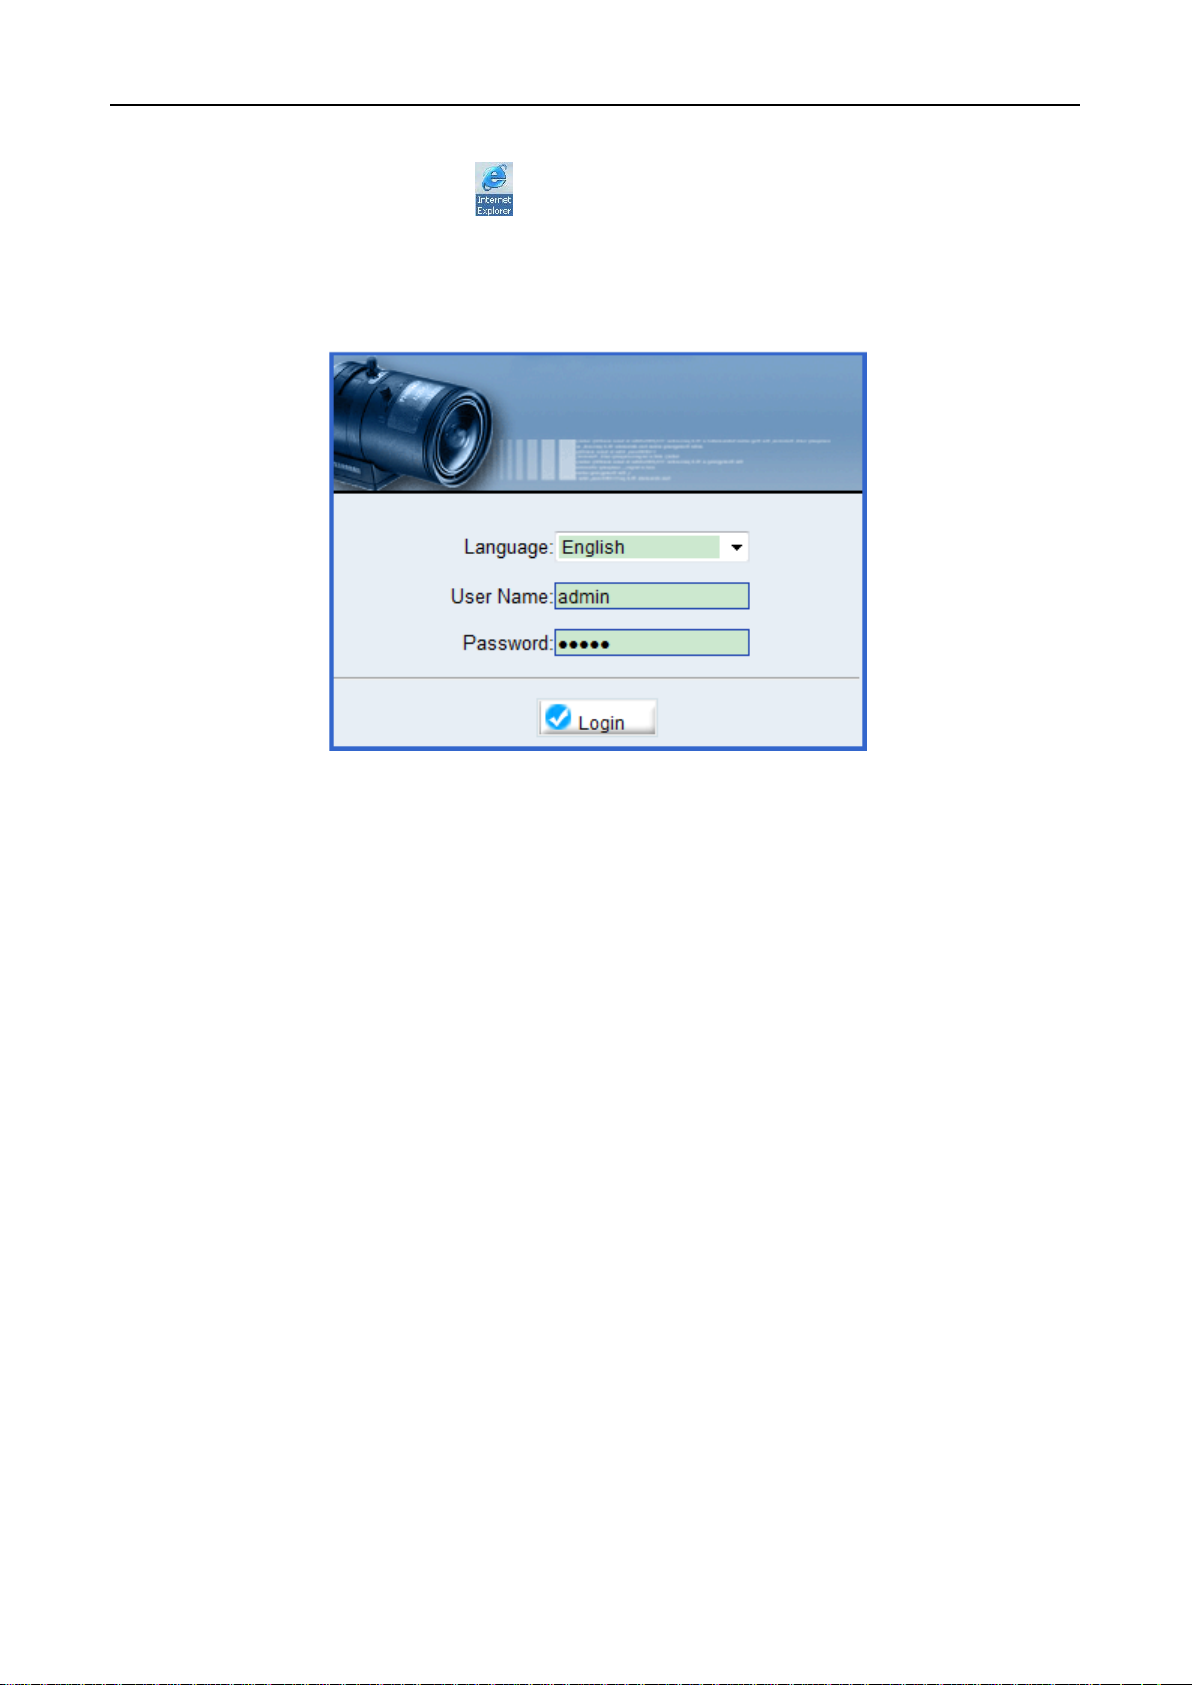
1.2 WEB login
After ActiveX to be set, cli ck icon on the desktop,open IE browser, currently this is the
only support browser,inp ut the IP address of the IP equip ment which y ou want to land in the IE brow ser
address bar. Press th e Retur n Key (ENTER), and en sure b e rig ht t o enter y our user na me a nd p as swor d
in login dialog then you can access IP equipment. The default IP address of IP equipment is:
192.168.0.120,the def ault IP equipment user name and password is : admin
The second chapter device conf iguration
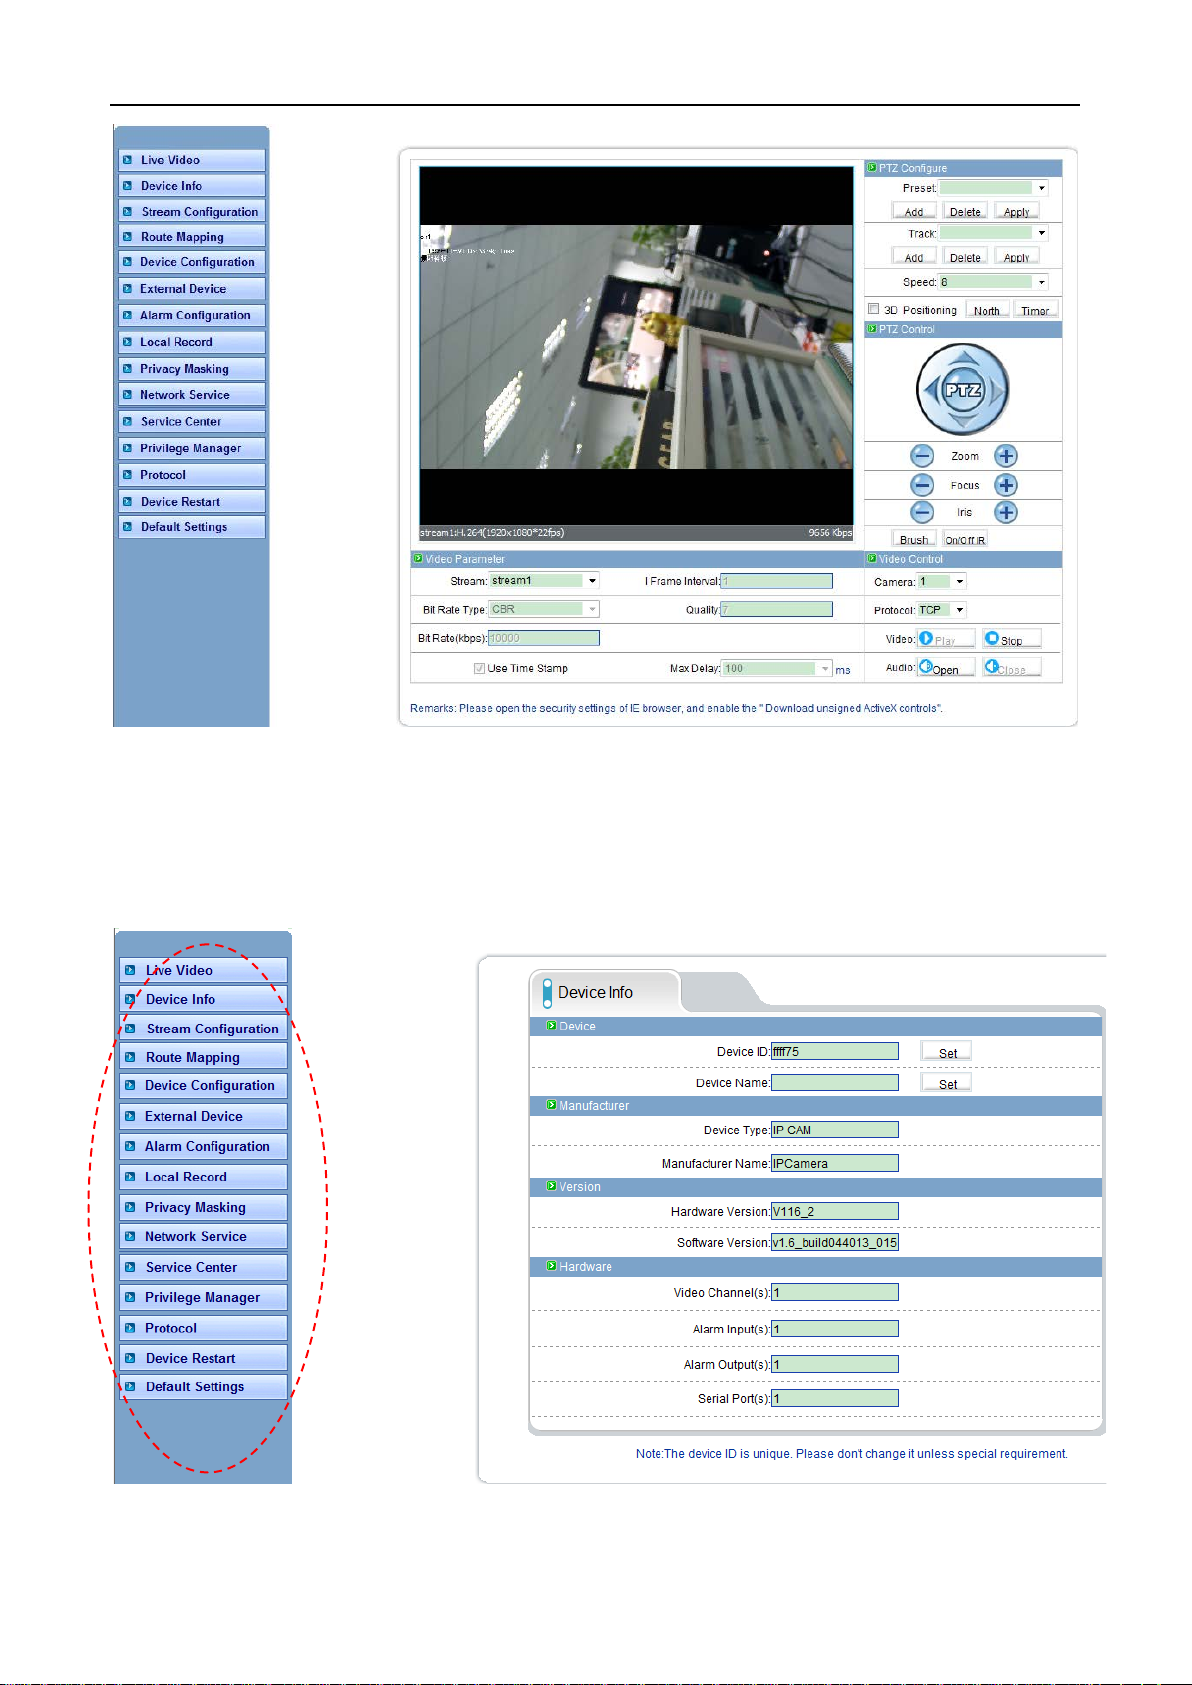
2.1 Live video
After you have logged in correctly, you will be presented with the display as below: With
mouse over the video window double mouse click will enter video into full screen mode. Other camera
settings are available as labeled including video stream and PTZ control functions.
-4-
Page 6
IPWEB Guide
eLineTechnology.com
2.2 Equipment information
On left side of the main window features all the "equipment information” settings. Thi s is th e enti re
configuration setup for the dev ice, s uch as IP i nfor mat ion aud io set tin gs n etwor k p ara meter s’ etc. Device
Information is used to sho w t he capabilities of the dev ice and also the master Device Name.
-5-
Page 7
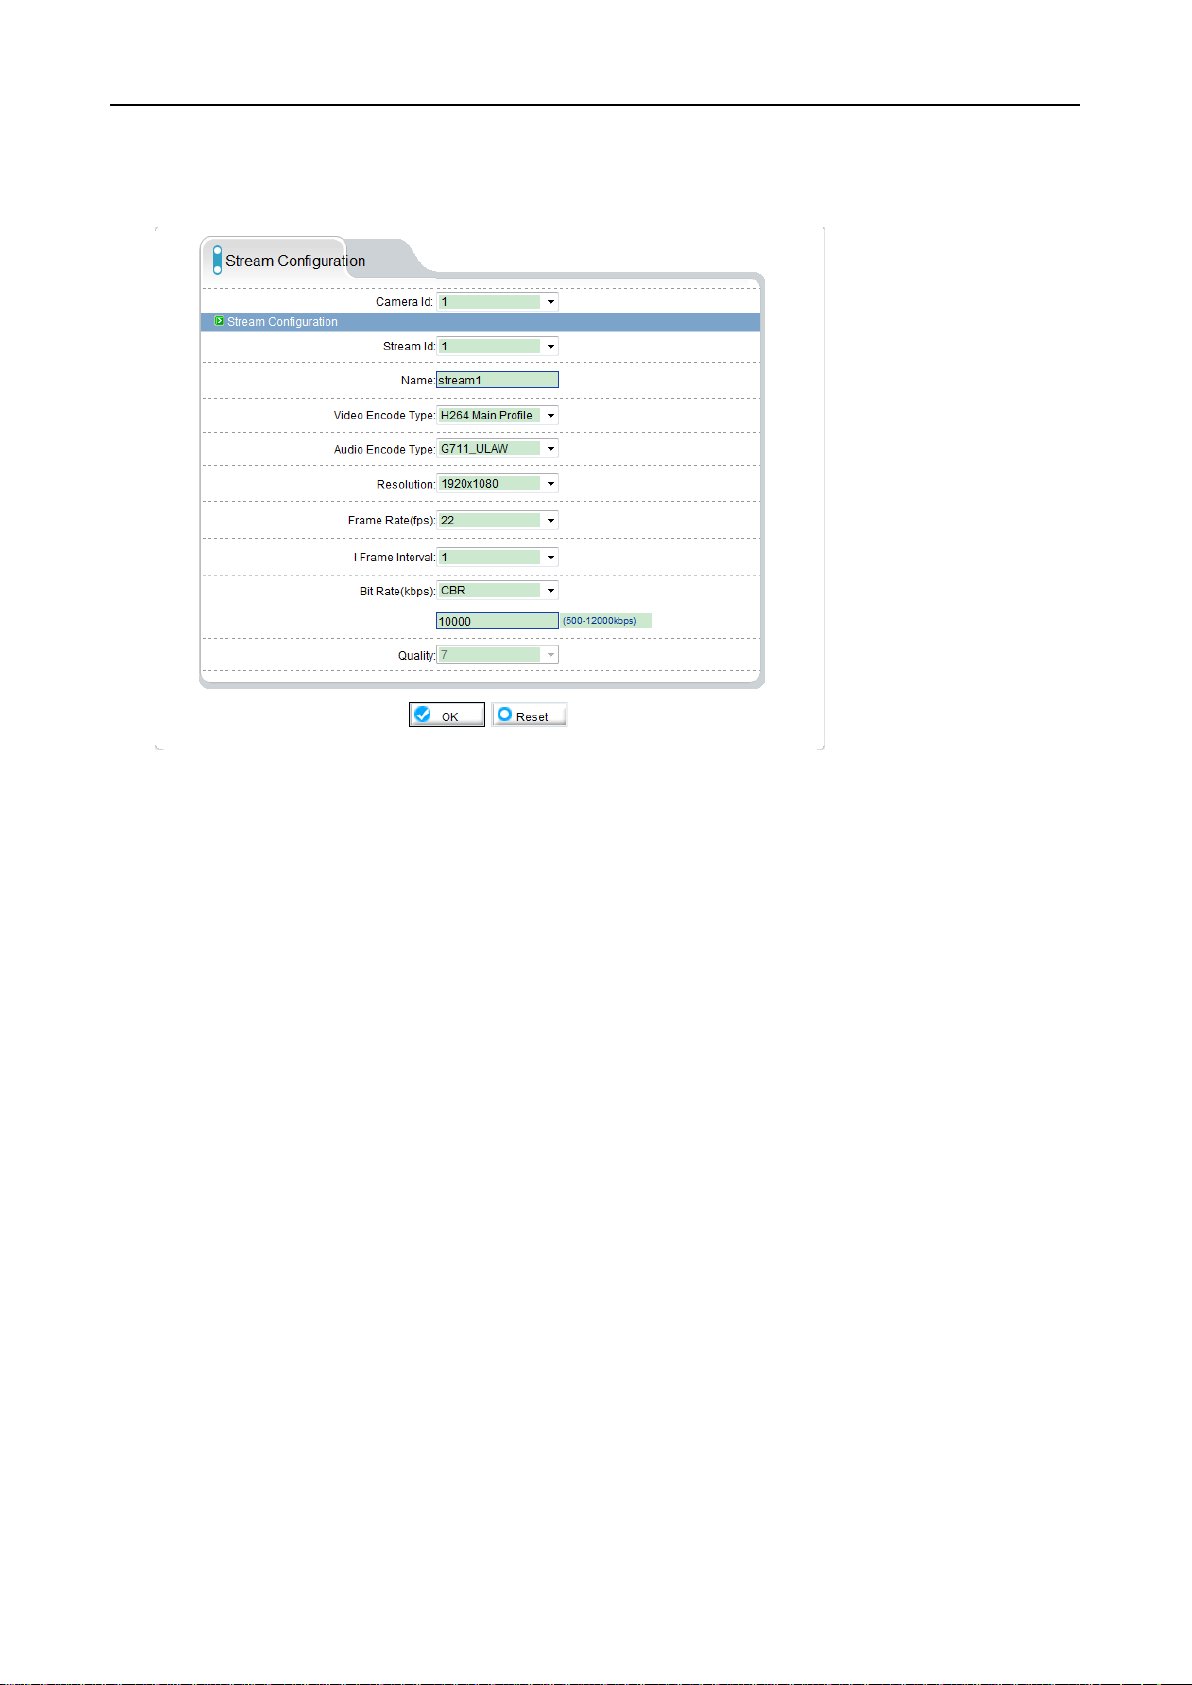
2.3 Stream configuration
eLineTechnology.com
Click features list on the left, select "Stream configuration”, then you can configure stream video for
the current IP equipment. As the following figure shows:
IPWEB Guide
Each device can be configured for different video stream; each device can be configured with up to
three different video streams. This let you set a high quality recording stream and perhaps a low level
stream for remote monitor ing.
Resolution: According to the actual resolution to actual resolution of IP equipment
divided :into :1920x1080/1280x960/1280x720/ 1600x1200/D1/CIF/QCIF etc.
Frame rate:PAL can be up to 25fps and NT SC up to 30fps
I Frame interval:time interval betw een I fra mes div ided into 1/2/3/ seconds three t ypes,for higher bit
rate of the screen, should shorten frame spacing. The smaller frame interval, it is good to increase
position accuracy of v i deo return, and advantageous to the netw ork video when the recovery of shaking.
If frame interval become small, the video streaming will be come big , unless understand the reason the
default value 2 should be used.
Bit Rate:Either CBR or VBR. CBR is constant bit rate, where the d aa stre amed w ill be at a const ant
value.;VBR that is variable bit rate, where compress ion dat a can c hange r elativ e to the co mplexity of the
compression of the scene, relative to the quality sett ing below.
Quality: Value 1-9 choose within qua lity. The higher the quality values the c learer images will.
Hint: setting a high quality value and a small VBR bitrate may not provide the ideal settings. Unless
required a quality setting of 7 is acc eptable.
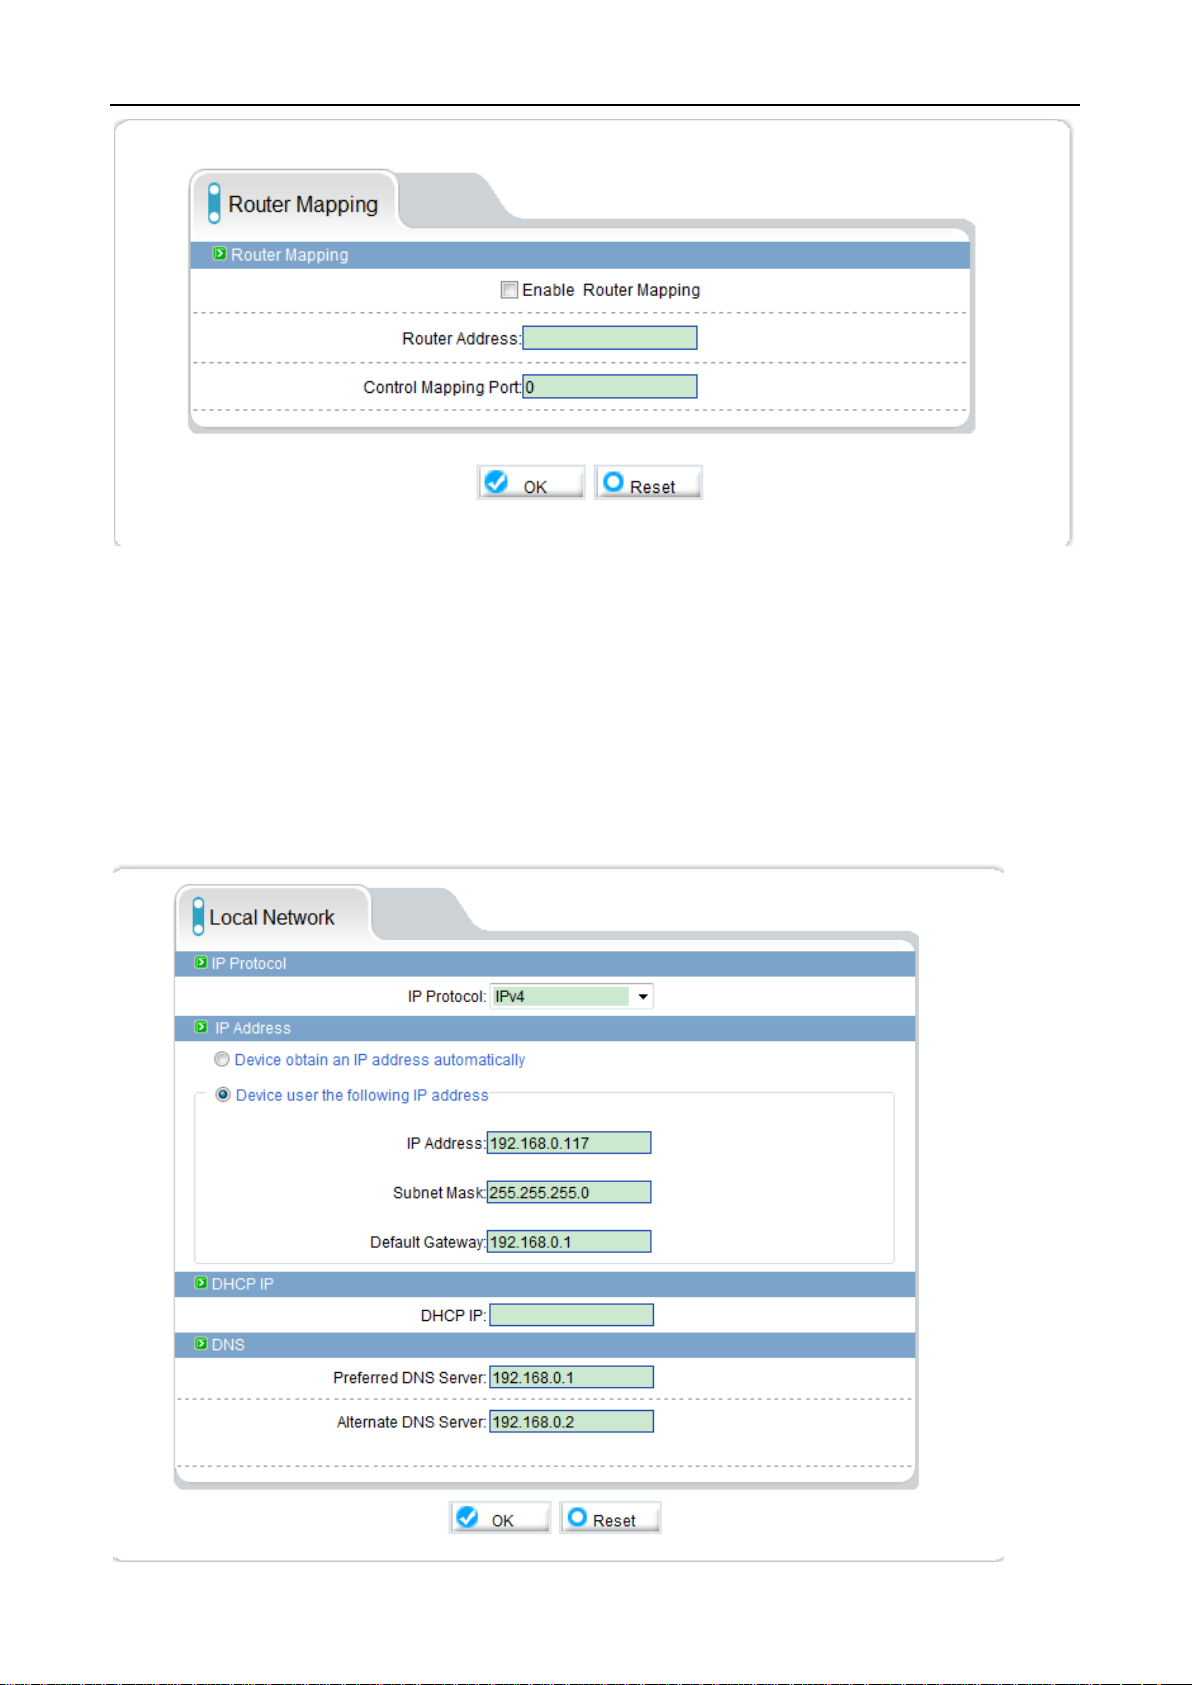
2.4 Route Mapping
Through the routing mapping IP equipment can be realized to WAN network requests through a
router.
-6-
Page 8
IPWEB Guide
eLineTechnology.com
The router address: fill the router WAN address, support f illing in domain name address, such as
test.gicp.net。
Control mapping port should remain consistent with control ports of "device
configuration”-“equip ment por t” Default should be 3001
This function detailed please refer to the document “set instructions of IP equipment WAN nets
visit”.
2.5 Device configuration
2.5.1 Local Network
-7-
Page 9
IPWEB Guide
eLineTechnology.com
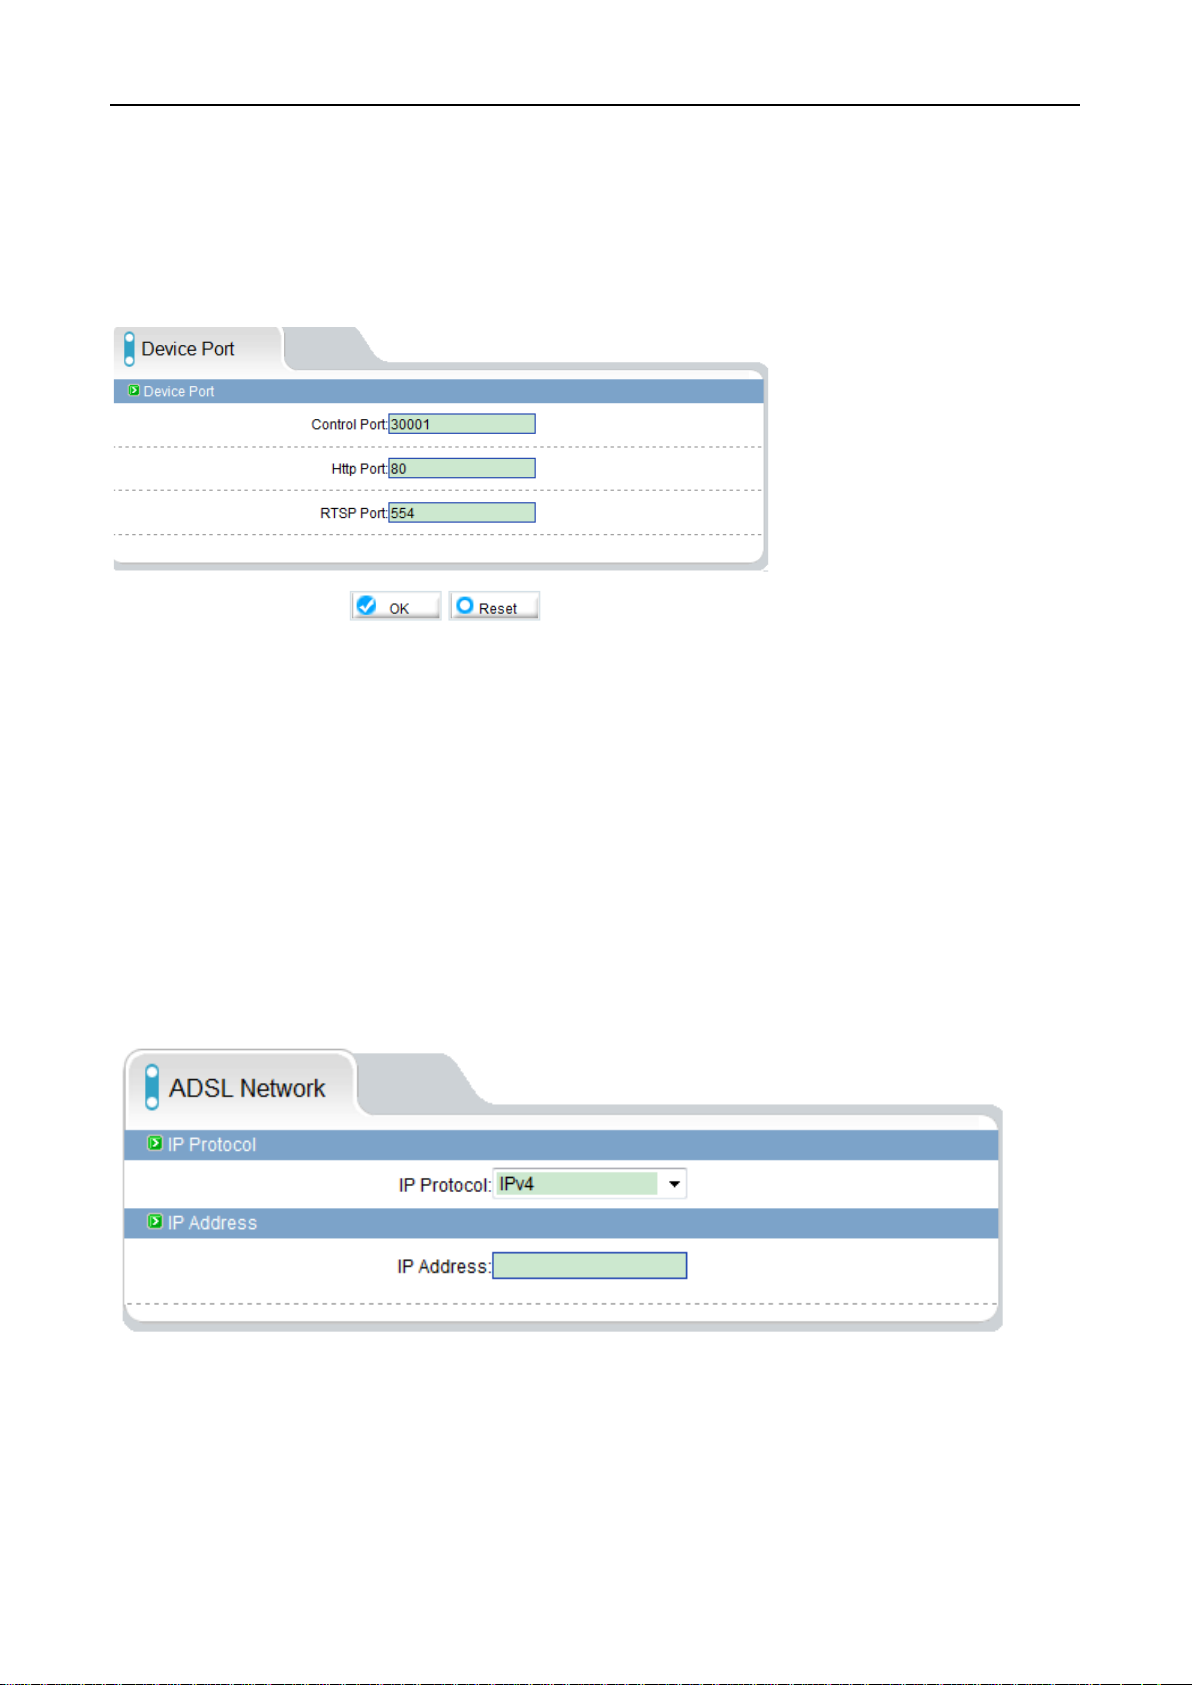
It Can set the network IP camera address, subnet mask, gateway, DNS and other network
parameters, If it is used in local area network you should be careful t hat not to set up the internal LAN IP
address and computer IP addres s to caus e a conflict . If a HDCP is set then t he current IP is dis play her e.
If you want to use the IPv6 protocol equipment, first in the IP protocol IPv6 protocol options to
choose and modify the network parameters, clic k on the "Apply" button.
2.5.2 Device port
Control port: The default is 30001, including the parameters of reading and writing, PTZ control are
both through this port to cont r ol;
TCP audio and video port: The default is 30002, for the TCP protocol under the audio and video
transmission which needs of the port number.
Http Port: Default is 80, for Web access to use the port number. If you change it to another port
number, you need add “: port number” in the address bar at the end. For example, the equipment which
IP is 192.168.10.96 and the Http port is changed to “8080”, you could enter the
http://192.168.10.96:8080 in the IE browser's address bar to access the network device through the
Web.
RTSP Port is use for streaming video. Only requirement to change this is if you are using multiple
devices on one IP which would require all ports t o be modified
2.5.3 ADSL Network
When the user set " Netwo rk Serv ice"“ PP PoE p ara meter s”, after th e s ucce ss of dial-u p eq uip ment,
Equipment’s WAN network IP address will appear in the page.
-8-
Page 10

2.5.4 multicast
eLineTechnology.com
This function can make a sing le flow provide more network receivers.
2.5.5 camera
IPWEB Guide
Camera name: Name of the camera settings will be displayed in real-time monitori ng
Video formats whether to mod ify th e devi ce's PAL/NTSC s ystem, this function is dependent on the
model if supported.
Source resolution: set video source resolution for the 4:3 or 16:9.usually D1 resolution for the
4:3,704×384 resolution for 16:9. Also allows lower v ideo r esolution for 2Mega Pixel s olutions.
-9-
Page 11

2.5.6 Date & time
eLineTechnology.com
Select the method to use for setting the time: one is to set the time according to the clock on your
computer; another is to m anually enter the time and date.
2.5.7 OSD settings
IPWEB Guide
Respectively for different resolutions of network device to set OSD parameters, a tick indicates this
information is displayed as overlay on encoded video stream including: device name, channel number,
-10-
Page 12

channel name, time and cust om OSD.
eLineTechnology.com
2.5.8 Microphone setting
Microphone Type:
Internal:built-in microphone. (if fitted)
External: Where support ed will select the Audio Input as audio source for Line in:
Audio is encoded inside the video stream, audio format is set under the Streaming Settings.
2.5.9 Dome PTZ
IPWEB Guide
IP high-speed dome can set PTZ address.
2.5.10 system servi ce
-11-
Page 13

2.5.11 system Configuration
eLineTechnology.com
Change the language for week OSD and alarm E-mail of the IP device.
2.6 External Device
IP equipment can connect external equipment such as external PTZ, PTZ keyboard and currency
counting.
2.6.1 PTZ
IPWEB Guide
When connect external PTZ control device via the serial, used for older style pan/tilt devices, you
can configured PTZ agreement address, bit rate, data bit.
-12-
Page 14

2.6.2 PTZ Keyboard
eLineTechnology.com
When connect PTZ keybo ar d, you can configure interface t ype, serial ports, bit rate, data bit.
IPWEB Guide
2.6.3 cash Registers
When connect external cash, can add the number that currency counting counts to the video though
OSD.
Note: this f unction needs especial external equipment to support this function.
-13-
Page 15

IPWEB Guide
eLineTechnology.com
2.7 Alarm configuration
Alarm configuration, including alarm I/O port configuration, Disk warning, I/O alarm linkage, and
motion detection alarm.
2.7.1 Alarm I/O Parameter Configuration
Alarm input: Select the alarm input configuration ID, the alarm can be chose the effective level.
Effective level include: high and low two options. When you select high effective input port when access
to high level alarm that is triggered by alarm signals, When you select low effective input port when the
alarm signal that is trigger ed off high alert.
Alarm output: Select the alarm output configuration ID, the effective signal, alarm mode and alarm
output timing para meter s.
Effectively including closed and disconnects signals two options: Alarm output model, including
switch-mode and square-wave mode, When the choice of square-wave mode, can fill in the fr equenc y o f
square-wave output, unit i s Hert z.
Note: the unit of Alarm Time is millisecond.
-14-
Page 16

IPWEB Guide
eLineTechnology.com
2.7.2 Disk Alarm configuration
Disk Alert configuration including: disk error alarm and disk full alarm. Disk alarm will be recorded in
the alarm log.
2.7.3 I/O Alarm Linkage configuratio n
Note: Before the opening of the record, we must first configure the "Local Record""Record Policy"
parameter.
Options need to configure the alarm I/O of the ID number, can be configured in the Alarm I/O trigger
the alarm when the linkage. Including whether the alarm output and whether or not such as the opening
of PTZ.
First of all, check "Enable IO alarm ", and then click on the "Time Setting" set the I/O warning time of
deployment:
-15-
Page 17

IPWEB Guide
eLineTechnology.com
2.7.4 Motion Alarm configuration
Note: Before the opening of the record, we must first configure the "Local Record""Record Policy"
parameter.
Options the camera that need to configure ID number, can be configured to detect movement of the
camera to trigger the alarm when the linkage. Including whether the alarm output and whether or not
such as the opening of PTZ.
First of all, select "Enable Motion Detection", then click on t he "T ime Sett ing" set t he camera to detect
movement of the deploy m ent t im e.
-16-
Page 18
IPWEB Guide
eLineTechnology.com
Require the deployment of the week, and set the beginning and ending days of deployment time,
click the "Add" button, clic k "OK" button.
Click on "Detection of regi onal Configuration":
Area Motion: Press and hold the left mouse button on the video in order to facilitate the sliding region
configured to detect regions, when the need to remove the detection region can click the right mouse
button. The most mob ile region can not detect more t han eight.
Area mask: Hold down the left mouse button within the region to add a mask area, when the need to
remove the mask area, you can cl ick the right mouse button.
Note: The maximum number of areas is 8.
2.8 local Record
Local recording settings is the SD memory card, NAS and FTP video parameters. Once configured, the
device can record video direc t ly to a SD card, NAS and FTP.
2.8.1Record policy
-17-
Page 19

IPWEB Guide
eLineTechnology.com
Need to set up the camera to choose ID, you can set the camera to record the quality of SD cards,
including: resolution, frame rate, bit-stream par ameters.
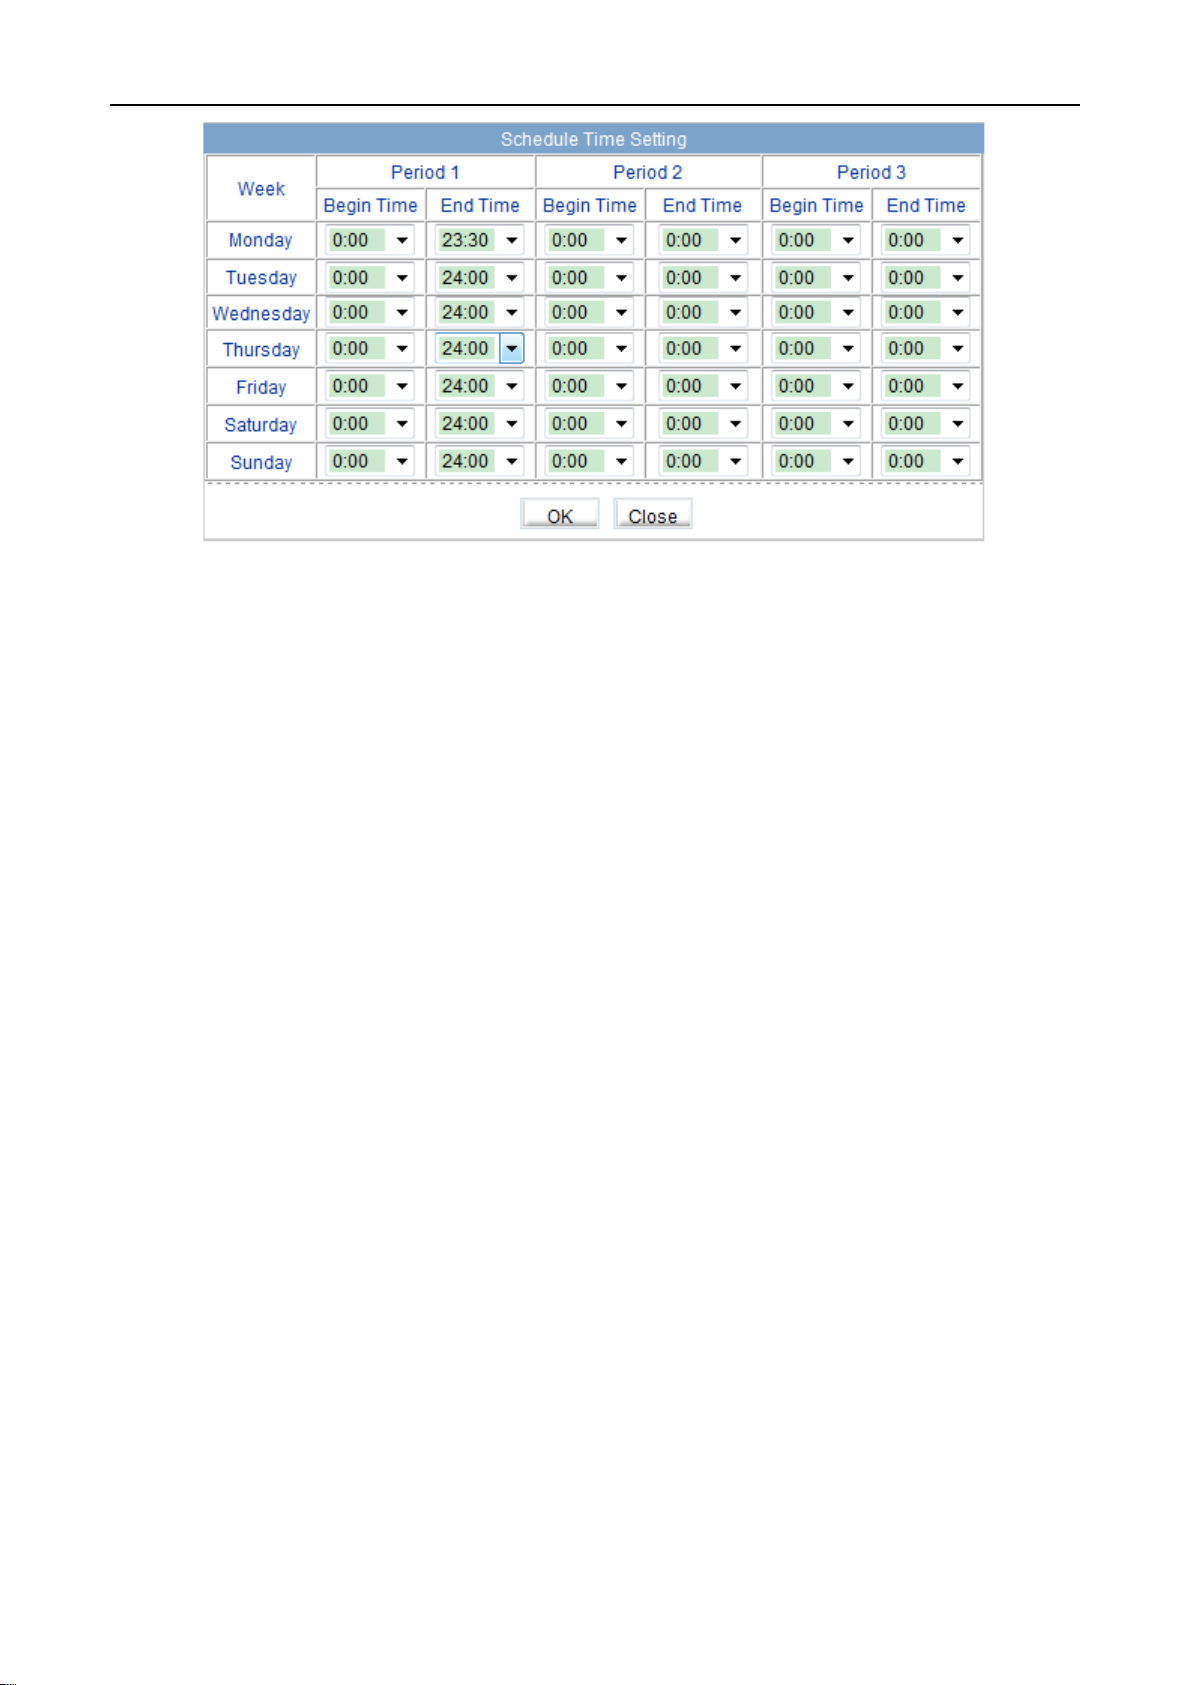
Schedule Record: Including 7X24-hour record and schedule record. When you select from time to
time recording, click the "set-up time",
-18-
Page 20

IPWEB Guide
eLineTechnology.com
Select the week to record, and set recording beginning and end of the day time, click the "Add"
button, click the "OK" button。
Alarm record: fill in the Length of pre-recorded and Length recorded continued, Length of
pre-recorded up to 30 seconds ma x.
Note: Document recording the total length of time=Length of pre-recorded+ Event time length+
Length recorded continued, For example, Set the length of pre-recorded for 10 seconds, Length
recorded continued for 10 seconds, Trigger motion detection for the duration of 5 seconds, While
recording the total le ngt h =10+5+10=25 seconds .
Days to keep video: Ret ain the largest number of day s for 9999 days.
Strea m: R ecor ding selected video stream ID.
2.8.2 Record Directory
Three default directories include SD card, NAS and FTP when setting the video equipme nt directory.
-19-
Page 21

IPWEB Guide
:
eLineTechnology.com
1. SD card
SD Card: Click on the SD card entry, click on the button "modify", you can format the SD
card, the following figure:
Disk name:can be set t o dir ect or y name.
Disk group:the default into 1-8 group.
Available space:the directory c an be equipped with video available space 0 for not rest riction of size.
File system:divided into Video and ext.
2, NAS: Click on the NAS entry, click on the button "modify", and the following figure:
-20-
Page 22

IPWEB Guide
eLineTechnology.com
Set the correct IP address of the NAS, path, userna me a nd password, Click enabled, you can record
video directly to a device on the NAS.
3. FTP:Click on the FTP entries, and click "modify" button, pop-up below
Set the right FTP IP address, port, account number and password, click the "opening" button,
equipment video record in g can directly record to the FTP. Normally ftp port is 21
2.9 Privacy Masking set ti ng
Though this function we can set video covered area, the biggest support covered area is no more
-21-
Page 23

than 8% total image space.
eLineTechnology.com
IPWEB Guide
2.10 Network Service
2.10.1 NTP
-22-
Page 24

IPWEB Guide
eLineTechnology.com
NTP: Network Time Protocol。Host can automatically adjust the clock of the computer and connect
sync. Click "Apply" button and then automatica lly adj ust the time.
2.10.2 PPPoE
PPPoE: Network Camera support agreement based on the PPPoE WAN access. Through the client
software is set up correct l y PPP oE user n ame a nd password, after ever y time you s t art Netw or k Ca mera ,
PPPoE mode automatically establish a network connection, after the success of the network camera to
obtain the dynamic WAN IP addr ess.
Description: Make sur e that ADSL Modem has b een open ed. PPPoE para meters set f or the first time,
the need to restart the eq uip m ent in order to establish a connection.
2.10.3 DDNS
DDNS: Dynamic domain Nam e serv ice: It is bett er to register a domain for av oid ing input I P address,
as IP address is difficult to remember. It is necessary to get a PC with stable IP address in Internet, and
domain name service software need to be run on the PC.(The PC will be DDNS)
After connection to net wor k thro ugh PPPo E su ccess fu lly, it is available to get IP address of extensiv e
area network, and sen d name a nd IP addres s to DDNS. When c lient-side s oft ware v isits net wor k camera,
need to find network camera name and corresponding IP address, then send the address to client-side
software; finally client-side software can build network connection with network camera to get video
images.
The DDNS supports the 3322 and DynDns domain name, future systems may offer additional
options.
-23-
Page 25

IPWEB Guide
eLineTechnology.com
2.10.4 Update
You can be set to upgrade the server IP address and port number as wel l as parameters such as t he
upgrade cycle.
Upgrade cycle: unit is minutes; the upgrade process for each time interval to upgrade the server
asked whether there is a need to upgrade the new version. Specific steps to upgrade please refer to
"Chapter III."
2.11 Service Center
2.11. 1 A larm center
Alarm center:when alarm triggered ,the alarm event is sent to the alar m center as per th e IP addres s.
-24-
Page 26

2.11.2 SMTP
eLineTechnology.com
IPWEB Guide
After SMTP is enabled, when triggered by motion detection, alarm and I / O alarm will be
automatically sent JPG p i c t ur es and alarm information to the recipient's mailbox.
-25-
Page 27

2.12 Privilege Manager
eLineTechnology.com
2.12.1 Authority group setting
IPWEB Guide
You can add, modify, or delete access group, but the default permissions group administrators can
not to be deleted.
2.12.2 user setting
You can add, modify, delete a user, but the default user admin can to be deleted. The default user
can unlock the customers w hich input wrong password for many times.
Support more login: when the user choice "yes" in Multi login, the user can land and user the
equipment on differ ent PC at the same time.
-26-
Page 28

2.13 protocol
eLineTechnology.com
2.13.1 Protocol information
Can see the current equipme nt agr eement name and vers ion nu m ber.
2.13.2 Security
IPWEB Guide
When the equipment is O nvif protocol connect, you can choose whether security checks or not.
2.13 Device Restart
IP CAMERA to use remote cont r ol equipment, to resume op er at ion.
2.15 Default settings
The parameter of the IP equipment will restored to the factory value.
-27-
Page 29

IPWEB Guide
eLineTechnology.com
-28-
 Loading...