

Page 1

POWER ASSISTED BICYCLES
OWNERS MANUAL
Page 2

Welcome to the World of e.bike cycling.
POWER ASSISTED BICYCLES
Firstly may we congratulate
you on purchasing your new
electric power assisted e.bike.
Please take time to read your
manual. We have tried to write
it in a way that is simple and
easy to follow, whilst
explaining how your bike
works and how it is
maintained.
At any point if you feel you
need help we have a tehnical
helpline for support.
Please call our
T
echnical help line:
(weekdays 9am-5pm)
01702 208187
(standard call rate charge applies)
Simply explained this is how your e.life bike basically works.
1. Switch the battery to ON, with the switch on the side of the battery, and
switch the power on by pressing the top power button on your controller
on
the handlebars.
2. As you begin to pedal a sensor will read the level of effort needed to turn
the wheels of your bike.
3. After one complete turn of the pedal the electric motor kicks in making
pedaling much easier.
4. There are 3 setting on your controller on the handlebar, allowing you to set
the level of assistance you require.
For example: Riding up a hill you’ll probably use ‘High’, mode.
5. You can change the level of assistance you need at any time and as often as
you wish.
6. The motor works to assist pedalling, stop pedalling and the motor
stops too.
7. Applying the brakes cuts the motor
8. You can also choose to switch the assist OFF and ON on the controller at any
point in your journey. This helps to save battery power when its not needed.
The more you use the assist, the more power it uses, each rider is dierent so gures can vary
considerably with dierent rider weight and the terrain you ride. Generally with normal use,
you should be able to obtain around 20 miles, before you need to re-charge your battery.
We Recommend that you get used to your new e.life bike and the level of assit you place on it,
you’ll soon be able to work out how long a journey you can make and safely return under
assist. You can of course ride as you would a normal bike if the charge runs out.
(Fig.14)
(Fig.14)
(Fig.13)
2
Page 3

INDEX
POWER ASSISTED BICYCLES
Contents check list
1. Your E.Life
2. Saddle & Seatpost
2. Box containing:
a. Battery Charger
b. Battery Lead
3. Box containing:
a. Tool kit and bag
b. This Manual
4. Set of Keys
( attached to Rear Carrier)
IMPORTANT!
PLEASE REMEMBER THAT
IT IS IMPORTANT TO KEEP
THE CARTON YOUR BIKE
ARRIVED IN , COURIERS
CANNOT COLLECT YOUR
BIKE WITHOUT A CARTON
SHOULD YOU HAVE NEED
TO RETURN IT TO US.
Page 2 Welcome to E.Life
Page 3 Index & Check List
Page 4 Unpacking your new E.Life
Page 4-6 Unfolding your E.Life
Page 6 Fitting the saddle
Page 7 Pre-Ride checks
Page 7 Getting Started
Page 8 Understanding your controller
Page 9 Understanding your Battery
Page 10 Charging your Battery
Page 11 Understanding your Gears
Page 12 Maintenance of your E.Life
Page 13 Simple Troubleshooting
Page 14 Warranty
Page 15 National Service Centre
Replacement Batteries & Chargers
3
There are video tutorials online or on Ideal World’s
website designed to assist you if you need help.
Please call our
Technical help line:
(weekdays 9am-5pm)
01702 208187
(standard call rate charge applies)
Page 4
Unpacking your new e.bike
POWER ASSISTED BICYCLES
Fig.1
Fig.2
Fig.3
Your bike comes 100% assembled in the Carton
1. Before you begin to unpack your e.bike we recommend you get another
person to assist you as it s much easier with 2 persons to lift out of the box.
2. Remove all the packing materials used to protect the bike and dispose of it
later in a responsible manner.
3. Once you have unpacked the bike it is a good idea to check to make sure
there has not been any damage in transit. ( If you nd anything missing or
damaged, contact Ideal World customer services)
idealworld.tv › gb/self-service
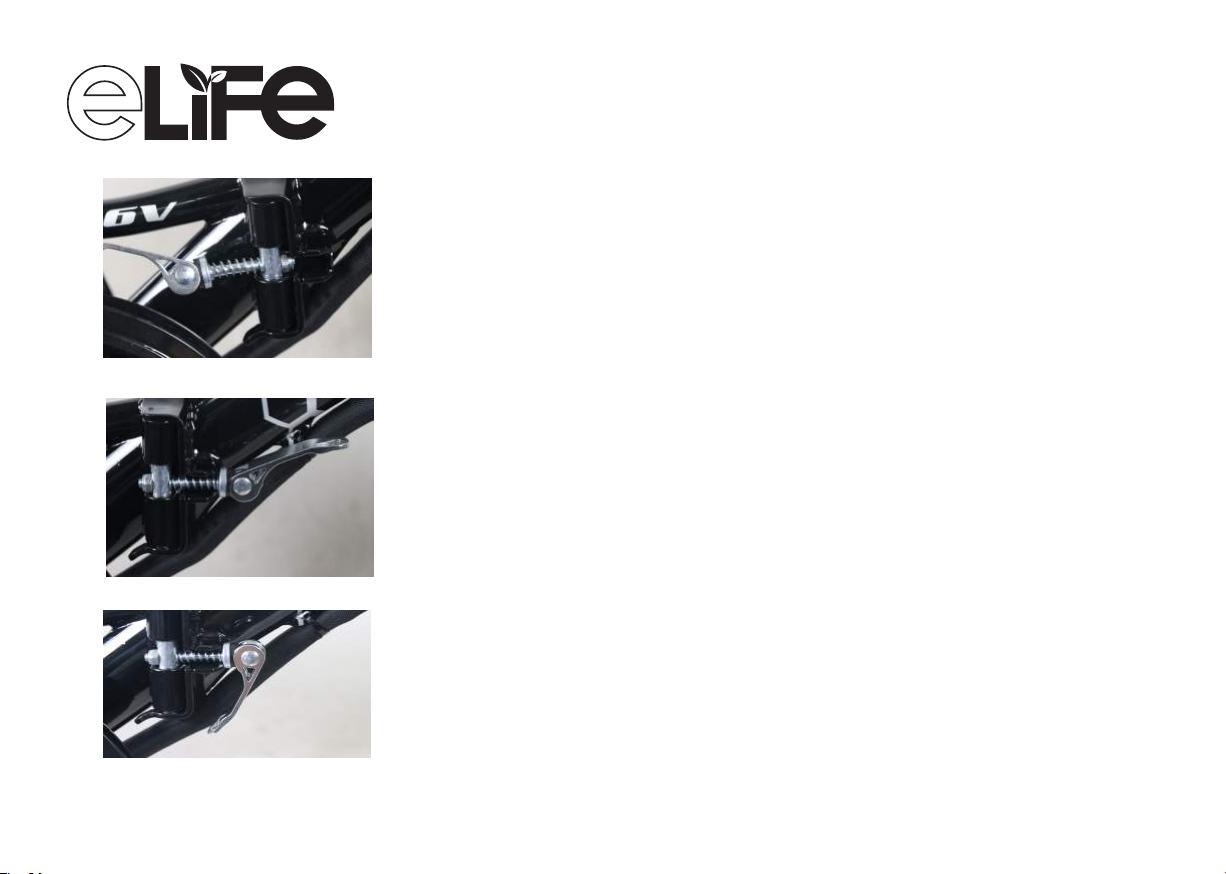
Unfolding your e.bike
Step 1. Frame
1. Unfold the frame lifting the locking pin, close the frame, releasing the
pin into the location hole
2. Swing the quick release bar around into the slot on the front frame section
as shown.
3. Close the quick release arm which tightens and locks the 2 frame sections
together
4. To fold your frame for transport of storage simply reverse steps 1-3.
PLEASE NOTE:
When you have unfolded your frame its a good idea to rest your bike on the bike
stand which is attached to the left rear chainstay, this makes it much easier to
complete the other steps.
(Fig.2)
(Fig.3)
(Fig.1)
4
Page 5
Unfolding your e.Life
Fig.4
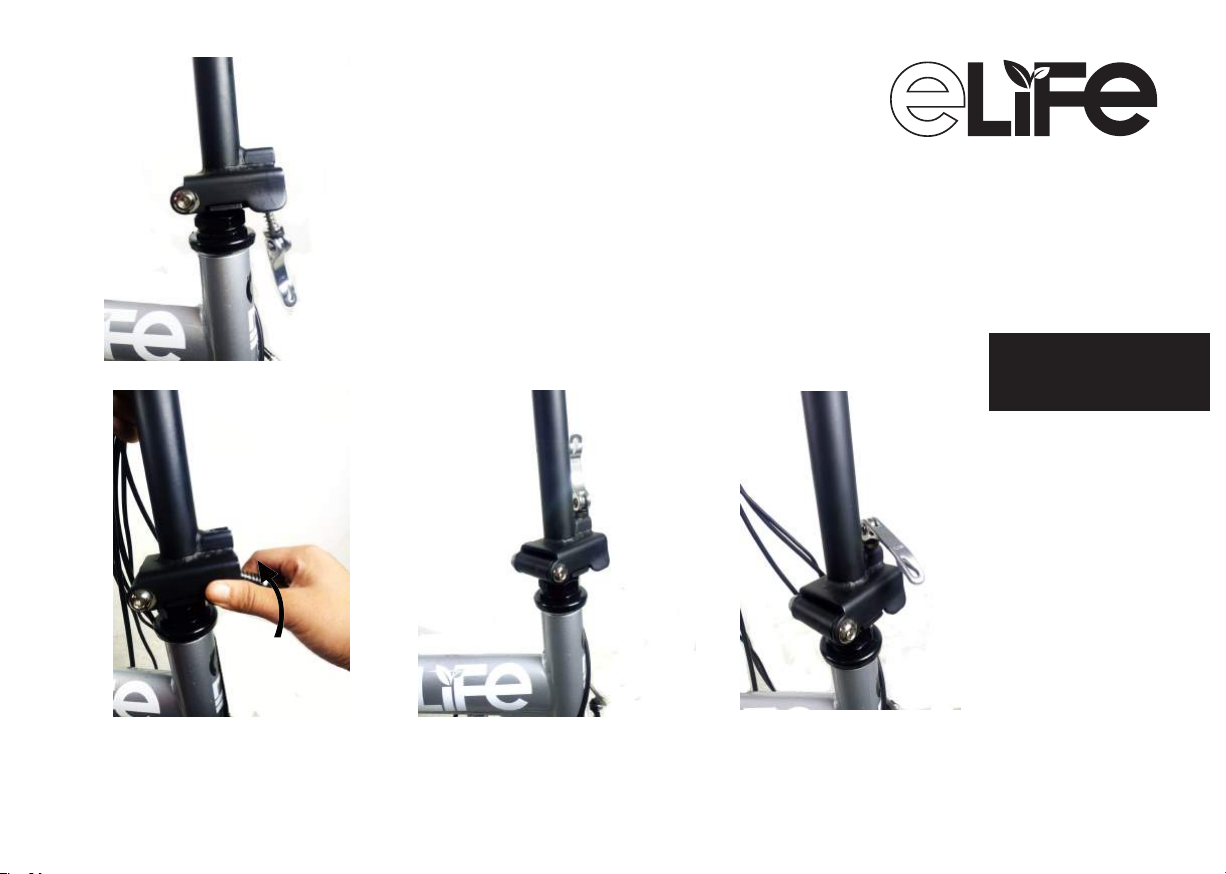
Step 2. Handlebars and Stem
POWER ASSISTED BICYCLES
1. Unfold by lifting the handlebars and Stem until it is sitting vertically.
2. Raise the clamp arm up towards the stem to lock inplace.
There are video tutorials online
or on Ideal World’s website
designed to assist you if you
need help.
Fig.5
Fig.6
Fig.7
5
Page 6
Unfolding your e.bike
NOTE: Should you ever need to replace the pedals
remember the right pedal tightens clockwise and
the left pedal anti-clockwise.
POWER ASSISTED BICYCLES
Fig.8 Fig.9
Fig.10
Knurled adjustment nut a
quater of a turn until required
tightness is obtained.
Fig.11
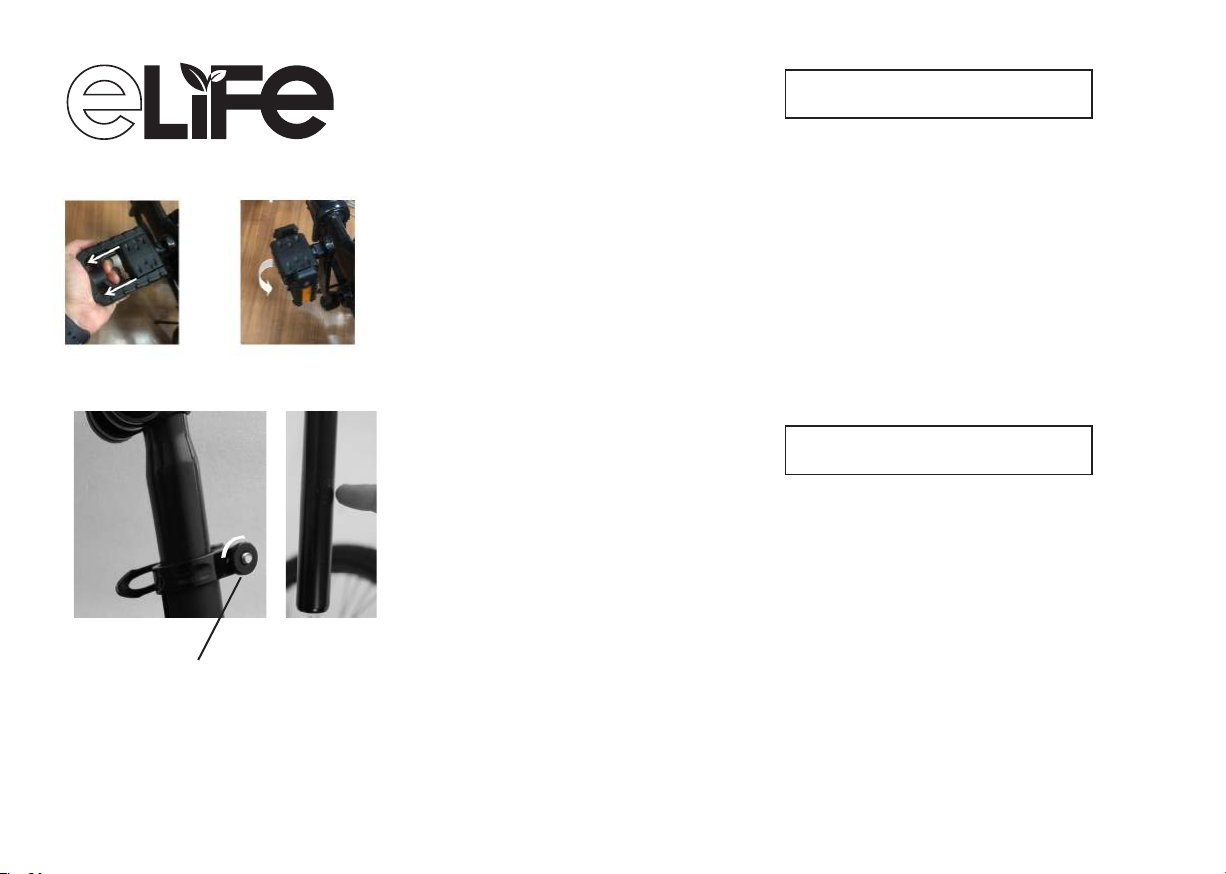
Step 3. Pedals
1.To fold the pedals for storage or transportation, pull the pedal outwards
and fold downwards.
Photo shows pedal movement direction
Fitting the Saddle
(Fig.10)
NOTE: Be sure not raise the seatpost higher than
the minimum insertion mark clearly on the
seatpost.
The Saddle and Seatpost are already tted together.
2. Slide the seatpost into the seatbube and close the tension lever
on the quick release clamp to lock your seat in place.
3. Adjust the saddle height to suit you by releasing the clamp and tightening
when at the correct height.
4. If the clamp does not tight enough to hold the saddle in position simply
release the tension lever and turn a quater of a turn on the wheel nut and
close the tension lever. Repeat as necessarry.
(Fig.11)
6
Page 7
Pre-Ride Checks
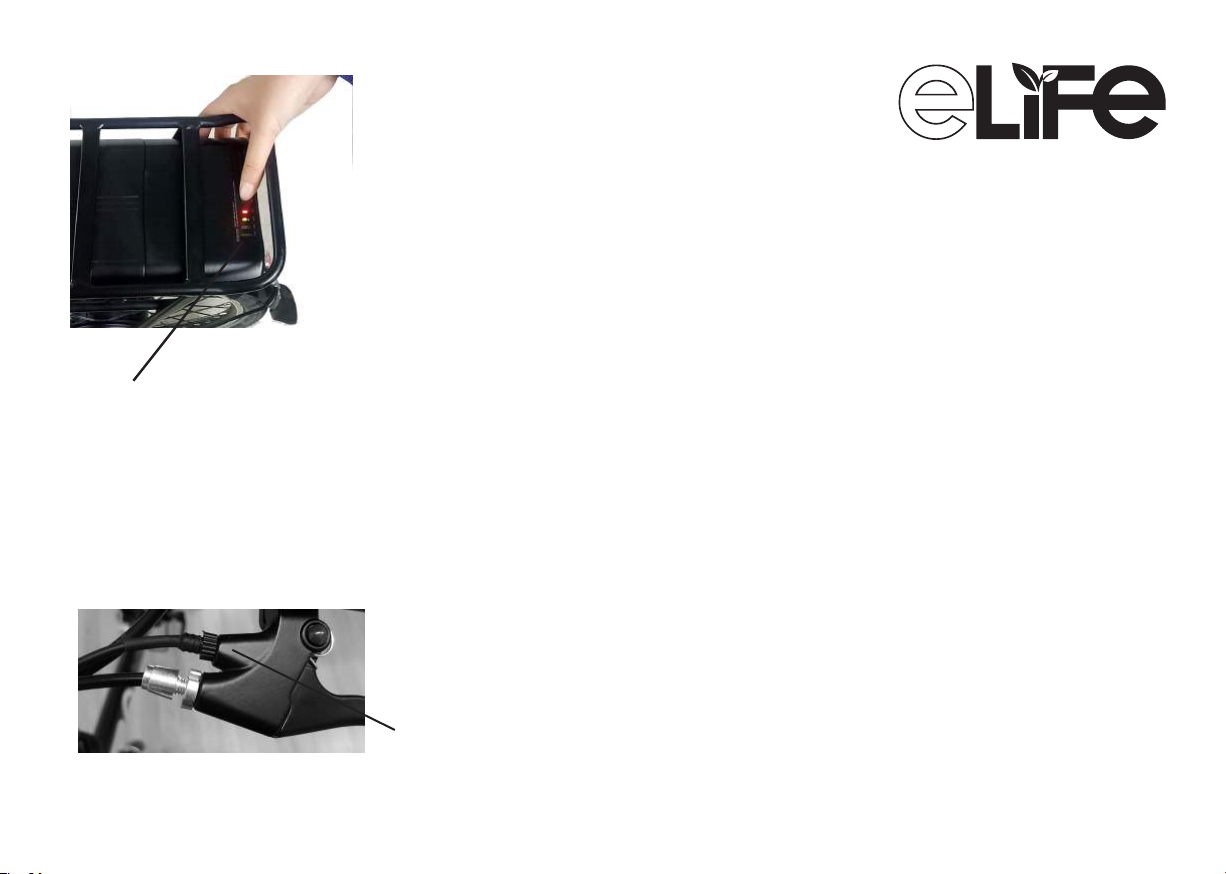
2
Fig.1
P
ess this button to show battery
r
charge level, the battery needs to be
switched to ‘ON’ to do this..
Fig.13
Complete these checks before every ride
POWER ASSISTED BICYCLES
1. Check to make sure all nuts/fastenings are tight
2. Check that your tyres are inflated sufficiently (see tyre
wall )
3. Check that the brakes are working correctly
4. Check your battery for charge.
our new e.bike is supplied with a partial charge)
(Note: Y
(Fig.12)
Getting Started
1. Switch the battery ‘ON’ by pressing the switch button.
2. Press the power button on the Controller on your handlebars to switch on
3. ‘MODE’ is set on ‘1
’
THAT‘S IT........You’re ready to go.
4. To start , simply begin to pedal. Once the crank is turning you will feel the
motor kick-in and the electric system begin to assist you.
5. You have 3 levels of assist,
1, 2 and 3, and its a good idea to try all 3 levels
to give you a feel of the effect this has on your riding.
6. Remember, stopping pedaling or braking cuts the motor assist, so you can
always feel safely in total control.
Applying the brakes activates the brake sensor which
cuts the power to the motor.
(Fig.17)
7
Page 8
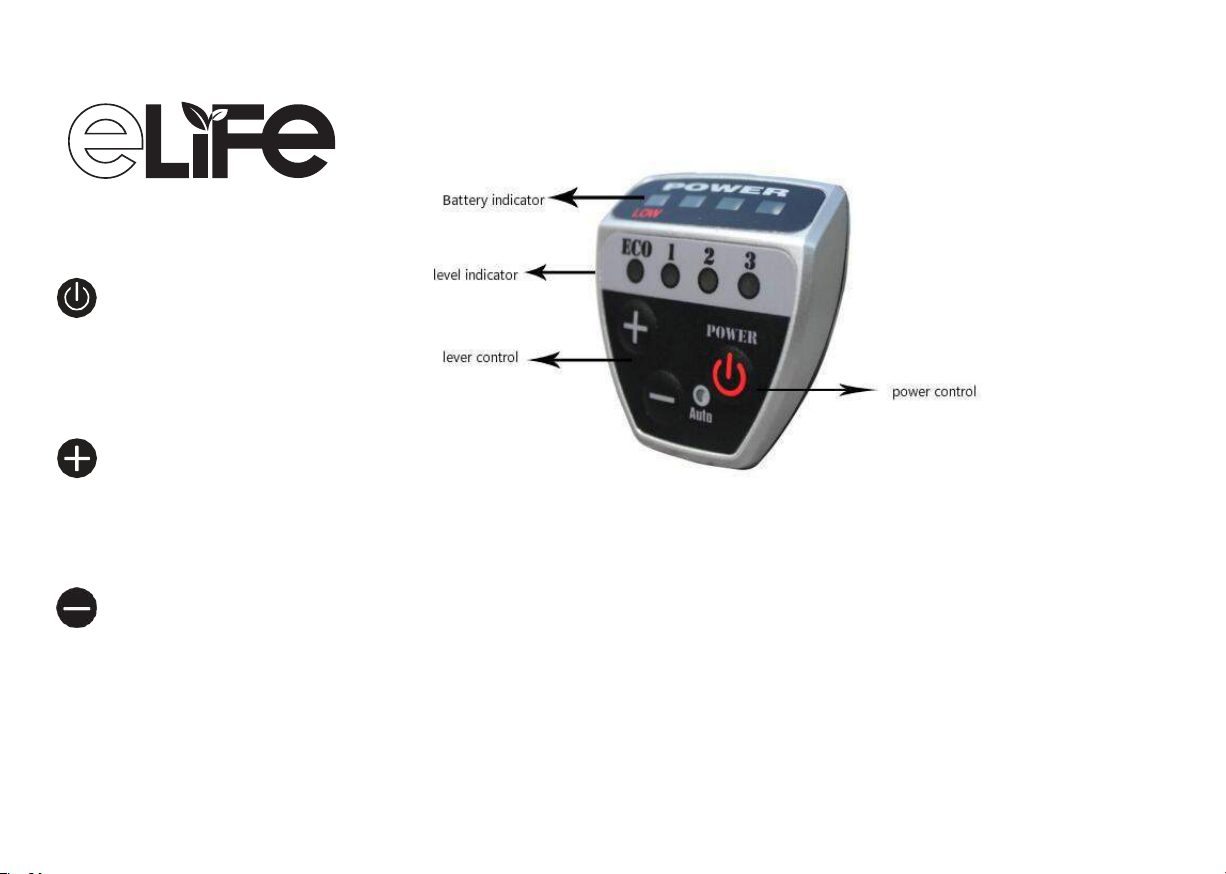
POWER ASSISTED BICYCLES
Press to switch ON/OFF
Press to increase assist
level 1-3.
Press to reduce assist
level 3-1.
Understanding your controller
Fig.14
Your Controller is tted to the left side of the Handlebar.
1. ON/OFF button - Switch on after you have switched battery switch to ‘ON’
2. Lever buttons - 1, 2
3. Battery
4. As you ride up a hill the power indicator drops down showing increased
resistance levels, but once back to level ground the indicator lights will
return to a more accurate position of available power levels.
5. This bike has a 6km walking mode function, which allows you to push
your bike effortlessly over steep ridges or hills. You can activate this
function by holding down the minus button for 3 seconds.
Indicator lights - These are red and go down as you use the power.
and 3, easy selection levels of assistance
8
Page 9
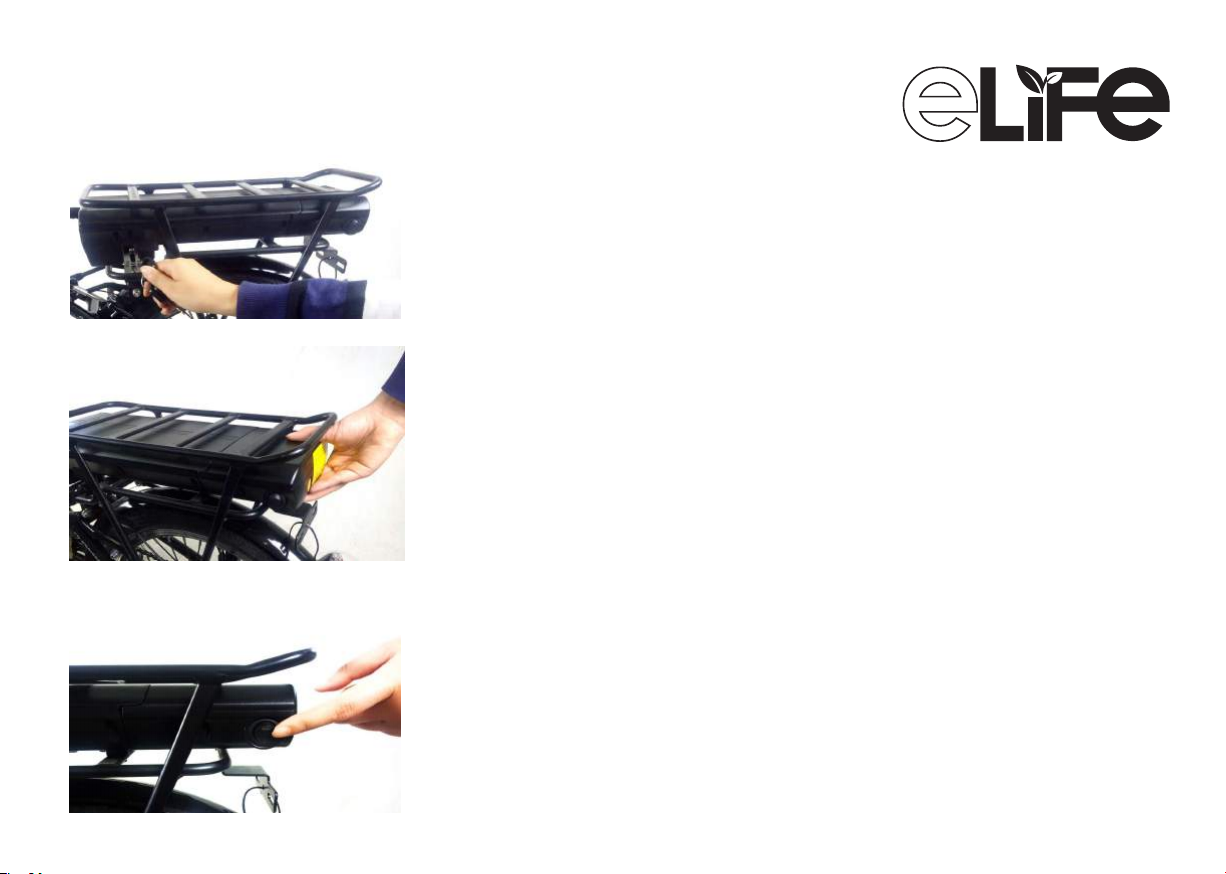
Fig.15
Understanding your battery
Fig.16
Fig.17
1. Security & Removal
1. You are supplied with 2 keys to secure your battery to your bike.
It is advisable to seperate the keys as they cannot be replaced if lost.
2. You can also unlock your battery enabling you to remove for security
or to charge away from the bike.
3.
5. Withdrawn the battery
To remove the battery, Push in the key and turn to anticlockwise position
(Fig.17)
POWER ASSISTED BICYCLES
2. Battery operation
1. Switching ON/OFF is by pressing the button on the side of the battery .
2. Remember to switch OFF when not in use as this may drain the battery
3. On the top of the battery is the power indicator lights, by pressing the button
the lights indicate the charge level.
4. Battery Charger
1. NOTE: Only charge your battery with the Charger supplied with your e.life
The charger is set to 220/240V. Never use 110v setting.
2. Avoid dropping the Charger as this may damage the sensitive electronics
within the casing.
3. You can leave the battery charging, it will stop charging by itself when it has
reached full charge, but it is not recommended to leave charging for any
considerable time over what is required.
(Fig.12)
(Fig.17)
9
Page 10
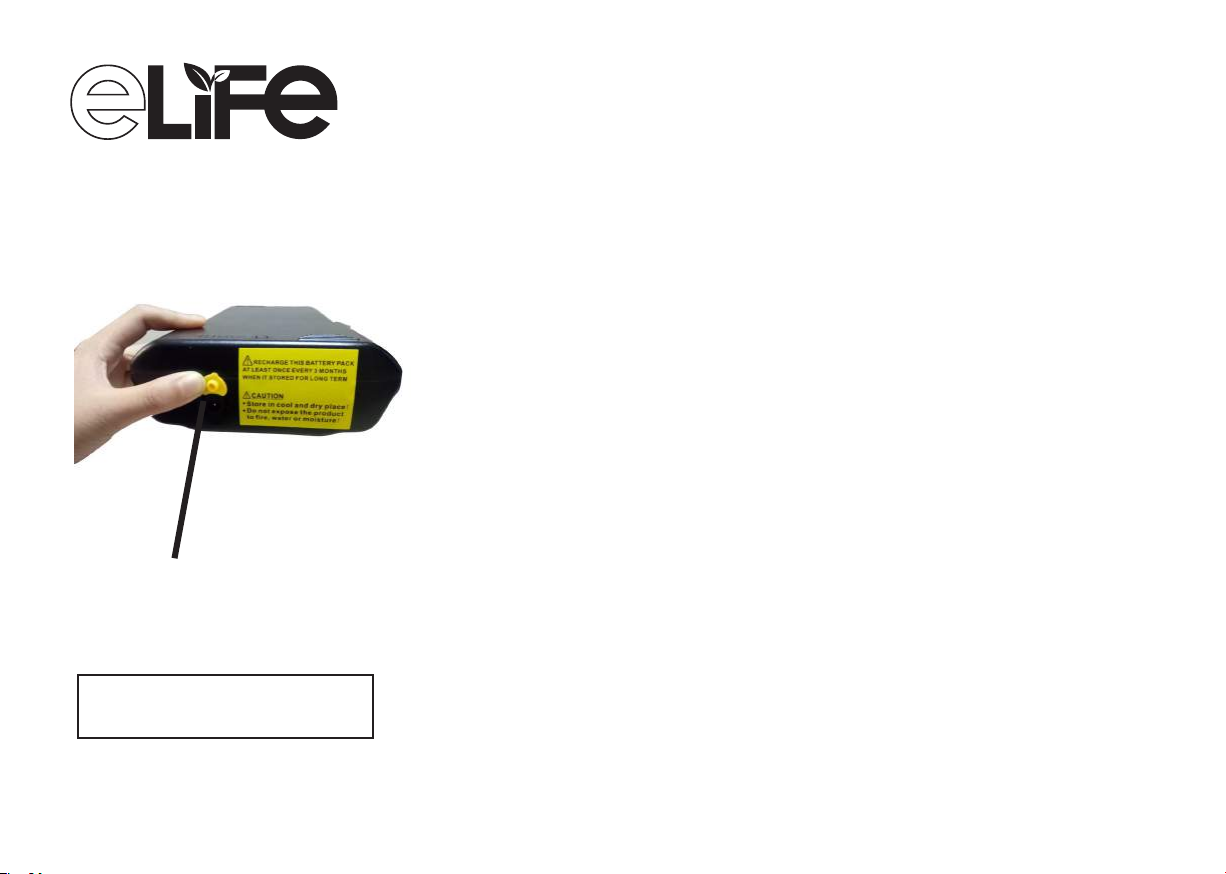
Charging your Battery
POWER ASSISTED BICYCLES
Charging port
18
Fig.
To fully charge your battery
takes approx. 2-3 hours
Your Lithium Battery arrives partially charged.
Your Battery can be charged on or o your bike.
1. Plug your charger into the mains, the LED light will illuminate GREEN
2. Connect the charger to the battery using the lead provided, the LED light on
the charger will change to RED. This indicates it is charging.
3. Once Fully charged the LED light on the charger switches back to GREEN
indicting the battery is fully charged, and then goes o.
Your Battery indicator lights.
When fully charge all 4 indicator lights on your battery will light GREEN
and will go out as the power is drained.
Press the button next to the indicator lights to check power, remember the battery must be switched on to do this.
Basic rules to follow when charging your battery
1. Do not cover chrger with any material of substance that may restrict airow
to the charger. The charger needs to ‘Breath’ to keep cool.
2. Charging your battery each time you use it no matter how far the trip, will
prolong the life of the battery.
3. DO NOT leave the battery discharged for long periods.
4. Never open the charger or change settings on charger.
10
Page 11
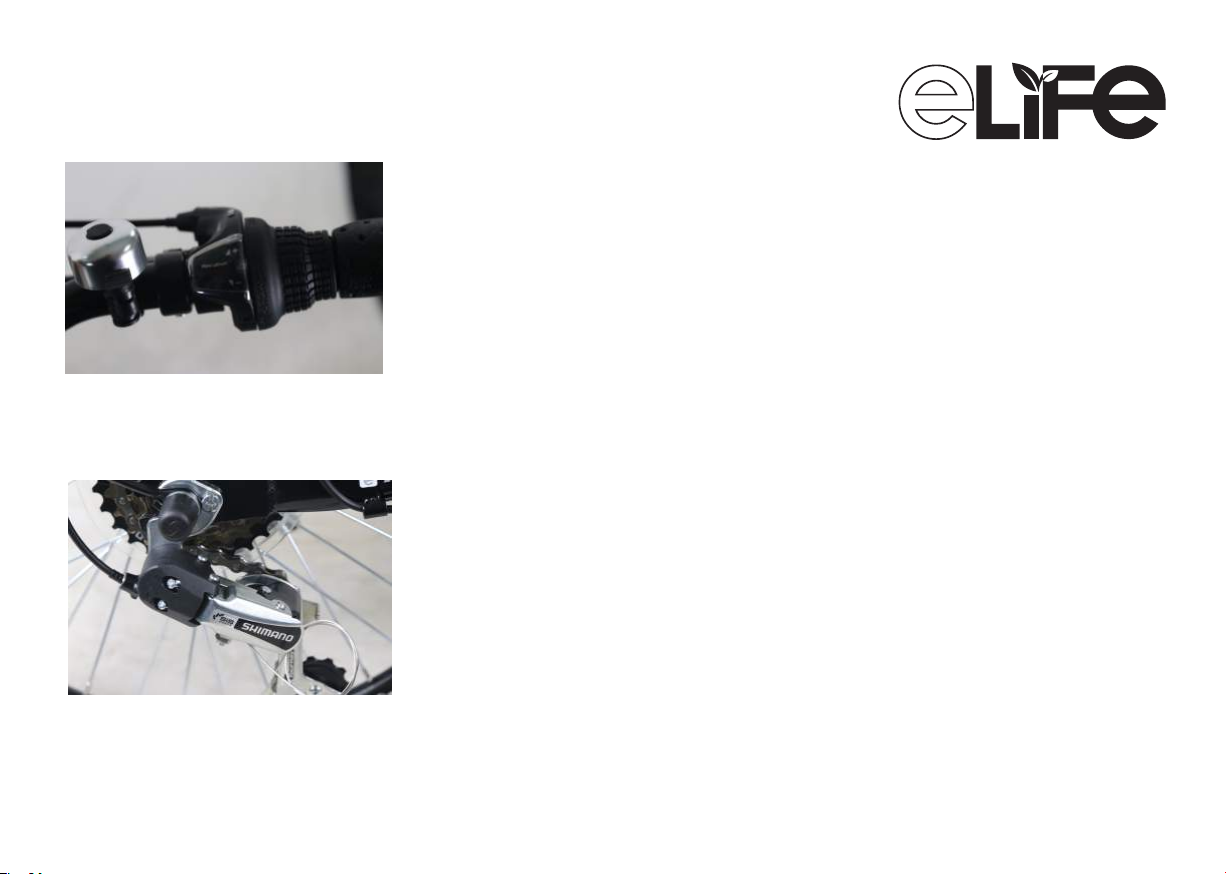
Understanding the Gears
Fig.
19
The Gears work exactly as a normal bike and are
POWER ASSISTED BICYCLES
independ of the electric motor.
Revoshift is fitted on the right side of the handlebars, which consists of a large
The
shift lever, you can turn the shifter to + side to HIGH gear and - side to LOW gear.
Once riding the 6 speed conventional gearing can be used to thumb shifting up to
low and simple release button to drop back down to High.
Lowest Being the easiest and Highest being the hardest.
The gears are pre-set in the factory so should need no adjustment.
Over a period of use the cables will stretch and may need adjustment which is
probably best done at your 3 month service.
Your local bike shop or specialist e.bike shop will offer this service.
( see page 15)
(Fig.19)
Fig.2
0
11
Page 12
Maintenance of your e.bike
POWER ASSISTED BICYCLES
Fig.2
1
It is ok to oil the front and rear axles
and chain . The Motor should not be
lubricated.
1. General
1. Wipe your bike over with a dry cloth, or neutral detergent.
2. Use lubrication oil for metal parts. i.e. chain, axles.
3. Wipe down Plastics, paint coated parts with a dishcloth.
4. Increase the frequency of lubricating oil at wet or hummid areas
( Recommend 30SAE lubricating oil)
2. Weekly Inspection
It is recommended that after this period you should inspect your bike as
things will slacken o and need re-tightening.
3. Every 6 months
We recommend that every six months you complete a full service on your
bike to keep it in excellent working order.
When stored and not in use remove the battery and store in a cool, dry
place, charging periodically as the battery will discharge over time of none
use. Failure to do this will result in the battery falling into a dormant state
rendering the battery unrepairable.
PLEASE NOTE:
If you do not feel that you can complete the maintenance of your bike, please
take it to your local bicycle workshop where they will beable to asist you.
12
Page 13

POWER ASSISTED BICYCLES
If unsure on any of these
points, or you fail to correct
the problem, please call the
helpline who will be able to
advise you.
Simple Troubleshooting
Problem Check Action
Low Speed battery power Charge Battery
Tyre pressure Inate tyre
If tyre at Repair tyre
Load Do not overload
The Motor is not Every plug Ensure every plug is
working connected
Power indicator Check the sensor is
light does not still in place on the
come on on the bottom bracket
Contact Helpline
Power indicator on Loose wiring or Checkwiring and
battery is on,but connection. connections,
the bike doesn’t check Sensor as above
work. Contact Helpline.
Please call our
Technical help line:
(weekdays 9am-5pm)
01702 208187
(standard call rate charge applies)
Reduce battery Is the battery
performance. fully charged?
Charger not giving Check the light on
full charge. charge remains
RED during
charging period?
Low Battery power charger works Replace Battery.
correctly?
Brakes loose Cable tension Take to cycle shop
Worn blocks for service.
If NOT, charge fully.
If NOT, replace charger
13
Page 14

Warranty
Subject to the following, Ideal World warrants that the goods
will correspond with their specication at the time of
purchase and will be free from defects in material and
workmanship.
Ideal World oers a 2 year warranty on the frame from any
problems relating to manufacturer workmanship or arising
from material defects including breakages or cracking caused
whilst riding ( other than rider misuse).
Ideal World oers 12 months warranty on the battery and
motor for any problems relating to manufacturers
workmanship or arising from material defects. The warranty
does not cover misuse or failure to follow the manufacturer’s
operational instructions correctly.
All other components are guaranteed for 1 year for problems
related to manufacturer workmanship or arising from
material defects with the exception of consumable
components for example brake blocks, pads, grips, tyres and
tubes.
Ideal World oers this warranty to the original purchaser of
the product. This warranty is not transferable to a third party.
PLEASE NOTE:
Any gures quoted regarding battery performance or distances which can be
obtained per single charge are based on standrard test conditions. Diverse terrain and
rider weight will of course produce varying results from those stated.
POWER ASSISTED BICYCLES
14
Page 15
Replacement Batteries & Chargers
National service Centre
Replacement batteries and chargers are available to t your
bike and can be purchased seperately from Ideal World.
Should you ever need to remove or replace your pedals it is important
to know that left-hand pedal screws in ANTI-CLOCKWISE and the
right-hand pedal screws in CLOCKWISE.
Pedals are normally stamped on the ends of the axle of the pedal
as in the photo, L and R.
ELIFE have teamed up with
to oer all Ideal World customers a
Nationwide Service for your e.bike.
If you live in Scotland or Cornwall or
anywhere in between and you want
the best electric bike service then
please contact us for more information.
Monday - Saturday 9am - 5pm.
Line 1. 02380 236 540
Line 2. 02380 224 344
15
Page 16

POWER ASSISTED BICYCLES
Distributed in the UK by
IMPORTANT!
PLEASE REMEMBER THAT
IT IS IMPORTANT TO KEEP
THE CARTON YOUR BIKE
ARRIVED IN , COURIERS
CANNOT COLLECT YOUR
BIKE WITHOUT A CARTON
SHOULD YOU HAVE NEED
TO RETURN IT TO US.
There are video tutorials online or on Ideal World’s
website designed to assist you if you need help.
Ideal World
Ideal Home House,
Newark Road,
Peterborough,
PE1 5WG
Please call our
Technical help line:
(weekdays 9am-5pm)
01702 208187
(standard call rate charge applies)
 Loading...