

Page 1

KS300 PRO
MANUAL
Page 2

2
English
This booklet provides information about the actual use and maintenance of the
machine. Read it carefully and keep it safely for future reference.
Please also keep your purchasing invoice or receipt together with this booklet.
Register your product online on www.eliet.eu
© ELIET
Copyright 2009 ELIET. All rights reserved. All textual material, drawings, illustrations, diagrams, graphs, etc., included in this
ELIET booklet are protected by copyright and also by other intellectual property rights. None of this information may be copied
for commercial purposes or distribution and/or changed or reposted for other purposes. The copyright on the content included in
this ELIET manual remains the exclusive property of its respective owners.
Page 3

English
3
1. Introduction
1.1 Read this operating manual carefully
ELIET machines are designed for safe and reliable use if they are operated in accordance with
the instructions provided. Carefully read these operating instructions before using the machine.
Failure to do so may result in personal injury or damage to the equipment.
1.2 Identification data – ELIET KS300 PRO
Note the identification data relating to your machine in the text boxes:
Stock no.:
MA
Serial number:
Year of manufacture:
20
2. Warranty
2.1 Warranty card
To be eligible to obtain warranty you must send the completed warranty card within one month
from the date of purchase to the address stated below:
ELIET EUROPE NV, Diesveldstraat 2, B – 8553 Otegem (Belgium)
Ph. +32 56 77 70 88 - Fax +32 56 77 52 13
REGISTER YOUR PRODUCT ONLINE ON WWW.ELIET.EU
Read the warranty conditions on the attached warranty card.
For your information:
The warranty does not cover any technical problems or defects that occur as a
result of poor maintenance. Chapter 11 provides an overview of the maintenance
intervals and recommendations regarding maintenance that requires intervention by an authorised dealer.
Page 4

4
English
3. Welcome
Welcome to the family of ELIET users.
We thank you for the trust that you have placed in ELIET and we are convinced that you have
purchased the very best machine. The operating life of your ELIET machine depends on how you
care for your machine. Strict adherence to the instructions and suggestions in these manuals will
guarantee optimum performance of your ELIET machine for a very long time.
Read this manual carefully before operating the machine. This will prevent you from operating
the device incorrectly. For your own safety, please observe the safety instructions specified in
the relevant chapter. Even if you are thoroughly familiar with operating such equipment, it is still
advisable to read these pages carefully.
All ELIET equipment and machines are continually being updated and improved and therefore
the specification of your machine may differ slightly in terms of shape, technology and accessories. The descriptions and technical data in this manual are accurate at the time of printing.
Certain illustrations and descriptions may not be applicable to your specific machine, but instead
relate to a different version of the machine. We trust therefore that you will understand that the
texts and illustrations in this manual cannot give rise to any claims. lf you still have questions
after reading this manual, please contact your ELIET dealer. Find an official ELIET dealer near
you on www.eliet.eu.
ELIET AT YOUR SERVICE
During office hours ELIET’s help desk will make every effort to answer all of your questions:
European customers GMT +1: from 8:00 a.m. to 6:00 p.m.
Ph +32 56 77 70 88
Fax +32 56 77 52 13
[email protected]
Page 5

English
5
4. Table of Contents
1. Introduction ............................................................................................................................... 3
1.1 Read this operating manual carefully ................................................................................................. 3
1.2 Identification data – ELIET KS300 PRO ............................................................................................3
2. Warranty ................................................................................................................................... 3
2.1 Warranty card .......................................................................................................................................... 3
3. Welcome .................................................................................................................................... 4
4. Table of Contents ..................................................................................................................... 5
5. Operator safety warnings ....................................................................................................... 7
5.1 For your information .............................................................................................................................. 7
5.2 Caution .....................................................................................................................................................7
5.3 Warning .................................................................................................................................................... 7
6. Main machine parts ................................................................................................................. 8
6.1. General overview ...................................................................................................................................8
6.2 Engines ....................................................................................................................................................9
7. Safety instructions .................................................................................................................10
7.1 Safety messages .................................................................................................................................... 10
7.2 Safety features .......................................................................................................................................11
7.3 Safety instructions ...............................................................................................................................12
7.3.1 General safety instructions ..........................................................................................................12
7.3.2 Careful and proper use ................................................................................................................13
7.3.3 Operator’s responsibilities ..........................................................................................................13
7.3.4 Personal Protective Equipment (PPE) .....................................................................................14
7.3.5 Danger zone ...................................................................................................................................14
7.3.6 Periodic maintenance ..................................................................................................................15
7.3.7 In harmony with nature ...............................................................................................................15
8. Dealer’s duties ........................................................................................................................15
8.1 Assembly .................................................................................................................................................16
8.2 Other duties ...........................................................................................................................................18
9. Operating instructions ...........................................................................................................19
9.1 Preliminary checks ................................................................................................................................19
9.2 Adding fuel ........................................................................................................................................... 20
9.3 Preparing the work site .......................................................................................................................21
9.4 Starting the petrol engine ..................................................................................................................21
Page 6

6
English
9.5 Operating the machine ........................................................................................................................ 22
9.5.1 Prior to starting the work ...........................................................................................................22
9.5.2 Setting blade depth ....................................................................................................................23
9.5.3 Setting the angle of the blade ..................................................................................................24
9.5.4 In the course of the work ..........................................................................................................24
9.6 Cleaning the machine .........................................................................................................................26
9.6.1 The importance of cleaning .......................................................................................................26
9.6.2 What does cleaning entail? .......................................................................................................27
9.7 Options ...................................................................................................................................................28
9.7.1 Double front wheels ......................................................................................................................28
9.7.2 Eight-tooth disc ............................................................................................................................28
10. Transporting the machine ...................................................................................................29
11. Maintenance ...........................................................................................................................30
11.1 General ................................................................................................................................................... 30
1.2 A routine check before each operation ............................................................................................31
11.2.1 Visual check of the state of the machine ...............................................................................32
11.2.2 Checking the engine’s oil level .................................................................................................32
11.2.3 Cleaning the air filter .................................................................................................................33
11.2.4 Adjusting depth regulator .........................................................................................................33
11.2.5 Checking and tightening the blade bolts ..............................................................................34
11.2.6 Checking the blade .................................................................................................................... 34
11.3 Checking after 50 hours of use .......................................................................................................35
11.3.1 Changing the oil ............................................................................................................................35
11.3.2 Checking the spark plug ............................................................................................................36
11.3.3 Changing the air filter ................................................................................................................36
11.3.4 Lubricating ...................................................................................................................................36
11.3.5 Belt tension adjustment ............................................................................................................38
12. Storing the machine ............................................................................................................. 39
13. Equipment specifications ....................................................................................................40
Appendices: ..................................................................................................................................41
B1 Maintenance schedule ...........................................................................................................................41
B2 List of torques .......................................................................................................................................42
B3 EC Declaration of Conformity ............................................................................................................43
B4 Warranty conditions ........................................................................................................................... 44
Page 7

English
7
5. Operator safety warnings
ELIET cannot anticipate every situation in which a risk or danger can occur. The warning symbols
in this operating manual and the labels on the machine are therefore not comprehensive. Although minimal, a residual risk will always be present. If while operating the machine you apply a
working method, operation or technique that is not explicitly recommended by ELIET, make sure
that it does not represent a danger for bystanders.
A number of symbols (“For your information”, “Caution”, “Warning”) are used in this operating
manual to provide additional information and to highlight dangers.
5.1 For your information
5.2 Caution
5.3 Warning
These safety messages can only warn and not remove the danger. Both the use of common sense
and proper observation of the guidelines in this manual are essential to prevent accidents.
Warning:
This symbol warns you about extreme danger that
you must take notice of in those specific circumstances. So for the sake of
your own safety, remain alert at all times.
Caution:
This symbol suggests safe practices. The purpose is to prevent incorrect
operation that could result in personal injury or damage to the machine.
For your information:
This symbol is used to draw your attention to specific information and/or
actions, or to indicate where you can find additional information relating to
the subject.
Page 8
English
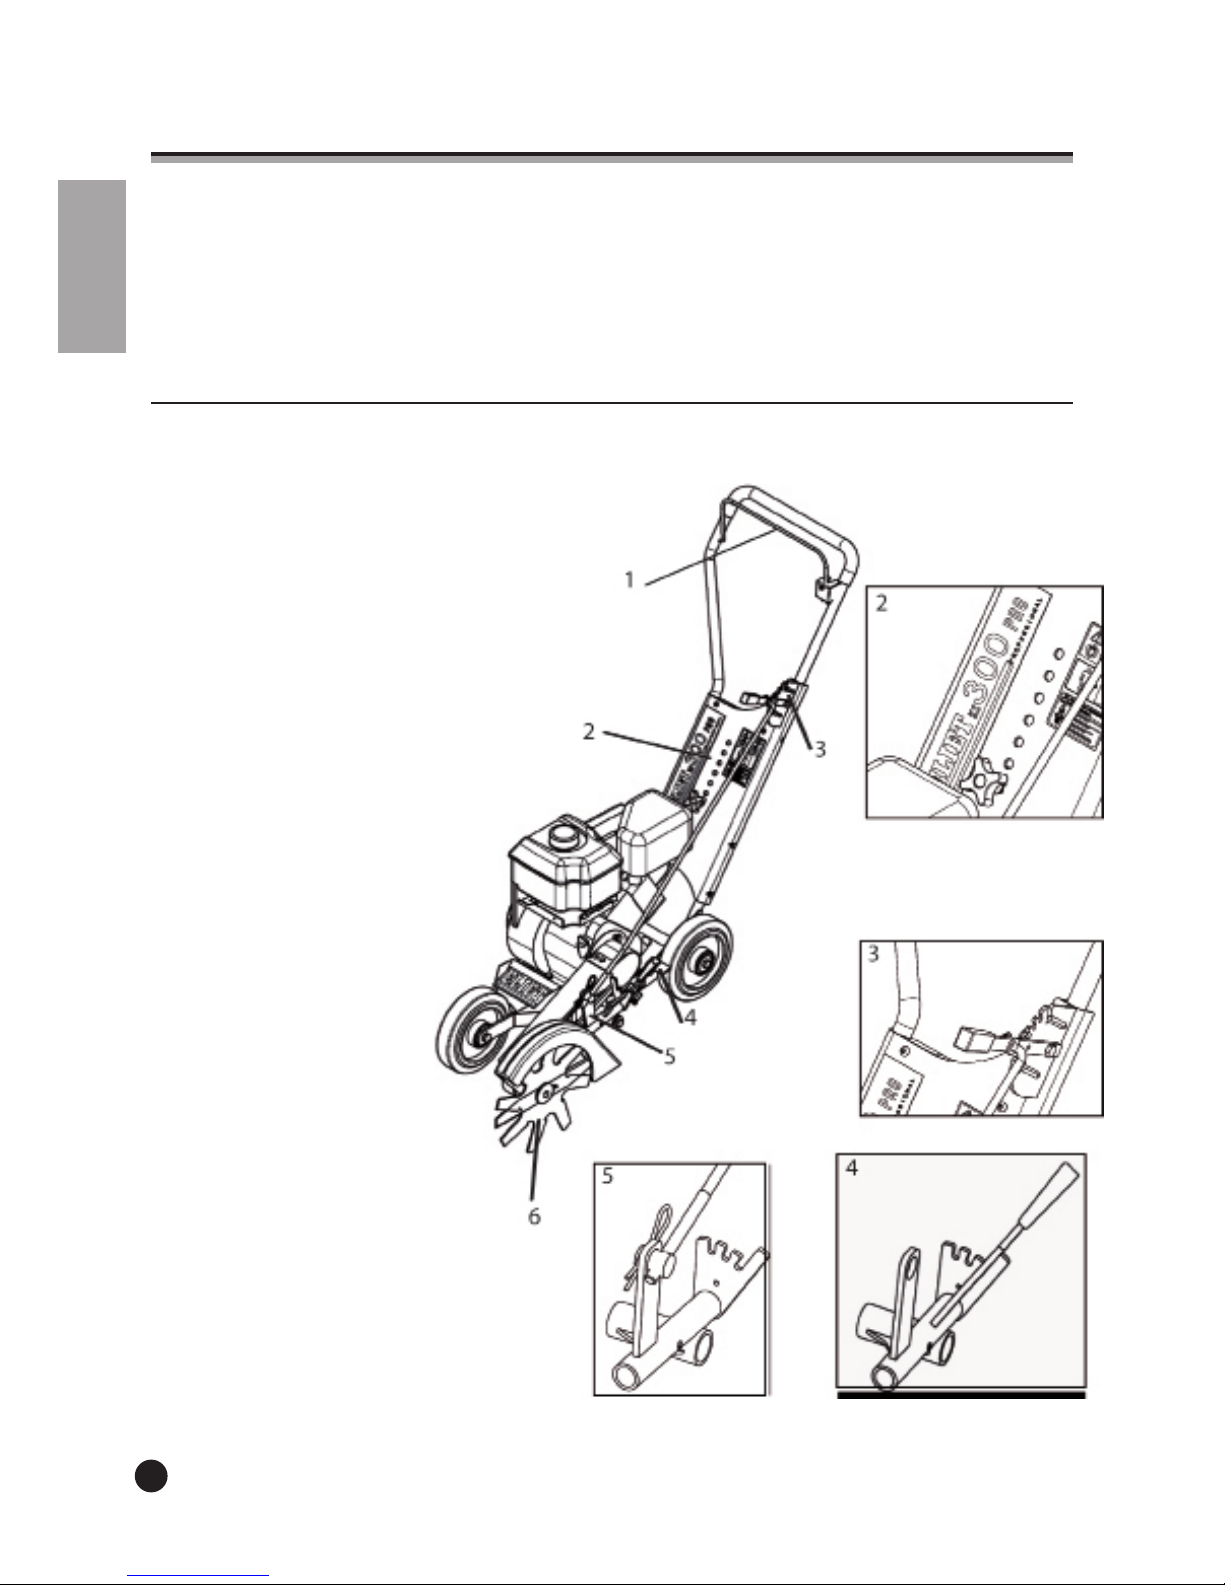
6. Main parts
To fully understand the content of this operating manual you need to be fully conversant with the
terminology used for the descriptions. This chapter refers to a broad range of machine parts and
identifies their names. We recommend that you take the time to study the machine prior to its
use for a better understanding of the descriptions provided in this operating manual.
6.1. General overview
1) Safety bar
2) Height-setting handlebar
3) Belt tensioner/Depth regulator
4) Angle setting
5) Precision adjustment height regulation
6) Blade
Page 9
Caution:
For your own safety, only genuine parts should be mounted on ELIET machines.
For a list of original spare parts and their ordering codes please visit www.eliet.
eu
For your information:
References to front, rear/back, left and right in this manual are from the
viewpoint of the operator standing on the side of the handlebar
For your information:
Your ELIET dealer remains at your service for any maintenance or advice,
ensuring your ELIET machine is always in perfect condition. You can contact
him for original ELIET parts and lubricants at any time. These service parts
are manufactured according to the same strict rules and craftsmanship as the
original equipment. (Find the closest dealer on www.eliet.eu).
English
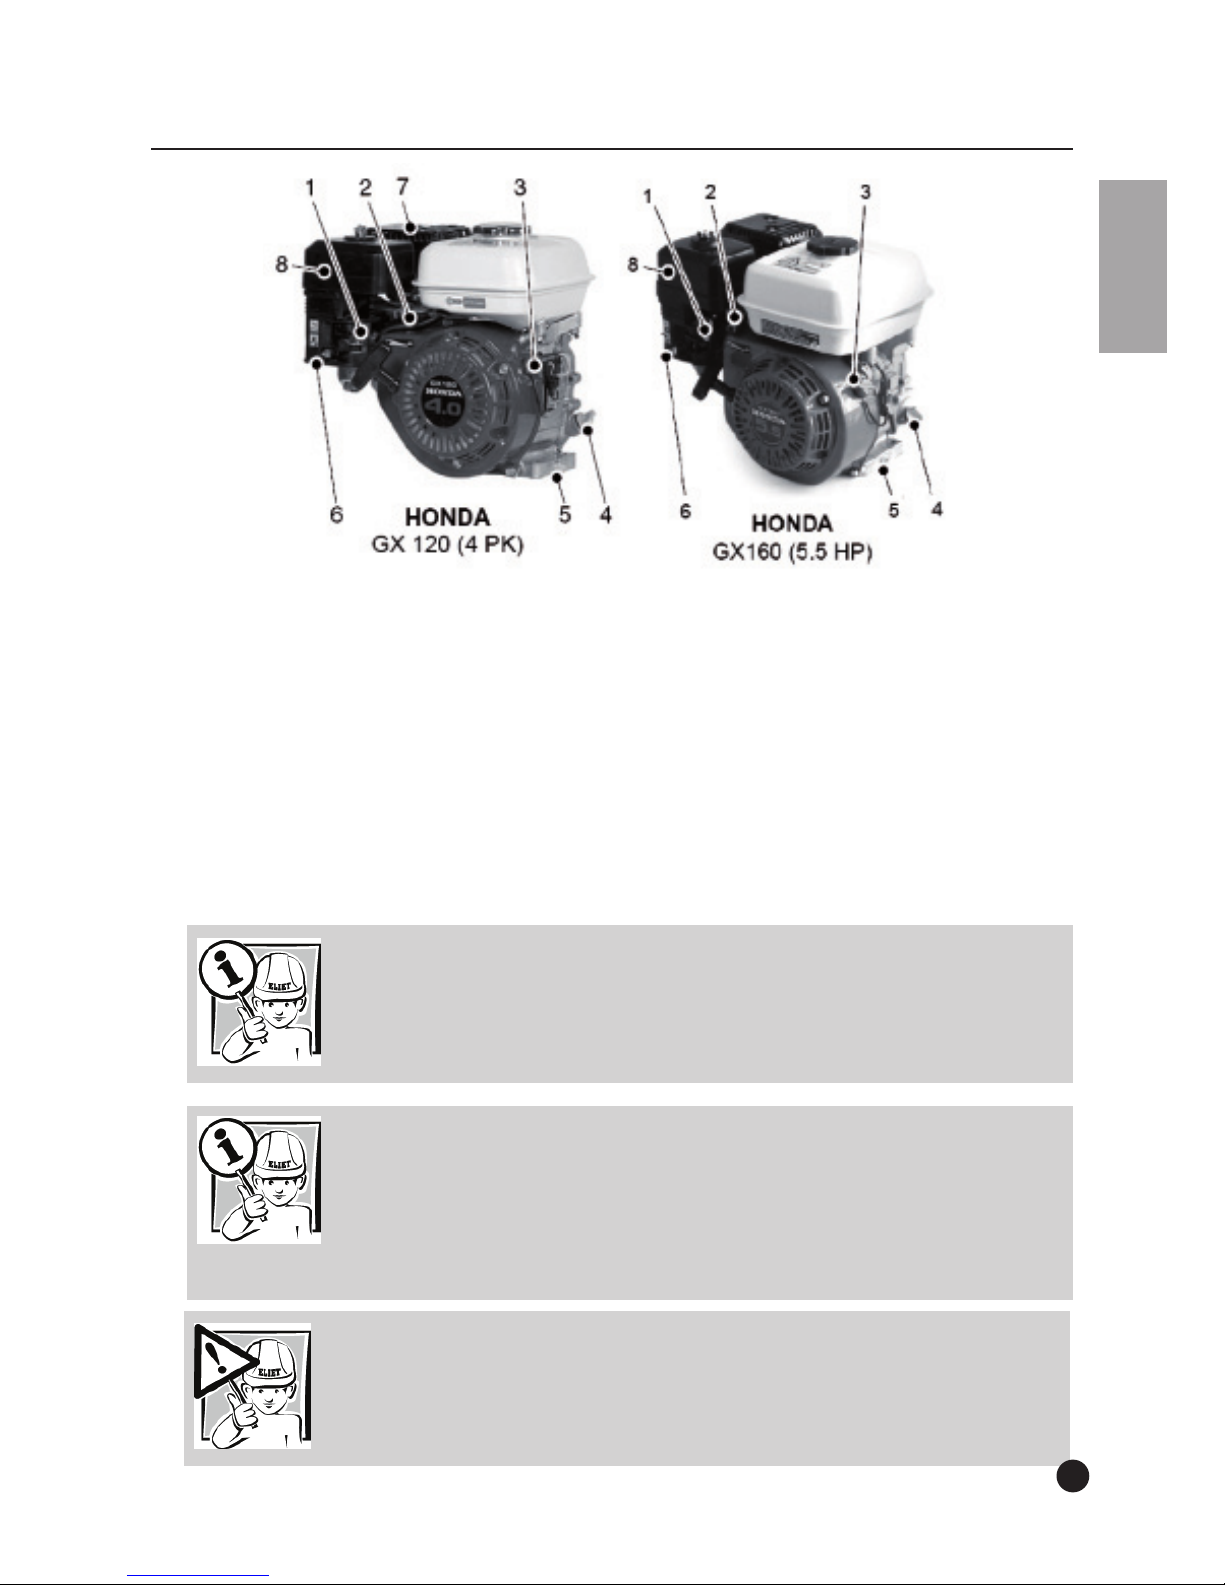
6.2 Engines
1. Choke
2. Speed control
3. ON/OFF switch
4. Oil filler cap/dipstick
5. Oil drain plug
6. Fuel tap
7. Exhaust
8. Air filter
Page 10
10
English
7. Safety instructions
7.1 Safety messages
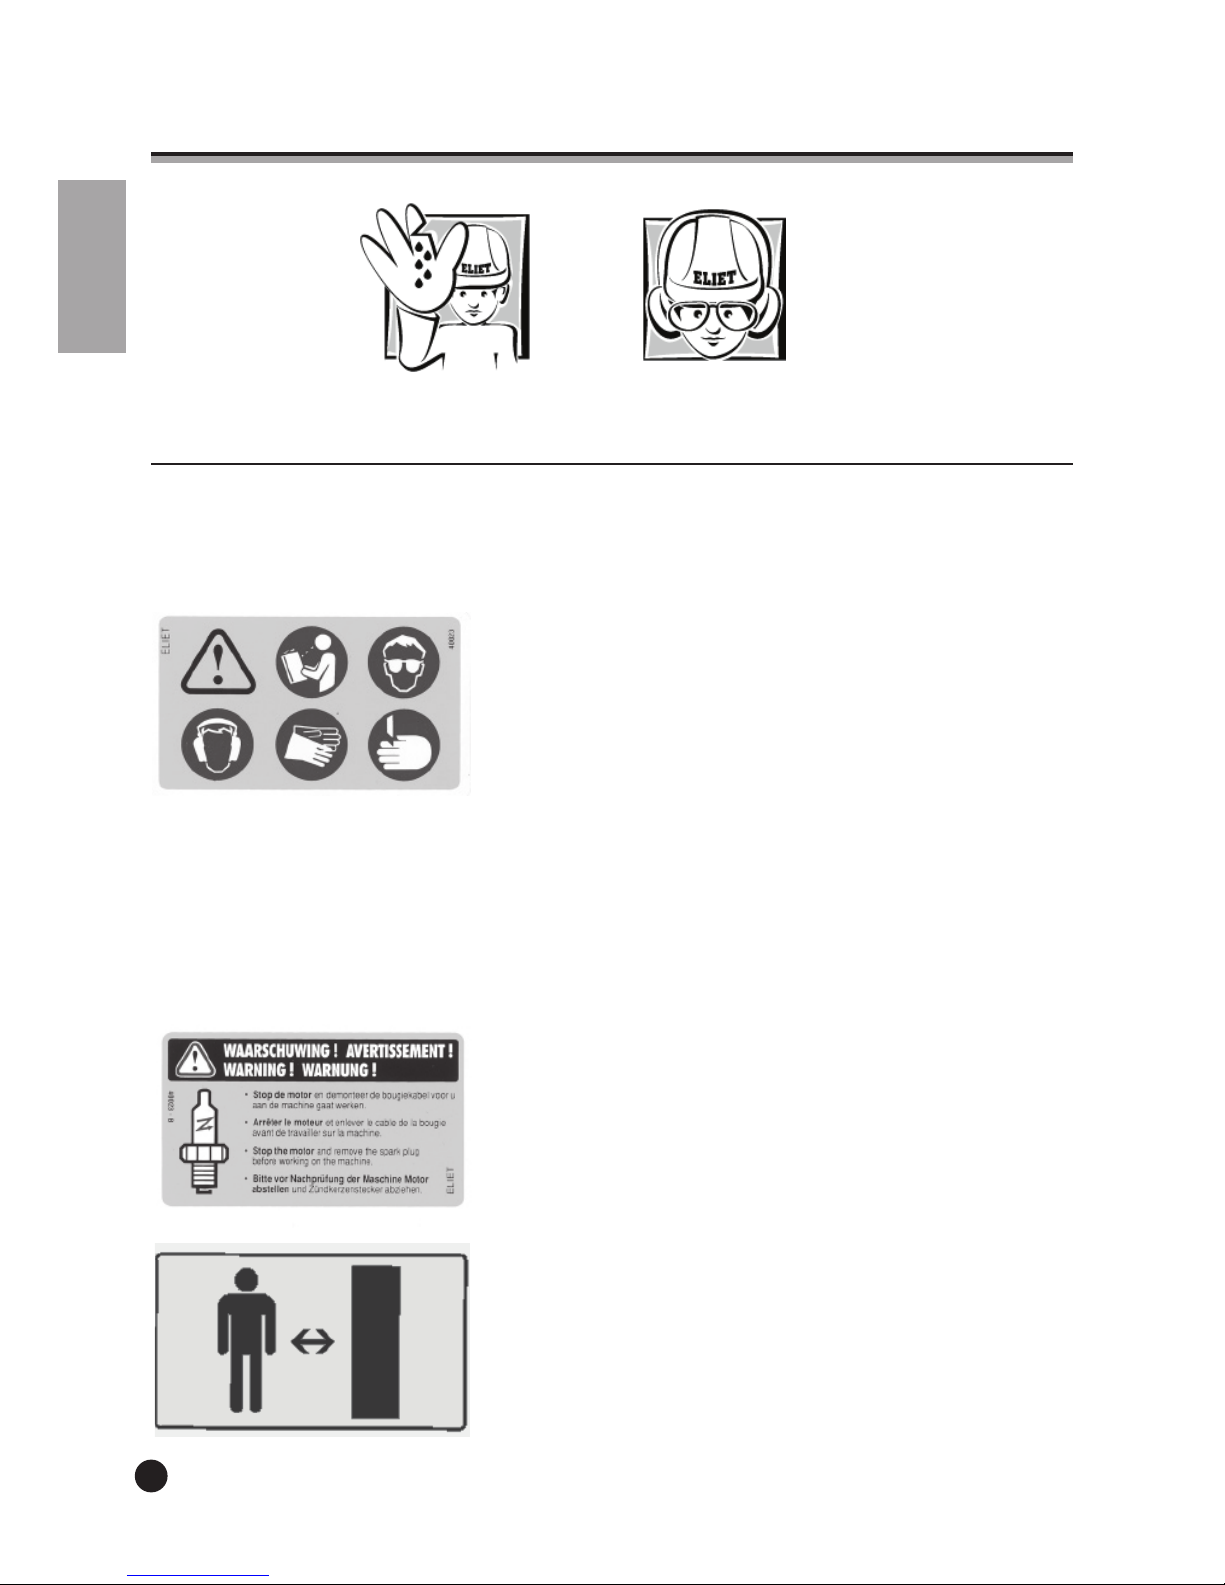
The safety messages are clearly indicated on the machine with stickers or relief pictograms. Take
good notice of the symbols and warning messages displayed.
This sticker groups a number of key safety messages and information about the machine and the manufacturer:
Some safety instructions are symbolised by icons:
1. Before operating the machine the manual should be read and
understood.
2. Suitable safety clothing (gloves, safety goggles, ear defenders) should be worn when operating the machine.
3. There is a real risk of severe injuries including permanent
damage to the hands. Never place your hands near the blade
while it is still operating.
4. There is a real risk of severe injuries with permanent damage
to the eyes or face as a result of flying debris.
This sticker notifies the operator that the engine must be
turned off and the spark plug cap removed before starting
maintenance on the machine.
This sticker reminds the user that bystanders should observe a
minimum distance from the machine.
Page 11
English
11
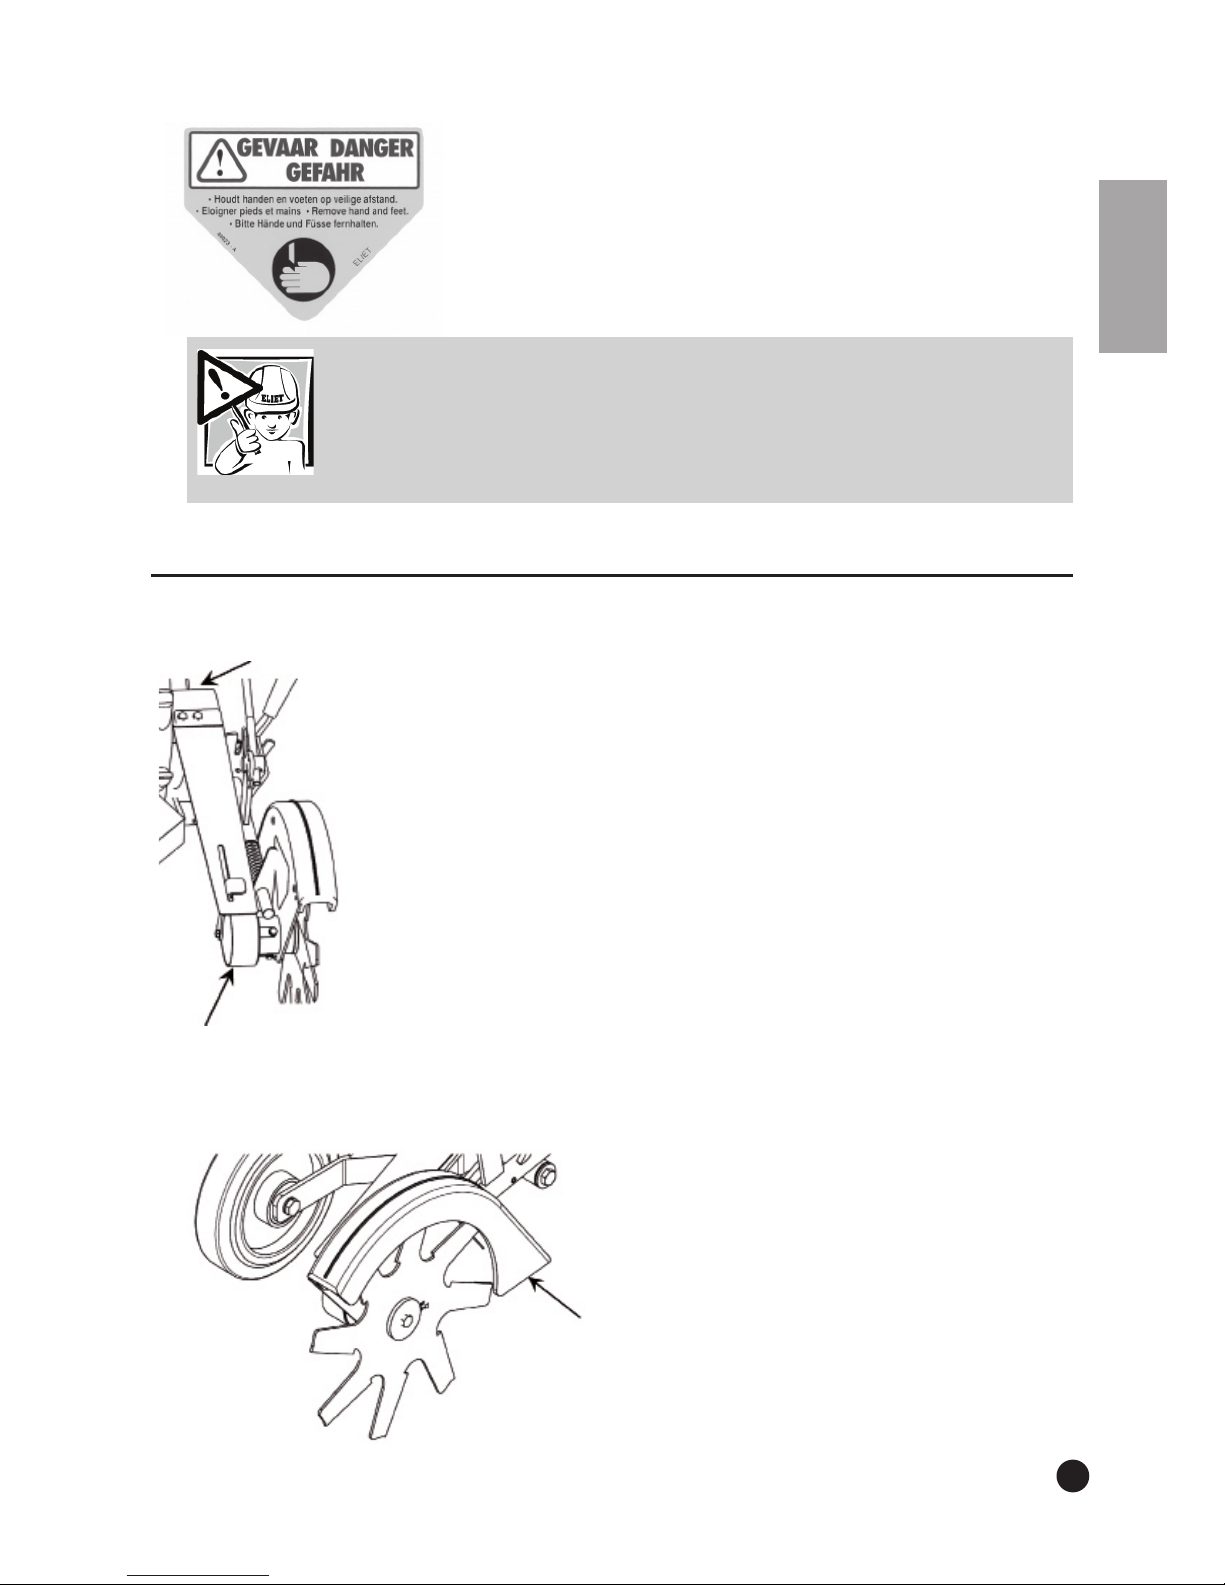
This sticker is affixed on the blade’s belt protection cover and
warns about the danger of hand injuries. Keep your hands and
feet away from underneath the machine as long as the blades
are rotating.
7.2 Safety features
Belt shield:
In order to guarantee your safety, the freewheeling part of the drive belt is covered.
Blade guard and mud-flap:
The special form protects the user against projected dirt. The rubber absorbs the impact of
stones, reducing noise and increasing safety.
Caution:
Safety stickers or parts that include safety information that are damaged due
to use or cleaning, become illegible or have been removed must be immediately
replaced. Stickers and parts can be obtained from any authorised ELIET dealer.
Page 12
12
English
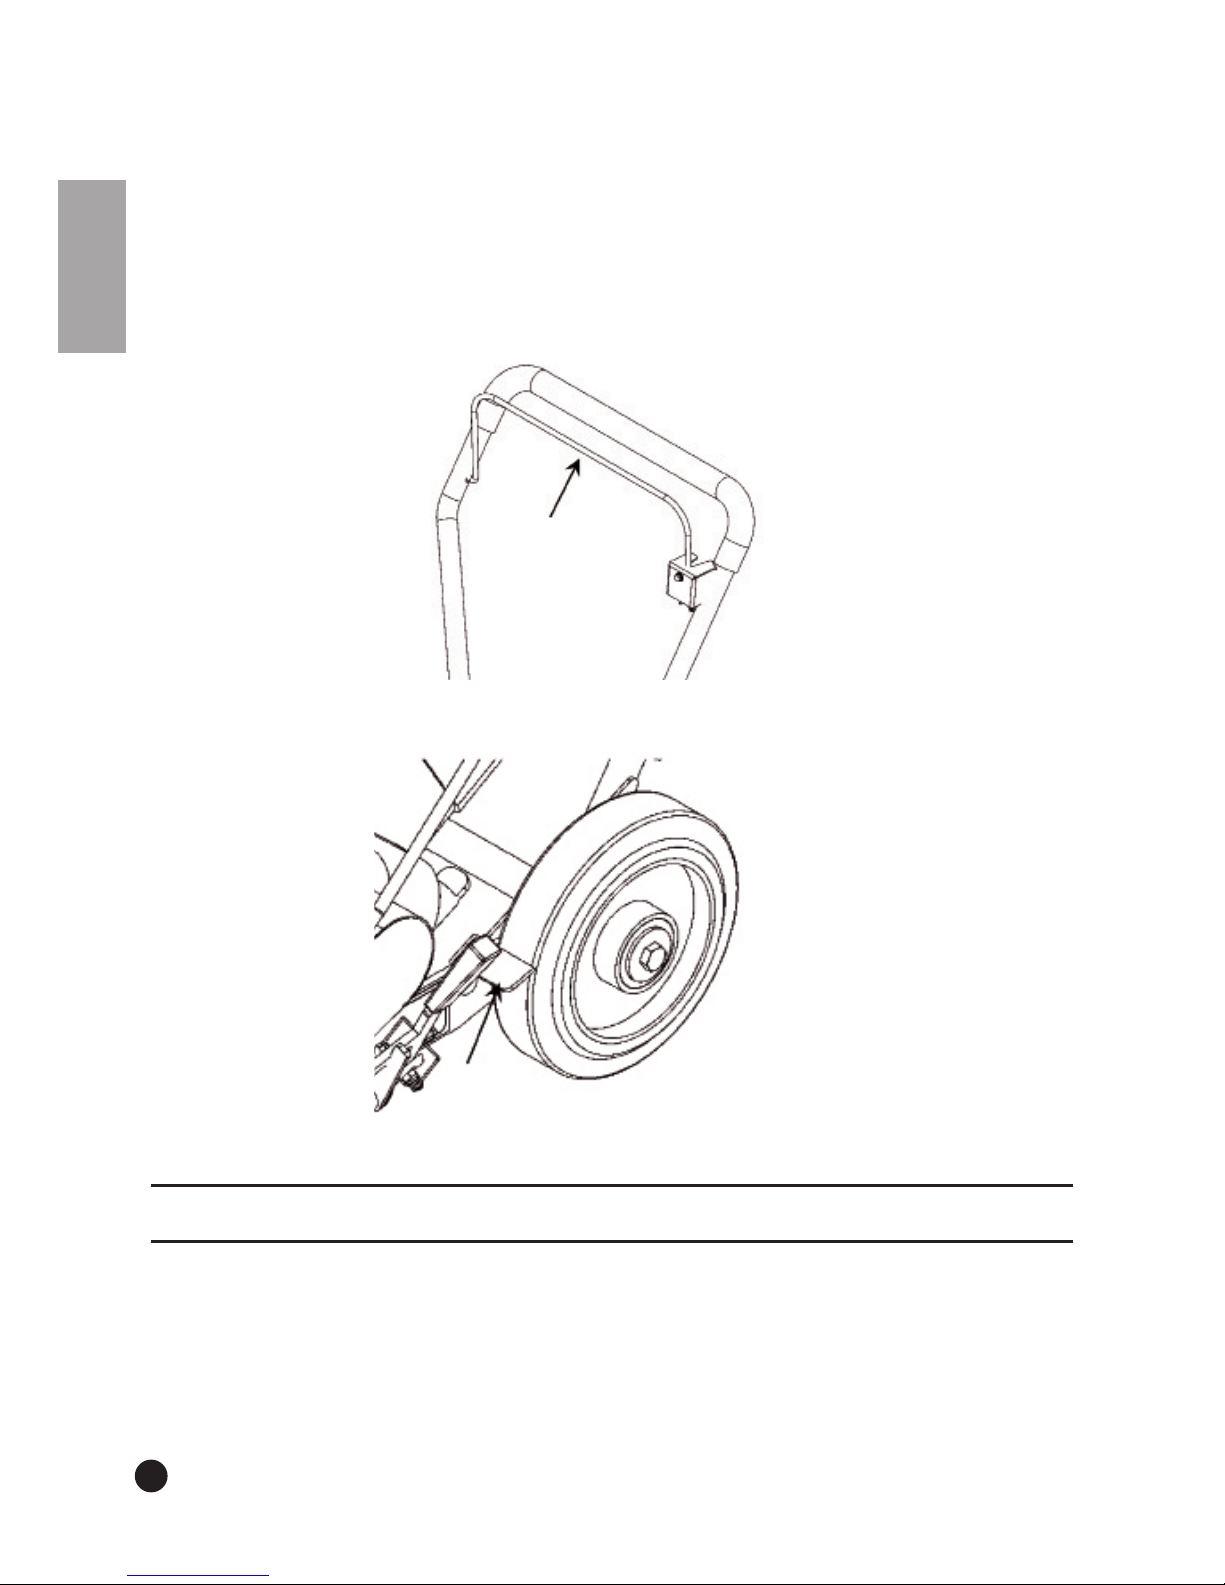
Safety bar:
If this bar is pulled towards the user, the blades will be engaged.
Releasing the operation lever disengages the blade drive from the engine, causing the blade axle
to come to a stop. The lever therefore provides maximum safety and prevents the engine coming
to an unexpected stop.
The engine can only run if the safety bar is pressed against the steering bar. While working,
therefore, this must always be manually pressed against the steering bar. You are not permitted
to fix this safeguard in position in any other way (e.g. rope, adhesive tape,…)
Wheel scrapers:
The back wheels are equipped with wheel scrapers. The tyre tread stays clean, allowing the machine to be more stable and giving a better cut edge.
7.3 Safety instructions
7.3.1 General safety regulations
• The owner of the machine will keep this manual during its complete service life. A reference
guide for the user, it also ensures that the machine is used and maintained correctly at all
times. Always refer to this instruction manual if you have any doubts about an operation that
you are about to perform.
• If the instructions stated in this manual are not clear to you, do not hesitate to contact your
Eliet dealer for further explanation. In addition, the ELIET help desk is at your service during
Page 13

English
13
office hours to answer any questions you may have: (EU +32 56 77 70 88).
• Be sure to read the chapter which is intended for the dealer (see chapter 8) and verify whether
the machine was delivered in accordance with the instructions.
• After you purchase the machine, allow the dealer or a professional to give you some instructions regarding correct use.
• Carefully observe all safety instructions when using this ELIET machine! Carefully read all the
instructions relating to the operation of the machine. All these instructions are important for
your own personal safety.
• Always observe the applicable regulations of the Labour Inspectorate to avoid accidents.
• Read and observe all safety messages indicated on the machine in the form of stickers or icons.
• Under no conditions whatsoever may the original design of the machine be modied without
written consent of ELIET EUROPE NV (Belgium).
7.3.2 Careful and proper use
• This machine is intended to be used to remove overgrown grass from lawn edges and should
only be used for this purpose.
• Think about what you are doing at every manoeuvre. Do not be tempted to let routine dull your
attention. Never act impulsively or on reflex.
• People with heart problems and/or balance disturbances are advised against operating this
machine.
• Although the machine is equipped with extensive safety features, please avoid dangerous situations.
• Never work with a machine that has not been fully assembled. Check the nish of the machine
to ensure compliance with the instructions provided in this manual.
• Never work on frozen ground.
• Remove foreign materials from the path you are to take (ropes, stones, metal, plastic, textiles…)
• The only safe position for the operator while operating the machine is behind the handlebar.
• Never work when light intensity is below 500 Lux.
• Never attempt to change a machine setting and never perform maintenance when the motor is
running.
• The machine may cause an explosion when you work near ammable products, fumes, etc.
7.3.3 Operator’s responsibilities
• All persons using the machine are assumed to be fully conversant with the safety instructions.
The operator is fully liable for the use of the machine in regard to himself and to third
parties.
The operator of this machine is assumed mature enough and with enough common sense to
make decisions by himself.
The machine may not be operated by underage persons. However, this does not apply to youths
over the age of 16 who are learning to operate the machine under the supervision of an experienced operator.
A disabled person may only operate the machine when under the supervision of an experienced
operator.
Page 14
14
English
Children (under 16 years of age) and animals should be kept at a safe distance (2 m) from the
machine.
ELIET advises against lending the machine to others, but if this should occur, it should only be
lent to persons who are familiar it. Always make sure that the user is aware of the potential
hazards and ensure that he/she reads the manual before using the machine.
This machine must only be operated by persons who have a good physical condition. Take a rest
if you become tired while operating the machine. Persons consuming alcohol or drugs must
not operate this machine.
The user must draw up a list that registers the number of hours worked. This will ensure that the
repetitive maintenance schedule can be followed correctly in relation to the machine.
7.3.4 Personal Protective Equipment (PPE)
You must wear suitable clothing to operate this machine. That is, clothing covering the whole body,
heavy protective gloves and closed non-slip footwear.
For the protection of the most sensitive senses, Eliet recommends wearing ear defenders and
safety goggles.
You must pay more attention and be more careful when wearing ear protection because noises that
announce a danger (such as shouting, signal sounds) will only be heard to a limited degree.
ELIET does not recommend using a Walkman or a portable MP3 player during operation of the
machine.
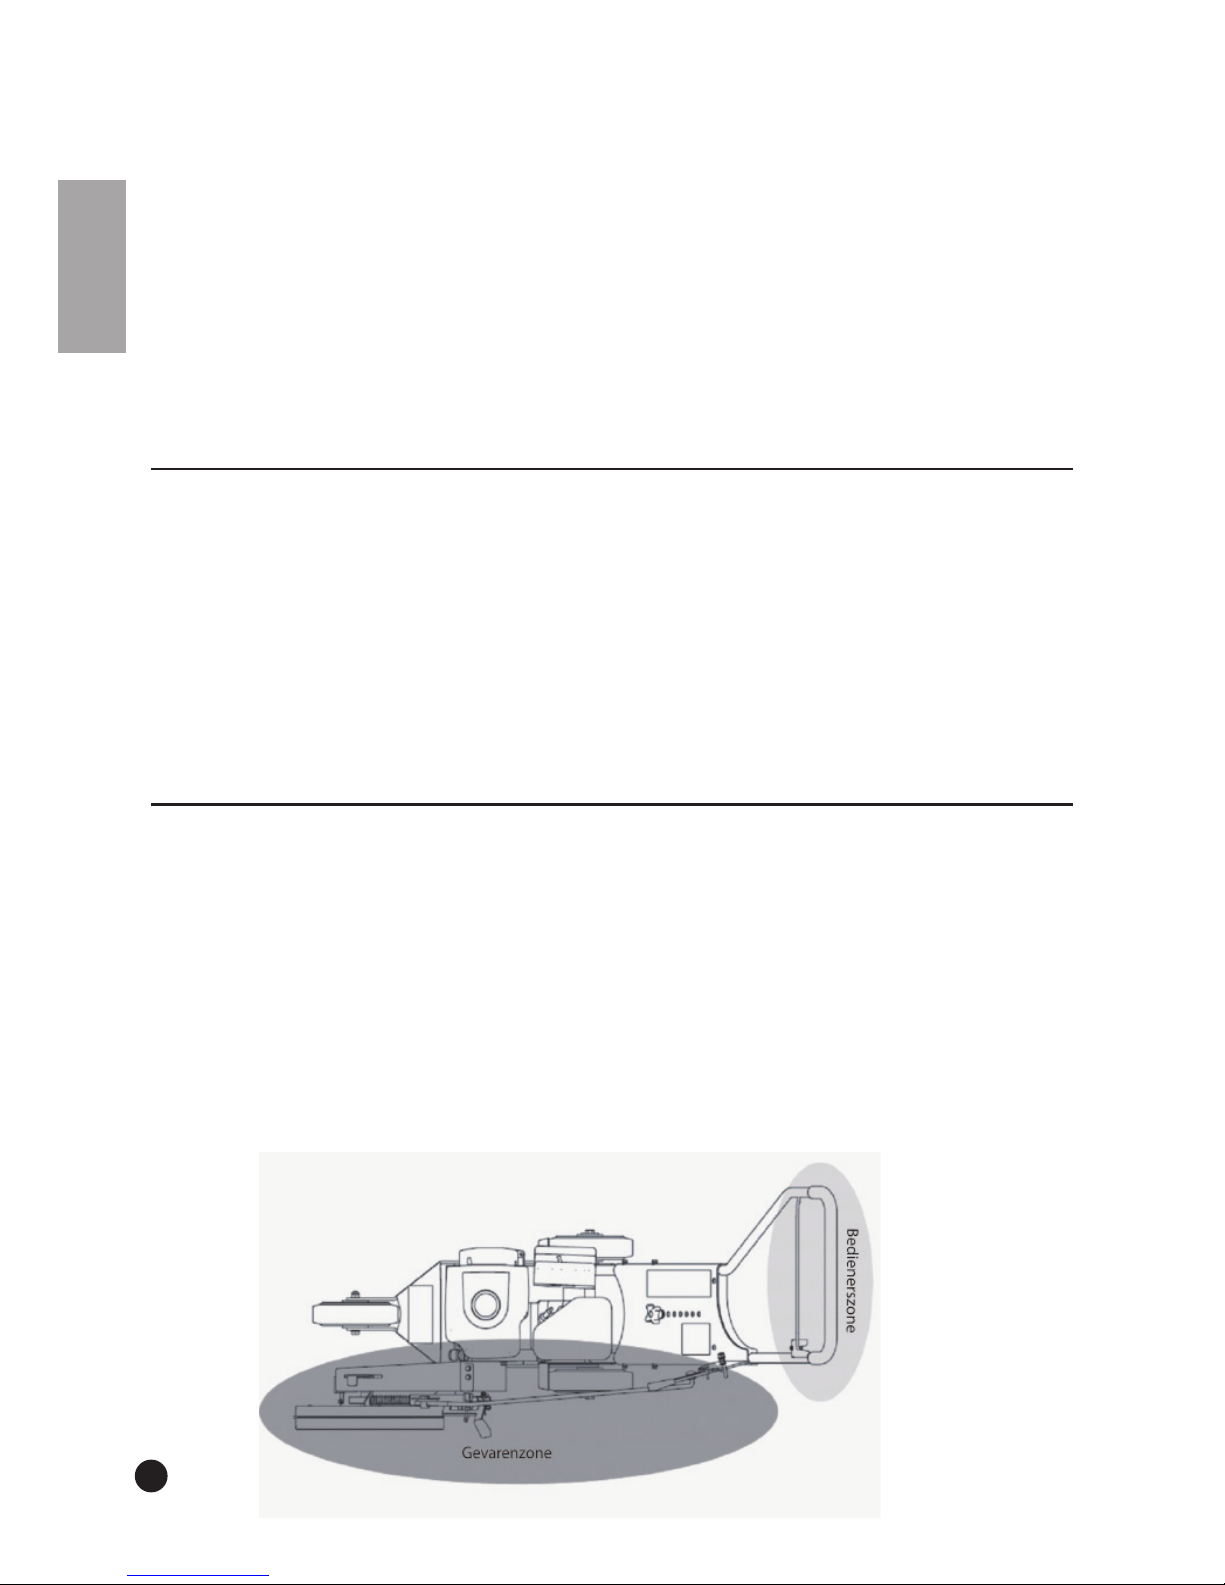
7.3.5 Danger zone
Never allow bystanders within the danger zone stretching up to 2 m around the machine during
work.
Contact with moving parts may cause injury or damage. Ensure, therefore, that hands, feet or
loose clothing are well away from moving parts.
You must only operate the machine when it is in its normal working condition.
Do not take any risks and immediately stop the machine as soon as anyone enters the danger
zone.
Children and animals must be kept well away from the machine.
Shut off the engine when leaving the machine unattended.
Once the motor is running, focus all your attention on operating the machine.
Page 15
English
15
7.3.6 Periodic maintenance
Periodic maintenance is essential. You must therefore strictly follow the maintenance schedule
in this operating manual (see Appendix B1 ‘Maintenance Schedule’)
Draw up a maintenance register in which you keep the performed maintenance updated in detail.
Regularly cleaning the machine is essential. In particular, keep the air supply for ventilation of
the motor free from obstructions. This will prevent overheating and consequential damage to
the machine.
When parts must be replaced as a result of wear or failure, you must always request original
ELIET replacement parts from your ELIET dealer. This is of key importance for your own safety.
(Find an authorised ELIET dealer near you on www.eliet.eu).
For a list of original spare parts and their ordering codes please visit www.eliet.eu.
Always make sure the engine is switched off and the battery has been disconnected before
performing repairs or maintenance.
Always wear suitable clothing for performing maintenance.
7.3.7 In harmony with nature
Use the machine in a manner that respects environmental regulations:
Avoid unnecessary machine running while not at work.
Avoid spillage of fuel while refuelling.
Service the engine regularly in order to achieve optimum combustion.
8. Dealer’s duties
ELIET machines are packaged in accordance with common rules for proper transportation.
Deliveries are always ex factory. Consequently, ELIET cannot be held liable for any damage
occurred during transport.
If the packaging is damaged upon receipt of the goods, check the state of the machine to ensure
it is not damaged. Report any irregularities on the delivery order before signing for receipt.
Warning:
As an ELIET dealer you must familiarize your customers with the operation
of the machine and also point out the possible dangers while using it. You are
expected to carefully go over the maintenance points of the machine together
with the new owner. Repeat these instructions until the new owner has fully
understood everything.
Page 16
16
English
In case of damage to the machine a complaint to the shipping company must be submitted im-
mediately after delivery.
8.1 Assembly
When the machine has been removed from its packaging, it is still not completely assembled. The
dealer must finish the assembly. Below we provide a few guidelines:
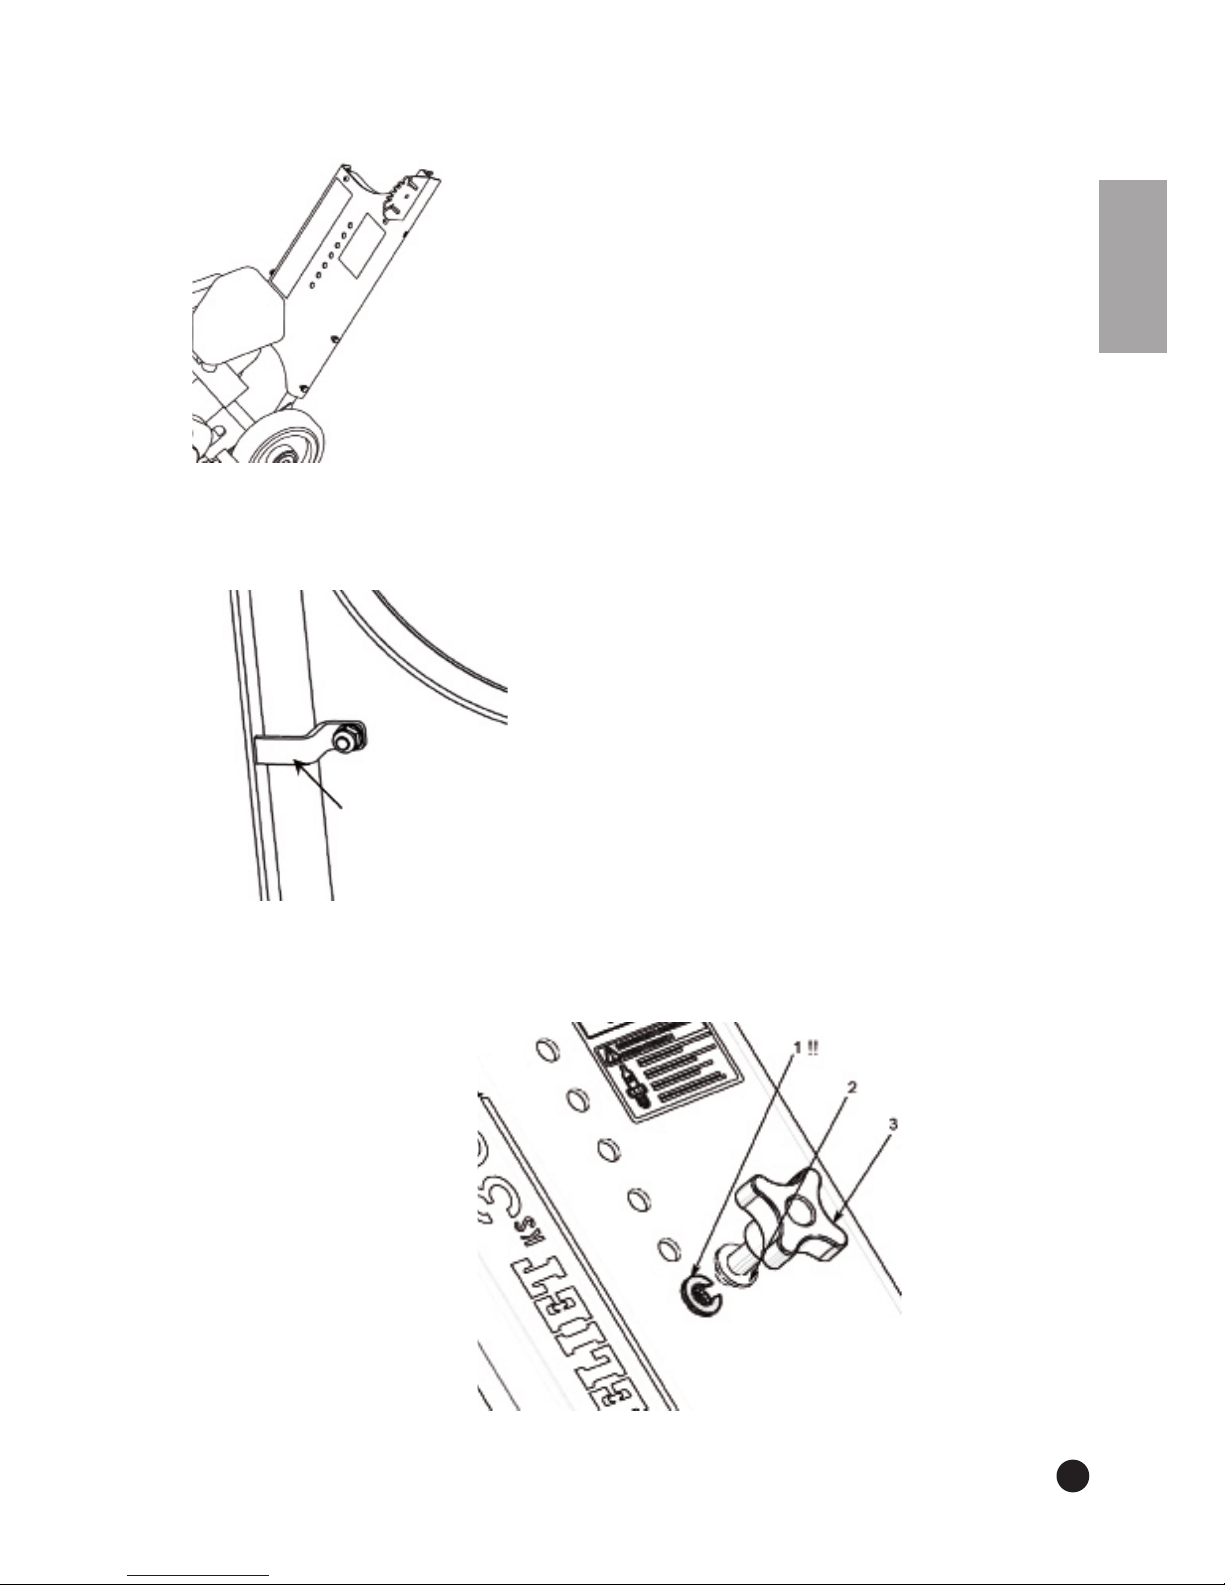
You will find the machine in the box with the handlebar underneath it.
Turn the bar and secure it with the nuts supplied.
The orange plate is mounted against the lower part.
Page 17
English
17
The second part of the bar is also assembled. This is done by inserting the bar behind the hook.
This part is fully secured in the following step, when the rotational knob for height regulation is
installed.
The rotational knob is installed. The order of installation is of utmost importance. The ‘dead man’s
handle’ will not work if installation is not completed correctly.
1. Spring washer.
2. Flat washer.
3. Rotational knob.
Page 18
18
English
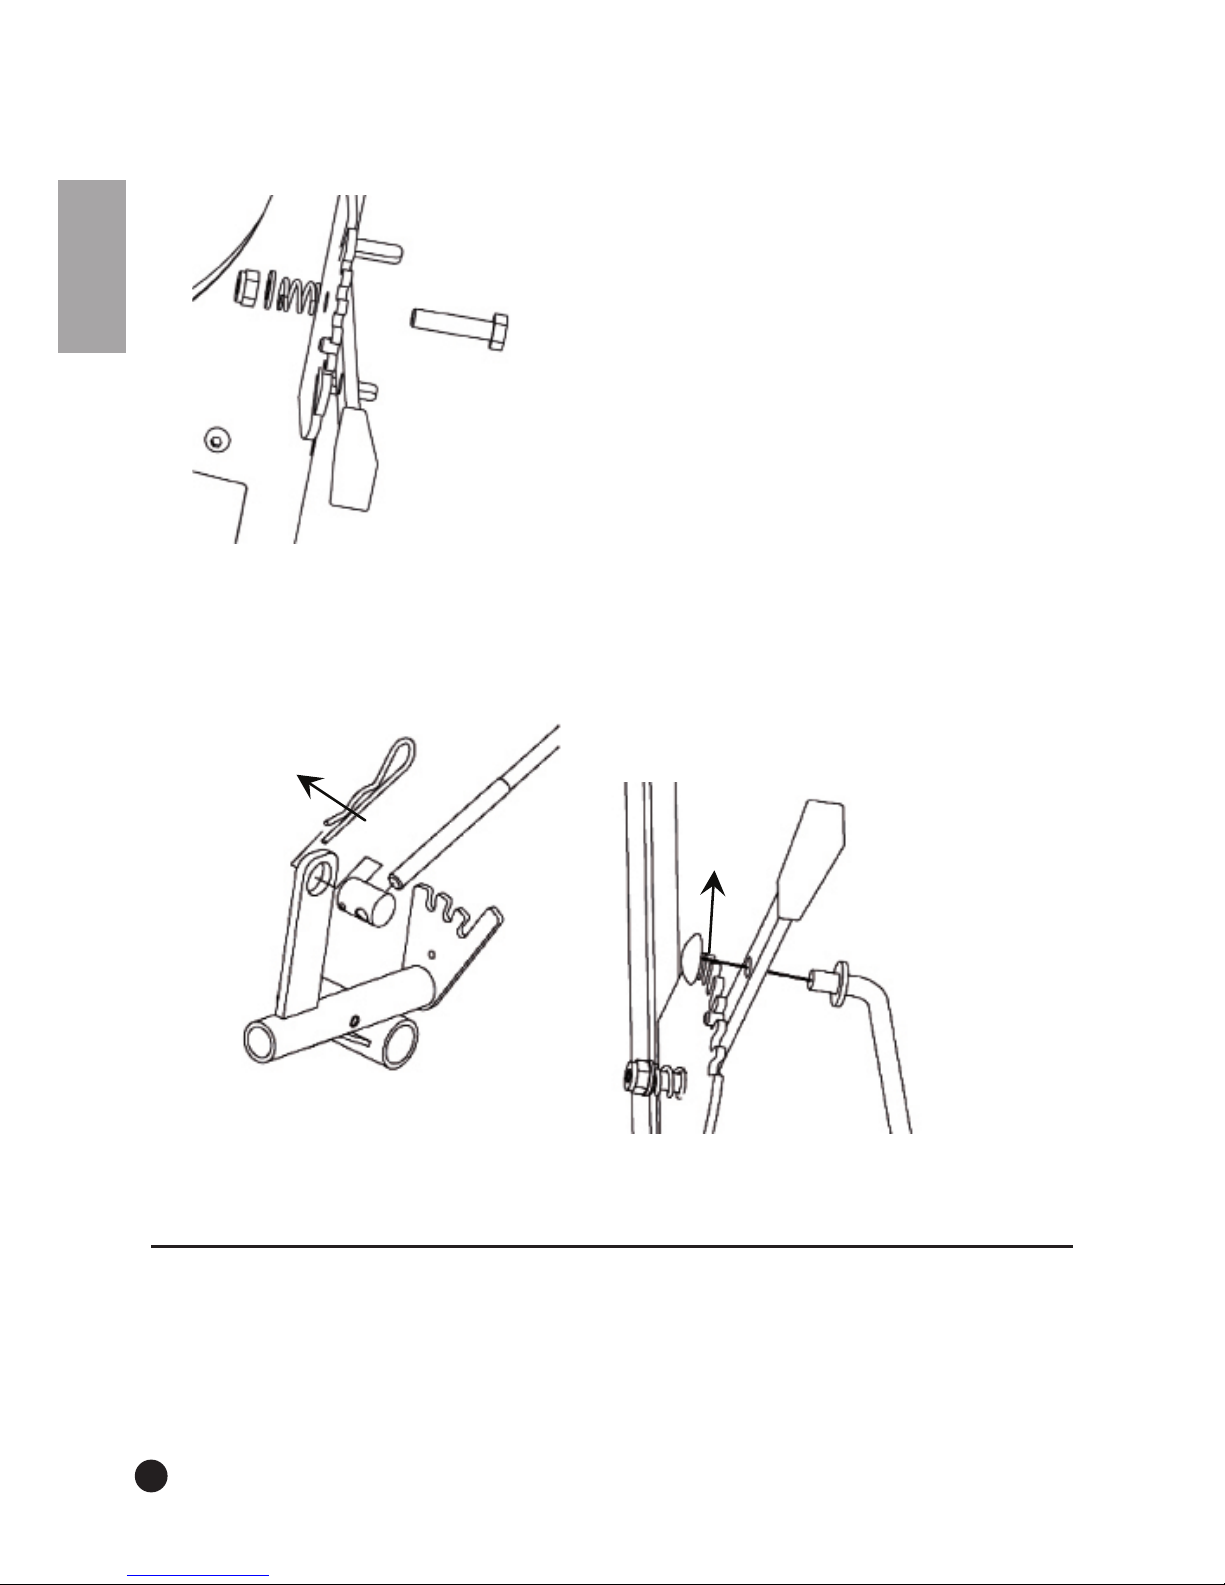
At the back, the rotational knob is secured with a nut.
The depth regulation lever is installed.
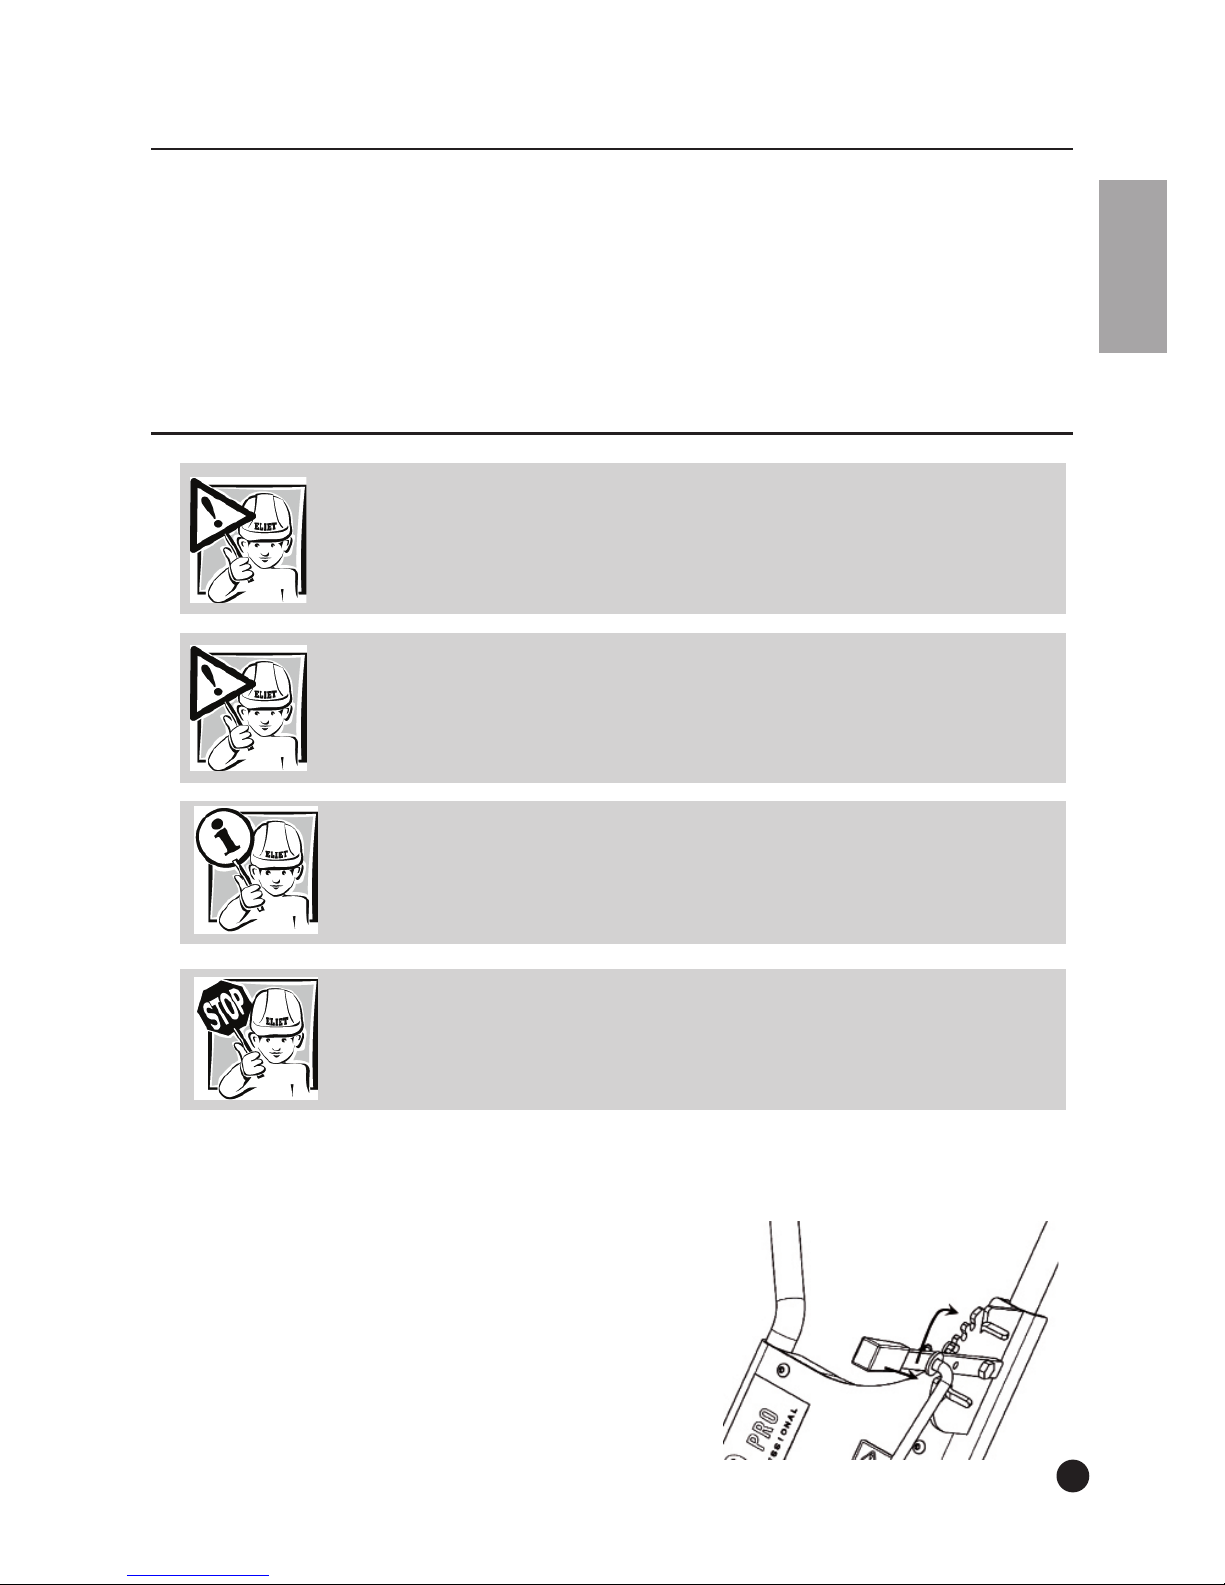
The rod that comes in the box connects the operation lever on the steering rack with the lever
arm on which the blades are mounted. The rod is affixed to the lever on top via a star lock fastener. Underneath the rod, there is a screw thread to which the connection piece must be screwed.
This is used for precision adjustments to depth. The axle pin on the connection piece is screwed
into the hole in the lever arm and secured with a beta pin.
Once assembled, you need to test if everything works as it should.
8.2 Other duties
The dealer will set the belt tension according to the details in the maintenance section of the
instruction booklet (§ 11.3.6 Belt tension adjustment)
Machines do not contain any oil or fuel when they are packed for transport. The dealer must
check the oil level and refill if necessary according to the instructions in this manual (or those
pertaining to the engine manual).
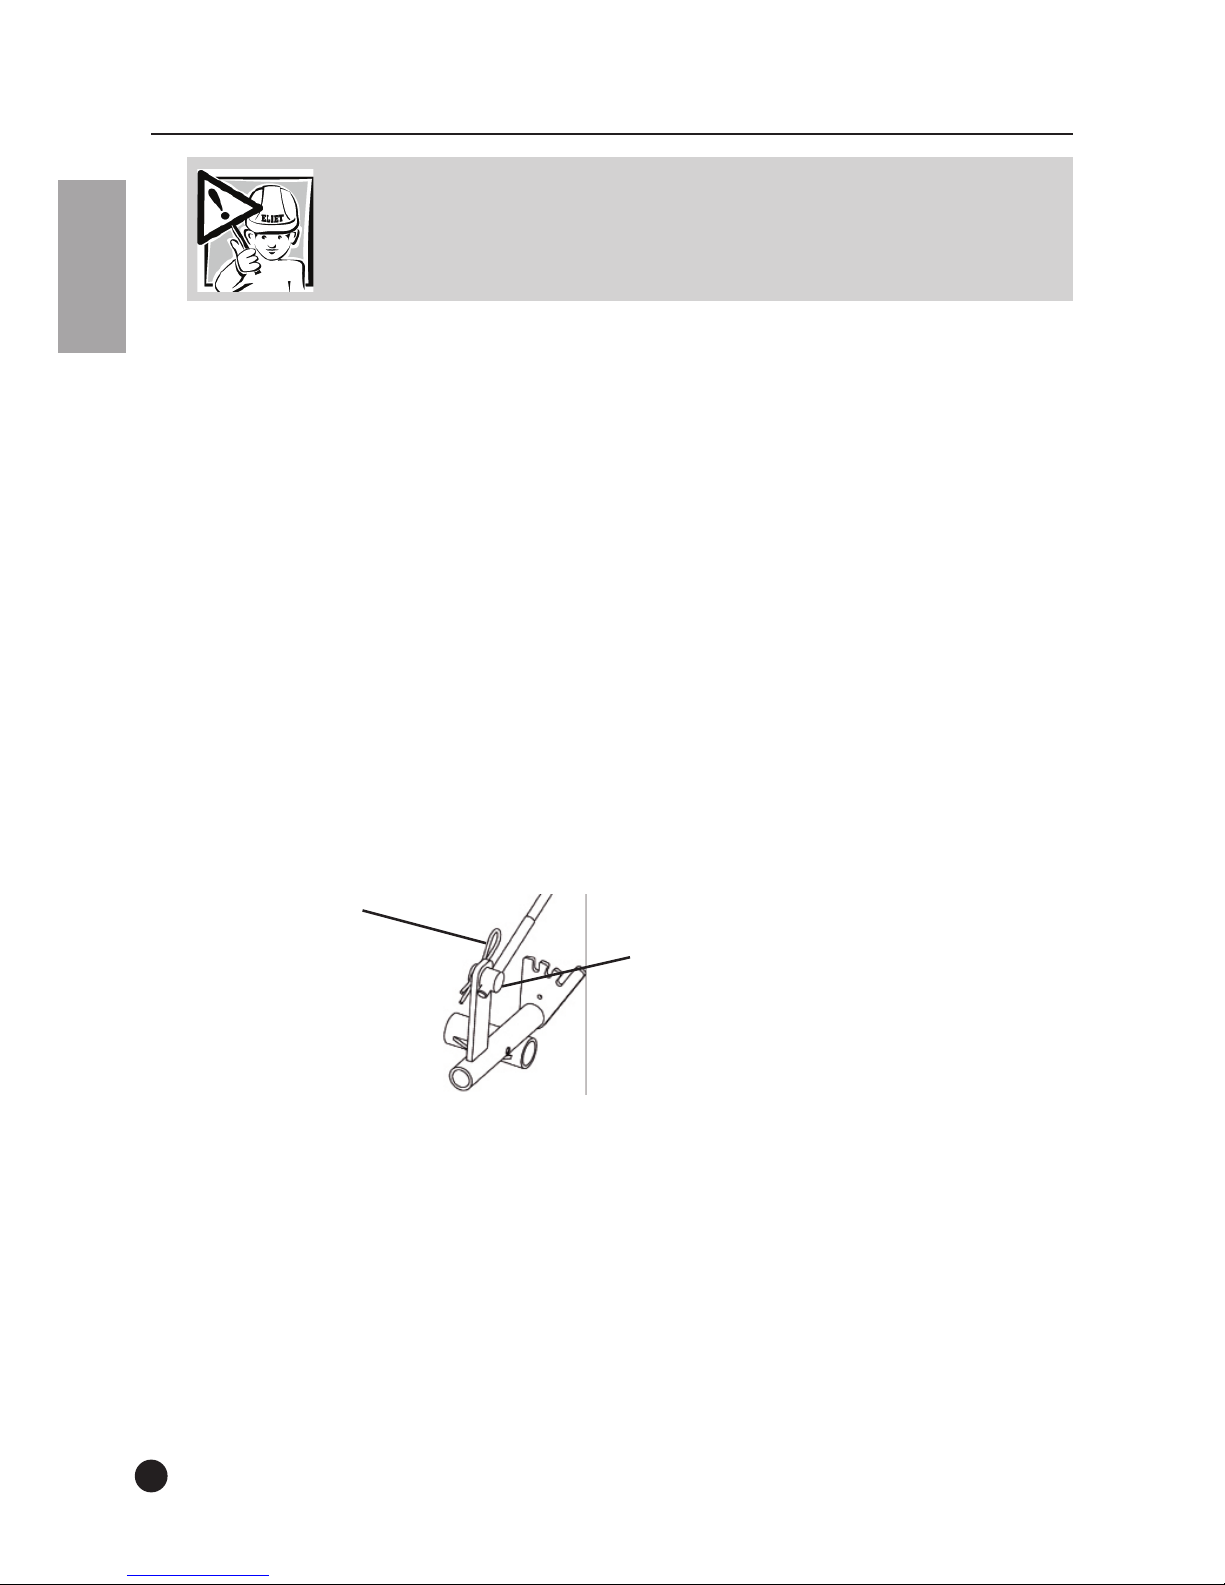
beta-pin
star lock fastener
Page 19
English
19
Every Eliet dealer warrants a long life span of Eliet machines. He will lubricate the hinges before
delivering the machine to the client.
The revolutions per minute will be set at 3,200 rpm.
Finally, make sure that the warranty card is filled in completely and signed. The purpose is to
avoid warranty disputes. Please read the warranty conditions for more details.
Please register your product online immediately after purchase to ensure that your warranty
entitlement is activated. (www.eliet.eu).
9. Operating instructions
9.1 Preliminary checks
Checklist
1. Check the oil level in the machine (see § 11.2.2 Checking the engine’s oil level)
2. Check that the fuel tank is full. If not, fill it. (See § 9.2 Adding fuel).
3. Check the air filter for excessive dirt. (If necessary see § 11.2.3 Cleaning the air filter)
4. Make sure the bolts on the blade are secure.
5. Check that the blade is in a good condition. If it needs to be sharpened, this must be done first.
If you detect cracks or flaws in the blade, immediately install a new blade.
6. Check that the machine is running at the rpm given (an rpm counter can be obtained from
your ELIET dealer).
7. Check that all safety provisions on the machine are still operating properly.
(See § 7.2 Safety features).
8. Check that the engine cuts out when the safety lever on the steering rack is released.
Caution:
Try making a habit of checking the following points before getting to work with
the machine:
Page 20
20
English
Once these items have been checked and approved, you can prepare the area of operation (see
§ 9.3 Preparing the work site) and move the machine to the work site.
9.2 Adding fuel
When the machine is running low on fuel it must be refuelled. The use of fresh petrol is recommended at all times.
Use unleaded petrol with an octane index of at least 85, but preferably 98 or 99. Use of any
other fuel is prohibited. (Please check the engine manual)
• Never refuel while the engine is running. Always allow the engine to cool down for several
minutes before refuelling.
• Use fresh fuel only.
• Given the limited shelf life of petrol, ELIET recommends purchasing small amounts.
• Store the fuel in an approved tank. Keep it out of reach of children.
• Store the petrol in a well-ventilated area, away from re, sparks or heat sources.
• Never refuel at the location where the machine will be operated. Keep a distance of at least 10
m from the selected work area in view of fire hazard.
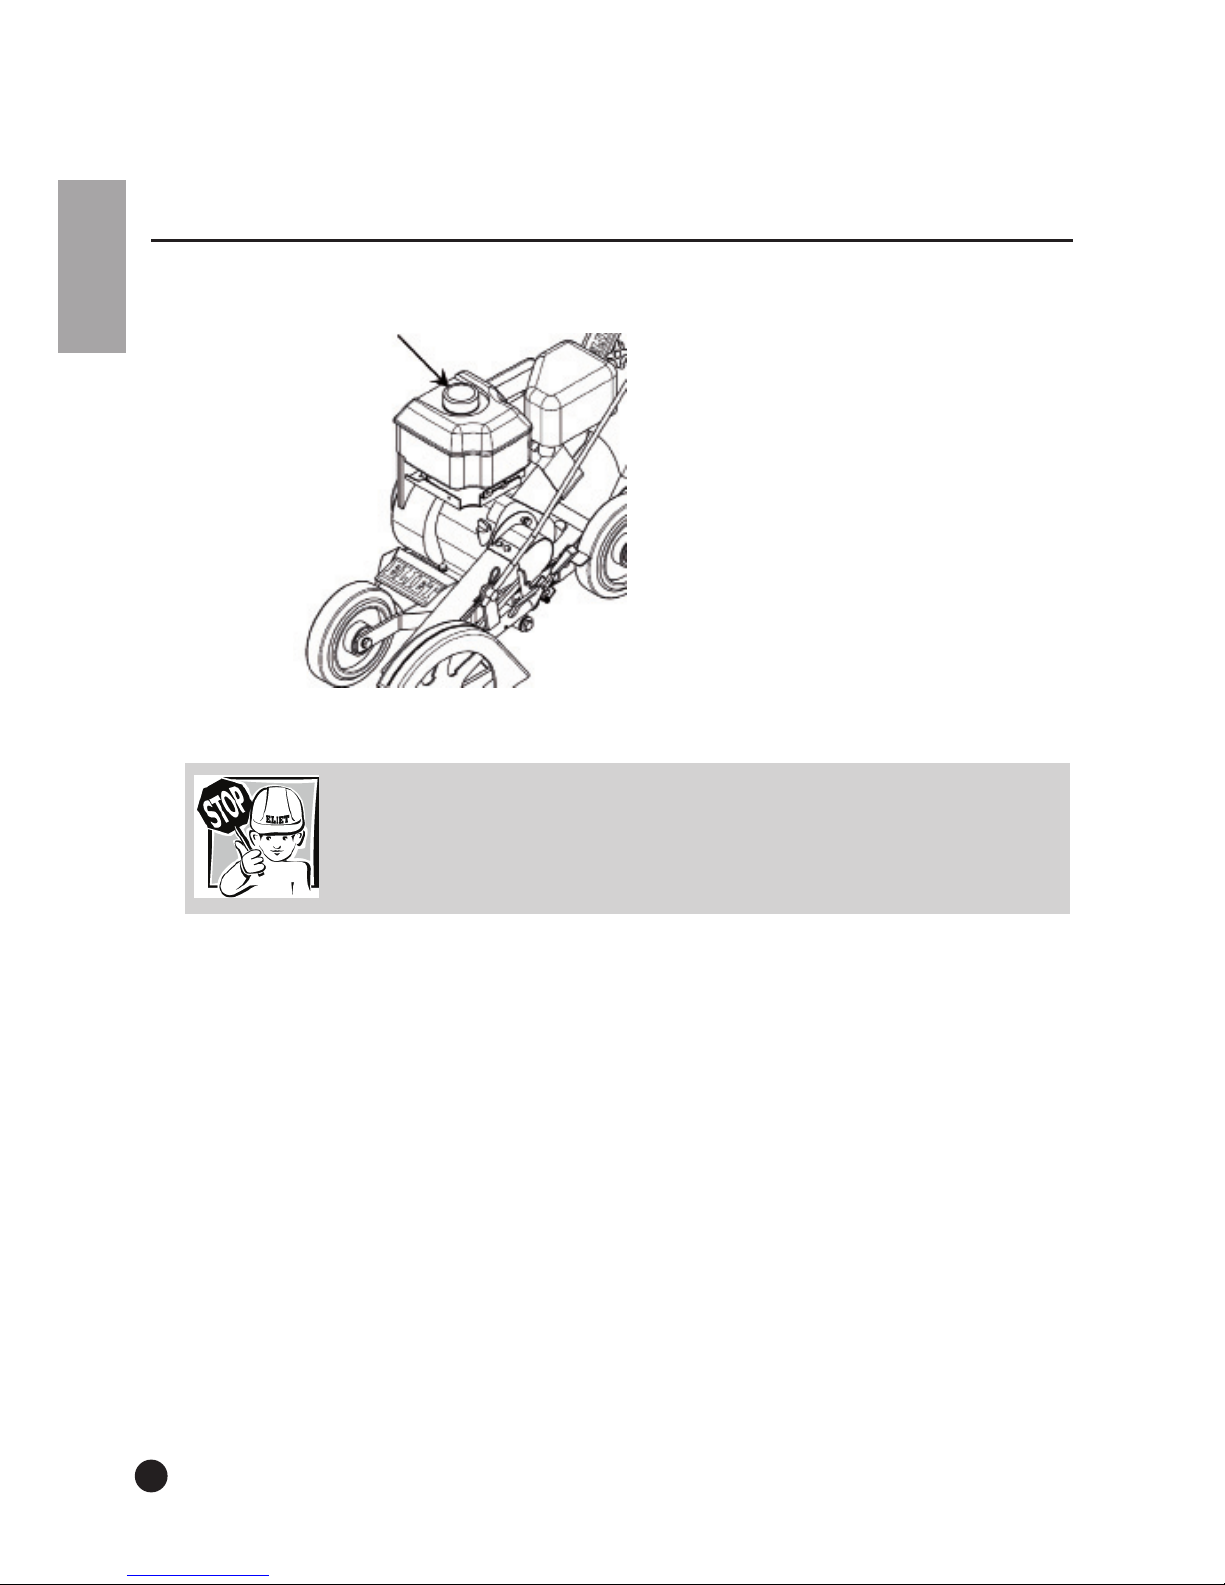
• Clean the area around the fuel cap (1) and remove it. Don’t ll the tank completely. Fill up to approximately 20 millimetres from the brim. So never fill it up to the brim.
• Always use a funnel or a spout for refuelling. Special funnels are available from your ELIET
dealer.
• Put the cap back on the fuel tank as quickly as possible.
• Also ensure that clothing does not come in contact with the petrol. If this happens, it must be
changed immediately.
• It is strictly prohibited to rell the tank around people who are smoking or near open re.
• If fuel is swallowed or comes in contact with the eyes, consult a doctor immediately.
Warning:
Under certain conditions, petrol is extremely flammable and highly explosive.
Fire breakouts and petrol explosions can inflict severe burns and cause damage
to personal property.
Page 21
English
21
9.3 Preparing the work site
• Clean up the area where the machine will be operated prior to starting the work.
Foreign objects are to be removed from the work area.
The term ‘foreign objects’ is understood to mean: anything that is not organic or which breaches
the maximum diameter given (e.g. metal, stone, plastic. rope, textiles…). Some of these items
can cause serious damage to the machine or could be ejected as projectiles towards the user.
Remove cables from your work area so that they are not cut.
9.4 Starting the petrol engine
Always check the engine for adequate oil and fuel levels before starting it. If necessary read the
following paragraphs:
§ 11.2.2 Checking the engine’s oil level
§ 9.2 Adding fuel.
- check that all safeguards are installed correctly.
- set the blade to the highest setting (freewheeling)
Caution:
Please read the safety instructions under § 7.3.
For your information:
For more information, please check the engine manual.
Warning:
Never start the engine in a closed environment. The exhaust fumes contain
toxins that may cause poisoning or suffocation.
Caution:
Never start the engine if the cooling fins are dirty. The engine would heat up too
quickly, which would pose a fire risk.
Page 22

22
English
How to proceed?
Open the throttle.
b. Put the ignition to ‘ON’.
c. Close the choke.
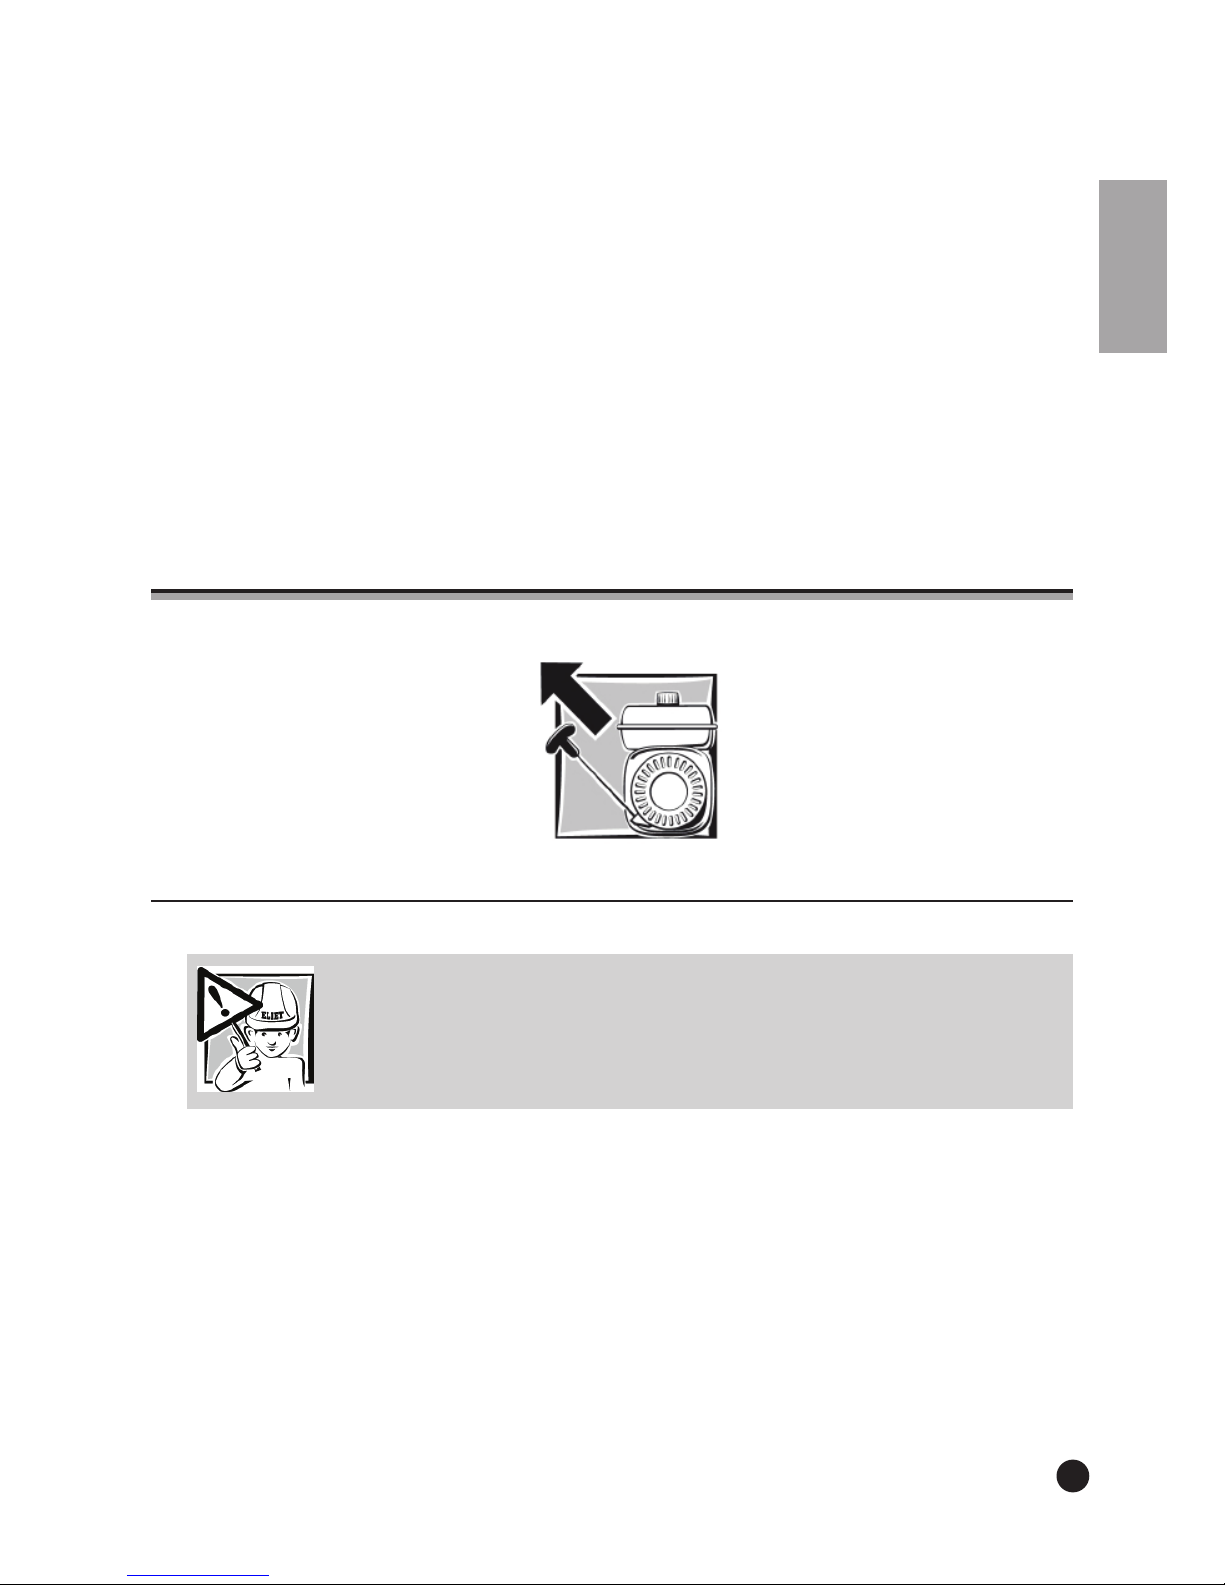
d. Pull the starter cord to start the engine.
e. Quickly open the choke when the engine has engaged (to avoid the engine from receiving
excess fuel).
f. Leave the engine to warm up for a few seconds.
Failure to open the choke will cause the engine to slow down and to produce smoke. It will eventually come to a stop. The solution is to simply restart the engine without opening the choke.
The engine’s failure to restart could indicate a soaked spark plug which then needs to be replaced.
9.5 Operating the machine
9.5.1 Prior to starting the work
• The operator must wear clothing, protective gloves and other protective attributes as prescribed in this manual (see § 7.3, General safety instructions).
A good gardener works efficiently and according to a well defined plan. It allows him to keep an
overview of his work and prevents accidents or wrong manoeuvres with the machine.
Never run the engine in a closed environment in view of the risk of carbon monoxide poisoning
from the exhaust.
9.5.2 Setting blade depth
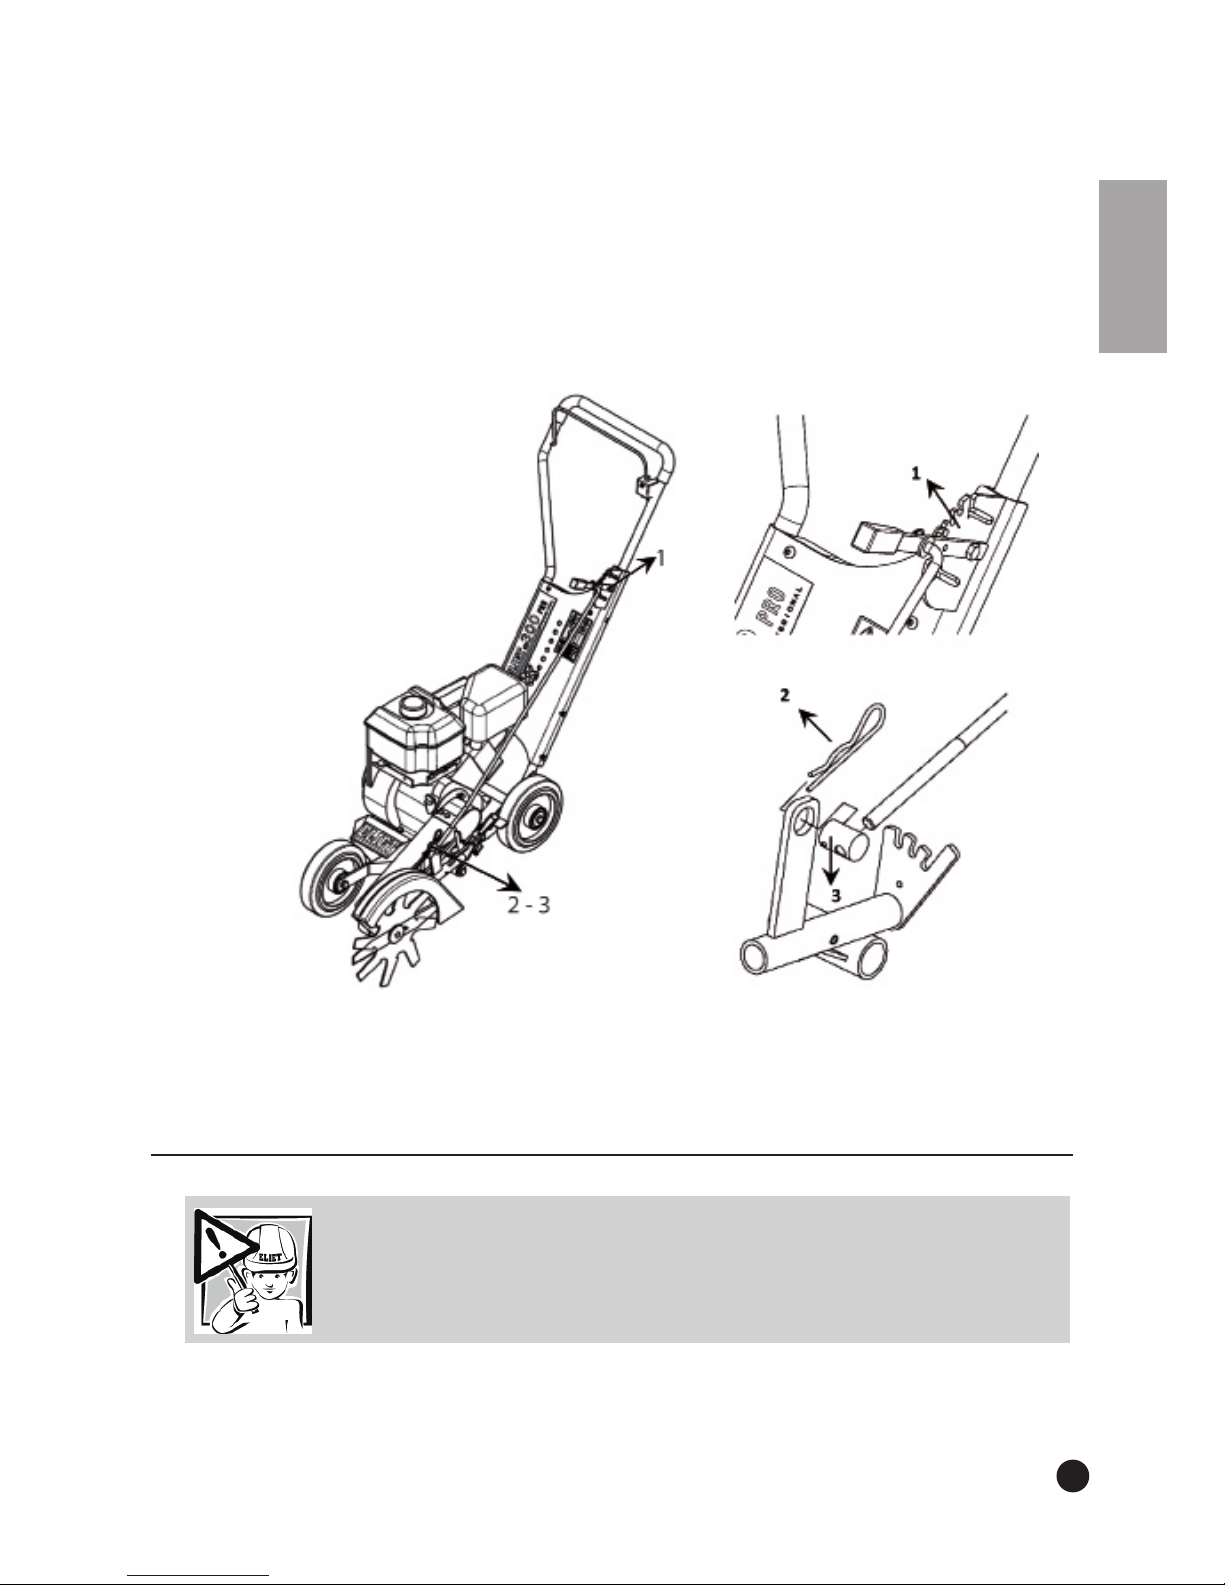
• Push the steering rack downwards.
Pull the depth regulation lever (1) out of its position. Do this by pulling the lever slightly to the
left so that the pin comes out of the hole.
Push it downwards until it reaches the desired setting (or the setting that gives the required
Caution:
The blade must only be set if the engine is switched off
For your information:
For placement of the parts, please check the engine manual or § 6.2.
Page 23
English
23
depth).
There are 6 settings. The first two settings are for disengaging the clutch, the others are for
setting the blade. The blade rises or falls by about 2 cm per setting.
Now compare the desired cutting depth with the actual cutting depth.
Set the depth regulation lever in its highest setting.
Pull the Beta pin (2) out and take the screw (3) out of the holder.
Turn the screw to the left to raise the blade or to the right to lower the blade. (A 1 cm movement
of the screw gives approximately 2 cm movement of the blade).
Now place the screw back in the holder and replace the Beta pin.
9.5.3 Setting the angle of the blade
Follow the instructions below if you would like slanting edges on your lawn.
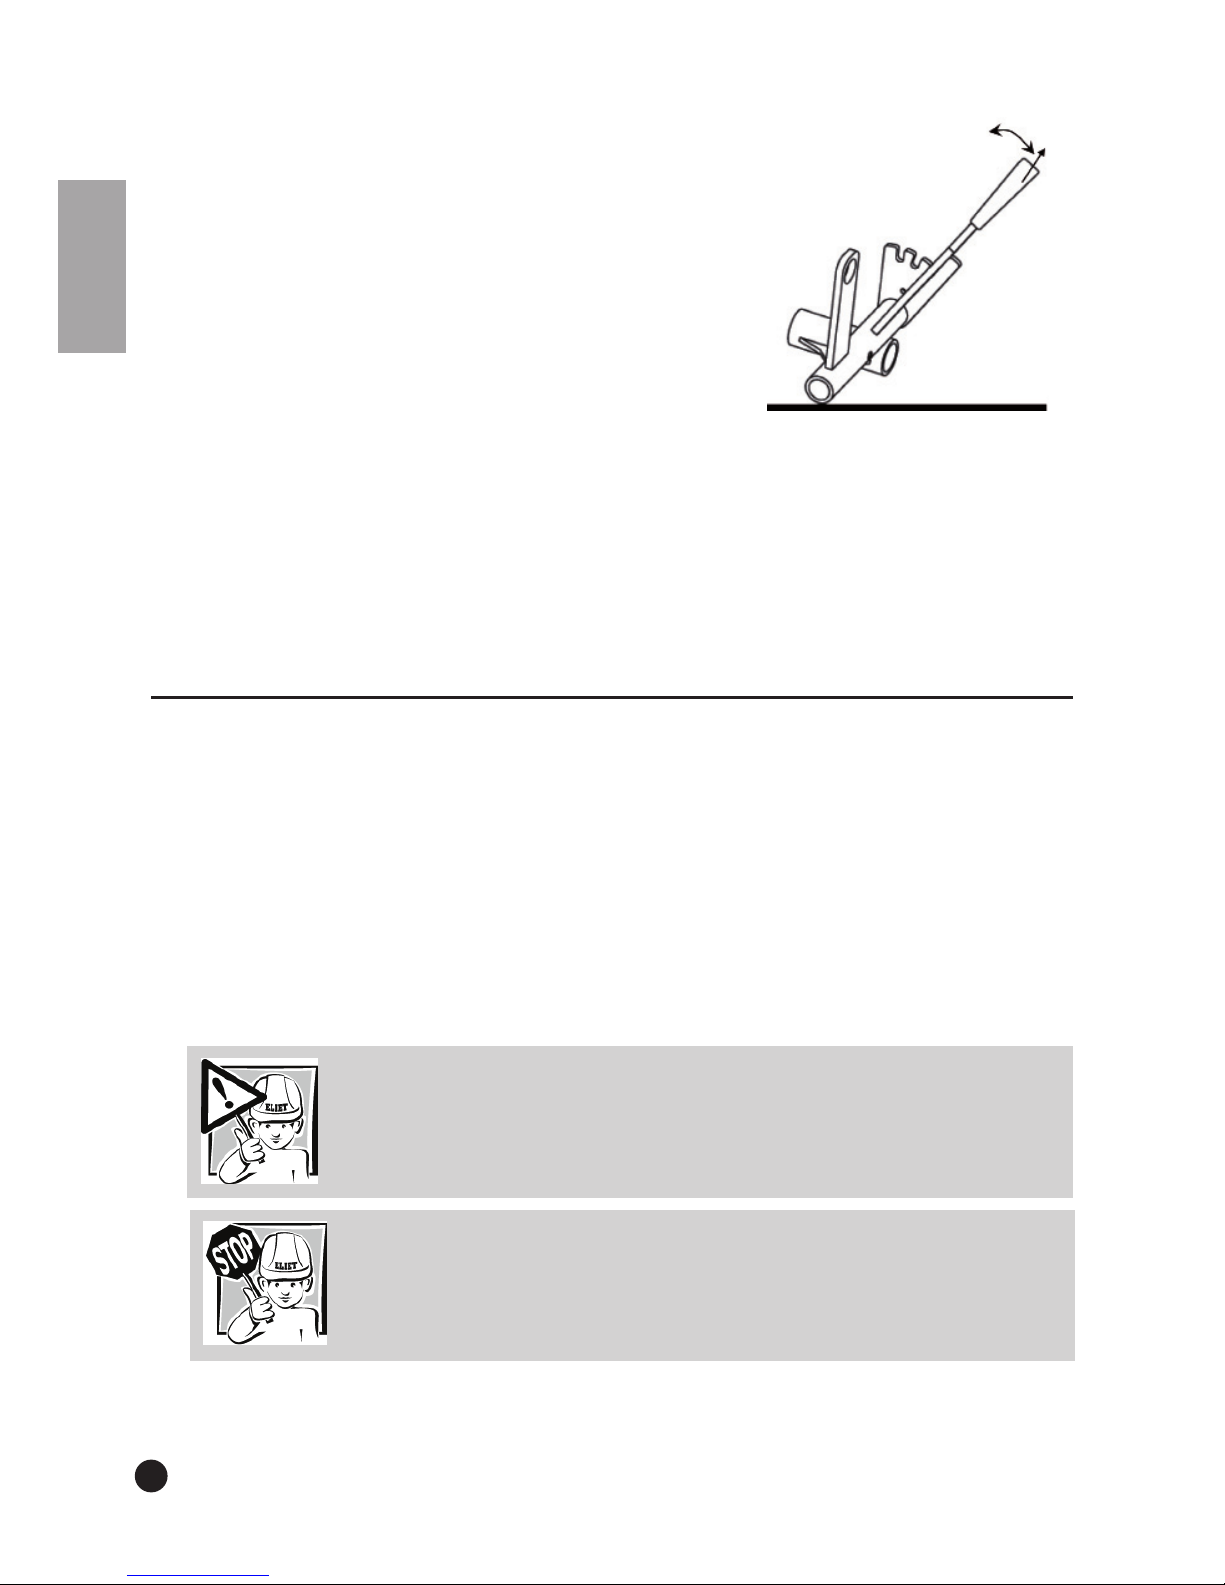
• Pull the depth regulation lever back as far as it will go (disconnect).
• Place the angle setting lever in the desired position by pulling the lever backwards and turning
Caution:
The blade must only be set if the engine is switched off
Page 24
24
English
to the desired angle. The angle can be set at 0° - 25° - 45°
• Set blade depth. (§ 9.5.2 Setting blade depth)
If the ground is firm and has been finished well, it is preferable to cut the edges at an angle. This
means that the ground will not be damaged and will retain its firmness.
A right angle is better for unfinished edges as this will give them a nice finish and will keep subsequent work to a minimum.
9.5.4 During work
The operator must be alert while he’s working. As long as he is operating the machine, his full
attention must be on the job.
Push the machine to the work area with the blades raised.
Engage the blade.
Start the engine.
Once the engine is running, take the machine to the lawn edge.
Put the machine in the correct position and engage the blade by lowering the lever on the han-
dlebar from the uppermost position. Set the lever to the required depth setting.
When engaging the blade, ensure that it does not immediately push into the lawn. Allow it to get
up to speed alongside the lawn edge. Then cut the edge gradually.
Warning:
Be particularly careful if you are in the vicinity of edging slabs or path edges
(increased risk of blade breakage).
Caution:
Always use the machine on the grass.
Page 25
English
25
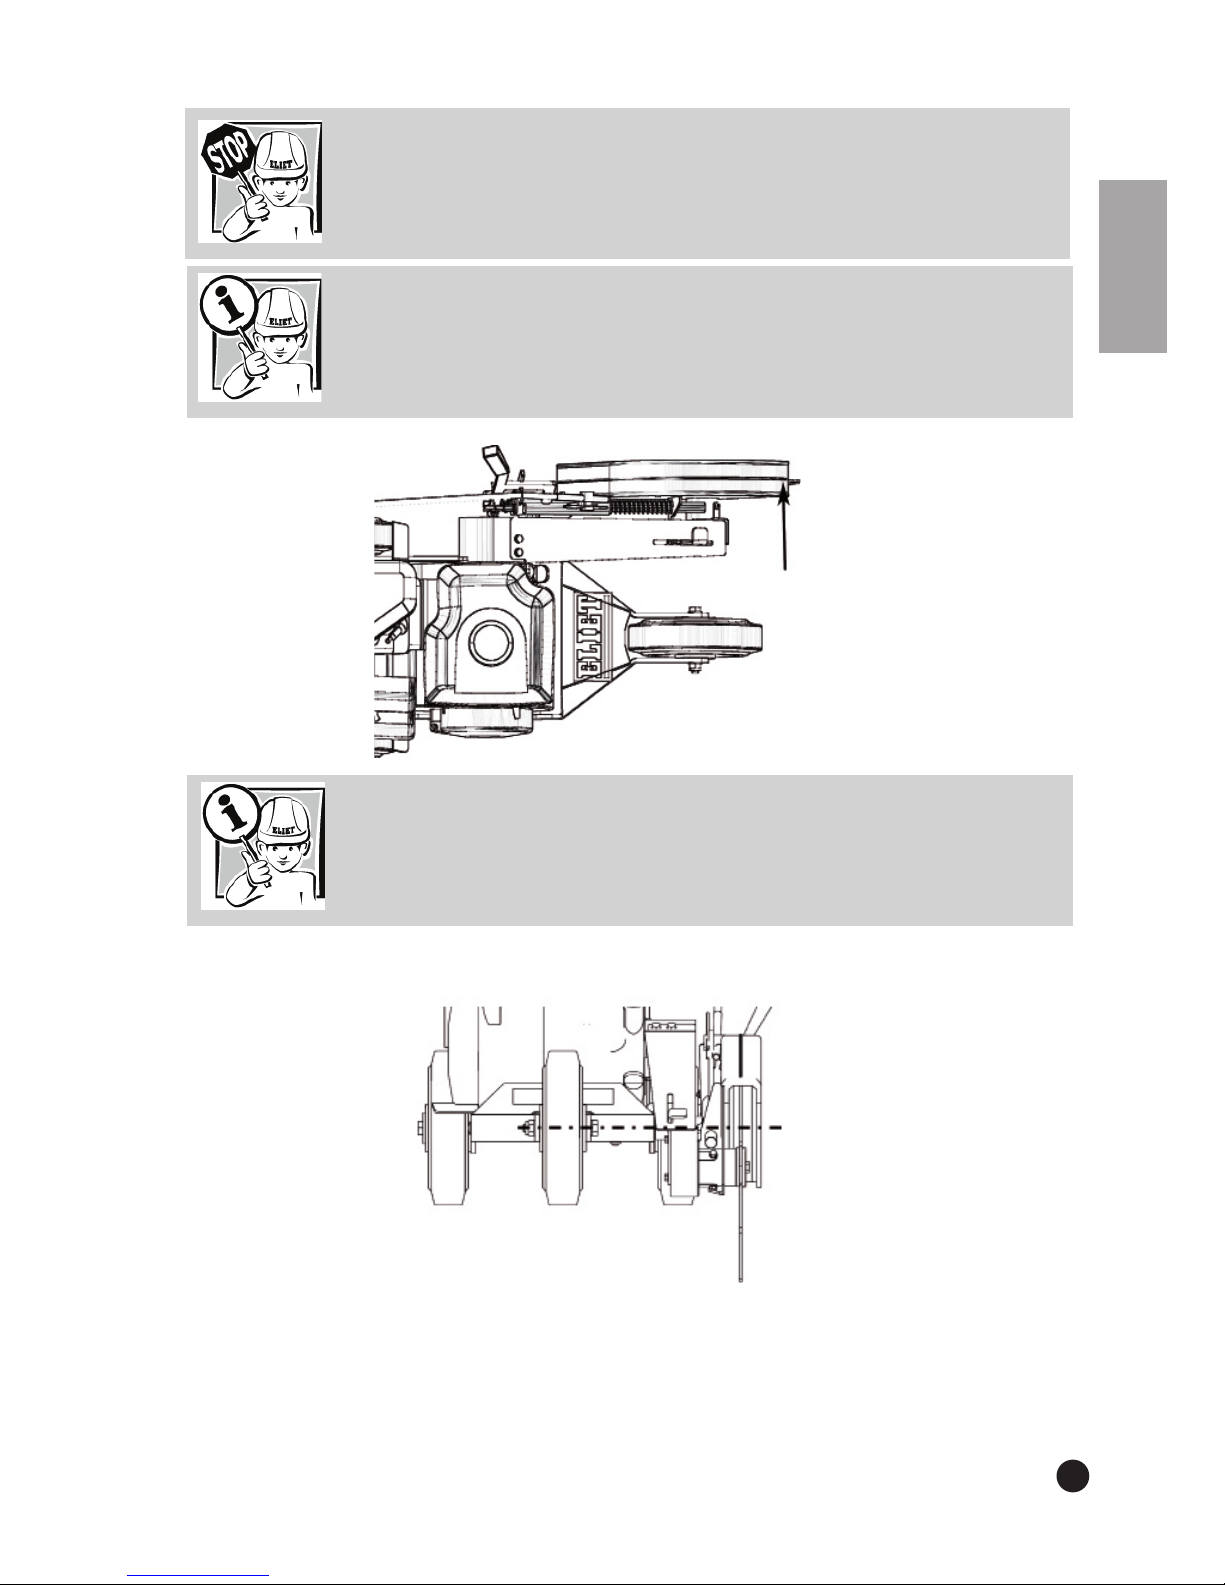
When tensioning the cord, ensure there is a safe distance between the wheel and the blade.
Warning:
The blade will continue to turn for a while after the machine has been switched
off. Always be careful.
For your information:
The ‘line’ that the blade follows is given by the indicator on the cover (see diagram below).
For your information:
A piece of string can be used to ensure that edges are straight. If the front
wheel continues along this string, the edge will follow the desired line. The wheel
and the blade are perfectly aligned.
Page 26

26
English
9.6 Cleaning the machine
9.6.1 The importance of cleaning
ELIET recommends cleaning the machine after each use. We recommend performing an inspection each time you clean the machine to check component and machine integrity. It allows timely
intervention and prevention of any defects, ensuring a longer service life of your machine.
Not cleaning the machine will lead to:
• Accelerated wear
Increased risk of fire
Reduced motor cooling
Increased risk of short circuits
Reduced performance
Illegibility of safety stickers
Not noticing defects or wear at an early stage
9.6.1 What does cleaning entail?
Check the entire machine when cleaning and subject it to an inspection if required. Check that
no parts have been deformed, that welded seams are not cracked and that parts do not exhibit
excess play.
Any necessary replacement and/or repair works must be undertaken immediately. Visit your
authorised ELIET dealer to have them carried out (find an authorised ELIET dealer near you on
Note:
Failure to perform the daily [sic] cleanup will result in loss of warranty.
Warning:
A machine functioning sub-optimally can compromise the operator’s safety.
Caution:
Wear suitable clothing for cleaning activities. Utility gloves are essential.
Page 27

English
www.eliet.eu).
Cleaning the machine entails more than just cleaning the outside. Open all protective covers so
that you can also clean the inside of your machine.
• Use penetrating oil with MoS2 to remove grease and lubricants. The latter is a lubricant and
rust solvent at the same time.
Using a dry cloth, remove any dirt form the frame. Particularly where safety stickers have been
placed. (Do not use a cleaning agent that will remove paint or stickers)
If safety messages on stickers have become illegible, please replace. Original stickers can be pur-
chased from your ELIET dealer.
Compressed air can be used to easily blow out and clean some parts.
Pay particular attention to cleaning the engine. Cooling fins and air inlets are of key importance
to guarantee adequate cooling of the engine.
A steamer may be used for cleaning, Do not spray excessive amounts of water on the bear-
ings, electric contacts and filler caps. Water is the number one cause of rust and this must be
avoided at all times. Allow the engine to cool down properly before treating it with water.
Caution:
Cleaning activities to the machine must always be carried out with the engine
turned off. Wear suitable clothing for cleaning activities. Utility gloves are essential.
Page 28
28
English
9.7 Options
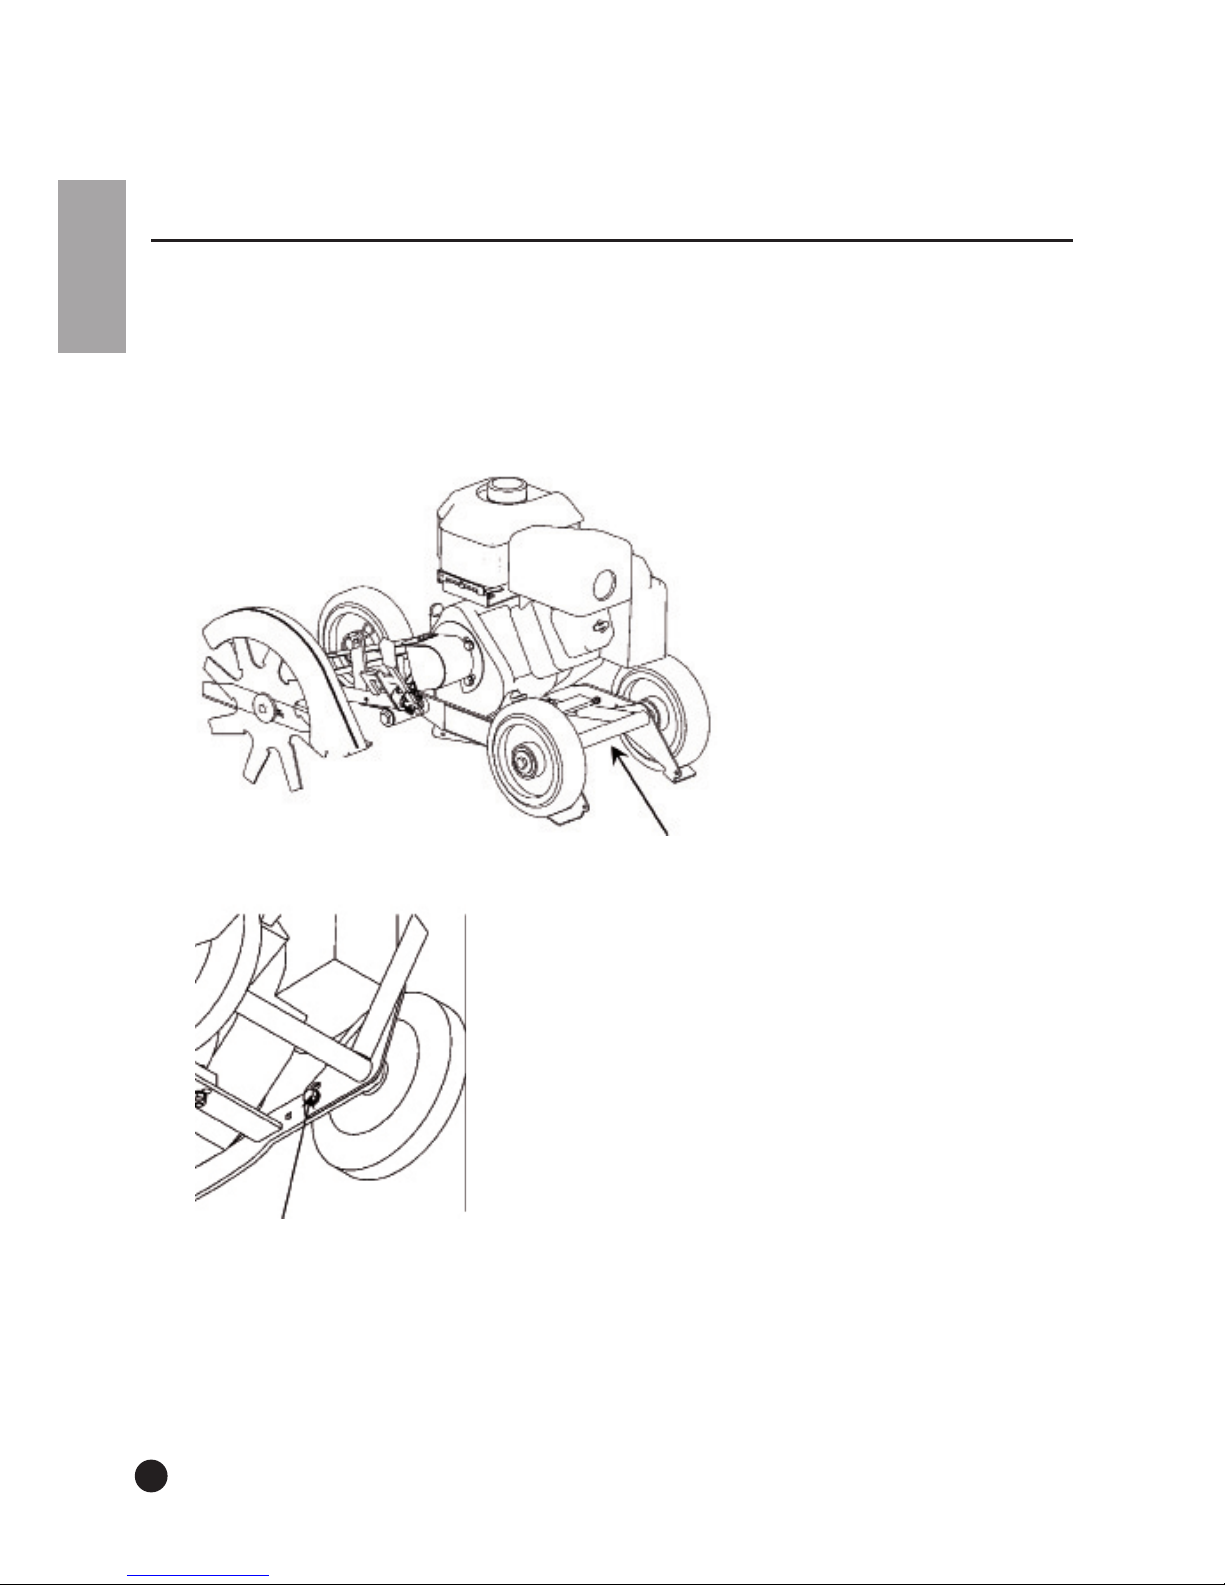
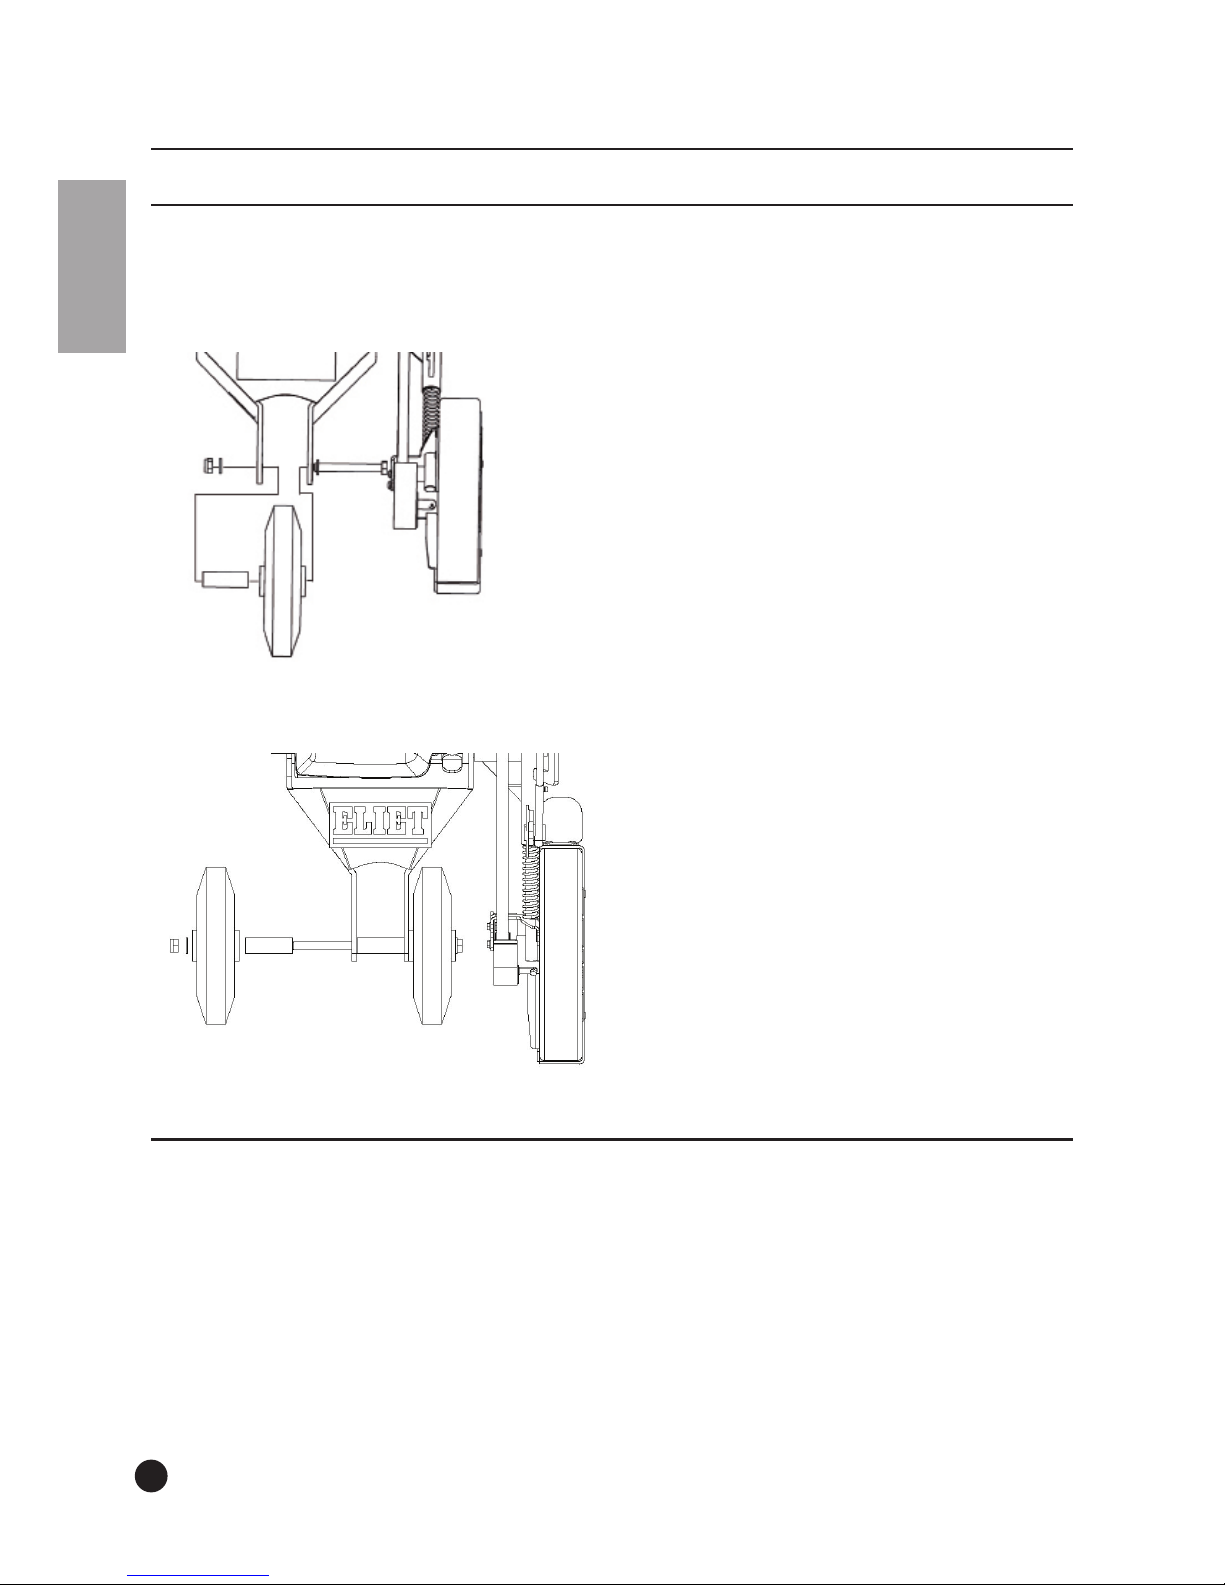
9.7.1 Double front wheels
A double-wheel gives the machine extra stability and makes it easier to use, particular when cutting curved lawns.
A. DISMANTLING SINGLE FRONT WHEEL
B. ASSEMBLING DOUBLE FRONT WHEEL
9.7.2 Eight-tooth disc
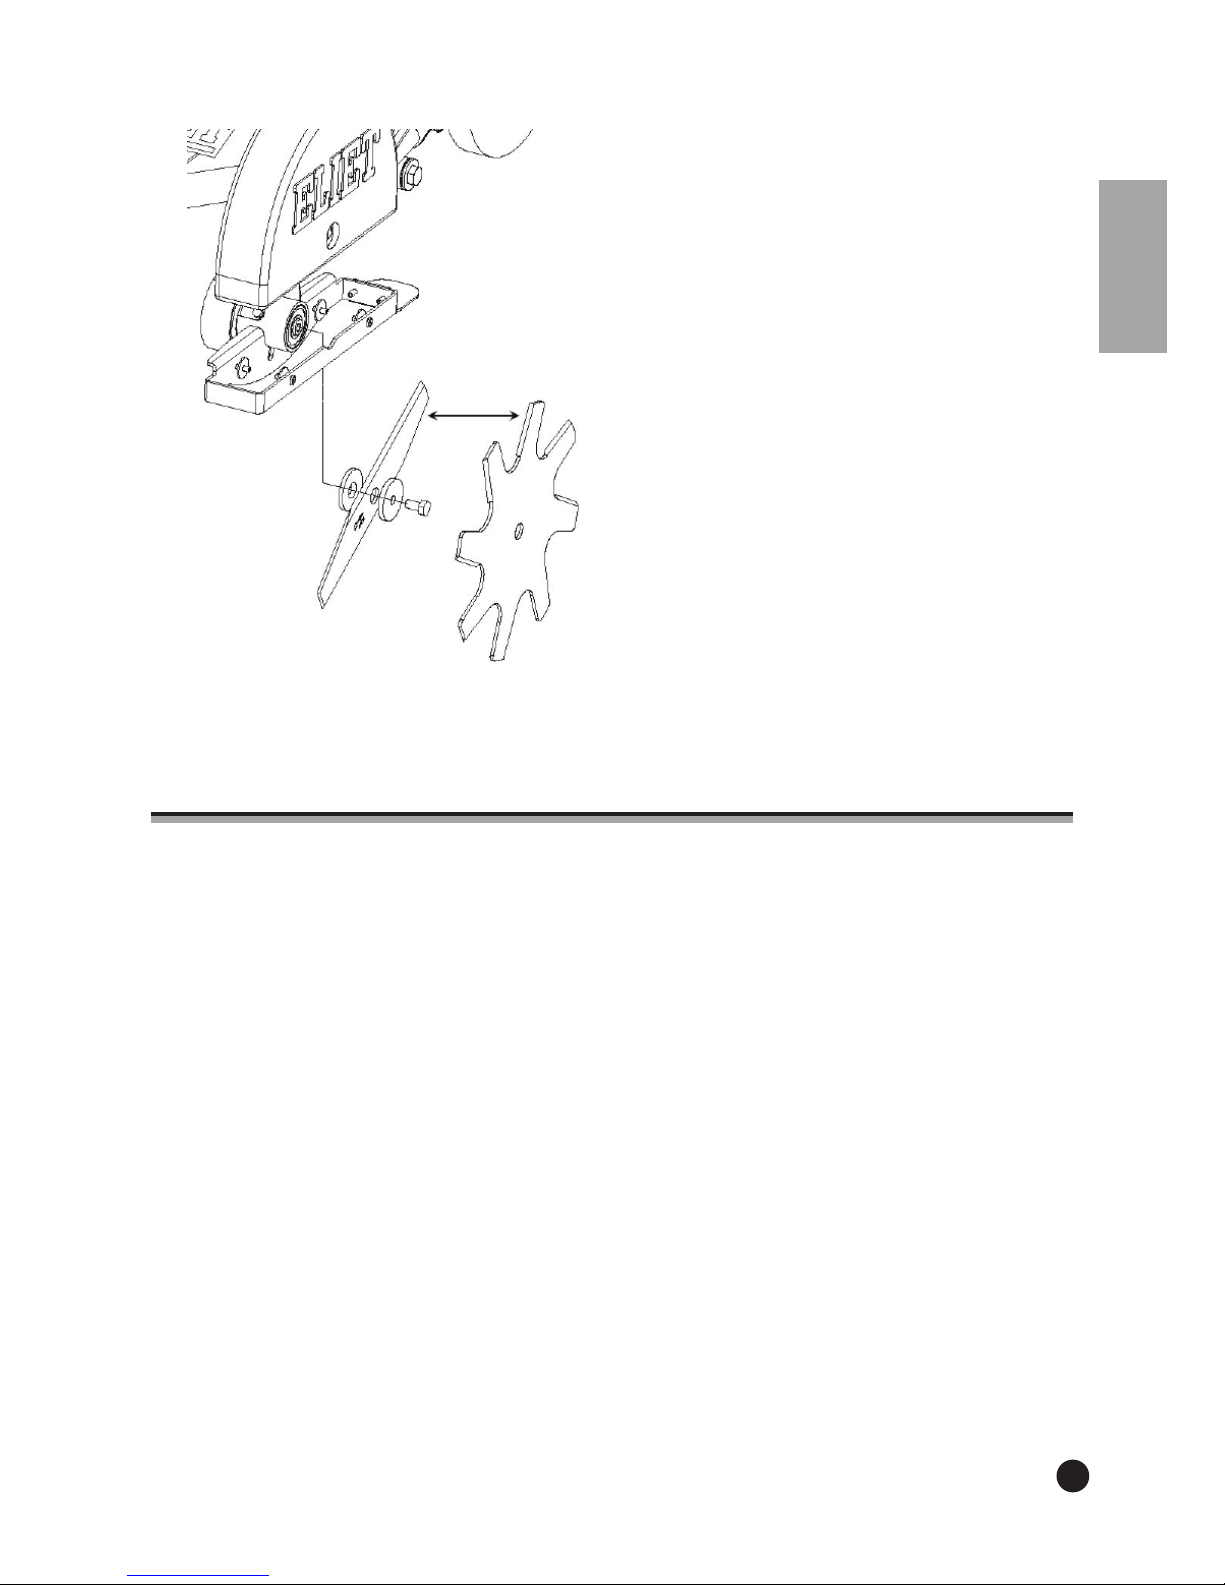
The standard machine is supplied with a classic straight blade.
For more delicate work you can replace the standard blade with an eight-tooth disc. This further
reduces the risk of damage to borders, stepping stones and path edges.
The blade is mounted between two locking rings and fixed using a bolt.
The ordinary blade is dismantled. The eight-tooth disc is installed in its place.
Page 29
English
29
10. Transporting the machine
• Only adults are permitted to move or transport the machine.
During transport children, unauthorised people or animals must not be allowed within a 2 m
radius of the machine.
Leave all operational levers unchanged when moving the machine.
The lawn edger can be pushed forwards.
Always transport your machine with its engine turned off.
Avoid very rough terrain; the transport route is preferably flat, with an even surface.
The engine does not need to be switched off for moving over short distances. The depth regula-
tion lever MUST be in its highest position so that the blade drive disengages. Always be aware
that the blade will not stop immediately. Wait until the blade has come to a complete standstill
before moving the machine.
For longer distances, it is best to turn the engine off. In order to do so, put the blade in its high-
est position so that the blade is no longer driven.
The danger zone remains in effect while the machine is being transported.
Page 30
30
English
11. Maintenance
11.1 General
ELIET recommends that the machine be brought to an official ELIET dealer for a major overhaul each year (find an authorised ELIET dealer near you on www.eliet.eu). Your ELIET dealer is
always at your service for maintenance and advice. He stocks genuine ELIET replacement parts
and lubricants. His staff can always obtain advice and service from ELIET’s help desk in order to
provide you with an impeccable after-sales service.
Perform maintenance in a room intended for this purpose. This room must be:
• Spacious
Dust-free
Easily accessible
Clean and tidy
Well lit
Quiet
These characteristics are important to properly carry out maintenance works.
Warning:
Maintenance performed in an incorrect manner may compromise the operator’s
safety. Damage or consequential damage that arises from insufficient or faulty
maintenance will void the warranty. Maintenance must therefore be performed
by expert and experienced engineers at all times.
Caution:
Maintenance work must only be carried out if the engine has been switched off
and the battery disconnected (positive pole disconnected).
Caution:
Only use original ELIET replacement parts. These service parts are manufactured according to the same strict quality requirements and craftsmanship as
the original equipment. For a list of original spare parts and their ordering codes
please visit www.eliet.eu.
Page 31
English
1.2 A routine check before each operation
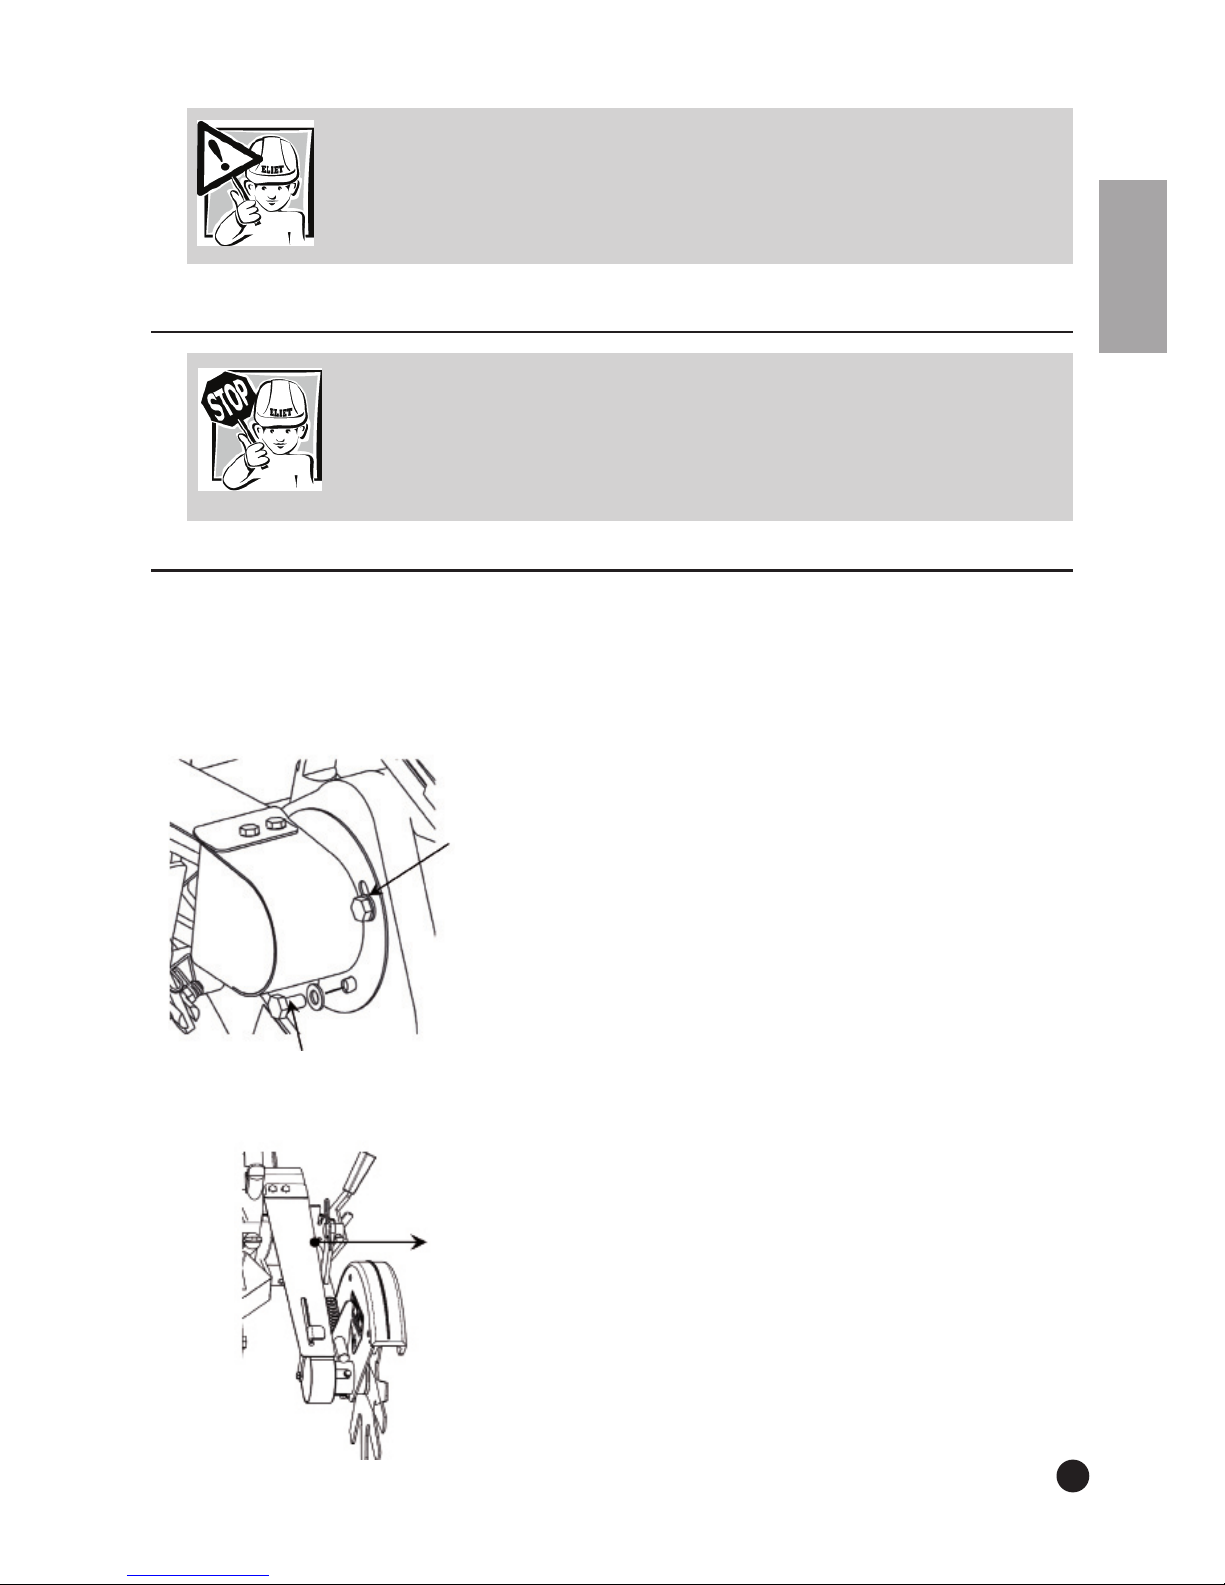
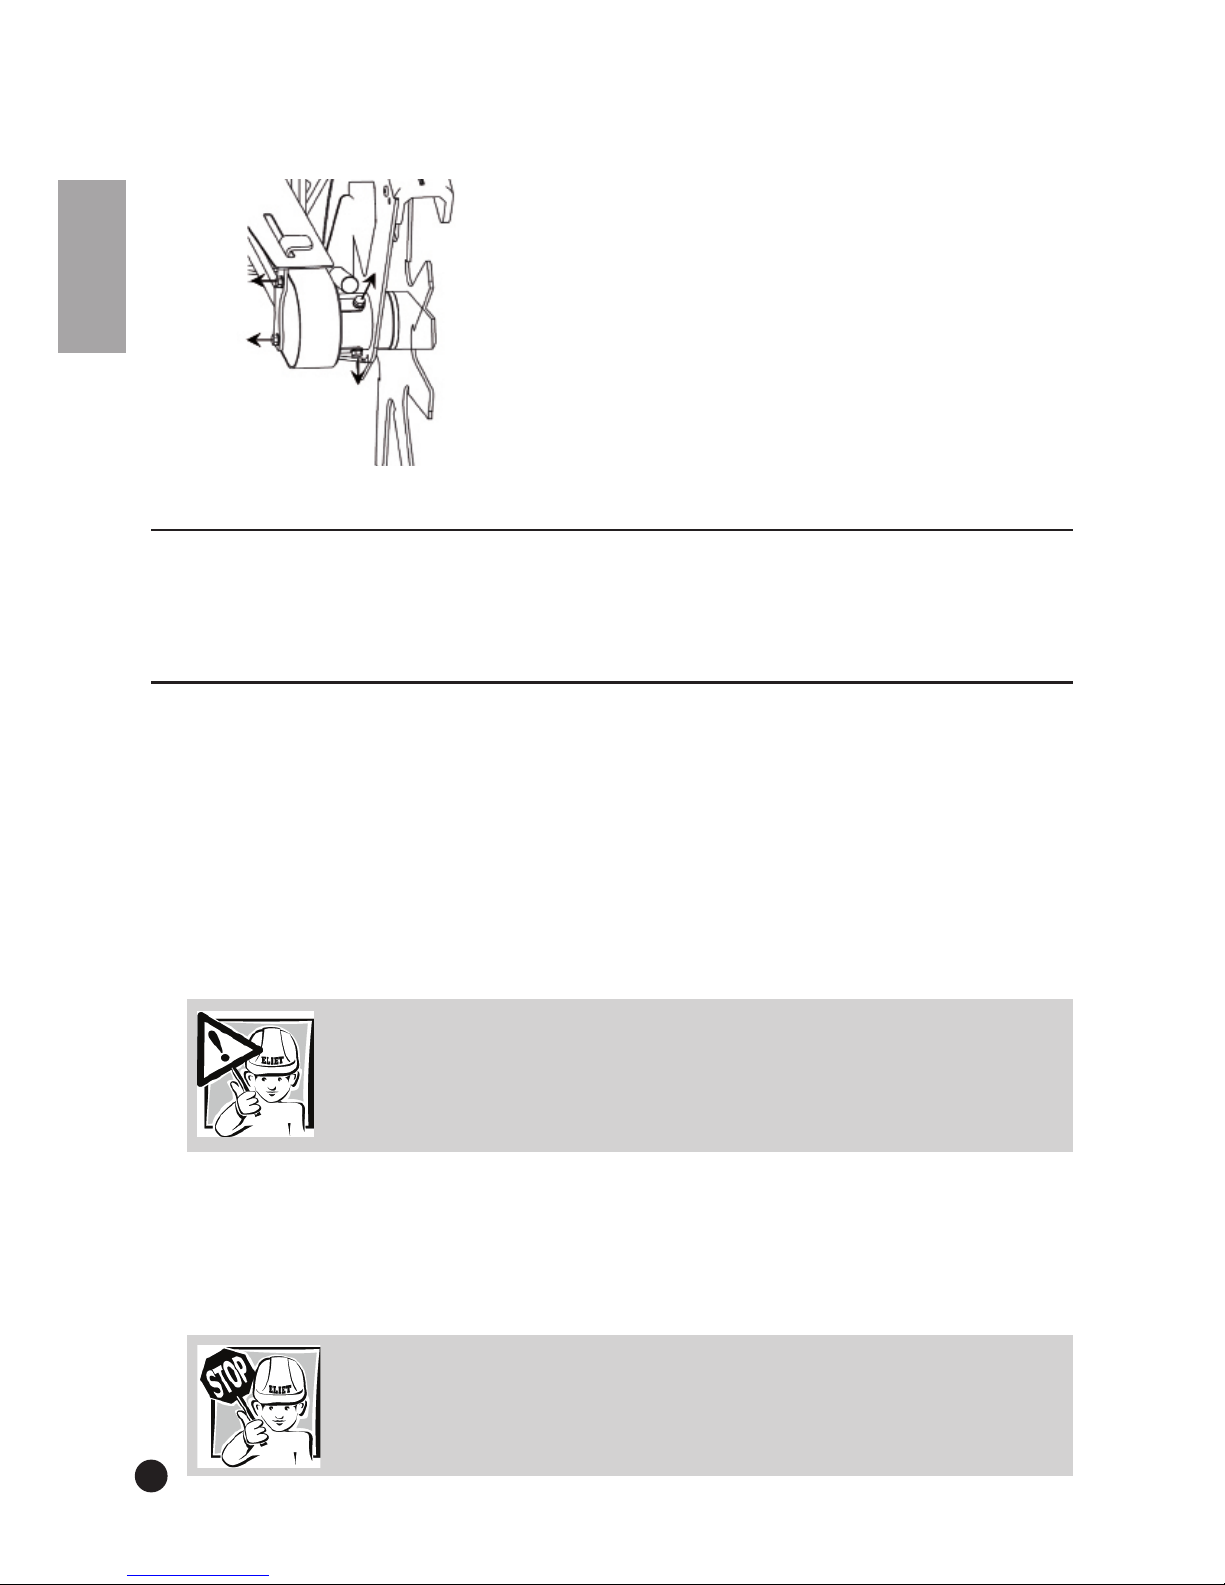
Removing the wheel guard
At the back (angle setting side)
• Unscrew both hexagonal bolts (SLW13).
• Remove the cover.
At the front (blade side)
• Unclasp the nylon plate.
Caution:
Always wear safety gloves when performing maintenance. Safety goggles may be
required for certain operations. These are supplied standard with the machine.
Warning:
For your own safety, always replace the safety guards after work.
Page 32
32
English
• Remove the hexagonal bolts.
• Remove the cover.
11.2.1 Visual check of the state of the machine
Check whether any parts have been deformed and check for torn welds and any excess play on
parts. If problems are found, repairs must be carried out first.
11.2.2 Checking the engine’s oil level
• Place the machine on at ground so that the engine plate is horizontal.
• Switch off the motor and pull the spark plug loose.
Take a clean cloth.
Pull the dipstick from the filler opening.
The oil level will usually be hard to read immediately. Wipe the dipstick with your clean towel and
re-insert it without fastening it.
Pull the dipstick out again; you will now get an accurate reading of the oil level.
The oil sticking to the dipstick should be between the minimum and maximum mark.
If there is insufficient oil in the engine, replenish it via the dipstick hole.
• Replenish the oil carefully. Check the level intermittently while replenishing to see if the desired
level has been reached.
• Only use the recommended oil (see engine manual).
• Once the engine has been topped up, replace the dipstick in the hole.
• Immediately remove any spilled oil.
Warning:
Oil shortage inevitably causes severe engine damage.
Caution:
You must replenish the oil carefully, too much engine oil in the sump is not beneficial for performance or the life span of the engine.
Page 33

English
33
11.2.3 Cleaning the air filter
The type of air filter may differ slightly depending on the engine brand and type.
• The air lter is located under the black protection cover, next to the fuel reservoir on the ma-
chine.
Loosen the black protection cover.
There are two types of filters: the common sponge filter and a paper filter, similar to the air filter
of a car.
Sponge filters can be cleaned by rinsing them with some petrol and blowing them with com-
pressed air.
Paper filters are cleaned by dusting them down or treating them with compressed air.
After cleaning, replace all parts in their original positions.
11.2.4 Adjusting depth regulator
If it is not possible to achieve the desired depth with the depth settings provided, there is an option to precision adjust to the desired depth.
• Place the height regulation lever in the position that comes closest to the desired depth.
Undo the connector between the rod and the lever arm. To do so, pull out the beta pin.
Turn the connector upwards on the screw thread to lift the blade at this depth setting. Turn the
connector downwards to lower the blade at this depth setting.
Replace the connector in its original location and lock it with the beta pin.
Caution:
Should the machine have toppled over for some reason, you must set it upright
again as soon as possible. The unusual position of the engine may have caused
oil to seep from the crankcase via the carburettor onto the air filter. Oil on the
filter paper obstructs the air passage and the filter must therefore be replaced.
Caution:
The engine must be switched off and the spark-plug cover disconnected if precision adjustments are to be made to the height.
Page 34
34
English
11.2.5 Checking and tightening the blade bolts
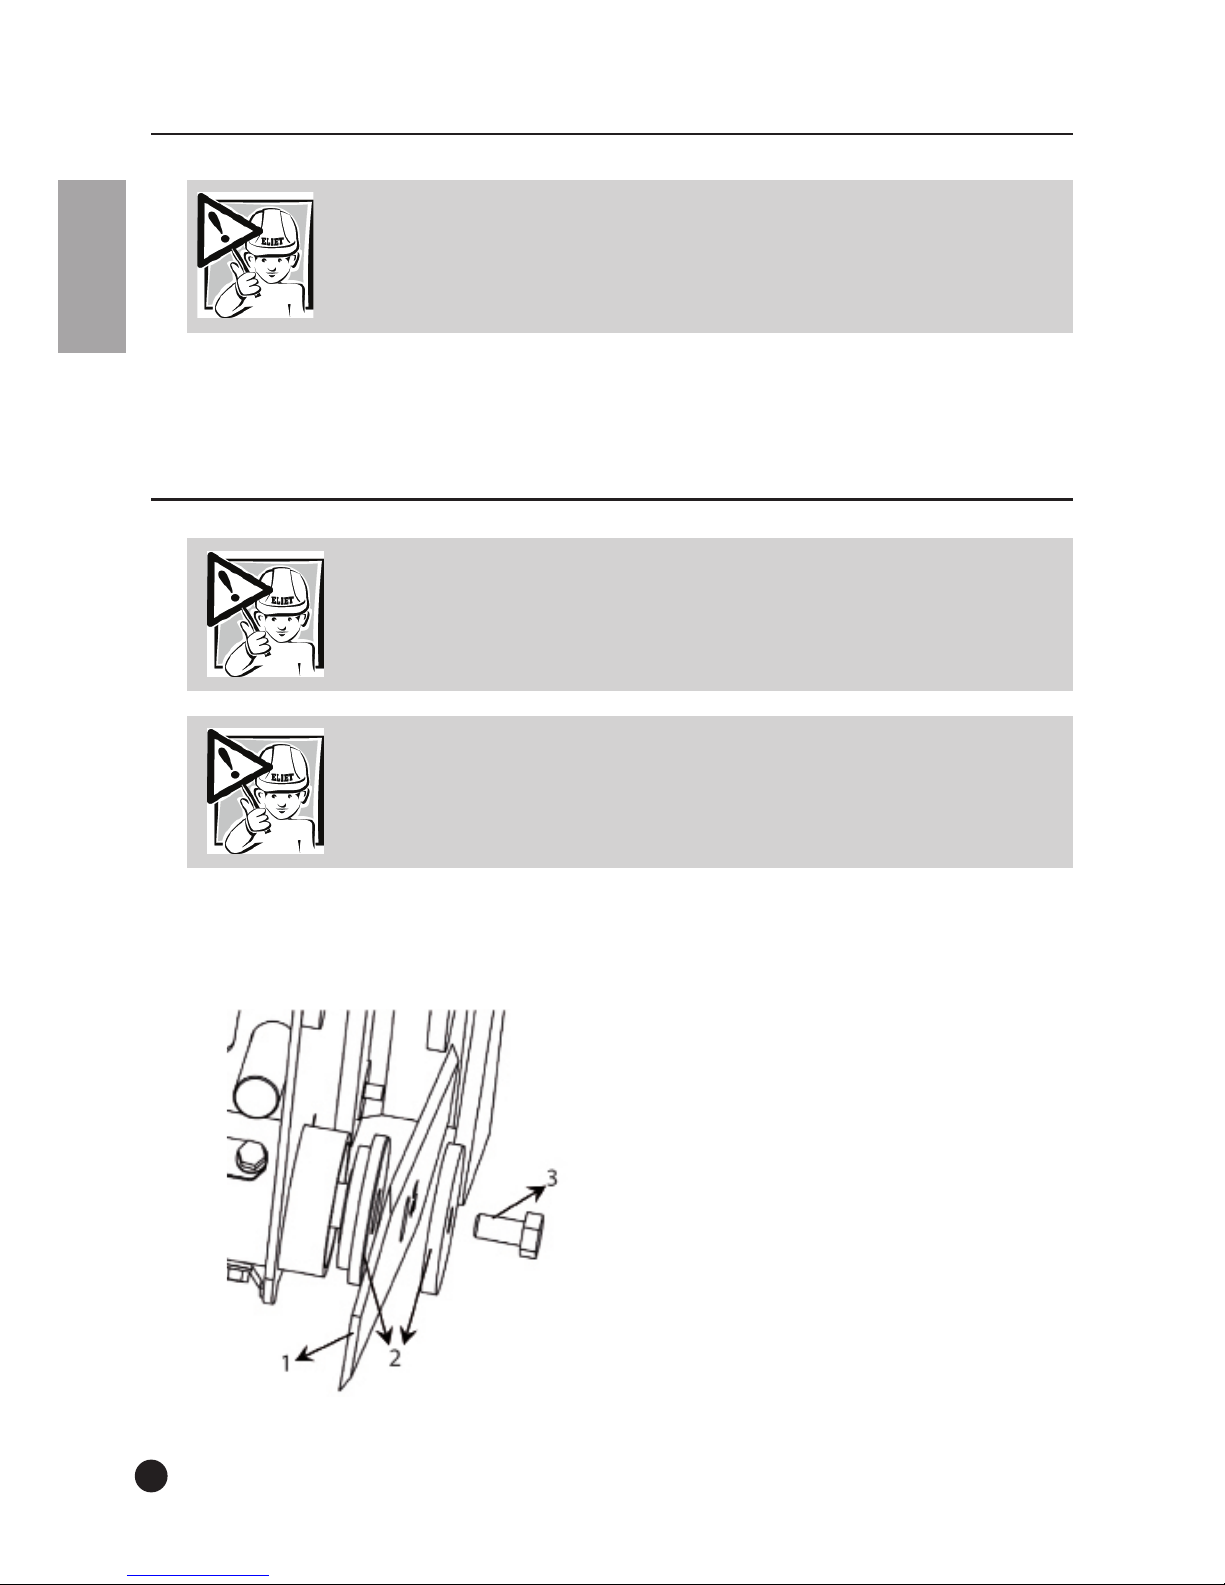
• The blade is mounted between two locking rings and xed using a bolt (M8).
• The bolt tightness can be adjusted by holding the blade with one hand and using a 13 ring span-
ner to turn the bolt clockwise to tighten. (Wear gloves!)
11.2.6 Checking the blade and sharpening
• Turn the blade and check that there are no cracks in it. If there are, replace the blade immedi-
ately. Always use original ELIET machine parts.
The blade must be undone in order to replace or sharpen it. The blade (1) is mounted between
two locking rings (2) and fixed using a bolt (3).
When removing the blade, note the order of the machine parts that have been removed; this will
simplify reassembly.
In order to sharpen the blade, you are advised to consult the ELIET dealer as they will have the
Caution:
The engine must be switched off and the height regulator must be put in the
highest position.
Caution:
The engine must be switched off and the height regulator must be put in the
highest position.
2 positions
Caution:
Wear gloves when turning the blade in order to avoid injury.
Page 35

English
35
appropriate materials for balancing the blade after sharpening.
When reassembling the blade, you must be aware of the blade’s rotational direction.
11.3 Checking after 50 hours of use
11.3.1 Changing the oil
Ensure that the engine is on an even surface and turned off.
At the rear of the engine, below the engine foot, a bolt is affixed to the crankcase.
Have a one litre collection reservoir ready before loosening the bolt.
Empty the full contents (approx. 0.6 l) from the engine.
Replace the bolt on the drain. Wipe away any spilled oil with a clean cloth.
Refill the engine with fresh 4 stroke oil. ELIET recommends a top quality high-detergent oil:
SUNOCO DENALUBE SAE 20W50 API SF / CC.
Pour 0.6 l of oil into the filler opening.
Remove any spilled oil after filling. Before checking the oil level with the dipstick, leave the
engine untouched until all the oil has found its way into the crankcase.
Place the dipstick in the filler opening without fastening it. After pulling it out again, the oil at-
tached to the dipstick should reach the maximum mark. If it doesn’t, more oil must be added.
Warning:
Always replace the blade in its original position and tighten the bolt sufficiently
so that the blade cannot come loose during use.
Warning:
Neglecting to perform this special maintenance may lead to the blade becoming loose during use. This will cause serious damage to your machine and also
represents a huge risk of serious injury or death to the user or bystanders. All
damage or subsequent damage caused as a result of this negligence falls outside
the guarantee.
Warning:
Oil shortage inevitably causes severe engine damage.
Page 36

36
English
11.3.2 Checking the sparking plug.
ELIET suggests the following spark plugs:
NGK BPM 7 A
CHAMPION BS 19 LM
• Turn off the engine and pull the cable from the spark plug.
Clean the area around the spark plug and remove the spark plug from the cylinder head.
The distance between the electrodes is 0.8 mm.
If the spark plug is heavily contaminated or dirty, it must be replaced.
Complete the following steps to verify ignition quality:
1. Replace the spark plug cap on the plug.
2. Grab the rubber of the spark plug cap and press the outermost electrodes against the mass of
the engine.
3. Pull the starter cord.
4. Check for sparks between the electrodes.
5. The spark plug is in good condition if the sparks are clear and neatly centred between the
electrodes.
6. Weak, irregular and off-centre sparks indicate that the spark plug must be changed.
• Replace the new or old spark plug with care so as not to damage the screw thread. Secure the
spark plug with a torque of 20 Nm.
11.3.3 Changing the air filter
This procedure is exactly the same as for cleaning the air filter. (See § 11.2.3 Cleaning air filter).
Contact your ELIET dealer or authorised engine service centre to purchase the proper air filter.
11.3.4 Lubricating
For proper operation of the machine it is recommended to lubricate it at regular intervals.
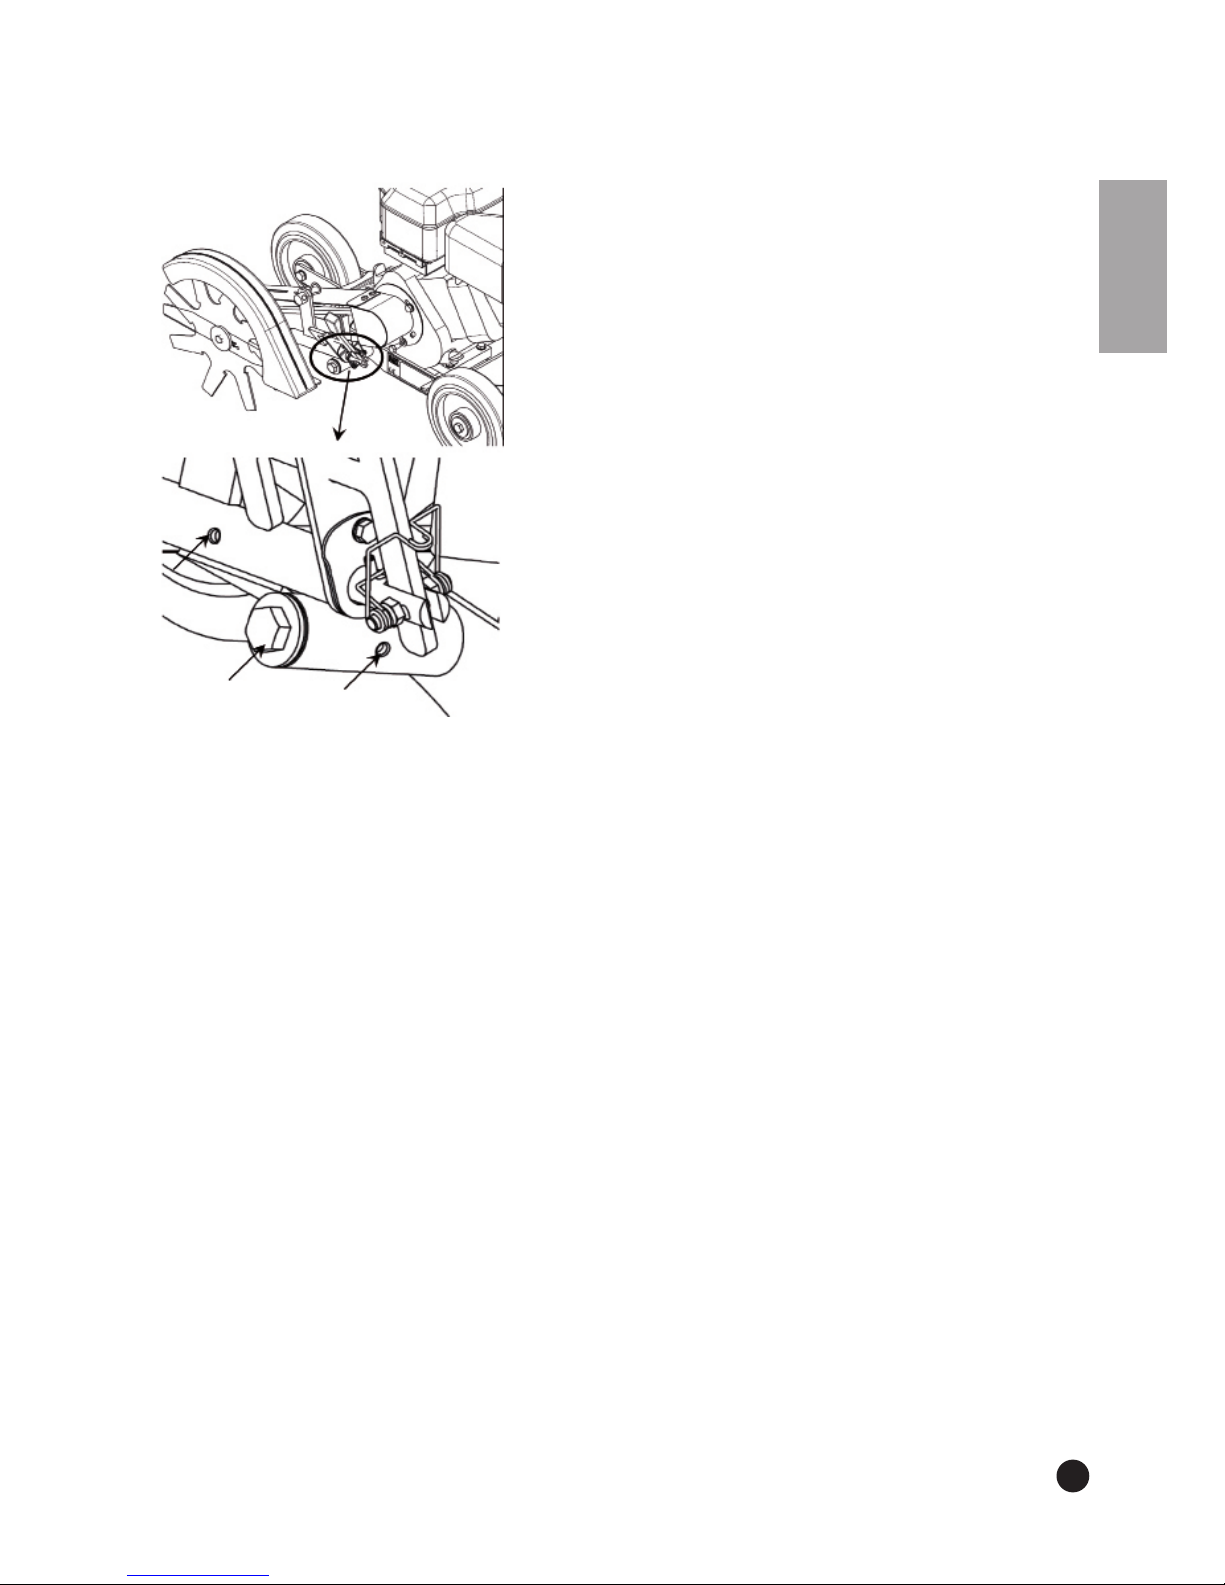
Lubricate hinges and friction points.
Lubrication nipples
Caution:
As for other maintenance, the engine must be switched off and the spark plug
cap removed before performing any lubricating activities Protective gloves
must be worn.
Page 37
English
37
A. LUBRICATING VIA AVAILABLE NIPPLES
How to proceed?
• Clean the nipple
Push new lubricant through the nipple with a special lubricant pump.
ELIET recommends Sunoco Multi Purpose Grease.
One or two pump-fulls will suffice to redistribute the new grease.
Remove the grease that protrudes via the seams.
B. LUBRICATING WHEELS
• Use a ring spanner 17 to loosen the bolts that hold the wheels on the axle. Remove the wheel
from the axle.
• Squirt penetrating oil on a basis of MOS2 onto the wheel axles and give it time to work in. Then
clean the wheel axles with a clean cloth. Reapply grease (Sunoco Multi-purpose LR - EP2 vet)
using a brush. Do this to the bearings in the wheel too.
C. LUBRICANTS
Engine 1.1 LSUNOCO SUPER DENALUBE
SAE 20 W 50 API SF / CC
Hinges NOVATIO
WHITE SUPREME GREASE
Wheel axles SUNOCO GREASE
MULTI-PURPOSE LR - EP2
Page 38
38
English
11.3.5 Belt tension adjustment
The operation lever on the handlebar can be used to set depth as well as to engage the blade.
You must ensure that the belt is not tensioned in the highest position. The blade must be disengaged in the highest setting.
The second position is a transition setting. Any tension put on the belt here is insufficient to be
effective.
The actual working positions begin from the third setting. When going from the second to the
third setting, the resistance can clearly by felt on the operation lever and it is quite obvious that
the belt is tightening. If you cannot feel this tension, the tension must be reset (§11.4.2 Tightening
the belt)
How to proceed?
• Switch the engine off and remove the spark-plug cover.
Put the depth regulator in its penultimate setting.
Use you finger to press the centre of the belt.
This should move the belt by a maximum of 1 cm. If the movement exceeds this, the belt needs
tightening.
Pull the Beta pin (1) out and take the screw (2) out of the holder.
Turn the screw in a clockwise direction to tension the belt.
Now place the screw back in the holder and replace the Beta pin.
Check
Once the connector has been replaced and fixed in place and the lever is put into the third position, you can check whether the tension is sufficient: hold the belt fast with one hand and try to
turn the blade with the other hand. If this is not possible, the tension is sufficient.
Replacing the belt
If the belt has to be replaced, the protection guards and the protection plates must be removed.
1
2
Caution:
When adjusting the belt tension the engine must be turned off and the spark
plug cap removed.
Page 39

English
39
The protection guard on the engine is attached with 1 bolt that can be undone with an Allen key.
The protection plate is secured using two bolts (M4).
The protection cover on the blade head is secured with two bolts (M6) that are undone using an
Allen key. The protection plate is also secured using two bolts (M4).
If the belt is replaced with another, original belt, everything can be replaced in its original posi-
tion.
After assembly, check that the belt does not catch on the protection covers when the depth
lever is set to a working position.
12. Storing the machine
Storage preparations
Clean the machine (see § 9.6 Cleaning the machine).
Properties of a storage area
The machine must be stored in a dry area away from precipitation.
The temperature in the storage area must be between 5 ºC and 40 ºC.
Store the machine out of the reach of children.
Never leave the machine connected to the mains when storing.
Never store the machine near heat sources or open flames. (Observe at least 2 m distance)
If the machine is stored outdoors, it must be properly covered with canvas. Avoid direct precipi-
tation on the machine. ELIET highly recommends a sheltered storage place.
Storing
Always allow the engine to cool down before storage.
When storing the machine for an extended period, we recommend that you follow the steps
below:
Check all nuts and bolts and fasten them where necessary.
To avoid rust on the machine, touch up all chipped areas or treat them with anti-rust grease.
Original paints/enamels in the appropriate colours are available from your ELIET dealer.
Page 40

40
English
13. Equipment specifications
Engine 4.0 hp Honda GX 120
5.5 hp Honda GX160
Blade Steel 6 mm
Rpm blade 2,550 rpm
Depth setting max 110 mm
Angle setting 0° / 25° / 45°
Chassis Steel 6 mm
Transmission V-belt A 32.5
Adjustable steering height 7 Height settings
Dimensions (LxWxH in mm) 1,250x460x900 mm
Weight 37 kg
Accessories 8 tooth-wheel (dia. 240 mm)
Double front wheels
Page 41
English
41
Appendices:
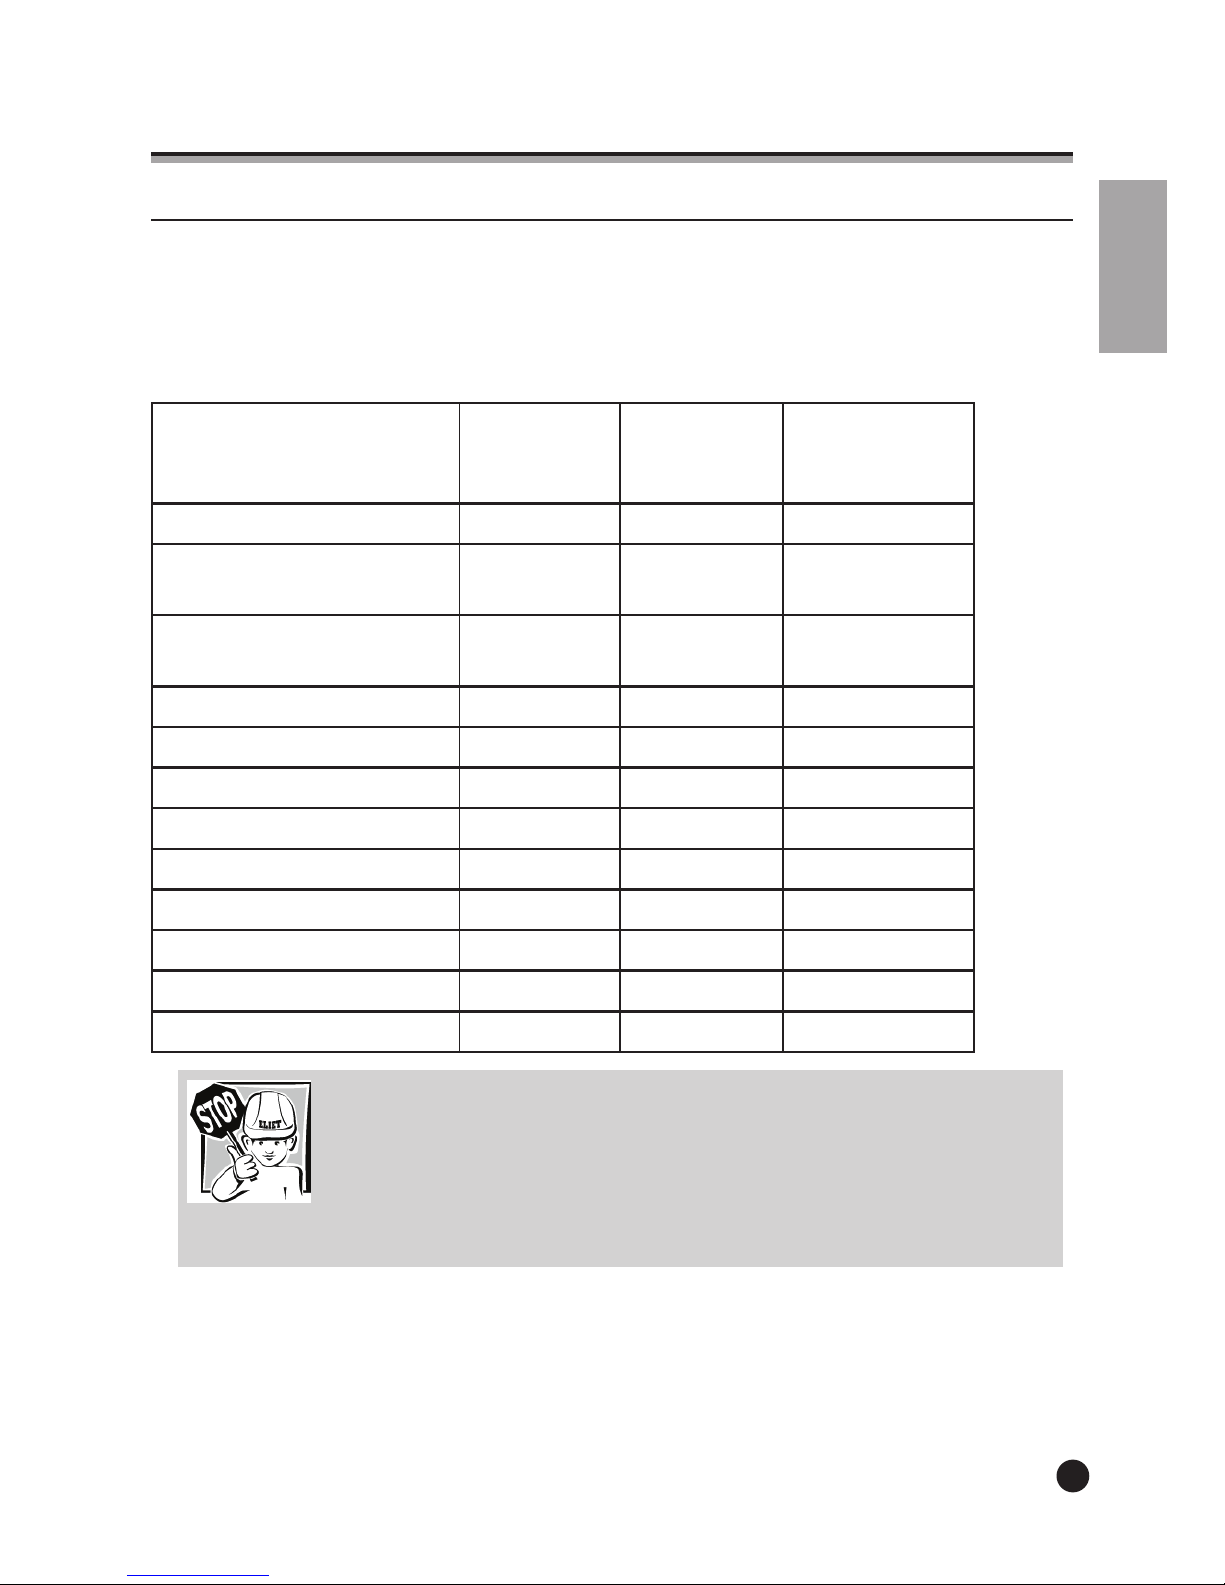
B1 Maintenance schedule
This list contains the minimum routine maintenance that must conducted to keep the machine in
good condition. Necessary repairs or replacements after breakage or breakdown must be carried
out in addition to this maintenance.
Routine maintenance
Maintenance
after 100
hours
Maintenance
after 50 hours
Daily mainte-
nance
Clean the machine x x x
Inspect the blades and sharpen if
necessary x x x
Check the machine for signs of abnor-
mal wear or fractures. x x x
Check the oil level x x
Check air filter x
Adjust depth regulator x
Check blade bolts x
Clean air filter x
Check belt tension x
General lubrication treatment x
Change the oil x
Replace air filter x
Warning:
Neglecting to conduct routine maintenance may cause a machine to stop
working effectively. Damage can be caused and the risk to the operator or
third parties may be increased. ELIET EUROPE NV cannot be held liable for the
consequences of neglecting to carry out maintenance. The warranty may also be
nullified as a result.
Page 42

42
English
B2 List of torques
Bolt head according to DIN 931,912 etc. Thread strength
8.8 10.9
Normal thread M4 3.0 4.4
M5 5.9 8.7
M6 10 15
M8 25 36
M10 49 72
M12 85 125
M14 135 200
M16 210 310
M18 300 430
M20 425 610
M22 580 820
M24 730 1050
M27 1100 1550
M30 1450 2100
Fine thread M8 x 1 27 39
M10 x 1.25 52 76
M12 x 1.25 89 130
M14 x 1.5 145 215
M16 x 1.5 225 330
M18 x 1.5 340 485
M20 x 1.5 475 680
M22 x 1.5 630 900
M24 x 2 800 1150
M27 x 2 1150 1650
M30 x 2 1650 2350
(with friction factor µ = 0.14)
Page 43
English
43
B3 EC Declaration of Conformity
Machine: Edger
Type: ELIET KS300
Model number: MA 010 020 203
MA 010 020 205
This machine has been designed and manufactured in accordance with the following European
standard:
EN 786 - GARDEN EQUIPMENT - ELECTRICALLY POWERED WALK-BEHIND AND HAND-
HELD LAWN TRIMMERS AND LAWN EDGE TRIMMERS - MECHANICAL SAFETY
The ELIET machine factory hereby declares that after performing a hazard analysis, it is fully
aware of the potential hazards and risks associated with the machine. In this knowledge, the
necessary steps have been taken in line with Machine Directive 2006/42/EC in order to ensure
absolute operator safety for the operator, when the machine is used correctly.
The assessment of the sound power level and the guaranteed sound power level as determined in
European Directive 2000/14/EC annex III/B/24 was carried out in accordance with the measurement instructions of EN13 683
Measured sound power level : 95 dB(A)
Guaranteed sound power level : 96 dB(A)
Date: 01/01/02011
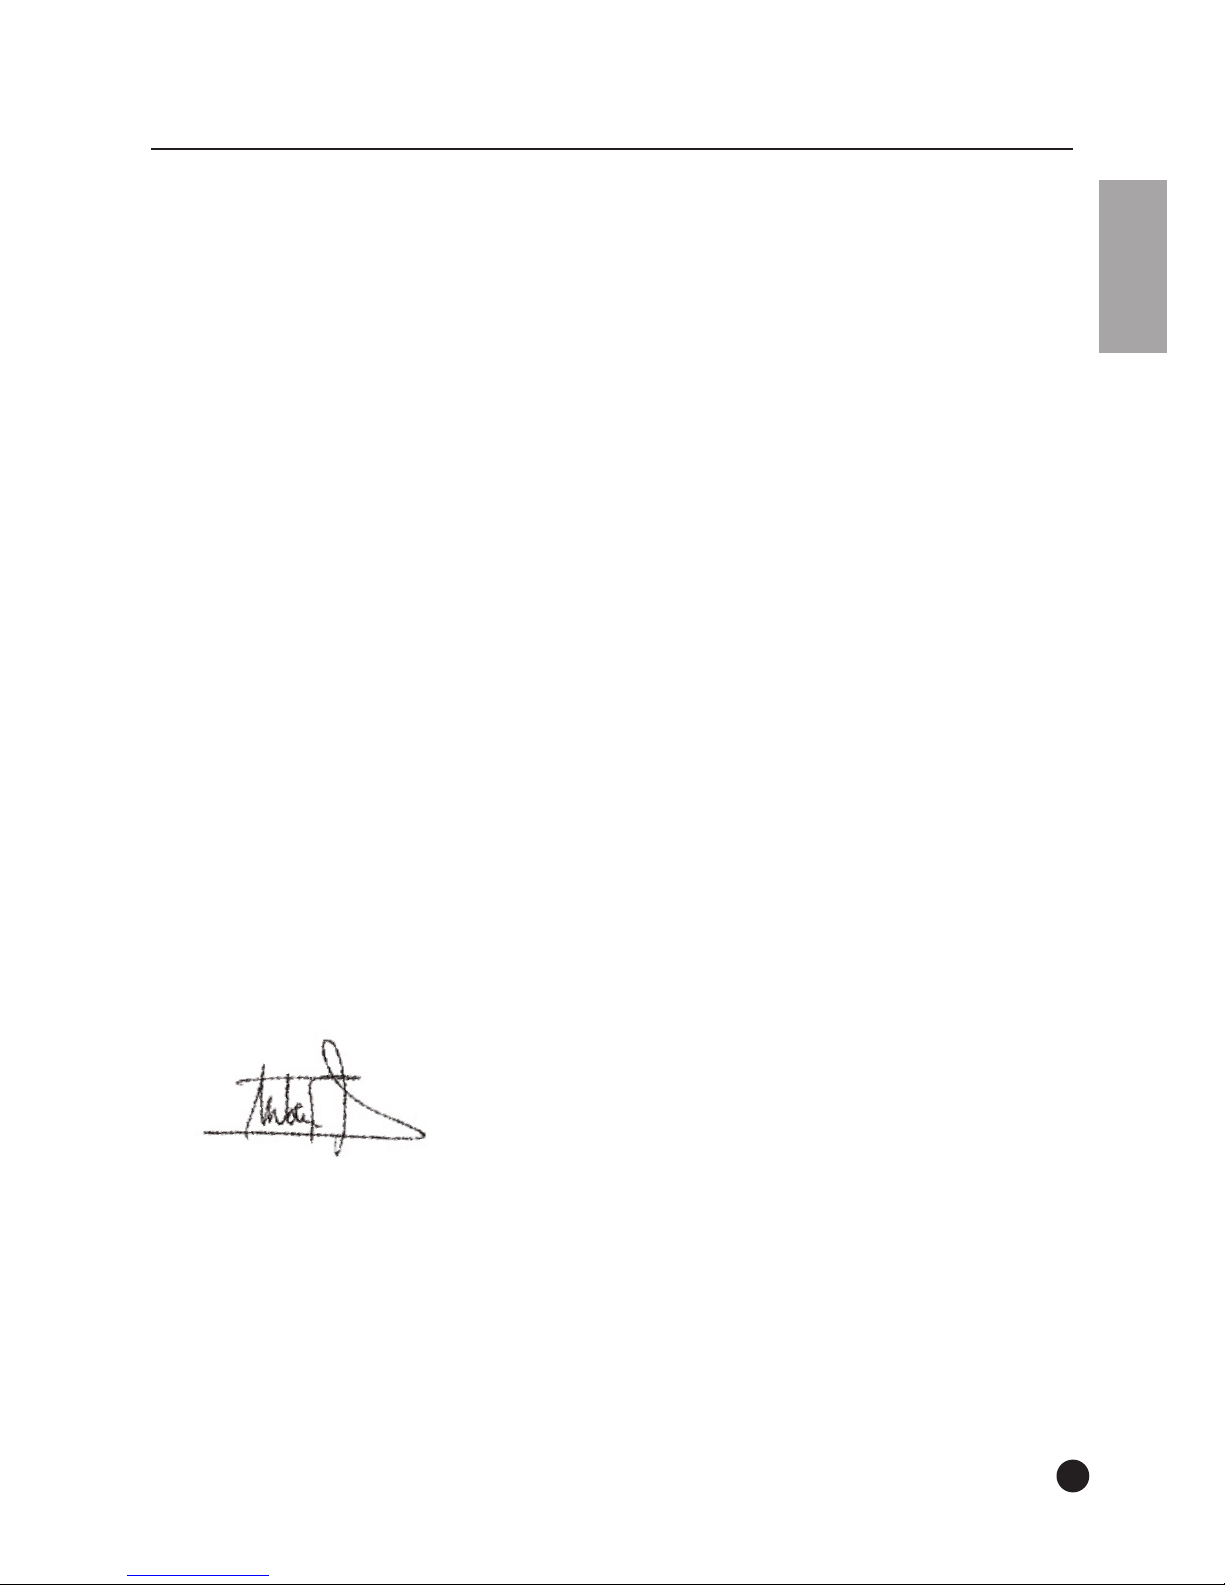
Signature:
Frederic LIETAER
Managing Director ELIET EUROPE NV
Date of birth: 02/01/1975
ELIET EUROPE NV
Diesveldstraat 2
BE - 8553 Otegem Belgium
Ph. +32 56 77 70 88 - Fax +32 56 77 52 13
[email protected] - www.eliet.eu
Page 44

44
English
B4 Warranty conditions
Dear Customer,
We thank you for purchasing an ELIET product. Congratulations on your purchase of this machine which is sure to exceed your expectations and needs over the coming years. At ELIET, we
do everything to ensure that our products function properly. That is why your product comes
with a two-year warranty.
What is warranty?
At ELIET, we have strict quality rules on designing and manufacturing products. The purpose of these
rules is to guarantee a long service life and permanent safety. That is why ELIET is happy to repair
any hidden defects or faults during the whole run-in period (i.e. the warranty period) free of charge,
provided the prescribed procedure is followed.
Warranty conditions
ELIET’s warranty obligations for new machines are governed by the following conditions.
Warranty period
The warranty period starts the day the dealer delivers the machine to the customer (maximum
one week after the purchase) and expires:
• for private use: after two years.
• for rental use: after twelve months or 100 hours of operation.
for semi-professional and/or professional use: after twelve months or 100 hours of operation.
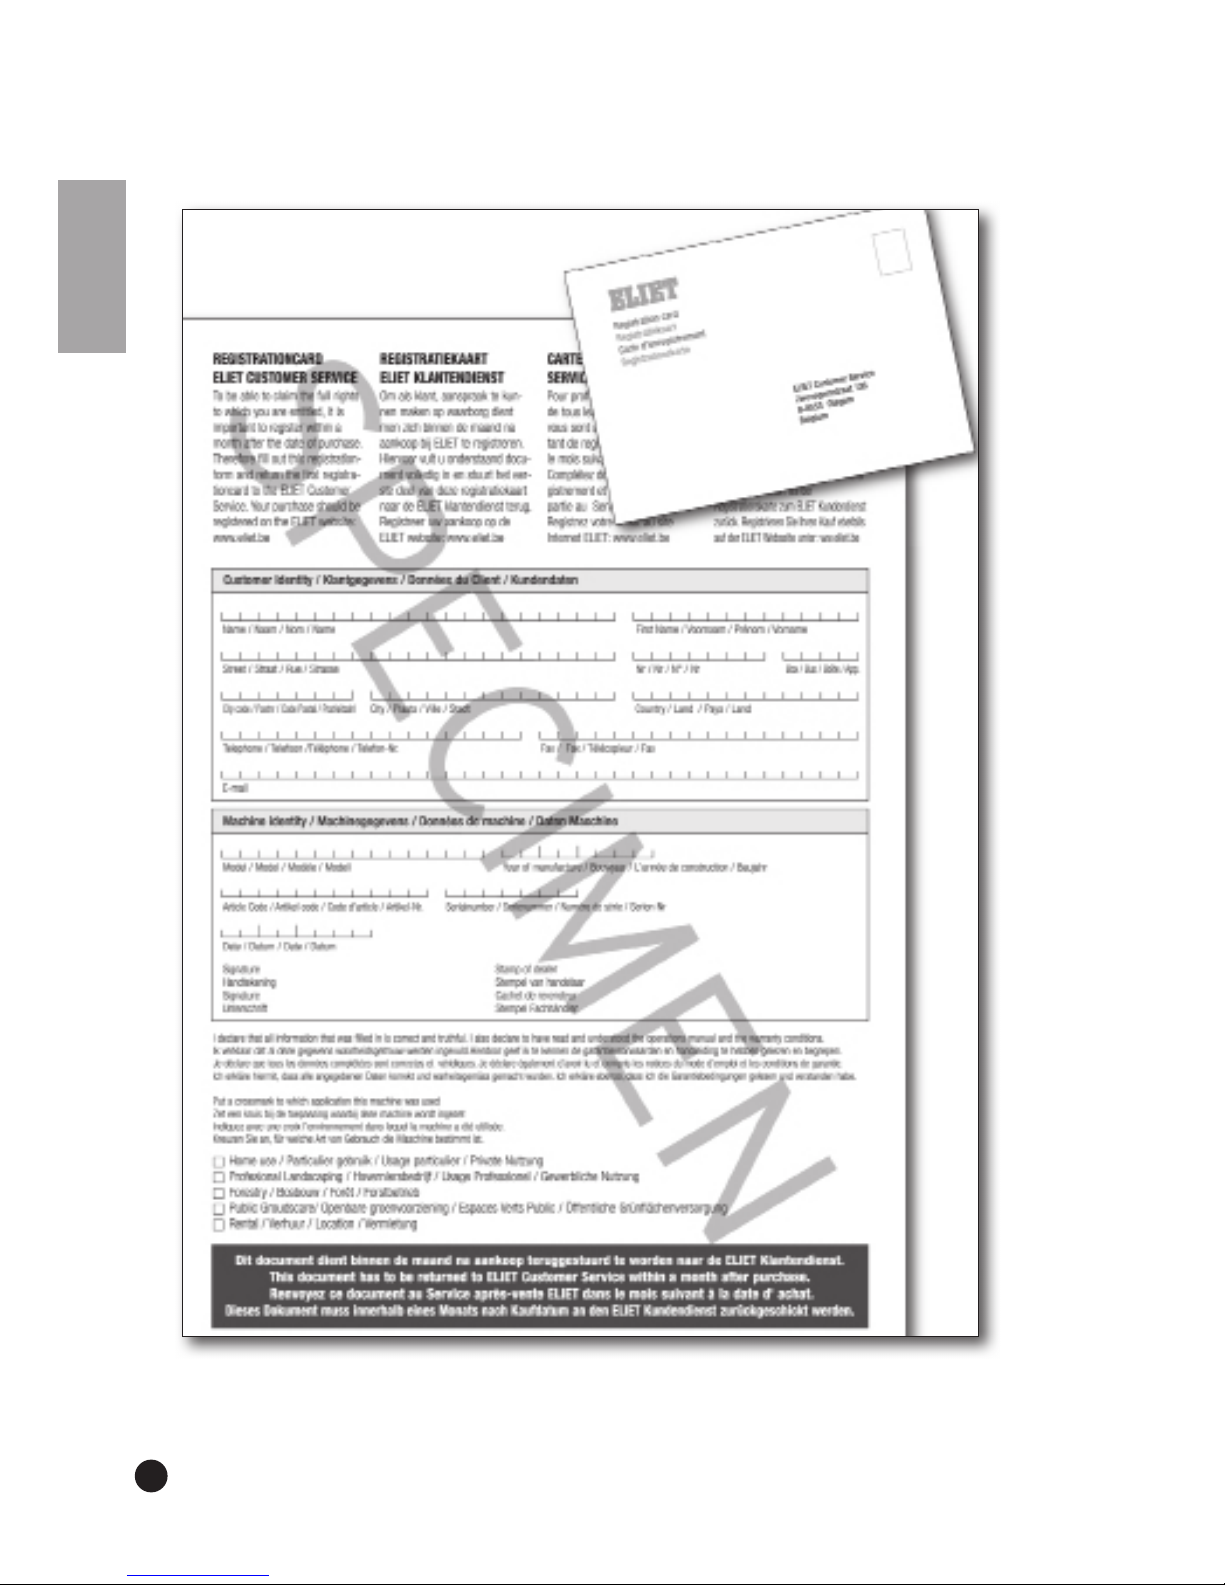
To be eligible to obtain warranty the customer is required to register the newly purchased machine with ELIET. You should complete the registration card online on Eliet’s website: www.eliet.
eu. If you don’t have access to the Internet, please complete the attached registration card and
return it to ELIET.
II. The Warranty does not apply in the following cases.
Worn items (such as blades, bearings, belts, chains, gearwheels, tyres, bulbs, fuses, etc).
Defects caused by improper use, neglect or consequential damage by an external source (fall,
chippings, foreign objects, accident).
Defects caused by improper maintenance of the machine, hence contrary to the prescribed
periodic maintenance.
Defects caused by improper repairs carried out by others than authorised ELIET dealers or after
using other than original ELIET replacement parts.
Defects caused by making improper changes to the original design of the machine.
Faults occurring as a result of machine use contrary to the instructions contained in this manual.
Failure to observe the prescribed warranty procedure or expiry of the warranty period.
For all problems relating to the engine, please contact an authorised service centre of the engine
manufacturer.
Page 45

English
45
III. Procedure
Step 1: On the date of purchase, the customer registers his/her purchase online by com-
pleting the registration card on www.eliet.eu. In addition, the enclosed registration card is
completed in its entirety on the day of purchase. The first part of the card has to be returned
to ELIET within one month. The customer is required to keep all remaining parts of the card
along with the purchase invoice for the duration of the warranty period.
Step 2: In the event of a defect, the customer shall have it verified by the authorised ELIET
dealer. If the dealer finds a manufacturing defect, he may invoke the warranty under the terms
specified.
Step 3: Every warranty application must be accompanied by a fully completed official ap-
plication form. Dealers may request application forms from ELIET or from an ELIET importer/
agent.
Step 4: The dealer then orders the parts needed to perform the repairs. Next, the dealer
faxes the order form together with the completed warranty form and a copy of the registration
card to ELIET.
Step 5: The warranty form must be stapled to the purchase invoice and sent to ELIET or an
ELIET importer/agent.
Step 6: ELIET sends the parts ordered to the dealer under the regular delivery and pay-
ment conditions.
Step 7: The defective part will be examined by ELIET’s technical department prior to ap-
proving or rejecting the warranty. ELIET reserves the right to unilaterally decide whether or
not the customer has complied with all the conditions applicable to the one year or two year
warranty. Faulty components automatically become the property of ELIET.
Step 8: If a warranty claim is found to be valid, ELIET will credit the warranted parts. Cus-
tomers shall never be entitled to a refund of labour costs.
IV. In case of damage caused by transport
All goods are supplied ex factory. Transport risks shall be borne by the customer. ELIET therefore
recommends checking the goods for damage on arrival.
Any damage found must be detailed on the delivery form before signing. Make sure the driver of
the transport company signs for the damage on your copy of the form.
In the absence of a written and signed statement on the delivery form, the transport insurance
company will not accept any liability.
Damages can be claimed from the carrier using a copy of the delivery form and a covering letter
stating your complaint.
The damaged machine should be kept in its original condition until the carrier’s insurer has
performed an examination.
Page 46
46
English
Page 47

English
47
Page 48

 Loading...