

Page 1

Maple
User Manual
Version 1.0.0
Page 2

Update Date: 4th April 2016
Table of Contents
Chapter 1: Introduction ............................................................................................................. 1
1.0 Maple Introduction .................................................................................................... 1
Chapter 2: Hardware Installation .............................................................................................. 1
2.0 Hardware Configuration ............................................................................................ 1
2.1 Site Installation .................................................................................................... 2
Chapter 3: Maple Core .............................................................................................................. 6
3.1 Introduction ............................................................................................................... 6
3.2 Log in Maple Core ...................................................................................................... 6
3.3 Menu ......................................................................................................................... 6
3.3.1 Setup .................................................................................................................. 7
3.3.1.1 Cards .............................................................................................................. 7
3.3.1.2 Controllers ..................................................................................................... 7
3.3.1.3 Timer .............................................................................................................. 8
3.3.1.4 Time Zone .................................................................................................... 10
3.3.1.5 Access Level ................................................................................................. 11
3.3.1.6 Holiday ......................................................................................................... 12
3.3.1.7 Advanced Settings ....................................................................................... 13
3.3.2 Access .............................................................................................................. 13
3.3.2.1 Door Status .................................................................................................. 14
3.3.2.2 Pulse Door Open .......................................................................................... 14
3.3.2.3 Send Parameters ......................................................................................... 14
3.3.2.4 Send Control Signals .................................................................................... 16
3.3.3 Report .............................................................................................................. 17
3.3.3.1 Transactions ................................................................................................. 17
3.3.3.2 Daily Attendance ......................................................................................... 18
3.3.3.3 Reprocess Attendance ................................................................................. 18
3.3.4 About ............................................................................................................... 18
3.3.4.1 ELID Home Page ........................................................................................... 19
3.3.4.2 Support ........................................................................................................ 19
3.3.4.3 About ........................................................................................................... 20
Chapter 4: Maple View ............................................................................................................ 21
Page 3

4.1 Introduction ............................................................................................................. 21
4.2 Log in Maple View ................................................................................................... 21
4.3 View Mode............................................................................................................... 22
4.4 Menu ....................................................................................................................... 23
4.4.1 Home ............................................................................................................... 23
4.4.2 Database .......................................................................................................... 23
4.4.2.1 Staff.............................................................................................................. 23
4.4.2.2 Department ................................................................................................. 26
4.4.2.3 Designation ...................................................................................................... 26
4.4.3 Report .............................................................................................................. 26
4.4.3.1 Staff Report .................................................................................................. 26
4.4.3.2 Transaction Report ...................................................................................... 27
4.4.3.3 Attendance Report ...................................................................................... 28
4.4.3.4 Audit Trail Report ........................................................................................ 28
4.4.4 Attendance ...................................................................................................... 29
4.4.4.1 Leave ............................................................................................................ 29
4.4.4.2 Working Schedule ........................................................................................ 31
4.4.4.3 Duty Roster .................................................................................................. 31
4.4.4.4 Reprocess..................................................................................................... 33
4.4.5 Notification ...................................................................................................... 33
4.5 Map Setting ............................................................................................................. 33
4.6 Legend ..................................................................................................................... 34
4.7 Icon on Map ............................................................................................................. 35
4.0.1 Door Access System ......................................................................................... 35
Chapter 5: eMirage Mobile Application (Android Version) ..................................................... 36
5.1 Introduction ............................................................................................................. 36
5.2 Installation ............................................................................................................... 36
5.3 Startup eMirage ....................................................................................................... 36
5.4 Main Screen ............................................................................................................. 37
5.5 Legend ..................................................................................................................... 38
5.6 Basic Operation ....................................................................................................... 38
5.6.1 Door Access System ......................................................................................... 38
5.7 Main Menu .............................................................................................................. 39
5.7.1 Floor Plan/Index View ..................................................................................... 39
Page 4

5.7.2 Notification ...................................................................................................... 40
5.7.3 Card Database ................................................................................................. 40
5.7.4 Options ............................................................................................................ 41
5.7.4.1 Site Management ........................................................................................ 41
5.7.4.2 Setting .......................................................................................................... 42
5.7.4.3 Help .............................................................................................................. 44
5.7.4.4 About ........................................................................................................... 44
Chapter 6: eTime Mobile Application (Android Version) ........................................................ 45
5.1 Introduction ............................................................................................................. 45
5.2 Installation ............................................................................................................... 45
5.3 Startup eTime .......................................................................................................... 45
5.4 Main Screen ............................................................................................................. 46
5.4.1 List of Subordinates ......................................................................................... 46
5.4.2 Options ............................................................................................................ 47
5.4.3 Leave Application ............................................................................................ 47
5.4.4 Chart View ....................................................................................................... 48
5.4.5 Site Management ............................................................................................ 48
5.4.6 About ............................................................................................................... 49
Appendix .................................................................................................................................. 50
Page 5
Maple User Manual
Chapter 1: Introduction
1.0 Maple Introduction
Maple’s main focus is on small companies who do not have IT support and find it difficult to
maintain Eastwin or WinPro.
Maple is also aimed at small installers who can only handle stand-alone access control
installations and cannot handle PC software. They want plug-and-play systems like CCTV. This
document is prepared for such dealers who are not familiar with ELID equipment and can only
handle stand-alone access control.
The user may use a mobile application, named “eMirage” Apps or through a web browser to
setup and control the system.
This manual will guide you how to install, configure and operate Maple System.
Chapter 2: Hardware Installation
2.0 Hardware Configuration
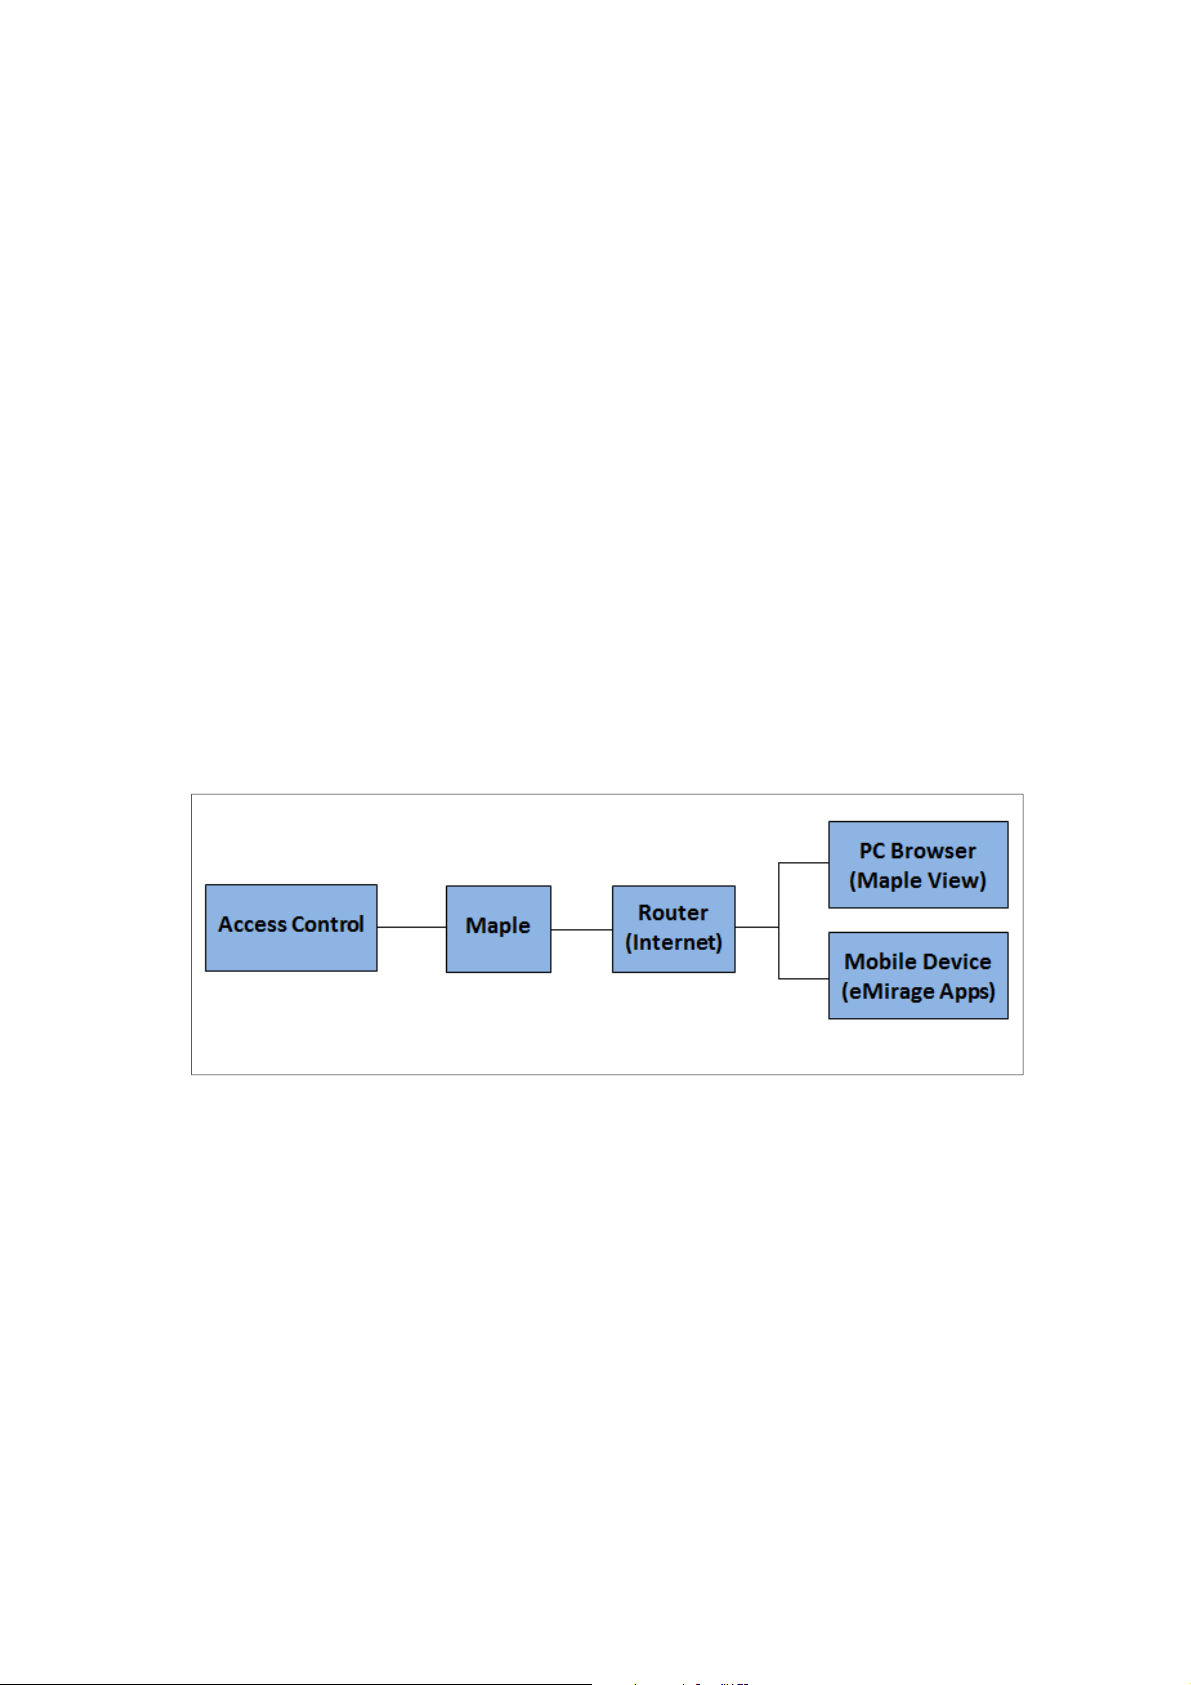
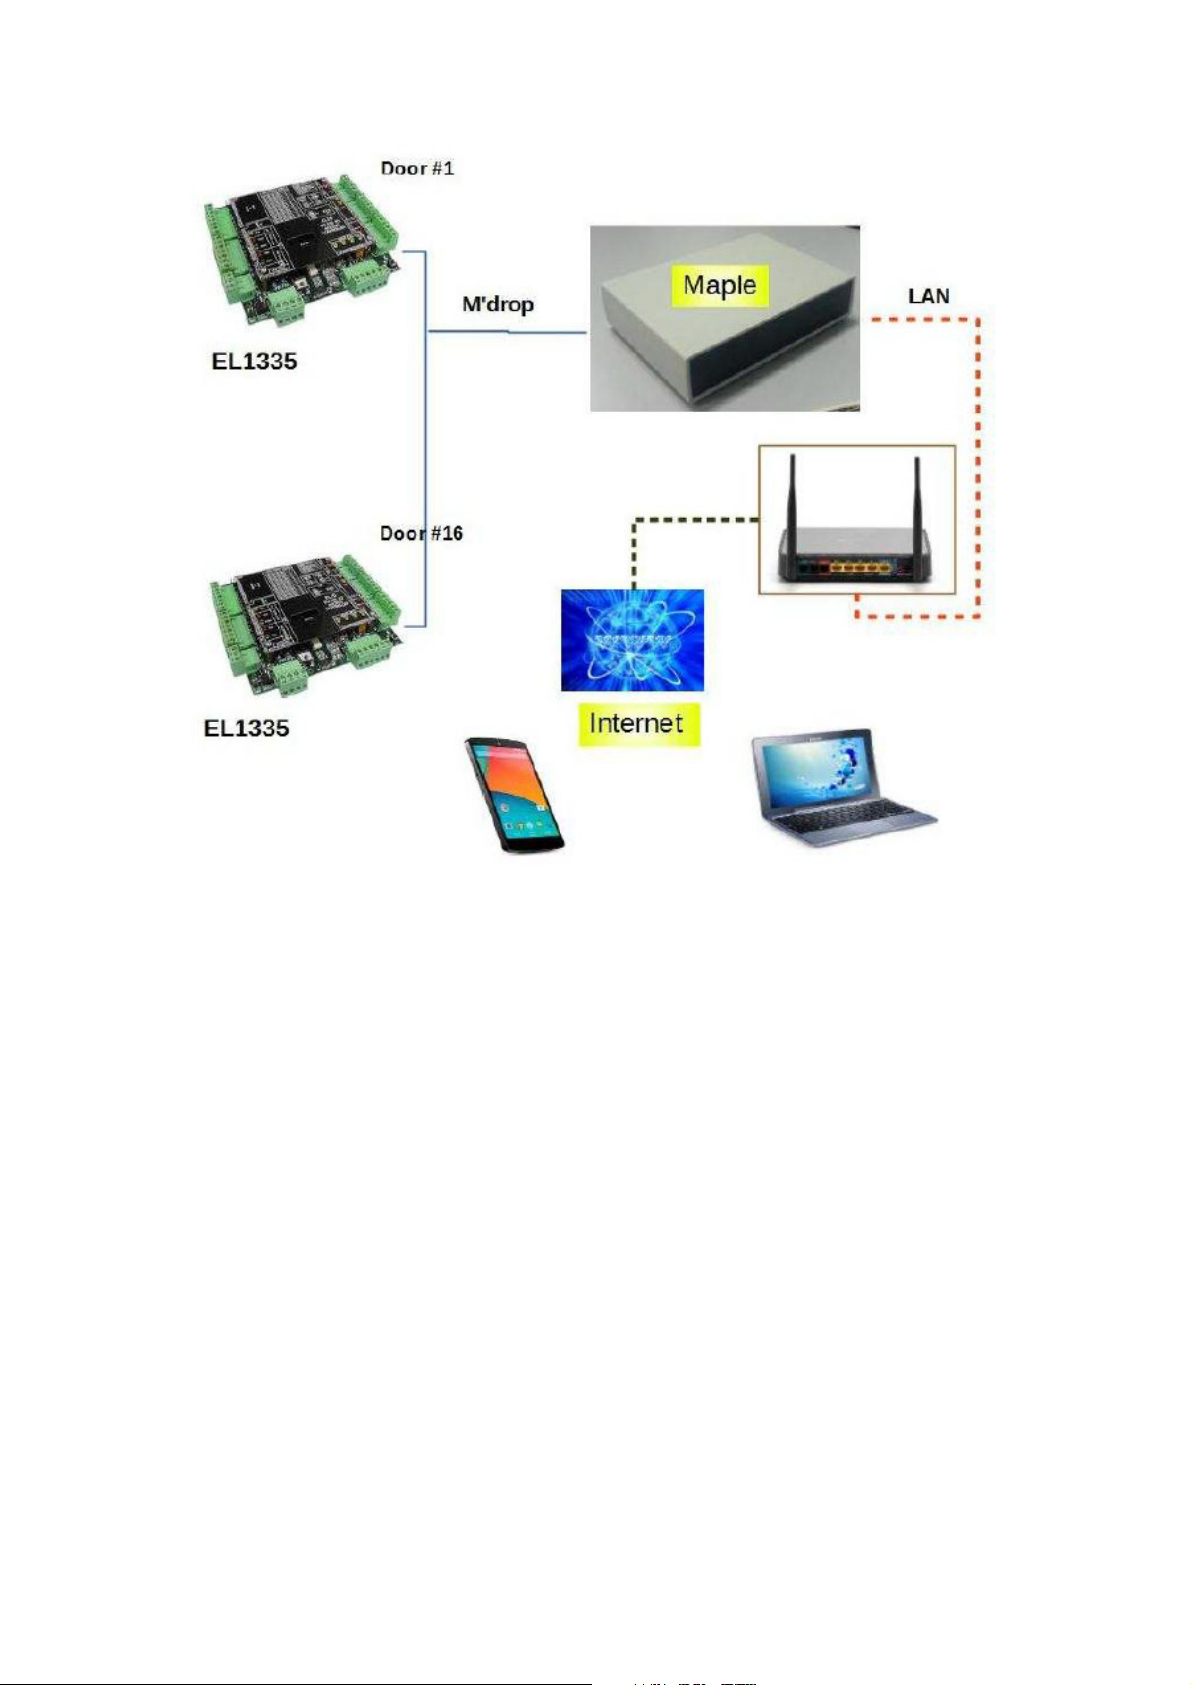
Installation will consist of Access Control System (maximum 16 doors) and Maple as a control
board.
Figure: Basic Configuration of Maple
1
Page 6
Maple User Manual
Figure: Configuration of Maple
2.1 Site Installation
Site installation is in 4 stages:-
Stage 1: Access Control Installation
The installer has to install access control system and make them work.
Although some of controllers can work in RS485, multi-drop or LAN mode, it is recommended
that you stick to multi-drop mode
The Maple Box is set up by the Service Centre, hence the installer no need to care about it.
The installer should not proceed to stage 2 until stage 1 is fully completed and operating
standalone properly.
Stage 2: Maple Installation
The installer has to install the Maple and make the Maple system work.
Although Maple can work by RS485, Multi-drop or LAN, we recommend that you use 4-wire
multi-drop, because it is simple, reliable and robust.
.
2
Page 7
Maple User Manual
Maple Connection:
• Locate the Maple unit near to the Internet access router (eg Unifi router)
• Use the LAN cable provided to connect between Maple and Internet router
• Plug in the power adapter which connects 15 V supply to Maple
• Connect the multi-drop cable between Maple and the nearest controller.
Powering up Maple:
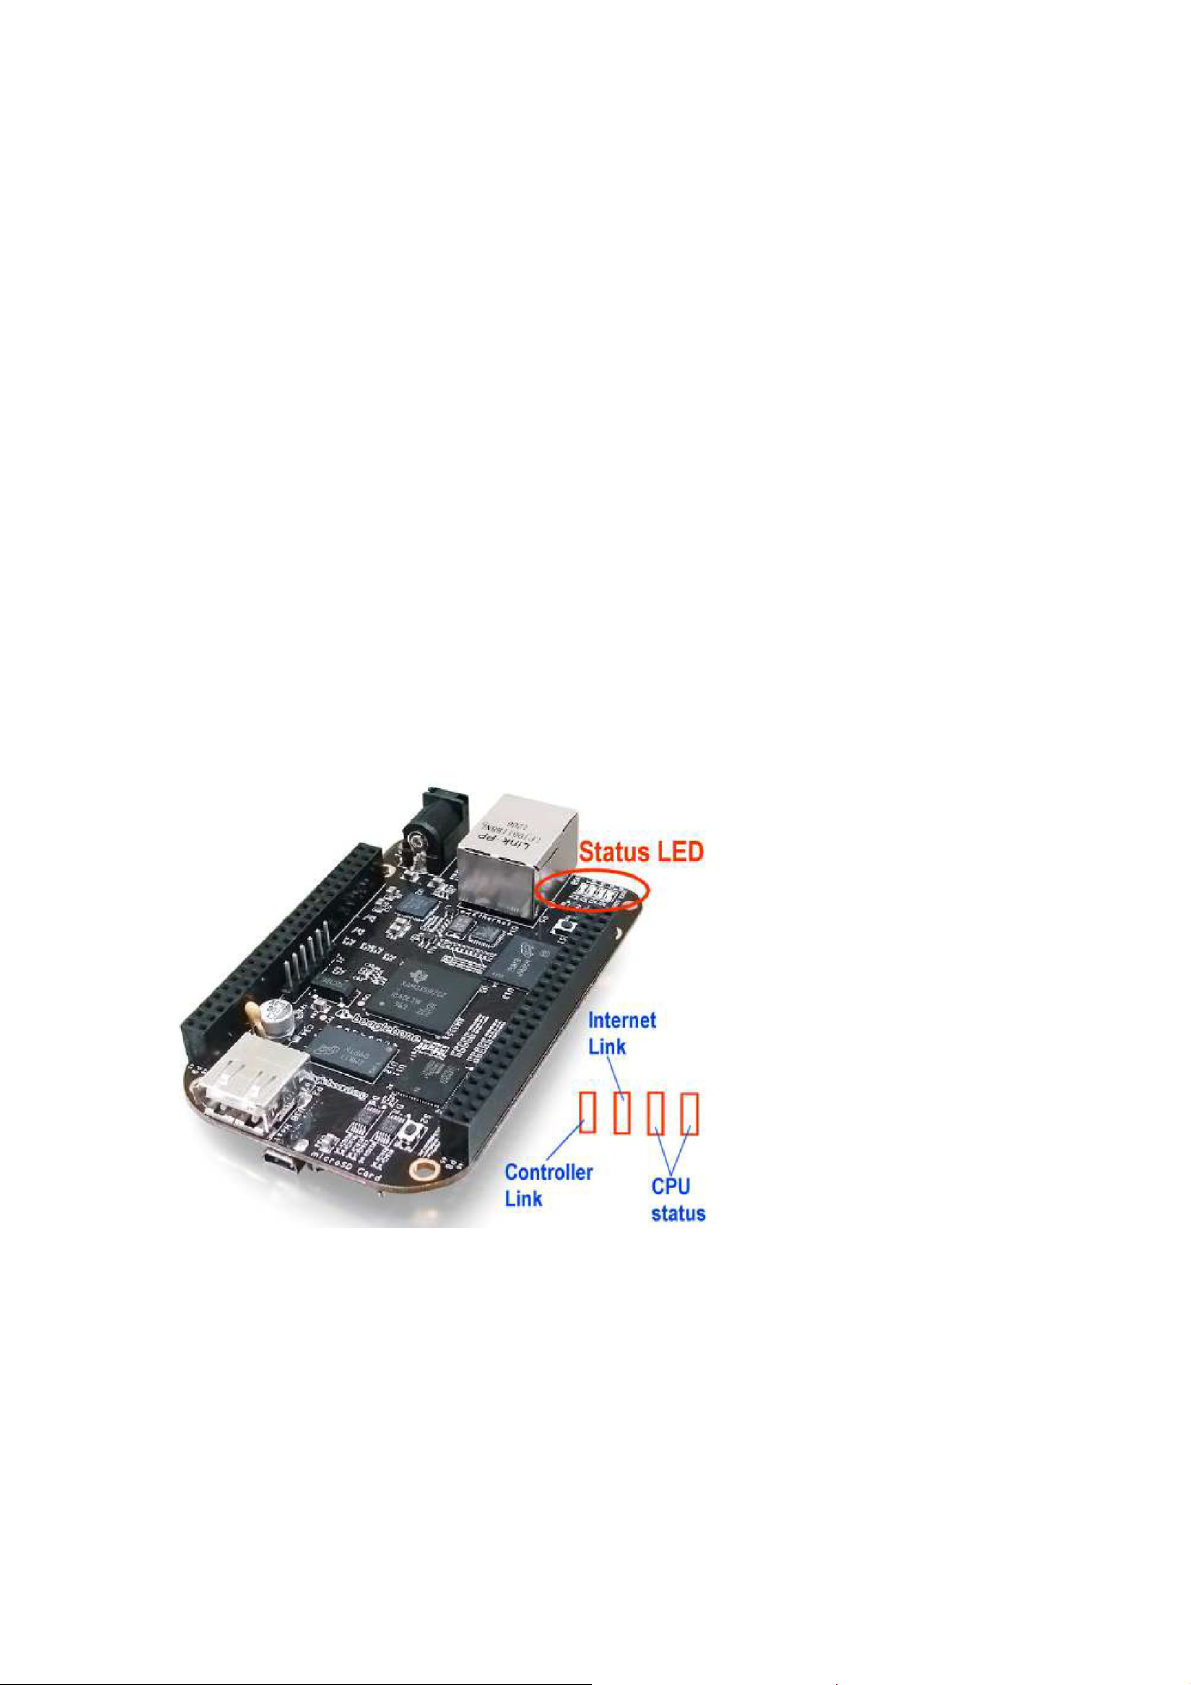
There are 4 status LED on the Maple control board.
The “internet Link” LED shows the status of Internet connection.
• Quick blink means Maple is trying to connect to internet
• Slow blink means that Maple is connected to internet, but no one is logged in.
• Steady on means a client is logged on to Maple
The “controller link” LED shows the status of Controller connection to Maples
• Each time Maple successfully receives a packet from a controller, it will blink once.
Therefore, a regular blink means that all controllers are replying.
The 2 CPU status LED are for factory use.
Figure: Maple Status LED
Turn on Maple power supply, and observe the controller link LED status. It should blink steadily
indicating it is communicating with each controller.
Observe the Internet Link status LED, it should blink rapidly, as it tries to connect to Internet.
Once connection is successful, it should blink steadily.
3
Page 8

Maple User Manual
Stage 3: System Setup
There are 2 options in system set-up.
• The first option is for those who are unfamiliar with Maple. In this case you need to fill
in the customer requirement form and request Elid Central Services to setup Maple for
you.
• The second option is for those who are familiar with Maple. In this case, you handle
setup yourself with configure the system by Maple Core and only request Elid Central
Services to save the programmed data. Maple Core is explained in Chapter 3: Maple
Core.
Option 1 – setup by Elid Central Services
You should get the help of your customer to fill in the form as follows:-
• First section is on customer information:- His name, address, phone number etc
• Second section is on system configuration:- Detailed information of equipment
installed, such as Access controller model & serial number, reader model & serial
number, Maple model & serial number, Address setting of each controller,
Communication mode used etc.
• Third section is on Access Control Time zone settings:- Time zone requirements,
Card/pin requirement, Auto lock release requirement, User category etc. This may
seem a bit complicated, but in most cases, for small companies, you can just choose
one of the templates 9-to-5 offices, 7-to-11 factory, etc and make slight modifications.
• Fourth section is on User database:- name, card number and category of each user
• Fifth section is on Report generations:- whether customer requires Elid Central Services
to provide reports. If yes, what type of reports?
• Sixth section is on Smart phones that are to be linked to this Maple:- Enter phone
number
When you have completed the above information, call Elid Central Services. The operator will
check and download relevant information to Maple.
After he has downloaded the settings, check that the system operates properly:-
• User cards are working properly
• Time zone is operating - It is a bit difficult to check time zone setting, unless there are
cards that can enter a particular door at that particular time, and there are cards that
cannot. In any case, it is quite easy for Elid Central Services to make changes if there
are mistakes.
• This completes system setup
Option 2 – setup by installer
Installer has to configure the system by Maple Core. Maple Core is explained in Chapter 3:
Maple Core.
4
Page 9

Maple User Manual
Stage 4:
The final step is to install Maple App into the Smart Phones of the customer and train the
customer to use Maple app. Installer has to contact Service Centre to request for the
Registration Code for Maple app. This Registration Code is valid for 24 Hours.
Installer should also train the customer on how to request help from Elid Central Services.
For customers who have IT capabilities, you can also train them on Maple View, which allows
them to manage card database and print reports themselves.
5
Page 10
Maple User Manual
Chapter 3: Maple Core
3.1 Introduction
Installer can use “Maple Core” through internet browser, such as Google Chrome, Mozilla
Firefox and others to configure the Maple System.
3.2 Log in Maple Core
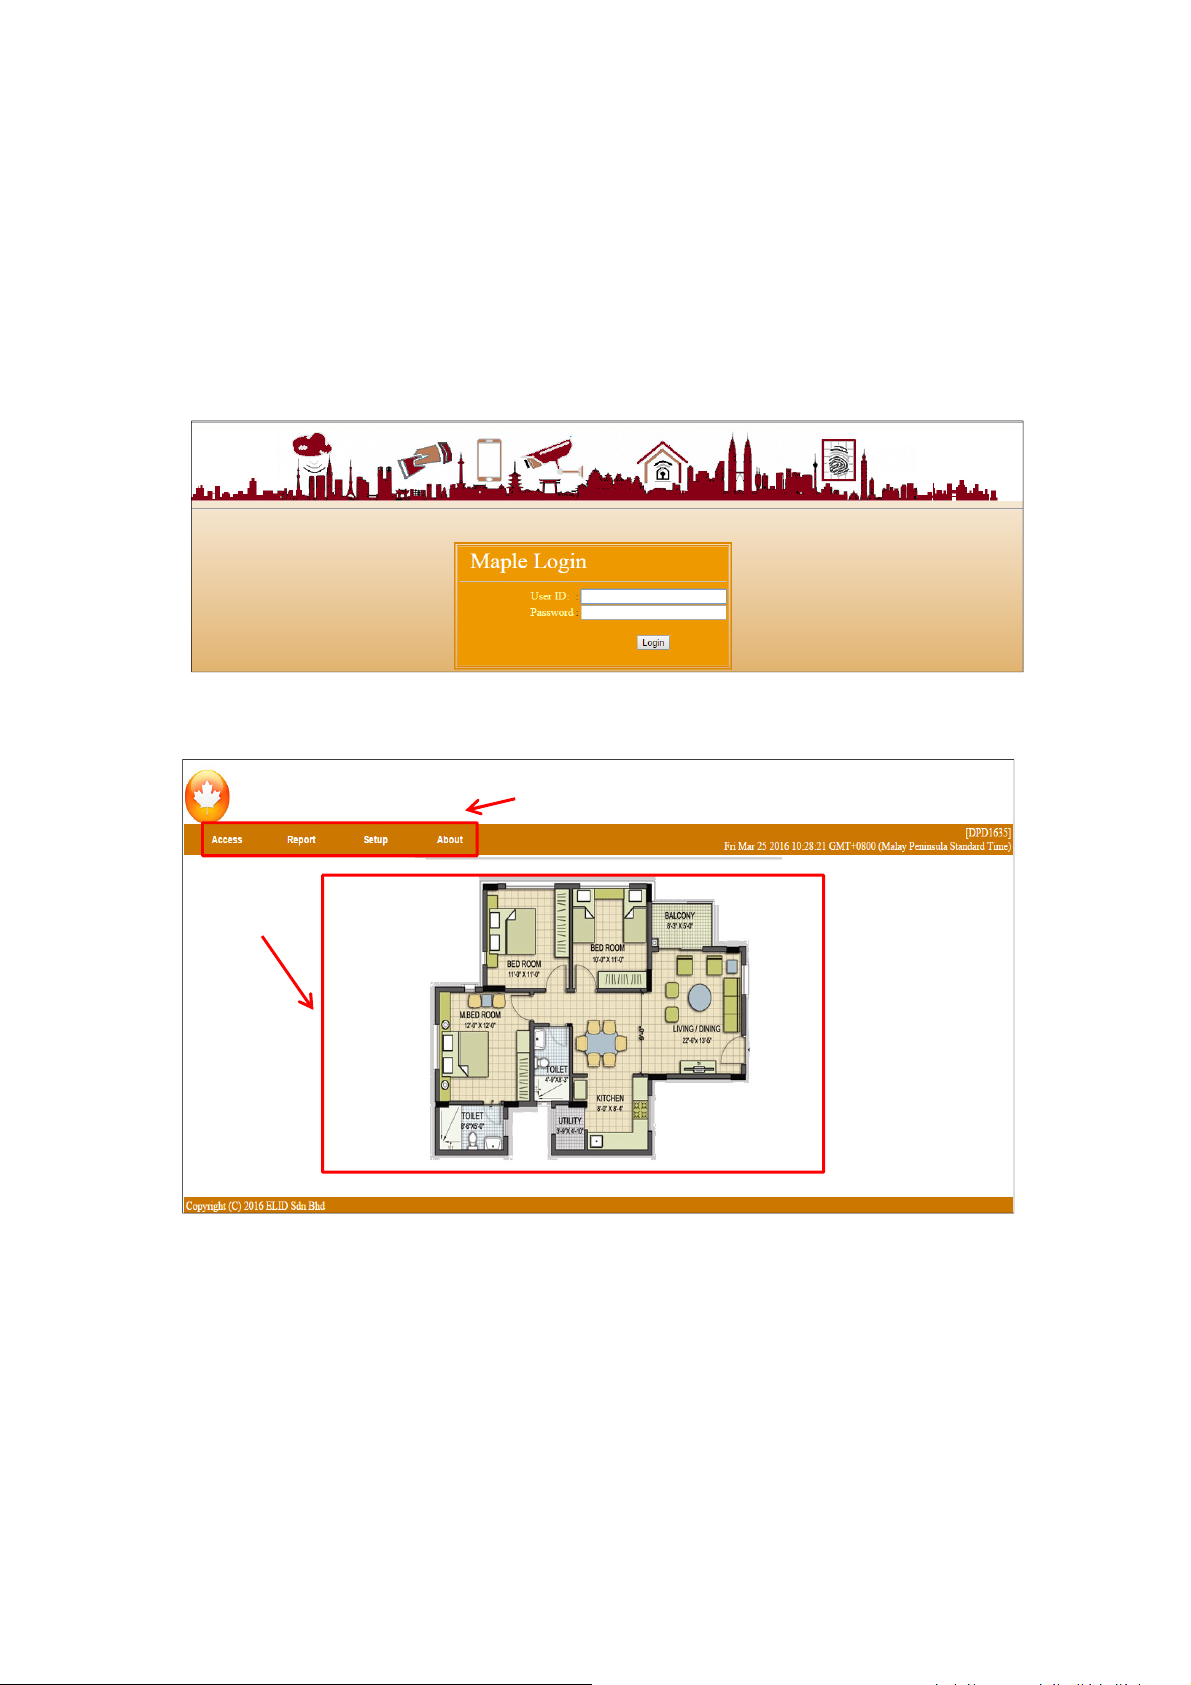
In order to log into Maple Core, key in your system’s URL (provided by Service Centre) in web
browser, for example, “https://e-mirage1.com/elidkl001_core”, then the following screen will
be prompted:
The Username and Password are provided by the Service Centre.
After you login, you will see the main screen of Maple Core as below:
Menu
Icon on map
3.3 Menu
The user may set the configuration of door access system through the Menu on the main
screen
6
Page 11
Maple User Manual
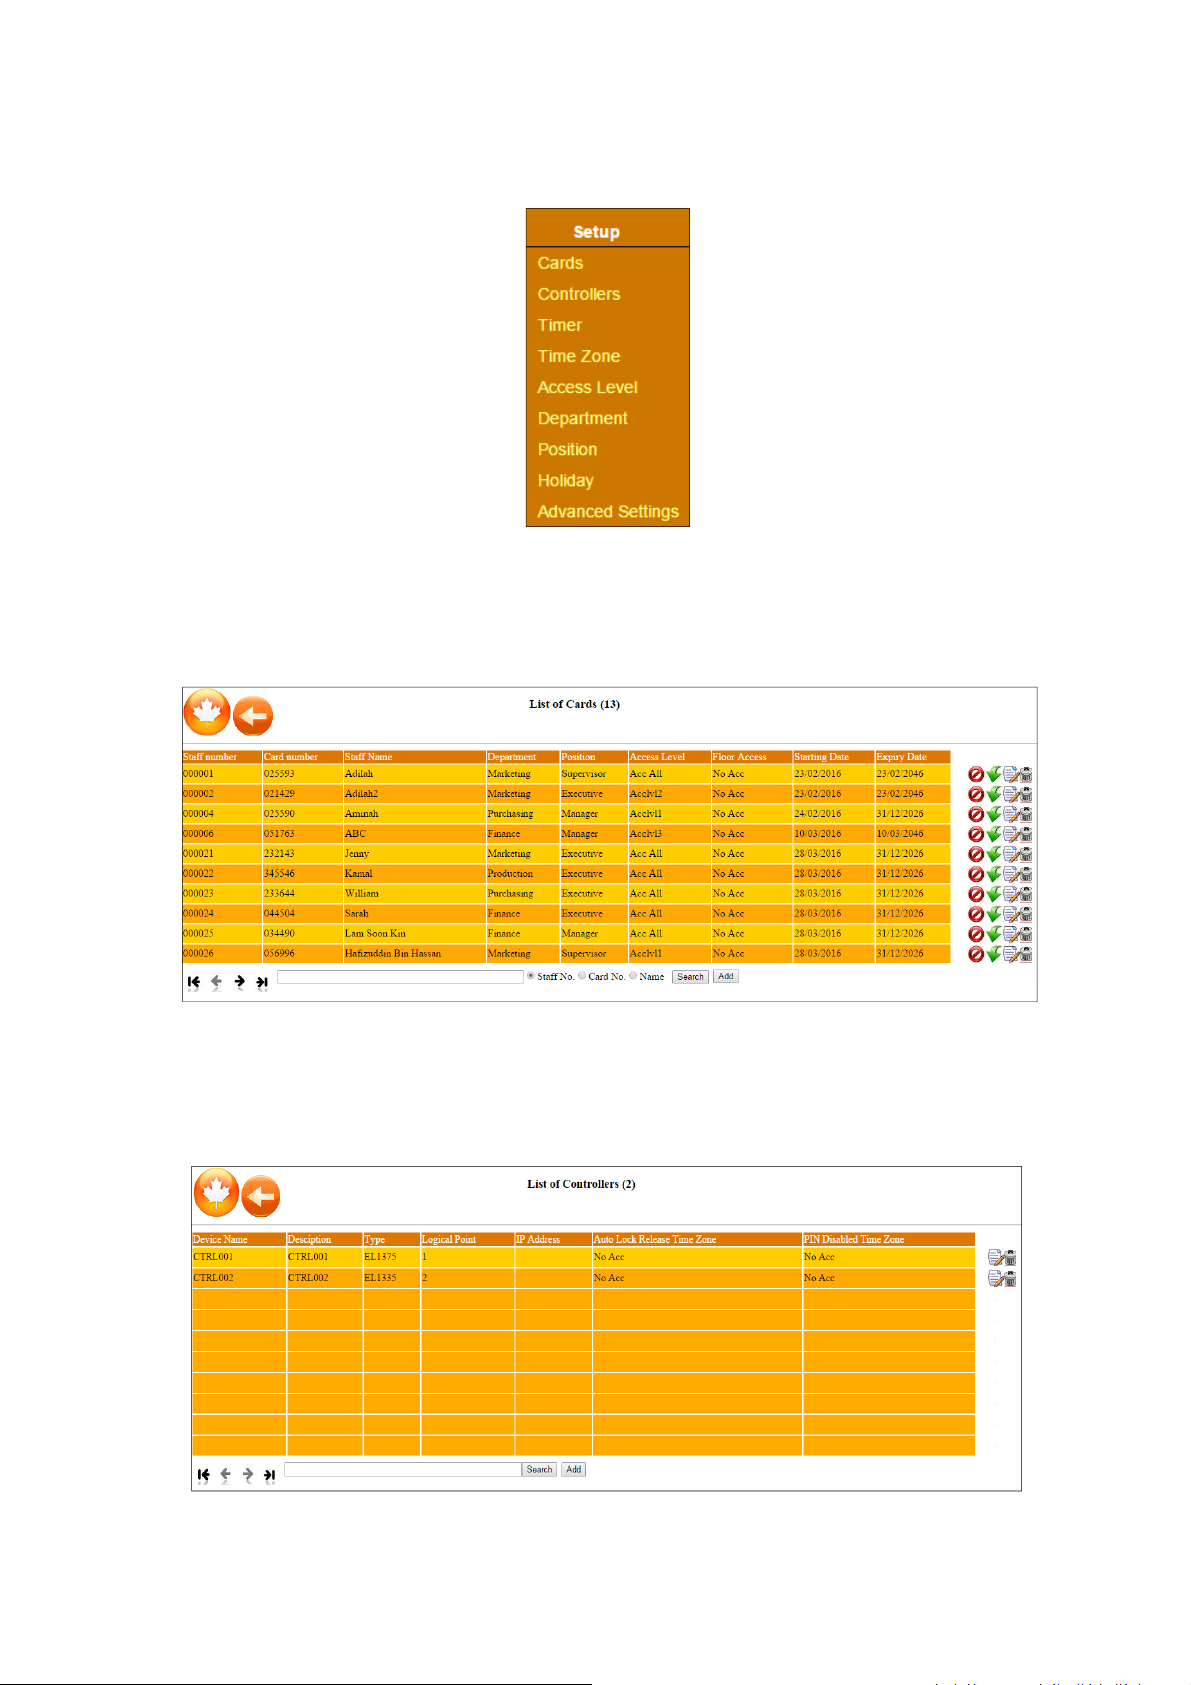
3.3.1 Setup
The user has to configure and setup the system in order the system can operate well.
Figure: Setup Menu
3.3.1.1 Cards
This menu allows the user to manage card database. The user may add, edit and delete card to
the access control system.
Figure: List of Cards
3.3.1.2 Controllers
This menu allows the user to create new controllers in the system, while include 2 parameters,
which are ALR Time Zone and PIN Disabled Time Zone.
Figure: List of Controllers
7
Page 12
Maple User Manual
Creating
New Controller
Tag Name
Key in
controller name such as CTRL1
Description
Key in controller description such as Front Door
Logical Point
Key in
Physical point of the controller e.g 1, 2, 3 etc
Controller Type
Key in
controller type e.g
EL1300, EL2200
ALR Time Zone
Select the Time Zone for Auto Lock Release period
PIN Disabled
Select the Time Zone for PIN Disabled period
IP Address
Key in
IP address of the controller if using TCP/IP controller eg
Update
Button
Click
Update
to save your configuration and exit
C
lose Click this button to cancel add new controller
Operation What to do
Time Zone
128.100.30.15
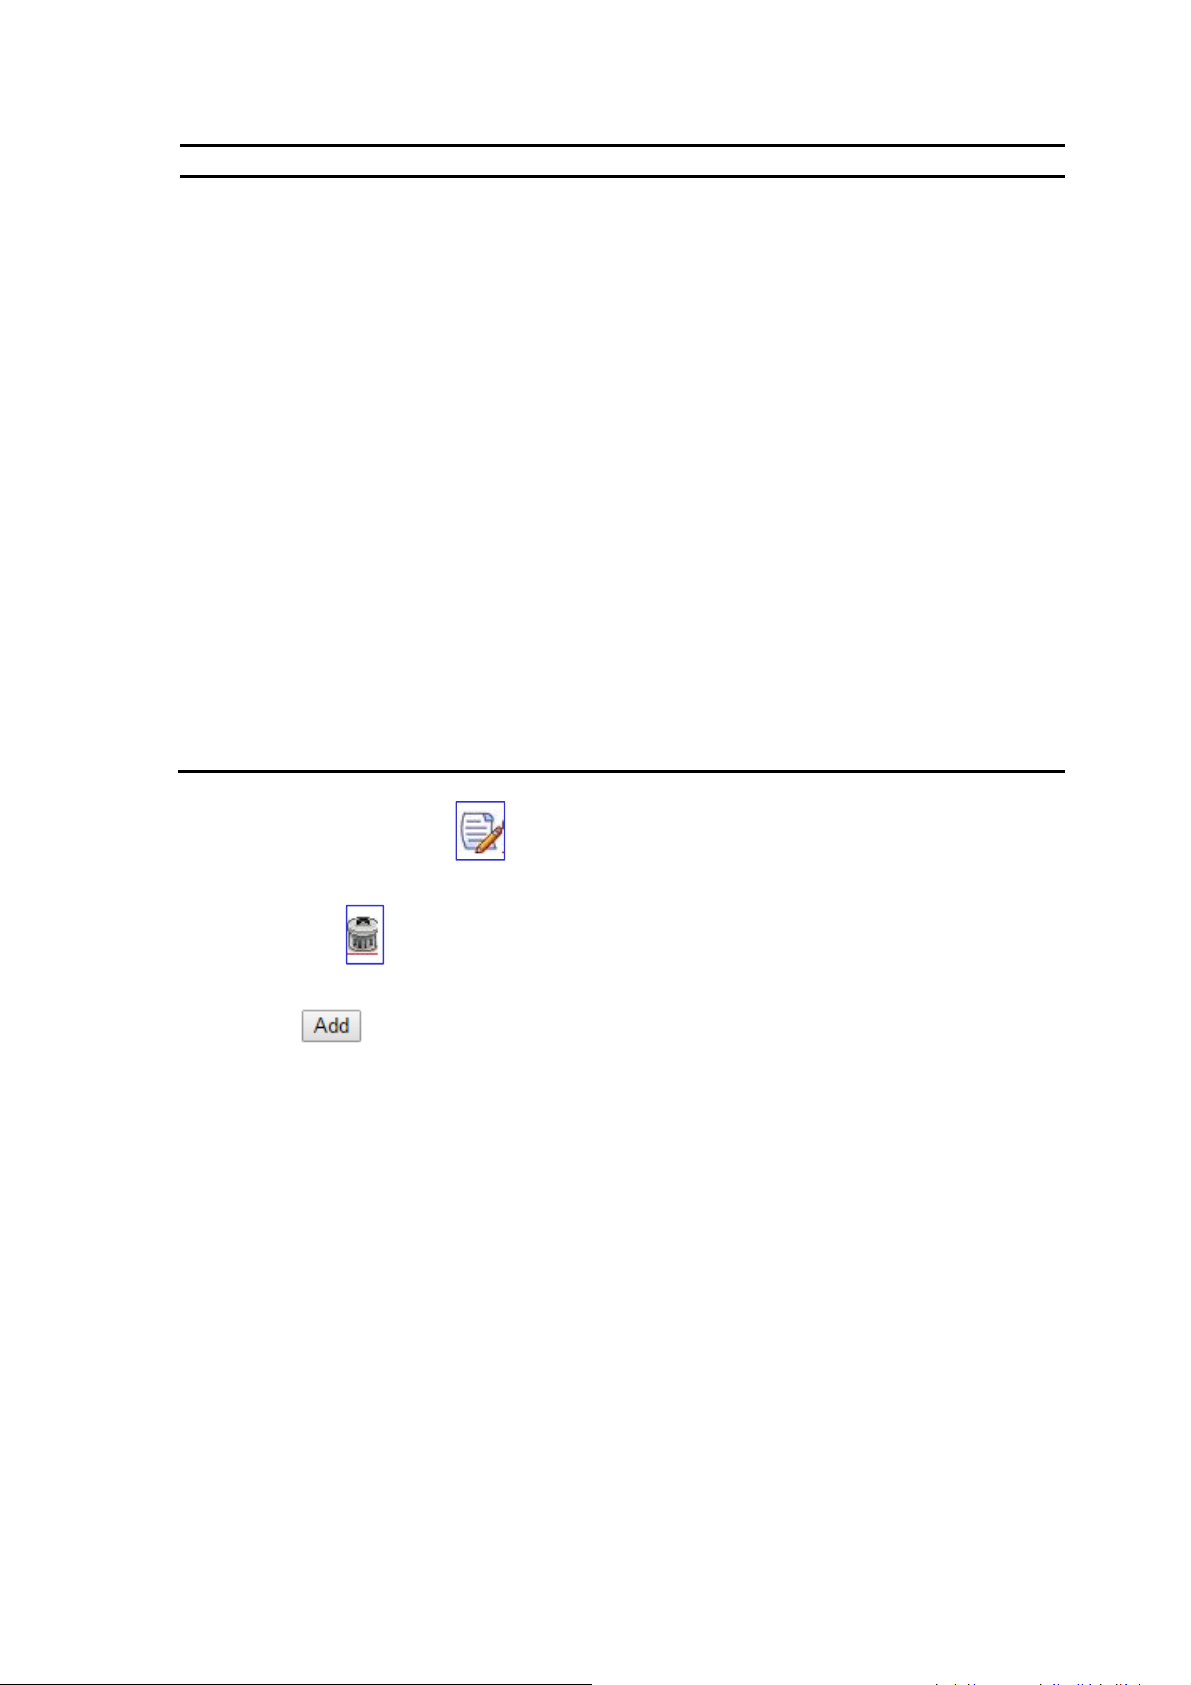
The user may click on the icon to edit the parameter of existing controller.
The trash bin icon allows the user to remove the existing controller.
The add icon allows the user to add the next controller.
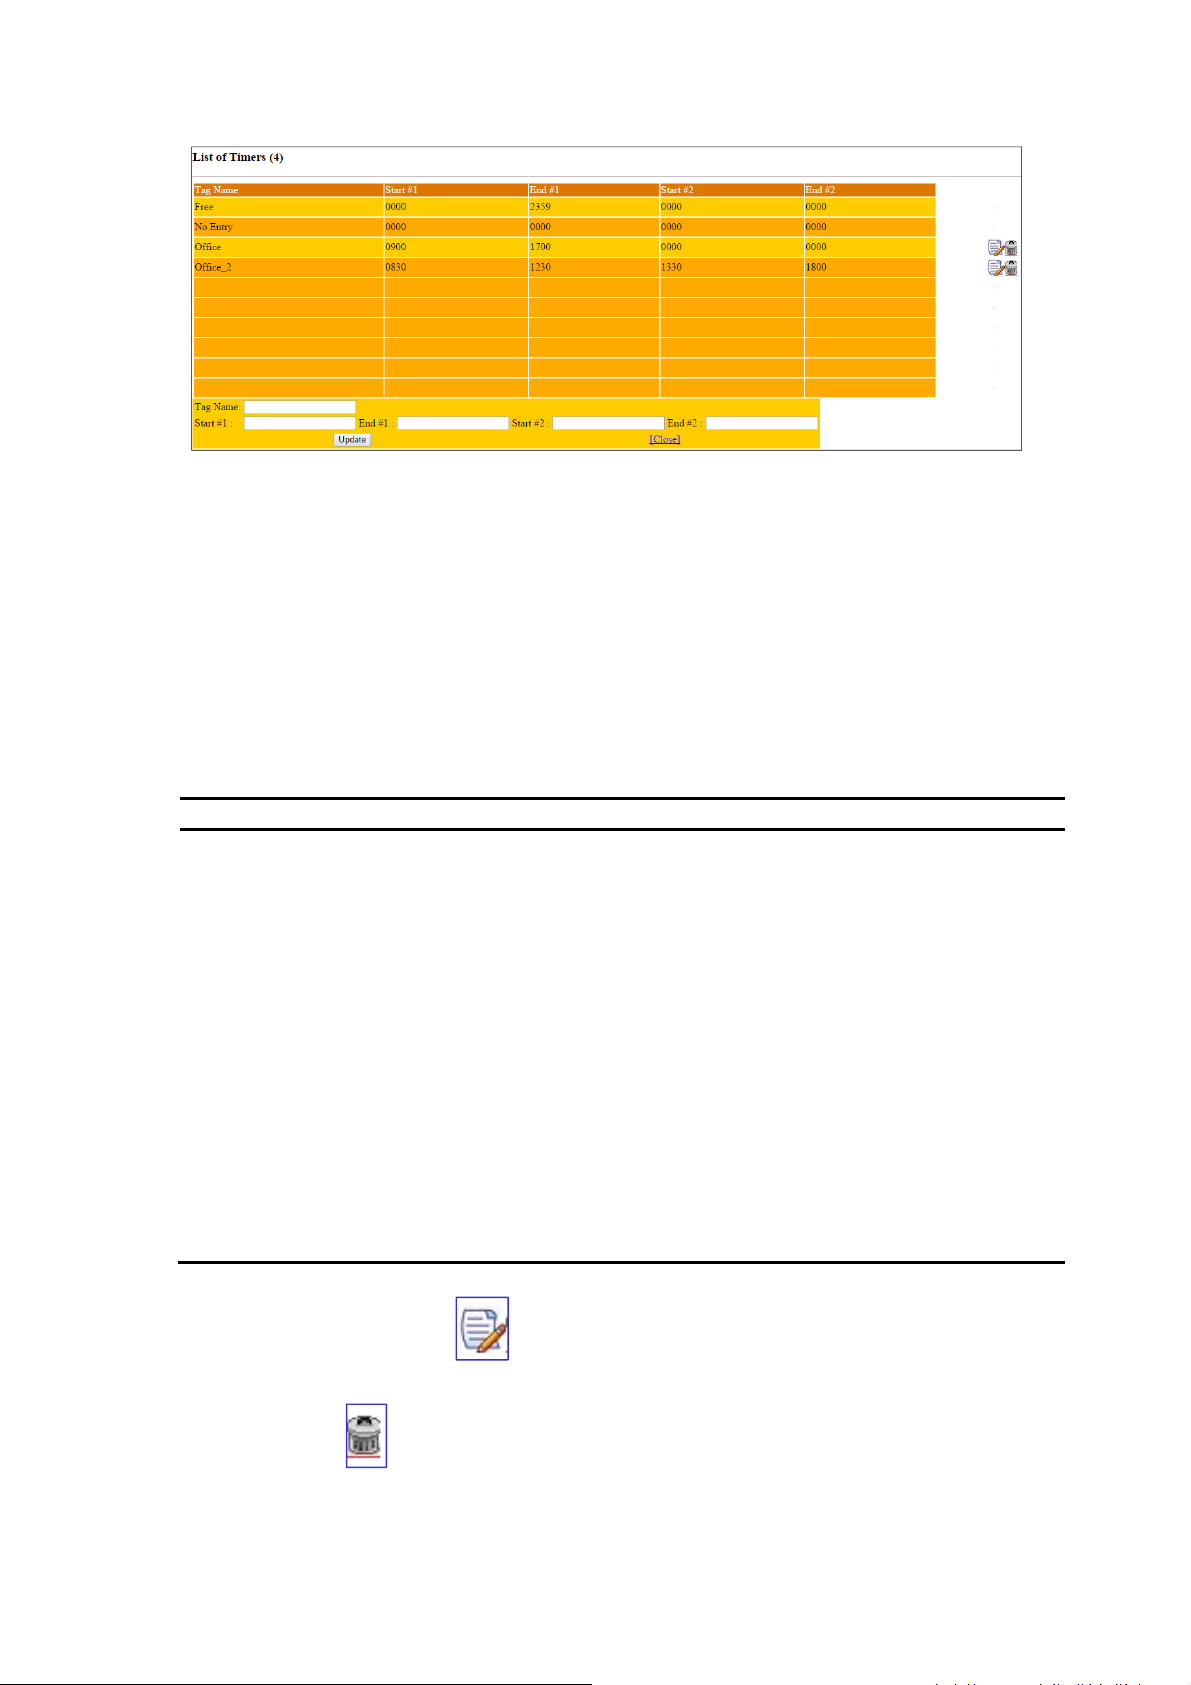
3.3.1.3 Timer
Timer is one of the important parameter of access control system. It is the range that you can
assign to the time zones, so that each particular day in the time zone can be assign with a set of
a time range. Timer would be the time each particular card can be access a door in a day. Timer
format defined is a 24 hour format.
8
Page 13
Maple User Manual
Cre
ating New
Timer
Tag Name
Key in
Tag Name
such as
Office
Start #1
Key in Start Time #1 (08:30)
End #2
Key in End Time #1 (12:30)
Start #2
Key in Start Time # 2 (13:30)
End #2
Key in End Time #2 (17:30)
Update
Button
Click
Update
to save your configuration and exit
C
lose Click this button to cancel add new controller
Figure: List of Timers
There are 2 sets of pre-defined timer:Free – user can access any time of the day
No Entry – No entry at all
The user may add timer to the access control system.
Example: Add one set of working period timer.
IN: 08:30 LUNCH OUT: 12:30 LUNCH IN: 13: 30 OUT: 17:30
Operation What to do
The user may click on the icon to edit the parameter of existing timer.
The trash bin icon allows the user to remove the existing timer.
9
Page 14
Maple User Manual
Creating New
Time Zone
Tag Name
Key in
Tag Name
such as
Office TZ
Sunday
Select timer for Sunday
(No Entry
)
Monday
Select timer for Monday
(Office
)
Tuesday
Select
timer for Tuesday
(Office
)
Wednesday
Select timer for Wednesday
(Office
)
Thursday
Select timer for Thursday
(Office
)
Friday
Select timer for Friday
(Office
)
Saturday
Select timer for Saturday
(No Entry
)
Holiday
Select timer for Holiday
(No Entry
)
Update
Button
Click
Update
to save your configuration and exit
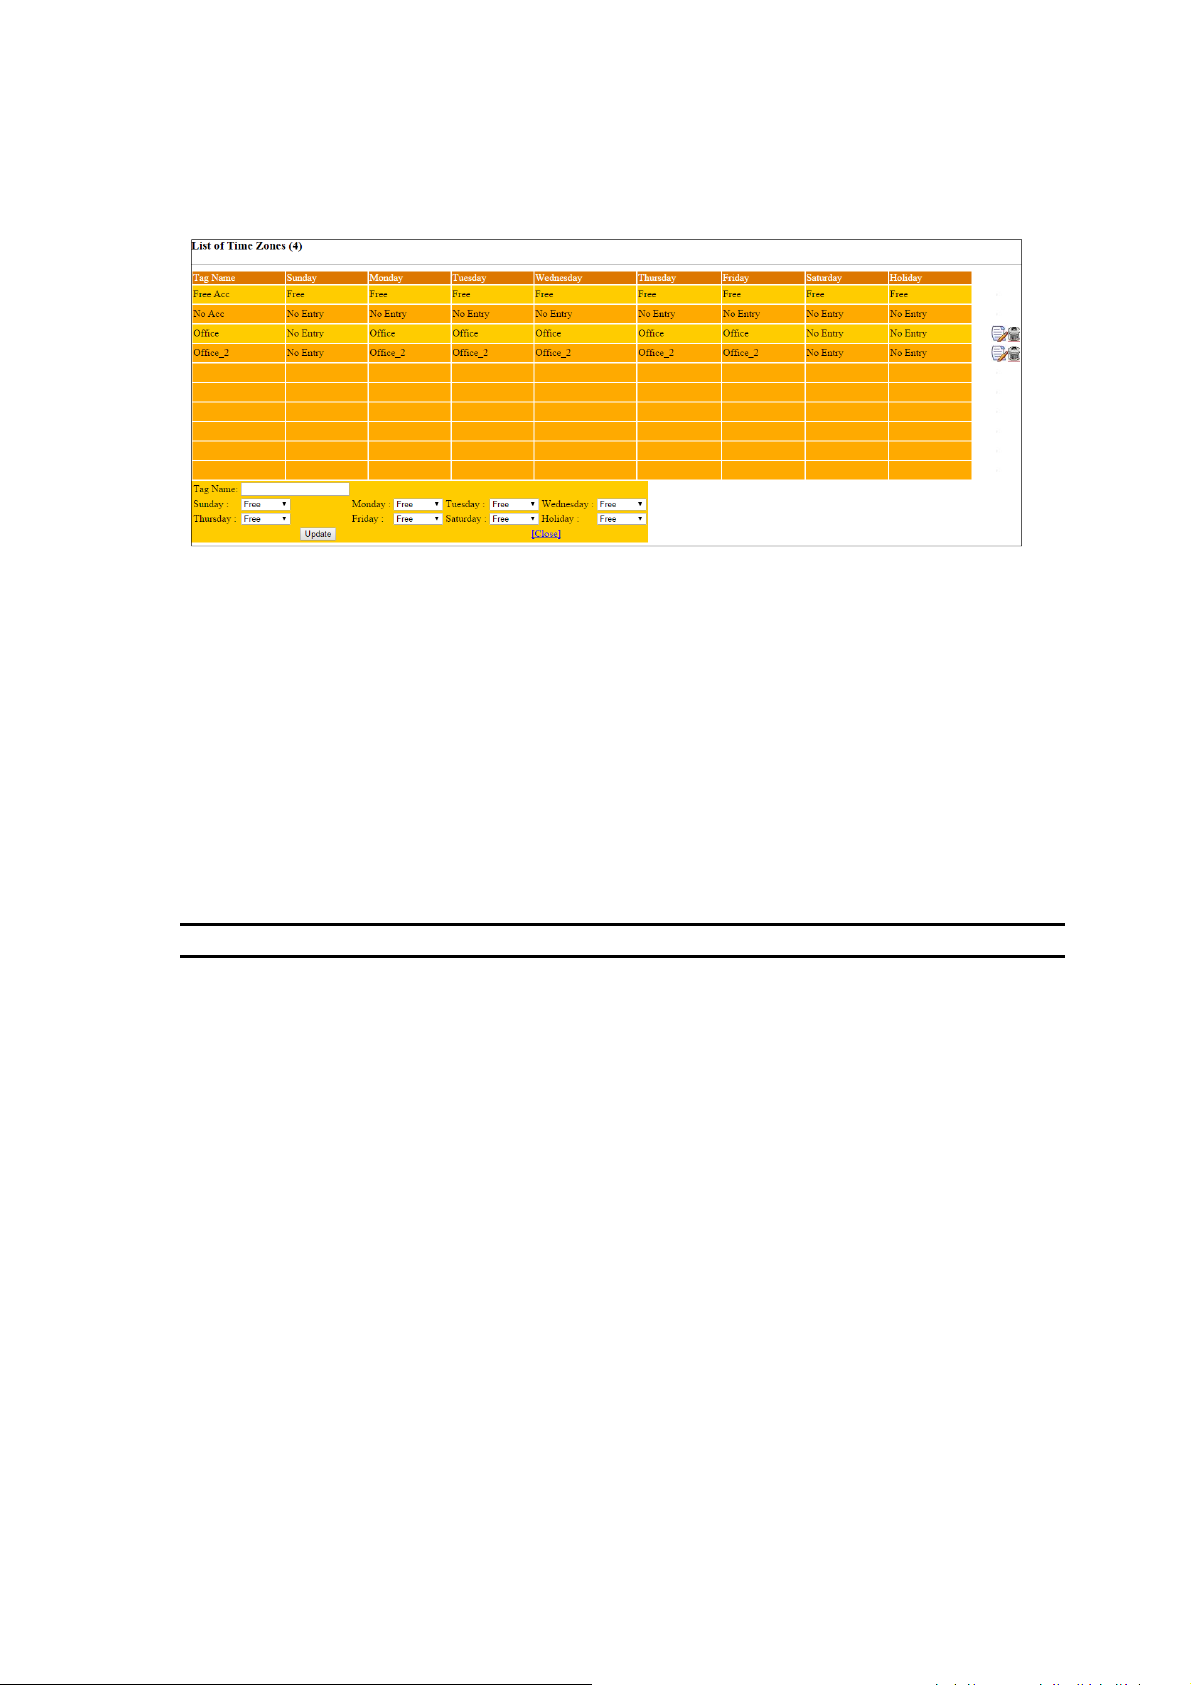
3.3.1.4 Time Zone
Time zone is the timer range in weekly format. Time zone can be assigned to the setting of
door accessibility, ALR and Auto Pin Disable and Pin Entry Mode.
Figure: List of Time Zone
There are also pre-defined time zones:Free Acc - Free Access for every single door
No Acc - No Access is not granted at any time and on any day.
The user may add time zone to the access control system.
Example: Add one set of time zone.
Sunday: No Entry Monday: Office Tuesday: Office Wednesday: Office
Thursday: Office Friday: Office Saturday: No Entry Holiday: No Entry
Operation What to do
10
Page 15
Maple User Manual
C
lose Click this button to cancel add new controller
Creating New
Access Level
Access Tag
Key in
Tag Name
such as
Office Acc
Controller Tag
Select
controller
Tag Name
Time Zone
Select Time Zone
Update
Button
Click
Update
to save your configuration and exit
C
lose Click this button to cancel add new controller
The user may click on the icon to edit the parameter of existing time zone.
The trash bin icon allows the user to remove the existing time zone.
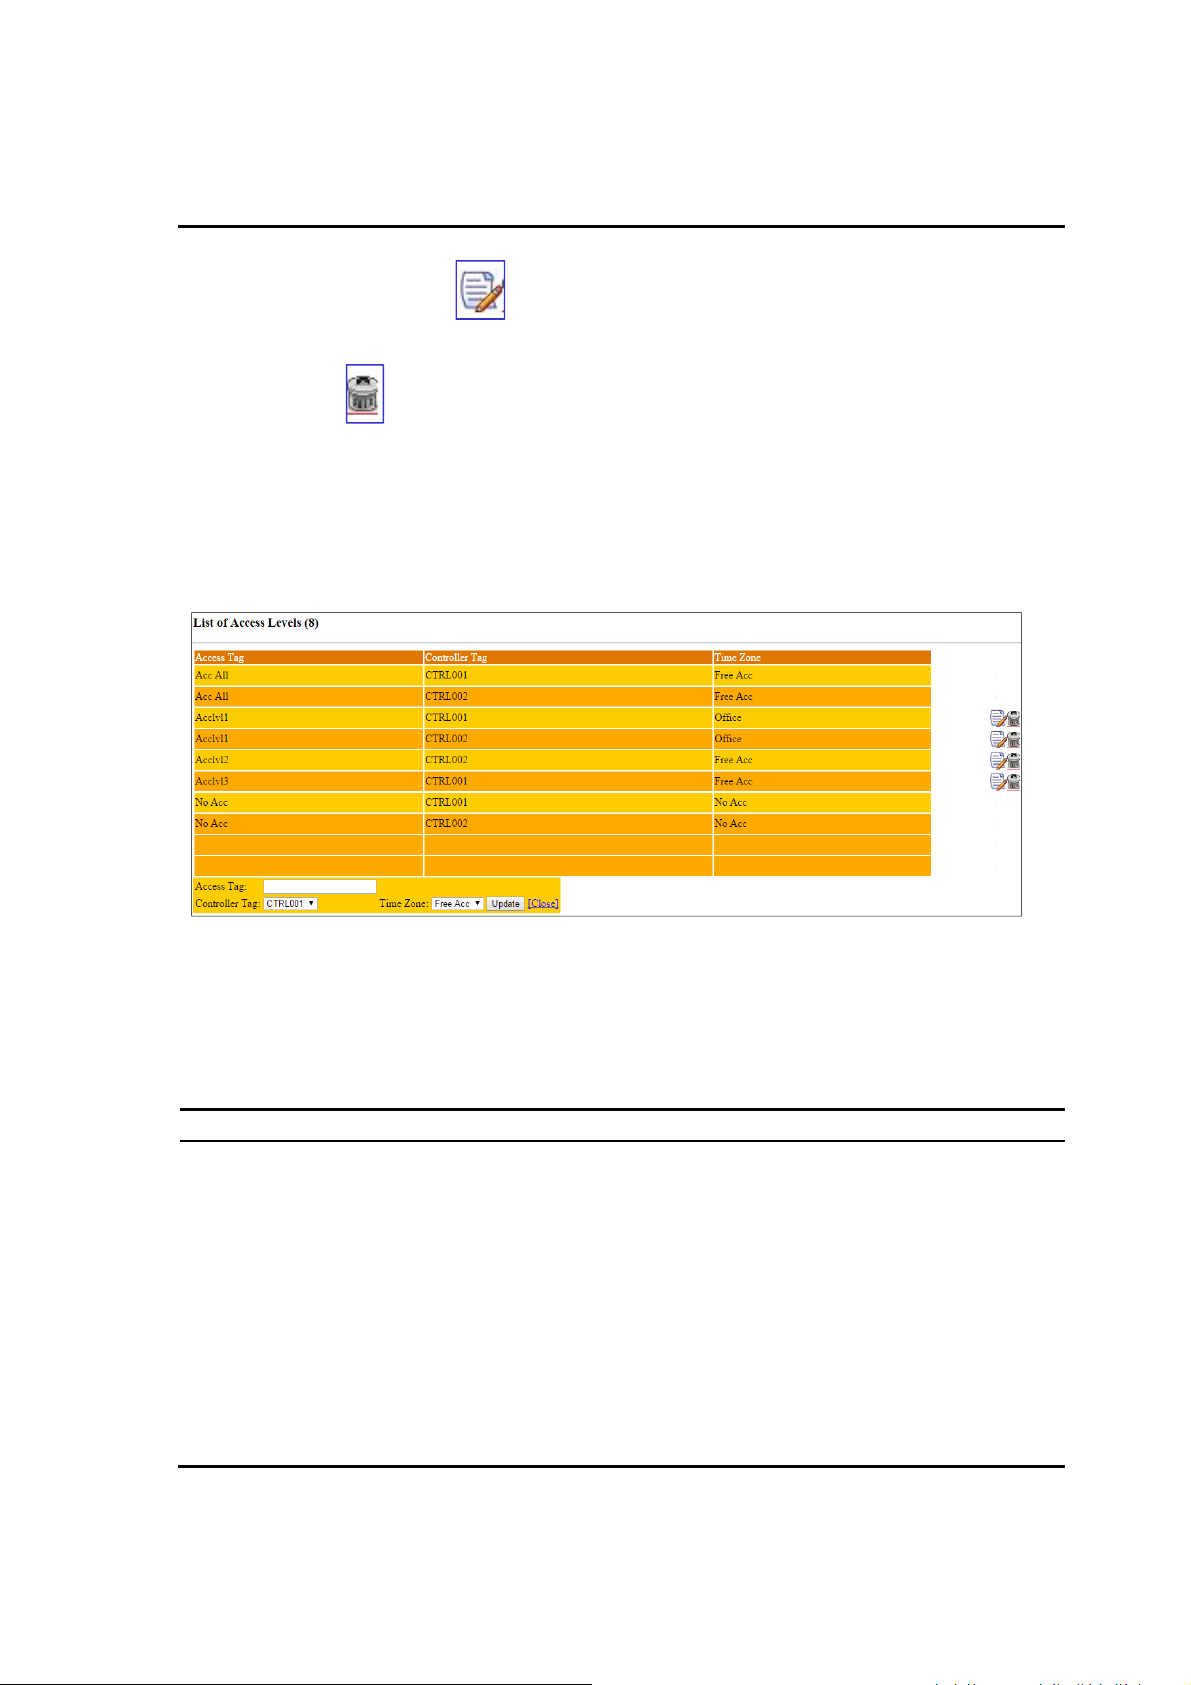
3.3.1.5 Access Level
Door Accessibility holds particular reader controller and Time Zone that specific cardholders
are allowed with access. This is useful in managing sites or areas (installed with individual
controller) of restricted access.
Figure: List of Access Levels
There is also pre-defined door accessibility:Acc All - Allows free access to all readers at all days and all times.
No Acc - No Access to all readers at all days and all times.
Operation What to do
11
Page 16
Maple User Manual
Creating New
Holiday
Date
Key in the holiday date
with for
mat dd/mm/yyyy (e.g
01/01/2015)
Description
Key in the description of the holiday, such as New Year
Update
Button
Click
Update
to save your configuration and exit
C
lose Click this button to cancel add new controller
The user may click on the icon to edit the parameter of existing access level.
The trash bin icon allows the user to remove the existing access level.
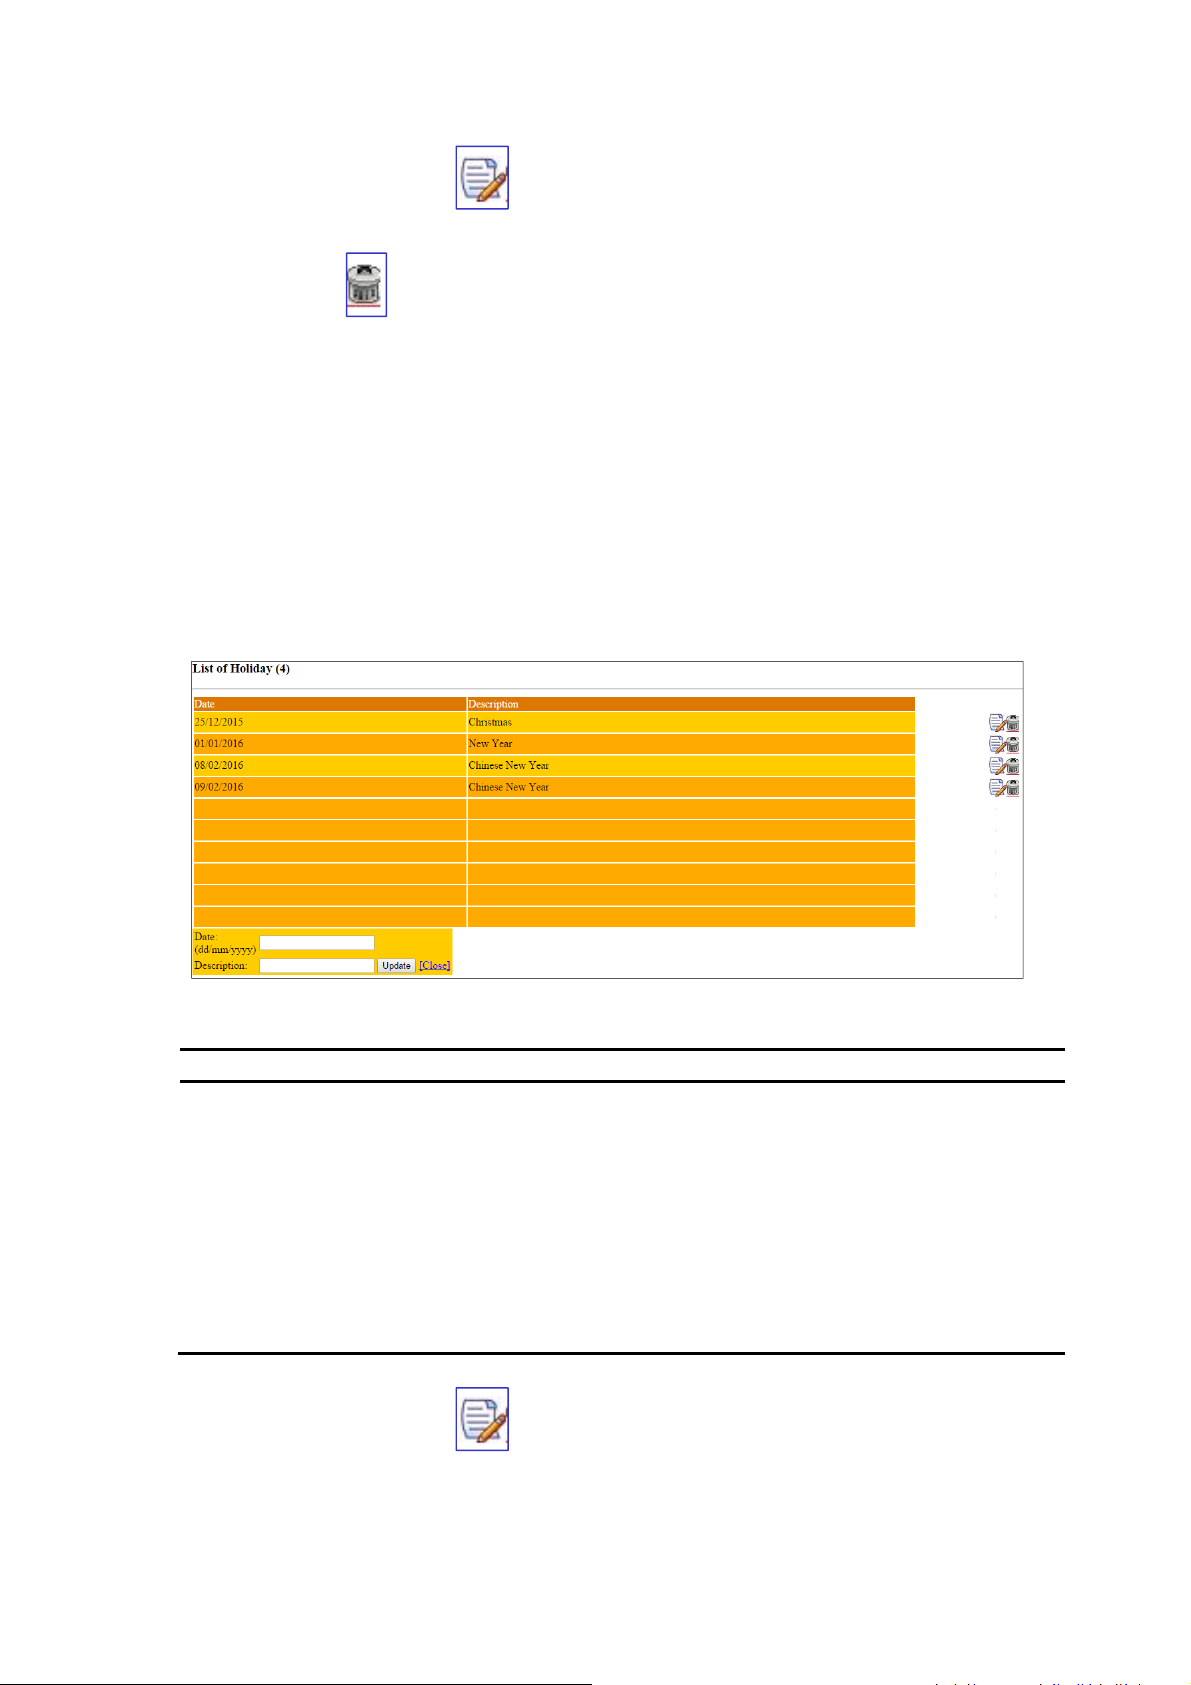
3.3.1.6 Holiday
Setting the Holiday would enable the controller to recognize the day as a holiday and the
holiday time zone will be used for granting access to the door. This is important because if a
holiday falls on a weekday you may want to bar users from entering the premises. Access
control for holidays needs to be handled differently from the access control for ordinary
working days. Not all cardholders having the same access control for ordinary working days
have the same access rights for holidays.
A maximum of 20 days in a year can be defined as holidays, and each date is in the pattern of
day/month/year. The description of each holiday can be edited but not the date.
Figure: List of Holiday
Operation What to do
The user may click on the icon to edit the parameter of existing holiday.
12
Page 17
Maple User Manual
Setting
Setting
Description
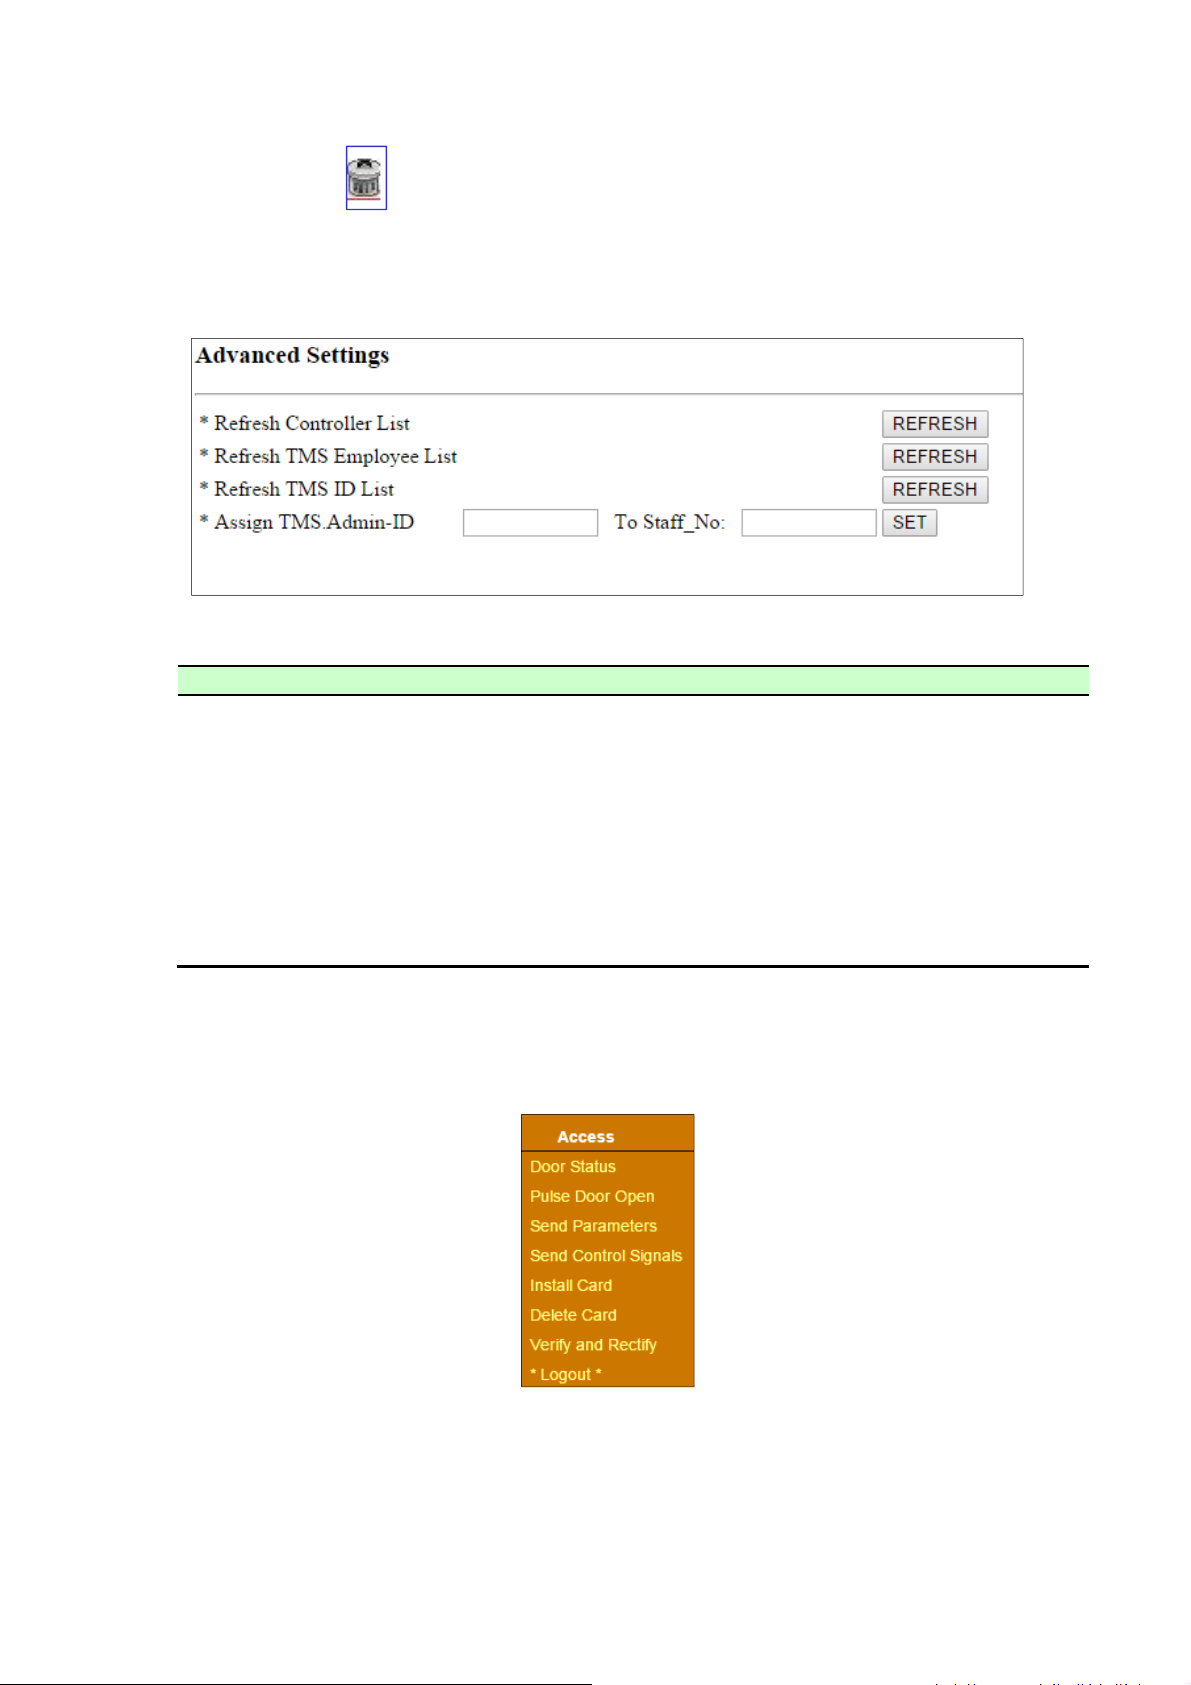
Refresh Controller List
This command allows the user to
update controller list.
Refresh TMS Employee List
This command allows the user to
update TMS employee list.
Refresh TMS ID List
This command
allows the user to update
TMS ID list.
Assign TMS Admin ID
This command allows the user to
assign TMS admin ID to the
The trash bin icon allows the user to remove the existing holiday.
3.3.1.7 Advanced Settings
This command allows the user to configure some others setting in the system.
Figure: List of Advanced Settings
attendance system.
3.3.2 Access
The user may send parameters and databases to specified readers as well as controlling directly
the operation of the reader.
Figure: Access Menu
13
Page 18
Maple User Manual
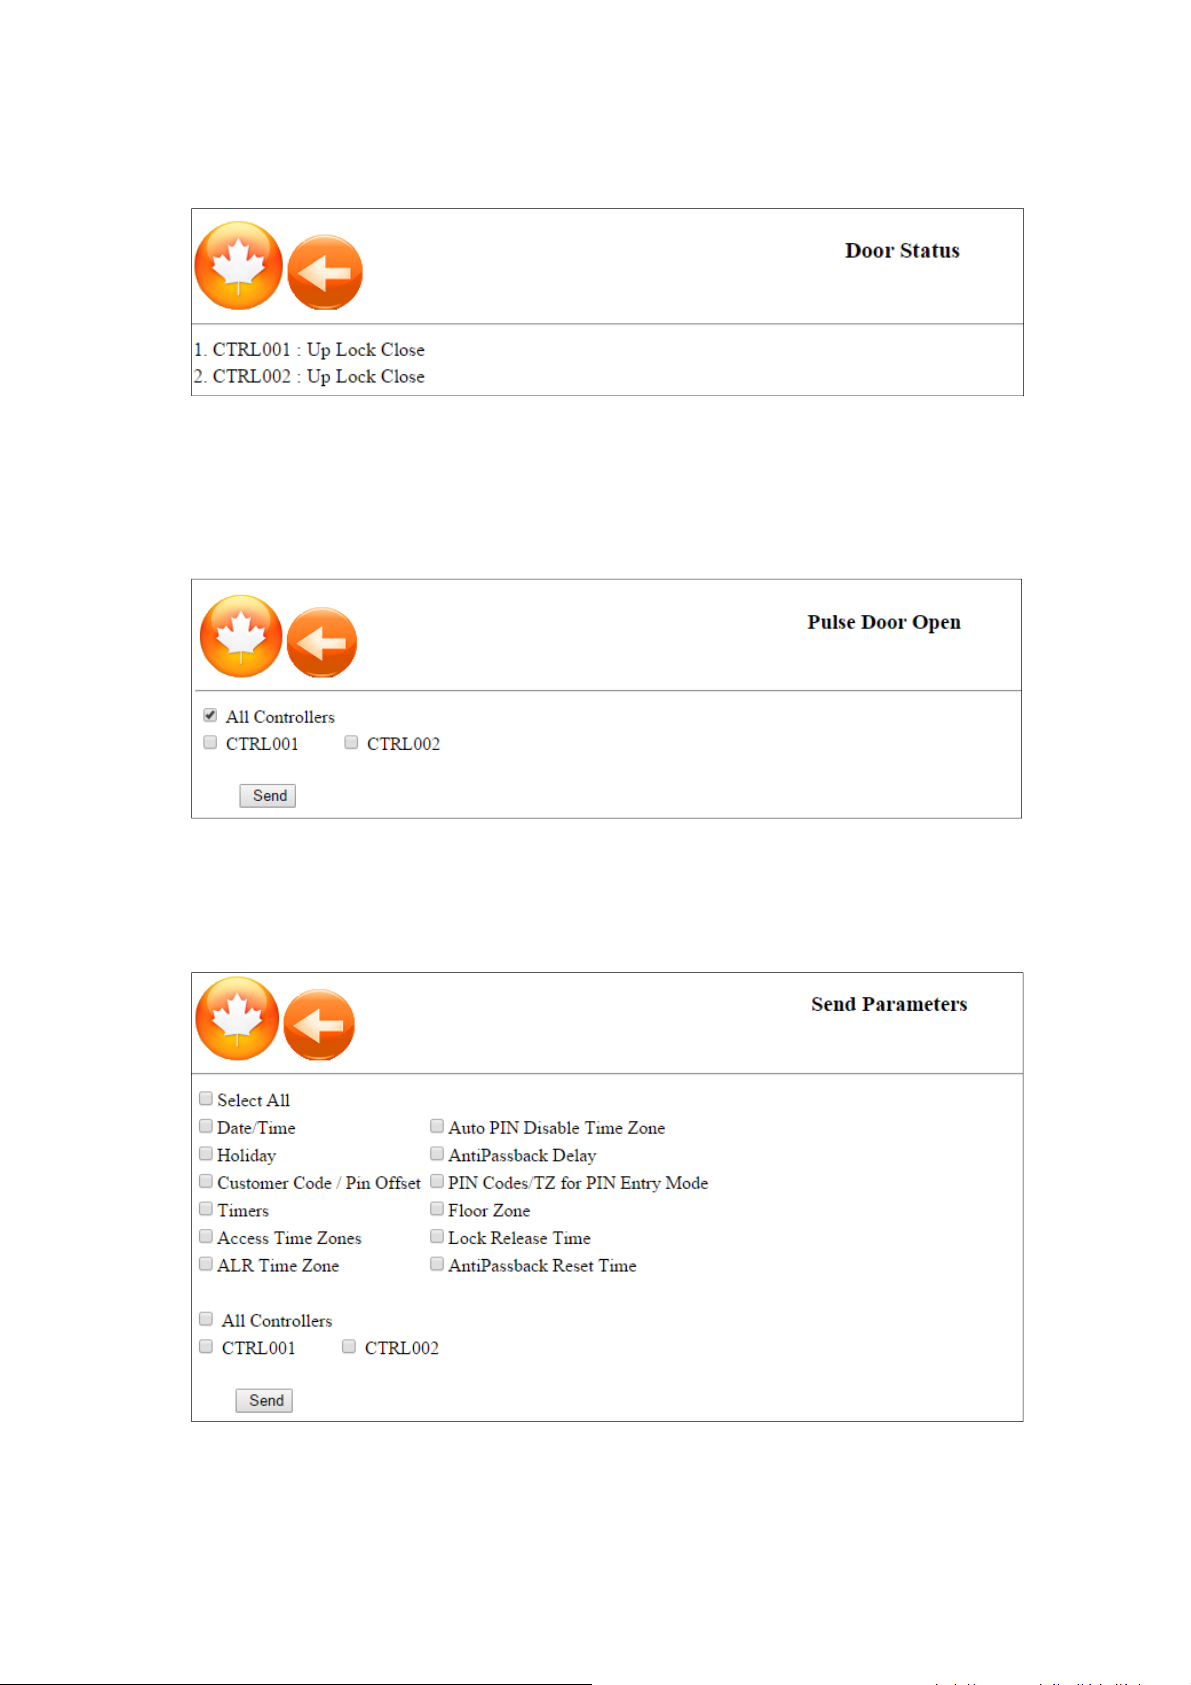
3.3.2.1 Door Status
The user may check the status of each door by this [Door Status] Menu.
Figure: Door Status
3.3.2.2 Pulse Door Open
Pulse Open is to momentarily unlock the door by deactivating the locking device. The user may
upload this command to a specific controller, to a selected set of controllers or to all controllers.
Figure: Pulse Door Open
3.3.2.3 Send Parameters
This command allows the user to send parameters to controllers in the system.
Figure: Send Parameters
14
Page 19

Maple User Manual
Parameter
Parameter
Description
Date/Time
This
command allows the user to send the computer’s date and time
Holiday
This command allows the user to send the pre
-
set holiday to the
Pin Offset
This command is only available for EL22xx series of controller, where
Timers
This command allows the user to send the pre
-
set timers to the
Access Time Zones
This command allows the user to send the pre
-
set time zones to the
Auto Lock Release
This command allows the electric lock of a door to be automatically
Auto PIN Disable
Allows the reader (controller) access condition to be automatically
Anti
Passback Delay
This command is mainly used for the Car Park System.
PIN Codes/TZ for Pin Entry
This command
allows the user to send the PIN Codes and Time Zone
You may click on the “Select All” button to select all parameters or just check on those
parameters you intend to upload to controllers. Click on “Send” button to execute the sending
of parameter data.
to the controller.
controller.
user cannot program individual PIN. PIN number is already preprogrammed in card.
This command allows the way to use PIN number be changed.
The 3-digit number is a value (enter by user) that is to be added to a
particular (un-modifiable) PIN number, to derive a ‘new’ PIN
number.
(ALR) Time Zone
Time Zone
controller.
Timer is the range that you can assign to the time zones, so that each
particular day in the time zone can be assign with a set of a time
range. Timer would be the time each particular card can be access a
door in a day.
controller.
Time zone is the timer range in weekly format. Time zone can be
assigned to the setting of door accessibility, ALR and Auto Pin Disable
and Pin Entry Mode.
released for access without the need for a user to badge/swipe a
card.
The release is to be controlled by Time Zone.
switched from (Card and PIN) mode to (Card only) mode according to
intended time zone.
Click on the Auto Pin Disabled TZ’s drop-down list box to display all
the previously defined Time Zones.
This time delay before triggering the anti-pass can be set between 0
to 120 minutes (or up to 2 hours). Once you have swiped your card
and entered into a car park area, you are not allowed to reuse the
card until you have swiped/badged and driven your vehicle out.
15
Page 20
Maple User Manual
Mode
setting of Pin Entry Mode to the controllers.
Anti Passback Reset
This command allows you to reset the Anti
-
Passback Reset Time back
Lock Release Time
This command allow you to set the time duration for Door Lock to
Permanent
“On”
designates that the door is to be kept unlocked at all time. The door will only
Inhibit Access
“On”
designates that all cardholders are suspended temporarily from entry/exit.
Pin Mode
“On”
designates that entry is of CARD + PIN mode. To switch back to the CARD
Anti-Passback
Time
to null. For example, if the Anti-Passback Reset Time is at 13:00 the
anti-pass will no long apply from 13:00 hours onwards, unless
another badge/swipe IN/OUT takes place.
remain operated each time it is commanded to turn on.
For further explanation of parameters, you may refer to particular hardware controller user
manual.
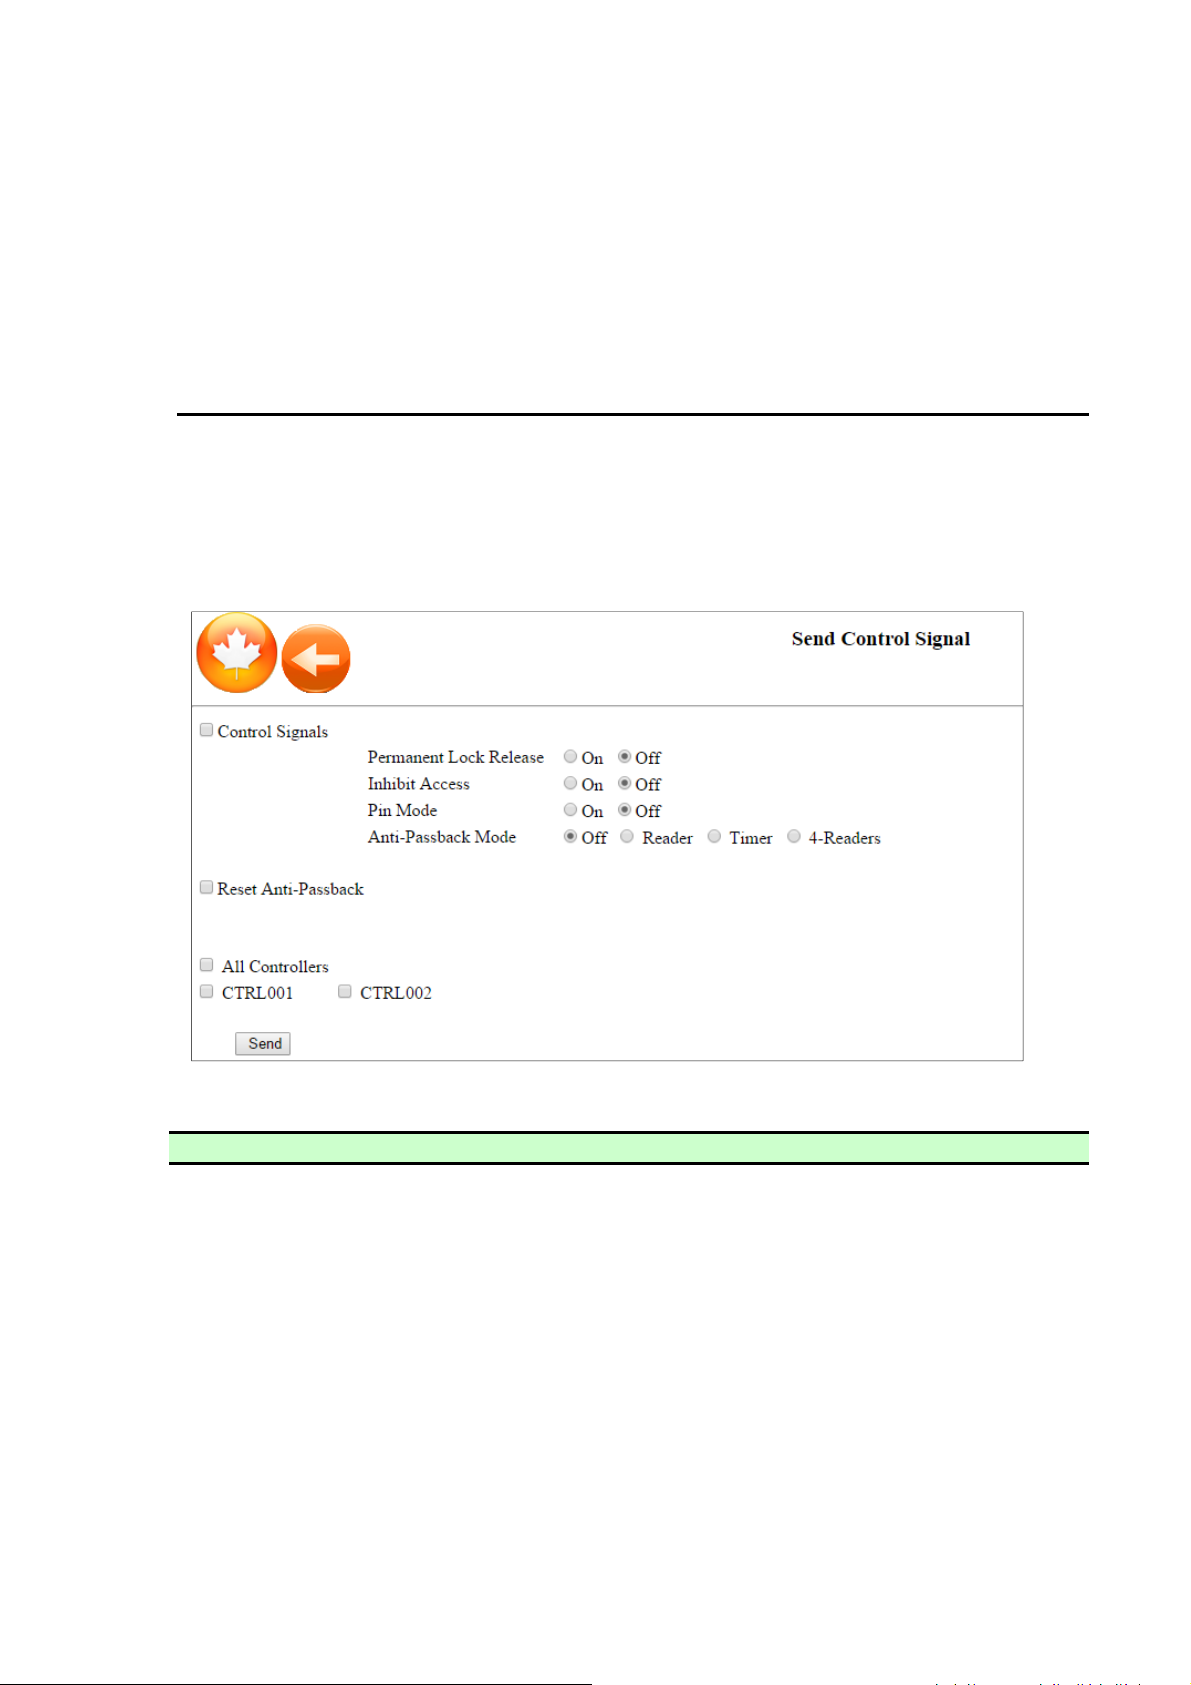
3.3.2.4 Send Control Signals
This command allows you to send control signal to controllers in the system.
Command Description
Lock Release
be locked back when you select “Off”.
Access is granted only if you select “Off”.
mode, click on “Off”.
Mode
This option has 4 selections. You may select “Off” to disable antipassback, select
“Reader” to enable anti-passback by reader, or select “Timer” to enable anti-
passback by timer. 4-Reader antipass-back is only applicable for EL2308 2-door
Figure: Send Control Signal
16
Page 21
Maple User Manual
controller. For
further
explanation
of anti
-
passback, you may refer to hardware
Reset
Anti
-
This
allows
the user to reset the anti
-
passback count of the selected controllers.
user manual.
Passback
3.3.3 Report
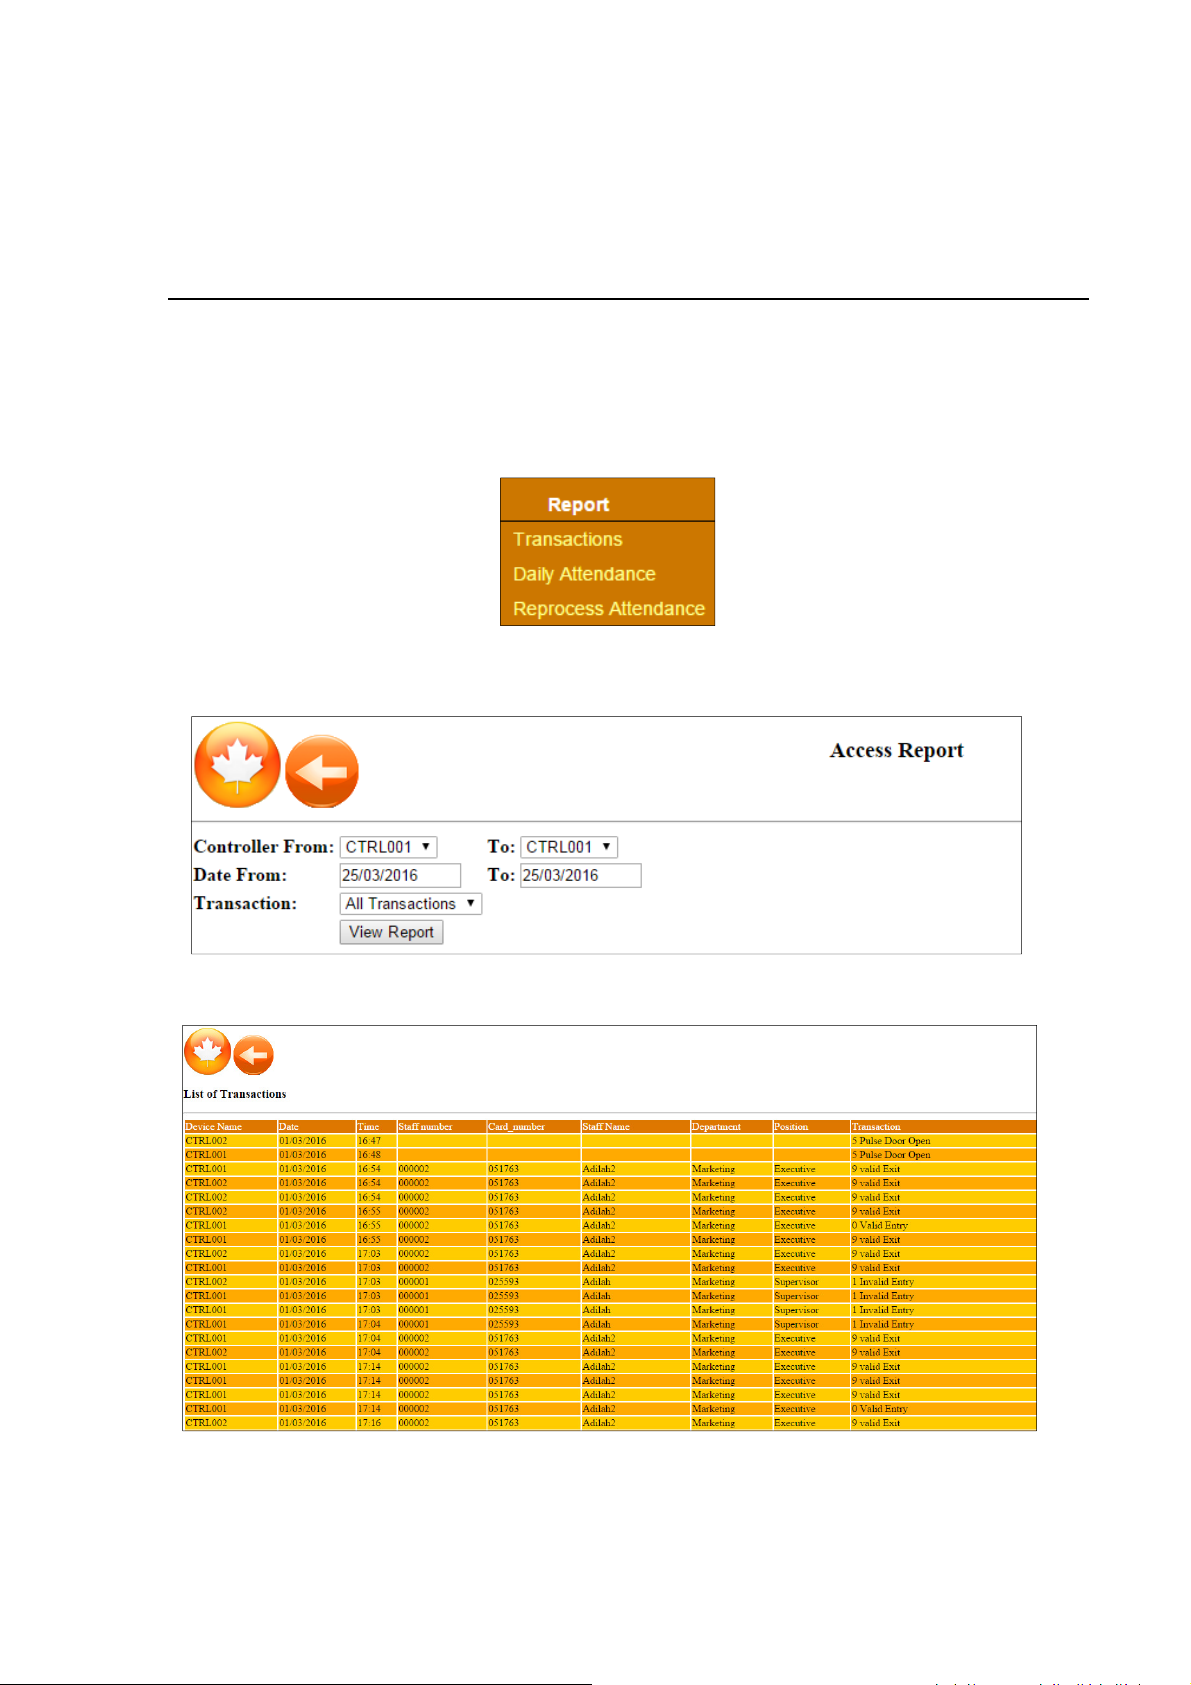
Controllers automatically log all transaction events including card numbers entry/exit, access
valid/invalid, photo display, date and time of access, and so on. The user may generate the
Transaction Report, view employee Daily Attendance and Reprocess Attendance in this menu.
Figure: Access Menu
3.3.3.1 Transactions
Figure: Transactions Report Filtering
Figure: Access Report
17
Page 22
Maple User Manual
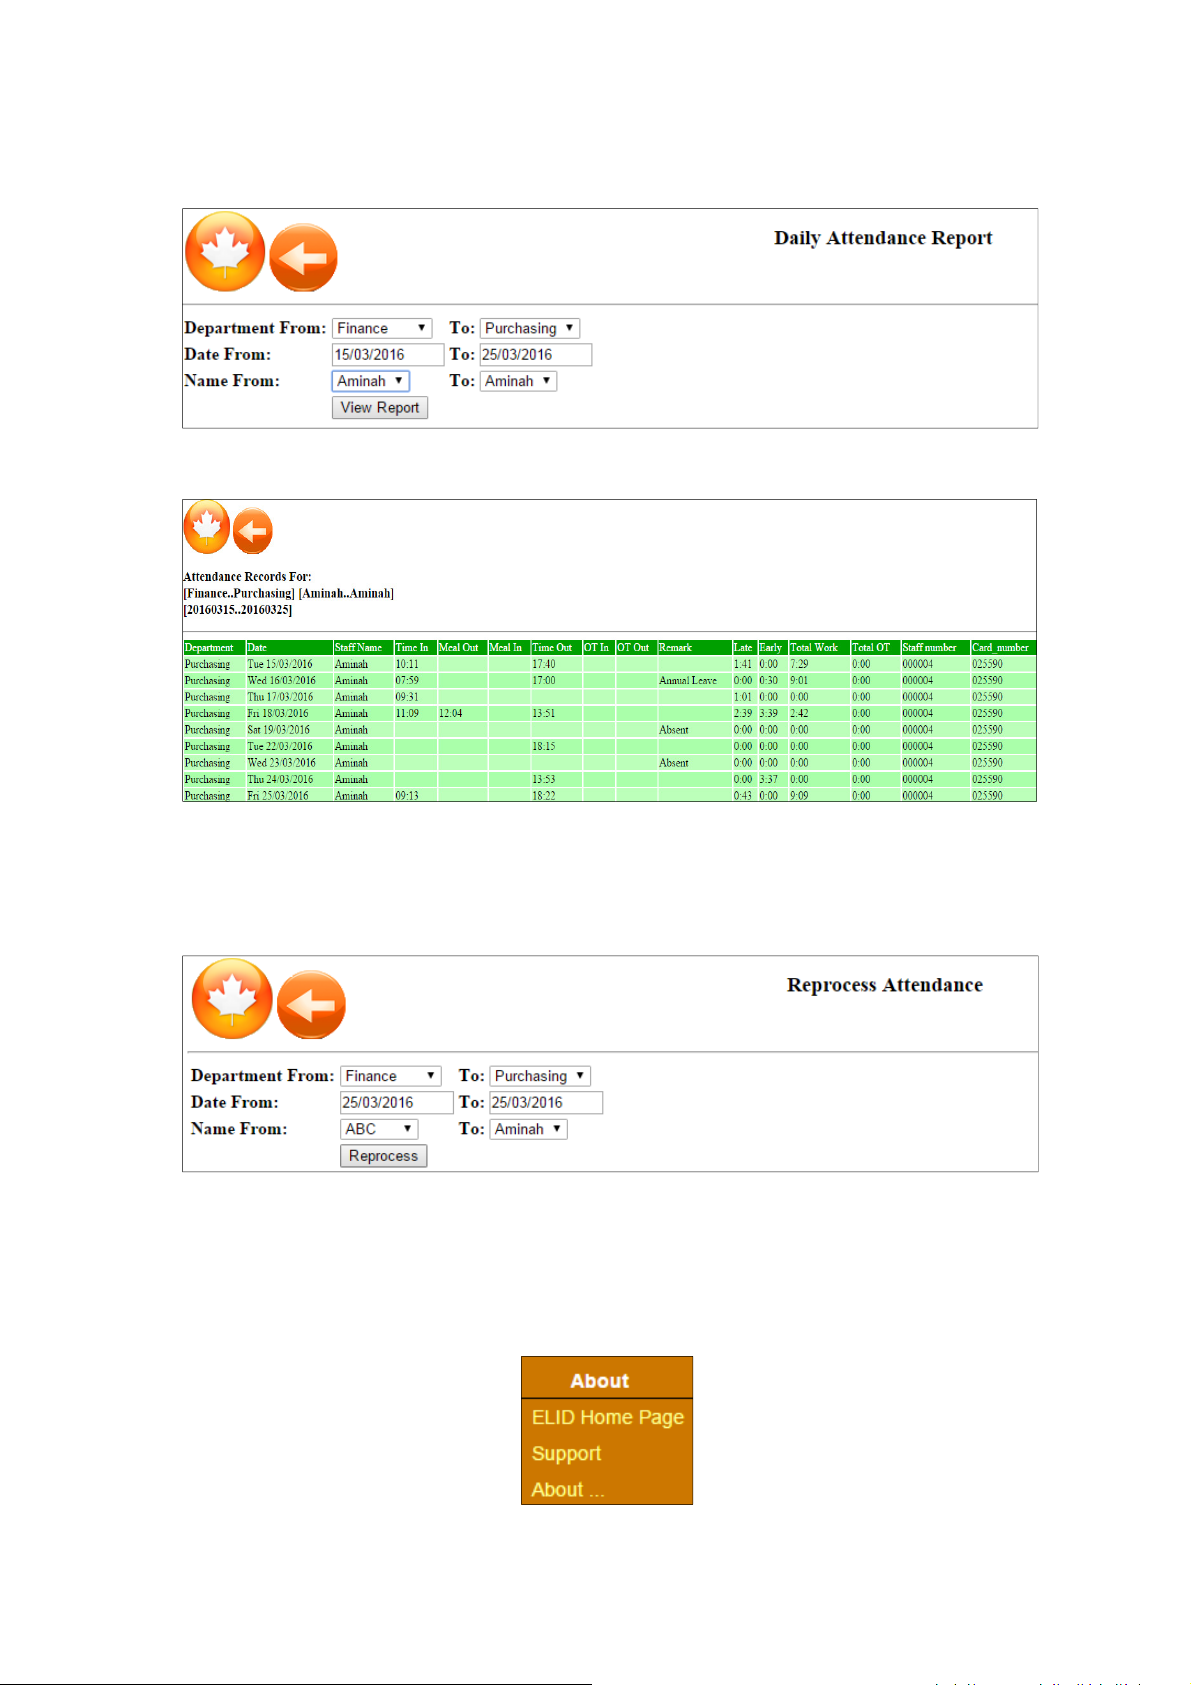
3.3.3.2 Daily Attendance
Figure: Daily Attendance Report Filtering
Figure: Daily Attendance Report
3.3.3.3 Reprocess Attendance
Figure: Reprocess Attendance Filtering
3.3.4 About
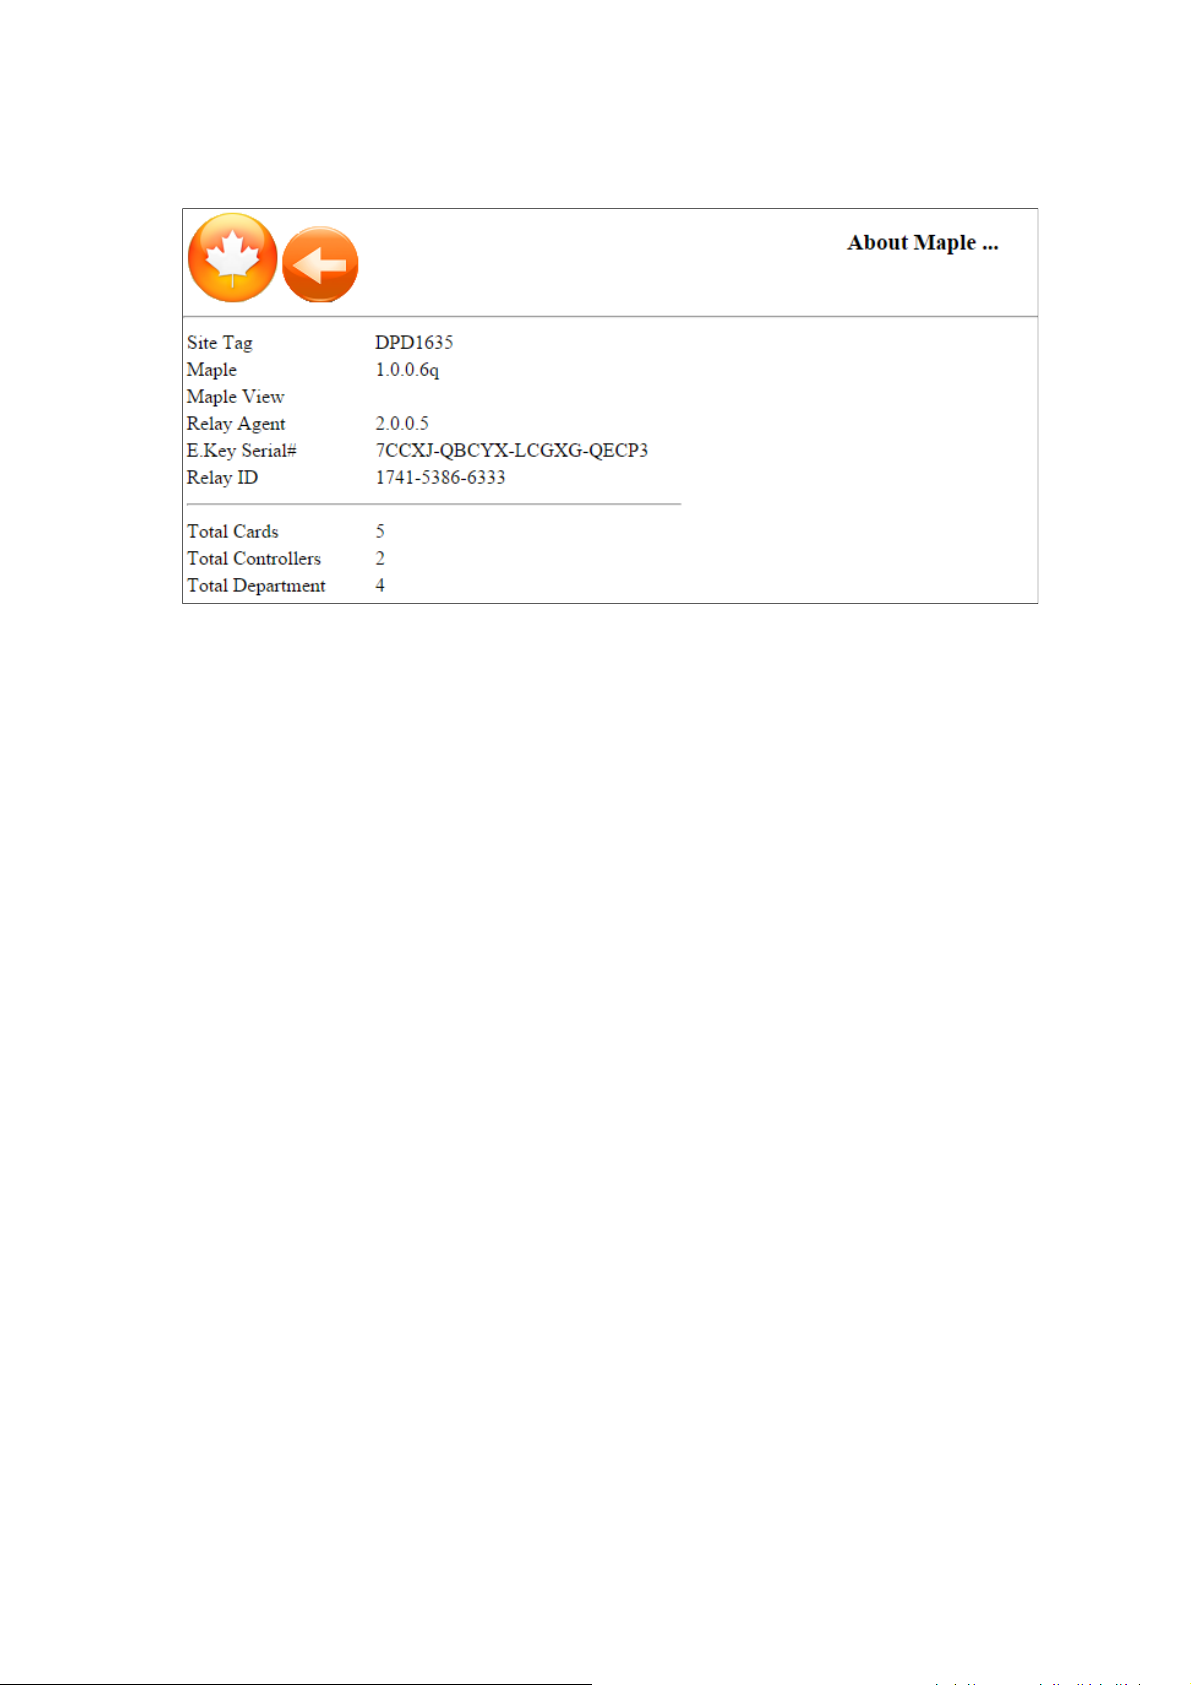
This menu allows the user to check the information of Maple. The user is able to enter ELID
Home Page by the redirect web link.
Figure: About Menu
18
Page 23
Maple User Manual
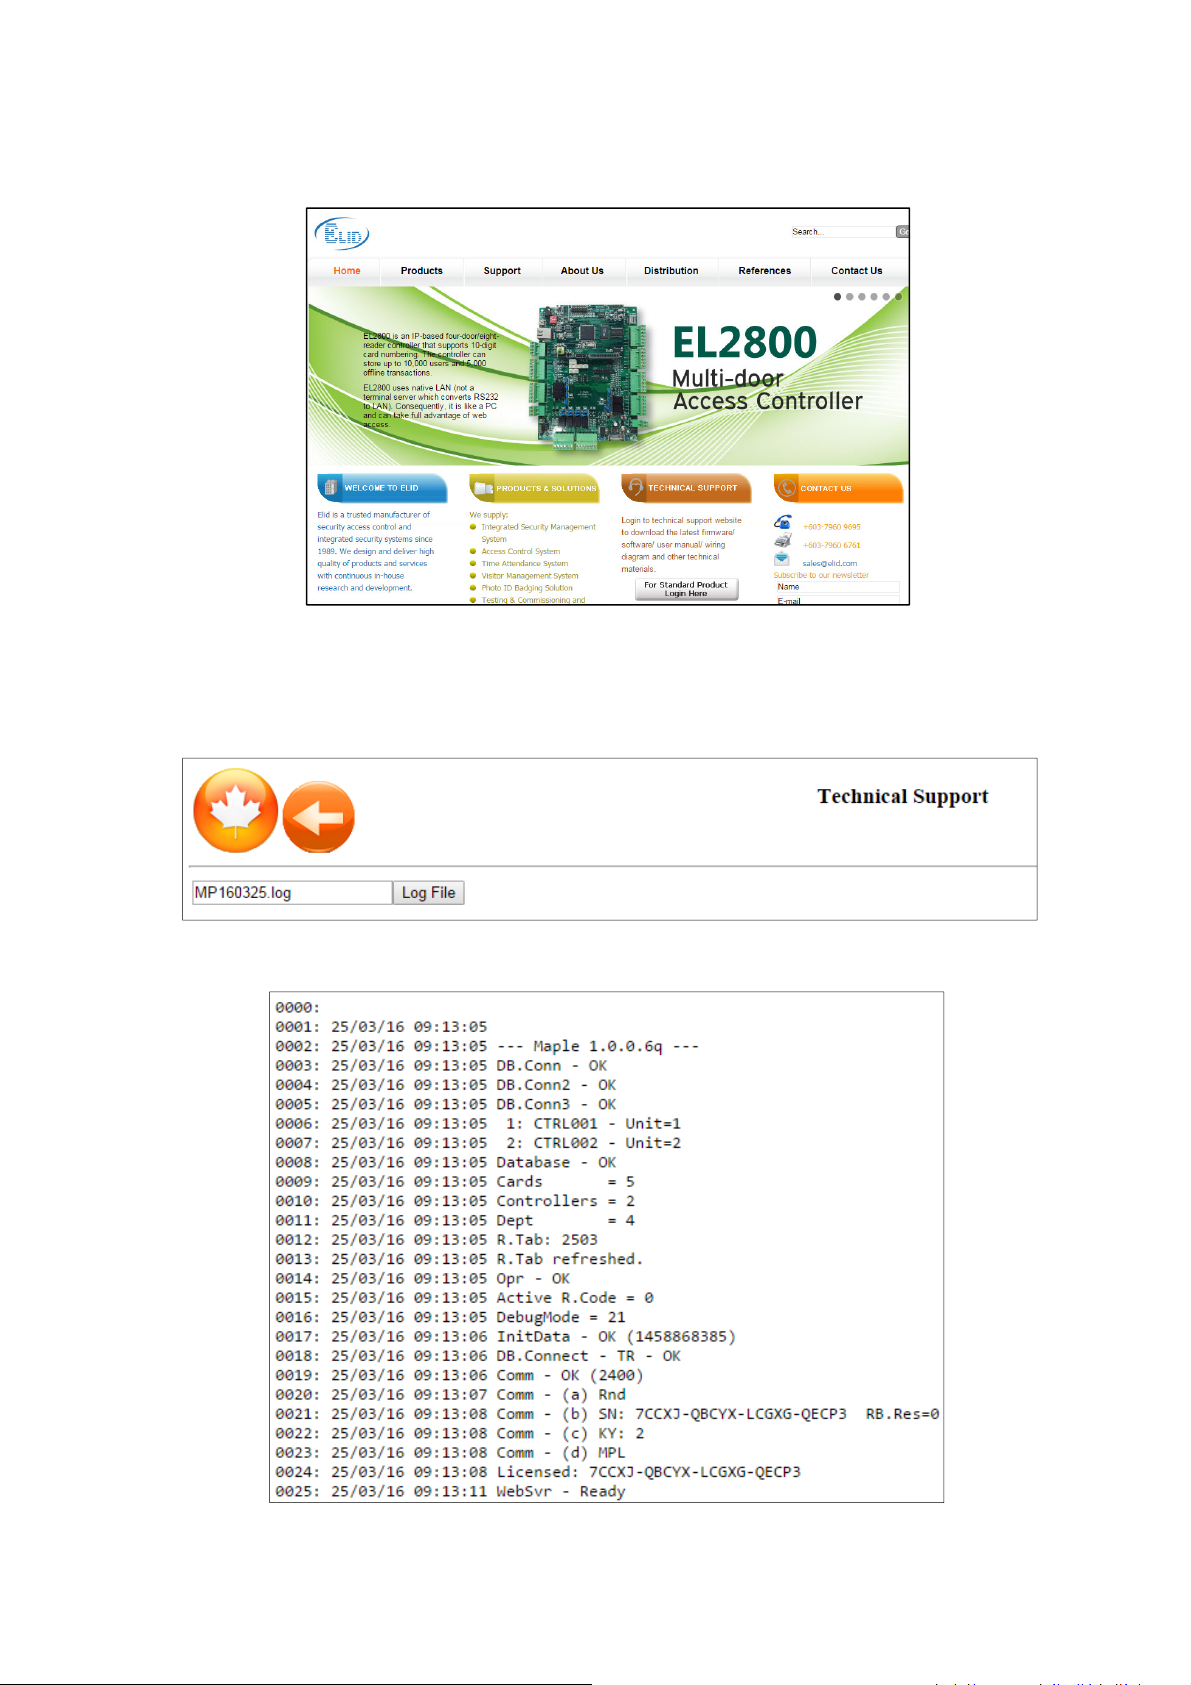
3.3.4.1 ELID Home Page
The web page will be redirect to ELID homepage once the [ELID Home Page] button is clicked.
Figure: ELID Home Page
3.3.4.2 Support
Log file will be shown on the page by date selected once the [Log File] button is clicked.
Figure: Support Menu
Figure: Log File
19
Page 24
Maple User Manual
3.3.4.3 About
The user may check the information of Maple System by clicking [About] button.
Figure: About Menu
20
Page 25
Maple User Manual
Menu
Chapter 4: Maple View
4.1 Introduction
The user can use “Maple View” through internet browser, such as Google Chrome, Mozilla
Firefox and others to access Maple functions such as pulse open a door, view staff attendance
and apply leave.
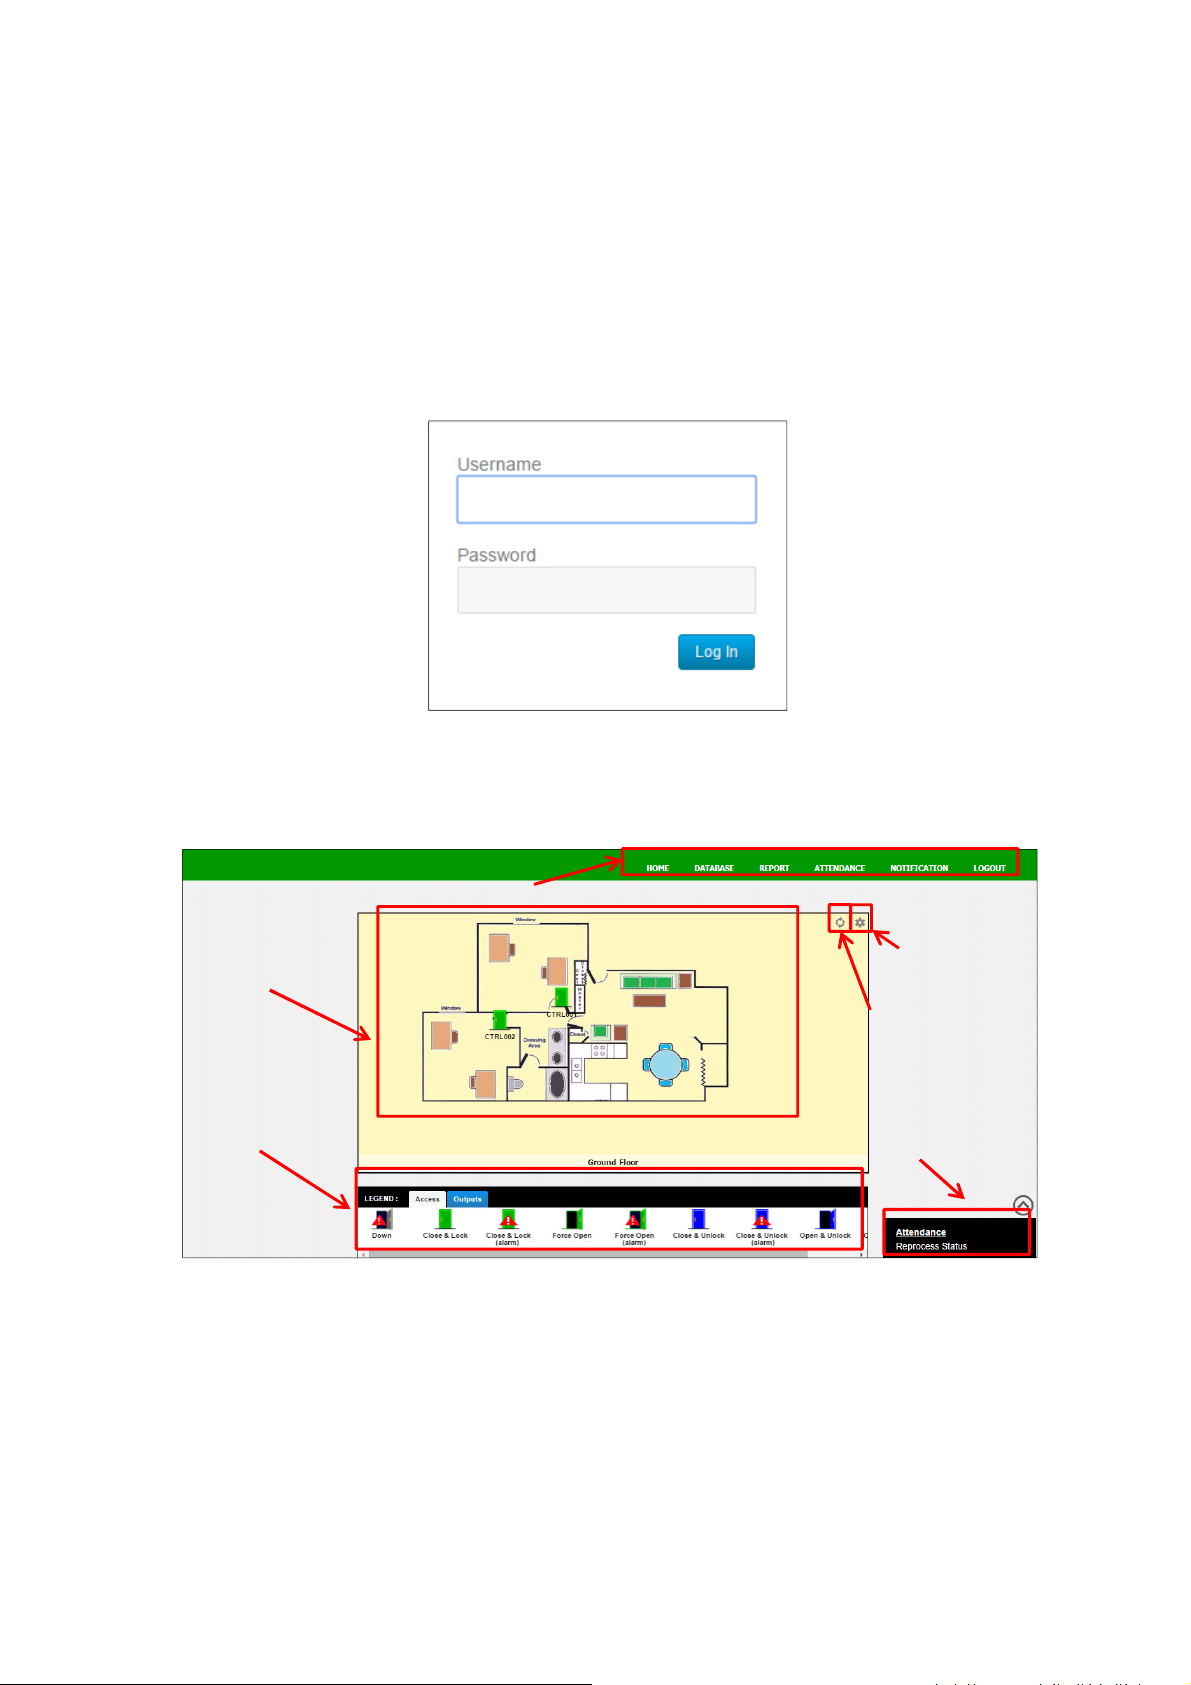
4.2 Log in Maple View
In order to log into Maple View, key in your system’s URL (provided by Service Centre) in web
browser, for example, “https://e-mirage1.com/elidkl”, the following screen will be prompted:
Figure: Maple View Login
The Username and Password are provided by the Service Centre.
After you login, you will see the main screen of Maple View as below:
Icon on map
Legend
Figure: Maple Main Screen
Map Setting
View Mode
Processing
Status
21
Page 26
Maple User Manual
4.3 View Mode
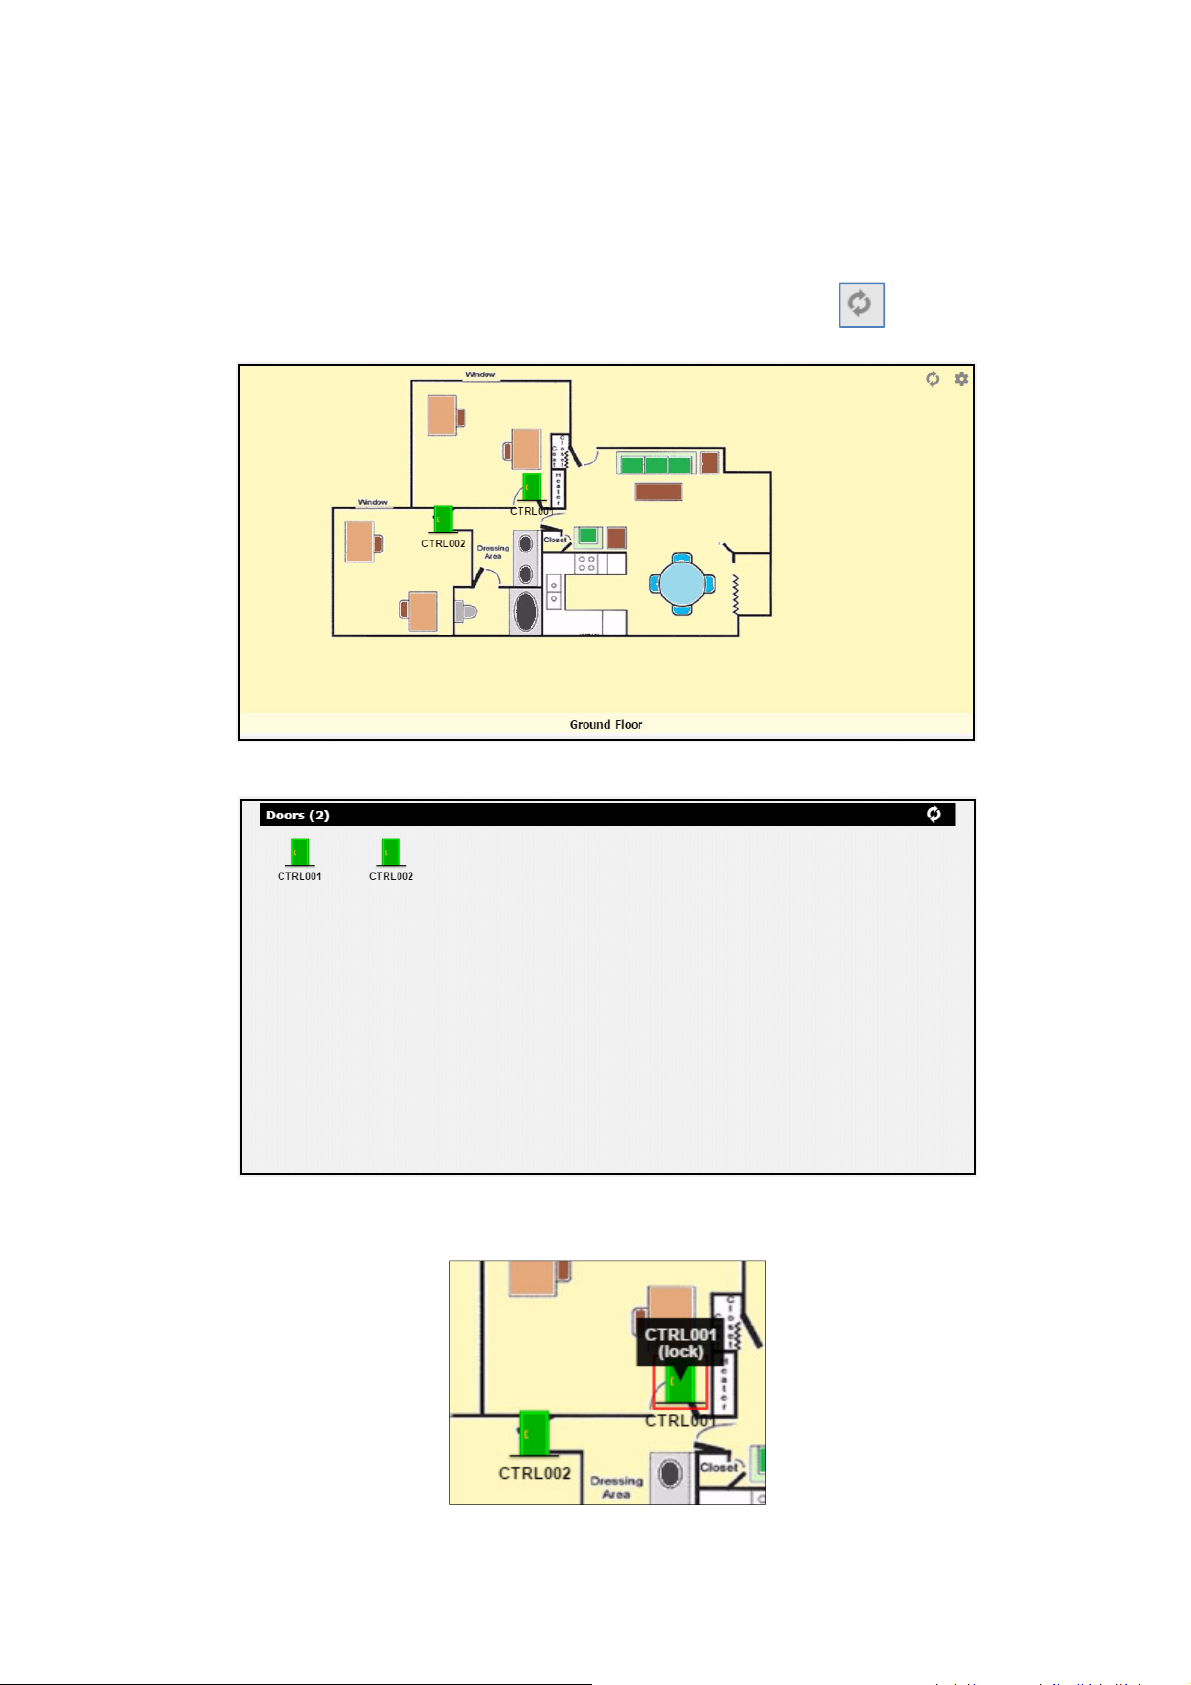
Maple can be view in 2 modes, which are Floor Plan View and Index View.
Floor Plan View is useful for the user who would like to have a map that shows the location of
the doors clearly.
While Index View is the basic view for user so that it is easy and convenient to view the system.
The user may switch between this 2 modes by clicking on the Switch Icon .
Figure: Floor Plan View
Figure: Index View
By putting the mouse arrow on the system point, its status will be shown.
Figure: Example of system point status
22
Page 27
Maple User Manual
Add Staff
4.4 Menu
The user may operate some basic features of door access system through the Menu on the
main screen.
4.4.1 Home
By selecting the [Home] menu, the main screen will always show the floor plan view.
4.4.2 Database
[Database] menu is referred to the card holder database of door access control system. The
[Database] menu contains three subtitles, which are [Staff], [Department] and [Designation].
4.4.2.1 Staff
The [Staff] menu contains two subtitle, which are [All Staff] and [Add Staff].
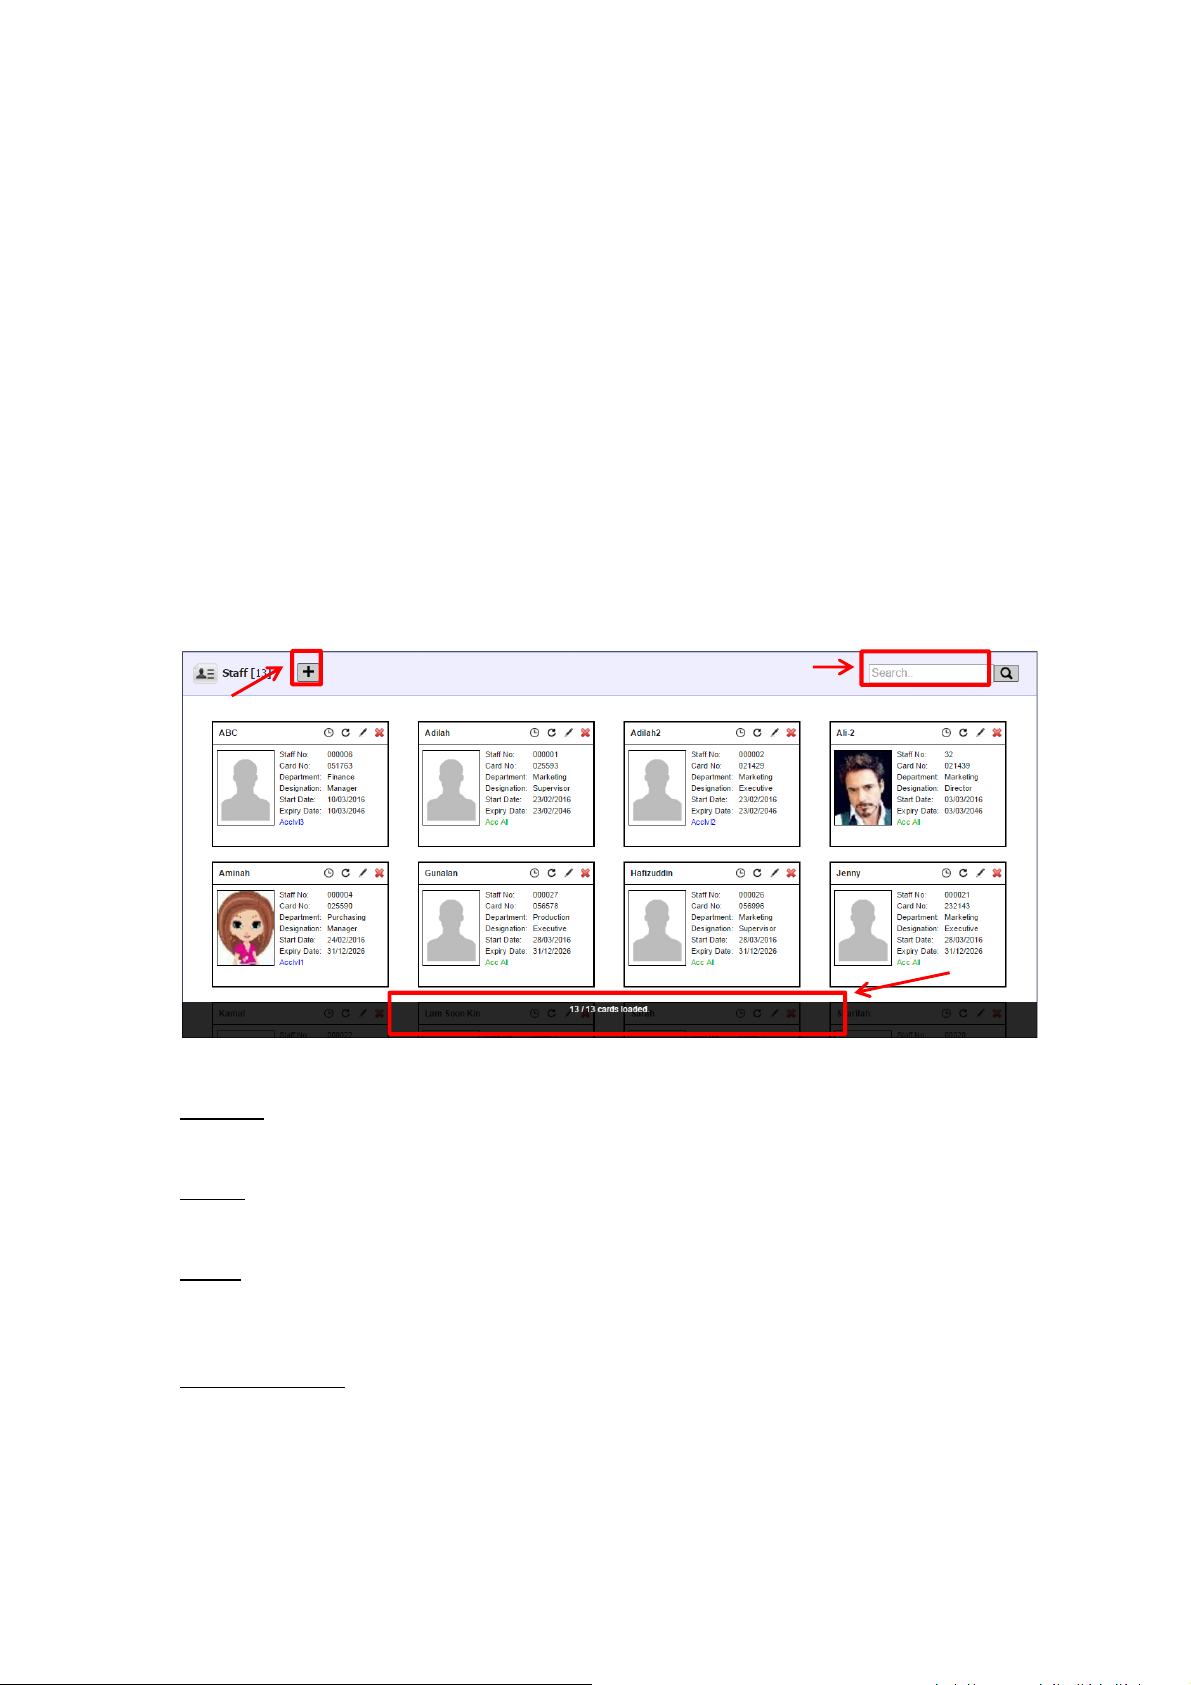
By selecting the [All Staff] menu, all card databases will be loaded and the customer may view
or modify the card database.
Search
Total
Card
Loaded
Figure: View or modify the user database
Add Staff
Redirect to [Add Staff] menu page.
Sorting
The staff list can be arranged in the order of Name or Department.
Search
A particular staff can be search by Name, Staff No., Card No., Department, Designation and
Access Level.
Total Card Loaded
Total card loaded will be viewed in the bottom bar.
23
Page 28
Maple User Manual
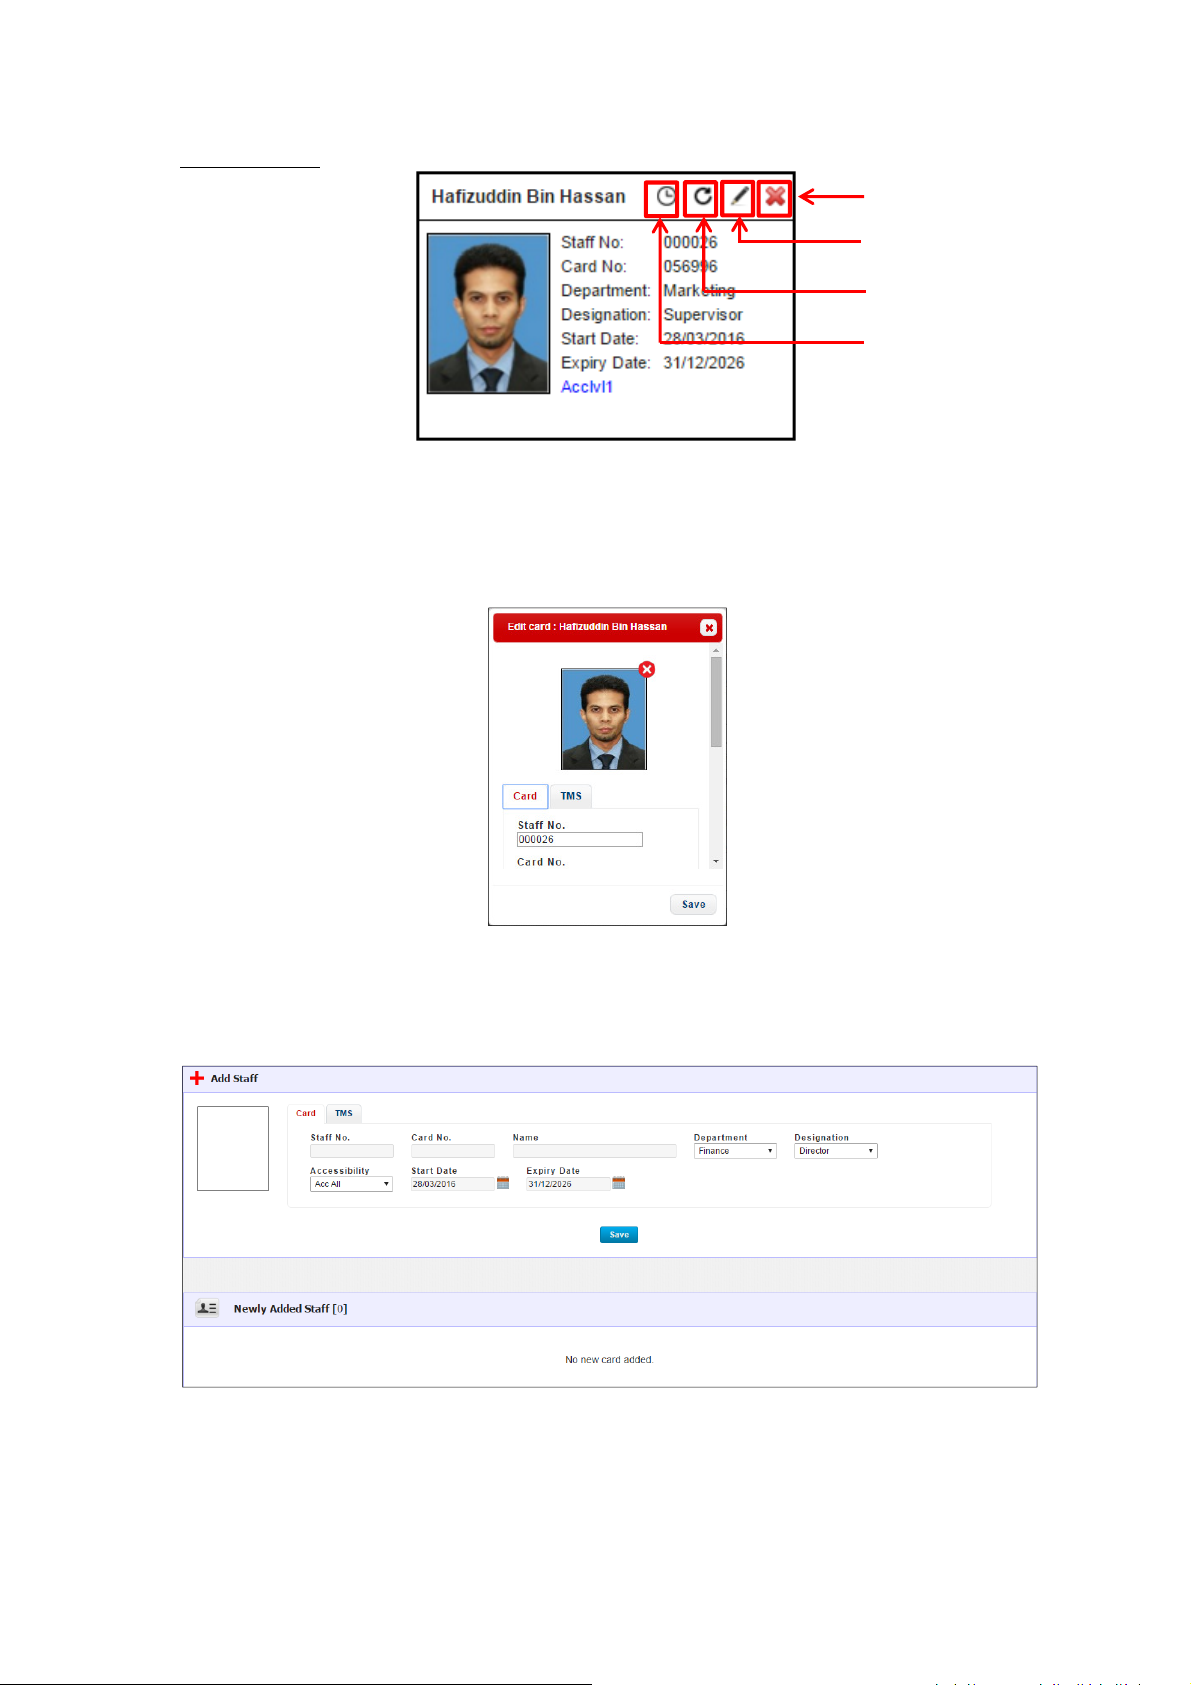
Editing Buttons
Delete
Edit
Re-send
TMS
Figure: Editing Buttons
Resend: Send the selected card to the door access controller again.
Edit: Modify the parameters of the selected card.
Delete: Delete the selected card from the card holder database and door access controller.
TMS: View the Time Management Setting of the selected staff.
Figure: Edit the user database
By selecting the [Add Staff] menu, customer may add a new user to the system by entering the
necessary parameters for Door Access and Time Management System.
Figure: Add new user card
24
Page 29

Maple User Manual
Operation Description
Operation Description
Card Parameter:
Parameter
Photo To store photograph of the Card holder.
Staff No. To define a unique Staff Number.
Staff Number could be different from Card
Number.
Card No. To define unique Card Number relevant to a
controller.
Name To define card holder name
Department To define the department a cardholder belongs to.
Designation The designation of a cardholder in the
Organization / company.
Door
Accessibility
Start & Expiry
Date
To define which door and the time frame relevant
to a Card holder
To define the valid period of card holder
Note
Maximum field length
is 12 characters.
Field length is 6 digits.
TMS Parameter:
Parameter
Shift Group To define the Shift Group of Card holder.
OT Entitled To define whether the Card holder is entitled to
have OT.
Flexi Hour To define whether the Card holder is entitled to
have flexible working hour.
Exempted To define whether the attendance processing of
Card Holder is exempted.
Report To To define the supervisor of a cardholder.
Note
25
Page 30
Maple User Manual
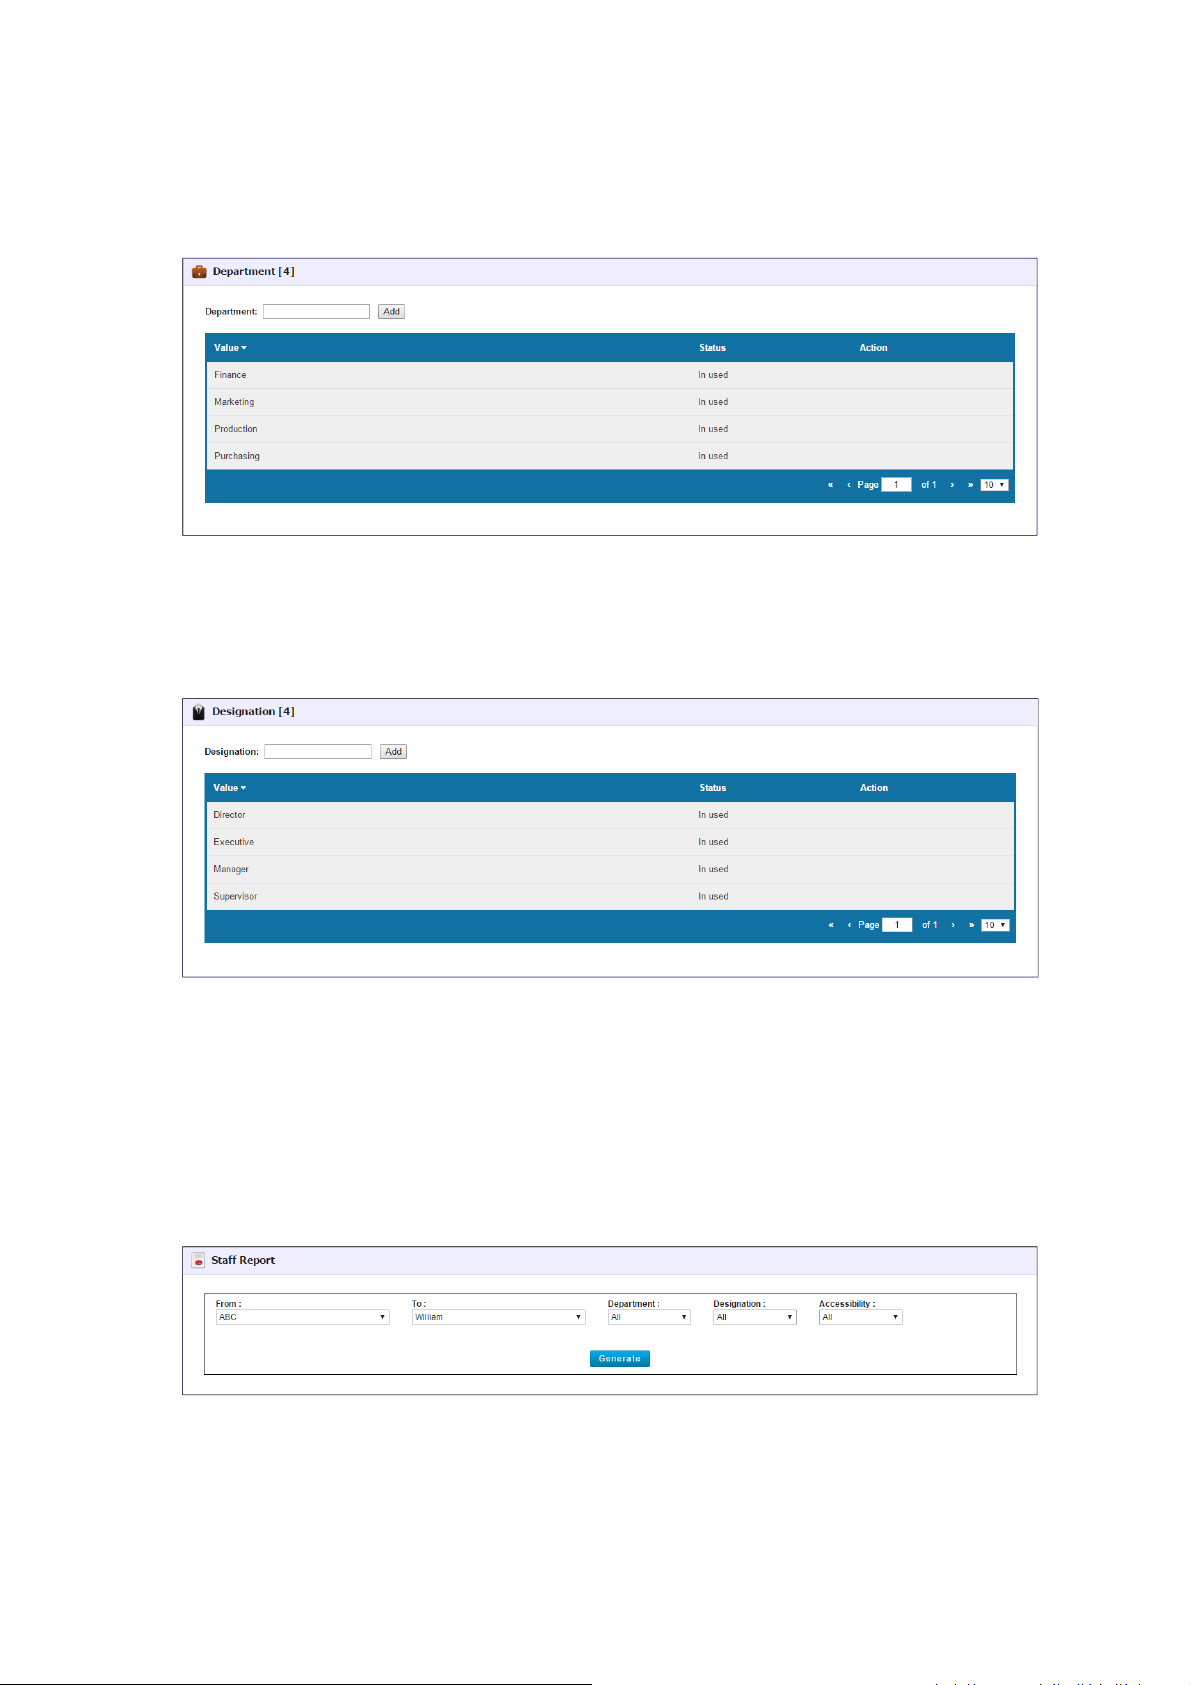
4.4.2.2 Department
By selecting the [Department] menu, customer is able to define the department of a card
holder belongs to. If there is any Department has not in used, the customer may edit or delete
it.
4.4.2.3 Designation
By selecting the [Designation] menu, customer is able to define the designation of a cardholder
belongs to. If there is any designation has not in used, the customer may edit or delete it.
4.4.3 Report
There are 4 types of reports can be generated by clicking [REPORT] button, which are Staff,
Transaction, Attendance and Audit Trail Report. All the reports can be exported in PDF file.
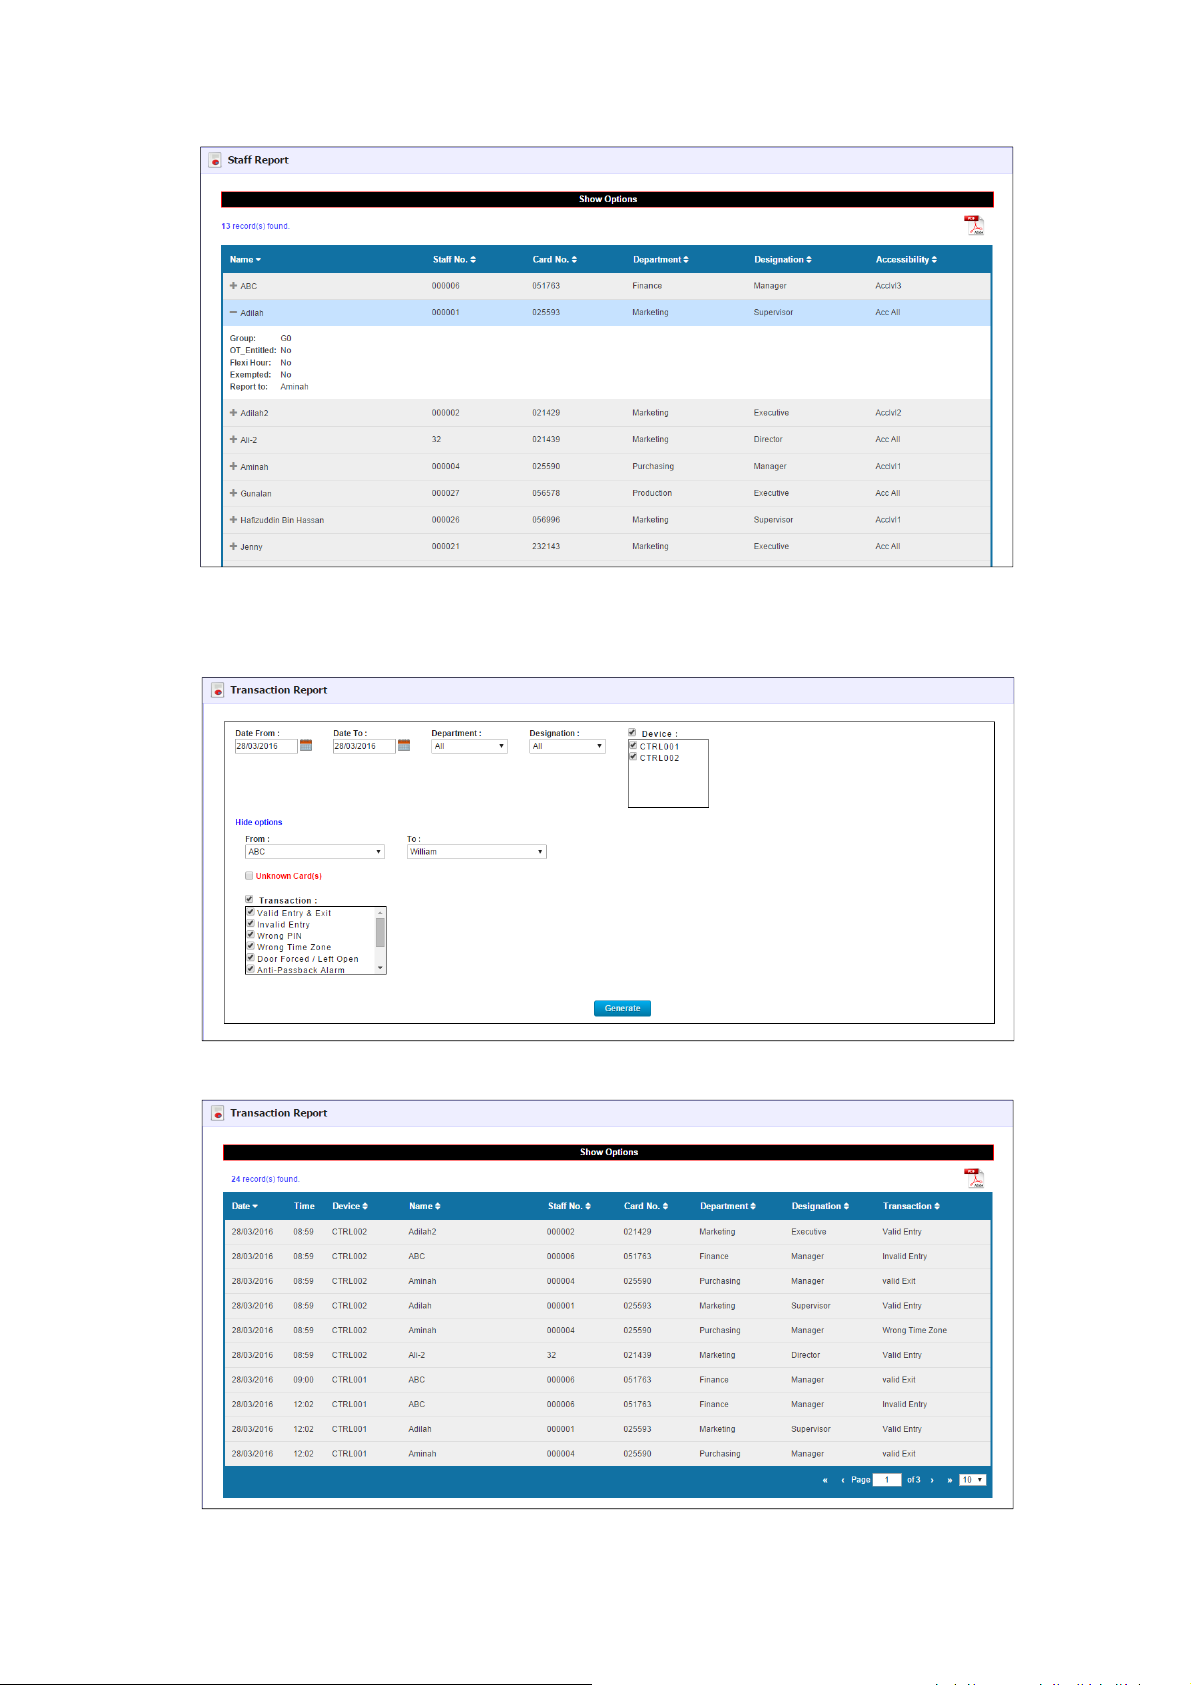
4.4.3.1 Staff Report
The report show the staff database in the system and filtering is allowed.
Figure: Staff Report Filtering
26
Page 31
Maple User Manual
Figure: Staff Report
4.4.3.2 Transaction Report
Transaction Report is the report which shows the activity of the door access system.
Figure: Transaction Report Filtering
Figure: Transaction Report
27
Page 32
Maple User Manual
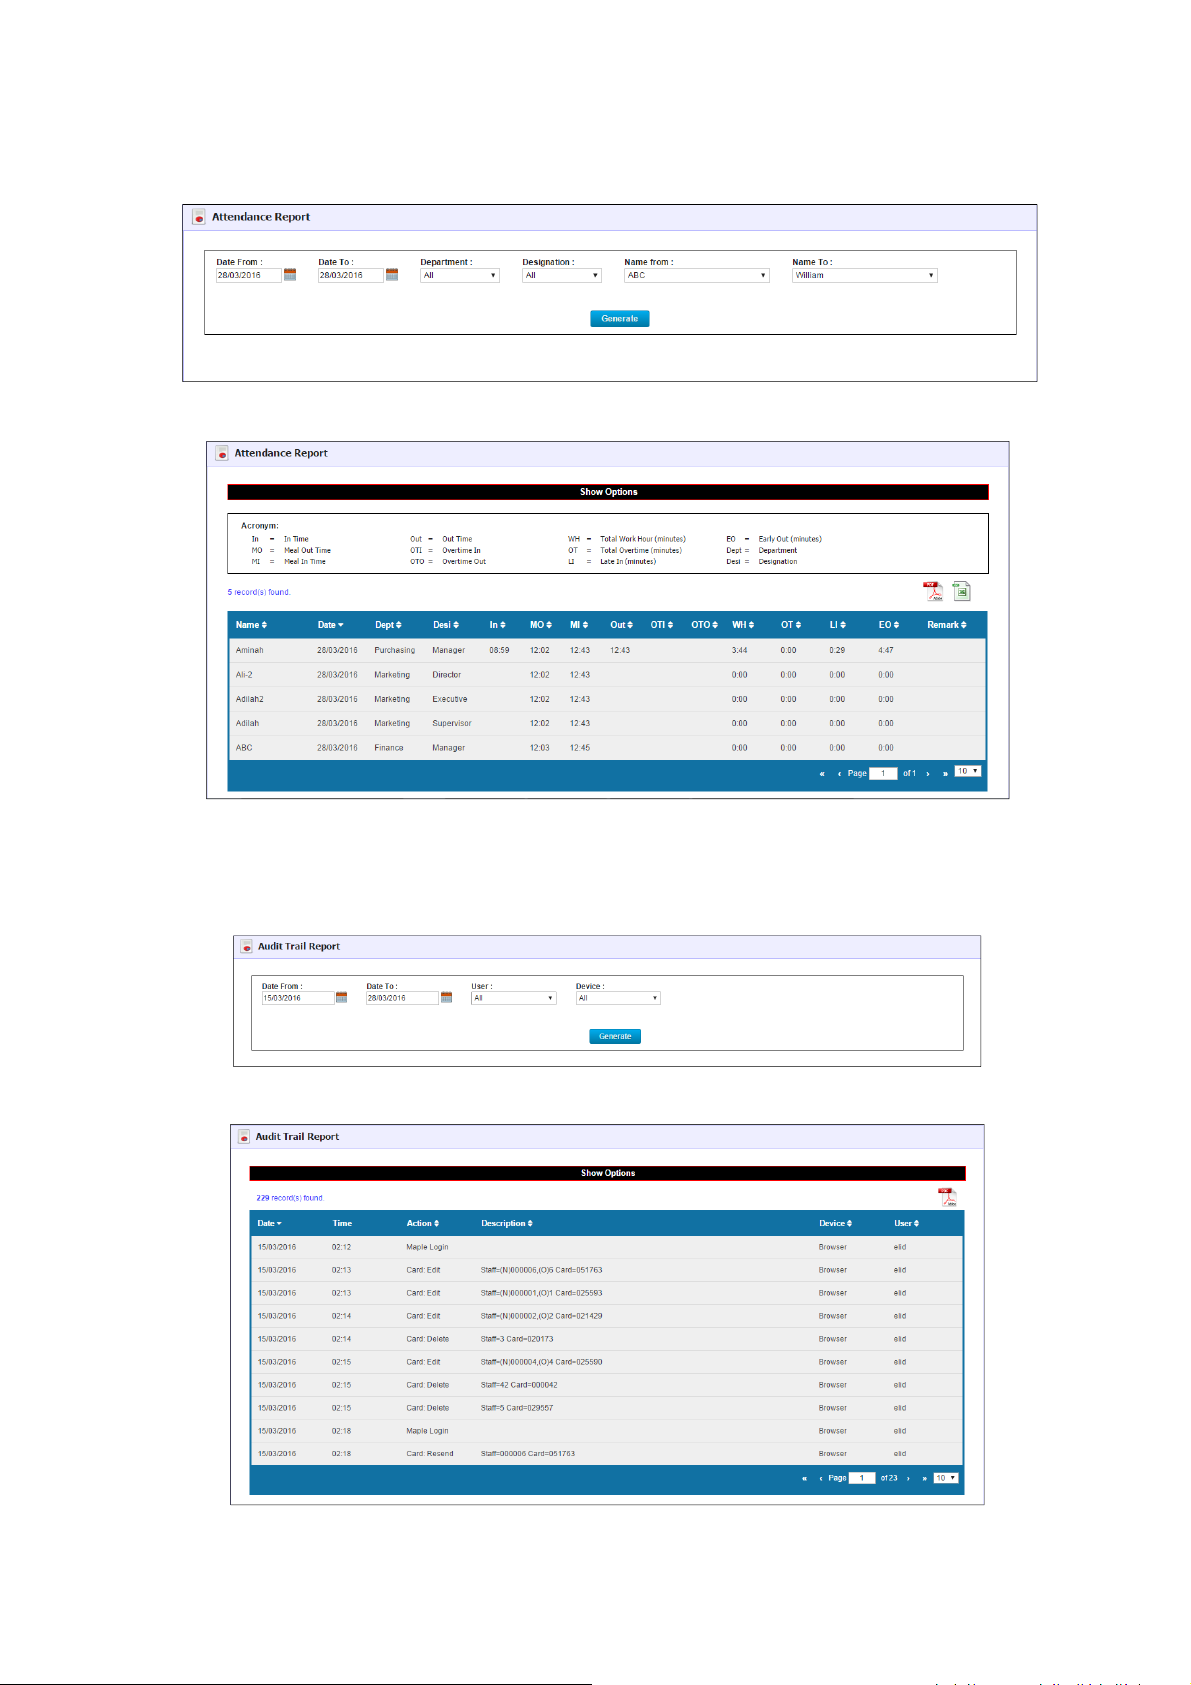
4.4.3.3 Attendance Report
Attendance Report is the report which shows the TMS attendance of staff.
Figure: Attendance Report Filtering
Figure: Attendance Report
4.4.3.4 Audit Trail Report
This report records the user’s action on Maple.
Figure: Audit Trail Filtering
Figure: Audit Trail Report
28
Page 33
Maple User Manual
Operation Description
4.4.4 Attendance
The user may configure the Time Management setting in this menu.
Daily Attendance and Leave Application & Approval are available in this menu.
The user may configure the working schedule, duty roster and reprocess the attendance report.
The user may refer to the TimePro manual for more information.
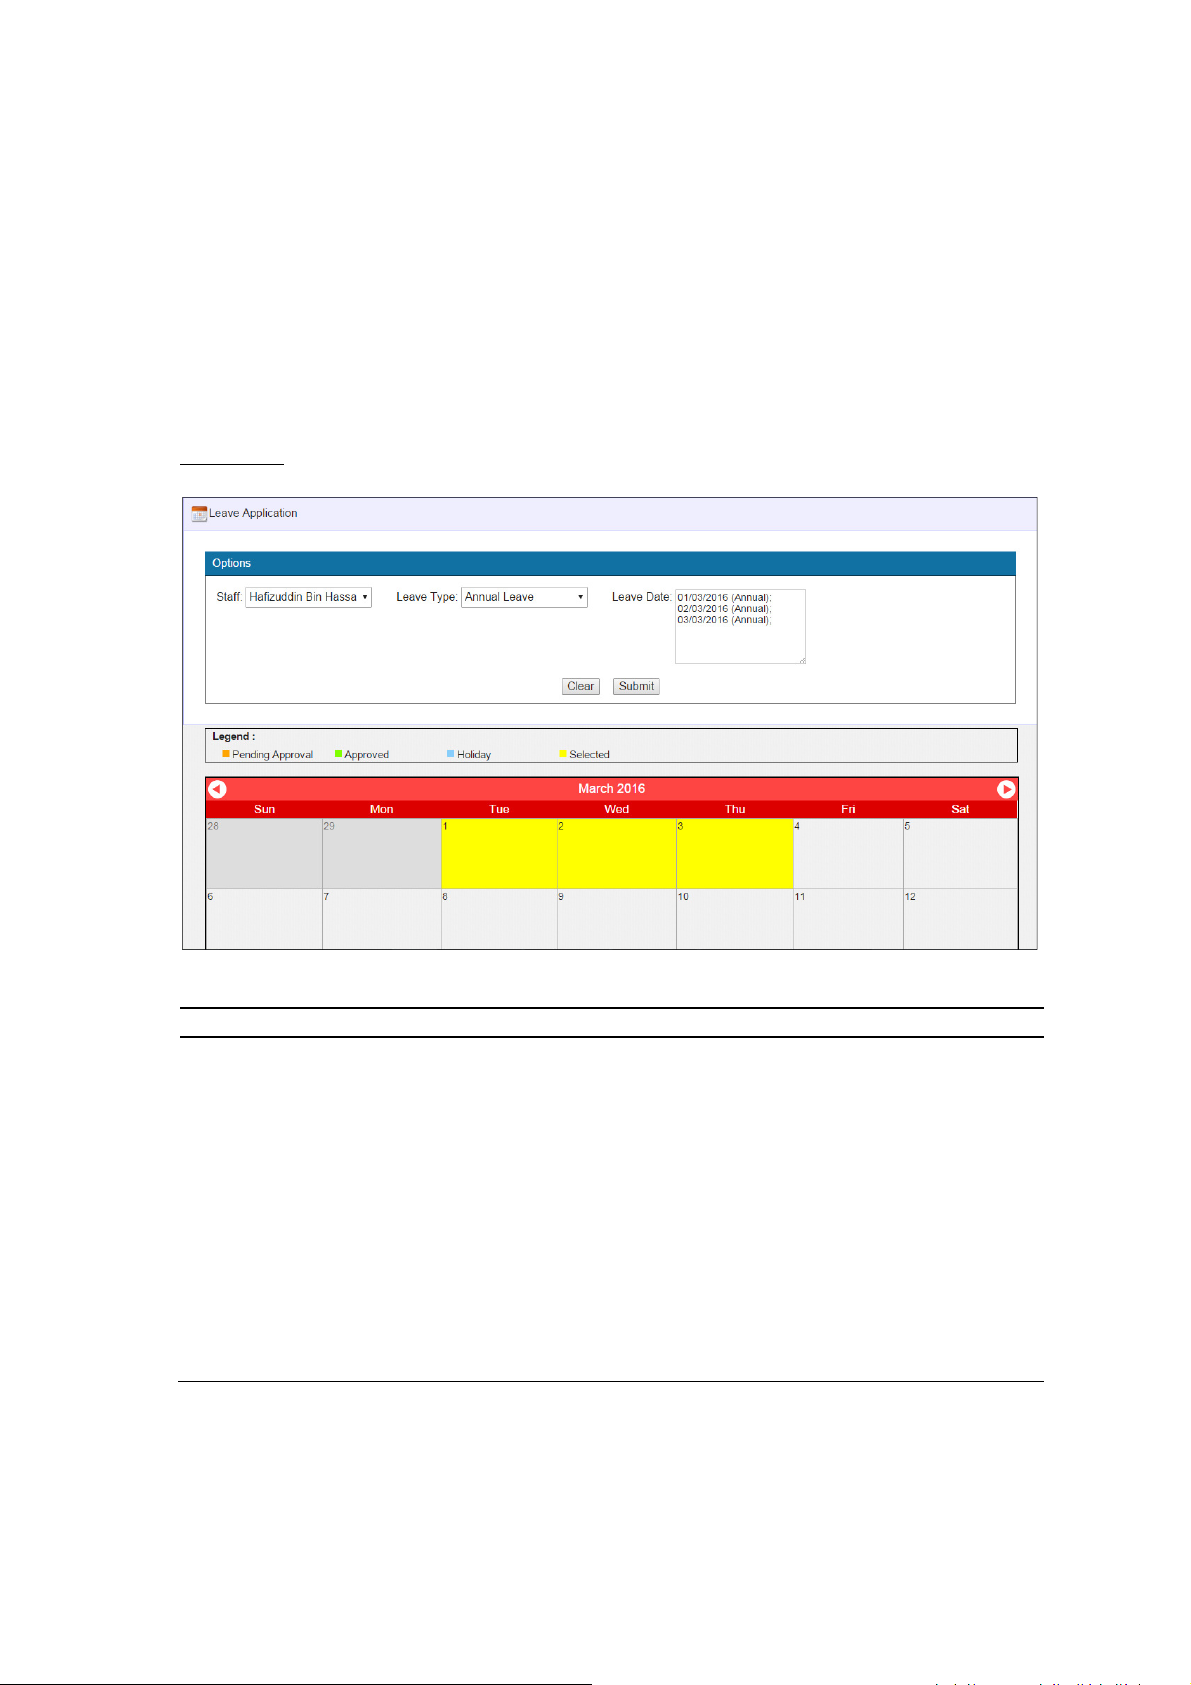
4.4.4.1 Leave
In a standard Time Management System, leave is always one of the important elements.
The staff may apply for leave, while the supervisor may approve the leave taken by the staff.
Application
The staff may apply the leave for approval by this menu.
Figure: Leave Application Form
Parameter
Staff Select the name of staff who would like to apply
for leave.
Leave Type Select the type of leave, eg Annual Leave,
Emergency Leave & etc.
Leave Date Click on the date in calendar to confirm the leave
date.
Clear Clear the leave date which has been inserted.
Submit Submit the application of leave
Note
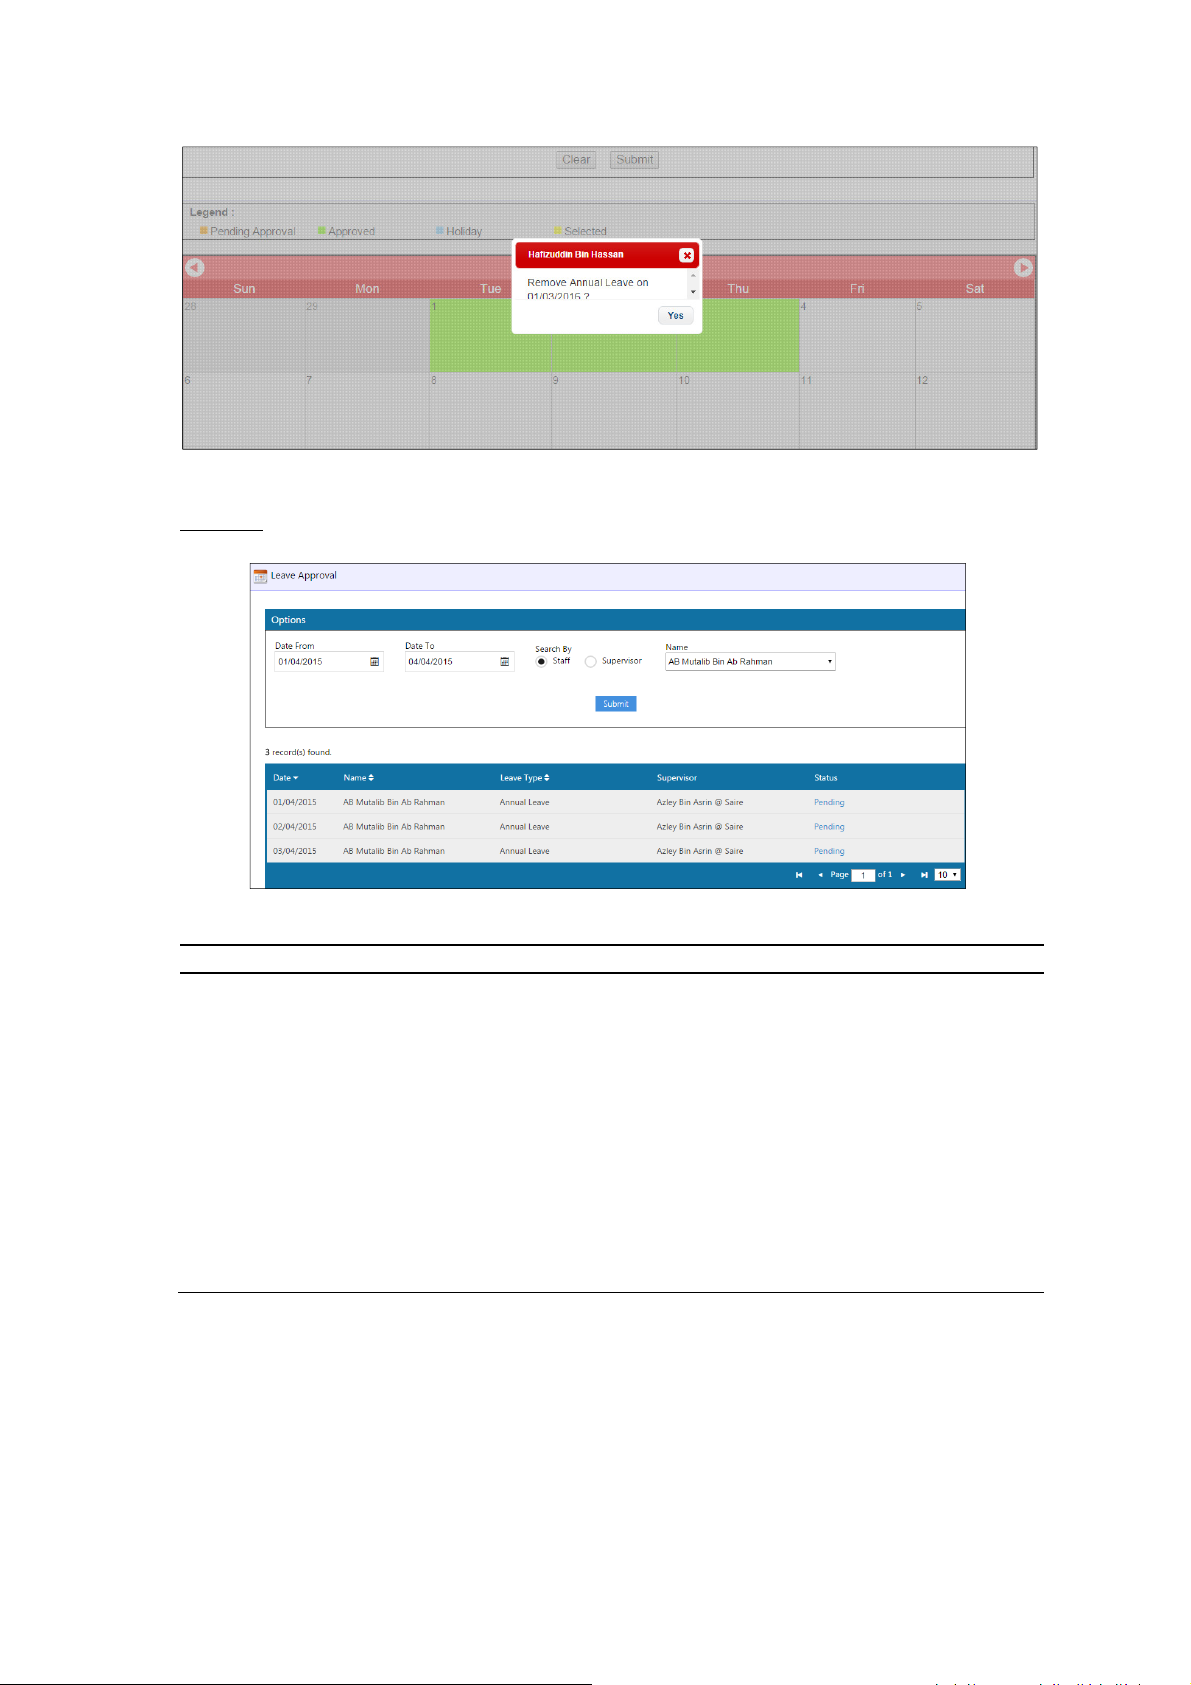
The staff may remove the leave that has been taken by clicking on the particular calendar date.
29
Page 34
Maple User Manual
Operation
Description
Figure: Remove Leave
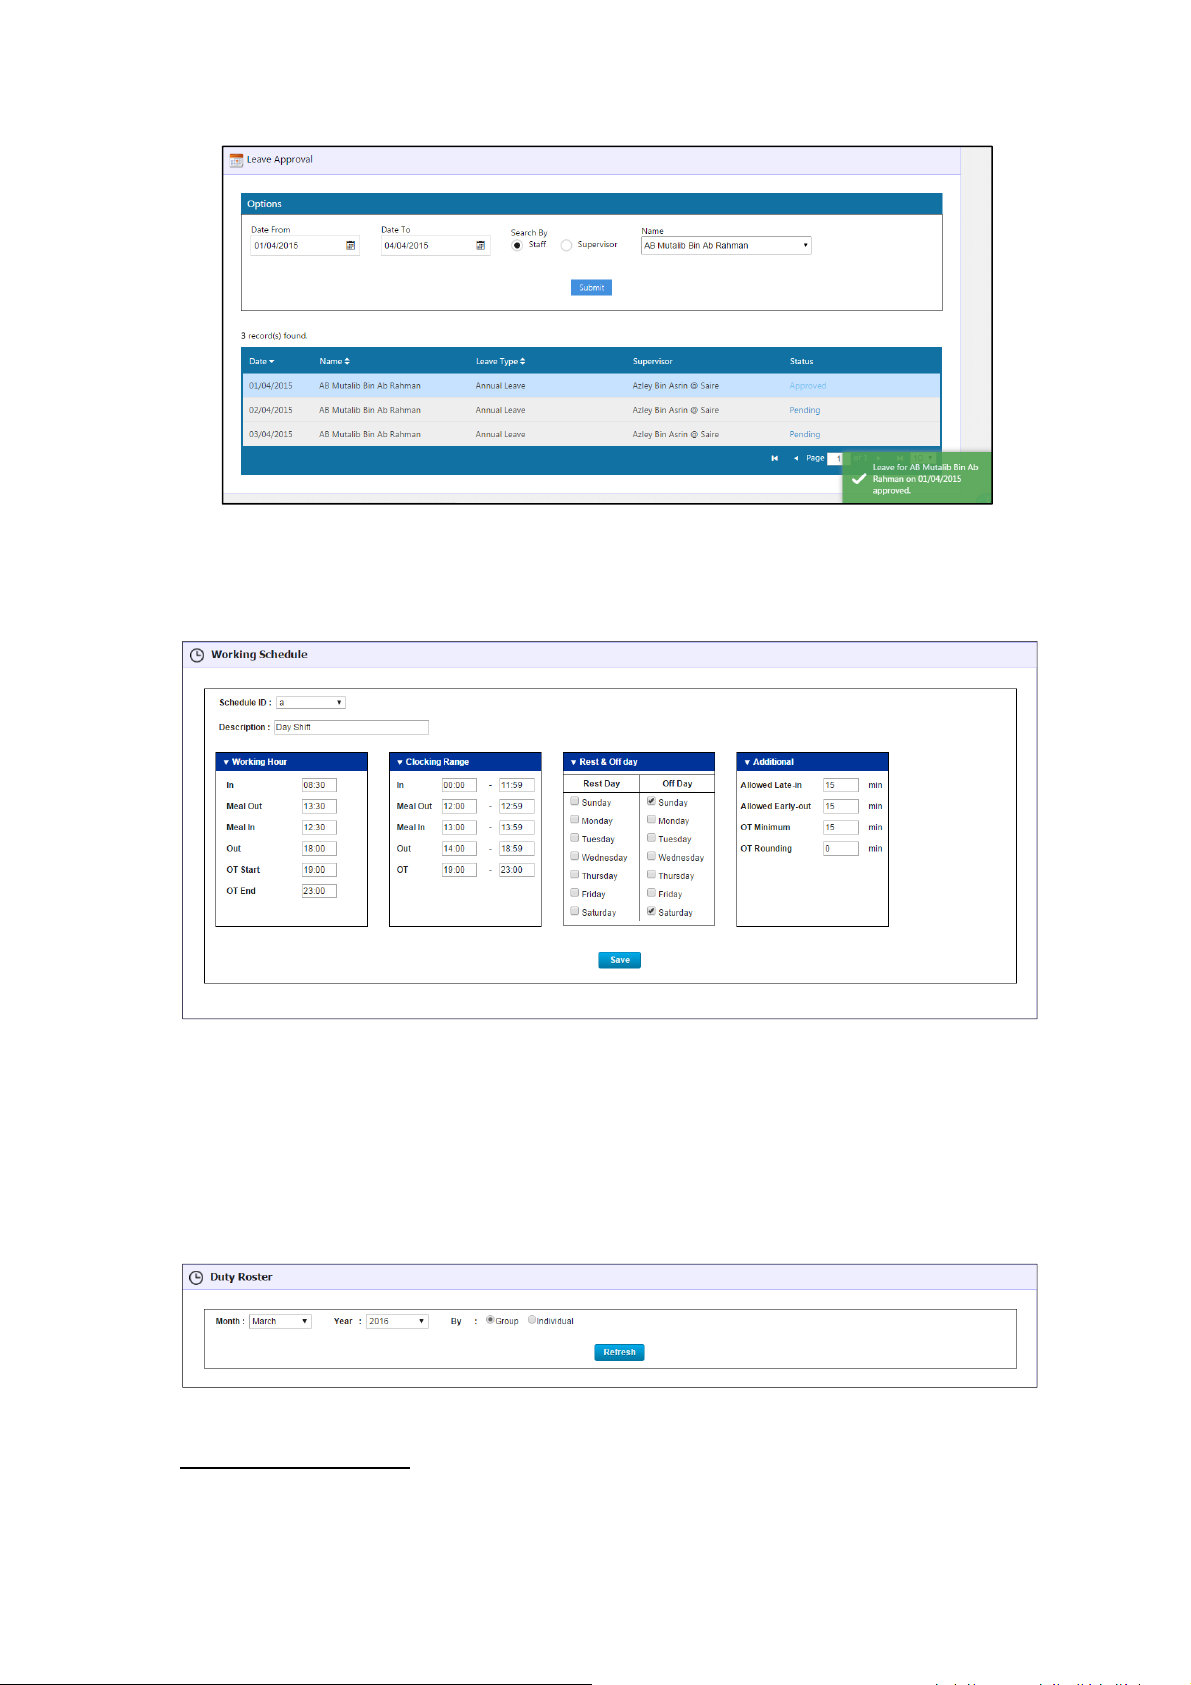
Approval
The supervisor is required to approve the leave that taken by the staff.
Figure: Leave Approval Form
Parameter
Date From Select the start date of the required period.
Date To Select the end date of the required period.
Search By Select he searching method, which are Staff or
Supervisor.
Name Select the name of staff that has applied leave.
Submit Click to view the leave taken in the selected
period.
Note
The supervisor may approve the leave by clicking on the [Pending] word under Status
30
Page 35
Maple User Manual
Figure: Approve Leave
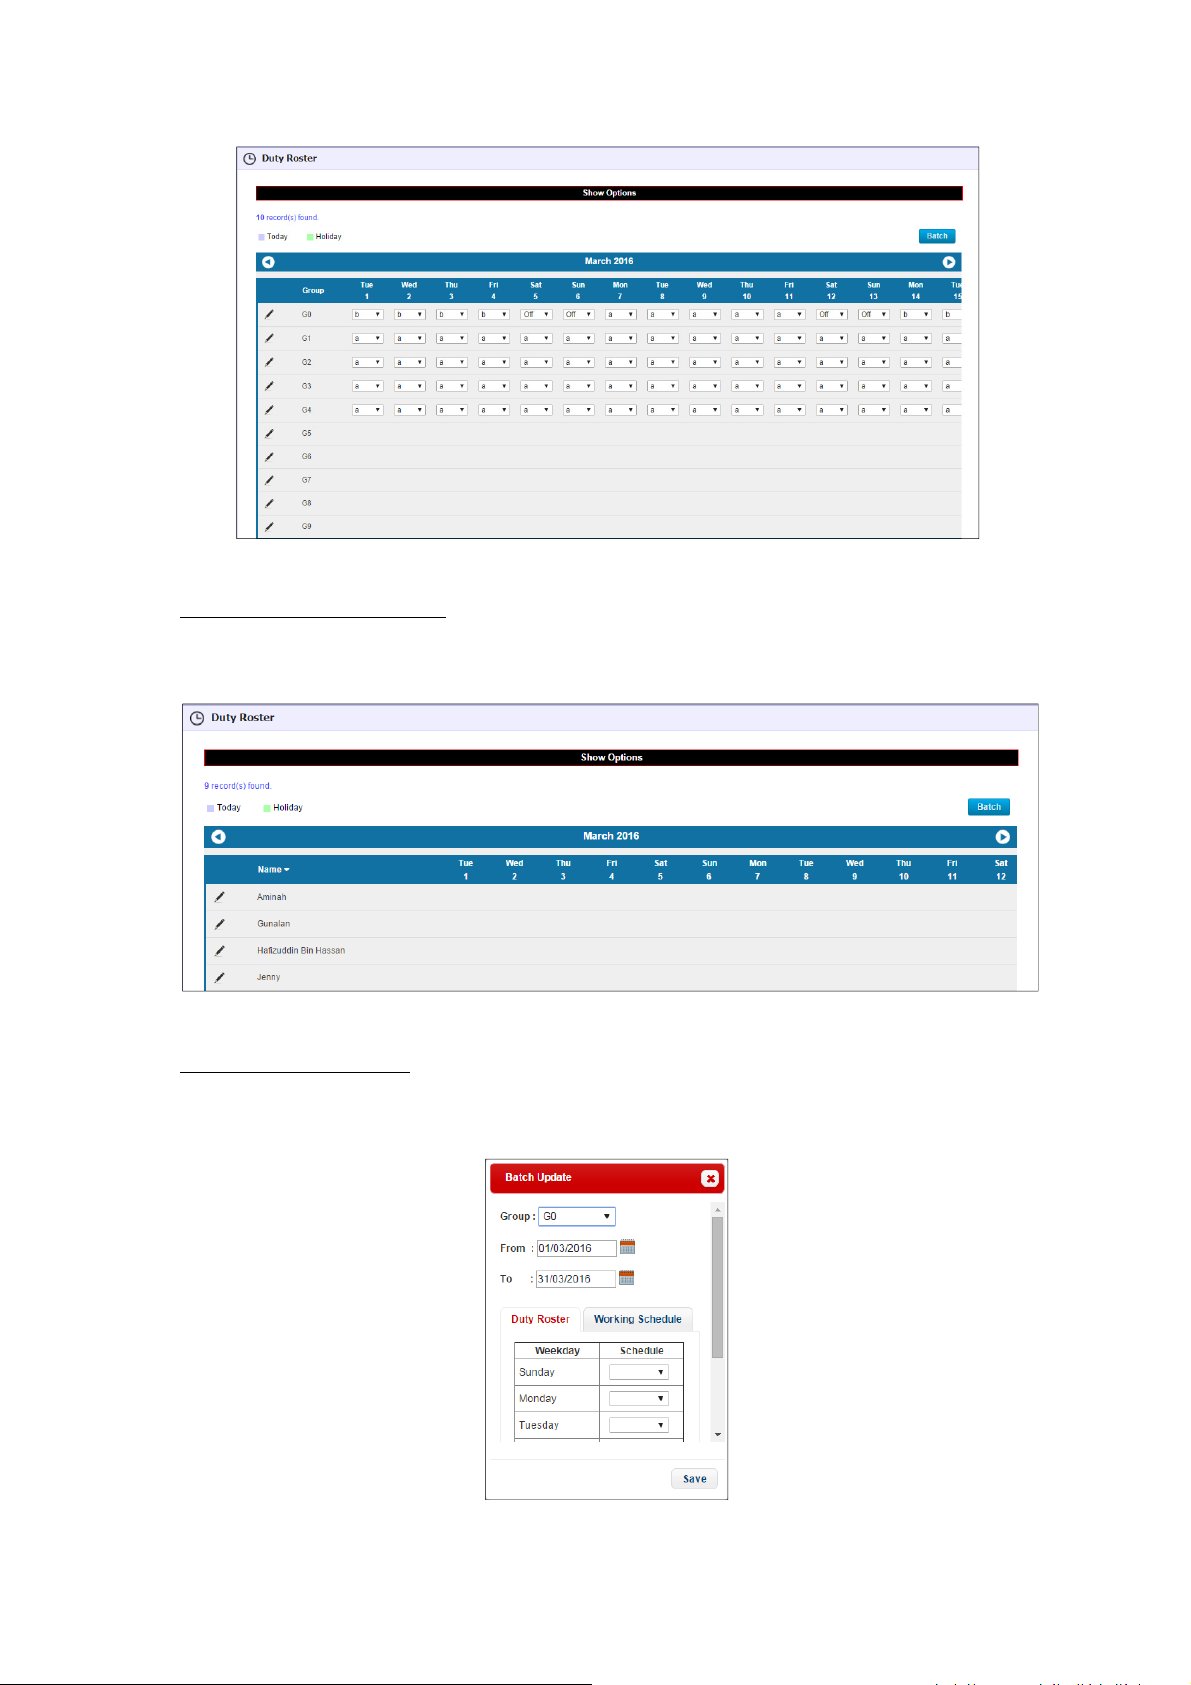
4.4.4.2 Working Schedule
Working Schedule function allows user to configure the working hour according to company
working hour and policy.
Figure: Working Schedule
Maple provides unlimited schedules/shifts. By default, Maple provides 26 working schedules.
User may add as many schedules as they need.
4.4.4.3 Duty Roster
Duty Roster function allows user to assign every day’s schedule to employees. The schedule
could be assigned to employee by group or by individual.
Figure: Duty Roster Filtering
Assign schedule by group
Employees with the same schedule are grouped together. Thus, the working schedule could be
assigned to employees by group instead of one by one.
31
Page 36
Maple User Manual
Figure: Duty Roster for Group
Assign schedule by individual
Employees who have different schedule pattern from others will be grouped to “NONE”, so
that they could have their own working schedule.
Figure: Duty Roster for Individual
Assign Schedule by Batch
Batch scheduling will allocate a weekly schedule to a particular group/Employee for a date
range.
Figure: Batch Update
32
Page 37
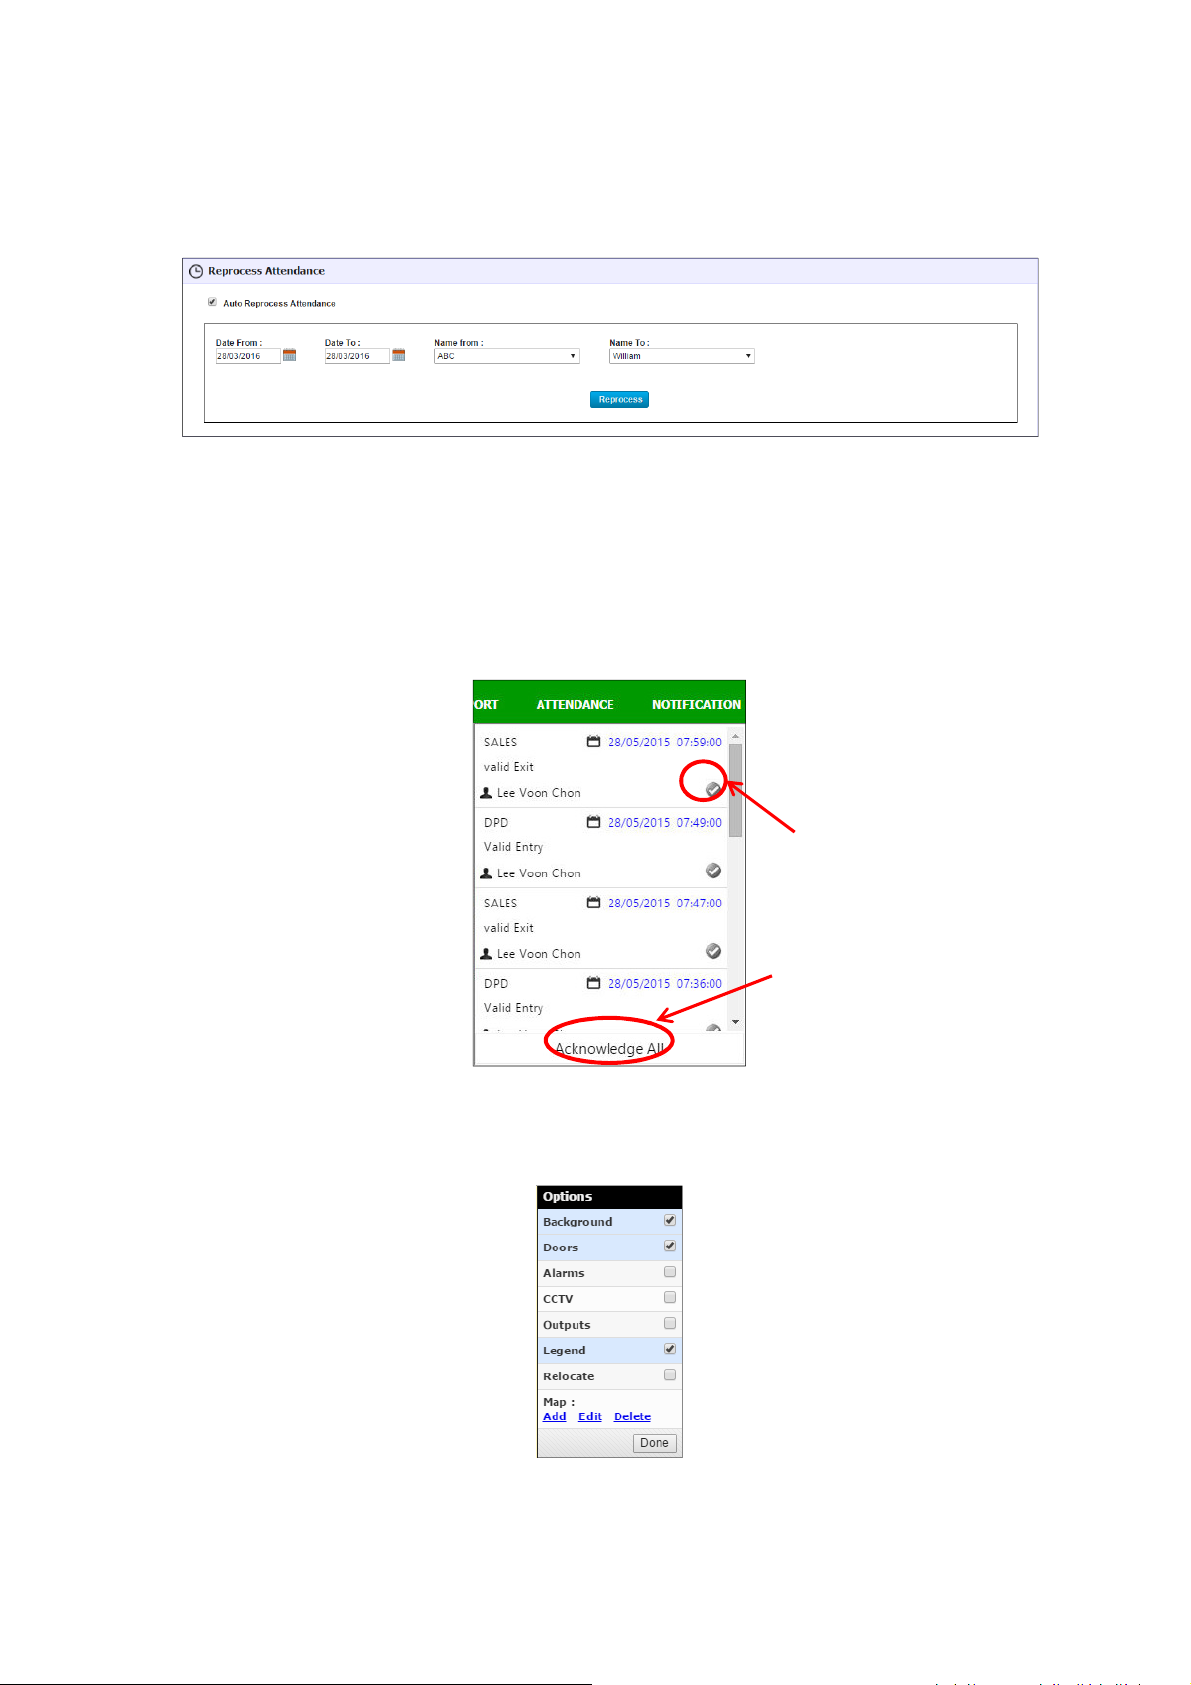
Maple User Manual
Tick to acknowledge particular
Tick to acknowledge all
4.4.4.4 Reprocess
Reprocess Attendance function allows user to reprocess the attendance manually. You need to
reprocess attendance only if you changed the working schedule settings or there is no latest
attendance update.
Figure: Reprocess Attendance
4.4.5 Notification
The abnormal events of the Maple will be recorded and notify the customer. It will record the
abnormal event details, date and time for the event.
The number of notification which haven’t acknowledged is shown on the top of the menu.
The user may acknowledge the notification one by one or Click [Acknowledge All] button to
acknowledge all notifications.
notification
notification
Figure: Notification
4.5 Map Setting
The user may do some modification on the floor plan as shown in the Options below:
Figure: Option of map setting
33
Page 38
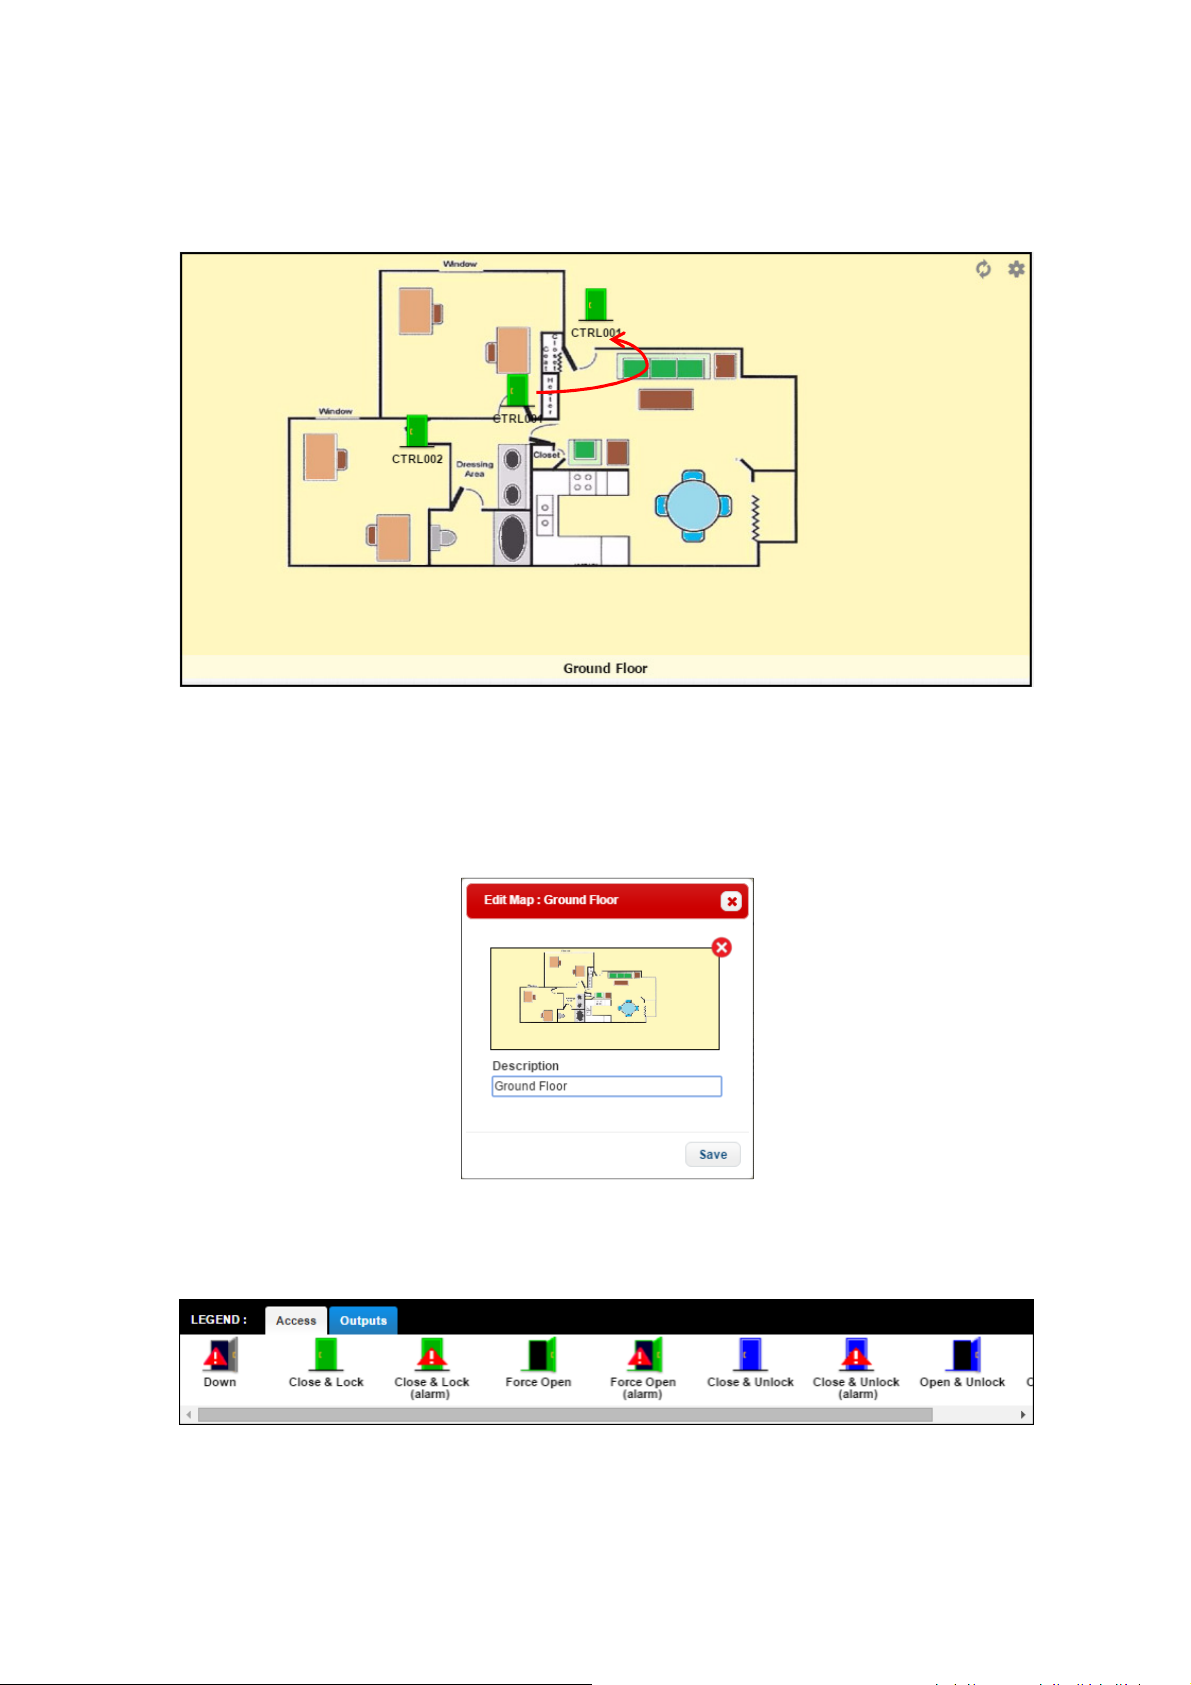
Maple User Manual
There are 3 elements that can be show by tick or hide by untick on the floor plan, which are
Background, Doors, Outputs and Legend. The rest is not available in Maple.
If Relocate is tick, then the system point of door can be moved by point and drag.
Figure: Relocate the system point
The user may add more than one floor map for a single site by click the button [Add Map].
[Delete Map] is available for the user to delete the map.
In order to change the floor map, the user has to click the button [Edit Map] to change the map.
The user may change the description of the map in this menu too.
Figure: Edit Map
4.6 Legend
The customer can know the status of the system point easily by refer to the legend.
Figure: Door Access Legend
34
Page 39
Maple User Manual
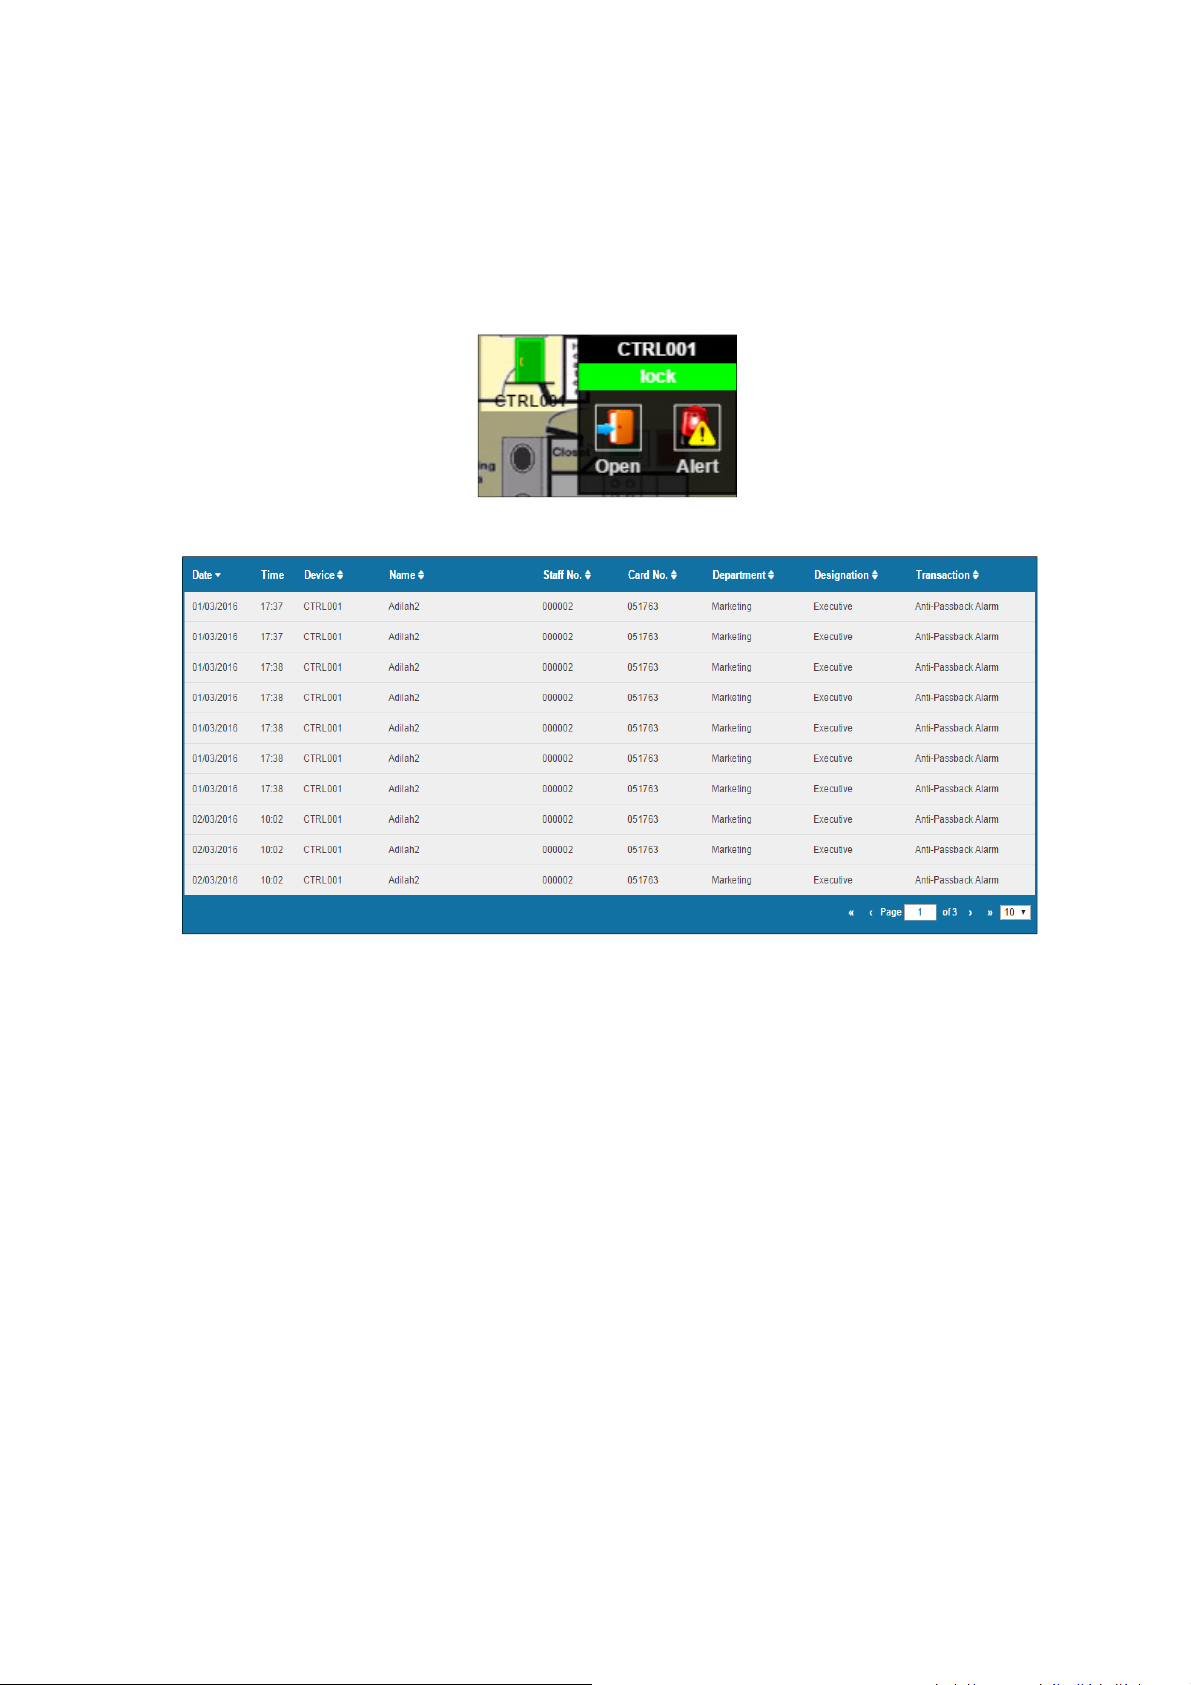
4.7 Icon on Map
The user may have some quick access to the system by click on the icons on the map.
4.0.1 Door Access System
The user can remotely open the door or view the abnormal activities happened on that
particular door.
Figure: Door icon operation
Figure: Alert activities of the door
35
Page 40
Maple User Manual
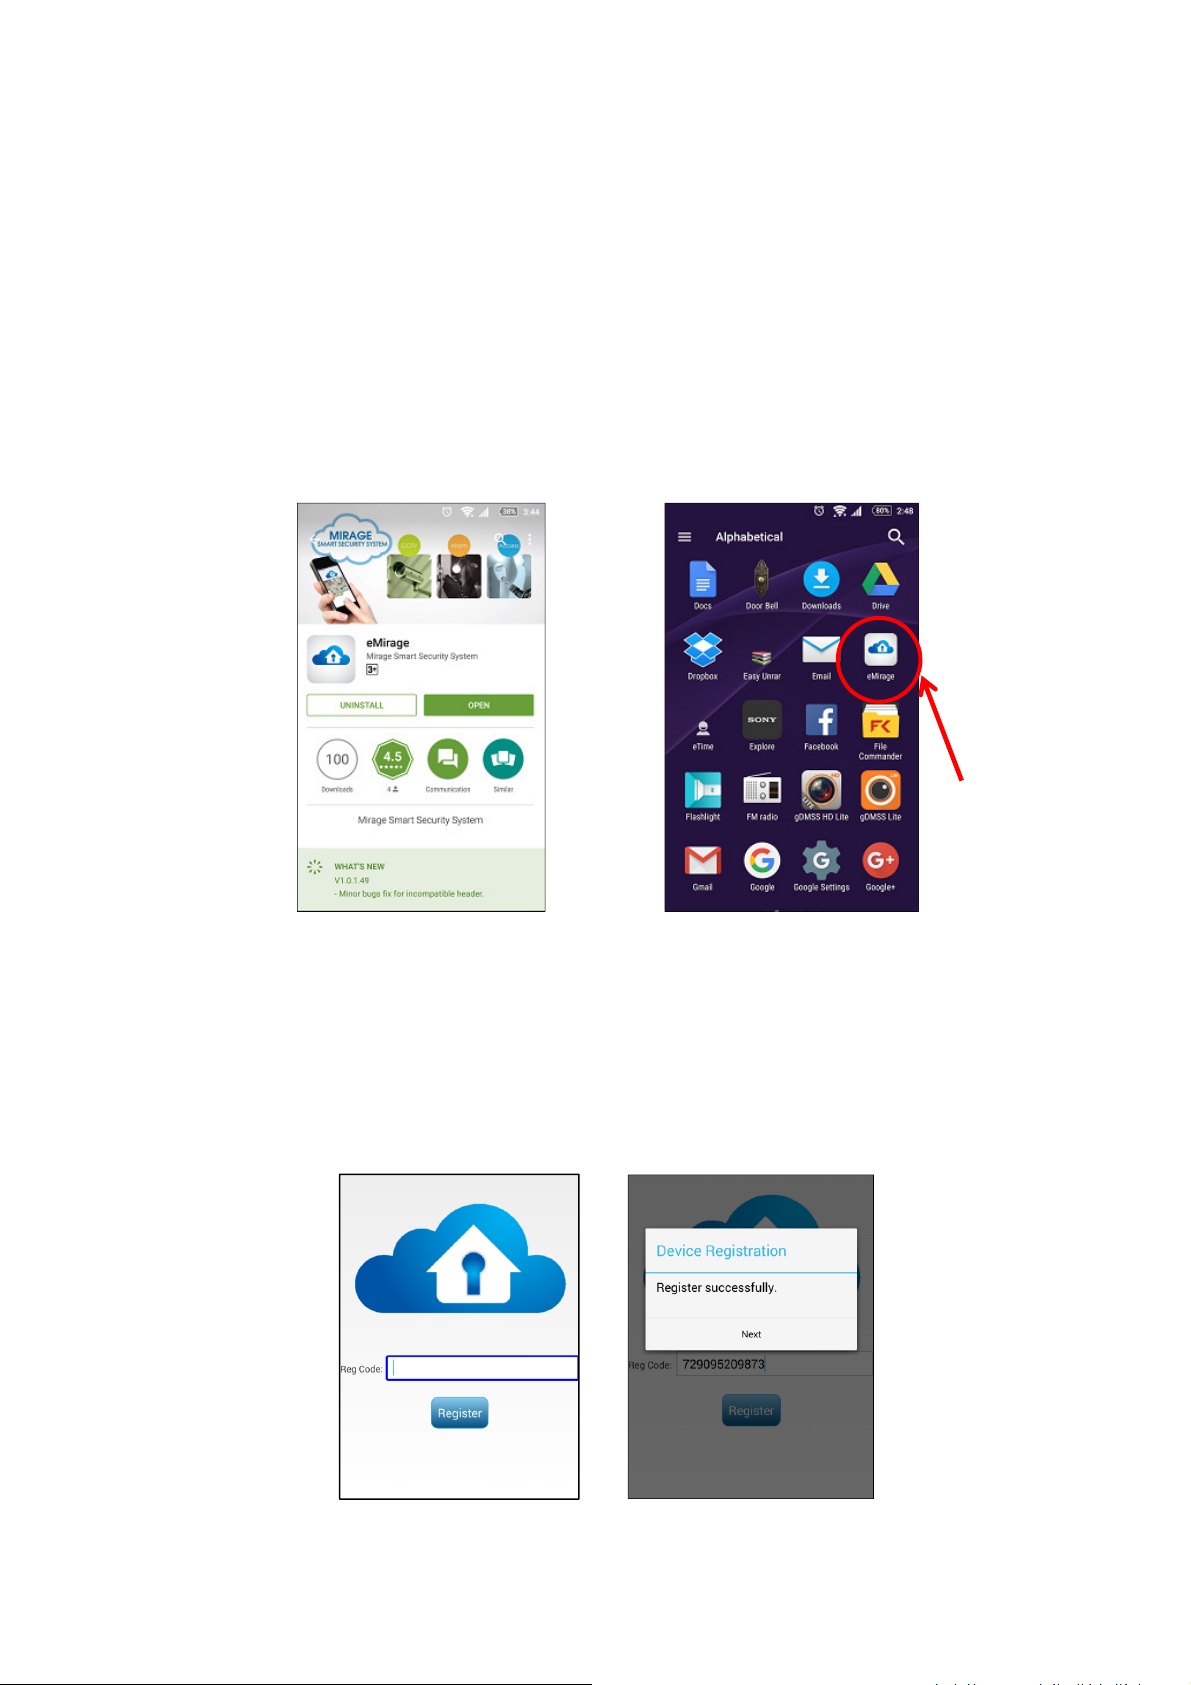
eMirage app
Chapter 5: eMirage Mobile Application (Android Version)
5.1 Introduction
Maple App allows effortless viewing and control of access door with a few strokes from a smart
phone or tablet. The information is presented in such a simple way that anyone can learn to
use it within minutes.
5.2 Installation
The user is able to download and install “eMirage” App from Play Store. The user may search
for “eMirage” and then install it.
After the installation, the eMirage apps icon will be appear in the mobile phone.
Figure: eMirage Installation
5.3 Startup eMirage
For the first time user, a Registration Code is needed. The user may request the Registration
Code from Service Centre.
If the user would like to add or change his mobile phone, he has to call to Service Centre to
disable the apps in previous mobile phone and obtain the new Registration Code.
The Registration Code is valid for one day.
Figure: eMirage Registration
36
Page 41
Maple User Manual
Icon on Map
Legend Icon
Floor Name
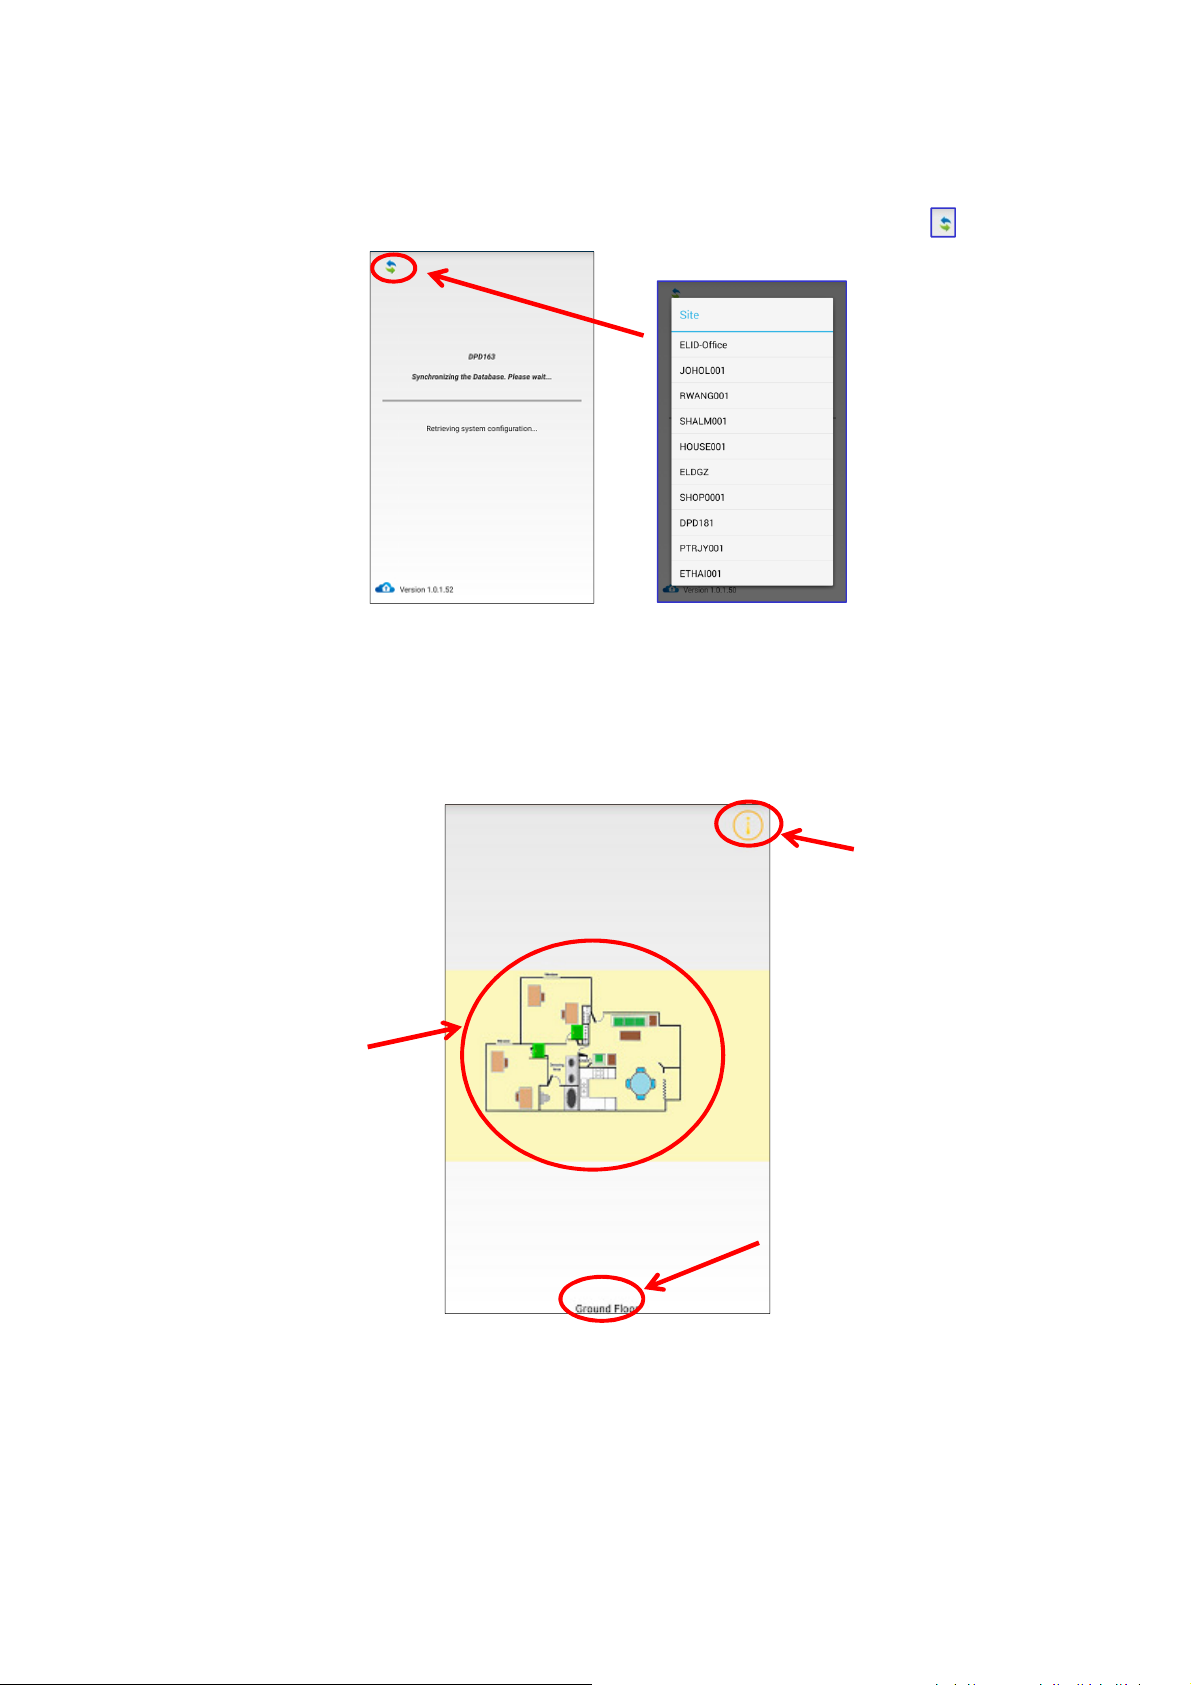
The apps will automatic synchronize the database with Maple System while opening in order to
obtain the latest database.
If the user have more than 1 site in the app, he may switch it by clicking on the icon .
Figure: Database Synchronizing Figure: Switch Site List
5.4 Main Screen
After “eMirage” App is opened, the same map as in the “Maple View” Web Browser will be
shown on the screen.
Figure: eMirage Main Screen
37
Page 42
Maple User Manual
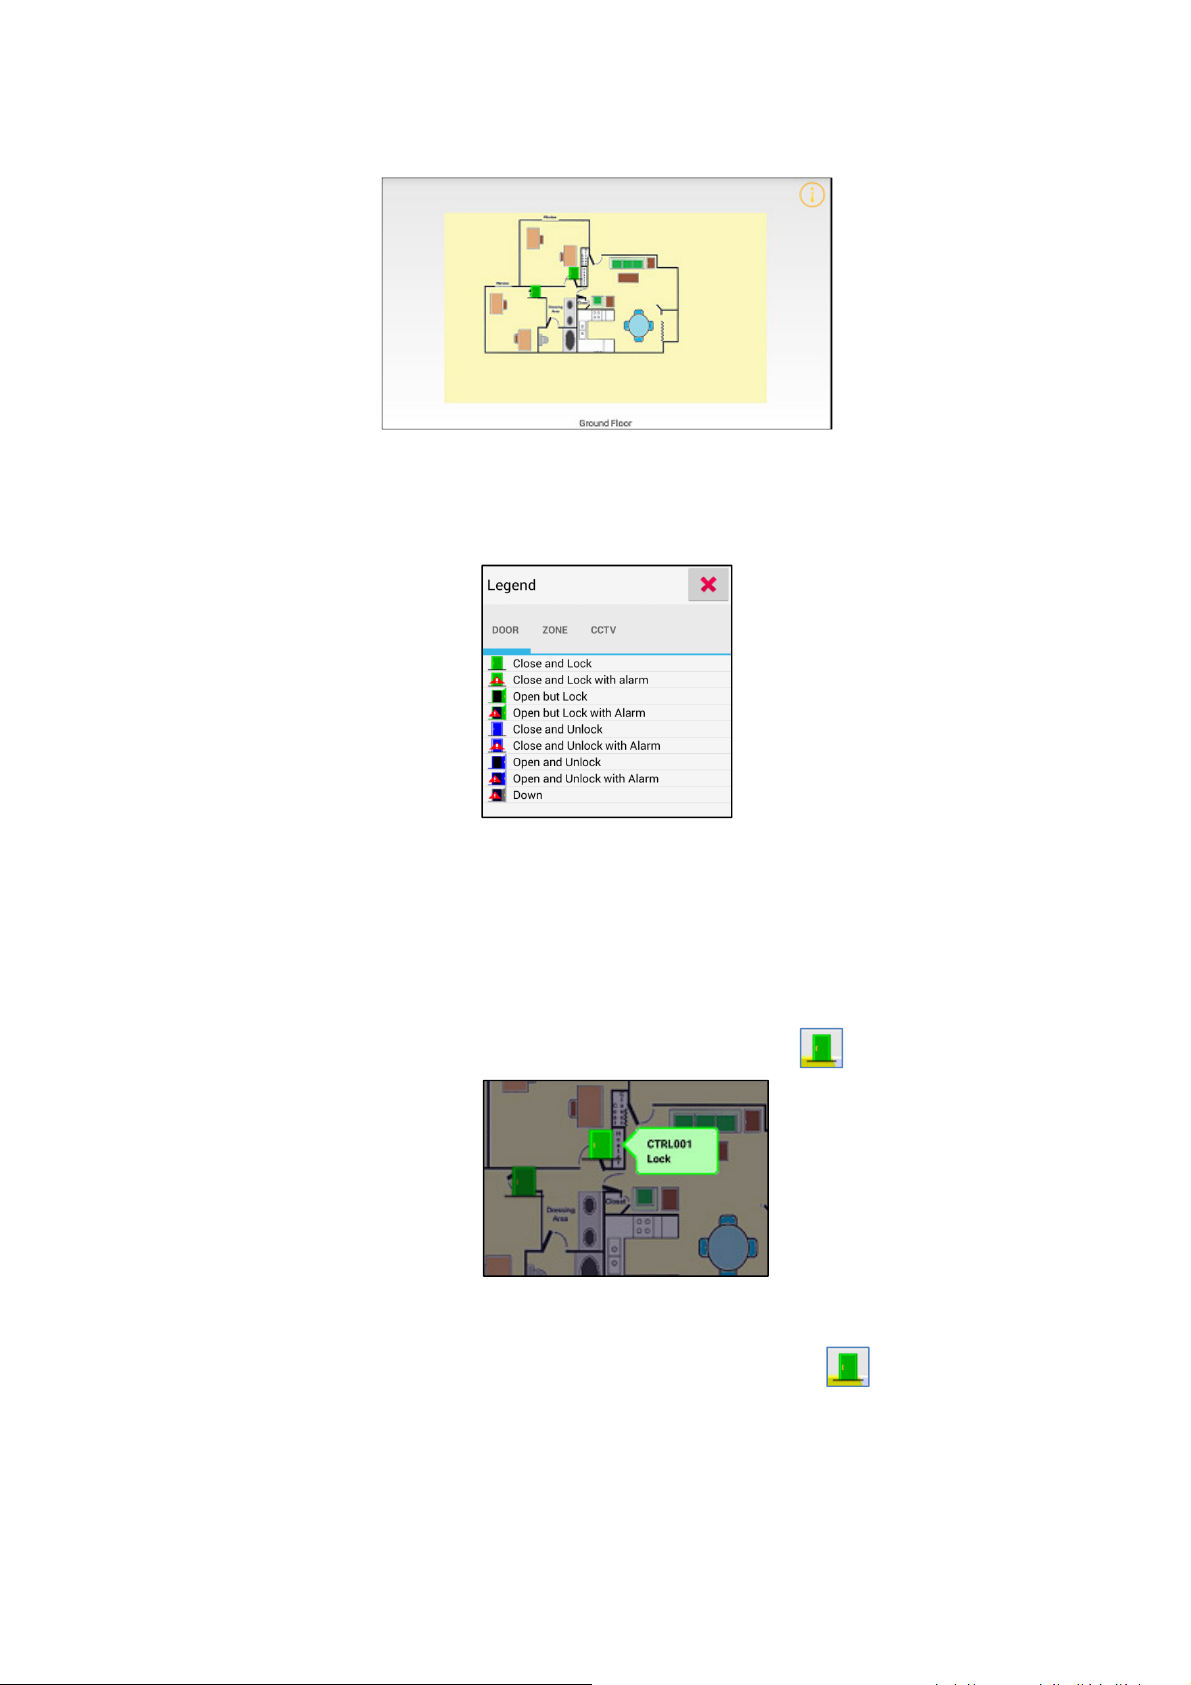
User also can view the eMirage App in horizontal mode.
Figure: eMirage in Horizontal View
5.5 Legend
The customer can know the status of the system point easily by refer to the legend.
Figure: Legend of Icon
5.6 Basic Operation
The user is able to operate the Maple System by using this eMirage App.
5.6.1 Door Access System
The user can view the status of the door by tapping on the Door icon .
Figure: Door Status
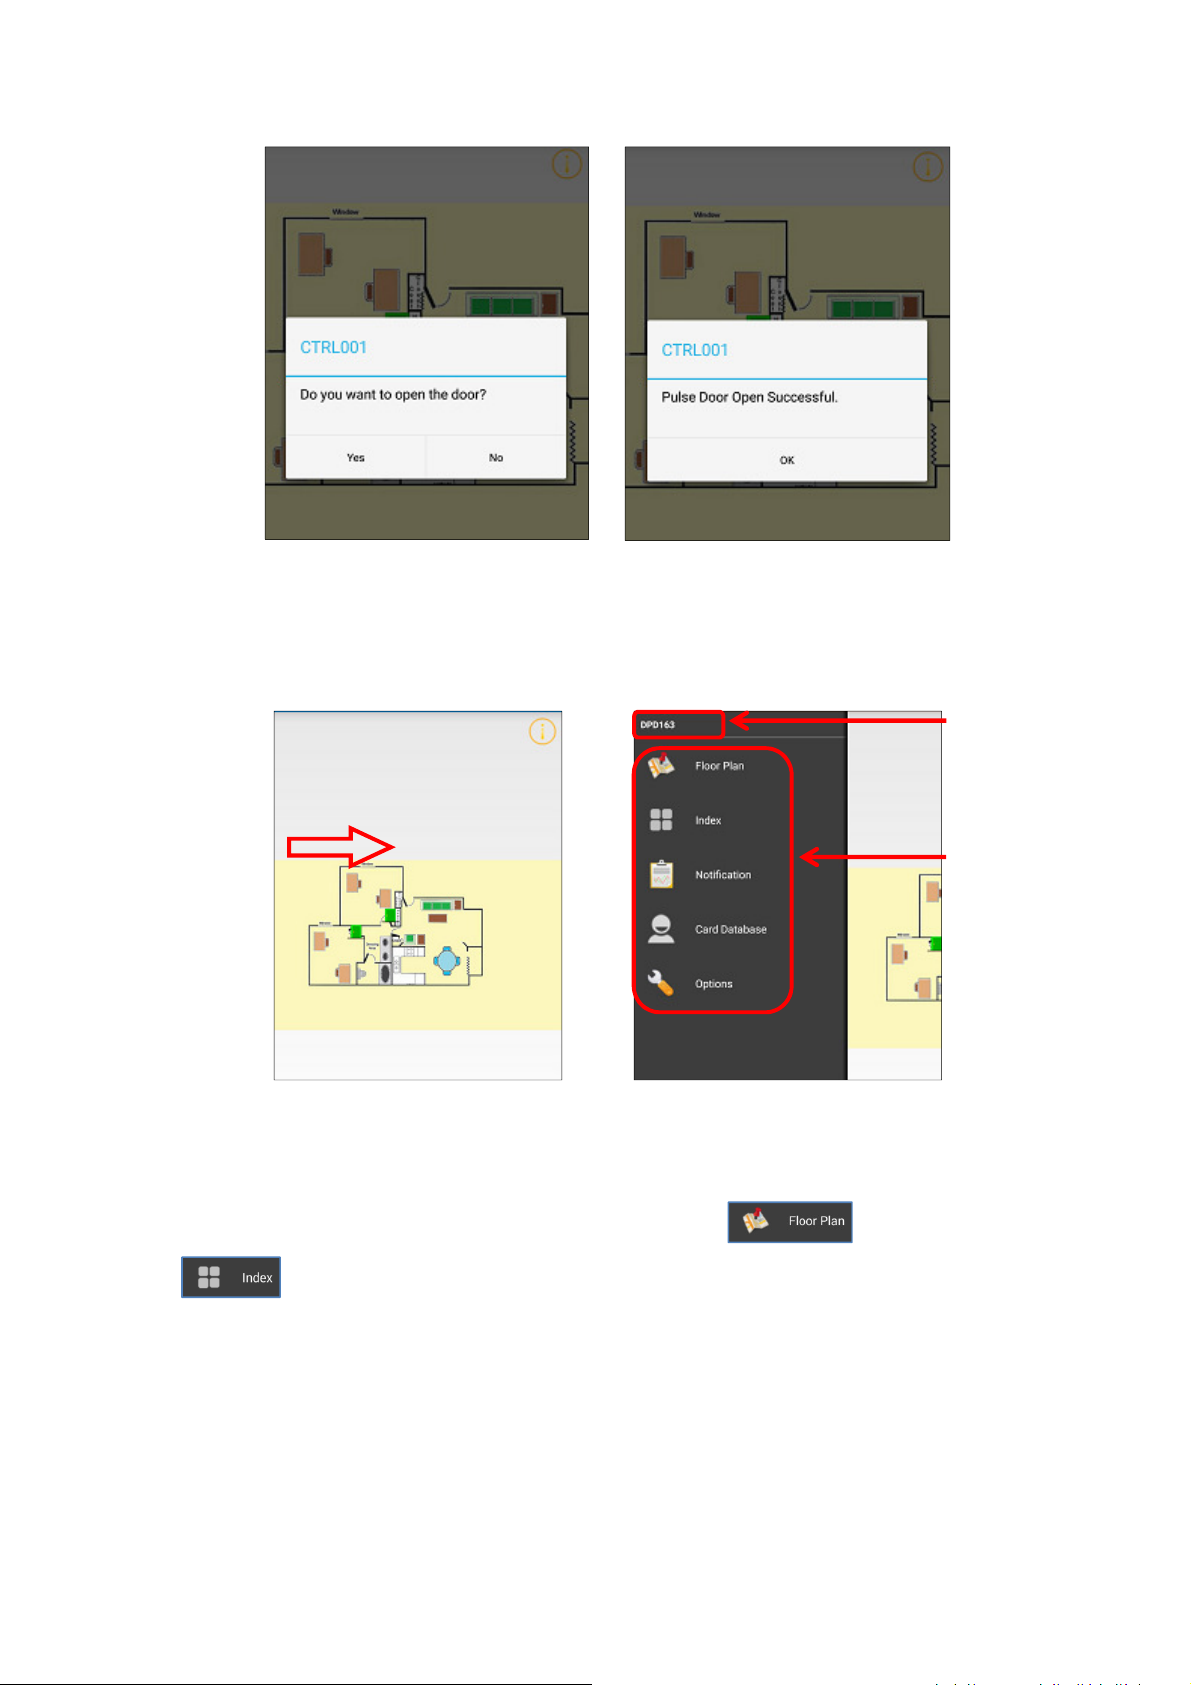
The user can open the door remotely by tapping twice on the Door icon .
38
Page 43
Maple User Manual
Site Name
Main Menu
Figure: Pulse Door Open
5.7 Main Menu
By sliding from left to right at the left hand side of the main screen, the main menu show in the
left hand side.
Figure: Slide from left to right Figure: Main Menu
5.7.1 Floor Plan/Index View
eMirage App has two view modes, which are Floor Plan view and Index view
.
The user may sweep between these two modes easily by tapping on the view icon in Main
Menu.
39
Page 44
Maple User Manual
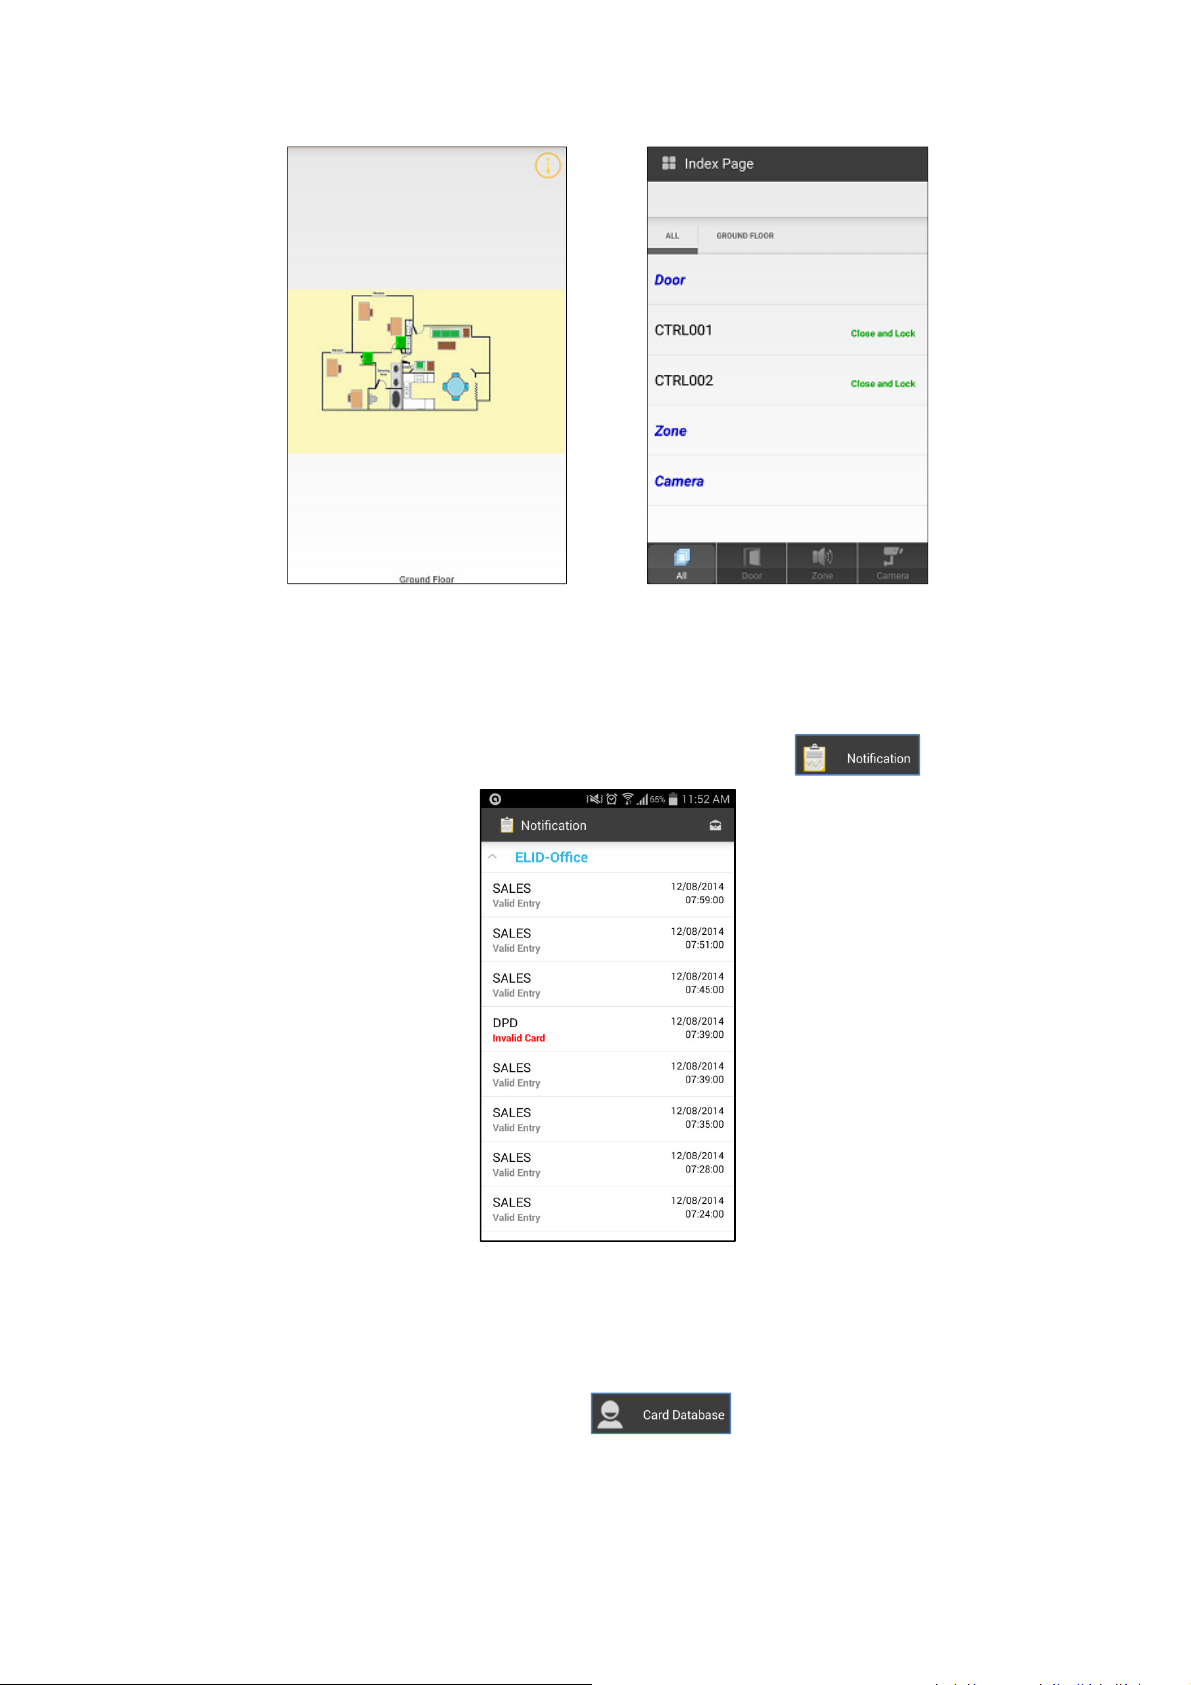
Figure: Floor Plan View Mode Figure: Index View Mode
5.7.2 Notification
The user may receive notification if there is any abnormal activity happened on Maple System.
The user can view all notification by tapping on the Notification icon .
Figure: Notification
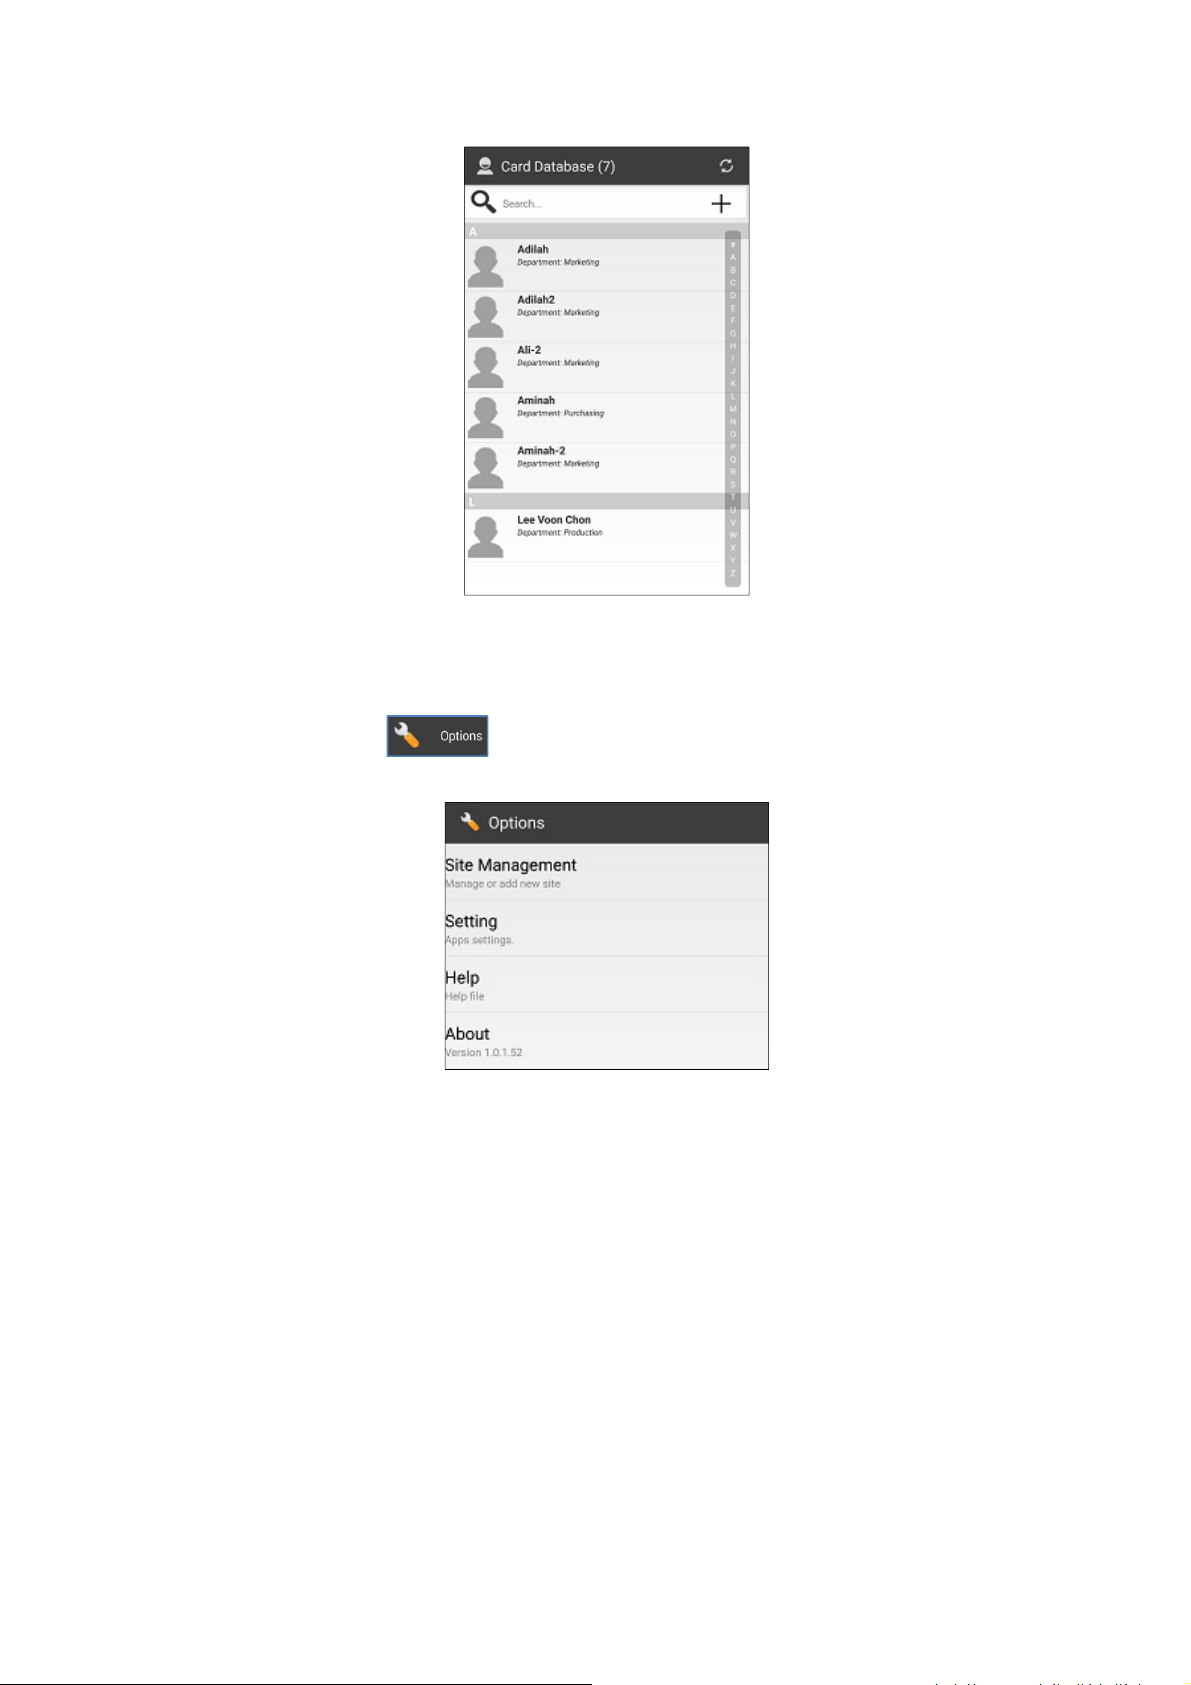
5.7.3 Card Database
The user can view and manage all the installed card or add new card for the Door Access
System by tapping on the Card Database icon .
40
Page 45
Maple User Manual
Figure: Card Database
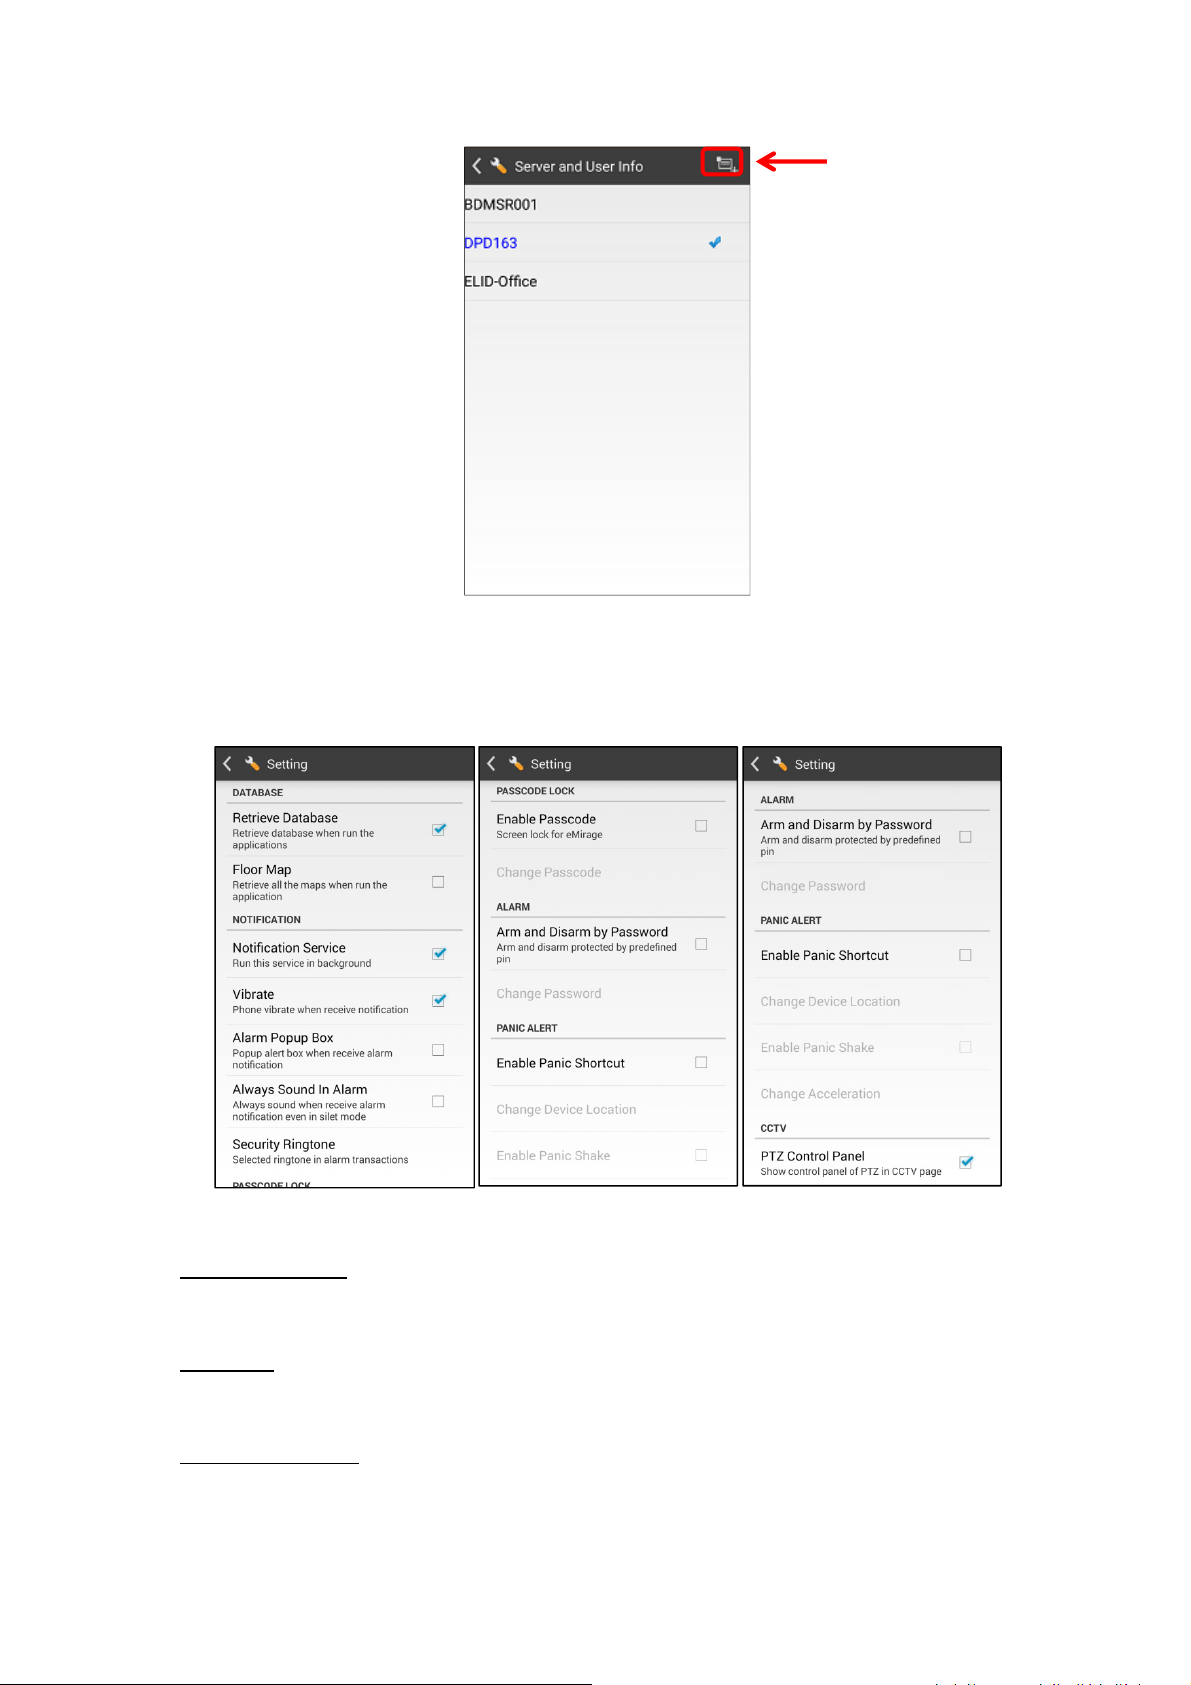
5.7.4 Options
In this Options menu , the user may manage or add new site in eMirage App,
configure the App setting, view the help file and check for the App version.
Figure: Options Menu
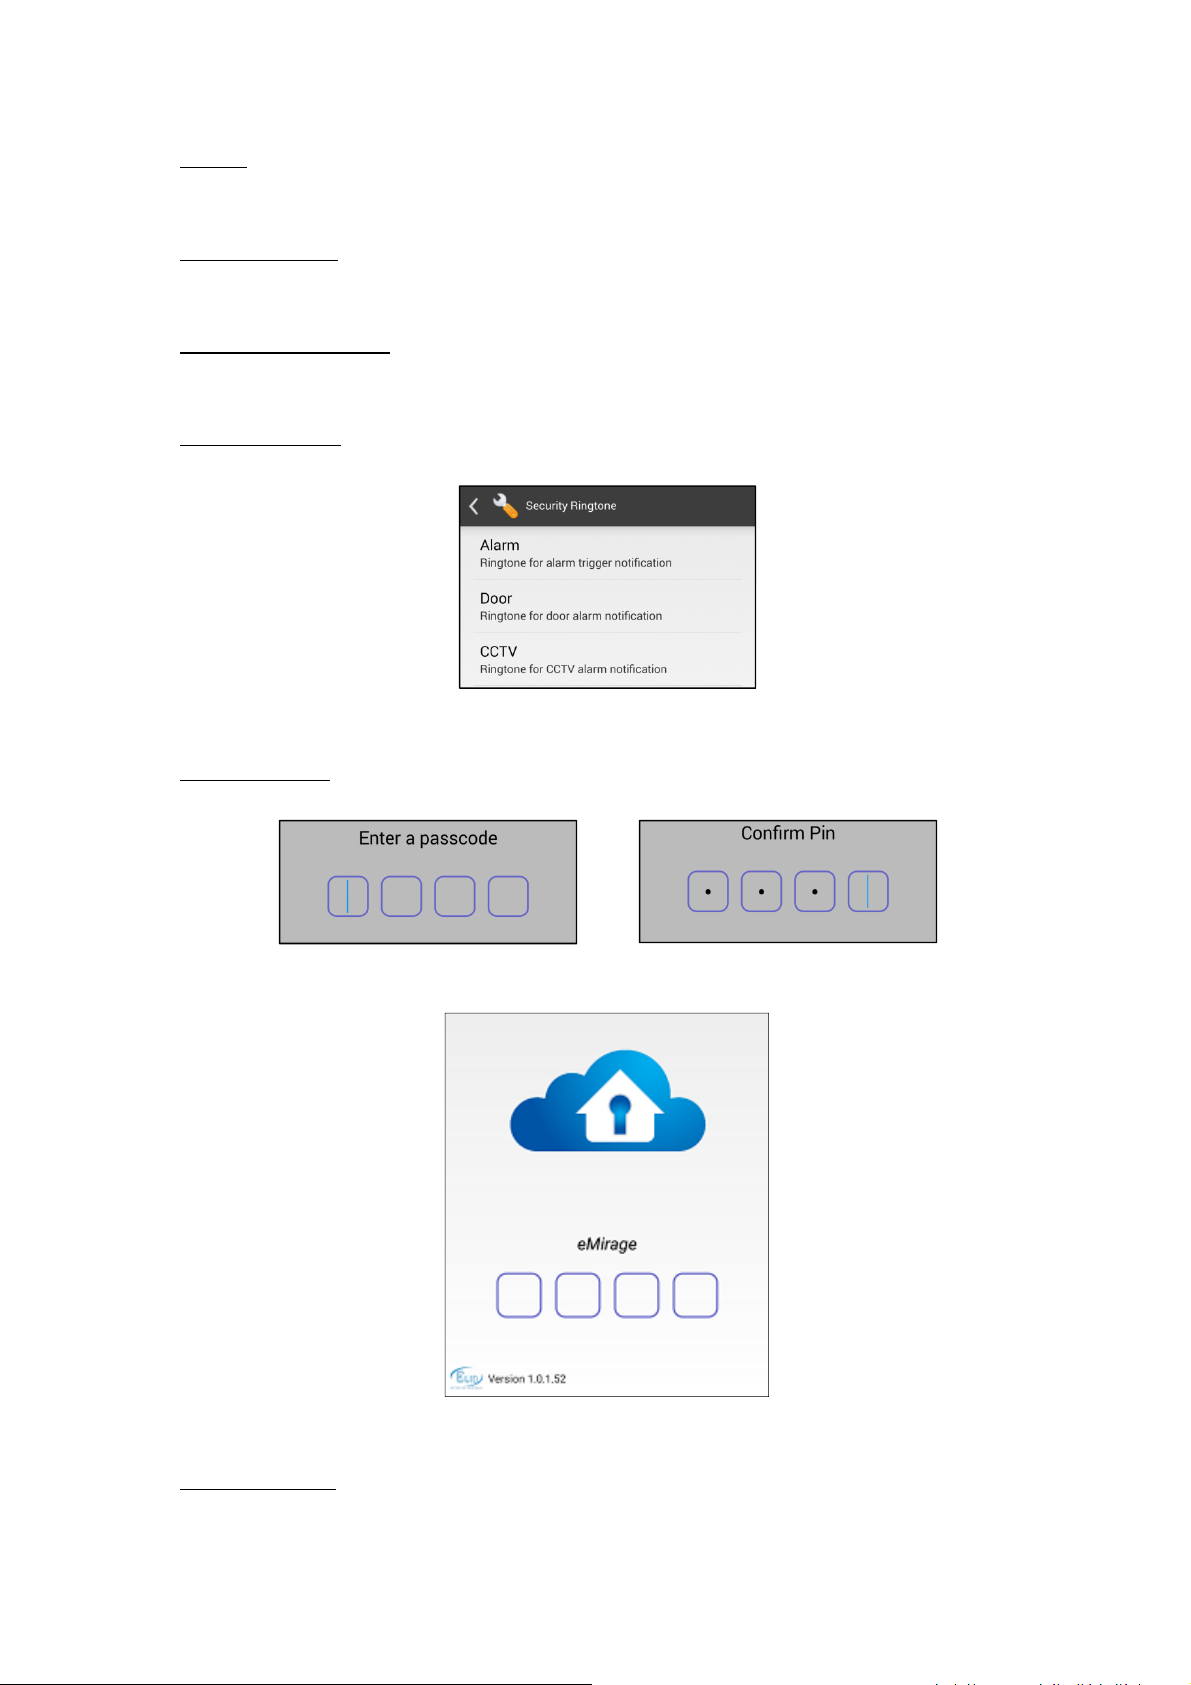
5.7.4.1 Site Management
The user can add a new site in eMirage App or delete a site from the App. He can change site
from this menu if he has more than one site in the App.
41
Page 46
Maple User Manual
Add Site
Figure: Site Management
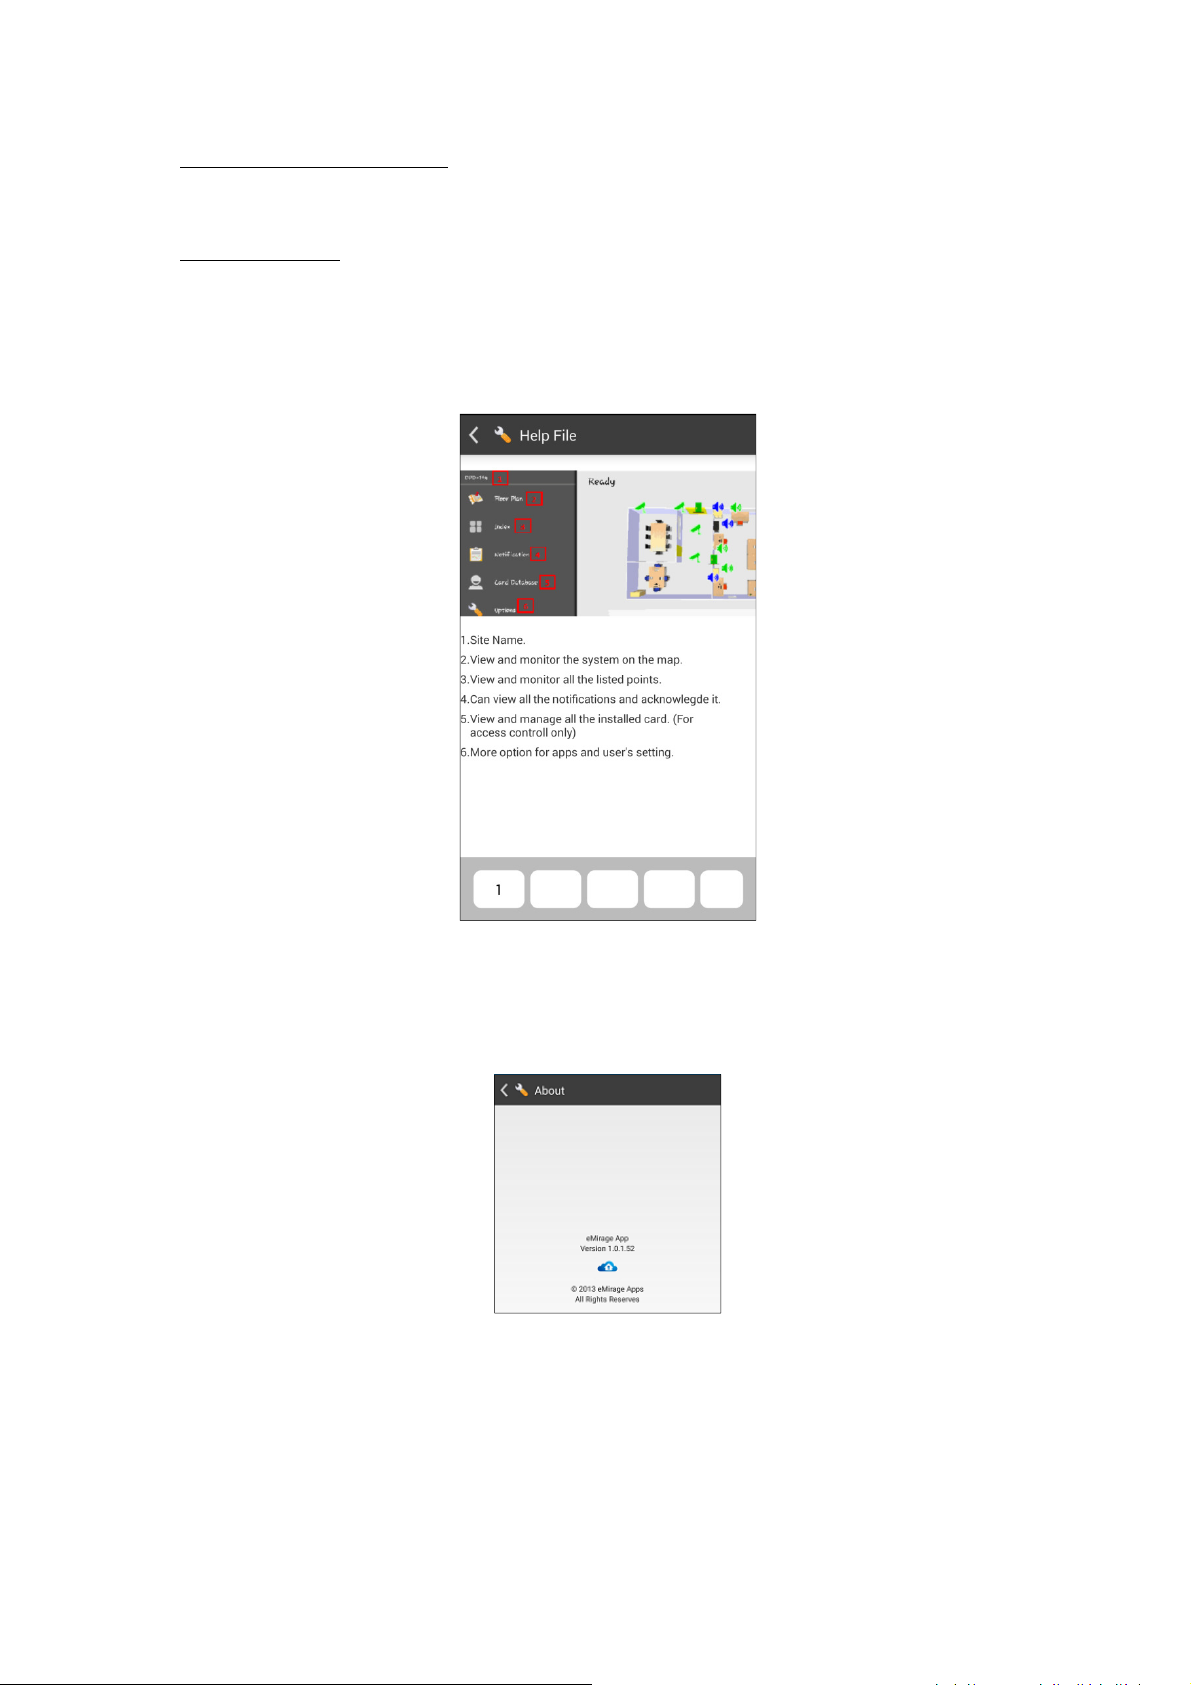
5.7.4.2 Setting
The user may configure the App setting from this menu.
Figure: Setting Menu
Retrieve Database
Retrieve database when run the application.
Floor Map
Retrieve all the maps when run the application.
Notification Service
Run this service in background and always receive notification from Maple System.
42
Page 47
Maple User Manual
Vibrate
Phone vibrate when receive notification.
Alarm Popup Box
Popup alert box when receive alarm notification.
Always Sound in Alarm
Always sound when receive alarm notification even in silent mode.
Security Ringtone
Selected ringtones in alarm transactions, which can be different ringtones for Door System.
Figure: Security Ringtones
Enable Passcode
Screen lock for eMirage while open the App.
Figure: Passcode
Figure: Passcode while open eMirage App
Change Passcode
Change passcode for eMirage App.
43
Page 48
Maple User Manual
Arm and Disarm by Password
Arm and disarm protected by predefined pin
Change Password
Change password for arm and disarm
5.7.4.3 Help
The user may view the simple help file from this [Help] menu.
Figure: Help File
5.7.4.4 About
The user can tap on [About] to check for the version of eMirage App.
Figure: About
44
Page 49
Maple System Maple User Manual
eTim
e app
Chapter 6: eTime Mobile Application (Android Version)
5.1 Introduction
eTime app is allows user to view attendance or submit leave requests with ease, while
allowing authorized staff to accept or reject such requests from a smart phone or tablet. The
information is presented in such a simple way that anyone can learn to use it within minutes.
5.2 Installation
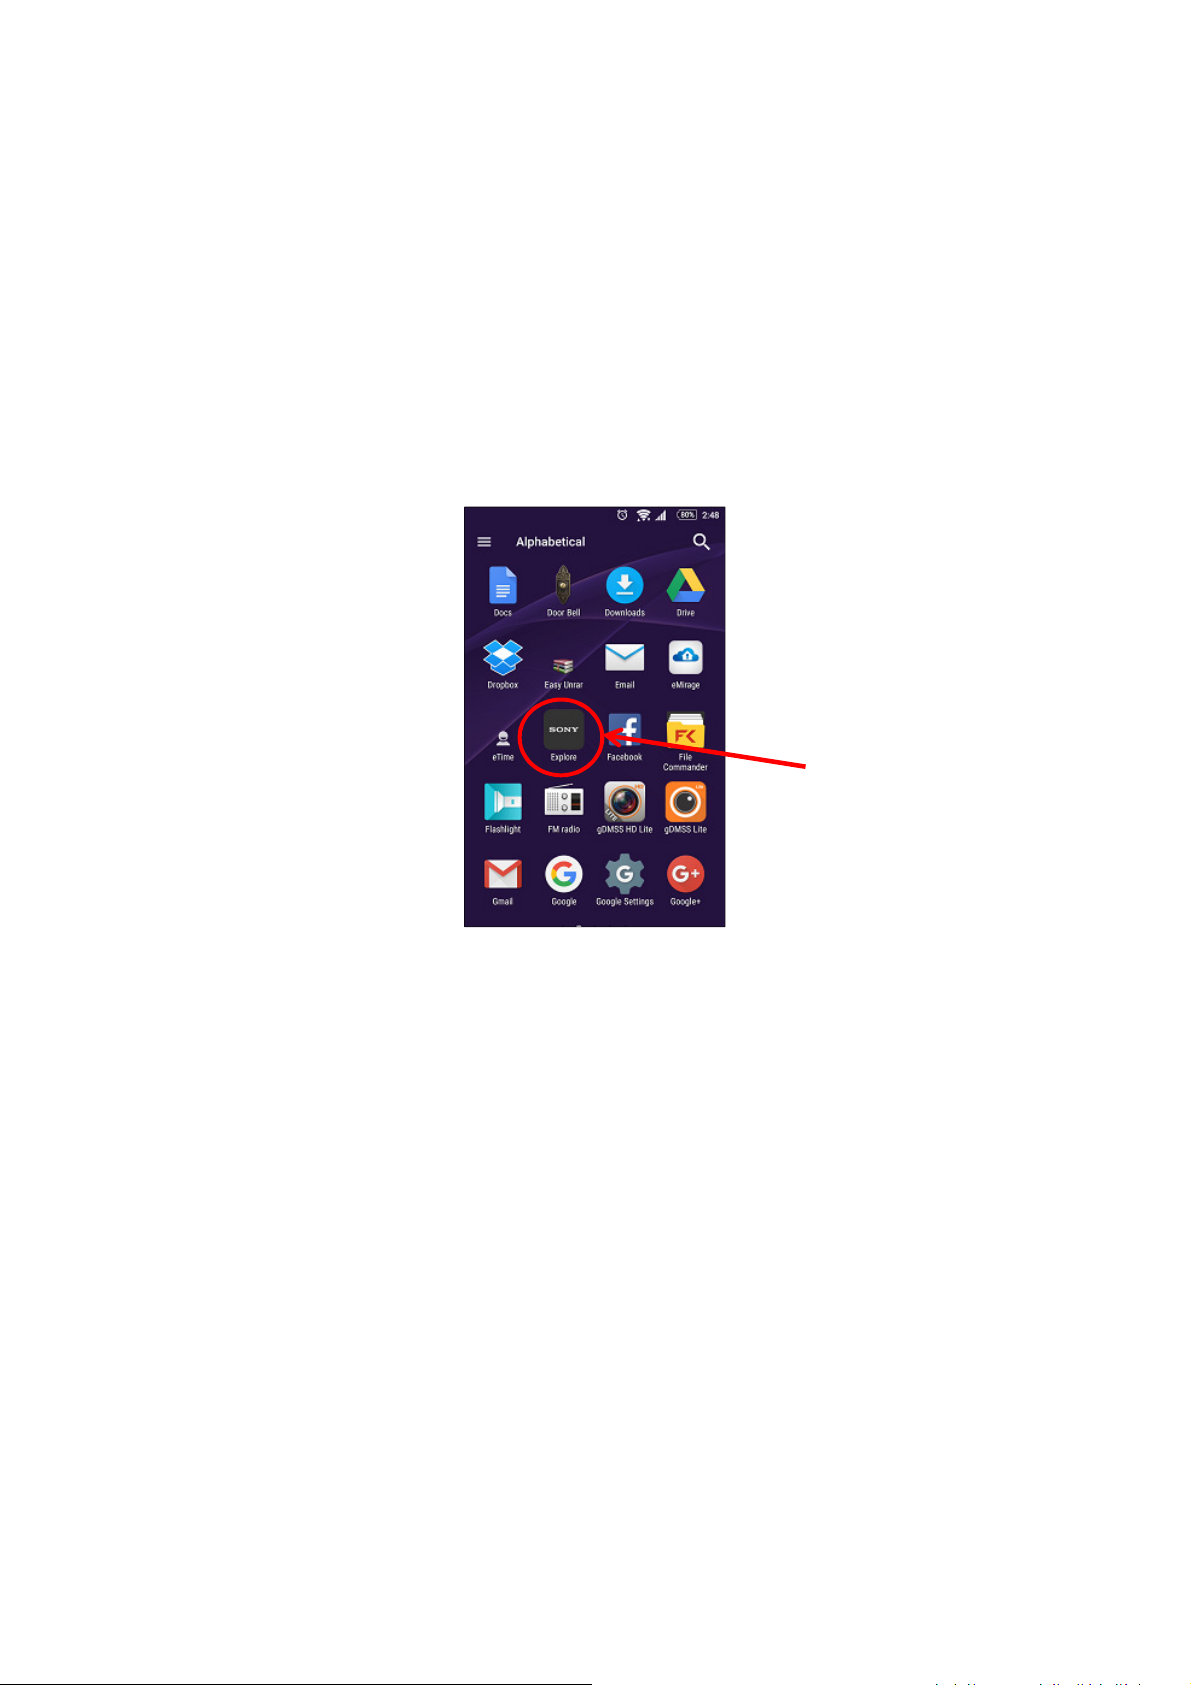
The user is able to download and install “eTime” App from App Store. The user may search
for “eTime” and then install it.
After the installation, the eTime app icon will be appearing in the mobile phone.
Figure: eTime Installation
5.3 Startup eTime
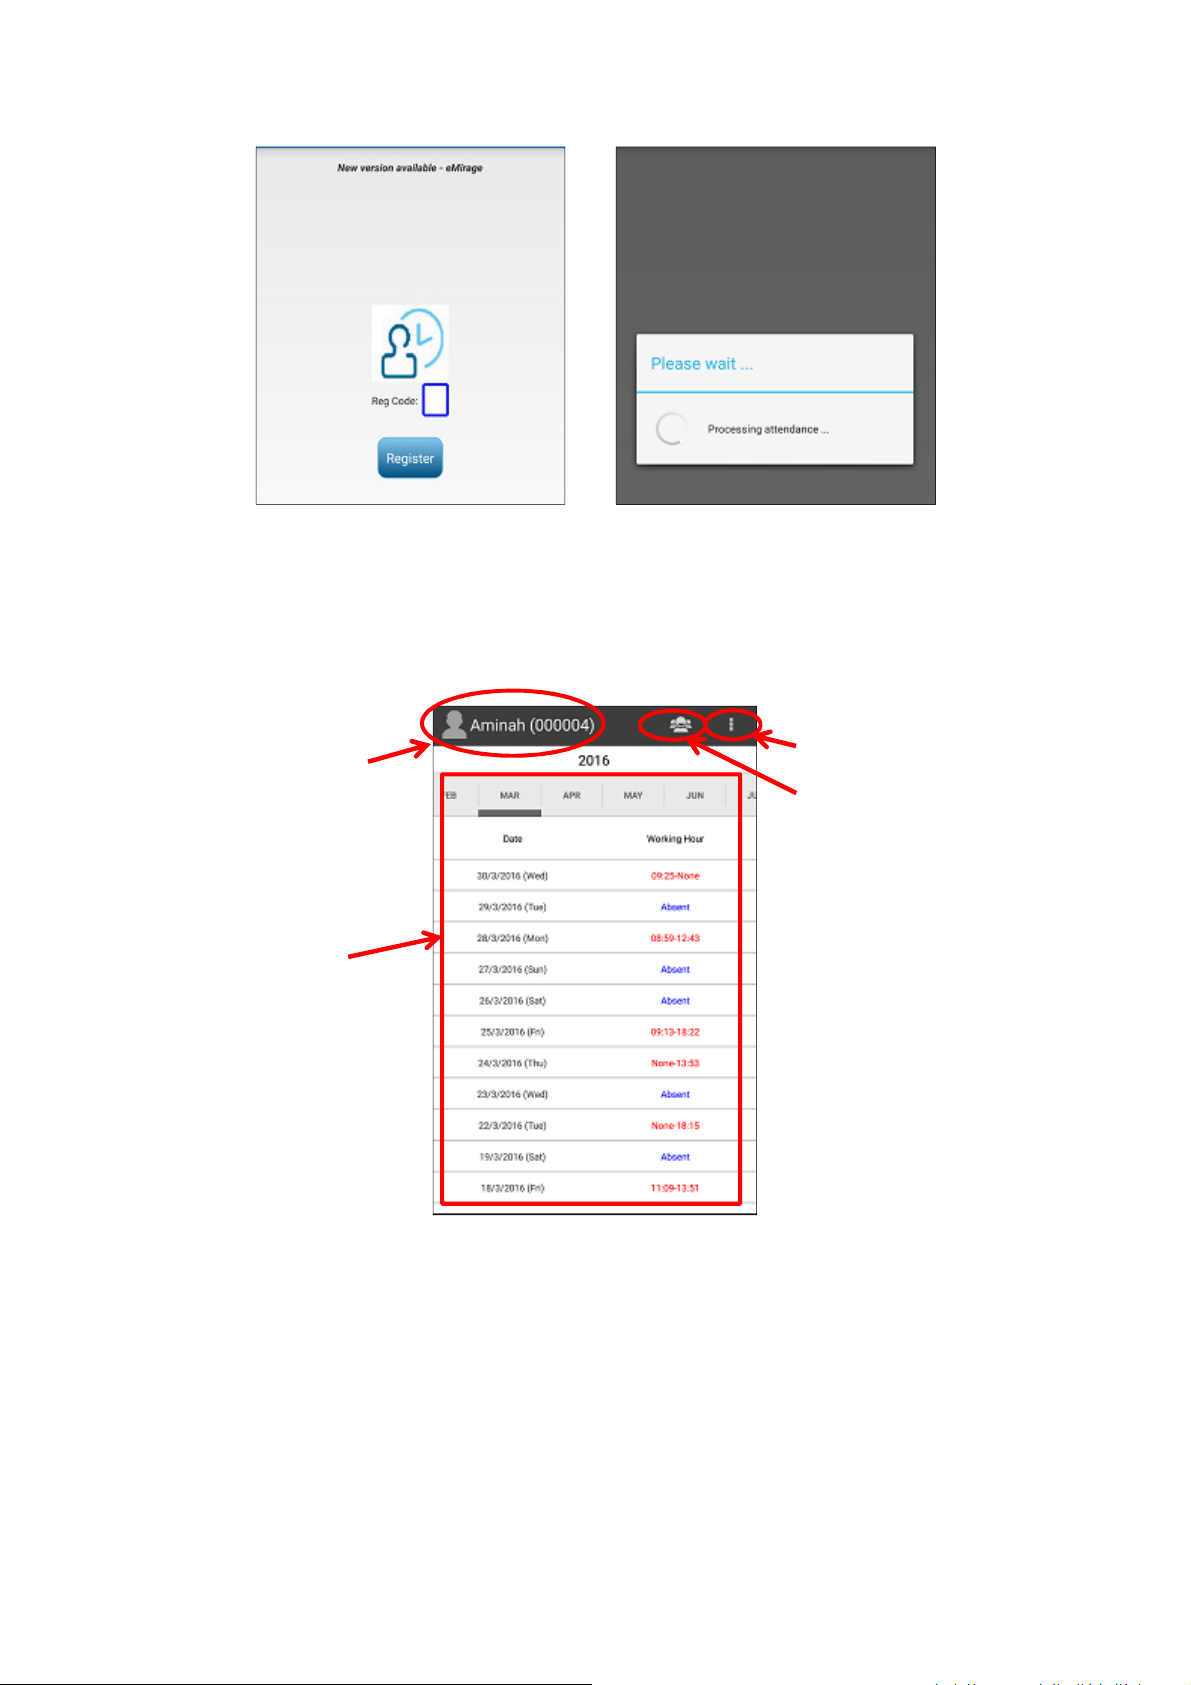
For the first time user, a Registration Code is needed. The user may request the Registration
Code from Service Centre.
If the user would like to add or change his mobile phone, he has to call to Service Centre to
disable the apps in previous mobile phone and obtain the new Registration Code.
The Registration Code is valid for one day only and 1-time-only usage.
The apps will automatic reprocessing the attendance with Maple system while opening in
order to obtain the latest attendance.
45
Page 50
Maple System Maple User Manual
Staff Attendance
List of Subordinates
Staff Name
Options
Figure: eTime Registration Figure: Processing Attendance
5.4 Main Screen
After “eTime” App is opened, the list view of employee attendance will be shown on the
screen.
and ID
Record
Figure: eTime Main Screen
5.4.1 List of Subordinates
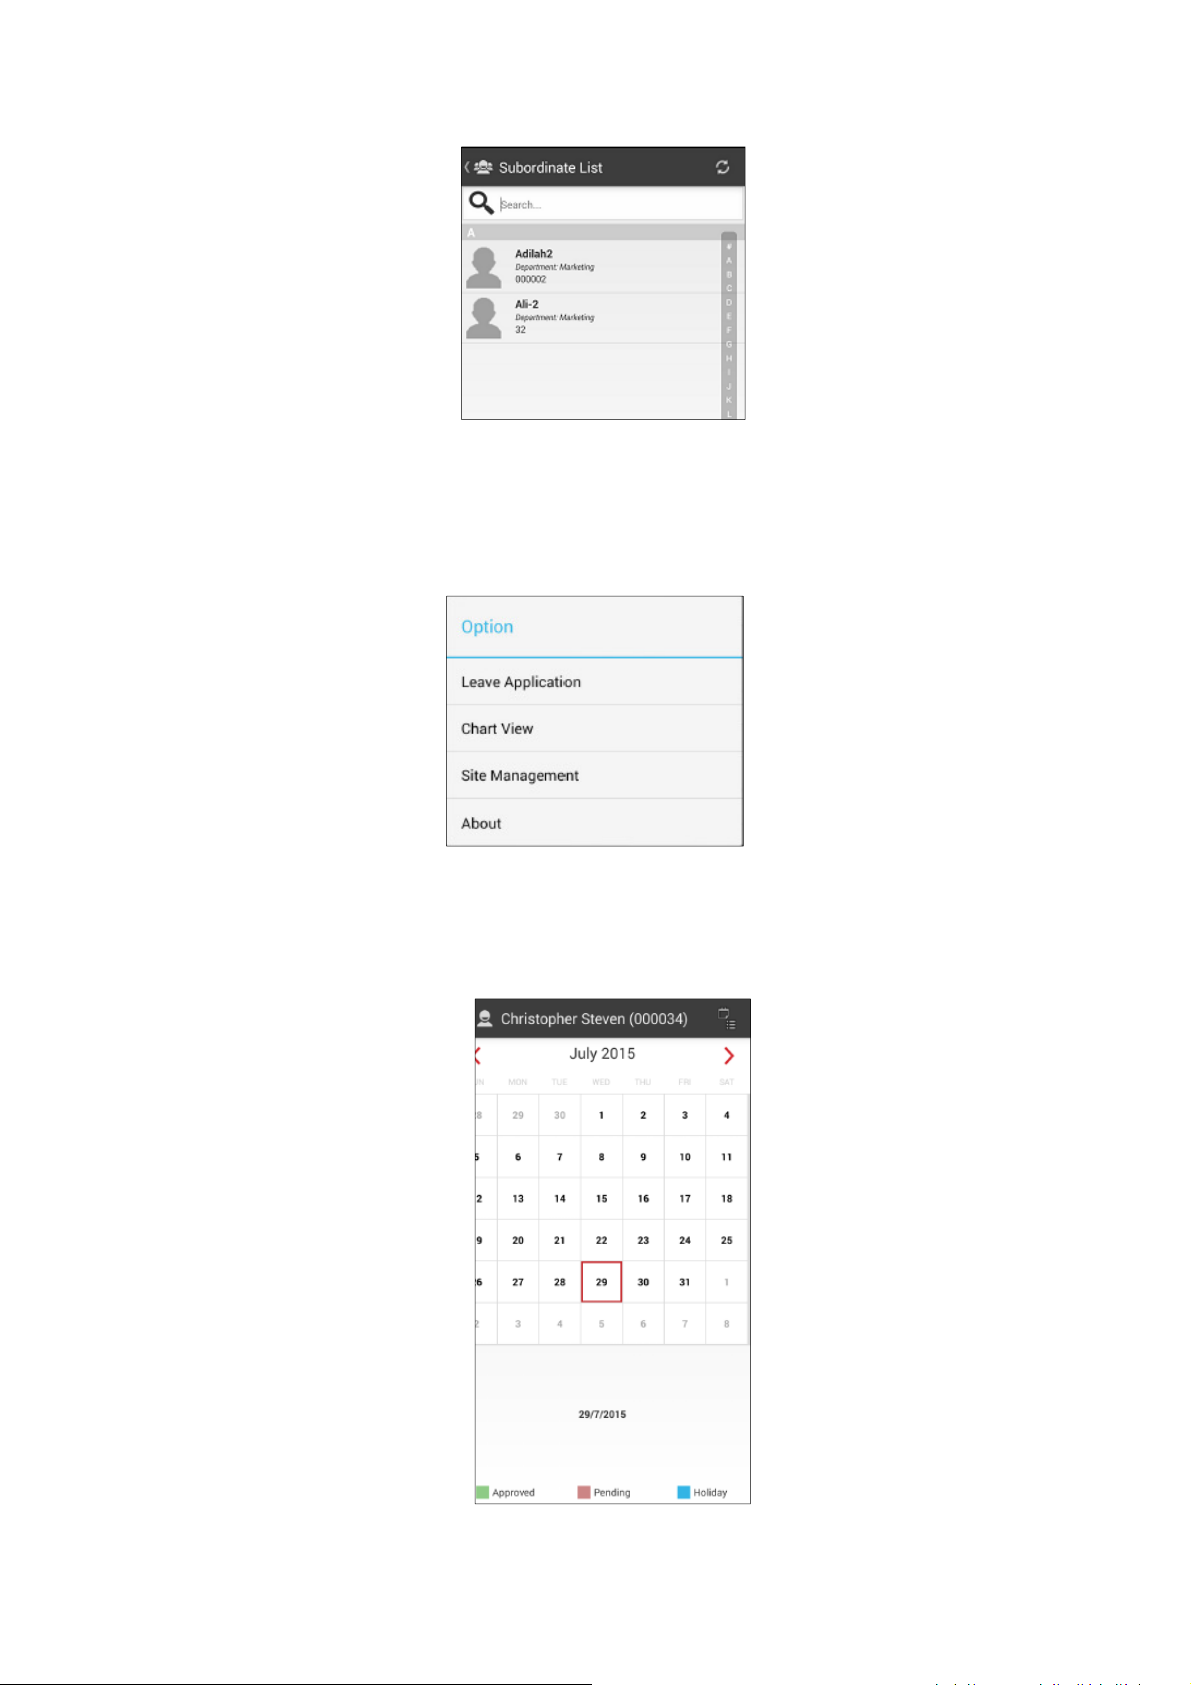
The staff can view their subordinate list, attendance and pending leave waiting for approval.
46
Page 51
Maple System Maple User Manual
Figure: Subordinate List
5.4.2 Options
The user is able to apply leave and view their attendance by using this eTime App.
Figure: Option Menu
5.4.3 Leave Application
The user may apply and view their leave from the app.
Figure: Door Status
47
Page 52
Maple System Maple User Manual
5.4.4 Chart View
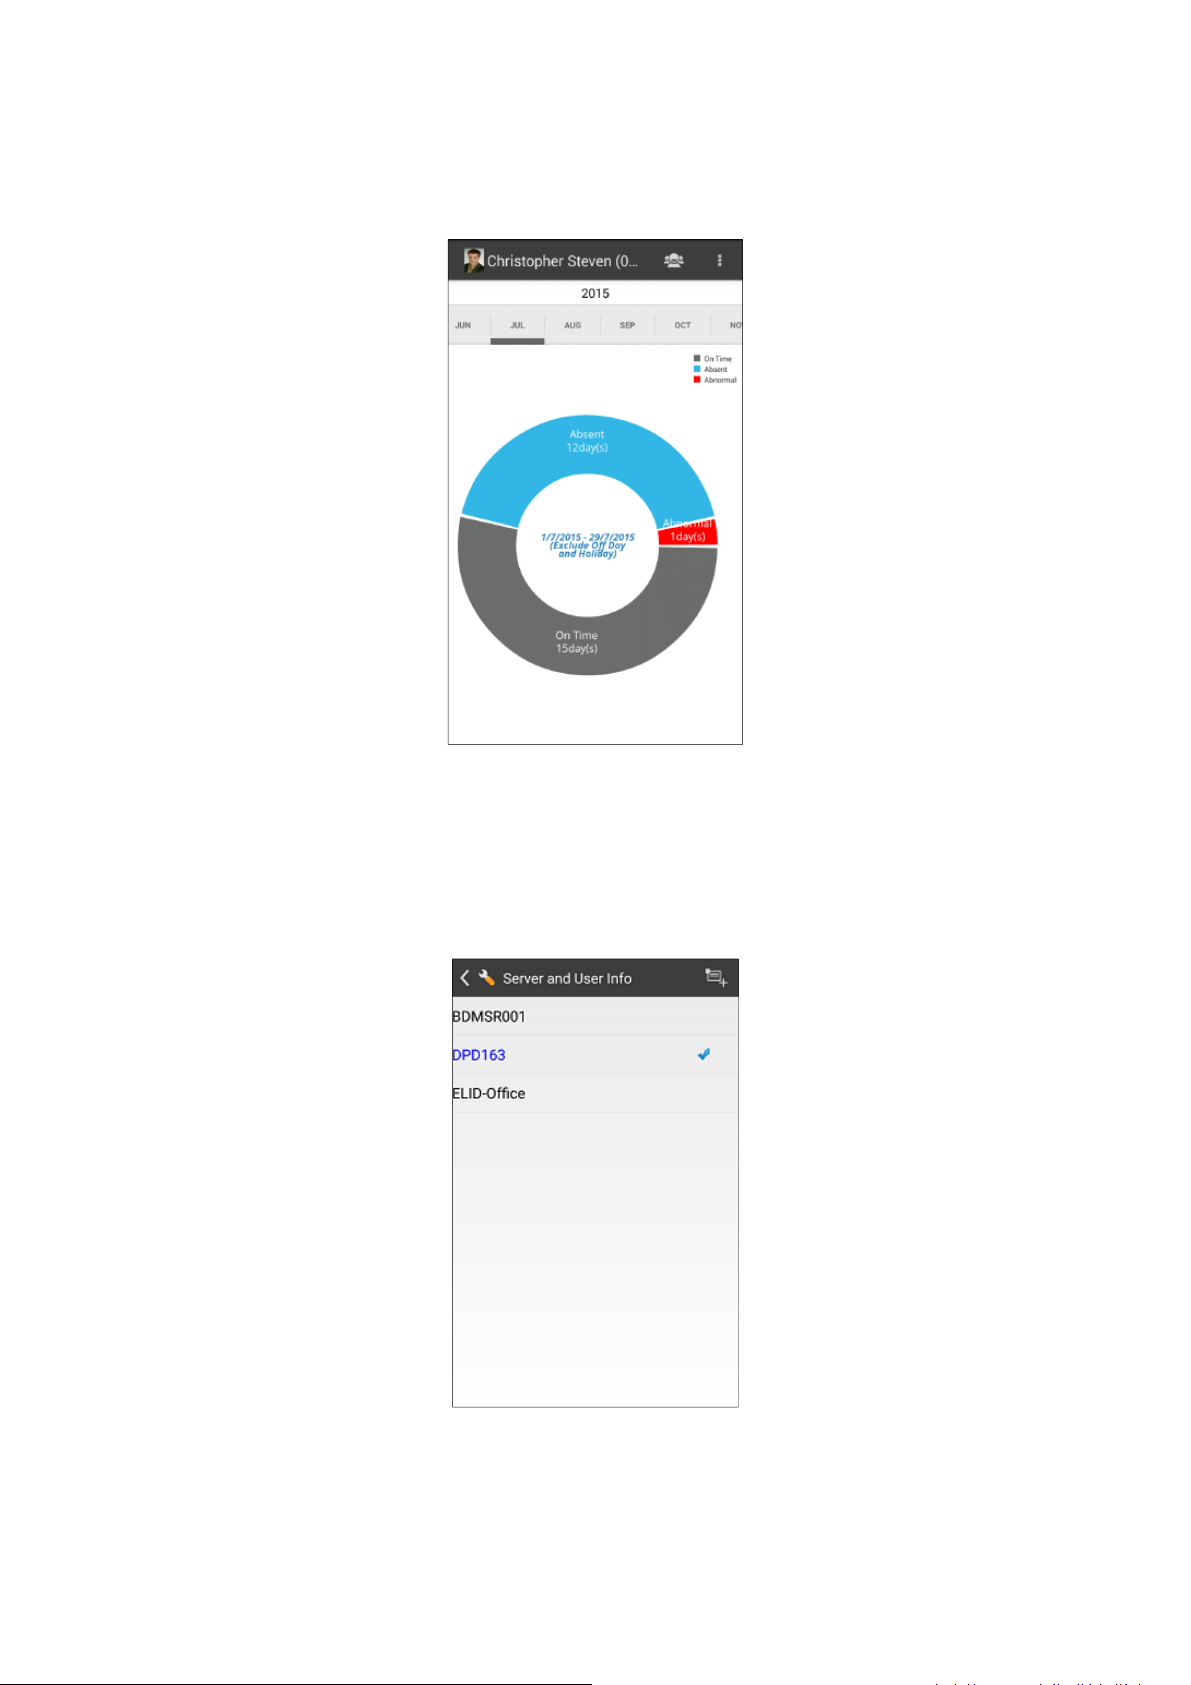
The user may see their attendance summary at the particular month in the chart view.
Figure: Chart View
5.4.5 Site Management
The user can add a new site in eTime App or delete a site from the App. He can change site
from this menu if he has more than one site in the App.
Figure: Site Management
48
Page 53
Maple System Maple User Manual
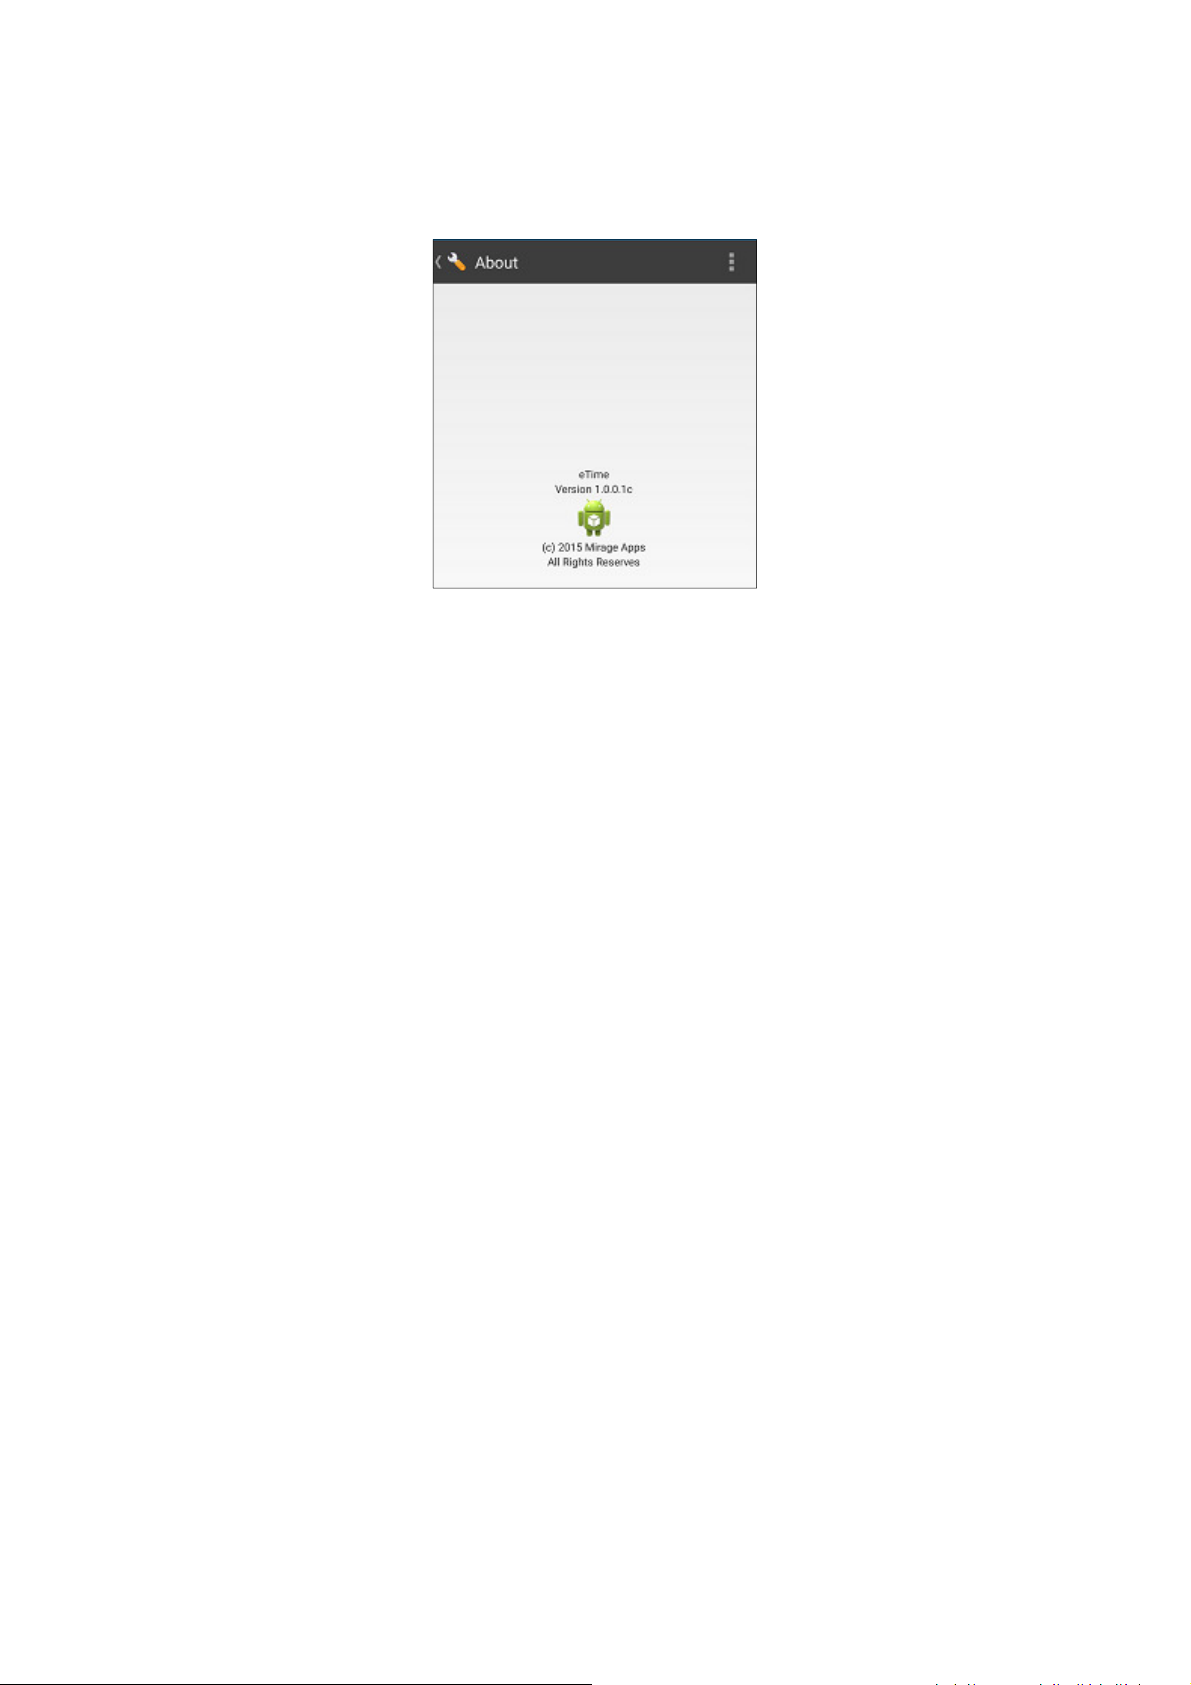
5.4.6 About
The user can tap on [About] to check for the version of eTime App.
Figure: About
49
Page 54
Maple System Maple User Manual
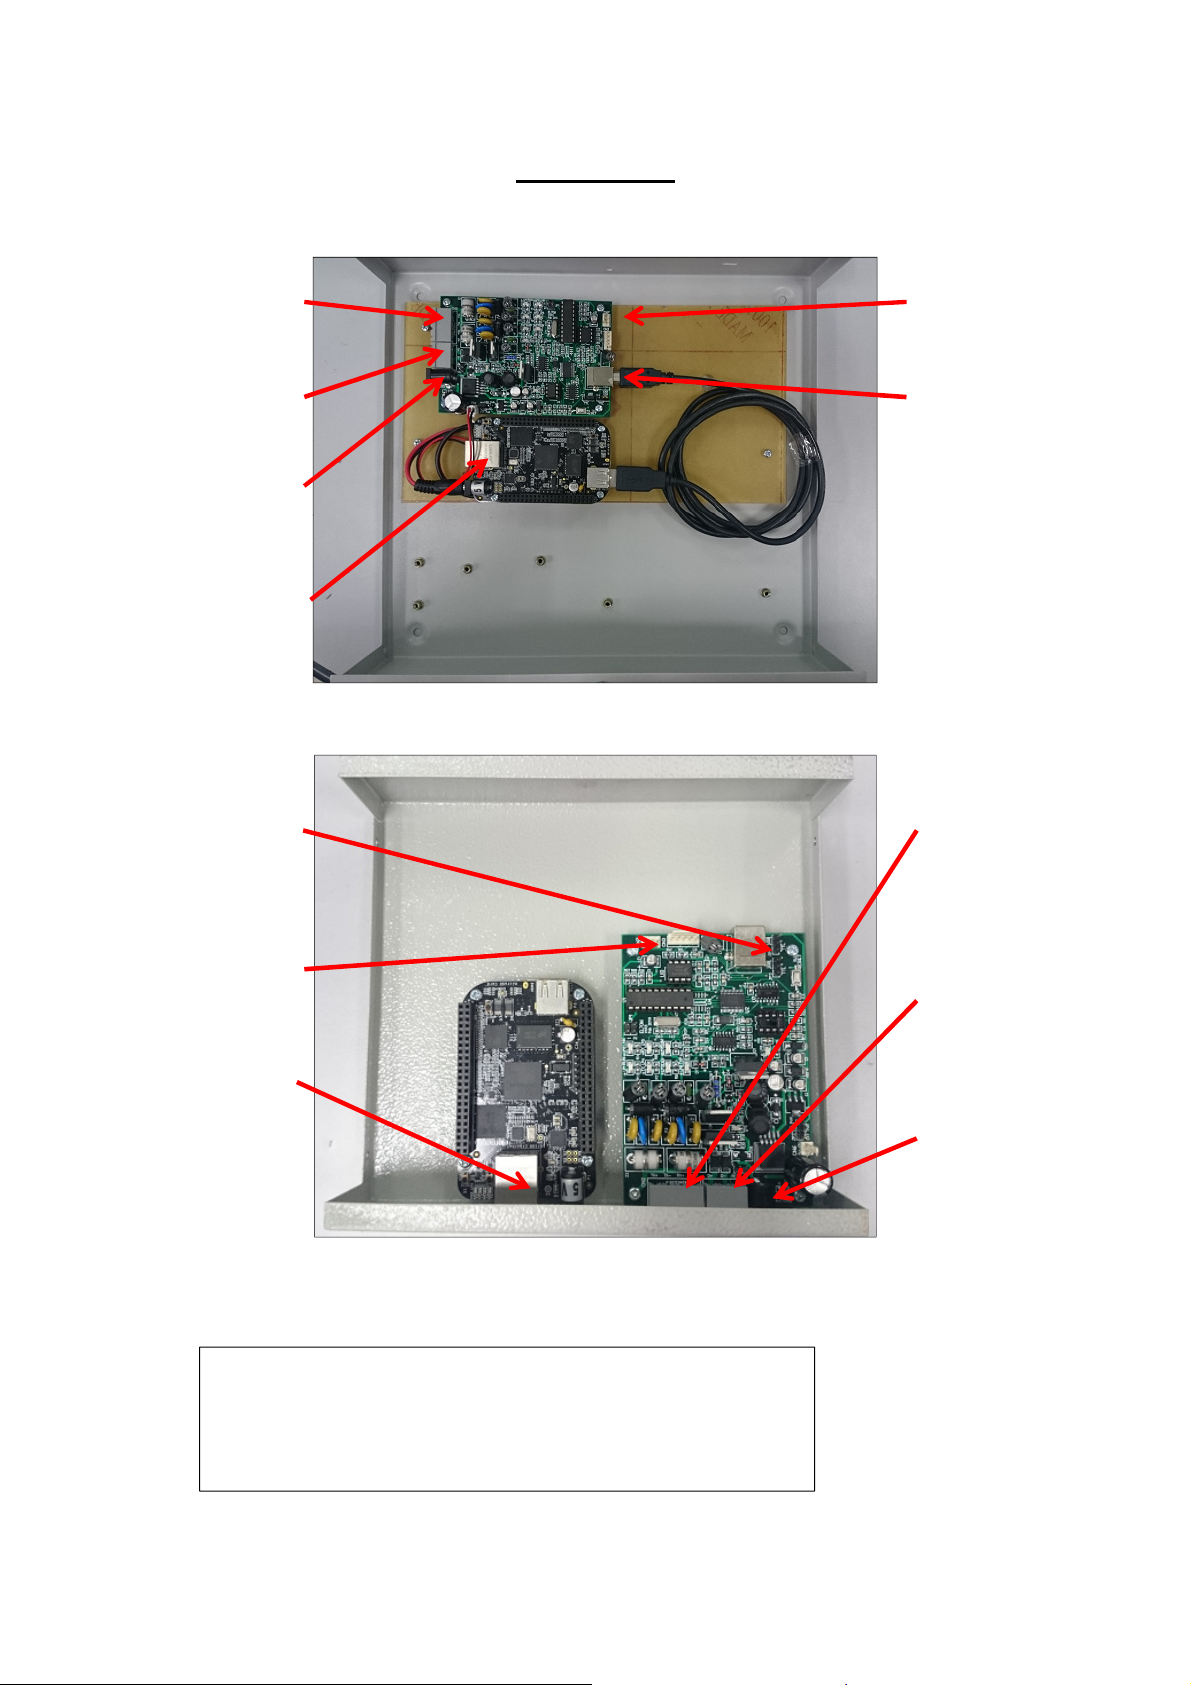
Multidrop
port
RS485 port
Power supply
TTL port
USB port
Multidrop
port
RS485 port
Power supply
TTL port
USB port
Shunt setting on JP3 & JP4
Appendix
socket
Network port
Network port
Figure: Inside of Maple (Wall Mount)
socket
Figure: Inside of Maple (Table top)
If USB port is used, set jumper to USB
If TTL port is used, set jumper to TTL
50
 Loading...