

Page 1

IT Istruzioni di montaggio e d'uso
EN Instruction on mounting and use
DE Montage- und Gebrauchsanweisung
FR Prescriptions de montage et mode d’emploi
NL Montagevoorschriften en gebruiksaanwijzingen
ES Montaje y modo de empleo
PT Instruções para montagem e utilização
EL ΟΔΗΓΙΕΣ ΣΥΝΑΡΜΟΛΟΓΗΣΗΣ ΚΑΙ ΧΡΗΣΗΣ
SV Monterings- och bruksanvisningar
FI Asennus- ja käyttöohjeet
NO Instrukser for montering og bruk
DA Bruger- og monteringsvejledning
PL Instrukcja montażu i obsługi
CS Návod na montáž a používání
SK Návod k montáži a užití
HU Felszerelési és használati utasítás
BG Инструкции за монтаж и употреба
RO INSTRUCTII DE MONTAJ SI FOLOSIRE
RU Инструкция по монтажу и эксплуатации
UK Інструкція з монтажу і експлуатації
ET Paigaldus- ja kasutusjuhend
LT montavimo ir naudojimosi instrukcija
LV ierīkošanas un izmantošanas instrukcija
SR Uputstva za montažu i upotrebu
SL Navodila za montažo in uporabo
HR Uputstva za montažu i za uporabu
TR Montaj ve kullanım talimatları
AR
Page 2
2
1
Page 3
Page 4

Page 5
Page 6

Page 7

Page 8

Page 9

Page 10

Page 11

IT - Istruzioni di montaggio e d'uso
Attenersi strettamente alle istruzioni riportate in questo
manuale. Si declina ogni responsabilità per eventuali
inconvenienti, danni o incendi provocati all'apparecchio
derivati dall'inosservanza delle istruzioni riportate in questo
manuale. La cappa è concepita per l'aspirazione dei fumi e
vapori della cottura ed è destinata al solo uso domestico.
! E' importante conservare questo manuale per poterlo
consultare in ogni momento. In caso di vendita, di
cessione o di trasloco, assicurarsi che resti insieme al
prodotto.
! Leggere attentamente le istruzioni: ci sono importanti
informazioni sull'installazione, sull'uso e sulla sicurezza.
! Non effettuare variazioni elettriche o meccaniche sul
prodotto o sulle condotte di scarico.
! Prima di procedere nell'installazione dell'apparecchio
verificare che tutti i componenti non siano danneggiati. In
caso contrario contattare il rivenditore e non proseguire
con l'installazione.
Avvertenze
Attenzione! Non collegare l’apparecchio alla rete elettrica
finche l’installazione non è totalmente completata.
Prima di qualsiasi operazione di pulizia o manutenzione,
disinserire la cappa dalla rete elettrica togliendo la spina o
staccando l’interruttore generale dell’abitazione.
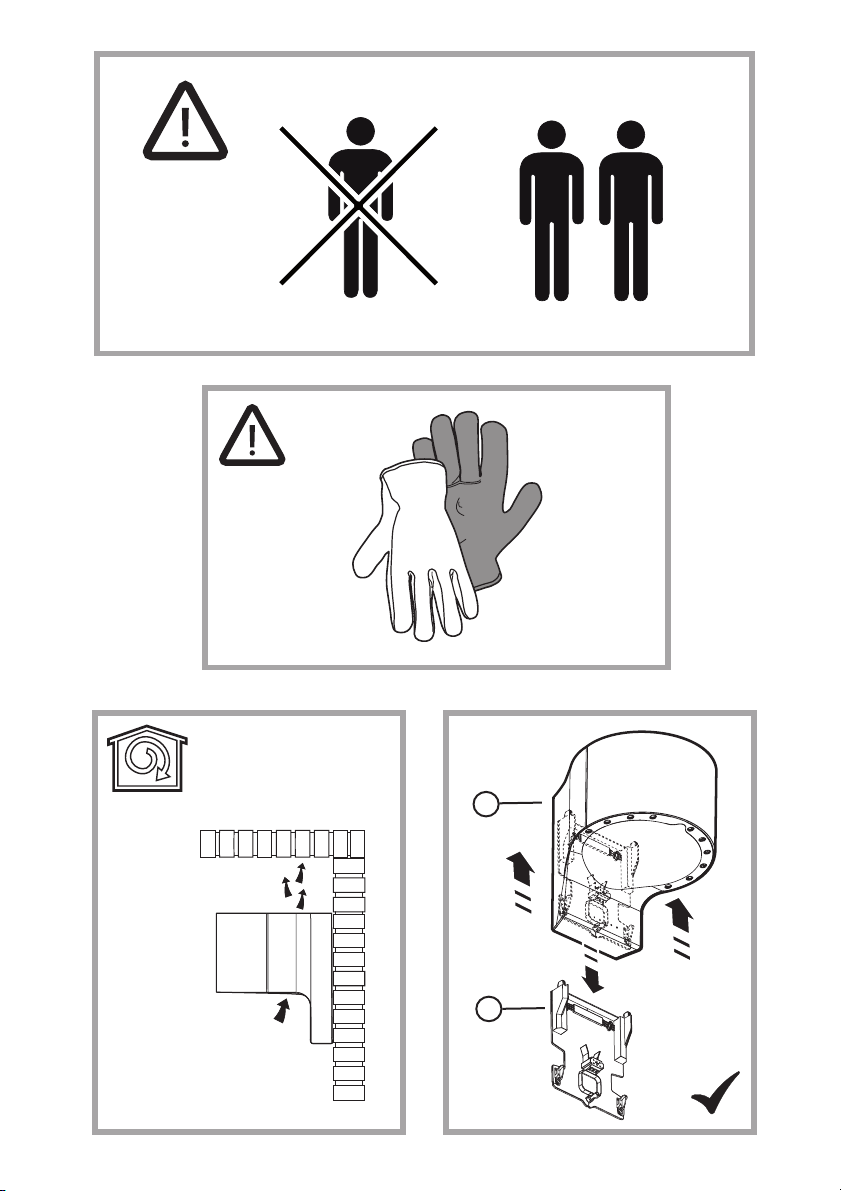
Per tutte le operazioni di installazione e manutenzione
utilizzare guanti da lavoro
L’apparecchio non è destinato all’utilizzo da parte di bambini o
persone con ridotte capacità fisiche sensoriali o mentali e con
mancata esperienza e conoscenza a meno che essi non siano
sotto la supervisione o istruiti nell’uso dell’apparecchiatura da
una persona responsabile per la loro sicurezza.
I bambini devono essere controllati affinché non giochino con
l’apparecchio.
Mai utilizzare la cappa senza griglia correttamente montata!
La cappa non va MAI utilizzata come piano di appoggio a
meno che non sia espressamente indicato.
Il locale deve disporre di sufficiente ventilazione, quando la
cappa da cucina viene utilizzata contemporaneamente ad altri
apparecchi a combustione di gas o altri combustibili.
L’aria aspirata non deve essere convogliata in un condotto
usato per lo scarico dei fumi prodotti da apparecchi a
combustione di gas o di altri combustibili.
E’ severamente vietato fare cibi alla fiamma sotto la cappa.
L’impiego di fiamma libera è dannoso ai filtri e può dar luogo
ad incendi, pertanto deve essere evitato in ogni caso.
La frittura deve essere fatta sotto controllo onde evitare che
l’olio surriscaldato prenda fuoco.
Quando il piano di cottura è in funzione le parti accessibili
della cappa possono diventare calde.
Per quanto riguarda le misure tecniche e di sicurezza da
adottare per lo scarico dei fumi attenersi strettamente a
quanto previsto dai regolamenti delle autorità locali
competenti.
La cappa va frequentemente pulita sia internamente che
esternamente (ALMENO UNA VOLTA AL MESE, rispettare
comunque quanto espressamente indicato nelle istruzioni di
manutenzione riportate in questo manuale).
L’inosservanza delle norme di pulizia della cappa e della
sostituzione e pulizia dei filtri comporta rischi di incendi.
Non utilizzare o lasciare la cappa priva di lampade
correttamente montate per possibile rischio di scossa elettrica.
Si declina ogni responsabilità per eventuali inconvenienti,
danni o incendi provocati all’apparecchio derivati
dall’inosservanza delle istruzioni riportate in questo manuale.
Questo apparecchio è contrassegnato in conformità alla
Direttiva Europea 2002/96/EC, Waste Electrical and Electronic
Equipment (WEEE). Assicurandosi che questo prodotto sia
smaltito in modo corretto, l'utente contribuisce a prevenire le
potenziali conseguenze negative per l'ambiente e la salute.
Il simbolo
sul prodotto o sulla documentazione di
accompagnamento indica che questo prodotto non deve
essere trattato come rifiuto domestico ma deve essere
consegnato presso l'idoneo punto di raccolta per il riciclaggio
di apparecchiature elettriche ed elettroniche. Disfarsene
seguendo le normative locali per lo smaltimento dei rifiuti. Per
ulteriori informazioni sul trattamento, recupero e riciclaggio di
questo prodotto, contattare l'idoneo ufficio locale, il servizio di
raccolta dei rifiuti domestici o il negozio presso il quale il
prodotto è stato acquistato.
11
Page 12

Utilizzazione
La cappa è realizzata per essere utilizzata unicamente in
versione FILTRANTE.
Versione filtrante
L’aria aspirata verrà sgrassata e deodorata prima di essere
riconvogliata nella stanza. Per utilizzare la cappa in questa
versione è necessario installare un sistema di filtraggio
aggiuntivo a base di carboni attivi.
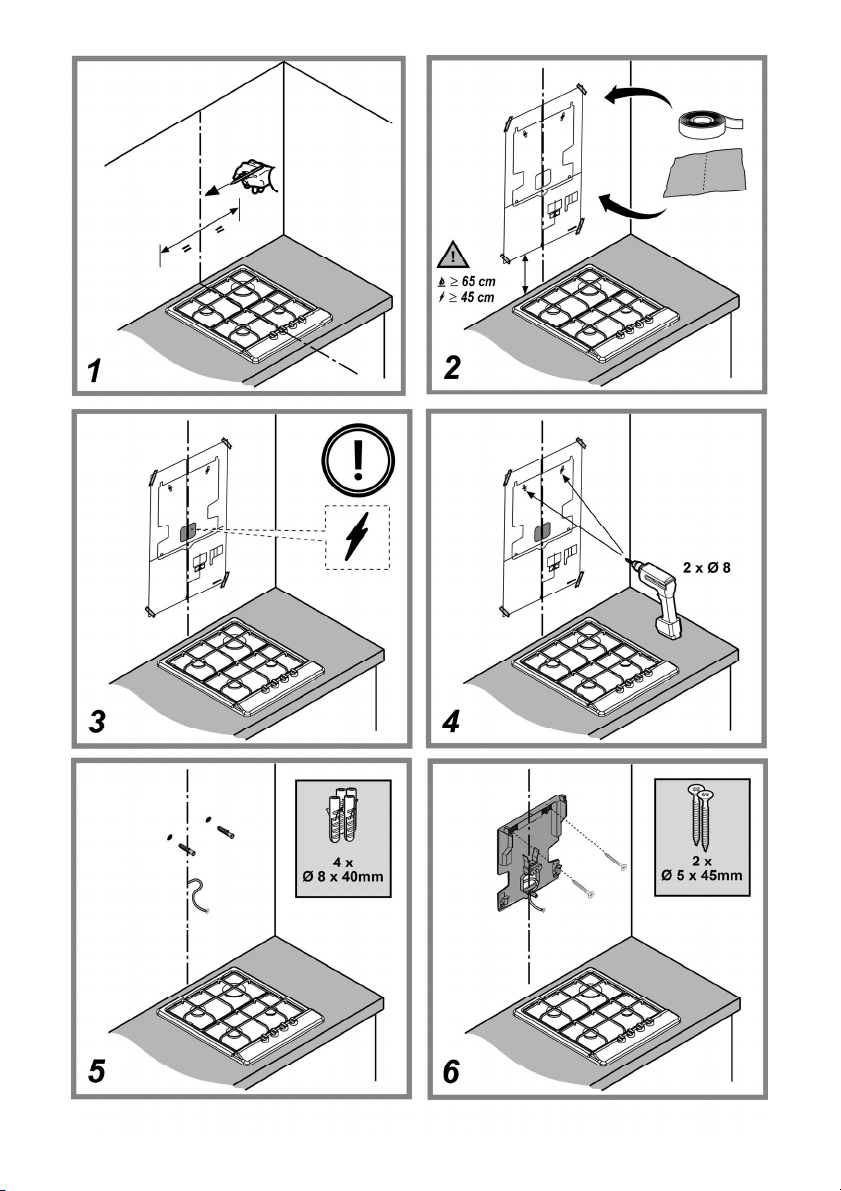
Installazione
La distanza minima fra la superficie di supporto dei recipienti
sul dispositivo di cottura e la parte più bassa della cappa da
cucina deve essere non inferiore a 45cm in caso di cucine
elettriche e di 65cm in caso di cucine a gas o miste.
Se le istruzioni di installazione del dispositivo di cottura a gas
specificano una distanza maggiore, bisogna tenerne conto.
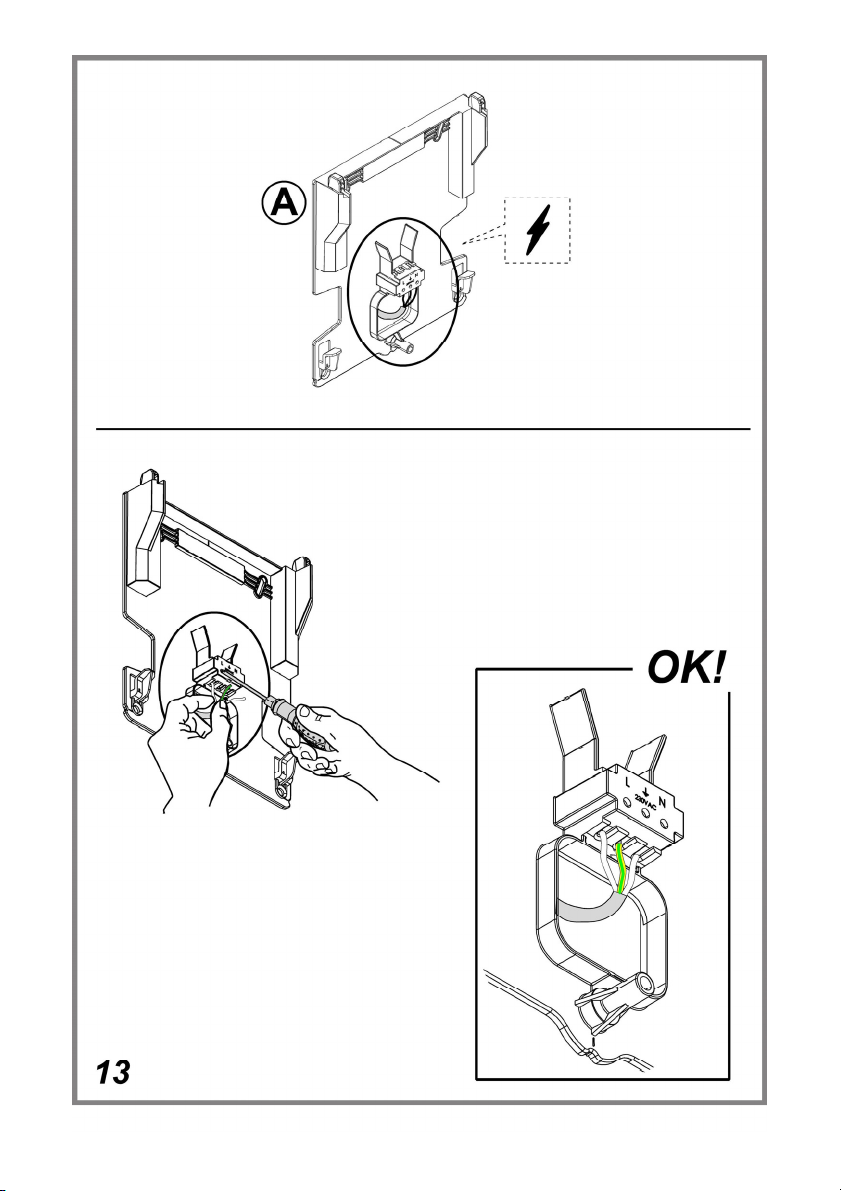
Collegamento Elettrico
La tensione di rete deve corrispondere alla tensione riportata
sull'etichetta caratteristiche situata all’interno della cappa.
Il prodotto è inteso per il collegamento diretto alla rete di
alimentazione, applicare quindi un interruttore bipolare a
norme che assicuri la disconnessione completa della rete
nelle condizioni della categoria di sovratensione III,
conformemente alle regole di installazione.
Attenzione! Prima di ricollegare il circuito della cappa
all’alimentazione di rete e di verificarne il corretto
funzionamento, controllare sempre che il cavo di rete sia stato
montato correttamente.
ATTENZIONE! La staffa fissaggio a muro (particolare A –
Fig.12-13) è dotata di morsettiera, che deve essere
collegata all’impianto elettrico domestico.
L'installazione, sia elettrica che meccanica, deve essere
eseguita da personale specializzato.
Montaggio
Prima di iniziare con l'installazione:
• Verificare che il prodotto acquistato sia di dimensioni
idonee alla zona di installazione prescelta.
• Verificare che all'interno della cappa non vi sia (per motivi
di trasporto) materiale di corredo (ad esempio buste con
viti, garanzie etc) , eventualmente va tolto e conservato.
• Se possibile scollegare e rimuovere i mobili sottostanti ed
intorno l’area di installazione (parete o soffitto) della
cappa in modo da avere una migliore accessibilità.
Altrimenti proteggere per quanto possibile i mobili e tutte
le parti interessate all'installazione. Scegliere una
superficie piatta da coprire con una protezione dove poi
appoggiare la cappa e i particolari a corredo.
La cappa è dotata di tasselli di fissaggio adatti alla maggior
parte di pareti/soffitti. E’ tuttavia necessario interpellare un
tecnico qualificato per accertarVi sull’idoneità dei materiali a
seconda del tipo di parete/soffitto. La/il parete/soffitto deve
essere sufficientemente robusto da sostenere il peso della
cappa.
Funzionamento
Usare la velocità maggiore in caso di particolare
concentrazione di vapori di cucina. Consigliamo di accendere
l'aspirazione 5 minuti prima di iniziare a cucinare e di lasciarla
in funzione a cottura terminata per altri 15 minuti circa.
1 - Sistema di sicurezza
Sgancio/Aggancio MESH-PLATE :
la cappa è provvista di un sistema di sicurezza regolato
elettronicamente all'agancio del MESH-PLATE (B);
se il MESH-PLATE di protezione non è inserito, la cappa non
entra in funzione.
PER TOGLIERE IL MESH-PLATE (Fig.15-16a-16b)
- premere il tasto "
" , e tenerlo premuto per 5 secondi
- attendere il segnale acustico (che sarà preceduto da un
segnale luminoso/lampeggio, di circa 2 minuti)
- sganciare il MESH-PLATE
PER INSERIRE IL MESH.PLATE (Fig.18b-18c-19)
- agganciare il MESH-PLATE
- attendere l’interrompersi del segnale luminoso (circa 2
minuti); la cappa è di nuovo pronta per l’utilizzo
2 - Velocità di aspirazione minima
3 - Velocità di aspirazione media
4 - Velocità di aspirazione massima
5 - Temporizzazione velocità
la cappa viene portata a velocità minima per 10 minuti,
dopodichè si spegne.
6 – ON/FF Luci
12
Page 13

Manutenzione
Attenzione! Prima di qualsiasi operazione di pulizia o
manutenzione, disinserire la cappa dalla rete elettrica
togliendo la spina o staccando l’interruttore generale
dell’abitazione.
Pulizia
La cappa va frequentemente pulita (almeno con la stessa
frequenza con cui si esegue la manutenzione dei filtri grassi),
sia internamente che esternamente. Per la pulizia usare un
panno inumidito con detersivi liquidi neutri.
Evitare l’uso di prodotti contenenti abrasivi. NON UTILIZZARE
ALCOOL!
Attenzione: L’inosservanza delle norme di pulizia
dell’apparecchio e della sostituzione dei filtri comporta rischi di
incendi. Si raccomanda quindi di attenersi alle istruzioni
suggerite.
Si declina ogni responsabilità per eventuali danni al motore,
incendi provocati da un’impropria manutenzione o
dall’inosservanza delle suddette avvertenze.
Filtro antigrasso
Fig. 16-18Trattiene le particelle di grasso derivanti dalla
cottura.
Il filtro antigrasso metallico deve essere pulito una volta al
mese con detergenti non aggressivi, manualmente oppure in
lavastoviglie a basse temperature ed a ciclo breve.
Con il lavaggio in lavastoviglie il filtro antigrasso metallico può
scolorirsi ma le sue caratteristiche di filtraggio non cambiano
assolutamente.
Per smontare il blocco filtro antigrasso:
- eseguire la procedure di sgancio MESH-PLATE (come
descritto nel paragrafo Funzionamento)
- estrarre il blocco filtro antigrasso, tirandolo con decisione
verso il basso
Fig.15-16
Per rimontare il blocco filtro antirgrasso, procedere in senso
inverso:
- riagganciare il blocco filtro antigrasso, facendolo aderire alle
apposite calamite
- esegurei la procedura di aggancio MESH-PLATE (come
descritto nel paragrafo Funzionamento)
Fig.18-19
Filtro ai carboni attivi (Solo per Versione Filtrante)
Fig. 20
Trattiene gli odori sgradevoli derivanti dalla cottura.
Il filtro al carbone può essere lavato ogni due mesi in acqua
calda e detergenti idonei o in lavastoviglie a 65°C (in caso di
lavaggio in lavastoviglie eseguire il ciclo di lavaggio completo
senza stoviglie all'interno).
Togliere l'acqua in eccesso senza rovinare il filtro, dopodiché
riporlo nel forno per 10 minuti a 100°C per asciugarlo
definitivamente.
Sostituire il materassino ogni 3 anni e ogni volta che il panno
risulta danneggiato.
- Aprire il pannello di copertuta superiore
- Sganciare lateralemnte il filtro ed estrarlo dal corpo cappa
Per rimontare il nuovo filtro carbone procedere in senso
inverso
Sostituzione Lampade
La cappa è dotata di un sistema di illuminazione basato sulla
tecnologia LED.
I LED garantiscono una illuminazione ottimale, una durata fino
a 10 volte maggiore delle lampade tradizionali e consentono
di risparmiare il 90% di energia elettrica.
Per la sostituzione rivolgersi al servizio assistenza tecnica.
13
Page 14

EN - Instruction on mounting and use
Closely follow the instructions set out in this manual. All
responsibility, for any eventual inconveniences, damages or
fires caused by not complying with the instructions in this
manual, is declined. The hood is conceived for the suction of
cooking fumes and steam and is destined only for domestic
use.
! It is important to conserve this booklet for consultation at
any moment. In the case of sale, cession or move, make
sure it is together with the product.
! Read the instructions carefully: there is important
information about installation, use and safety.
! Do not carry out electrical or mechanical variations on the
product or on the discharge conduits.
! Before proceeding with the installation of the appliance
verify that there are no damaged all components.
Otherwise contact your dealer and do not proceed with
the installation.
Caution
WARNING! Do not connect the appliance to the mains until
the installation is fully complete.
Before any cleaning or maintenance operation, disconnect
hood from the mains by removing the plug or disconnecting
the mains electrical supply.
Always wear work gloves for all installation and maintenance
operations.
The appliance is not intended for use by children or persons
with impaired physical, sensorial or mental faculties, or if
lacking in experience or knowledge, unless they are under
supervision or have been trained in the use of the appliance
by a person responsible for their safety.
This appliance is designed to be operated by adults, children
should be monitored to ensure that they do not play with the
appliance.
This appliance is designed to be operated by adults. Children
should not be allowed to tamper with the controls or play with
the appliance.
Never use the hood without effectively mounted grating!
The hood must NEVER be used as a support surface unless
specifically indicated.
The premises where the appliance is installed must be
sufficiently ventilated, when the kitchen hood is used together
with other gas combustion devices or other fuels.
The ducting system for this appliance must not be connected
to any existing ventilation system which is being used for any
other purpose such as discharging exhaust fumes from
appliances burning gas or other fuels.
The flaming of foods beneath the hood itself is severely
prohibited.
The use of exposed flames is detrimental to the filters and
may cause a fire risk, and must therefore be avoided in all
circumstances.
Any frying must be done with care in order to make sure that
the oil does not overheat and ignite.
Accessible parts of the hood may became hot when used with
cooking appliance.
With regards to the technical and safety measures to be
adopted for fume discharging it is important to closely follow
the regulations provided by the local authorities.
The hood must be regularly cleaned on both the inside and
outside (AT LEAST ONCE A MONTH).
This must be completed in accordance with the maintenance
instructions provided in this manual). Failure to follow the
instructions provided in this user guide regarding the cleaning
of the hood and filters will lead to the risk of fires.
Do not use or leave the hood without the lamp correctly
mounted due to the possible risk of electric shocks.
We will not accept any responsibility for any faults, damage or
fires caused to the appliance as a result of the nonobservance of the instructions included in this manual.
This appliance is marked according to the European directive
2002/96/EC on Waste Electrical and Electronic Equipment
(WEEE). By ensuring this product is disposed of correctly, you
will help prevent potential negative consequences for the
environment and human health, which could otherwise be
caused by inappropriate waste handling of this product.
The symbol
on the product, or on the documents
accompanying the product, indicates that this appliance may
not be treated as household waste. Instead it should be taken
to the appropriate collection point for the recycling of electrical
and electronic equipment. Disposal must be carried out in
accordance with local environmental regulations for waste
disposal.
For further detailed information regarding the process,
collection and recycling of this product, please contact the
appropriate department of your local authorities or the local
department for household waste or the shop where you
purchased this product.
Additional Installation Specifications:
Use only the fixing screws supplied with the product for
installation or, if not supplied, purchase the correct screws
type.
Use the correct length for the screws which are identified in
the Installation Guide.
In case of doubt, consult an authorised service assistance
centre or similar qualified person.
WARNING! Failure to install the screws or fixing device in
accordance with these instructions may result in electrical
hazards.
14
Page 15

Use
The hood is designed to be used solely as a FILTER version.
Filter version
One active charcoal filter is needed for this and can be
obtained from your usual retailer.
The filter removes the grease and smells from the extracted
air before sending it back into the room through the upper
outlet grid.
Installation
The minimum distance between the supporting surface for the
cooking equipment on the hob and the lowest part of the
range hood must be not less than 45cm from electric cookers
and 65cm from gas or mixed cookers.
If the instructions for installation for the gas hob specify a
greater distance, this must be adhered to.
Electrical connection
The network voltage must correspond to the voltage specified
on the label specifications situated on the inner part of the
hood. The product is intended to be directly connected to the
mains electrical supply, therefore, install a standardised
bipolar switch that ensures total disconnection of the network
when in overvoltage category III, in compliance with the rules
of installation.
Warning! Before reconnecting the hood’s circuit to the power
supply network, and before verifying correct operation, always
check that the network cable has been assembled correctly.
WARNING! The wall bracket (particular A – Fig.12-13) is
equipped with a terminal board, which must be connected
to the domestic electrical system.
Specialised personnel must carry out both the electrical
and the mechanical installation.
Mounting
Before beginning installation:
• Check that the product purchased is of a suitable size for
the chosen installation area.
• Check (for transport reasons) that there is no other
supplied material inside the hood (e.g. packets with
screws (*), guarantees (*), etc.), eventually removing
them and keeping them.
• If possible, disconnect and move freestanding or slide-in
range from cabinet opening to provide easier access to
rear wall/ceiling. Otherwise put a thick, protective
covering over countertop, cooktop or range to protect
from damage and debris. Select a flat surface for
assembling the unit. Cover that surface with a protective
covering and place all canopy hood parts and hardware
in it.
Expansion wall plugs are provided to secure the hood to most
types of walls/ceilings. However, a qualified technician must
verify suitability of the materials in accordance with the type of
wall/ceiling. The wall/ceiling must be strong enough to take
the weight of the hood. Do not tile, grout or silicone this
appliance to the wall. Surface mounting only.
Operation
Use the high suction speed in cases of concentrated kitchen
vapours. It is recommended that the cooker hood suction is
switched on for 5 minutes prior to cooking and to leave in
operation during cooking and for another 15 minutes
approximately after terminating cooking.
1 – Safety System
MESH-PLATE Release/Connection:
the hood is provided with an electronically regulated safety
system on connection of the MESH-PLATE (B);
if the protection MESH-PLATE is not inserted, the hood will
not operate.
TO REMOVE THE MESH-PLATE (Fig.15-16a-16b)
- press the "
" key and keep it pressed for 5 seconds
- wait for the acoustic signal (it will be preceded by a
luminous/flashing signal, for approximately 2 minutes)
- release the MESH-PLATE
TO INSERT THE MESH-PLATE (Fig.18b-18c-19)
- connect the MESH-PLATE
- wait for the luminous signal to stop (approximately 2
minutes); the hood is once again ready for use
2 - Low suction speed
3 - Medium suction speed
4 - High suction speed
5 – Timed speed
the hood is brought to a minimum speed for 10 minutes after
which, it extinguishes.
6 – Lights ON/FF
15
Page 16

Maintenance
ATTENTION! Before performing any maintenance operation,
isolate the hood from the electrical supply by switching off at
the connector and removing the connector fuse.
Or if the appliance has been connected through a plug and
socket, then the plug must be removed from the socket.
Cleaning
The cooker hood should be cleaned regularly (at least with the
same frequency with which you carry out maintenance of the
fat filters) internally and externally. Clean using the cloth
dampened with neutral liquid detergent. Do not use abrasive
products. DO NOT USE ALCOHOL!
WARNING: Failure to carry out the basic cleaning
recommendations of the cooker hood and replacement of the
filters may cause fire risks.
Therefore, we recommend observing these instructions.
The manufacturer declines all responsibility for any damage to
the motor or any fire damage linked to inappropriate
maintenance or failure to observe the above safety
recommendations.
Grease filter
Fig. 16-18
Traps cooking grease particles.
The grease filter must be cleaned once a month using non
aggressive detergents, either by hand or in the dishwasher,
which must be set to a low temperature and a short cycle.
When washed in a dishwasher, the grease filter may discolour
slightly, but this does not affect its filtering capacity.
To disassemble the anti-grease filter block:
- execute the procedure to release the MESH-PLATE (as
described in the paragraph related to Operation)
- extract the anti-grease filter block by firmly pulling it
downwards
Fig.15-16
To reassemble the anti-grease filter block, proceed in reverse
order:
- reconnect the anti-grease filter block, making it adhere to the
relevant magnets
- execute the procedure to connect the MESH-PLATE (as
described in the paragraph related to Operation)
Fig.18-19
Charcoal filter (filter version only)
Fig. 20
It absorbs unpleasant odours caused by cooking.
The charcoal filter can be washed once every two months
using hot water and a suitable detergent, or in a dishwasher at
65°C (if the dishwasher is used, select the full cycle function
and leave dishes out).
Eliminate excess water without damaging the filter, then put it
in the oven for 10 minutes at 100° C to dry completely.
Replace the mattress every 3 years and when the cloth is
damaged.
- Open the upper panel cover
- Release the filter from the side and extract it from the hood
To reassemble the new carbon filter, proceed in reverse order.
Replacing lamps
The hood is equipped with a lighting system based on LED
technology.
The LEDs guarantee an optimum lighting, a duration up to 10
times as long as the traditional lamps and allow to save 90%
electrical energy.
For replacement, contact the technical service.
16
 Loading...