

Page 1

TerraTec Home Cinema User Manual
Version 6
Page 1
Introducing: The TerraTec Home Cinema .............................................................................. 2
Installation ............................................................................................................................. 3
Launching the software for the first time ................................................................................ 5
Design and controls ..............................................................................................................15
The on-screen display ..........................................................................................................21
The info bar ......................................................................................................................... 22
Picture-in-Picture (PiP) ........................................................................................................ 24
EPG—the electronic program guide .................................................................................... 25
Recordings .......................................................................................................................... 32
Timeshifting ......................................................................................................................... 44
Playback.............................................................................................................................. 45
Teletext ............................................................................................................................... 47
The settings ......................................................................................................................... 49
Context menus .................................................................................................................... 73
Key assignments ................................................................................................................. 75
General ............................................................................................................................... 75
Annex .................................................................................................................................. 78
Legend:
This symbol indicates useful information or instructions for the
functions of the TerraTec Home Cinema.
This symbol indicates functions that are included with the
TerraTec Home Cinema, but not with the
TerraTec Home Cinema Basic. You can enable these functions with a
serial number, which you can purchase at our Webshop on our
website.
Page 2

TerraTec Home Cinema User Manual
Version 6
Page 2
Introducing: The TerraTec Home Cinema
The TerraTec Home Cinema is your analogue and digital TV control centre. The full range of functions
and features of your new TV hardware—station selection, timeshifting, recording and teletext—are
united in the TerraTec Home Cinema.
Page 3

TerraTec Home Cinema User Manual
Version 6
Page 3
Installation
Before installing the TerraTec Home Cinema software, first connect your TV tuner to the
USB port or plug your TV card into an available PCI slot on your computer and install the
drivers.
You can select your location as soon as you launch the installation of the TerraTec Home Cinema
software. The installation wizard shows you what devices are already installed. Then, click "Finish" to
start the installation process.
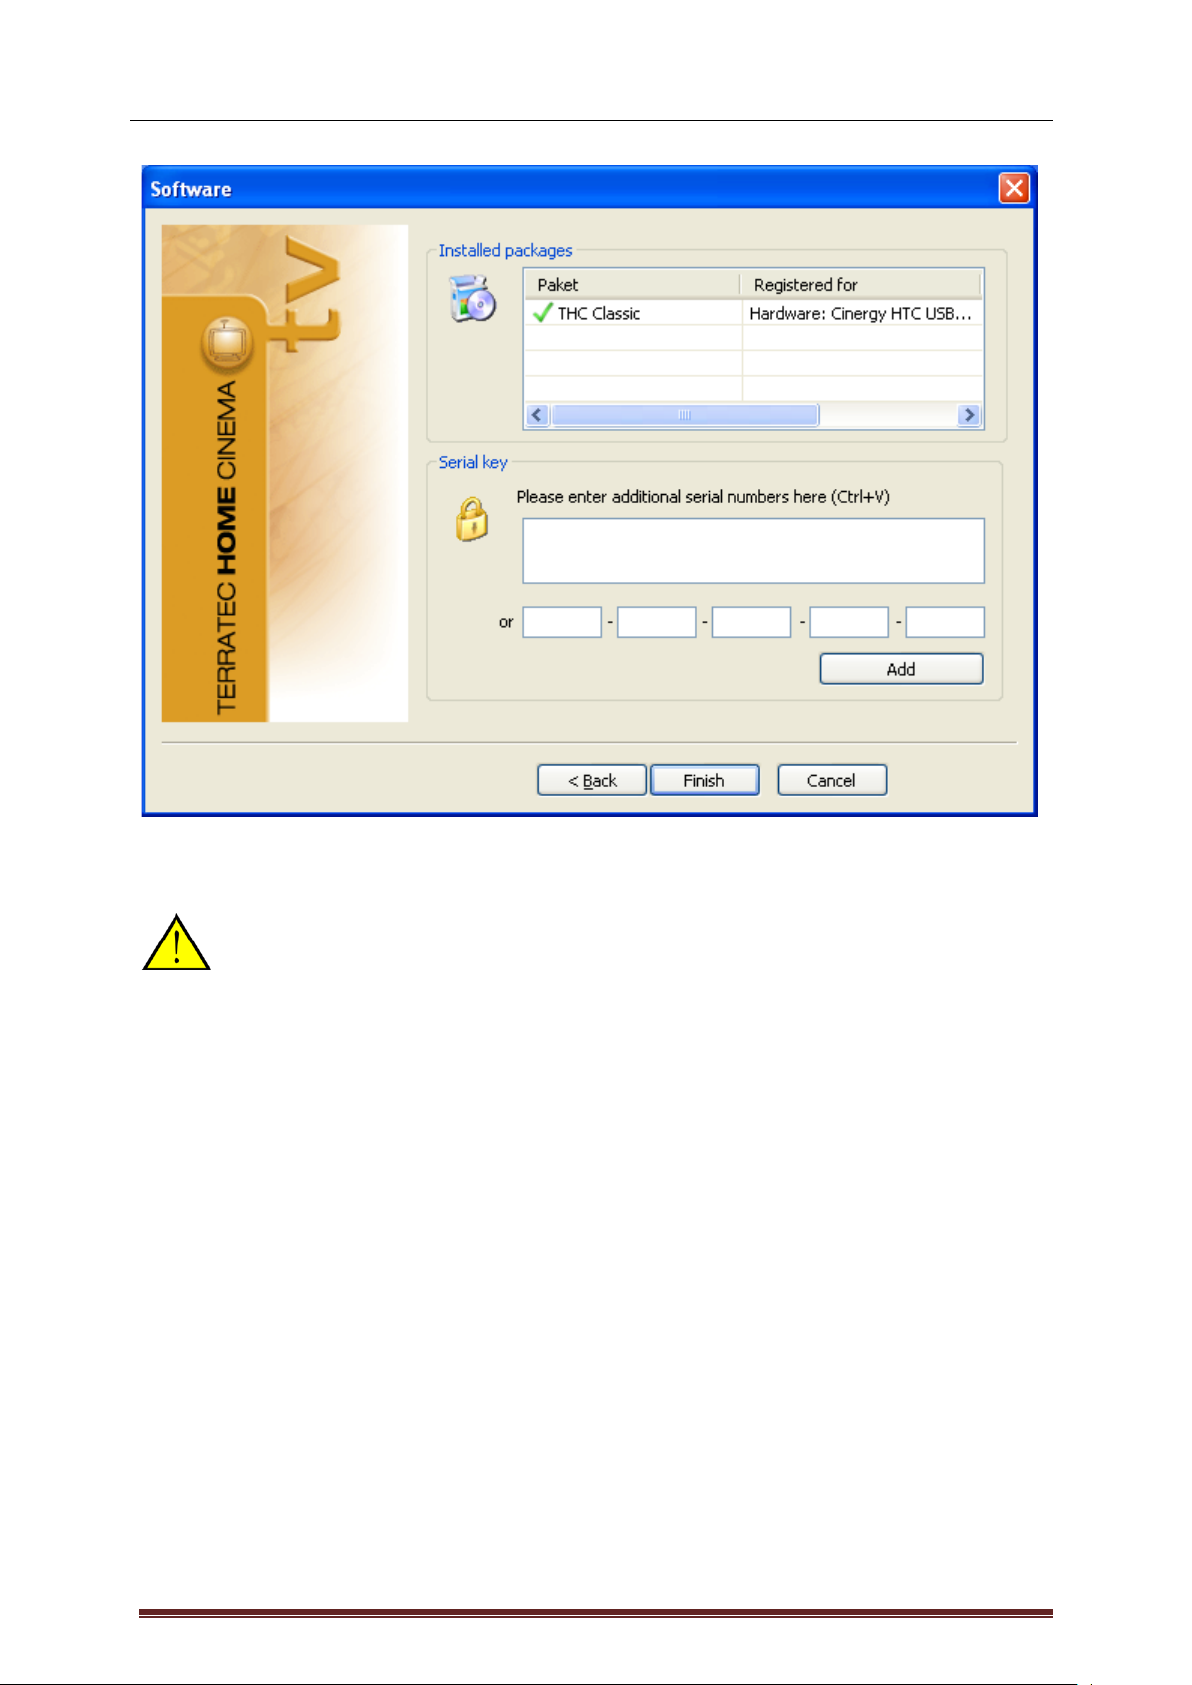
If you are using the Basic version, and wish to use the advanced features of the
TerraTec Home Cinema software, you will have to enter or confirm a serial number. To do so, tick the
option for "I want to add or review serial numbers".
Page 4
TerraTec Home Cinema User Manual
Version 6
Page 4
In the next step, enter your serial number and then click "Add". Here, in the list of installed packages,
the data for your package are displayed. When finished, click "Finish".
You can expand the range of features of the TerraTec Home Cinema Basic with
upgrades that can be purchased at the TerraTec Webshop.
Page 5

TerraTec Home Cinema User Manual
Version 6
Page 5
Launching the software for the first time
The TerraTec Home Cinema configuration menu will open automatically when launching the software
for the first time. The basic settings, which are described in detail below, can be configured here.
First, you should carry out the following steps:
1. Start the channel scan!
2. Create a Favourites list!
3. Define the storage location for recordings!
1. Start the channel scan!
Device – Select the device for which to perform a station scan. This is only necessary once for each
standard (e.g. DVB-T). If you have installed multiple devices that use the same standard, the found
stations will be available for all of those devices, of course.
Filter – Restrict the scan to free, encrypted, or all available stations (no filter).
Scan mode – Depending on the TV standard, a variety of options are available here. For more
information, please see the Scan sections for the relevant TV standard.
Click "Scan" to start the scan.
Page 6
TerraTec Home Cinema User Manual
Version 6
Page 6
DVB-T scan
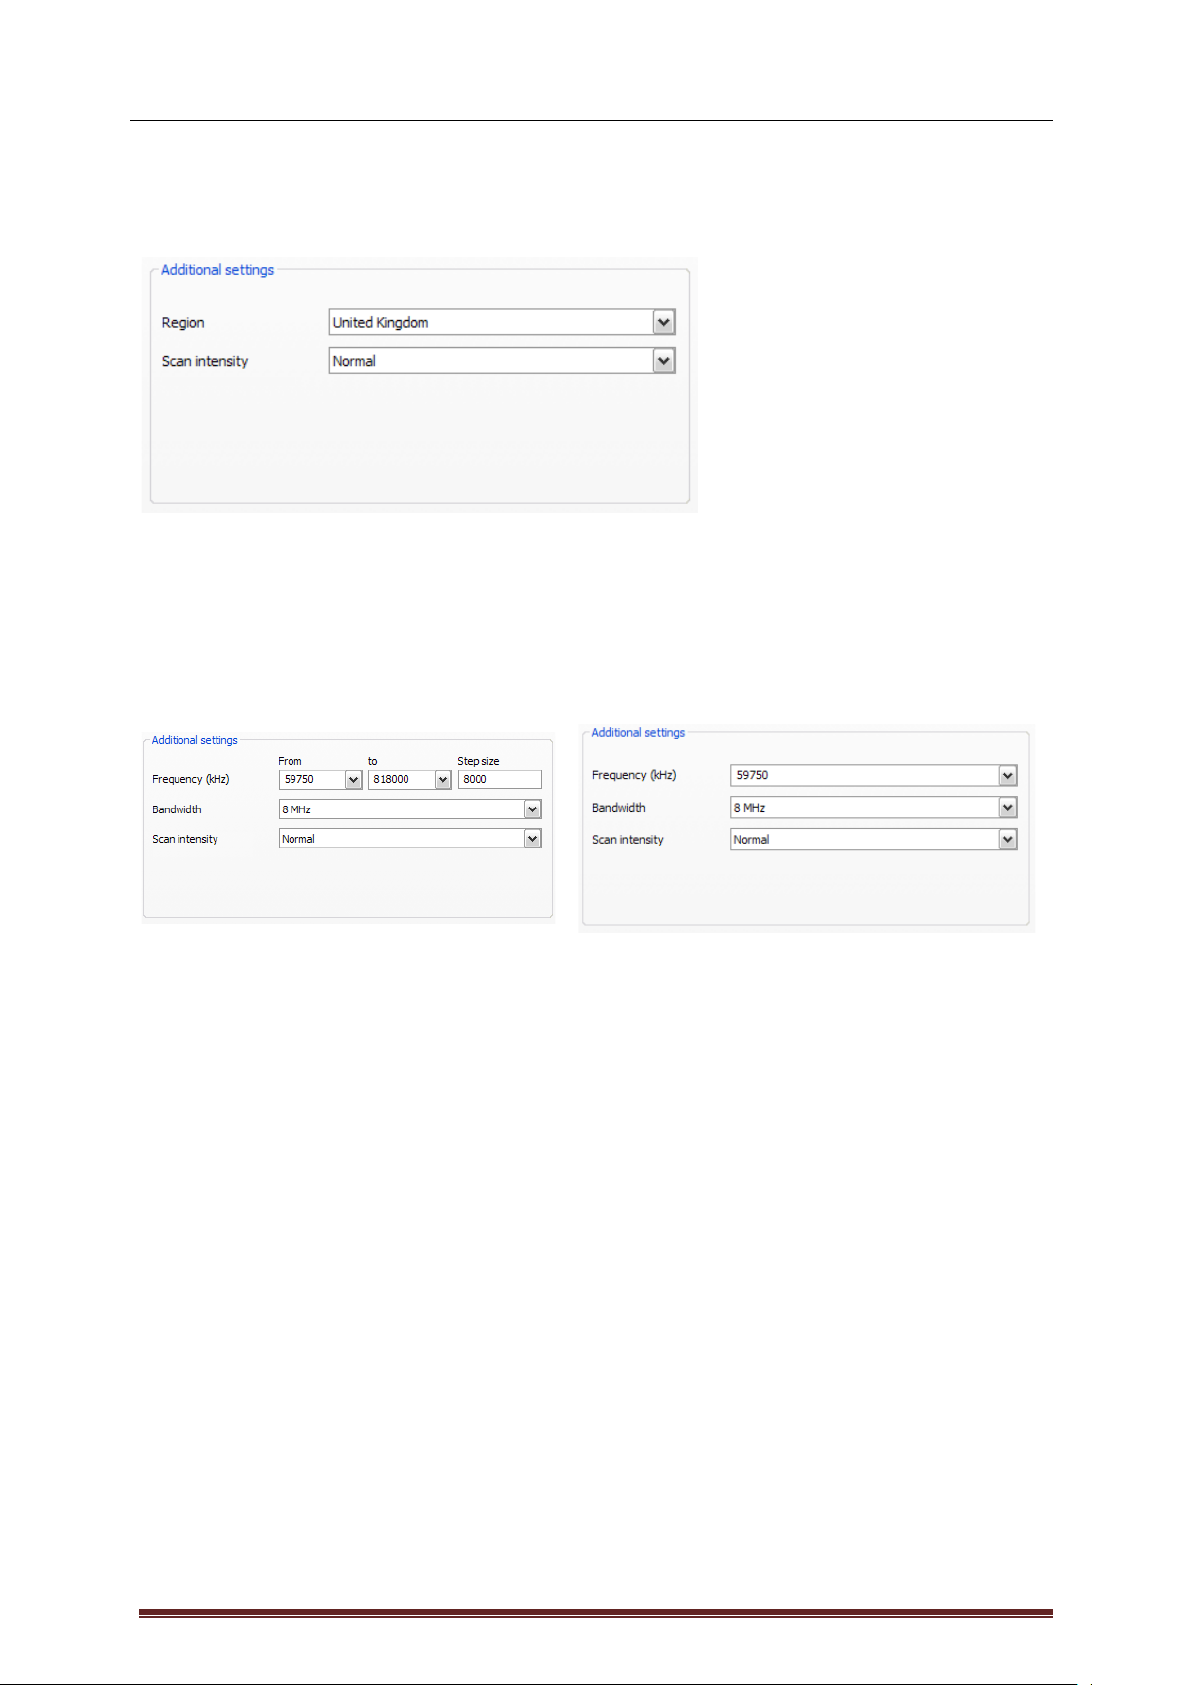
Scan mode: Scan by region
Region – Select your reception region from the list. If you cannot find it, simply select "All".
Scan intensity – Some countries, such as France, broadcast stations slightly off of the standardised
frequencies. This option lets you customise the scan in cases in which it does not find all stations while
in "Normal" mode.
Scan mode: Scan by frequency band or single frequency
Scan one frequency band
Scan single frequency
Frequency (kHz) – Specialists will appreciate the ability to select an individual frequency or frequency
band and its step size for scanning.
Bandwidth – DVB-T can be broadcast at varying bandwidths. 7 or 8 MHz are common in Europe,
while 6 MHz is used in Taiwan, for example.
Scan intensity – see "Scan mode: Scan by region"
Page 7
TerraTec Home Cinema User Manual
Version 6
Page 7
DVB-S scan
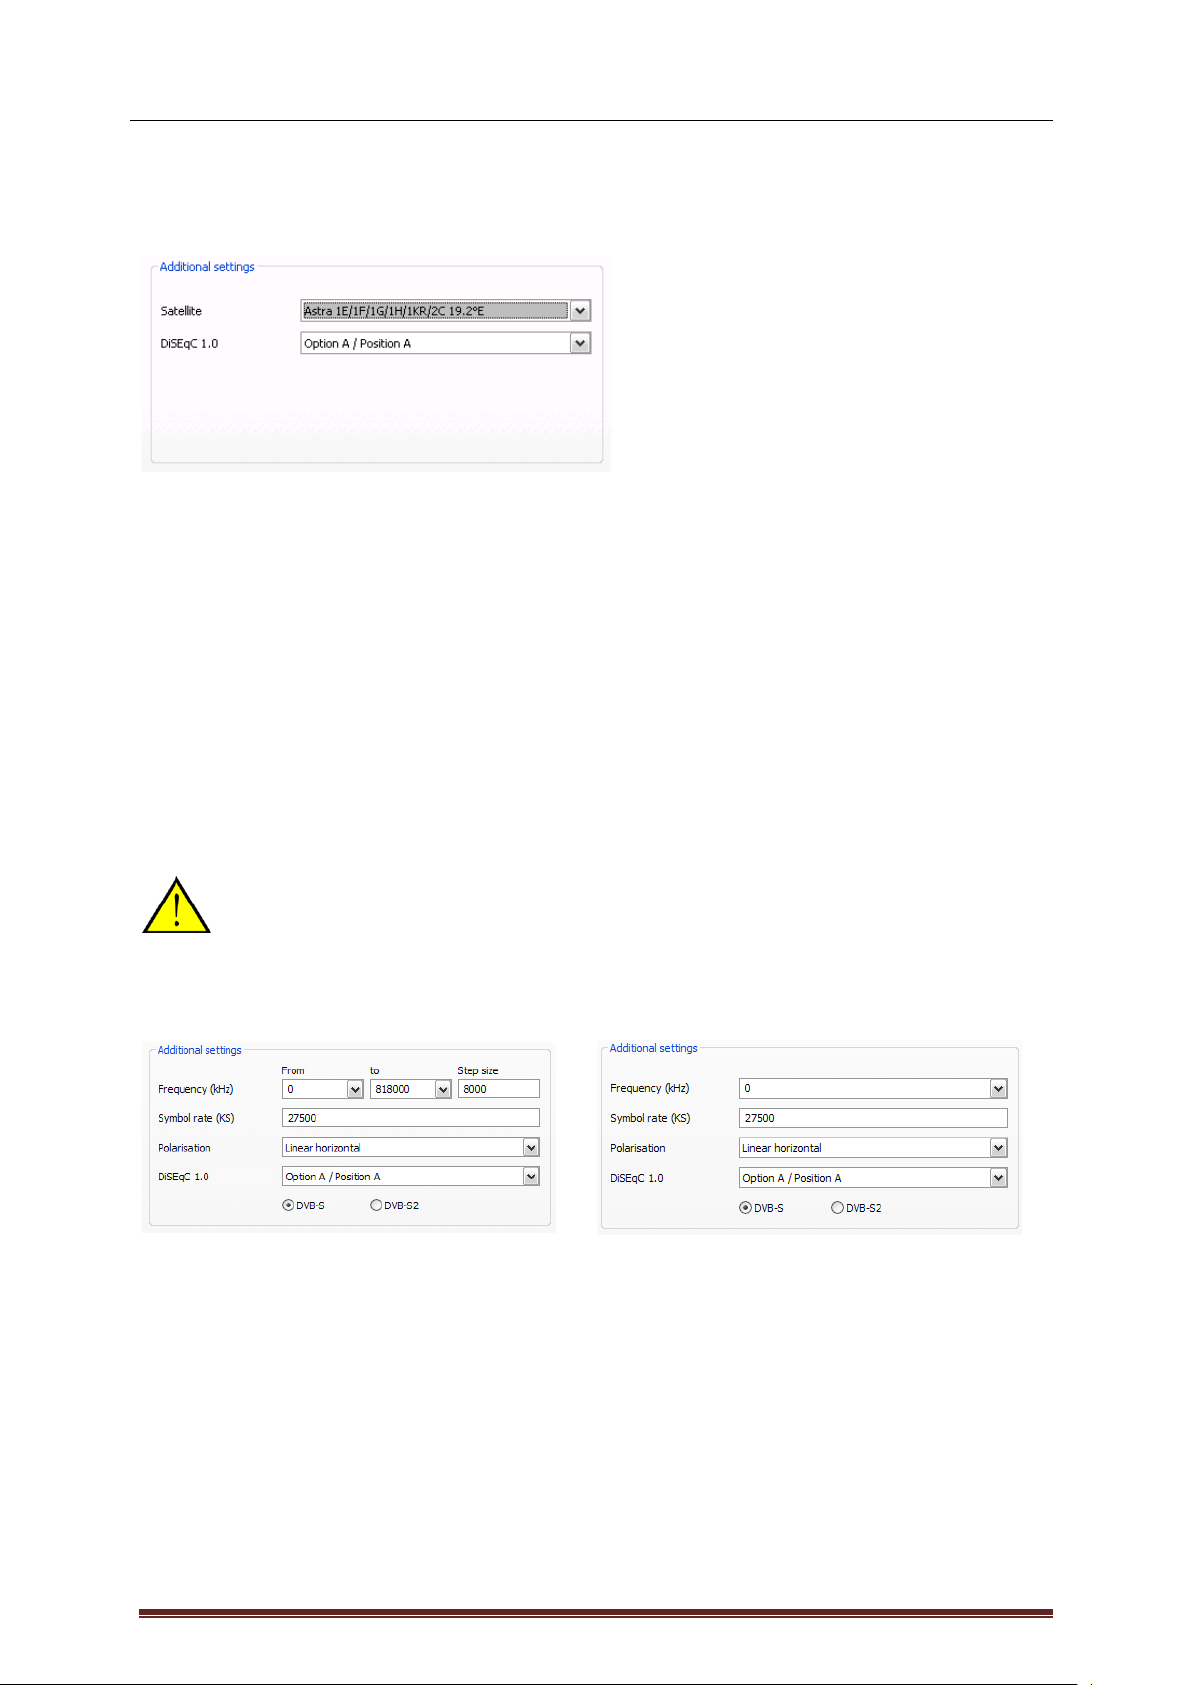
Scan mode: Scan by satellite
Satellite – Select the satellite to which you have set your dish.
DiSEqC 1.0 – DiSEqC is used to control satellite systems that receive data (TV) from more than one
satellite. Configure this setting to match those on your satellite system. DiSEqC 1.0 allows you to
receive up to four different satellites.
Example:
Your satellite system is pointed towards Astra and Eutelsat. In this case, configure the DiSEqC options
as follows:
Option A / Position A during the scan on Astra
Option B / Position B during the scan on Eutelsat
Since, unfortunately, no standardised settings exist for satellite systems, often the only
option is trial and error if no information about the satellite system is available. For the
same reason, we hope you understand that our support team may not always have the
answers regarding your settings.
Scan mode: Scan by frequency band or single frequency
Scan one frequency band
Scan single frequency
Frequency (kHz) – Specialists will appreciate the ability to select an individual frequency or frequency
band and its step size for scanning.
Symbol rate (KS) – The symbol rate is the specified data transmission speed. It must be specified
when scanning a frequency band or individual frequency.
Polarisation – A frequency can be polarised horizontally or vertically. Select the correct polarisation
here.
FEC – (forward error correction) This option specifies the error protection of the signal.
Page 8
TerraTec Home Cinema User Manual
Version 6
Page 8
Information on satellite programs and their parameters can be found at a number of sources,
including:
http://www.lyngsat.com
DVB-C scan
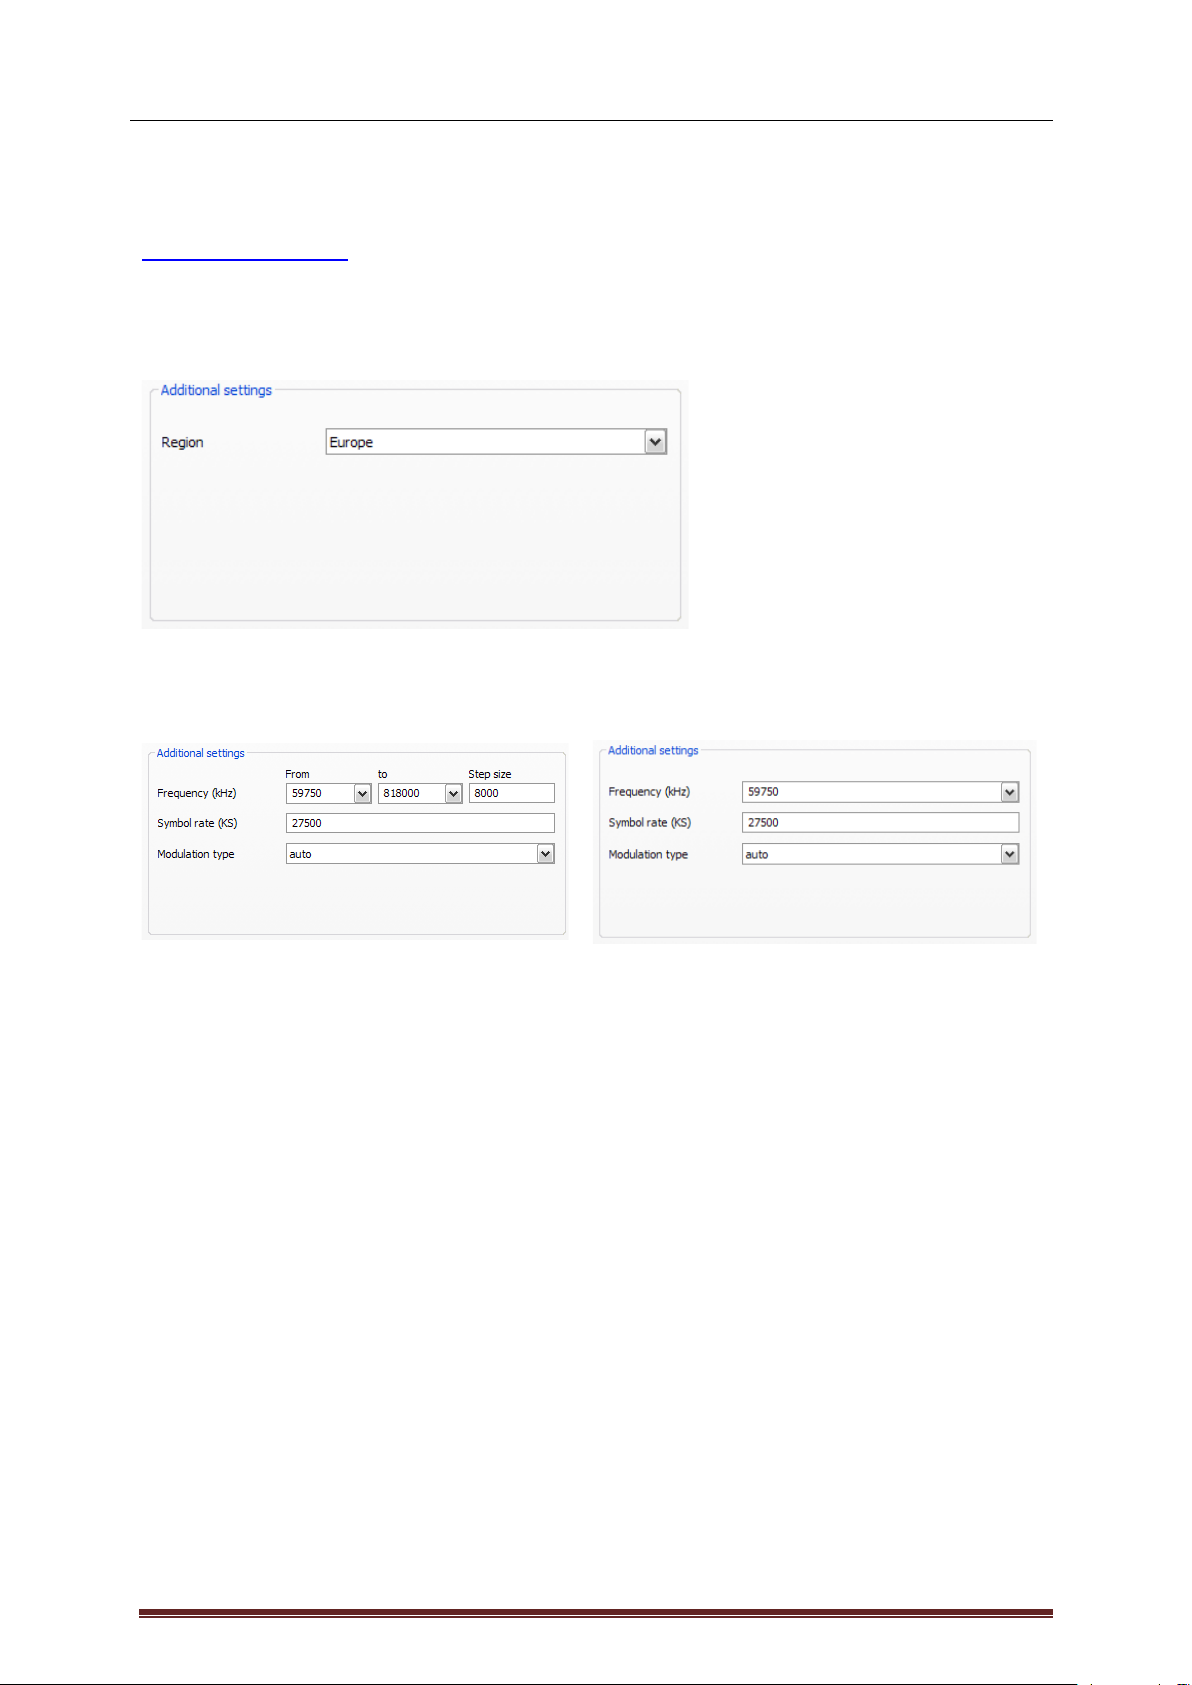
Scan mode: Scan by region
Region – Select your reception region from the list. If you cannot find it, simply select "All".
Scan mode: Scan by frequency band or single frequency
Scan one fre quenc y ban d
Scan si ngle frequ ency
Frequency (kHz) – Specialists will appreciate the ability to select an individual frequency or frequency
band and its step size for scanning.
Symbol rate (KS) – The symbol rate is the specified data transmission speed. It must be specified
when scanning a frequency band or individual frequency.
Modulation type – The modulation type is a further option for data transmission and can be specified
for certain programs.
Page 9

TerraTec Home Cinema User Manual
Version 6
Page 9
Analogue scan
Scan mode: Scan by region
Region – Select your reception region from the list. If you cannot find it, simply select "All".
Scan mode: Scan by frequency band or single frequency
Scan one fre quenc y ban d
Scan single frequency
Frequency (kHz) – Specialists will appreciate the ability to select an individual frequency or frequency
band and its step size for scanning.
If your TV solution has analogue inputs, then they are treated like channels. The names
for the analogue inputs are automatically assigned and depend on the type of connection
-> S-Video / composite.
Page 10

TerraTec Home Cinema User Manual
Version 6
Page 10
Station list import
Furthermore, you have two options for importing existing station lists. To access these, click the
following in the selection menu for the scan mode:
Import stations from file
This allows you to import a station list from a previous channel scan.
Import stations from Internet
Here, first select your transmission standard, then the file that you want to import. The lists are named
according to the region or satellite.
An Internet import is particularly recommended for the DVB-S transmission standard,
because the satellite scan can take up to an hour. With an import, the stations are presorted and can be added to your station database with just a click. This method has you
up and running fast.
Page 11

TerraTec Home Cinema User Manual
Version 6
Page 11
2. Create a Favourites list!
The left side of the station management tab contains a list of all of the stations found during one or
more scans. The list can be filtered according to reception types, filters (whether the stations are free
or encrypted) or whether they are TV or radio broadcasts.
Use the button to add selected stations to the Favourites list, or click the button to add all
stations at once.
You will only be able to select stations that are in a Favourites list. Analogue video inputs
are indicated by the symbols for composite and for S-Video, and can be added to
the favourites list just like "regular" channels.
Page 12

TerraTec Home Cinema User Manual
Version 6
Page 12
Setting up Favourites lists
To sort stations based on your interests, select them and drag them up or down the list using the
and buttons.
Use the and buttons to remove one or more stations from the Favourites list.
Special Favourites lists (only with TerraTec Home Cinema)
In addition to the standard Favourites lists for radio and TV, you can also create your own special
Favourites lists.
Page 13

TerraTec Home Cinema User Manual
Version 6
Page 13
These Favourites lists can perform a variety of functions, for example sorting stations according to
DVB-T coverage areas, transmission standards (e.g. analogue/DVB-T/DVB-S) or genres such as
sports, movies or news.
To add a station to a special Favourites list, select the station and then click one of the coloured
buttons . Individual stations may be added to more than one list.
Click to name the special Favourites list.
Where do I find the Favourites lists?
You can access your Favourites lists by "right-clicking" the TV picture and then opening "TV
favourites".
Page 14

TerraTec Home Cinema User Manual
Version 6
Page 14
How can switch stations?
There are several ways to navigate and jump through the station list.
To switch to the next station in the list, press the key on your keyboard. To return to the previous
station, press the key. To confirm, simply press the Enter key.
Or:
Right-click within the TV window and select "Station +" from the context menu to go to the next station,
or "Station –" to return to the previous.
Or:
Using the left mouse button, click the "arrow up" button in the control window to go to the next station,
or the "arrow down" button to return to the previous, and then confirm with OK.
3. Define the storage location for recordings!
In the Settings of the TerraTec Home Cinema, you have the option of changing the default storage
location for your recordings. To do so, click the button with the small file symbol next to the "Store
recordings in" field. Now you can browse to the directory of your choosing and select it by clicking the
"OK" button.
Page 15

TerraTec Home Cinema User Manual
Version 6
Page 15
Design and controls
The software essentially consists of the TV window and the user interface.
TV window
User interface
The user interface contains:
• Display – a context-sensitive display for additional information
• Mode button (TV, radio, playback of recordings)
• Navigation buttons (station selection, menu navigation)
• Teletext button (open/close teletext, transparent teletext)
• Subtitles
• Display functions (open/close TV window, full screen)
• Recording navigation functions (playback, record, pause, etc.)
• Audio functions (audio channel / format, volume, mute)
• Still image function
• On-screen display functions (OSD)
• Show EPG
• Settings (basic configuration)
• Timer button
Page 16

TerraTec Home Cinema User Manual
Version 6
Page 16
TerraTec Home Cinema functions can be accessed in a number of ways. The following options are
always available:
• The buttons of the user interface
• Infrared remote (if available)
• On-screen display (OSD)
• Context menus – right mouse button in the TV window
• Keyboard commands or key combinations
Display
The user interface display is context-dependent and shows the following:
Station number and name
The current program
Start and end time of program
The current time/recording time
Current mode (TV, radio, recordings)
Timeshift active
Timer programmed
Volume
The current audio track
Recording in progress
Page 17

TerraTec Home Cinema User Manual
Version 6
Page 17
Mode
(TV, radio and recording mode)
Switches between the following three modes:
TV mode
In TV mode, you can watch and/or record TV programs. TV mode is only available if you have at least
one TV station stored in your TV favourites list.
For more information, see Stations
.
Radio mode
In radio mode, you can listen to and/or record radio station programs. Radio mode is only available if
you have at least one radio station stored in your radio favourites list.
For instructions on adding radio stations to a favourites list, refer to the chapter on Setting up
DVB-T radio is not available everywhere.
.
favourites lists
.
Recording mode
In this mode, you can play back TV or radio programs that have been recorded and stored in the
configured recording folder. The display will be empty if there are no recordings in the folder. Note that
the TerraTec Home Cinema is not a replacement for a general media player, as it can only play back
recordings that have been created using this application.
Navigation functions
(TV and radio mode)
Use the navigation buttons to select your station. Press OK to display a list of TV and radio favourites
in the TV window. You can also select stations directly without navigating through the intermediate
stations.
Navigation in OSD
Use the arrow buttons to navigate through the various OSD menus (main OSD menu, EPG, timer,
recording, etc.). The menus are shown on the TV window. Press OK to select a menu item.
The scroll wheel of the mouse can also be used to navigate list fields such as the EPG and EPG
details.
Teletext
(TV mode only)
Press the button once to display the teletext page of the current station in the TV window. Pressing the
button again will display the page transparently over the current TV program. Pressing it once more
ends the teletext display and returns you to normal TV display.
For more information, see Teletext
Page 18

TerraTec Home Cinema User Manual
Version 6
Page 18
Subtitle
(TV mode only)
Clicking this button immediately adds subtitles (as long as the station offers them).
Display functions
(all modes)
The TV button closes the TV window. Click the button again to reopen the window.
The program will continue to be decoded if the TV window is closed. To completely
switch off decoding, if you need to conserve system resources for example, disable the
decoder using "Stop audio/video playback" in the context menu.
(all modes)
Full Screen – Use the "Full Screen" button to change to full-screen mode and hide the user interface.
Click the TV picture and the user interface will reappear, ready for your input. Press the button again
to restore the window.
(all modes)
Change Format – Use the "Change Format" button to force video format changes. Many stations
broadcast programs with the familiar black bars above and below the picture. Naturally, these bars are
extremely annoying on wide-screen displays, as a large part of the screen simply remains black. In
some cases, the black bars are transmitted as part of the program signal. These are conventional 4:3
broadcasts, even though the important part of the picture is in wide-screen format. The software
recognises genuine 16:9 broadcasts and adapts the picture automatically. While the software cannot
automatically recognise wide-screen movies being broadcast in 4:3 format, you can nevertheless force
it to display the correct format.
(all modes)
Screenshot – Use the screenshot button to save a still image of the current TV picture. The images
are saved to the configured recording folder.
For detailed information, see Still images
.
Page 19

TerraTec Home Cinema User Manual
Version 6
Page 19
Navigation functions
(all modes)
Use the recording navigation buttons to control the timeshifting, recording and playback functions of
the Software. Timeshifting, recording and playback are covered in separate chapters, so this is only an
overview of the individual buttons:
Transport functions that are in italics are enabled during manual timeshifting
.
Timeshifting
Record
Playback
No function
Starts playback
No function
Starts playback of the
recording
Starts playback
No function
Stops timeshifting
Stops recording
Stops playback
Pauses playback
Starts timeshifting
No function
Pauses playback
No function
Starts recording
No function
Jumps to the start or end of
the timeshift
Jumps to the
previous/next marker
position
Jumps to the
previous/next marker
position
Fast-forwarding/rewinding,
press more than once to
increase the speed
Fastforwarding/rewinding,
press more than once to
increase the speed
Fastforwarding/rewinding,
press more than once to
increase the speed
Positions playback within
timeshifting. The start of the
timeshift is at the left, real
time at the right.
Positions the playback
within recording. The
start of the recording is
at the left, real time at the
right.
Positions playback within
regular playback . The
start is at the left, the end
at the right.
To use the navigation within a current recording, press the play button once first.
Page 20

TerraTec Home Cinema User Manual
Version 6
Page 20
Audio functions
(all modes)
Use the audio functions to select the audio channel and audio format, adjust the volume or mute audio
output. Some stations broadcast in several languages and/or audio formats. Depending on the
recording settings, the selected audio channel will also be used for recording.
The icon is displayed in the TV window while the audio is muted.
For further information, see Recording
.
You can also adjust the volume with the scroll wheel of your mouse. Click the middle
button to activate the mute—clicking again will cancel the mute.
OSD functions
(all modes)
The on-screen display (the main menu) can be called up in any mode.
For more information, see The on-screen display
One of the most important functions is without a doubt programming via the EPG. For
detailed information, see Timer-controlled recording—EPG-programmed
.
.
.
Show EPG
Displays the electronic program guide, which provides an overview of the programming
schedule of the current station. Note that EPG data are broadcast via digital television only. If you
have a TV receiver that supports analogue TV, you can also receive EPG data via the tvtv service. For
further information, see tvtv service
.
Settings
opens the settings window. Here you can configure the software's general settings, start the
station scan and manage stations in the Favourites list.
For more details, refer to the chapter on The settings
Page 21

TerraTec Home Cinema User Manual
Version 6
Page 21
The on-screen display
opens the main menu.
TV - Switches to TV mode and shows the most recently selected TV station.
Radio - Switches to radio mode and plays the most recently selected radio station.
Recordings - This area allows you to manage your recordings, and lets you play back or delete your
recordings.
Online media - This is where the online media services of "myNoxon" and ZDFmediathek are located.
The colour-coded buttons
This displays scheduled recordings. Here you can schedule new recordings manually,
delete or edit existing scheduled recordings, and quit the OSD.
Selecting the green button allows you to enable the sleep timer. The sleep timer
automatically shuts down the computer at a specified time, which is particularly valuable
when watching late-night TV.
Here you can access the settings for a connected CI module.
Use this to quit TerraTec Home Cinema or shut down the computer.
Page 22

TerraTec Home Cinema User Manual
Version 6
Page 22
The info bar
To show the info bar, you can press either the "i" key on your keyboard or the button on the
user interface. The info bar provides you with a lot of interesting information.
The selected station is displayed in the upper left. Below this is a timeline with the key data of the
current program displayed at its end. A marker shows the current position within the program. The
start times of the current and subsequent programs are displayed below the timeline.
In the right-hand area of the info bar, you are shown the currently selected picture format (16:9 in this
case). You can press F5 to access the settings.
Page 23

TerraTec Home Cinema User Manual
Version 6
Page 23
To access EPG information for the current program, press the "i" key on your keyboard or the
button again. This provides you—similar to a TV magazine—a short description and other key
information about the program.
Use the arrow keys or the "Before" and "Afterwards" to navigate through the schedule for this station.
If you want to program a program, simply press the "R" key or the "Record" button in the upper-right
corner of the image.
To display the electronic program guide information for another station, press the up arrow or down
arrow button to jump to the previous/next station in your list.
Use the button or the "i" key to close the info bar again.
In the settings for the info bar, you can change the audio track, video track, subtitle track, aspect ratio
and picture-in-picture (PiP).
Audio track
Some stations broadcast their TV programs in two or more languages (Arte in Germany, for example,
broadcasts in German and French). Use this feature to select the language you want.
Video track
If there are more than one video track, you can use this to select the one you want to watch.
Subtitles
If subtitles are available for the current program, use this menu to select the one you want to see.
Aspect ratio
Here you can change the aspect ratio.
PiP (picture-in-picture)
Use this option to enable the picture-in-picture feature
, which is described in more detail in the next
chapter.
Page 24
TerraTec Home Cinema User Manual
Version 6
Page 24
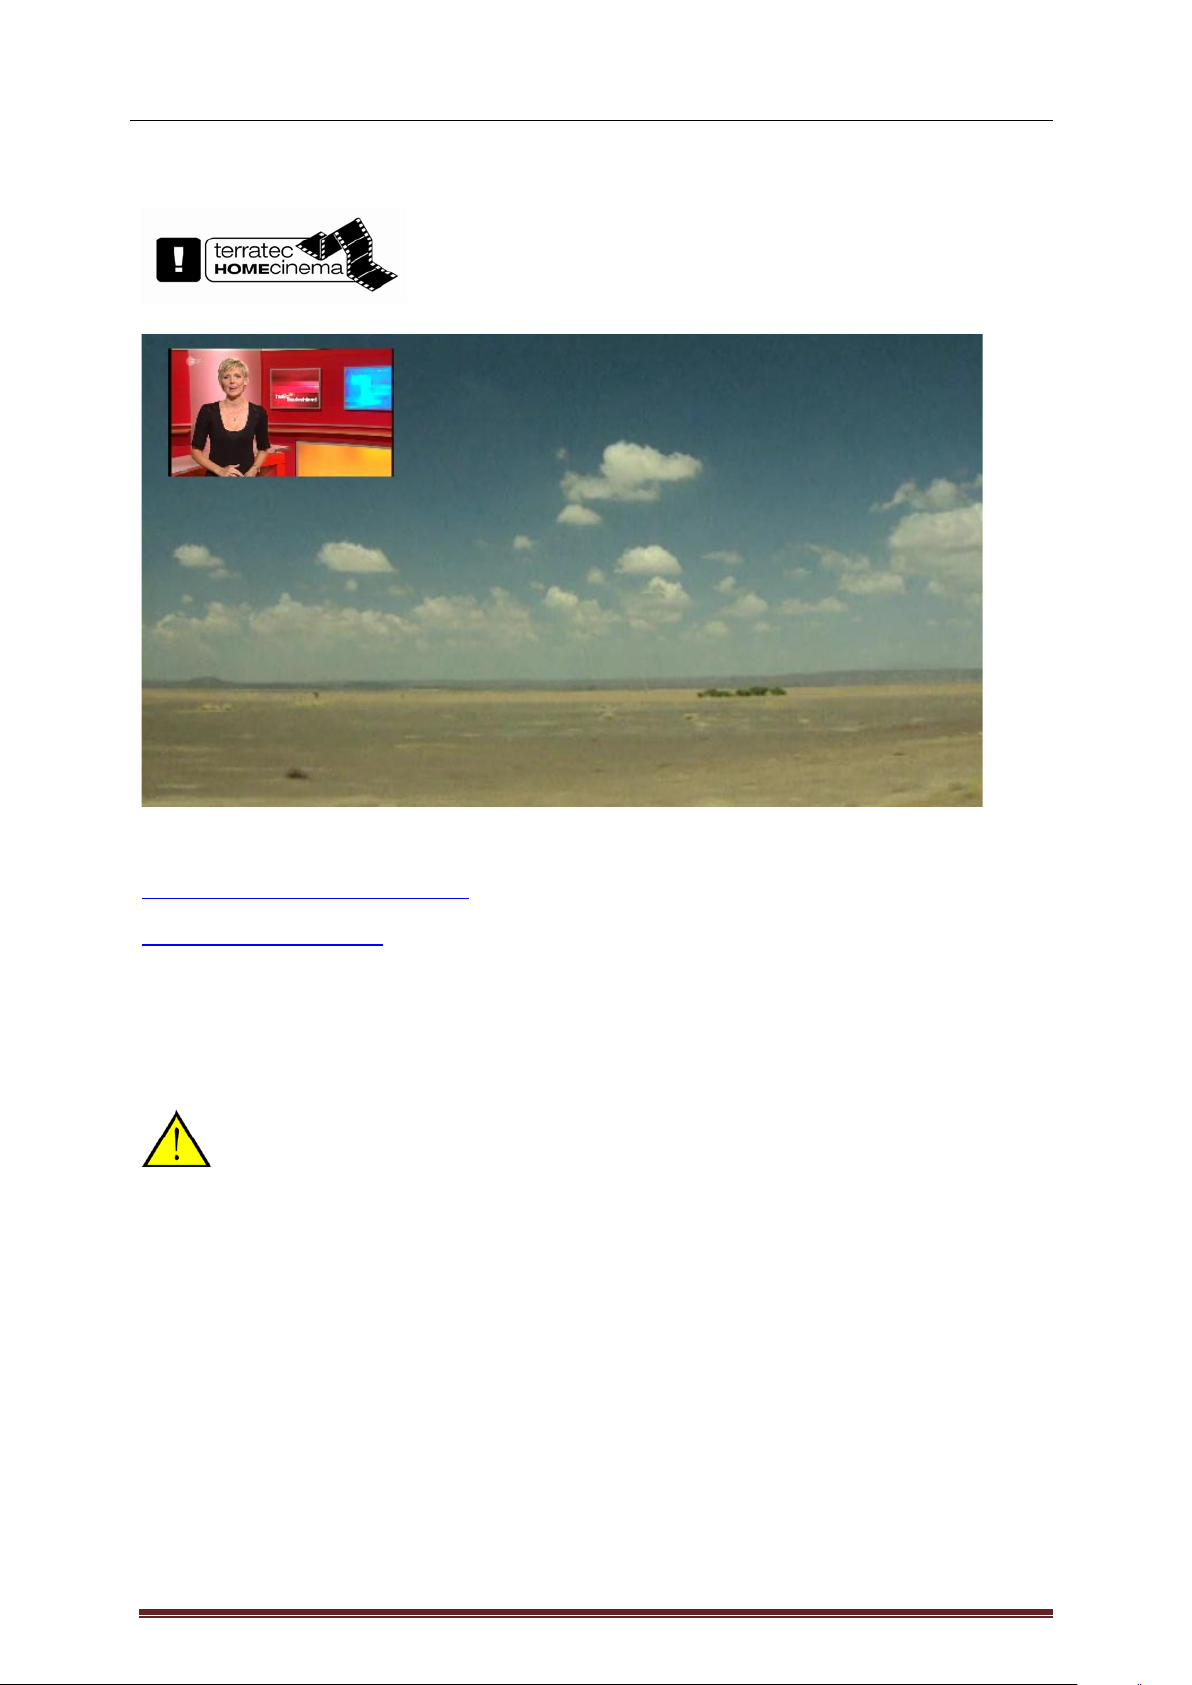
Picture-in-Picture (PiP)
The picture-in-picture function allows you to follow the action on
two different stations simultaneously. With it, you can keep an
eye on the elections, for example, while watching sports on
another channel.
There are various ways you can enable or disable the picture-in-picture function:
Using the information bar in the OSD
.
Using the TV context menu
Using the picture-in-picture feature usually requires two tuners; in any event, two are
recommended.
One of the features of digital television is that multiple channels are transmitted over one
and the same frequency. This feature allows the picture-in-picture function to used these
channels.
While the picture-in-picture function is active, only the stations that can be watched
simultaneously are available for selection in the station list.
Using the CTRL + ALT + P key combination.
You can toggle between screens using the Z key or by double-clicking the small TV picture.
Use the CTRL + (1 – 9) keys to move the position of the small TV picture.
.
Page 25

TerraTec Home Cinema User Manual
Version 6
Page 25
EPG—the electronic program guide
displays the electronic program guide, which provides an overview of the programming
schedule of the current station. Note that EPG data are broadcast via digital television only. If you
have a TV receiver that supports analogue TV, you can also receive EPG data via the tvtv service. For
further information, see tvtv service
.
EPG offers several different viewing options:
View
Description
EPG - Channel
The program overview of the current channel.
EPG - Current
The current and upcoming programs in the selected Favourites list.
EPG - Favourites
The program overview of all channels in the selected Favourites list.
If you are in an EPG view, select to switch between the options listed above.
In addition to the EPG views shown above which are common to digital home entertainment devices,
TerraTec Home Cinema also offers an EPG search function—a powerful tool to help you find your way
through the data jungle. To access the EPG search, use the TV/Radio context menu or press SHIFT +
E.
For a detailed description of the EPG search function, please see EPG Search
.
One of the most important functions is without a doubt programming via the EPG. For
detailed information, see Timer-controlled recording—EPG-programmed
.
Page 26

TerraTec Home Cinema User Manual
Version 6
Page 26
EPG - Channel
The header displays the channel name, day of the week and date; below that, it lists the programs
according to time.
You can navigate through the list by days using the cursor keys and . Using the "PgUp" and
"PgDown" buttons, you can go to the EPG for another channel without having to switch.
While program details are not always available, they frequently contain very useful information when
they are present.
Page 27

TerraTec Home Cinema User Manual
Version 6
Page 27
EPG - Current
The left column of this view displays all channels in the selected Favourites list
, the middle column
shows the currently running program, and the right column shows the next program.
Page 28

TerraTec Home Cinema User Manual
Version 6
Page 28
EPG - Favourites
The "EPG - Favourites" view shows you a list of programming, sorted by time, of all channels of the
selected Favourites list.
Using the and cursor keys, you can navigate through the list by hour; you can navigate through it
by day using the "PgUp" and "PgDown" buttons.
Page 29

TerraTec Home Cinema User Manual
Version 6
Page 29
EPG Search
The EPG search function lets you search the available EPG data for specific keywords.
Keyword search
The keyword search lets you search for individual keywords and narrow your searches by using
keyword groups and excluding individual words.
Simple search
In the simple search, enter the words to be found or ignored as you would in an Internet search
machine.
Example:
Let's say you want to watch Saturday Night Live, but don't particularly care for Maya Rudolph. Simply
tick the Title and Description checkboxes and enter Saturday –Maya or "Saturday Night Live" –
"Maya Rudolph". If the search returns too many hits, narrow it down further by adding more words
preceded by a dash to exclude them. The search might then look like this:
Page 30

TerraTec Home Cinema User Manual
Version 6
Page 30
Advanced search
The advanced search view is designed for users that might not be so familiar with Google or other
search engines. Switching to the advanced view shows the keywords in their respective categories.
The search in the previous example would then look like this:
Title – This setting restricts searches to within titles.
Description – The detailed EPG information is also searched for the keywords.
Persons – Expands the search to include persons such as actors or directors.
<< or >> - Toggles between the simple and advanced views.
Save – Saves the current search string in a list for future use.
Start search – Starts the search and saves the string in a list for future use.
Limit search
These options for limiting the search are only available when using tvtv data for the EPG.
Format – Specifies a format—such as movies, documentaries or news—to which the search will be
limited.
Genre – Specifies the genre—such as science fiction, crime or drama—within the selected format.
Station – Restricts the search to TV, radio, or a Favourites list.
Page 31

TerraTec Home Cinema User Manual
Version 6
Page 31
Hitlist
A preview image is available in the detailed information for programs marked with a *.
Record (selected) – Adds all of the selected hitlist entries to the list of scheduled recordings.
Do not record (selected) – Clears your selections.
Record all – Adds all of the hitlist entries to your list of scheduled recordings.
Record none – Removes all of the hitlist entries from the list of scheduled recordings, if present.
Detailed information
Detailed information on the selected hitlist entry is available here.
Some information in the EPG search function such as images or cast information will only
be available when using tvtv EPG data
.
Page 32

TerraTec Home Cinema User Manual
Version 6
Page 32
Recordings
TerraTec Home Cinema lets you archive TV and radio programs for posterity.
The following recording options are available:
Direct recording
Timer-controlled recording: EPG-programmed
If conflicts occur when programming recordings, they are indicated immediately via direct OSD display
and by a flashing timer icon on the user interface.
For further information, see Timer conflicts.
Suppose it's time to hang up the washing, and you quickly started a recording first. Now
you've fulfilled your domestic duties and would like to watch the program from the
beginning, although it hasn't finished recording. No problem! It's possible to adjust the
playback position while a recording is in progress. For an overview of the possibilities,
see Navigation functions
.
Timer-controlled recording: manually programmed
Timer-controlled recording: programming via tvtv
Page 33

TerraTec Home Cinema User Manual
Version 6
Page 33
Direct recording
Press the record button to record the current program of the selected station.
On the user interface display, the channel name appears, and the mode indicator turns red. Instead of
the current time, the record time and the recording symbol are displayed.
To stop recording, press the stop button .
A duration of 4 hours is preset for direct recordings.
To limit the direct recording to a specific time period, for example as predetermined by EPG data,
simply press the record button again, select the desired time from the menu that appears, and
change the recording length as desired.
Page 34

TerraTec Home Cinema User Manual
Version 6
Page 34
Timer-controlled recording—EPG-programmed
To program a timer-controlled recording from the EPG, click the EPG button
and select the program in the EPG list:
Click Timer to program the show. The timer menu now opens.
Click timer again to clear the programming.
To scroll through the EPG list one day at a time, use the arrow keys on the keyboard or remote
control.
To adjust the programming manually, edit the entry on the Scheduled recordings OSD page.
Page 35

TerraTec Home Cinema User Manual
Version 6
Page 35
You can also set up your PC to perform a specific action any time a recording is complete.
For further information, see Settings - Recording
.
Page 36

TerraTec Home Cinema User Manual
Version 6
Page 36
Timer-controlled recording—manually programmed
To program a recording manually, open the Scheduled recordings OSD page.
…then click New.
Select the desired station and click OK on the user interface or press the Enter key on your keyboard.
Page 37

TerraTec Home Cinema User Manual
Version 6
Page 37
Select the desired recording mode. Selecting the user-defined option lets you select the days on which
the recordings should take place (the keys 1-7 may be used instead of the mouse) and confirm your
selection by pressing OK on the user interface, or by pressing Enter on your keyboard.
Enter the start and end times, and select an action to be performed after the recording is complete.
Page 38

TerraTec Home Cinema User Manual
Version 6
Page 38
No action
Nothing happens after the recording completes.
Close application
The application exits after the recording completes.
Hibernate
The PC goes into hibernation mode after the recording completes.
Standby
The PC goes into standby mode after the recording completes.
Power off
The PC shuts down after the recording completes.
Please note that the "Power off" option will power down your PC, and that scheduled
recordings can then no longer be performed. If you have planned further recordings, we
recommend selecting the options "Hibernate" or "Standby". A warning message will be
displayed before any action (other than the "No action" option) is executed. For more
information on this topic, see Power options—standby, hibernate
.
Page 39

TerraTec Home Cinema User Manual
Version 6
Page 39
Timer-controlled recording—programming via tvtv
Timer-controlled recording via tvtv requires a valid tvtv account.
Go to the tvtv website for your country and enter your login information:
Germany
http://www.tvtv.de
Netherlands
http://www.tvtv.nl
France
http://www.tvtv.fr
Austria
http://www.tvtv.at
United
Kingdom
http://www.tvtv.co.uk
Switzerland
http://www.tvtv.ch
Italy
http://www.tvtv.it
Spain
http://www.tvtv.es
Note that your username must be at least 5 characters in length so that you can use the
service in the TerraTec Home Cinema software.
Once you are logged in, simply program away.
For detailed information on tvtv settings in TerraTec Home Cinema, see tvtv service
.
Page 40

TerraTec Home Cinema User Manual
Version 6
Page 40
Timer conflicts
When planning recordings with the TerraTec Home Cinema, you may find that scheduled programs
overlap, preventing the recording of the complete programs.
This can occur when programming two shows on different stations but with the same start time, or
when the pre/post recording times of the shows overlap.
TerraTec Home Cinema provides simultaneous support for multiple TV
cards. Purchasing an additional TerraTec TV tuner is therefore a
proven method of preventing timer conflicts.
Overlapping recordings
If you program two overlapping shows on different stations,
Page 41

TerraTec Home Cinema User Manual
Version 6
Page 41
a prompt opens automatically, which displays one or more existing timer conflicts between scheduled
recordings
and provides the data for your scheduled recordings. Use the selection keys to keep one of the
recordings, or to ignore the overlap and resolve the problem at a later time.
Page 42

TerraTec Home Cinema User Manual
Version 6
Page 42
Overlap of recordings due to pre/post recording times
If you program two shows on different stations with overlapping pre/post recording times,
the "Edit timer" OSD page opens automatically
Page 43

TerraTec Home Cinema User Manual
Version 6
Page 43
and provides the data for your scheduled recordings. You can use the "Don't record" buttons to
remove a timer you no longer want, or "Ignore overlapping" to resolve the conflict at a later time.
To prevent future overlaps between the pre/post recording times, you can adjust these times in the
Recording preferences
in the TerraTec Home Cinema application…
...or you can use an additional TerraTec TV tuner card to avoid the
problem in future.
Page 44

TerraTec Home Cinema User Manual
Version 6
Page 44
Timeshifting
Timeshifting is a truly remarkable function. It lets you interrupt programs whenever you like and
continue watching them later from where you left off. The program is cached on the hard drive in the
mean time.
Timeshifting starts as soon as the TV program begins. If you have disabled constant timeshifting for
performance reasons, you can, of course, always enable it again manually. Manual timeshifting is
described below:
To pause a program, simply click the pause button of the user interface and the TV picture will be
frozen. Click the playback button to continue watching at the point you left off.
The timeshift symbol appears on the control panel whenever timeshifting is active.
It is also possible to navigate
within the timeshift recording while it is active.
For timeshifting settings, see Recording
.
Page 45

TerraTec Home Cinema User Manual
Version 6
Page 45
Playback
Naturally, you can also watch your recorded TV programs in TerraTec Home Cinema.
The easiest way to get to the Recordings mode is via the on-screen display.
Select the menu item Recordings.
The following page contains a list of the recorded programs in the Record folder you defined.
Start playback with .
Page 46

TerraTec Home Cinema User Manual
Version 6
Page 46
You can also delete recordings (caution—you will not be prompted whether you really want to delete
them!) or edit them using Cut!
.
The "Export" option appears at the bottom of the window
whenever you select an MPEG-TS recording. The recording will be converted into MPEG-PS format
when you export it.
For more information on navigating within recordings, see Navigation functions
.
Page 47

TerraTec Home Cinema User Manual
Version 6
Page 47
Teletext
Modern media technology like the Internet made a widespread service offered by TV broadcasting
establishments somewhat forgotten in recent years: teletext.
Press the Teletext button once to display the teletext page of the current station in the TV
window. Pressing the button again will display the page transparently over the current TV program.
Pressing it once more ends the teletext display and returns you to normal TV display.
Normal
Transparent
The remote control, mouse and keyboard can be used to navigate teletext pages. When using the
numerical keypad, please ensure that the NumLock is active.
Entering the page number directly
To enter a page number directly, use the keypad of the remote control or keyboard. The page will be
opened immediately after the last digit has been entered.
Using the mouse to select pages
Teletext pages can also be opened by clicking on their numbers, as you would click a link in a web
browser.
a) Page memory and subpage display
In addition to the normal teletext navigation, the teletext also indicates whether additional pages with
the same page number are present in the page memory. The availability of additional pages is
indicated by arrows before or after the selected page number. Select the subpages with the left and
right arrow buttons.
b) Page references – navigating with colour fields
Teletext itself offers simple navigation options with a method known as FLOF or TOP teletext. Colour
fields or coloured text is often visible at the bottom of a teletext page. These markings are comparable
to links on websites, leading directly to the relevant links. You may also find the same colours on your
remote control buttons.
Example 1
Page 48

TerraTec Home Cinema User Manual
Version 6
Page 48
Example 2
c) Teletext in a dedicated window
Teletext can also be displayed in its own window.
This can be controlled using the context menu or the CTRL+T key combination.
For those who are especially interested in Videotext, here is a little tip:
You can also select interesting lines of text by pressing the mouse button. Use the
CTRL+C key combination to copy the highlighted text to the clipboard; then, use the
CTRL+V key to copy it to another location, such as a new text document.
Page 49

TerraTec Home Cinema User Manual
Version 6
Page 49
The settings
calls up the settings window.
The advanced configuration options of the TerraTec Home Cinema can be found here:
Options
Select the TerraTec TV card you would like to use here.
User interface
Select the language of the user interface and control the appearance of the
OSD here.
Record
Configure the settings for your recordings here.
Still image
Define how and where to save your still images here.
Audio/Video
You can change the audio and video settings here.
Scan
Start the scan here.
Stations
Use this tab to arrange the stations in the order you prefer, create
Favourites lists, and much more.
Network
You can configure the network streaming options of the TerraTec Home
Cinema here.
tvtv service
Configure the settings for the online EPG, tvtv, here.
Advanced
This tab gives advanced users the ability to change additional preferences.
About
This provides useful information about the software and the devices used.
Page 50

TerraTec Home Cinema User Manual
Version 6
Page 50
Options
Installed devices
A broad range of TerraTec TV products are supported. Select your devices here. If you do not want to
use a device, simply untick its list entry.
Miscellaneous
Priority - Set here the priority Windows should give the application. By setting a lower value here,
Windows will give more CPU resources to other applications. This may lead to choppy video playback,
however.
Update
Check for new version on startup – If you enable this option, TerraTec Home Cinema checks for a
new version each time it is started. If a new version is available, you can download and install it using
the dialogue that appears.
Check now – This button starts a manual check for updates.
Beta versions usually contain bug fixes, which correct faults in the application. However,
please install a beta version only if you experience serious issues with TerraTec Home
Cinema or if TerraTec Support recommends this version to you. You can enable this
function on the "Advanced" tab.
Beta versions frequently have not yet been tested exhaustively; as a result, we cannot
always provide support for these versions.
Page 51

TerraTec Home Cinema User Manual
Version 6
Page 51
User interface
Regional settings
Program language – Select the language for the program's user interface here.
Preferred language – Select the default language for TV playback and subtitles here.
Alternative language – Select a second choice for TV playback and subtitles for cases in which the
preferred language is not available.
Display
Video window with border – A border will be drawn around the TV window when this option is
enabled.
Monitor aspect ratio – Enter the aspect ratio of your monitor to optimise the display for the TV
picture.
Please note that most TFT displays have an aspect ratio of 5:4, while wide-screen TFTs
have aspect ratios of 16:10 or 14:9. For more information, see the documentation of your
display.
On-Screen display (OSD)
Transparency (with VMR-7 or VMR-9 only) – If you have activated the VMR-7 or VMR-9 options in
your audio/video configuration, use this slider to adjust the transparency of the OSD.
Quality – Adjust the display quality of the OSD here. If you experience consistently choppy video, your
system may be too slow to render digital TV correctly. If this is the case, set the quality of the OSD to a
lower value.
Display duration: TV info – Here, you can define how long the information is to be displayed at the
bottom of the screen.
Page 52

TerraTec Home Cinema User Manual
Version 6
Page 52
Display duration: status messages – Define how long the status messages are to be displayed at
the top of the screen.
Display duration: status list – Define how long the station list is to be displayed on the right of the
screen.
Mouse sensitive OSD – With this option, the OSD can be displayed automatically if you move the
mouse pointer to the bottom edge (Information) or the right edge (Station list) of the TV window.
PiP (Picture in Picture
)
Position – Here, you can define the position where the second TV picture is to appear. You can also
define the position using the context menu or the key combination (CTRL + 1 - 9).
Page 53

TerraTec Home Cinema User Manual
Version 6
Page 53
Record
General
Store recordings in – The files created by the various recording functions are stored in the Record
folder.
Pre/post recording time – Set the time by which recordings start before and stop after the
programmed times. The programmed times are based on the system time of your computer. You may
therefore be in for an unpleasant surprise if your system time is not reasonably close to the actual
time. This option lets you create additional recording time before and after the actual times to help
avoid this problem.
Page 54

TerraTec Home Cinema User Manual
Version 6
Page 54
Default action after timer recordings – Select one of the following actions to be performed after a
timer recording:
No action
After recording has finished, TerraTec Home Cinema continues normally.
Close application
Exits the application after the recording.
Standby
Puts the computer in standby mode.
Hibernate
Hibernates the computer.
Power off
Powers off the computer.
Please note that the "Power off" option will power down your PC, and that scheduled
recordings can then no longer be performed. If you have planned further recordings, we
recommend selecting the options Hibernate or Standby. A warning message will be
displayed before any action (other than the "No action" option) is executed.
Timeshift
Timeshift buffer size – The maximum amount of hard drive space that may be used for timeshifting.
Please note that timeshift files are always recorded in TS format for technical reasons.
Automatically activate timeshift for DVB – This function is enabled by default. This allows you to
skip back during a TV program and watch the previous portion again.
The ranges of minutes, depending on the transmission standard currently used, that can
be buffered are listed below the specified buffer size.
Page 55

TerraTec Home Cinema User Manual
Version 6
Page 55
Still image
Still-image settings
Naturally, TV software is designed for viewing moving pictures, but you may nevertheless have reason
to save a still image from time to time. You may wish to take a screenshot and use it as a background
image for DVD authoring, for example. Teletext can also be saved this way.
General
Store screenshots in – The files created by the screenshot functions are stored in the folder.
File format
TV / Movies – Choose between saving your images as Windows bitmaps (.bmp) or the space-saving
but lossy JPEG (.jpg) format.
Teletext – In addition to the "Windows Bitmap (.bmp)" and "JPEG (.jpg)" options, you may also save
teletext as a text file (.txt), making it suitable for use in any text editor.
The settings made here apply globally for the entire software and are not stored
individually for each station.
Page 56

TerraTec Home Cinema User Manual
Version 6
Page 56
Audio/Video
Audio/Video settings
Audio/Video settings
Video Renderer– Windows offers a number of options for conjuring a TV picture onto your monitor.
The so-called Overlay Mixer, in which the picture is written directly to the memory of the graphics card,
is generally suitable for this task. The graphics card drivers must play along for this to work correctly,
however. An alternative is the VMR-7 or VMR-9 (video mixing renderer) provided by recent DirectX
versions. If you experience difficulties with the TV picture, we recommend activating the
"Video Mixing Render 7" or "Video Mixing Renderer 9" option.
Under Windows XP, we recommend using the "Overlay Mixer" wherever possible. Under
Windows Vista, we suggest the "Video Mixing Renderer 9" option. Not all decoders
support VMR-7 or VMR-9 mode. At times, a number of attempts may be necessary to
find the best combination for audio/video playback.
Audio renderer – Select the default device or a special audio driver for your audio playback here.
The following options let you select specific decoders for the various audio and video standards. If the
gear button behind the option is active, additional configuration options are available for that decoder.
Video decoder – Here, you should select the CyberLink Video/SP Decoder (TerraTec).
Audio decoder – The default setting for the audio decoder should be the CyberLink Audio Decoder
(TerraTec).
Page 57

TerraTec Home Cinema User Manual
Version 6
Page 57
H.264 decoder – To be able to watch HDTV, you need an H.264
decoder, which is installed automatically when you install the
TerraTec Home Cinema. If more than codec are available (for
example from a codec pack), please select the CyberLink
H.264/AVC Decoder (TerraTec).
Please note that the ability to receive HDTV depends on the station. Many stations still
do not broadcast their programs in high-definition TV format.
General
Prefer AC-3 – Automatically selects the current program's AC-3 audio track for playback, if available.
Automatically show subtitles – Subtitles, if available, will be displayed automatically if this option is
enabled. If multiple sets of subtitles are available, the subtitles in the language selected in the regional
settings under Options will be displayed automatically.
Overscan
Unattractive black areas can appear along the edges of the TV image. These do not appear on regular
TV sets, which use what is known as overscan. This zooms in on the picture slightly, cutting off the
edges. This option allows you to reproduce this effect in TerraTec Home Cinema and adjust the ratio.
Page 58

TerraTec Home Cinema User Manual
Version 6
Page 58
Scan
The station scan
Device – Select the device for which to perform a station scan. This is only necessary once for each
standard (e.g. DVB-T). If you have installed multiple devices that use the same standard, the found
stations will be available for all of those devices, of course.
Filter – Restrict the scan to free, encrypted, or all available stations (no filter).
Scan mode – Depending on the TV standard, a variety of options are available here. For more
information, please see the scan section for the relevant TV standard.
Click "Scan" to start the scan.
DVB-T scan
Scan mode: Scan by region
Region – Select your reception region from the list. If you cannot find it, simply select "All".
Scan intensity – Some countries, such as France, broadcast stations slightly off of the standardised
frequencies. This option lets you customise the scan in cases in which it does not find all stations while
in "Normal" mode.
Page 59

TerraTec Home Cinema User Manual
Version 6
Page 59
Scan mode: Scan by frequency band or single frequency
Scan one frequency band
Scan single frequency
Frequency (kHz) – Specialists will appreciate the ability to select an individual frequency or frequency
band and its step size for scanning.
Bandwidth – DVB-T can be broadcast at varying bandwidths. 7 or 8 MHz are common in Europe,
while 6 MHz is used in Taiwan, for example.
Scan intensity – See "Scan mode: Scan by region"
DVB-S scan
Scan mode: Scan by satellite
Satellite – Select the satellite to which you have set your dish.
DiSEqC 1.0 – DiSEqC is used to control satellite systems that receive data (TV) from more than one
satellite. Configure this setting to match those on your satellite system. If in doubt, consult your radio
and TV technician. DiSEqC 1.0 allows you to receive up to four different satellites.
Example:
Your satellite system is pointed towards Astra and Eutelsat. In this case, configure the DiSEqC options
as follows:
Option A / Position A during the scan on Astra
Option B / Position B during the scan on Eutelsat
Since, unfortunately, no standardised settings exist for satellite systems, often the only
option is trial and error if no information about the satellite system is available. For the
same reason, we hope you understand that our support team may not always have the
answers regarding your settings.
If in doubt, consult your radio and TV technician.
Page 60

TerraTec Home Cinema User Manual
Version 6
Page 60
Scan mode: Scan by frequency band or single frequency
Scan one frequency band
Scan single frequency
Frequency (kHz) – Specialists will appreciate the ability to select an individual frequency or frequency
band and its step size for scanning.
Symbol rate (KS) – The symbol rate is the specified data transmission speed. It must be specified
when scanning a frequency band or individual frequency.
Polarisation – A frequency can be polarised horizontally or vertically. Select the correct polarisation
here.
FEC – (forward error correction) This option specifies the error protection of the signal.
Information on satellite programs and their parameters can be found at a number of sources,
including:
http://www.lyngsat.com
DVB-C scan
Scan mode: Scan by region
Region – Select your reception region from the list. If you cannot find it, simply select "All".
Scan mode: Scan by frequency band or single frequency
Scan one frequency band
Scan single frequency
Page 61

TerraTec Home Cinema User Manual
Version 6
Page 61
Frequency (kHz) – Specialists will appreciate the ability to select an individual frequency or frequency
band and its step size for scanning.
Symbol rate (KS) – The symbol rate is the specified data transmission speed. It must be specified
when scanning a frequency band or individual frequency.
Modulation type – The modulation type is a further option for data transmission and can be specified
for certain programs.
Analogue scan
Scan mode: Scan by region
Region – Select your reception region from the list. If you cannot find it, simply select "All".
Scan mode: Scan by frequency band or single frequency
Scan one frequency band
Scan single frequency
Frequency (kHz) – Specialists will appreciate the ability to select an individual frequency or frequency
band and its step size for scanning.
If your TV solution has analogue inputs, then they are treated like channels. The names
for the analogue inputs are automatically assigned and depend on the type of connection
-> S-Video / composite. If you connect external devices here, it is best to name the
connection after the device, such as "Satellite receiver" or "Playstation".
FM scan
To receive radio using your FM-capable TV card, you first have to run a scan. To do so, select the
analogue tuner on your TV card (if available), then "Scan by region" and then the "FM only" region in
the drop-down menu.
Page 62

TerraTec Home Cinema User Manual
Version 6
Page 62
Station list import
Furthermore, you have two options for importing existing station lists. To access these, click the
following in the selection menu for the scan mode:
Import stations from file
This allows you to import a station list from a previous channel scan. This is recommended if you have
to reinstall TerraTec Home Cinema. It also allows you to use a sender list created by someone you
know in our neighbourhood, sparing you the time it takes to run a scan.
Import stations from Internet
Here, first select your transmission standard, then the file that you want to import. The lists are named
according to the region or satellite.
Then click "Apply" to save your station database
.
An Internet import is particularly recommended for the DVB-S transmission standard,
because the satellite scan can take about an hour. With an import, the stations are presorted and can be added to your station database with just a click. This method has you
up and running fast.
Page 63

TerraTec Home Cinema User Manual
Version 6
Page 63
Stations
Station management
The left side of the station management tab contains a list of all of the stations found during one or
more scans. The list can be filtered according to reception types, filters (whether the stations are free
or encrypted) or whether they are TV or radio broadcasts.
Use the button to add selected stations to the Favourites list, or the button to add all stations.
You will only be able to select stations that are in a Favourites list. Analogue video inputs
are indicated by the symbols for composite and for S-Video, and can be added to
the favourites list just like "regular" channels.
Page 64

TerraTec Home Cinema User Manual
Version 6
Page 64
Setting up Favourites lists
To sort stations according to your preferences, select them and move them up or down the list with the
and buttons.
Use the and buttons to remove one or more stations from the Favourites list.
Special Favourites lists
In addition to the standard radio and TV Favourites lists, you may also create special Favourites lists.
These Favourites lists can perform a variety of functions, for example sorting stations according to
DVB-T coverage areas, transmission standards (e.g. analogue/DVB-T/DVB-S) or genres such as
sports, movies or news.
To add a station to a special Favourites list, select the station and click one of the coloured buttons
. Individual stations may be added to more than one list.
Click to name the special Favourites list.
Page 65

TerraTec Home Cinema User Manual
Version 6
Page 65
Network
On the Online media tab of the OSD, you can, among other things, access the "myNoxon" portal. To
use this service, you can register free of charge at http://my-noxon.de
. Then, once you enter your user
data here, you have immediate access to a great variety of online content.
Page 66

TerraTec Home Cinema User Manual
Version 6
Page 66
tvtv service
tvtv is a program information service similar to the EPG that allows you to program recordings via the
Internet or a WAP-enabled cellular phone. In addition, this service offers much more extensive EPG
data for digital and analogue television.
The tvtv options include:
Use tvtv – If you do not want to use the tvtv service, disable it by clearing this checkbox.
User account
Your username, password, tvtv server and the validity of your subscription are all set when configuring
the tvtv service and are shown here for your information. You can also set up tvtv access at a later
date if you did not do so when installing the application.
Note that your username must be at least 5 characters in length so that you can use the
service in the TerraTec Home Cinema software.
Proxy settings
The proxy settings are only required if you connect to the Internet via a proxy server. For the correct
settings, either check your default web browser or contact your system administrator.
Downloads
The automatic job query option is important here. Use it to define how often the application should
download your programming from the tvtv server.
In the option Automatic EPG Download, define when tvtv EPG data are to be downloaded. tvtv offers
the EPG data for 3 weeks.
Website – Opens the selected tvtv website in your web browser.
Page 67

TerraTec Home Cinema User Manual
Version 6
Page 67
Jobs – Use this button to search manually for new recording jobs.
An entry just made may not be visible under certain circumstances. If you do not see it, click add now
in your job list on the tvtv website.
EPG – Starts a manual download of the tvtv EPG data.
Stations – Compares the list of stations found by TerraTec Home Cinema with those of tvtv. It may
inform you that stations cannot be associated correctly. To correct the problem, use the Channel
Editor located under the Tools menu of the TerraTec Home Cinema.
If the tvtv service is activated, the function will be executed automatically after each scan
of the TerraTec Home Cinema. The TerraTec Home Cinema will also automatically
search for new recording jobs every time it launches.
Page 68

TerraTec Home Cinema User Manual
Version 6
Page 68
Advanced
The advanced settings give you the ability to change additional preferences. Please note, however,
that the preset default values for advanced settings generally function perfectly well. We recommend
making changes only if you are sure of their results, or if our technical support suggests doing so.
User interface
Show control window only in info area (not in the
taskbar)
If set to "Yes" (default), the control window is not
displayed as a separate task in the taskbar.
Minimise control window in the info area
If set to "Yes" (default), the control window
disappears from the info area when the task is
minimised.
Dock video window along screen edge
If set to "Yes" (default), the video window
automatically docks along the screen edge if you
move it to the edge.
User input
Number input delay
Specifies the delay for number input.
Fast switching delay
Specifies the delay for switching.
Page 69

TerraTec Home Cinema User Manual
Version 6
Page 69
OSD
Area for mouse-sensitive OSD
Portion of the video window (as a percentage) in
which the mouse pointer triggers the mousesensitive OSD (such as Favourites lists in TV
mode).
Delay for displaying mouse-sensitive OSD
Indicates the delay before the mouse-sensitive
OSD is displayed.
Delay for hiding mouse-sensitive OSD
Indicates the delay before the mouse-sensitive
OSD is hidden.
Enable animated displaying/hiding for OSD
If set to "Yes" (default), the mouse-sensitive OSD
disappears into the TV picture in an animated
fashion.
Signal information interval
Indicates how long the signal information is
shown.
Enable OSD fix for NVIDIA graphics boards
Enable this option if you have an NVIDIA
graphics board and the OSD does not function
properly.
Audio/Video
Audio fade-in
Indicates the length of the audio fade-in time
when switching stations or muting.
Audio fade-out
Indicates the length of the audio fade-out time
when switching stations or muting.
Add <Enhanced Video Renderer> to list of video
renderers
Adds the Enhanced Video Renderer to the list of
video renderers (for problems with HDTV).
Encode analogue TV with MPEG for display
If set to "Yes", analogue TV is encoded according
to MPEG for the display.
Enable PID filter
Enables/disables the PID filter.
Enable PMT correction
Enables/disables PMT correction.
Enable adaptation field control (Arte HD)
Enables/disables adaptation field control (Arte
HD).
Recordings
Create XML file
Creates, in addition to the recording, an XML file
with additional data, such as EPG details.
File template
Indicates the components that make up the file
name of a recording.
Analyse recordings automatically
Enables/disables automatic recording analysis.
Default length for direct recordings
Indicates the default length for direct recordings.
Split recording files
Indicates whether recordings in long files should
be split.
Size for split files
Indicates the size of the individual split
recordings.
Computer start-up time before recording
Indicates how long before a recording the
computer should be woken up from standby or
Page 70

TerraTec Home Cinema User Manual
Version 6
Page 70
hibernation.
Interval for verifying scheduled recordings
Indicates the interval for verifying scheduled
recordings.
Allow AVI recordings
Enables/disables AVI as a recording format.
Set time stamp for AVI recordings
Places a time stamp on the video image for AVI
recordings.
Audio amplification for AVI
Enables/disables audio amplification for AVI.
Search subdirectories of the recording folder
Also searches for recordings in subdirectories.
Timeshift
Delete timeshift buffer after use
Automatically deletes timeshift buffer after use.
Scan
Enable scan via NIT
Switches on the scan via NIT.
LNB
Overwrite LNB settings
Allows you to make changes to the your LNB
settings.
Lower frequency
Specifies the lower frequency.
Upper frequency
Specifies the upper frequency.
Switching frequency
Indicates the switching frequency.
EPG
Enable EPG in context menu
Enables EPG in the context menu.
Show current program in Favourites
Indicates whether the current program is
displayed in the Favourites.
Show next program in Favourites
Indicates whether the following program is
displayed in the Favourites.
Show start time of program in Favourites
Indicates whether the starting time of the
program is displayed in the Favourites.
EPG database
Enable EPG database
Enables the EPG database.
Number of entries in cache
Indicates the number of entries in the cache.
Cache size
Indicates the size of the cache.
Cache refresh interval
Indicates the interval for refreshing the cache.
Page 71

TerraTec Home Cinema User Manual
Version 6
Page 71
Common Interface
Disable CAM messages
Enables/disables CAM messages.
Network
Telnet
Enables/disables Telnet for network streaming.
Multicast
Enables/disables multicast for network
streaming.
Multicast IP
Specifies the IP for the multicast.
Multicast port
Specifies the port for the multicast.
System
Use all processors
For CPUs with more than one processor core,
you can specify here whether all cores are to be
used.
Update
Also allow beta versions
During updates, beta versions are allowed, too!
These are not supported by our technical support
department. Because of this, this option is
disabled by default.
Page 72

TerraTec Home Cinema User Manual
Version 6
Page 72
About
This tab contains a wide range of information about your system and TerraTec Home Cinema.
This information is especially useful any time you need to contact TerraTec Support.
Page 73

TerraTec Home Cinema User Manual
Version 6
Page 73
Context menus
Context menus frequently make access to specific functions easier. TerraTec Home Cinema also has
a number of special functions that are only available in the context menus.
To open the context menu, right-click in the TV window.
Various modes and displays feature different context menus. Functions that can only be accessed via
context menus are described below.
a) Context menu: TV/Radio
Exclusive feature
Desktop TV – Uses the TV picture as your desktop wallpaper.
Page 74

TerraTec Home Cinema User Manual
Version 6
Page 74
b) Context menu: Recording
c) Context menu: Teletext
Page 75

TerraTec Home Cinema User Manual
Version 6
Page 75
Key assignments
General
General key assignments
Key
Function
0-9
Station selection
M / * (NUM)
Mute
+ / -
Volume up/down
CTRL + X
Closes the TV window (not the application)
CTRL + I
Displays signal information
CTRL + V
Opens the Record folder
CTRL + O
Forces optimal size for TV window
CTRL + P
Opens the Screenshot folder
CTRL + C
Opens the Cut! application
/
Next / previous station (must be confirmed with Enter)
F2
F5
Sets a marker
Displays the timer
F6/F
Full-screen mode
TV/Radio
TV key assignments
Key
Function
Enter
Selects a station.
/
Navigation within the station list (see above).
I
Displays/hides the information bar.
F10/<
Changes the aspect ratio (4:3/16:9/zoom).
Z
Zaps between the previous station and the current one. In picture-in-picture
(PiP) mode, toggles between the current programs.
P
Screenshot of TV picture.
A
Switches audio tracks.
B
Switches to the next subtitle track (if available).
Shift + E
Opens the EPG search.
CTRL + ALT + P
Starts or stops picture-in-picture (PiP) playback.
CTRL + 1 - 9
Changes the position of the picture-in-picture (PiP) picture.
Teletext
Teletext key assignments
Page 76

TerraTec Home Cinema User Manual
Version 6
Page 76
Key
Function
T
Displays/hides teletext
Pos. 1 / Home
Selects the teletext home page (page 100).
Page number + 1
Page number – 1
Next subpage
Previous subpage
Backspace
Back to the previously viewed page
Shift + Backspace
Forward to next viewed page
F5
Soft key: red
F6
Soft key: green
F7
Soft key: yellow
F8
Soft key: blue
0-9
Page entry
P
Screenshot of teletext
CTRL + T
Teletext in separate window
OSD
OSD key assignments
Key
Function
E
EPG on/off
I
Program information on/off
O
Shows/hides OSD
S
Opens/closes scheduler (timer)
F5
Soft key: red
F6
Soft key: green
F7
Soft key: yellow
F8
Soft key: blue
PgUp
One page up in OSD lists
PgDn
One page down in OSD lists
/
Navigation in OSD lists
/
Previous/next day in EPG lists
Esc
Closes the OSD
Backspace
Moves cursor back one place when entering information, e.g. timer settings
Page 77

TerraTec Home Cinema User Manual
Version 6
Page 77
Navigation functions
Navigation function key assignments
Key
Space
X
PAUSE
R
L
N
Shift + L
Shift + N
Page 78

TerraTec Home Cinema User Manual
Version 6
Page 78
Annex
Setting up the antenna
TerraTec Home Cinema can display the quality and current strength of the signal. This is especially
useful if your video and audio reception is choppy, making it necessary to adjust the antenna.
Press CTRL+I to open an OSD information window showing the current signal strength and quality.
The quality of the signal is decisive in this case.
Press the green button to enable beeping sounds, which can assist you with positioning the antenna.
There are four different settings: signal strength, signal quality, packets and off. The more frequent the
beeps are, the better the corresponding signal is.
Positioning a terrestrial antenna
Under most circumstances you will be using a rod antenna or roof antenna. You may also use an
active antenna, provided it draws its power from a separate power supply. Unfortunately, a rod
antenna is often not sufficient to receive digital TV signals. It is therefore frequently necessary to use a
roof antenna or an active antenna, especially at the edges of coverage areas.
In case you can't find stations or the picture appears fragmented, start by changing the location of your
antenna. If the situation does not improve, you may need to use an active antenna instead. It is
generally helpful to keep experimenting, as minimal changes in the position of the antenna can have a
major effect on reception quality.
Antenna location:
Avoid setting the antenna up near sources of electromagnetic radiation. These include computers,
TVs, microwave ovens and similar devices. Avoid the proximity of steel or reinforcing rods. Position
the antenna near a window and as high as possible.
To enhance the performance of a rod antenna with a magnetic foot, attach it to a metallic
surface.
Page 79

TerraTec Home Cinema User Manual
Version 6
Page 79
Glossary
AAC
Advanced Audio Coding is an audio compression format that was specified as a
further development of the MPEG-2 standard.
AC-3
This is a designation for a multichannel audio system better known as Dolby Digital.
AC-3 stands for Audio Codec 3, the compression method used.
Bitrate
The bitrate is the volume of data transferred in a given interval. A low audio or video
bitrate will result in low quality. High bitrates, on the other hand, require more
storage space for recordings.
Codec
A codec is a program that digitally encodes or decodes data or signals. All codecs
have specific advantages and disadvantages which must be taken into account
when choosing one for a specific purpose.
Device ID
A device ID is a unique identifier for a piece of hardware.
DiSEqC
Digital Satellite Equipment Control refers to a data communications technology
used between satellite receivers and switches or satellite dishes. It is used to send
control commands to the satellite dish when selecting a different satellite.
Dolby Digital
This is the designation for a multichannel audio standard used in movie theatres,
DVDs and TV. The audio tracks are sent as data packets together with the video
data.
DVB
DVB stands for Digital Video Broadcast, a new digital TV format. DVB provides
better audio and video quality than the traditional analogue TV standard.
DVB-T
DVB-T is the digital video standard for terrestrial broadcasting. (Terrestrial)
DVB-S
DVB-S is the digital video standard for satellite broadcasting. (satellite)
DVB-C
DVB-C is the digital video standard for cable broadcasting. (Cable)
EPG
EPG is the electronic program guide transmitted together with DVB signals. EPG
provides program listings and supports convenient programming of recordings.
H.264/AVC
Advanced Video Coding is a video codec also known as MPEG 4 Part 10. It
provides better quality at higher compression rates (smaller files). It requires greater
processor performance when decoding, however.
Page 80

TerraTec Home Cinema User Manual
Version 6
Page 80
HDTV
High-definition television. The higher resolution results in better picture quality.
MPEG
The Moving Picture Experts Group (MPEG) is responsible for the standardisation of
audio and video compression, as well as related areas such as container formats. A
variety of formats are available that can serve as recording formats with the
appropriate codec. MPEG-1/2 are common formats, as is MPEG-4 (DivX is based
on MPEG-4, for example). The differences mainly lie in the quality and size of the
output file.
OSD
OSD stands for on-screen display, a menu which is superimposed on the TV
picture. OSDs are a convenient configuration option.
Skin
A skin is a customisable user interface layout that can be applied to an application.
Symbol rate
The symbol rate (or baud rate) is the number of steps per second, i.e. the number of
times per second the signal changes. The symbol rate must be known to the
receiver to ensure a correct data transfer.
Timeshift
Timeshift is a function that caches the TV signal, permitting live TV to be paused
and resumed at a later time.
Transponder
A transponder is a transmission medium on which multiple stations are transmitted
to the receiver. The number of stations on a transponder can vary depending on the
available bandwidth and utilisation.
TS
TS stands for transport stream. DVB is broadcast as a transport stream containing
all of the information transmitted by the station.
VMR-7 or
VMR-9
Video Mixing Renderer 7 or 9 are Windows display components optimised for
DirectX.
Page 81

TerraTec Home Cinema User Manual
Version 6
Page 81
Editing recordings using Cut!
Cut! is an editing tool that lets you remove unnecessary ballast from your video recordings. The files
are not re-encoded, but simply cut to avoid quality losses.
Cut! can be found in the TerraTec Home Cinema program folder. For a detailed description of Cut!,
please see the program itself.
Page 82

TerraTec Home Cinema User Manual
Version 6
Page 82
tvtv
tvtv is available in the following countries:
Germany
www.tvtv.de
France
www.tvtv.fr
United Kingdom
www.tvtv.co.uk
Italy
www.tvtv.it
Netherlands
www.tvtv.nl
Austria
www.tvtv.at
Switzerland
www.tvtv.ch
Spain
www.tvtv.es
An account is required in order to use tvtv. If you did not create a tvtv account during installation, you
may also do so at a later time.
To create an account, open the "tvtv Setup" application from the Programs menu on your computer:
tvtv Setup will guide you through the configuration of your account.
Page 83

TerraTec Home Cinema User Manual
Version 6
Page 83
The Boss key
The Boss key is a well-hidden but vital function—especially for major football games—that lurks in the
background, ready to do your bidding at moment's notice.
Suppose you're sitting in the office watching an exciting game, when suddenly the boss walks in?
We should know—after all, we don't want our boss to catch us watching TV, either!
Press Ctrl+Alt+B! The entire application is immediately minimised, the sound muted and the timeshift
function activated. When the coast is clear, press the Boss key again to restore the application and
continue watching where you left off. The perfect feature to brighten a boring day at the office!
Page 84

TerraTec Home Cinema User Manual
Version 6
Page 84
Power options—standby, hibernate
Windows lets you save energy by putting your PC into standby mode or hibernation. THC can still
perform programmed recordings even when your PC is in a power-saving mode.
We recommend hibernation mode, as it uses the least power. Although Windows reloads more quickly
from standby mode, the computer's RAM remains powered up in standby.
Ensure that Windows does not prompt for a password when waking up, as that would
interfere with recording.
To open the Power Options applet, click Start, point to Settings, click Control Panel and double-click
Power Options. Click the Advanced tab.
Untick the "Prompt for password when computer resumes from standby" option, if available.
More information on power options, see the Windows XP "Help and Support Centre".
Page 85

TerraTec Home Cinema User Manual
Version 6
Page 85
Questions and Answers
Question: Why aren't programmed recordings being added to the timer list of TerraTec Home
Cinema, even though my tvtv account is activated?
Answer: Check whether the automatic job query
option is set to "Manual update only", and change it
to suit your preferences.
Question: I have not programmed any recordings to start while the computer is in standby or
hibernation mode. Why does the system still wake up?
Answer: The computer not only wakes up from standby or hibernation to record programs, but also for
automatic job queries
.
Question: Why is the "Jobs" button in the tvtv options greyed out and disabled?
Answer: Please note that the tvtv and TerraTec Home Cinema station tables must be matched prior
to job queries. For further information, see tvtv configuration
Question: I have several TV tuners in my system. Can I set up TerraTec Home Cinema to use a
specific one?
Answer: You can set up TerraTec Home Cinema not to use a certain TV tuner. For further
information, see Options
configured in the tvtv options.
.
Page 86

TerraTec Home Cinema User Manual
Version 6
Page 86
Link-O-Rama
The following is a number of interesting links to programs that can simplify your day-to-day handling of
TV programs and recorded material.
DivX
A popular MPEG-4 codec
http://www.divx.com/
Dr. DivX
A tool that converts your recordings into DivX format
Xvid
An open-source equivalent of the DivX codec
Project X
An editing tool for your recordings (demultiplexer)
http://sourceforge.net/projects/project-x
Cuttermaran
An editing tool especially for DVB recordings.
PVAStrumento
A further editing tool for your recordings. (demultiplexer)
http://www.lyngsat.com
Visit this site for current digital satellite TV station lists.
http://www.videolan.org
VLC, a popular open source media player, can be found here.
The following table contains links to vendors of MPEG-2 video and audio decoders:
http://www.mainconcept.de
http://www.gocyberlink.com
http://www.intervideo.com
http://www.nvidia.com
 Loading...