

Page 1
EyeTV 3 Software Manual
© 2008, 2009, 2010
Elgato Systems LLC
900 Kearny Street • Suite 750
San Francisco, CA 94133
United States of America
Elgato Systems GmbH
Nymphenburgerstr. 14
80335 München
Germany
http://www.elgato.com
Revision 1.2
1
Page 2

EyeTV 3 Manual
How do I open the On Screen Menu? 13
Table of Contents
EyeTV 3 Features
Welcome To EyeTV!
Step One: Installing EyeTV Software 7
Step Two: Launching EyeTV for the First Time 7
Registering EyeTV Online 7
Where to get help 7
Windows
How do I open a Live TV window? 8
How do I close a video window? 8
How do I resize a video window? 8
How do I watch video in Full Screen mode? 8
How do I exit Full Screen mode? 8
How do I change the Aspect Ratio of a video
window? 8
How do I view Closed Captions? 8
How do I export Closed Captions? 9
How do I view Subtitles? 9
How do I view Teletext? 9
Tips: 10
On Screen Controller
How do I use the On Screen Controller? 11
① EyeTV Information Display 11
Timeshifting Control Buttons 11
On Screen Menu
What is the On Screen Menu? 13
How is the On Screen Menu organized? 13
How do I navigate the On Screen Menu? 13
How do I close the On Screen Menu? 14
How do I use the On Screen Menu with the Apple
Remote? 14
How do I access recordings via the On Screen
Menu? 14
How do I schedule recordings via the On Screen
Menu? 14
How do I watch Live TV via the On Screen Menu? 14
Programs Window
What is the EyeTV Programs window? 16
How do I open the EyeTV Programs window? 16
Program Guide
What is the Program Guide? 17
How do I set up the Program Guide? 17
How do I use the Program Guide to find content? 18
How do I use the Program Guide to schedule? 18
How do I use the Program Guide to record? 18
What do the colors mean in the Program Guide? 18
Coverage Details 18
Smart Guides
How do I create a Smart Guide? 19
How do I use Smart Guides? 19
What recording options are there with Smart
Guides? 20
How do I remove a Smart Guide? 20
2
Page 3

EyeTV 3 Manual
Table of Contents
How do I automatically record all episodes from one
series? 20
How do I create a Smart Series Guide? 21
How do I delete a Smart Series Guide? 21
Tip: Narrow down your Smart Guide search 21
Tip: How to keep a specific Smart Guide recording
from being automatically deleted 21
Schedules
How do I manually schedule a recording? 22
How do I use the Program Guide to schedule? 22
How do I edit a schedule? 22
How do I repeat a schedule? 22
How can I set a recording limit for a schedule? 22
How do I delete a schedule? 22
How do I deactivate a schedule? 23
Recordings
How do I find a recording? 24
How do I watch a recording? 24
How do I tell if a recording has not yet been played?
24
What are channels? 26
How do I detect channels? 26
How do I search for channels? 27
How do I change channels? 27
How do I rename channels? 27
How do I sort channels? 27
How do I delete a channel? 27
How do I make a favorite channels list? 27
How do I use a favorite channels list? 27
How do I save a channel set? 28
How do I edit a channel set? 28
Quickly see what’s on, and what’s on next for each
channel 28
Playlists
What is a Playlist? 29
How do I add a Playlist? 29
How do I use Playlists? 29
What is a Smart Playlist 29
How do I add Smart Playlists? 29
3
How do I mark a recording as Watched or Not
Watched? 24
How do I delete a recording? 24
How do I edit a recording? 24
How do I export a recording? 25
How do I sort recordings? 25
Tip: Use Playlists and Smart Playlists to organize your
Library 25
Channels
Automatically create a Smart Playlist 29
How do I use Smart Playlists? 30
Editor
What are the parts of the the editor? 31
How do I open the editor? 32
How do I use the editor to select and remove
content? 32
How do I export from the editor? 33
Page 4

EyeTV 3 Manual
Table of Contents
How do I save content from the editor? 33
How do I break a long recording into smaller chunks?
33
What are the keyboard shortcuts for the editor? 33
Picture In Picture
How do I start Picture in Picture? 34
How do I use Picture in Picture? 34
EyeTV Sharing
How do I share my EyeTV Archive with others? 35
How do I access Archives from other Macs? 35
Can I watch Live TV via sharing? 36
EyeTV Sharing requires all participants to be
connected in the same network and subnet 36
EyeTV Sharing and the Mac OS X 10.5 Firewall 36
Preferences
How do I change the image quality? 39
How do I change the look of the picture? 39
How do I find the signal strength readings? 39
Wi-Fi Access
What is Wi-Fi Access? 40
How do I start Wi-Fi Access? 40
How do I use Wi-Fi Access with my network? 40
How do I use Wi-Fi Access with my firewall? 41
How do I use Wi-Fi Access outside of my network? 41
How do I use Wi-Fi Access with my iPhone/iPod
touch? 41
How do I use Wi-Fi Access with a browser on a
Mac? 41
How do I choose a password for Wi-Fi Access? 42
How do I enable my EyeTV recordings for Wi-Fi
Access? 42
How do I change the export format to iTunes? 37
How I move my EyeTV Archive? 37
How do I change the Live TV Buffer? 37
How do I extend recordings? 37
How do I change jump times? 38
How do I setup my EPG service? 38
How do I change the Overscan setting? 38
How do I change deinterlacing? 38
How do I stretch the full screen image? 39
How do I use EyeTV with multiple displays? 39
How do I change the sound output? 39
How do I turn on Game Mode? 39
Parental Controls
What are Parental Controls? 43
How do I turn on Parental Controls? 43
How do I set my PIN for Parental Controls? 43
How can I export recordings when using Parental
Controls? 43
How do I manage Parental Controls? 44
How do I set a maximum rating for Parental
Controls? 44
How do I set a maximum rating for Parental
Controls? 45
How do I block certain channels with Parental
Controls? 46
Remote Control
4
Page 5

EyeTV 3 Manual
Table of Contents
What remote controls can I use? 47
How do I use the EyeTV Remote to control EyeTV? 47
How do I use the Apple Remote to control EyeTV? 49
Support for Set Top Boxes
Configuring EyeTV and Set Top Box Support (USA and
Canada) 50
A Note About Multiple Devices 52
Configuring EyeTV and IR Blaster Hardware 52
Configuring ZephIR with EyeTV 52
Configuring iRed and IRTrans with EyeTV 53
For Developers of Infrared Hardware and Software 53
DVD Creation
EyeTV and Toast 54
EyeTV and Other DVD Software 54
TV Guide 58
TitanTV Remote Scheduling 58
TitanTV Guide Diagnostics 59
IceTV 59
IceTV Remote Scheduling 59
Other Countries / In-Stream EPG 59
EyeTV Assistants
How do I use the EyeTV Setup Assistant? 55
How do I use the VHS Assistant? 55
How do I use the iPod assistant? 55
AppleScript
Script Menu 56
Dictionary 56
Triggered Scripts 56
EyeTV Archive
Electronic Programming Guide
tvtv 58
tvtv Remote Scheduling 58
5
Page 6
EyeTV 3 Manual
New EyeTV 3 Features
EyeTV 3 Features
Smart Guides
Schedule recordings according to criteria you
choose, and EyeTV will always find your favorites.
Smart Series Guides
Records all episodes of a certain series with no
repeats
Smart Playlists
Pick your criteria, and EyeTV will auto-fill a playlist
of recordings.
Parental Controls
Block certain channels or programs.
EyeTV Archive Sharing
Browse through EyeTV recordings on other Macs
on your local network, and share your recordings.
Improved On Screen Menu
Using EyeTV full screen has never been easier.
Cover Flow
Using Leopard? Turn on Cover Flow in EyeTV, and
quickly browse your recordings.
Channel Set Management
Travel a lot? Save a channel set for each city, or
back up your customized channel list.
Improved Editor
Larger and cleaner interface for fast editing.
6
Page 7
EyeTV 3 Manual
Registering EyeTV Online
Registering EyeTV entitles you to the following
benefits:
• Notification of product updates
• Technical support
• Special offers
To register:
Open your web browser and go to:
•
Welcome To EyeTV
Welcome To EyeTV!
This guide shows you how to begin watching and
recording television programs on your Macintosh. It
covers installing and configuring EyeTV software
and includes instructions for using the most
common features of EyeTV.
Step One: Installing EyeTV Software
• Insert the EyeTV software CD into your CD-ROM or
DVD-ROM drive.
• Drag and drop the EyeTV application where you
would like to install it. We recommend your Mac’s
Applications folder.
Step Two: Launching EyeTV for the First Time
Navigate to the folder where you installed the
•
EyeTV Software and double-click the EyeTV icon.
The first time you launch EyeTV, a Setup Assistant
•
will guide you through the complete setup and
configuration of your EyeTV software.
You may be asked to enter an Activation Key. This
•
either came with your EyeTV product, or has been
provided to you electronically. Keep this key in a
safe place, in case you need to reinstall the EyeTV
software.
• When you complete the Setup Assistant, the
EyeTV Programs window, an EyeTV viewer window
and the EyeTV Controller will appear.
http://www.elgato.com/elgato/na/mainmenu/
support/registration.html
Enter the requested information and click the
•
“Submit” button.
Where to get help
Both the EyeTV Support web site at
http://support.elgato.com
and the EyeTV Help, accessible through the Help
menu, are your first destinations for getting
answers to your troubleshooting questions.
7
Page 8

EyeTV 3 Manual
Windows
Windows
How do I open a Live TV window?
Select Open Live TV Window from the File menu.
How do I close a video window?
Select Close Window from the File menu.
To watch in the largest sized window that will fit on
your screen:
• Select Maximum Size from the View menu or
press Command-4.
How do I watch video in Full Screen mode?
Select Enter Full Screen from the View menu or
press Command-0.
How do I exit Full Screen mode?
Press the Esc key, press Command-0, or double
click on the video window.
How do I keep player windows on top?
Select Keep Player Windows On Top from the View
menu or press Option-Command-F.
How do I change the Aspect Ratio of a video
window?
How do I resize a video window?
Grab the lower right corner of the window and drag
it diagonally.
Or, choose a pre-selected size from the View menu:
To watch in a small size window:
• Select Small Size from the View menu or press
Command-1.
To watch in a half size window:
• Select Half Size from the View menu or press
Command-2.
To watch in a normal size window:
• Select Normal Size from the View menu or press
Command-3.
EyeTV will automatically try to choose the correct
aspect ratio. Typical TV has a 4:3 ratio, while a few
widescreen formats also exist.
If you would like EyeTV to automatically choose a
certain ratio, you can pick that from the View menu.
This could be useful if you are trying to remove
letterboxing, or display content on a widescreen
monitor. Your choices are 4:3, 14:9, 16:9 and Wide.
Some ratios may visibly remove part of the image, to
make it fit that shape without otherwise stretching
or distorting the picture.
How do I view Closed Captions?
TV programs in North America will often have
Closed Captions that can be displayed. These
captions use text to display the dialog present in the
audio track, and sometimes also indicate sound
effects. Select Closed Captions from the View
8
Page 9

EyeTV 3 Manual
menu to Show them, or uncheck the Show
command to hide them.
You can also select between Closed Captions
channels, from CC1 to CC4.
Windows
How do I export Closed Captions?
When an EyeTV recording from North America with
Closed Captions is exported from within EyeTV,
EyeTV automatically creates a Closed Captions text
track.
The Closed Captions will be played back on the
iPhone, iPod and Apple TV if Closed Captions have
been enabled on the device. Turn on Show Closed
Captioning in QuickTime Player, or the appropriate
Show Closed Captions When Available preference
on the iPod/iPhone/Apple TV or in iTunes.
EyeTV will export the last Closed Caption track used
in EyeTV. For example, if CC3 captions are used,
they will be converted to CC1 captions upon export.
Only one Closed Captions track is supported.
How do I view Teletext?
International TV programs in PAL format will often
have Teletext screens that can be displayed. This
text displays various information provided by the TV
channel. Select Teletext from the View menu to
show them.
The colored buttons (red, green, yellow, blue, also
on the infrared remote control) are used to navigate
to the corresponding screens.
It is recommended to have the latest software and
firmware updates for QuickTime, iTunes, iPhone,
iPod and Apple TV as older versions did not support
Closed Captions.
How do I view Subtitles?
International TV programs will often have Subtitles
that can be displayed. This text displays the dialog
present in the audio track. Select Subtitles from
the View menu to Show them, or uncheck the Show
command to hide them.
EyeTV is not able to export subtitles, either with
video or separately.
9
Page 10

EyeTV 3 Manual
Tips:
How do I open several multiplex channels?
Digital TV channels are often subdivided into multiple
Windows
subchannels.
Looking for subchannels, or identical frequencies, would be the
way to determine if channels are on the same multiplex. Look in
the frequency column of the Channels section of the Programs
window, to see the frequency. In the US, digital antenna (ATSC)
subchannels are often designated by a hyphen (like 11-1 for
regular programming, and 11-2 for weather).
To open an additional live TV window, hold down the Control key
while selecting Open Live TV Window from the File menu.
After you press the Control key, you’ll see a new option in the
File menu, Open Live TV on Multiplex. A new video window
will open from that multiplex.
You can open as many additional windows as you like, but 2 or 3
are a practical upper limit on most machines.
How do I take a picture of what’s on screen?
Pause playback of your recording or live TV, and move the
timeline until the EyeTV player window is displaying the frame
you want. Then, choose Snapshot from EyeTV’s Edit menu.
EyeTV saves the picture to the Desktop.
All live TV windows can be paused, timeshifted, manually
recorded, etc. independent of each other. Scheduled recordings
will not be able to open more than one multiplex channel at once
- you have to do so manually, and then click on each window
before selecting Record.
For products with only one tuner, changing any window to a
channel on a different multiplex will change all other open
windows to channels on the new multiplex.
10
Page 11
EyeTV 3 Manual
On Screen
Controller
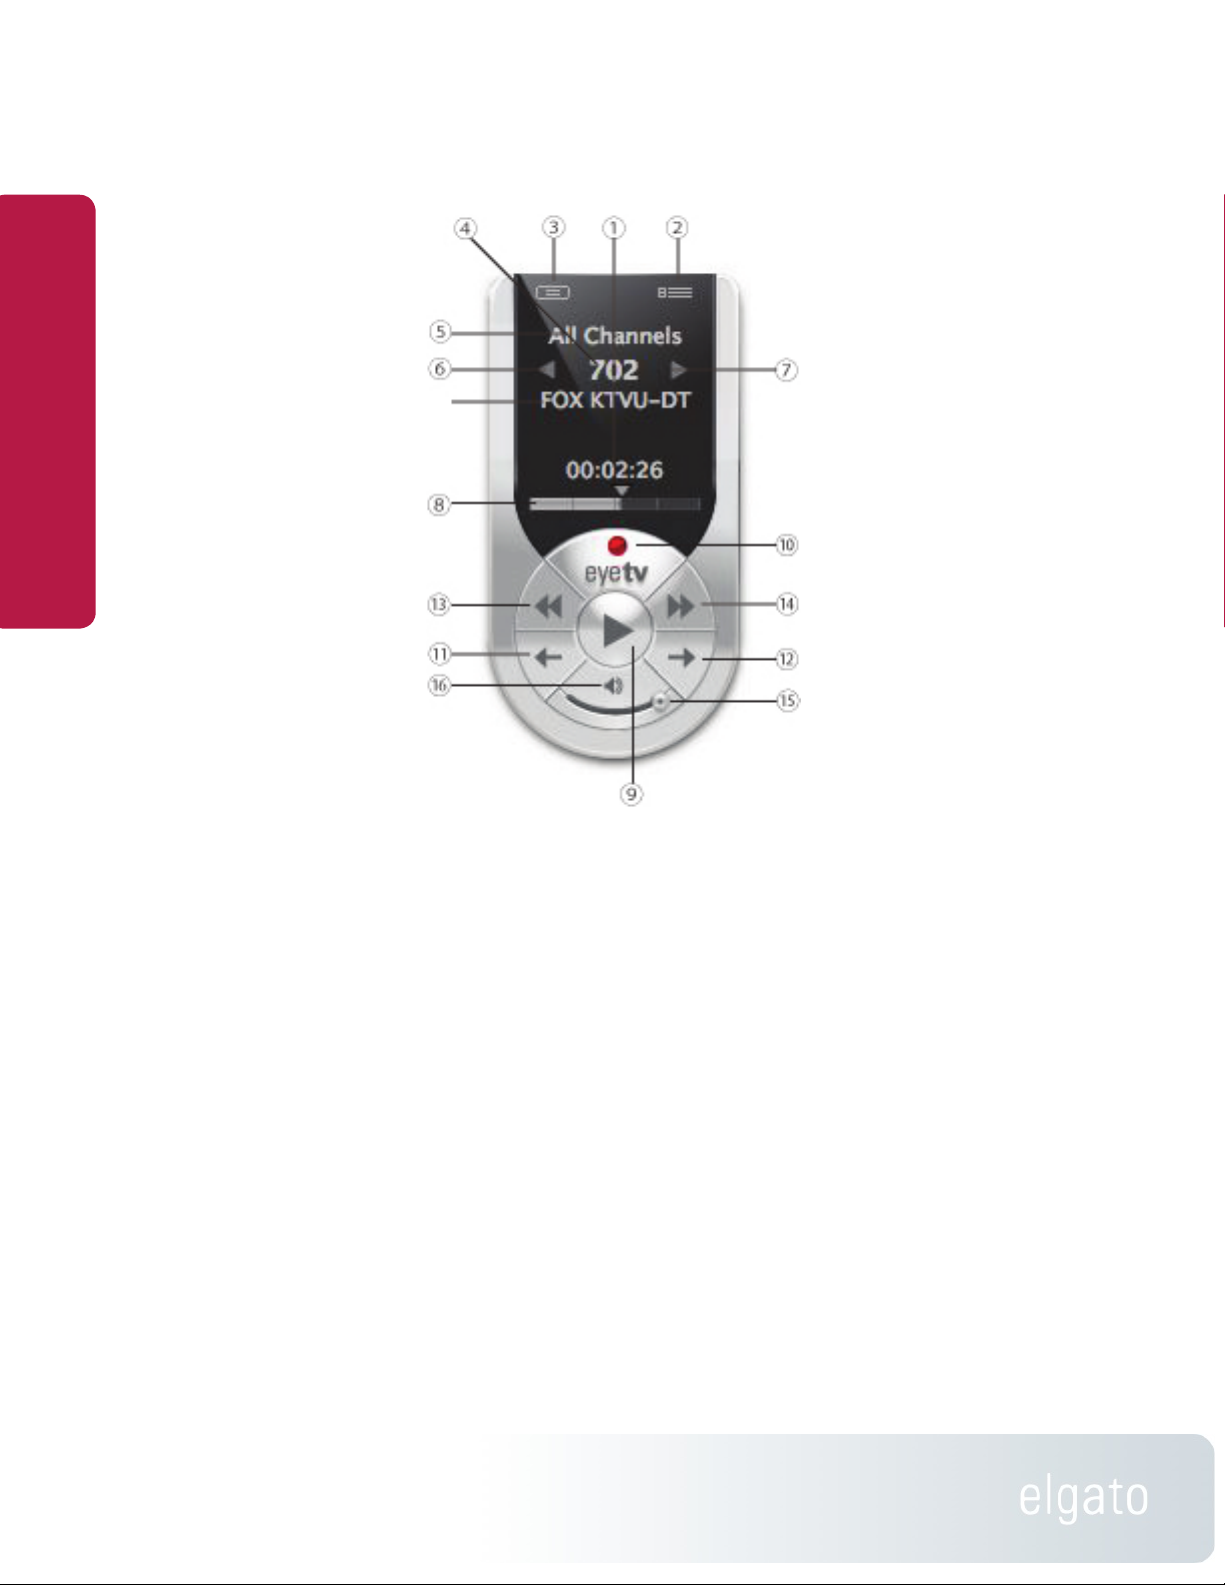
How do I use the On Screen
Controller?
① EyeTV Information Display
This area displays the name
of the program currently
being watched or recorded,
On Screen Controller
the elapsed time, and the
channel on which the
program is playing. Clicking
the time display toggles
between elapsed time, total
time, and time remaining.
② EyeTV Programs - Click
this button to bring up the
EyeTV Programs window,
which displays all of the
Recordings, Scheduels,
Playlists, Favorite Channels,
and the Program Guide.
③ EyeTV Menu - Click this button to bring up the
EyeTV On Screen Menu over the current player
window.
④ Channel Number - Click to use a drop-down
menu to switch to any available channel.
⑧ Time Slider - This bar gives a
visual representation of your
current position in the show. For
example, you are at the beginning
of the show when the bar is at the
left edge of the timeline and you
are at the end of the show when
the bar fills the timeline. Click
anywhere inside the slider to jump
to any part of the recording; click
and drag to scan through the
program.
Timeshifting Control Buttons
⑨ Play/Pause - Click this button to
play/pause the current program. In
the case of live television, EyeTV
keeps recording the live feed onto
your disk. The pause time
remaining for your now timeshifted
show depends on the free space
available on your disk.
⑩ Record - Clicking this button
starts or stops recording the current program. The
record button is highlighted pink during a
recording. By default, the manually started
recording’s duration is set to 180 minutes (3 hours).
If you want to record a longer program, please
highlight the recording in the Recording section of
the EyeTV Programs window, press the Info button,
and edit the schedule there.
⑤ Current Channel List - Use this drop-down menu
to switch between Favorite Channel lists, and all
channels.
⑥ Channel Down - Click this left facing triangle to
switch to the next lower channel.
⑦ Channel Up - Click this right facing triangle to
switch to the next higher channel.
11
Many EyeTV units have only one tuner, and can only
handle one video source at a time. Thus, channels
and inputs cannot be changed while recording.
Once a recording has started, the Live TV Buffer is
flushed so you cannot skip backwards beyond the
start time of the recording.
⑪ Instant Replay - Clicking this button will rewind
the current program 7 seconds and continue
playing, creating an “instant replay” effect. Clicking
Page 12

EyeTV 3 Manual
this button while holding down the Option key starts
playing the current program from the beginning.
⑫ Jump - Clicking this button will fast-forward the
current program 30 seconds and continue playing.
This is useful for jumping over less desirable
content. Clicking this button while holding down the
Option key resumes watching live television.
⑬ Fast Backward - Click this button to play the
current program in reverse at high speed. Clicking
this button while pressing the Option key plays the
On Screen Controller
current program in reverse in slow motion. 2x, 4x, 8,
16x, 32x speeds are available.
⑭ Fast Forward - Click this button to play the
current program at high speed. Clicking this button
while pressing the Option key plays the current
program in slow motion. 2x, 4x, 8, 16x, 32x speeds
are available.
⑮ Volume Control - Use this curved slider to
control the volume of the program being played.
⑯ Mute - Click this button to mute the sound, click
it again to turn it back on.
Tip:
Use EyeTV’s Window menu to hide or show the On Screen Controller.
While EyeTV is recording, the EyeTV icon in the Dock displays a red
dot in place of the On Screen Controller.
12
Page 13

EyeTV 3 Manual
On Screen Menu
On Screen Menu
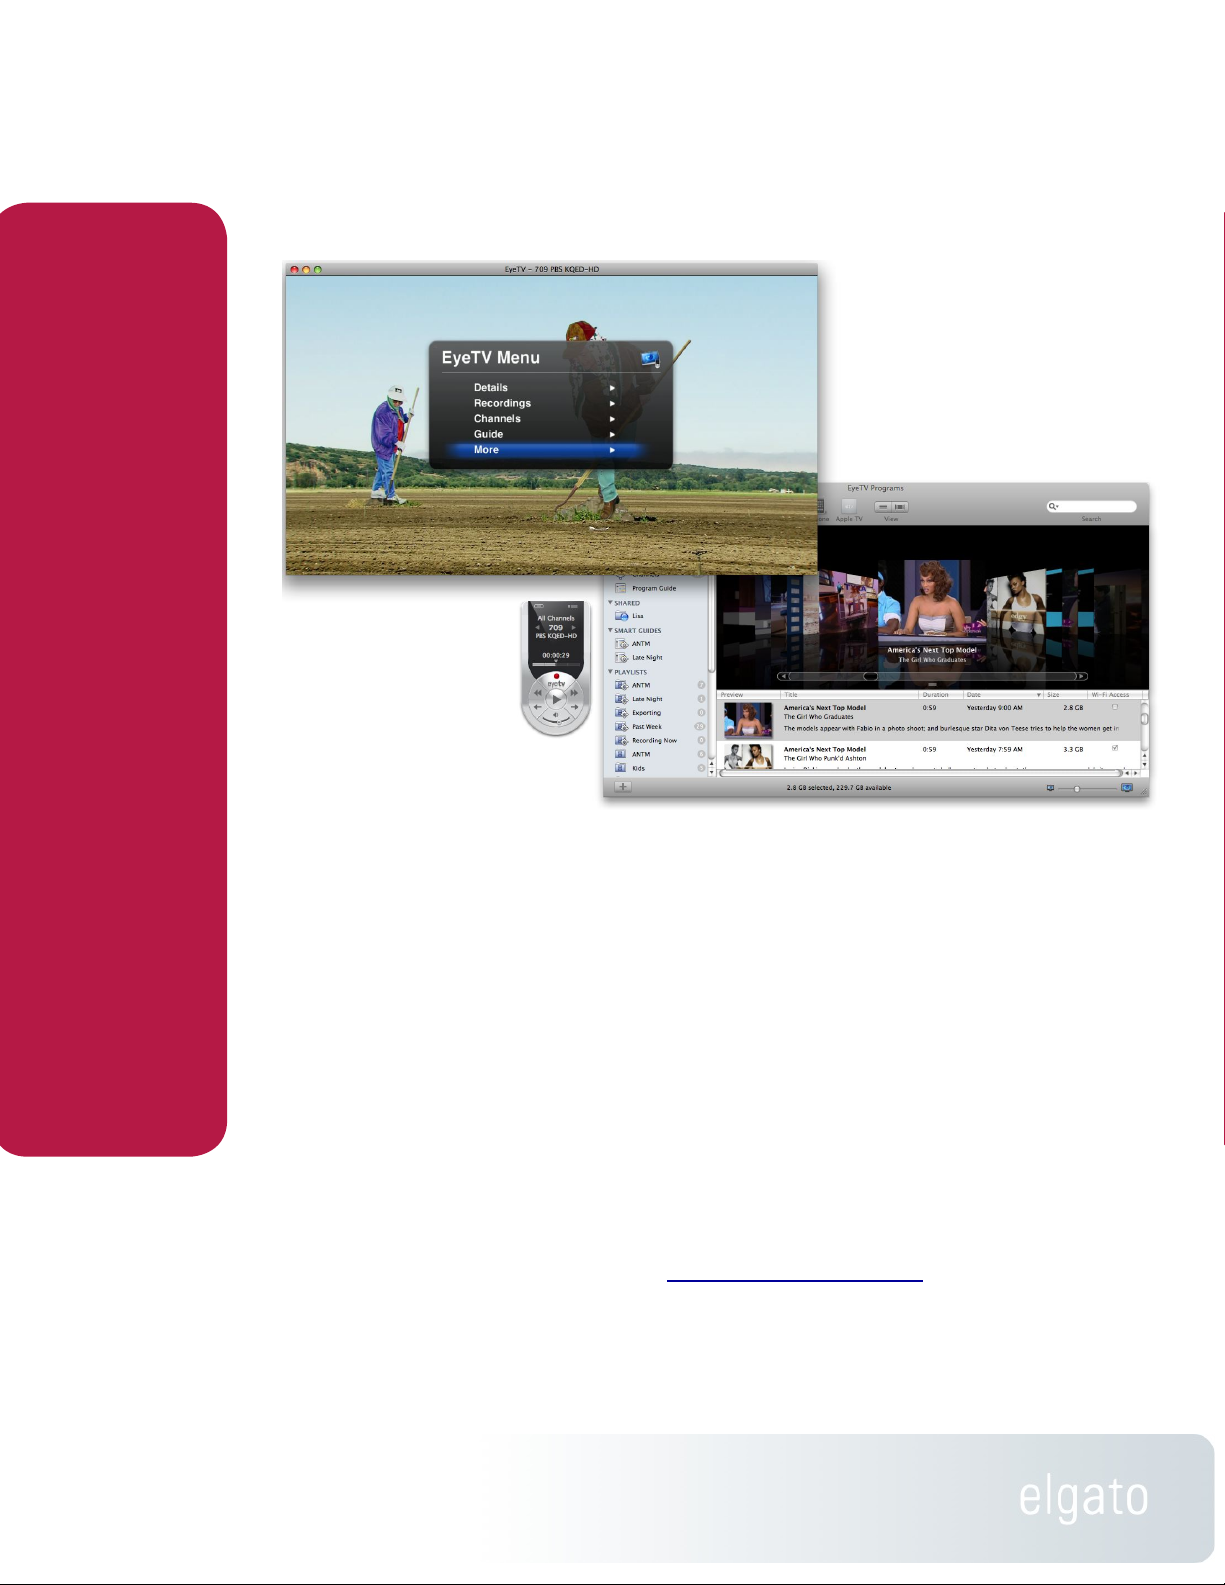
What is the On Screen Menu?
The On Screen Menu enables you to sit back and
relax while you watch and record television on your
Mac.
It works with the Apple Remote, and remotes that
have been bundled with EyeTV products. It also has
keyboard and mouse navigation.
How do I open the On Screen Menu?
There are a number of ways to enter EyeTV’s On
Screen Menu. While EyeTV is running, either
How is the On Screen Menu organized?
The Main Menu of the On Screen Menu includes
these options:
Details - More information about the currently
playing video
Recordings - A list of all recordings in your EyeTV
Library, organized by playlists
Channels - A list of the channels you have available.
The title of the current program on each channel
will be listed, if available.
Guide - The Program Guide will be shown - it can be
used to select shows to record.
More - Leads to the next page of the On Screen
Menu.
If you select More, then you will see a second page
of options:
Live TV - Allows you to pick from the following
options: Resume Playing, Mute, Picture-in-Picture,
Favorite Channels, Input, Last Channel, Go to Live,
Record, Aspect Ratio, Closed Captions, Audio
Channels.
Schedules - Lists all scheduled recordings. Select
one to Delete, Disable, Export to iPod, Export to
Apple TV, and Add to Playlist.
Settings - Allows you to pick from the following
options: Display Options, Audio Output, Controls,
and Sort Order.
a) Press Command-Esc on the keyboard, or
b) Press and hold the Menu key on the Apple
Remote, or
c) Press the Enter key on the silver EyeTV remote
control, or
d) Press the OSD key on the black EyeTV (Terratec)
remote control, or
e) Select Open Menu from EyeTV’s View menu.
13
How do I navigate the On Screen Menu?
To select an item and move a level down into its
submenu, indicated by a small caret at the right
edge of the screen, use either
a) The OK button on the EyeTV remote control, or
b) The Play/Pause button on the Apple Remote, or
c) The Enter/Return keys on your keyboard.
To go back up one level, press either
a) the Enter key on the silver EyeTV remote control,
or
Page 14

EyeTV 3 Manual
b) the OSD key on the black EyeTV (TerraTec)
remote control, or
c) the Menu button on the Apple Remote, or
d) the Esc key on your keyboard, or
e) double click the title of the present level.
How do I close the On Screen Menu?
To exit the On Screen Menu, keep going back up
one level by pressing either
On Screen Menu
a) the Enter key on the EyeTV remote control, or
b) the OSD key on the black EyeTV (TerraTec)
remote control, or
c) the Menu key on the Apple Remote, or
d) the Esc key on your keyboard, or
e) click the (X) control at the top left corner.
How do I use the On Screen Menu with the Apple
Remote?
To select an item and move a level down into its
submenu, indicated by a small caret at the right
edge of the screen, use the Play/Pause button on
the Apple Remote
To go back up one level, press the Menu button on
the Apple Remote.
When EyeTV is running:
Press the Menu button on the Apple Remote to
enter Front Row.
Press and Hold the Menu button on the Apple
Remote to enter the On Screen Menu.
screen, press the Play/Pause button on the Apple
Remote.
To go back up one level, press the Menu button on
the Apple Remote.
To exit the On Screen Menu, keep going back up
one level by pressing the Menu button on the Apple
Remote.
How do I access recordings via the On Screen
Menu?
Select the Library command in the Recordings
section.
You can also browse and view individual Playlists
that you have created, selecting individual
recordings to view.
To change the sort order of recordings, between
Sort By Date (latest first) and Sort By Title
(alphabetically), select the Sort Order command in
the Settings menu.
How do I schedule recordings via the On Screen
Menu?
You can use the Program Guide built into the On
Screen Menu to browse for upcoming shows, and
schedule them for recording immediately, without
leaving the On Screen Menu.
Any potential recording conflicts will be announced,
and there is a separate Schedules section to further
manage your upcoming recordings.
You will be reminded of this behavior the first time
you use the Apple Remote with EyeTV.
Use the Up/Down buttons on the remote control to
scroll up and down the list of menu items. To select
an item and move a level down into its submenu,
indicated by a small arrow at the right edge of the
14
How do I watch Live TV via the On Screen Menu?
Select More at the bottom of the On Screen Menu.
You will then see the option for Live TV.
You will have choices to Resume Playing, Mute, turn
on Picture-in-Picture, select Favorite Channels,
Page 15

EyeTV 3 Manual
change the video Input, go to the Last Channel, and
Go To Live. You can also Record, change the
Aspect Ratio, show Closed Captions, and adjust
Audio Channels.
On Screen Menu
Tip:
Put your Mac to sleep via the Apple Remote
1) Press the Menu button on the Apple Remote until you exit
the On Screen Menu
2) Press the Menu button to enter Front Row
3) Press and hold the Play/Pause button for a few seconds to
sleep your Mac
15
Page 16

EyeTV 3 Manual
Programs Window
Programs Window
What is the EyeTV Programs window?
The EyeTV Programs window is the main interface
to the application.
It is organized into a number of sections, accessible
from the Categories column on the left. Library,
Shared, Smart Guides, Playlists and Channels are
the default sections.
The Library section is sub-divided into Recordings,
Schedules, Channels and Program Guide.
How do I open the EyeTV Programs window?
Choose Show EyeTV Programs from the Window
menu, and the EyeTV Programs window will appear.
You can also press the button at the top right corner
of the On Screen Controller, to open the EyeTV
Programs window.
How do I use Cover Flow in the EyeTV Programs
window?
When using EyeTV under OS X 10.5 (Leopard), an
extra button will appear at the top of the Recordings
section. That View button can be used to turn
Cover Flow mode on or off.
When using EyeTV under OS X 10.4 (Tiger), that
button will not appear, and Cover Flow mode can
not be started.
16
Page 17
EyeTV 3 Manual
Program Guide
Program Guide
What is the Program Guide?
EyeTV has a built in Electronic Program Guide
(EPG), that lists upcoming programs available for
viewing or recording. Information for that list is
gathered from online sources like TV Guide, tvtv and
IceTV, depending on where you live.
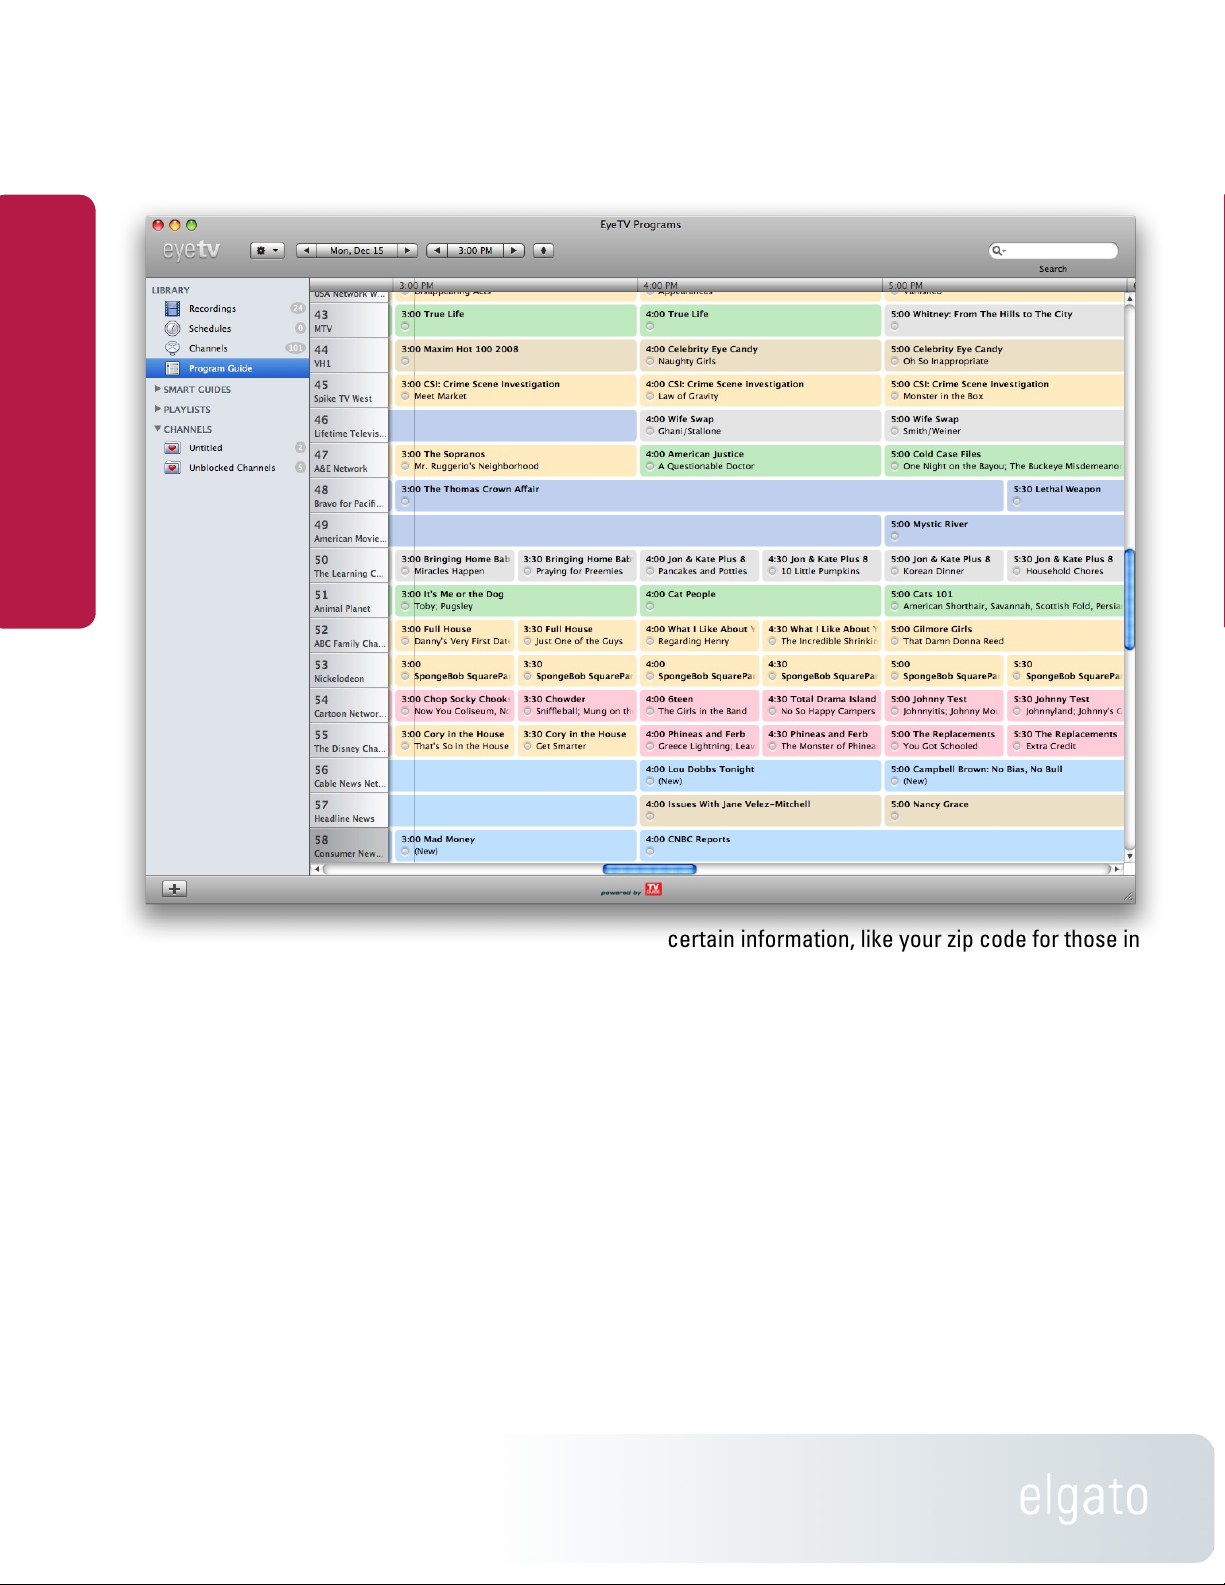
How do I set up the Program Guide?
To set up the Program Guide for the first time, start
the EyeTV Setup Assistant from the Help menu.
After you Auto Tune, EyeTV will prompt you for
17
certain information, like your zip code for those in
the US.
Then, the Program Guide section will then list
upcoming programs. These programs will be in a
grid format, with the colors representing like
genres, such as movies or news.
If you need to update your Channel Lineup, that
option is in the Action menu of the Channels
section. To update the Guide, that option is in the
Action menu of the Program Guide section. You
can also use the Guide section in the Preferences.
Page 18

EyeTV 3 Manual
How do I use the Program Guide to find content?
At the top right corner of the EyeTV Programs
window, there is a field to enter words for a search.
For example, if you want to find all instances of The
Simpsons, then enter “Simpsons”. Then, the
Program Guide section will temporary narrow
down, to only show the results of that search.
You can save your search as a Smart Guide (see
next chapter) that constantly records the results of
Program Guide
your search.
Erase the search terms from the box, to bring things
back to normal.
How do I use the Program Guide to schedule?
To add a schedule using the EyeTV Program Guide,
select the Program Guide section in the EyeTV
Programs window. You will see information about
upcoming programs, using information from TitanTV,
tvtv, or other sources, depending on your location.
Clicking the red RECORD button next to a program
tells EyeTV to schedule the program to be
automatically recorded.
Turquoise - Sports
Light Blue - News
Red - Childrens
Green - Documentary
Coverage Details
See the Appendix for more details about the
different programming guides that EyeTV supports:
TVTV for several European countries
TV Guide for the USA and Canada
IceTV for Australia
EyeTV can also build an EPG from information
contained in a digital broadcast (DVB, ATSC or
ISDB-T. The “built-in” EPG offers significantly less
information and covers fewer days than the EPG
downloaded from an EPG service, but it is an
alternative for users without an active subscription,
or those in a country currently not served by an
online EPG service.
How do I use the Program Guide to record?
To immediately record using the EyeTV Program
Guide, select the Program Guide section in the
EyeTV Programs window. You will see information
about upcoming programs, using information from
TV Guide, tvtv, or other sources, depending on your
location. If a scheduled item has already started,
but it not yet over, then clicking the red RECORD
button next to the program tells EyeTV to record the
program already in progress.
What do the colors mean in the Program Guide?
Grey - Default, no particular genre
Orange - Series
Dark Blue - Movie
Yellow - Music
18
Page 19

EyeTV 3 Manual
Smart Guides
Smart Guides
How do I create a Smart Guide?
Smart Guides are automatic searches, that will
constantly examine the Program Guide for shows
you want to see.
To make a Smart Guide, start your search in the
electronic program guide window, modify or further
refine the search using the criteria below, then
simply click Save to save the results.
Or, you can choose New Smart Guide... from the
File menu, or press the + button at the bottom left
corner of the EyeTV Programs window.
The Smart Guides section of the EyeTV Programs
window will list every Smart Guide that you've
created. You can rearrange their order by dragging
and dropping.
How do I use Smart Guides?
Smart Guides are automatic searches, that will
constantly examine the Program Guide for shows
you want to see.
After you name your Smart Guide, enter one or
more search terms you want to use.
You can add or subtract criteria by using the + and buttons.
Here are the categories you can search within:
19
Page 20

EyeTV 3 Manual
Any Field
Title
Episode Title
Description
Actors
Director
Content
Genre
Year
Smart Guides
Duration
Date
Start Time
Stop Time
Day of Week
Channel Name
Channel Number
Favorite Channels
HDTV
Repeat
Episode Number
Episode Count
As you change the search criteria, the guide will
automatically update.
What recording options are there with Smart
Guides?
Click on an entry to find out more about that
program, or to use the Add Schedule button. You
can also choose to record it by pressing the pink
circle underneath the name of each item in the
Smart Guide.
Press the Options button if you would like your
Smart Guide to automatically Record All Matches of
the programs that it finds. You have the option to
add these recordings to a certain playlist, or to
export them to iTunes, in the iPod, iPhone or Apple
TV formats. You can also let EyeTV create the
corresponding “Smart Playlist” that will contain the
subsequently recorded programs.
Finally, you can tell EyeTV to keep only a certain
amount of recordings. You may be recording 10
items each week using a Smart Guide, but if you
select "Keep 5 shows", then only the last 5
recordings for that Smart Guide will be saved - the
rest will be deleted. This will let you give a rough
limit for how much hard drive space each Smart
Guide will use for recordings.
How do I remove a Smart Guide?
Smart Guides are automatic searches, that will
constantly examine the Program Guide for shows
you want to see.
To permanently remove a Smart Guide, highlight it
and press the Delete key on the keyboard. That will
not delete any recordings or schedules associated
with the Smart Guide; it will only remove that
specific automatic search.
How do I automatically record all episodes from
one series?
A Smart Series Guide is a special Smart Guide, that
records all episodes of a certain series on a certain
channel.
The default settings of a new Smart Series Guide
are to record all matches, create a new playlist to
contain those recordings, and to not limit the
amount of items recorded.
A Smart Series Guide will examine your EyeTV
Library, and will not record an episode if it already
20
Page 21

EyeTV 3 Manual
exists in your collection - that
unneeded schedule will be
skipped.
How do I create a Smart Series
Guide?
Open the Program Guide
Smart Guides
section of the EyeTV Programs
window, and find an episode of a series you want to
record.
Tip: Narrow down your Smart Guide search
Click on the colored rectangle surrounding the title
of that episode, to see the Details View.
Press the Record All button at the bottom of the
Details View, to create a Smart Series Guide
You can also use the Program Guide in the On
Screen Menu to select an episode. Then, press
the Record All button to create a Smart Series
Guide.
Creating a Smart Series Guide automatically
creates a corresponding Smart Playlist.
How do I delete a Smart Series Guide?
To permanently remove a Smart Series Guide,
highlight it and press the Delete key on the
keyboard. That will delete any schedules already
associated with the Smart Series Guide, but it will
not delete any recordings.
Here is a specific example of how to narrow down a Smart Guide
search. We are looking for new episodes of the “Simpsons” that are
on one specific channel. Start from the main EPG window’s search
field by typing “Simpsons”. Then change the “Any Field contains
Simpsons” condition to “Title contains Simpsons” (to avoid catching
Simpsons that appear on late nate comedy channels). Then add the
“Repeat is false” condition to get only the new episodes, and the
“Channel is 2” condition (because there are several cable channels
carrying new Simpsons episodes).
In this way, you’ll only find the new episodes of the Simpsons and
won’t have to weed out the duplicates afterwards.
Tip: How to keep a specific Smart Guide recording
from being automatically deleted
If you’ve set a Smart Guide recording to keep the latest 5 episodes,
EyeTV won’t keep more than 5 of them. To save a specific recording
from being auto-deleted, highlight it in the Programs window, then
click the Action menu (that looks like a gear) and select “Keep
Recording”.
21
Page 22

EyeTV 3 Manual
Schedules
How do I manually schedule a recording?
Schedules
the red RECORD button next to a program tells
EyeTV to schedule the program to be automatically
recorded.
How do I edit a schedule?
Existing schedules will appear in the Schedules
section of the EyeTV Programs window with an icon
of a clock next to them. To edit a schedule,
highlight it and either press the Info button on the
top of the Schedules section, or select Edit
Schedule from the Action menu.
How do I repeat a schedule?
Existing schedules will appear in the EyeTV
Programs window > Schedules section with an icon
of a clock next to them. To repeat a schedule,
highlight it and either press the Info button on the
top of the Schedules section, or select Edit
Schedule from the Action menu. Then, adjust the
Repeat menu, which includes Daily, Weekly,
Weekdays and Custom options.
To add a manually scheduled program, select the
Schedules section, click the New button at the top
of the window and fill in the program’s parameters,
including Title, Episode, Description, Date and Time
(When), Duration, Repeats and what channel or
input (Where).
You can also set a schedule to add its recording to a
particular Playlist, and to export to the iPod or Apple
TV format after recording completes. That will
export to a H.264 format, and add the item to an
“EyeTV” playlist in the iTunes Library.
How do I use the Program Guide to schedule?
To add a schedule using the EyeTV Program Guide,
select the Program Guide section. This
section brings up information about upcoming
programs, using information from TitanTV, tvtv, or
other sources, depending on your location. Clicking
How can I set a recording limit for a schedule?
You can tell a schedule to keep only a certain
amount of recordings. If you select a value for
Repeats, then you can also enter how many shows
should be kept.
You may be recording 5 items each week using a
schedule, but if you select Keep 2 shows, then only
the last 2 recordings for that schedule will be saved
- the rest will be deleted. This will let you give a
rough limit for how much hard drive space each
schedule will use for recordings.
How do I delete a schedule?
Existing schedules will appear in the Schedules
section of the EyeTV Programs window with an icon
of a clock next to them. To permanently remove a
22
Page 23

EyeTV 3 Manual
schedule, highlight it and either press the Delete
key on the keyboard, or select Delete from the
Action menu.
How do I deactivate a schedule?
Existing schedules will appear in the Schedules
Schedules
section of the EyeTV Programs window with an icon
of a clock next to them. The checkbox to the left of
the schedule’s name allows you to enable or disable
it. Only enabled schedules will create recordings;
disable a recording if you don’t want to use it now,
but perhaps want to turn it on again later.
23
Page 24

EyeTV 3 Manual
Recordings
Recordings
How do I find a recording?
Each time you record something using EyeTV, a new
entry will be added to the list in the Recordings
section of the EyeTV Programs window.
During the recording process, there will be a
progress bar, listing the time elapsed, and total
duration.
You can use the search box at the top right corner
of the Recordings section to find specific
recordings by name.
How do I watch a recording?
After you find your recording in the in the
Recordings section of the EyeTV Programs window,
double click on it and it will immediately start
playing.
How do I mark a recording as Watched or Not
Watched?
EyeTV has a contextual menu to flag a recording as
Watched or Unwatched. Select the recording in the
Recordings section of the EyeTV Programs window,
then choose the appropriate option from the action
or contextual menus. A filter for Watched
recordings is available when making a Smart
Playlist.
How do I delete a recording?
After you find your recording in the in the
Recordings section of the EyeTV Programs window,
highlight it and then press the Delete key. You will
be asked to confirm the deletion. You can also use
the Action menu to select Delete.
If the recording was associated with a repeating
schedule, the repeating schedule will not be
deleted.
If you've never watched it before, it will start at the
beginning. If you've watched part of it before, it will
start at the point you last closed it.
How do I tell if a recording has not yet been
played?
In the Recordings section of the EyeTV Programs
window, recordings that have not yet been watched
will display a blue badge over their thumbnail
picture.
24
How do I edit a recording?
After you find your recording in the in the
Recordings section of the EyeTV Programs window,
highlight it and then select Open Editor from the
View menu. You can also use the Action menu to
select Edit.
When a recording is playing, press the grey button
at the top right corner of the window, on the title
bar. That will also open the editor.
Page 25

EyeTV 3 Manual
How do I export a recording?
All recorded programs can be exported to a
QuickTime file for use in other programs. Perform
the following steps to save a recorded program as a
QuickTime movie:
Recordings
• Open the EyeTV Programs window and select the
video recording you wish to save by clicking on it
once to highlight it
• Choose Export... from the File menu, or from the
Action menu (which looks like a gear).
Under Format, you will have a number of preset
options. EyeTV will create the correct files for use
with those applications. You can also choose the
specific format you prefer.
How do I sort recordings?
Recordings are sorted by Title, Duration, Date and
Size. To sort the Recordings section, click on one of
the columns, like the Date column, and the sort will
happen. Click again to reverse the order. You can
change the order of the columns, by clicking on the
label, and then dragging it to the left or right.
Tip: Use Playlists and Smart Playlists to organize
your Library
Once the total number of recordings in your EyeTV Library starts
creeping towards triple digits, it’s time to organize your library. Instead
of typing “Simpsons” into the search field each time you want to
watch the latest episode, create a playlist or a Smart Playlist that
finds the recordings. Both types of playlists appear in the EyeTV
Programs window’s “Playlists” section, and are described later in this
manual.
25
Page 26

EyeTV 3 Manual
Channels
Channels
What are channels?
EyeTV compatible hardware devices have built in
tuners, to select channels. The type and amount of
channels depends on what video source your
particular device is using.
Typically, antenna and cable sources can be used
to find channels, via the tuner input.
EyeTV can also receive channels from some
networked devices, like the HDHomeRun or
Freebox.
How do I detect channels?
To detect channels, you need to use the Auto Tune
process. This is usually done via the EyeTV Setup
Assistant, located in the Help menu. If you need
to tune again, at the bottom of the Channels section
there are controls to select your Country and
Service, and then to Auto Tune. The tuning will take
a few minutes, and will find all possible channels for
that service.
If some channels are missing, you can select the
Exhaustive Scan option before using Auto Tune.
If you want to Auto Tune to only find newly available
channels, without removing the current channel list,
then you can select Advanced, and then choose the
Update Scan option before using Auto Tune.
How do I listen to FM radio?
A few EyeTV products have a tuner that can receive
FM signals. You can use an antenna, and in some
cases cable TV service will also have
rebroadcasted FM channels.
26
Page 27

EyeTV 3 Manual
To detect channels, you need to use the Auto Tune
process. This is usually done via the EyeTV Setup
Assistant, located in the EyeTV menu. You can also
detect channels at the bottom of the Channels
section, where there are controls to select your
Country and Service, and then to Auto Tune.
Channels
For your Service, choose Analog - FM Radio. The
tuning will take a few minutes, and will find all
possible FM radio channels.
How do I search for channels?
To search for particular channels, use the Search
field at the top right corner of the Channels section
in the EyeTV Programs window. The listing will
become more restrictive with each additional
character entered.
How do I change channels?
Once the Auto Tune is complete, your channels will
appear in the Channels section, in numerical order.
Double-click on the name of a channel to have
EyeTV tune to that channel, and show it in the Live
TV Window.
the Name column, and the sort will happen. Click
again to reverse the order. You can change the
order of the columns, by clicking on the label, and
then dragging it to the left or right.
How do I delete a channel?
Channels can be deleted from within the Channels
section of the EyeTV Programs window. Simply
select the channel to be removed and press the
Delete key. "Delete Channels" can also be selected
from the Contextual and Action Menus.
How do I make a favorite channels list?
At the bottom left corner of the EyeTV Programs
window there is a button with a + sign. Use that to
name and add a Favorite Channels list. Or, select
New Favorite Channels from the File menu.
If you drag channels from the Channels section to
an empty space in the Categories column, you will
automatically create a new Untitled Favorite
Channels list. Rename it using the Action menu.
How do I use a favorite channels list?
How do I rename channels?
Changing the name of channels is not
recommended, since it may affect the performance
of the Program Guide.
If you do need to change the name of a channel,
highlight it in the Channels list, and choose Rename
from the Action menu (which looks like a gear).
How do I sort channels?
Channels are sorted by Number, Name, Provider,
Service, Frequency, EPG, and Type. To sort the
Channels section, click on one of the columns, like
27
Once you create a Favorite Channels list, you can
drag items to it, from the Channels section.
Items in a Favorite Channels list can be sorted,
added or deleted, without changing the full
Channels section. Use a Favorite Channels list to
create a subset of channels you like to visit.
A small remote control icon will appear next to the
active Favorite Channels list. You can activate a
favorites list via the on screen controller, or by
clicking on its name. When a Favorite Channels list
is activated, only that lineup can be used for Live TV.
If no Favorite Channels list is active, then all
channels will be available to select from.
Page 28

EyeTV 3 Manual
How do I save a channel set?
After you Auto Tune, a listing of all available
channels is created. That channel set can be saved
via the EyeTV Programs window, in the Channels
Channels
section. Choose Save Channels... from the Service
pop-up menu, and name your Saved Channel Set as
you see fit.
Saved channel sets will be listed in the Service
menu.
How do I edit a channel set?
In the Channels section of the EyeTV Programs
window, choose Edit... from the Service pop-up
menu. This brings up the Manage Channel Sets
window.
already exists, the new set will have “Copy” as a
suffix.
Tip:
Quickly see what’s on, and what’s on next for each
channel
Open the EyeTV On Screen Menu by typing in the first few characters
of the channel’s name or number. The EyeTV On Screen Menu appears
automatically, and the currently running show is displayed next to
each channel:
Now, press the right arrow (on the keyboard, or on an infrared remote
control), and EyeTV displays what’s on next:
The active channel set will have a blue circle next
to it. After highlighting a channel set, you can use
the Duplicate or Delete buttons.
You can also Export... channel sets, which helps if
you are installing EyeTV on another computer, or if
you visit many different locations regularly - you
can have a channel set for each location. Exported
channel sets will be saved to the Desktop, but you
can move them to anywhere on your computer.
Double-clicking them will load them into EyeTV.
Scroll to the channel you want to watch or record, and press Enter. It’s
a quick and easy miniature programming guide in your channel list.
If you want to load a set you may have exported in
the past, use the Import... button. If an identical set
28
Page 29

EyeTV 3 Manual
Playlists
Playlists
What is a Playlist?
A Playlist is like a folder, that you can fill with one
or more recordings from your entire EyeTV Library.
The original recordings are not removed from the
EyeTV Library, but a link to them can be stored in a
Playlist. This allows you to categorize your
recordings for easier file management.
How do I add a Playlist?
At the bottom left corner of the EyeTV Programs
window there is a button with a + sign. Use that to
name and add a Playlist, which is a grouping of
recordings. Or, select New Playlist from the File
menu.
What is a Smart Playlist
A Smart Playlist is like a folder, that is automatically
filled with one or more recordings from your entire
EyeTV Library. Items in Smart Playlists are chosen
due to specific criteria of your choosing, like a
certain string of text in the title, or recordings from a
certain channel.
The original recordings are not removed from the
EyeTV Library, but a link to them can be stored in a
Smart Playlist. This allows you to automatically
categorize your recordings for easier file
management - when new recordings are made,
they will join Smart Playlists that they fit under.
EyeTV comes with certain Smart Playlists preinstalled, like Exporting, Recording Now and Past
Week. You can add your own favorite Smart
Playlists to this list.
If you drag items from the Recordings section to an
empty space in the Categories column, you will
automatically create a new Untitled Playlist.
Rename it using the Action menu.
There is no limit to how many Playlists you can
create.
How do I use Playlists?
Once a Playlist is added to the Categories column,
you can drag items to it, from the Recordings
section.
Each Schedule can send recordings to a specific
playlist. To do so, highlight a schedule in the
Schedules section, choose the Info button, and then
press the Edit Schedule button. At the bottom of
that Schedule Info window, you can choose a
playlist.
How do I add Smart Playlists?
At the bottom left corner of the EyeTV Programs
window there is a button with a + sign. Use that to
name and add a Smart Playlist, which is a grouping
of recordings that is automatically created, due to
criteria you select. Or, select New Smart Playlist
from the File menu.
There is no limit to how many Smart Playlists you
can create.
Automatically create a Smart Playlist
While creating a Smart Guide, you can also create
a Smart Playlist that corresponds to the Smart
Guide and that automatically “fills up” with the
29
Page 30

EyeTV 3 Manual
recordings that happen according to the Smart
Guide’s rules.
Playlists
leads to:
How do I use Smart Playlists?
Before a Smart Playlist can be used, it should be
given a name, and then you will need to choose one
or more rules to narrow down what items will
appear in it. Those rules are:
Title
Episode Title
Description
Actors
Director
Content
Genre
Year of Production
Duration
Size
Date Recorded
Channel Name
Channel Number
Currently Recording
Has Video
HDTV
Has Wi-Fi Variant
Currently Exporting
Currently Compacting
Playlist
Smart Guide
Watched
Last Played
existing rule. To remove a rule, press the - button
next to the rule you want to remove.
If Show Live Update is selected, then your EyeTV
Library will be shown, and as you change the Smart
Playlist rules, the list will automatically update.
This serves as a preview of what sort of files the
Smart Playlist will capture.
All Smart Playlists must have at least one rule. To
add a rule, press the + button next to the last
30
Page 31

EyeTV 3 Manual
Editor
Editor
What are the parts of the the editor?
There are a number of items in the editor:
Timeline: The horizontal bar represents the overall
length of the recording. Light blue sections mark the
clips of video. The yellow section in the screenshot
is the currently selected clip. The currently selected
clip can also be saved as a QuickTime movie or
EyeTV recording. In this example, the selected clips
are commercials that will be discarded later.
31
Playhead: A large white triangle above the timeline
indicates which point in the recording is currently
playing (or paused). Use the spacebar to toggle
between play and pause. All navigational features
of the EyeTV Remote and menus are also available,
e.g. Fast Forward, Reverse, and so on.
Thumbnails: The lower row of small pictures
represents the beginnings of individual scenes in
the recording. There are two levels of detail for the
thumbnails. When Fine resolution is not selected,
each thumbnail starts at the beginning of a scene
transition, as determined by the EyeTV hardware.
Page 32

EyeTV 3 Manual
When Fine is chosen, the thumbnail is at the
beginning of groups of pictures, usually around 15
frames, which represent approximately half a
second of video.
Editor
Markers: Pairs of smaller triangles beneath the time
line are designed to bookend the clip you want to
cut (or that you want to export) from the recording.
There are no markers visible for a new recording.
To add a marker, use the button in the center of the
editor, beneath the timeline. Press this button to add
a new pair of markers at the current Playhead
position. Markers are preserved with the recording
when the editor drawer is closed. This allows you to
begin editing your recording and save your work
during interruptions.
To delete a marker group, click either one of the
pair, and press the Delete key. To clear all markers,
use the Clear All Markers command in the Action
menu (which looks like a gear).
Arrow keys: The arrow keys on the keyboard have
different functionality depending whether the editor
drawer is visible or not. When the editor is visible
the right and left arrow keys can be used to
navigate between thumbnails. When the editor is
closed, and EyeTV is playing over a clip marked for
deletion, the right arrow skips playback to the end
of the clip.
How do I open the editor?
After you find your recording in the in the
Recordings section of the EyeTV Programs window,
highlight it and then select Open Editor from the
View menu. You can also use the Action menu to
select Edit.
When a recording is playing, press the grey button
at the top right corner of the window, on the title
bar. That will also open the editor.
How do I use the editor to select and remove
content?
1) After you find your recording in the in the
Recordings section of the EyeTV Programs window,
highlight it and then select Open Editor from the
View menu. You can also use the Action menu to
select Edit. Or, use the second mouse button,
which opens a context menu where you can choose
the Edit command.
2) The recording will open, and there will be editing
controls at the bottom of the window. Note the
upside down triangle above the blue bar, that’s the
Playhead.
3) Press the Space Bar to pause the recording, and
then move the Playhead to the beginning of the
recording.
4) Now, move the Playhead to the first section you
want to cut out. You should also press the Fine
button, to see more detail.
5) At the middle bottom of the screen there is a
circular button with two triangles in it. That’s the
Add Markers button. Press it to add a pair of
markers at the beginning of the clip.
6) Move the marker on the right slowly to the right,
or click on the thumbnails on the right side of the
screen. The footage will slowly jump ahead, and
then you can highlight the last frame you want to
cut. The blue bar should now be yellow, meaning
that the clips are selected.
7) The Compact command is accessed by using the
Action menu at the bottom right corner of the
Editing window (it looks like a gear/cog).
Either choose Compact now, or select more clips
and then press it at the end. The Compact button
will remove all of the clips permanently from your
footage.
32
Page 33

EyeTV 3 Manual
How do I export from the editor?
Any part of a recording can be saved as a separate
movie. Use the editing tools to mark your favorite
Editor
scene or video clip. Click into the marked area so
that it is highlighted yellow, then choose Export Clip
from the Action menu.
Exporting will not permanently affect the original
recording.
How do I save content from the editor?
Any part of a recording can be saved as a separate
EyeTV recording that is listed in the EyeTV
Programs window. Use the editing tools to mark a
clip so it is highlighted in yellow, and then choose
Save Clip as Recording from the Action menu.
Saving a clip will not permanently affect the original
recording. The new clip will appear in the
Recordings section of the EyeTV Programs window.
%C Shift-C presses the Compact button
%F Shift-F switches to Fine
%N Shift-N switches to Normal
%M Shift-M toggles between Normal and Fine
Tip:
Match the aspect ratio to what’s being edited
If you’re editing a recording that is in 16:9 format and would like to
eliminate the 4:3 content, it can be disturbing to see the entire
player window’s aspect ratio change automatically when the
playhead hits the areas of the recording that are at 4:3 aspect ratio.
To avoid this, match the editor’s aspect ratio to the content that you
are editing. Select
Aspect Ratio > 16:9 from EyeTV’s View menu.
How do I break a long recording into smaller
chunks?
Mark off the first section of your recording, and
then choose Export Clip from the Action menu and
save the first chunk. Repeat until done - if you just
want two sections, then using the Invert Markers
command from the Action menu would be useful.
Invert Markers would highlight the section you
haven’t exported yet.
What are the keyboard shortcuts for the editor?
! Delete deletes a marker
" Right arrow skips to next thumbnail to the right
# Left arrow skips to next thumbnail to the left
$ Tab selects the next marker
%$ Shift-tab selects the previous marker
& Return sets a new marker
33
Page 34

EyeTV 3 Manual
Picture In Picture
How do I use Picture in Picture?
EyeTV will display both player windows. The sound
will come from the larger, primary player window.
Move the mouse over the secondary window to
display the four commands available:
Off — toggles off PiP display
Rotate — cycles placement of the secondary
window between the following positions:
top left corner
top right corner
bottom right corner
bottom left corner
vertical split screen
horizontal split screen
second monitor (if available)
Picture In Picture
How do I start Picture in Picture?
You must have two video windows open to use PiP:
1) A Live TV window and a recording window
2) Two Live TV windows
3) Two recordings windows.
To have two Live TV windows, you need to have
multiple tuners - perhaps by using a device like
EyeTV Diversity (which has two tuners for DTT), or
two EyeTV devices connected to your Mac.
There are 3 different ways to enter Picture in
Picture (PiP) mode:
1) Select Picture in Picture from the View menu.
2) Press Control-Shift-P on the keyboard.
3) Use the contextual menu while EyeTV is playing
back with two player windows.
You can also enable and control PiP from within
EyeTV’s On Screen Menu. In the On Screen Menu
select Recordings, and start playback of a
recording. Enter the On Screen Menu and select
Picture in Picture, and then Show.
Swap — swaps the content of primary and
secondary windows
Focus — playback controls affect secondary
window
34
Page 35

EyeTV 3 Manual
EyeTV Archive Sharing
EyeTV Sharing
How do I share my EyeTV Archive with others?
If you have more than one EyeTV Archive in your
local network, each EyeTV installation can have
read-only access to the other libraries.
To use this feature, visit the Sharing section of the
Preferences. Check Share my EyeTV Archive - that
will make your EyeTV Archive available to other
users. Then select the Look for shared EyeTV
Archives option. That will let you access the
archives of other EyeTV users on your local network
(who must have enabled EyeTV Sharing as well.)
How do I access Archives from other Macs?
The EyeTV Programs window has a Shared section.
Open it via the triangle, and any shared EyeTV
Arcives on your local network will be listed. Select
one to browse that library, and double-click on any
entry to start watching.
Any shared recordings you watch are not copied to
your Mac, just streamed at the original resolution.
You cannot edit or erase those recordings - you
have read only access.
35
Page 36

EyeTV 3 Manual
Can I watch Live TV via sharing?
At this time, you cannot watch Live TV from another
Mac via the Sharing feature. However, you can
view a shared recoding already in progress - just
select it to start viewing.
Tip:
EyeTV Sharing requires all participants to be
connected in the same network and subnet
EyeTV Archive Sharing
Make sure that all Macs are on the same network and share the
same subnet. To make EyeTV Sharing work from a Mac with a wired
network connection to a wireless network connection (or vice versa),
your wireless base station should be set up to create a bridge
between the wired and wireless networks.
EyeTV Sharing and the Mac OS X 10.5 Firewall
To make EyeTV Sharing work with the Mac OS X 10.5 Firewall,
you’ll need to add both the EyeTV application and the EyeConnect
service to the Firewall’s list of applications and services that are
allowed network access.
The EyeConnect service is a component that gets installed by
EyeTV to:
/Library/Application Support/EyeConnect/EyeConnect.app.
36
Page 37

EyeTV 3 Manual
Preferences
Preferences
How do I change the export format to iTunes?
In the EyeTV menu, select Preferences. The
General section allows you to select the iPod/
iPhone button export format.
There are three choices for the iPod:
that new location. Finally, restart EyeTV for the
changes to take effect.
How do I change the Live TV Buffer?
In the EyeTV menu, select Preferences. The
Recording section allows you to select the type and
style of Live TV Buffer.
Best - 640x480 H.264
Smallest - 320x240 H.264
Fastest - 320x240 MPEG-4
There is one choice for the iPhone, 480x360 H.264.
Once you select a format, then that will be used
whenever you press the iPod or iPhone button, at
the top of the EyeTV Programs window.
How I move my EyeTV Archive?
In the EyeTV menu, select Preferences. The
Recording section allows you to select the location
where your EyeTV Archive is stored.
If you want to make a new, blank EyeTV Archive,
choose a new location, and then restart EyeTV.
From that point on, recordings and schedules will
be saved at that new location.
If you want to move an existing EyeTV Archive to a
new location, then first use the Finder to copy the
EyeTV Archive to that new location. Next, visit the
Recording section of the Preferences, and choose
The Live TV Buffer is a temporary storage place for
live video, that enables you to pause and rewind live
TV. By default, it is 2000MB, but you can press the
Change... button to select a new size, 50MB and
above.
You can also select to Keep in RAM, which will
store the buffer in memory, rather than on disk.
That can speed up access to the Live TV Buffer, or
reduce disk activity.
How do I extend recordings?
In the EyeTV menu, select Preferences. The
Recording section allows you to extend the
recording time before or after a scheduled
recording, to ensure the beginning or end is not
missed.
The start or finish can be extended by 0, 1, 2, 3, 4, 5,
10, 15, 20, or 30 minutes. EyeTV will extend the
recording by the amount selected if it can do so
without conflicting with another scheduled
recording.
37
Page 38

EyeTV 3 Manual
How do I change jump times?
In the EyeTV menu, select Preferences. The
Controls section allows you customize jump times,
which are used to quickly skip forward or backward
in the Live TV Buffer, or recordings.
You can enter the amount of seconds you’d like to
Preferences
jump forward, or back. For each direction, you can
select two separate time periods - perhaps you
want to jump 30 seconds forward to avoid a
commercial, or jump 120 seconds forward to avoid a
whole break.
These separate jump intervals can be controlled by
the keyboard or EyeTV remote - each jump is
controlled by a separate key or key combination.
How do I setup my EPG service?
In the EyeTV menu, select Preferences. The Guide
section allows you decide how the Electronic
Program Guide (EPG) will be setup.
Choose TV Guide if you are in the US or Canada,
and it will be used to populate the Program Guide
section of the EyeTV Programs window.
connection, and you can elect to wake up your Mac
to check for schedule changes.
How do I change the Overscan setting?
In the EyeTV menu, select Preferences. The
Display section allows you customize the Overscan
- how much of the TV image that appears on the
edges.
Overscan hides the extreme edges of the TV signal
that do not appear on a TV set. Overscan should be
turned off when using a TV as a monitor, connected
via S-Video.
How do I change deinterlacing?
In the EyeTV menu, select Preferences. The
Display section allows you customize deinterlacing.
Deinterlacing reduces video artifacts caused by
showing a TV signal on a computer monitor. You
have four options for use with EyeTV:
No Deinterlacing - Recommended when you are
using a TV as a monitor, connected via S-Video.
For Europe, select your country’s tvtv service. In
Japan, choose one of the iEPG choices.
Australians can use IceTV. Some of these services
require an additional monthly fee.
Make sure to press press Change..., and enter the
Account name and Password you selected for that
service.
EyeTV needs to periodically check with the Online
Program Guide, to download up to 14 days worth of
information. Use the Update option to select Every
Day or Manually for your check.
You can choose to automatically check for
schedules you may have added using your guide’s
website. This will happen when you have a network
38
Motion-Adaptive - Fast-moving parts of the picture
are deinterlaced, providing the best balance
between picture quality and usage.
Always - Deinterlacing always applied to the entire
picture, producing a slightly softer effect.
Progressive Scan - Adanced motion detection and
doubled frame rate result in excellent picture
quality. Requires a very fast Mac.
EyeTV has separate deinterlacing options for
Standard TV and HDTV. For Standard TV on Intel
Core Duo Macs, the default is Progressive Scan.
For HDTV, the default is Always.
Page 39

EyeTV 3 Manual
How do I stretch the full screen image?
In the EyeTV menu, select Preferences. The
Display section allows you change how the video
appears when displayed at full screen.
The Tab key can be used to toggle between normal
and stretched presentation during full screen
Preferences
playback. Stretching will occur only if the original
video occupies at least 75% of the screen area.
How do I use EyeTV with multiple displays?
In the EyeTV menu, select Preferences. The Full
Screen section allows you determine if EyeTV will
use other displays that may be connected to your
Mac.
Start EyeTV in full screen will always open the On
Screen Menu when you start EyeTV.
Black out other screens will darken all displays not
showing full screen EyeTV video.
Always put full screen display on this monitor
allows you to click on a small picture of the display
that you want EyeTV to use for full screen playback.
some of options that may appear, depending on
what’s connected to your Mac.
How do I turn on Game Mode?
Some EyeTV products can turn off their MPEG
encoding chips, to improve console gameplay. If
your product can use Game Mode, you can turn it
on or off at the bottom of the Controls menu.
The Devices section of the Preferences will also let
you toggle Game Mode on or off.
Game Mode will still have a very small delay - the
smallest allowed by current available hardware but most games should be quite playable.
How do I change the image quality?
In the EyeTV menu, select Preferences. The
Encoding part of the Devices section allows you
determine the quality for Live TV and recording.
The options will vary depending on what devices
are connected; digital signals are pre-encoded and
cannot be further adjusted.
How do I change the sound output?
In the EyeTV menu, select Preferences. The Sound
section allows you determine how EyeTV will output
sound.
Play sound when EyeTV is in background lets you
hear EyeTV even if other applications are being
used.
Play sound in the Dock will allow sound to continue
even when the window is minimized.
EyeTV will also give you Audio Output choices that
depend on the choices available to OS X. System
Sound Output, Headphones, and Digital Out are
39
How do I change the look of the picture?
In the EyeTV menu, select Preferences. The
Picture part of the Devices section allows you
change how analog signals appear. You can use
sliders to adjust the Brightness, Contrast, Color,
Hue and Sharpness of analog signals.
How do I find the signal strength readings?
In the EyeTV menu, select Preferences. The Signal
part of the Devices section allows you see the
Signal Quality and Signal Strength for products that
can receive digital signals.
Page 40

EyeTV 3 Manual
Wi-Fi Access
What is Wi-Fi Access?
Wi-Fi Access allows you to stream your EyeTV
recordings to your iPhone, or iPod Touch over your
wireless network. Since the streaming service is
essentially a web page being served by EyeTV, this
Wi-Fi Access
means you can also access the same recordings
via a web browser, such as Safari, or Firefox over
any local network.
How do I start Wi-Fi Access?
In the EyeTV menu, select Preferences. Visit the
Sharing section, and check Enable access from
Safari on iPhone, iPod touch or Mac/PC.
EyeTV will set up a web page suitable for use on the
iPhone, iPod Touch, and some other devices.
A clickable URL to your EyeTV Archive is listed; that
uses your local hostname for OS X, and requires
that port 2170 be open on your firewalls.
Wi-Fi Access can share completed recordings, but
not Live TV.
How do I use Wi-Fi Access with my network?
To use Wi-Fi Access, your Mac and device or
browser must be on the same local network.
Make sure that all Macs and wireless devices are
on the same network and share the same subnet. To
make Wi-Fi Access work from a Mac with a wired
network connection to a wireless network
connection, your wireless base station should be
set up to create a bridge between the wired and
wireless networks.
40
Page 41

EyeTV 3 Manual
How do I use Wi-Fi Access with my firewall?
If you have an active firewall, port 2170 will need to
be opened.
To make Wi-Fi Access work with the Mac OS X 10.5
Firewall, you’ll need to add both the EyeTV
application and the EyeConnect service to the
Wi-Fi Access
Firewall’s list of applications and services that are
allowed network access.
Other manufacturers’ hardware will have a similar
feature. Note that there are several other
considerations that are outside the scope of this
manual, such as the requirement that your router’s
public Internet address remain constant and easily
reachable via a DNS entry.
How do I use Wi-Fi Access with my iPhone/iPod
touch?
The EyeConnect service is a component that gets
installed by EyeTV to:
/Library/Application Support/EyeConnect/
EyeConnect.app.
How do I use Wi-Fi Access outside of my network?
To make Wi-Fi Access work outside of your local
network, you will have to configure your router to
forward port 2170 to your Mac’s private IP address.
Here is an example of the relevant setting in Apple’s
Airport Extreme base station.
In the EyeTV menu, select Preferences. Visit the
Sharing section, and check Enable access from
Safari on iPhone, iPod touch or Mac/PC.
A clickable URL to your EyeTV Archive is listed; that
uses your local hostname for OS X, and requires
that port 2170 be open on your firewalls.
To provide an easy way to get this link onto your
iPhone or iPod touch, the Sharing preference pane
has a function for emailing this link to yourself. You
can then check the email from your iPhone or iPod
touch and click on the link to access your streaming
content.
How do I use Wi-Fi Access with a browser on a
Mac?
In the EyeTV menu, select Preferences. Visit the
Sharing section, and check Enable access from
Safari on iPhone, iPod touch or Mac/PC.
A clickable URL to your EyeTV Archive is listed;
that uses your local hostname for OS X, and
requires that port 2170 be open on your firewalls.
41
This web page should work with Safari 3.0, or the
latest versions of Camino or Firefox. It will be
accessible from your local network, and not all
over the world.
Most Mac browsers will also have a Bonjour
section in their Bookmarks window. That will list
any Macs using Wi-Fi Access on your network,
and you can click on one to immediately browse
Page 42

EyeTV 3 Manual
their Wi-Fi Access content.
Wi-Fi Access
The first time you turn on Wi-Fi Access, EyeTV will
ask you whether you’d like to convert all existing
recordings into a format suitable for Wi-Fi Access.
There are 5
options to
choose
from in the
popup
menu in the
Wi-Fi
Access
preferences:
Choose the option that suits your needs. The
Cellular option should be used if you plan to play
back recordings via the iPhone’s EDGE network.
You can also decide whether to convert all future
recordings for use with Wi-Fi Access.
Individual recordings may be enabled individually
for use with Wi-Fi Access in the EyeTV Programs
Window. Select your recording, and check the box
in the Wi-Fi Access column to begin the conversion.
How do I choose a password for Wi-Fi Access?
In the EyeTV menu, select Preferences. Visit the
Sharing section, and press the Change... button.
Your user name will be "eyetv", and you can choose
whatever password you like.
A clickable URL to your EyeTV Archive is listed; that
uses your local hostname for OS X, and requires
that port 2170 be open on your firewalls.
You will be asked for this password, whenever you
visit that URL.
Once Wi-Fi Access is password protected, then you
can adjust the password by pressing the Change...
button.
How do I enable my EyeTV recordings for Wi-Fi
Access?
42
Page 43

EyeTV 3 Manual
Parental Controls
What are Parental Controls?
Television programs often are
transmitted with age-based ratings
attached. These ratings can be used to
categorize various programs, with the
object in mind to protect children from
objectionable content.
Parental Controls
Parental Controls allow parents to block
specific content, by following perprogram ratings, or by blocking certain
channels.
How do I turn on Parental Controls?
In the EyeTV menu, select Preferences.
The Parents section allows you to
restrict EyeTV content, for each OS X
user account on your Mac.
To turn on Parental Controls, first select
the OS X user account you wish to
manage, from the list in the left side of
the window.
Then, click on the lock icon in the bottom
left corner of the window, and enter your
OS X administrative account password.
Now, you can select Enable Content Rating Limit,
which officially turns on Parental Controls.
How do I set my PIN for Parental Controls?
In the EyeTV menu, select Preferences. The
Parents section allows you to restrict EyeTV
content, for each OS X user account on your Mac.
If you're using Parental Controls for the first time,
the default PIN is 0000 (all zeros). You should
change that by selecting a new PIN.
Press the Change PIN... button, and enter a new 4
digit combination. That PIN will take effect as soon
as you select the OK button.
How can I export recordings when using Parental
Controls?
Then, click on the lock icon in the bottom left corner
of the window, and enter your OS X administrative
account password.
43
When Parental Controls are on, manual exports will
be blocked, unless you can enter the PIN for onetime access.
Page 44

EyeTV 3 Manual
A window asking for the PIN will appear when you
select the Export command.
Click on the lock icon in the bottom left corner of the
window, and enter your OS X administrative
account password.
Automatic exports associated with schedules or
Wi-Fi Access will still happen, even when Parental
Controls are active.
How do I manage Parental Controls?
Parental Controls
In the EyeTV menu, select Preferences, and then
the Parents section.
Click on the lock icon in the bottom left corner of the
window, and enter your OS X administrative
account password.
Now, you can select Enable Content Rating Limit,
which officially turns on Parental Controls.
There are a number of controls that can selectively
block content, namely:
• A slider to select the maximum TV rating or age for
content
• Check boxes to block specific content due to
language, violence, or sexual content (United States
only)
• A window where you can select a list of certain
channels that can be watched
Now, you can select Enable Content Rating Limit,
which officially turns on Parental Controls.
Choose your Rating System at the top of the
window, and then use the slider to change the
maximum rating.
The different rating systems are listed below:
Ratings System: US TV
TV-Y – All Children. This program is designed to be
appropriate for all children.
TV-Y7 – Directed to Older Children. This program is
designed for children age 7 and above.
TV-G – General Audience. Most parents would find
this program suitable for all ages.
TV-PG – Parental Guidance Suggested. This
program contains material that parents may find
unsuitable for younger children.
TV-14 – Parents Strongly Cautioned. This program
contains some material that many parents would
find unsuitable for children under 14 years of age.
Each control takes effect immediately; if you are
watching a channel and then remove it from the list
of approved channels, you will no longer see any
video. The same is true for ratings - if you adjust
the slider, content will be blocked or allowed on the
fly.
How do I set a maximum rating for Parental
Controls?
In the EyeTV menu, select Preferences, and then
the Parents section.
44
TV-MA – Mature Audience Only. This program is
specifically designed to be viewed by adults and
therefore may be unsuitable for children under 17.
Ratings System: US Movie (MPAA)
G – General Audience. All ages admitted.
PG – Parental Guidance Suggested. Some material
may not be suitable for children.
PG-13 – Parents Strongly Cautioned. Some material
may be inappropriate for children under 13.
Page 45

EyeTV 3 Manual
R – Restricted. Children under 17 require
accompanying parent or adult guardian.
NC-17 – No one 17 and under admitted.
X – Older material may be rated X instead of NC-!7.
Ratings System: Canada (English)
Parental Controls
E – Exempt
C – Children
8+ – Children eight years and older.
G – General programming, suitable for all
audiences.
PG – Parental Guidance.
14+ – Viewers 14 years and older.
18+ – Adult programming.
Selecting a more restrictive rating will still allow for
less restrictive content to be seen (anything to the
left of the slider). For example, if you select TV-MA,
then all other content can also be viewed, but if you
select TV-Y7, then only TV-Y and TVY7 content will
be accessible.
How do I set a maximum rating for Parental
Controls?
In the EyeTV menu, select Preferences, and then
the Parents section.
Click on the lock icon in the bottom left corner of the
window, and enter your OS X administrative
account password.
Now, you can select Enable Content Rating Limit,
which officially turns on Parental Controls.
Choose your Rating System at the top of the
window. For those in the United States, there are
some additional options you can select.
Ratings System: Canada (French)
E – Exempt
C – Children
8 ans+ – Children eight years and older.
13 ans+ – Viewers 14 years and older.
16 ans+ – Viewers 16 years and older.
18 ans+ – Adult programming.
Ratings System: Age
The age limit can be selected, between 6 years and
18 years.
Ratings System: US TV
You can check boxes to block specific content due
to language, violence, or sexual content.
Specifically, you can Block Specific Content Flags:
FV Fantasy Violence
D Sexual Dialog
L Adult Language
S Sexual Situations
V Violence
These flags are a part of the TV rating, like TV-14 LV
(Parents Strongly Cautioned, with Language and
Violence flags).
Ratings System: US Movie (MPAA):
You have one additional choice:
Allow NR ("Not Rated") Material
45
Page 46

EyeTV 3 Manual
Some NR content may be
suitable for all ages, while
others could be for adults
only. So, turn off this option
to maximize protection.
How do I block certain
channels with Parental
Controls?
Parental Controls
In the EyeTV menu, select
Preferences, and then the
Parents section.
Click on the lock icon in the
bottom left corner of the
window, and enter your OS X
administrative account
password.
Now, you can select Enable Content Rating Limit,
which officially turns on Parental Controls.
At the bottom of the window, select Only allow
certain channels to be watched, then press the
Channels... button.
Then, you can select the channels you want to
allow. By default, all channels start out as
unchecked (unselected), and so you will need to
check next to the name of each channel you want
to enable.
You can use the search field at the top right of this
window to narrow down the channel list - if you
type in CNN, then only channels with CNN in the
name will appear. Then, you could check off all
CNN channels, and therefore allow them to be
viewed.
You can also sort channels by Number, Name,
Provider, Service, Frequency, and Type, to assist in
finding channels to allow.
46
Page 47

EyeTV 3 Manual
Remote Control
What remote controls can I use?
Most television tuner hardware compatible with
EyeTV comes with an infrared remote control that
can be used with EyeTV software. Elgato hardware
is shipped with the EyeTV Remote control, which is
described below.
Remote Control
If your Mac came with an Apple Remote, you can
use it to control the EyeTV software.
You need to start the EyeTV software before using
either remote control.
How do I use the EyeTV Remote to control EyeTV?
Power
If EyeTV isn’t displaying a window, a Live TV
window is opened. If there are windows playing
EyeTV content, the front playing window is closed,
and the next window is brought to the front. If the
frontmost window is an alert dialog, pressing the
Power key is like pressing Cancel or hitting Escape.
Mute
Click this button to mute the sound, click it again to
turn it back on.
Number keys
Used to enter channel number.
Last
Switches the live TV window to go to the last
channel used. If you’re watching a recording,
pressing this button jumps playback to the start of
the recording. If the front-most window is an alert
dialog, pressing the LAST key is like pressing
Cancel or hitting Escape.
Enter
Enters the On Screen Menu and switches to
fullscreen mode. While in the On Screen Menu,
Enter is used to navigate up one level.
If the front-most window is an alert dialog, pressing
the Enter key is like pressing OK or hitting Enter on
the keyboard.
OK
While in the On Screen menu, the OK button is used
to confirm your selection and will go down one
level. Also used to terminate a sequence of
numbers.
47
Page 48

EyeTV 3 Manual
Red
Cycles through open windows backwards.
Green
Cycles through open windows forwards.
Yellow
Opens/closes the EyeTV Programs window, which
Remote Control
displays all of the shows that have been or will be
recorded.
Blue
Shows/hides the on-screen remote controller.
Channel Up/Down
Switches to the next higher or lower channel.
Volume Up/Down
Increases or decreases the sound volume.
Fast Forward
Plays the current program at high speed.
Stop/REVEAL
Stops playback of the current program. REVEAL is a
Teletext function.
Menu/TXT
Show/Hide Closed Captions. TXT is a Teletext
function.
Record/SIZE
Starts or stops recording the current program. The
default recording duration is three hours. To extend
or shorten the recording time, open the currently
recording program by selecting it in the EyeTV
software’s Programs window, clicking the Show
Info button in the toolbar, and changing the
recording’s ending time.
Instant Replay
Playback jumps backwards for the duration
specified in the Preferences’ Controls pane. The
default is 7 seconds.
Play/Pause
Toggles between playing back or pausing video
Jump
Fast-forwards the current program 30 seconds and
then continues playing. This is useful for jumping
over less desirable content.
Fast Backward
Plays the current program in reverse at high speed.
Red ‘L’
Jumps playback to live.
SIZE is a Teletext function.
HOLD
HOLD is a Teletext function. Also toggles full-screen
mode.
SELECT
SELECT is a Teletext function. Also cycles through
EyeTV’s analog video inputs.
48
Page 49

EyeTV 3 Manual
①
②
③
④
⑤
⑥
How do I use the Apple Remote to control EyeTV?
Remote Control
You can also use the Apple Remote to control EyeTV
while in windowed Mode:
② Play/Pause
Press the button once to pause live television or a
recording, press it again to resume playback.
③ Channel up/Fast Forward
While watching live TV, press this button once to go up
one channel. Press and hold this button to activate Fast
Forward playback, for live, timeshifted TV and for
recordings.
④ Channel down/Fast Backward
While watching live TV, press this button once to go
down one channel. Press and hold this button to activate
Fast Backward playback, for live, timeshifted TV and for
recordings.
⑤ Volume Up and ⑥ Volume Down
Self-explanatory.
① MENU
② Play/Pause/OK
③ Channel up/Fast Forward
④ Channel down/Fast Backward
⑤ Volume Up
⑥ Volume Down
If your computer included an Apple Remote, you may
use it to navigate EyeTV’s On Screen Menu.
Press the MENU ① button to enter Front Row. Press and
hold the MENU button to enter the EyeTV On Screen
Menu. Use the MENU button to go up one level and the
Play/Pause/OK ② button to go down one level. Use the
⑤ and ⑥ buttons to scroll up and down lists.
For more details on using the Apple Remote with the On
Screen Menu, see this manual’s section about the On
Screen Menu.
49
Page 50

EyeTV 3 Manual
Support for Set Top Boxes
Set Top Box support is currently limited to the USA
and Canada, and all satellite or cable providers for
which information is available from TV Guide.
All television tuner hardware that is compatible with
EyeTV can be connected to a set top box using
either the composite, S-Video, or RF port. In this
way, EyeTV can record programming that is
available via the set top box. What follows in
“Configuring EyeTV and Set Top Box Support” is a
Set Top Box Control
step-by-step tutorial on how to configure EyeTV to
get the same programming guide as your set top
box, and display it within EyeTV.
Although EyeTV can schedule recordings based on
your set top box's programming guide, EyeTV alone
cannot change channels on your set top box. For
this, additional infrared (also referred to as
“blaster”) hardware and compatible software is
required. EyeTV indicates its intention to change
channels by posting a notification on your
computer, which the application that controls the
infrared hardware listens to.
1. First, name the set top box. This name appears in
the "Service" column of the Channels panel. You
may want to enter "Dish", "Comcast", "Time Warner"
or something similar here. If you are using either
IRed or ZephIR to change channels, use the name
of the iRed tuner or ZephIR component you have
already set up for your box (see “Configuring EyeTV
and IR Blaster Hardware” below.)
Configuring EyeTV and Set Top Box Support (USA
and Canada)
If you own a supported hardware/software infrared
blaster package, you should set it up before
completing this section — please skip to
“Configuring EyeTV and IR Blaster Hardware”
below, complete the infrared setup, then return to
this section.
This is how you can configure EyeTV to get a
programming guide for your Set Top Box:
a) In the main EyeTV Programs window, select the
Channels section.
b) In the Service popup, select Configure Set Top
Box.
2. Select which device input you use (S-Video or
Composite).
3. Select or change your Zip Code or Postal Code.
4. Choose a Service. The list of available services at
your location is looked up at TV Guide every time
you open this dialog, because it may change at any
50
Page 51

EyeTV 3 Manual
time. You cannot configure a Set Top Box without an
Internet connection.
If you choose a cable connection, you have the
option of using the built-in tuner for low-numbered
analog channels. This is because some cable
providers, even when supplying digital cable
service, supply unencrypted analog cable channels
also. In some cases, the EyeTV tuner provides a
better picture than the cable box provided by your
cable company.
Set Top Box Control
6. If you have infrared hardware, now test EyeTV's
capability to change channels. Use the on screen
remote control or double click a channel in the
channels list. This causes EyeTV to send a channel
change notification. The ZephIR or iRed software
(which should be running at all times) is already
listening for these notification messages. Then,
ZephIR or iRed will send the channel number
requested by EyeTV to your set top box.
When you click OK, EyeTV will download all the
channels available from the chosen service. It will
then begin to download the program guide for those
channels. This may take a long time (14 days of
program guide for hundreds of satellite channels
are about 60MB), so don't expect the Program
Guide to be updated immediately.
5. Confirm that the downloaded channel list
matches the channel list on your set top box. You
may want to deselect all channel numbers that you
do not subscribe to.
7. Use the EPG to schedule recordings on different
channels. Once EyeTV has downloaded the
complete electronic program guide information, use
the on screen EPG information to schedule your
recording. Remember to leave your set top box
powered on. If you do not have infrared hardware,
to ensure that EyeTV will record the channel you
intended, you must leave your set top box tuned to
the channel you want to record. EyeTV has no way
of knowing what channel your set top box is
currently tuned to.
51
Page 52

EyeTV 3 Manual
Set Top Box Control
8. If you have infrared hardware, leave the ZephIR
or iRed software running, and remember to leave
your set top box powered on.
Currently, two different packages provide solutions
that are compatible with EyeTV: ZephIR and
IRTrans/iRed. What follows are step-by-step guides
to configuring EyeTV together with each solution.
Technical support for these products is provided by
their respective publishers/manufacturers.
ZephIR
ZephIR from studioZee makes hardware and
software that is able to listen to the EyeTV channel
change notification:
http://www.thezephir.com
The ZephIR package comes with software and an
infra-red remote control device that you connect to
your Mac via USB. ZephIR is not directly available
from Elgato. Please use the link above to purchase
directly from studioZee.
A Note About Multiple Devices
If you have multiple devices with analog inputs, you
will need to use the Configure Set Top Box item in
the Channels panel. This will bring up a list of set
top boxes, you can choose one at a time to
configure.
EyeTV matches the configuration to the device
using the device serial number, if it is available and
unique. Only Elgato Hybrid devices and the EyeTV
200 have unique serial numbers. For other devices,
the matching is based on something called the USB
location ID, which changes if you unplug a USB
device and replug it into a different socket. So, if
you have multiple devices, we recommend that you
don't move them around once they are configured.
Configuring EyeTV and IR Blaster Hardware
EyeTV supports Set Top Box channel changing
using 3rd party infrared hardware and software
packages.
iRed and IR Trans
IRTrans by IRTrans GmbH is infra-red remote control
hardware connected via USB to your computer.
The iRed software by tin:b Software controls the
IRTrans hardware and is able to listen to the EyeTV
channel change notification.
More information about IRTrans is here: http://
www.irtrans.com
More information about iRed is here: http://
www.filewell.com/iRed
Mention iRed when purchasing IRTrans, to receive
a bundle discount. Neither iRed nor IRTrans are
directly available from tin:b Software or Elgato.
Please use the links above to acquire them.
Configuring ZephIR with EyeTV
Once you have installed the ZephIR (version 3.0 or
later), you will need to create a new IR Component
that is able to change channels on your Set Top
52
Page 53

EyeTV 3 Manual
Box. Choose your type of Set Top Box from the
zeecode database, or create your own component
by learning your Set Top Box's remote, and give
your component a unique name. You may want to
enter "Dish", "Comcast", "Time Warner" or something
similar here.
Later on, you will use this same name to identify
your Set Top Box in EyeTV.
Leave the ZephIR application running after you've
configured your component and have verified that
Set Top Box Control
ZephIR can change channels. Also, to ensure that
unattended recordings in EyeTV work even when
EyeTV starts up your Mac, add ZephIR to your Login
items (System Preferences>Accounts>Login Items.)
Configuring iRed and IRTrans with EyeTV
Once you have installed iRed 1.8.2 or later and
IRTrans, you will need to create a virtual iRed tuner
that is able to change channels on your set top box.
Use iRed's Tuner Assistant feature and give your
virtual iRed tuner a unique name. You may want to
enter "Dish", "Comcast", "Time Warner" or something
similar here.
Later on, you will use the same name to identify
your set top box in EyeTV. Leave the iRed
application running after you've configured your
virtual tuner and have verified that iRed can change
channels.
Also, to ensure that unattended recordings in EyeTV
work even when EyeTV starts up your Mac, add
iRed to your Login items (System
Preferences>Accounts>Login Items.)
For Developers of Infrared Hardware and Software
When the channel is changed in EyeTV, and at
certain other times (e.g. opening the live window,
starting or ending a recording), EyeTV posts a
notification to the CFDistributedNotificationCenter.
For more information about how to post and listen to
notifications, consult Apple's documentation.
The notification name is
CFSTR("com.elgato.ExternalChannelChange") The
notification is accompanied by a dictionary with
three members:
1. key="channelNumber", value = CFNumberRef, the
number, generally 1 through 99999.
2. key="subChannelNumber", value = CFNumberRef,
currently always 0.
3. key= "setTopBoxName", value = CFStringRef. This
is the name from "Name" field of the Configure Set
Top Box dialog. This name should match the name
of the virtual tuner you make in iRed. So, if you set
up a DirecTV box, you should call the Set Top Box in
EyeTV "DirecTV", and the iRed virtual tuner
"DirecTV". Currently, however, iRed ignores the
name field.
You'll also need to enable iRed to listen for EyeTV
Channel Changes by checking the box in iRed's
Notification preferences:
53
If you are a developer and see a need for any other
information in the notification, please contact us at
stb-feedback@elgato.com
.
Page 54

EyeTV 3 Manual
DVD Creation
DVD Creation
EyeTV and Toast
EyeTV has been integrated with Roxio’s Toast 10
Titanium disc recording software to make it easy for
you to archive your favorite shows onto Video CD
(VCD), Super Video CD (SVCD), or DVD.
Toast has a built in Media Browser. Select Media -
EyeTV, and drag items from the listing of EyeTV
recordings to Toast.
To burn a disc from within EyeTV, using Toast:
Open the EyeTV Programs window, choose the
•
Recordings section, and select the video
recording you wish to archive by clicking on it
once to highlight it.
Drag it from the Recordings section of the EyeTV
•
Programs window, to Toast’s Video section. Then,
select what format you want to use (VCD, SVCD,
DVD) in Toast.
You can also highlight the recording, and then press
the Toast button at the top of the Programs window,
or choose for Toast via the Export command.
Some EyeTV hardware devices may come with
Toast Basic, which is a feature-limited version of
Toast. That should also work with EyeTV as
described above.
EyeTV and Other DVD Software
You can also highlight the recording, and then
select the Export command in EyeTV. EyeTV
supports exporting to Apple’s iDVD and DVD Studio
Pro software. You can also export the video and
audio elementary streams to post-process in other
DVD authoring programs
54
Page 55

EyeTV 3 Manual
EyeTV Assistants
EyeTV Assistants
EyeTV contains several guided modules, called
Assistants, designed to walk you through common
tasks. These Asisstants are accessible via the Help
menu.
How do I use the EyeTV Setup Assistant?
The EyeTV Setup Assistant launches automatically
the very first time you install EyeTV software and
your new hardware. If your configuration changes,
it’s a good idea to re-run the setup assistant and let
it auto tune again. The EyeTV Setup Assistant can
also help when troubleshooting issues with the
electronic programming guide.
How do I use the VHS Assistant?
The VHS Assistant helps you turn your VHS tapes
into DVDs. To run the VHS Assistant you’ll need
EyeTV compatible hardware that contains analog
inputs and a hardware MPEG encoding processor.
The VHS Assistant will walk you through the
process of connecting your VHS recorder, capturing
analog video into your Macintosh, and finally
converting the video onto a DVD or into iPod format.
How do I use the iPod assistant?
The iPod Assistant helps you capture movies for
iPod Video, Apple TV, and iPhone. To run the iPod
Assistant you’ll need EyeTV compatible hardware
that contains analog inputs and a hardware MPEG
encoding processor.
The iPod Assistant will walk you through the
process of connecting your video source and
capturing analog video into your Macintosh.
Afterwards, the video will be converted into the
appropriate iPod/iPhone/Apple TV format, and
finally transferred to iTunes, where it will be synced
to your device the next time it is connected to your
Mac.
55
Page 56

EyeTV 3 Manual
AppleScript
AppleScript
Many functions in Eye TV 3 can be accessed using
AppleScript.
Script Menu
EyeTV 3 displays a script menu in the menu bar
when it finds scripts in
/Library/Application Support/EyeTV/Scripts.
scripts. These are scripts that automatically trigger
following certain events. EyeTV offers the following
trigger events:
ScheduleCreated
Scripts using this trigger will start after a schedule
is created.
RecordingDone
Scripts using this trigger will start after a recording
has finished.
These scripts can directly be started from the script
menu. Please note that when scripts have changed
EyeTV needs to be restarted for the changes to
become effective.
Dictionary
The AppleScript Dictionary of EyeTV lists all
available commands and parameters. To write
scripts and browse the dictionary the application
“Script Editor” is available on every computer
running Mac OS X. It can be found under
Applications/AppleScript. You can also find example
scripts on the EyeTV installation CD, and in the
online Elgato Knowledgebase.
If you find that there is functionality in EyeTV that is
not present in the AppleScript dictionary, please
write us at support@elgato.com. We will try to
accommodate your needs in future software
updates.
Triggered Scripts
ExportDone
Scripts using this trigger will start after a recording
has been completely exported.
RecordingDeleted
Scripts using this trigger will start after a recording
was deleted.
Commented example trigger scripts can be found
on the EyeTV installation CD.
In order to execute these scripts EyeTV looks for
triggered scripts in
/Library/Application Support/EyeTV/Scripts/
TriggeredScripts.
In case this directory does not exist, create it
manually.
Note: The TriggeredScripts directory and its
contents are not displayed in EyeTV’s script menu
since triggered scripts should not be launched
manually.
In addition to the conventional AppleScript support
EyeTV 3 also offers the possibility to use triggered
56
Page 57

EyeTV 3 Manual
EyeTV Archive
EyeTV recordings and schedules, along with other
information about your setup, are kept in the EyeTV
Archive. The Archive is a normal folder, which has
to be called “EyeTV Archive” for EyeTV to use it.
You can move the Archive folder wherever you like,
but you must tell EyeTV where to look for it, in the
EyeTV Archive
Recording part of the Preferences.
Inside the EyeTV Archive are a number of files,
which have specific purposes:
EyeTV Archive.xml - Contains the overall structure
of the EyeTV Archive, for use with other programs
that need to understand the EyeTV Archive’s
contents. If erased, it will be recreated upon
restart. This file is invisible
EyeTVAutoTune.log - After an Auto Tune,
information about the scanned frequencies is
contained in this log. If you have tuning problems,
sending this log to Customer Support can help with
troubleshooting.
select Show Package Contents.
Backing up an EyeTV recording or schedule is very
simple - move the .eyetv and .eyetvsched files with
the corresponding names in and out of the Archive.
Restart EyeTV for the changes to take effect.
You can also drag recordings from the Recordings
section of the EyeTV Programs window, to the
Finder. That will make a copy of that recording, in
the .eyetv format. Move that copy to wherever you
like, even to another EyeTV Archive.
If .eyetv files are moved elsewhere in the Finder,
then double-clicking them will launch EyeTV.
Playlists are kept in an invisible folder called
Playlists. If selecting a Playlist in the EyeTV
Programs window causes a crash or other problem,
that file may be corrupted, and you can erase that
playlist from the playlists folder.
Live TV Buffer.eyetv - A package containing .eyetvi
and .mpg files, of which the Live TV Buffer is
consisted. These files will be erased and rewritten
depending on the state of the Buffer.
Furthermore, in the EyeTV Archive recordings and
schedules are contained within packages:
.eyetvsched - A package containing an .eyetvp file.
It represents a schedule, and will disappear when
recording is complete. If a schedule repeats, then
the .eyetvsched package will remain.
.eyetv - A package containing .eyetvi, .eyetvp
and .eyetvr files, along with an .mpg of the actual
recording.
A package is a container, similar to a folder, that
can’t be examined by double-clicking. To open
these packages, right-click (or Option-click) and
57
Page 58

EyeTV 3 Manual
Electronic Programming Guide
tvtv
In Great Britain, Germany, Switzerland, Austria,
Holland, Spain, Italy, France and Belgium the EPG is
supplied by tvtv and the subscription period is one
year. Customers in Finland and Sweden may use the
tvtv UK service.
The EyeTV Setup Assistant guides you through
configuring your tvtv account.
For existing tvtv users, please note that EyeTV
cannot extend your account's subscription period.
We recommend keeping your present account until
Appendix: Progam Guides
it expires, then re-running the Setup Assistant again
and creating a new account when asked to enter
account information. We are working on improving
this process.
tvtv Remote Scheduling
The tvtv service also offers a web site featuring
remote scheduling. Remote scheduling allows you
to send program information to EyeTV from any
computer with Web access.
synchronizes with tvtv.
TV Guide
In the USA and Canada, the EPG is supplied by TV
Guide. The first year of the subscription is free, and
subsequent years are for a small fee (currently
$19.95).
The EyeTV Setup Assistant guides you through
configuring your TV Guide account.
TitanTV Remote Scheduling
The TitanTV service offers a web site featuring
remote scheduling, for use in the United States.
Remote scheduling allows you to send program
information to EyeTV from any computer with Web
access.
Here’s how it works: Your Mac at home (provided its
Internet connection is present) periodically checks
for new schedules that were added on the web site,
then adds them to the local list of schedules. You’ll
have to enable automatic checking of remote
schedules in the Guide section of the EyeTV
Preferences, it is not on by default.
Select “Go to Online Guide” from EyeTV’s File
menu, then log onto the tvtv web site, using the tvtv
user name and password that you configured in the
EyeTV Setup Assistant.
Once you’ve found a program that
you like, click the red REC OFF icon,
which then changes to REC ON.
This sends program information to
the tvtv Job List. From there, it is
stored until the next time EyeTV
58
Log onto the TitanTV web site, and create a free
account. You will need to configure your
TitanTV.com account,
specifying your zip code,
and the type of
television programming
you receive at your
home location.
Once you’ve found a
program that you like,
click the Remote
Schedule button. This sends program information to
the TitanTV server. From there, it is stored until the
next time EyeTV synchronizes with TitanTV.
Page 59

EyeTV 3 Manual
TitanTV Guide Diagnostics
For assistance in troubleshooting problems with the
TitanTV electronic program guide, open the TitanTV
Guide Diagnostics dialog from the Help menu.
IceTV
In Australia, the EPG is supplied by IceTV and the
free trial subscription period is 3 months.
The EyeTV Setup Assistant guides you through
configuring your IceTV account.
For existing IceTV users, please note that EyeTV
Appendix: Progam Guides
cannot extend your account's subscription period.
We recommend keeping your present account until
it expires, then re-running the Setup Assistant again
and creating a new account when asked to enter
account information. We are working on improving
this process.
IceTV Remote Scheduling
The IceTV service also offers a web site featuring
remote scheduling. Remote scheduling
allows you to send program information
to EyeTV from any computer with Web
access.
locations.
Once you’ve found a program that you like, click the
red REC button. This sends program information to
the IceTV server. From there, it is stored
until the next time EyeTV synchronizes
with IceTV.
Other Countries / In-Stream EPG
Elgato plans to offer a similar built-in guide for other
countries in the future.
EyeTV can also build an EPG from information
contained in a digital broadcast (DVB, ATSC, or
ISDB-T). The “built-in” EPG offers significantly less
information and covers fewer days than the EPG
downloaded from an electronic programming guide
web service, but it is an alternative for users
without an active subscription, or those in a country
currently not served by an online EPG service.
To manually set a channel to use the in-stream EPG,
select the channel in EyeTV’s Programs window,
then click into the EPG column.
Here’s how it works: Your Mac at home
(provided its Internet connection is present)
periodically checks for new schedules that were
added on the web site, then adds them to the local
list of schedules. You’ll have to enable automatic
checking of remote schedules in the Guide section
of the EyeTV Preferences, it is not on by default.
Select Go to Online Guide from EyeTV’s File menu,
then log onto the IceTV web site, using the user
name and password that you configured in the
EyeTV Setup Assistant. You will need to configure
your IceTV account, specifying your postal code,
and the type of television programming you receive
at your home location. You can also specify a
“Device Label” for up to 3 different recording
59
Page 60

Elgato television tuner devices sold in the United States comply with part 15 of the FCC Rules. Operation is
subject to the following two conditions:
(1) This device may not cause harmful interference, and
(2) this device must accept any interference received, including interference that may cause undesired operation.
 Loading...