

Page 1

Elgato Systems
EyeTV 2
Software Manual
3.0
© 2006
Elgato Systems LLC
900 Kearny Street • Suite 750
San Francisco, CA 94133
United States of America
Elgato Systems GmbH
Nymphenburgerstr. 86
80636 München
support@elgato.com
Page 2

Table of Contents
1
Chapter 1
Chapter 2
Chapter 3
Chapter 5
Installation 3
Welcome to EyeTV! 3
Viewer Window 6
Watching Live Television 6
Watching Multiple Programs 6
Using Multiple Digital Channels 7
Using Digital Multifeeds 8
Changing the Size of the EyeTV Viewer Window 8
Changing the Aspect Ratio of the Viewer Window 9
Adjusting the Display Options 9
Teletext Subtitles 10
DVB Subtitles 10
Overlay Window 10
Snapshots from the EyeTV Viewer Window 11
Controller 12
Controller Button Descriptions 13
Programs Window 15
Programs Window Sections 15
Recordings 16
Schedules 18
Channels 21
Program Guide 23
Favorite Channels 25
Playlist 26
Advanced Recording Features 27
Editor 28
Opening the EyeTV Visual Editor 28
Visual Editor Drawer 29
Fine Tuning Edits 30
Compacting a Recording 31
Examples of Using the Visual 32
Editor 32
Program Guide 34
EyeTV Program Guide in North America: Powered by TitanTV 35
New User Registration 35
TitanTV Sections 35
Navigating through the Program Guide 36
Navigating the Guide Tabs 36
Searching for Programs 37
Chapter 4
Chapter 6
Page 3

EyeTV Manual
2
Chapter 7
Chapter 8
Chapter 9
Tuning to Live Television 38
Automatically Recording Programs 38
Remote Scheduling Programs 38
EyeTV Program Guide in Europe: Powered by tvtv 40
New User Registration 40
Navigating through the Program Guide 43
View by Date 43
View by Filter 44
Searching for Programs 44
Automatically Recording 45
Programs 45
Preferences 46
General Preferences 46
Recording Preferences 47
Controls Preferences 48
Guide Preferences 49
Display Preferences 50
Sound Preferences 51
Device Settings 52
Advanced Features 53
Playing Video CDs 53
Opening QuickTime Movies 54
Exporting QuickTime Movies 54
EyeTV Archive 58
EyeTV Tips and Tricks 59
EyeTV Keyboard Shortcuts 60
Troubleshooting 62
Downloading Updates 62
Getting Help 62
Page 4

EyeTV Software Manual
InstallationChapter 1
Chapter 1 · Installation
3
This chapter will show you how to install EyeTV software and launch
EyeTV for the first time.
Welcome to EyeTV!
This guide shows you how to begin watching and recording television programs
on your Macintosh. It covers installing and configuring EyeTV software and includes instructions for using the most common features of EyeTV.
This chapter contains installation instructions for the software. Installation
instructions for compatible hardware can be obtained directly from the manufacturer.
Installation
Page 5

EyeTV Software Manual
Chapter 1 · Installation
4
Installation
Step One: Installing EyeTV Software
• Insert the EyeTV software CD-ROM into your CD-ROM or
DVD-ROM drive.
• Drag and drop the EyeTV application where you would like to
install it. We recommend your Mac’s Applications folder.
Step Two: Launching EyeTV for the First Time
• Navigate to the folder where you installed the EyeTV Software and double-click the EyeTV icon.
• The first time you launch EyeTV, a Setup Assistant will guide
you through the complete setup and configuration of your
EyeTV software.
• You may be asked to enter an Activation Key. This either
came with your EyeTV product, or has been provided to you
electronically. Keep this key in a safe place, in case you need
to reinstall the EyeTV software.
• When you complete the Setup Assistant, the EyeTV Programs
window, an EyeTV viewer window and the EyeTV Controller
will appear.
Page 6

EyeTV Software Manual
Chapter 1 · Installation
5
Registering EyeTV Online
Registering EyeTV entitles you to the following benefits:
• Notification of product updates
• Technical support
• Special offers
To register:
• Open your web browser and go to
www.elgato.com/registration.html
• Enter the requested information and click the “Register”
button.
Page 7

EyeTV Software Manual
Viewer WindowChapter 2
Chapter 2 · Viewer Window
6
The EyeTV Viewer window displays live or pre-recorded programs on
your Macintosh. This chapter describes how to use the EyeTV Viewer
window.
Watching Live Television
With EyeTV you can watch live television in several different window sizes or
in full screen mode. A live television window usually appears immediately after
EyeTV is started. Live television can be manipulated (i.e. paused, instant-replayed, fast-forwarded) at any time using the Controller buttons (see Chapter 3,
The EyeTV Controller) or using commands from the Controls menu. To close or
re-open the Live TV Window, select Close Window or Open Live TV Window
from the File menu.
For EyeTV models with analog video inputs, EyeTV can only record from one
input at a time, because there is only one MPEG encoder chip.
Watching Multiple Programs
EyeTV supports multiple Viewer windows so you can watch live television in
one window and/or multiple pre-recorded programs in other windows (To learn
Viewer Window
Page 8

EyeTV Software Manual
Chapter 2 · Viewer Window
7
how to watch multiple pre-recorded programs, please see Chapter 4, The EyeTV
Programs Window).
Using Multiple Digital Channels
With digital television products EyeTV can play and record two or more TV
channels that reside on the same transponder/multiplex simultaneously.
A simple explanation is that digital TV channels are often subdivided into multiple subchannels. That means there could be multiple channels of related content available, instead of just one. For example, a network like NBC could have
a channel for regular content, and a separate channel for 24 hour weather.
With this new feature, you can watch both the NBC weather channel and NBC
regular channel at the same time.
A more technical explanation is that a multiplex is a collection of digital TV
channels that are broadcast on the same frequency, therefore a device with a
single tuner can receive all of them at the same time. A DVB-T or ATSC multiplex usually contains between 3 and 5 standard definition TV channels, or one
high definition (HDTV) and one standard definition channel. Cable and Satellite
multiplexes/transponders can contain 10 or more channels.
In the US, digital antenna (ATSC) subchannels are often designated by a hyphen
Page 9

EyeTV Software Manual
Chapter 2 · Viewer Window
8
(like 11-1 for regular programming, and 11-2 for weather). Look on your channel
list, and note these subchannels. You cannot watch content from two different transponders at once (CBS and NBC), unless you had two separate tuners.
That would require two separate EyeTV units.
Looking for identical frequencies would be the way to determine if channels are
on the same multiplex. Look in the frequency column of the Channels section of
the Programs window, to see the frequency.
To open an additional live TV window, hold down the Control key while selecting Open Live TV Window from the File menu. You can open as many additional
windows as you like, but 2 or 3 are a practical upper limit on most machines.
All live TV windows can be paused, timeshifted, recorded, etc. independent of
each other. Since there is only one tuner, changing any window to a channel on
a different multiplex will change all other open windows to channels on the new
multiplex.
Using Digital Multifeeds
EyeTV software supports Multifeed. Multifeeds are sub-channels that can be
accessed from a portal channel. If your provider offers multifeeds and you have
a subscription and/or a smartcards that entitles you to receive these channels
you can use the onscreen remote to open the portal channel and then access
the multifeed sub-channel by choosing View > Multifeed.
Please note that providers tend to change the location of multifeed channels
which might require a fresh Auto Tune from time to time. Scheduling recordings
on these channels in not supported. Recordings need to be started manually.
This feature does not work with analog EyeTV products.
Changing the Size of the EyeTV
Viewer Window
You can change the size of the EyeTV Viewer window by grabbing the lower
right corner and dragging it diagonally.
Page 10

EyeTV Software Manual
Chapter 2 · Viewer Window
9
The following pre-selected sizes are also available from the View menu.
To watch full screen:
Select Enter Full Screen from the View menu, press z-0, or double click on the
viewer window To exit full screen mode, press the Escape key press z-0 again,
or double click on the viewer window
To watch in a small size window:
• Select Small Size from the View menu or press z-1.
To watch in a half size window:
• Select Half Size from the View menu or press z-2.
To watch in a normal size window:
• Select Normal Size from the View menu or press z-3.
To watch in the largest sized window that will fit on your screen:
• Select Maximum Size from the View menu or press z-4.
Changing the Aspect Ratio of the
Viewer Window
EyeTV will automatically try to choose the correct aspect ratio. Typical TV has
a 4:3 ratio, while a few widescreen formats also exist. If you would like EyeTV
to always choose a certain ratio, you can pick that from the View menu. This
could be useful if you are trying to remove letterboxing, or display content on
a widescreen monitor. Your choices are 4:3, 14:9, 16:9 and Wide. Some ratios
may visibly remove part of the image, to make it fit that shape without otherwise
stretching or distorting the picture.
Adjusting the Display Options
You can adjust how the Viewer Window presents video by selecting Display
Options… from the View menu. You can control the overscan and interlacing,
which can improve the image quality of the viewer window. See Chapter 8.
Page 11

EyeTV Software Manual
Chapter 2 · Viewer Window
10
Closed Captions
Most programs in the US have embedded subtitles, known as Closed Captions.
These are designed for the hearing impaired, with extra features that normal
subtitles don’t have.
To turn on the display of Closed Captions, go to View – Closed Captions.
All EyeTV units in the US and Canada support Closed Captioning.
Teletext Subtitles
For all EyeTV models that support the PAL broadcast standard, EyeTV has subtitling support via Teletext pages. To access subtitles, go to View - Teletext and
use the keypad to navigate to the Teletext page that contains the subtitles for
the current channel. You can also invoke the Teletext display by using the colored keys on the hardware remote control that accompanies the EyeTV hardware. To jump to a page enter the page number via keyboard or remote control.
You can also access the page by clicking on the page number in the videotext
window.
EyeTV only supports older style Teletext, like what’s found traditionally with
analog TV. Modern DVB signals may contain new interactive data services that
EyeTV does that support. In those cases, you may see a black screen instead
of Teletext or subtitles.
DVB Subtitles
For all EyeTV models that support the DVB broadcast standard, EyeTV can display DVB-based subtitles. To access them, go to View - Subtitles. You can
show subtitles, and select a particular track, if multiple tracks are present.
Overlay Window
Information about the current program is displayed in an overlay window. This
window is displayed automatically on every channel change, and can also be
invoked by pressing either Command-I on the keyboard, or the OK button on
Page 12

EyeTV Software Manual
Chapter 2 · Viewer Window
11
the EyeTV infrared control. Pressing the return key on the keyboard forces it to
display for a few seconds. You can control how long it will display, by using the
General Preferences (“Display program information after channel changes”).
Please note that the amount of information available varies. Full information
(program title, start, duration, rating, genre, next program) is typically available
for digital broadcasts. Generally the amount of information available depends
on the broadcaster. EyeTV uses all sources available in a broadcast (XDS, Teletext, DVB event information, ATSC PSIP).
Snapshots from the EyeTV Viewer
Window
If you want to capture a snapshot of the current frame of video, you can press
z-C, which will save the picture to the clipboard. Or, you can press Shift-z-C
which will create a snapshot file on your desktop from the active video window,
named “EyeTVSnapshot.jpg”, “EyeTVSnapshot[1].jpg” and so on .
Page 13

EyeTV Software Manual
ControllerChapter 3
Chapter 3 · Controller
12
This chapter will show you how to use the EyeTV Controller. The Controller enables you to fully manage your TV viewing experience.
You can use the Controller while watching either live or pre-recorded programs.
The picture and table on the next page describes the function of each of the
buttons on the Controller. Note that some additional functions are available
through the Controls menu and keyboard shortcuts.
Controller
Page 14

EyeTV Software Manual
Chapter 3 · Controller
13
Controller Button Descriptions
EyeTV Information Display
This blue area displays the name of the program currently being watched or
recorded, the elapsed time, and the channel on which the program is playing.
Clicking the time display toggles between elapsed time, total time, and time remaining.
EyeTV Programs - Click this button to bring up the EyeTV Programs window,
which displays all of the Recordings, Scheduels, Playlists, Favorite Channels,
and the Program Guide (See Chapter 4, The EyeTV Programs Window).
Current Channel List - Use this drop-down menu to switch between Favorite
Channel lists, and all channels.
Channel Number - Click to use a drop-down menu to switch to any available
channel.
Channel Up - Click this right facing triangle to switch to the next higher channel.
Channel Down - Click this left facing triangle to switch to the next lower chan-
nel.
Time Slider - This blue bar gives a visual representation of your current position
in the show. For example, you are at the beginning of the show when the blue
bar is at the left edge of the timeline and you are at the end of the show when
the blue bar fills the timeline. Click anywhere inside the slider to jump to any
part of the recording; click and drag to scan through the program.
Timeshifting Control Buttons
Play/Pause - Click this button to play/pause the current program. In the case of
live television, EyeTV keeps recording the live feed onto your disk. The pause
time remaining for your now timeshifted show depends on the free space available on your disk.
Record - Clicking this button starts or stops recording the current program. The
record button is highlighted pink during a recording. By default, the manually
started recording’s duration is set to 180 minutes (3 hours). If you want to re-
Page 15

EyeTV Software Manual
Chapter 3 · Controller
14
cord a longer program, please highlight the recording in the Recording section
of the EyeTV Programs window, press the Info button, and edit the schedule
there.
Because EyeTV has only one tuner, and can only handle one video source at a
time, channels and inputs cannot be changed while recording. Once a recording has started, the cache is flushed so you cannot skip backwards beyond the
start time of the recording.
Instant Replay - Clicking this button will rewind the current program 7 seconds
and continue playing, creating an “instant replay” effect. Clicking this button
while holding down the Option key starts playing the current program from the
beginning.
Jump - Clicking this button will fast-forward the current program 30 seconds
and continue playing. This is useful for jumping over less desirable content.
Clicking this button while holding down the Option key resumes watching live
television.
Fast Backward - Click this button to play the current program in reverse at high
speed. Clicking this button while pressing the Option key plays the current program in reverse in slow motion. 2x, 4x, 8, 16x, 32x speeds are available.
Fast Forward - Click this button to play the current program at high speed.
Clicking this button while pressing the Option key plays the current program in
slow motion. 2x, 4x, 8, 16x, 32x speeds are available.
Volume Control - Use this curved slider to control the volume of the program
being played.
Mute - Click this button to mute the sound, click it again to turn it back on.
Page 16

EyeTV Software Manual
Programs WindowChapter 4
Chapter 4 · Programs Window
15
Programs Window
This section describes the functions of the EyeTV Programs window.
Programs Window Sections
The EyeTV Programs window is organized into a number of sections, accessible
from the Categories column on the left. Recordings, Schedules, Channels and
Program Guide are the default sections, and Favorites and Playlists can also be
added to the Categories column.
There are contextual buttons at the top of the Programs Window (Info, Play,
Toast, iPod, New) and an Action menu which looks like a gear. Depending on
what is selected, the choices will adjust accordingly.
At the bottom left corner of the Programs Window there is a button with a +
sign. Use that to add a Playlist or Favorite Channels list. You can also add
Page 17
EyeTV Software Manual
Chapter 4 · Programs Window
16
those items from the File menu, with New Playlist or New Favorite Channels.
At the bottom right corner of the Programs Window there is a slider. Move it to
the left, and items displayed in the Programs Window will shrink. Move it to the
right, and they will be magnified.
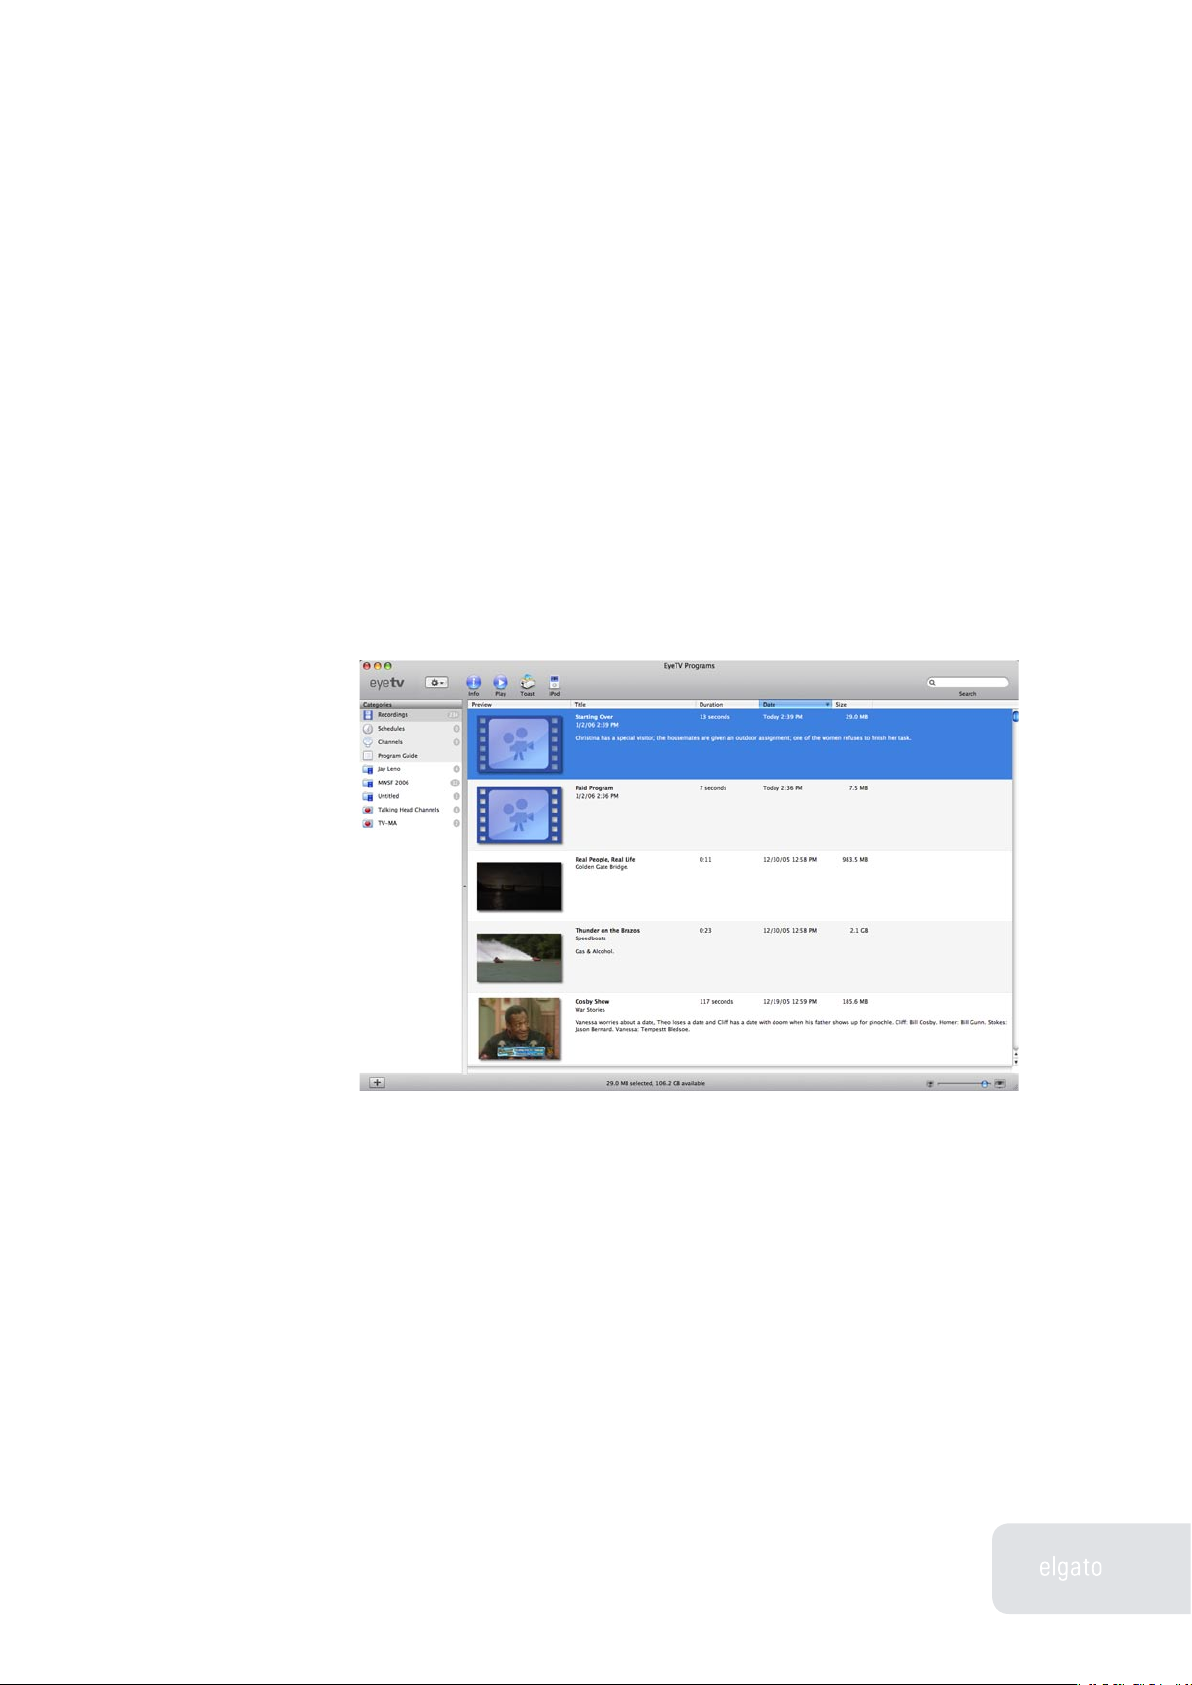
Recordings
Each time you record something using EyeTV, a new entry will be added to the
list in the Recordings section of the EyeTV Programs window.
New recordings are indicated by a blue icon picturing a movie camera. During
the recording process, there will be a progress bar, listing the time elapsed, and
total duration. When a recording is played, the blue icon is replaced by a snapshot of a frame from that recording.
The total amount of recordings is listed in the Categories column, next to the
Recordings section.
Live Recordings
While watching live TV, if a recording is started by pressing the record button
Page 18

EyeTV Software Manual
Chapter 4 · Programs Window
17
on the remote, a new recording is automatically added to the EyeTV Programs
window. If you are recording from the tuner, then it should be named as per the
Program Guide information. Otherwise, it is displayed as a “Live Recording”,
with the date and time listed.
You can enter the program information for this recording, or change the stop
time, by highlighting it in the Programs Window and clicking the Info button.
By default, the manually started recording’s duration is set to 180 minutes (3
hours). If you want to record a longer program, please call up the Info window,
and adjust the desired length there.
Managing Stored Recordings
To play a recording, find it in the list and double-click, or highlight it and click
the Play button at the top of the window.
To view more details about a recording, or to change its title or description, select the recording and click the Info button.
To delete a recording, select it and click the Delete button, or select Delete from
the Action menu. If the recording was associated with a repeating schedule,
the repeating schedule will not be deleted.
To search for particular recordings, use the Search field at the top right corner
Page 19

EyeTV Software Manual
Chapter 4 · Programs Window
18
of the EyeTV Programs window. The listing will become more restrictive with
each additional character entered.
Recordings are sorted by Title, Duration, Date and Size. To sort the Recordings
section, click on one of the columns, like the Date column, and the sort will
happen. Click again to reverse the order. You can change the order of the columns, by clicking on the label, and then dragging it to the left or right.
To export a recording to Toast, select it, and then click the Toast button. You
can also drag a file from the Recordings section, to the Video section of Toast
7.0.2 or later. Finally, you can select “for Toast” via the Export command.
To export a recording to the iPod video format, select it, and then click the iPod
button. That will export to a MPEG-4 format, and add the item to an “EyeTV”
playlist in the iTunes Library.
The bottom of the Programs window lists the amount of recordings, and their
total elapsed time. Clicking on that information bar will additionally show the
amount of storage space currently in use by EyeTV recordings.
The Action menu, which looks like a gear, allows you to do the following to recordings:
Rename - Change the name of the highlighted recording.
Delete - Permanently remove the recording from the Recordings section, and
from the Finder.
Edit - Open up the EyeTV Visual Editor for this recording.
Edit Info - Change the information associated with the recording.
Export - Make a copy of the recording in another encoded format, so other ap-
plications can use it.
Show In Finder - Highlight the actual files that represent this recording, in a
folder in the Finder.
Backup with Toast - Send the recording to Toast for a data disk (not a video
DVD).
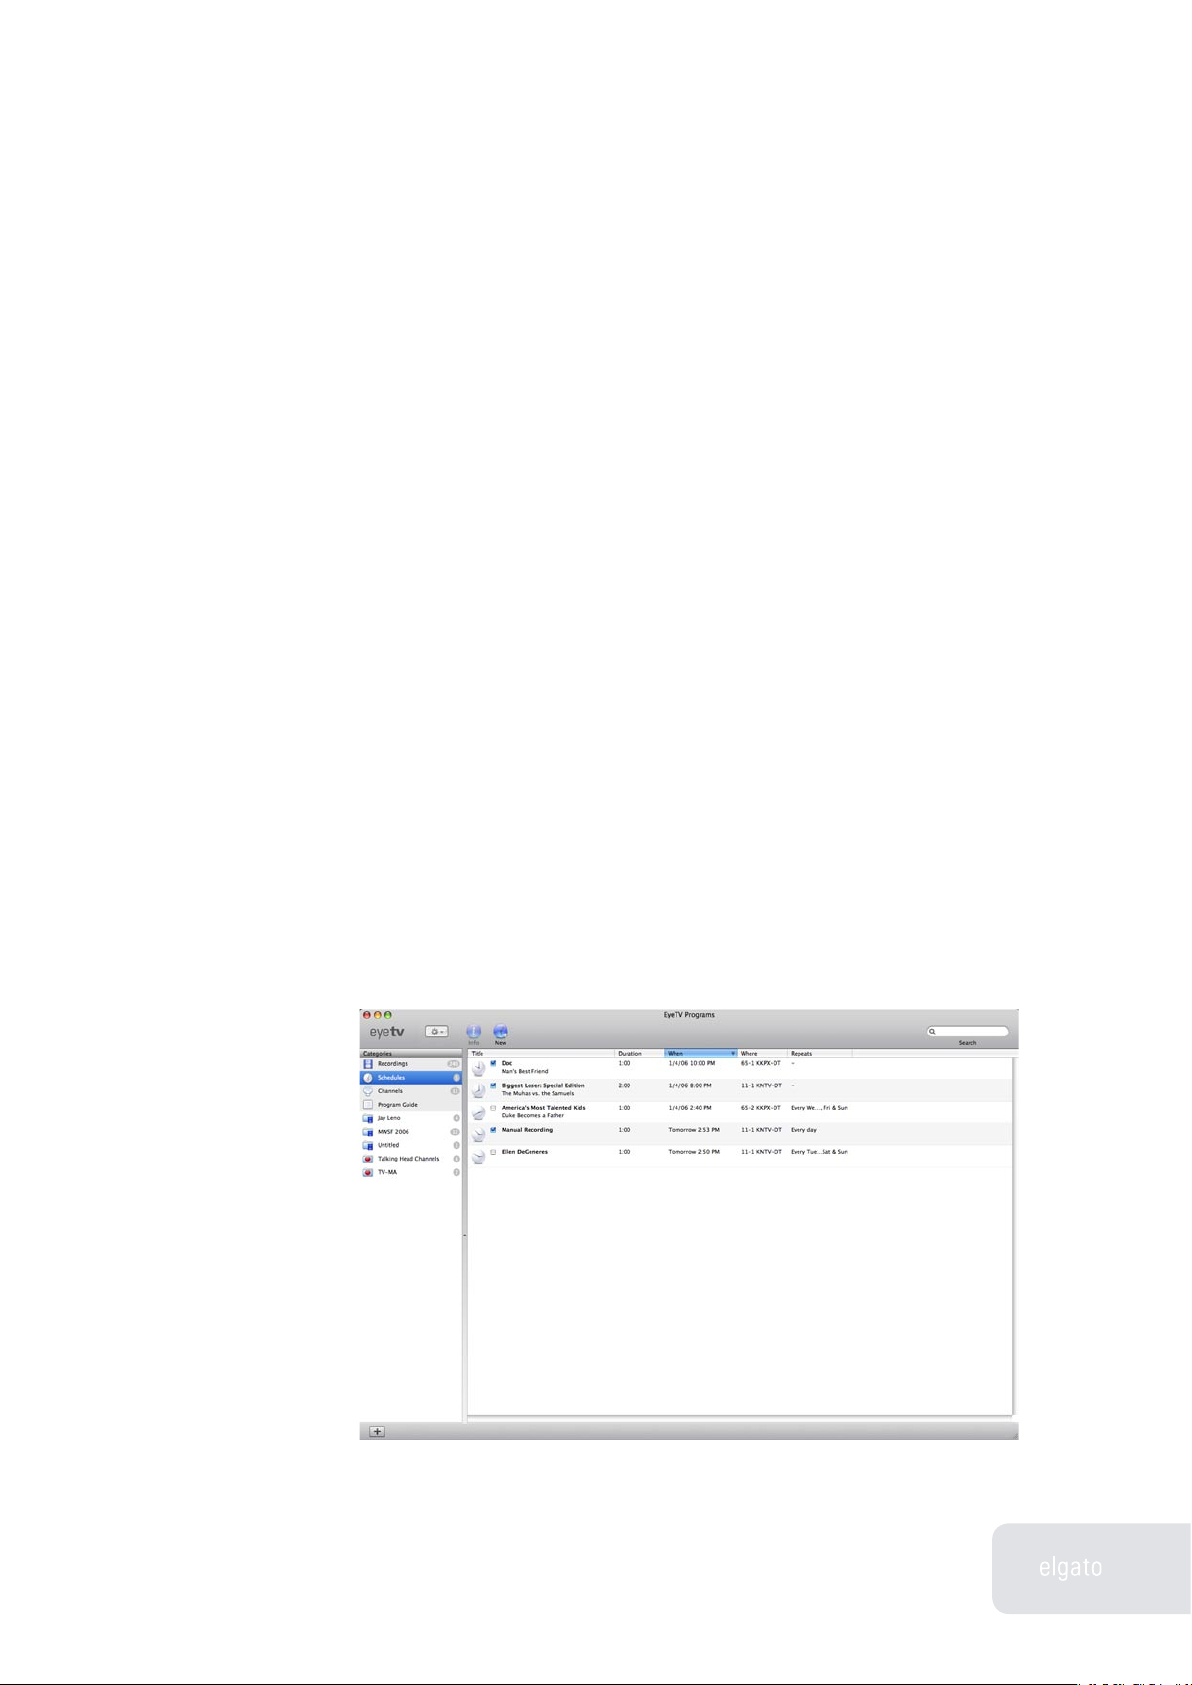
Schedules
Each time you schedule a program to be recorded, either manually or through
the Program Guide, a new entry will be added to the Schedules section of the
EyeTV Programs window.
Page 20
EyeTV Software Manual
Chapter 4 · Programs Window
19
The total amount of schedules is listed in the Categories column, next to the
Schedules section.
Managing Schedules
To add a manually scheduled program, select the Schedules section, click the
New button at the top of the window and fill in the program’s parameters, including Title, Episode, Description, Date and Time (When), Duration, Repeats
and what channel or input (Where).
You can also set a schedule to add its recording to a particular Playlist, and to
export to the iPod format after recording completes. That will export to a MPEG4 format, and add the item to an “EyeTV” playlist in the iTunes Library.
To add a schedule using the EyeTV Program Guide, select the Program Guide
section. This section brings up information about upcoming programs, using
information from TitanTV, tvtv, or other sources, depending on your location.
Clicking the red RECORD button next to a program tells EyeTV to schedule the
program to be automatically recorded. For more details, refer to the Program
Guide section of this chapter, and Chapter 6.
Once a schedule is created, it will appear in the Schedules section with an icon
of a clock next to it. The checkbox to the left of the schedule’s name allows
you to enable or disable it. Only enabled schedules will create recordings; disable a recording if you don’t want to use it now, but perhaps want to turn it on
again later.
Page 21

EyeTV Software Manual
Chapter 4 · Programs Window
20
To view more details about a recording, or to change its title or description, select the recording and click the Info button.
When a repeating schedule is recording, the clock icon will turn red.
Using the iPod column, you can select a recording to automatically export to
iTunes, in the iPod format.
Schedules are sorted by Title, Duration, When, Where, Repeats and iPod. To
sort the Schedules section, click on one of the columns, like the When column,
and the sort will happen. Click again to reverse the order. You can change the
order of the columns, by clicking on the label, and then dragging it to the left or
right.
To search for particular schedules, use the Search field at the top right corner
of the EyeTV Programs window. The listing will become more restrictive with
each additional character entered.
The Action menu, which looks like a gear, allows you to do the following to
schedules:
Rename - Change the name of the highlighted schedule.
Delete - Permanently remove the schedule from the Schedules section, and
from the Finder.
Show In Finder - Highlight the actual file that represents this schedule, in a
folder in the Finder.
Page 22

EyeTV Software Manual
Chapter 4 · Programs Window
21
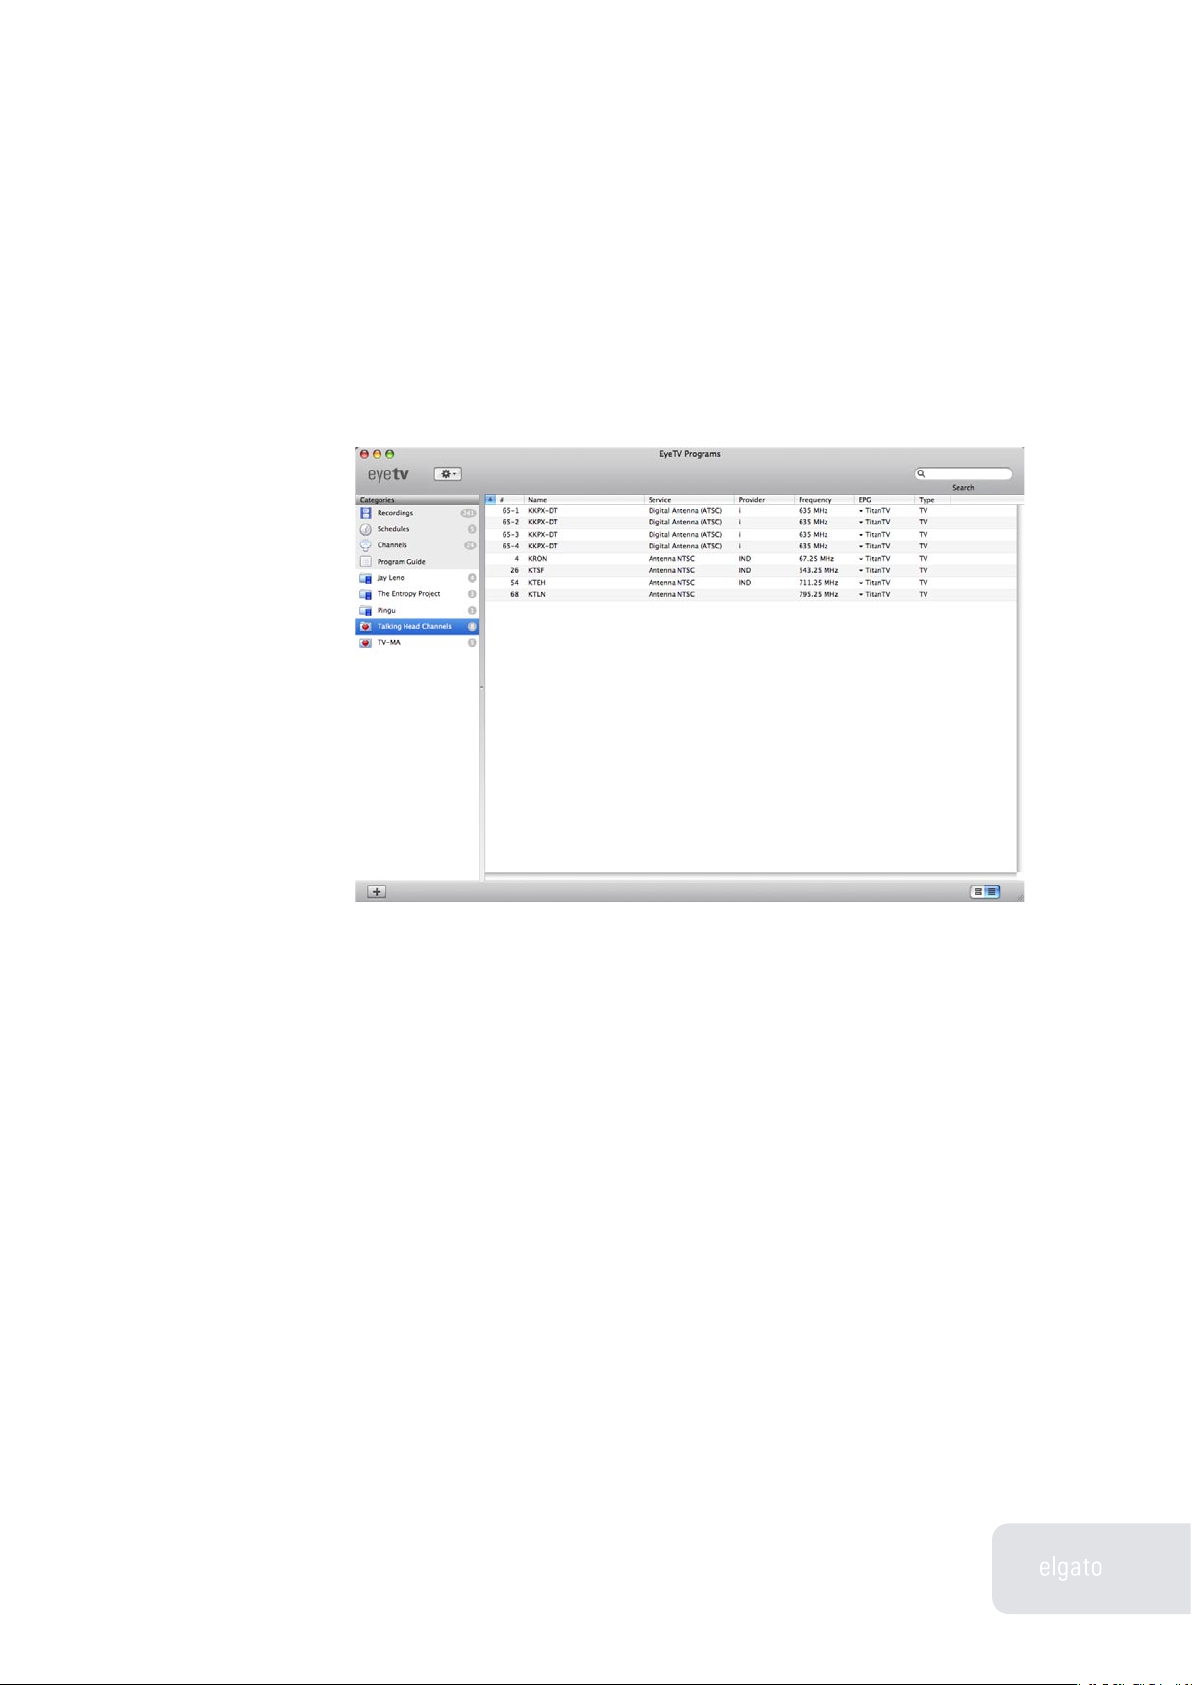
Channels
EyeTV-compatible hardware devices have built in tuners, to select channels.
The type and amount of channels depends on what video source your particular
device is using.
To detect channels, you need to use the Auto Tune process. This is usually
done via the Setup Assistant, located in the Help menu. If you need to tune
again, at the bottom of the Channels section there are controls to select your
Country and Service, and then to Auto Tune. The tuning will take a few minutes,
and will find all possible channels for that service.
If some channels are missing, you can select the Exhaustive Scan option before
using Auto Tune.
Once the Auto Tune is complete, your channels will appear in the Channels section, in numerical order. Double-click on the name of a channel to have EyeTV
tune to that channel, and show it in the Live TV Window.
Channels are sorted by Number, Name, Provider, Service, Frequency, EPG, and
Type. To sort the Channels section, click on one of the columns, like the Name
column, and the sort will happen. Click again to reverse the order. You can
change the order of the columns, by clicking on the label, and then dragging it
to the left or right.
Page 23

EyeTV Software Manual
Chapter 4 · Programs Window
22
To search for particular channels, use the Search field at the top right corner of
the EyeTV Programs window. The listing will become more restrictive with each
additional character entered.
The Action menu, which looks like a gear, allows you to do the following to
channels:
Rename - Change the name of the highlighted schedule.
Clear Custom Channel Names - Sets renamed channels back to their defaults.
Manually Add Channel - Allows you to add a missing channel, by frequency.
Channel Lineup - Allows you to choose the correct lineup for your location.
Assign EPG Channel - Lets you use the over-the-air EPG information found on
one channel, with another channel.
Enable Selected Channels - Activates a channel, allowing it to be selected for
Live TV.
Disable Selected Channels - Deactivates a channel, so it will be skipped when
using Live TV.
Select Pay TV Channels - Shows channels that require a CAM to view.
Select Free to Air Channels - Shows channels that don’t require a CAM to view.
Select TV Channels - Shows normal TV channels.
Select Radio Channels - Shows radio only channels, as for DVB products.
Page 24
EyeTV Software Manual
Chapter 4 · Programs Window
23
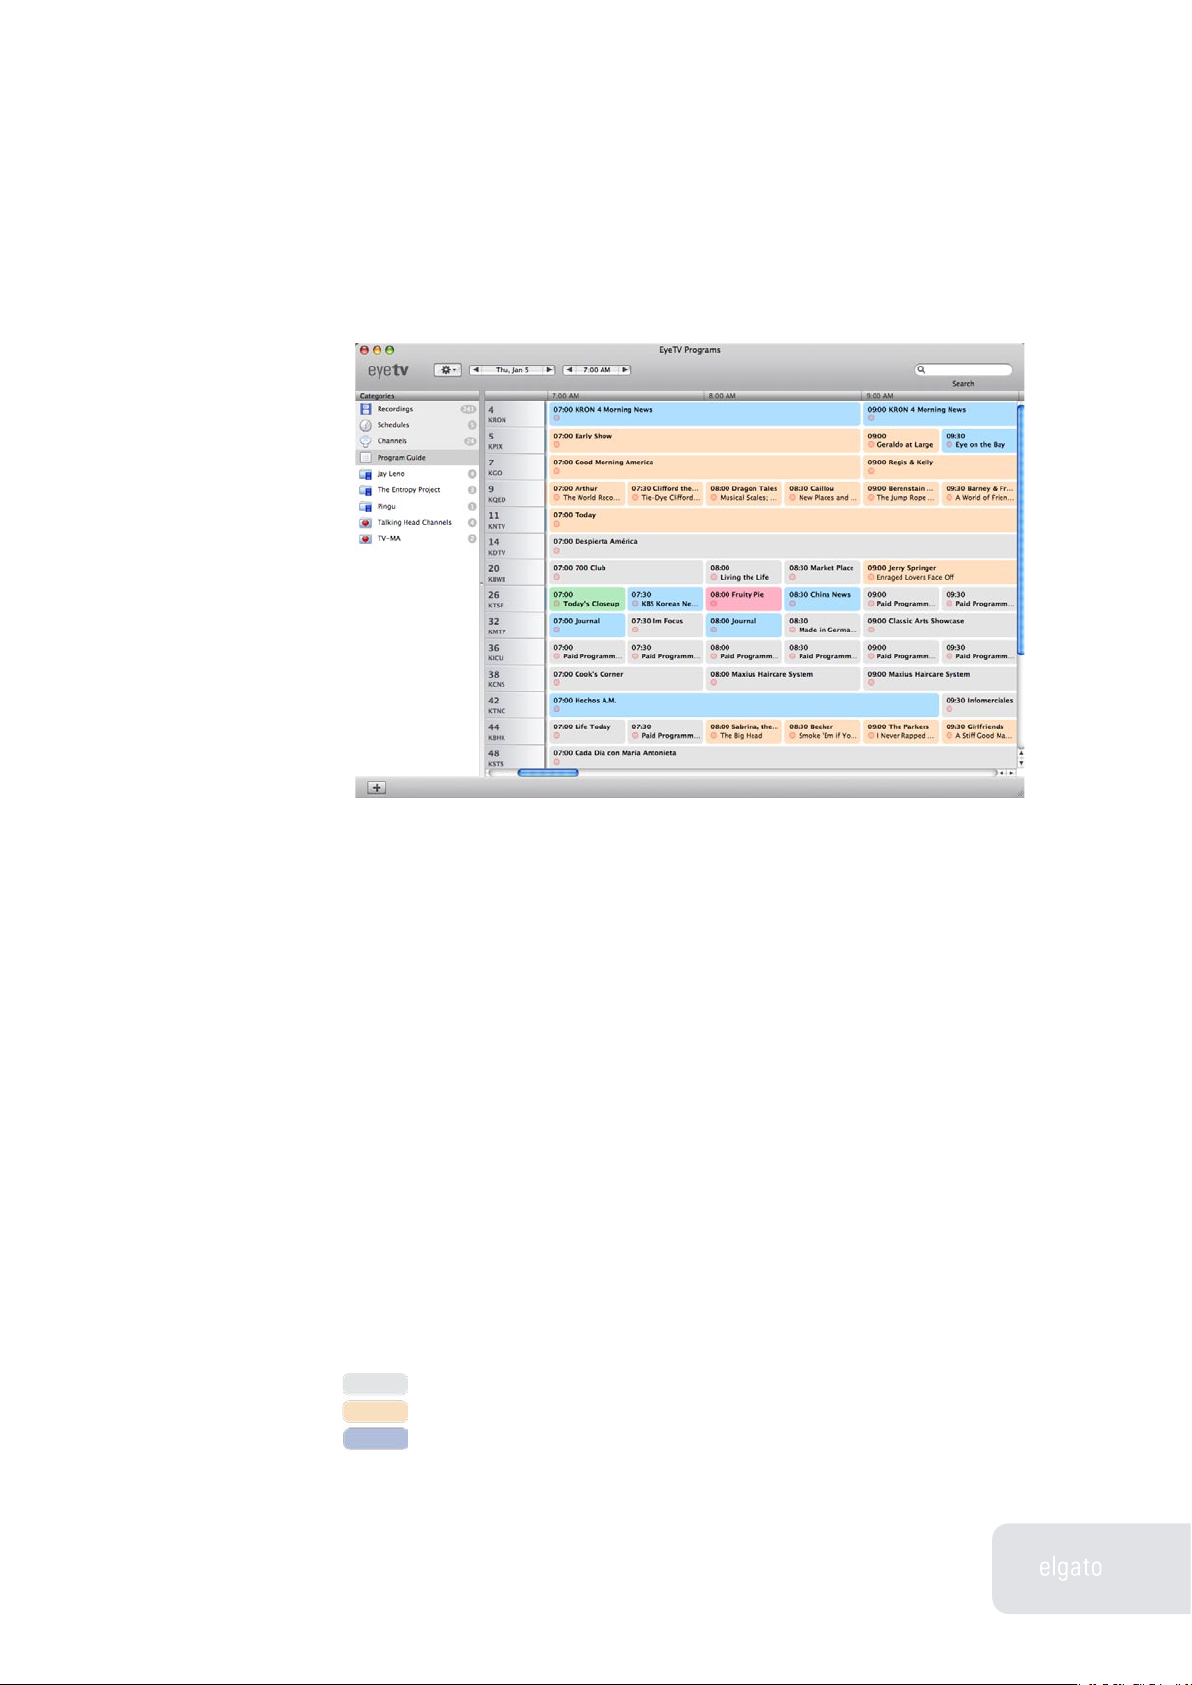
Program Guide
EyeTV has a built in Electronic Program Guide (EPG), that lists upcoming programs available for viewing or recording. Information for that list is gathered
from online sources like TitanTV and tvtv, depending on where you live.
If you need to update your Channel Lineup, that option is in the Action menu of
the Channels section. To update the Guide, that option is in the Action menu of
the Program Guide section. You can also use the Guide section in the Preferences (Chapter 7).
Only information that relates to your particular EyeTV-compatible unit will be
shown. Thus, if you have a DTT product, only DTT listings will be shown.
To set up the Program Guide for the first time, EyeTV will prompt you for certain information, like your zip code for those in the US. Then, you will select
the appropriate Channel Lineup, and your Program Guide section will then list
upcoming programs. These programs will be in a grid format, with the colors
representing like genres, such as movies or news. Here is the meaning of each
color:
Grey - Default, no particular genre
Orange - Series
Dark Blue - Movie
Page 25

EyeTV Software Manual
Chapter 4 · Programs Window
24
Yellow - Music
Turquouse - Sports
Light Blue - News
Red - Childrens
Green - Documentary
There are also symbols representing (below, in order) Widescreen, Subtitles,
Multilingual, Dolby, TV, Stereo, HDTV, Closed Captions, and Black and White.
Click on the title of any program to find out more information about it. Click on
the small, red circle to schedule it for later recording. It will then appear in the
Schedules section.
The Action menu, which looks like a gear, allows you to do the following to
channels:
Update Online Guide - Download the latest information from services like TitanTV or tvtv.
Update OTA Guide - Load the latest program information present in digital TV
signals.
Page 26
EyeTV Software Manual
Chapter 4 · Programs Window
25
Favorite Channels
At the bottom left corner of the Programs Window there is a button with a +
sign. Use that to name and add a Favorite Channels list. Or, select New Favor-
ite Channels from the File menu.
Once a Favorite Channels list is added to the Categories column, you can drag
items to it, from the Channels section.
If you drag channels from the Channels section to an empty space in the Categories column, you will automatically create a new Untitled Favorite Channels
list. Rename it using the Action menu.
Items in a Favorite Channels list can be sorted, added or deleted, without
changing the full Channels section. Use a Favorite Channels list to create a
subset of channels you like to visit.
A small remote control icon will appear next to the active Favorite Channels list.
You can activate a favorites list via the on screen controller, or by clicking on its
name in the Catetories column. When a Favorite Channels list is activated, only
that lineup can be used for Live TV. If no Favorite Channels list is active, then
all channels will be available to select from.
To Delete a Favorite Channels list, highlight it and then press Delete on the key-
Page 27

EyeTV Software Manual
Chapter 4 · Programs Window
26
board.
There is no limit to how many Favorite Channels lists you can create.
Playlist
At the bottom left corner of the Programs Window there is a button with a +
sign. Use that to name and add a Playlist, which is a grouping of recordings.
Or, select New Playlist from the File menu.
Once a Playlist is added to the Categories column, you can drag items to it, from
the Recordings section.
If you drag items from the Recordings section to an empty space in the Categories column, you will automatically create a new Untitled Playlist. Rename it
using the Action menu.
To Delete a Playlist, highlight it and then press Delete on the keyboard.
Each Schedule can send recordings to a specific playlist. To do so, highlight
a schedule in the Schedules section, choose the Info button, and then press
the Edit Schedule button. At the bottom of that Schedule Info window, you can
Page 28

EyeTV Software Manual
Chapter 4 · Programs Window
27
choose a playlist.
There is no limit to how many Playlists you can create.
Advanced Recording Features
Auto-Launch of EyeTV to Record
EyeTV can launch automatically two minutes before a scheduled recording
is supposed to begin. For this to work, set the General Preferences to “Start
EyeTV when device is plugged in” (see Chapter 7, EyeTV Preferences).
Waking From Sleep to Record
The EyeTV software can wake up your Mac to enable scheduled recordings to
run (this feature only works with Mac OS 10.2 or later). Automatic wake up occurs two minutes before the scheduled recording starts, in order to allow your
Mac time to wake up. For this to work, set the General Preferences to “Start
EyeTV when device is plugged in” (see Chapter 7, EyeTV Preferences). This feature should work if your display, hard drives or CPU are asleep - make sure the
Energy Saver sleep interval in the System Preferences is set for two minutes
or greater. Note that the system will not go to sleep while a Live TV window is
open.
Booting the Computer to Record
The EyeTV software can power on your Mac to enable scheduled recordings to
run (this feature only works with Mac OS 10.2 or later). Automatic power-on occurs two minutes before the scheduled recording starts, in order to allow your
Mac time to start up. For this to work, set the General Preferences to “Start
EyeTV when device is plugged in” (see Chapter 7, EyeTV Preferences). Furthermore, automatic login must be enabled in the System Preferences. This feature
will power on your Mac, and potentially activate other peripherals that receive
power over the FireWire or USB buses.
Please Note: In all of the above cases, if you have extended the scheduled
recording time in the Recording Preferences, EyeTV will launch two minutes
before the padded time. For example, with the two minutes of default padding,
EyeTV will launch four minutes before the scheduled time.
Page 29

EyeTV Software Manual
EditorChapter 5
Chapter 5 · Editor
28
This chapter will show you how to use EyeTV’s built in Visual Editor
Opening the EyeTV Visual Editor
The Visual Editor is normally hidden from view. To begin editing, select a recording in the EyeTV Programs Window, and click the Edit button. (Or, press the grey
button in the top right hand corner of the video window). A drawer containing
the editor will open below the window.
Editor
Page 30

EyeTV Software Manual
Chapter 5 · Programs Window
29
Visual Editor Drawer
There are a number of items in the editor drawer:
Timeline: The horizontal blue bar represents the overall length of the recording.
Light blue sections mark the clips of video. The yellow section in the screenshot
is the currently selected clip. The currently selected clip can also be saved as
a QuickTime movie or EyeTV recording. In this example, the selected clips are
commercials that will be discarded later.
Playhead: A large triangle above the timeline indicates which point in the recording is currently playing (or paused). Use the spacebar to toggle between
play and pause. All navigational features of the EyeTV Remote and menus are
also available, e.g. Fast Forward, Reverse, and so on. (see Chapter 8, Advanced
Features, EyeTV Keyboard Shortcuts).
Thumbnails: The top row of small pictures represents the beginnings of individual scenes in the recording. There are two levels of detail for the thumbnails.
When Normal resolution is selected, each thumbnail starts at the beginning of
a scene transition, as determined by the EyeTV hardware. When Fine is chosen, the thumbnail is at the beginning of groups of pictures, usually around 15
frames, which represent approximately half a second of video.
Markers: Pairs of smaller triangles beneath the time line are designed to bookend the clip you want to cut (or that you want to export) from the recording.
There are no markers visible for a new recording.
To add a marker, use the button in the center of the editor, beneath the timeline.
Press this button to add a new pair of markers at the current Playhead position.
Markers are preserved with the recording when the editor drawer is closed.
This allows you to begin editing your recording and save your work during interruptions.
To delete a marker group, click either one of the pair, and press the Delete key.
To clear all markers, use the Clear All Markers command in the Action menu
(which looks like a gear).
Arrow keys: The arrow keys on the keyboard have different functionality depending whether the editor drawer is visible or not. When the editor is visible
the right and left arrow keys can be used to navigate between thumbnails.
When the editor is closed, and EyeTV is playing over a clip marked for deletion,
the right arrow skips playback to the end of the clip.
Page 31

EyeTV Software Manual
Chapter 5 · Programs Window
30
The Action menu, which looks like a gear, allows you to do the following via the
editor:
Compact - Permanently remove marked sections
Export Clip - Save the marked section as a separate file
Save Clip as Recording - Saves the marked section as a separate EyeTV re-
cording.
Clear All Markers - Permanently remove all markers
Invert Markers - Reverse which sections are marked, and which are not.
Fine Tuning Edits
In order to find a good start or end for your clip within a recording, EyeTV offers
the following navigational aids to assist you in “drilling down” to the best location:
• Drag the Playhead with your mouse to roughly go to where
you want to edit. Use the spacebar to play/pause the video.
• When you are close to the spot you want to cut, press the
Add Marker button. This adds a pair of markers that start at
the current position.
• Note that the playhead is connected to the marker with a
violet bar. This means that the playhead is now locked to the
marker.
• Drag the left hand marker to the approximate beginning of
your cut. Notice the playhead following the marker. Click on a
thumbnail to move both the marker and playhead to it, or use
the left/right arrow keys. If you need more detail, change the
resolution to Fine, then click on the desired thumbnail to mark
the exact beginning of your cut.
• Repeat the last step with the right hand marker to find the
exact end of your cut.
Page 32

EyeTV Software Manual
Chapter 5 · Programs Window
31
• If you need to manually drag the playhead during this operation, e.g. for large-scale navigation, the marker-playhead lock
will come apart. To enable the marker-playhead lock again,
click on either the left or right marker of the pair. The playhead will snap to that marker and the violet bar designates
the lock.
Compacting a Recording
In the Action menu, there is a Compact command. Compacting a recording
saves disk space by replacing the original recording with a new recording,
minus the marked clips. Before proceeding with the compaction, a preview of
the operation is displayed:
If you are unsure whether to proceed with compacting, you may also preview
the results by saving the entire recording as a QuickTime movie or burning a
DVD or Video CD. The marked clips will not be exported, but will remain in the
EyeTV recording archive.
Page 33

EyeTV Software Manual
Chapter 5 · Programs Window
32
Examples of Using the Visual
Editor
Delete Undesirable Content (like Commercials)
Here is a detailed step-by-step example of how to cut out a clip from the middle
of a recording:
1) Open the Editor.
2) Move the Playhead to roughly to where you want to edit. You can always
pause or play the video by using the space bar. When you’re close to the spot
you want to cut, click on a thumbnail to move the playhead to it.
3) Press the Add Marker button. This adds a pair of markers that start at the
current position. Note that the playhead is connected to the marker with a violet
bar. This means that the playhead is now locked to the marker.
4) Drag the left hand marker to the approximate beginning of your cut. Notice
the playhead following the marker. Click on a thumbnail to move both the marker and playhead to it, or use the left/right arrow keys. If you need more detail,
change the resolution to Fine, then click on the desired thumbnail to mark the
exact beginning of your cut.
5) Drag the right hand marker to the approximate end of your cut. Click on the
right marker. Notice the playhead move to the marker and lock itself to it with
the violet bar. Click on a thumbnail to move both the marker and playhead to it,
or use the left/right arrow keys. If you need more detail, change the resolution
to Fine, then click on the desired thumbnail to mark the exact end of your cut.
Crop the Beginning and the End of your Show
Drag the playhead to the beginning of the recording and press Add Marker right
away. Drag the right marker to the true show start time. Then drag the playhead
to the end of the recording, press Add Marker, and move the left marker to the
real end of show.
Page 34

EyeTV Software Manual
Chapter 5 · Programs Window
33
Export Clip
Any part of a recording can be saved as a separate movie. Use the editing
tools to mark your favorite scene or video clip. Click into the marked area so
that it is highlighted yellow, then choose Export Clip from the Action menu.
Save Clip As Recording
Any part of a recording can be saved as a separate EyeTV recording that is
listed in the EyeTV Programs window. Use the editing tools to mark a clip so it is
highlighted in yellow, and then choose Save Clip as Recording from the Action
menu.
Segment A Long Recording Into Smaller Chunks
Mark off the first section of your recording, and then choose Export Clip from
the Action menu and save the first chunk. Repeat until done - if you just want
two sections, then using the Invert Markers command from the Action menu
would be useful. Invert Markers would highlight the section you haven’t exported yet.
Keyboard Shortcuts
⌫ Delete deletes a marker
→ Right arrow skips to next thumbnail to the right
← Left arrow skips to next thumbnail to the left
⇥ Tab selects the next marker
⇪⇥ Shift-tab selects the previous marker
↩ Return sets a new marker
⇪C Shift-C presses the Compact button
⇪F Shift-F switches to Fine
⇪N Shift-N switches to Normal
⇪M Shift-M toggles between Normal and Fine
Page 35

EyeTV Software Manual
Program GuideChapter 6
Chapter 6 · Program Guide
34
This chapter will show you how to use EyeTV’s program guide to find
shows that interest you, and automatically record them to your Mac’s
hard disk.
TitanTV is the provider of TV listings for EyeTV users in North America.
tvtv is the provider of TV listings for EyeTV users in Europe.
Program Guide
EyeTV has a built in Electronic Program Guide (EPG), that lists upcoming
programs available for viewing or recording. Information for that list is gathered
from online sources like TitanTV and tvtv, depending on where you live.
Only information that relates to your particular EyeTV-compatible unit will be
shown. Thus, if you have a DTT product, only DTT listings will be shown.
To set up the Program Guide for the first time, EyeTV will prompt you for
certain information, like the zip code of those in the US. Then, you will select
the appropriate Channel Lineup, and your Program Guide section will then list
upcoming programs. These programs will be in a grid format, with the colors
representing like genres, such as movies or news.
For more information about the built-in Program Guide, see Chapter 4.
Remote Scheduling
If you are away from your Mac, or if you prefer using a web browser with your
Program Guide, then you can vist the TitanTV or TVTV websites. This could be
useful if you want to remotely schedule your recordings, which is a feature of
both services. EyeTV can regularly poll the program guide website, to see if
Program Guide
Page 36

EyeTV Software Manual
Chapter 6 · Program Guide
35
you have any newly scheduled content.
The following is a description of these two services, including how their
websites are organized. To sign up for either, use the EyeTV Setup Assistant,
found in the Help menu.
EyeTV Program Guide in North
America: Powered by TitanTV
™
Elgato has partnered with TitanTV, the nation’s most comprehensive TV listings
service, to provide you with accurate information about the programs available
in your area. EyeTV’s program guide will help you find shows to watch now or
automatically record, so you can watch them later at a more convenient time.
You can access the TitanTV program guide by clicking the Guide button at the
top of the EyeTV Programs Window, by selecting Guide under the Controls
menu, or by pressing z-G.
New User Registration
The first time you use EyeTV’s Program Guide, you will need to register with
TitanTV as a new user. You will need to tell TitanTV where your computer is located and what type of TV service you receive, so TitanTV can supply accurate
information about the programs available to you. You must sign up as a TitanTV
user before using the EyeTV Program Guide.
TitanTV Sections
Once you log into TitanTV, there are four main sections available to you, each
with its own tab, right below the TitanTV logo:
Command Center – This is a general resource screen for your account, with
messages and reminders from TitanTV, along with access to your favorite Movies, Actors and Shows.
My Guide – This is the main section of TitanTV, with all of the programming list-
Page 37

EyeTV Software Manual
Chapter 6 · Program Guide
36
ings. More about this is in the next few sections.
My Account – All of the settings for your grids, and how they interact with
EyeTV (your PVR). Adjust things to exactly suit your needs.
Community – This is a general forum for all things TitanTV. You can leave messages here for other users to see, or you can use the “Elgato PVR Discussion”
to talk about EyeTV.
Navigating through the Program
Guide
The most useful TitanTV web page is the programming grid for your area and
service, located under the My Guide tab on your on-screen remote control. This
grid is divided lengthwise by station/channel number and widthwise by time (in
increments you can choose, from 1-6 hours). You may have to scroll to see all
channels/programs available to you.
Change the Time Segment – It’s easy to view programming through the entire
day. Above the programming grid you’ll find two arrow buttons. Click these buttons to view programming previous to your current time segment or following
your current segment. The jump is equal to how many hours of programming
you have displayed, from 1 to 6.
Change the Day of Your Grid – You can even jump ahead and see what’s on tomorrow or any day/date up to 14 days in advance. Select a day and a time from
the drop-down list and press “Go”. To return to the scheduled programming for
your current time, press the “Now” button.
Program Description – Click the program’s title to view a description of that
program.
Navigating the Guide Tabs
TitanTV offers more types of programming than any other TV listings Web site.
It is easy to look at what programming is available through any of the sources
that come to your house by selecting a guide tab at the top of the page. If your
favorite guide isn’t showing, then go to My Account – Edit Providers/Tabs. The
Page 38

EyeTV Software Manual
Chapter 6 · Program Guide
37
following is a description of each tab:
Digital Programming Guide - The default grid that appears when you log onto
TitanTV.com or when you click the Digital tab at the top of the page. This tab
displays the programming for all the digital broadcasts that you currently receive.
Analog Programming Guide - Click the Analog tab to display the programming
grid for analog stations you can receive. The stations in this list are based on
regulations by the FCC, and assume that you have a 20 or 30-foot antenna to
help you receive the signals.
Cable Programming Guide - Click the Cable tab to display the programming grid
for cable service you subscribe to. The stations in the grid are determined by
the cable service provider that you must select the first time you click on the
Cable tab. If you subscribe to a different cable service, you can change your
guide by clicking the “Choose Provider” button on the Cable tab.
Digital Cable Programming Guide – Click the Digital Cable tab to display the
programming grid for the digital cable service you subscribe to. The stations
in the grid are determined by the digital cable service provider that you must
select the first time you click on the the Digital Cable tab. If you change your
digital cable provider or package, you can change your guide by clicking the
“Choose Provider” button on the Digital Cable tab.
Satellite Programming Guide – Click the Satellite tab to display the programming grid for the satellite service you subscribe to. The stations in the grid are
determined by the satellite service provider that you must select the first time
you click on the Satellite tab. If you change your satellite service provider, you
can change your guide by clicking the “Choose Provider” button on the Satellite
tab.
Searching for Programs
Use the Quick Search box found on the top right of the My Guide section. The
Advanced Search link allows you to choose which source/lineup you wish to
search and what criteria to search with. You can look for a certain program
title, actor, category of program (comedy, educational, drama, etc.).
The results of your TitanTV search including program title, affiliate name, channel number, as well as date and time of the episode, will be displayed on the
Page 39

EyeTV Software Manual
Chapter 6 · Program Guide
38
same page.
Tuning to Live Television
Watch Now Icon Clicking the Watch Now icon (located next to currently
playing programs) sends program information to EyeTV, which then automatically tunes to the associated channel so you can watch live television programs
on your Mac.
Automatically Recording Programs
Record Icon Clicking the Record icon (located in every program cell on the
Digital, Analog, Cable, Digital Cable and Satellite tabs, except currently playing
programs) sends program information to EyeTV which then schedules the program to be automatically recorded.
Remote Scheduling Programs
Remote Scheduling allows you to send program information to EyeTV from any
computer with Web access.
To use Remote Scheduling with TitanTV, follow this procedure
• In EyeTV’s Preferences – Guide section, select TitanTV and
enter your user name and password (see Chapter 7, EyeTV
Preferences, Guide Preferences).
• Log on to TitanTV, and go to My Account – Edit PVR/Tuner
Devices.
• For the Remote Scheduling Settings, select PVR Being Used
= EyeTV.
• Select Programming Guide on the left side of the screen, and
then make sure that PVR/Watch Icons = Display in Grid and
Page 40

EyeTV Software Manual
Chapter 6 · Program Guide
39
PopUp Menu.
• Go to your TitanTV Guide. Move your mouse over the recording you want to schedule, and a PopUp menu will come up,
with the Remote Scheduling option. Your schedule will be
placed in a queue. Schedule more if you like.
• Then, EyeTV will check with TitanTV to find your schedules,
according to the preferences. To Check TitanTV Now, see the
File menu.
Page 41

EyeTV Software Manual
Chapter 6 · Program Guide
40
EyeTV Program Guide in Europe:
Powered by tvtv
Elgato has partnered with tvtv, one of Europe’s most comprehensive TV listings
services, to provide you with accurate information about the programs available
in your area. EyeTV’s Program Guide will help you find shows to watch now, or
to automatically record so you can watch them later at a more convenient time.
You can access the tvtv program guide by clicking the Guide button at the top
of the EyeTV Programs Window, by selecting Guide under the Controls menu, or
by pressing z-G.
New User Registration
The first time you use EyeTV’s Program Guide, you will need to register with tvtv
as a new user. You will need to pick a user name and password, which will be
used by tvtv and EyeTV to access and synchronize your listings.
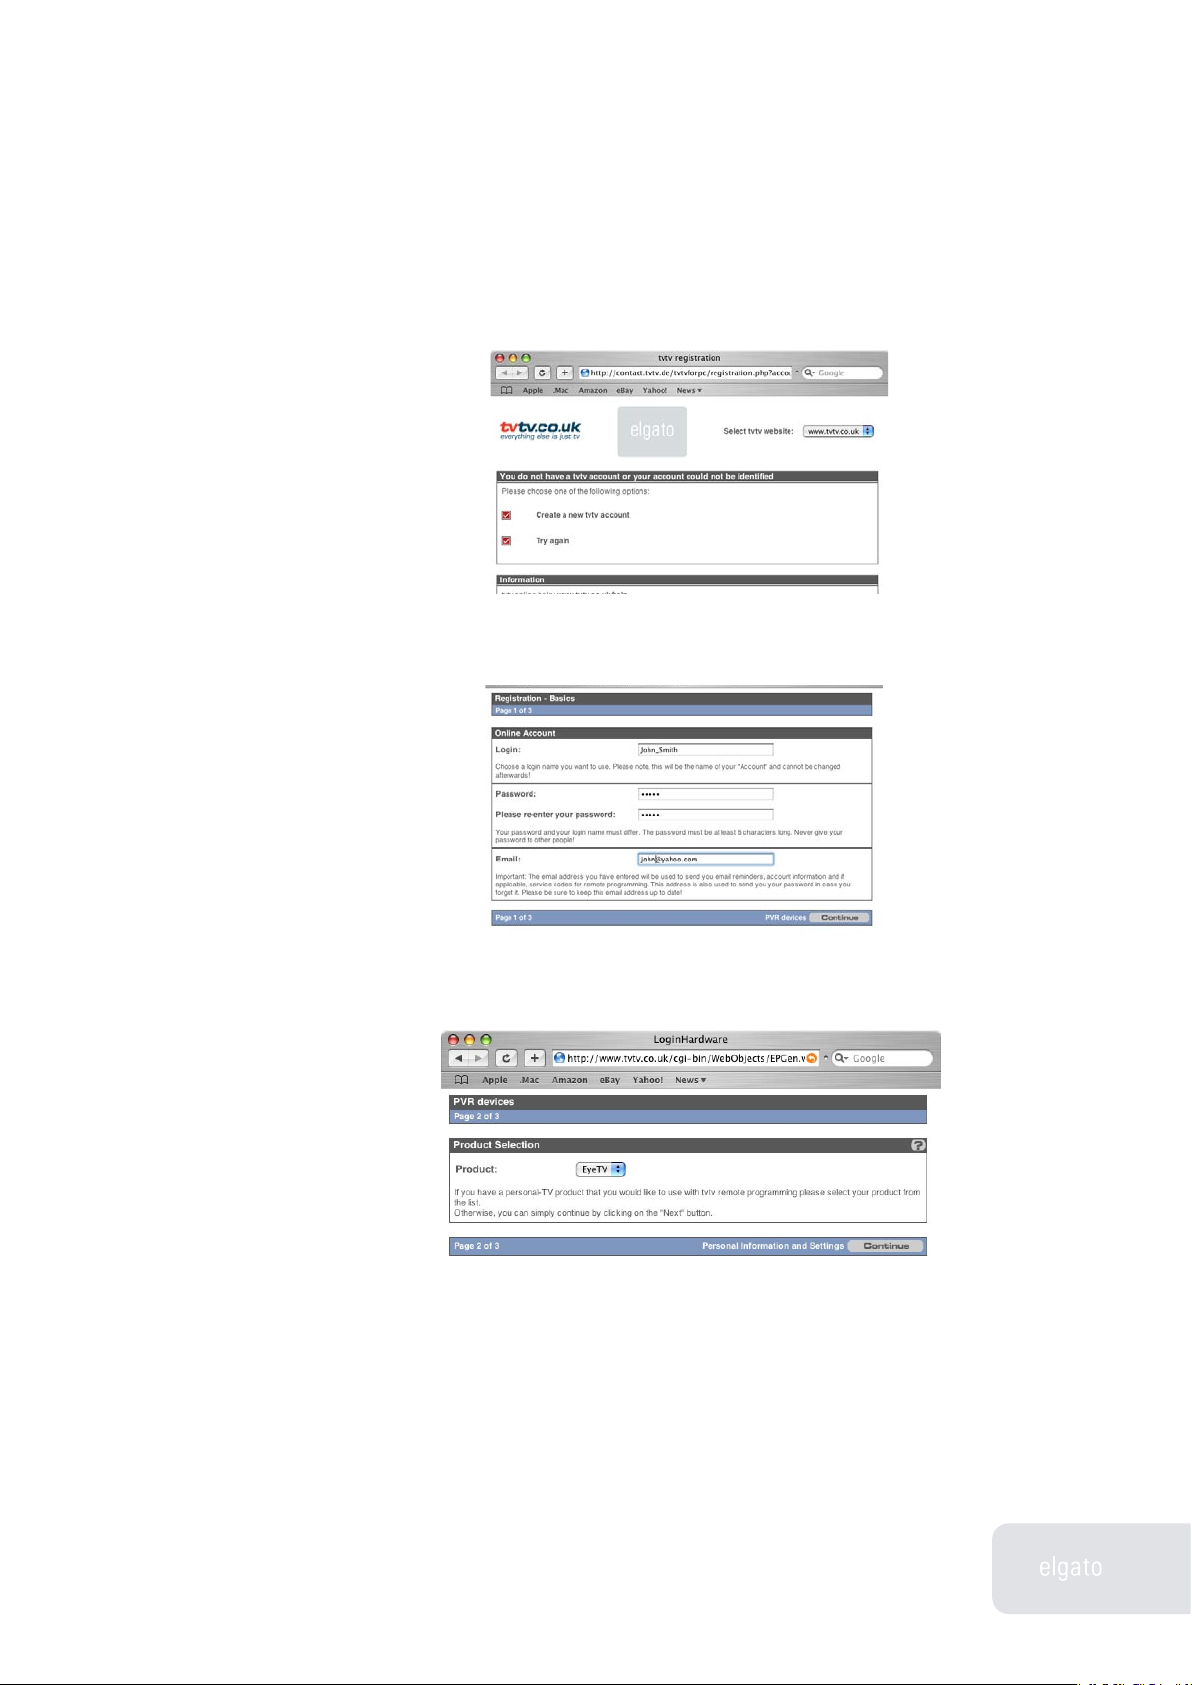
Steps of Registration
The EyeTV Setup Assistent will guide you through the registration process.
Below you will find some screenshots, showing you, how it works.
1. After choosing your device and country etc. you will get to this window
where you have to click on Register with tvtv.
Page 42
EyeTV Software Manual
Chapter 6 · Program Guide
41
2. Next you have to create a new tvtv account.
3. Choose an account name (Login) and a password. This one has to be confirmed. After inserting your email address, click Continue.
4. The next page shows you the used product: EyeTV. All you have to do is click
Continue.
Page 43

EyeTV Software Manual
Chapter 6 · Program Guide
42
5. On page 3 of 3 you have to enter your name and address and a few other settings before clicking Continue again.
6. Now, close the browser window to get back to the EyeTV Setup Assistent.
7. Back to the Setup Assistant you have to confirm your tvtv account and password. Then you can check the box for automatically checking for schedule
changes. Then click Next.
8. A window pops up showing you when your account expires.
Page 44

EyeTV Software Manual
Chapter 6 · Program Guide
43
9. Congratulations! Now you are registered and can use tvtv for scheduling programs.
Navigating through the Program
Guide
There are two main ways to view all of the programs available to you: By Date,
or by Filter.
View by Date
View Daily Programs - It’s easy to view current programming: Press the Daily
Programs button to view what shows are available all throughout the day. For
each channel, the grid is subdivided into Morning, Afternoon, Evening and
Night. The current 6 hour period will be expanded, with a listing of all upcoming
programs. If you wish to see what’s on at another time, simply click on that time
period, and additional programs will be displayed.
Change the Day of Your Grid - You can even jump ahead and see what’s on
tomorrow or any day up to 21 days in advance. Select a day and week by using
the controls at the top of the screen.
Program Description - Click the program’s title to view a description of that program.
Navigating the Category Tabs – You can filter your daily listings by using the
small tabs at the top of the screen. View your Main Channels, your Freeview
choices, or examine just the channels that fall into these categories: Entertainment, Kids, News and Business, Sport, and Music. You can also view Regional
Page 45

EyeTV Software Manual
Chapter 6 · Program Guide
44
Network programming, or even add More Channels to your listings.
View by Filter
On the left side of the screen is a Menu bar, which offers the following ways to
filter through programs:
Films – Choose from one of the many subcategories, from Comedy to Period
film. Today’s choices will be listed for all of your channels.
Series – Pick the genre, and tvtv will display all of the regular series that fall
into that area.
Categories – Navigate through a detailed hierarchy of program types, and narrow things down to just what you’re interested in.
For all three filters, you can adjust what channel information appears by selecting and deselecting channels from the grey bar at the top of the screen. As
with Daily Programs, you can choose from Main Channels, Freeview, Entertainment, Kids, News and Business, Sport, Music and Regional Networks.
You can also select a different day by using the 3 Week Time Line at the top of
the screen. Press the Show Selection button to confirm your choice.
Searching for Programs
At the bottom of the Menu bar is a box to enter your search terms. You can look
for a certain program title, actor, and category (comedy, medical, drama, etc.).
By selecting Profi Search, you can also narrow down the channels you’re exploring, and even create a Macro (saved search).
The results of your tvtv search, including the title, channel, as well as date and
time of the programs, will be displayed on a new page.
Page 46

EyeTV Software Manual
Chapter 6 · Program Guide
45
Automatically Recording
Programs
Record Icon – When viewing programs by date, if you click on a show’s
title you’ll see this icon. If you view listings by a certain filter, you’ll see it next
to every program scheduled for a future time. Pressing the Record icon sends
program information to the tvtv Job List. From there, it is stored until the next
time EyeTV synchronizes with tvtv. (See Chapter 7, EyeTV Preferences, Guide
Preferences).
Make sure that you name your EyeTV channels exactly the same as they appear in tvtv. Otherwise, when you synchronize, they will be set to Channel 0.
(See Chapter 7, EyeTV Preferences, Setup Preferences).
Page 47

EyeTV Software Manual
PreferencesChapter 7
Chapter 7 · Preferences
46
This chapter will show you how to use the EyeTV Preferences menu item
to configure EyeTV to your specific needs.
You can open the Preferences by clicking on the EyeTV menu and selecting
Preferences…, or by pressing z-, (comma). Here you can adjust your EyeTV
settings to suit your personal preferences. There are seven sections in the preferences dialog box: General, Recording, Controls, Guide, Display, Sound and
Device Settings.
General Preferences
Start EyeTV when device is plugged in - Check this box to have the EyeTV software launch automatically when you plug in the EyeTV unit to your Macintosh.
Uncheck this box if you prefer to launch EyeTV manually. If you want EyeTV to
wake from sleep, auto-launch, or boot the system for scheduled recordings, this
box must be checked (see Chapter 5, Advanced Recording Features).
Always open Live TV window at startup - Check this box to open a Live TV window whenever EyeTV is launched. If unchecked, EyeTV will remember the last
state of the window.
Preferences
Page 48

EyeTV Software Manual
Chapter 7 · Preferences
47
Automatically check for updates - Check this box if you’d like EyeTV to periodically check for software updates. If an update is posted, then you will be notified when starting EyeTV.
Display program information after channel changes determines how often the
blue overlay window is displayed. If you do not want the overlay to appear at
all, then select Never.
Recording Preferences
“EyeTV Archive” Location - By default, EyeTV stores its recordings inside the
user’s Documents folder, in a folder named “EyeTV Archive”. If you want to
change that location, you will have to physically move your EyeTV Archive
folder to a new location, using the Finder. Then, click Change to tell EyeTV to
use this new location. If no EyeTV Archive folder is in the new location, then a
new, blank Archive will be created.
Live TV Buffer Size - EyeTV sets aside a certain amount of disk space in the
EyeTV Archive in order to buffer live television. The higher the amount of disk
space, the longer EyeTV can pause live television, depending on the quality set-
Page 49

EyeTV Software Manual
Chapter 7 · Preferences
48
ting used. 2000MB is the default size, which represents different amounts of
time, depending on your EyeTV hardware, and the quality setting.
Keep Live TV Buffer in RAM – Checking this can improve system responsive-
ness, especially on lower-end Macintoshes. Press Change.... for Live TV Buffer
Size, to activate this feature.
Extend Recordings - This setting helps automatically recorded programs deal
better with slight variances in individual channels’ show start and stop times.
You can adjust the Start and Finish padding independently.
Controls Preferences
When navigating through video, you can use the left and right arrows to jump
forward and backward in the footage. Here you can customize how far these
jumps are in seconds.
Page 50
EyeTV Software Manual
Chapter 7 · Preferences
49
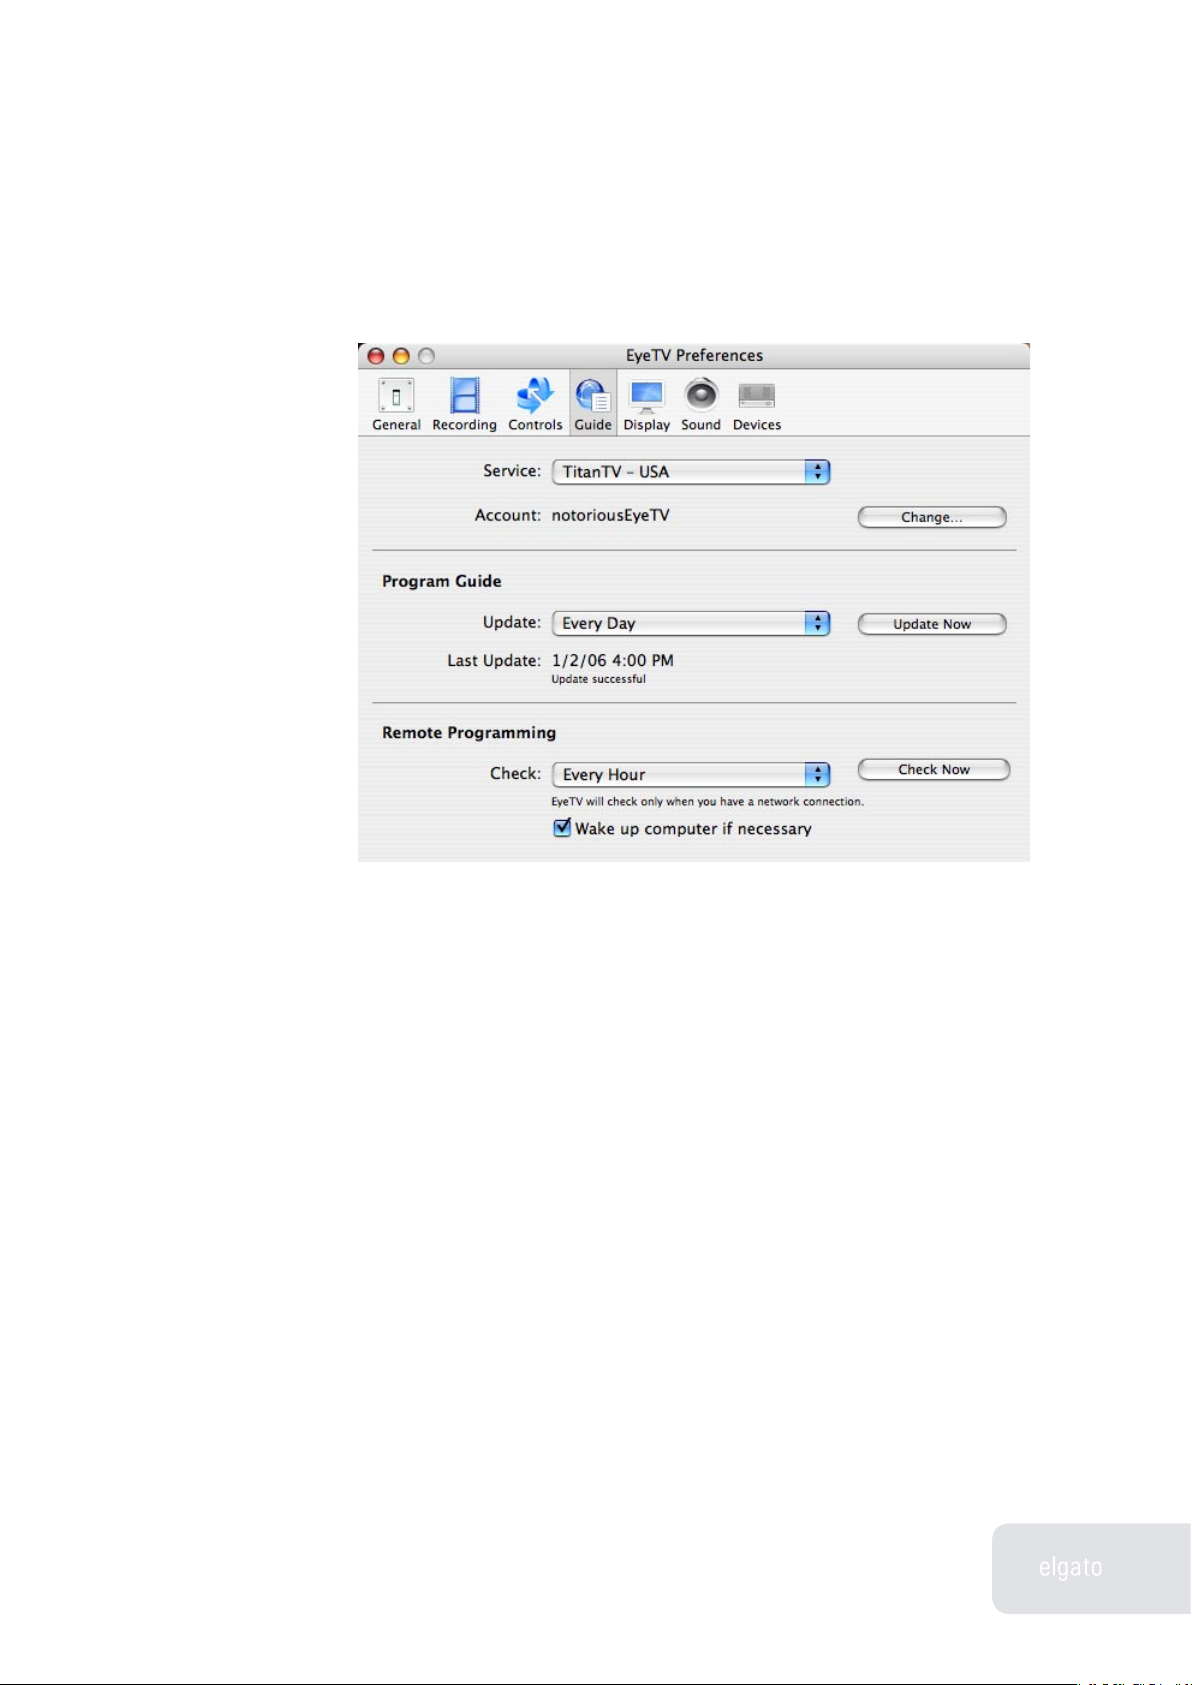
Guide Preferences
Program Guide
This is where you can manually select the service to use for your EyeTV Program Guide. Choose TitanTV if you are in the US, and that service will launch
whenever you press the Guide button on the EyeTV Controller or the Programs
window (see Chapter 6, The EyeTV Program Guide). For Europe, select your
country’s tvtv service. In Japan, choose one of the iEPG choices. In Australia,
IceTV is available.
Make sure to press press Change..., and enter the Account name and Password
you selected for that service.
Updating Guide
EyeTV needs to periodically check with the Online Program Guide, to download 7 days worth of information. Use the Update option to select Every Day or
Manually for your check.
Page 51

EyeTV Software Manual
Chapter 7 · Preferences
50
Remote Programming
You can choose to automatically check for schedules you may have added
using your guide’s website. This will happen when you have a network connection, and you can elect to wake up your Mac to check for schedule changes.
Display Preferences
Here you can adjust how the Viewer Window presents video.
Page 52

EyeTV Software Manual
Chapter 7 · Preferences
51
Overscan masks the edges of the window, to hide unwanted visual data.
Full Screen allows the video window to be stretched to fit screens wider than
4:3, as long as the original video occupied at least 75% of the screen area. The
tab key can be used to toggle stretching.
Deinterlace takes the visible lines usually present in an analog TV signal and
blends them together. Motion-Adaptive, the default, intelligently deinterlaces
when needed. You may want to turn Deinterlace off if you are going to have
EyeTV output directly to a TV set, like through your computer’s S-Video port.
Progressive Scan uses advanced motion detection, and doubles the frame rate,
which can significantly increase picture quality. A Mac with ample processing
power is needed for this feature.
Sound Preferences
Play sound when EyeTV is in background - Check this box to toggle sound on
or off when EyeTV is running in the background.
Play sound in the Dock - Check this box to toggle sound on or off when the
viewer window is minimized to the Dock.
Audio Output - Choose between System Sound Output (recommended), and
Digital Audio Output. System Sound works with OS X to intelligently route ana-
log or digital sound to the right output, while Digital Audio forces EyeTV to take
over your digital output, potentially causing problems if other applications are
also using digital out.
Page 53

EyeTV Software Manual
Chapter 7 · Preferences
52
Device Settings
Here you can adjust your hardware’s capture settings, including the Encoding
and Picture options. Specifics are included in the separate guide for your particular hardware.
Page 54

EyeTV Software Manual
Advanced FeaturesChapter 8
Chapter 8 · Advanced Features
53
This chapter will show you how to use some of the advanced features of
EyeTV.
EyeTV has been integrated with Roxio’s Toast 7 Titanium disc recording software to make it easy for you to archive your favorite shows onto Video CD
(VCD), Super Video CD (SVCD), or DVD.
Toast has a built in Media Browser. Select Media - EyeTV, and drag items from
the listing of EyeTV recordings to Toast.
To burn a disc from within EyeTV, using Toast:
• Open the EyeTV Programs window, choose the Recordings
section, and select the video recording you wish to archive by
clicking on it once to highlight it.
• Drag it from the Recordings section of the EyeTV Programs
window, to Toast’s Video section. Then, select what format
you want to use (VCD, SVCD, DVD) in Toast.
You can also highlight the recording, and then press the Toast button at the top
of the Programs window, or choose “for Toast” via the Export command.
Playing Video CDs
EyeTV can now playback Video CDs, just like any other QuickTime file. Video
CDs have DAT files, with titles like AVSEQ01.DAT, in a MPEGAV directory. Simply
drag and drop these DAT files onto EyeTV, or navigate to them and open them
up using the Open QuickTime Movie command in the File menu. The Video CD
will start playing automatically once a DAT file is opened. To quit the Video CD,
close its video window.
Advanced Features
Page 55

EyeTV Software Manual
Chapter 8 · Advanced Features
54
Opening QuickTime Movies
EyeTV can now play back any QuickTime movie, along with audio-only files.
Just use Open QuickTime Movie command in the File menu, and then you can
present the movie at any size you wish, even full screen. You can even play AC3
audio. QuickTime Pro is not necessary for this feature.
Exporting QuickTime Movies
All recorded programs can be exported to a QuickTime file for use in other programs. Perform the following steps to save a recorded program as a QuickTime
movie:
• Open the EyeTV Programs window and select the video
recording you wish to save by clicking on it once to highlight
it
• Choose Export... from the File menu, or from the Action menu
(which looks like a gear).
You will be presented with following screen:
Under Format, you will have a number of preset options: Email, Web, iMovie,
iMovie HD, iDVD, DVD Studio Pro, Toast, PSP (PlayStation Portable), iPod, and
iTunes. EyeTV will create the correct files for use with those applications.
You can also choose the specific format you prefer:
Page 56

EyeTV Software Manual
Chapter 8 · Advanced Features
55
MPEG Program Stream – The standard EyeTV format, creating a muxed MPEG
file (audio and video intermixed). Suitable for Toast.
MPEG Elementary Stream – Separate audio and video files, useful for importing
into other programs like DVD Studio Pro.
DV – Creates a DV file that can be used with iDVD, iMovie, Toast and other programs.
DV 16:9 – Creates a widescreen DV file that can be imported into iMovie HD,
Final Cut Pro or Express. Note that QuickTime 7 does not display the aspect
ratio correctly.
HDV 720p - Creates a High-Definition DV file for use in iMovie HD, or Final Cut
Pro/Express HD projects. Recommended if your content is HDTV 720p.
HDV 1080i - Creates a High-Definition DV file for use in iMovie HD, or Final Cut
Pro/Express HD projects. Recommended if your content is HDTV 1080i.
QuickTime Movie – Offers you full access to all possible QuickTime codecs, selected from the Options... button.
MPEG-4 – Re-encodes into MPEG-4 using Apple’s MPEG-4 codec. Recommended for converting to lower resolutions and for streaming applications.
H.264 – Re-encodes into MPEG-4 using Apple’s H.264 codec, offering high quality at lower bitrates.
3G – Re-encodes into MPEG-4 using Apple’s 3G codec. Recommended for playback on portable and handheld devices such as cell phones.
DivX AVI - This choice is available if you have downloaded the DivX plugin for
QuickTime. DivX is a popular variant of MPEG-4, with high quality and low storage requirements.
AAC Audio - Creates an AAC audio file that can be used with iTunes and other
programs.
Apple Lossless Audio - Creates an Apple Lossless audio file that can be used
with iTunes and other programs.
Page 57

EyeTV Software Manual
Chapter 8 · Advanced Features
56
Exporting To PSP (PlayStation Portable)
EyeTV can export footage to the PSP, in the correct resolution and format, be it
4:3 or widescreen. If you have letterboxed footage in EyeTV, you can use the
Aspect Ratio controls to select widescreen, and the exported footage will be
masked appropriately.
1) Highlight the recording you wish to export in the EyeTV Programs window.
2) Select Export from the File menu.
3) Choose the “for PSP” export format.
4) Save the file. The new file name, something similar to M4V50970.MP4, is
suitable for the PSP. Note - the numbers between “M4V” and the .MP4 extension need to be unique - another file on your Memory Stick can’t have the same
name.
5) Locate the exported .MP4 file, and the file with the same name, but a .THM
extension. That’s a thumbnail file that will show up on the PSP.
6) Connect your PSP to your Mac via a suitable USB cable.
7) Turn the PSP on, and use the directional buttons to move to the far left in the
interface, which is the Settings section. Then, move up or down, until you see
“USB Connection” option, and press the X button.
8) You PSP will connect to your Mac, and your Memory Stick will be mounted
on the Desktop, most likely with the name of “Untitled”
9) In the main level of your Memory Stick, look for a folder named “MP_ROOT”.
If it does not exist, create it.
10) In the MP_ROOT folder, there should be a folder named “100MNV01”. It is
does not exist, create it.
11) Place your exported .MP4 and its .THM file into the “100MNV01” folder.
12) If you’ve erased any files from your Memory Stick, make sure to empty the
trash to clear that space.
13) Unmount the Memory Stick from the Desktop, perhaps by highlighting it,
and then using Eject “Untitled” from the File menu
14) On the PSP, press the O key to disconnect from the USB bus.
15) Use the directional buttons to move to the Video section, and then select
your Memory Stick.
16) Your movie(s) will be listed - choose a thumbnail, and use the X button to
start playback.
Exporting To iPod (5G, iPod with video support)
EyeTV can export footage to iPods that support video, in the correct resolution
and format, be it 4:3 or letterboxed widescreen.
Page 58

EyeTV Software Manual
Chapter 8 · Advanced Features
57
The easiest way is to highlight the recording you wish to export in the EyeTV
Programs window, and then press the iPod button at the top of the EyeTV Programs window. That will export the file to a MPEG-4 format, and add it to an
“EyeTV” playlist within iTunes.
If you want more control over the file type, then use one of these two presets,
via the Export command from the File or Action menus.
The “for iPod (default)” preset encodes using Apple’s default QuickTime H.264
320x240 settings.
The “for iPod (recommended)” preset uses MPEG-4 compression, which encodes up to five times faster than H.264. The MPEG-4 preset also has higher
resolution output, which results in better quality, but generates a larger file. We
recommend this preset as it provides the best quality for viewing either on an
iPod screen or on a TV screen.
Neither preset requires QuickTime Pro. H.264 export requires QuickTime 7.0.3 or
later.
Here are the specifics of each preset:
iPod (default)
H.264 Video, 320x240 or 368x208, 600 kbps, 29.97 or 25 fps, baseline profile, multipass
MPEG-4 Audio, 48000 Hz, stereo, 128 kbps
iPod (recommended)
MPEG-4 Video, 544x408 or 640x360, 1500 kbps, 29.97 or 25 fps, one pass
MPEG-4 Audio, 48000 Hz, stereo, 128 kbps
Using EyeTV Exports With EyeHome
EyeHome, Elgato’s network media player, will automatically detect any EyeTV
recordings in your Programs window, for display on a TV. It can also play EyeTV
recordings exported to the MPEG Program Stream (MPEG-1, MPEG-2 or MPEG-
4) and DivX AVI formats, if those exports are placed in the Movies folder in your
Home directory.
EyeHome cannot play any HDTV content from EyeTV, or any EyeTV 500 content.
Page 59

EyeTV Software Manual
Chapter 8 · Advanced Features
58
EyeTV Archive
EyeTV recordings and schedules, along with other information about your
setup, are kept in the EyeTV Archive. The Archive is a normal folder, which has
to be called “EyeTV Archive” for EyeTV to use it.
You can move the Archive folder wherever you like, but you must tell EyeTV
where to look for it, in the Recording part of the Preferences.
Inside the Archive are a number of files, which have specific purposes:
EyeTV Archive.xml - Contains the overall structure of the Archive, for use with
other programs that need to understand the Archive’s contents. If erased, it will
be recreated upon restart.
EyeTVAutoTune.log - After an Auto Tune, information about the scanned frequencies is contained in this log. If you have tuning problems, sending this log
to Customer Support can help with troubleshooting.
Live TV Buffer.eyetv - A package containing .eyetvi and .mpg files, of which the
Live TV Buffer is consisted. These files will be erased and rewritten depending
on the state of the Buffer.
Furthermore, In the EyeTV Archive recordings and schedules are contained
within packages:
.eyetvsched - A package containing an .eyetvp file. It represents a schedule,
and will disappear when recording is complete. If a schedule repeats, then the
.eyetvsched package will remain.
.eyetv - A package containing .eyetvi, .eyetvp and .eyetvr files, along with an
.mpg of the actual recording.
A package is a container, similar to a folder, that can’t be examined by doubleclicking. To open these packages, right-click (or Option-click) and select Show
Package Contents.
Backing up an EyeTV recording or schedule is very simple - move the .eyetv
and .eyetvsched files with the corresponding names in and out of the Archive.
Restart EyeTV for the changes to take effect.
Page 60

EyeTV Software Manual
Chapter 8 · Advanced Features
59
You can also drag recordings from the Recordings section of the EyeTV Programs window, to the Finder. That will make a copy of that recording, in the
.eyetv format. Move that copy to wherever you like, even to another EyeTV
Archive.
If .eyetv files are moved elsewhere in the Finder, then double-clicking them will
launch EyeTV.
EyeTV Tips and Tricks
If you’re interested in finding new and exciting ways to use EyeTV, then please
visit our Tips and Tricks page:
http://www.elgato.com/index.php?file=support_tips
Included there are links to 3rd party applications that extend EyeTV’s capabilities.
Page 61

EyeTV Software Manual
Chapter 8 · Advanced Features
60
EyeTV Keyboard Shortcuts
Use the following keyboard shortcuts to control playback of live television or
pre-recorded programs. Note: The z key is marked with the Apple symbol on
most Macintosh keyboards.
Function Shortcut Key(s)
Play/Pause Space bar
Record
z–R
Stop
z–. (period)
Open Live TV Window
z–O
Open QuickTime Movie
z–Shift-O
Close Window
z–W
Show Info
z–I
Export
z–E
Enter Full Screen
z–0
Small Size Screen
z–1
Half Size Screen
z–2
Normal Size Screen
z–3
Maximum Size Screen
z–4
Open Editor Option–E
Fast Forward
z-→ (right arrow) (hold down)
Single Frame Forward
z-→ (right arrow) (tap once)
Slow Forward
z–Option-→ (right arrow)
Fast Backward
z-← (left arrow) (hold down)
Single Frame Backward
z-← (left arrow) (tap once)
Slow Backward
z–Option-← (left arrow)
Jump Forward → (right arrow)
Instant Replay ← (left arrow)
Go To Beginning
z–B
Go To Live
z–L
Channel Up +
Channel Down Last Channel
z–Shift–L
Volume Up
z–↑ (up arrow)
Volume Down
z–↓ (down arrow)
Mute
z–K
Program Guide
z–G
Show Info
z–I
Page 62

EyeTV Software Manual
Chapter 8 · Advanced Features
61
Tuner Input
z–T
A/V Input
z–V
Snapshot to Clipboard
z–C
Snapshot to Desktop
z–Shift–C
Aspect Ratio: Automatic
z–Option-0
Aspect Ratio: 4:3
z–Option-1
Aspect Ratio: 14:9
z–Option-2
Aspect Ratio: 16:9
z–Option-3
Aspect Ratio: Wide
z–Option-4
Closed Captions Control–Shift–C
EyeTV Help z–?
EyeTV Preferences z-: (semi-colon)
Page 63

EyeTV Software Manual
TroubleshootingChapter 9
Chapter 9 · Troubleshooting
62
This chapter will show you how to troubleshoot EyeTV.
Downloading Updates
Elgato is dedicated to making EyeTV a better product. We will be releasing updates to the EyeTV software periodically, that add new features and functionality to EyeTV, as well as fixing any bugs encountered. Please check the Elgato
web site often to download the latest version of EyeTV software at www.elgato.
com/support/downloads.html
Getting Help
Go To Help - EyeTV Help for links to detailed troubleshooting information for
EyeTV, including the Frequently Asked Questions, which contains an online
Troubleshooting database, at http://faq.elgato.com
If you are still experiencing problems after troubleshooting, you can get expert
help directly from Elgato by using our web-based Support Contact form at http://
www.elgato.com/support/supportcontact.html Our Support Specialists will get
back to you as soon as possible.
Version 3.0 Software only AS Jan 7 2006
Troubleshooting
 Loading...