

Page 1

Elgato Systems, LLC
EyeHome
User’s Guide
© 2004
Elgato Systems, LLC
900 Kearny Street, Suite 750
San Francisco, CA 94133-5145
USA
support@elgato.com
Page 2

Table of Contents
Chapter 1
Chapter 2
Chapter 3
Installation
Welcome to EyeHome 2
EyeHome System Requirements 2
Installing the EyeHome Software 3
Connecting EyeHome to a Television 3
Connecting EyeHome to a Network 4
Launching EyeHome for the First Time 5
Registering EyeHome Online 5
Using EyeHome
Login Screen 6
EyeHome Screen 7
EyeTV Screen 9
Movies Screen 10
Music Screen 11
Pictures Screen 12
Web Screen 13
Remote Control
Remote Control 14
Remote Commands 15
Chapter 4
Chapter 5
Chapter 6
Preferences/Setup
Setup Screen 19
Options 19
Network 21
Time 22
Update 22
Troubleshooting
Stopping EyeHome 23
Starting EyeHome 23
Resetting EyeHome 23
Loss of Image 24
Loss of EyeHome Server 25
Content Not Available 25
Downloading Updates 26
Getting Help 26
Technical Specs
EyeHome Specifications 27
Limited Warranty for EyeHome 29
1
Page 3

EyeHome User’s Guide
InstallationChapter 1
Welcome to EyeHome!
Thank you for purchasing EyeHome. This guide shows you how to use EyeHome
to transmit movies, music and pictures from your Macintosh to a television
set. It covers installing and configuring the EyeHome hardware and software,
and includes instructions for using the most common features of the EyeHome
system.
EyeHome System Requirements
EyeHome requires the following minimum system configuration:
• Any Mac with a PowerPC® G4 500 MHz or G5 processor
that meets Apple’s requirements for OS X support
• A built-in Ethernet port, or Ethernet card
• Mac OS X 10.3 or later, or 10.2.8 or later with QuickTime 6.4
or later and QuickTime for Java 1.4.1 or later (available via
system software update)
• Minimum 20 MB free hard disk space
• iPhoto, iTunes installed for viewing photo and music content
• EyeTV installed for viewing Personal Video Recorder (PVR)
content
• An Internet connection for some features (Web), and firmware
updates
2
Chapter 1 · Installation
Page 4

EyeHome User’s Guide
Step One: Installing the EyeHome Software
To install the EyeHome software:
• Insert the EyeHome CD into your CD/DVD drive.
• Launch the EyeHome installer, and follow the instructions (usually it
will take only a few minutes).
Once the installation is complete, the EyeHome Preference Pane will be
installed in the System Preferences. Use this control to turn the EyeHome server
on and off.
Step Two: Connecting EyeHome to a Television
EyeHome can export video to a wide variety of formats. Choose from the
following outputs, and then use the appropriate cables to hook EyeHome up to
your television (cables are not included):
Video (Europe):
• Composite - This is the basic video connection connection. It uses
a standard yellow-colored composite video cable with a RCA
connector.
• SCART - This is the standard European video-audio connection.
Video (North America):
• S-Video – This is the video connection that provides better picture
quality.
• Component - This is the best video connection possible. It uses
three cables (Red, Green and Blue) to transmit video data. Note: For
component to work, you must select Component in the EyeHome
Settings (See Chapter 4, Preferences/Setup). Otherwise, the screen
will have a blue tint.
• If your television or other display device supports HDTV video scan
rates, you can set EyeHome to use 480p, 720p or 1080i resolutions
with your component cables (See Chapter 4, Preferences/Setup).
Note: Do not use more than one video connection to EyeHome at a time. Picture
quality could be severely degraded.
3
Chapter 1 · Installation
Page 5

EyeHome User’s Guide
Audio:
• RCA audio (not needed if using SCART connection) – Use standard
red and white RCA audio cables to connect to your television.
• S/PDIF Optical - If you want the best audio possible, use this
connection if your audio receiver or television supports it.
Step Three: Connecting EyeHome to a Network
EyeHome must be attached to a network to operate properly. Audio and Video
data is transmitted from your Macintosh to EyeHome by a standard Ethernet
cable.
Connect the included Ethernet cable to EyeHome, and then to a hub, router, or
switch on the same network as your Mac.
Some example setups are:
• You have one Macintosh, connected to the Internet via broadband.
Connect EyeHome to the same hub, router or switch that your Mac
uses, or if you’re lacking Ethernet ports, purchase a compact switch
to connect EyeHome to your network.
• You have multiple Macs, connected to the Internet via broadband.
Connect EyeHome to a free Ethernet port on your hub, router or
switch, just like you would another Macintosh.
• You have one or multiple Macs, connected wirelessly to a Base
Station, which may be connected to the Internet in turn. Use the free
LAN (Local Area Network) port on your Base Station with EyeHome,
or connect EyeHome to the LAN attached to that port.
In case that you want to use your Mac wirelessly, Elgato recommends to use
the Airport Express wireless adapter to add EyeHome to an existing wireless 802.11g
wireless network.
If the network is properly constructed, then data should now be transmitted
between the EyeHome hardware and the EyeHome server.
If you don’t have a network, you can directly connect the EyeHome hardware to
your Mac via a cross-over Ethernet cable, which can be purchased separately.
EyeHome can take advantage of any Internet access you may have, either when
4
Chapter 1 · Installation
Page 6

EyeHome User’s Guide
using the Web section of the EyeHome interface (Chapter 2, Using EyeHome), or
to upgrade the firmware (Chapter 4, Preferences/Setup).
Launching EyeHome for the First Time
• Open the System Preferences in the Apple Menu, and then select
EyeHome.
• Start the EyeHome server by turning Media Sharing on.
• At the top of the Sharing Preferences, give your Macintosh a more
descriptive name. This is how EyeHome will identify your Mac on
the network. EyeHome uses Apple’s Rendezvous technology to
automatically find your Macintosh’s name.
• Turn on your TV, and select the correct A/V input.
• After plugging in the power cord your EyeHome hardware should
turn on automatically. If not, turn on the EyeHome hardware using
the included remote.
• The EyeHome startup screen will appear on your TV.
• Your EyeHome server should show up with your chosen Rendezvous
name. Select it to start using EyeHome.
Registering EyeHome Online
Registering EyeHome entitles you to the following benefits:
• Notification of product updates
• Technical support
• Special Offers
To register:
• Open your web browser and go to
http://www.elgato.com/
eyehome/register.html
• Enter the requested information and click the “Register” button.
5
Chapter 1 · Installation
Page 7
EyeHome User’s Guide
Using EyeHomeChapter 2
This section describes the functions of the EyeHome interface.
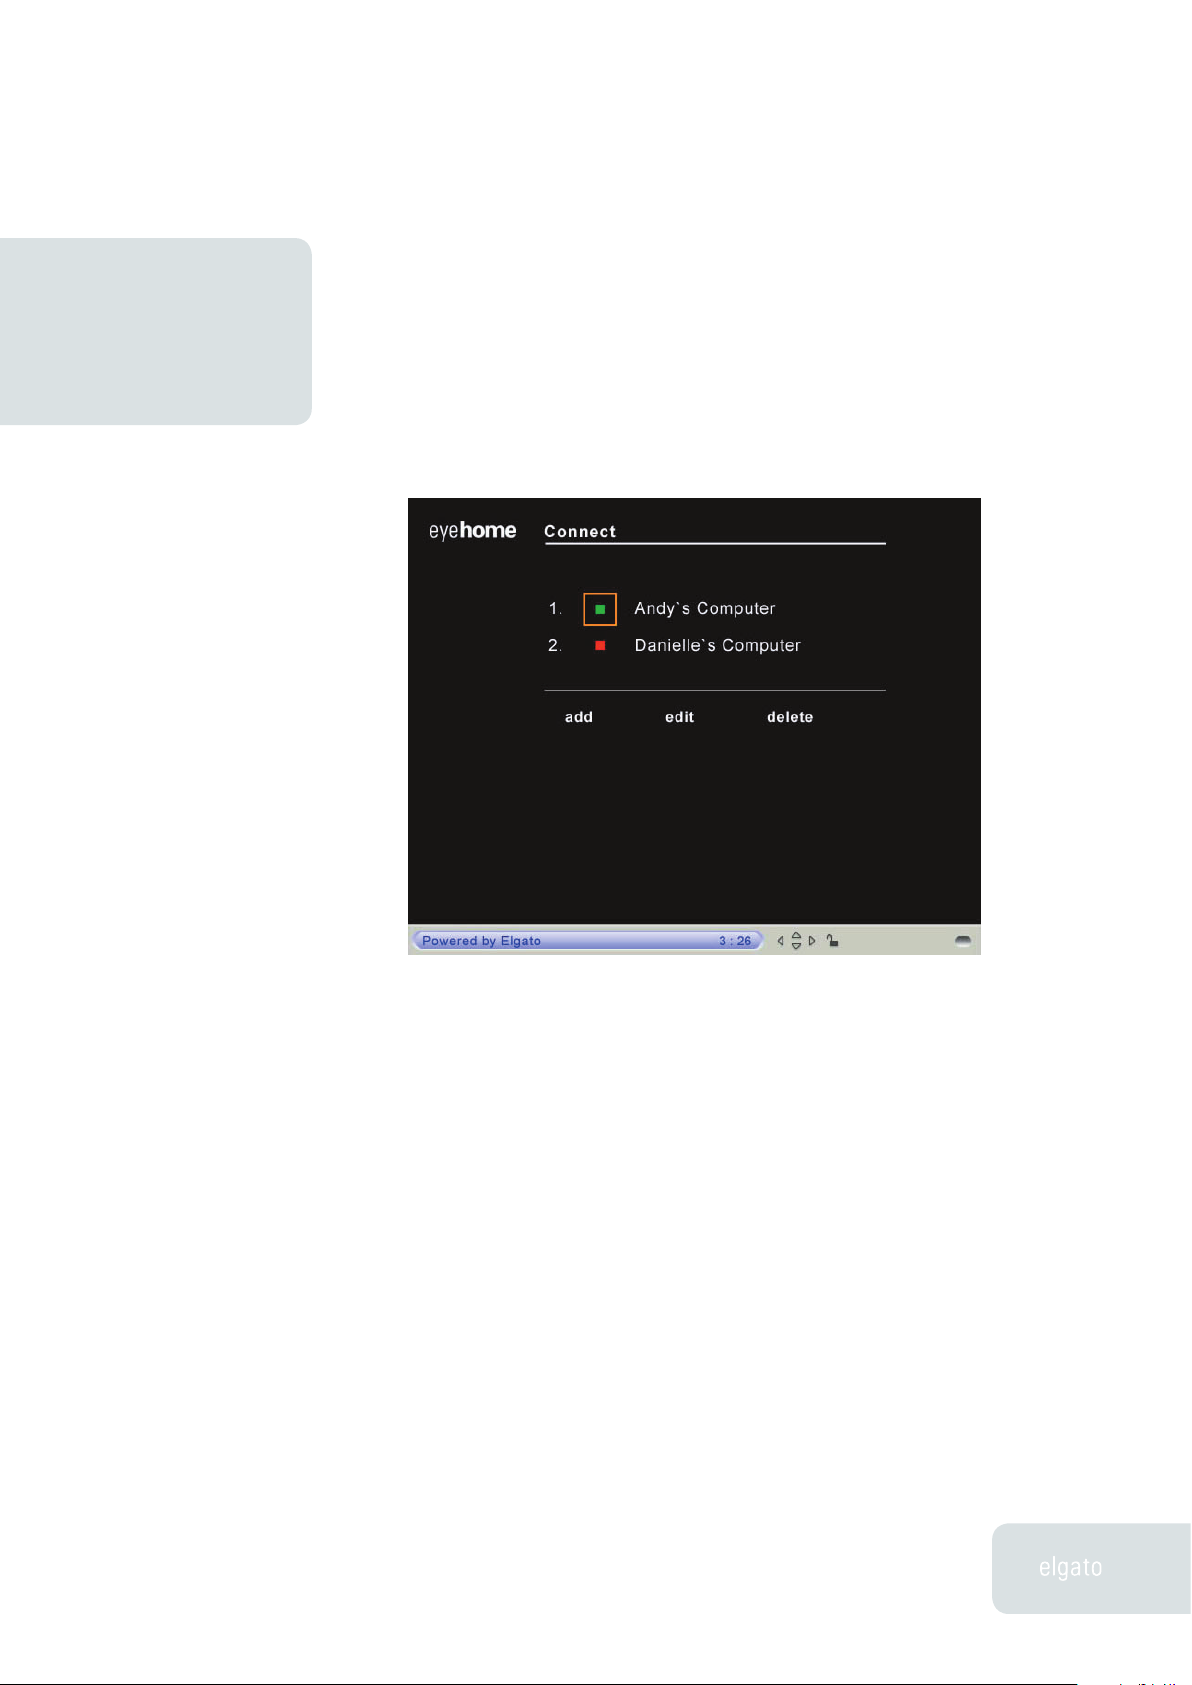
Login Screen
When you turn on the EyeHome unit, you will see a startup screen, followed
by the Login screen. This is where you connect to the various Macs that are
running EyeHome software on your network — and add, edit or delete links to
these Macs if necessary.
• Add – Usually, the EyeHome hardware will detect EyeHome software
running on your Macintosh using Apple’s Rendezvous technology. If
your Mac doesn’t show up, you can manually add it. Enter a name to
identify that Macintosh, along with the IP address that can be found
in the Network Preference Pane. You can use the alphanumerical
keypad on the remote to enter letters, numbers and characters.
• Edit – If you want to give your Macintosh another name, or if the
IP address of your Macintosh ever changes, you can adjust the
information in EyeHome by using this function.
6
Chapter 2 · Using EyeHome
Page 8

EyeHome User’s Guide
• Delete – To remove unwanted links to EyeHome servers, press the
Delete button, and then check off those you wish to remove.
Once your Macs running EyeHome software are listed, there will be a colored
circle next to them. If the circle is Red, then that means the EyeHome hardware
has not yet detected that Mac. Once the circle turns Green, you can then login
to your EyeHome.
After selecting your EyeHome, it will take a few seconds before the main
EyeHome screen appears.
EyeHome Screen
The EyeHome interface is a convenient and powerful way to manage and use
the video, audio and photos on your Macintosh. Instead of searching for various
digital media stored around your Macintosh, everything is presented on your
television for easy use.
EyeHome categorizes your media into the following sections:
• EyeTV - All of your stored EyeTV recordings, sorted alphabetically
• Video - Whatever QuickTime files that are in your Movies folder.
7
Chapter 2 · Using EyeHome
Page 9

EyeHome User’s Guide
Specifically, MPEG-1 (.mpg), MPEG-2 (.mpg, .vob), MPEG-4, DIVX,
3IVX and XVID are supported. Other codecs used in .mov files are
not supported. Aliases to content stored elsewhere are supported.
• Music - Your entire iTunes library, sorted by playlist. Other items
in your Music folder will also show up. Aliases to content stored
elsewhere are supported.
• Photo - Every image in your iPhoto library, sorted by album. Other
items in your Pictures folder will also show up. Aliases to content
stored elsewhere are supported.
• Web - Safari bookmarks, as well as pre-chosen links
Jumping from one medium to another is a simple remote press. Instead of
having to start up different applications, EyeHome can play back everything,
formatted especially for your television.
To change sections, simply press the color-coded buttons on the remote, or
use the arrow keys to navigate, and the OK button to choose. Once a section is
active, you can press the right arrow key to start the selection process. Note
that the top of the screen has context dependent commands, like Play All, Back,
or Search, depending on your choice.
If you plan on using EyeHome for an extended period of time, you should set
your Energy Saver preferences not to sleep your hard disks. This will make sure
that the connection to the EyeHome server stays open.
8
Chapter 2 · Using EyeHome
Page 10

EyeHome User’s Guide
EyeTV Screen
EyeHome is designed to integrate with EyeTV. Specifically, you can view all of
the recordings stored on your Mac that appear in the EyeTV Programs window.
The recordings are listed alphabetically by title, along with the date of the
recording. You cannot watch live TV through EyeHome. Therefore, EyeTV does
not need to be connected to your Macintosh when you use EyeHome.
9
Chapter 2 · Using EyeHome
Page 11

EyeHome User’s Guide
Movies Screen
EyeHome will display the video files stored in your home directory’s Movies
folder. Aliases to content stored elsewhere are supported. Folders within
the Movies folder are displayed with a triangle in front of the folder’s name.
EyeHome can play back many file types: MPEG-1, MPEG-2, MPEG-4, DIVX, XVID
and 3IVX movie files are supported.
Not all QuickTime formats are supported. Only .mov files using the above codecs
are supported.
You can search through your video library by using the Search command at the
top of the screen. You can also use Random to shuffle through the files in the
current directory.
10
Chapter 2 · Using EyeHome
Page 12
EyeHome User’s Guide
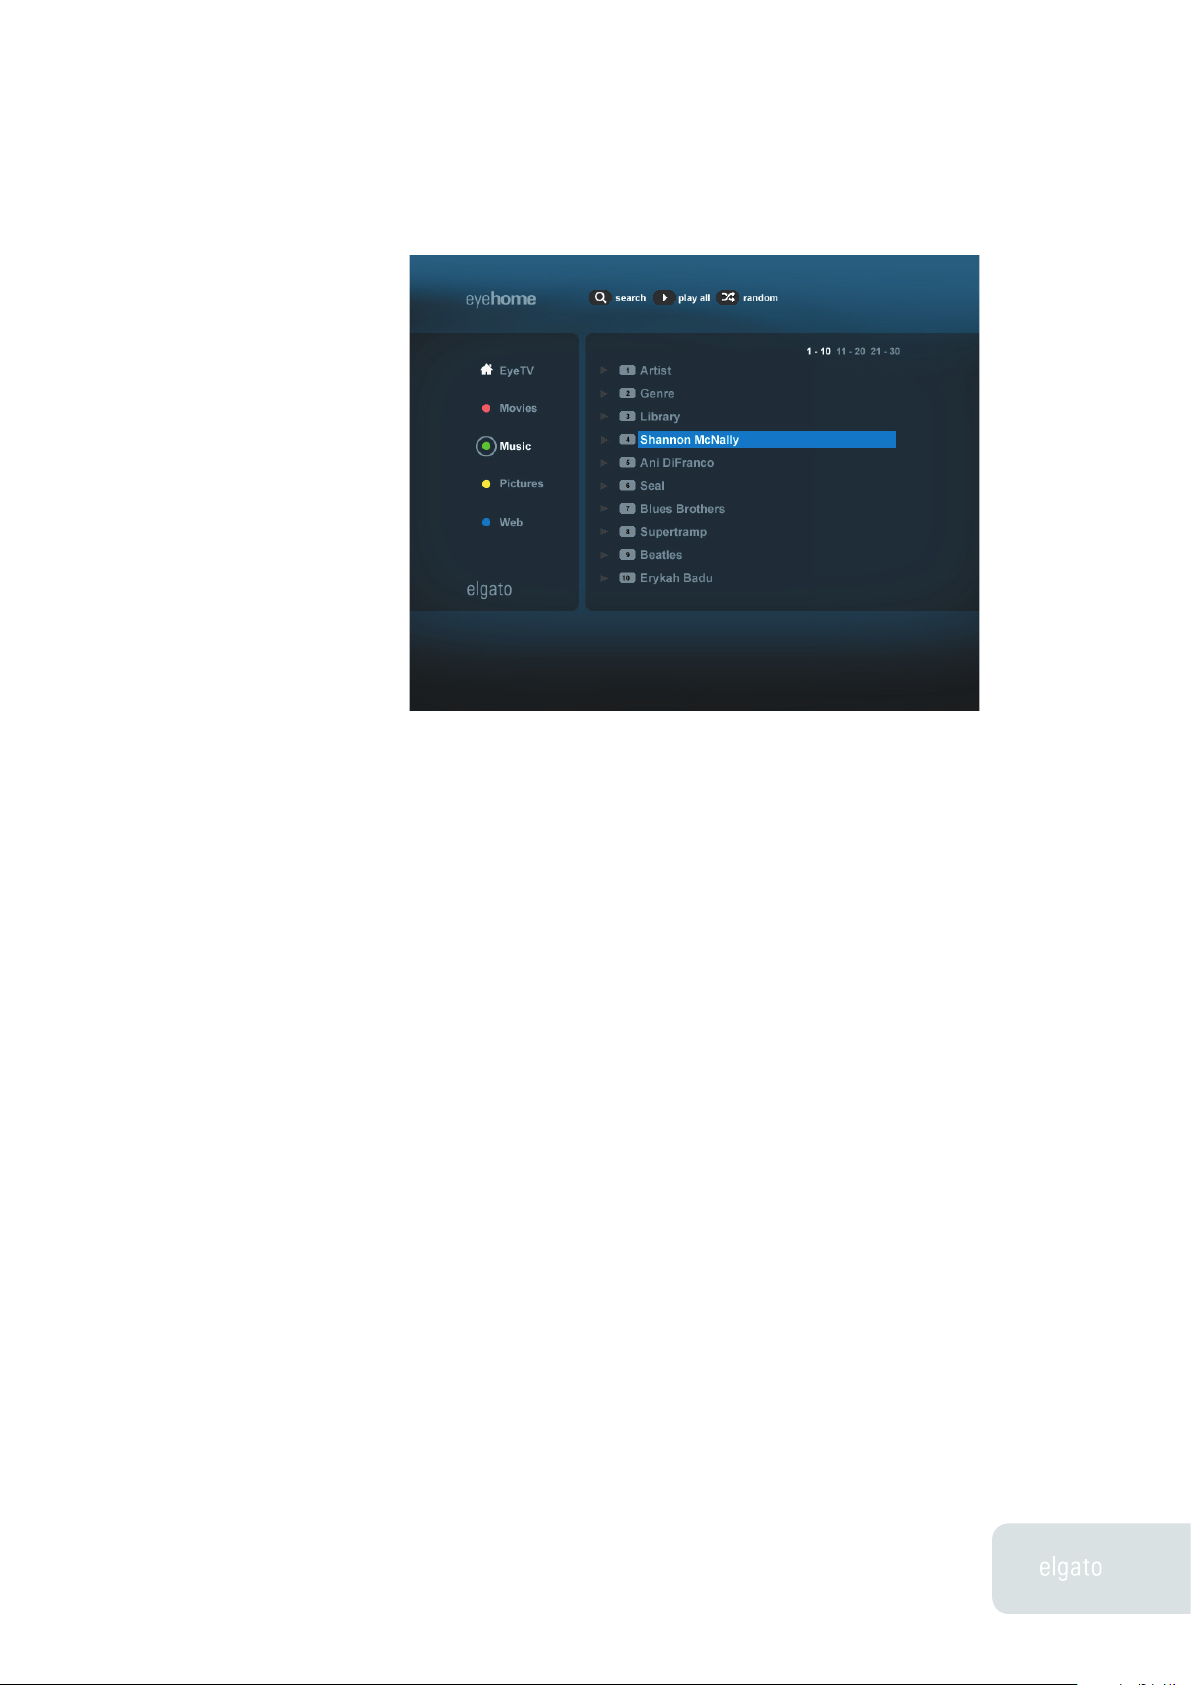
Music Screen
EyeHome has extensive integration with iTunes. All of your iTunes playlists are
displayed alphabetically. After selecting one, you can select individual tracks,
or use the Play All button at the top of the window to play the whole list. You
can also search for individual tracks, artists or albums.
There are four special playlists in EyeHome – Album, Artist, Genre and Library.
• Artist lists all of the artists in your collection, and you can select one
to see their music.
• Album lets you view your tracks by the recording they are from.
• Genre sorts everything by the type of music.
• Library lists every track in your iTunes library alphabetically.
Smart Playlists will also show up in EyeHome, if they contain at least one song.
Recently Played and Top 25 Most Played are two examples, and you can make
your own using the File menu of iTunes.
Once you select a track, its title is displayed on screen as it plays, along with a
slide show. If you want to change the pictures displayed during the music slide
show, simply create an album in iPhoto called “EyeHome Music”. Any pictures
11
Chapter 2 · Using EyeHome
Page 13

EyeHome User’s Guide
placed in that album will play when you select music in EyeHome.
Other folders and tracks in your Music folder will also show up, after your
iTunes playlists. Aliases to content stored elsewhere are supported.
EyeHome will play unencrypted .wma files that are kept in your Music folder.
EyeHome will play Ogg Vorbis .ogg files that are kept in your Music folder.
EyeHome supports .pls files that are placed in your Music folder. These files
link to Internet Radio stations. It does not support .m3u files at this time.
iTunes Music Store tracks are currently unsupported.
12
Pictures Screen
Your entire iPhoto library is viewable in EyeHome. You can select any of your
albums, and view individual pictures, or the whole album as a slideshow.
If you associate music with a certain album’s slideshow in iPhoto, that music
will play in EyeHome. You can do this by highlighting an album in iPhoto,
pressing the Slideshow button, and then selecting a music track. EyeHome
Chapter 2 · Using EyeHome
Page 14

EyeHome User’s Guide
does not support associating a playlist with an album, just individual songs. If
a picture is not in the iPhoto library, but is still in the Pictures folder, it will be
available to EyeHome. Folders of pictures will show up alphabetically via name,
and individual pictures will be grouped together in a Pictures folder in the
EyeHome interface. Aliases to content stored elsewhere are supported.
You must have at least one user-created album in iPhoto for your pictures to
show up in EyeHome.
13
Web Screen
This area has 4 main categories, each with a particular function. This section
will only work if EyeHome is connected to the Internet.
• Web Bookmark - All of the Safari bookmarks listed in your Bookmark
Bar will appear here. Choosing one launches the EyeHome built-in
browser, and will bring up that site.
• Web Directory - A selection of websites, broken down into
Entertainment, Shopping, Tech and Gadgets, Reference, Travel,
Classifieds, Greeting Card and Home Family. Each one has up to 10
useful selections.
• Radio - An extensive catalog of streaming Internet radio stations.
• News - News sources from around the Internet
Chapter 2 · Using EyeHome
Page 15
EyeHome User’s Guide
EyeHome Remote ControlChapter 3
This chapter will show you how to use the EyeHome remote control to navigate
through the EyeHome interface.
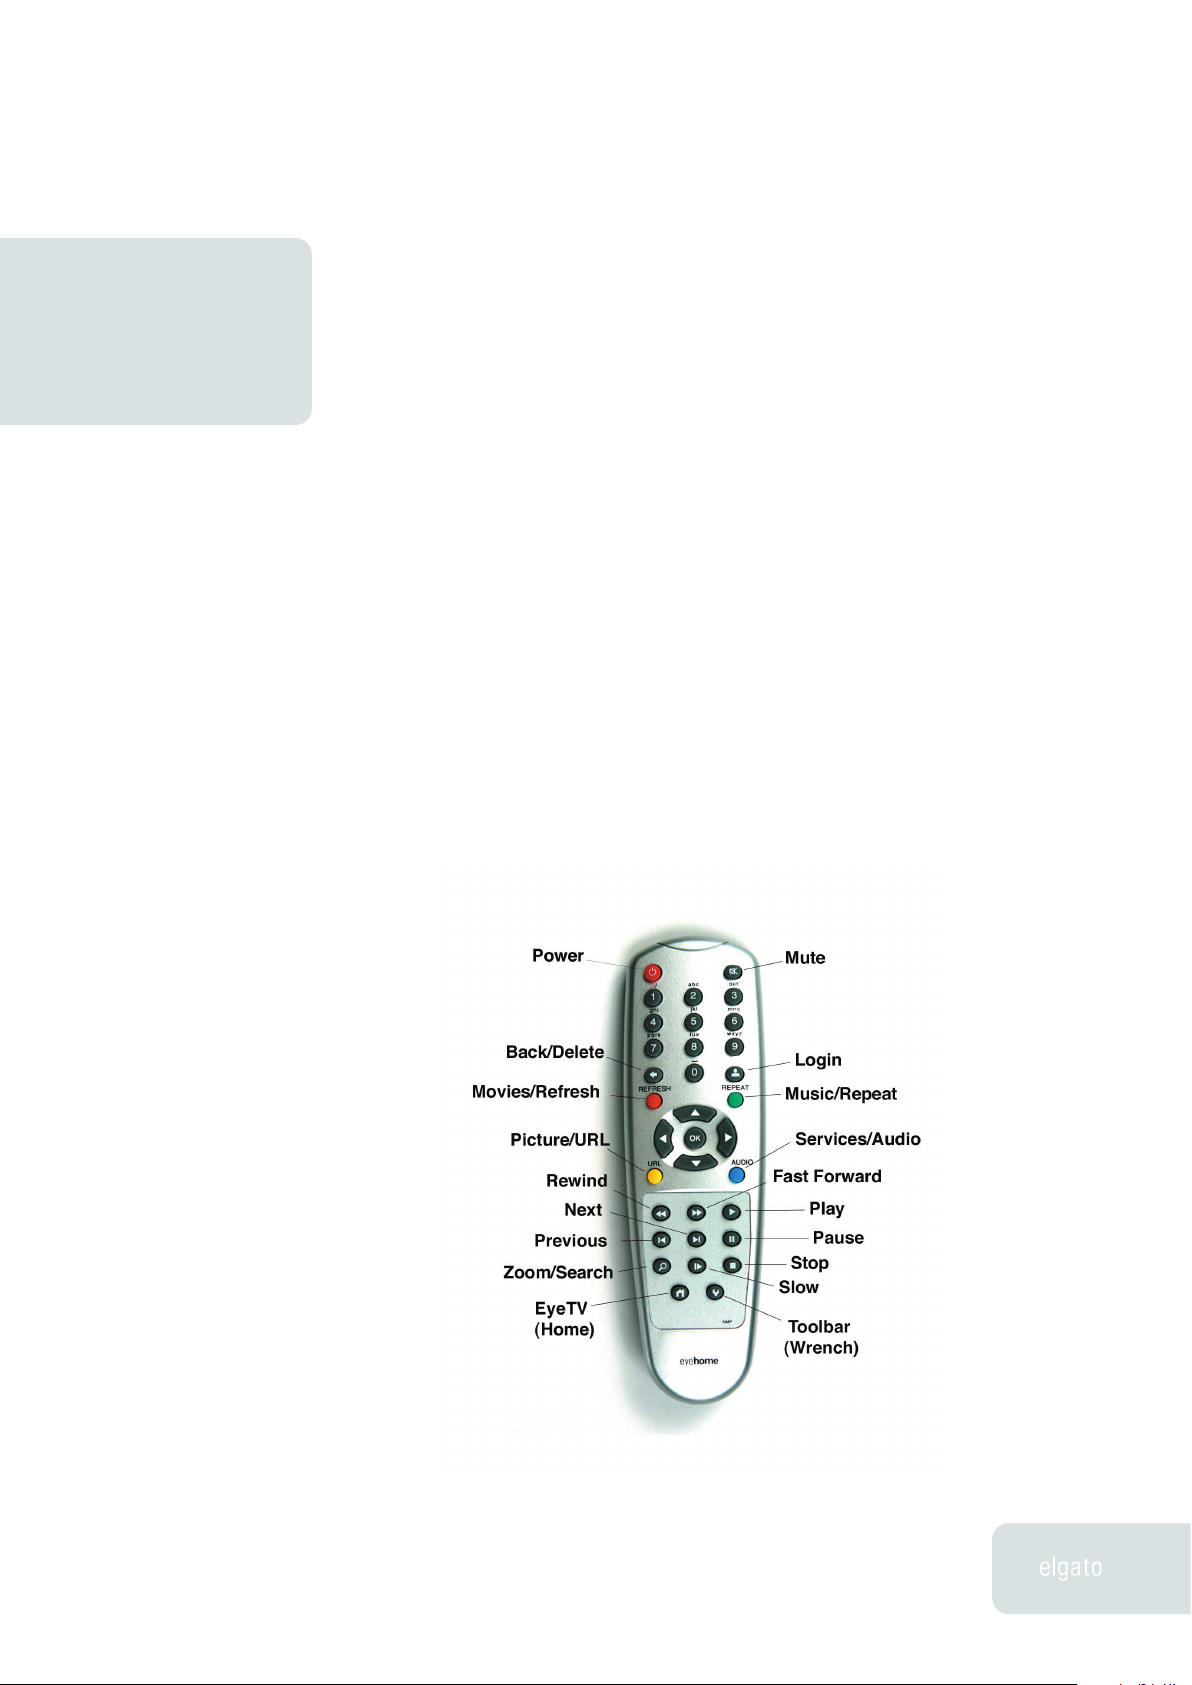
Remote Control
The EyeHome remote control is designed to offer you full and easy access to all
parts of EyeHome. Most keys are the same as what you’d find on a multifunction
remote, while a few have context-dependent functions.
Each remote control key is described in detail below.
14
Chapter 3 · EyeHome Remote Control
Page 16

EyeHome User’s Guide
Remote Commands
Power
• Turns the EyeHome box on and off.
Mute
• Temporarily silences playback. Press again to bring back sound.
Numbers – The number keys have two main functions:
• Allows entry of alphanumerical data into fields. When a text field is
active, press a number key once to enter that number, or multiple
times in a row to cycle through the characters associated with that
key.
• Eases selection of content. In all of the EyeHome sections, each
item has a number. Enter that number with the keypad to select it,
instead of using the arrow keys and OK button.
Back/Delete (Arrow left)
• Removes previous character, or goes to the last page.
Login (Person)
• Brings up Login page.
Left Arrow
• Moves backward in Movie or Music by percent.
Right Arrow
15
• Moves forward in Movie or Music by percent.
Chapter 3 · EyeHome Remote Control
Page 17

EyeHome User’s Guide
Up Arrow
• Increases volume during Movie or Music playback.
Down Arrow
• Decreases volume during Movie or Music playback.
Red (Refresh)
• Goes to the Video section.
• Refreshes the screen when viewing a web page.
Green (Repeat)
• Goes to the Music section.
• Repeats current track, movie or playlist; Repeat One, Repeat All,
Repeat Off are the choices.
Yellow (URL)
• Goes to the Photo section.
• Brings up the URL bar, to enter web addresses.
Blue (Audio)
• Goes to the Web section.
• Toggles between Stereo, Mono Left and Mono Right.
Arrows
16
• Navigates through the interface.
Chapter 3 · EyeHome Remote Control
Page 18

EyeHome User’s Guide
OK
• Selects the currently highlighted item.
Rewind
• Fast Reverses playback of Video content.
• Moves to the previous page of choices.
Fast Forward
• Fast Forwards playback of Video content.
• Moves to the next page of choices.
Play
• Starts Music or Video playback.
• Selects “Play All” if present on screen.
Pause
• Freezes Music or Video playback.
Previous
• Goes to the previous Music track, Video file or Photo.
Next
• Goes to the next Music track, Video file or Photo.
Zoom (Search)
17
• Adjusts the aspect radio of a movie – 4:3 letter box, 4:3 pan scan,
16:9, Actual Size, Fit To Screen or Full Screen.
• Selects “Search” if present on screen.
Chapter 3 · EyeHome Remote Control
Page 19

EyeHome User’s Guide
Slow
• Slows down Video playback.
Stop
• Stops music, video, or slideshow playback.
Home
• Goes to the EyeTV section.
Toolbar (Wrench)
• Brings up toolbar; Setup is last choice on right (wrench).
• Brings up information about currently playing file.
18
Chapter 3 · EyeHome Remote Control
Page 20

EyeHome User’s Guide
Preferences/SetupChapter 4
This chapter describes how to use the EyeHome Setup screen.
19
Setup Screen
If you press the Wrench button on the remote, and then select the Wrench icon
on the far right, you will be taken to the Setup screen.
The Setup screen has four main sections: Options, Network, Time and Update.
Each section has settings that affect your EyeHome experience.
Options
The options section controls many aspects of your EyeHome’s visual
presentation. Note that you need to scroll down to the bottom of the screen to
access some of the options, and to save any changes. Use the up/down keys on
the remote control to navigate.
Chapter 4 · Preferences/Setup
Page 21

EyeHome User’s Guide
• Screen saver – You can set EyeHome to wait from 1 minute to 1 hour
before the screen saver begins. To exit the screen saver, press any
key on the remote.
• System/Encoding language – English is the standard language,
but you can also change the character encoding to what’s used in
China, Taiwan and Japan.
• Internet security – This applies to when you use EyeHome’s built
in browser to make encrypted connections, like during an online
purchase. SSL2 is the default, and you can also choose SSL3 or
TLSV1/SSL2/SSL3. There usually isn’t any reason to change this
setting.
• Video settings (Europe) – This determines which video ports are
being used to connect to your TV. SCART PAL is the default, and you
can also choose SCART NTSC or Composite PAL and NTSC.
• Video settings (North America) - The default is Composite/S-Video
NTSC. You can also choose Component NTSC or one of the three
HDTV component standards – 480P, 720P or 1080i. Check with your
TV’s manual to see what video modes it supports.
• Video zoom – This applies whenever you are watching video
content. The default is Fit to screen, but you can also choose Full
screen, Actual size, 4:3 Letter Box, 4:3 Pan Scan or 16:9. You can
also cycle though these choices during video playback by using the
Zoom button on the remote.
• Browser options – You can use this to turn Compact Browser
mode on and off. Leaving this off is recommended for maximum
compatibility.
• Sound options – Here you can turn Typing, Navigation and System
alert sounds on or off.
20
After you chose the settings you like, please press the Save button to apply
them. In some cases you will be prompted to restart the EyeHome hardware.
Chapter 4 · Preferences/Setup
Page 22

EyeHome User’s Guide
Network
When connected to your network, EyeHome will automatically acquire an IP
address from a DHCP server. The EyeHome hardware finds Macs running the
EyeHome software using Apple’s Rendezvous technology.
If you connect your EyeHome directly to your Macintosh via a cross-over
cable, then set your Ethernet interface (in the System Preferences’ Network
Preference) to use DHCP. Then, EyeHome and your Macintosh will automatically
be assigned default IP addresses, and EyeHome will be available via
Rendezvous.
If for some reason you need to assign EyeHome an IP address manually, then
follow these instructions:
First, press the Switch to Manual button, which allows for manual entry of the
addresses.
Choose an IP address that is different from other computers, printers and
various devices on your network. Changing the last group of numbers of an
existing IP address might be an easy way to do this. For example, if your
Macintosh has the IP of 10.10.100.02, then try a number like 10.10.100.03. Do not
end this IP address with 1 or 255.
You’ll also need to enter the following information, which can be found in your
Macintosh’s Network Preference Pane:
• Subnet Mask - This is another number in IP address form.
255.255.255.0 is the usual setting for most home user networks.
• Primary DNS - This is the IP address of your Domain Name Server
(DNS). That server, usually associated with your ISP, resolves
alphanumeric domain names (like
address.
www.elgato.com) into an IP
21
• Secondary DNS - This is the IP address of your backup DNS.
• Default Gateway - The IP address of the gateway or router on your
network.
Chapter 4 · Preferences/Setup
Page 23

EyeHome User’s Guide
You should enter the above information exactly as it appears in your Network
Preference Pane. Only EyeHome’s IP address will be different.
Time
EyeHome automatically sets its internal clock by using a Network Time Protocol
server. You can change what server is used here, along with your Time Zone
and Daylight Savings time settings.
The Primary NTP sever is time.apple.com, and the Secondary NTP Server is
time.nist.gov.
Update
Occasionally, the software that runs inside the EyeHome unit needs to be
updated. This firmware program can be downloaded, and automatically written
to EyeHome.
When the EyeHome software is updated, via a download from www.elgato.com,
you may also be instructed to also use the Update screen to download new
firmware.
The Roll Back Firmware button reinstalls the last firmware version your
EyeHome unit was using.
For troubleshooting purposes, you can locate your exact firmware version by
looking at the very bottom of the Options section.
22
Chapter 4 · Preferences/Setup
Page 24

EyeHome User’s Guide
This chapter will show you how to troubleshoot EyeHome.
Stopping EyeHome
To stop EyeHome, you should turn off the EyeHome hardware using the power
button of the remote control. Then, you can power down your television, or
change its video input to another choice. You can also turn off the EyeHome
software (media Sharing) in the EyeHome control panel in System Preferences.
TroubleshootingChapter 5
Starting EyeHome
When you want to use EyeHome, first make sure that the EyeHome software is
running (Media Sharing On). If you’ve added new video, audio or photo content
to your Mac, and you want it to show up in EyeHome, then stop the EyeHome
software in System Preferences, and then restart it.
Once the EyeHome software is active, then turn on your television and select
the appropriate video input for the EyeHome hardware. Finally, turn on the
EyeHome unit by using its remote control, and the login screen will appear
shortly thereafter.
Resetting EyeHome
To reset the EyeHome hardware, turn it off, and then turn it back on. If that
doesn’t help, then turn it off, and unplug the power and network cables.
Reattach the network cable, then the power cord, and finally restart the
EyeHome hardware.
To reset the EyeHome software, go to the EyeHome control panel (in the System
Preferences), and stop the server, then start again. It will take about 15 seconds
before the EyeHome hardware can connect with the EyeHome server.
23
Chapter 5 · Troubleshooting
Page 25

EyeHome User’s Guide
Loss of Image
If you’re not able to view the EyeHome interface on your TV, then try these
steps to get things working again:
• Power - Make sure that the EyeHome unit is on, by checking the
status LED on the front right of the hardware. If it is lit green, then
the box is receiving power. If nothing happens, after you press the
Power key on the remote, then check to make sure that: 1) The
EyeHome unit is plugged into a power outlet, 2) The power cable
is firmly seated into the hardware, and 3) Your outlets are still
powered. Also confirm that the batteries in your remote are present,
and still operational.
• Input/Output - Confirm that your TV is on, and that the video cables
are connected to the EyeHome unit and the proper input jacks
on your TV. Check to see if your TV is set to receive video with
that input. Also, it’s possible that EyeHome’s video output signal
resolution is set incorrectly, or for a format that your TV does not
support. In this case, you can reset EyeHome back to “Composite/SVideo NTSC” (for the US) or SCART PAL (for Europe and Australia)
output by pressing the Slow key on the remote, followed by “1-2-34”. Now you can go to the Setup screen (via the Wrench button) and
choose the correct video output format.
24
• Server - Open the EyeHome Preference Pane, in the System
Preferences of OS X. If Media Sharing is off, start it. If it is on, then
stop it, and start again. Look up your Macintosh’s Rendezvous or
Macintosh name in the Sharing part of the System Preferences.
You can also check to see if the EyeHome software is broadcasting
by opening a web browser on your Mac, and then entering
//localhost:8000, which will bring up the EyeHome interface, along
with a message “Unauthorized access. Please try again.” That
means the server is running properly.
• Firewall – Make sure that port 8000 is open, or else EyeHome won’t
be able to contact its server. You can adjust Firewall settings with
the Sharing Preference Pane. If necessary, use the New button to
add EyeHome’s port.
Chapter 5 · Troubleshooting
http:
Page 26

EyeHome User’s Guide
Loss of EyeHome Server
If you are using EyeHome, and then suddenly can’t connect to any of your
content, then it is likely that your EyeHome server is either off, or somehow
interrupted. Therefore, check for the following circumstances:
• Server Off – Open the EyeHome Preference Pane, in the System
Preferences of OS X. Confirm that Media Sharing is on. If it is off,
press start to turn it back on.
• Server Hung – If Media Sharing is on, but nothing is happening, then
stop it and restart. If that doesn’t help, then Log Out and Login to OS
X, or even restart your Macintosh.
• Macintosh Asleep – Whenever your hard drive spins down, the
EyeHome server will be interrupted. Therefore, in the Energy Saver
Preferences of OS X, set “Put the computer to sleep when it is
inactive for:” to Never, and turn off “Put the hard disk to sleep
when possible.” You can select a separate time for display sleep, to
whatever duration you choose. These settings will allow EyeHome
to operate, and will let your system have Display Only sleep.
• Network Loss – Check to make sure that your network cable is
still attached on both ends. Use the Setup button (Wrench) on the
EyeHome remote to confirm that the Network section still has the
right settings. Make sure any network devices like hubs, switches or
routers are still powered on and operational.
Content Not Available
If you add any content to EyeTV, your Movies folder, iTunes or iPhoto, it may not
show up in EyeHome until you stop and then restart the EyeHome server. You
can do this in the EyeHome section of the System Preferences of OS X. Turn
Media Sharing off, then on again, to make your new content available. It will
take about 15 seconds before the EyeHome interface reflects these changes.
25
If EyeHome still doesn’t show your new content, make certain that the media
has an extension and file type that EyeHome supports (Chapter 6, Technical
Specifications).
Chapter 5 · Troubleshooting
Page 27

EyeHome User’s Guide
Downloading Updates
Elgato is dedicated to making EyeHome a better product. We will be releasing
updates to the EyeHome software periodically that add new features and
functionality, as well as fixing any bugs encountered. Please check the Elgato
web site often to download the latest version of EyeHome software at:
http://www.elgato.com/support/downloads.html
Getting Help
If you are still experiencing problems after troubleshooting, you can get expert
help directly from Elgato by using our web-based Technical Support Form:
http://www.elgato.com/support/contact/
Our Support Specialists will get back to you as soon as possible.
26
Chapter 5 · Troubleshooting
Page 28

EyeHome User’s Guide
Technical SpecsChapter 6
EyeHome Specifications
The EyeHome hardware has the following specifications:
Video Output:
• Composite Video
• S-Video (North America only)
• Component Video (Interlaced, Progressive 480p, 720p, 1080i) (North
America only)
• SCART (Europe only)
Audio Output:
• Stereo (Composite)
• S/PDIF (Optical)
Network:
• 10/100-Base-T-Ethernet
Video Playback:
• MPEG-1 (.mpg)
• MPEG-2 (including unencrypted .vob)
• ISMA MPEG-4 (.mp4)
• 3IVX (4.x and up)
27
• DIVX (including DIV3, DIVX and DX50 codecs)
• XVID
Chapter 5 · Troubleshooting
Page 29

EyeHome User’s Guide
Audio Playback:
• MPEG-1 Layers 1, 2, 3 (.mp3)
• AAC (.m4a, iTunes Music Store tracks are currently unsupported)
• AIFF
• Ogg Vorbis (.ogg)
• WAV
• WMA (unencrypted)
• PLS (Internet Radio)
Graphic File Formats Supported:
• JPEG
• BMP
Power
• GIF
• PNG
• TIFF
• AC Adapter, DC 5V 1A
28
Chapter 6 · Technical Specs
Page 30

EyeHome User’s Guide
Limited Warranty for EyeHome
Elgato warrants that EyeHome, if properly used and installed, will be free from defects in material and
workmanship and will substantially conform to Elgato’s publicly available specifications for a period of one
(1) year after the date EyeHome was purchased from an Elgato authorized distributor. Software of any kind
delivered with or as part of EyeHome is expressly provided “as is” unless specifically provided for otherwise in
any software license accompanying the software.
If any EyeHome furnished by Elgato that is the subject of this Limited Warranty fails during the warranty period
for reasons covered by this Limited Warranty, Elgato, at its option, will:
• REPAIR EyeHome by means of hardware and/or software; OR
• REPLACE EyeHome with another EyeHome, OR, if Elgato is unable to repair or replace EyeHome,
• REFUND the then-current value of EyeHome.
If such EyeHome is defective, transportation charges for the return of EyeHome to Buyer within the USA will
be paid by Elgato. For all other locations, the warranty excludes all costs of shipping, customs clearance and
other related charges. Elgato will have a reasonable time to make repairs or to replace EyeHome or to refund
the then-current value of EyeHome. In no event will Elgato be liable for any other costs associated with the
replacement or repair of EyeHome, including labor, installation or other costs incurred by buyer. THIS LIMITED
WARRANTY, AND ANY IMPLIED WARRANTIES THAT MAY EXIST UNDER STATE LAW, APPLY ONLY TO THE
ORIGINAL PURCHASER OF EYEHOME.
Extent of Limited Warranty
Elgato does not warrant that EyeHome will be free from design defects or errors known as “errata”. Current
characterized errata are available upon request. This limited warranty does not cover damages due to
external causes, including accident, problems with electrical power, usage not in accordance with EyeHome
instructions, misuse, neglect, alteration, repair, improper installation, or improper testing.
Warranty Limitations and Exclusions
These warranties replace all other warranties, expressed or implied including, but not limited to, the implied
warranties of merchantability and fitness for a particular purpose. Elgato makes no expressed warranties
beyond those stated here. Elgato disclaims all other warranties, expressed or implied including, without
limitation, implied warranties of merchantability and fitness for a particular purpose. Some jurisdictions do
not allow the exclusion of implied warranties so this limitation may not apply. All expressed and implied warranties are limited in duration to the limited warranty period. No warranties apply after that period. Some jurisdictions do not allow limitations on how long an implied warranty lasts, so this limitation may not apply to you.
Limitations of Liability
Elgato’s responsibility under this, or any other warranty, implied or expressed, is limited to repair, replacement
or refund, as set forth above. These remedies are the sole and exclusive remedies for any breach of warranty.
Elgato is not responsible for direct, special, incidental, or consequential damages resulting from any breach
of warranty under another legal theory including, but not limited to, lost profits, downtime, goodwill, damage
to or replacement of equipment and property, and any costs of recovering, reprogramming, or reproducing
any program or data stored in or used with a system containing this EyeHome. Some jurisdictions do not allow
the exclusion or limitation of incidental or consequential damages, so the above limitations or exclusions may
not apply to you. This limited warranty gives you specific legal rights, and you may also have other rights that
vary from jurisdiction to jurisdiction. Any and all disputes arising under or related to this limited warranty shall
be adjudicated in the following forums and governed by the following laws: for the united states of America,
Canada, North America and South America, the forum shall be Santa Clara, California, USA and the applicable
law shall be that of the state of California, USA; for the Asia Pacific region, the forum shall be Singapore and
the applicable law shall be that of Singapore; for Europe and the rest of the world, the forum shall be London
and the applicable law shall be that of the United Kingdom. In the event of any conflict between the English
language version and any other translated version(s) of this limited warranty, the English language version
shall control.
How to Obtain Warranty Service
To obtain warranty service for this EyeHome, you may contact Elgato or your authorized distributor. Please be
prepared to provide: (1) your name, address, and telephone numbers; (2) model name and serial number of the
EyeHome; (3) an explanation of the problem. [Note: The Customer Service Representative may need additional
information from you depending on the nature of the problem.] In North America: To request warranty service
from Elgato, e-mail Elgato at support@elgato.com during the warranty period during normal business hours
(Pacific Time), excluding holidays. Any replacement EyeHome is warranted under this written warranty and is
subject to the same limitations and exclusions for the remainder of the original warranty period.
29
Copyright © 2004 Elgato Systems LLC. All rights reserved.
Chapter 6 · Technical Specs
 Loading...